cs4 adobe illustrator cs4 -...
TRANSCRIPT

What you need, when you need it!
Step-by-Step Tasks in Full Color
What you need, when you need it!
on Demand1 2 3 4 5 6 7 on Demand1 2 3 4 5 6 7
Illustrator® CS4
Steve Johnson, Perspection, Inc.
on D
em
and
12
34
56
7
JohnsonPerspection, Inc.
informit.com/que
ISBN-13:ISBN-10:
978-0-7897-3838-70-7897-3838-4
9 7 8 0 7 8 9 7 3 8 3 8 7
5 2 9 9 9
$29.99 US | $32.99 CAN | £18.99 UK
Details on Inside Back Cover
Category: GraphicsCovers: Adobe Illustrator CS4User Level: Beginning—Intermediate
What you need, when you need it!
Need answers quickly? Adobe Illustrator CS4 on Demand provides those answers in a visual step-by-step format. We will show you exactly what to do through lots of full color illustrations and easy-to-follow instructions.
Numbered Stepsguide you through each task
See Alsopoints you to related information in the book
Did You Knowalerts you to tips and techniques
Illustrations with matching steps
Tasks are presented on one or two pages
on D
em
and
Illustrato
r® C
S4
• Improve publishing and productivity with the CS4 interface
• Browse, organize, and process files using Adobe Bridge
• Transform and reshape objects to create a new look
• Use Live Paint to create recolor and modify images
• Use Live Color to create color harmony in a design
• Create text and apply style to display artistic text
• Apply appearances and graphic styles for a unique design
• Create eye catching special effects and filters
• Prepare for the Adobe Certified Expert (ACE) Program with the ACE courseware objectives
Register your book at queondemand.com to gain access to:
• Workshops and related files
• Keyboard shortcuts
Visit the author site: perspection.com
1 2 3 4 5 6 7 What you need, when you need it!
Adobe Illustrator CS4 on Demand provides those answers in a visual step-by-step format. We will show you exactly what to do through lots of full color
on Demand What you need, when you need it!1 2 3 4 5 6 7 What you need, when you need it!on Demandon DemandIllustrator® CS4
Inside the Book
Adobe®
Adobe®
Adobe®
Includes
Workshops
ACE Exam Objectives
More than 500 EssentialIllustrator CS4 Tasks
Bonus Online Content
Cover image: Burke/Triolo/Brand X Pictures/Jupiter Images
Includes
in Full Color

Adobe® Illustrator® CS4 On Demand
Copyright © 2009 by Perspection, Inc.All rights reserved. No part of this book shall be reproduced, stored in aretrieval system, or transmitted by any means, electronic, mechanical, photo-copying, recording, or otherwise, without written permission from the publish-er. No patent liability is assumed with respect to the use of the informationcontained herein. Although every precaution has been taken in the prepara-tion of this book, the publisher and author assume no responsibility for errorsor omissions. Nor is any liability assumed for damages resulting from the useof the information contained herein.
Library of Congress Cataloging-in-Publication data is on file
ISBN-10: 0-7897-3838-4
ISBN-13: 978-0-7897-3838-7
Printed and bound in the United States of AmericaFirst Printing: November 2008
11 10 09 08 4 3 2 1
Que Publishing offers excellent discounts on this book when ordered in quantity for bulk purchases or special sales.
For information, please contact: U.S. Corporate and Government Sales
1-800-382-3419 or [email protected]
For sales outside the U.S., please contact: International Sales
1-317-428-3341 or [email protected]
TrademarksAll terms mentioned in this book that are known to be trademarks or servicemarks have been appropriately capitalized. Que cannot attest to the accuracyof this information. Use of a term in this book should not be regarded asaffecting the validity of any trademark or service mark.
Adobe, the Adobe logo, Acrobat, Bridge, Device Central, Dreamweaver,Extension Manager, Flash, InDesign, Illustrator, PageMaker, Photoshop,Photohsop Elements, and Version Cue are registered trademake of AdobeSystem Incorporated. Apple, Mac OS, and Macintosh are trademarks of AppleComputer, Inc. Microsoft and the Microsoft Office logo are registered trade-marks of Microsoft Corporation in the United States and/or other countries.
Warning and DisclaimerEvery effort has been made to make this book as complete and as accurate aspossible, but no warranty or fitness is implied. The authors and the publishersshall have neither liability nor responsibility to any person or entity withrespect to any loss or damage arising from the information contained in thisbook.
PublisherPaul Boger
Associate PublisherGreg Wiegand
Acquisitions EditorLaura Norman
Managing EditorSteve Johnson
AuthorSteve Johnson
Technical EditorToni Bennett
Page LayoutBeth TeylerJames Teyler
Interior DesignersSteve JohnsonMarian Hartsough
IndexerSharon Shock
ProofreaderToni Bennett
Team CoordinatorCindy Teeters
A00ILCS4.qxp 11/5/08 1:14 PM Page ii
xvii
Introduction
Welcome to Adobe Illustrator CS4 On Demand, a visual quickreference book that shows you how to work efficiently withIllustrator. This book provides complete coverage of basic toadvanced Illustrator skills.
How This Book WorksYou don’t have to read this book in any particular order.We’ve designed the book so that you can jump in, get theinformation you need, and jump out. However, the book doesfollow a logical progression from simple tasks to more com-plex ones. Each task is presented on no more than two facingpages, which lets you focus on a single task without havingto turn the page. To find the information that you need, justlook up the task in the table of contents or index, and turn tothe page listed. Read the task introduction, follow the step-by-step instructions in the left column along with screen illus-trations in the right column, and you’re done.
What’s NewIf you’re searching for what’s new in Illustrator CS4, just lookfor the icon: New!. The new icon appears in the table of con-tents and throughout this book so you can quickly and easilyidentify a new or improved feature in Illustrator. A completedescription of each new feature appears in the New Featuresguide in the back of this book.
Keyboard ShortcutsMost menu commands have a keyboard equivalent, such asCtrl+P (Win) or A+P (Mac), as a quicker alternative to usingthe mouse. A complete list of keyboard shortcuts is availableon the Web at www.perspection.com.
How You’ll Learn
How This Book Works
What’s New
Keyboard Shortcuts
Step-by-Step Instructions
Real World Examples
Workshops
Adobe Certified Expert
Get More on the Web
A03ILCS4.qxp 11/4/2008 6:39 PM Page xvii

xviii
Step-by-StepInstructionsThis book provides concise step-by-step instructions that show you“how” to accomplish a task. Eachset of instructions includes illus-trations that directly correspond tothe easy-to-read steps. Alsoincluded in the text are time-savers, tables, and sidebars tohelp you work more efficiently orto teach you more in-depth infor-mation. A “Did You Know?” pro-vides tips and techniques to helpyou work smarter, while a “SeeAlso” leads you to other parts ofthe book containing related infor-mation about the task.
Real World ExamplesThis book uses real world exam-ple files to give you a context inwhich to use the task. By usingthe example files, you won’t wastetime looking for or creating sam-ple files. You get a start file and aresult file, so you can compareyour work. Not every topic needsan example file, such as changingoptions, so we provide a completelist of the example files usedthroughout the book. The examplefiles that you need for projecttasks along with a complete filelist are available on the Web atwww.perspection.com.
Real worldexamples helpyou apply whatyou’ve learnedto other tasks.
Illustrationsmatch thenumberedsteps.
Numberedsteps guideyou througheach task.
Did You Know? alertsyou to tips, techniquesand related information.
See Also points you torelated information inthe book.
Easy-to-followintroductionsfocus on asingle concept.
A03ILCS4.qxp 11/4/2008 6:39 PM Page xviii

The Workshopwalks youthrough in-depthprojects to helpyou put Illustrator to work.
Introduction xix
WorkshopsThis book shows you how to puttogether the individual step-by-step tasks into in-depth projectswith the Workshop. You start eachproject with a sample file, workthrough the steps, and then com-pare your results with a projectresults file at the end. The Work-shop projects and associated filesare available on the Web atwww.perspection.com.
Adobe Certified ExpertThis book prepares you fully forthe Adobe Certified Expert (ACE)exam for Adobe Illustrator CS4.Each Adobe Certified Expert certifi-cation level has a set of objec-tives, which are organized intobroader skill sets. To prepare forthe certification exam, you shouldreview and perform each taskidentified with a Adobe CertifiedExpert objective to confirm thatyou can meet the requirements forthe exam. The Adobe CertifiedExpert objectives are available onthe Web at www.perspection.com.
Logo indicates atask fulfills one ormore AdobeCertified Expertobjectives.
A03ILCS4.qxp 11/4/2008 6:39 PM Page xix

xx
Get More on the WebIn addition to the information inthis book, you can also get moreinformation on the Web to helpyou get up-to-speed faster withIllustrator CS4. Some of the infor-mation includes:
Transition Helpers◆ OOnnllyy NNeeww FFeeaattuurreess..
Download and print the newfeature tasks as a quick andeasy guide.
Productivity Tools◆ KKeeyybbooaarrdd SShhoorrttccuuttss..
Download a list of keyboardshortcuts to learn faster waysto get the job done.
More Content◆ PPhhoottooggrraapphhss.. Download
photographs and othergraphics to use in yourIllustrator documents.
◆ MMoorree CCoonntteenntt.. Downloadnew content developed afterpublication.
You can access these additionalresources on the Web atwww.perspection.com.
Additionalcontent is availableon the Web.
A03ILCS4.qxp 11/4/2008 6:40 PM Page xx

3
3What You’ll Do
59
Working with Objects
Introduction
Adobe Illustrator is an application that gives you great controlover vector graphics, which include vector shapes and vectorobjects. Vector graphics are created using mathematicalshapes, not pixels, and that's why vector shapes are consid-ered resolution-independent. When you draw a vector object,you create one or more lines called a path. A path is made upof one or more curved or straight line segments. The start andend points for a line segment is known as an anchor point,which you can drag to change and move.
Illustrator provides drawing tools on the Tools panel thatyou can use to create a variety of shapes, including rectan-gles, rounded rectangles, ellipses, polygons, stars, flares,lines, arcs, spirals, rectangle grids, and polar (circular) grids.After you draw an object, you can use Illustrator selectiontools to modify it. The two main selection tools are theSelection tool and the Direct Selection tool. The Selection toolallows you to select entire objects, while the Direct Selectiontool allows you to select paths and segments. In addition tothese tools, you can also use the Select menu. The Selectmenu provides a variety of powerful selection commands foryou to use in a document or artboard. For example, you canselect objects whose attributes (including Appearance,Blending Modes, Fill & Stroke, Opacity, and Stroke Color) aresimilar to the current or last selection.
After you select one or more objects, you can move,align, group, and transform them. The transformation toolsallow you to rotate, scale (resize), reflect (mirror image), orshear (slant) an object.
What You’ll Do
Understand Vector and Raster Images
Understand Paths
Create Rectangle and Ellipses
Create Polygons and Stars
Create Line Segments
Create Arcs and Spirals
Create Grids
Understand Selections
Use the Selection Tool
Use the Direct Selection Tool
Use the Lasso Tool
Use the Magic Wand Tool
Select and Group
Select Similar Objects
Save and Edit Selections
Move and Duplicate Objects
Align and Distribute Objects
Transform Objects
Rotate, Scale, Reflect, or Shear Objects
Apply Multiple Transformations
Reshape Objects with Envelopes
C03ILCS4.qxp 11/5/2008 1:21 AM Page 59

60
Illustrator is an application that gives yougreat control over vector graphics, whichinclude vector shapes and vector objects.Vector graphics are created using mathemati-cal shapes, not pixels, and that's why vectorshapes are considered resolution-independ-ent. For example, if you enlarge a vectorimage to 100 times its original size, Illustratormerely changes the mathematical formulas toreflect the new size, and since vector shapesare constructed of mathematical data insteadof pixels, file sizes are extremely small.
Raster graphics, such as bitmaps and pho-tographs, are images creating using individ-ual pixels that identify one piece of colorinformation. The reason raster images areconsidered resolution-dependent is that oncethe image is created or scanned, any enlarge-ment of the image forces Illustrator to enlargeand average the existing color information inthe document. This process, called iinntteerrppoollaa--ttiioonn, is what causes enlarged raster images tobecome blurred, or pixelated.
Understanding Vector and Raster Graphics
Raster Image Vector Image
Close up shows lines Close up shows pixels
C03ILCS4.qxp 11/5/2008 1:21 AM Page 60

Chapter 11 Using the Paths Panel 61
When you draw an object, you create one ormore lines called a ppaatthh. A path is made up ofone or more curved or straight lines, knownas sseeggmmeennttss. The start and end points for asegment is called an aanncchhoorr ppooiinntt. An anchorpoint is a bending point to modify the linesegment. A path can be open or closed. Anopen path has open-ended endpoints, such asa line, while a closed path has connected end-points, such as a circle. Paths can have twotypes of anchor points: smooth points or cor-ner points. A smooth point connects twocurved segments to create a smooth line,while a corner point connects two straight orcurved segments to create a path directionchange. You can draw a path using bothsmooth and corner points. The outline of apath is called a stroke, which you can formatwith different characteristics. You can specifystroke weight (thickness), color, or a dashedpattern. The interior of an open or closed pathis called a fill, which you can also format witha color or gradient.
You can change the shape of a path bydragging its anchor point. A selected anchorpoint or endpoint appears as a solid square,while an unselected one appears as a whitesquare. When you select an anchor pointwith a curved segment, a direction lineappears with direction points on each end,which you can drag to change the shape ofthe path. When you change the shape of asmooth point with curved segments on eachside, both segments get changed. When youchange a shape of a corner point, the corneris maintained, but adjusted based on thechange.
Working with Anchor PointsIn Illustrator, you can show or hide anchorpoints, direction lines, and direction points bychoosing the VViieeww menu, and then choosingSShhooww EEddggeess or HHiiddee EEddggeess. If you want toshow or hide direction lines for selectedanchor points, select the DDiirreecctt SSeelleeccttiioonn tool,select the anchor point that you want, andthen click SShhooww HHaannddlleess FFoorr MMuullttiippllee SSeelleecctteeddAAnncchhoorr PPooiinnttss or HHiiddee HHaannddlleess FFoorr MMuullttiipplleeSSeelleecctteedd AAnncchhoorr PPooiinnttss button in the Controlpanel.
You can specify options in the Selection &Anchor Display preferences to always showhandles when multiple anchor points areselected (this option is turned off by default).
Understanding Paths IL 2.1
Closed path
Open path
C03ILCS4.qxp 11/5/2008 1:21 AM Page 61

62
Creating Rectanglesand Ellipses
Draw an Ellipse or Circle
Select the Ellipse tool on the Toolspanel.
TIMESAVER Press L to selectthe Ellipses tool.
Select a Stroke and Fill Color fromthe Colors area of the Tools panel.
Click and drag on the artboard,and then release the mouse.
TIMESAVER Press and holdShift while you drag to create acircle.
To create an oval or circle with aspecific width and height, click onthe artboard where you want thetop left corner, enter width andheight values, and then click OK.
4
3
2
1
The Illustrator Tools panel includes several tools for quickly creatingsimple geometric vector shapes. They are easy to use; you just click anddrag on the Stage to create the shapes. The Rectangle tool creates rec-tangles with square or rounded corners. The Ellipse tool creates circularshapes such as ovals and circles. These shapes can be comprisedeither of Strokes, which are lines that surround and define the shape, orFills, which can be a color or texture inside the shape, or both.
Did You Know?You can enter values ranging from 0 to100 points in the Rounded RectangleSettings dialog box. A value of zerogives you a straight-sided-square.Higher numbers produce squares withmore rounded sides.
You can draw shapes without a strokeor a fill. Set either of these propertiesto No Fill in the Colors section of theTools panel or in the Color panel.
1
2
3
4
C03ILCS4.qxp 11/5/2008 1:21 AM Page 62

Chapter 11 Using the Paths Panel 63
Draw a Rectangle or RoundedRectangle
Click the Rectangle or RoundedRectangle tool on the Tools panel.
TIMESAVER Press M to selectthe Rectangle tool.
Select a Stroke and Fill color fromthe Colors area of the Tools panel.
Click and drag on the artboard,and then release the mouse.
TIMESAVER Press and holdShift while you drag to create asquare.
To create a square, rectangle, orrounded rectangle with a specificwidth and height, click on theartboard where you want the topleft corner, enter width and heightvalues, and then click OK.
4
3
2
1
Did You Know?You can change the corner radius for arounded rectangle. While you drag arounded rectangle, press the Up Arrowor Down Arrow key. To create squarecorners, press the Left Arrow key. Tocreate corners with maximum round-ness, press the Right Arrow key.
You can draw shapes with no strokeor fill. If you want to draw an oval or arectangle without a stroke or fill, youcan set either of these options to NoFill in the Colors area of the Tools panelor in the Color Mixer.
You can create a flare shape using theFlare tool. Select the Flare tool on theTools panel, click and drag on the art-board, and then release the mouse.
2
1
3
4
C03ILCS4.qxp 11/5/2008 1:21 AM Page 63

64
Creating Polygons and Stars
Draw a Polygon or Star Shape
Select the Polygon or Star tool onthe Tools panel.
The pointer becomes a crosshairthat you can drag anywhere on theartboard.
Select a Stroke and Fill color fromthe Colors area of the Tools panel.
Click and drag on the artboard,and then release the mouse.
TIMESAVER Press and holdShift while you drag to create aproportional shape.
To create a shape with a specificradius and number of sides orpoints, click on the artboard whereyou want the center of the shape,enter the following values, andthen click OK.
◆ Polygon. Enter a radius andnumber of sides for thepolygon. To create a triangle,enter 3 sides.
◆ Star. Enter radius 1 for thedistance from the center of thestar to the innermost points andenter radius 2 for the distancefrom the center to theoutermost points.
4
3
2
1
The Polygon and Star tools work in much the same way as the Ellipseand Rectangle tools do to allow you to easily create complex vectorshapes. You can use these tools to create either polygons and stars.Polygons are shapes based on a center radius and a number of sides,while stars are shapes based on two center radiuses: one for the dis-tance from the center of the star to the innermost points, and anotherfor the distance from the center to the outermost points. Experimentwith several options to get the kind of shape you want.
1
2
3
Polygon options4
Star options4
C03ILCS4.qxp 11/5/2008 1:22 AM Page 64

Chapter 11 Using the Paths Panel 65
Creating LineSegments
Draw a Line Segment
Click the Line Segment tool on theTools panel.
The pointer becomes a crosshairthat you can drag on the artboard.
TIMESAVER Press \ to selectthe Line tool.
Select a Stroke color from theColors area of the Tools panel.
Click and drag on the artboard,and then release the mouse whenthe line is the length you need.
TIMESAVER Hold down theShift key, and then drag to draw a45, 90, or 180 degree line.
To create a line with a specificlength and angle, click on theartboard where you want the lineto begin, enter length and anglevalues, select the Fill Line checkbox to fill the line with the currentfill color, and then click OK.
4
3
2
1
The Line Segment tool draws perfectly straight lines in any directionyou drag your mouse. In Illustrator, a line is called a stroke and there isa variety of thicknesses, styles, colors, and fills that can be applied to it.You can also create your own line style for specific types of dashed,dotted or artistic lines. You can constrain the path a line draws to 45-degree angles or create closed shapes by intersecting the lines youdraw.
2
1
3
4
C03ILCS4.qxp 11/5/2008 1:22 AM Page 65

66
Creating Arcs andSpirals
Draw an Arc
Click the Arc tool on the Toolspanel.
The pointer becomes a crosshairthat you can drag on the artboard.
Select a Stroke color from theColors area of the Tools panel.
Click and drag on the artboard,and then release the mouse whenthe arc is the length you need.
To create an arc with specificsettings, click on the artboardwhere you want the arc to begin,enter x and y lengths, specify type(open or closed), arc direction(Base Along) and slope options,select the Fill Arc check box to fillthe arc with the current fill color,and then click OK.
4
3
2
1
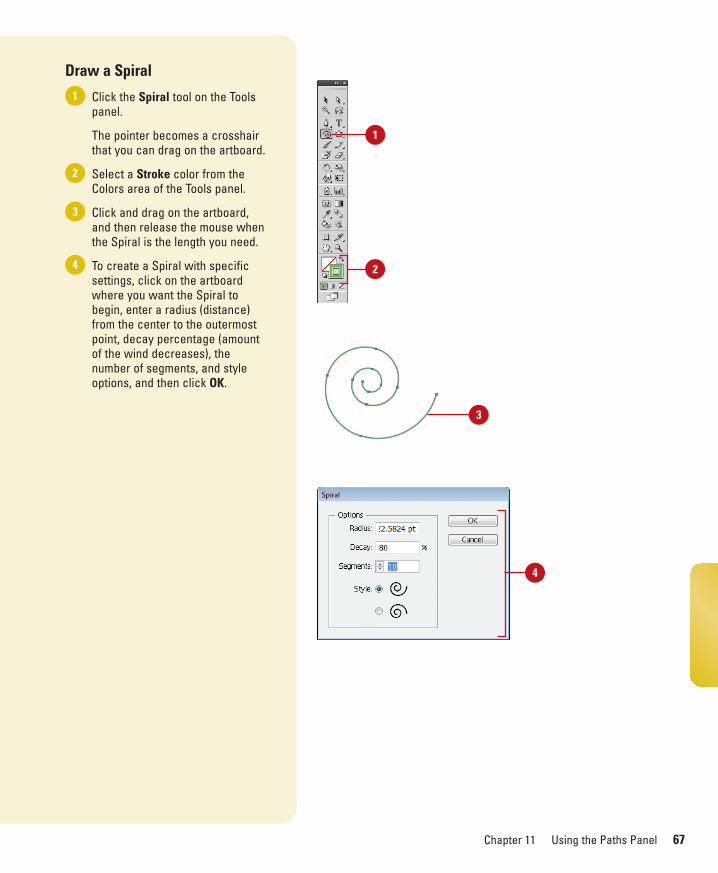
The Arc and Spiral tools make it easy to create unique and interestingshapes. These tools draw curved lines to create an individual arc or aSpiral wind. An arc consists of an x and y axis length, open or closedpath, arc direction (known as the Base Along), arc slope, and arc fill(optional). A Spiral consists of a radius from the center to the outermostpoint in the Spiral, decay (the amount each wind decreases), number ofsegments for the spiral, and Spiral style. Each full wind of a Spiral con-sists of four segments.
2
1
3
4
C03ILCS4.qxp 11/5/2008 1:22 AM Page 66
Chapter 11 Using the Paths Panel 67
Draw a Spiral
Click the Spiral tool on the Toolspanel.
The pointer becomes a crosshairthat you can drag on the artboard.
Select a Stroke color from theColors area of the Tools panel.
Click and drag on the artboard,and then release the mouse whenthe Spiral is the length you need.
To create a Spiral with specificsettings, click on the artboardwhere you want the Spiral tobegin, enter a radius (distance)from the center to the outermostpoint, decay percentage (amountof the wind decreases), thenumber of segments, and styleoptions, and then click OK.
4
3
2
1
2
1
3
4
C03ILCS4.qxp 11/5/2008 1:22 AM Page 67

68
Creating Grids
Draw Rectangle Grids
Click the Rectangle Grid tool onthe Tools panel.
The pointer becomes a crosshairthat you can drag on the artboard.
Select a Stroke color from theColors area of the Tools panel.
Click and drag on the artboard,and then release the mouse whenthe grid is the size you need.
To create a grid with specificsettings, click on the artboardwhere you want the grid referencepoint, enter a width and height forthe grid, specify the number ofhorizontal and vertical dividers,select the Use Outside RectangleAs Frame check box to replaceindividual segments with aseparate rectangle object, selectthe Fill Grid check box to fill thegrid with the current fill color, andthen click OK.
4
3
2
1
The grid tools on the Tools panel allow you to create a rectangular orcircular polar grid. The Rectangular Grid tool creates rectangular gridsof a specified size and number of horizontal and vertical dividers. ThePolar Grid tool creates concentric circles of a specified size and spe-cific number of concentric and radial dividers.
2
1
3
4
C03ILCS4.qxp 11/5/2008 1:22 AM Page 68

Chapter 11 Using the Paths Panel 69
Draw Circular Polar Grids
Click the Polar Grid tool on theTools panel.
The pointer becomes a crosshairthat you can drag on the artboard.
Select a Stroke color from theColors area of the Tools panel.
Click and drag on the artboard,and then release the mouse whenthe grid is the size you need.
To create a grid with specificsettings, click on the artboardwhere you want the grid referencepoint, enter a width and height forthe grid, specify the number ofconcentric and radial dividers,select the Create Compound PathFrom Ellipses check box toreplace circles with separatecompound paths, select the FillGrid check box to fill the grid withthe current fill color, and then click OK.
4
3
2
1
2
1
3
4
C03ILCS4.qxp 11/5/2008 1:22 AM Page 69

70
When you create vector graphics in Illustrator,they are comprised of distinct segments thatcan be selected separately or as a whole witha variety of selection tools. The type of editingyou need to perform determines which toolyou use. For example, a simple rectangle iscomprised of four line segments that sur-round the contour of the shape and one fill inthe center. Each of these parts can be selectedas a group with the SSeelleeccttiioonn tool or individu-ally with the DDiirreecctt SSeelleeccttiioonn tool. To select anobject using the fill, you need to deselect theObject Selection by Path Only check box inSelection & Anchor Display preferences.
In addition to the Selection and DirectSelection tools, you can also use the GGrroouuppSSeelleeccttiioonn tool to select all the anchor pointson a single path. With the Group Selection
tool, click to select an object, click twice toselect the object’s group, and click three timesto select the group within the group (if avail-able). The Group Selection tool is useful forworking with multiple objects. If you want towork with an individual object without affect-ing other objects, it’s better to use IsolationMode.
The LLaassssoo tool is a classic selection toolthat allows you to select path points and seg-ments by dragging a freeform marqueearound them.
The MMaaggiicc WWaanndd tool allows you to selectobjects of the same or a similar fill color,stroke color, stroke weight, opacity, or blend-ing mode.
Understanding Selections IL 2.8
Selection preferences
Group selection tool
Selection tool
Lasso tool
Direct Selection tool
MagicWand
tool
C03ILCS4.qxp 11/5/2008 1:22 AM Page 70
Chapter 11 Using the Paths Panel 71
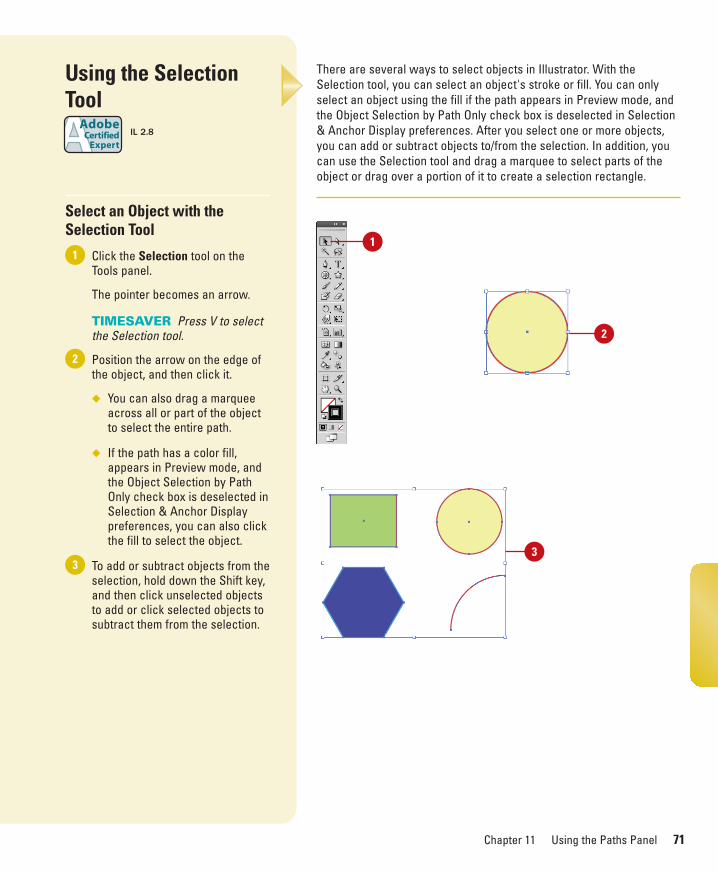
Using the Selection Tool
Select an Object with theSelection Tool
Click the Selection tool on theTools panel.
The pointer becomes an arrow.
TIMESAVER Press V to selectthe Selection tool.
Position the arrow on the edge ofthe object, and then click it.
◆ You can also drag a marqueeacross all or part of the objectto select the entire path.
◆ If the path has a color fill,appears in Preview mode, andthe Object Selection by PathOnly check box is deselected inSelection & Anchor Displaypreferences, you can also clickthe fill to select the object.
To add or subtract objects from theselection, hold down the Shift key,and then click unselected objectsto add or click selected objects tosubtract them from the selection.
3
2
1
There are several ways to select objects in Illustrator. With theSelection tool, you can select an object's stroke or fill. You can onlyselect an object using the fill if the path appears in Preview mode, andthe Object Selection by Path Only check box is deselected in Selection& Anchor Display preferences. After you select one or more objects,you can add or subtract objects to/from the selection. In addition, youcan use the Selection tool and drag a marquee to select parts of theobject or drag over a portion of it to create a selection rectangle.
IL 2.8
1
2
3
C03ILCS4.qxp 11/5/2008 1:22 AM Page 71

72
Using the DirectSelection Tool
Select Anchor Points andSegments with the SelectionTool
Click the Direct Selection tool onthe Tools panel.
The pointer becomes an arrow.
TIMESAVER Press A to selectthe Direct Selection tool.
Position the arrow on the edge ofthe path and click to select asegment, and then click an anchorpoint to select it.
◆ You can also select an anchorpoint directly. Pass the pointerover a path and then point to ananchor point and then click it.
◆ You can also drag a marqueeacross all or part of the objectto select the entire path.
To add or subtract anchor pointsor segments from the selection,hold down the Shift key, and thenclick unselected items to add themor selected items to subtract themfrom the selection.
3
2
1
With the Direct Selection tool, you can select individual points and seg-ments of a path. After you select one or more individual points and seg-ments, you can add or subtract items to/from the selection. In addition,you can also use the Direct Selection tool and drag a marquee to selectparts of the path or drag over a portion of it to create a selection rec-tangle.
IL 2.8
1
2
3
C03ILCS4.qxp 11/5/2008 1:22 AM Page 72

Chapter 11 Using the Paths Panel 73
Using the Lasso Tool
Select with the Lasso Tool
Click the Lasso tool on the Toolspanel.
Draw around the shapes you wantto select.
To complete the selection, returnto the point where you started.
3
2
1
Use the Lasso tool when you want to select shapes that are very closeto shapes you don't want to select. This tool allows you to draw aroundthe shape, selecting everything contained within the drawn area. Whenyou draw a selection, you can drag across a path to include it in theselection instead of dragging completely around it. This selection tool isuseful when you are working with overlapping paths.
Did You Know?You can select single or multipleobjects. Holding the Shift key adds linesegments and fills them. Shift-clickingselected items deselects them.
IL 2.8
1
3
2
C03ILCS4.qxp 11/5/2008 1:23 AM Page 73

74
The Magic Wand tool (so named since it looks like a magic wand) isunique in the fact that you do not drag and select with this tool; yousimply click. The Magic Wand tool creates a selection based on theshift in brightness ranges within an image. If there is a definable shift inthe brightness of the pixels, it can be a very powerful tool for the selec-tion of odd-shaped areas. To use the Magic Wand, click on the MagicWand Tool button on the Tools panel.
Using the Magic Wand Tool
Select Options for the MagicWand Tool
Double-click the Magic Wand toolon the Tools panel.
◆ You can also click the Windowmenu, and then click MagicWand to display the panel.
Click the Options menu, and thenselect the Show Stroke Optionsand Show Transparency Options(if necessary) to display them inthe Magic Wand panel.
◆ You can also click the double-arrow next to the Magic Wandtitle to display options.
Select the check box for theattributes that you want the MagicWand to select. The optionsinclude: Fill Color, Stroke Color,Stroke Weight, Opacity, orBlending Mode.
Enter a Tolerance value (0 to 255).The higher the value, the moreinformation the Magic Wand toolselects.
To select objects on all layers,click the Options menu, and thenselect Use All Layers to check it.Select it again to select objectsonly on the current layer.
To reset all fields in the MagicWand panel, click the Optionsmenu, and then click Reset.
6
5
4
3
2
1
IL 2.8
1
2
3
4
5
C03ILCS4.qxp 11/5/2008 1:23 AM Page 74

Chapter 11 Using the Paths Panel 75
Use the Magic Wand Tool
Select the Magic Wand tool on theTools panel.
Click an object area to make aselection.
Depending on the options youselected in the Magic Wand panel,other objects with the same orsimilar attributes (fill color, strokecolor, stroke weight, opacity, orblending mode) are selected.
To add to the selection, hold downthe Shift key, and then clickanother unselected object.
To subtract from the selection,hold down the Alt (Win) or Option(Mac) key, and then click aselected object.
3
2
11
2
3
C03ILCS4.qxp 11/5/2008 1:23 AM Page 75

76
Selecting and grouping objects makes it easier to work with multipleobjects as if they were a single object. You can easily select, isolate,cut, copy, paste, move, recolor, and transform a grouped object. Youcan group all types of objects, yet still edit individual objects within thegroup as needed without having to ungroup them first by usingIsolation Mode. Illustrator places a grouped object on the top level ofthe top object in the group and uses the same selection color. If you nolonger need to group objects, you can ungroup them.
Selecting andGrouping
Create a Group
Select the Selection tool on theTools panel.
Use a selection method to selectthe objects that you want in thegroup.
Click the Objects menu, and thenclick Group.
◆ You can use the Groupcommand again to groupobjects already in a group; thisis known as a nested group.
Ungroup Objects
Select the Selection tool on theTools panel.
Select the grouped objects thatyou want to ungroup.
Click the Objects menu, and thenclick Ungroup.
◆ If you have nested groupswithin an object, you can usethe Ungroup command again toungroup it.
3
2
1
3
2
1
IL 2.4, 2.8
1
2
1
2
C03ILCS4.qxp 11/5/2008 1:23 AM Page 76

Chapter 11 Using the Paths Panel 77
Use Isolation Mode to Workwith Groups
Select the Selection tool on theTools panel.
Double-click a grouped object.
◆ You need to click the IsolateSelected Group button on theControl panel or select theDouble-click to Isolate checkbox in General preferences.
A gray bar appears with the nameof the group at the top of thedocument window. All objectsoutside the group are dimmed outand uneditable. The words“Isolation Mode” also appear onthe Layers panel.
Edit individual objects or add newobjects to the group.
To exit Isolation Mode, click thegray bar.
4
3
2
11
2
4
3
C03ILCS4.qxp 11/5/2008 1:23 AM Page 77

78
The Select menu provides a variety of powerful selection commandsfor you to use in a document or artboard. In addition to the commoncommands, such as All, Deselect, and Inverse, you can also selectobjects whose attributes (including Appearance, Blending Modes, Fill &Stroke, Opacity, and Stroke Color) are similar to the current or lastselection. For more selection power, you can select objects based onthe object type (including All on Same Layers, Direction Handles, BrushStrokes, Clipping Masks, Stray Points, Text Objects).
Selecting SimilarObjects
Use the Select Menu to SelectObjects
Click the Select menu.
Select the command that youwant:
◆ All. Selects all objects in thedocument.
◆ All in Active Artboard. Selectsall objects in the activeartboard.
◆ Deselect. Deselects all objectsin the document.
◆ Reselect. Reselects the mostrecent selection.
◆ Inverse. Inverses the currentselection.
◆ Next Object Above. Selects thenext object above the currentselection.
◆ Next Object Below. Selects thenext object below the currentselection.
2
1
IL 2.8
1
2
C03ILCS4.qxp 11/5/2008 1:23 AM Page 78

Chapter 11 Using the Paths Panel 79
Select Similar Objects or ObjectAttributes
Select an object on which to basethe new selection or deselect allobjects to base the new selectionon the last selected object.
Click the Select menu, and thenpoint to Same or Object.
Choose the command that youwant to use to make a selection.
Select Objects in the LayersPanel
Open the Layers panel.
Click the expand/collapse triangleto display the layer that you wantto select.
Click the selection area on theright side of the layer in the Layerspanel that has the object that youwant to select.
◆ You can also click the Selectmenu, point to Object, and thenclick All on Same Layers toselect all on a layer.
3
2
1
3
2
1
32
2
1
3
Selection
C03ILCS4.qxp 11/5/2008 1:23 AM Page 79

80
If you frequently select the same elements in a document, you can saveyourself some time by saving the selection with a name of your choice.After you save a selection, the saved selection name appears as amenu command at the bottom of the Select menu. When you need tomake the same selection, simply choose the command. When you nolonger use a saved selection, you can delete it.
Saving and EditingSelections
Save and Use a Selection
Make the selection that you wantto save.
Click the Select menu, and thenclick Save Selection.
Enter a name for the selection.
Click OK.
Click the Select menu, and thenclick the name of the savedselection at the bottom of themenu.
Edit a Saved Selection
Click the Select menu, and thenclick Edit Selection.
Select the saved selection thatyou want to rename or delete.
To delete a saved selection, clickDelete.
To rename a saved selection,change the name in the Name box.
Click OK.5
4
3
2
1
5
4
3
2
13
4
5
5
4
3
2
C03ILCS4.qxp 11/5/2008 1:23 AM Page 80

Chapter 11 Using the Paths Panel 81
Moving an object or group of objects is very easy. The simplest way isto drag the edge of an object in Outline or Preview view. If you want toconstrain the movement of the object in multiples of 45 degrees, thenuse the Shift key as you drag. While you drag an object, Smart Guidesappear automatically to make it easier for you to align objects withother objects.
Moving Objects
Move an Object
Select the Selection tool on theTools panel.
Select one or more objects thatyou want to move.
Drag the edge of an object.
◆ To constrain the movement ofthe object to multiples of 45degrees or the current angle inGeneral preferences, holddown the Shift key as you drag.
◆ If the path has a color fill,appears in Preview mode, andthe Object Selection by PathOnly check box is deselected inSelection & Anchor Displaypreferences, you can also clickthe fill to select the object.
3
2
1
See AlsoSee “Using Smart Guides” on page 50for more information on setting SmartGuide preferences and using SmartGuides.
Did You Know?You can delete an object. Select theobject that you want to delete, andthen press Delete, or click the Editmenu, and then click Clear.
1
2
3
C03ILCS4.qxp 11/5/2008 1:23 AM Page 81

82
Duplicating objects can be a powerful way of creating geometrical art-work. You can duplicate one or more selected objects by draggingthem, using Arrow keys, copying to and pasting from the Clipboard, orusing the Offset Path command. The Offset Path command duplicates apath (along with fill and stroke attributes) and places it on the artboardbased on the offset distance specified in the Offset Path dialog box.The duplicate path is reshaped to fit around the original path.
Duplicating Objects
Duplicate Objects
Select the Selection tool on theTools panel.
◆ If the object is in a group,select the Direct Selection toolon the Tools panel.
Use any of the following methods:
◆ Same Document. Hold down Alt(Win) or Option (Mac), and thendrag the edge or fill of theobject.
◆ Different Documents. Open thedocuments side by side, andthen drag the edge or fill of theobject from one document toanother.
◆ Clipboard. Select the object,click the Edit menu, and thenclick Copy. Click in the targetdocument or artboard, click theEdit menu, and then clickPaste, Paste in Front, or Pastein Back.
◆ Keyboard. Select the object,press Control (Win) orCommand (Mac) key, and thenuse one of the Arrow keys tomove the duplicated object inthe direction you want. Theduplicate object moves awayfrom the original object basedon the current keyboardincrement value in Generalpreferences.
2
1 1
2
C03ILCS4.qxp 11/5/2008 1:23 AM Page 82

Chapter 11 Using the Paths Panel 83
Duplicate Objects Using anOffset
Select the Selection tool on theTools panel.
Select an object.
Click the Object menu, point toPath, and then click Offset Path.
Enter the distance you want tooffset the duplicate path from theoriginal object.
Click the Joins list arrow, and thenselect a bend style: Miter(pointed), Round (circular), orBevel (square-cornered)
You can set a limit (1-500) todetermine when a mitered cornerchanges into a beveled corner. Alow number creates a morebeveled corner, while a highnumber creates a sharper corner.
Click OK.7
6
5
4
3
2
11
2
6
4
7
5
Results
C03ILCS4.qxp 11/5/2008 1:24 AM Page 83

84
Aligning andDistributing Objects
Align or Distribute Objects
Select the Selection tool on theTools panel.
Select two or more objects to alignthem or select three or moreobjects to distribute them.
Select the Align panel or clickAlign on the Control panel.
Click the Options menu, and thenclick Use Preview Bounds. Achecked option uses he object’sstroke weight and any appliedeffects when aligning ordistributing.
If you want to align objects alongthe edges of the artboard, click theAlign To menu on the Align orControl panel, and then click Alignto Artboard. Objects are moved onthe artboard based on thealignment or distribution commandto the closest edge (top andbottom, or left and right).
If you want to align objects to akey object, click an object to makeit the key object (a thick blueoutline appears and the Align ToKey Object option is selected inthe Align and Control panel).
Use the alignment and distributionbuttons on the Align or Controlpanel.
7
6
5
4
3
2
1
In addition to using grids and guides to align objects to a specific point,you can align a group of objects to each other. The Align panel buttonsmake it easy to align two or more objects relative to each other or tothe page. To evenly align several objects to each other across the doc-ument, either horizontally or vertically, select them and then choose adistribution option. Before you select an align command, specify howyou want Illustrator to align the objects. You can align the objects inrelation to the document or to the selected objects. If you want to alignall the objects to another object, you can select and use a key object(New!), before you select an alignment option.
IL 2.7
1
2
3
4
7
C03ILCS4.qxp 11/5/2008 1:24 AM Page 84
Chapter 11 Using the Paths Panel 85
Transforming Objects
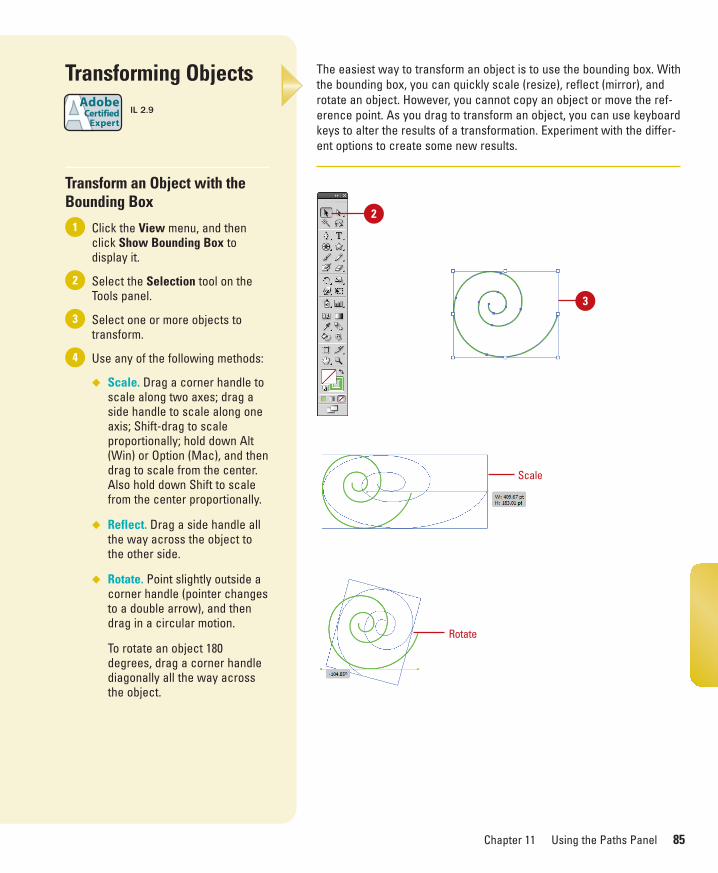
Transform an Object with theBounding Box
Click the View menu, and thenclick Show Bounding Box todisplay it.
Select the Selection tool on theTools panel.
Select one or more objects totransform.
Use any of the following methods:
◆ Scale. Drag a corner handle toscale along two axes; drag aside handle to scale along oneaxis; Shift-drag to scaleproportionally; hold down Alt(Win) or Option (Mac), and thendrag to scale from the center.Also hold down Shift to scalefrom the center proportionally.
◆ Reflect. Drag a side handle allthe way across the object tothe other side.
◆ Rotate. Point slightly outside acorner handle (pointer changesto a double arrow), and thendrag in a circular motion.
To rotate an object 180degrees, drag a corner handlediagonally all the way acrossthe object.
4
3
2
1
The easiest way to transform an object is to use the bounding box. Withthe bounding box, you can quickly scale (resize), reflect (mirror), androtate an object. However, you cannot copy an object or move the ref-erence point. As you drag to transform an object, you can use keyboardkeys to alter the results of a transformation. Experiment with the differ-ent options to create some new results.
IL 2.9
2
3
Scale
Rotate
C03ILCS4.qxp 11/5/2008 1:24 AM Page 85

86
Using the FreeTransform Tool
Transform an Object with theFree Transform Tool
Select the Free Transform tool onthe Tools panel.
Select one or more objects totransform.
Use any of the following methods:
◆ Scale. Drag a corner handle toscale along two axes; drag aside handle to scale along oneaxis; Shift-drag to scaleproportionally; hold down Alt(Win) or Option (Mac), and thendrag to scale from the center.Also hold down Shift to scalefrom the center proportionally.
◆ Reflect. Drag a side handle allthe way across the object tothe other side.
◆ Rotate. Point slightly outside acorner handle (pointer changesto a double arrow), and thendrag in a circular motion. Torotate in 45 degree increments,Shift-drag.
To rotate an object 180degrees, drag a corner handlediagonally all the way acrossthe object.
◆ Shear. Drag a side handle andthen hold down Ctrl (Win) orCommand (Mac) as youcontinue to drag. To constrainthe movement, also press Shift.To shear from the center, alsopress Alt (Win) or Option (Mac).
3
2
1
The Free Transformation tool allows you to rotate, scale (resize), reflect(mirror image), or shear (slant) an object. In addition, you can applyperspective and distortion to an object. However, you cannot copy anobject or move the reference point. As you drag to transform an object,you can use keyboard keys to alter the results of a transformation. Tohelp you align the results the way you want, you can use Smart Guidesto make it easier.
IL 2.9
1 2
ShearShear results
C03ILCS4.qxp 11/5/2008 1:24 AM Page 86

Chapter 11 Using the Paths Panel 87
◆ Perspective. Drag a sidehandle and then hold downCtrl+Alt+Shift (Win) orCommand+Option+Shift (Mac)as you continue to drag.
◆ Distort. Drag a corner handleand then hold down Ctrl (Win)or Command (Mac) as youcontinue to drag.
To use Smart Guides as youtransform an object:
◆ Select the Transform Toolscheck box in Smart Guidespreferences.
◆ Click the View menu, and thenclick Smart Guides to displaythem.
◆ As you drag to transform anobject, smart guides appear inyour document, which you canuse to align the transformedobject.
4Perspective
Perspectiveresults
4
C03ILCS4.qxp 11/5/2008 1:24 AM Page 87

88
Rotating and ScalingObjects
Rotate or Scale an Object
Select the Selection tool on theTools panel.
Select one or more objects totransform.
Select the Rotate or Scale tool onthe Tools panel.
To move the reference point, clicka new point.
Use the appropriate method:
◆ Rotate. Drag in a circularmotion. To rotate in 45 degreeincrements, Shift-drag.
◆ Scale. Drag away from ortoward the object. Shift-drag toscale proportionally; hold downAlt (Win) or Option (Mac), andthen drag to scale from thecenter. Also hold down Shift toscale from the centerproportionally.
◆ Scale and Flip. Drag across theentire object.
◆ Scale and Copy. Hold downAlt+Shift (Win) or Option+Shift(Mac), and then drag.
To rotate or scale an object usingexact values or percentages, usethe Transform panel. If theTransform panel is not visible,select it from the Window menu.
6
5
4
3
2
1
After you create an object, you can change its orientation by rotating itor change its size by scaling it. For a freeform rotation, when you wantto rotate the object in other than 90 or 180 degree increments, you canuse the Rotate tool. To resize an object, either smaller or larger, you canuse the Scale tool. With either tool, you can transform the object fromits center or the reference point. To rotate or scale an object usingexact values or percentages, use the Transform panel, which is avail-able on the Control panel or Window menu.
IL 2.9
1
3
2
4
Scale flip5
C03ILCS4.qxp 11/5/2008 1:24 AM Page 88

Chapter 11 Using the Paths Panel 89
Reflecting andShearing Objects
Reflect or Shear an Object
Select the Selection tool on theTools panel.
Select one or more objects totransform.
Select the Reflect or Shear tool onthe Tools panel.
To move the reference point, clicka new point.
Use the appropriate method:
◆ Reflect. Click to establish areference point, and then clickagain to establish the axis ofreflection.
◆ Shear. Drag away from theobject.
To reflect or shear an object usingexact values or percentages, usethe Transform panel.
6
5
4
3
2
1
The Reflect and Shear tools on the Tools panel allow you to be creativeas you transform an object. The Reflect tool creates a mirror image ofan object, while the Shear tool creates a slanted image of an object. Toreflect or shear an object using exact values or percentages, open theTransform panel, which is available on the Control panel or Windowmenu.
IL 2.9
1
3
4
2
5 Reflect
C03ILCS4.qxp 11/5/2008 1:24 AM Page 89
90
Applying MultipleTransformations
Use the Transform EachCommand
Select the Selection tool on theTools panel.
Select one or more objects totransform.
Click the Object menu, point toTransform, and then clickTransform Each.
Select the Preview check box toview your changes on the selectedobject.
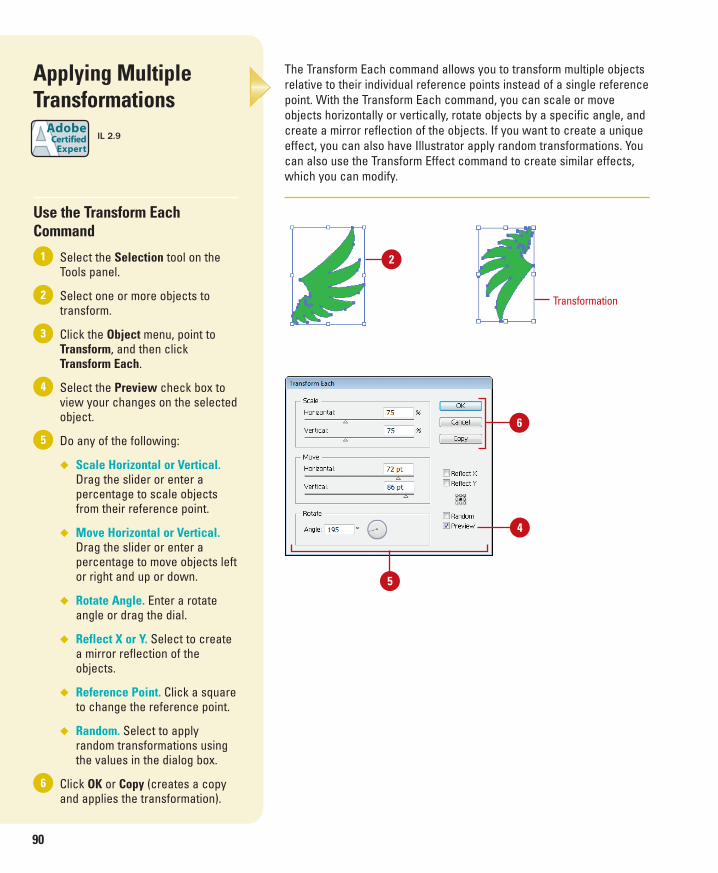
Do any of the following:
◆ Scale Horizontal or Vertical.Drag the slider or enter apercentage to scale objectsfrom their reference point.
◆ Move Horizontal or Vertical.Drag the slider or enter apercentage to move objects leftor right and up or down.
◆ Rotate Angle. Enter a rotateangle or drag the dial.
◆ Reflect X or Y. Select to createa mirror reflection of theobjects.
◆ Reference Point. Click a squareto change the reference point.
◆ Random. Select to applyrandom transformations usingthe values in the dialog box.
Click OK or Copy (creates a copyand applies the transformation).
6
5
4
3
2
1
The Transform Each command allows you to transform multiple objectsrelative to their individual reference points instead of a single referencepoint. With the Transform Each command, you can scale or moveobjects horizontally or vertically, rotate objects by a specific angle, andcreate a mirror reflection of the objects. If you want to create a uniqueeffect, you can also have Illustrator apply random transformations. Youcan also use the Transform Effect command to create similar effects,which you can modify.
IL 2.9
2
5
4
6
Transformation
C03ILCS4.qxp 11/5/2008 1:24 AM Page 90

Chapter 11 Using the Paths Panel 91
Use the Transform Effect
Select the Selection tool on theTools panel.
Select one or more objects totransform.
Click the Effect menu, point toDistort & Transform, and then clickTransform.
Select the Preview check box toview your changes on the selectedobject.
Do any of the following:
◆ Scale Horizontal or Vertical.Drag the slider or enter apercentage to scale objectsfrom their reference point.
◆ Move Horizontal or Vertical.Drag the slider or enter apercentage to move objects leftor right and up or down.
◆ Rotate Angle. Enter a rotateangle or drag the dial.
◆ Copies. Enter the number ofcopies you want.
◆ Reflect X or Y. Select to createa mirror reflection of theobjects.
◆ Reference Point. Click a squareto change the reference point.
◆ Random. Select to applyrandom transformations usingthe values in the dialog box.
Click OK.
To edit the transformation, selectthe object, and then clickTransform on the Appearancepanel.
7
6
5
4
3
2
1
Repeating a TransformationThe Transform Again command allows you to quickly repeat the lasttransformation with the last-used values on a selected object. To usethe command, transform and select an object or group, click theObject menu, point to Transform, and then click Transform Again orpress Ctrl+D (Win) or Command+D (Mac).
For Your Information
2
6
4
5
Transformationeffect
C03ILCS4.qxp 11/5/2008 1:24 AM Page 91

92
Reshaping Objectswith Envelopes
Distort Objects with an Envelope
Select the Selection tool on theTools panel.
Select one or more objects toreshape.
Click the Object menu, point toEnvelope Distort, and then clickone of the following:
◆ Make With Warp. Uses apreset warp shape.
◆ Make with Mesh. Uses arectangle grid.
◆ Make With Top Object. Uses anobject as the shape of theenvelope. The object needs tobe at the top of the stackingorder.
Specify the options you want forthe envelope type; select thePreview check box to view yourchanges on the selected object.
Click OK.
Do any of the following:
◆ Reshape. Select the Selectionor Mesh tool, and then dragany anchor points.
◆ Delete Anchor Points. For amesh grid, Select the Selectionor Mesh tool, select an anchorpoint, and then press Delete.
◆ Add Anchor Points. For meshgrid, select the Mesh tool, andthen click on the grid.
6
5
4
3
2
1
Envelopes are objects you can use to reshape other objects, exceptgraphs, guides, or linked objects. You can use one of the built-inenvelopes or create your own out of an existing object. The built-inenvelopes use warp shapes or a mesh grid as the object. After youapply an envelope, you can edit the original object or the envelope(anchor points), separately, using the Selection and Mesh tools on theTools panel.
IL 6.2, 6.7
2
4
5
Selection tool
Mesh tool
Mesh point
Mesh grid
C03ILCS4.qxp 11/5/2008 1:25 AM Page 92

441
Index
Aaccented edges effects, 257actions
Actions panel, 308–309adding commands to, 314adding stops to, 312batch file processing, 316–317building new, 310built-in scripts, 318controlling playback of, 311deleting commands from, 315inserting a non-recordable command in
an Action, 313order of commands in, changing, 314recording, 310running actions within actions, 310saving
as files, 309into sets, 309
scripts, 318–319activation, 2active documents, 19active windows, 18Adobe Bridge
automating tasks in, 418browsing documents with, 14Camera Raw feature, 410–411color settings, 95components of, 407description of, 406editing images in, 416Get Photos from Camera command, 409opening documents with, 14–15, 408placing graphics from, 222–223preferences, setting, 414–415revealing documents in, 14Web Photo Gallery creation, 417
working with images using, 15, 412–413Adobe ConnectNow, 406, 419Adobe Device Central
basic description of, 406, 422checking content using, 423components of, 422
Adobe Drive, 406, 421Adobe Extension Manager, 406, 424Adobe Flex File, saving documents as, 360Adobe PDF Presets command (Edit menu),
353Adobe Product Improvement Program, 23Adobe Studio Exchange, 2Adobe Updater, 21Adobe Version Cue
basic description of, 406file management, 420
Adobe Web siteAdobe Studio Exchange, 2Community Help, 22
advanced print options, 340–341Advanced tab (File Info dialog box), 345alignment
anchor points, 148–149objects, 84paragraphs, 208slices, 383stroke, 120
All Objects command (Select menu), 78All Objects in Active Artboard command
(Select menu), 78anchor points
adding new, 146–147alignment, 148–149Convert Anchor Point tool, 145converting, 144–145deleting, 147direction lines, 142
Z00ILCS4.qxp 11/5/2008 1:44 AM Page 441
442
aanncchhoorr ppooiinntt ((ccoonnttiinnuueedd))endpoints, 149highlighting, 142moving, 142–143paths and, 61preferences, 142selecting with Direct Selection tool, 72showing and hiding, 61smooth points, converting to corner
points, 144anchors, 393anti-aliasing, 390Appearance of Black preferences, 402Appearance panel, 236–237Arc tool, 66arcs, drawing, 66area graphs, 322Area Type tool, 189arranging
documents, 18layers, 174–175slices, 382–383
art brushes, 280–281Artboard tool
artboard creation, 34Artboard Options button, 35multiple artboards, 36
artboardswithin artboards, 34aspect ratio, 35centerpoints, 35deleting, 36display options, 37duplicating, 34exiting editing mode, 34landscape/portrait orientation, 35moving, 36multiple, working with, 36navigating within, 34presets, 34previewing, 36resizing, 36rotating, 36size, 35switching between, 17, 37video safe areas, 35X and Y positioning, 35
artwork, inserting in documents, 16Assign Profile command (Edit menu), 96attributes
appearance, 236–237stroke, 120–121
Audio Data tab (File Info dialog box), 344auto slices, 378AutoCAD drawing format, 349AutoCAD File format, 349
Bbar graphs, 322batch file processing, 316–317Batch Rename command, 418bend styles, 83bevel bend style, 83bevel joins, 121bitmap, exporting documents as, 350black appearance options, 402bleed
bleed print option, 335document creation, 32
Blend command (Objects menu), 127–128Blend tool, 129blends
blending fill colors, 126changing and applying blend options,
128creating automatically, 127creating with Blend tool, 129making and releasing blend objects, 127objects, modifying, 130opacity, 131transformation, 130transparency settings, 132
Bloat tool, 286Blob Brush tool
brush options, setting, 155merging paths with, 154
blur effects, 252BMP format, 349bold font, 200Bounding Box command (View menu),
270–271Bridge (Adobe)
automating tasks in, 418browsing documents with, 14
Z00ILCS4.qxp 11/5/2008 1:44 AM Page 442

Index 443
Camera Raw feature, 410–411color settings, 95components of, 407description of, 406editing images in, 416Get Photos from Camera command, 409opening documents with, 14–15, 408placing graphics from, 222–223preferences, setting, 414–415revealing documents in, 14Web Photo Gallery creation, 417working with images using, 15, 412–413
Browse in Bridge command (File menu),14–15, 222–223
brushesart, 280–281Blob Brush tool, 155Brushes panel, 273calligraphic, 278–279deleting, 284Paintbrush tool, 274–275pattern, 282–283scatter, 276–277strokes, removing, 284
Brushes panel, 273built-in scripts, actions, 318
Ccalligraphic brushes, 278–279Camera Data tab (File Info dialog box), 344Camera Raw feature, 410–411caps, 121case, text, 329Categories tab (File Info dialog box), 344center mark, 37centerpoints, 35Check Spelling command (Edit menu), 324circles, drawing, 62clearing
guides, 49objects, 81
clipping maskscreating, 160creating for groups or layers, 161editing, 162masked object, editing in Isolation
Mode, 163
release objects from, 161clipping sets, 163Close button, 26Close command (File menu), 26closed paths, 61closing
documents, 26Illustrator, 26panels, 7
CMYK (Cyan, Magenta, Yellow and Black)color mode, 28, 97, 101
collapsing panels, 7Color Guide panel
applying color with, 112–113color groups, 113harmony rules, variations based on, 113variation options, selecting, 111variation types, displaying, 111
color management print options, 342color modes. See also colors
changing, 98CMYK, 28, 97, 101document creation, 28Grayscale, 28, 100RGB, 28, 97, 100switching between, 97working with, 97
Color panelColor sliders, 100working with, 100–101
colored paper simulation, 33colors. See also Color Guide panel; color
modes; Swatches panelapplying to objects, fills, or stroke, 99,
118applying with Eyedropper tool, 122–123Color Guide Panel, 111–113Color panel, 100–101color profiles, changing or removing, 95color settings, changing, 94–95converting to grayscale, 109crop mark registration color, 54gamut warning icon, 101global, 108–110grayscale images, 109grid colors transparency settings, 33grids, 52guides, 48, 51
Z00ILCS4.qxp 11/5/2008 1:44 AM Page 443

444
ccoolloorrss ((ccoonnttiinnuueedd))hue, 101inverting, 110Kuler panel, 106–107Live Color feature, 114–115luminosity, 101nonglobal, 108–110proofing, 116replacing, 108–109saturation, 101selecting, 101soft proof, 116Swatches panel, 102–105themes, 106–107view box color, 42Web-safe, 101
column graphs, 322commands
adding to actions, 314basic description of, 6deleting from actions, 315Panel Options menu, 9
Community Help site, 22compound paths
creating, 158releasing, 159reversing object's fill in, 159
condensed font, 200ConnectNow (Adobe), 406, 419Constrain Angle general preference, 390Control panel
anchor points, converting, 145basic description of, 11splitting paths using, 153tools in, 6
Convert Anchor Point tool, 145Convert to Shape command (Effect menu),
242convert to shape effects, 242converting anchor points, 144–145Copy command (Edit menu), 197copying text, 196–197corner points, 144Corner Radius general preference, 390Create New Action button (Actions panel),
309Create New Set button (Actions panel), 309
crop markscreating, 54deleting, 54general preferences, 391registration color, 54
cross hairs, 37Crystallize tool, 286cursor preferences, 390curved segments, 143curves, drawing, 141custom dictionaries, spell checking, 325Cut command (Edit menu), 197cutout effects, 256
Ddashed stroke, 121data graphs, 322data sets
creating, 320–321deleting, 320–321renaming, 321
data variables, 320–321Define Pattern command (Edit menu), 124Delete button (Actions panel), 309deleting
anchor points, 147artboards, 36brushes, 284commands from actions, 315crop marks, 54data sets, 320–321files, 12graphic styles, 235layers, 171objects, 81selections, 80slices, 380symbols, 291workspaces, 57
Description tab (File Info dialog box), 344Deselect command (Select menu), 78Device Central (Adobe)
basic description of, 406checking content using, 423components of, 422
Device Central command (File menu), 39DICOM tab (File Info dialog box), 345
Z00ILCS4.qxp 11/5/2008 1:44 AM Page 444

Index 445
dictionaries, spell checking, 325diffuse glow effects, 257Direct Selection tool
anchor points, adding new, 146anchor points or segments, moving, 143deleting anchor points using, 147editing patterns using, 125end points, connecting, 149selecting anchor points and segments
with, 72showing/hiding direction lines, 61understanding selections, 70
direction linesanchor points, 142showing and hiding, 61
Distort & Transform command (Effectmenu), 90
distributingobjects, 84slices, 383
dithering, 373dividing paths, 153DOC format, 193docking
documents, 19panels, 8
Document Color Mode command (Filemenu), 98, 330
Document Info panel, 346Document Setup command (File menu), 32,
133Document window, 6documents
active, 19arranging, 18bleed and view options settings, 32browsing with Adobe Bridge, 14closing, 26color modes, 28creating
from scratch, 28from templates, 30–31using presets, 29
docking/undocking, 19exporting
as bitmap, 350Export command, 348export file formats, 349
as Flash Movie, 354–355to Photoshop, 352with presets, 353as TIFF format, 351
file information, inserting, 344–345finding and replacing text and elements
in, 326–327grid pattern, 19inserting images in, 16language settings, 33linking, 16measurement units, 32opening
with Adobe Bridge, 14–15existing documents, 12recently opened, 13from Welcome Screen, 13
printing, 330revealing in Adobe Bridge, 14rulers, 46–47saving, 24–25
as Adobe Flex File, 360as EPS format, 358–359as FXG format, 360as Microsoft Office, 361as PDF format, 356–357as template, 362for the Web, 364–365
setting up, 32–33spell checking, 324–325switching between, 18tabbed, 18templates, 16transparency settings, 32–33type options settings, 33view size, 17viewing information in, 17views, 38–41windows, 18–19working with multiple, 18–19
DOCX format, 193double quotes, 33drawing
arcs, 66circles, 62curves, 141ellipses, 62line segments, 65
Z00ILCS4.qxp 11/5/2008 1:44 AM Page 445

446
ddrraawwiinngg ((ccoonnttiinnuueedd))with Pencil tool, 260–261polygons, 64, 140rectangle grids, 68rectangles, 63spirals, 66–67stars, 64
drawing tablets, 404Drive (Adobe), 406, 421drop shadow effects, 245duplicating
artboards, 34color in Swatches panel, 103graphic styles, 233layers, 176objects, 82–83slices, 380symbols, 292
EEdit Colors command (Edit menu), 110, 126Edit Custom Dictionary command (Edit
menu), 325Edit menu commands
Adobe PDF Presets, 353Assign Profile, 96Check Spelling, 324Color Settings, 94Copy, 197Cut, 197Define Pattern, 124Edit Colors, 110, 126Edit Custom Dictionary, 325Find and Replace, 326–327Paste, 196–197Paste in Back, 197Paste in Front, 197Print Presets, 331Redo, 58Transparency Flattener Presets, 341Undo, 58
Edit Selection command (Select menu), 80Edit View command (View menu), 38editing
blend objects, 130clipping masks, 162color in Swatches panel, 103
colors with Live Color, 114–115gradients, 136graphic styles, 234images in Adobe Bridge, 416paths within clipping sets, 163patterns, 125selections, 80symbols, 293
Effect menu commandsConvert to Shape, 242Crop Marks, 54Distort & Transform, 90Effect Gallery, 254–255Sharpen, 253Stylize, 243
effectsaccented edges, 257applying multiple, 254blur, 252controlling with selections, 255convert to shape, 242cutout, 256diffuse glow, 257drop shadow, 245dry brush, 256Fresco, 256gaussian blur, 252glass, 257glowing edges, 257grain, 258graphic pen, 258Illustrator, 240–241inner glow, 244–245mosaic tiles, 258note paper, 257outer glow, 244–245panel knife, 256Photoshop Effect Gallery, 250–251plastic wrap, 258previewing, 240raster graphics, 248scribble, 243spatter, 258stained glass, 258stamp, 257text, 1923D, 246–247
Z00ILCS4.qxp 11/5/2008 1:44 AM Page 446

Index 447
unsharp mask, 253vector objects, 249
Ellipse tool, 62ellipses, drawing, 62embedded graphics, 226–227endpoints, 149Enhanced Metafile format, 349Envelopes, reshaping with, 92EPS format, 25, 345, 358–359Eraser tool, 164erasing path parts, 164exiting Illustrator, 26Expand button (Pathfinder panel), 156Expand command (Objects menu), 125, 134expanding
gradients, 134panels, 7patterns, 125
exportingdocuments
as bitmap, 350Export command, 348as Flash Movie, 354–355to Photoshop, 352with presets, 353as TIFF format, 351
export file formats, 349Extension Manager (Adobe), 406, 424Extensions command (Window menu),
106–107Eyedropper tool
applying colors and attributes with,122–123
color attributes, changing, 123Save For Web & Devices tool, 366
Ffamilies, font, 200File Handling & Clipboard preferences, 401File Info command (File menu), 344file information, inserting into documents,
344–345file management, Adobe Version Cue, 420File menu commands
Browse in Bridge, 14–15, 222–223Close command, 26Device Center, 39
Document Color Mode, 98, 330Document Setup, 32, 133File Info, 344New, 28–29New From Template, 30Open, 12, 220Open Recent, 13Open With, 222Place, 16, 221, 224, 226Print, 330, 332Return to Adobe Illustrator, 14Revert, 24Save, 24Save a Copy, 25Save As, 25, 31Save For Web & Devices, 364–366Scripts, 318–319
filesdeleting, 12saving actions as, 309
fillsapplying color to, 99, 112, 118blending fill colors, 126patterns as, 124–125
Find and Replace command (Edit menu),326–327
Find Font command, 328Fit All In Window command (View menu),
44Fit Artboard In Window command (View
menu), 44Flare tool, 63Flash format, SWF, 349, 365Flash Movie, exporting documents as,
354–355Flattener Preview command (Window
menu), 39, 341flattening layers, 182fonts
bold, 200condensed, 200families and styles, 200Find Font command, 328finding, 201italic, 200replacing, 201reusing recent, 200size, 202
Z00ILCS4.qxp 11/5/2008 1:44 AM Page 447

448
Free Transform tool, 86–87Fresco effects, 256full screen mode, 43FXG format, 25, 360
Ggamut warning icon, 101Gap options, 272gaussian blur effects, 252General preferences, 390Get Photos from Camera command
(Adobe), 409GIF documents, optimizing, 372–373GIF format, 345glass effects, 257global colors, 108–110glowing edges effects, 257glyphs, 215Go to Bridge button, 14–15Gradient tool, 137gradients
applying to objects, 134creating, 135editing, 136expanding, 134Gradient tool, 137linear type, 135mesh, 92, 138radial type, 135
grain effects, 258graphic pen effects, 258graphics
embedded, 226–227linked, 226–227linking, 224–225opening graphic images, 220placing, 221–223print options, 336raster
interpolation and, 60tracing, 228–230understanding raster graphics, 60
stylesapplying, 231breaking links to, 235creating, 232
deleting, 235duplicating, 233editing, 234
graphs, 322Grayscale color mode, 28, 100grayscale images, 109grid colors transparency settings, 33grid patterns, 19grid size transparency setting, 32grids. See also guides
color, 52displaying in back of artwork, 52Polar Grid tool, 69preferences, 52Rectangle Grid tool, 68showing and hiding, 52Snap to Grid command, 52styles, 52subdivisions, 52Transparency, 133
Group command (Objects menu), 76Group Selection tool, 70grouping objects, 76–77groups, creating clipping masks for, 161guides. See also grids
clearing, 49color, 48converting vector objects to, 49creating, 49locking, 48preferences, 48ruler, 47showing and hiding, 48smart guides
object transformation, 87preferences, 51turning on/off, 50working with, 50–51
snap to point, 48style, 48switching, 49
HHand tool
moving elements around with, 53quick access to, 53Save For Web & Devices tool, 366
Z00ILCS4.qxp 11/5/2008 1:44 AM Page 448

Index 449
handles, 393hanging indents, 209hardware, Illustrator CS4 system
requirements, 3Help menu commands
Adobe Product Improvement Program,23
Illustrator Help, 22–23Updates, 21Welcome Screen, 13
help optionsCommunity Help site, 22searching topics, 23
Hide Edges command (View menu), 61Hide Panels command (Window menu), 18hiding
anchor points, 61direction lines, 61grids, 52guides, 48layers, 178panels, 8, 43rulers, 47slices, 380–381Transparency grid, 133
highlighting anchor points, 142histograms, 411History tab (File Info dialog box), 345HSB color slider (Color panel), 100HTML text, adding to slices, 386hue, 101hyphenation, 211, 397
Iicons, collapsing and expanding panel sets
between icons and panels, 9Illustrator Help command (Help menu),
22–23Illustrator tab (File Info dialog box), 345images
inserting in documents, 16replacing, 16working with images using Bridge, 15
importing text, 193indentation
hanging indents, 209paragraphs, 209
Info panel
color fill and stroke information, 55uses for, 55
inner glow effects, 244–245installing Illustrator CS4
in Macintosh, 3in Windows, 2
Internet, checking for updates from, 20interpolation, 60Inverse command (Select menu), 78inverting colors, 110IPTC tab (File Info dialog box), 344Isolation Mode, 163italic font, 200
Jjoining anchor endpoints, 149joins, 121JPEG documents, optimizing, 370–371JPEG format, 345, 349
Kkerning type, 204Keyboard Increment general preference,
390keyboard shortcuts, 403Knife tool, 152Knockout Group option, 132Kuler panel, 106–107
Llandscape/portrait orientation, 35language settings, document creation, 33Lasso tool
selecting objects with, 73understanding selections, 70
layers. See also Layers panelarranging, 174–175creating clipping masks for, 161creating top level layers, 168–169deleting, 171deselecting, 170duplicating, 176flattening, 182hiding, 178locking, 177merging, 179moving, 174–175
Z00ILCS4.qxp 11/5/2008 1:44 AM Page 449

450
llaayyeerrss ((ccoonnttiinnuueedd))moving objects to, 180–181naming, 169releasing objects to, 181selecting, 170selecting objects with, 172–173showing and hiding, 178sublayers, 168–169
Layers panel. See also layersaccessing, 166components of, 166locating objects in, 183options, setting, 167
layouts, workspace, 56leading text, 203line graphs, 322Line Segment tool, 65line segments, drawing, 65linear gradient type, 135linked graphics, 226–227linking
documents, 16graphics, 224–225slices, 381
Liquify tools, 289Live Color feature
applying color groups to objects with,114–115
editing colors with, 114–115Live Paint Bucket tool
paint fills, 266preferences, setting, 265selecting options to paint fills or strokes
with, 264stroke edges, changing, 267
Live Paint Groupsadding paths to, 271converting traced objects to, 263creating, 262–263Gap options, 272reshaping or moving paths in, 270–271
Live Paint Selection tool, 268–269lockingguides, 48layers, 177
lossy compression, 373lowercase text, 329luminosity, 101
MMacintosh
Illustrator CS4 system requirements, 3installing Illustrator CS4 in, 3starting Illustrator CS4 in, 5
Macintosh PICT format, 349Magic Wand tool
selecting objects with, 74–75understanding selections, 70
marks print options, 334–335Measure tool, 55measurement
distance between objects, measuring, 55measurement units, document creation,
32menus, 6merging
layers, 179paths, 154–155
mesh, 92, 138 metadata, 345Microsoft Office, saving documents as, 361miter bend style, 83miter joins, 121Mobile SWF tab (File Info dialog box), 344mosaic tiles effects, 258Move tool, 50moving
anchor points, 142–143artboards, 36document elements with Hand tool, 53layers, 174–175objects, 81objects to layers, 180–181segments, 142–143slices, 382text, 191, 196–197between tools, 53
Nnaming
layers, 169selections, 80workspaces, 56
navigationartboards, 37within artboards, 34
Z00ILCS4.qxp 11/5/2008 1:44 AM Page 450

Index 451
Navigator panelcustomizing, 42view area, 41view box color, 42view size, 40
New command (File menu), 28–29New From Template command (File menu),
30New View command (View menu), 38Next Object Above command (Select
menu), 78Next Object Below command (Select
menu), 78nonglobal colors, 108–110normal screen mode, 43note paper effects, 257
Oobjects
alignment, 84applying color to, 99, 112, 118clearing, 81deleting, 81distributing, 84duplicating, 82–83grouping, 76–77measuring distance between, 55moving, 81moving to layers, 180–181reflecting, 85, 89rotating, 85–86, 88scaling, 85, 88selecting
with Lasso tool, 73with Magic Wand tool, 74–75similar objects, 78–79using Direction Selection tool, 72using Select menu, 78–79using Selection tool, 71
transforming, 85–87Objects menu commands
Blend, 127–128Clipping Mask, 160Compound Path, 158Expand, 125, 134Group, 76Text Wrap, 216
Transform, 90Ungroup, 76
offsetting paths, 83opacity, blends, 131Open command (File menu), 12, 220open paths, 61, 147Open Recent command (File menu), 13Open With command (File menu), 222opening
documentswith Adobe Bridge, 14–15existing documents, 12recently opened, 13from Welcome Screen, 13
graphic images, 220panels, 7
Origin tab (File Info dialog box), 345outer flow effects, 244–245Outline view, 38–39outlines, 217output print options, 338–339output slice settings, 385overflow, text, 198–199Overprint Preview command (View menu),
39, 337
PPaintbrush tool, 151painting
art brushes, 280–281Brushes panel, 273calligraphic brushes, 278–279Live Paint Bucket tool, 264–267Live Paint Groups
adding paths to, 271converting traced objects to, 263creating, 262–263Gap options, 272reshaping or moving paths in,
270–271Live Paint Selection tool, 268–269Paintbrush tool, 274–275
pattern brushes, 282–283scatter brushes, 276–277
panel knife effects, 256Panel Options menu, 7, 9
Z00ILCS4.qxp 11/5/2008 1:44 AM Page 451

452
panelsadding, 8closing, 7collapsing, 7displaying hidden, 43docking/undocking, 8expanding, 7hiding, 8, 43opening, 7Panel Options menu, 9sets, collapsing and expanding between
icons and panels, 9subtracting, 8
paragraphsalignment, 208indentation, 209spacing, 209
Paste command (Edit menu), 196–197Paste in Back command (Edit menu), 197Paste in Front command (Edit menu), 197Pathfinder panel, 156paths
anchor points and, 61clipping mask, 160–163closed, 61compound, 158–159dividing, 153erasing parts of, 164, 260merging, 154–155offsetting, 83open, 61, 147reshaping, 150–151segments and, 61Shape Mode command, 156shape of, changing, 61splitting, 152–153
pattern brushes, 282–283patterns
applying to objects, 124editing, 125expanding, 125as fills, 124–125
PDF format, 25, 345, 356–357Pen tool
anchor points, adding, 147drawing curves with, 141drawing polygons with, 140
Pencil toolpreferences, 261reshaping paths with, 151working with, 260–261
Photoshop Effect Gallery, 250–251Photoshop, exporting to, 352Photoshop format, 349pie graphs, 322Pixel Preview command (View menu), 39pixels, 35Place command (File menu), 16, 221, 224,
226placing graphics, 221–223plastic wrap effects, 258Play button (Actions panel), 309playback, action, 311plug-in preferences, 398PNG format, 345, 349PNG-8 document, 374–375PNG-24 document, 376point type, 187point/pica size, 46points, anchor
adding new, 146–147alignment, 148–149Convert Anchor Point tool, 145converting, 144–145deleting, 147direction lines, 142endpoints, 149highlighting, 142moving, 142–143paths and, 61preferences, 142selecting with Direct Selection tool, 72showing and hiding, 61smooth points, converting to corner
points, 144Polar Grid tool, 69Polygon tool, 64polygons, drawing, 64, 140portrait/landscape orientation, 35preferences
Adobe Bridge, 414–415anchor points, 142Appearance of Black, 402cursor, 390File Handling & Clipboard, 401
Z00ILCS4.qxp 11/5/2008 1:44 AM Page 452

Index 453
General, 390grids, 52guide, 48hyphenation, 397keyboard shortcut, 403Live Paint Bucket tool, 265Pencil tool, 261plug-in, 398ruler, 46Scratch Disk, 399Selection & Anchor Display, 392–393slices, 397smart guides, 51text, 394–395Transparency grid, 133type, 394–395Units & Display Performance, 396updates, 20user interface, 400
presetsartboard, 34creating new documents using, 29exporting with, 353list of, 29printing with, 331, 340
Preview view, 38–39Preview View command (View menu), 260previewing
artboards, 36color separations, 337effects, 240
Print command (File menu), 330, 332Print Presets command (Edit menu), 331printing
advanced print options, 340–341bleed options, 335color management settings, 342color separations, previewing, 337documents, 330general print options, 332–333graphics print options, 336marks options, 334–335number of copies, specifying, 333output options, setting, 338–339Overprint preview, 337overprints, 340presets, 340
with presets, 331Print command, 330print problems, checking for, 343print tiling, 333reverse order, 332Separations preview, 337summary print options, 343
Product Improvement Program (Adobe), 23Proof Colors command (View menu), 116Proof Setup command (View menu), 39proofing colors, 116PSD format, 345Pucker tool, 286punctuation, 214
QQuit Illustrator command (Illustrator menu),
26quotes, 33
Rradar graphs, 322radial gradient type, 135raster graphics
effects, 248interpolation and, 60tracing, 228–230understanding raster graphics, 60
Raw Data tab (File Info dialog box), 345Record button (Actions panel), 309recording actions, 310Rectangle Grid tool, 68Rectangle tool, 63rectangles, drawing, 63Redo command (Edit menu), 58Reflect tool, 89reflecting objects, 85, 89registration, 4–5releasing
compound paths, 159objects from clipping masks, 161objects to layers, 181
renamingdata sets, 321selections, 80workspaces, 57
Z00ILCS4.qxp 11/5/2008 1:44 AM Page 453

454
rendering intent color management printoption, 342
replacingcolors, 108–109fonts, 201images, 16
Reselect command (Select menu), 78Reshape tool, 150reshaping paths, 150–151resizing
artboards, 36slices, 382
resolution preset transparency setting, 33Return to Adobe Illustrator command (File
menu), 14reverse order printing, 332Revert command (File menu), 24revolving 3D effects, 247RGB (Red, Green, Blue) color mode, 28, 97,
100Rotate tool, 88rotating
artboards, 36objects, 85–86, 88text, 207
round bend style, 83round joins, 121Rounded Rectangle tool, 63RTF format, 193rulers
artboard display options, 37, 47displaying, 46–47document, 46–47guides
alignment, 51changing, 47clearing, 49color, 48converting vector objects to, 49creating, 49locking, 48preferences, 48ruler, 47showing and hiding, 48smart guides, 50–51snap to point, 48style, 48switching, 49
hiding, 47origin, changing, 47preferences, 46
Ssafe area, artboard display options, 37Same command (Select menu), 79saturation, color, 101Save a Copy command (File menu), 25Save As command (File menu), 25, 31Save command (File menu), 24Save For Web & Devices command (File
menu), 364–366Save Selection command (Select menu), 80Save Workspace command (Workspace
menu), 56saving
actionsas files, 309into sets, 309
documents, 24–25as Adobe Flex File, 360as EPS format, 358–359as FXG format, 360as Microsoft Office, 361as PDF format, 356–357as template, 362for the Web, 364–365
selections, 80slices for Web, 384–385symbols, 291
Scale tool, 88scaling
objects, 85, 88type, 206
Scallop tool, 286scatter brushes, 276–277scatter graphs, 322Scissor tool, 152Scratch Disk preferences, 399screen modes, 43scribble effects, 243scripts, actions, 318–319searching
fonts, 201for help information, 23
segments
Z00ILCS4.qxp 11/5/2008 1:44 AM Page 454

Index 455
curve, 143moving, 142–143paths and, 61selecting with Direct Selection tool, 72
Select menu commands, 78–79Edit Selection, 80Same command, 79Save Selection, 80
Selection & Anchor Display preferences,392–393
Selection tool. See also selectionsaligning and distributing objects using,
84duplicating objects with, 82–83moving objects with, 81reflecting or shearing objects, 89rotating and scale objects with, 88selecting objects with, 71transforming objects with, 85understanding selections, 70
selections. See also Selection toolanchor points, 72controlling effects using, 255deleting, 80editing, 80examples of, 70inverting color of, 78layers, 170naming, 80renaming, 80reselecting, 78saving, 80selecting next object above/below cur-
rent, 78slices, 380–381type, 194–195understanding selections, 70
sentence case, 329Separations Preview command (Window
menu), 39Shape Mode command (Pathfinder panel),
156Share My Screen command, 419Sharpen command (Effect menu), 253Shear tool, 89shortcuts
starting Illustrator CS4, 4–5tool, 11
Show Bounding Box command (Viewmenu), 85
Show Edges command (View menu), 61Show Panels command (Window menu), 18Show Print Tiling command (View menu),
38Show Text Threads command (View menu),
198Show Transparency Grid command (View
menu), 133single quotes, 33size
artboard, 35font, 202views, 40
Slice Selection tool, 366slices
alignment, 383arranging, 382–383auto, 378deleting, 380distributing, 383duplicating, 380hiding, 380–381HTML text, adding, 386linking, 381moving, 382output option settings, 385preferences, 397resizing, 382saving for Web, 384–385selecting, 380–381showing, 380–381stacking, 383subslices, 379unlinking, 381URL links, adding, 387user, 378viewing slice options, 380–381working with, 381
smart guidesobject transformation, 87preferences, 51turning on/off, 50working with, 50–51
Smart Punctuation, 214smooth points, converting to corner points,
144
Z00ILCS4.qxp 11/5/2008 1:44 AM Page 455

456
Snap to Grid command, 52Snap to Point command, 48, 392soft proof colors, 116software, Illustrator CS4 system require-
ments, 3spacing paragraphs, 209spatter effects, 258spell checking, 324–325Spiral tool, 66–67spirals, drawing, 66–67splitting paths, 152–153stacked bar graphs, 322stacked column graphs, 322stacking slices, 383stained glass effects, 258stamp effects, 257Star tool, 64stars, drawing, 64Start menu, opening documents using, 13starting Illustrator CS4
in Macintosh, 5shortcuts, 4–5Welcome screen, 4in Windows, 4
status bar, 17Stop button (Actions panel), 309stops, adding to actions, 312stroke
alignment, 120applying color to, 99, 112, 118attributes, changing, 120–121caps or joins, changing, 121dashed, 121weight of, changing, 120
stylesfont, 200graphic
applying, 231breaking links to, 235creating, 232deleting, 235duplicating, 233editing, 234
grids, 52guides, 48type, 212–213
Stylize command (Effect menu), 243
sublayers, 168–169subscript text, 33subslices, 379subtracting panels, 8summary print options, 343superscript text, 33SVG format, 25, 365Swatches Library
copying swatches between libraries, 104customized swatch panels, saving, 105displaying, 104gradient library, 134
Swatches panelcreating color groups in, 103deleting colors from, 102display of, changing, 102editing or duplicating color in, 103sorting colors in, 102swatches, displaying by type, 102Swatches Library, 104–105
SWF format, Flash, 349, 365symbols
creating, 290deleting, 291duplicating, 292editing, 293links, breaking, 294–295saving, 291sets, expanding instances of, 305Symbol Libraries, 289Symbol Screener tool, 303Symbol Scruncher tool, 299Symbol Shifter tool, 298Symbol Sizer tool, 300Symbol Spinner tool, 301Symbol Sprayer tool, 296Symbol Strainer tool, 302Symbol Styler tool, 304symbolism tool options, setting, 297Symbols panel, 288
system requirements, 3
Ttab stops, 210tabbed documents, 18tabs, 210Targa format, 349
Z00ILCS4.qxp 11/5/2008 1:44 AM Page 456

Index 457
templatescreating documents from, 30–31document, 16, 30–31saving documents as, 362
textcase, 329copying, 196–197effects, 192fonts, 200–202glyphs, 215hyphenation, 211importing, 193kerning, 204leading, 203moving, 191, 196–197outlines, 217overflow, 198–199paragraphs, 208–209preferences, 394–395rotating, 207scaling, 206selecting, 194–195styles, 212–213subscript, 33superscript, 33tabs, 210threads, 198–199tracking, 205typing new, 187–188wrapping, 216
Text Format, 349Text Wrap command (Objects menu), 216themes, color, 106–107threads, text, 198–1993D effects, 246–247thumbnail views, 41TIFF format, 345, 349, 351Tolerance selection option, 392tool tips, 391tools
accessing in Tools panel, 10accessing multiple, 10Control panel, 6moving between, 53shortcuts to, 11
Tools panelaccessing tools in, 10
contents of, 6tracing raster graphics, 228–230tracking type, 205transformations
applying multiple, 90–91blends, 130Distort & Transform command, 90repeating, 90Transform Each command, 90
transforming objects, 85–87Transparency Flattener Presets command
(Edit menu), 341Transparency grid, 133transparency settings
blends, 132colored paper simulation, 33controlling transparency effects, 132document creation, 32–33grid colors, 33grid size, 32resolution preset, 33
turning on/off smart guides, 50TXT format, 193type
Area Type tool, 189copying, 196–197fonts, 200–202kerning, 204leading, 203moving, 196–197outlines, 217overflow, 198–199paragraphs, 208–209preferences, 394–395rotating, 207scaling, 206selecting, 194–195styles, 212–213threads, 198–199tracking value, 205Type on a Path tool, 190Vertical Area Type tool, 189Vertical Type on a Path tool, 190Vertical Type tool, 187wrapping, 216
Type on a Path tool, 190Type tool, 186typographer's quotes, 33
Z00ILCS4.qxp 11/5/2008 1:44 AM Page 457

458
Twirl tool, 286
UUndo command (Edit menu), 58undocking
documents, 19panels, 8
Ungroup command (Objects menu), 76Units & Display Performance preferences,
396unsharp mask effects, 253Updater (Adobe), 21updates
checking for, 20–21preferences, 20
Updates command (Help menu), 21updating, from previous versions, 2uppercase text, 329URL links, adding to slices, 387user interface preferences, 400user slices, 378
Vvariables, data
creating, 320–321deleting, 320–321renaming, 321
vector objectsconverting to guide, 49effects, 249understanding vector graphics, 60
Version Cue (Adobe)basic description of, 406file management, 420
Vertical Area Type tool, 189Vertical Type on a Path tool, 190Vertical Type tool, 187Video Data tab (File Info dialog box), 344video safe areas, artboards, 35View menu commands
Bounding Box, 270–271Edit View, 38Fit All In Window, 44Fit Artboard In Window, 44Hide Edges, 61New View, 38Overprint Preview, 39
Pixel Preview, 39Preview View, 260Proof Colors, 116Proof Setup, 39Rulers, 46Show Bounding Box, 85Show Edges, 61Show Print Tiling, 38Show Text Threads, 198Show Transparency Grid, 133Smart Guides, 50Soft Proof, 116
view size, documents, 17views
box color, 42changing, with Zoom tool, 44–45display view, changing, 38–39document, 38–41fit in window, 44Outline, 38–39Preview, 38–39ruler options, 46size, 40thumbnail, 41
WWarp tool, 286WBMP document, optimizing, 377Web
file formats, 368–369GIF documents, optimizing, 372–373images, optimizing to file size, 367JPEG documents, optimizing, 370–371PNG-8 document, optimizing, 374–375PNG-24 document, optimizing, 376saving documents for, 364–365saving slices for, 384–385WBMP document, optimizing, 377
Web-safe color, 101Welcome screen, 4, 13Welcome Screen command (Help menu), 13Window menu
Extensions, 106–107Flattener Preview, 39panel display, 7–8
Window menu commandsFlattener Preview, 341
Z00ILCS4.qxp 11/5/2008 1:44 AM Page 458

Index 459
Hide Panels, 18Separations preview, 39Show Panels, 18
WindowsIllustrator CS4 system requirements, 3installing Illustrator CS4 in, 2starting Illustrator CS4 in, 4
windowsactive, 18document, 18–19
Windows Metafile format, 349Workspace menu commands, 56workspaces
creating, 56deleting, 57displaying, 56layouts, 56naming, 56renaming, 57
wrapping text, 216Wrinkle tool, 286
XX and Y positioning, 35XMP format, 344XMP Software Development Kit, 345
Zzoom
in/out, 45using Navigator thumbnail, 41view size, 40
Zoom toolchanging view with, 44–45Save For Web & Devices tool, 366
Z00ILCS4.qxp 11/5/2008 1:44 AM Page 459

Z00ILCS4.qxp 11/5/2008 1:44 AM Page 460