cross peen hammer - open school bc | home page work cross peen hammer ... lathe use, layout...
TRANSCRIPT

Metal Work Cross Peen Hammer
Skills Exploration 10–12 1
Cross Peen Hammer
IntroductionIn this activity plan students will develop various machining and metalworking skills by building a two-piece steel hammer. This project will introduce basic operations for initial familiarization with lathe use, layout procedures, drill press operations, edge and face milling, and an oil or chemical blackening finish process.
Lesson ObjectivesThe student will be able to:
• Use a machine lathe to form tool cut, face off, centre drill, knurl, and file in a scrolling 3-jaw chuck, and facing in an independent 4-jaw chuck
• Lay out hole locations for drilling
• Use a drill press with a drill press vise to pilot drill and bore to a given nominal size
• Cut stock steel using a band saw
• Perform milling operations: face milling, edge milling, chamfer milling
• Perform an oil or chemical blackening finish process
AssumptionsThe student will already know:
• Hand tool safety
• Measurement
• Basic layout techniques
• Names and usages of layout and hand tools

Cross Peen Hammer Metal Work
2 Skills Exploration 10–12
TerminologyEnd mill: a type of cutting tool different from a drill bit in that it can generally cut in all directions. An end mill creates a flat surface on the sides along the same axis as the spindle.
Face off: a process performed on a lathe in which irregularities on the face of an object are removed so that the face is at a 90-degree angle (right angle) to the object’s sides.
Face mill: a cutting tool with blades along the bottom or sides; used to shape the face of an object.
HRMS: Hot rolled mild steel made by a process which involves rolling the steel at a high temperature (typically at a temperature over 1700° F), which is above the steel’s recrystallization temperature.
HSS tooling: High-speed steel tooling made of carbon tool steel, often with alloying of tungsten and vanadium, that resists tool edge breakdown due to heat caused by rapid motion. It is found in endmills, drill bits, lathe tool bits, etc. Such tooling may be coated in ceramics such as titanium nitride to improve wear and speed abilities.
Knurl: small ridges or bumps on a metal surface to help grip the object. Also used to describe the act of cutting knurls.
Live centre: a part of a lathe that holds and revolves with the work piece. Usually refers to the headstock centre.
Tailstock: the movable part of a lathe that supports the dead centre.
Estimated Time7 hours
Recommended Number of Students20, based on the BC Technology Educators’ Best Practices Guide
Facilities Metal shop as per the BC Technology Educators’ Best Practices Guide
Tools and Equipment• Drill bits: bell end centre drills with 5⁄16" body, ⅛" tip
• HSS twist drills: 3⁄16", 13⁄32", 27⁄64"
• Taper or plug tap: ½-13NC
• Split die: ½-13NC
• Layout tools, including height gauge, centre punch, scribe, dividers, layout dye, layout hammer

Metal Work Cross Peen Hammer
Skills Exploration 10–12 3
• Hacksaw, bench vise, flat file, mill file, de-burring tool
• Drill press
• Machine lathe, knurling head, LH tool holder/bit, 3- and 4-jaw chuck
• Belt machine with 60 g and 120 g belts
• Vertical milling machine with tooling: 2"+ facing mill, ¾"+ end mill, chamfering mill (optional)
• T-slot clamping kit for milling machine
Materials • Head: 1" × 1" square 1018 HRMS, 100 mm (4") long piece per hammerhead
• Handle: ⅞" diameter 1018 HRMS, 250 mm (10½") long piece per hammer handle
• Securing pin: 3⁄16" × 1" roll pin
• Chemical blackening kit or oxy-fuel torch and used motor oil
• Tapping fluid, threading lubricant
Teacher-Led ActivityDemonstrate the following steps to fabricate a cross peen hammer. Students will then each make their own hammer.
Hammerhead1. Cut 1" × 1" square 1018 HRMS over length by 3 mm (⅛") to 103 mm or 4⅛" long on band
saw.

Cross Peen Hammer Metal Work
4 Skills Exploration 10–12
2. Face one end flat on lathe. Tool bit should be on centre and 90 degrees to the direction of travel. Centre stock within 2 mm in a 4-jaw chuck.
Caution: Turn only at maximum manufacturer’s recommended speed for their 4-jaw chuck. This is approximately 400 rpm if using HSS tooling or 900 rpm if using carbide tooling. Calculate rotational speed using the formula of 4x cutting speed (100 for mild steel)/diameter in inches of the cutting circle (outer diameter of the cutting tool).
3. Measure and mark height at 100 mm or 4" on layout table using a height gauge.
Then face the opposite end to approximate final length using lathe.

Metal Work Cross Peen Hammer
Skills Exploration 10–12 5
4. Mount in a milling vise using parallels to support and place the block.
Chamfer, approximately 1 mm wide and 45 degrees, all four longitudinal edges of the block using a chamfering mill or a flat file.
Then chamfer one end only of the block, all four edges. Part may be held in stepped jaws as shown or set using parallels as above.

Cross Peen Hammer Metal Work
6 Skills Exploration 10–12
5. Re-mount hammerhead in a milling vise using a 1" jacking block to set a taper of 1:4 ratio or about 14.5 degrees. Change tooling to a facing mill. Reset spindle speed to suit tooling size and type of cutting material (HSS or carbide).
Calculate rotational speed using the formula of 4x cutting speed (100 for mild steel) / diameter in inches of the cutting circle (outer diameter of the cutting tool).
Take multiple cuts of 1–2 mm depth using a feed speed up to 200–250 mm/min., depending on facing mill. Calculate using rotational speed × number of teeth × 0.025 mm = mm/minute feed rate.
6. Remove hammerhead from vise and de-burr edges using a flat file.
Metal Work Cross Peen Hammer
Skills Exploration 10–12 7
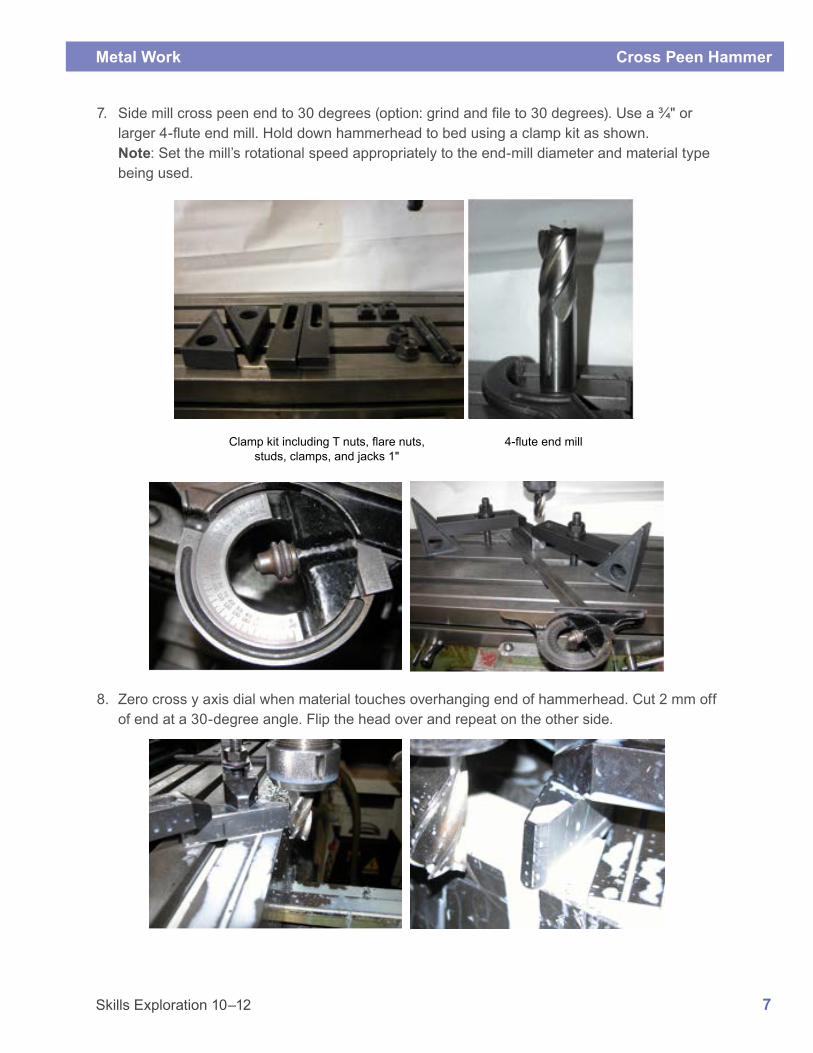
7. Side mill cross peen end to 30 degrees (option: grind and file to 30 degrees). Use a ¾" or larger 4-flute end mill. Hold down hammerhead to bed using a clamp kit as shown. Note: Set the mill’s rotational speed appropriately to the end-mill diameter and material type being used.
Clamp kit including T nuts, flare nuts, 4-flute end mill studs, clamps, and jacks 1"
8. Zero cross y axis dial when material touches overhanging end of hammerhead. Cut 2 mm off of end at a 30-degree angle. Flip the head over and repeat on the other side.

Cross Peen Hammer Metal Work
8 Skills Exploration 10–12
9. Lay out head for drilling holes:
Measure height of block and then divide by 2 and mark centre lines down each side.
Measure 38 mm up from square end and mark, then an additional 6.5 mm up from there and mark again.
Centre-punch handle hole and retainer pin hole 6.5 mm offset from handle hole.

Metal Work Cross Peen Hammer
Skills Exploration 10–12 9
10. Pilot drill both the handle hole and retainer pin hole through, using a 3/16" twist drill.
11. Re-drill handle hole using a 13/32" twist drill through.
12. Counter-bore using a ⅜" CB, 3 mm deep.
13. Re-drill handle hole to tap drill size for a ½-13NC internal thread (27/64").

Cross Peen Hammer Metal Work
10 Skills Exploration 10–12
14. Using a 12-13NC tap, thread 27/64" hole through the head. Check to ensure that the tap is square to the hole throughout the process. Use appropriate tapping fluid.
15. Clean up faces then edges on a surface grinder or on a belt grinder using 120 g belt to finish all surfaces.

Metal Work Cross Peen Hammer
Skills Exploration 10–12 11
16. De-burr all holes using a countersink or a de-burring tool.
Hammer handle1. Cut ⅞ diameter × 245 mm piece of round stock on band saw.
2. Using a lathe, calculate and set spindle speed to minimally face off both ends of the handle and then centre-drill to the base of the cone, but no deeper.
Lathe spindle speed should be calculated for a 5/16" bell centre-drill and be at least 1200 rpm.

Cross Peen Hammer Metal Work
12 Skills Exploration 10–12
3. Lay out the lines on handle stock according to sketch. All transition points should be clearly marked on the handle.
4. Knurl using a medium or coarse set of knurling wheels. Knurling head must be 90 degrees to the work and on centre. Use a coolant to clean, cool, and lubricate the knurling head.

Metal Work Cross Peen Hammer
Skills Exploration 10–12 13
5. Turn handle stock to 0.500+/–0.005" diameter × 25 mm long.
6. External threading of spindle
Machine cut process using a lathe:
a. Set compound slide to 60 degrees.

Cross Peen Hammer Metal Work
14 Skills Exploration 10–12
b. Set quick change gear box to 13 threads per inch (TPI). LBT7V is the setting below.
c. Set spindle speed to 200 or lower.
d. Secure work piece in the lathe. Allow about 50 mm protrusion from the 3-jaw chuck.
e. Set a 60-degree threading bit on centre and correctly angled to the work piece.
f. Test cut to confirm 13 TPI settings.
g. Zero both cross feed dial and compound slide dial with tip of bit touching the work piece.
h. Make cuts engaging threading dial only at No. 1 position for a 13 TPI cut or according to the lathe manufacturer’s instructions.

Metal Work Cross Peen Hammer
Skills Exploration 10–12 15
i. Apply a heavy duty cutting fluid to work piece. Make successive cuts beginning with a 0.020" depth and advancing with 0.005" depth of cuts, always advancing only with the compound slide.
j. Continue successive cuts until to double depth calculation of approximately 0.100" is obtained.
k. A clean-up pass using a ½-13NC split die with threading lubricant can be used to obtain a final fit. Check that the head threads onto the handle with minimal interference.
7. Turn a shoulder to 0.600"+/–0.005" × 3 mm wide at end of thread so that the hammer handle threads into the counter bore.
Cross Peen Hammer Metal Work
16 Skills Exploration 10–12
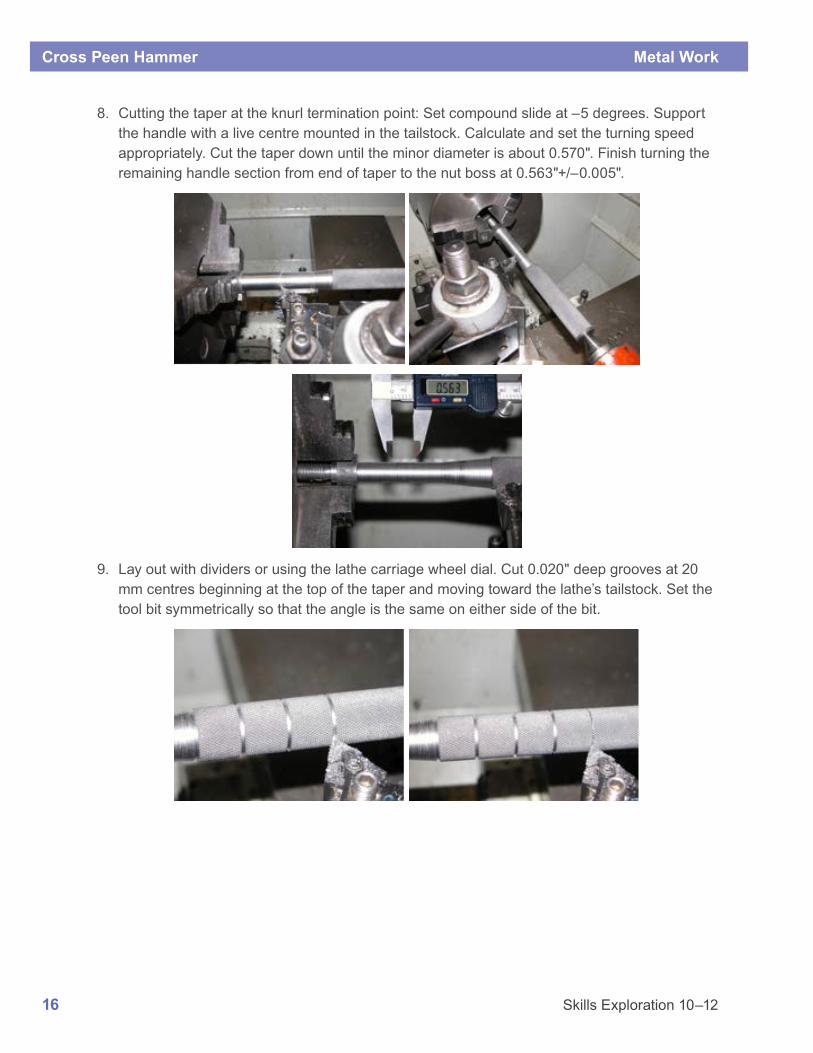
8. Cutting the taper at the knurl termination point: Set compound slide at –5 degrees. Support the handle with a live centre mounted in the tailstock. Calculate and set the turning speed appropriately. Cut the taper down until the minor diameter is about 0.570". Finish turning the remaining handle section from end of taper to the nut boss at 0.563"+/–0.005".
9. Lay out with dividers or using the lathe carriage wheel dial. Cut 0.020" deep grooves at 20 mm centres beginning at the top of the taper and moving toward the lathe’s tailstock. Set the tool bit symmetrically so that the angle is the same on either side of the bit.
Metal Work Cross Peen Hammer
Skills Exploration 10–12 17
10. Chamfer end of handle at 45–60-degree angle.
11. Chamfer each side of the nut boss. Support part using tailstock and live centre.
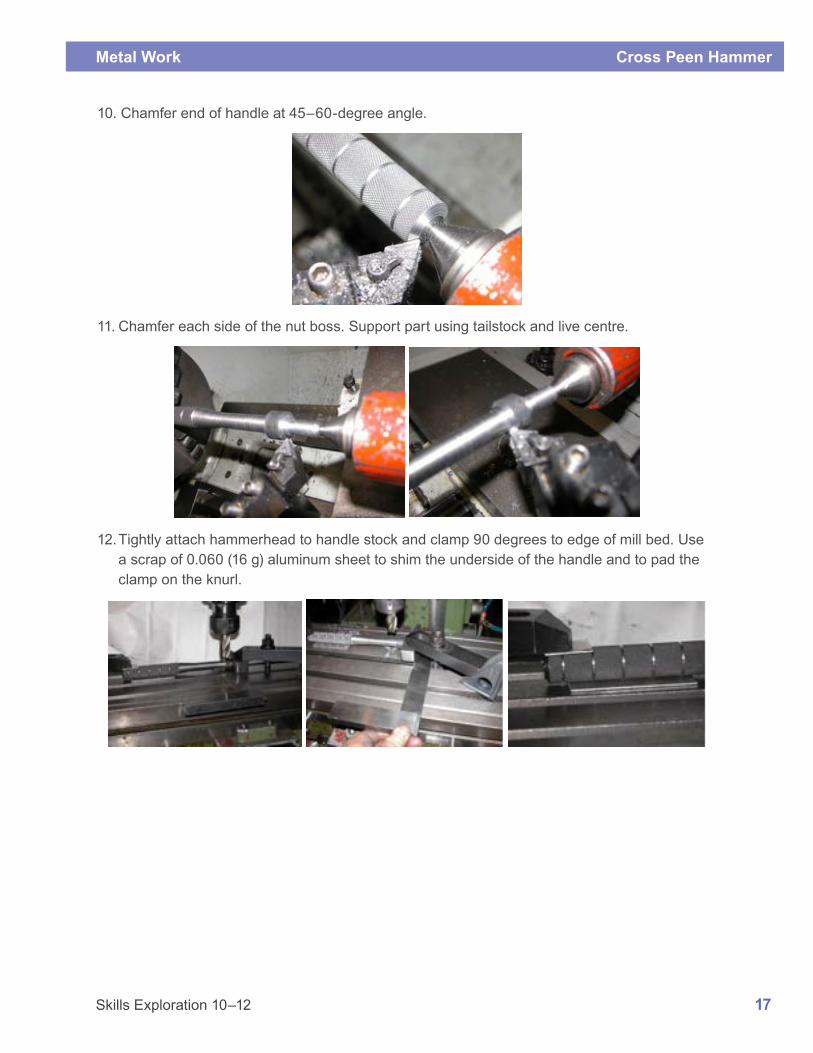
12. Tightly attach hammerhead to handle stock and clamp 90 degrees to edge of mill bed. Use a scrap of 0.060 (16 g) aluminum sheet to shim the underside of the handle and to pad the clamp on the knurl.

Cross Peen Hammer Metal Work
18 Skills Exploration 10–12
13. Touch the end mill to the top of the nut boss, then zero the knee height adjusting dial. Lock the x axis of the mill bed, provide clearance between the end mill and the nut boss, and raise the knee by 1.6 mm.
14. Flip head over and repeat milling operation to form a nut that measures ¾" across the flats.
15. Clamp in drill press and drill 3⁄16" hole through the head with handle in place for the retaining roll pin (3⁄16 × 1.00).

Metal Work Cross Peen Hammer
Skills Exploration 10–12 19
16. De-burr edges of nut and check fit with ¾" wrench.
17. Wire wheel or bead blast all parts clean in preparation for finishing.
18. Parts may be oil blackened or chemically blackened (blueing).
a. Oil process: Heat parts to black hot (very dull cherry red) using an oxyacetylene torch, then quench in used diesel engine oil, drip dry, wipe off residue, and wash with detergent soap.

Cross Peen Hammer Metal Work
20 Skills Exploration 10–12
b. Chemical blueing: Follow manufacturer’s recommended application process. Brush on solution, wait one or two minutes, rinse, dry off parts, apply sealer coats as specified.
Assembly1. Thread head together with handle and tighten as before. Nut flats should parallel the sides of
the head.
2. Insert roll pin and tap in place using a layout hammer.

Metal Work Cross Peen Hammer
Skills Exploration 10–12 21
EvaluationConsider co-creating the evaluation criteria with your students at the beginning of the activity/project. You may want to include the following:
• Overall size and shape
• Hole placement, sizing, and alignment
• Head taper and 30-degree bevels
• Knurl quality: consistent diamond pattern
• Handle taper and finished diameters
• Handle groove spacing and depth
• Nut alignment, shape, finish quality
• Prefinish: filing and sanding removal of all tool marks
• Finishing: even lustre