creating a web page computer concepts i and ii sue norris
TRANSCRIPT

Creating A Web PageCreating A Web Page
Computer Concepts I and IIComputer Concepts I and IISue NorrisSue Norris

AgendaAgenda
What is HTMLWhat is HTML HTML and XHTML TagsHTML and XHTML Tags Required HTML and XHTML TagsRequired HTML and XHTML Tags Using Notepad to Create a Simple Using Notepad to Create a Simple
Web PageWeb Page Viewing Your Web Page in a BrowserViewing Your Web Page in a Browser Submitting Your ProjectSubmitting Your Project

Slide MenuSlide Menu
HTML HTML XHTMLXHTML Required HTML TagsRequired HTML Tags
XHTML RequirementsXHTML Requirements Creating a Web Page witCreating a Web Page with Notepadh Notepad
Formatting TagsFormatting Tags
Paragraph TagParagraph Tag Page Background ColorPage Background Color Anchor Tag for LinksAnchor Tag for Links
ListsLists Header TagsHeader Tags Further HTML Further HTML TrainingTraining
XHTML AdditionXHTML Addition DOCTYPE StatementDOCTYPE Statement Further XHTML TrainingFurther XHTML Training
XHTML ValidationXHTML Validation Viewing HTML SourceViewing HTML Source Transfer Files to Web SerTransfer Files to Web Serverver
TablesTables

HHyper yper TText ext MMarkup arkup LLanguageanguage
Every Web Page is Formatted with HTML Every Web Page is Formatted with HTML markup tagsmarkup tags
HTML Markup tags Tell a Browser How to HTML Markup tags Tell a Browser How to Display a Web PageDisplay a Web Page
A Web Page ALWAYS has a File Extension A Web Page ALWAYS has a File Extension of htm or htmlof htm or html
The Browser (ie Internet Explorer, The Browser (ie Internet Explorer, Netscape, Firefox) Reads the HTML tags Netscape, Firefox) Reads the HTML tags Sequentially From Top to Bottom and Sequentially From Top to Bottom and Formats the Page Based On What the Tags Formats the Page Based On What the Tags SaySay

XHTMLXHTML
EExxtensible tensible HHyperyperTText ext MMarkup arkup LLanguageanguage
Almost Identical to HTML 4.01Almost Identical to HTML 4.01 Stricter and Cleaner Version of HTMLStricter and Cleaner Version of HTML

What Do What Do HTMLHTML Tags Look Like? Tags Look Like?
HTML Tags Look Like:HTML Tags Look Like:<p> </p><p> </p> paragraph tagparagraph tag<b> </b><b> </b> bold tagbold tag<ul> </ul><ul> </ul> unordered list tagunordered list tag<li> </li><li> </li> list item taglist item tag
What is Common About HTML Tags?What is Common About HTML Tags?• Starting and Ending TagsStarting and Ending Tags• Data Between the Tags will be Formatted Data Between the Tags will be Formatted
According to the TagAccording to the Tag• The Starting Tag Starts the Type of Format; the The Starting Tag Starts the Type of Format; the
Ending Tag Stops the Type of FormatEnding Tag Stops the Type of Format

Required HTML TagsRequired HTML TagsThe Following HTML Tags are Required/Recommended for The Following HTML Tags are Required/Recommended for
Every We PagesEvery We Pages
<html><html> Every Web Page Starts with the Every Web Page Starts with the <html> tag<html> tag
<head><head> The Starting <head> tag always The Starting <head> tag always follows the <html> tagfollows the <html> tag
<title>My First Web Page</title><title>My First Web Page</title> The title tags encompass the title The title tags encompass the title of your pageof your page
</head></head> The Ending </head> tag The Ending </head> tag always follows the ending always follows the ending </title> tag</title> tag
<body> <body> Starting body tagStarting body tag
Everything that appears on a Everything that appears on a web page goes between the web page goes between the <body> and </body> tags<body> and </body> tags
</body></body> Ending body tagEnding body tag
</html></html> Ends every web pageEnds every web page

XHTML Additional RequirementsXHTML Additional Requirements All HTML Tags and Tag Elements Must be All HTML Tags and Tag Elements Must be
in lower-casein lower-case Every HTML Tag Must have a Starting Tag Every HTML Tag Must have a Starting Tag
AND an Ending TagAND an Ending Tag HTML Tags Must be Properly NestedHTML Tags Must be Properly Nested HTML Tag Attributes Must be in QuotesHTML Tag Attributes Must be in Quotes The Id attribute replaces the Name The Id attribute replaces the Name
AttributeAttribute The DOCTYPE Declaration Should be the The DOCTYPE Declaration Should be the
First Line in a XHTML DocumentFirst Line in a XHTML DocumentSlide Menu

Starting a Simple Web PageStarting a Simple Web Page Open NotepadOpen Notepad
Click Start Button, Click on All Programs, Click Click Start Button, Click on All Programs, Click on Accessories, Click on Notepadon Accessories, Click on Notepad
Slide Menu

Notepad OpensNotepad Opens
Save Your Web PageSave Your Web Page• Click File on the Menu Bar, Click Save, Click File on the Menu Bar, Click Save, Choose Choose
DesktopDesktop for Save in, type in Example1.htm in for Save in, type in Example1.htm in File Name and Click SaveFile Name and Click Save
• NOTE: We are Saving to the Desktop to Make NOTE: We are Saving to the Desktop to Make This Easy; You Would Normally Save to a This Easy; You Would Normally Save to a Folder of ChoiceFolder of Choice
Slide Menu

Type the Following HTML Tags into your Example1.htm Type the Following HTML Tags into your Example1.htm document. document.
Type in the Tags Exactly as You See Them AboveType in the Tags Exactly as You See Them Above To Comply with To Comply with XHTMLXHTML coding standards: coding standards:
• ALL xHTML tags MUST be in lower case ALL xHTML tags MUST be in lower case • ALL tags MUST have a starting tag and an ending tagALL tags MUST have a starting tag and an ending tag
Save Your Web PageSave Your Web PageClick File on the Menu Bar, Click SaveClick File on the Menu Bar, Click Save
Minimize the Notepad Window; We Will Come Back to ItMinimize the Notepad Window; We Will Come Back to It
Slide Menu

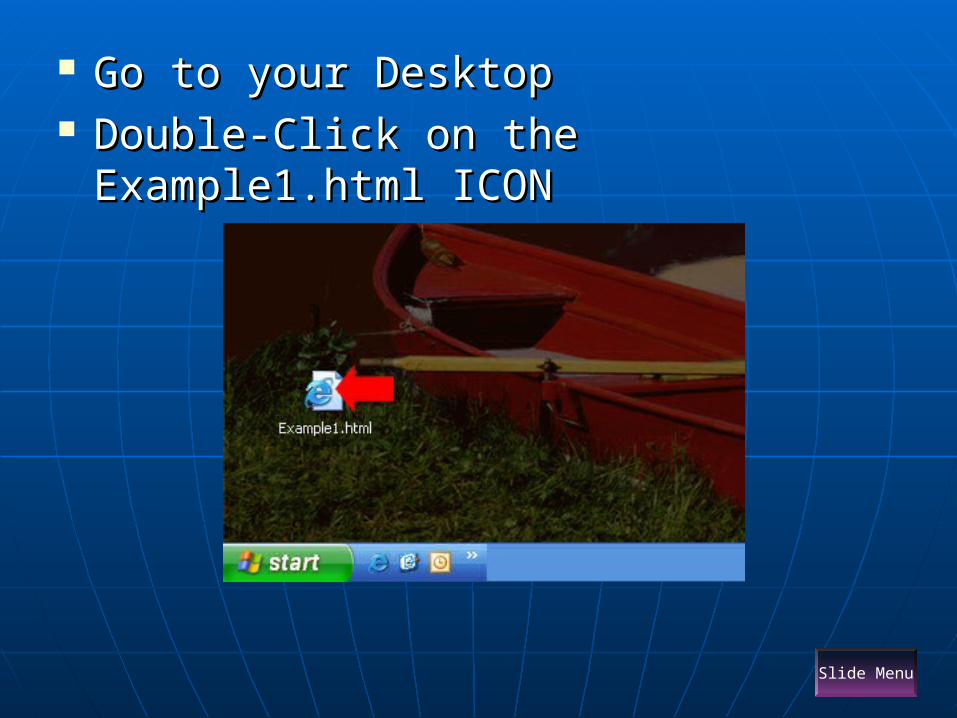
Go to your DesktopGo to your Desktop• You Should See the Example1.htm ICON on your You Should See the Example1.htm ICON on your
Desktop, Similar to that BelowDesktop, Similar to that Below• If you Don’t, Go Back to Slide 6 and Start OverIf you Don’t, Go Back to Slide 6 and Start Over
Double-Click on the Example1.htm ICONDouble-Click on the Example1.htm ICON
Slide Menu

View Your Lovely WorkView Your Lovely Work Your Browser Window Should Open with Your Browser Window Should Open with
Your Web Page Loaded in It.Your Web Page Loaded in It. It if Doesn’t, Go Back to Slide 7 and Make It if Doesn’t, Go Back to Slide 7 and Make
Sure You Saved Your Page CorrectlySure You Saved Your Page Correctly
Slide Menu

Add Formatting to TextAdd Formatting to Text Maximize Your Notepad WindowMaximize Your Notepad Window Change Your HTML Code To Add the Bold Tag or Other Text Change Your HTML Code To Add the Bold Tag or Other Text
Formatting Tag, and So It Looks Similar to the FollowingFormatting Tag, and So It Looks Similar to the Following
NOTE: The Yellow Background is Only to Highlight the NOTE: The Yellow Background is Only to Highlight the Inserted TagInserted Tag
When Done, Save Your Web Page and Minimize the When Done, Save Your Web Page and Minimize the Notepad WindowNotepad Window Slide Menu
Go to your DesktopGo to your Desktop Double-Click on the Example1.html Double-Click on the Example1.html
ICONICON
Slide Menu

View Your WorkView Your Work If You Did Everything Correctly, Your Web Page If You Did Everything Correctly, Your Web Page
Should Look Similar to the Following and Should Look Similar to the Following and My My FirstFirst should be in should be in BoldBold::
Slide Menu

Continuing With Your Web PageContinuing With Your Web Page Create Two Paragraphs with the Paragraph TagCreate Two Paragraphs with the Paragraph Tag
• Edit Your Example1.htm file in Notepad to add the two Edit Your Example1.htm file in Notepad to add the two Paragraph Tags that you See Below. Paragraph Tags that you See Below.
• Also add the <u></u> and <i></i> tags for Also add the <u></u> and <i></i> tags for UnderlineUnderline and and ItalicsItalics formatting. formatting.
• XHTML RULE: Tags MUST BE Properly Nested. If formatting XHTML RULE: Tags MUST BE Properly Nested. If formatting Starts with <i><u>, the Order of the Ending Tags Must Be: Starts with <i><u>, the Order of the Ending Tags Must Be: </u></i>.</u></i>.
• Save Your File and Minimize the Notepad WindowSave Your File and Minimize the Notepad Window
Slide Menu

View Your PageView Your Page
Go to Your Desktop and Double-Click the Go to Your Desktop and Double-Click the Example1.htm ICON. Your Webpage Should Look Example1.htm ICON. Your Webpage Should Look Similar to That Shown in the Image Below.Similar to That Shown in the Image Below.
If it Doesn’t Go Back to Slide 14 and Make If it Doesn’t Go Back to Slide 14 and Make CorrectionsCorrections
Slide Menu

Add a Background ColorAdd a Background Color A Webpage Background Color is Added with the bgcolor parameter A Webpage Background Color is Added with the bgcolor parameter
of the Body Tagof the Body Tag Colors are Entered as 6 character hexadecimal numbersColors are Entered as 6 character hexadecimal numbers Code Must Start with # and be enclosed in “”Code Must Start with # and be enclosed in “” Go to the Webmonkey site and pick a color that you like and jot Go to the Webmonkey site and pick a color that you like and jot
down the 6 character hexadecimal code associated with it.down the 6 character hexadecimal code associated with it. Save Your File and Minimize Your Notepad WindowSave Your File and Minimize Your Notepad Window
Slide Menu

View Your Web PageView Your Web Page Go to Your Desktop and Double-Click the Go to Your Desktop and Double-Click the
Example1.htm ICON. Your Webpage Should Example1.htm ICON. Your Webpage Should Look Similar to That Shown in the Image Below.Look Similar to That Shown in the Image Below.
If it Doesn’t Go Back to Slide 16 and Make If it Doesn’t Go Back to Slide 16 and Make CorrectionsCorrections
Slide Menu

Add a LinkAdd a Link
Links Are Created with the Anchor Tag: <a></a>Links Are Created with the Anchor Tag: <a></a> A Link to the Microsoft web site would look like: A Link to the Microsoft web site would look like:
<a href=“<a href=“http://www.microsoft.comhttp://www.microsoft.com/”>/”>Click hereClick here</a> </a> to go to the Microsoft Site.to go to the Microsoft Site.• This Represents a Link to an External Web SiteThis Represents a Link to an External Web Site• The Information Between the “ ” s is the Address of the Linked The Information Between the “ ” s is the Address of the Linked
to Pageto Page• The Information in The Information in YellowYellow and Between the > and </a> is and Between the > and </a> is
What Appears on the Web Page for the User to ClickWhat Appears on the Web Page for the User to Click A Link to Another Page Within the Same Web Site Might A Link to Another Page Within the Same Web Site Might
Look Like:Look Like:<a href=“computers.htm”><a href=“computers.htm”>Computers PageComputers Page</a></a>• Name of Page is computers.htmName of Page is computers.htm• No Path is Specified if page is within the same folder as calling No Path is Specified if page is within the same folder as calling
Web PageWeb Page• Computers Page is What Will Display on Calling Page for User Computers Page is What Will Display on Calling Page for User
to Clickto Click
Slide Menu

Try ItTry It Maximize Your Notepad Window with Maximize Your Notepad Window with
Example1.htm Open in ItExample1.htm Open in It Edit your HTML Code So That It Looks as Pictured Edit your HTML Code So That It Looks as Pictured
Below.Below. Save Your File and Minimize the Notepad WindowSave Your File and Minimize the Notepad Window
Slide Menu
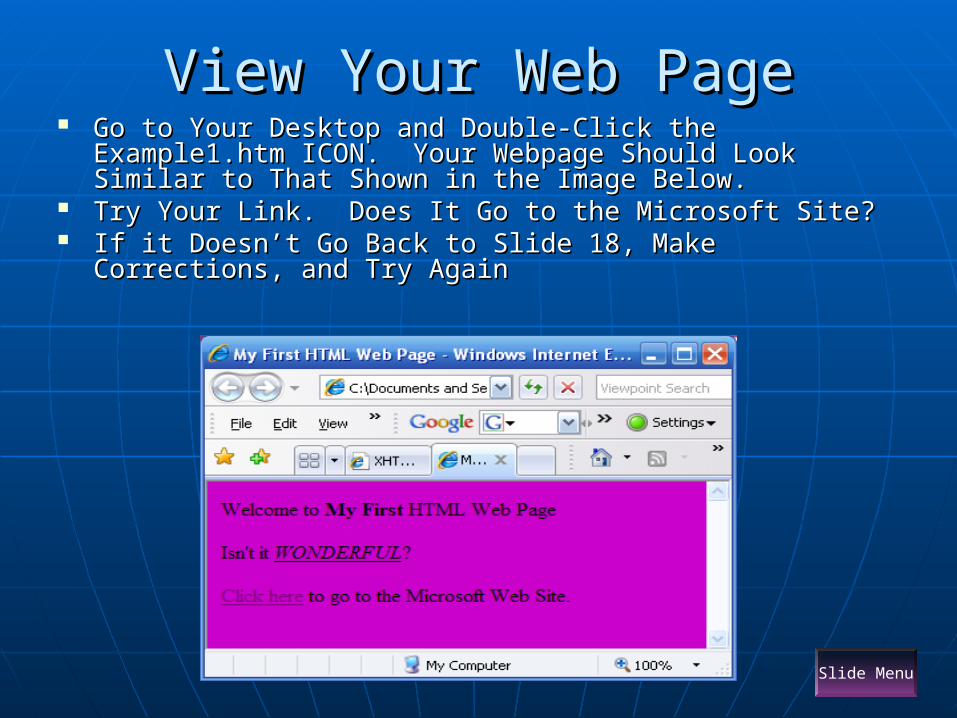
View Your Web PageView Your Web Page Go to Your Desktop and Double-Click the Example1.htm Go to Your Desktop and Double-Click the Example1.htm
ICON. Your Webpage Should Look Similar to That Shown in ICON. Your Webpage Should Look Similar to That Shown in the Image Below.the Image Below.
Try Your Link. Does It Go to the Microsoft Site?Try Your Link. Does It Go to the Microsoft Site? If it Doesn’t Go Back to Slide 18, Make Corrections, and Try If it Doesn’t Go Back to Slide 18, Make Corrections, and Try
AgainAgain
Slide Menu

Creating A ListCreating A List Ordered Lists (numbered) are Created with the OL Ordered Lists (numbered) are Created with the OL
and LI tags and LI tags • Example of Two Item Unordered ListExample of Two Item Unordered List
<p>Rivers</p><p>Rivers</p><ul><ul><li>Mississippi</li><li>Mississippi</li><li>Missouri</li><li>Missouri</li></ul></ul>
Unordered Lists (bulleted) are Created with the Unordered Lists (bulleted) are Created with the UL and LI tagsUL and LI tags• Example of Two Item Ordered ListExample of Two Item Ordered List
<p>Rivers</p><p>Rivers</p><ol><ol><li>Mississippi</li><li>Mississippi</li><li>Missouri</li><li>Missouri</li></ol></ol>
Slide Menu

Try ItTry It Maximize Your Example1.htm Notepad Window and Edit Your Maximize Your Example1.htm Notepad Window and Edit Your
HTML Source Code so That it Looks as Below.HTML Source Code so That it Looks as Below. Save Your File and Minimize Your Notepad WindowSave Your File and Minimize Your Notepad Window
Slide Menu

View Your PageView Your Page Go to Your Desktop Go to Your Desktop
and Double-Click and Double-Click the Example1.htm the Example1.htm ICON. Your ICON. Your Webpage Should Webpage Should Look Similar to Look Similar to That Shown in the That Shown in the Image Below.Image Below.
Do your Lists Look Do your Lists Look Similar?Similar?
If They Don’t Go If They Don’t Go Back to Slide 22, Back to Slide 22, Make Corrections, Make Corrections, and Try Againand Try Again
Slide Menu

Adding a Header TagAdding a Header Tag Header Tags are Used to Emphasize Header Tags are Used to Emphasize
Web Page Sections and Subsections Web Page Sections and Subsections in an Outline Fashionin an Outline Fashion
Header Tags Range From H1 to H6 Header Tags Range From H1 to H6 with H1 Being the Largest and H6 the with H1 Being the Largest and H6 the SmallestSmallest
Examples:Examples: <h1>Main Section</h1><h1>Main Section</h1> <h2>Sub-section</h2><h2>Sub-section</h2> <h3>Sub-sub-section</h3><h3>Sub-sub-section</h3>
Slide Menu

Try ItTry It Maximize your Example1.htm Notepad WindowMaximize your Example1.htm Notepad Window Edit Your HTML Code To Look as BelowEdit Your HTML Code To Look as Below Save Your File and Minimize the WindowSave Your File and Minimize the Window
Slide Menu

View Your WorkView Your Work Go to Your Desktop and Double-Click the Example1.htm Go to Your Desktop and Double-Click the Example1.htm
ICON. Your Webpage Should Look Similar to That Shown in ICON. Your Webpage Should Look Similar to That Shown in the Image Below.the Image Below.
Do You Notice the Heading Difference?Do You Notice the Heading Difference? If it Doesn’t Go Back to Slide 25, Make Corrections, and Try If it Doesn’t Go Back to Slide 25, Make Corrections, and Try
AgainAgain
Slide Menu

TablesTables Tables are Created with the Tables are Created with the
following tags:following tags:• TableTable• TR for table RowsTR for table Rows• TD for Table CellsTD for Table Cells
In the Example to the Right, a In the Example to the Right, a 3 Row, 3 Column Table is 3 Row, 3 Column Table is CreatedCreated• The Table is 500 pixels wideThe Table is 500 pixels wide• The Table has a border that is The Table has a border that is
1 pixel wide.1 pixel wide. Note: The Information Note: The Information
Between the <td> & </td> is Between the <td> & </td> is Just Padding; You Can Have Just Padding; You Can Have Anything You LikeAnything You Like
Open Your Example1.htm file Open Your Example1.htm file and add the tags for a table. and add the tags for a table. Put whatever data you want Put whatever data you want into the Cells. Save Your File.into the Cells. Save Your File.
See the W3Schools Tutorial See the W3Schools Tutorial Site for Additional Information Site for Additional Information on Creating Tables on Creating Tables
Slide Menu

View Your TableView Your Table Double-click on the Desktop ICON for Example1.htm to View Your Double-click on the Desktop ICON for Example1.htm to View Your
WorkWork It Should Look Similar to the FollowingIt Should Look Similar to the Following If It Doesn’t, Go Back and Review Your TagsIf It Doesn’t, Go Back and Review Your Tags
Slide Menu

Further HTML TrainingFurther HTML TrainingContinue Training at the W3Schools HTML Tutorial Site:Continue Training at the W3Schools HTML Tutorial Site:http://www.w3schools.com/html/default.asphttp://www.w3schools.com/html/default.asp
Slide Menu

XHTML Finishing TouchesXHTML Finishing Touches DOCTYPE Statement RequiredDOCTYPE Statement Required
• First Statement in XHTML Source CodeFirst Statement in XHTML Source Code• Three Document Type Definitions (DTD) SupportedThree Document Type Definitions (DTD) Supported
StrictStrict TransitionalTransitional FramesFrames
• Transitional is Most CommonTransitional is Most Common Fine for This ClassFine for This Class If Cascading Style Sheets (CSS) are Used, Strict DTD Should If Cascading Style Sheets (CSS) are Used, Strict DTD Should
be Usedbe Used <!DOCTYPE html PUBLIC "-//W3C//DTD XHTML 1.0 <!DOCTYPE html PUBLIC "-//W3C//DTD XHTML 1.0
Transitional//EN" Transitional//EN" "http://www.w3.org/TR/xhtml1/DTD/xhtml1-"http://www.w3.org/TR/xhtml1/DTD/xhtml1-transitional.dtd"> transitional.dtd">
Slide Menu

Add DOCTYPE StatementAdd DOCTYPE Statement Open Your Example1.htm Notepad Window and Open Your Example1.htm Notepad Window and
Edit Your HTML Code so That it Looks as BelowEdit Your HTML Code so That it Looks as Below Save Your Page, Minimize the Window, then Save Your Page, Minimize the Window, then
Check Your Web Page to Make Sure it OpensCheck Your Web Page to Make Sure it Opens
Slide Menu

Further XHTML TrainingFurther XHTML Training Continue Your XHTML Training at:Continue Your XHTML Training at:
http://www.w3schools.com/xhtml/default.asphttp://www.w3schools.com/xhtml/default.asp Tutorials From Introduction to Validation are RequiredTutorials From Introduction to Validation are Required
Slide Menu

XHTML ValidationXHTML Validation
Validate HTML Source Validate HTML Source CodeCode• Verifies If Source Code Verifies If Source Code
Conforms to XHTML Conforms to XHTML StandardsStandards
• Pinpoints ErrorsPinpoints Errors• Offers Offers
RecommendationsRecommendations Several Web Sites Several Web Sites
AvailableAvailable• Try: Try:
http://validator.aborla.nhttp://validator.aborla.net/et/
See Web Page Notes See Web Page Notes for Further Informationfor Further Information
Slide Menu

Viewing the HTML Source Code of Viewing the HTML Source Code of a Web Pagea Web Page
The HTML Code of any Web Page Can The HTML Code of any Web Page Can Easily be Viewed in a BrowserEasily be Viewed in a Browser
In IE, click In IE, click ViewView on the Menu Bar and on the Menu Bar and Select Select SourceSource
In Mozilla Firefox, click In Mozilla Firefox, click ViewView on the on the Menu Bar and Select Menu Bar and Select Page SourcePage Source
Slide Menu

Transfer Files to Web ServerTransfer Files to Web Server
Use a FTP Program To Transfer Student Use a FTP Program To Transfer Student Web Pages and Files to the Web ServerWeb Pages and Files to the Web Server• IE FTP ClientIE FTP Client• WS_FTPLEWS_FTPLE• FetchFetch
Most Assignments Also Need to be Posted Most Assignments Also Need to be Posted to the Assignment Dropbox in WebCTto the Assignment Dropbox in WebCT• Make Sure Your Page Has All RequirementsMake Sure Your Page Has All Requirements• Make Sure Your Link WorksMake Sure Your Link Works
That Wasn’t So Hard, Was ItThat Wasn’t So Hard, Was It
Slide Menu

SummarySummary
What is HTMLWhat is HTML HTML TagsHTML Tags Required HTML TagsRequired HTML Tags Creating a Web Page in NotepadCreating a Web Page in Notepad Viewing a Web Page in the BrowserViewing a Web Page in the Browser Submitting Your Web PageSubmitting Your Web Page
Slide Menu