creating a new vendor account - boston
TRANSCRIPT

Creating a New Vendor Account
Welcome to the City of Boston’s Supplier Portal. To apply for a City of Boston vendor ID number please
follow the detailed steps below.
1. Open your Internet browser and type in www.boston.gov/procurement and click on ‘Go to
Supplier Portal’
2. Click on the ‘Vendor Registration Form’ link near the bottom left to begin the registration
process.

3. First you must set up a user account. The Create a Vendor User Account form displays.
Complete all the required fields marked with an asterisk* and click ‘Submit’
Leave the Vendor ID field empty.
If the person registering has the authority to sign contracts check off the box indicating so.
This will give the user ID certain permissions in the system which will allow the City to send
this user contracts for electronic signature. It will also allow the user to access,
electronically sign and upload contracts back to the City of Boston.
You can choose
whatever you would
like as a User ID as
long as it is at least 7
characters in length.
Note: User ID’s are
CaSe SeNsEtIvE

4. Now you will create the vendor profile. Click on ‘Add/Update your Vendor Profile’
5. Click on ‘Add New Vendor’
6. Select Individual or Business and click ‘Next’

7. Complete all required fields. Only the fields marked with an asterisk* are required. Click ‘Next’.
A general email address for the company although not required is highly recommended.
In the NEW ADDRESS area check off the box or boxes that apply for that address.
You can add additional
addresses if necessary by clicking
the ‘+’ sign here. The new
address line fields will appear at
lower left. You may need to
scroll down a bit to see them.
You can add additional
contact names to the
account by clicking the ‘+’
sign here
If you elect to receive PO’s
via email (see check box
below) this is the email
address they will be sent to.
Once you check the ‘Ordering’ box the Purchase Order Dispatch
Method box displays. Please check off this box to receive your PO’s
via email (recommended). The PO’s are sent to the email address
in the Vendor Information box at the top of the page.

8. For faster payments complete the direct deposit (A.C.H.) information. When all information is
complete click on ‘Click to Sign’ then click ‘Next’.
(If you would rather receive a paper check via US mail you may Opt out of direct deposit by checking
the ‘Direct Deposit Opt Out’ box in the lower left of the screen).

9. Review the W-9 Certification information. To proceed, click the ‘Click Here to Acknowledge’
button and then click ‘Next’. If item 2 does not apply, check the check box as indicated.
10. Check the box to confirm that neither you nor the organization you represent are barred from
doing business with the City of Boston. Click ‘Next’.
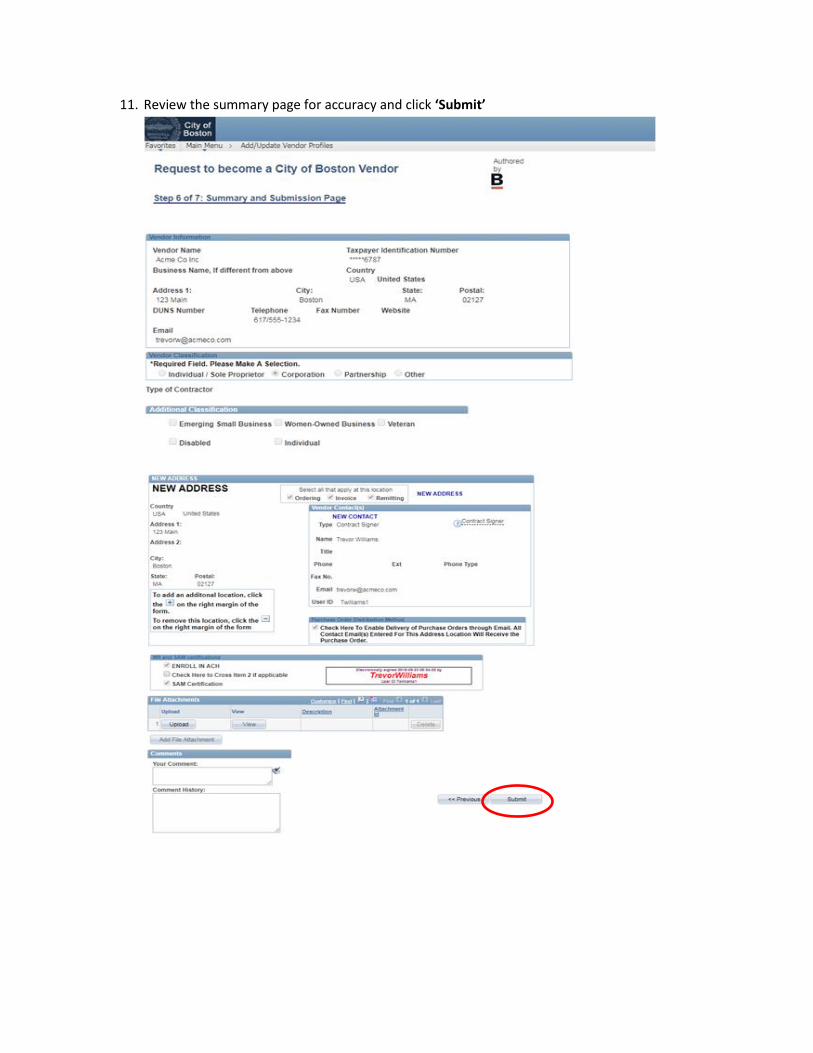
11. Review the summary page for accuracy and click ‘Submit’

12. Your vendor eForm will be forwarded to our auditing department for review. Once approved
you will receive your vendor ID number via email.
If you have any questions please don’t hesitate to contact supplier portal support at 617-635-4564. You can also contact us by sending an email to [email protected].
Thank you for using the City of Boston Supplier Portal!