create onlie offline webdynpro java
TRANSCRIPT

How-to GuideSAP NetWeaver ‘04
How To…Create Onlineand OfflineForms in WebDynpro forJava(Tips and Tricks on InteractiveForms Development Based onAdobe Software – Part 1)
Version 1.01 – January 2006
Applicable Releases:SAP NetWeaver ’04SAP Web Application Server 6.40

© Copyright 2006 SAP AG. All rights reserved.
No part of this publication may be reproduced ortransmitted in any form or for any purpose without theexpress permission of SAP AG. The informationcontained herein may be changed without prior notice.
Some software products marketed by SAP AG and itsdistributors contain proprietary software components ofother software vendors.
Microsoft, Windows, Outlook, and PowerPoint areregistered trademarks of Microsoft Corporation.
IBM, DB2, DB2 Universal Database, OS/2, ParallelSysplex, MVS/ESA, AIX, S/390, AS/400, OS/390, OS/400,iSeries, pSeries, xSeries, zSeries, z/OS, AFP, IntelligentMiner, WebSphere, Netfinity, Tivoli, and Informix aretrademarks or registered trademarks of IBM Corporationin the United States and/or other countries.
Oracle is a registered trademark of Oracle Corporation.
UNIX, X/Open, OSF/1, and Motif are registeredtrademarks of the Open Group.
Citrix, ICA, Program Neighborhood, MetaFrame,WinFrame, VideoFrame, and MultiWin are trademarksor registered trademarks of Citrix Systems, Inc.
HTML, XML, XHTML and W3C are trademarks orregistered trademarks of W3C®, World Wide WebConsortium, Massachusetts Institute of Technology.
Java is a registered trademark of Sun Microsystems, Inc.
JavaScript is a registered trademark of Sun Microsystems,Inc., used under license for technology invented andimplemented by Netscape.
MaxDB is a trademark of MySQL AB, Sweden.
SAP, R/3, mySAP, mySAP.com, xApps, xApp, SAPNetWeaver, and other SAP products and servicesmentioned herein as well as their respective logos aretrademarks or registered trademarks of SAP AG inGermany and in several other countries all over theworld. All other product and service names mentionedare the trademarks of their respective companies. Data
contained in this document serves informationalpurposes only. National product specifications may vary.
These materials are subject to change without notice.These materials are provided by SAP AG and its affiliatedcompanies ("SAP Group") for informational purposesonly, without representation or warranty of anykind, and SAP Group shall not be liable for errors oromissions with respect to the materials. The onlywarranties for SAP Group products and services are thosethat are set forth in the express warranty statementsaccompanying such products and services, if any.Nothing herein should be construed as constituting anadditional warranty.
These materials are provided “as is” without a warrantyof any kind, either express or implied, including but notlimited to, the implied warranties of merchantability,fitness for a particular purpose, or non-infringement.SAP shall not be liable for damages of any kind includingwithout limitation direct, special, indirect, orconsequential damages that may result from the use ofthese materials.SAP does not warrant the accuracy or completeness ofthe information, text, graphics, links or other itemscontained within these materials. SAP has no controlover the information that you may access through theuse of hot links contained in these materials and does notendorse your use of third party web pages nor provideany warranty whatsoever relating to third party webpages.SAP NetWeaver “How-to” Guides are intended tosimplify the product implementation. While specificproduct features and procedures typically are explainedin a practical business context, it is not implied that thosefeatures and procedures are the only approach in solvinga specific business problem using SAP NetWeaver. Shouldyou wish to receive additional information, clarificationor support, please refer to SAP Consulting.Any software coding and/or code lines / strings (“Code”)included in this documentation are only examples andare not intended to be used in a productive systemenvironment. The Code is only intended better explainand visualize the syntax and phrasing rules of certaincoding. SAP does not warrant the correctness andcompleteness of the Code given herein, and SAP shallnot be liable for errors or damages caused by the usage ofthe Code, except if such damages were caused by SAPintentionally or grossly negligent.

- 1 -
1 (Business) ScenarioHave you ever think that you can have your users fill out a PDF form and have the inputsautomatically kick-off some business processes in your backend? In NetWeaver 04, SAPprovides a new technology called Adobe Interactive Forms which allows such businessscenario. In this series of how-to paper, we will show you a step-by-step guideline ondeveloping a custom application using the Adobe Interactive Forms technology.
In this paper, in particular, we will focus on the creation of online interactive forms andoffline form.
2 IntroductionIn SAP Web Application Server 6.40 (SAP NetWeaver 04), it provides a new servicecalled Adobe Document Service for rendering and generating Adobe Forms. In this how-to paper, we will show you the basic steps you need for creating an Adobe InteractiveForm for online and offline scenarios.
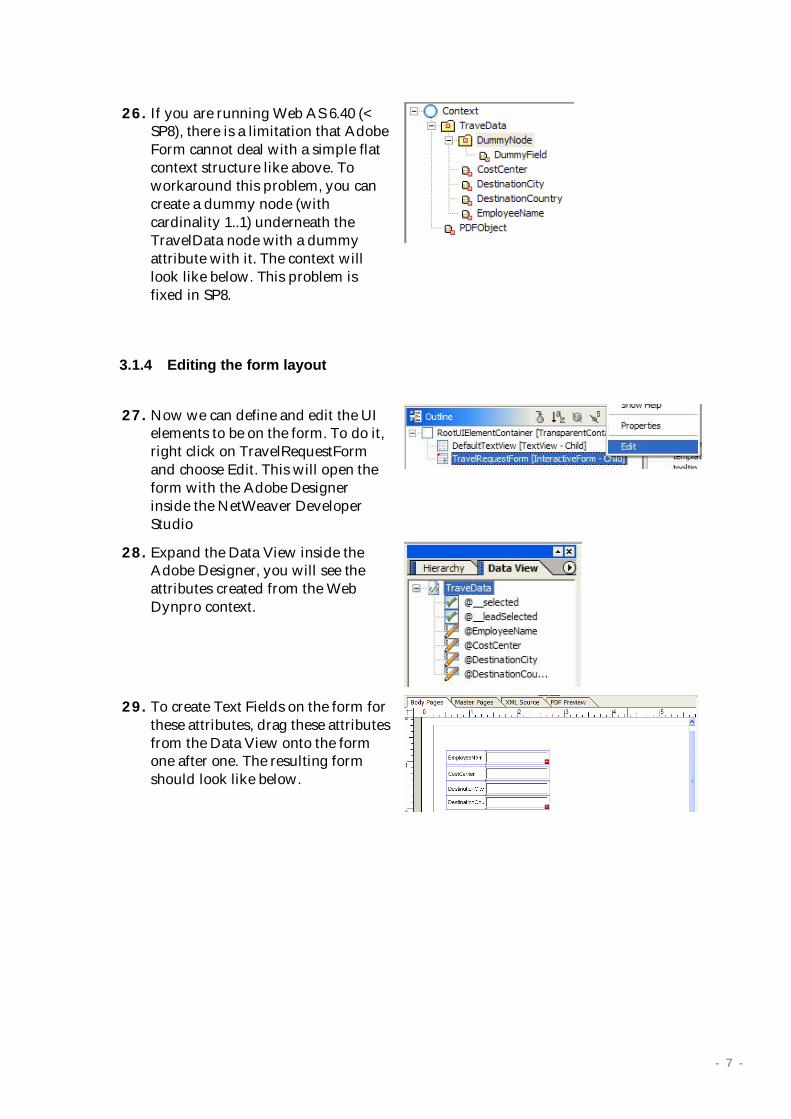
Remarks: the info in this document is based on the NetWeaver 04 release of SAP WebApplication Server 6.40.
Prerequisites
This paper assumes the readers have already had the basic concepts on Web Dynprodevelopment. The details of Web Dynpro’s terminologies and concepts will not beexplained in this paper. Users can refer to the corresponding Web Dynpro documents fordetails.
Users should have had SAP Web Application Server 6.40 – NetWeaver DevelopersWorkplace installed on his/her development machine. Details on installing NetWeaverDevelopers Workplace can be found in the installation guide of SAP Web ApplicationServer 6.40.
Adobe Document Service should have been installed and ready for use. The detail on theinstallation and configuration of Adobe Document Service can be found in the installationguide. On the developer’s machine, you need to have Adobe Reader (>= 6.0.2) andActiveX Control Framework installed. For details, please see the installation guideline.

- 2 -
3 The Step By Step Solution
3.1 PART 1 - Creating an Online Interactive Form
In this part of the paper, it will show the steps for creating an online interactive form inWeb Dynpro. As an example, we will build a simple interactive Travel Expense formwhich takes some user inputs from the form and have Web Dynpro display the info in asecond view.
3.1.1 Creating a Web Dynpro application
1. Start the SAP Web ApplicationServer and SAP NetWeaverDeveloper Studio if you haven’t doneso.
2. In SAP NetWeaver Studio, click onthe file menu File -> New -> WebDynpro Application.
3. In the Dialog Box, enter theTravelRequest as the name of theWeb Dynpro project name. Thenclick on Finish.

- 3 -
4. Expand the TravelRequest projectinside Web Dynpro Explorer, rightclick on Applications and chooseCreate Application.
5. Enter the following info for creatingthe application:
Name: TravelRequestApp
Package: com.sap.demo.travelrequest
After that, click on Next.
6. Choose to Create a New Componenton the following screen. Click onNext.
7. Change the component name toTravelRequestComp. Click onFinish.
8. This will create the Web Dynproapplication and a component inside.A default view for the componentwill also be generated.

- 4 -
3.1.2 Embedding an Interactive Form to a Web Dynpro View
9. Open the viewTravelRequestCompView by doubleclicking on it.
10. In the Layout of the view, right clickon the RootUIElementContainerinside the Outline view and selectInsert Child.
11. In the Type field, chooseInteractiveForm from the drop-down list. Enter TravelRequestFormas the Id. Click on Finish.
12. Go to the Properties ofTravelRequestForm, change theHeight to 500px and Width to 600px.

- 5 -
3.1.3 Defining context for the interactive formWe now need to define what data we want to show in the interactive form. Just like WebDynpro, the data are controlled by the Context in Web Dynpro. In this example, we willcreate several attributes in the Web Dynpro Context and will later on map these attributesto the corresponding fields in the interactive form
13. Click on the Context tab underneaththe view.
14. Right click on Context -> New ->Context Node.
15. Enter the name as TravelData, thenclick on Finish.
16. Go to the properties of theTravelData node, change theCardinality to 1..1. This is just tomake sure we have at least 1instance of the data.
17. Right click on the newly createdTravelData node, this time chooseNew -> Value Attribute.
18. Enter the attribute name asEmployeeName. Click on Finish tocreate the attribute.

- 6 -
19. Repeat step 17 and 18 to create 3more fields with names CostCenter,DestinationCity andDestinationCountry. The resultContext should look like below.
20. We need to create a PDF binaryobject field in the Context as well.This will be used for the interactiveform as a temporary placeholder forgenerating the form. To do it, rightclick on Context again and chooseValue Attribute.
21. Enter the name as PDFObject andclick on Finish. The attribute will becreated as below.
22. Go to the Properties of thePDFObject by right click on it andselect Properties. In the Properties,change the Type to binary.
23. Click on the Layout tab of the view.
24. Now we need to specify in theInteractive Form Properties to bindto these context. To do it go to theProperties of the TravelRequestForm(right click on it and chooseProperties).
25. Specify the followings in theproperties.
dataSource: TravelData
pdfSource: PDFObject
- 7 -
26. If you are running Web AS 6.40 (<SP8), there is a limitation that AdobeForm cannot deal with a simple flatcontext structure like above. Toworkaround this problem, you cancreate a dummy node (withcardinality 1..1) underneath theTravelData node with a dummyattribute with it. The context willlook like below. This problem isfixed in SP8.
3.1.4 Editing the form layout
27. Now we can define and edit the UIelements to be on the form. To do it,right click on TravelRequestFormand choose Edit. This will open theform with the Adobe Designerinside the NetWeaver DeveloperStudio
28. Expand the Data View inside theAdobe Designer, you will see theattributes created from the WebDynpro context.
29. To create Text Fields on the form forthese attributes, drag these attributesfrom the Data View onto the formone after one. The resulting formshould look like below.

- 8 -
30. Instead of just having the datadisplay/input from a text field, wecan change the properties to haveanother UI element associate with it.For example, we now want theDestinationCountry field to beinputted from a Drop-down Listinstead of from a Text Field. To do it,select the DestinationCountry fieldby clicking on it. On the right handcolumn under the Object tab -> Fieldtab, change the Type to Drop-downList.
31. We can also predefine certain valuesfor the Drop-down List. To do it,under the List Items in the Field tab,click on the + button and you candefine value for the list. Try to create3 countries like below.
3.1.5 Defining actions for the form
We can put buttons on the Interactive Form and specify actions to it on user’s clicking onthe button. In this example, we will create a Submit button on the form for formsubmission
32. Still inside the Adobe Designer, goto the Web Dynpro tab under theLibrary tab window.
33. Drag the Submit to SAP elementonto the Form like below.

- 9 -
34. Now we need to action to thisbutton. To do it, go back to theTravelRequestCompView and clickon the Actions tab.
35. Under Actions, click on the Newbutton.
36. Create an Action calledFormSubmit. Click on Finish whendone.
37. Click on the Layout tab again and goto the Properties of theTravelRequestForm (by right clickon it and choose properties). UnderEvent -> onSubmit, chooseFormSubmit.
38. To do the code implementation ofthe action, click on theImplementation tab. Then go to theonActionFormSubmit() method.
39. As an example, we will just displaythe inputted data as a message fromWeb Dynpro. Enter the followingcodes in the onActionFormSubmit()method.
<Please refer to Appendix 1 for the samplecodes>
- 10 -
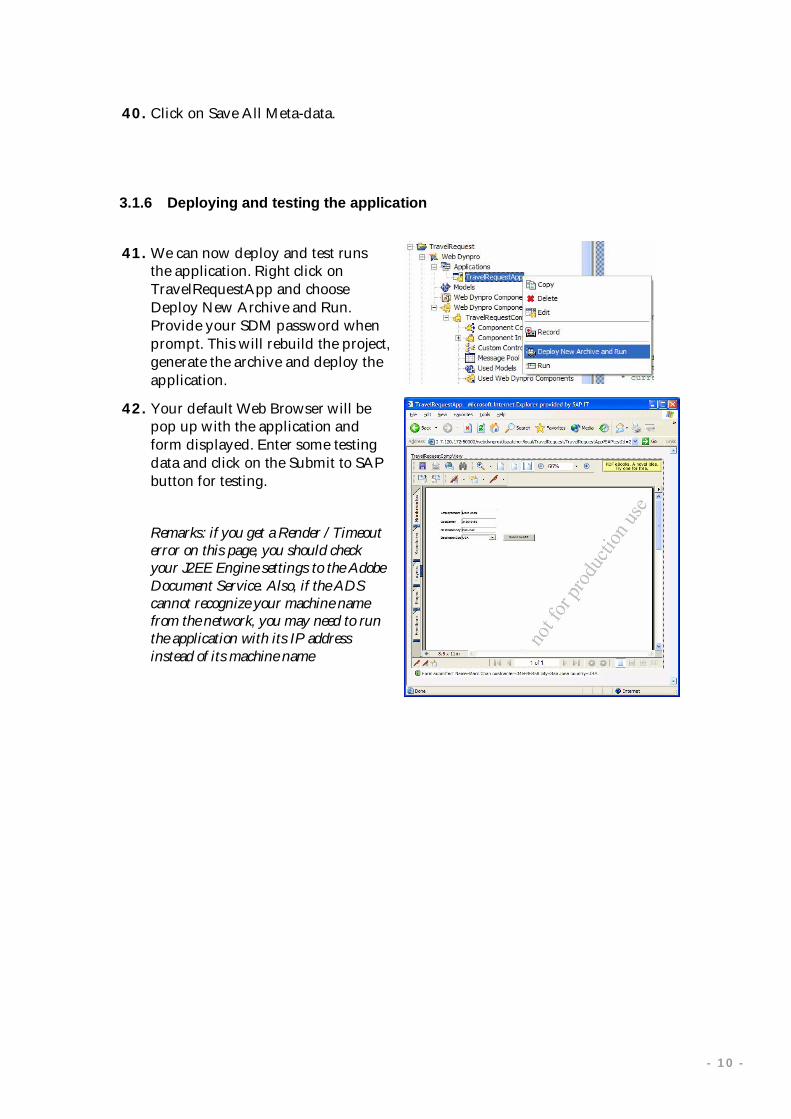
40. Click on Save All Meta-data.
3.1.6 Deploying and testing the application
41. We can now deploy and test runsthe application. Right click onTravelRequestApp and chooseDeploy New Archive and Run.Provide your SDM password whenprompt. This will rebuild the project,generate the archive and deploy theapplication.
42. Your default Web Browser will bepop up with the application andform displayed. Enter some testingdata and click on the Submit to SAPbutton for testing.
Remarks: if you get a Render / Timeouterror on this page, you should checkyour J2EE Engine settings to the AdobeDocument Service. Also, if the ADScannot recognize your machine namefrom the network, you may need to runthe application with its IP addressinstead of its machine name

- 11 -
3.2 PART 2 - Creating an Offline Form
In this part of the paper, you will modify the interactive form created in part 1 to take careof offline scenario.
3.2.1 Obtaining a PDF with Adobe Reader’s right
43. Adobe Document Service cangenerate Adobe Forms with AdobeReader’s Right so that users can useAdobe Reader to render the form.
The first thing you need to do foroffline scenario is to provide anoffline form with Adobe Reader’sright. To convert our existing formto an offline form with the right, justrun the application again. Then clickon the Save button from the AdobeReader when displaying the form,and save the PDF file for offlinedownload.
3.2.2 Creating a Web Dynpro view for form upload
In offline scenario, users fill out the form offline and upload the form back to the WebDynpro application for submission. To do it, we will create an UploadView in WebDynpro to take care of the upload.
44. Go back to the TravelRequestproject, expand until you seeTravelRequestComp underWindows. Right click on Windowsand select Embed View.

- 12 -
45. Select Embed new View, click onNext.
46. Provide View Name as UploadView.Click on Finish.
47. In the Diagram View, right click onthe box of UploadView and chooseProperties.

- 13 -
48. In the properties, change the Defaultfield to True.
49. We need to specify the flow thatafter uploading the form, users candisplay it as if an online interactiveform. To do it, we need to define anavigation flow from theUploadView to theTravelRequestCompView.
50. Create an Outbound Plug calledOutToDisplay on UploadView.Create an Inbound Plug calledInFromUpload on theTravelRequestCompView. Create aNavigation Link between theseplugs. The result should look likebelow.
3.2.3 Editing the Upload View
51. In the UploadView, we need toprovide the user interface for theusers to upload the filled form anddisplay it.
Double click on UploadView toopen it. Go to the Layout tab.
52. Place a FileUpload UI element onthe view. To do it, right click onRootUIElemetContainer and chooseInsert Child.

- 14 -
53. Choose the Type FileUpload. Specifythe Id as FormUpload. Click onFinish.
54. Click on the Context tab. Create aValue Attribute called pdfObjectunder the root with binary type.
55. Click on the Layout tab again, in theProperties of FormUpload, set theData field to pdfObject.
56. Create another Button on theUploadView called DisplayForm.
57. Go to the Actions tab, create anaction called ShowForm. To do itclick on the New button. InputShowForm as the action name. Onthe Fire Plug field, chooseOutToDisplay. Click on Finish.

- 15 -
58. Go back to the Layout tab, specifythe followings on the Properties ofthe DisplayForm button.
Text: Display Form
onAction: ShowForm
3.2.4 Transferring the uploaded form for display
To make the uploaded form be able to display on the TravelRequestCompView, we needto create a Web Dynpro Controller to control the flow of the pdfObject.
59. Open the Component Controller bydouble clicking on ComponentController.
60. Under the Context, create a newValue Attribute called pdfObjectwith type binary.
61. Open the TravelRequestCompViewand go to the Properties tab. Add theTravelRequestComp –com.sap.demo.travelrequest as thecontroller for this view.
62. Go to the Context tab. Right click onpdfObject on the left and chooseEdit Context Mapping. ChoosepdfObject on the following dialogbox.
63. Go back to UploadView and click onthe Properties tab.

- 16 -
64. Under Required Controller, click onAdd. Choose TravelRequestComp –com.sap.demo.travelrequest. ClickOK.
65. Go to the Implementation tab. Addthe following line of code to themethod wdDoInit.
wdContext.getNodeInfo().getAttribute("pdfObject").getModifiableSimpleType();
66. Add the following line of code rightbeforewdThis.wdFirePlugOutToDisplay()in the method onActionShowForm().
wdThis.wdGetTravelRequestCompController().wdGetContext().currentContextElement().setPdfObject(wdContext.currentContextElement().getPdfObject());
3.2.5 Modifying the online view to display the uploaded form
We now need to specify in the TravelRequestCompView to display the uploaded formand not the online interactive form.
67. Go to the Layout ofTravelRequestCompView.
68. Go to the Properties ofTravelRequestForm. Change theMode to usePdf.
69. Click on Save All Meta-data.
- 17 -
3.2.6 Deploying and testing the offline scenario
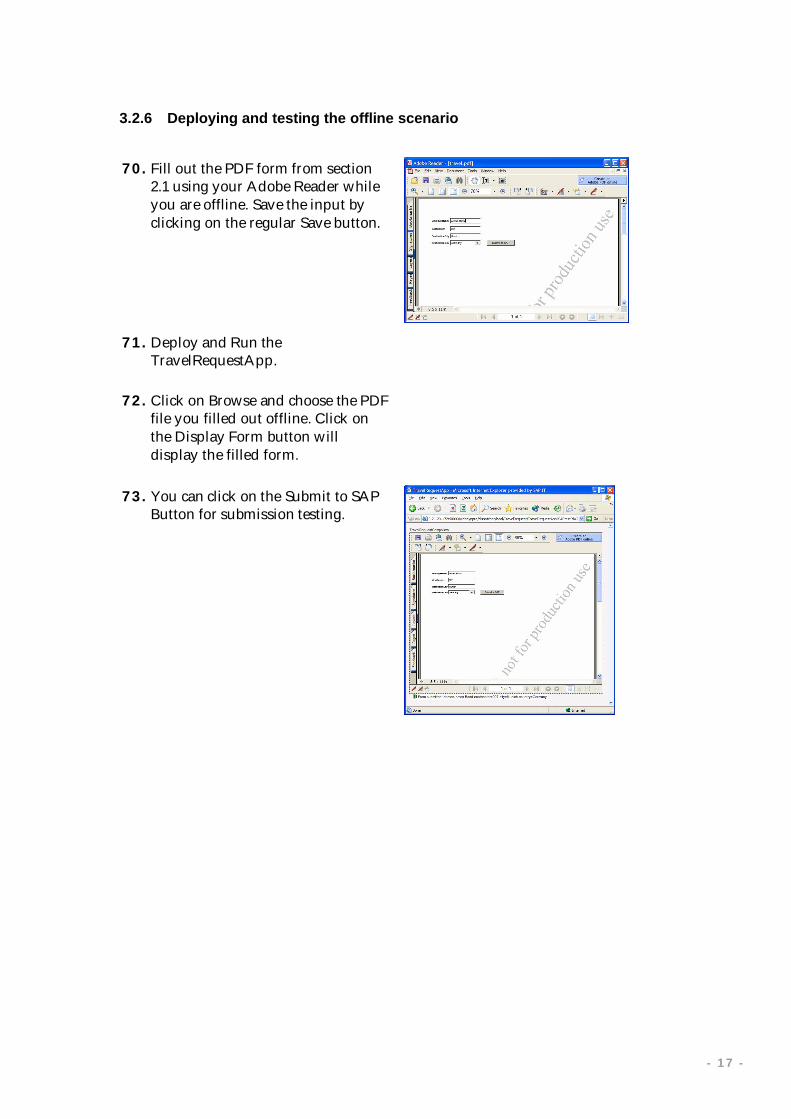
70. Fill out the PDF form from section2.1 using your Adobe Reader whileyou are offline. Save the input byclicking on the regular Save button.
71. Deploy and Run theTravelRequestApp.
72. Click on Browse and choose the PDFfile you filled out offline. Click onthe Display Form button willdisplay the filled form.
73. You can click on the Submit to SAPButton for submission testing.

- 18 -
4 Appendix
4.1 4.1 Appendix 1 – sample code for form submit
public void onActionFormSubmit(com.sap.tc.webdynpro.progmodel.api.IWDCustomEventwdEvent ) {
//@@begin onActionFormSubmit(ServerEvent)String name = wdContext.currentTraveDataElement().getEmployeeName();String costcenter = wdContext.currentTraveDataElement().getCostCenter();String city = wdContext.currentTraveDataElement().getDestinationCity();String country =
wdContext.currentTraveDataElement().getDestinationCountry();wdThis.wdGetAPI().getComponent().getMessageManager().reportSuccess(
"Form submitted: Name="+ name+ " costcenter="+ costcenter+ " city="+ city+ " country="+ country);
//@@end }
