create a new drawback submission · create a new drawback submission . company/address detail...
TRANSCRIPT

Formulas Online
Create a New Drawback Submission Follow these steps to create a new Formula and Process for Nonbeverage Product Request (Drawback) submission:
1. Select Formula and Process for Nonbeverage Product from the New drop-down menu. See Figure 1.
Figure 1: Create a New Drawback – Select New Drop-Down Menu
The Company modal window displays. See Figure 2.
Figure 2: Create a New Drawback – Select Company Name
►Note: Fields marked with asterisks (*) are required fields.
2. Select the name for the company for which you are creating this submission. The system pre-populates the company address information. See Figure 3.

Create a New Drawback Submission
Figure 3: Create a New Drawback – Address Fields
3. Edit Submitter mailing address information if applicable.
►Note: Fields marked with asterisks (*) are required fields.
►Note: Company address information is not editable.
►Note: By default, the Create New Formula radio button is selected. If you wish to supersede an existing formula, select the Supersede Existing Formula radio button. You will be prompted to populate the information noted in Superseded Formula.
4. Select the Continue button and proceed to Company/Address Detail. The Company tab displays with the address information added. See Figure 4.
Page 2

Create a New Drawback Submission
Company/Address Detail
Figure 4: Create a New Drawback – Company Tab with Company Address Added
►Note: Whenever you see a Company or Address screen, you will also see the Start Date and End Date fields. These fields indicate the dates during which the entity (generally the Manufacturer) had ownership of a given submission or formula and/or when a given address was active and/or valid (for any submission type). The majority of submissions will never show an End Date. End Dates are generated only when formulas are adopted by, transferred to, or removed from, a given company. This is referred to as formula adoption.
►Note: Please contact ALFD directly if you need assistance with formula adoption. Your e-mail request should include information for both the sending and receiving companies (company names, company codes, permit numbers, formula numbers, and dates of adoption, removal, or transfer) involved for both the sending and receiving companies.
1. Confirm the Company/Address Detail information.
►Note: Select the Address Type link to edit any necessary information for the address type. You cannot edit the Manufacturer address, but you may add a different one and then delete the one you have selected. Select the checkbox next to the address and select the Delete button to delete the address. A confirmation message box displays prompting you to confirm your action. See Figure 5. Select the OK button to confirm.
Page 3

Create a New Drawback Submission
Figure 5: Create a New Drawback – Delete Address Confirmation
2. Select the Add button to add a new address. The Address modal window displays. See
Figure 6.
Figure 6: Create a New Drawback – Address Modal Window
3. Select the address type from the Address Type drop-down list. See Figure 7. The system
displays the address fields. See Figure 8.
Figure 7: Create a New Drawback – Address Type
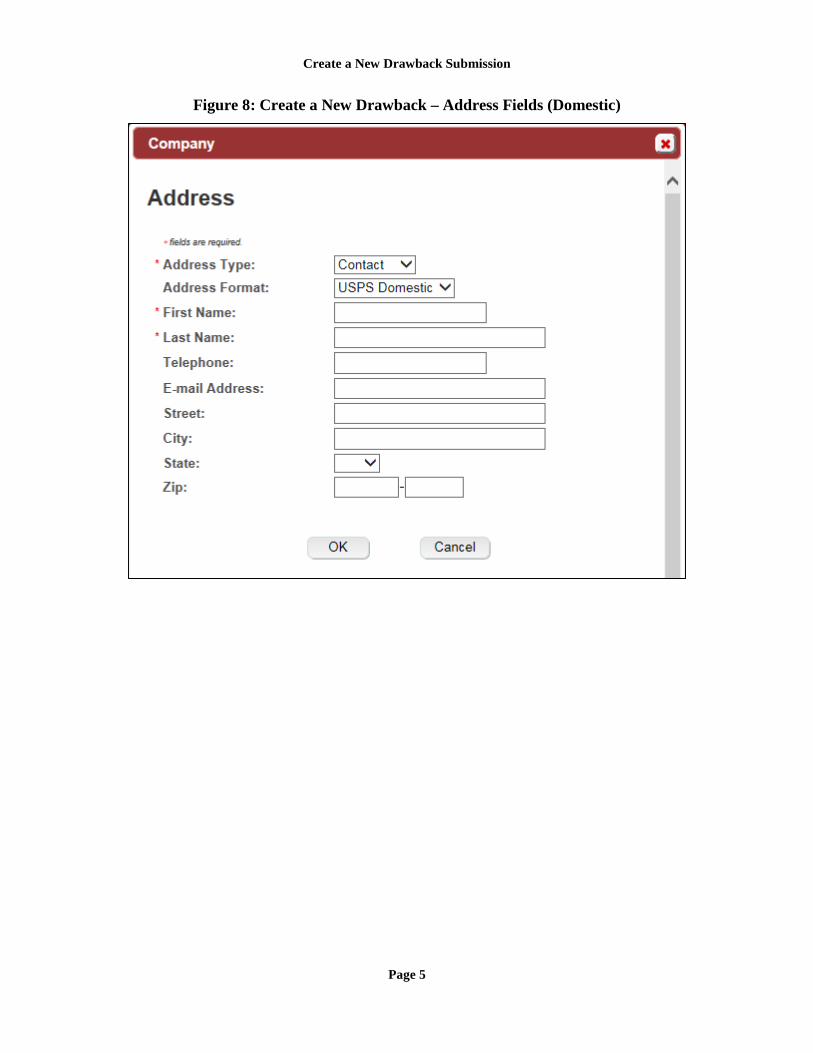
4. Enter the company address information in the available fields. See Figure 8. If you select
Foreign for Address Format, additional address fields display. See Figure 9.
Page 4
Create a New Drawback Submission
Figure 8: Create a New Drawback – Address Fields (Domestic)
Page 5

Create a New Drawback Submission
Figure 9: Create a New Drawback – Address Fields (Foreign)
►Note: Fields marked with asterisks (*) are required fields.
5. Select the OK button. The Address modal window closes and the Company tab displays with the address information added.
6. Repeat the steps for all additional addresses needed for the submission.
►Note: If you add any company for which you are not an authorized Submitter, even after you have either started with or entered one for which you are an authorized Submitter, you will not be able to submit the submission. You will only be able to save as draft.
7. Select the Next button. The Main tab displays. See Figure 11.
►Note: For convenience, the system displays Contacts information at the bottom of the Main tab as well as on the Company tab. See Figure 10.
Page 6

Create a New Drawback Submission
Contacts
Figure 10: Create a New Drawback – Contacts
1. Confirm Contacts information (if any).
2. Add, edit, or delete Contacts through the Company tab if applicable following the steps in Company/Address Detail.
Main Tab
Figure 11: Create a New Drawback – Main Tab
►Note: Fields marked with asterisks (*) are required fields.
1. Create a new formula or supersede an existing formula.
a. If you are creating a new formula:
i. Enter the Company Formula Number in the text box to the right of the Company Formula #. This must be a numeric value.
b. If you are superseding an existing formula:
i. Select the Supersede Existing Formula radio button. The Supersedes Formula fields display below the radio buttons. See Figure 12.
Page 7

Create a New Drawback Submission
Superseded Formula
►Note: You may change the submission from Supersede to New by selecting the Create New Formula radio button. You will not be able to change the submission from Supersede to New until you delete any superseded formula information.
►Note: A single formula may supersede multiple formulas.
Figure 12: Create a New Drawback – Supersedes Formula Fields
1. Select the Add button. The Superseded Formula modal window displays. See Figure 13.
Figure 13: Create a New Drawback – Superseded Formula Modal Window
2. Select the Closed TTB Formula ID or Closed Company Formula #.
or
3. Enter the TTB Formula ID.
or
4. Select the Company Code and enter the Company Formula #.
5. Select the OK button. The Superseded Formula modal window closes and the Main tab displays with the superseded formula added. See Figure 14.
Figure 14: Create a New Drawback – Superseded Formula Added
Page 8

Create a New Drawback Submission
►Note: Select the checkbox next to the superseded formula and select the Delete button to delete the superseded formula. A confirmation message box displays prompting you to confirm your action. See Figure 15. Select the OK button to confirm.
Figure 15: Create a New Drawback – Delete Superseded Formula Confirmation
►Note: You may add additional superseded formulas by selecting the Add button to display the Superseded Formula modal window and following Steps 1 – 5.
Product Type
Figure 16: Create a New Drawback – Product Type Specified
►Note: Fields marked with asterisks (*) are required fields.
1. Enter the Product Name in the available field.
2. Select the Product Type from the Product Type drop-down list. See Figure 17.
Figure 17: Create a New Drawback – Product Type Drop-Down List
►Note: If you select the product type “Dietary Supplement,” it will automatically default the process type of the Drawback submission to “Dietary Supplement” in the Formula tab. This will display Dietary Supplement-specific fields.
3. Enter the Kind of Spirits On Which Drawback Will Be Claimed in the available field.
4. Select the Next button. The Formula tab displays. See Figure 18 and Figure 19.
Page 9

Create a New Drawback Submission
Formula Tab
Figure 18: Create a New Drawback – Formula Tab (Top)
Page 10

Create a New Drawback Submission
Figure 19: Create a New Drawback – Formula Tab (Bottom)
Follow these steps to add formula information to the submission:
1. Select your process type.
2. Enter information applicable to your selected process type. Required fields and sections vary depending upon the selected process type. The sections available are as follows:
a. Summary – All process types
b. Alcoholic Beverage Use – All process types
c. Alcoholic Components/Compounded Flavors – All process types except Dietary Supplements
d. Nonalcoholic Components – All process types except Dietary Supplements
e. Dietary Supplement Components – Dietary Supplements only
f. Additional Details – All process types
Page 11

Create a New Drawback Submission
Summary
Figure 20: Create a New Drawback – Summary
Follow these steps to add summary information to the submission:
1. Enter summary information applicable to your selected process type.
►Note: Fields marked with asterisks (*) are required fields.
►Note: Measurements Used will pre-populate the type of Units of Measurement used in the Ingredients pop-up windows.
2. Optional Step: Select the checkbox next to Is calculated alcohol content of finished product not the same as declared alcohol content? to display applicable and complete fields.
Figure 21: Create a New Drawback – Calculated Not Same As Declared Alcohol Content Fields
Process Type
Follow these steps to add process type information to the submission:
1. Select the process type from the Process Type drop-down list. See Figure 22.
Figure 22: Create a New Drawback – Process Type Drop-Down List
►Note: The default selection is “Dietary Supplements” if “Dietary Supplements” was selected as a product type in the Main tab. “Dietary Supplements” will not display as an option in the Process Type drop-down list if it was not selected as a product type.
Page 12

Create a New Drawback Submission
►Note: The primary difference between pop-up windows fields between Simple Mixture/Filtration and Washed Extracts is that Washed Extracts pop-up windows will include a checkbox for whether the ingredient is soluble. A process type of “Other” will contain all possible fields except Dietary Supplement-specific fields.
Alcoholic Beverage Use
Figure 23: Create a New Drawback – Alcoholic Beverage Use
Follow these steps to add alcoholic beverage use information to the submission:
1. Add alcoholic beverage use information.
a. Select the checkbox to indicate whether the finished product is to be used in alcoholic beverage. The subsequent fields only display if this checkbox is selected.
b. Select the checkbox to indicate whether the product contains natural flavoring.
c. Select the checkbox to indicate whether the product contains > 0.1% artificial flavoring.
d. Select the checkbox to indicate whether the product contains a color additive and, if so, enter name of additive. The additive field only displays if this checkbox is selected.
e. Select the checkbox to indicate whether all FDA Approved Ingredients are without limitation.
f. Enter the Parts Per Million (PPM) for the TTB Limited Ingredients listed.
►Note: You may enter a Parts Per Million (PPM) value of up to 999,999 in all TTB Limited Ingredients fields.
Page 13

Create a New Drawback Submission
Alcoholic Components/Compounded Flavors
Figure 24: Create a New Drawback – Alcoholic Components/Compounded Flavors
Follow these steps to add alcoholic components/compounded flavors ingredient information to the submission:
1. Add all alcoholic components/compounded flavors ingredient information.
a. Alcoholic Components (Eligible Alcohol)
b. Alcoholic Components (Disapproved Intermediates)
c. Alcoholic Components (Ineligible Alcohol)
Alcoholic Components (Eligible Alcohol)
Figure 25: Create a New Drawback – Alcoholic Components (Eligible Alcohol) for Simple Mix or Filtration
Page 14

Create a New Drawback Submission
Figure 26: Create a New Drawback – Alcoholic Components (Eligible Alcohol) for Washed Extracts
Follow these steps to add alcoholic components (eligible alcohol) ingredient information to the submission:
1. Select the checkbox to indicate that the product contains eligible alcohol.
2. Select the Add button. The Alcoholic Components (Eligible Alcohol) pop-up window displays. See Figure 25 and Figure 26.
3. Enter the required alcoholic components (eligible alcohol) ingredient information.
►Note: Fields marked with asterisks (*) are required fields.
4. Select the OK button. The Alcoholic Components (Eligible Alcohol) pop-up window closes and the Formula tab displays. The ingredient is added in the Eligible Alcohol section. See Figure 27.
Figure 27: Create a New Drawback – Alcoholic Components (Eligible Alcohol) Information Added
5. Repeat the steps to add all alcoholic components (eligible alcohol) ingredient information.
Page 15

Create a New Drawback Submission
►Note: Select the Ingredient link to display the Alcoholic Components (Eligible Alcohol) pop-up window and edit the alcoholic components (eligible alcohol) ingredient information. Select the checkbox next to the alcoholic components (eligible alcohol) ingredient and select the Delete button to delete the ingredient. A confirmation message box displays prompting you to confirm your action. See Figure 28. Select the OK button to confirm.
Figure 28: Create a New Drawback – Delete Alcoholic Components (Eligible Alcohol) Ingredient Confirmation
Alcoholic Components (Disapproved Intermediates)
Figure 29: Create a New Drawback – Alcoholic Components (Disapproved Intermediates) for Simple Mix or Filtration
Page 16
Create a New Drawback Submission
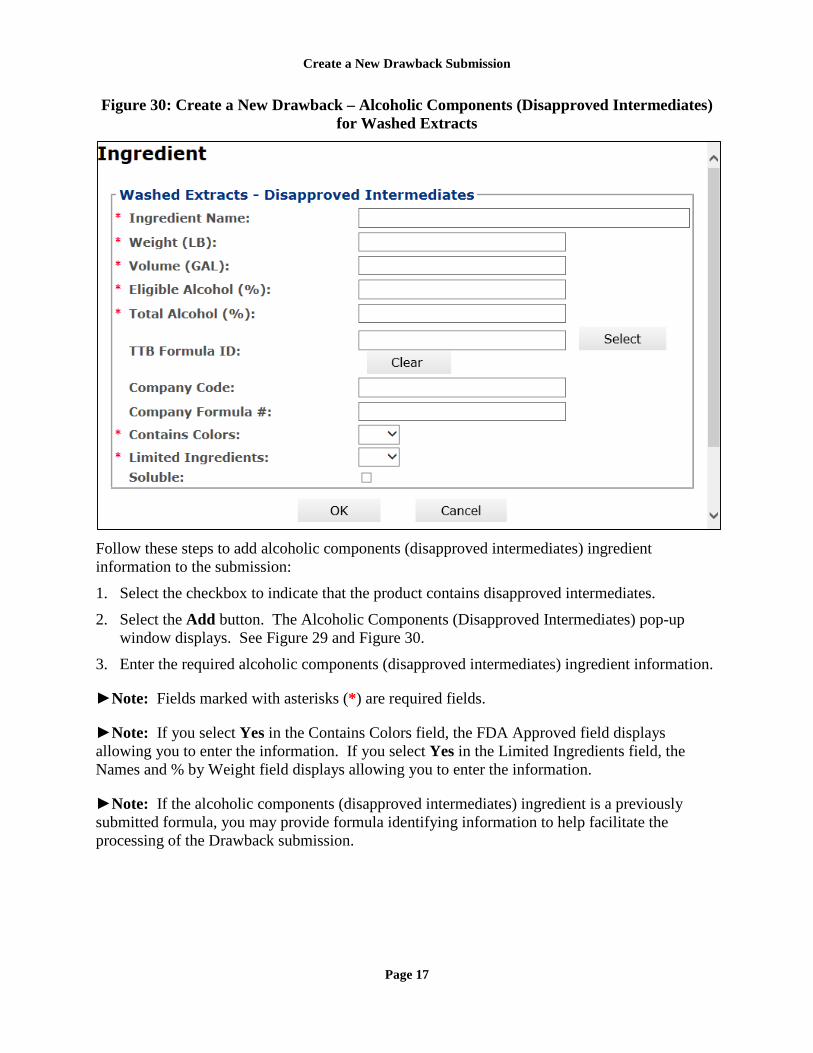
Figure 30: Create a New Drawback – Alcoholic Components (Disapproved Intermediates) for Washed Extracts
Follow these steps to add alcoholic components (disapproved intermediates) ingredient information to the submission:
1. Select the checkbox to indicate that the product contains disapproved intermediates.
2. Select the Add button. The Alcoholic Components (Disapproved Intermediates) pop-up window displays. See Figure 29 and Figure 30.
3. Enter the required alcoholic components (disapproved intermediates) ingredient information.
►Note: Fields marked with asterisks (*) are required fields.
►Note: If you select Yes in the Contains Colors field, the FDA Approved field displays allowing you to enter the information. If you select Yes in the Limited Ingredients field, the Names and % by Weight field displays allowing you to enter the information.
►Note: If the alcoholic components (disapproved intermediates) ingredient is a previously submitted formula, you may provide formula identifying information to help facilitate the processing of the Drawback submission.
Page 17

Create a New Drawback Submission
►Note: You may search for a submission and populate the existing formula information (e.g., TTB Formula ID, Company Code, and Company Formula ID). Alternately, you may enter the Company Code and Company Formula # directly on the Alcoholic Components (Disapproved Intermediates) pop-up window.
4. Optional Step: Select the Select button next to TTB Formula ID. The Search Formulas pop-up window displays. See Figure 31.
Figure 31: Create a New Drawback – Search Formulas Pop-Up Window
a. Enter the search criteria in the available fields.
b. Select Search button. The Formulas Search Results pop-up window displays. See Figure 32.
Figure 32: Create a New Drawback – Formulas Search Results Pop-Up Window
c. Select the TTB Formula ID link. The Formulas Search Results pop-up window closes
and the Alcoholic Components (Disapproved Intermediates) pop-up window displays. The TTB Formula ID, Company Code, and Company Formula ID fields are populated. Select the Clear button to clear the fields.
5. Select the OK button. The Alcoholic Components (Disapproved Intermediates) pop-up window closes and the Formula tab displays. The ingredient is added in the Disapproved Intermediates section. See Figure 33.
Page 18
Create a New Drawback Submission
Figure 33: Create a New Drawback – Alcoholic Components (Disapproved Intermediates) Information Added
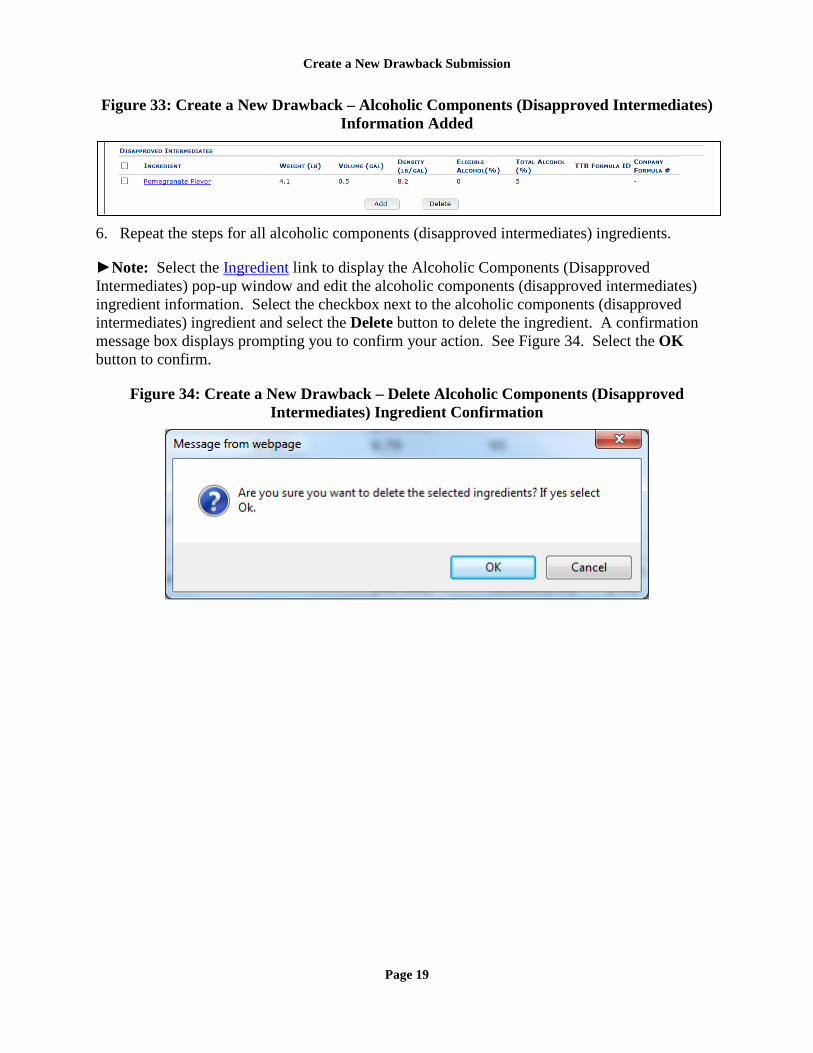
6. Repeat the steps for all alcoholic components (disapproved intermediates) ingredients.
►Note: Select the Ingredient link to display the Alcoholic Components (Disapproved Intermediates) pop-up window and edit the alcoholic components (disapproved intermediates) ingredient information. Select the checkbox next to the alcoholic components (disapproved intermediates) ingredient and select the Delete button to delete the ingredient. A confirmation message box displays prompting you to confirm your action. See Figure 34. Select the OK button to confirm.
Figure 34: Create a New Drawback – Delete Alcoholic Components (Disapproved Intermediates) Ingredient Confirmation
Page 19

Create a New Drawback Submission
Alcoholic Components (Ineligible Alcohol)
Figure 35: Create a New Drawback – Alcoholic Components (Ineligible Alcohol) for Simple Mixture or Filtration
Figure 36: Create a New Drawback – Alcoholic Components (Ineligible Alcohol) for
Washed Extracts
Page 20

Create a New Drawback Submission
Follow these steps to add alcoholic components (ineligible alcohol) ingredient information to the submission:
1. Select the checkbox to indicate that the product contains ineligible alcohol.
2. Select the Add button. The Alcoholic Components (Ineligible Alcohol) pop-up window displays. See Figure 35 and Figure 36.
3. Enter the required alcoholic components (ineligible alcohol) ingredient information.
►Note: Fields marked with asterisks (*) are required fields.
►Note: If you select Yes in the Contains Colors field, the FDA Approved field displays allowing you to enter the information. If you select Yes in the Limited Ingredients field, the Names and % by Weight field displays allowing you to enter the information.
►Note: If the finished alcohol ingredient is a previously submitted formula, you may provide formula identifying information to help facilitate the processing of the Drawback submission.
►Note: You may search for a submission and populate the existing formula information (e.g., TTB Formula ID, Company Code, and Company Formula ID). Alternately, you may enter the Company Code and Company Formula # directly on the Alcoholic Components (Ineligible Alcohol) pop-up window.
4. Optional Step: Select the Select button next to TTB Formula ID. The Search Formulas pop-up window displays. See Figure 37.
Figure 37: Create a New Drawback – Search Formulas Pop-Up Window
a. Enter the search criteria in the available fields.
b. Select Search button. The Formulas Search Results pop-up window displays. See Figure 38.
Page 21

Create a New Drawback Submission
Figure 38: Create a New Drawback – Formulas Search Results Pop-Up Window
c. Select the TTB Formula ID link. The Formulas Search Results pop-up window closes
and the Alcoholic Components (Ineligible Alcohol) pop-up window displays. The TTB Formula ID, Company Code, and Company Formula ID fields are populated. Select the Clear button to clear the fields.
5. Select the OK button. The Alcoholic Components (Ineligible Alcohol) pop-up window closes and the Formula tab displays. The ingredient is added in the Ineligible Alcohol section. See Figure 39.
Figure 39: Create a New Drawback – Alcoholic Components (Ineligible Alcohol) Information Added
6. Repeat the steps for all alcoholic components (ineligible alcohol) ingredients.
►Note: Select the Ingredient link to display the Alcoholic Components (Ineligible Alcohol) pop-up window and edit the alcoholic components (ineligible alcohol) ingredient information. Select the checkbox next to the alcoholic components (ineligible alcohol) ingredient and select the Delete button to delete the ingredient. A confirmation message box displays prompting you to confirm your action. See Figure 40. Select the OK button to confirm.
Figure 40: Create a New Drawback – Delete Alcoholic Components (Ineligible Alcohol) Ingredient Confirmation
Page 22

Create a New Drawback Submission
Nonalcoholic Components
Figure 41: Create a New Drawback – Nonalcoholic Components
Follow these steps to add nonalcoholic components ingredient information to the submission:
1. Enter all nonalcoholic components ingredient information.
a. Nonalcoholic Components (Ingredients by Group)
b. Nonalcoholic Components (Individual Solid Ingredients)
c. Nonalcoholic Components (Individual Liquid Ingredients)
Nonalcoholic Components (Ingredients by Group)
Figure 42: Create a New Drawback – Nonalcoholic Components (Ingredients by Group)
Page 23

Create a New Drawback Submission
Follow these steps to add nonalcoholic components (ingredients by group) ingredient information to the submission:
1. Select the checkbox to indicate that the product contains ingredients by group.
2. Select the Add button. The Nonalcoholic Components (Ingredients by Group) pop-up window displays. See Figure 42.
3. Enter the required nonalcoholic components (ingredients by group) ingredient information.
►Note: Fields marked with asterisks (*) are required fields.
►Note: Enter the Predominant Chemical Information in the following order, separated by commas: (1) Name, (2) FEMA #, and (3) Weight (which varies depending on units of measurement used).
4. Select the OK button. The Nonalcoholic Components (Ingredients by Group) pop-up window closes and the Formula tab displays. The ingredient is added in the Ingredients by Group section. See Figure 43.
Figure 43: Create a New Drawback – Nonalcoholic Components (Ingredients by Group) Information Added
5. Repeat the steps for all nonalcoholic components (ingredients by group) ingredients.
►Note: Select the Ingredient link to display the Nonalcoholic Components (Ingredients by Group) pop-up window and edit the nonalcoholic components (ingredients by group) ingredient information. Select the checkbox next to the nonalcoholic components (ingredients by group) ingredient information and select the Delete button to delete the ingredient. A confirmation message box displays prompting you to confirm your action. See Figure 44. Select the OK button to confirm.
Figure 44: Create a New Drawback – Delete Nonalcoholic Components (Ingredients by Group) Ingredient Confirmation
Page 24

Create a New Drawback Submission
Nonalcoholic Components (Individual Solid Ingredients)
Figure 45: Create a New Drawback – Nonalcoholic Components (Individual Solid Ingredients)
Follow these steps to add nonalcoholic components (individual solid ingredients) ingredient information to the submission:
1. Select the checkbox to indicate that the product contains individual solid ingredients.
2. Select the Add button. The Nonalcoholic Components (Individual Solid Ingredients) pop-up window displays. See Figure 45.
3. Enter the required nonalcoholic components (individual solid ingredients) ingredient information.
►Note: Fields marked with asterisks (*) are required fields.
►Note: If you select Yes in the Limited Ingredients field, the Names and % by Weight field displays allowing you to enter the information.
4. Select the OK button. The Nonalcoholic Components (Individual Solid Ingredients) pop-up window closes and the Formula tab displays. The ingredient is added in the Individual Ingredients (Solids) section. See Figure 46.
Figure 46: Create a New Drawback – Nonalcoholic Components (Individual Solid Ingredients) Information Added
5. Repeat the steps for all nonalcoholic components (individual solid ingredients) ingredients.
Page 25

Create a New Drawback Submission
►Note: Select the Ingredient link to display the Nonalcoholic Components (Individual Solid Ingredients) pop-up window and edit the nonalcoholic components (individual solid ingredients) ingredient information. Select the checkbox next to the nonalcoholic components (individual solid ingredients) ingredient information and select the Delete button to delete the ingredient. A confirmation message box displays prompting you to confirm your action. See Figure 47. Select the OK button to confirm.
Figure 47: Create a New Drawback – Delete Nonalcoholic Components (Individual Solid Ingredients) Ingredient Confirmation
Nonalcoholic Components (Individual Liquid Ingredients)
Figure 48: Create a New Drawback – Nonalcoholic Components (Individual Liquid Ingredients)
Follow these steps to add nonalcoholic components (individual liquid ingredients) ingredient information to the submission:
1. Select the checkbox to indicate that the product contains individual liquid ingredients.
2. Select the Add button. The Nonalcoholic Components (Individual Liquid Ingredients) pop-up window displays. See Figure 48.
3. Enter the required nonalcoholic components (individual liquid ingredients) information.
Page 26

Create a New Drawback Submission
►Note: Fields marked with asterisks (*) are required fields.
►Note: If you select Yes in the Limited Ingredients field, the Names and % by Weight field displays allowing you to enter the information.
►Note: When adding a liquid ingredient, if the process type is “Other,” you will see the quantity sufficient (Q.S) checkbox. This field may be selected when you have added a liquid Q.S to display the total yield.
4. Select the OK button. The Nonalcoholic Components (Individual Liquid Ingredients) pop-up window closes and the Formula tab displays. The ingredient is added in the Individual Ingredients (Liquids) section. See Figure 49.
Figure 49: Create a New Drawback – Nonalcoholic Components (Individual Liquid Ingredients) Information Added
5. Repeat the steps to add all nonalcoholic components (individual liquid ingredients).
►Note: Select the Ingredient link to display the Nonalcoholic Components (Individual Liquid Ingredients) pop-up window and edit the nonalcoholic components (individual liquid ingredients) ingredient information. Select the checkbox next to the nonalcoholic components (individual liquid ingredients) ingredient information and select the Delete button to delete the ingredient. A confirmation message box displays prompting you to confirm your action. See Figure 50. Select the OK button to confirm.
Figure 50: Create a New Drawback – Delete Nonalcoholic Components (Individual Liquid Ingredients) Ingredient Confirmation
Page 27

Create a New Drawback Submission
Dietary Supplement Components
Figure 51: Create a New Drawback – Dietary Supplement Components
Follow these steps to add dietary supplement components ingredient information to the submission:
1. Enter all dietary supplement components ingredient information.
a. Dietary Supplement Components (Herbs)
b. Dietary Supplement Components (Liquids)
Dietary Supplement Components (Herbs)
Figure 52: Create a New Drawback – Dietary Supplement Components (Herbs)
Follow these steps to add dietary supplement components (herbs) ingredient information to the submission:
1. Select the checkbox to indicate that the product contains herbs.
2. Select the Add button. The Dietary Supplement Components (Herbs) pop-up window displays. See Figure 52.
Page 28

Create a New Drawback Submission
3. Enter required dietary supplement components (herbs) ingredient information.
►Note: Fields marked with asterisks (*) are required fields.
4. Select the OK button. The Dietary Supplement Components (Herbs) pop-up window closes and the Formula tab displays. The ingredient is added in the Herbs section. See Figure 53..
Figure 53: Create a New Drawback – Dietary Supplement Components (Herbs) Information Added
5. Repeat the steps for all dietary supplement components (herbs) ingredients.
►Note: Select the Ingredient link to display the Dietary Supplement Components (Herbs) pop-up window and edit the dietary supplement components (herbs) ingredient information. Select the checkbox next to the dietary supplement components (herbs) ingredient information and select the Delete button to delete the ingredient. A confirmation message box displays prompting you to confirm your action. See Figure 54. Select the OK button to confirm.
Figure 54: Create a New Drawback – Delete Dietary Supplement Components (Herbs) Ingredient Confirmation
Page 29

Create a New Drawback Submission
Dietary Supplement Components (Liquids)
Figure 55: Create a New Drawback – Dietary Supplement Components (Liquids)
Follow these steps to add dietary supplement components (liquids) ingredient information to the submission:
1. Select the checkbox to indicate that the product contains liquid ingredients.
2. Select the Add button. The Dietary Supplement Components (Liquids) pop-up window displays. See Figure 55.
3. Enter the required dietary supplement components (liquids) ingredient information.
►Note: Fields marked with asterisks (*) are required fields.
4. Select the OK button. The Dietary Supplement Components (Liquids) pop-up window closes and the Formula tab displays. The ingredient is added in the Liquids section. See Figure 56.
Figure 56: Create a New Drawback – Dietary Supplement Components (Liquids) Information Added
5. Repeat the steps to add all dietary supplement components (liquids) ingredients.
Page 30

Create a New Drawback Submission
►Note: Select the Ingredient link to display the Dietary Supplement Components (Liquids) pop-up window and edit the dietary supplement components (liquids) ingredient information. Select the checkbox next to the dietary supplement components (liquids) ingredient information and select the Delete button to delete the ingredient. A confirmation message box displays prompting you to confirm your action. See Figure 57. Select the OK button to confirm.
Figure 57: Create a New Drawback – Delete Dietary Supplement Components (Liquids) Ingredient Confirmation
Additional Details
Figure 58: Create a New Drawback – Additional Details
1. Enter any additional details.
a. Unfit for Beverage Statement
b. Taste Panel Results
c. Formula Information and Process
►Note: Fields marked with asterisks (*) are required fields.
2. Select the Next button. The Samples tab displays. See Figure 59.
Page 31

Create a New Drawback Submission
Sample Detail
Figure 59: Create a New Drawback – Samples Tab
►Note: Drawback submissions require samples for any products not produced in the United States and for all dietary supplements. All other Drawback submissions do not require any samples but may include them.
Follow these steps to add a sample to the submission:
1. Select the Add button. The Sample modal window displays. See Figure 60.
Page 32

Create a New Drawback Submission
Figure 60: Create a New Drawback – Sample Modal Window
2. Enter the sample information in the available fields.
►Note: Fields marked with asterisks (*) are required fields.
3. Select the OK button. The Sample modal window closes and the Sample tab displays. The sample is added in the Sample Detail section. See Figure 61.
Page 33

Create a New Drawback Submission
Figure 61: Create a New Drawback – Samples Tab with Sample Added
4. Repeat the steps to add each sample you are sending to TTB.
►Note: The system generates submission ID and sample IDs after you save as draft or submit. Until then, sample IDs appear as “Pending.” The system prompts you to generate the sample ID sheet once you submit. When it does, enter dates sent, print sample ID sheets, and affix them to the physical samples or include them in the mailing package.
►Note: Select the Sample ID link to display the Sample modal window and edit the sample. Select the checkbox next to the sample and select the Delete button to delete the sample. A confirmation message box displays prompting you to confirm your action. See Figure 62. Select the OK button to confirm.
Figure 62: Create a New Drawback – Delete Sample Confirmation
Validate/Save as Draft
Before submitting, you may either:
1. Validate (check for errors without saving or submitting as final to TTB) to ensure that you have completed the submission correctly. Select the Validate button. Red error messages display indicating any issues found with the submission. See Figure 63. Alternatively, a green message displays indicating no issues were found with the submission. See Figure 64.
Page 34

Create a New Drawback Submission
Correct any errors and repeat this step until the submission is successfully validated. You may save as draft with errors, but you must correct all errors before submitting a draft.
Figure 63: Create a New Drawback – Unsuccessful Validation Message
Figure 64: Create a New Drawback – Successful Validation Message
or
2. Save as Draft if you are not yet ready to submit, or if you are the Preparer/Reviewer (since only a Submitter may actually submit the submission). Select the Save as Draft button and Formulas Online stores your submission until you or an authorized Submitter return to finalize the submission. See Figure 65.
Figure 65: Create a New Drawback – Save As Draft Confirmation
Submit Drawback Submission
Follow these steps to submit your drawback submission:
1. Select the Perjury Statement checkbox at the bottom of any tab to acknowledge you have read, understood, and complied with instructions for filing the application. See Figure 66.
Figure 66: Create a New Drawback – Perjury Statement
2. Select the Submit button. The Submission Confirmation page displays with links to the
Submission ID and the Samples tab (where applicable). The drawback submission is successfully submitted. See Figure 67.
Page 35

Create a New Drawback Submission
Figure 67: Create a New Drawback – Submission Confirmation
TTB will contact you by e-mail when analysis has been completed or if additional information is needed.
3. Select the return to the Samples link in the submission confirmation to enter sample sent dates and print sample ID sheets if you included samples in the submission.
►Note: Only users with authenticated Submitter roles may submit submissions. Users with authenticated Preparer/Reviewer roles for any of the permit numbers included with the submission may perform all other submission preparation functions, but are not allowed to submit as final to TTB for processing.
Enter a Sample Sent Date for Drawback Submissions
See Entering Sample Sent Date for sample sent date instructions.
Print a Sample ID Sheet for Drawback Submissions
See Printing Sample ID Sheets for sample sending instructions.
Comments and Docs/Links for Drawback Submissions
See Adding, Editing, and Deleting Comments for comment instructions. See Uploading Attachments and Linking Submissions for upload and link instructions.
Edit, Correct, and Resubmit a Drawback Submission
Before submitting, you may edit the submission at will. After submitting, you will be unable to edit until/unless TTB informs you that your submission needs correction. See Editing, Correcting, and Resubmitting Submissions for editing, correction, and resubmission instructions.
Copy an Existing Drawback Submission
See Copying Existing Submissions for copy instructions.
Print a Drawback Submission
See Printing Submissions for print instructions.
Withdraw a Drawback Submission
See Withdraw a Submission for instructions on how to withdraw an active submission prior to TTB process completion.
Page 36