cpccpd2011a handle painting and decorating materials lr
TRANSCRIPT

!!!
!
!
!
!
CPCCPD2011A Handle painting and decorating materials
Student Learning Resource !!!!!!!!!!!!!!!!!!!!!!!Student Name ________________________________________________

!
!Type Title Standard Issue Version Ref Release
date
Kit CPCCPD2011A NVR Standard 15.5 1.0 1.0 Handle painting and decorating materials 20/02/14 19/082013
Page 1 of 76
!
!
!
!

!
!Type Title Standard Issue Version Ref Release
date
Kit CCPCCPD2011A NVR Standard 15.5 1 1 Handle painting and decorating materials 07/03/14 19/082013
Page!2!of!77
Student Information Please read the following
Purpose: The purpose of this learning package is to help you understand the technical and theoretical knowledge and associated skills of your selected trade area. This package contains a number of learning and associated documents for this unit of competency. Please read all parts of this package to ensure that you complete and manage the process correctly. These assessment tools address the mandatory requirements of the unit of competency including, evidence requirements, range statements and the required skills and knowledge to achieve the learning outcomes indicated in the document. Performance criteria are described below. The contents of this unit will contain some or all of the following as required: Unit outlines / performance criteria Recommended Study Guides Assignments where applicable Self-Checks are self-tests for the student. These have in general been extracted from this Learning Book.
ELEMENT PERFORMANCE CRITERIA
1. Plan and prepare. 1.1. Work instructions and operational details are obtained using relevant information, confirmed and applied for planning and preparation purposes.
1.2. Safety (OHS) requirements are followed in accordance with safety plans and policies. 1.3. Signage and barricade requirements are identified and implemented. 1.4. Tools and equipment are selected to carry out tasks are consistent with the requirements of the job, checked for
serviceability and any faults are rectified or reported prior to commencement. 1.5. Materials quantity requirements are calculated in accordance with plans, specifications and quality requirements. 1.6. Environmental requirements are identified for the project in accordance with environmental plans and regulatory
obligations and applied.
2. Identify, handle and store painting and decorating materials
2.1. Base colour is identified from analysis of sample. 2.2. Paint type, tint base and sheen level of sample are established in accordance with manufacturer recommendations
and specifications. 2.3. Colorants are selected as suitable for colour match. 2.4. Colour is mixed and matched against sample and allowed to dry to establish accuracy of colour match. 2.5. Full quantity of paint is mixed and colour match is retested prior to application in accordance with specifications.
3. Identify, handle and store painting and decorating materials
3.1. Painting and decorating materials are sorted to suit material type and size, and stacked for ease of identification and retrieval.
3.2. Painting and decorating material and components are protected against physical and water damage and stored clear of traffic ways.
4. Select and distribute painting and decorating materials in preparation for use.
4.1. Painting and decorating products, material and components are identified, selected from stack and safely handled and distributed to required job location.
4.2. Storage/holding area at job location is checked to ensure provision of adequate ventilation, fire safety and dispersal. 4.3. Painting and decorating materials are stored to best serve their subsequent use. 4.4. Work areas are prepared, including the removal of objects and the use of drop sheets to protect surrounding
surfaces.
5. Clean up. 5.1. Hazardous material is identified for separate handling by authorised personnel. 5.2. Work area is cleared and material disposed of in a safe and effective manner in accordance with state and territory
requirements. 5.3. Unused materials are sealed and stored/stacked in accordance with standard material handling practices. 5.4. Non-paint Waste materials and debris are removed and placed into job waste bins or rubbish stockpile in a safe
and effective manner in accordance with environmental requirements. 5.5. Paint waste, water and solvents used in cleaning painting equipment are disposed of in an environmentally
sustainable manner and in accordance with relevant legislative requirements 5.6. Likelihood of spontaneous combustion is identified and suitable protective measures are applied. 5.7. Tools and equipment are cleaned, checked, maintained and stored in accordance with manufacturer
recommendations, environmental sustainability requirements and standard work practices

!
!Type Title Standard Issue Version Ref Release
date
Kit CCPCCPD2011A NVR Standard 15.5 1 1 Handle painting and decorating materials 07/03/14 19/082013
Page!3!of!77
UNIT DESCRIPTOR CPCCPD2011A Handle painting and decorating materials This unit of competency specifies the outcomes required to handle, sort and store painting and decorating materials. The unit includes planning and preparing for the work; identifying, handling and storing materials; and selecting and distributing appropriate housekeeping standards. Environmentally sustainable practices are required for waste disposal and equipment cleaning. ASSESSMENT Overall Assessment Requirements The instructional outcomes required at the completion of this training is 100% competent, If you do not achieve the required outcomes of competent, 100% correct for this assessment you will be required to re sit a supplementary examination within 1 week of the original examination date. To achieve successful completion of this unit you should achieve a minimum of 3 forms of assessment. Below are some of the forms of evidence that can be used. 1. Written Assessment 2. Third party reports (usually by your employer or supervisor) 2. Workshop/ On Site Activity (generally referred to as “Practical Assessment”) 4. Logbook Evidence (a record of the tasks you carry out for each unit) Theory Examination During the period of this learning you will be required to complete a written theory examination to establish the level of understanding of technical content. Practical Assessment An activity checklist assessed by the trainer will indicate the outcomes that you are required to achieve in a practical application. You will be required to demonstrate you’re on the job skill level to the required industry standard in a practical application and to demonstrate a satisfactory level of practical skill and proficiency within the tolerances of the trade governed by the Australian Standards to achieve the desired outcomes and competency level of this unit. Self Checks Self-checks are to be completed on pages provided when requested by your trainer. These exercises are used mainly as a learning tool; they may form part of your overall assessment if deemed necessary by your Trainer. Verbal Questions Verbal questions may be used and recorded to establish your level of knowledge of the competencies of this learning package. Practical Assessment During the length of this course you will be required to demonstrate a satisfactory level of practical skill and proficiency within the tolerances of the trade governed by the Australian Standards to achieve the desired outcomes and competency level of this unit.

!
!Type Title Standard Issue Version Ref Release
date
Kit CCPCCPD2011A NVR Standard 15.5 1 1 Handle painting and decorating materials 07/03/14 19/082013
Page!4!of!77
Log Book or Training Record Book It is the responsibility and requirement for the learner to complete the training record based on the on-the-job and structured training tasks received by the employer or Supervising Registered Training Organisation (SRTO) or as indicated in the training plan, which may be produced to the employer and SRTO at reasonable intervals of not more than 3 months. Log Book evidence from your employer and other forms of evidence relating to this unit of competency will contribute to the outcome of this learning package. If the required activity is not part of your employer’s scope of activity you will be required to complete the skill learning process within a simulated environment. Logbook evidence must reflect the “Elements” shown for this unit. Results A statement of Attainment may be printed for this unit if required, but in general your achievement of this unit will be recorded and presented to you on completion of the entire qualification. Your certificate will record all the units you have completed. RPL and Acceleration Recognition of prior learning is available to all students. This provides an opportunity for being credited for previous learning. Acceleration provides an opportunity to reduce the allocated learning hours for this unit of competency. There is a separate RPL kit for this process. Methodology This unit may be provided as a separate learning instruction or provided with other units of competency in a practical or theoretical learning experience. Acknowledgements Relevant AS numbers and codes, Obtain this standard from any library. Australian National Training Authority (ANTA) Pre-requisites
CPCCOHS2001A Apply OHS requirements, policies and procedures in the construction industry
CPCCOHS1001A Work safely in the construction industry (White Card) Feedback to the learner The trainer will provide feedback to the learner on the progress of assessment This learning package is intended for use by those completing the Competency Unit – CPCCPD2011A handle painting and decorating materials as part of Basic Stream Skills within the Construction Skills Stream of the National Competency Framework.
Suggested approach to gain competency in Handling materials Handle painting decorating materials is a unit of competency which involves a lot of new information and procedures. To achieve in this competency, you will need to remain focused through out the various tasks set out in the workbook. During this competency you may feel a bit overwhelmed at times due to information overload. But you must remain focused and forge ahead. Remember, you have access to a teacher for assisstance. It is recommended that at the end of each day you review what you have achieved or covered that day. This is important and you should resolve any concerns with the Trainer before proceding. It is handy to view this competency in parts and then use all the parts to complete the objective of matching paint colours as a whole. Trainer can give input here

!
!Type Title Standard Issue Version Ref Release
date
Kit CCPCCPD2011A NVR Standard 15.5 1 1 Handle painting and decorating materials 07/03/14 19/082013
Page!5!of!77
!
!
The main parts are; !
• Definitions • Preparation of tools and materials • Material quantities • Handling materials • Clean up
Approach this competency as a challenge, particularly when you may have little or no exposure to handle paintng and decorating materialsonsite on site.
DEFINITION OF HAZARDS AND RISK Hazards and risks are terms used on a daily basis, however, because their true meaning is not realized, by many we will look at the definition of each.
Hazard The term hazard may be defined by any, or all of the following
• An energy source over which control has been lost
• The potential for harm
• A source of potential damaging
Risk The term risk can be defined as:
• The potential for the realisation of unwanted negative consequences of an event
• The probability of an event occurring and the maximum reasonable consequences should it occur
• The combination of the likelihood that an event will occur and the consequences if it does
WORK HAZARDS The exact nature of the hazards may vary from site to site, so it is important to assess each new task that you are about to undertake for hazards and the risks that may result from exposure to these hazards. If a hazard is identified and the risk is assessed at being high to yourself or others, you should take steps to eliminate it, or adjust your operation to reduce the risk to an acceptable level.
Some of the more common hazards that you are likely to encounter on site include: • Falling objects • Slip/trip hazards • Fall hazards • Laser radiation • Suspended loads • Power tools/equipment • Hand tools • Mobile equipment • Hazardous substances.
!
!Type Title Standard Issue Version Ref Release
date
Kit CCPCCPD2011A NVR Standard 15.5 1 1 Handle painting and decorating materials 07/03/14 19/082013
Page!6!of!77
WORKS PROCEDURE Before any work commences on the job, the supervisor should prepare a ‘Works Procedure’. This is a written document that considers many aspects of the task and is based on a risk assessment and should include the following:
1. The name of the competent person in regard to the concreting job. 2. A list of supervisory staff available on site and instructions as how they are to ensure
strict compliance with the procedure and daily inspections of the work site.
3. An emergency response plan, this plan must include: Details of a communication system (either telephone or two-way radio) that will provide assistance in the event of an accident in the shortest possible time. All personnel must familiarise themselves with the communication system and who to involve.
4. Provision for additional equipment to be kept on site in case of an emergency. 5. Provision for temporary protection for workers who are required to enter the site
before long-term protection is installed.
6. A direction that no one enters the site unless authorised. 7. Methods and procedures to ensure scaffolding and associated work systems are
installed with the minimum possible delay.
8. Instructions for all scaffolding and equipment be regularly inspected by workplace management directly in charge of the work.
9. The type of machinery that will be required for the job. 10. Access arrangements for machinery and equipment. 11. Traffic control requirements these may include:
• On-site traffic control and management • Traffic control of public roads to provide entry and exit to the site.
12. Transportation of workers to and from the site. 13. Amenities for the workers, these may include:
• Change room • Lunch/tea room • Toilets.
14. Availability of services, which may include:
• Power • Water
The Work Procedure may also include a code of conduct for the workers. It should be stressed that the Work Procedure described is the minimum requirement. Many Work Procedures may cover greater detail and cover more items relevant to the site location
Safety Signage This section provides information on the signs that you can encounter on the work site. Most signs are self-explanatory, but if you encounter a sign where the meaning is not clear, seek advice before you commence work in the area covered by the sign.

!
!Type Title Standard Issue Version Ref Release
date
Kit CCPCCPD2011A NVR Standard 15.5 1 1 Handle painting and decorating materials 07/03/14 19/082013
Page!7!of!77
Why Do We Need Safety Signage? Safety signs draw your attention to objects and situations affecting your health and safety. Safety signs are placed in strategic locations as close as possible to hazardous areas. If they become damaged or unreadable, please report this to your supervisor so that the sign/s can be replaced. If a sign displays a distinct safety message, it will carry the same authority as a direct instruction from your Supervisor.
What are the different types of signs?
We all see many signs everyday but how many signs do we take notice of? The answer is most likely many, however we do not admit to this. Signs are put in place to assist people. It is not the intention of this note to attempt to teach all about all signs and the category they fit under. However some knowledge of signs and how to use them is essential.
Identify signs and respond as necessary and appropriately Signs may be: 1. Picture (symbol) 2. Written (words) 3. Picture and written Picture signs are universal in language Written signs may have a language barrier Picture and written where the writing has the ability to clarify the picture.
There are many categories of signs that the Australian Standards have developed. The correct titles for these signs are:
1. Prohibition signs (don’t do) 2. Mandatory signs (must do) 3. Restriction signs (limiting) 4. Hazard signs (warning signs) 5. Danger hazard signs (life threatening) 6. Emergency signs (medical, exit etc.) 7. Fire signs (fire fighting)
Safety signs Compliance can be a confusing issue. We can help you make a “good faith effort” to comply with OH&S regulations and meet statutory requirements where they apply. Take advantage of our free site survey consultation service. Rules governing Safety signs are set out in the joint New Zealand Australian standards NZS/ AS 1319: 1994. All pictograms used on Safety Signs should be those approved by this standard. All Safety Sign legends should describe the danger or direction in a simple and concise manner. Safety Signs are generally either screen-printed or poly vinyl applied to aluminum, PVC or Corflute. Some are reflective or glow in the dark.

!
!Type Title Standard Issue Version Ref Release
date
Kit CCPCCPD2011A NVR Standard 15.5 1 1 Handle painting and decorating materials 07/03/14 19/082013
Page!8!of!77
Must do Signs
Are WHITE with a BLUE circle !!!!!!
!
!!!!Restriction Signs
Are RED circle with BLACK writing
What is important is that you appreciate and know how to respond to signs. It is just as important that you follow the meaning of the signs. People who do not respond to signs are a risk to themselves and others

!
!Type Title Standard Issue Version Ref Release
date
Kit CCPCCPD2011A NVR Standard 15.5 1 1 Handle painting and decorating materials 07/03/14 19/082013
Page!9!of!77
Hazard Warning Signs These are triangular YELLOW with BLACK writing
Signs should be placed where they will be effective and at a height that is readily visible. This usually means that they need to be close, but before, to where the danger is and it should be fixed to a stable object. Consider the effectiveness of placing a number of signs at the entrance of a large commercial job. This means that everyone has the opportunity to read the signs before entering the site, but what happens an hour later when they actually come across the danger? Will they remember the details of the sign or will it be too late.

!
!Type Title Standard Issue Version Ref Release
date
Kit CCPCCPD2011A NVR Standard 15.5 1 1 Handle painting and decorating materials 07/03/14 19/082013
Page!10!of!77
Signs are best located near to the danger but not that close that it is too late. The following sign is typical of a cluster of signs that may be found on large commercial building sites. !
!
!!
Modern day construction site PPE Signs There are all types of signs and placing them effectively is always a concern. Consider where would you place a First Aid Sign that is going to be effective. Yes you place it at the location of the first aid room. It is expected that you will remember this later when you are working well away from the first aid room. In this instance the sign is where the object is and it relies on your memory when in need of it.
Be alert to signs and even be alert to the absence of signs. If you see a danger and there is no sign, do something about it. Bring it to the attention of your employer but do not let a serious danger remain without doing something about it.
!! !!
Hazard Signs (Life Threatening)
!

!
!Type Title Standard Issue Version Ref Release
date
Kit CPCCPD2011A NVR Standard 15.5 1.0 1.0 Handle painting and decorating materials 20/02/14 19/082013
Page 11 of 76
Emergency Signs Wherever ‘lifesaving’ equipment exists, it is critical to ensure that it is ready to perform in the event of an emergency
For those responsible for workplaces, there are strict requirements for the maintenance of essential services such as fire safety equipment. Responsibilities can include maintaining equipment to specific standards, keeping maintenance records and completing necessary compliance reports. One of the very important signs for every one is the emergency assembly area.
!
Fire Fighting Signs !
!!!!!!!!!!!!!!!!!!!!!!!!!!!!!!!! ! !
!
Your First Line of Defense!A potential fire can often be controlled before it really takes hold, if the right fire equipment is close at hand. Companies including those in construction should have a range of portable fire extinguishers to suit all types and classes of fires. !
!
What is a Material Safety Data Sheet (MSDS)? A Material Safety Data Sheet (MSDS) is designed to provide both workers and emergency personnel with the proper procedures for handling or working with a particular substance. MSDS's include information such as physical data (melting point, boiling point, flash point etc.), toxicity, health effects, first aid, reactivity, storage, disposal, protective equipment, and spill/leak procedures. These are of particular use if a spill or other accident occurs.

!
!Type Title Standard Issue Version Ref Release
date
Kit CCPCCPD2011A NVR Standard 15.5 1 1 Handle painting and decorating materials 07/03/14 19/082013
Page!12!of!77
MSDS's vary in length depending on their format, content, and font size. Sometimes from 1 to 10 pages, with most being 2 to 4 pages. An example of an MSDS sheet is at the rear of this booklet.
Who are MSDS's for?
MSDS's are meant for:
a. Employees who may be occupationally exposed to a hazard at work. b. Employers who need to know the proper methods for storage etc. c. Emergency responders such as fire fighters, hazardous material crews, emergency
medical technicians, and emergency room personnel
Where can I get MSDS's? Your workplace should have a collection of MSDS that came with the hazardous chemicals you have ordered or with the products you use on your construction site. (don't throw them away!)
These MSDS must be stored in a MSDS Register.
!!!!!!!!!!!!! !!

!
!Type Title Standard Issue Version Ref Release
date
Kit CCPCCPD2011A NVR Standard 15.5 1 1 Handle painting and decorating materials 07/03/14 19/082013
Page!13!of!77
Always remember the substances that you are working with can often be very poisonous and even contact with your skin could have dire consequences. A helpful site in Australia for MSDS’s is http://www.msds.com.au/ where most dangerous substances can be found.
JSA (Job Safety Analysis) What are safe work procedures? Safe work procedures ensure your workers are aware of the risks in their work tasks, and outline how to avoid injury or illness while doing these tasks. Safe work procedures are a means of documenting the risks associated with a work task and incorporating the appropriate risk control measures into a sequence of steps for doing the task safely. JSA’s Job Safety Analysis (JSA) is a method of identifying hazards and developing ways to manage them. Basically, completing a JSA means taking the time before doing a job to plan for safety, rather than starting work assuming that everyone involved knows what to do and how to do it safely. Key Point JSA is the responsibility of your supervisor, but you may be asked to contribute your ideas and knowledge about the job. There are 3 ways of doing a JSA: 1. Direct Observation: The supervisor watches and discusses job steps, hazards and
solutions with the employee doing the job. 2. Group Discussion: A team of people familiar with all aspects of the job identifies the
steps, hazards and solutions. The supervisor leads the team. 3. Recall and Check: The supervisor prepares a draft version of the analysis based on his
or her knowledge of the job, and checks this by discussing it with the employee (and where necessary, by observing the job being carried out).
Jobs that could be considered for a JSA include:
• jobs with a history of many accidents • newly established jobs, and • jobs that could result in serious injuries or fatalities if risks are not controlled.
A JSA (Job Safety Analysis) can be found at the end of this booklet and will be completed as part of a class exercise. It must also be handed in as part of the ongoing evidence collection process. SWMS (Safe work method Statements) A Safe Work Method Statement (SWMS) is developed by the employer for their employees or by a sub-contractor for work that they are performing. It details how specific risks in the workplace will be managed. !
Working safely should be on the minds of all workers. A typical worker who is going to carry out a task must consider safety as one of the important items in the planning of a task.
!

!
!Type Title Standard Issue Version Ref Release
date
Kit CCPCCPD2011A NVR Standard 15.5 1 1 Handle painting and decorating materials 07/03/14 19/082013
Page!14!of!77
!
!
!! !!!!
!
!!!!!! !!!!!! !
!
!

!
!Type Title Standard Issue Version Ref Release
date
Kit CCPCCPD2011A NVR Standard 15.5 1 1 Handle painting and decorating materials 07/03/14 19/082013
Page!15!of!77
Environmental concerns Although concreting tasks do not have a huge impact on the environment, there are some things that should be considered. The following points must be considered when working on a construction site: • Water quality • Air levels • Waste management • Hazardous chemicals • Lighting.
!
Water Quality
Under no circumstances should waterways be polluted through thoughtless acts. As a concrete worker, you must ensure that material residue does not enter waterways. One simple method is to contain wastewater when conducting cleaning and washout tasks and place any unused or waste concrete in a bunded area.
Air Quality Dust control and management is essential in ensuring air quality. Water sprays should be used to prevent dust rising. This is particularly important on windy days.
Noise Levels Noise should be maintained to the minimum. This is particularly important during night operations, especially in populated areas.
Waste Management
Waste management is an important link in maintaining a clean environment. Waste problems can be minimised by acting on the following priorities: • avoidance • recycling • re-use • disposal.
Hazardous Chemicals
The storage, use and disposal of hazardous chemicals must be of prime importance to the concrete worker. Although concreting does not require vast amounts of these types of substances, all employed within the site must be aware of the problems associated with hazardous chemicals. If you are unsure of any product or their method of disposal, seek advice from your supervisor.
Lighting Lighting of construction sites close to populated areas can pose serious environmental concerns. Whenever possible, all lighting should be directed away from residential areas. Care should also be taken not to direct lighting onto public roads in a fashion that may cause traffic hazards.
!

!
!Type Title Standard Issue Version Ref Release
date
Kit CCPCCPD2011A NVR Standard 15.5 1 1 Handle painting and decorating materials 07/03/14 19/082013
Page!16!of!77
Environmental Hazards Objectives 1. Identify environmental hazards. 2. Recognize treatment and first aid for exposure to environmental hazards. All workers in Australia are committed to observing and practicing environmental management in all aspects of their job and in undertaking activities in compliance with all statutory legislation and other legal requirements.
Environmental protection of the building site Environmental protection begins at the building site with the air workers have to breathe. They should be protected from any fumes from construction machinery, as well as fumes from building waste or materials which need to be carefully separated and properly recycled or disposed of when the job is complete, the soil should be treated as a valuable asset and left unpolluted. Queensland's Environmental Protection Agency (abbreviated to EPA) was for some time a separate department of the Queensland Government, and, following 2009 State elections, became a part of the Government's larger Department of Environment and Resource Management This part of the Department of Environment and Resource Management's role is to manage climate change and protect the environment on behalf of the Queensland Government [2] To achieve this the section aims to • provide Conservation and Environmental Services: including a Queensland Parks
and Wildlife Service to manage the Queensland's protected area estate; plus Environmental Services to assist manage development, business, and industry;
• promote Sustainable Futures: including planning for climate change; encouraging environmental sustainability, supporting environmental innovation, and developing strategies and policies to achieve an environmentally sustainable future; and
• achieve organisational Performance and Capability: including building a "robust" scientific base to government policy and decision making, and valuing people and accumulating knowledge within the organisation

!
!Type Title Standard Issue Version Ref Release
date
Kit CCPCCPD2011A NVR Standard 15.5 1 1 Handle painting and decorating materials 07/03/14 19/082013
Page!17!of!77
ENVIRONMENTAL PROTECTION WHY DO WE NEED ENVIRONMENTAL CONTROLS? We need environmental controls to protect the receiving environment not just on a small scale but on a global scale as well. Environmental controls on site are those structures or monitoring systems put in place to minimise the impacts of construction activities. Deciding which to use depends on the reasons why controls may be needed. • Waste control • Hazardous materials • Water quality (erosion and sediment control) • Cultural heritage management issues • Air quality • Noise • Flora and fauna
WHAT THE LAW SAYS GENERAL There are many legal requirements you must follow in order for the construction process to precede without damage to the environment. Legislation includes Acts and Regulations, which are mandatory, codes of Practice, Advisory Standards, and Guidelines, which are non-mandatory but may be cited in mandatory Acts and Regulations. The tiers of Government are: • Federal or Commonwealth Legislation (the Environmental Protection & Biodiversity Conservation Act 1999) • State & Territory Legislation (Environmental Protection Act 1994 and Water Act 2000) • Local Government Legislation (Development Approvals, Material Change of Use, Environmentally Relevant Activities) In Queensland, the principal law is the Environmental Protection Act (1994) and the administering Authority is the Environmental Protection Agency (EPA). Common Law is where a precedent has been set in a Court of Law, not through an Act of Parliament (also known as Case Law). Two examples of Common Law are: • Rights of Neighbours – causing undue interference with use of land or damage. • Rights of Protection – requires obligations to be met to provide adequate safety standards. MOST RECENT LEGISLATION UPDATES RELATING TO THE ENVIRONMENT AND QUEENSLAND Aboriginal Cultural Heritage Act 2003: New legislation, which includes changes to regulate impacts and disturbances to significant Aboriginal areas or objects. Definition of Aboriginal Cultural Heritage has been amended and is: “anything that is – a) a significant Aboriginal area in Queensland; or b) a significant Aboriginal object; or c) evidence of archaeological or historical significance, of Aboriginal occupation of an area of Queensland.” It also includes the following new provisions: • Duty of Care (section 23) which carries a penalty for Individuals of $7500, and for Corporations $75000. • Unlawful Harm (section 24) which carries a penalty of $7500 or 2 years imprisonment. • Prohibited excavation, relocation and taking away (section 25). • Unlawful possession of Aboriginal Cultural Heritage (section 26).

!
!Type Title Standard Issue Version Ref Release
date
Kit CCPCCPD2011A NVR Standard 15.5 1 1 Handle painting and decorating materials 07/03/14 19/082013
Page!18!of!77
Water Regulation 2002: Permits and approvals required for development, which affects water access or impacts on water (e.g. canal developments). Environmental Protection Act 1994 and Integrated Planning Act 1997 outline the required ERA’s and Development Approvals. Common Law Obligations regarding Prevention of Vandalism, Fire or Flooding: A duty of care exists on managed land to prevent foreseeable events to provide Due Diligence for the public and your employee’s safety. Contractor must prevent consequential air pollution, water pollution, and unlawful discharges to the sewer, noise pollution and other environmental offences by taking preventative actions to deal with foreseeable acts of vandalism or natural events. For example, properly maintain and protect through fencing, roofing, contouring, fire breaks, locked gates etc. any liquid storage tanks or other plant and equipment exposed to the elements or to mischief from vandals. DETAILS FROM THE ENVIRONMENTAL PROTECTION ACT 1994 Due Diligence Due diligence is: 1. A defense under the Environmental Protection (EP) Act to protect the workforce and the companies they work for against prosecution 2. A duty of care from individuals and companies to prevent or minimise environmental harm 3. "Taking all reasonable and practical steps to prevent or minimise environmental harm by establishing and maintaining a system to ensure compliance with the EP Act". Taking all reasonable and practical steps to prevent or minimise environmental harm by establishing and maintaining a system to ensure compliance with the EP Act". 4. Where there is an obligation to provide a level of care through expected standards (e.g. record keeping demonstrating compliance with legal obligations, contractor responsibilities such as obtaining an Environmentally Relevant Activity (ERA) permit to undertake an ERA activity.) GENERAL ENVIRONMENTAL DUTY Every person has a duty not to carry out any activity that will cause or is likely to cause environmental harm unless all reasonable and practicable measures have been taken to prevent or minimise the harm (S36). It is important to understand that under this Act, a person can be found guilty of an offence before any actual harm is caused.
Duty to Notify Environmental Harm Any person who becomes aware that serious or material environmental harm will be caused or is likely to occur (unless it is authorised or an emergency direction) must notify their employer or the relevant authority as soon as possible (S37). The maximum penalty for not notifying environmental harm is $6,000. Project employees should notify their Supervisor as soon as possible if they have any concerns.
ENVIRONMENTAL PROTECTION POLICIES Environmental policies have been established under the EP Act for air, water noise, and waste management. Some examples are as follows. Air – failure to comply with an air quality abatement notice (S19 Air Policy). Penalty is $2500. Water – 1) Rubbish, waste water, concrete, pesticides, oil, etc., cannot be released into a roadside gutter, drain or body of water, or be placed in a position where it could be released (S31 of 136). The penalty varies between $1200 and $1500. This may include an unprotected stockpile of topsoil or mulch close to a creek. 2) Storm water that results in a buildup of mud or silt in drains. Sand, silt, or mud may not be deposited or placed where it could wash into a gutter or drain (S32 Water Policy). The penalty is $1200. This may include washing a vehicle on the roadside or in a driveway.

!
!Type Title Standard Issue Version Ref Release
date
Kit CCPCCPD2011A NVR Standard 15.5 1 1 Handle painting and decorating materials 07/03/14 19/082013
Page!19!of!77
Noise – Failure to comply with a noise abatement notice (S23 Noise Policy), the penalty is $2500. Under the new Noise Policy, any audible noise outside normal working hours is a nuisance and is an offence under the EP Act. This means a contractor cannot work on a Sunday or public holiday at any time, or any weekday including Saturday, before 6.30am or after 6.30pm without prior approval from a regulatory authority. • Waste Management – The EP (Waste Management) Regulation 2000 imposes fines for littering and waste dumping. Fines range up to $1,500 for littering, then from around $3000 (less than 200 litres) to up to $12,375 if over 200 litres for illegally dumping waste. The penalties stated above are an indication only and may change according to circumstances. ENVIRONMENTAL OFFENCES The fines quoted are for individuals. For companies the fine is five to ten times greater. • Unlawful environmental harm – any act or omission that causes material or serious environmental harm or a nuisance is unlawful, unless it is authorised or an emergency (S119). • Environmental nuisance – (not trivial or negligible in nature) the penalty is $10,000 or $50,000 if willful (S123). Some examples include noise, dust and odour exceeding the limits. • Material environmental harm – the maximum penalty is $50,000. If the harm is willful, the fine is $100,000 and up to two years imprisonment (S120). Examples include land contamination and/or improper waste disposal. • Serious environmental harm – the maximum penalty is $100 000. If the arm is willful, the fine is $250 000 and up to five years imprisonment (S120). Examples would include a major oil spill in waterways and/or dumping toxic material. • Offences against environmental protection policies – a person must not willfully contravene an environmental protection policy. Penalties range up to $100,000 (S124). • Prescribed contaminants – contaminants prescribed by an environmental policy must not be placed in a position where they could cause serious or material environmental harm or environmental nuisance (S126) or be released into the environment except when directed by an authorised person’s emergency direction (S125). The maximum penalty is $10,000.
WHAT COMPANIES ARE DOING TO IMPROVE THE ENVIRONMENT? Many companies are committed to implementing and maintaining an Environmental Management System in accordance with the requirements of AS/NZ ISO 14001 (International Standard Quality Assurance for the Environment). This includes the following specific to each project: • Company Environmental Policy: Sets out obligations and company requirements. The Company Environmental Policy applies to all employees and their subcontractors • Company Branch Environmental Management Plan (EMP). A separate EMP is required for each project and considers the specific environmental impacts of the project: • Legal requirements • Identification of all environmental impacts • Controls for all significant impacts • Emergency response for critical activities • Clear authorities and responsibilities • Monitoring programs for all controls • Audits, management review and corrective action • Records of all activities, e.g., training and communications.

!
!Type Title Standard Issue Version Ref Release
date
Kit CCPCCPD2011A NVR Standard 15.5 1 1 Handle painting and decorating materials 07/03/14 19/082013
Page!20!of!77
Included in the EMP are a series of Project Instructions (PI) and Process Control Plans (PCP). These documents are specific to each project and activity, and detail the required environmental controls including responsibilities. These documents are administered by Project Management. Civil Construction is striving to be a leading example of environmental management in the construction industry. Achieving certification to ASNZ 14001 gives companies certain commercial advantages such as being able to undertake contracts, which specify this as a requirement. Environmental protection Acts and Regulations • Environmental Protection Act 1994 • Environmental Protection Regulation 1998 • Environmental Protection (Waste) Policy and Regulation 2000 • Environmental Protection (Water) Policy 1997 • Environmental Protection (Noise) Policy 1997 • Environmental Protection (Air) Policy 1997 • National Environment Protection Council (Queensland) Act 1994 • Queensland heritage Act 1992 • Queensland Heritage Regulation 2003 ENVIRONMENTAL PROTECTION ACT 1994 THIS ACT IS TO PROTECT QUEENSLAND'S ENVIRONMENT WHILE ALLOWING FOR DEVELOPMENT THAT IMPROVES THE TOTAL QUALITY OF LIFE, NOW AND IN THE FUTURE, IN A WAY THAT MAINTAINS ECOLOGICAL PROCESSES ON WHICH LIFE DEPENDS. THIS APPROACH IS TERMED 'ECOLOGICALLY SUSTAINABLE DEVELOPMENT'. Environmental Protection Regulation 1998 One of the main functions of the Environmental Protection Regulation 1998 is to list all the environmentally relevant activities, their level and the annual fee. Environmental Protection (Waste) Policy and Regulation 2000 The Environmental Protection (Waste Management) Policy 2000 (Waste EPP) and the Environmental Protection (Waste Management) Regulation 2000 co-ordinate and clarify waste management practices in Queensland and provide improved environmental safeguards. The legislation commenced on 1 July 2000. Developed with local government and industry input, the legislation will benefit the Queensland community through safer disposal practices, and cost savings achieved by improved planning and management of waste services. It provides clarification for waste contractors, waste generators, local governments and the general community.
• EPP summary The Waste EPP provides a strategic framework for managing wastes in Queensland. It does this by establishing a preferred waste management hierarchy and various principles as the basis for waste management. The waste hierarchy moves from the most preferred — waste avoidance, to re-use, recycling, and energy recovery, through to waste disposal, the least preferred
Environmental Protection (Water) Policy 1997 This has the purpose of achieving the object of the Environmental Protection Act 1994 in relation to Queensland waters. The purpose is to be achieved by providing a framework for— • identifying environmental values for Queensland waters; • deciding and stating water quality guidelines and objectives to enhance the environmental values;

!
!Type Title Standard Issue Version Ref Release
date
Kit CCPCCPD2011A NVR Standard 15.5 1 1 Handle painting and decorating materials 07/03/14 19/082013
Page!21!of!77
• making consistent and equitable decisions about Queensland waters that promote efficient use of resources and best practice environmental management; and • involving the community through consultation and education, and promoting community responsibility Environmental Protection (Noise) Policy 1997 This has the purpose of achieving the object of the Environmental Protection Act 1994 in relation to Queensland's acoustic environment. To achieve the object, the policy— • identifies environmental values to be enhanced or protected; • specifies an acoustic quality objective; and • provides a framework for making consistent and fair decisions that best protect Queensland's acoustic environment, resolving disputes about noise issues, developing noise management programs involving government entities, industry groups and the community, making accurate and consistent noise assessments, and providing customers with important information about noise. • Environmental Protection (Air) Policy 1997 This has the purpose of achieving the object of the Environmental Protection Act 1994 in relation to Queensland's air environment. To achieve the object, the policy— • Identifies environmental values to be enhanced or protected; • Specifies air quality indicators and goals to protect the environmental values; and • Provides a framework for making consistent and fair decisions about managing the air environment and involving the community in achieving air quality goals that best protect Queensland's air environment. Queensland Heritage Act 1992 This provides for the conservation of Queensland's historical cultural heritage. It requires all involved in its administration to achieve the retention of the cultural heritage significance of the places and objects to which it applies and the greatest sustainable benefit to the community from those places and objects consistent with the preservation of their cultural heritage significance. Queensland Heritage Regulation 2003 This sets out the details of forms approved by the Minister, fees in a schedule, and states the details that must accompany an application to enter a place in the heritage register, an application for a certificate of immunity from registration and a application for an exemption certificate. PREPARING ENVIRONMENTAL MANAGEMENT PLANS This guideline provides information on the purpose and content of an environmental management plan (EM plan) and how to prepare one as part of an environmental impact assessment (EIA). This guideline provides guidance on how to undertake effective EIA.

!
!Type Title Standard Issue Version Ref Release
date
Kit CCPCCPD2011A NVR Standard 15.5 1 1 Handle painting and decorating materials 07/03/14 19/082013
Page!22!of!77
PPE (Safety Gear)
!!
!!!!
The drawing above displays a person who may be considered ready for work. This does not mean that they are ready for all types of work. The clothing and equipment worn by this person is a starting point for a construction worker. Having said this it is not necessary to wear long trousers regularly. Being ready for work is important and generally good heavy duty clothing, and safety shoes and hard hat are very good starting points. This is only the beginning and to choose the correct equipment depends on the task to be performed !
!!

!
!Type Title Standard Issue Version Ref Release
date
Kit CPCCPD2011A NVR Standard 15.5 1.0 1.0 Handle painting and decorating materials 20/02/14 19/082013
Page 23 of 76
Fit PPE where required and when appropriate to do so.
Personal protective equipment (PPE) has been designed for protecting people from harm that can occur to your body. It is considered as a last resort against hazards that can harm you. Your employer will provide you with PPE to use and it is your responsibility to use it. It is strongly recommended that you do so when it is appropriate. The selection and use of PPE should not be taken lightly or ignored. There are many hazards in the construction industry that can cause you serious and short and long term harm. The correct selection of the appropriate PPE is essential.
!
!!
!! !
PPE is one of those items that someone is going to keep reminding you that you must use. Eventually it will be left to you to automatically fit your PPE when it is appropriate to do so. When considering buying PPE, select items that are quality products that fit comfortably and are convenient to use.
Hi Vis Jackets & Chain Saw PPE

!
!Type Title Standard Issue Version Ref Release
date
Kit CCPCCPD2011A NVR Standard 15.5 1 1 Handle painting and decorating materials 07/03/14 19/082013
Page!24!of!77
!
Protection location Description
Body clothing Suitable clothing
Feet protection Safety shoes
Hearing protection Ear muffs or ear plugs
Eye protection Full face shields or safety eye glasses or goggles
Head protection Comfortable Safety helmets
Lung or breathing protection Dust masks, chemical, gas and fine particle filtering respirators.
Hand Gloves Wear, heat and chemical resistant types
!
There are many good safety stores available and at the end of the day it is up to you to look after yourself. Do not blame others for your own bad habits.
PPE Items The following describes a range of PPE that you should be prepared to wear.
Clothing Sensible clothing that protects from the sun and is tough enough to resist annoying scratches. It should not be very loose or baggy as loose clothing can get caught on obstacles or in machinery. It should not be skin tight as some circulation of air is recommended. Sun-safe, breathable heavy duty cotton materials are recommended for general purpose clothes in the construction industry.
!!!!!!!!!!!!!!!!

!
!Type Title Standard Issue Version Ref Release
date
Kit CCPCCPD2011A NVR Standard 15.5 1 1 Handle painting and decorating materials 07/03/14 19/082013
Page!25!of!77
Protective suites for different jobs !
!
!! !!
!! !!
Safety Shoes Shoes should be quality shoes that have steel caps in the toe. There are types for most occasions including working on the ground, below ground in trenches or on the roof.
!! !Safety shoes protect you from objects falling onto the front of your feet. Shoes need to be a quality product that can flex sufficiently when You are required to climb ladders or similar. Do not wear thongs or open foot-ware as you can easily receive serious damage to your feet. Most building sites will ban such practices. !

!
!Type Title Standard Issue Version Ref Release
date
Kit CCPCCPD2011A NVR Standard 15.5 1 1 Handle painting and decorating materials 07/03/14 19/082013
Page!26!of!77
!!! !! !!
Steel capped Wellington style boots for concreting and muddy conditions are recommended
Hearing Protection Hearing protection is essential where ever excessive noise is being created i.e. more than 70 decibels. Circular saws that cut brick, timber, tiles and other materials create a noise level that can permanently damage your hearing. This is a long term process and after many years working in the industry, permanent damage occurs. Many people take this far too lightly and after years in the industry you may have wished that you listened to early warnings. By then it is too late
The earplugs shown above offer excellent protection and these reduce the noise down to an acceptable level. Earplugs can reduce the noise level 20 to 35 decibels. It is best to have suitable protection that offers safe reduction. It is not wise to make it impossible to hear any noise as this can become dangerous. Your trainer will demonstrate their correct use.
Eye Protection Eye protection is a must where there is a chance of getting something caught in your eyes. Far worse than this is the chance that something may pierce your eye. It is recommended that people wear quality protective safety glasses all of the time. They may also be lightly tinted for sun protection. These are not expensive and can look quite fashionable. Once again, many people take this advice far too lightly and only wish they had listened when told of the dangers. Other forms of eye protection are available including full face shields.

!
!Type Title Standard Issue Version Ref Release
date
Kit CCPCCPD2011A NVR Standard 15.5 1 1 Handle painting and decorating materials 07/03/14 19/082013
Page!27!of!77
!Eye protection is essential on site
!!!!! !
Head Protection Wearing hard hats are now the standard that must be followed in construction. Commercial building sites now demand this and you will not be permitted to work without wearing them. The housing industry is slow in making hard hats compulsory but should be seriously considered. You only have one head and one severe blow to your head can be fatal. There are basic hard hats to select from, ventilated hardhats, attachments to your hardhat in the way of broad brims, ear muffs, communication devices etc.
!!! !!
Select a hardhat that is comfortable and cool to use and one that offers good support from inside.

!
!Type Title Standard Issue Version Ref Release
date
Kit CCPCCPD2011A NVR Standard 15.5 1 1 Handle painting and decorating materials 07/03/14 19/082013
Page!28!of!77
!
Hand Protection Gloves are available for many duties that are hard on the hands. The range includes general purpose gloves, gloves for heat protection, gloves for chemical protection, and many others. You should not be afraid to wear gloves simply because you may be considered soft. Ignore such remarks and protect yourself from bad cuts and chemicals attack etc.
!
!
Hundreds of different types of gloves for hand protection
Mouth or Breathing Protection Breathing dust, fumes and chemical vapours are all possible while working in the construction industry.
!
!!
From simple dust masks to more complex breathing masks are available. What is needed for the job may depend on the type of job being performed. If in doubt it may be necessary to consult your employer or read the material safety data sheet that is available. More information is provided on this topic later.

!
!Type Title Standard Issue Version Ref Release
date
Kit CCPCCPD2011A NVR Standard 15.5 1 1 Handle painting and decorating materials 07/03/14 19/082013
Page!29!of!77
These are masks for dust, mist and fume protection
! !
!
! !!
Many types of simple masks are available to protect against small amounts of dust
Skin Protection Other types of PPE are available and should be seriously considered as part of the tool kit.
• Sun creams min factor 30+ • Extended brims for hard hats or straw hats or wide brimmed ones • Protective creams from cement etc.
!
! !! !!
Each of the PPE displayed over the previous pages is only a sample and a very wide range of each of the PPE items is possible. It is important to make your selection carefully because if you are not protected properly, you may suffer lifelong consequences. Later you will read about many other issues of poisoning and chemicals that can lead to extreme health risks. Read advice provided carefully and do not take anything for granted.

!
!Type Title Standard Issue Version Ref Release
date
Kit CCPCCPD2011A NVR Standard 15.5 1 1 Handle painting and decorating materials 07/03/14 19/082013
Page!30!of!77
The wearing of PPE is nominated on many building sites and you may see this as signs at the entry of the premises. If the signs state that nominated or displayed PPE must be worn, then it becomes illegal not to wear it and you may be fined if you do not.
If a building site does not have signs displaying PPE to be worn your employer may inform you about it. Your employer will have a policy that you must wear nominated PPE for various duties. Inspectors may request to see the work method statement or the construction workplace safety plan, to see what safety items is required on site. Ignoring advice or signs can lead to fines. !
Machinery Guards Manufacturers of machinery are required to produce equipment with safe quality guards and protection devices. These are provided you’re your safety and it is a very dangerous practice to interfere with these protective devices.
!! !!
Check tools and report faults When selecting tools and equipment for the first time in the day, inspect them to see that they are safe to use. If you come across a damaged tool you need to ask "What do I do with this now?" For your part, the employee, it is necessary to obtain a faulty tool tag and identify it as not safe to use. You then draw attention of the problem to your employer and they will organise the repair of the tool.
Below - damaged electrical machinery.!!
!! !
If your employer asks you to use the tool just this once and the condition of the tool is much like the one shown above or below, you are strongly advised not to. Your life is too important to say "Ok, just this once".

!
!Type Title Standard Issue Version Ref Release
date
Kit CCPCCPD2011A NVR Standard 15.5 1 1 Handle painting and decorating materials 07/03/14 19/082013
Page!31!of!77
!
! ! !!
Daily Routines or procedures There will set routines for you to perform on a daily basis. If you are the person who connects extension leads etc. in readiness for other trades people to use, it is necessary for you to understand the correct procedures. For example, if connecting power extension leads to a power supply there are some basic rules to apply. These are:
• You must have an earth leakage device or ensure that the power supply is protected by earth leakage. Construction sites that use temporary power supplies are required to have these built into the power supply. If using a private household power supply, it is essential to connect an Earth Leakage Device (ELD) to the power point first.
!
• Connect extension leads to the ELD or protected power supply. • Do not use double adaptors at any time. These are illegal. • Use only heavy-duty extension leads. • It is unwise to connect several leads to create a very long power source. This causes
significant power loss and can damage the tools being used. • Protect the extension leads so that they do not get damaged by other working in the vicinity. • If wheel barrows or vehicles are required to run over the leads, protect them with two boards • Spaced apart to protect the lead. Better still keep them up off the road or walk ways
out of danger.

!
!Type Title Standard Issue Version Ref Release
date
Kit CCPCCPD2011A NVR Standard 15.5 1 1 Handle painting and decorating materials 07/03/14 19/082013
Page!32!of!77
!!!!!!!!!! !!
• Do not allow connections to get wet or leads and hoses to get near anything that is very hot as this may melt the outside protection surface or the hoses and leads.
• Keep a check on the expiry date of the leads. When almost due for testing, bring this to the attention of your employer.
!
The duties listed above are a sample of everyday duties just for setting up power supplies. You may be required to make ready for other daily equipment use. Some of these include:
!
!
!
!
!
• Air compressors and hoses
• Air guns and fasteners
• Power tools
• Hand tools
• Wheel barrows

!
!Type Title Standard Issue Version Ref Release
date
Kit CCPCCPD2011A NVR Standard 15.5 1 1 Handle painting and decorating materials 07/03/14 19/082013
Page!33!of!77
!
!
!
!
!
!
!
!
!
!!!!!!!!!

!
!Type Title Standard Issue Version Ref Release
date
Kit CCPCCPD2011A NVR Standard 15.5 1 1 Handle painting and decorating materials 07/03/14 19/082013
Page!34!of!77
• Spray tools
• Planks for scaffolds
• Check batteries for battery operated tools
• Laser levels or automatic levels
Many jobs have duties often required to be carried out at the beginning of the day. Similar duties are required at the end of the day. Consider: • Rolling up extension leads so that they do not get tangled • Air compressor hoses carefully coiled and tied and placed where no damage can occur
etc. The most common tools and equipment used in Handle painting and decorating materials would be:
A heat gun or hair dryer – this would be used for drying the sample in order to determine the finished colour. If you are using a heat gun ensure that you use precaution as the end can get very hot. Also beware that you don’t burn or discolour the sample through creating too much heat.
A Pallet – you will find it advantages to mix a small amount of paint on a pallet to establish what colour you will need before mixing the whole batch. You will find an ordinary floor tile a very handy pallet, it can be easily cleaned and used again. Spectrometer – most paint distributors have a spectrometer. This tool measures the light waves from the surface of an object or sample and interprets the colour. It then calibrates what base and stainers are needed to match the colour. This is usually a free service and you may find at times that you will want to take advantage of this, especially if you are mixing large volumes of paint or you are having difficulty matching the base. The spectrometer is not as effective as matching by eye and it is also usually not convenient to leave the job and go the store to match the colour.
A fan deck – a fan deck of colours is available from most distributors of paint. The advantage of a fan deck is that you may find a similar colour to the one you are matching. Then you can adjust the colour slightly to the sample. This will be useful when matching colours other than white base colours. You will learn more about bases as we go on. Colour Wheel – a colour wheel can be very useful for assisting a customer select a colour scheme. We will learn more about selecting colour schemes and colour harmonies later in the lesson.
The packing-up of equipment at the end of the day is possibly more important than unpacking it in the morning. This is because damage can occur if equipment is not placed correctly. Extension leads can get tangled, hoses damaged from sharp objects etc.

!
!Type Title Standard Issue Version Ref Release
date
Kit CCPCCPD2011A NVR Standard 15.5 1 1 Handle painting and decorating materials 07/03/14 19/082013
Page!35!of!77
Handle painting and decorating materials In this section you will find learning resources to support the underpinning knowledge and skills relating to: Competency CPCCPD2011A elements: 1, 2, 3, 4 and 5 1. Plan and prepare work 2. Identify, handle and store painting and decorating materials 3. Identify, handle and store painting and decorating materials 4. Select and distribute painting and decorating materials in preparation for use 5. Clean
Paint products, materials and components It is important for a tradesperson to be familiar not only with the types of paints and products that they will be using in the industry but also with the ingredients of the products. This is important not only for the application but also the storing and handling of materials. Apart from the product themselves that can be ruined if used inappropriately there is also many considerations when it comes to your health and safety. Many products are not very hazardous on their own but can be deadly when combined with another material. For example Brake Fluid may not seem like a very dangerous product but when mixed with Sodium Hypochlorite may cause an explosion. Then there are products like two pack epoxies that many have one type of hazard in one part of the paint and another in the other part of the paint. For example many industrial coatings contain Lead in the part A of the paint this provides an obvious hazards. At the same time the part B contains Isocyanides that form another type of Hazard. Another reason for developing knowledge of materials is the potential for ruining a product. This could happen by: Contaminating it with another product __ inappropriate application Using a coating over the wrong substrate Using the wrong coating over another coating Incorrect thinning Protection of stacked/stored materials There are basic rules for manual handing of all materials and special methods used for handling some different types. One of the main reasons for this special care is to prevent injury to yourself, others in the vicinity, and damage to the material itself. Incorrect handling can lead to unnecessary injury, and poor storage and stacking can lead to misplaced or ruined materials. It has been estimated that the manual handling of materials accounts for about 25% of all occupational injuries. Given that the handling of materials is a basic element of most jobs this is not a surprising statistic. Such manual handling injuries are not limited to back strains, but can occur to the fingers, hands, legs and feet. Common injuries are: Strains; Sprains;! Fractures; Bruises.

!
!Type Title Standard Issue Version Ref Release
date
Kit CCPCCPD2011A NVR Standard 15.5 1 1 Handle painting and decorating materials 07/03/14 19/082013
Page!36!of!77
These are mainly caused by: Unsafe manual handling practices such as improper lifting; Carrying too heavy a load; Incorrect grip when lifting; Failure to use proper protective equipment; Poor job design. Storing Procedures Paints and wallpapers should be stored in clean dry conditions. Wallpaper, if exposed to water or moisture, will become spoiled, especially if it is a pre-glued type. It should be kept in an area where it cannot be physically damaged. If creased or torn it cannot be used. Keep wallpapers in their plastic wrapping until they are actually required to prevent dirt marks and any water spoilage. Paint should be kept in clean dry conditions to prevent water or dirt entering the containers. After opening, tins must have the lids properly sealed down otherwise any remaining paint will spoil inside the tin/container.
Waste material Note: The following information has been taken from the NSW Department of Environment and Conservation (incorporating Environment Protection Authority) www.environment.nsw.gov.au The disposal of waste products is a major task in the Painting & Decorating industry. An examination of the waste leaving the premises should be done to assess the type and quantity of the waste. Some waste may be putrescible (rots or decomposes quickly), or waste that will be “prescribed”. This is waste that cannot be disposed of by normal methods, as there are laws about where you can put it. It may have to go to a special treatment plant for incinerating, neutralising or storage. Your employer should observe relevant local, state and federal requirements regarding waste disposal. Paint clean - environmental information for painters The benefits for a business of becoming environmentally responsible include: A better business image. Minimised potential for environmental fines and prosecutions. Increased customer patronage. Cost savings.

!
!Type Title Standard Issue Version Ref Release
date
Kit CCPCCPD2011A NVR Standard 15.5 1 1 Handle painting and decorating materials 07/03/14 19/082013
Page!37!of!77
A painter should Develop and implement an environment management plan for all jobs, big and small. Minimise the amount of waste you create and control its disposal responsibly. Check and signpost the stormwater drains and make sure all workers know that only clean water may be put into them. Do not hose or sweep waste material, litter or any other matter into gutters or drains. Have in place spill prevention and clean-up procedures. If a spill occurs that threatens to harm the environment you must tell the EPA or local council as soon as possible.!!
Check with your local sewerage utility for their requirements in relation to trade wastewater treatment and discharge before you discharge any wastewater into the sewer. Make sure that all paints and equipment are stored away from the stormwater drains. Know the special requirements for the storage and disposal of Dangerous Goods that you work with. Make sure the contractors and workers on the site know about your commitment to protecting and caring for the environment. Be aware that the maximum penalties for most pollution offences have been doubled to $250,000 for companies and $120,000 for individuals, under the Protection of the Environment Operations Act 1997. Be aware that even very minor breaches of environmental laws can result in infringement notices of up to $1500. Doing the job smarter The following sections outline suggested 'good practice' procedures for each stage of a painting project. Preparation Develop a management plan for the job before starting: Check the location of stormwater drains (and signpost if necessary). Develop a spill clean-up plan and make sure all staff know what to do in the event of a spill. Designate a paint contractor's area (for large jobs). This area should be signposted, enclosed, cool and well ventilated, and include the following: A paint and equipment storage area. Allow at least one paint brush or roller per type and colour of paint used on the project, so that equipment does not have to be washed out prematurely. Storage areas for equipment in current use. Keep paint types such as water-based and solvent-based separate. For example, use a roller-sleeve canister storage system, allocated by paint type and colour. Paint wash-out areas. Again, keep paint types such as water-based and solvent-based separate.

!
!Type Title Standard Issue Version Ref Release
date
Kit CCPCCPD2011A NVR Standard 15.5 1 1 Handle painting and decorating materials 07/03/14 19/082013
Page!38!of!77
Waste storage areas for dry empty containers before collection for recycling. Separate these into steel, plastic and so on. A general waste area with a general waste bin and another bin for holding any rags or paper that carry solvent or solvent-based paint. This bin should hold sufficient water to cover the rags and paper, or be made of non-combustible material such as metal with a close-fitting lid. If practical, rags and paper can be contained in an area that is open to allow air drying. Storage areas for flammable goods, posted with flammable goods signage appropriate to the type of solvent or paint (see illustration). On smaller projects or in occupied home units, houses and offices, it may not be possible or practical to follow all the recommended steps. In these cases, follow as many as you can and always remain aware of the possibility of polluting the environment. Equipment Each paint wash-out area should include the following: Three or more containers, holding sufficient solvent or water in which to dip brushes and rollers, and with sufficient height above the liquid to allow high-speed spinning of roller sleeves while containing the liquid flying off the roller—20 L drums holding 3 to 5 L of liquid work well. For solvent, drums should be metal rather than plastic (unless the type of plastic is approved for that solvent). A roller spinner (for roller sleeves only; brushes should be shaken out or spun by hand, as high-speed spinning can damage bristles by splaying them excessively). A supply of clean water, or storage for new or recycled solvent. A supply of material for enclosing brushes and rollers during short breaks. For example, plastic film or bags, and roller sleeve canisters. A number of proprietary products do this. Equipment for processing washings. For example, a drum for settling of solids, paint filters, capillary absorption ropes for processing solvent-based paint washings, and a loose-lidded container to allow oxidation of binders in solvent-based washings. A supply of gloves to limit skin contact with paint and solvents while washing. A supply of materials for wiping up. For example, cloth, rags, paper. The Queensland Sustainable Technology Program has supported scientific testing of a portable device for disposing of acrylic paint washings. The device works by capturing the water used for cleaning paint equipment and using a specially formulated flocculent to settle the paint as sludge. The sludge can then be mixed with cement to prevent leaching from landfill. The water can be reused a number of times, thus reducing the amount needed. Further details can be obtained from the Manager, QSTDP, on (07) 3224 5632!!!
.

!
!Type Title Standard Issue Version Ref Release
date
Kit CCPCCPD2011A NVR Standard 15.5 1 1 Handle painting and decorating materials 07/03/14 19/082013
Page!39!of!77
Clean-up procedures Is cleaning necessary? When painting of an area is completed, equipment needs to be washed up only if there is no other area that needs the same paint and equipment, or there is to be an extended break before the same paint and equipment are used again. Otherwise, the equipment may be wrapped to slow the hardening of the paint during the break. The equipment can be wrapped in an impervious material such as plastic film or a plastic bag or a purpose made canister. When equipment is not to be reused in the near future: Return as much paint as possible from rollers, brushes, trays and paint pots back into paint containers at the end of the section, day or job. Place each roller sleeve into a canister, if one is available, add as much solvent or water as specified by the manufacturer and shake it before resealing. Put the canister back into the equipment storage area. If a canister is not available, stop the paint from drying by submerging the roller sleeve in the dirtiest solvent or water until it can be cleaned later. Wipe excess paint residue from trays, paint pots and other tools (other than brushes or waste in a nominated waste bin located close to the paint wash-out area. Wash each brush in successive drums of solvent or water, starting with the dirtiest liquid and moving towards the cleanest. Twirl the brush between your hands before moving on to the next drum. Use a brush to rinse the residual paint from trays, paint pots and other equipment into the drum of wash liquid. Then wipe this equipment dry. Brushes can be stored upright (preferably hanging, to avoid distortion of the bristles) in the cleanest drum of liquid overnight, ready to be spun out between the hands before the next use. If a brush is not to be further used on the job, after cleaning it as far as possible in a sequence of drums wash it thoroughly in soap and warm water, rinse it clean in running water and lay it flat to dry.

!
!Type Title Standard Issue Version Ref Release
date
Kit CCPCCPD2011A NVR Standard 15.5 1 1 Handle painting and decorating materials 07/03/14 19/082013
Page!40!of!77
If a roller sleeve was stored in a canister, it can remain there overnight or a little longer until the next use, when it can be spun out with a roller spinner into the dirtiest drum and used for the same type of paint. If a roller sleeve needs to be washed out, wash it in successive drums of solvent or water, starting with the dirtiest liquid and moving towards the cleanest. Use a roller spinner to spin the liquid out of the roller sleeve into the drum before moving on to the next drum. If a roller sleeve is not to be further used on the job, after cleaning it in the drums, wash it thoroughly in soap and warm water, rinse it clean in running water, spin it out and stand it on end while it dries. Alternatively, after it has been allowed to dry, it may be economic to discard it as ordinary waste.! Each day (or sooner if usage requires) take the drum with the dirtiest water out of the drum of clean water at the other end of the line. Move the other drums up one: that is, yesterday's second dirtiest drum becomes todays dirtiest, and so forth. This is essential to limit runaway bacterial and algal growth in the washings. If the break is longer than overnight, then replace all drums other than the cleanest in this way. Check the canisters holding wash water for possible algal growth, and empty them regularly into the dirtiest wash drum. Replace with clean water.! Replace the dirtiest solvent drum with a drum of clean solvent (using the same cyclical pattern as above) only when its burden of paint limits its usefulness for further washing of equipment. (Solvents are not prone to runaway bacterial and algal growth.) Similarly, canisters holding wash solvent need to be washed out and refilled with clean solvent only when the paint loading is excessive. Dispose of brushes, roller sleeves and other equipment that are unfit for further use in the nominated waste bin located near the paint wash-out area.

!
!Type Title Standard Issue Version Ref Release
date
Kit CCPCCPD2011A NVR Standard 15.5 1 1 Handle painting and decorating materials 07/03/14 19/082013
Page!41!of!77
What should you know about waste management? Product packaging and labels can help you determine the chemical composition and properties of the products. The labelling may also tell you the properties of a waste and its contaminants. Typical painter's waste streams, waste classifications & management recommendations The following table provides information on the classification and management of typical paint wastes. It is a guide only, and provides the likely waste classifications. The responsibility for classification and disposal rests with you. If you are unsure of the classification of a waste, you must find out the properties of the waste and its contaminants and follow the Waste Guidelines. If in doubt, you may choose the worstcase classification (e.g. hazardous waste).
Waste stream
Likely waste classification according to the waste guidelines
Recommendations
Dry!
Paint!(water!or!
solvent!based)
May!be!classified!as!solid!
waste!unless!it!contains!toxic!
additives!such!as!lead.!
Dry!lead!paint!waste!or!lead!paint!
contaminated!soil!from!residential!
premises!or!educational!or!
childcare!institutions!is!classified!
as!solid!waste.!
Dry!lead!paint!from!commercial!or!
industrial!premises!is!potentially!
industrial!or!hazardous!waste!
Depending!on!the!concentration!of!
lead.!It!needs!to!be!assessed!and!
classified.!
Dry!paint!containing!toxic!
contaminants!is!potentially!
industrial!or!hazardous!waste.!It!
needs!to!be!assessed!and!classified.!
Solid!waste!(e.g.!dry!bulk!paint!mixed!
with!paper,!cardboard!etc.)!can!be!
disposed!of!with!municipal!and!
domestic!waste!or!into!waste!skips!for!
final!disposal!to!landfill.!
Make!sure!the!landfill!is!licensed!or!
can!otherwise!legally!receive!this!type!
of!solid!waste.!
Should!the!dry!paint!waste!be!
classified!as!industrial!or!hazardous!
waste,!follow!the!EPA's!requirements!
for!their!handling!and!disposal.!
Explore!all!treatment,!recycling!and!
reuse!options!available.!
Liquid!paint!
(waterH!or!
Solvent!based)
SolventHbased!paint!can!be!
flammable!(Dangerous!Goods)!and!
therefore!be!classified!as!
hazardous!waste.!
Otherwise,!liquid!paint!
(including!waterHbased!paint)!
would!generally!be!classified!as!
Group!A!waste.!
It!is!illegal!to!dispose!of!any!liquid!
paint!into!open!waters,!the!
stormwater!system!(e.g.!drains,!
gutters!or!pits),!the!sewer!or!landfill.!
Save!the!paint!for!the!next!job!or!find!
someone!who!can!use!it.!
An!EPA!licence!is!required!to!transport!
loads!over!200!kg!where!a!fee!is!
involved.!Send!the!paint!to!a!liquid!
waste!treatment!facility!licensed!to!
receive!this!type!of!waste.!
Water!
washings!
from!cleanHup!
of!water!based!
paint
These!are!likely!to!be!Group!
A!waste. It!is!illegal!to!dispose!of!any!liquid!
paint!into!open!waters,!the!
stormwater!system!(e.g.!drains,!
gutters!or!pits),!the!sewer!or!landfill.!
Save!the!paint!for!the!next!job!or!find!

!
!Type Title Standard Issue Version Ref Release
date
Kit CCPCCPD2011A NVR Standard 15.5 1 1 Handle painting and decorating materials 07/03/14 19/082013
Page!42!of!77
someone!who!can!use!it.!An!EPA!
licence!is!required!to!transport!loads!
over!200!kg!where!a!fee!is!involved.!
Send!the!paint!to!a!liquid!waste!
treatment!facility!licensed!to!receive!
this!type!of!waste.!
Solvent!
washings!
from!cleaning!
up!paint
Solvent!washings!can!be!
flammable!(Dangerous!Goods)!and!
therefore!be!classified!as!
hazardous!waste.!
A!solvent–water!mixture!that!is!
not!flammable!could!be!classified!
as!Group!A!waste!
Separate!the!paint!solids!and!decant!
the!solvent!for!reuse.!
It!is!illegal!to!dispose!of!any!solvent!
waste!or!solvent!washings!into!open!
waters!or!the!stormwater!system!(e.g.!
drains,!gutters!or!pits).!
Very!dilute!solvent!washings!may!be!
discharged!into!the!sewer!subject!to!
authorisation!from!the!local!sewerage!
authority!or!council.!
An!EPA!licence!is!required!to!transport!
loads!over!200!kg!where!a!fee!is!
involved.!
Send!solvent!washings!to!a!solvent!
recycler!or!liquid!waste!treatment!
facility!
licensed!to!receive!this!type!of!waste Paint!cans If!empty!and!dry!with!no!free!
liquid,!they!may!be!classified!
as!solid!waste.
May!be!recycled!by!steel!recyclers.!
Councils!may!provide!information!
regarding!the!local!requirements!and!
procedures!for!collection!or!dropHoff.!
The!metal!cans!should!be!empty!and!
dry!and!have!lids!off.!Alternatively,!
paint!cans!(dry!&!punctured)!can!be!
landfilled.!Make!sure!the!landfill!is!
licensed!or!can!otherwise!legally!
receive!this!type!of!solid!waste.!
Aerosol!cans Empty!aerosol!cans!remain!
Dangerous!Goods!because!
of!the!residual!compressed!gas!
they!contain.!These!are!classified!
as!hazardous!waste.!
Do!not!send!to!landfill.!
May!be!recycled!by!steel!recyclers.!
Councils!may!provide!information!
regarding!the!local!requirements!and!
procedures!for!collection!or!drop!off Brushes,!
rollers,!rags,!
trays
Provided!they!are!dry!with!no!
!ree!liquid,!these!items!may!be!
classified!as!solid!waste!
May!be!disposed!of!with!municipal!and!
domestic!waste!or!into!waste!skips!for!
final!disposal!to!landfill.!Make!sure!the!
landfill!is!licensed!or!can!otherwise!
legally!receive!this!type!of!solid!waste.!

!
!Type Title Standard Issue Version Ref Release
date
Kit CCPCCPD2011A NVR Standard 15.5 1 1 Handle painting and decorating materials 07/03/14 19/082013
Page!43!of!77
Lead hazards Lead particles are released when old lead paint flakes and peels and collects as dust in ceiling, wall and floor voids. If dust is generated it must be contained. If runoff contains lead particles it must be contained. Lead is extremely hazardous, and stripping of lead base paint and the disposal of contaminated waste must be carried out with all care. Lead is a cumulative poison and even small levels in the body can have severe effects.
Graffiti Many of the paints and substances used for graffiti are toxic, to both the graffitists and the environment. Even more damaging are the substances often used to remove graffiti. If these substances are not used carefully, they can cause considerable environmental damage to our waterways. Early removal of graffiti is recommended to discourage offenders and to minimise the hardening of the substance used. Paints are more easily removed within the first 72 hours after application. If you don’t know what the substance is, use the precautionary principle and assume that it is hazardous. The two basic methods used to remove graffiti are chemical and abrasive. Chemical methods include natural cleaners, petroleum-based solvents and paint strippers. Use potent chlorinated solvents only in open-air locations or when wearing an appropriate breathing apparatus. Aerosol paints are the most difficult to remove. Other substances such as felt tip markers, crayons, ordinary paints (both water- and solvent-based), lipstick and shoe polish can also be encountered. Some can be removed with detergent and water; paints may need solvents recommended by paint manufacturers. Whatever you use you must prevent the runoff from polluting the environment. Procedures for working with graffiti are contained in a special training programs available from Other RTO’s or training providers across Australia Working in environmentally sensitive areas Environmentally sensitive areas include those that would be dramatically affected by exposure to fumes, dust, lead, runoff or noise. Examples include paint spills into waterways and upwind sandblasting adjacent to a school or playground. Paint waste can contaminate soil. Marina owners and managers must be aware of their responsibilities to inform and supervise contractors and boat owners, who may pollute the waterways by painting, stripping or anti-fouling vessels. Safe working methods should be developed for all work in sensitive areas. Insurers expect statements of such methods, and occupational health and safety implications mean that the principal contractor or owner should insist on their development.

!
!Type Title Standard Issue Version Ref Release
date
Kit CCPCCPD2011A NVR Standard 15.5 1 1 Handle painting and decorating materials 07/03/14 19/082013
Page!44!of!77
Occupational health and safety It is beyond the scope of this guide to detail the occupational health and safety requirements for painters on site. An occupational health and safety plan needs to be developed and adhered to. Remember: Vapours from paints and solvents can cause harmful effects to workers. Allow adequate ventilation when working in enclosed areas or use breathing apparatus. The escape of such vapours must be strictly controlled to avoid harm to nearby people. Do not smoke near open cans of paint. Health hazards are associated with working with lead paint. Obtain Material Safety Data Sheets from the manufacturers for all potentially dangerous substances.
Never wash brushes, rollers and trays by flushing them under running water, which ends up in the sewer, stormwater network or natural waterways. Contaminated water can reach underground water and pollute it. Be aware of the natural water cycle. Never empty paint wastewater into any drain or natural waterway or where it could reach a drain or waterway. Check for any drains in your vicinity. Note that wood chips are often laid over plastic, which may lead water to a drain. Never dispose of used turps or other solvents by tipping them down any drain leading to the sewer, stormwater network or natural waterways. Never mix flammable solvents with water, because the waste classification and therefore the disposal requirements are likely to change to Group A or hazardous. Never use the same washing facilities for water-based and solvent-based paints. If both types of paints are to be used on a project, then establish two separate rows of wash-out containers. Never deposit any liquid or containers with liquid inside into the waste bin. Never burn off paint tins. Risk Management The risk assessment process is our main tool for managing safety issues. Risk assessments must be carried out for all hazardous activities, especially in unfamiliar workplaces or work activities. A hazard is anything that could cause injury or illness. A risk is the likelihood a hazard will result in an injury or illness. A risk assessment evaluates the risk associated with a hazard.
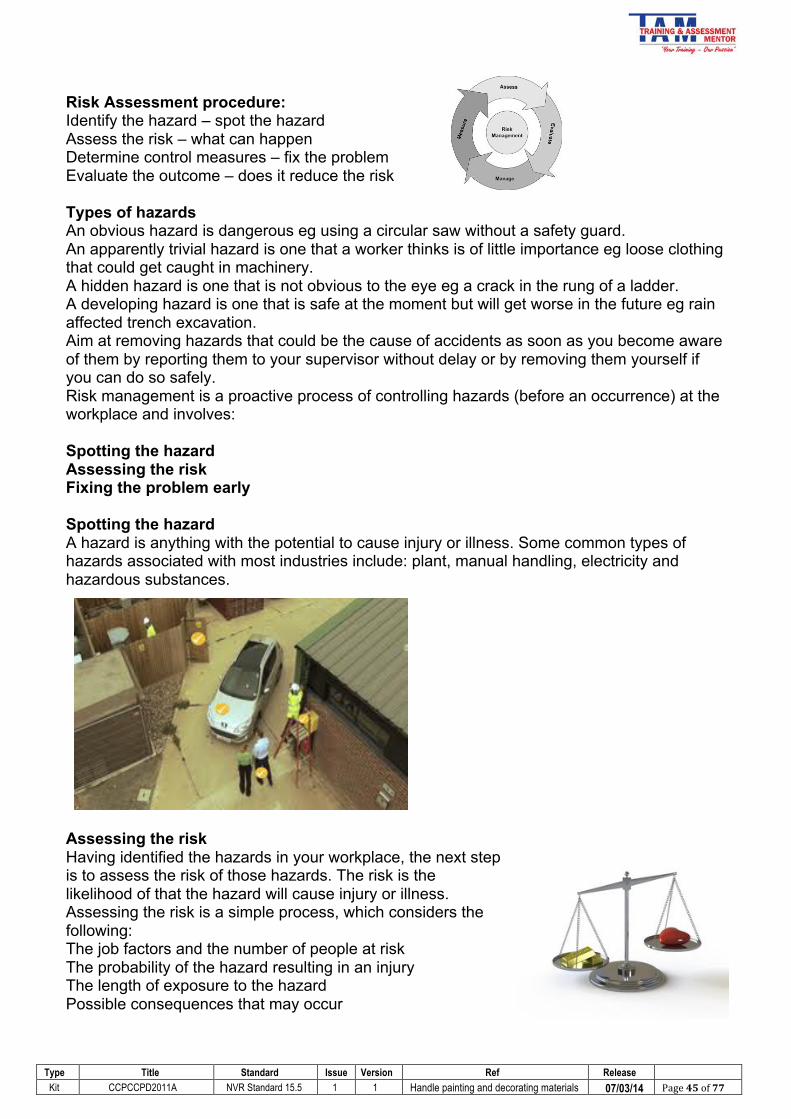
!
!Type Title Standard Issue Version Ref Release
date
Kit CCPCCPD2011A NVR Standard 15.5 1 1 Handle painting and decorating materials 07/03/14 19/082013
Page!45!of!77
Risk Assessment procedure: Identify the hazard – spot the hazard Assess the risk – what can happen Determine control measures – fix the problem Evaluate the outcome – does it reduce the risk Types of hazards An obvious hazard is dangerous eg using a circular saw without a safety guard. An apparently trivial hazard is one that a worker thinks is of little importance eg loose clothing that could get caught in machinery. A hidden hazard is one that is not obvious to the eye eg a crack in the rung of a ladder. A developing hazard is one that is safe at the moment but will get worse in the future eg rain affected trench excavation. Aim at removing hazards that could be the cause of accidents as soon as you become aware of them by reporting them to your supervisor without delay or by removing them yourself if you can do so safely. Risk management is a proactive process of controlling hazards (before an occurrence) at the workplace and involves: Spotting the hazard Assessing the risk Fixing the problem early Spotting the hazard A hazard is anything with the potential to cause injury or illness. Some common types of hazards associated with most industries include: plant, manual handling, electricity and hazardous substances.
Assessing the risk Having identified the hazards in your workplace, the next step is to assess the risk of those hazards. The risk is the likelihood of that the hazard will cause injury or illness. Assessing the risk is a simple process, which considers the following: The job factors and the number of people at risk The probability of the hazard resulting in an injury The length of exposure to the hazard Possible consequences that may occur

!
!Type Title Standard Issue Version Ref Release
date
Kit CCPCCPD2011A NVR Standard 15.5 1 1 Handle painting and decorating materials 07/03/14 19/082013
Page!46!of!77
TASK HAZARD RISK CONTROL METHOD Unload truck, heavy load, sprain/strain, team lift or forklift (fixing the problem) Fixing the problem Having spotted the hazards and assessed the risk of injury, employees without supervisory responsibilities should report hazards to designated personnel. Designated personnel may include supervisors, managers, occupational health and safety representatives and officers or other personnel in control of the workplace. Once you’ve told these designated personnel, it is the employer’s responsibility to then solve the issue and provide a safe workplace. Nearly all workplace hazards can be minimised or controlled. Management can choose to control the hazard in a number of ways. The following hierarchy of controls provide a range of mechanisms to manage hazards at the workplace. Those at the top of the hierarchy are considered ideal, since they control the hazard at their source. Other lower order controls such as personal protective equipment (PPE) simply control the worker’s exposure to hazards. However, all controls can be effective, if carried out properly. Eliminate the hazard – removing chemicals not used any more. Substitute the hazard – using a less toxic chemical. Engineering the hazard – ventilation. Administration - safe work procedures, restrict access, rotate workers, training, housekeeping. Personal protective equipment – gas mask. For further information consult the Advisory Standard Risk Management 2000

!
!Type Title Standard Issue Version Ref Release
date
Kit CCPCCPD2011A NVR Standard 15.5 1 1 Handle painting and decorating materials 07/03/14 19/082013
Page!47!of!77

!
!Type Title Standard Issue Version Ref Release
date
Kit CCPCCPD2011A NVR Standard 15.5 1 1 Handle painting and decorating materials 07/03/14 19/082013
Page!48!of!77
There are many hazards in the Construction industry that could result in injury or disease. Listed below is a risk management approach to some of the hazards that construction workers may be exposed to on a daily basis:

!
!Type Title Standard Issue Version Ref Release
date
Kit CCPCCPD2011A NVR Standard 15.5 1 1 Handle painting and decorating materials 07/03/14 19/082013
Page!49!of!77
PAINT – TYPES AND USES Although painters no longer mix their own paint, it is important that you, as a modern day professional Painter and Decorator, have a basic understanding of paint technology. You will need to understand paint and its ingredients (components) so that you can: Identify the causes of paint failure Know the reasons why paint coatings may fail to dry, stick to a surface or perform as expected Select the correct paint system for a given job Solve painting problems Give advice to the public on painting and decorating Write specifications for painting contracts REASONS FOR APPLYING PAINT 1. PROTECTION
Paint protects surfaces from damage and the effects of the weather and enables them to be cleaned.
2. DECORATION
Paint provides colour and texture to surfaces. it makes them pleasing to the eye and makes our surroundings pleasant to live and work in.
3. IDENTIFICATION
Paint and colour is used to identify surfaces, products and areas for safety, advertising etc.
4. SANITATION
Used for hygiene and ease of cleaning BASIC PAINT COMPONENTS & THEIR FUNCTIONS Decorative paints are commonly known as oil [solvent) based paints or water based paints. Most surface coatings have three main components: 1. BINDER The binder (sometimes known as the vehicle) is the single most important component in paint. It is the liquid part of the paint that provides many important qualities. Examples of common water based binders are Acrylics and Latex P.V.A. (also known as Vinyls). The most widely used oil based binders for decorative paints are Alkyds and other mixtures of oils and resins. The function of a binder is: To change from a liquid coating to a dry film To provide gloss! To cause the coating to adhere to the surface To give elasticity to the film To provide resistance to the weather, chemicals & abrasion To bind the pigment particles together To hold the pigment in suspension

!
!Type Title Standard Issue Version Ref Release
date
Kit CCPCCPD2011A NVR Standard 15.5 1 1 Handle painting and decorating materials 07/03/14 19/082013
Page!50!of!77
2. PIGMENT The pigment is a powder that is added to the binder, to form the basis of the paint coating.!Coloured pigments are made, which give clean decorative colours, and other pigments are made which give protective qualities to exterior paints Examples of pigments giving protection to metal are zinc chromate and iron oxide. The most common white pigment used is titanium dioxide. There is another group of pigments called Extenders these effect the gloss level of the paint. The main function of a pigment is: To provide colour To help the binder to protect the surface To provide opacity or hiding power to the paint To control the gloss level of the paint 3. THINNER A thinner is a liquid that can reduce the viscosity of a paint, (this means it can make the paint thinner). For water-based paints - water is the thinner. For oil-based paints, mineral turpentine is the thinner but other oil paints may require a different solvent to thin them. NOTE: The painter to help make the paint easier to apply under certain conditions usually adds a thinner, but it should be added sparingly. It is not always necessary to add a thinner to the paint. Remember that the thinner will make the binder thinner, which may affect the performance and function of the binder. Example: Too much thinner may cause loss of gloss or cause a reduction in opacity. The function of a thinner is: To make the paint liquid enough to be easily and evenly applied To help wet the surface To help control the drying time To evaporate and begin the drying process To assist the binder to flow out evenly TYPES OF PAINT COATINGS There are many types of paint coatings available. They can be grouped together and listed as either: Primers Sealers Intermediate coatings (under coats) Finish coatings

!
!Type Title Standard Issue Version Ref Release
date
Kit CCPCCPD2011A NVR Standard 15.5 1 1 Handle painting and decorating materials 07/03/14 19/082013
Page!51!of!77
1. PRIMERS A primer is the first coat of paint to be applied to a bare surface. It is the foundation of a paint system and its stability is most important. The functions of a primer are: To help make absorbent surfaces. Non-absorbent. To provide adhesion to the surface To form a barrier over chemically active surfaces To protect metal against corrosion 2. SEALERS A sealer is a coating that is specially made to do a specific task. Some examples are: Acrylic-based sealers These are made to: Enable same day recoating Become the foundation for an acrylic paint system because of their compatibility to acrylic undercoats and finish coats Be applied over masonry and plaster surfaces Spirit-based sealers These types of sealers: Are designed for use over surfaces which have a tendency to soften or stain through following coats of paint Act as a barrier coat that prevents soluble inks or dyes from staining following coats of paint. Oil-based sealers These sealers have two main purposes: To penetrate and bind loose, powdery surfaces To seal highly porous or cement-type surfaces INTERMEDIATE COATINGS (UNDERCOATS) These types of coatings are applied between the primer or the sealer and the finishing coat. They are also applied over previously painted surfaces prior to the finishing coat. The intermediate coat will vary according to the type of system that is used. The functions of an intermediate coat are to: Adhere to the primer or sealer and provide a surface to which the finishing coats can adhere Provide good opacity Provide good sanding properties
FINISH COATINGS

!
!Type Title Standard Issue Version Ref Release
date
Kit CCPCCPD2011A NVR Standard 15.5 1 1 Handle painting and decorating materials 07/03/14 19/082013
Page!52!of!77
These coatings are the last or final coats of paint applied to a surface. Their functions are to: Protect the surface from the effects of the weather, chemical attack and abrasion Decorate the surfaces and appear pleasing to the eye Provide texture to a surface Provide colour to identify and label surfaces, or to convey a message, e.g. Red for danger, Orange / Yellow for caution, Green for safety Enable the surface to be cleaned easily Finish coatings are available in: Flat (matt) Semi-gloss Gloss Flat, semi-gloss and gloss finishes are available in both water-based and solvent thinned paints.

!
!Type Title Standard Issue Version Ref Release
date
Kit CCPCCPD2011A NVR Standard 15.5 1 1 Handle painting and decorating materials 07/03/14 19/082013
Page!53!of!77
USES OF WATER THINNED FINISH COATINGS FLAT PLASTIC/VINYL/P.V.A. These are interior flat paints sold as either "ceiling paints" or "washable flat plastics" [or vinyls). USES: For interior ceilings and walls where a flat finish is required. NOTES: Not suitable for exterior surfaces or interior surfaces which may get wet, handled or easily marked. Not suitable for "wet areas" such as laundries or bathrooms. FLAT ACRYLIC Should not be confused with plastic paints (acrylics are different binders to plastics and have different qualities). USES: Acrylics give lasting results on exterior surfaces, especially on brickwork, concrete and cement sheet. NOTES: Flat acrylics are available' for interior and exterior surfaces. They are not suitable for interior "wet areas" SATIN ACRYLIC Dry with a satin (semi-gloss) finish and can be used on interior or exterior surfaces. USES: Interior ceilings and walls that may require light washing, e.g. children’s rooms. Sometimes used on exterior brickwork, etc. NOTES: Have poor resistance to abrasion - are not suitable for use on woodwork. Are non-yellowing. GLOSS ACRYLIC Dry with a gloss finish. Gloss acrylic is excellent exterior wall paint. Not commonly used on interior surfaces. USES: Exterior weatherboards, brickwork and Grim, etc NOTES: Are not suitable for use on windows or doors due to their comparative softness and poor resistance to abrasion. OIL MODIFIED ACRYLIC An exterior water based finish available in low-sheen and gloss finishes. This paint is sometimes called a stain but it is opaque. USES: Exterior woodwork and metalwork NOTES: This paint can be applied directly over most un-painted surfaces (pure acrylics cannot). The finish produced, looks the same, as the finish of "pure" acrylic.

!
!Type Title Standard Issue Version Ref Release
date
Kit CCPCCPD2011A NVR Standard 15.5 1 1 Handle painting and decorating materials 07/03/14 19/082013
Page!54!of!77
USES OF SOLVENT THINNED FINISH COATINGS FLAT ENAMEL Flat enamels produce high quality flat finishes. Due to their slow drying properties they are not as widely used as flat plastics. USES: For walls and ceilings in bedrooms, lounge rooms, etc. NOTES: Not recommended for areas subject to steam, cooking or in "wet" areas such as bathrooms and laundries. Tends to give off a strong odour. SEMI-GLOSS ENAMEL An alkyd based enamel sometimes called satin enamel hard satin sheen with good wear and washability. USES. Recommended for interior and sheltered exterior areas. Suited for ceilings, walls and woodwork where a semi-gloss finish is required. NOTES. Not recommended for exposed exterior surfaces. White semi-gloss enamel tends to yellow due to discoloration of the oil content. Tends to give off a strong odour. Dries hard and can be easily cleaned and washed. GLOSS ENAMEL An alkyd based interior and exterior paint having a full gloss finish. Used as the main protective coating in the decorating industry because of its hard, durable finish. USES. Gloss Enamel is suitable for painting ceilings, walls, woodwork and metal. Used in kitchens, bathrooms, laundries and other areas where cooking fumes and moisture occurs. NOTES: Is suitable for windows and doors. Has more gloss than acrylic gloss.

!
!Type Title Standard Issue Version Ref Release
date
Kit CCPCCPD2011A NVR Standard 15.5 1 1 Handle painting and decorating materials 07/03/14 19/082013
Page!55!of!77

!
!Type Title Standard Issue Version Ref Release
date
Kit CCPCCPD2011A NVR Standard 15.5 1 1 Handle painting and decorating materials 07/03/14 19/082013
Page!56!of!77

!
!Type Title Standard Issue Version Ref Release
date
Kit CCPCCPD2011A NVR Standard 15.5 1 1 Handle painting and decorating materials 07/03/14 19/082013
Page!57!of!77

!
!Type Title Standard Issue Version Ref Release
date
Kit CCPCCPD2011A NVR Standard 15.5 1 1 Handle painting and decorating materials 07/03/14 19/082013
Page!58!of!77
!
1. What PPE is needed when handling painting and decorating materials?
______________________________________________________________________
______________________________________________________________________
______________________________________________________________________
______________________________________________________________________
______________________________________________________________________
______________________________________________________________________
2. Where will the quality and preparation guidelines information come from?
______________________________________________________________________
______________________________________________________________________
______________________________________________________________________
______________________________________________________________________
______________________________________________________________________
______________________________________________________________________
3. What is a JSA?
______________________________________________________________________
______________________________________________________________________
4. What is a MSDS?
______________________________________________________________________
______________________________________________________________________
5. What is the EPA?
______________________________________________________________________
______________________________________________________________________
6. What is the APAS?
Self Checks

!
!Type Title Standard Issue Version Ref Release
date
Kit CCPCCPD2011A NVR Standard 15.5 1 1 Handle painting and decorating materials 07/03/14 19/082013
Page!59!of!77
______________________________________________________________________
______________________________________________________________________
7. What are painting and decorating materials?
______________________________________________________________________
______________________________________________________________________
______________________________________________________________________
______________________________________________________________________
______________________________________________________________________
______________________________________________________________________
8. What checks should be made to equipment before and after use?
______________________________________________________________________
______________________________________________________________________
______________________________________________________________________
______________________________________________________________________
______________________________________________________________________
______________________________________________________________________
9. What must be done to finished surrounding areas?
______________________________________________________________________
______________________________________________________________________
______________________________________________________________________
______________________________________________________________________
______________________________________________________________________
______________________________________________________________________
10. Explain the correct lifting procedure for lifting a 15L drum of texture paint?
______________________________________________________________________
______________________________________________________________________
______________________________________________________________________
______________________________________________________________________
______________________________________________________________________
______________________________________________________________________

!
!Type Title Standard Issue Version Ref Release
date
Kit CCPCCPD2011A NVR Standard 15.5 1 1 Handle painting and decorating materials 07/03/14 19/082013
Page!60!of!77
11. What are the environmental issues with painting and decorating?
______________________________________________________________________
______________________________________________________________________
______________________________________________________________________
______________________________________________________________________
______________________________________________________________________
______________________________________________________________________
12. What must be checked before any paint can be applied to a substrate?
______________________________________________________________________
______________________________________________________________________
______________________________________________________________________
______________________________________________________________________
______________________________________________________________________
______________________________________________________________________
13. What are solvents used for?
______________________________________________________________________
______________________________________________________________________
______________________________________________________________________
______________________________________________________________________
______________________________________________________________________
______________________________________________________________________
14. Explain what fillers are used for?
______________________________________________________________________
______________________________________________________________________
______________________________________________________________________
______________________________________________________________________
______________________________________________________________________
______________________________________________________________________
!

!
!Type Title Standard Issue Version Ref Release
date
Kit CCPCCPD2011A NVR Standard 15.5 1 1 Handle painting and decorating materials 07/03/14 19/082013
Page!61!of!77
15. Explain the storage requirements for Solvents?
______________________________________________________________________
______________________________________________________________________
______________________________________________________________________
______________________________________________________________________
______________________________________________________________________
______________________________________________________________________
16. Explain the storage requirements acrylic paints?
______________________________________________________________________
______________________________________________________________________
______________________________________________________________________
______________________________________________________________________
______________________________________________________________________
______________________________________________________________________
17. Explain the storage requirements for plaster products?
______________________________________________________________________
______________________________________________________________________
______________________________________________________________________
______________________________________________________________________
______________________________________________________________________
______________________________________________________________________
18. Explain the cleanup procedure at the end of a job?
______________________________________________________________________
______________________________________________________________________
______________________________________________________________________
______________________________________________________________________
______________________________________________________________________
______________________________________________________________________
______________________________________________________________________
______________________________________________________________________
______________________________________________________________________

!
!Type Title Standard Issue Version Ref Release
date
Kit CCPCCPD2011A NVR Standard 15.5 1 1 Handle painting and decorating materials 07/03/14 19/082013
Page!62!of!77
______________________________________________________________________
______________________________________________________________________
______________________________________________________________________
19. Explain how a WRS Waste reticulation system works?
______________________________________________________________________
______________________________________________________________________
______________________________________________________________________
______________________________________________________________________
______________________________________________________________________
______________________________________________________________________
!
!
!
!! !

!
!Type Title Standard Issue Version Ref Release
date
Kit CCPCCPD2011A NVR Standard 15.5 1 1 Handle painting and decorating materials 07/03/14 19/082013
Page!63!of!77
Complete the Job Safety Analysis on the last page of this assessment for the project ______________________________. Please hand this in to your trainer to be compiled with your written Assessment. You should make a list of the hazards as part of a team exercise where possible, making a list of the hazards below before completing the JSA individually.
!
___________________________________________________________________________________________________________!
!
___________________________________________________________________________________________________________!
!___________________________________________________________________________________________________________!
!
___________________________________________________________________________________________________________!
!___________________________________________________________________________________________________________!
!
___________________________________________________________________________________________________________!
!___________________________________________________________________________________________________________!
!
___________________________________________________________________________________________________________!
!___________________________________________________________________________________________________________!
!
___________________________________________________________________________________________________________!
!___________________________________________________________________________________________________________!
!
___________________________________________________________________________________________________________!
!___________________________________________________________________________________________________________!
!
___________________________________________________________________________________________________________!
!___________________________________________________________________________________________________________!
!
!
!
!
!
!
Practical Exercise 1

!
!Type Title Standard Issue Version Ref Release
date
Kit CCPCCPD2011A NVR Standard 15.5 1 1 Handle painting and decorating materials 07/03/14 19/082013
Page!64!of!77
!
The house below is a rental property that has had smokers living in it for the past 2 years. The house a large hole in the living room, bedroom 2, bedroom 3 and the W.C. List the procedures and the products from start to finish to prepare the inside of the building below in readiness for painting.
___________________________________________________________________________________________________________!
!
___________________________________________________________________________________________________________!
!___________________________________________________________________________________________________________!
!
___________________________________________________________________________________________________________!
!___________________________________________________________________________________________________________!
!
___________________________________________________________________________________________________________!
!___________________________________________________________________________________________________________!
!
___________________________________________________________________________________________________________!
!
___________________________________________________________________________________________________________!
!___________________________________________________________________________________________________________!
!
___________________________________________________________________________________________________________!
Practical Exercise 2

!
!Type Title Standard Issue Version Ref Release
date
Kit CCPCCPD2011A NVR Standard 15.5 1 1 Handle painting and decorating materials 07/03/14 19/082013
Page!65!of!77
OHS & Read and Interpret Material Safety Data Sheets (MSDS) Many substances may present hazards at work. But if the hazards are known and understood, appropriate precautions can be taken so that they can be used safely. An MSDS will help a workplace to gather necessary information to safely manage the hazardous substance. This is considered when learning about colour matching as many colours have hazardous substances in the ingredients to make the colour. It is also important when it comes to safe disposal of materials at the completion of the activity. When new substances are to be introduced into the workplace, the employer should make arrangements to get a copy of the MSDS before the substance is brought into the workplace. It is important that you are able to identify specific information on a MSDS so that you can prevent injury or illness to yourself or others.
From the MSDS on the following pages answer these questions:
1. What should you do if you splashed this product in your eye and you wear contact lenses?
___________________________________________________________________________________________________________!
___________________________________________________________________________________________________________
2. What are the transporting requirements?
___________________________________________________________________________________________________________!
!___________________________________________________________________________________________________________!
! 2. Briefly explain the acute & Chronic health effects of the product:
Acute health effects: ______________________________________________________
Chronic health effects: ____________________________________________________
!
Practical Exercise 3

!
!Type Title Standard Issue Version Ref Release
date
Kit CCPCCPD2011A NVR Standard 15.5 1 1 Handle painting and decorating materials 07/03/14 19/082013
Page!66!of!77
WATTYL EUROCRYL METALLIC TINTERS ChemWatch Material Safety Data Sheet (REVIEW) CHEMWATCH 55599 Date of Issue: Mon 8-Jan-2001 -------------------------------------------------------------------------------- -------------------------------------------------------------------------------- IDENTIFICATION -------------------------------------------------------------------------------- STATEMENT OF HAZARDOUS NATURE ----------------------------- HAZARDOUS ACCORDING TO WORKSAFE AUSTRALIA CRITERIA. CONSIDERED A DANGEROUS SUBSTANCE ACCORDING TO DIRECTIVE 67/548/EEC, POINT 4; AND TO 29 CFR 1910.1200 (USA). SUPPLIER -------- Company: Wattyl Australia Pty Limited Address: 4 Steel St
Blacktown NSW 2148 Australia
Telephone: (02) 9621 6255 Emergency Tel: 1800 039 008 - 24 hour Fax: (02) 9831 2651 Product Name: Wattyl Eurocryl Metallic Tinters Other Names: Product Code: 2120TRAL, 120-MTRAL CAS RN No(s): None UN Number: 1263 Packing Group: II Dangerous Goods Class: 3(3.1) Subsidiary Risk: None Hazchem Code: 3[Y]E Poisons Schedule Number: S5 USE: Solvent based, synthetic resin metallic tinter used specifically for tintng Eurocryl
colours. The use of a quantity of material in an unventilated or confined space may result in increased exposure and an irritating atmosphere developing.
PHYSICAL DESCRIPTION/PROPERTIES APPEARANCE Coloured highly flammable liquid with mild solvent odour; does not mix with
water. Boiling Point (deg C): 120-200 Melting Point (deg C): Not available Vapour Pressure (kPa): >1 Specific Gravity: 1.1 Flash Point (deg C): 22 (OC-lit) Lower Explosive Limit (%): 1.0 Upper Explosive Limit (%): 7.0 Solubility in Water (g/L): Insoluble INGREDIENTS NAME CAS RN % Synthetic resin 10-30 Pigments including 10-30
Aluminium powder uncoated
7429-90-5 10-30
Solvents including 30-60 Xylene 1330-20-7 10-30 N-butyl acetate 123-86-4 10-30
Additives <10 Solvent grades have less than 0.1% benzene content
HEALTH HAZARD
ACUTE HEALTH EFFECTS
SWALLOWED Considered an unlikely route of entry in commercial/industrial environments The liquid is highly discomforting and harmful if swallowed. Ingestion may result in nausea, pain, vomiting. Vomit entering the lungs by aspiration may cause potentially lethal chemical pneumonitis.

!
!Type Title Standard Issue Version Ref Release
date
Kit CCPCCPD2011A NVR Standard 15.5 1 1 Handle painting and decorating materials 07/03/14 19/082013
Page!67!of!77
EYE The liquid is highly discomforting to the eyes and is capable of causing a mild, temporary redness of the conjunctiva (similar to wind-burn), temporary impairment of vision and/ or other transient eye damage/ ulceration. The vapour is discomforting to the eyes. The material may produce severe irritation to the eye causing pronounced inflammation. Repeated or prolonged exposure to irritants may produce conjunctivitis.
SKIN The liquid may produce skin discomfort following prolonged contact. Defatting and/ or drying of the skin may lead to dermatitis The material may cause skin irritation after prolonged or repeated exposure and may produce a contact dermatitis (nonallergic). This form of dermatitis is often characterised by skin redness (erythema) and swelling (oedema) which may progress to vesiculation, scaling and thickening of the epidermis. Histologically there may be intercellular oedema of the spongy layer (spongiosis) and intracellular oedema of the epidermis.
INHALED The spray mist is discomforting to the upper respiratory tract and lungs. Prolonged exposure may cause headache, nausea and ultimately loss of consciousness. If exposure to highly concentrated solvent atmosphere is prolonged this may lead to narcosis, unconsciousness, even coma and possible death. The main effects of simple aliphatic esters are narcosis and irritation and anaesthesia at higher concentrations. These effects become greater as the molecular weights and boiling points increase. Central nervous system depression, headache, drowsiness, dizziness, coma and neurobehavioral changes may also be symptomatic of overexposure. Respiratory tract involvement may produce mucous membrane irritation, dyspnea, and tachypnea, pharyngitis, bronchitis, pneumonitis and, in massive exposures, pulmonary oedema (which may be delayed). Gastrointestinal effects include nausea, vomiting, diarrhoea and abdominal cramps. Liver and kidney damage may result from massive exposures.
CHRONIC HEALTH EFFECTS Principal routes of exposure are usually by inhalation of vapour and skin contact/absorption. Xylene is a central nervous system depressant. Central nervous system (CNS) depression may include nonspecific discomfort, symptoms of giddiness, headache, dizziness, nausea, anaesthetic effects, slowed reaction time, slurred speech and may progress to unconsciousness. Serious poisonings may result in respiratory depression and may be fatal. Prolonged or continuous skin contact with the liquid may cause defatting with drying, cracking, irritation and dermatitis following. Chronic solvent inhalation exposures may result in nervous system impairment and liver and blood changes. [PATTYS].
FIRST AID
SWALLOWED Rinse mouth out with plenty of water. If poisoning occurs, contact a doctor or Poisons Information Centre. In Australia phone 13 1126; New Zealand 03 4747000. If swallowed, do NOT induce vomiting. Give a glass of water. If spontaneous vomiting appears imminent or occurs, hold patient's head down; lower than their hips to help avoid possible aspiration of vomitus.
EYE If this product comes in contact with the eyes: 1: Immediately hold the eyes open and wash continuously for at least 15 minutes with fresh running water. 2: Ensure complete irrigation of the eye by keeping eyelids apart and away from eye and moving the eyelids by occasionally lifting the upper and lower lids. 3: Transport to hospital or doctor without delay. 4: Removal of contact lenses after an eye injury should only be undertaken by skilled personnel.
SKIN If product comes in contact with the skin: 1: Immediately remove all contaminated clothing, including footwear (after rinsing with water). 2: Wash affected areas thoroughly with water (and soap if available). 3: Seek medical attention in event of irritation.
INHALED 1: If fumes or combustion products are inhaled: Remove to fresh air. 2: Lay patient down. Keep warm and rested. 3: Prostheses such as false teeth, which may block airway, should be removed, where possible, prior to initiating first aid procedures 4: If breathing is shallow or has stopped, ensure clear airway and apply resuscitation, preferably with a demand valve resuscitator, bag-valve mask device, or pocket mask as trained. Perform CPR if necessary. 5: Transport to hospital, or doctor.
ADVICE TO DOCTOR Treat symptomatically.
PRECAUTIONS FOR USE
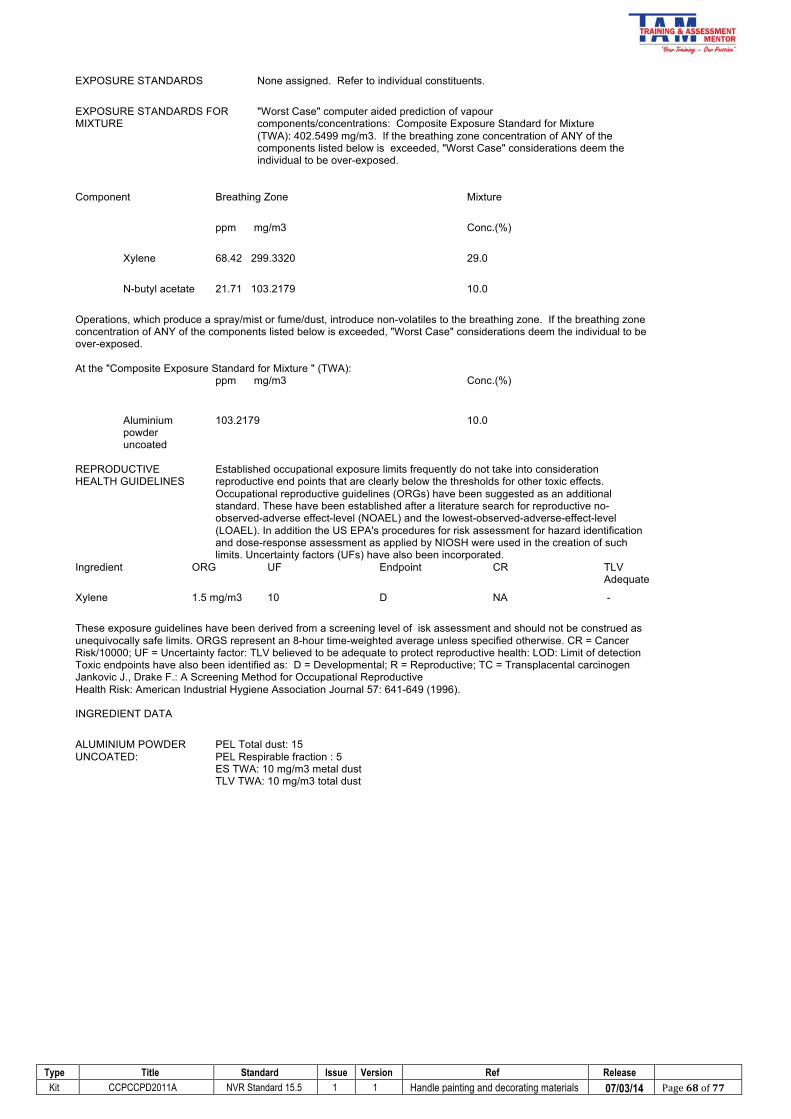
!
!Type Title Standard Issue Version Ref Release
date
Kit CCPCCPD2011A NVR Standard 15.5 1 1 Handle painting and decorating materials 07/03/14 19/082013
Page!68!of!77
EXPOSURE STANDARDS None assigned. Refer to individual constituents.
EXPOSURE STANDARDS FOR MIXTURE
"Worst Case" computer aided prediction of vapour components/concentrations: Composite Exposure Standard for Mixture (TWA): 402.5499 mg/m3. If the breathing zone concentration of ANY of the components listed below is exceeded, "Worst Case" considerations deem the individual to be over-exposed.
Component Breathing Zone Mixture
ppm mg/m3 Conc.(%)
Xylene
68.42 299.3320 29.0
N-butyl acetate 21.71 103.2179 10.0
Operations, which produce a spray/mist or fume/dust, introduce non-volatiles to the breathing zone. If the breathing zone concentration of ANY of the components listed below is exceeded, "Worst Case" considerations deem the individual to be over-exposed. At the "Composite Exposure Standard for Mixture " (TWA): ppm mg/m3 Conc.(%)
Aluminium powder uncoated
103.2179 10.0
REPRODUCTIVE HEALTH GUIDELINES
Established occupational exposure limits frequently do not take into consideration reproductive end points that are clearly below the thresholds for other toxic effects. Occupational reproductive guidelines (ORGs) have been suggested as an additional standard. These have been established after a literature search for reproductive no-observed-adverse effect-level (NOAEL) and the lowest-observed-adverse-effect-level (LOAEL). In addition the US EPA's procedures for risk assessment for hazard identification and dose-response assessment as applied by NIOSH were used in the creation of such limits. Uncertainty factors (UFs) have also been incorporated.
Ingredient ORG UF Endpoint CR TLV Adequate
Xylene 1.5 mg/m3 10 D NA -
These exposure guidelines have been derived from a screening level of isk assessment and should not be construed as unequivocally safe limits. ORGS represent an 8-hour time-weighted average unless specified otherwise. CR = Cancer Risk/10000; UF = Uncertainty factor: TLV believed to be adequate to protect reproductive health: LOD: Limit of detection Toxic endpoints have also been identified as: D = Developmental; R = Reproductive; TC = Transplacental carcinogen Jankovic J., Drake F.: A Screening Method for Occupational Reproductive Health Risk: American Industrial Hygiene Association Journal 57: 641-649 (1996). INGREDIENT DATA
ALUMINIUM POWDER UNCOATED:
PEL Total dust: 15 PEL Respirable fraction : 5 ES TWA: 10 mg/m3 metal dust TLV TWA: 10 mg/m3 total dust

!
!Type Title Standard Issue Version Ref Release
date
Kit CCPCCPD2011A NVR Standard 15.5 1 1 Handle painting and decorating materials 07/03/14 19/082013
Page!69!of!77
XYLENE: PEL TWA: 100 ppm ; 435 mg/m³ TLV TWA: 100 ppm, 434 mg/m3; STEL: 150 ppm, 651 mg/m3 A4 NOTE: This substance has been classified by the ACGIH as A4 NOT classifiable as causing Cancer in humans. ES TWA: 80 ppm, 350 mg/m3; STEL: 150 ppm, 655 mg/m3 (Under review) OES TWA: 100 ppm, 441 mg/m3; STEL: 150 ppm, 662 mg/m3 skin Exposure limits with "skin" notation indicate that vapour and liquid may be absorbed through intact skin. Absorption by skin may readily exceed vapour inhalation exposure. Symptoms for skin absorption are the same as for inhalation. Contact with eyes and mucous membranes may also contribute to overall exposure and may also invalidate the exposure standard. IDLH Level: 900 ppm Odour Threshold Value: 20 ppm (detection), 40 ppm (recognition) NOTE: Detector tubes for o-xylene, measuring in excess of 10 ppm, are available commercially. (m-xylene and p-xylene give almost the same response) Xylene vapour is an irritant to the eyes, mucous membranes and skin and causes narcosis at high concentrations. Exposure to doses sufficiently high to produce intoxication and unconsciousness also produces transient liver and kidney toxicity. Neurologic impairment is NOT evident amongst volunteers inhaling up to 400 ppm though complaints of ocular and upper respiratory tract irritation occur at 200 ppm for 3 to 5 minutes. Exposure to xylene at or below the recommended TLV-TWA and STEL is thought to minimise the risk of irritant effects and to produce neither significant narcosis or chronic injury. An earlier skin notation was deleted because percutaneous absorption is gradual and protracted and does not substantially contribute to the dose received by inhalation.
N-BUTYL ACETATE: PEL TWA: 150 ppm ; 710 mg/m³ TLV TWA: 150 ppm, 713 mg/m3; STEL: 200 ppm, 950 mg/m3 ES TWA: 150 ppm, 713 mg/m3; STEL: 200 ppm, 950 mg/m3 OES TWA: 150 ppm, 724 mg/m3; STEL: 200 ppm, 966 mg/m3 MAK value: 200 ppm, 950 mg/m3 MAK Category I Peak Limitation: For local irritants Allows excursions of twice the MAK value for 5 minutes at a time, 8 times per shift. MAK values, and categories and groups are those recommended within the Federal Republic of Germany. Odour Threshold Value: 0.0063 ppm (detection), 0.038-12 ppm (recognition) IDLH Level: 1700 ppm (lower explosive limit) Exposure at or below the recommended TLV-TWA is thought to prevent significant irritation of the eyes and respiratory passages as well as narcotic effects. In light of the lack of substantive evidence regarding teratogenicity and a review of acute oral data a STEL is considered inappropriate.
ENGINEERING CONTROLS
Use in a well-ventilated area. Spraying to be carried out in conditions conforming to local stateregulations. Unprotected personnel must vacate the spraying area. General exhaust is adequate under normal operating conditions. Local exhaust ventilation may be required in special circumstances. If risk of overexposure exists, wear approved respirator Supplied-air type respirator may be required in special circumstances. Correct fit is essential to ensure adequate protection. Provide adequate ventilation in warehouses and enclosed storage areas. Air contaminants generated in the workplace possess varying "escape" velocities which, in turn, determine the "capture velocities" of fresh circulating air required to effectively remove the contaminant. Type of Contaminant: Air Speed:
Solvent, vapours, degreasing etc., evaporating from tank (in still air). 0.25-0.5 m/s (50-100 f/min.)
Aerosols, fumes from pouring operations, intermittent container filling, low speed conveyer transfers, welding, spray drift, plating acid fumes, pickling (released at low velocity into zone of active generation)
0.5-1 m/s (100-200 f/min.)
Direct spray, spray painting in shallow booths, drum filling, conveyer loading, crusher dusts, gas discharge (active generation into zone of rapid air motion)
1-2.5 m/s (200-500 f/min.)
Grinding, abrasive blasting, tumbling, high-speed wheel generated dusts (released at high initial velocity into zone of very high rapid air motion).
2.5-10 m/s (500-2000 f/min.)
Within each range the appropriate value depends on:
Lower end of the range Upper end of the range
1: Room air currents minimal or favourable to capture 2: Contaminants of low toxicity or of nuisance value only 3: Intermittent, low production 4: Large hood or large air mass in motion
1: Disturbing room air currents 2: Contaminants of high toxicity 3: High production, heavy use 4: Small hood-local control only

!
!Type Title Standard Issue Version Ref Release
date
Kit CCPCCPD2011A NVR Standard 15.5 1 1 Handle painting and decorating materials 07/03/14 19/082013
Page!70!of!77
Simple theory shows that air velocity falls rapidly with distance away from the opening of a simple extraction pipe. Velocity generally decreases with the square of distance from the extraction point (in simple cases). Therefore the air speed at the extraction point should be adjusted, accordingly, after reference to distance from the contaminating source. The air velocity at the extraction fan, for example, should be a minimum of 1-2 m/s (200-400 f/min.) for extraction of solvents generated in a tank 2 meters distant from the extraction point. Other mechanical considerations, producing performance deficits within the extraction apparatus, make it essential that theoretical air air velocities are multiplied by factors of 10 or more when extraction systems are installed or used. In confined spaces where there is inadequate ventilation, wear full-face air supplied breathing apparatus. PERSONAL PROTECTION
EYE Safety glasses with side shields; or as required, Chemical goggles. Contact lenses pose a special hazard; soft lenses may absorb irritants and all lenses concentrate them
HANDS/FEET Barrier cream with polyethylene gloves or Wear chemical protective gloves, eg. PVC. Wear safety footwear. Do NOT use solvent to clean the skin.
OTHER 1: Overalls. 2: Eyewash unit.
RESPIRATOR
Selection of the Class and Type of respirator will depend upon the level of breathing zone contaminant and the chemical nature of the contaminant. Protection Factors (defined as the ratio of contaminant outside and inside the mask) may also be important.
Breathing Zone Level ppm (volume)
Maximum Protection Factor
Half-face Respirator Full-Face Respirator
1000 1000 5000 5000 10000
10 50 50 100 100 100+
A - AUS P – - Airline * - - -
- A - AUS P - - A - 2 P – A - 3 P – Airline **
* - Continuous Flow ** - Continuous-flow or positive pressure demand. The local concentration of material, quantity and conditions of use determine the type of personal protective equipment required. For further information, consult site specific CHEMWATCH data (if available), or your Occupational Health and Safety Advisor. SAFE HANDLING
STORAGE AND TRANSPORT
SUITABLE CONTAINER Metal can Metal drum Packing as recommended by manufacturer. Check all containers are clearly labelled and free from leaks.
STORAGE INCOMPATIBILITY Avoid storage with oxidisers 1: Avoid contamination with water, alkalies and detergent solutions. 2: Material reacts with water and generates gas, pressurises containers with even drum rupture resulting. 3: DO NOT reseal container if contamination is suspected. 4: Open all containers with care.
STORAGE REQUIREMENTS 1: Store in original containers in approved flammable liquid storage area. 2: DO NOT store in pits, depressions, basements or areas where vapours may be trapped. 3: No smoking, naked lights, heat or ignition sources. 4: Keep containers securely sealed. 5: Store away from incompatible materials in a cool, dry, well-ventilated area. 6: Protect containers against physical damage and check regularly for leaks. 7: Observe manufacturer's storing and handling recommendations.
TRANSPORTATION Class 3 - Flammable liquids shall not be loaded in the same vehicle or packed in the same freight container with: Class 1 - Explosives; Class 2.1 - Flammable gases (where both flammable liquids and flammable gases are in bulk); Class 2.3 - Poisonous gases; Class 4.2 - Spontaneously combustible substances; Class 5.1 - Oxidising agents; Class 5.2 - Organic peroxides; Class 7 - Radioactive substances.

!
!Type Title Standard Issue Version Ref Release
date
Kit CCPCCPD2011A NVR Standard 15.5 1 1 Handle painting and decorating materials 07/03/14 19/082013
Page!71!of!77
SPILLS AND DISPOSAL
MINOR SPILLS 1: Remove all ignition sources. 2: Clean up all spills immediately. 3: Avoid breathing vapours and contact with skin and eyes. 4: Control personal contact by using protective equipment. 5: Contain and absorb small quantities with vermiculite or other absorbent material. 6: Wipe up. 7: Collect residues in a flammable waste container.
MAJOR SPILLS 1: Clear area of personnel and move upwind. 2: Alert Fire Brigade and tell them location and nature of hazard. 3: May be violently or explosively reactive. 4: Wear breathing apparatus plus protective gloves. 5: Prevent, by any means available, spillage from entering drains or water course. 6: Consider evacuation (or protect in place). 7: No smoking, naked lights or ignition sources. 8: Increase ventilation. 9: Stop leak if safe to do so. 10: Water spray or fog may be used to disperse /absorb vapour.
11: Contain spill with sand, earth or vermiculite. 11: Use only spark-free shovels and explosion proof equipment. 12: Collect recoverable product into labelled containers for recycling. 13: Absorb remaining product with sand, earth or vermiculite. 14: Collect solid residues and seal in labelled drums for disposal. 15: Wash area and prevent runoff into drains. 16: If contamination of drains or waterways occurs, advise emergency services.
DISPOSAL 1: Consult manufacturer for recycling options and recycle where possible . 2: Consult State Land Waste Management Authority for disposal. 3: Incinerate residue at an approved site. 4: Recycle containers if possible, or dispose of in an authorised landfill.
FIRE/EXPLOSION HAZARD 1: Liquid and vapour are highly flammable. 2: Severe fire hazard when exposed to heat, flame and/or oxidisers. 3: Vapour may travel a considerable distance to source of ignition. 4: Heating may cause expansion or decomposition leading to violent rupture of containers. 5: On combustion, may emit toxic fumes of carbon monoxide (CO). May emit clouds of acrid smoke. Combustion products include carbon monoxide (CO).
-------------------------------------------------------------------------------- CONTACT POINT -------------------------------------------------------------------------------- COMPANY CONTACT 1800 039 008 - 24 hour AUSTRALIAN POISONS INFORMATION CENTRE 24 HOUR SERVICE: 13 11 26 POLICE, FIRE BRIGADE OR AMBULANCE: 000 NEW ZEALAND POISONS INFORMATION CENTRE 24 HOUR SERVICE: (03) 4747 000 NZ EMERGENCY SERVICES: 111 End of Report (REVIEW) Date of Preparation: Mon 8-Jan-2001 Print Date: Sun 2-Sep-2001 This document is copyright. Apart from any fair dealing for the purposes of private study, research, review or criticism, as permitted under the Copyright Act, no part may be reproduced by any process without written permission from CHEMWATCH. TEL (+61 3) 9572 4700

!
!Type Title Standard Issue Version Ref Release
date
Kit CCPCCPD2011A NVR Standard 15.5 1 1 Handle painting and decorating materials 07/03/14 19/082013
Page!72!of!77
You need to complete this task over 2 hours.
Task
Complete the preparation of the following substrates as directed by your trainer: Wall and ceiling Using sugar soap, cornice cement, top coat, gap sealant Apply primer/undercoat and finish coat to above substrate following preparation Clean up carried out at completion of project
Completed risk assessment Developed a plan to prioritise and correctly sequence events Selected appropriate; Tools - sandpaper, sanding blocks, orbital sander, grinder, heat gun, caulking gun, scraper, filling blades, brushes, rollers PPE – steel cap boots, ear protections, eye protection, dust mask Correctly calculated paint quantities for project Materials selected according to project requirements Sugar soap, filler, paint – undercoat/top coat, no more gaps Materials handled safely according to project requirements Adjacent surfaces protected from paint spills i.e drop sheets, tape Preparation is carried out in accordance to the project requirements using: Sugar soap, cornice cement, gap sealant, topcoat
Undercoat is applied in accordance to the project requirements using: Sealer undercoat, oil based undercoat,
Finish coat is applied being to specification including terms of defects, runs, brush marks, etc using acrylic paint system
Work carried out in accordance with organisational policies such as quality and OH&S, in addition to regulations and codes of practice Worked with others to complete tasks Student displayed the ability to communicate clearly with others and asked questions if required to ensure a clear understanding of the task. Tools and equipment are cleaned, checked, reported if faulty, maintained and stored in accordance with project requirements Work site cleaned up and waste materials disposed of in a safe and environmentally sound manner.
Practical Exercise 4

!
!Type Title Standard Issue Version Ref Release
date
Kit CCPCCPD2011A NVR Standard 15.5 1 1 Handle painting and decorating materials 07/03/14 19/082013
Page!73!of!77
Task
Complete the preparation of the following substrates as directed by your trainer: Architrave/skirting Using sugar soap, mineral turpentine, cornice cement, 2 pack filler, gap sealant Apply primer/undercoat and finish coat to above substrate following preparation Clean up carried out at completion of project
Completed risk assessment Developed a plan to prioritise and correctly sequence events Selected appropriate; Tools - sandpaper, sanding blocks, orbital sander, grinder, heat gun, caulking gun, scraper, filling blades, brushes, rollers PPE – steel cap boots, ear protections, eye protection, dust mask Correctly calculated paint quantities for project Materials selected according to project requirements Sugar soap, filler, paint – undercoat/top coat, no more gaps Materials handled safely according to project requirements Adjacent surfaces protected from paint spills ie. drop sheets, tape Preparation is carried out in accordance to the project requirements using: Sugar soap, cornice cement, gap sealant, top oat
Undercoat is applied in accordance to the project requirements using: Sealer undercoat, oil based undercoat
Finish coat is applied being to specification including terms of defects, runs, brush marks, etc using acrylic paint system Work carried out in accordance with organisational policies such as quality and OH&S, in addition to regulations and codes of practice Worked with others to complete tasks Student displayed the ability to communicate clearly with others and asked questions if required to ensure a clear understanding of the task. Tools and equipment are cleaned, checked, reported if faulty, maintained and stored in accordance with project requirements Work site cleaned up and waste materials disposed of in a safe and environmentally sound manner.
Practical Exercise 5

!! Type Title Standard Issue Version Ref Release
date
Kit CPCCPD2011A NVR Standard 15.5 1.0 1.0 Handle painting and decorating materials 20/02/14 19/082013
Page 74 of 76
!!!!!
Student Name : Student Signature:
Project : Trainers Name:
Location : Date : Accepted : Yes ! No !
Procedure - List of steps in doing a Job on a site.
Possible Hazards – What things can happen or go wrong, also what hidden dangers are there on this Job Site? Risk Safety Control – How can I stop or minimize these
things happening or going wrong or injuries occurring? Risk
! ! ! ! !
! ! ! ! !
! ! ! ! !
! ! ! ! !
! ! ! ! !
! ! ! ! !
! ! ! ! !
! ! ! ! !
! ! ! ! !
!!Job Safety Analysis – 1 Copy to be handed in for each unit

!
!Type Title Standard Issue Version Ref Release
date
Kit CCPCCPD2011A NVR Standard 15.5 1 1 Handle painting and decorating materials 07/03/14 19/082013
Page!75!of!77
! ! ! ! !
! ! ! ! !
! ! ! ! !
! ! ! ! !
! ! ! ! !
! ! ! ! !
! ! ! ! !
! ! ! ! !
! ! ! ! !
! ! ! ! !
! ! ! ! !
! ! ! ! !
! ! ! ! !!!!!!Signature Trainer / Site Leader_____________________________________ Signature Employer / Supervisor___________________________________!!!!!

!
!Type Title Standard Issue Version Ref Release
date
Kit CCPCCPD2011A NVR Standard 15.5 1 1 Handle painting and decorating materials 07/03/14 19/082013
Page!76!of!77
!!
!!!!
Consequence
Likelihood 1 2 3 4 5!
Insignificant Minor Moderate Major Catastrophic
A (Almost Certain) 11 16 20 23 25!
B (Likely) 7 12 17 21 24!
C (Possible ) 4 8 13 18 22!
D (Unlikely) 2 5 9 14 19!
E (Rare) 1 3 6 10 15!
Low Medium High Extreme
!
Job Safety Analysis – Risk Matrix