copyright: douglas dombrosky graduate studies, university of saskatchewan graduate student...
TRANSCRIPT

Copyright: Douglas DombroskyGraduate Studies, University of Saskatchewan
Graduate Student Information System: Basic Training.
College of Graduate Studies and Research
GSIS
Douglas Dombrosky, Director of Graduate Enrolment & IT
Updated: May 24, 2006

Copyright: Douglas DombroskyGraduate Studies, University of SaskatchewanDouglas Dombrosky, Graduate Studies, UofS
Main Menu
1. Overview of GSIS (5 min)2. Student Information Page (10 min)
Click on any of the underlined links to view that part of the presentation
Please do not share outside of your University.Presentation of some functionality of GSIS
Go ahead pick one.
3. Advisor Transcript (5 min)
4. List of Students (10 min)
5. Programs of Study (10 min)
6. Progress Reports (10 min)
7. Note to File ( 5 min)
5.1 Input information into PoS (10 min)

Copyright: Douglas DombroskyGraduate Studies, University of Saskatchewan
Welcome to the Graduate Student Information System of the U of S. Graduate College
This system was designed to help graduate departments better manage their students.
This presentation will walk through the basics of GSIS and then go into some detail on the various sections.
GSIS is a web based application that needs only a web browser to use.

Copyright: Douglas DombroskyGraduate Studies, University of Saskatchewan
Each individual user is identified by their login.
In the case of the UofS – we use our network service ID
Each person has at least one role and can have as many roles as necessary to do their job.
Departmental Administrators can only see the students in their department.
As a Graduate Administrator, I have access to all departments.

Copyright: Douglas DombroskyGraduate Studies, University of Saskatchewan
The top menu is the main menu and stays the same on every screen in GSIS
The side menu is the context menu and changes depending on which screen you are on.

Copyright: Douglas DombroskyGraduate Studies, University of Saskatchewan
WELCOME: takes you back to this page.
AWARDS: Holds the forms for production of hiring and separation forms.
PROGRAMS OF STUDY: Shows all the Programs of Study on file for the current student.
PROGRESS REPORTS: Shows all the Progress Reports on file for the current student.
CONVOCATION: All information related to convocation and graduation.
DEFENCE: External examiners, defence dates, etc.
UWHO: The institutional database that holds biographical information for people on campus.
For Banner, the information would come from General Person.
This is the ADVISOR TRANSCRIPT for those implementing Banner
ANOTHER SEARCH: Allows you to search for another student – no matter which screen you are on.
STUDENT INFO: This is the main user screen – it has a main aspects of a student’s program.
SECURITY: Only available to GSIS administrators; ordinary users do not see this menu item.
CONTROL TABLES: Only available to GSIS administrators; ordinary users do not see this menu item.
ADMISSIONS: Screens needed to get a student on to GSIS; send letters and so on.
MAIN MENU: We will describe the items on the main menu.
Back to GSIS Presentation Main Menu
Click Here to go back to the GSIS presentation main menu.

Copyright: Douglas DombroskyGraduate Studies, University of Saskatchewan
Student Information Screen
We will now look at the STUDENT INFO screen to see what information is available.
Simply click on the link

Copyright: Douglas DombroskyGraduate Studies, University of Saskatchewan
Since we have not picked a student, the GSIS search automatically comes up.
The first way to pick a student is by their Name.The second way is by their Banner ID – which
the UofS calls their BID or SiRIUS & UniFi ID.This the ID field in the UofS UWHO database. We use this to find a student before they have a Banner ID.
GSIS also can search by alternate IDs from our UWHO database. For Banner, General Person would provide the information.

Copyright: Douglas DombroskyGraduate Studies, University of Saskatchewan
We will search for the student we want based on their Banner Id
10407475
Clicking Find would start the search and take us to the Student Information Screen

Copyright: Douglas DombroskyGraduate Studies, University of Saskatchewan
GSIS has found the student BUT there are two admissions for this person.GSIS can deal with multiple admissions for
each student. In this case one is real and one is a catch all for the system administrator.
The created date for each admission is shown – the last created is first on the list..
The program for each application is also listed.The Degree sought for each admission is also shown.Finally, the current status of each admission is
listed.In this case, one is active and one is shredded. More about admission status later.Click on the hyperlink to get the admission
you wish to see.

Copyright: Douglas DombroskyGraduate Studies, University of Saskatchewan
The Student Information Screen is the main information page for students in GSIS
This student information shows up on most screens showing individual student information.
Student’s Name and Banner IDFull or Part Time StatusThe last term the student has been registered.Program and Degree
Thesis, Project or Course Based.This indicates if the student is in a special case program – not a regular established program.
The side menu has changed to show the screens available.

Copyright: Douglas DombroskyGraduate Studies, University of Saskatchewan
The Admission Status is the way the student is tracked through their program. More detail on the setup and changing of the admission status will come later in the presentation.
These are help icons which give some basic help on each area.
This is an indicator that becomes visible when a student is over their program time.It takes into account the end date of the program of study and any extensions or leaves.
The next section is a group of buttons for popup windows that draw their information from the Banner system via the ODS.
This information comes into GSIS through Oracle views in GSIS from the Operational Data Store (ODS) which gets its info from Banner.
The Admission status also drives the production of letter for various situations. – Admissions, extensions, convocation, etc.

Copyright: Douglas DombroskyGraduate Studies, University of Saskatchewan
Si!- Class Reg.: shows the courses taken in Graduate Studies.When you click on any of the buttons a popup
window comes up.All the courses are listed by term. This can be adjusted to fit a school’s needs.In this case, any UG course below 70% or GS
course below 60% are red for ease of advising.
The popups can be printed and automatically close after 2 minutes.This shows residency: international or
domesticThis shows any holds the student may have.Any faculty actions on file.
Listing of fee/tuition assessment and payment.The information is taken from a summary
table in Banner to limit the number of entries.All this information can be used by the departments without leaving GSIS and going into Banner Native.

Copyright: Douglas DombroskyGraduate Studies, University of Saskatchewan
The next section of this screen shows the last submitted Program of StudyDate the Program of Study was created on
GSIS.
The Thesis titleThis is the approval status of the Program of Study.
The Program of Study has an approval process that is controlled by the Program status.More about the Program Status later.
This area shows how much time the student has left in their program according to this Program of Study
All the created Programs of Study – past and current – can be found on this screen.
Again, this indicator takes into account leaves and extensions.Clicking on the link will bring up all the information on
this Program of Study.
We will now move the screen down to see the rest of the information presented.

Copyright: Douglas DombroskyGraduate Studies, University of Saskatchewan
We have moved down the Student Information ScreenWe have already discussed the Program of
Study area.This is the Progress Report area.
Progress Reports at the UofS must be submitted at least once a year.
Again, this shows the date the Progress Report was created.The approval status of the Program of StudyOverall progress of the student in their program – set by the committee.
Overall Progress types include: course work completed; research started; thesis started; etc.
Clicking on the link will bring up the complete information on this Progress Report.ALL submitted Progress Reports are listed
here to show movement through the program.
Copyright: Douglas DombroskyGraduate Studies, University of Saskatchewan
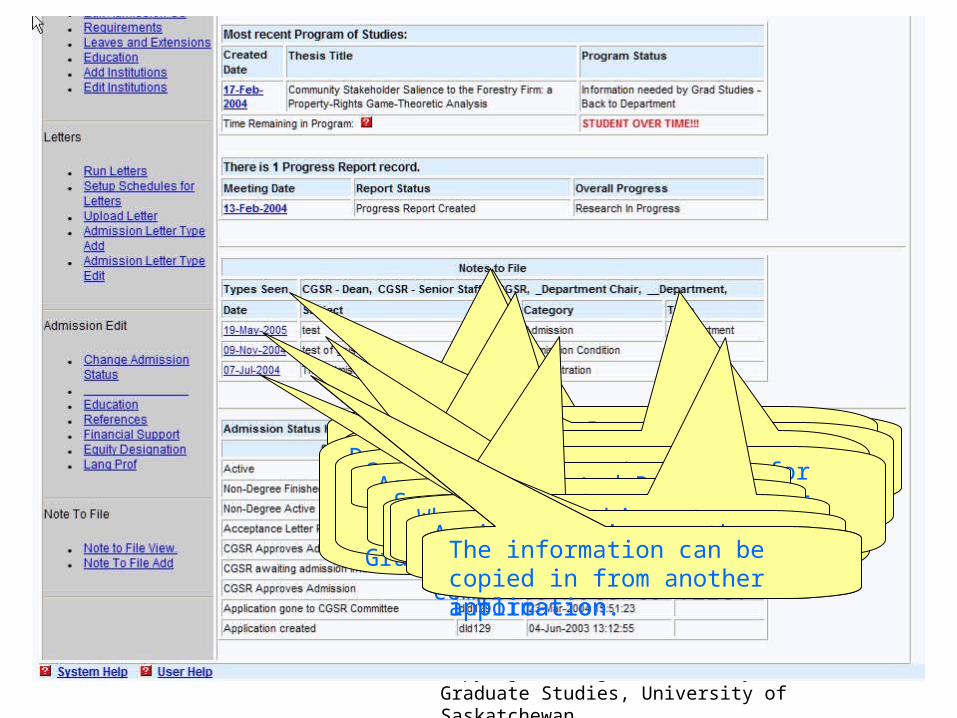
The next section is the most used: Notes to File.
Notes to File fulfill the same function as in paper files – a catch all of important information.
Text of special letters sent to students; interactions with students, depts; email interactions; etc. – all fit here.
There are security levels on Notes to File set by Role.
Departments can only see Notes set to department level – but not above. CGSR can see Dept. Chair and Department but not above.
Security tends to be useful for confidential situations and for issues only relating to the Graduate Office.
As usual, Created Date is listed.Summary of Note: same format as emails.General topic area of the NoteWho can see this note.
Again, clicking on the link will show the complete note to file.The actual Note field can handle
about 10 pages of information.The information can be copied in from another application.

Copyright: Douglas DombroskyGraduate Studies, University of Saskatchewan
The final section is the Admission Status historyIf you remember, the Active Status was shown at the top of this page.
To help you remember what it looks like.
This shows a history of this admission from the time it was created until the file is shredded.
Roles determine which Admission Status you can change. You only see the status changes you can perform.You can see who set this status.
And when.Some status changes take place automatically after a preset period of time.
For example: after four month a student “On Extension” changes to “Over Time in Program”
This ends the demonstration of the Student Information Screen.
Back to GSIS Presentation Main Menu
Click Here to go back to the GSIS presentation main menu.

Copyright: Douglas DombroskyGraduate Studies, University of Saskatchewan
SMISSMIS
In this demonstration, we will look at the Advisor Transcript.
At the UofS, the old unofficial transcript was called: the SMIS (Student Master Information Sheet) – we kept the name.Reason: SMIS is shorter than Advisor Transcript
Again, clicking the link will take you to the SMIS screen

Copyright: Douglas DombroskyGraduate Studies, University of Saskatchewan
We are on the SMIS screenSince we had a student picked, the GSIS search did not come upThis will produce a HTML version of the
Advisor Transcript.This will produce a spreadsheet version of the Advisor Transcript.

Copyright: Douglas DombroskyGraduate Studies, University of Saskatchewan
This is the GS advising transcript.The first section gives basic information on the studentThe next section gives degree
granted information.
The courses are listed by term.
We will now look at the bottom of the Advising transcript.

Copyright: Douglas DombroskyGraduate Studies, University of Saskatchewan
This is the bottom of the transcript
Each term is listed (in Banner – ese).The College the person is registered in by Term
Full or Part time status by TermProgram/Department by Term
Degree by TermAll this information is repeated at the top of each term ……because students do change programs
and degrees while at the University.
A weighted UG average is calculated.A weighted Graduate average is calculated.
The issuing institution and courses are listed for transfer credit.
This ends the demonstration of the Advising transcript.
Back to GSIS Presentation Main Menu
Click Here to go back to the GSIS presentation main menu.
This is another person so the BID is covered to protect the innocent.

Copyright: Douglas DombroskyGraduate Studies, University of Saskatchewan
List by ProgramSMIS
In this demonstration, we will look at the Listing of students by Program.This link is available off the Student Info
Screen.
Again, click on the link to open up the screen.

Copyright: Douglas DombroskyGraduate Studies, University of Saskatchewan
SMIS
This is the List by Program ScreenYou can search by Program
Of course, departments can only pick their own department.
If you do not pick a degree – it will give you all of the degrees available in the department.You can also pick by active admission status.
If you do not pick a status, a limited set of active statuses are returned.
The “active” statuses returned are controlled by Role.Usually people do not want to find students
whose files are shredded, withdrawn or archived.
You can find any students in a particular status simply by picking the status.You can also search by special case students.
You can also produce a more printer friendly list.Again, you simply click the find button to
proceed.
You can also pick the degree.

Copyright: Douglas DombroskyGraduate Studies, University of Saskatchewan
SMIS
This is the results screen from a search of one of our departments.Information has been changed for privacy
reasons.This shows the total number of matching records found.
This line shows which of the matching records are being shown.Name of the student: Last Name, First Name;
arranged alphabetically.Banner ID
Last Term that the student was registered.Current Active StatusStatus of Program of Study
Status of Progress ReportTime in Program indicator
Extension and Leave indicator
Program student is in: useful for the Graduate Office.
Degree the student currently is working on.

Copyright: Douglas DombroskyGraduate Studies, University of Saskatchewan
SMIS
This list takes advantage of the graphic interface to show the status of individual students
This symbol shows red – the Program of Study is not entered.This symbol shows yellow – warning that the
students time in program is nearThis symbol shows green – this student has a completed Program of Study and Progress Report – their time is program is good.
It purposely uses the green, yellow and red colours to show if an area needs attention.This symbol is for information not needed yet
and needs no attention.If you put your mouse over the symbol in Explorer – more information will be shown..
A Program of Study has been received.A Progress Report has been
received in the last 10 months.
The student has 3.0 months left in their program. The end date is 30-Apr-2006.
An Extension has been given from 01-Jan-2006 to 30-Apr-2006
Clicking on any of these links will take you to the Student Information screen.
This ends the demonstration on the List By Program screen.
Back to GSIS Presentation Main Menu
Click Here to go back to the GSIS presentation main menu.

Copyright: Douglas DombroskyGraduate Studies, University of Saskatchewan
LettersOverview of Letter Generation and maintenance.
Clicking on this link starts the letter generation process.
This is the Student Information screen.

Copyright: Douglas DombroskyGraduate Studies, University of Saskatchewan
This is the first screen of the letter generation process.
Letters are set on schedules based on an Admission Status.
This the schedule that generates the admission letters.These are the various admission letters that
are generated by this schedule.
Most of our regular letters are generated through the appropriate schedule.We will click on the Acceptance Letter Printed
schedule to see the next screen.GSIS will go through all the students who have the appropriate admission status and set them up for the next step.

Copyright: Douglas DombroskyGraduate Studies, University of Saskatchewan
GSIS has searched for all the students in the “Application Approved by CGSR” status and set up the appropriate letter and envelope to print
The Header provides a grouping for the print batch. Canadian are separate from International for example.
A user would click on this button to download this group of letters.GSIS would then download the already merged
documents to the desktop word process application (MS Word if you are a Microsoft shop)
From the Word Processor, the letters can be saved, changed and printed as needed.
Once all the letters have been created and downloaded to the desktop . . . Clicking on this button will change the status of
each of these applications to “Application Letter Printed”.
Today’s date and the user’s identifier are also added to the admission status change for logging purposes.
Modifications to existing letters are done by simply uploading a new letter in .rtf format and setting it to the appropriate schedule.
Back to GSIS Presentation Main Menu
Click Here to go back to the GSIS presentation main menu.

Copyright: Douglas DombroskyGraduate Studies, University of Saskatchewan
Program of Study
In this section we will look at the Program of Study.

Copyright: Douglas DombroskyGraduate Studies, University of Saskatchewan
SMIS
We will again go back to the Student Information Screen to start.
We will now open up the current Program of Study to review the basic information.Then we will go through the steps in inputting a new Program of Study for a student.
To open up this Program of Study – simply click on the blue underlined date.

Copyright: Douglas DombroskyGraduate Studies, University of Saskatchewan
This screen show the current Program of Study for this student.
Clicking on this link will produce a page that resembles the GSR 20X form – that can easily be printed.
The top information is the same as that on the Student Information Screen – for convenience.
Program of Studies have an approval status. From Created to Approved by CGSR.The start of the Program: from the start date
of the first class credited toward the degree.
The end of the Program: to the end of the 5th (Masters) or 6th year (PhD) – usually to the end of a term.
Notice the date format: dd-Mmm-yyyy. This is the only date format that is acceptable. And it will NOT convert it to the right format.
Next is the Thesis Title – these sometimes change over the student’s program.Next is the Project title – if the student is in a
project program
Ethics Review Needed: is either Y (yes) or N (No) and must be set when Program of Study is input.
Then the total number of credit units that are on the student’s Program of Study.Now we will scroll down for the rest of the
information on the Program of Study…

Copyright: Douglas DombroskyGraduate Studies, University of Saskatchewan
SMIS
The Course Requirement are the courses that the student must take to meet the requirements for their degree.
Course name, number and credit units are listed.Research classes (eg. 994, 996) do not have
credit weighting and xx’s are to be inserted.The Title of Special Topics courses (898, 899) must be listed – otherwise they cannot be identified at convocation check.
Is this a required course that the student must have in order to get their degree – or an optional extra.
New tuition students will be assessed extra tuition for courses taken that are not on the program of studies.

Copyright: Douglas DombroskyGraduate Studies, University of Saskatchewan
SMIS
Program requirements are other non-course items that are required: Comprehensive, etc.
Transfer credit is also identified – by course description, Institution and credits.

Copyright: Douglas DombroskyGraduate Studies, University of Saskatchewan
SMIS
Finally, the advisory committee is listed – by name, type, program and position.
Next, we will look at entering the data in each of the area of the Program of Study.

Copyright: Douglas DombroskyGraduate Studies, University of Saskatchewan
Input PoS InformationWe are back at the Program of Study screen.
We will now create a new Program of Study- starting with the program core.The program core is the basic information to
which every else in the PoS is attached.We will now look at entering this information.This information must be entered every time a new PoS is created.

Copyright: Douglas DombroskyGraduate Studies, University of Saskatchewan
SMIS
The working thesis title needs to be input: the final thesis title is recorded on the final PoS and on the Convocation information.
The Title of the project can be put in here.The total number of credit units required for this student’s PoS is put in here.
The start date of the student’s program is put in here.The format must be dd-Mmm-yyyy. For example:
01-Sep-2006, 31-Aug-2005. Include the dashes.
The time in program starts from the start of the first class applied to the PoS. This is important for transfer credit courses or courses taken before the student enters the program.
The end date must be entered as well. To the end of the 5th year for a Masters and to the end of the 6th year for a PhD. Again – same format dd-Mmm-yyyy.
Ethics review must be checked. If the student is working with animals or humans – ethics approval must be received. This requirement is checked at before the defence moves forward.
Once this information is input – then remember to save the information before you move on.
Once the information has been saved. Click on this link to continue.
Input PoS Information

Copyright: Douglas DombroskyGraduate Studies, University of Saskatchewan
SMIS
Program requirements, transfer credit and advisors need to be entered..You will see that the core program information has been saved.Since ethic approval was checked – the system automatically adds a program requirement for an ethic review.
We will work our way down the page – adding what is needed.We will start with the course requirements.
Click on this link.Or this link – to enter the course requirements.

Copyright: Douglas DombroskyGraduate Studies, University of Saskatchewan
SMIS
Program requirements are other non-course items that are required: Comprehensive, etc.
Click on Add New Record to input a new course requirement.

Copyright: Douglas DombroskyGraduate Studies, University of Saskatchewan
SMIS
First you pick a subject code from the list available.Next is the specific course number.
Then the credit count – it defaults to 3 CUs since most GS courses are 3 CUs.The Title of the Special Topics (898) courses
must be input for Convocation check.Is this course required for the degree – a core course?You must save the course or it will be lost. We
will save it now.

Copyright: Douglas DombroskyGraduate Studies, University of Saskatchewan
SMISThe Record has been added.
You can edit or delete the record by clicking on this link.The subject line remembers the last one
picked.
GSIS assumes most classes are in one subject area.Therefore, all you need to add is the course
number and hit SAVE.As you add the courses, the CUs are added up.Since the 994,5,6 courses are non-credit –
just put xx into the CU count field.
Once you have entered all the course requirements – click on this link to see the PoS.

Copyright: Douglas DombroskyGraduate Studies, University of Saskatchewan
SMIS
We are back at the PoS screen and the Course requirements now show up.
Now to add some Transfer Credit – by clicking here or on the Tranfer Credit on the left hand menu.

Copyright: Douglas DombroskyGraduate Studies, University of Saskatchewan
SMIS
We get to the input screen – which again tells us that there are no records on this PoS.So …again … we click on Add New Record to
input a new record – a transfer credit class.

Copyright: Douglas DombroskyGraduate Studies, University of Saskatchewan
SMISThis is a bit different than the course requirement screen – and more information is needed.
The complete course descriptor and number must be input here.The University giving the course is listed here.
Abbreviations are allowed (UofA, UofM, etc.)A brief description of the course – usually course title.Credit Unit count allowed by the advisory
committee – usually 3 CUs.If there is a UofS equivalent for the course – that information is added in these two fields.
Of course, the information must be saved.And when you are finished you go back to the PoS page.
Remember: the student must submit an official transcript from the granting university before they can get credit for it.

Copyright: Douglas DombroskyGraduate Studies, University of Saskatchewan
SMIS
Transfer Credit has been added to our growing PoS.
Program requirements work much like the previous two areas.Now we will click here to input Advisors.
Or you can click on Add Advisors on the left hand menu.

Copyright: Douglas DombroskyGraduate Studies, University of Saskatchewan
Now we will add or edit the Advisory Committee.GSIS assumes that most of the advisory committee will be from one department.
Therefore you first pick a department/Program you want advisors from. I will pick Educational Administration as an example
Then click Find Advisors to bring up the list of advisors to pick for the committee.

Copyright: Douglas DombroskyGraduate Studies, University of Saskatchewan
Here is the list of advisors available in Educational Administration.You put people on the committee by giving
them a position – chosen from the pull down list.
Advisors can be taken off the committee by setting the position to Not on committee.Please contact the Graduate College Programs Area for any
changes that are needed to the advisory list for your department.
As always, you must save the screen or the changes are lost.
Once the system tells you all the members have been saved. You can click on the Program of Study link again to go back to the PoS.
If you have to add advisors from another department (cognate members) you can click on Edit Advisory Committee.
We will click on this now to add a cognate member.

Copyright: Douglas DombroskyGraduate Studies, University of Saskatchewan
SMIS
First … notice that the advisors already chosen are listed at the bottom of the screen.
Again, you pick the cognate member’s department from the list. I will pick Chemistry for this example.
Then click on Find advisors to get the list.

Copyright: Douglas DombroskyGraduate Studies, University of Saskatchewan
This is the list of Chemistry AdvisorsNotice that the advisors already chosen are at the top of the list.Again you can add or drop people from the list
by the Advisor Position drop down list.
Again … remember to save once you have made the changes.
Then …back to the Program of Study for a final check at all the requirements.

Copyright: Douglas DombroskyGraduate Studies, University of Saskatchewan
We are back on the Program of Study screen – and have gone to the bottom of the screen.
Notice that the Advisory Committee – with an added cognate member – is listed.
There is now one more process – approving the PoS.

Copyright: Douglas DombroskyGraduate Studies, University of Saskatchewan
We will move to the top of the Program of Study screen.
PoS have an approval status associated with them. In some status, you can edit the PoS – other
status, the PoS is locked.The Created status allows editing of the PoS. Advisory committees, courses, etc. can be changed.
Clicking on the status link will open the screen to change the status.

Copyright: Douglas DombroskyGraduate Studies, University of Saskatchewan
SMIS
This is the list of options available for the next status.
Approved by Department is a locked status. If a department picks this option – they will not be able to edit this PoS.
This is also the status that the Graduate College looks for in order to do the final approval of the PoS.
A person will only see the list of statuses that they have the privileges to change.
There is also a history of the status changes.Remember to Save (Update Status).

Copyright: Douglas DombroskyGraduate Studies, University of Saskatchewan
There is another point that will help save time when producing a second (third …) PoS for a student.
This view is from the bottom of the New Program screen – where we started the entering the new PoS.
This area lists all the previous PoS created for this student for this admission.Since many of them are in Approved by
CGSR – these cannot be edited.But when a new PoS is created – these different areas can be edited.
Notice that all the areas are represented here;Advisory Committee
Courses (or Classes)Transfer Credit
Exam requirementsSimply pick the piece you want from the PoS you want by clicking on the button in the column.
It will automatically be saved to the new PoS you are creating.However, you still have to save the
information – as always.
This ends the section on entering data into the Program of Study.
Back to GSIS Presentation Main Menu

Copyright: Douglas DombroskyGraduate Studies, University of Saskatchewan
Progress ReportThis section will discuss the Progress Report in detail.
The Progress Reports (ProgRpt) can be accessed by click on the Progress Report link on the main menu.
Or … you can click on the link on any of the ProgRpt that are listed.
We will click on this one so we can see what a ProgRpt looks like.

Copyright: Douglas DombroskyGraduate Studies, University of Saskatchewan
This is an example of a Progress ReportThe approval status of the ProgRpt is listed at the top – same pattern as PoS and Admission Status.
The date of the advisory committee meeting being reported on.
ProgRpts are to be submitted at least once a year for each student in a program.The overall status of the student is displayed
– chosen from a pull down list on input.The current PoS information is listed so the ProgRpt can be associated with a PoS and supervisor and topic.
The Committee comments is a way of helping the committee comment on the performance of the student.
The Competency is the specific area of performance to be reviewed.A ranking can be associated with the
competency – UofS standard ranking system.And any comments on the competency may be entered.
A very simple reporting of Financial Support is provided.
Finally, the typed minutes of the meeting should be copied into the Minutes area.
About 10 pages of information can be put into this field.We will now go to a new ProgRpt to show how the information is input into the system.
Click on New Progress Report to start.

Copyright: Douglas DombroskyGraduate Studies, University of Saskatchewan
Here is the start of the creation of a new ProgRpt.Since a ProgRpt is associated with a PoS –
the system will ask you which PoS you want if it does not have a PoS id already.
We will pick this one by clicking on the link.

Copyright: Douglas DombroskyGraduate Studies, University of Saskatchewan
Here is the data entry form for the ProgRpt.The Meeting Date defaults to today’s date – but can be changed to the date of the committee meeting.
Remember: use the dd-Mmm-yyy format to enter dates.You can choose the overall progress
descriptor from the pull down list.As already described, the competency is a specific topic that the committee may comment on.
However, the committee does not have to comment on any specific competency if the full committee minutes are attached.
The specific competency is listed here.Performance rating is from the pull down list.
Short comments on the competency can be put in here. Longer comments should be put into the minutes field.
There are a number of competency types but we will skip down to the bottom to look at the minutes field.

Copyright: Douglas DombroskyGraduate Studies, University of Saskatchewan
We are at the bottom of the ProgRpt.
The meeting minutes may be copied into this field from any word processor.Some formatting will be lost – but simple
HTML coding may be used to format.
Remember: the document must be saved or the information will be lost.

Copyright: Douglas DombroskyGraduate Studies, University of Saskatchewan
A ProgRpt in Progress Report Created status may be edited.You can edit the current ProgRpt by clicking
on Progress Report Edit.
This ends the section on the description and input of Progress Reports.
Back to GSIS Presentation Main Menu

Copyright: Douglas DombroskyGraduate Studies, University of Saskatchewan
Note to FileThis section will look at inputting a Note to File.
The Note to File in GSIS act the same as Notes to file in paper records.
And tend to be information that cannot be stored elsewhere: letters, emails, comments, etc.The existing Note to File (NtoF) are listed on the Student Information page in reverse chronological order.
A summary statement of each NtoF is given.To see the full Note – simply click on the link.

Copyright: Douglas DombroskyGraduate Studies, University of Saskatchewan
This is the data entry screen for the NtoF.Read the Warning: once saved, the NtoF cannot be edited.The Created Date and User are automatically
put in.
The NtoF has a security level system – only certain people can see certain Notes.It is a top down system – the top of the list can
see those set lower but the lower cannot see higher.
Therefore, a department cannot see a NtoF set at CGSR level – even if a department has created it.
It is Very Important to always set the security level at _Department if you wish to see the Note again.Next to pick the general category of the NtoF.
Categories are to help summarize the information in the Note.
Again, you can pick from the pull down list.The subject acts as a summary statement for the Note and act the same as a subject line on an email message.
Next is the Note Text – this can be up to 10 pages long.
Again, the NtoF must be saved.
This ends the section on the Note to File
Back to GSIS Presentation Main Menu

Copyright: Douglas DombroskyGraduate Studies, University of Saskatchewan
There is now one more process – approving the PoS.

Copyright: Douglas DombroskyGraduate Studies, University of Saskatchewan
There is now one more process – approving the PoS.

Copyright: Douglas DombroskyGraduate Studies, University of Saskatchewan
There is now one more process – approving the PoS.