cookcenter dual fuel cooker electric ovens & gas · pdf filecookcenter dual fuel cooker...
TRANSCRIPT

Cookcenter Dual Fuel Cooker
Electric ovens & Gas hob
Users & Installation GuideModel number 152A
This model is supplied for use with Natural gas, and is convertible toLPG (Propane) with the kit supplied.
08 27095 00- 152A CC 14/6/04 10:59 am Page 1

08 27095 00- 152A CC 14/6/04 10:59 am Page 2

CONTENTS
1
Introduction . . . . . . . . . . . . . . . . . . . . . . . . . . . . . . . . . . . . . . . . . . 2
Installation instructions . . . . . . . . . . . . . . . . . . . . . . . . . . . . . . . . . . 3
For your safety - always . . . . . . . . . . . . . . . . . . . . . . . . . . . . . . . 11
For your safety - never . . . . . . . . . . . . . . . . . . . . . . . . . . . . . . . . . 12
Know your cooker . . . . . . . . . . . . . . . . . . . . . . . . . . . . . . . . . . . . 13
Know your timer . . . . . . . . . . . . . . . . . . . . . . . . . . . . . . . . . . . . . 15
Using your electronic timer . . . . . . . . . . . . . . . . . . . . . . . . . . . . . . 16
Hob . . . . . . . . . . . . . . . . . . . . . . . . . . . . . . . . . . . . . . . . . . . . . . . 23
Griddle . . . . . . . . . . . . . . . . . . . . . . . . . . . . . . . . . . . . . . . . . . . . . 24
Warming zone . . . . . . . . . . . . . . . . . . . . . . . . . . . . . . . . . . . . . . . 25
Oven temperature chart . . . . . . . . . . . . . . . . . . . . . . . . . . . . . . . . 26
Grilling . . . . . . . . . . . . . . . . . . . . . . . . . . . . . . . . . . . . . . . . . . . . . 27
Fan Oven - Cookery notes & charts . . . . . . . . . . . . . . . . . . . . . . . 28
Conventional oven - Cookery notes & charts . . . . . . . . . . . . . . . . 32
Slow cook / Warming oven . . . . . . . . . . . . . . . . . . . . . . . . . . . . . 37
Care & Cleaning . . . . . . . . . . . . . . . . . . . . . . . . . . . . . . . . . . . . . . 39
Is there something wrong? - Troubleshooting . . . . . . . . . . . . . . . . 39
Service information. . . . . . . . . . . . . . . . . . . . . . . . . . . . . . . . . . . . 43
08 27095 00- 152A CC 14/6/04 10:59 am Page 3

INTRODUCTION
2
Thank you for buying this Bellingappliance. We hope that you find itto be a stylish and attractive additionto your kitchen, and enjoy cookingwith it.
Your Belling CookerThere are the following features:l a fanned oven, l a conventional oven,l a slow cook/warming oven, l a separate grill, l a seven burner gas hob with awarming area l a removable griddle plate. There is also a clock /timer with aminute minder and automatic ovenswitch on and off.
Getting helpShould you need any help installing,operating or cooking with this appli-ance, please check these instructionsthoroughly to make sure you have notmissed anything. If you still requireadvice or assistance please contact:
When making a call for adviceplease quote the cookers model num-ber and serial number. These num-bers can be found on the left handside of the oven frame. These num-bers can be written in the box provid-ed on this page.
Warning!For your own safety, please makesure these instructions on installation,use and maintenance are followed.
We advise that you keep theseinstructions in a safe place for futurereference. If you sell, or transferownership of this appliance, pleasepass on these instructions to the newowner.
Unpacking your appliancePlease make sure that you haveremoved all packaging, wrapping,labels and stickers from the appliancebefore use.
Model NumberSerialNumber
08 27095 00- 152A CC 14/6/04 10:59 am Page 4

INSTALLATION INSTRUCTIONS
3
Gas Safety (Installation & Use)Regulations.This appliance must be installed by anauthorised person in accordance withthe manufacturers installation instruc-tions, local gas fitting regulations, theAGA Gas Installations, the AustralianGas Installation Code AG601/AS5601 and any other re l e v a n tstatutory regulations. Particular atten-tion should be given to re l e v a n trequirements regarding ventilation.Space for fixingThe cooker can be close fitted belowhotplate level. This requires a mini-
mum distance of 1085mm betweenthe cupboard units of hotplate height.The wall behind the cooker betweenthe hotplate and 450mm above andacross the width of the cooker, must bean incombustible material such asceramic wall tiles.Follow the diagrams provided forguidance on fitting. Take note of alldimensions.W h e re this appliance isinstalled in Marine craft or car-avans - it shall not be used as aspace heater.
08 27095 00- 152A CC 14/6/04 10:59 am Page 5

INSTALLATION INSTRUCTIONS
4
Technical Data
DimensionsHeight 900 - 915mmWidth 1090mmDepth 600mm (excluding handles)
GeneralGas connection:RP1/2 (1/2 BSP Female)Burner pressure:Natural gas - 1.0kPaLPG gas (propane) 2.75 kPa
Pressure test point:Gas regulator or middle rear hobb u rn e r. (see “Checking Burn e rPressure”)Gas rate adjustment: noneAeration adjustment: none
Electrical connection: 6mm2 cable230 - 240 v a.c. 50Hz
Total heat Input (Gas):Natural gas 59.40MJ/hLPG gas (propane) 55.30 MJ/hTotal heat Input (electric):7.35 - 8.00 kW
Fan oven bottom left:2.30 - 2.50kWGrill top left: 2.38 - 2.60kWConventional oven (top right):2.20 - 2.40kWSlow cook / Warming oven: 0.20 - 0.22kWWarming zone: 0.23 - 0.25kW
Natural Gas LPG - Propane
Burner Heat Input Injector Heat Input Injector
Front Middle (UltraRapid)/ Wok.
12.60MJ/h 1.65mm 12.60MJ/h 0.95mm
Rear Left (Rapid)
11.52MJ/h 1.55mm 10.80MJ/h 0.87mm
Front Left / Rear Middle(Semi-rapid)
7.74MJ/h 1.25mm 6.66MJ/h 0.69mm
Front & Rear Right (Auxiliary)
4.14MJ/h 0.90mm 3.89MJ/h 0.53mm
08 27095 00- 152A CC 14/6/04 10:59 am Page 6

INSTALLATION INSTRUCTIONS
5
Unpacking the cookerUnpack the components from insidethe grill and the oven. Please makesure that you remove everything frominside the cavities.Check that the following are present:l Grill pan and gridl Pansupports (3)l Main oven shelves (4)l Meat panl Literaturel Griddle
LevellingTwo rear wheels and two front feet arefitted which can be adjusted up ordown to set the height (900mm -915mm) and level the cooker.l The rear wheels can be raised orlowered from the back of cooker byadjusting the levelling screws ‘A’ in theplinth.
l The front feet can simply be screwedin or out to lower or raise the front ofthe cooker.
Caution:Some soft floor coverings may getdamaged if the cooker is not movedcarefully.
08 27095 00- 152A CC 14/6/04 10:59 am Page 7

INSTALLATION INSTRUCTIONS
6
Stability bracketThe cooker must be fitted a stabilitydevice firmly secured to the fabric ofthe building. The back of the cookerhas a slot for attaching the stabilitybracket, which can be obtained fromyour cooker supplier. The leafletincluded with the bracket should beread in conjunction with the followinginstructions:l Push the cooker to its intendedpositionl Draw pencil lines on the floor inline with the front and left side of theplinth.l Remove the cooker.
l Position the stability bracket inaccordance with the diagram (Fig 1).l Measure the height from floor levelto the bottom of the slot in the back ofthe cooker.l Add 3mm to the dimension andassemble the stability bracket to thatheight (i.e. from the floor level to theunderside of the top member)
08 27095 00- 152A CC 14/6/04 10:59 am Page 8
CONNECTING TO THE GAS SUPPLY
7
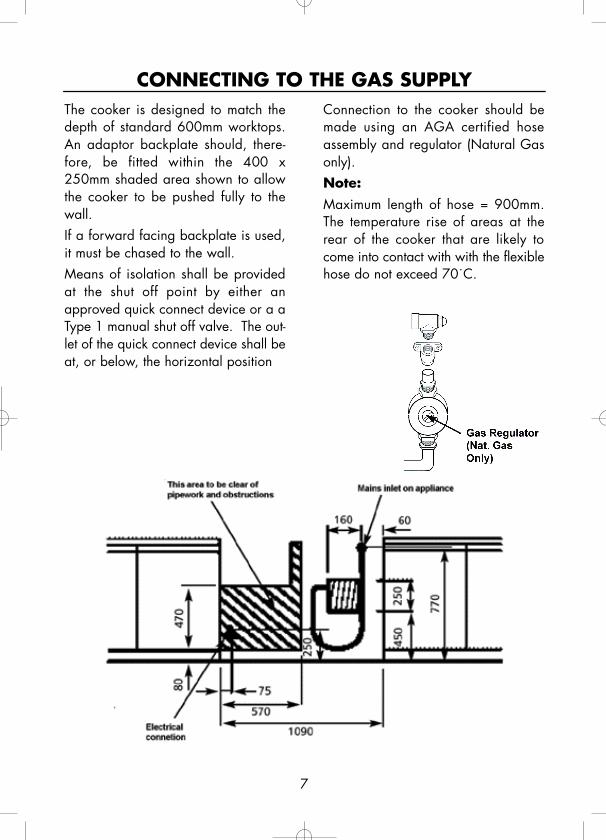
The cooker is designed to match thedepth of standard 600mm worktops.An adaptor backplate should, there-f o re, be fitted within the 400 x250mm shaded area shown to allowthe cooker to be pushed fully to thewall.If a forward facing backplate is used,it must be chased to the wall.Means of isolation shall be providedat the shut off point by either anapproved quick connect device or a aType 1 manual shut off valve. The out-let of the quick connect device shall beat, or below, the horizontal position
Connection to the cooker should bemade using an AGA certified hoseassembly and regulator (Natural Gasonly).Note:Maximum length of hose = 900mm.The temperature rise of areas at therear of the cooker that are likely tocome into contact with with the flexiblehose do not exceed 70˙C.
08 27095 00- 152A CC 14/6/04 10:59 am Page 9

CONNECTING TO THE GAS SUPPLY
8
A restraining chain or wire of ade-quate strength is to be fixed to theappliance and the wall within 50mmof each connection point. The lengthof the chain or wire is not to exceed80% of the length of the hose assem-bly. The restraining chain or wire is toprevent stress being imparted onto thehose assembly when the cooker ismoved out of its normal operatingposition.After installation check for soundness.The burner pressure is tested at thepressure regulator or rear middle hobburner.With reference to the users instruc-tions:l Check that the hotplate burnersignite correctly and burn with a steadyflame.l Check for a steady flame at thelowest setting (small flame symbol).
Finally, instruct the user on the opera-tion of the cooker and give them thisbook for reference.
08 27095 00- 152A CC 14/6/04 10:59 am Page 10

CHECKING BURNER PRESSURE
9
Burner pressure of the appliance canbe checked at the gas re g u l a t o r(Natural Gas) or middle rear burner(Semi Rapid) on the appliance hob.To check the burner pressure of theappliance at the middle rear hob burn-er, the adaptor (illustrated) will berequired.
Remove the burner jet from the middlerear burner (Semi Rapid) and screw inthe adaptor.Connect the test equipment, and ignitethe rear left burner (Rapid) and oper-ate at its maximum gas rate.Pressure should be be as stated on thedata badge (adjust the pressure ifrequired)Removed the adaptor and replace thejet in the middle rear burner (SemiRapid).
Bypass Screw adjustment
The low rate setting of the individualgas burners are preset for NaturalGas and should not require adjust-ment.However, if adjustment is requiredthen the bypass screw, situated on thegas tap and located through the aper-ture in the control panel, can beadjusted with the aid of a thin bladed
flat ended screw driver as follows:Clockwise adjustment to lower theflame.Anticlockwise to increase the flame.A torch may assist in this operation.
The bypass screw adjustment
08 27095 00- 152A CC 14/6/04 11:00 am Page 11

CONNECTING TO THE ELECTRICAL SUPPLY
10
Connecting The CookerFor your own safety we recommendedthat your cooker be installed by a com-petent person. The cooker should be installed ina c c o rdance with AS/NZS 3000:2000.
Warning! This cooker must beearthed.
The cooker must be connected to thecorrect electrical supply as stated onthe rating plate, through a suitablecooker control unit incorporating adouble pole switch having a contactseparation of at least 3mm in all poles,adjacent to(but not above) the cooker.We recommend the cooker circuit berated to 45 amps with a minimum of30 amps.We recommend that 6m2 PVC insulat-ed twin and earth cable is used to con-nect the cooker to the cooker controlunit, the minimum size of cable thatcan be used is 6mm2 twin and earththe maximum size is 10mm2 twin andearth.
ImportantFor access to the mains terminal block,for supply cable connection, it is nec-essary to remove the mains terminalcover, located at the lower right handside of the rear panel. No part of theappliance will operate unless the maincontrol unit is switched ON.
Allow sufficient cable for the cooker tobe pulled out for cleaning, but do notlet it hang closer than 25mm (1”) tothe floor. The cable can be looped ifnecessary, but make sure that it is notkinked or trapped when the cooker isin position.
Before Cooking
Before you cook for the first time, werecommend that you switch on eachelement in turn to burn off any odoursremaining from manufacture.
08 27095 00- 152A CC 14/6/04 11:00 am Page 12

FOR YOUR SAFETY
11
Please read the followingpages before using your cooker4 Always make sure you understandthe controls before using the cooker.4 Always check the controls of thecooker are switched off after use.4 Always stand back when openingthe oven doors to allow heat to dis-perse.4 Always use dry, good quality ovengloves when removing items from theoven.4 Always take care when removingitems from the top oven/grill when themain oven is on, as the contents mightbe hot.4 Always keep the oven and grilldoors closed when the cooker is not inuse.4 Always place pans centrally overthe hotplate burners and position themso they cannot be accidentallyknocked, caught or become heated byother burners.4 Always keep the cooker clean, as abuild up of grease or fat from cookingcan cause a fire.4 Always allow the cooker to coolbefore cleaning.4 Always follow the basic practices offood handling and hygiene to preventthe possibility of bacterial growths.4 Always keep ventilation slots clearof obstructions.4 Always turn of the electricity before
cleaning or changing a light.4 Always refer servicing to registeredservice engineers.4 Always ensure that the griddle is fit-ted correctly to the pansupports andthat the fingers are located within theslots of the griddle feet.4 Always remove the griddle handlewhile cooking.4 Always take care when fitting thegriddle handle not to touch any of thehot surfaces of the griddle or the cook-er.4 Always remove any spillage fromthe surface of the lid before opening it.4 Always allow the hob to cool beforeclosing the lid.4 Always during use, the ovenbecomes hot. Care should be taken toavoid touching heating elementsinside the oven.
08 27095 00- 152A CC 14/6/04 11:00 am Page 13

FOR YOUR SAFETY
12
6 Never leave children unattendedwhere the cooker is installed as all sur-faces will get hot during and after use.6 Never allow anyone to sit or standon any part of the appliance.6 Never store items that children mayattempt to reach above the appliance.6 Never fill chip pans more than 1/3full with oil or fat, or use a lid. DONOT LEAVE PANS UNATTENDEDWHILE COOKING.6 Never use propriety spillage wellson the hotplate, eg. foil spillagebowls.6 Never heat up unopened food con-tainers as pressure can build up caus-ing the container to burst.6 Never store chemicals/ food stuffs,or pressurised containers in or on thecooker, or in cabinets immediatelyabove or next to the cooker.6 Never place flammable items orplastics on or near the hotplate.6 Never use the cooker as a roomheater.6 Never dry clothes or place otheritems over or near the hotplate or theoven/grill doors eg. tea towels oroven gloves.6 Never wear garments with longflowing sleeves while cooking.6 Never leave items that could catchfire near the burners of the flue.6 Never leave burners lit while not inuse.
6 Never use plastic items in or on thecooker.6 Never leave the handles on thegriddle while cooking.6 Never use steam cleaners on thecooker.6 Never spray aerosols in the vicinityof the cooker while it is in operation.6 Never store flammable materials inthe storage drawer of the cooker.
08 27095 00- 152A CC 14/6/04 11:00 am Page 14

KNOW YOUR COOKER
13
The use of a gas appliance results inthe production of heat and moisture inthe room in which it is installed.Ensure that the kitchen is well ventilat-ed; keep natural ventilation holes openor install a mechanical ventilationdevice (mechanical extractor hood).
Prolonged intensive use of the appli-ance may call for additional ventila-tion, for example opening of a win-dow or more effective ventilation i.e.increasing the level of mechanical ven-tilation where present.
08 27095 00- 152A CC 14/6/04 11:00 am Page 15

CONTROL PANEL
14
Operating controls when thegrill is in use.In common with all cookers havingcontrols sited above the grill compart-ment, care must be taken when settingthe controls, due to the hot air beingexpelled from the grill compartment.
Cooling fanA gentle flow of air will be blownbelow the control panel when the grill/ oven controls are in use.
Oven lightThe oven light will illuminate when thecontrol panel is operated. The lightwill remain on during the cooking peri-od.
08 27095 00- 152A CC 14/6/04 11:00 am Page 16

KNOW YOUR TIMER
15
The oven timer offers you the followingfeatures:1. Time of day2. Automatic cooking3. Minute minder
Automatic cookingThe main fan oven can be controlledautomatically.
Guidance on automatic cookingl Select food which will take the samelength of time to cook, and require thesame temperature.l Set the oven timer so that food willhave finished cooking, or be about tofinish cooking on your return to theoven. This will ensure that the food ishot and will not require re heating.l Food should be as cold as possiblewhen it goes into the oven, ideallystraight from the refrigerator. Frozenmeat and poultry should be thawedthoroughly before it is put into theoven.l We advise that warm food is neverplaced in the oven for automatic cook-ing. Stews prepared by frying themeat and vegetables should becooked as soon as possible.l We advise that dishes containingleft over meat or poultry e.g. ShepardsPie should not be cooked automatical-ly, if there is a delay period.l Stews and joints should be cooked
by the long, slow method, so that thedelay period is kept to a minimum.l On warm days, to prevent thegrowth of harmful bacteria in certainfoods (i.e. poultry, joints etc.) the delayperiod should be kept to a minimum.l Wine or beer may ferment andcream may curdle during the delayperiod, so it is best to add these ingre-dients just before serving.l Foods which discolour should beprotected by coating in fat or tossingin water to which lemon juice hasbeen added prior to placing in theoven.l Dishes containing liquid should notbe filled too full to prevent boilingover.l Foods should be well sealed (but notairtight) in a container to prevent theloss of liquid during cooking.Aluminium foil gives a good seal.l Ensure that the food is cookedthrough before serving.
08 27095 00- 152A CC 14/6/04 11:00 am Page 17

ELECTRONIC TIMER OPERATION
16
ClockfaceThe timer incorporates a 24 hourclock.
Ensure that the clock is set tothe correct time before usingyour cooker.
SymbolsA bell symbol will light up when youselect a Minute Minder Period, andwill remain lit for the period set.At the end of the Minute MinderPeriod, the timer will emit an audibletone and the bell symbol will disap-pear
The cookpot symbol will light upeither:-l When the timer is in manual mode.l During the actual Cook Period.
The ‘AUTO’ symbol will light up :-l When the timer is first turned on itwill flash. It will go out when a time ofday is set or when the timer is set tomanual.l The ‘AUTO’ symbol will flash at theend of an Auto Cooking programmeto indicate that the programme has fin-ished.
When the ‘AUTO’ symbol is flashing,to return to the oven to Manual opera-tion, turn all the oven controls off,ensure the correct time of day is setand press the ‘MANUAL’ button - the‘AUTO’ symbol will go out.
AUTO
AUTO
08 27095 00- 152A CC 14/6/04 11:00 am Page 18

ELECTRONIC TIMER OPERATION
17
Timer Function Buttons
Minute minder button: Here youcan set a time period of up to 23 hoursand 59 minutes. When the timerreaches zero, an audible tone willsound.Example: If you set 20 minutes, thetone will sound 20 minutes later.
Auto Cooking Programme.
Cook Period Button: Cook Periodis the actual length of time for whichthe timer will switch the ovens on, asp a rt of the ‘Auto Cooking’ pro-gramme.(e.g. if you set two hours, the food willbe cooked for 2 hours)
End Time Button: The time of dayyou would like the Auto Cooking pro-gramme to end.(e.g. If you set a cook period of 2hours and an end time of 11.00. Thetimers will set the oven to come on at9.00 and turn off at 11.00. You willhear a tone to signal the end of the
programme.You will need to set the oven tempera-ture controls to the required tempera-ture when you set the oven.The oven will only operate during thepre selected time when set for automat-ic - it will not turn on earlier.
Manual Button: Needs to bepressed to cancel an automatic pro-gramme and return the oven to themanual setting.
Plus and Minus Buttons: Theseare used for adding, or reducing timeon the clock. Also for adding orreducing time to Auto Cooking pro-grammes, and the Minute Minder func-tion.
08 27095 00- 152A CC 14/6/04 11:00 am Page 19

ELECTRONIC TIMER OPERATION
18
Setting the time of dayMake sure all the oven controls areturned off.l Check the electricity supply to thecooker is turned of.l When switched on the display willshow 00.00 and the ‘AUTO’ symbolflashing intermittently.l Press and hold the Cook Period andthe End Time buttons together. Shownin black on the diagram below.l Use the ‘+’ and ‘-’ buttons to select-ed the time of day. Shown in grey onthe diagram below.l Release all the buttons simultaneous-ly.l The time of day is now set.
To change the time of day repeat steps4, 5 & 6 above.Note: You cannot set the time ofday if the oven is set for anAuto Cooking Programme.
Setting the Minute Minderl Ensure the time of day is set correct-ly.l Press and hold the Minute Minder
button. Shown in black on the dia-gram below.l With the Minute Minder button heldin, use the ‘+’ and ‘-’ buttons to set therequired duration. Shown in grey onthe diagram belowl Release all the buttons and the timerdisplay will revert back to the time ofday. The bell symbol will remain lit tosignify that a Minute Minder periodhas been set.
At the end of the set time an audibletone will be heard, and the bell sym-bol will disappear.To cancel the Minute Minder, and stopthe audible tone press the MinuteMinder button.
Notes:l The remaining time can be checkedwhen the Minute Minder has been set,by pressing the Minute Minder button.l The Minute Minder function can becancelled by holding the MinuteMinder button down, and pressing the‘-’ button until the timer has countedback to 0.00
AUTO
08 27095 00- 152A CC 14/6/04 11:00 am Page 20

ELECTRONIC TIMER FUNCTION
19
Automatic CookingProgrammesThere are two automatic cooking pro-grammes that can be selected usingyour timer:l To set the timer to switch the ovenon and off automatically.l To set the timer to switch on imme-diately and off automatically after aset Cook Time.
To set the timer to switch theoven on and off automatically.This allows you to chose a specifictime for a chosen period before theoven switches off automatically.
l Check that the correct time of day isset. If it is not, please set the clock fol-lowing the instructions earlier in thebook.l Place the food on the correct shelfposition and close the door.l Press and hold the Cook Time but-ton, the display will read 0.00 with thecook pot symbol lit.l Still holding in the Cook Time but-ton, set the required cooking periodusing the ‘+’ and ‘-’ buttons.
l Release the buttons and the timerdisplay will revert to the time of daywith the ‘AUTO’ and cook pot symbolslit.l Press and hold the End Time button.The display will show the earliest endtime possible for the cook time youhave set. The ‘AUTO’ and cook potsymbols will be lit.
l With the End Time button still heldin, use the ‘+’ and ‘-’ buttons to chosethe time you wish the oven to switchoff. This is the ‘End Time’.l Release all the timer buttons and thedisplay will revert back to the time ofday.l The ‘AUTO’ symbol will remain lit tosignify that an Auto CookingProgramme has been set. The cookpot symbol will go out.
AUTO
AUTO
08 27095 00- 152A CC 14/6/04 11:00 am Page 21

ELECTRONIC TIMER FUNCTION
20
l Tu rn the oven controls to therequired temperature, and select antnecessary functions.l At the end of the Automatic CookPeriod the ‘AUTO’ symbol will flashand an intermittent bleeping sound willbe heard.l The tone will continue until it is can-celled. The ‘AUTO’ symbol will contin-ue to flash until the timer is returned toManual operation.l Press the Manual button and theaudible tone will stop, the ovens willalso return to the Manual setting.When you have finished withthe Automatic Cooking, pleasemake sure that all the ovencontrols are switched to the offposition.
08 27095 00- 152A CC 14/6/04 11:00 am Page 22

ELECTRONIC TIMER OPERATION
21
Automatic CookingProgrammes.
To set the timer to switch onimmediately and off automati-cally after a set cook period.
l Check that the correct time of day isset.l Place the food onto the correct shelfposition in the oven and close thedoor.l Tu rn the oven controls to therequired temperature, and if neces-sary select the appropriate function.l Press and hold the Cook Period but-ton, the display will read 0.00 and thecook pot symbol will light up.l With the Cook Period button helddown set the required Cook Periodusing the ‘+’ and ‘-’ buttons.
Please note: the Cook Period isthe length of time the foodrequires cooking.l Release all buttons. l The timer display will revert to the
time of day with the ‘AUTO’ symbol litand the cook pot remaining lit.
l At the end of the Cook Period the‘AUTO’ symbol will flash and an inter-mittent audible tone will be heard.The audible tone will be heard untilcancelled and the ‘AUTO’ symbol willcontinue to flash until the timer isreturned to Manual.l Press the Manual button to cancelthe tone and re t u rn the oven toManual. When you have finished withthe Automatic Cooking, pleasemake sure all of the oven con-trols are switched to the offposition.
Notes:l When using either AutomaticCooking programme, the Cook Periodcan be checked at any time by press-ing the Cook Period button.l The End Time can also be checkedby pressing the End Time button at anypoint during the cooking.
AUTO
08 27095 00- 152A CC 14/6/04 11:00 am Page 23

ELECTRONIC TIMER OPERATION
22
Cancelling an AutomaticCooking programme.You can cancel the Automatic CookPeriod at any time. You do not haveto let it finish.To cancel :l Turn the oven controls to the off posi-tion.l Press the Manual button to return theovens to Manual operation. The‘AUTO’ symbol will go out.
Notes on timer operation:l When cooking automatically, theCook Period can be checked at anytime by pressing the Cook Period but-ton.
l When cooking automatically theEnd Time can be checked at any timeby pressing the End Time button.
l Having set a Cook Period and EndTime an electronic device stores theinformation. The device within thetimer will switch the oven on and off atthe required times.
l If a mistake is made while program-ming, or you need to change the infor-mation you’ve entered, you can clearthe programmer this way:Press and release the Manual button.
S t a rt re entering the inform a t i o nagain. Pressing Manual cancels all theinformation previously entered.
l If at any time the display showst h ree zero ’s flashing (0.00) and‘AUTO’, it is likely that the power sup-ply has been interrupted. Reset thetimer to the correct time of day. If youhave been cooking, or set an AutoCook programme, it may not havecooked, so please check that any foodis thoroughly heated before serving.
l To set each function always pressand hold the required function buttonand at the same time press the ‘+’ and‘-’ buttons.
08 27095 00- 152A CC 14/6/04 11:00 am Page 24

HOB
23
Your HobThe hob lid is fitted with a safetydevice which cuts off the gas supply tothe hotplate burners unless the lid isfully opened and the manual lever tothe right of the hotplate vent is lifted tothe upright position Do not use thesafety device as a means to control thehotplate burners. The hob has 1 x ultra rapid wok burn-er, 2 x rapid burners, 2 x semi-rapidburners and 2 x auxiliary burnerswhich will accommodate pansbetween 100mm (4”) and 230mm(9”).All pans should be placed centrallyover the burners.
To use the hobCheck the electricity supply is switchedon.l Push in and turn the control knob ofyour chosen burner anti-clockwise tothe large flame symbol.l Turn the knob anti-clockwise to thedesired setting. Only turn the knobbetween the large flame symbol andthe small flame symbol for adjustingthe setting.l To turn off, turn the control knob fullyclockwise.Do not use mis shapen pans whichmay be unstable.Do not use round base woks directlyon the pan supports.Do not use the glass lid as a work sur-face.
Safety for deep fat frying6 Never fill chip pans more than onethird full of fat or oil.6 Never leave fat or oil unattendedduring the heating or cooling period.6 Never heat or fry with the lid on.4 Always dry food thoroughly beforefrying and lower it slowly into the hotoil or fat. Frozen foods in particularcause frothing and spitting if addedtoo quickly.4 Always keep the outside of the panclean and free from streaks of oil andfat.
How to deal with a fat firel Do not move the pan.l Turn off the hotplate burners.l Smother the flames with a fire blan-ket or damp cloth. Do not use wateror a fire extinguisher as the force of itmay spread the burning fat or oil overthe edge of the pan.l Leave the pan for at least 60 min-utes before moving it.
Re-lighting the burnerIn the event of the burner flames beingextinguished accidentally, turn off theburner control and do not attempt to reignite the burner for at least oneminute.If the surface of the glass warmingarea becomes cracked, switch off thecooker to avoid electric shocks. Callfor a engineer and do not use.
08 27095 00- 152A CC 14/6/04 11:00 am Page 25

GRIDDLE
24
Important NoteThe griddle must only be used over thetwo simmer/auxiliary burners.A non stick griddle is supplied for useover the two simmer/auxiliary burnerson the right hand side of the hob. Thegriddle must be positioned on the topof the pan support, with the legs on theunderside engaged on the pan sup-port fingers.The griddle must not be placeddirectly on top of the simmer burners.To protect the non stick coating neveruse metal cooking utensils as they mayscratch. Wooden or heat resistantplastic utensils may be used. Underno circumstances must the griddle beused over any other hot plate.
The griddle may be used with either orboth of the simmer burners on,depending on the food being cooked.The griddle can be positioned with theridged portion at the front or at therear.
Use of the griddlel Position the griddle at the top of thepan support, with the locating legs onthe underside engaged on the pans u p p o rt fingers, above the simmerburners.l Push in and turn the control knob(s)anti-clockwise to the large flame sym-bol. Press the ignition button until theburner(s) light.l The controls should then be set atthe small flame setting as a gentle heatis all that is required for griddling.l Cook the food for the required,which will depend on the food beingcooked.l To turn off, turn the control knob(s)fully clockwise to the position ‘O’.l Do not remove the griddle from thecooker whilst hot.l Allow the griddle to cool beforeremoving and cleaning.l Clean the griddle with warm soapywater.Do not put into a dishwasher.
Caution:Do not refit the griddle plate to the hobif the glass lid is to be lowered.
08 27095 00- 152A CC 14/6/04 11:00 am Page 26

WARMING ZONE
25
To the rear of the wok burner is awarming zone which can be used fora wide range of non cooking tasksassociated with the preparation ofmeals. It provides a gentle heat sur-face and can achieve a surface tem-perature of 120˙C and is speciallydesigned for keeping coffee hot aswell as gravy, custard and othersauces. The warming zone warningneon illuminates on the control panel ifthe warming zone control is operated.To warm plates on the warming zone,simply place your plates on the warm-ing zone and turn the control knob tothe on position.
08 27095 00- 152A CC 14/6/04 11:00 am Page 27

APPROXIMATE OVEN TEMPERATURES
26
GAS MARK CONVENTIONAL OVEN FAN OVEN(It is not always necessary
to pre heat oven)
˙F ˙C ˙C
1/2 250 120 100
1 275 140 120
2 300 150 130
3 325 160 140
4 350 180 160
5 375 190 170
6 400 200 180
7 425 220 200
8 450 230 210
9 475 240 220
08 27095 00- 152A CC 14/6/04 11:00 am Page 28

GRILLING
27
NEVER allow your children nearthe appliance when the grill isin use as the surfaces getextremely hot.
Grilling should never be under-taken with the grill door closed.
Do not line the grill pan withaluminium foil.
The grill control is designed to provideto provide variable heat control oneither left and right grill elementstogether or left hand element only,depending on which direction the con-trol knob is rotated. With the controlknob rotated clockwise both elementswill come on together, and with the theknob rotated anti-clockwise only theleft hand element will come on.
Using the grill.l Open the grill door.l Preheat the grill at setting 5 forapproximately 5 minutes.l When toasting/grilling the grill panis placed either in the upper or lowerrunner and pushed back until it locatesin the stop. This will correctly positionthe pan under the grill element.l Leave the control at 5 for toast, andfor sealing and fast cooking foods.l For thicker foods requiring longercooking, turn the switch to a lower set-
ting after the initial sealing on bothsides at 5. The thicker the food thelower the setting should be set.
After use, always re t u rncontrols to their off position.
Note:Utensils stored in the grill compartmentwill get hot when the fan oven is inuse. Care should be taken whenremoving them.
08 27095 00- 152A CC 14/6/04 11:00 am Page 29

FAN OVEN COOKERY NOTES
28
Oven thermostatWhen operated the oven neon willimmediately come on, and will go outwhen the desired temperature isreached, subsequently switching onand off to maintain the temperature.The fan will operate continuously whilethe oven is switched on.Note: if the neon does not come onwhen the control is turned, check thatthe timer is in manual operation.
Since a fan oven heats up more quick-ly, and generally cooks food at alower temperature than a conventionaloven, preheating the oven is oftenunnecessary. However foods such asbread, scone and Yorkshire puddingdo benefit from being placed in a pre-heated oven.The charts are a guide only, givinga p p roximate cooking temperature sand times. To suit personal tastes andrequirements it may be necessary toincrease or decrease the temperaturesby 10˙C. Because the fan oven cooksso eff i c i e n t l y, we recommend thatwhen cooking recipes not designedfor a fan oven, you reduce the temper-ature by about 25˙C and the time byabout 10 minutes in the hour. If largequantities are being cooked it will benecessary to increase the cooking timeto compensate for the extra oven load.Unless otherwise indicated the foodshould be placed into a cold oven i.e.
without preheating. If the oven isalready hot, the suggested cookingtime should be reduced depending onthe quantity and and type of foodbeing cooked. It should be noted that at the end of acooking period there may be amomentary puff of steam when thedoor is opened, this will disperse in afew seconds and is a perfectly normalcharacteristic of an oven with a goodseal.
Oven positionsSince the distribution of heat in a fanoven is fairly even, most foods willcook satisfactorily on any shelf posi-tion, but the shelves should be even;yspaced :To ensure even circulation do not usemeat tins which are larger than 390 x300mm (15” x 12”) and baking traysno larger than 330 x 255mm (13” x10”), these should be positioned cen-trally on the oven shelf.Do not fit shelves upside down.Never use more than three shelves inthe oven as air circulation will berestricted.Food or cooking utensils should not beplaced on the floor of the oven.To avoid unnecessary cleaning, rodshelves which are not in use should beremoved from the oven.
08 27095 00- 152A CC 14/6/04 11:00 am Page 30

FAN OVEN COOKERY NOTES
29
Temperature and TimeWhen all three shelves are used tocook large quantities of food for homefreezing or parties, it may be neces-sary to increase the cooking timesgiven in the charts, by a few minutes,to allow for the loss of heat due to theextra time taken to load the oven andthe larger mass of food. Baking traysshould allow an equal gap on all sidesof the oven.
Preparing meat and poultry forroasting.l Wipe the meat or poultry, dry welland weigh it. Meat which has beens t o red in a refrigerator should beallowed to come to room temperaturebefore cooking, and frozen meat orpoultry should be completely defrostedbefore placing in the oven.l The weight of any stuffing should beadded to before calculating the cook-ing time.l Place the meat/poultry in the mainoven meat tin supplied with your cook-er. Smaller joints weighing less than1.75kg (31/2 lbs) should be roasted ina smaller roasting tin/pan - or theymay be pot roasted - a small joint in alarge pan causes unnecessary ovensplashing and evaporation of meatjuices.l Additional fat should not be added,except for veal, very lean meat orpoultry which can be either ‘larded’with fat bacon or brushed very spar-
ingly with cooking oil or melted fat.l Beef, lamb, mutton and poultry maybe dusted lightly with seasoned flourto give a crisp outer surface. The skinof duck and goose should be prickedto released excess fat during cookingand the rind of pork should be scored,brushed lightly with oil and rubbedwith salt to give crisp crackling. l Meat and poultry wrapped in, orcovered with a tent of aluminium foilwill be juicy and tender. Roastingbags offer the same advantages.Always follow the manufacture r sinstructions, and remember to reducethe temperature by 25˙C and the cook-ing time by 10 minutes per hour.l Potatoes for roasting only requirelightly brushing with melted fat orcooking oil.l It is not necessary to baste whenroasting in an electric oven, and stockor liquid should not be added to themeat pan since this only causes unnec-essary soiling, steam and condensa-tion.
Frozen meat and poultryJoints of meat and whole birds shouldbe defrosted slowly, preferably in adomestic refrigerator (5-6 hrs per450g) or at room temperature (2-3 hrsper 450g). Frozen meat must be com-pletely defrosted before placing in theoven. It is essential to wash thorough-ly and cook meat immediately afterdefrosting.
08 27095 00- 152A CC 14/6/04 11:00 am Page 31

FAN OVEN TEMPERATURE CHART - BAKING
30
Food Pre-heat Temperature ˙C Time(approx)
scone Yes 210 - 220 9 - 12 min
Small cakes Yes 170 -180 15 - 20 min
Victoria sandwich Yes 160 - 170 20 - 25 min
Sponge sandwich(fatless)
Yes 170 - 190 15 - 20 min
Swiss roll Yes 180 - 200 12 - 15 min
Semi-rich fruit cakes Yes 140 - 150 11/4 - 11/2 hrs
Rich fruit cakes Yes 130 - 140 Depends on size
Shortcrust pastry Yes 190 - 200 Depends on size
Puff pastry Yes 190 - 200 Depends on size
Yorkshire pudding Yes 180 - 190 40 - 50 min
Individual Yorkshirepuddings
Yes 190 - 200 20 - 25 mins
Milk pudding Yes 130 - 140 11/2 - 2 hrs
Bread11/2 - 2 hrs Yes 200 - 210 35 - 45 mins
Meringues Yes 70 - 90 3 - 4 hrs
Temperatures recommended in this chart for cakes refer to cakes made with block mar-garine or butter. For soft tub use the all-in-one method and reduce the temperature by 10˙C
08 27095 00- 152A CC 14/6/04 11:00 am Page 32

FAN OVEN TEMPERATURE CHART - MEAT
31
Meat Pre-heat Temperature ˙C Time
Beef No 160 - 180 20 - 25 mins per450g + 20 mins
Lamb No 160 - 180 20- 30 mins per 450g+25 mins
Pork No 160 - 180 25 - 30 mins per450g + 25 mins
Veal No 160 - 170 25 - 30 mins per450g + 25 mins
Chicken/Turkey - to4kg
No 160 - 180 19 - 20 mins per450g + 20 mins
Turkey 4 - 5.5 kg No 150 - 160 or150
12 - 14 mins per450g + 12 mins.
For every 450g over5.5kg allow 10 mins
per 450g and roast at150˙C
Casserole, stews No 140 - 150 11/2 - 2 hrs
If using aluminium foil, never:l Allow the foil to touch the sides of theoven.l Cover the oven interior with foil.l Cover the shelves with foil.
The most accurate way of testing thereadiness of joints of meat or whole poul-try is to insert a thermometer into the thick-est part of the joint, or thigh if poultry dur-ing the cooking period. Beef: Rare 60˙C
Medium 70˙CWell done 75˙C
Lamb: 80˙CPork: 90˙CVeal: 75˙CPoultry: 90˙C
08 27095 00- 152A CC 14/6/04 11:00 am Page 33

CONVENTIONAL OVEN COOKERY NOTES
32
The charts are a guide only, givinga p p roximate cooking temperature sand times. To suit personal taste andrequirements, it may be necessary toincrease or decrease temperatures by10˙CThe oven is fitted with ‘Cookclean’ lin-ers and two rod shelves. The oven isheated by two tubular sheathed ele-ments located behind re m o v a b l esides. The heating of the oven isachieved by turning the control knobclockwise to the required temperatureas recommended in the temperaturecharts. The oven neon will immediate-ly and will automatically go off and onduring cooking as the oven thermostatmaintains the correct temperature.It should be noted that at the end of thecooking period there may be amomentary puff of steam when theoven door is opened. This will dis-perse in a few seconds and is a per-fectly normal characteristic of an ovenwith a good door seal.
Preparing meat and poultry forroasting.l Wipe the joint, dry well with a cleancloth, kitchen tissue etc., and weigh it.Meat which has been stored in arefrigerator , should be allowed tocome to room temperature for approx-imately 30 minutes, and similarlymeat stored in a freezer should beallowed the defrost thoroughly. Beef,lamb and mutton may be lightly
floured, but pork should have the rindscored, brushed over lightly with oliveoil, and sprinkled with salt - this givescrisp crackling.l Place the joint in a meat pan (smalljoints weighing less than 1.5kg shouldbe roasted in a small pan/meat tin, orthey may be pot roasted - a small jointin a large pan causes unnecessarysplashing) Additional fat should not beused, except for veal, very lean meat,poultry which can either be ‘larded’with fat bacon or brushed over verysparingly with melted fat/cooking oil.l When potatoes are to be roastedaround a joint, they only require light-ly coating in oil or melted fat. It is notnecessary to baste, when roasting inan electric oven, and liquid and stockshould not be added to the meat pan.
For optimum cooking perf o rm a n c e ,there must be clearance between themeat pan and the oven sides. Theoven pan must be placed length waysin the oven to allow circulation.
08 27095 00- 152A CC 14/6/04 11:00 am Page 34

CONVENTIONAL OVEN COOKERY NOTES
33
Times and temperatures forroastingThe secret of succulent, tender meat isnot to roast it too quickly at too high atemperature. Best results are obtainedwhen roasting is carried out at a lowtemperature. When a lower tempera-ture is used, the joint loses less weightand is more tender (too high a temper-ature causes meat to be dry andtough), the splashing of fat is alsoreduced to a minimum. When a com-plete meal is being cooked in theoven, cooking time may need to beincreased, and the temperature mayneed to be raised for the last 30 min-utes or so. (i.e. when cookingYorkshire Puddings to be served with aroast beef).
The suggested times and temperaturesgiven below should be used as aguide, but may vary according to:-l Whether you prefer meat well done,rare or medium.l The size and shape of your joint:i A short thick joint takes longer tocook than a long thin joint.i A small joint under 1.5kg takeslonger per 450g to cook in the timegiven for ‘minutes’ per 450g, this iswithout the extra minutes added at theend.i Boned, rolled and stuffed joints takelonger to cook through than those witha bone. The weight of the stuffingshould be added to the oven readyweight of meat/poultry to calculate theroasting time.
08 27095 00- 152A CC 14/6/04 11:00 am Page 35

CONVENTIONAL OVEN TEMPERATURE CHART
34
Food Pre-heat Temperature (˙C) and approx time
Position inoven
Beef Yes 190/200 - 25 - 30 mins per450g + 25 mins
In a meat panon runner 2
from the bottomof the oven
Lamb/Mutton Yes 190/200 - 25 - 30 mins per450g + 25 mins
Pork Yes 190/200 - 30 - 35 mins per450g + 30 mins
Veal Yes 190/200 - 25 - 35 mins per450g + 30 mins
Poultry/Game/Turkey
Yes 190/200 - 20 - 25 mins per450g + 20 mins
up to 5.5kg allow 22mins per450g @ 190
over 5.5kg allow 16 mins per450g @ 180.
Casserole Cooking Yes 140/160 according to quantity Centre of theoven floor
If using aluminium foil, never:l Allow the foil to touch the sides of theoven.l Cover the oven interior with foil.l Cover the shelves with foil.l Remember to increase the cooking timeby one third.
08 27095 00- 152A CC 14/6/04 11:00 am Page 36
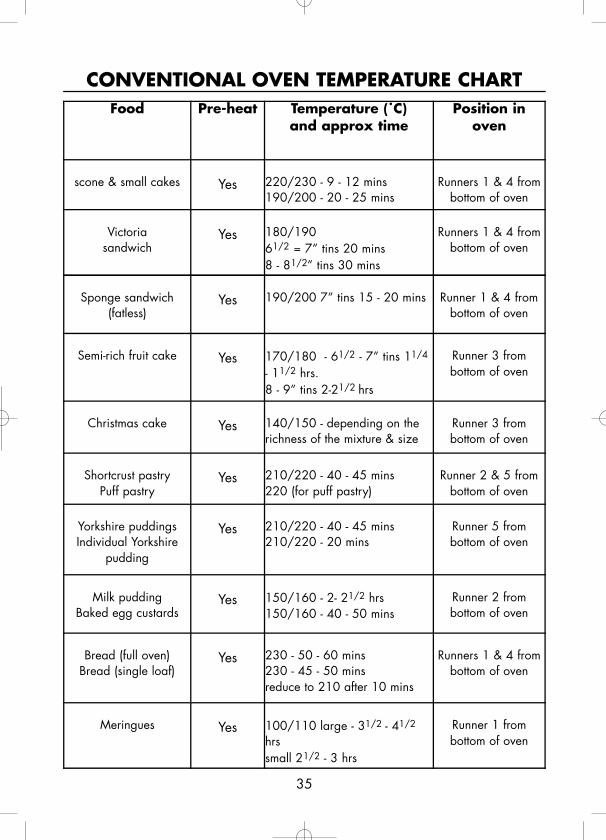
CONVENTIONAL OVEN TEMPERATURE CHART
35
Food Pre-heat Temperature (˙C) and approx time
Position inoven
scone & small cakes Yes 220/230 - 9 - 12 mins190/200 - 20 - 25 mins
Runners 1 & 4 frombottom of oven
Victoria sandwich
Yes 180/19061/2 = 7” tins 20 mins8 - 81/2” tins 30 mins
Runners 1 & 4 frombottom of oven
Sponge sandwich(fatless)
Yes 190/200 7” tins 15 - 20 mins Runner 1 & 4 frombottom of oven
Semi-rich fruit cake Yes 170/180 - 61/2 - 7” tins 11/4
- 11/2 hrs.8 - 9” tins 2-21/2 hrs
Runner 3 from bottom of oven
Christmas cake Yes 140/150 - depending on therichness of the mixture & size
Runner 3 from bottom of oven
Shortcrust pastryPuff pastry
Yes 210/220 - 40 - 45 mins220 (for puff pastry)
Runner 2 & 5 from bottom of oven
Yorkshire puddingsIndividual Yorkshire
pudding
Yes 210/220 - 40 - 45 mins210/220 - 20 mins
Runner 5 from bottom of oven
Milk puddingBaked egg custards
Yes 150/160 - 2- 21/2 hrs150/160 - 40 - 50 mins
Runner 2 from bottom of oven
Bread (full oven)Bread (single loaf)
Yes 230 - 50 - 60 mins230 - 45 - 50 minsreduce to 210 after 10 mins
Runners 1 & 4 frombottom of oven
Meringues Yes 100/110 large - 31/2 - 41/2
hrssmall 21/2 - 3 hrs
Runner 1 from bottom of oven
08 27095 00- 152A CC 14/6/04 11:00 am Page 37

CONVENTIONAL OVEN TEMPERATURE CHART
36
Please note:When using two shelf positions at thesame time (e.g. to bake two platetarts, full oven of bread etc.) tinsshould be interchanged half waythrough the cooking period. Whenbaking two trays of scone, smallcakes, at the same time, the lower traymay require to be baked for a fewminutes longer than the top tray. If softtub margarine is used for cake mak-ing, temperature recommended by them a n u f a c t u rer should be followed.Temperatures for baking in this bookare for cakes baked with block butteror margarine.
08 27095 00- 152A CC 14/6/04 11:00 am Page 38
SLOW COOK / WARMING ZONE
37
Using the slow cook/warmingovenThe lower right hand electric oven pro-vides a gentle heat suitable for warm-ing food, warming plates or slowcooking. It must be preheated if it is tobe used for keeping food warm.
Keeping food warmTurn the control clockwise to the onposition and allow to preheat for 20minutes before placing food in theoven. If food is to be kept moist thenit is important to cover the dishes andplates to prevent them from drying out.This can be done using aluminium foilif the dish doesn’t have a lid. Do notuse cling film as it cannot withstandthe heat in the oven. Some foods arebest left uncovered if you wish to main-tain their crispness. Do not add gravyto plated meals until serving. Carvedmeat should be placed on one plateand covered, adding just a teaspoonof gravy for moistness. When keep-ing plated meals warm it is recom-mended that the food is placed on hot,rather than cold plates.
Slow cookingSlow cooking has always been thebest way to prepare a hot meal withminimum preparation and maximumtime away from the kitchen. Simplyturn the slow cooker control clockwiseto the on position. The neon will illu-
minate and preheat for 20 minutes.Always put the prepared cooking potcentrally on the base of the oven.
Warming platesThe slow cook / warming oven canalso be used for warming plates.Place the plates on the base of theoven. China plates and serving dishesshould be placed in the oven before itis switched on, otherwise the suddenchange in temperature may result indamage.
08 27095 00- 152A CC 14/6/04 11:00 am Page 39

SLOW COOKING GUIDELINES
38
For best results with Slow cooking:l Cooking time will depend on sizeand shape of meat or poultry.l The maximum capacity of the dishshould be no more than 2.5 litres (4.5pints). The fuller a dish is - the longerit will take to cook.l Always bring soups, casserole andliquids to the boil before putting in theoven and for best results and to givemore colour to meat and poultry, frythe meat to brown and add to hotstock.l All meat recipes need a minimum of5 hours to cook.l Make sure that all frozen ingredi-ents are well thawed out. Alwaysensure that frozen poultry has thawedcompletely and all ice crystals havemelted.l Cut root vegetables into smallerpieces as they take longer to cookthan meat. If possible they should besauteed for 2-3 minutes before slowcooking. l Ensure that root vegetables areplaced at the bottom of the pan andimmersed in the cooking liquid.l A meat thermometer should be usedto when cooking pork joints and poul-try. The internal temperature shouldreach at least 88˙C.l Stuffed meat or stuffed poultry areunsuitable for slow cooking.l Cover casserole with foil or a lid toprevent loss of moisture.
l Adjust seasoning and thickeningingredients at the end of the cookingtime.l Egg and fish dishes need only 1-5hours cooking and should be includedin day cooking sessions when they canbe observed from time to time.l Dried red kidney beans must beboiled for a minimum of 10 minutesbefore being included in any dishes.
08 27095 00- 152A CC 14/6/04 11:00 am Page 40

CARE AND CLEANING
39
In the interests of both safety andhygiene, your Belling Cookcenterneeds to be kept clean. A build up ofgrease and fat from cooking couldcause a fire hazard.
Warning! For your own safetyalways switch off your cookerat the mains switch and allowto cool before cleaning.
Never use excessive amounts of waterto clean your cooker, and rememberthat your cooker is heavy. Take carewhen pulling it out for access.Clean the cooker regularly and wipespills soon after they occur to preventthem from becoming dried on. Neveruse biological washing powder, caus-tic cleaners, harsh abrasive, scouringpads, aerosol cleaners or oven chemi-cal cleaners of any kind. Do not use asteam cleaner.To move the cooker forward, open thedoor and with both hands positionedunder the roof of the compartment, liftand pull forward. Replace by pushingthe cooker backwards. Check that thecooker is level. Take care to ensurethat the floor covering is not damaged.
Replacing an oven lightDisconnect the appliance from theelectricity supply before replacing alamp to avoid the possibility of electricshock.Open the oven door and remove therod shelves.Use a thick cloth to grip the light glassdome, unscrew anti-clockwise and liftout. Reach into the aperture and with athick cloth and unscrew the faulty bulbanti-clockwise. (15W 300˙C SES). Fit a replacement bulb, refit the glasslens.
The oven lamp is not covered by theguarantee.
08 27095 00- 152A CC 14/6/04 11:00 am Page 41

CARE AND CLEANING
40
Cooker Finish Cleaning Method
Vitreous enamelHotplate, pan supports, burner ring discsmeat tine, grill pan, oven base, inside ofoven and grill doors, grill compartment.
Use a cloth wrung out in hot soapy water.Stubborn stains can be removed with acream, paste, liquid cleaner or by rubbingwith fine steel wool, soap pads. Check thatthe cleaning agent is approved by theVitreous Enamel Development Council.
PaintSide trims, plinth, fascia trims
Wash with a cloth wrung out with hot soapywater only. Do not use abrasive.
AluminiumBurner bodies
Note: care must be taken to prevent cleaningmaterials, water and dirt from entering andblocking the burner ring ports.
Chromium platingOven shelves, grill pan grid, grill panhandle support
Wipe with a cloth wrung out in hot, soapywater. A fine steel wool soap pad, or stain-less steel/chrome cleaner may be used.
Stainless steel Use a cloth wrung out in warm soapy water,or a propriety stainless steel cleaner.
Grill and ovens Shelving and enamel parts of the oven andgrills maybe cleaned with a cream cleaner &nylon sponge or pad. Heavier soiling myrequire a propriety cleaner or or steel woolpad - do not let either of these come into con-tact with the Cookclean panels, door seals orplastic cooker parts. Check that the clean-ing agent is approved by the Vitreous EnamelDevelopment Council.
Cookclean panels Use a nylon pad/sponge and warm soapywater, blot dry with kitchen tissue or a drysponge - but do not rub dry. Run the ovensfor about 30 minutes following cleaning.
PlasticGrill pan handle, control knobs
Wipe with a cloth wrung out in hot soapywater.
Griddle Wash with a cloth wrung out in hot soapywater, for stubborn stains use a non stick padcarefully. Ensure both sides are rinsed anddried thoroughly. Do not put in a dishwasher
08 27095 00- 152A CC 14/6/04 11:00 am Page 42

TROUBLESHOOTING
41
Problem Check
Nothing works Is the main cooker wall switch turned on?Is the timer display blank?If the timer is not working it is likely there is notelectricity supply to your cooker.
Fan oven does not work,but Grill and Conventionaloven work
Ensure that the timer is set to manual - refer to thetimer section of this book.
Grill does not work, butthe main oven does
Operating the cooker under the following condi-tions may cause a safety device to operate:Grilling with the door shut.Grilling for an excessively long time at a maximumsetting.Switch the appliance off for approx 30 minutes andthen check to see if the grill is working.
Grill keeps turning on andoff
When the grill is set to less than ‘5’, this is normalregulator operation not a fault.
Cannot set an ‘Auto Cook’programme/ cannot getthe timer to switch theoven on and off at therequired times
Remember: “Cook Time” is the actual length of timefor which the timer will switch the oven on for aspart of an ‘Auto Cook’ programme.
Timer sounds continually Return the minute minder to ‘off’
Hotplate burner failing toignite
Ensure the burner caps/rings are seated correctly.Ensure the holes in the rings are not blocked.Ensure there is gas coming from the burner. If notcheck the gas is on and the lid is fully up right.Ensure there is spark at the burner, a clicking noiseshould be heard, if not check the cooker is on.
Replacement of lamps See the section on replacing an oven lamp in thecare and cleaning section. This part is not coveredby the guarantee.
08 27095 00- 152A CC 14/6/04 11:00 am Page 43

TROUBLESHOOTING - COOKING RESULTS
42
Problem Check
Grilling - Uneven cooking frontand back
Ensure the grill pan is placed centrally underthe grill element
Grilling - Fat splattering Ensure the grill is not set too high
Baking - Uneven rising of cakes Ensure the oven shelves are level by using aspirit level on the rod shelf and adjusting thewheels/feet. The oven should be checkedboth left to right and back to front
Baking - Cakes sinking The following may cause cakes to sink:Preheating of fan ovens.Cooking at too high a temperature.Using the creaming method with soft mar-garine.
Baking - Over/Under cookingBaking - Fast/Slow cooking
Refer to the cooking times in this book, butbear in mind they are only a guide and mayrequire increasing or decreasing dependingon personal taste and preference.Do not use tins higher than 56mm (21/4’)
08 27095 00- 152A CC 14/6/04 11:00 am Page 44

SERVICE
43
Calling for a service
If you should experience any problemswith your cooker please contact yourretailer or place of purchase.
Important Note:Service work is to be conducted byauthorised persons only. It is alsoadvisable that your cooker is checkedregularly and maintained in good con-dition. An annual maintenance is rec-ommended.
Remember that you may be chargedfor any visit (even during the guaran-tee period) if nothing is found to bewrong with your appliance, of if thefault lies with incorrect use or installa-tion.Always check the instruction book
before calling a service agent to makesure you have not missed anything.
If you require a service agent pleasecontact:RHA AustraliaPO Box 301CardiffNew South Wales 2285Phone: 02 49569696Fax: 02 49568215
B e f o re contacting a service agentmake sure you have the followinginformation:Model Number:Serial Number:Date of Purchase:Postcode:
Date Nature of Fault PartsReplaced/Repaired
AuthorisedStamp/Signature
08 27095 00- 152A CC 14/6/04 11:00 am Page 45

44
Our policy is one of continual improvement in design and development, thereforestrict accuracy of illustrations and descriptions cannot be guaranteed.
This appliance must be installed in accordance with the rules in force, and only usedin a sufficiently ventilated space. Consult instructions before installation and use ofthis appliance.
08 27095 00- 152A CC 14/6/04 11:00 am Page 46

NOTES
45
08 27095 00- 152A CC 14/6/04 11:00 am Page 47

08 27095 00 © 04.2004 - Glen Dimplex Cooking LimitedMerseyside UK
08 27095 00- 152A CC 14/6/04 11:00 am Page 48