contract management system (cms) contractor user … · · 2016-05-23contract management system...
TRANSCRIPT
Contract Management System (CMS) Contractor User Manual
Revised May 2016

Table of Contents
Chapter 1 - Overview .......................................................................................... 4
1.1 Contractor Role Definitions ................................................................................................................................ 4
1.2 CMS Authorization ............................................................................................................................................. 5
1.3 Accessing the Contract Management System ................................................................................................... 6
1.4 Using the Forgot My Password Link .................................................................................................................. 6
Chapter 2 - Navigating the System ...................................................................... 7
2.1 Home Page ........................................................................................................................................................ 7
2.2 CMS Main Menu................................................................................................................................................. 7
2.3 CMS Inbox Introduction ...................................................................................................................................... 8
Chapter 3 - Managing Tasks from the Inbox ........................................................ 9
3.1 Processing a Contract Task ............................................................................................................................. 10
3.2 Interactive Documents ..................................................................................................................................... 10
3.3 Downloadable Documents ............................................................................................................................... 12
3.4 Entering Budget Details ................................................................................................................................... 14
3.5 Uploading Documents from the Inbox .............................................................................................................. 16
3.6 Signing a Contract from the Inbox .................................................................................................................... 17
Chapter 4 - Reviewing Basic Information .......................................................... 19
4.1 Viewing Contractor Details ............................................................................................................................... 19
4.2 Viewing Contract Details .................................................................................................................................. 21
4.3 Viewing Schedule Information .......................................................................................................................... 22
Chapter 5 - Managing Expenditures .................................................................. 23
5.1 Logging a Claim ............................................................................................................................................... 23
5.2 Processing an Online Claim ............................................................................................................................. 25
5.3 Uploading Claim Documents ............................................................................................................................ 26
5.4 Reporting Temporary Assistance for Needy Families (TANF) Data ............................................................... 28
5.5. Rejecting a Claim ............................................................................................................................................. 29
5.6 Signing an Online Expenditure ......................................................................................................................... 31
5.7 Declining a Claim ............................................................................................................................................. 32
5.8 Logging an Advance ........................................................................................................................................ 33
5.9 Processing/Signing an Advance ...................................................................................................................... 34
5.10 Viewing Claim History ....................................................................................................................................... 35
Chapter 6 - Online Program Reports ................................................................. 38
6.1 Logging a Program Report ............................................................................................................................... 38
6.2 Processing a Program Report .......................................................................................................................... 40
6.3 Viewing Program Reports from Contract Details ............................................................................................. 41
Chapter 7 - Budget Modifications ...................................................................... 43
Chapter 8 - Exiting the Contract Management System ...................................... 43

Preface
Purpose of this Manual
This document describes the procurement process flow, functionality and procedures to be utilized while
performing contractor actions in the Contract Management System.
Intended Audience External CMS users will be provided with this document as reference.
Related Documents Additional resource materials and online tutorials may be found on the Office of Children and Family
Services (OCFS) website. http://ocfs.ny.gov/main/bcm/cms_training.asp
Document Conventions In this manual, certain words are represented in different fonts, typefaces and sizes. The below table
illustrates the typographic conventions used in this manual.
Style Elements
Blue text Indicates links and cross references
Blue Boldface User interface elements such as menu items and command button
names
Italic Document titles, glossary terms, and occasional emphasis
Indicates Notes
A note icon presents information that is recommended as a best
practice or essential to the operation of the system.
Version History
Date/Release Comments
May 2016 Updated content and screenshots
Comments Every effort has been made to ensure the accuracy of this document. Should you have any questions or
suggestions regarding this document, contact CMS support at: 518.474.5358.

4 | P a g e
Chapter 1 - Overview
The Contract Management System (CMS) is a secure, web browser-based
application used by the Office of Children and Family Services (OCFS) to
effectively manage and increase efficiency of the contract development
process and payment of claims/expenditures.
1.1 Contractor Role Definitions There are several user roles designated for contractor use. The specific
functions that can be performed in the system are based on the privileges
assigned to a specific CMS role.
Role Definition
CONUSER Responsible for many contract related data entry tasks, such
as completing online program reports and/or entering claim
information online. The CONUSER typically processes
contract related tasks that pertain to contract development.
Examples include: completing interactive documents,
budgets, online claiming, and uploading contract related
documents.
CONSIG Responsible for signing contracts on behalf of an
organization.
CLAIMSIG Responsible for signing claims on behalf of an organization.
CONVIEWER Limited, View Only Access
Please Note: Multiple CMS roles [user ids] may be assigned to an individual.
Since certain roles dictate specific task actions, it is not unusual that an
organization designate an individual to possess multiple roles [user ids] to
perform particular tasks within the system.
The following table depicts the modules within the system and the level of
access the contractor roles have in each module.
Type of User CONUSER CONSIG/CLAIMSIG CONVIEWER
Modules View Perform View Perform View
Announcements/
Notifications
Inbox
With Contractor
Stage Items
Contractor
Signature Stage
(e-Signature)
Contractor
Details
Contract Details
Correspondence
TIP: When toggling between multiple roles, to prevent caching (the temporary storing of login information from a previous CMS login session) be sure to log out of the CMS application using the ‘logout’ link and close the Internet Explorer (IE) web browser completely as opposed to opening a new CMS session via a new tab on the IE browser.

5 | P a g e
1.2 CMS Authorization Prior to completing any online transactions in CMS, it is recommended that at
least two individuals within a vendor organization be designated as CMS
users:
User responsible for processing the contract documents; and
User responsible for electronically signing a contract and/or
expenditure
Designating multiple users for each CMS role will prevent delays in the
contract process during vacations, sick leaves and/or other absences.
In order to request access to CMS, a CMS Authorization form must be
completed. This form in conjunction with the Vendor & Contract Contact
Update form should be used for any adds, edits, and/or updates to reviewer
credentials or the CMS vendor record. For new vendors contracting with
OCFS, these forms are included with the Award letter.
The CMS Authorization and the Contract Contact Update form should
be reviewed annually or whenever there is a change in personnel to
ensure CMS reflects the appropriate organizational contacts and CMS
Reviewers.
For existing CMS users, the CMS Authorization form may be obtained by accessing the link located on the Home Page or by contacting the OCFS Program Manager.
The Vendor and Contract Contact Update form may be obtained here

6 | P a g e
1.3 Accessing the Contract Management System
As a best practice, it is recommended to access CMS using the Internet
Explorer (IE) web browser. All other browsers are incompatible with the
CMS system. Although some browsers will allow successful CMS logins, visual
and functional differences may result in certain modules and features while
using other web browsers.
What to Do Comments/Prompts
1. To launch the CMS application,
from the computer desktop,
select the Internet Explorer
icon.
2. Then, enter the following
website URL address into the
address bar to navigate to the
enterprise New York State
Login page:
https://apps.ocfs.ny.gov/cms
3. Next, enter the CMS username
and the supplied temporary
password. Then, select Sign
In to validate the CMS
permissions.
Once the authentication process is complete, CMS will prompt first time users
to change any temporary password to a more secure one. Additionally, as a
security measure, CMS will ask a series of security questions in the event a
password reset may be necessary.
1.4 Using the Forgot My Password Link
Select the Username or Password link if the CMS credentials are not
accepted or simply forgotten. This link will aid in recovering and/or resetting
the CMS permissions to regain access to the system.
A free version of Internet Explorer may be downloaded at:
http://windows.microsoft.com
TIP: To easily access CMS, it may be beneficial to bookmark the URL to your website favorites and/or create a desktop shortcut
CMS passwords are case sensitive. Make sure the CAPS lock key is not turned on when trying to access CMS.
Also, CMS will become disabled after (4) failed login attempts.
The ‘Forgot Your Password’ link allows user to reset
username and password information

7 | P a g e
Chapter 2 - Navigating the System
2.1 Home Page Once logged in successfully, the CMS Home Page will appear by default.
The screen layout serves as a navigational dashboard which provides at-a-
glance important reminders/notices, a main menu pane and a link to the CMS
Authorization form may also be found here.
CMS is divided into modules, each feature accessible from the navigational
main menu. The menu categories of the Home Page display as follows:
• Inbox
• Contractor (Details)
• Log Screen (Claim and Program Reports)
• Contracts (List)
• Correspondence (Search)
2.2 CMS Main Menu
In addition to the Inbox the following menu attributes are available via the
Home Page. [Note: The below example depicts CONUSER access.]
The announcement and instructions sections of the Home Page should be viewed each time you log into the system to check for broad but relevant information from OCFS
Main Menu
Inbox
CMS Authorization
Form Announcements
Logout Logs a user out of the
CMS application
Returns to the CMS
Home Page
Accesses the CMS Inbox
Navigates to the Contractor Details page
where basic contractor
information can be viewed
To initiate a Budget
Modification
Displays contracts
associated to the vendor
To access Correspondence
Displays the active user ID and role logged into the
system
To initiate a Program Reports
To initiate a Claim
User Credentials Displays Name of Person Currently
Logged Into the System and the User Role in Brackets
Role CMS application

8 | P a g e
2.3 CMS Inbox Introduction
The CMS Inbox is a tool used for processing online contract tasks. From the
inbox view, users can readily view the contract transactions that require
attention and simultaneously perform the necessary actions. When a contract
transaction becomes a task in CMS, the task then remains in the inbox until
the review stage is completed.
There are two ways to access the Inbox: 1) from the Main Menu; or 2) by
using the Inbox link within the Inbox area.
Select Inbox from
the Main Menu to
navigate to the
Inbox or select the
link within the Inbox
section to navigate to the Inbox

9 | P a g e
Chapter 3 - Managing Tasks from the Inbox
Any pending task must be accessed from the CMS Inbox. The type of task
depends on the contract transaction. CMS tasks are defined in the following
abbreviated format:
If multiple tasks are displayed in the inbox, each row of the task table will
indicate a specific task, the corresponding contract number, the program
name, review stage, the reviewer, the reviewer log status, and the total
number of days remaining for all scheduled tasks.
As a best practice, carefully review the Reviewer column to ensure the
correct CMS credentials are being used to complete the task. Often users
encounter the error, Invalid Privileges to Process a Stage, when an
attempt is made to process a task with an incorrect CMS role.
The name listed within the Reviewer column is the assigned default
[primary] reviewer designated in the task schedule. The primary reviewer is
the individual that receives the email alert notifications as referenced below.
It is important to note the email notifications are sent to the primary
reviewer’s external email account and not the CMS Inbox. Also, some email
providers filter certain email messages. It is essential to check spam or junk
mail folders if any email notifications from OCFS CMS are not received.
If there are multiple persons within the organization with the same role and a
specific role based task is pending for action, please note the default reviewer
listed in the task table and anyone with the permissions necessary to finalize
the task has the ability to access the CMS Inbox and complete the task.
In order to begin a task, always select the abbreviated task hyperlink under
the Task column. After selecting the hyperlink either the Contract Review
Module, the Expenditure Report, or Program Report page will appear
depending on the type of task.
As a best practice, log into CMS with the intended role for the task in which you plan to complete.
TIP: The role in brackets underneath the name in the top left corner should match the role listed under the Reviewer column in the task table.
Invalid Privileges to Process a Task?
Before getting started make certain that you are logged in according to the CMS user role assigned to the current schedule stage. The user role underneath the user name found in brackets in the upper left corner of the CMS screen should match the role referenced in the Reviewer column of the task table.

10 | P a g e
3.1 Processing a Contract Task
The Contract Review Module page is the online version of the procurement
packet. This screen has multiple components each representing items that
need to be completed in order to fully process a contract, renewal, or
amendment transaction. Specifically, this page displays the contract
properties and any interactive and/or downloadable documents associated
with the procurement inclusive of the budget. All components of the
Contract Review Module page must be completed before the task can be
moved forward to the next review stage.
It is important to note that the majority of the contract documents in CMS are
in Adobe Acrobat PDF format. In order to view, complete, and/or print these
PDF files in CMS, Adobe Acrobat Reader must be installed on your computer.
Adobe reader is absolutely free and may be obtained here.
3.2 Interactive Documents
Interactive documents are fillable contract documents that are to be
completed within the CMS system. These forms allow CMS users to type
information directly into the form and then save via the Submit button
located directly within the document. The Submit button stores the form’s
data entry and the information entered is submitted when the review stage is
ultimately completed.
Follow the steps below to complete and save an interactive document.
Before Getting Started: Select the abbreviated contract task
hyperlink from the Inbox task table to navigate to the Contract
Review Module page.
As a best practice, please use Adobe Reader when viewing PDFs in the CMS system. Please be advised all other PDF viewers are not compatible with the CMS system.
A free version of Adobe Reader may be downloaded at:
http://www.adobe.com/

11 | P a g e
What to Do Comments/Prompts
1. From the Inbox, select the
CTRCT link from the TASK
column to navigate to the
Contract Review Module
page.
2. Within the Interactive
Documents section, select
Insert Details from the
Action column to open the
document.
3. Complete the necessary fields
within the document.
Periodically, CMS will timeout
as a result of not recognizing
activity and/or for security
purposes. While working in
any interactive document, it is
good practice to save the data
entered often by selecting the
Submit button intermittently
to prevent loss of data.
NOTE: The Submit button
serves as a Save action. The
Submit button stores the form
data in memory or a temporary
database until the entire review
stage is complete. The form is
then sent to OCFS staff when
the Complete button is
selected from the Contract
Review Module page.
A pop up window will appear
after selecting Submit
referencing the Contract
Document Updated
Successfully. Continue exiting
the form by selecting Close
Window.
4. The next message to appear on
screen is the confirmation
message Do you want to
close this window?
5. Select Yes to return to the
Contract Review Module
screen.
Avoid Loss of Data
Select the Submit button every so often when working in a budget or interactive document.
After selecting Submit, reopen the document and continue with the data entry.
Contact OCFS Program staff with any questions and/or concerns regarding the completion of any interactive document

12 | P a g e
What to Do Comments/Prompts
6. After saving the form data,
Update Details should display
next to the document name.
Changes to the form data may
be made at any time before the
review stage is completed.
Simply, select Update Details
and repeat steps 2-4.
3.3 Downloadable Documents
Downloadable documents are contract documents made available for
download. These documents can be downloaded from CMS and saved to your
computer to be completed at a later date.
Before Getting Started: Select the abbreviated contract task
hyperlink from the Inbox task table to navigate to the Contract
Review Module page.
What to Do Comments/Prompts
1. From the Inbox, select the
CTRCT link from the TASK
column to navigate to the
Contract Review Module page.
2. Within the Downloadable
Documents section, select
Download to open the
document.
3. A File Download dialog box will
appear prompting to Open, Save
or Cancel? Select Save to
download/save the document for
changing, viewing or printing,
now or at later date.

13 | P a g e
What to Do Comments/Prompts
4. A Save As window will appear
prompting to specify a location to
save the file. By default, the
document will save to the
computer desktop. Note:
Choosing the desktop as the
location makes it easier to locate
the document at a later time.
The document may also be
renamed at this point. If not
necessary, proceed to saving the
file by selecting the Save option
in the bottom right corner.
5. Refer to section - Uploading
Documents from the Inbox for
guidelines on how to upload the
downloadable documents into
CMS.

14 | P a g e
3.4 Entering Budget Details
The Enter Budget Details button provides access to the budget in order to
allocate the contracts funds to the appropriate budget categories according to
the contract guidelines.
Be reminded of the following when completing the interactive budget:
Enter numeric values as whole dollar amounts.
Do not round to the nearest dollar.
Special characters such as dollar signs, decimals, and commas
will result in a budget error.
Before Getting Started: Select the abbreviated contract task
hyperlink from the Inbox task table to navigate to the Contract
Review Module page.
What to Do Comments/Prompts
1. From the Inbox, select the
CTRCT link from the TASK
column to navigate to the
Contract Review Module
page.
2. Within the Contract Review
Module page, select Enter
Budget Details to launch the
budget.
Note: The message Budget
Information Needs to be
Entered will display upon entry
of the page and will remain
onscreen until the budget is
satisfactorily completed
according to the contract award
amount.
3. Begin entering the budget
details.
Please Note: The system will
automatically subtotal and total
the amounts.
If the contract requires Local
Share/Local Match make sure to
enter the values in the
appropriate columns.
Please refer to the original contract award notification letter and/or RFP when completing the budget.
The budget should be consistent with the contract award amount including any matching funds. Otherwise this will prevent the task from being completed.

15 | P a g e
What to Do Comments/Prompts
4. Once all values are entered into
the budget make sure the data
entry agrees with the contract
award amount, then select
Submit.
5. Next, a confirmation message
will display, referencing the
Budget Updated
Successfully.
6. Select Close Window to exit
the budget and return to the
Contract Review Module
screen to finalize the review
stage.
If the budget values do not match the requirements of the contract one of the
following error messages will display on the Contract Review Module
screen in place of the original message BUDGET NEEDS TO BE ENTERED:
Budget Error Explanation
Budget Amount Not Equal to
Award Amount
Revisit the budget to ensure the budget
details summarize to the award amount.
The Contract Amount and the value in the
Total OCFS Funds column within the budget
summary should match.
Budget Violates Matching
Percentage
Review the terms of the contract then revisit
the budget to ensure the matching
percentage is correct.
Budget Violates Admin
Percentage
Review the terms of the contract then revisit
the budget to ensure the administrative
percentage is correct.
Budget Category Cannot Be
Less Than Expenditures to
Date
Review all expenditures invoiced to date
then revisit the budget to thoroughly review
all budget categories to ensure all categories
are more than expenditures to date.
Budget Modification Amount
is Less than 5% of Contract
Value
Contact OCFS Program staff for assistance.
Budget Modification Amount
is Less than 10% of Contract
Value
Contact OCFS Program staff for assistance.
If this is the case, re-enter the budget and make the necessary corrections
until all warning messages disappear.

16 | P a g e
3.5 Uploading Documents from the Inbox
The Upload Document feature allows users to upload supporting
documentation. PDF [.PDF] file formats will successfully upload into the
system. As a best practice, convert all other file extensions (.doc, .xls, .png,
.jpg, etc) into a PDF format first before attempting an upload. Also, it is
important to note CMS can only accommodate files sizes up to 8 MB. A
system error or a CMS error page will appear if an attempt is made to upload
a PDF file that is too large or contains any digital signatures.
Before Getting Started: Select the abbreviated contract task
hyperlink from the Inbox task table to navigate to the Contract
Review Module page.
What to Do Comments/Prompts
1. From the Inbox, select the
CTRCT link from the TASK
column to navigate to the
Contract Review Module
page.
2. Select the Uploaded
Document button from the
Contract Review Module
page to access the upload
documents feature.
3. From the Upload
Document page, enter the
desired document Name and
Description. As a helpful tip,
be cognizant when naming
uploaded documents. The
name of the document
should be clear and practical
to avoid confusion. Also, do
not use any special
characters and/or
punctuation when naming
the uploaded file otherwise
an upload error will occur.
4. Select Browse to locate the
document from your
computer.
To prevent compatibility issues, please upload all documents as PDFs.
HELPFUL HINT:
Prior to any uploads, carefully review documents for submission to avoid uploading documents in error.
17 | P a g e
What to Do Comments/Prompts
5. Next, select the document
then select Open.
6. From the Upload
Document page, select
Save to append the file.
7. A confirmation message will
immediately display in the
top right corner confirming
Document Uploaded
Successfully.
8. Select the Back button on
screen to return to the
Contract Review Module
page. The document should
now be pending within the
uploaded documents
section.
9. NOTE: Once a document
has been successfully
uploaded into the system,
the document will remain
pending until reviewed.
Upon initial review, OCFS
will mark the file status
either Approved or
Rejected.
As a best practice, prior to any uploads, carefully review documents for
submission. Documents cannot be deleted once uploaded. Documents
uploaded in error can only be marked as Rejected by internal OCFS staff.
3.6 Signing a Contract from the Inbox
The user responsible for signing a contract document must be assigned a
CONSIG role. Similar to the CONUSER task, the CONSIG will need to first
access the CMS Inbox to navigate to the Contract Review Module to
complete the e-signature process.
18 | P a g e
As a rule of thumb, the CONSIG should always review the contract
documents prior to electronically signing any contract document. The contract
document in its entirety may be viewed at any time by selecting the View
Contract button from the Contract Review Module screen. Any
information completed within the interactive documents, or documents that
have been uploaded and approved by OCFS staff will be accessible from the
View Contract button.
Before Getting Started: Select the abbreviated contract task
hyperlink from the Inbox task table to navigate to the Contract
Review Module page.
What to Do Comments/Prompts
1. From the Inbox, select
the CTRCT link from the
TASK column to
navigate to the Contract
Review Module page.
2. To electronically sign a
contract, select the
Complete button to
navigate to the
Certification page.
NOTE: Upon selection,
CMS will prompt with a
message to inquire if all
documents are complete.
To proceed, select OK.
3. The Certification page
provides an attestation
statement. It is here the
CONSIG will affirm and
accept the conditions of
the contract. This page
also gives the option to
decline the terms of the
agreement.
IMPORTANT!
To avoid delays in the contract process, please be sure to thoroughly review all required documents for completion before signing.

19 | P a g e
What to Do Comments/Prompts
4. Select Accept to
electronically sign the
contract.
Chapter 4 - Reviewing Basic Information
Basic contractor information may be viewed in CMS. Please note that
organizational information cannot be changed at the contractor level.
Should you have any questions and/or concerns regarding your organizational
information in CMS, please contact OCFS Program staff.
4.1 Viewing Contractor Details
What to Do Comments/Prompts
1. Select the Details link within
the Contractor section of the
main menu to navigate to the
Contract Details page.
2. An overview of the contractor
properties including
demographic information are
displayed upon entry of the
page.
3. Chief Administrative Officer
(CAO) and Chief Fiscal Officer
(CFO) information may be
viewed under the Contacts
Contractor Details are also accessible via the Inbox.
From the task table select the contract number hyperlink to peruse the contractor details.
To request changes to contact information in CMS, please refer to the CMS Authorization form and/or Vendor Contract Contact form

20 | P a g e
What to Do Comments/Prompts
tab. Note: The page
automatically defaults to the
Contacts tab upon entry of the
page.
4. Select the Persons tab to view
the staff members associated
with your organization.
21 | P a g e
4.2 Viewing Contract Details
Should you have any questions and/or concerns about the contract
information in CMS please contact OCFS Program staff.
What to Do Comments/Prompts
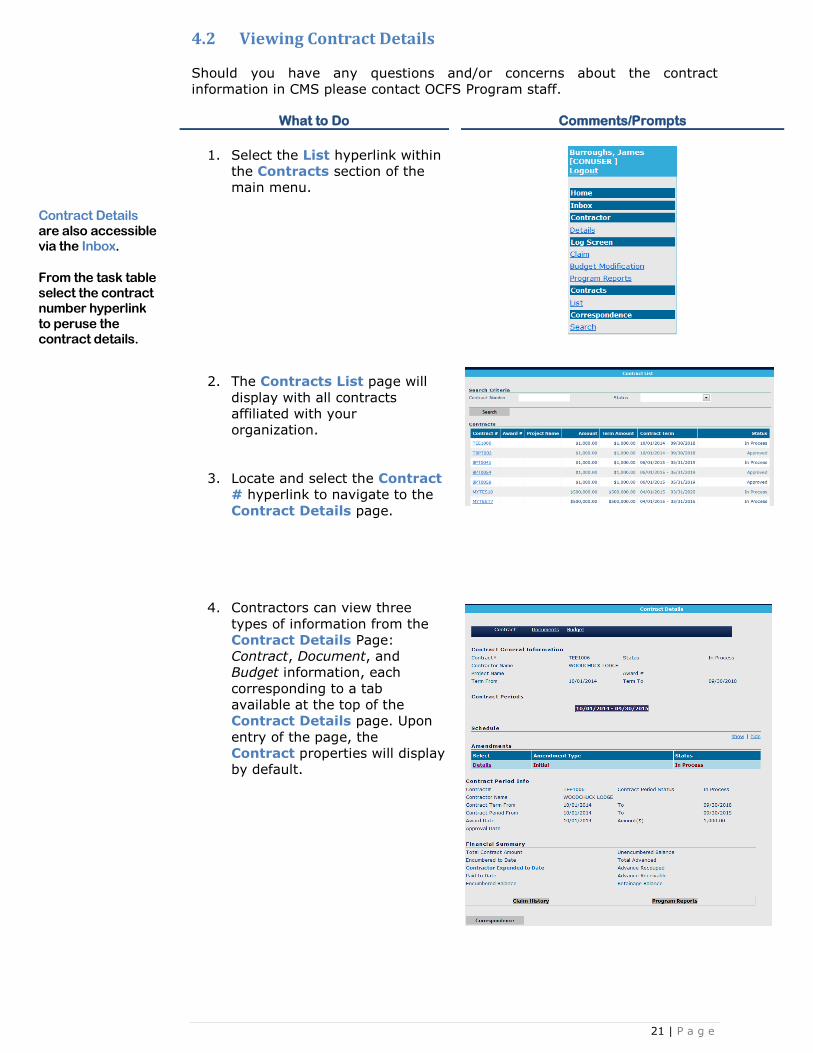
1. Select the List hyperlink within
the Contracts section of the
main menu.
2. The Contracts List page will
display with all contracts
affiliated with your
organization.
3. Locate and select the Contract
# hyperlink to navigate to the
Contract Details page.
4. Contractors can view three
types of information from the
Contract Details Page:
Contract, Document, and
Budget information, each
corresponding to a tab
available at the top of the
Contract Details page. Upon
entry of the page, the
Contract properties will display
by default.
Contract Details are also accessible via the Inbox.
From the task table select the contract number hyperlink to peruse the contract details.

22 | P a g e
What to Do Comments/Prompts
Documents Tab
5. All documents that are part of
the official contract package
are listed on the Documents
page. Select the Documents
tab to access any contract
related and/or uploaded
documents.
6. Simply select, View Contract
to display the contract
documents.
7. The Upload Document link
allows documents to be
uploaded into the system.
Please refer to steps 2-6 of
Section 3.5 - Uploaded
Documents from the Inbox
section within this manual for
step-by-step instructions.
Budget Tab
8. Select the Budget tab to view
the Contract Budget page.
If applicable, overviews of any
budget modifications are also
displayed on this screen.
4.3 Viewing Schedule Information
Schedule information provides an overview of the review stages: the allotted
number of days for each stage, the review status, a completion date, and the
name of the individual who processed a particular stage.
An at-a-glance schedule may be referenced within the Inbox displaying the
overall stage days remaining for a task, however, a more definitive schedule
overview can be found within the task screens: Contract Review Module,
the Expenditure Report, or Program Report page.
The schedule is also referenced on the Contract Details page for history
purposes.
To view a particular schedule from the task screens or on the Contract
Details page, locate the Schedule banner. Then, select Show to display the
details of a particular task schedule. Select Hide, to collapse [minimize] the
schedule from view.
Sample schedules are depicted on the following page.
The task schedule may also be viewed from any task screen. [ie. Contract Review Module, Expenditure Report or Program Report Module]
Locate the Schedule banner on any of these pages to view schedule information.
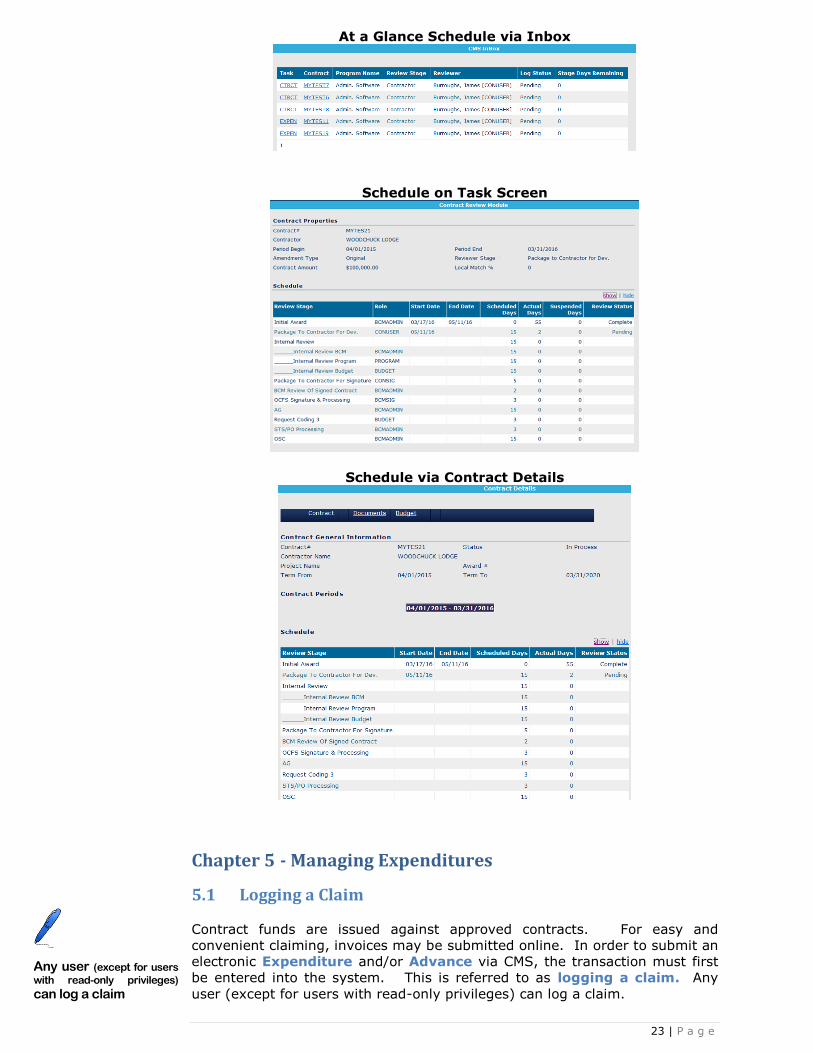
23 | P a g e
At a Glance Schedule via Inbox
Schedule on Task Screen
Schedule via Contract Details
Chapter 5 - Managing Expenditures
5.1 Logging a Claim
Contract funds are issued against approved contracts. For easy and
convenient claiming, invoices may be submitted online. In order to submit an
electronic Expenditure and/or Advance via CMS, the transaction must first
be entered into the system. This is referred to as logging a claim. Any
user (except for users with read-only privileges) can log a claim.
Any user (except for users
with read-only privileges)
can log a claim

24 | P a g e
CLAIMSIG User Role
Although claims may be logged by any of the CMS users associated with a
particular contract, the claim task can only be electronically signed by the
CLAIMSIG.
What to Do Comments/Prompts
From the CMS Main Menu 1.
underneath the Log Screen
banner, select Claim.
From the Contract List, locate 2.
the contract along with the
corresponding contract period.
Next select the Log link from the 3.
Action column to navigate to the
Expenditure Report Log screen.
At the Expenditure Report Log 4.
page, complete the necessary
details as required by the claim
type.
Select Save to save the claim 5.
information and to initiate the
process. The message Claim
Successfully Logged will appear
in the upper right corner and the
Next button in the lower right
corner will be enabled for
selection.
Select Next to continue 6.
processing the claim.
Once a claim is logged it becomes a task in the CMS Inbox. Since CMS tasks
are dictated by the CMS roles, please be reminded that claim tasks can only
be processed by users who are logged in with the role assigned to a particular
review stage. For auditing and review assurances, most expenditure
schedules contain (2) contractor review stages; a CONUSER and CLAIMSIG
stage. Before getting started, check with OCFS Program staff to inquire
and/or to designate default reviewers for the claiming task schedules.
Online Processing Not Yet Available for this Period?
Contact OCFS Program staff, if this message appeared on screen while attempting to log a claim.

25 | P a g e
5.2 Processing an Online Claim
Once an expenditure has been logged, navigate directly to the Inbox and
locate the pending expenditure task.
Keep in mind the first contractor stage of the claim process may be processed
by the CONUSER or CLAIMSIG depending on the task schedule associated
with the online claim. As a best practice, always review the task table within
the Inbox to ensure that you are logged in with the correct credentials to
complete the task.
Before Getting Started: Select the abbreviated expenditure task
hyperlink from the Inbox task table to navigate to the Contract
Review Module page.
What to Do Comments/Prompts
Select the EXPEN link 1.
from the TASK column
to navigate to the
Expenditure Report
screen.
Proceed with allocating 2.
funds to the appropriate
budget categories, by
entering a value in the
Claim Expended field for
each budget category that
is being invoiced.
Then, select RUN EDIT 3.
at the bottom of the
screen. The RUN EDIT
button serves as a
validation check. It
compares what was
entered against the
budget and claiming
rules associated with
the contract.
Next, select the 4.
Process button to
move the claim to the
next review stage.
Invalid Privileges to Process a Task?
Before getting started make certain that you are logged in according to the CMS user role assigned to the current schedule stage. The user role underneath the user name found in brackets in the upper left corner of the CMS screen should match the role referenced in the Reviewer column of the task table.
Before completing the claim stage, have all claim documents been uploaded against the claim?
26 | P a g e
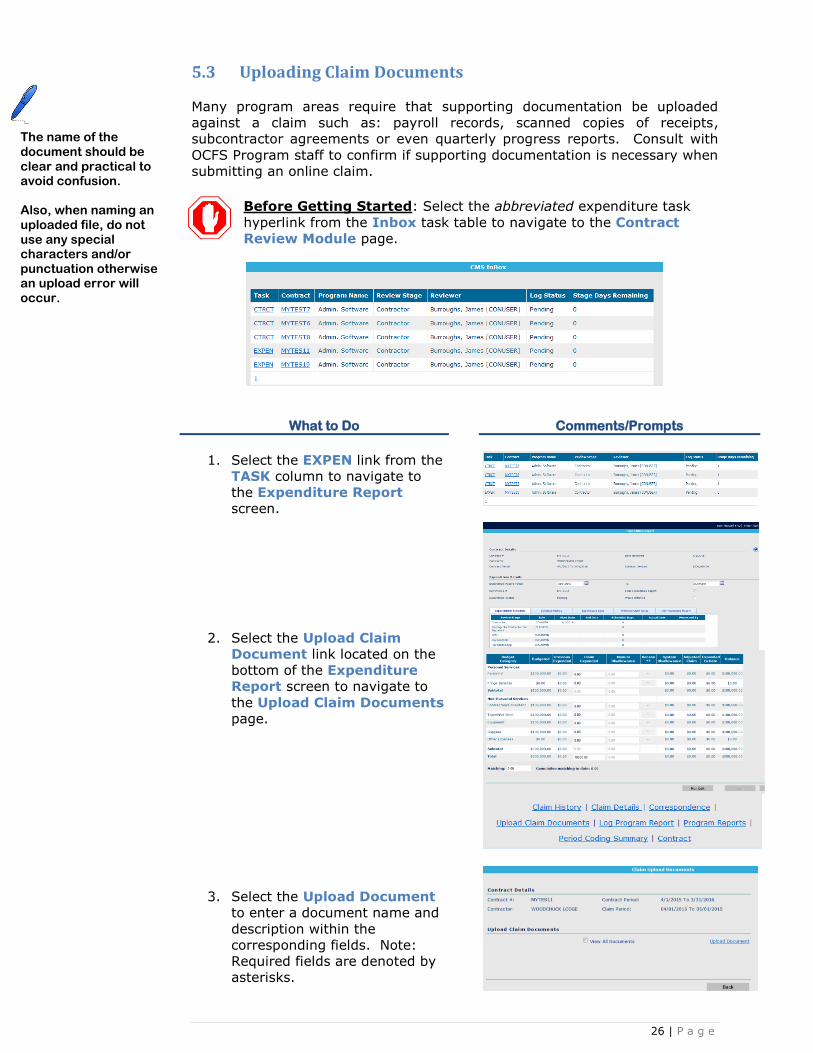
5.3 Uploading Claim Documents
Many program areas require that supporting documentation be uploaded
against a claim such as: payroll records, scanned copies of receipts,
subcontractor agreements or even quarterly progress reports. Consult with
OCFS Program staff to confirm if supporting documentation is necessary when
submitting an online claim.
Before Getting Started: Select the abbreviated expenditure task
hyperlink from the Inbox task table to navigate to the Contract
Review Module page.
What to Do Comments/Prompts
1. Select the EXPEN link from the
TASK column to navigate to
the Expenditure Report
screen.
2. Select the Upload Claim
Document link located on the
bottom of the Expenditure
Report screen to navigate to
the Upload Claim Documents
page.
3. Select the Upload Document
to enter a document name and
description within the
corresponding fields. Note:
Required fields are denoted by
asterisks.
The name of the document should be clear and practical to avoid confusion. Also, when naming an uploaded file, do not use any special characters and/or punctuation otherwise an upload error will occur.

27 | P a g e
What to Do Comments/Prompts
4. Next, select Browse to locate
the file to be uploaded. Then,
select Save to append [upload]
the file to the claim.
5. Next, select the document then
select Open.
6. From the Upload Document
page, select Save to append
the file.
7. A confirmation message will
immediately display in the top
right corner confirming
Document Uploaded
Successfully. Select the Back
button on screen to return to
the Claim Upload Documents
page.
8. Next, select the Back button
from this page to navigate back
to the Expenditure Report
page.

28 | P a g e
5.4 Reporting Temporary Assistance for Needy Families (TANF) Data
The number of families served for a particular month must be reported
against a claim if TANF data is a contract requirement. If this is the case, the
following message will appear upon entry of the Expenditure Report page.
TANF data must be entered first before any data entry action is performed
within the budget categories of the expenditure report.
NOTE: All command buttons including RUN EDIT will be disabled until the
TANF data is entered.
Before Getting Started: Select the abbreviated expenditure task
hyperlink from the Inbox task table to navigate to the Expenditure
Report page.
What to Do Comments/Prompts
1. Select the EXPEN link from the
TASK column to navigate to
the Expenditure Report
screen.
2. Select the TANF Report link
located on the bottom of the
Expenditure Report.
If TANF data is a reporting requirement, all buttons on the Expenditure Report screen will be disabled including the RUN EDIT validation button until TANF data is entered.

29 | P a g e
What to Do Comments/Prompts
3. Enter the number of families
served for each month
displayed. Null values are not
accepted. Enter (0) if there
isn’t any data to report.
4. Next, select Process. Then,
select the Back button on
screen to return to the
Expenditure Report page.
5.5. Rejecting a Claim
There may be instances where a claim may need to be rejected as a result of
inadvertently logging a claim in error.
Before Getting Started: Select the abbreviated contract task
hyperlink from the Inbox task table to navigate to the Expenditure
Report page.
What to Do Comments/Prompts
**If your organization is required to
submit TANF data when submitting
invoices, refer to the special
instructions below** Otherwise,
proceed to Step 4.
TANF CONTRACTS:
1. Select the TANF Report link located
on the bottom of the Expenditure
Report page.
30 | P a g e
What to Do Comments/Prompts
2. From the TANF Report screen, enter
(0) for each month displayed.
3. Then, select Process. Note: The
message TANF data successfully
saved will display as confirmation.
Next, select the Back button on
screen to return to the Expenditure
Report page.
ALL CONTRACTS:
4. Select RUN EDIT at the bottom of
the Expenditure Report screen to
enable the REJECT button for
selection.
5. Select REJECT then enter a Reject
Reason to successfully reject the
claim.
6. A confirmation message will appear
on screen referencing Reject
Operation Successful.

31 | P a g e
5.6 Signing an Online Expenditure
Online expenditures must be signed by an individual within your organization
that has the legal authority to submit a claim on behalf of the organization. In
CMS, the CLAIMSIG serves as the designated signatory.
In order to sign the claim, the CLAIMSIG must retrieve the expenditure
contract task via the Inbox.
Before Getting Started: Select the abbreviated expenditure task
hyperlink from the Inbox task table to navigate to the Expenditure
Report page.
What to Do Comments/Prompts
1. From the Inbox, select the
EXPEN link from the TASK
column to navigate to the
Expenditure Report
screen to review the details
of the claim.
2. Select the RUN EDIT
button to check the claim
for calculation errors and/or
rule violations.
3. Claim with Error(s)
If an error message is
received, correct the error
and/or contact OCFS
Program staff for
assistance. Then repeat
Step 2. Otherwise, proceed
to Step 4.
4. After selecting RUN EDIT,
a certification statement will
appear on screen.
5. To ready the claim for
electronic signature, select
Accept.
6. Then, select Process to
complete the signature
stage.
If there are any issues that prevent the signing of the claim, select DECLINE or either correct the issue(s) and/or contact OCFS Program staff for further assistance.

32 | P a g e
What to Do Comments/Prompts
7. After signing the claim, the
page will display the
electronic signature and
date. Also, a confirmation
message indicating Process
Operation Successful will
display in the top right
corner.
5.7 Declining a Claim
Before Getting Started: Select the abbreviated expenditure task
hyperlink from the Inbox task table to navigate to the Expenditure
Report page.
What to Do Comments/Prompts
1. From the Inbox, select the
EXPEN link from the TASK
column to navigate to the
Expenditure Report screen.
2. Next, select RUN EDIT to
display the certification
statement.
3. Then, select the DECLINE
button at the bottom of the
Certification statement.
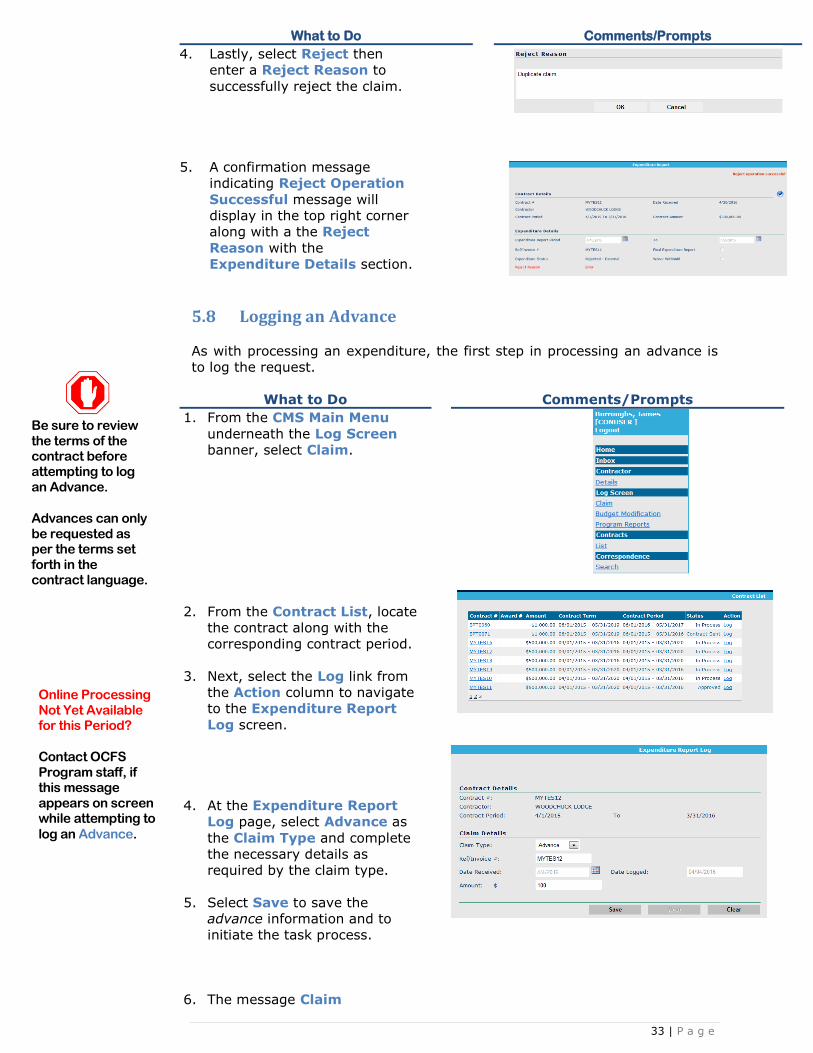
33 | P a g e
What to Do Comments/Prompts
4. Lastly, select Reject then
enter a Reject Reason to
successfully reject the claim.
5. A confirmation message
indicating Reject Operation
Successful message will
display in the top right corner
along with a the Reject
Reason with the
Expenditure Details section.
5.8 Logging an Advance
As with processing an expenditure, the first step in processing an advance is
to log the request.
What to Do Comments/Prompts
From the CMS Main Menu 1.
underneath the Log Screen
banner, select Claim.
From the Contract List, locate 2.
the contract along with the
corresponding contract period.
Next, select the Log link from 3.
the Action column to navigate
to the Expenditure Report
Log screen.
At the Expenditure Report 4.
Log page, select Advance as
the Claim Type and complete
the necessary details as
required by the claim type.
Select Save to save the 5.
advance information and to
initiate the task process.
The message Claim 6.
Be sure to review the terms of the contract before attempting to log an Advance.
Advances can only be requested as per the terms set forth in the contract language.
Online Processing Not Yet Available for this Period?
Contact OCFS Program staff, if this message appears on screen while attempting to
log an Advance.

34 | P a g e
What to Do Comments/Prompts
Successfully Logged will
appear in the upper right corner
and the Next button in the
lower right corner will be
enabled for selection.
Select Next. Then proceed 7.
directly to the Inbox to
continue processing the
Advance.
5.9 Processing/Signing an Advance
Before Getting Started: Select the abbreviated expenditure task
hyperlink from the Inbox task table to navigate to the Expenditure
Report page.
What to Do Comments/Prompts
From the Inbox, select 1.
the ADVANCE link from
the TASK column to
navigate to the Advance
Payment Calculation
screen.
As a best practice, review the 2.
information on the Advance
Payment Calculation screen
for accuracy. Note: The
Advance Amount field is
editable, if the advance amount
initially logged is incorrect.
To ready the Advance for 3.
electronic signature, select
Accept button just below the
certification statement.
If a justification statement 4.
and/or any necessary details
need to be added, select the
Description and/or Notes tab.
Note: By default, the
Expenditure Schedule is
displayed. Otherwise, select
the Process button after all
necessary fields have been
completed to move the Advance
to the next stage for review.
Invalid Privileges to Process a Task?
Before getting started make certain that you are logged in according to the CMS user role assigned to the current schedule stage. The user role underneath the user name found in brackets in the upper left corner of the CMS screen should match the role referenced in the Reviewer column of the task table.

35 | P a g e
What to Do Comments/Prompts
After signing the advance, the 5.
page will display the electronic
signature and date. Also, the
screen will display Process
Operation Successful in the
top right corner as
confirmation.
5.10 Viewing Claim History
Claim history may be viewed by accessing the Claim History Report screen
via the Contract Details page. The Claim History will list all claims logged
against a contract and the status of those claims inclusive of the expense
period of the claim, claim type, transaction type, received date, invoice
number, amount reported, and amount paid.
What to Do Comments/Prompts
1. Select the List hyperlink within
the Contracts section of the
main menu.
2. The Contract Search page will
display with a list of contracts
associated the user’s
organization.
3. Locate and select the Contract
# hyperlink to navigate to the
Contract Details page.
If there are any issues that prevent the signing of the Advance, select DECLINE then select the REJECT
button.

36 | P a g e
What to Do Comments/Prompts
4. Select the Claim History link
located at the bottom of the
page to navigate to the Claim
History Report page.
5. The Expenditure List table on
the Claim History Report
screen contains a list of all
expenditures. Select Details to
find specific information about
the claim.
6. When reviewing claim history
please note that the payment
amount may be different than
the amount requested as a
result of adjustments, advance
recoupment, withholding, etc.

37 | P a g e
What to Do Comments/Prompts
Note: Use the CMS Main Menu to
return to the contract details via
Contract List or any other part of
the system.

38 | P a g e
Chapter 6 - Online Program Reports
The Program Reports feature in CMS is designed to expedite program report
processing by establishing requirements for when program reports are due.
The module works in conjunction with the online claims process to manage
contract compliance.
Ultimately, program report monitoring facilitates the payment of claims. With
CMS, online contractors may complete and submit program reports
electronically. As with other contract tasks, program reports may have
interactive and downloadable contract documents linked to the task. Also,
any additional supporting documentation necessary to satisfy program report
requirements may also be uploaded.
Much like managing contracts, renewals and expenditures; the program
report is managed through a schedule, the Inbox, and the Program Report
Review Module.
There are three different program report types:
Interim Reports are due on periodic intervals such as monthly or
quarterly.
Final Reports are the last reports for a contract period. These
reports are typically due a certain number of days after the contract
period’s end date.
Supplemental Reports are intended to amend or supplement
existing reports. CMS defaults to supplemental reports when interim
and/or final program report requirements are not set up against a
contract.
6.1 Logging a Program Report
The initial step in the online program report process is to log the request. In
order to submit an electronic Program Report via CMS, the transaction must
be first entered into the system. This is referred to as logging a program
report. Any user (except for users with read-only privileges) can log a
program report.
The following steps demonstrate the contractor responsibilities of logging a
program report:
What to Do Comments/Prompts
1. From the CMS Main Menu
underneath the Log Screen
banner, select the Program
Reports link.
2. Then, from the Contract List,
locate the contract along with
the corresponding contract
period.
3. Next, select the Log link from
the Action column to navigate
to the Program Report Log
screen.
Online Processing Not Yet Available for this Period?
Contact OCFS Program staff, if this message appears on screen while attempting to log a program report.
As a best practice when logging a program report, be reminded to carefully review the reporting details within the Program Report Log screen to ensure the report type and reporting period are correct.
Contact OCFS Program staff if a discrepancy is observed. This initial validity check will help to reduce any reporting inaccuracies.
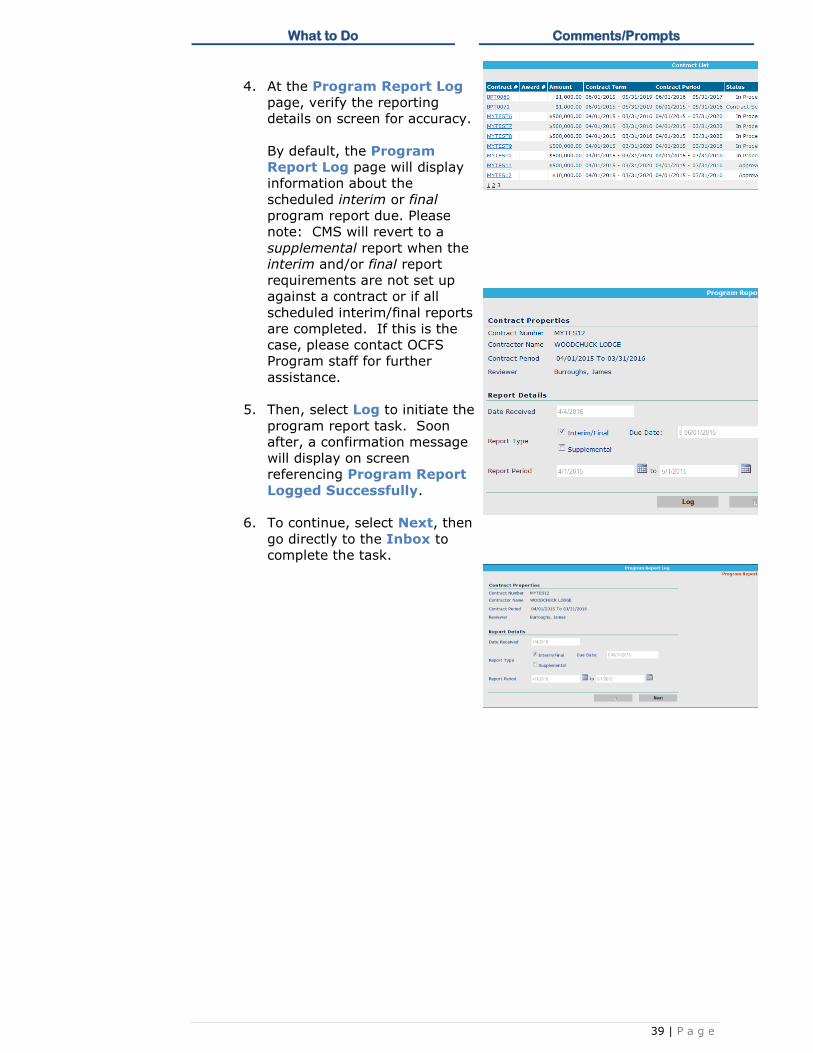
39 | P a g e
What to Do Comments/Prompts
4. At the Program Report Log
page, verify the reporting
details on screen for accuracy.
By default, the Program
Report Log page will display
information about the
scheduled interim or final
program report due. Please
note: CMS will revert to a
supplemental report when the
interim and/or final report
requirements are not set up
against a contract or if all
scheduled interim/final reports
are completed. If this is the
case, please contact OCFS
Program staff for further
assistance.
5. Then, select Log to initiate the
program report task. Soon
after, a confirmation message
will display on screen
referencing Program Report
Logged Successfully.
6. To continue, select Next, then
go directly to the Inbox to
complete the task.

40 | P a g e
6.2 Processing a Program Report
What to Do Comments/Prompts
1. From the Inbox, select
the PROGREP link from
the TASK column to
navigate to the
Program Report
Review page.
2. Within the Program
Report Review module,
review the information
on screen and complete
all required
documentation inclusive
of uploading any
supporting
documentation.
3. Next, select the
Complete button. A
pop-up message will
appear inquiring if all
required documents
have been completed.
Select OK to move the
task to the Program
Review stage for OCFS
approval.
Invalid Privileges to Process a Task?
Before getting started make certain that you are logged in according to the CMS user role assigned to the current schedule stage. The user role underneath the user name found in brackets in the upper left corner of the CMS screen should match the role referenced in the Reviewer column of the task table.
To cancel a program report task, simply select CANCEL at the bottom of the page.

41 | P a g e
6.3 Viewing Program Reports from Contract Details In process and completed program reports may be viewed via the Contract
screens. Follow the steps below to navigate to the Program Reports module
via the Contract Details.
What to Do Comments/Prompts
1. From the CMS Main Menu
underneath the Contracts
banner, select the List link.
2. From the Contract List, locate
the contract along with the
corresponding contract period.
3. Then, select the Program
Reports link located at the
bottom of the Contract Details
page.
4. Next, select the Details link to
navigate to the Program
Reports.
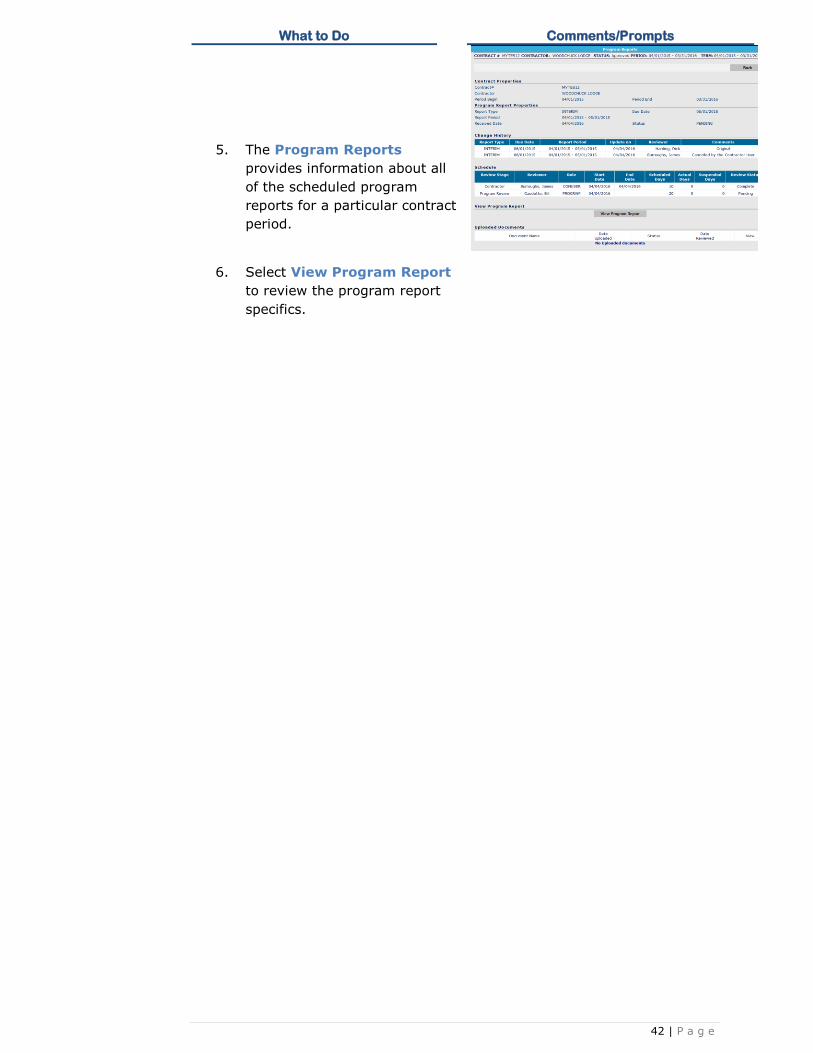
42 | P a g e
What to Do Comments/Prompts
5. The Program Reports
provides information about all
of the scheduled program
reports for a particular contract
period.
6. Select View Program Report
to review the program report
specifics.

43 | P a g e
Chapter 7 - Budget Modifications
A budget modification is a change to an existing budget. It involves
reallocating funds between and across budget categories and line items—for
example, increasing personnel funds while decreasing equipment funds. A
budget modification does not increase or decrease the total amount of the
contract budget—just the way the funds are allocated.
The majority of budget modifications are managed as contract amendments.
Please contact OCFS Program staff for specific directions as to how to handle
any budget modifications.
Chapter 8 - Exiting the Contract Management System
To logout of CMS, simply select the Logout link in the upper left corner of the
CMS Home Page, located underneath the user name and role information.
IMPORTANT - To prevent caching, the temporary storing of login information
from a previous CMS login session, it is necessary to log out of the CMS
application using the Logout link as opposed to closing the application using
the from the Internet Explorer browser.