contents - pc-adapter.net diagnostic post card.doc · web view①. omnipotent password. for the...
TRANSCRIPT

Catalogue ⒈Synopsis……………………………………………………………………………………………⒉Obligatory contents…………………………………………………………………………………⒊Hexadecimal character table……………………………………………………………………….4.Description of LED displays………………………………………………………………………⒍Flow chart………………………………………………………………………………………….⒎Error codes table…………………………………………………………………………………….⒏Description of beep code…………………………………………………………………………..
(1) AMI BIOS beep codes (fatal error)……………………………………………………...(2) AMI BIOS beep codes (Non-fatal error)………………………………………………...(3) Award BIOS beep codes …………………………………………………………………(4) Phoenix BIOS beep codes………………………………………………………………..(5) IBM BIOS beep codes……………………………………………………………………
⒐Corrective Action…………………………………………………………………………………..(1) If I forget the password, what can I do?…………………………………………………. ①Omnipotent password……………………………………………………………………..
a. AMI password…………………………………………………………………………..b. Award password…………………………………………………………………………c. Other ways………………………………………………………………………………②Discharge by software…………………………………………………………………….③Discharge by hardware……………………………………………………………………④.Other way………………………………………………………………………………...
(2) How to enter CMOS SETUP?……………………………………………………………⒑Answers of frequently-asked questions…………………………………………………………….⒒If the code is not included in the book, what can I do?………………………………..……………
⒈SYNOPSIS The card is named POST (Power On Self Test ) card too, it could display the error code by
the result of POST ,then you would soon determine cause of the error by error codes table. Especially when the PC can’t boot operating system, or it is a black screen, or the card and motherboard couldn’t issue an audible beep. It is a powerful diagnostic tool. Now just use it, you’ll get twice the result with half the effort.
When the power is turned on, the BIOS first would have a strict test with system
circuit、memory、keyboard、video、hard disc、floppy drive and so on. It analyzes the system
configuration and initializes the basic I/O setup. At last when all is normal, it boots the operating system .The obvious feature of testing crucial components is demarcate by curse’s appearing .At first, the BIOS tests the crucial components .If the testing is abnormal, the computer stopped compulsively; The curse cannot appear in the screen; There is no response to the screen. The BIOS tests common components afterwards .If the testing is abnormal, the computer continues to run and displays the information of error. When there is some trouble with the computer and the testing is abnormal, especially the testing crucial component, no displaying in the screen, the black screen, you can put the Post card in the expansive slot .You will know the cause of the trouble by the code that the card indicates and the error codes table of this manual.
⒉OBLIGATORY CONTENTS

1.The error codes table is in the order of the codes’ value from small to big. The sequence in which the code displays is decided by BIOS of the motherboard.
2. You must identify that the code that POST card displayed is "initiative code" or " Error code". "initiative code" is meaningless.
①How do we distinguish "initiative code" or " Error code" of conventional two-bit-code POST card? When conventional two-bit-code POST card displayed a code. At first, we must see whether there have been some other codes varying before the code is displayed. If there have been some codes varying and it stops at a certain code in the end, the code is the" error code"; If the displayed code is first code and you cannot see any other code varying before it, the code is the" initiative code". The "initiative code" is meaningless. But sometimes the speed of much code varying is too fast so that by unaided eye we cannot make a judgement whether there have been some other codes varying before it stops at the certain code that I can see in the end. You need consider this code as the “Error code" here in this condition. If you have not solve the trouble, this code must be the "initiative code".
As long as code "0000" or "FFFF" is displayed by four-bit-code POST card, the code "0000" or "FFFF" is "initiative code". It is no need for you to make a judgment by unaided eye whether there have been some other codes varying before it stops at the code "0000" or "FFFF".②Why is the "initiative code" meaningless? The first code that is displayed when power is on is named "initiative code" by us, because the debug card is also electronical device itself. When the power is on, the card will display one two-bit code automatically. It is the initiative code. But the code is not the POST code (referred to the "SYNOPSIS" in the chapter one of the manual) of the computer. So the "initiative code" is meaningless.
3. The codes that haven’t been defined is not included in the table.
4. For the different BIOS (such as AMI、Award、Phoenix ), the code is meaning differently . So you
must make sure that which kind of BIOS you are testing by viewing the users’ guide、 Seeing
symbol on the BIOS IC of the motherboard or seeing the screen directly while the computer booting
5. There is no more than some code displayed when you insert the card into the PCI slot on a few brands of motherboards, but when you plug it into the ISA slot, all the code can be displayed. At present, it has be discovered that all codes is displayed when you insert the card into the PCI slot of several brands of computers which not all codes is displayed when you plug the card in the ISA slot. So we suggest that you need plug the card from one slot to another slot when consulting the code is unsuccessful. In addition, the different slot on the certain motherboard in the different states. For example, all codes can be displayed from “00” to “FF”
when you plug the card in the PCI slot that is near the CPU on the motherboard DELL810 while only a part of codes can be displayed from “00” to”38” when you plug the card in the other PCI slot on the motherboard DELL810.
6. The time of PCI that the resetting signal needs is not always synchronized with the time of ISA .So sometimes the code begin to be displayed when the card in the ISA, but the resetting light of PCI has not been off while the card stops to display the original code.
7. As there are more and more different kinds and structures of the motherboard, and the codes of BIOS POST is updated constantly, so the cause of trouble that error code indicates is just a reference for you.

8.According to experience, the card of two-bit code is reliable if you plug it in the slot on the motherboard below and including the PⅡ300. It will stop running or it dose not indicate the error code or it indicates false error code. As until recently we haven’t received the bad reflect about the four-bit code card of P0050. We suggest you buy and use the four-bit code card of P0050.
⒊Hexadecimal character table
⒌Description of LED displays
LED Signal Type Description RUN Bus pulse If the LED sparkles, the main board has been running. If
the man board hasn’t run, the LED is off. CLK Bus clock As long as the main board is on power after you plug the
card in either PCI slot or ISA slot, the LED is on. or else there is no bus clock signal.
BIOS Base input/output signals As long as the CPU is reading to BIOS when the board is on powered, the LED sparkles.
IRDY Main equipments is ready The LED sparkles when there is a IRDY signal.OSC Oscillation signal It is oscillation signal of ISA slot. The LED should be on,
As long as the Power is on after you plug the card in the ISA slot on the main board. Or else the crystal oscillation circuit is broken, and there is no OSC signal.
FRAME Frame periods It is cycle frame signal of PCI slot. The LED should be on, As long as the Power is on after you plug the card in the PCI slot on the main board. The LED sparkles when the FRAME signal is coming. Or else there is no FRAME signal. Lights all the time.
RST Resetting signal The LED ought to have been on for half second since you press the power switch or the reset switch. If it is on all the time, please check whether the resetting pin connects to the accelerating switch or makes up a short circuit or there is some trouble with the resetting circuit.
12V Power The LED should be on, As long as the Power is on after you plug the card in the slot. Or else there is no voltage of 12V or there is short circuit.
-12V Power The LED should be on, As long as the Power is on after you plug the card in the slot. Or else there is no voltage of-12V or there is short circuit.
5V Power The LED should be on, As long as the Power is on after you plug the card in the slot. Or else there is no voltage of 5V or there is short circuit.

-5V Power The LED should be on, As long as the Power is on after you plug the card in the ISA slot. Or else there is no voltage of-5V or there is short circuit. (There is own -5V of ISA slot.)
3V3 Power There is the proper voltage of 3V3 of the PCI volt. The LED should be on, As long as the Power is on after you plug the card in the PCI slot, but sometimes the LED may be off by the reason that there is no voltage of 3V3 of a few PCI slot or there is open circuit.
⒍Flow chart
Begin
Power off and remove all the cards that plug in expansion slot. Insert the card into ISA or PCI slot. (Notice: When you plug it in the ISA slot the component side should face to the power, if it plugged in the wrong direction, the card and motherboard is not broken, but both the card and the main board stop running.
Power on; Judge If the all lights run normally. (The BIOS light may be on low power to sparkle
NO
According to the “Description of LED displaying ”, you can find the cause of the trouble and correct it
YES
Judge whether the error code that means there is a trouble with the main board is displayed
According to the error code table, you can find the cause of the trouble and correct it
YES
NOPower off, insert the display card、I/O card、keyboard、hard disk drive and expansion cardsPower on, Judge whether the error code that means there is a trouble with the main board is displayed
Power off, According to the error code table, you can find the cause of the trouble and correct it

⒎Error code table
CODE Award AMI Phoenix4.0/Tandy300000 Copying code to
specific area is done. Passing control to INT 19h boots loader next.
01 Processor Test 1 verifies Processor status (1FLAGS) . Test the following processor status flags: carry, zero, sign,
overflow.
CPU is testing the register inside or the test fails, please check the CPU or replace it.
The BIOS sets each flags and verifies whether they are set. After then It turns each flag off and verifies whether it is off.
02 Test All CPU Registers Except SS, SP, and BP with Data FF and 00
Verify Real Mode
03 Disable NMI, PIE, AIE, UEI, SQWV.
The NMI is disabled. Next, It checks a soft reset or the power condition
Disable Non maskable Interrupt (NMI)
Disable video, parity checking, DMA.Reset math coprocessor.
Clear all page registers, CMOS shutdown byte.Initialize timer 0, 1, and2, including set EISA timer to a known state.Initialize DMA controllers 0
If the result of the test is correct even though it can’t boot the operating system, there may be some trouble with the software or disc drive, or disk controller, or DMA circuit.
NO
YES
End

and 1.Initialize interrupt controllers 0 and 1.Initialize EISA extended registers.
04 RAM must be periodically refreshed to keep the memory from decaying. This refreshing function is working properly.
Get CPU type
05 Keyboard Controller Initialization
The BIOS stack has been built. Next, it disable cache memory.
DMA initialization is in progress or fails
06 Reserved Uncompressing the POST code next.
Initialize system hardware
07 Verifies whether CMOS is Working correctly, Detects whether battery is bad
Initialize the CPU and the CPU data area subsequently.
Disable shadow and execute code from the ROM.
08 Early chip set initialization The CMOS checksum is computed.
Initialize chipset with initial POST values
Memory presence test
OEM chip set routines
Clear low 64K memory
Test first 64K memory
09 Initialize Cyrix CPU Set IN POST flag
Initialize Cache
0A Initialize first 120 interrupt vectors with SPURIOUS-INT-HDLR and initialize INT 00h-1Fh according to INT-TBL.
The CMOS checksum calculation is done. Initialize the CMOS status register for date and time next.
Initialize CPU registers
0B Test CMOS RAM Checksum, if it is bad, or INS Key is Pressed, Load the default
The CMOS status register is initialized. Next, performing any required initialization before the keyboard BAT command is issued
Enable CPU cache

0C Detect Type of Keyboard Controller.
The keyboard controller input buffer is free. Next, issue the BAT command to the keyboard controller.
Initialize caches to initial POST values
Set NUM_LOCK Status
0D Detect CPU Clock; Read CMOS location 14h to find out type of video in use.Detect and initialize video adapter.
0E Test Video Memory and write sign-on information to screen.
The keyboard controller BAT command result has been verified. Next, perform any necessary initialization after the keyboard controller BAT command test
Initialize I/O component
Setup shadow RAM? Enable shadow according to setup.
0F Test DMA Cont. 0; BIOS Checksum Test.
The initialization after the keyboard controller BAT command test is done. The keyboard command byte is written next.
Initialize the local IDE bus.
Detect and Initialize Keyboard.
10 Test DMA Controller 1 The keyboard controller command byte is written. Next, issue the Pin 23 and 24 blocking and unblocking command
Initialize Power Management
11 Test DMA Page Registers Next, check if <End> or <Ins> keys were pressed during power on. Initializing CMOS RAM if the Initialization CMOS RAM in every boot AMIBIOS POST option was set in AMIBCP or the <End> key was pressed.
Load alternate registers with initial POST values
12 Reserved Next, disabling DMA Restore CPU control

controllers 1 and 2 and interrupt controllers 1 and 2
word during warm boot
13 Reserved The video display has been disabled. Port B has been initialized. Next, initialize the chipset.
Initialize PCI Bus primary devices
14 Test 8254 Timer 0 Counter 2 The 8254 timer test will begin next.
Initialize keyboard controller
15 Verify 8259 Channel 1 Interrupts by Turning Off and On the Interrupt Lina
16 Verify 8259 Channel 2 Interrupts by Turning Off and On the Interrupt Lina
BIOS ROM checksum
17 Turn Off Interrupts and verify whether Non maskable Interrupt Register is On
Initialize cache before memory Auto size
18 Force an Interrupt and Verify the Interrupt Occurring.
Initialize 8254 timer.
19 Test Stuck NMI Bits; Verify whether NMI Can Be Cleared
The 8254 timer test is over. Starting. The memory refresh test is after that
1A Display CPU clock The memory refreshing lina is triggered. Check the 15 microsecond on/off time next
Initialize 8237 DMA controller
1B Reserved1C Reserved Reset Programmable
Interrupt Controller1D Reserved1E Reserved 1F If EISA non-volatile memory
checksum is normal, execute EISA initialization.If not, execute ISA tests and clear EISA mode flag.
Test EISA configuration memory

Integrity (checksum & communication interface).
20 Initialize Slot 0 (System Board) Test whether DRAM refreshes.
21 Initialize Slot 1
22 Initialize Slot 2 Test 8742 Keyboard Controller
23 Initialize Slot 3 Read the 8042 input port and disable the MEGAKEY Green PC feature next. Make the BIOS code segment rewrite and perform any necessary configuration before initializing the interrupt vectors
24 Initialize Slot 4 The configuration is required before interrupt vector initialization has completed. Interrupt vector initialization is about to begin
Set ES segment register to 4 GB
25 Initialize Slot 5 Interrupt vector initialization is done. Clearing the password if the POST DIAG switch is on.
26 1.test the exception situation of protected mode. Please check the memory of CPU and main board.2.no fatal trouble, VGA displayed normally. If nonfateful trouble occurred, then display error message in VGA, else Boot operating system. Now code 26 is OK code, and no any other codes can be displayed.
1.Read
/write、 input、output
port of 8042 keyboard, readyfor resolve mode, continue to get ready for initialization of all data,check the 8042 chips on main board.2.refered to the left .
1.enable A20 address line, check the A20 pins of memory controlling chips, and check circuit, correlated to pins. In memory slot, may be A20 pin and memory pins are not in contact, or memory A20 pins bad.2.refered to the left.
27 Initialize Slot 7 Any is initialized before. Setting video mode will be done next
28 Initialize Slot 8 Initialization is done before. Setting the video mode completes. Configure the monochrome mode and color mode settings next
Auto size DRAM
29 Initialize Slot 9 Initialize POST Memory Management
2A Initialize Slot 10 Initialize the different bus system and static output devices, if it is present
Clear 512 KB base RAM
2B Initialize Slot 11 Passing control to the video ROM to perform any required configuration before the video ROM test.
2C Initialize Slot 12 All necessary processing before passing control to the video ROM is done. Look for the video ROM next and pass control to it.
RAM fails on address l lina XXXX*
2D Initialize Slot 13 The video ROM has returned control to BIOS POST. Performing any required processing is after the video ROM had control.
2E Initialize Slot 14 Complete post-video ROM test processing. If the EGA/VGA controller is not found, perform the display memory read/write test next
RAM fails on data bits XXXX* of low byte of memory bus
2F Initialize Slot 15 The EGA/VGA Enable cache before

controller was not found. The display memory read/write test is about to begin
system BIOS shadow
30 Size of base Memory From 256K to 640K and Memory is Extended Above 1MB.
The display memory read/write test passed. Look for retracing checking next
31 Test Base Memory From 256K to 640K and Memory Extended Above 1MB
The display memory read/write test or retracing checking failed. Perform the alternate display memory read/write test next
32 If EISA Mode, Test EISA Memory Found in Slots Initialization
The alternate display memory read/write test passed. Look for alternate display retracing checking next.
Test CPU bus-clock frequency
33 Reserved Initialize Phoenix Dispatch manager
34 Reserved Video display checking is over. Set the display mode next.
35 Reserved36 Reserved Warm start and shut
down37 Reserved The display mode is
set. Displaying the information when it boots next.
38 Reserved Initialize the bus input, IPL and general devices next, if present
Shadow system BIOS ROM
39 Reserved Display bus initialization error messages.
3A Reserved The new cursor position has been read and saved. Display the Hit <DEL> message next
Auto size cache
3B Reserved The Hit <DEL> message is displayed. The protected mode

memory test is about to start.
3C Setup Enabled Advanced configuration of chipset registers
3D Detect if Mouse is Present, Initialize Mouse, Install Interrupt Vectors
Load alternate registers with CMOS values
3E Initialize Cache Controller3F Reserved 40 Display Virus Protest Disabled
or EnabledPrepare the descriptor tables next
41 Initialize Floppy Disk Drive Controller and Any Drives
Initialize extended memory for Rom Pilot
42 Initialize Hard Drive Controller and Any Drives
The descriptor tables are prepared. Enter protected mode for the memory test next
Initialize interrupt vectors
43 Detect and Initialize Serial & Parallel Ports and Game Port
Entered protected mode. Enable interrupts for diagnostics mode next.
44 Reserved Interrupts is enabled if the diagnostics switch is on. Initialize data to check memory wrapping around at 0:0 next.
45 Detect and Initialize Math Coprocessor
Data initialized. Check for memory wrapping around at 0:0 and find the total system memory size next
POST device initialization
46 Reserved The memory wrapping around test is done. Memory size calculation has been done. Writing patterns to test memory next
Check ROM copyright notice
47 Reserved The memory pattern has been written to extended memory. Write patterns to the base 640 KB memory next.
Initialize I20 support

48 Reserved Patterns write in base memory. Determine the amount of memory below 1 MB next.
Check video configuration against CMOS
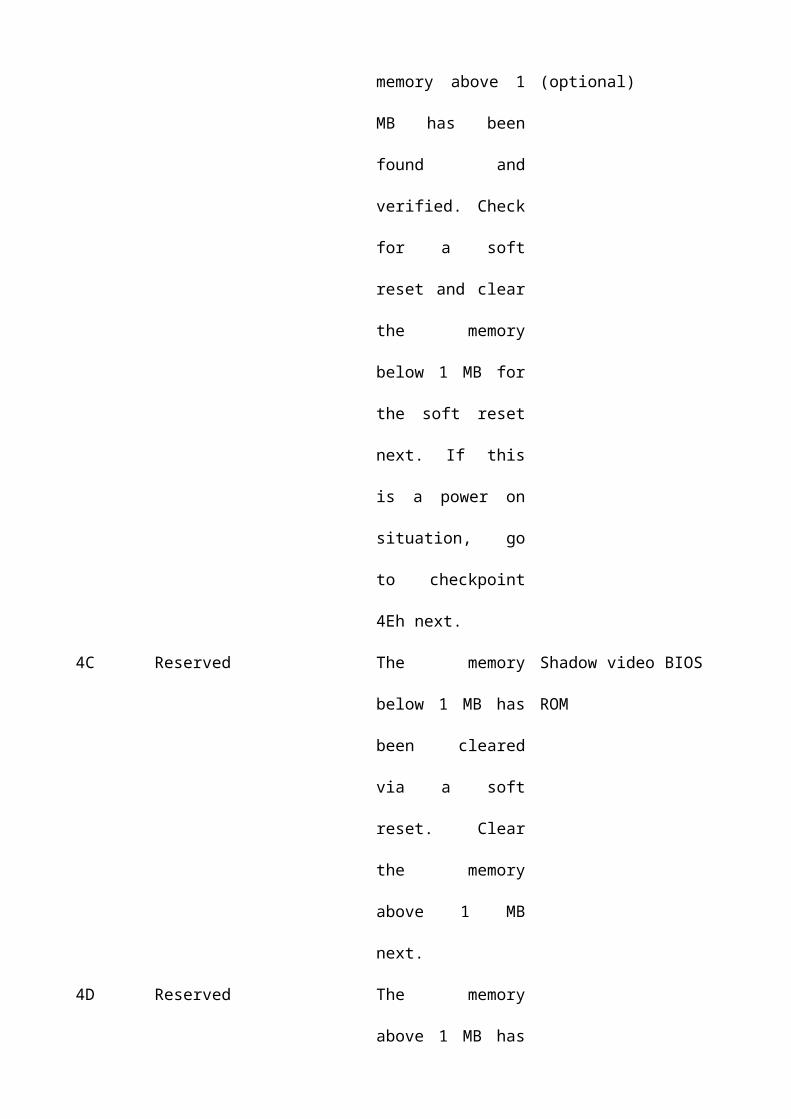
49 Reserved The amount of memory below 1 MB has been found and verified. Determine the amount of memory above 1 MB memory next.
Initialize PCI bus and devices
4AReserved Reserved
Initialize all video adapters in system
4B Reserved The amount of memory above 1 MB has been found and verified. Check for a soft reset and clear the memory below 1 MB for the soft reset next. If this is a power on situation, go to checkpoint 4Eh next.
Quiet Boot start (optional)
4C Reserved The memory below 1 MB has been cleared via a soft reset. Clear the memory above 1 MB next.
Shadow video BIOS ROM
4D Reserved The memory above 1 MB has been cleared via a soft reset. Save the memory size next. Go to checkpoint 52h next
4E Reboot if it is Manufacturing Mode; If not, Display Messages and Enter Setup
The memory test started, but not as the result of a soft reset. Displaying the first 64 KB memory size next.
Display BIOS copyright notice
4F Ask Password Security (Optional)
The memory size display has started. The display is updated during the memory
Initialize Multi Boot

test. Perform the sequential and random memory test next
50 Write All CMOS Values Back to RAM and Clear
The memory below 1 MB has been tested and initialized. Adjust the displayed memory size for relocation and shadowing next.
Display CPU type and speed
51 Enable Parity Checking. Enable NMI, Enable Cache Before Boot
The memory size display was adjusted for relocation and shadowing. Testing the memory above 1 MB next.
Initialize EISA board
52 Initialize Option ROMs from C8000h to EFFFFh or if FSCAN Enabled to F7FFFh
The memory above 1 MB has been tested and initialized. Saving the memory size information next.
Test keyboard
53 Initialize Time Value in 40h: BIOS Area
The memory size information and the CPU registers are saved. Enter real mode next.
54 Shutdown was successful. The CPU is in real mode. Disable the Gate A20 line, parity, and the NMI next
Set key click if enabled
55 Enable USB devices57 The A20 address line,
parity, and the NMI are disabled. Adjust the memory size depending on relocation and shadowing next.
58 The memory size was adjusted for relocation and shadowing. Clear the Hit <DEL> message next
Test for unexpected interrupts
59 The Hit <DEL> message is cleared.
Initialize POST display service

The <WAIT...> message is displayed. Start the DMA and interrupt controller test next.
5A Display prompt “Press F2 to enter SETUP”.
5B Disable CPU cache
5C Test RAM between 512KB and 640 KB
60 Setup virus protection (boot sector protection) functionality according to setup setting.
The DMA page register test passed. Perform the DMA Controller 1 base register test next.
Test extended memory
61 Try to turn on level 2 cache (if L2 cache has already turned on in post 3D, this part will be skipped)Set the boot up speed according to setup settingLast chance for chipset is initializedLast chance for power management is initialized(reen BIOS only)Show the system configuration table
62 Setup NUM Lock Status According to Setup values
The DMA controller 1 base register test passed. Perform the DMA controller 2 base register test next
Test extended memory address lina
Program the NUM lock, Set matic rate & typematic speed according to setup.
63 If there is any changes in the hardware configuration. Update the ESCD information (PnP BIOS only)Clear memory that have been usedBoot system via INT 19h
64 Jump to UserPatch1
65 The DMA controller 2 base register test passed. Programme

DMA controllers 1 and 2 next.
66 Complete programming DMA controllers 1 and 2. Initialize the 8259 interrupt controller next.
Configure advanced cache registers
67 Complete 8259 interrupt controller initialization.
Initialize Multi Processor APIC
68 Enable external and CPU caches
69 Set up System Management Mode (SMM) area
6A Display external L2 cache size
6B Load custom defaults (optional)
6C Display shadow-area message
6E Display possible high address for UMB recovery
6F70 Display error message7172 Check for configuration
errors76 Check for keyboard
errors7C Set up hardware interrupt
vectors
7D Initialize Intelligent System Monitoring
7E Initialize coprocessor if present.

7F Enabling extended NMI source is in progress.
80 The keyboard test has started. Clear the output buffer and check for stuck keys. Issue the keyboard reset command nex.t
Disable onboard Super I/O ports and IRQs.
81 A keyboard reset error or stuck key was found. Issue the keyboard controller interface test command next.
Late POST device initialization.
82 The keyboard controller interface test completed. Write the command byte and initialize the circular buffer next.
Detect and install external RS232 ports
83 The command byte was written and global data initialization has completed. Check for a locked key nex.t
Configure non-MCD IDE controllers
84 Locked key checking is over. Check whether a memory size mismatch with CMOS RAM data next.
Detect and install external parallel ports
85 The memory size check is done. Display a soft error and check for a password or by passing WINBIOS isSet up next.
Initialize PC-compatible PnP ISA devices

86 The password was checked. Perform any required programming before WINBIOS Setup next.
Re-initialize onboard I/O ports.
87 The programming before WINBIOS Setup has completed. Uncompress the WINBIOS Setup code and execute the AMIBIOS Setup or WINBIOS Setup utility next.
Configure Motherboard Configurable Devices
(optional)
88 Returned from WINBIOS Setup and cleared the screen. Perform any necessary programming after WINBIOS Setup next.
Initialize BIOS Data Area
89 The programming after WINBIOS Setup has completed. Display the power on screen message next.
Enable Non-Maskable Interrupts (NMIs)
8A Initialize Extended BIOS Data Area
8B The first screen message has been displayed. The <WAIT...> message is displayed. Perform the PS/2 mouse check and extended BIOS data area allocation check next.
Test and initialize PS/2 mouse
8C Programme the WINBIOS Setup options next.
Initialize floppy controller
8D The WINBIOS Setup

options are programmed. Reset the hard disk controller next.
8E The hard disk controller has been reset. Configure the floppy drive controller next.
8F Determine number of ATA drives (optional)
90 Initialize hard-disk controllers
91 The floppy drive controller has been configured. Configure the hard disk drive controller next.
Initialize local-bus hard-disk controllers
92 Jump to UserPatch2
93 Build MPTABLE for multi-processor boards
95 Initialize bus adaptor ROMs from C8000h through D8000h
Install CD ROM for boot
96 Initialize before passing control to the adaptor ROM at C800
Clear huge ES segment register
97 Initialize before the C800 adaptor ROM gains control has completed. The adaptor ROM check is next.
Fix up Multi Processor table
98 The adaptor ROM had control and has now returned control to BIOS POST. Perform any required processing after the
Search for option ROMs. One long, two short beeps on checksum fails.

option ROM returned control A
99 Any initialization required after the option ROM test has completed. Configure the timer data area and printer base address next.
Check for SMART Drive (optional)
9A Set the timer and printer base addresses. Set the RS-232 base address next.
Shadow option ROMs
9B Returned after setting the RS-232 base address. Perform any required initialization before the Coprocessor test next.
9C Required initialization before the Coprocessor test is over. Initialize the Coprocessor next
Set up Power Management
9D Coprocessor initialized. Perform any required initialization after the Coprocessor test next.
Initialize security engine (optional)
9E Initialization after the Coprocessor test is complete. Check the extended keyboard, keyboard ID, and Num Lock key next. Issuing the keyboard ID command next
Enable hardware interrupts
9F Determine number of ATA and SCSI drives
A0 Set time of dayA1 Check key lockA2 Display any soft error

nextA3 The soft error display
has completed. Set the keyboard typematic rate next.
A4 The keyboard typematic rate is set. Programme the memory wait states next
Initialize typematic rate
A5 Memory wait state programming is over. Clear the screen. Enable parity and the NMI next
A7 NMI and parity is enabled. Perform any initialization required before passing control to the adaptor ROM at E000 next.
A8 Initialization before passing control to the adaptor ROM at E000hm is completed. Pass control to the adaptor ROM at E000h next
Erase F2 prompt
A9 Returned from adaptor ROM at E000h control. Performing any initialization required after the E000 option ROM had control next
AA Initialization after E000 option ROM control has completed. Display the system configuration next
Scan for F2 key stroke
AB Uncompress the DMI data and execute DMI POST initialization next
AC Enter SETUP
AE Clear boot flag

B0 If Interrupts Occurs in Protecting Mode
The system configuration is displayed.
Check for errors
B1 If non masked NMI Occurs, Display “Press F1 to Disable NMI, F2 Reboot”
Copy any code to specific areas.
Inform RomPilot about the end of POST.
B2 POST is done - prepare to boot operating system
B3
B4 1 One short beep before boot
B5 Terminate QuietBoot (optional
B6 Check password (optional)
B7 Initialize ACPI BIOSB8B9 Prepare BootBA Initialize SMBIOSBB Initialize PnP Option
ROMsBC Clear parity checkersBD Display MultiBoot menuBE Program chipset registers with
power on BIOS defaultsClear screen (optional)
BF Program the rest of the chipset’s value according to setup (later setup value program)
Check virus and backup reminders
If auto configuration is enabled, programmed the chipset with predefined values in the MODBINable Auto Table
C0 Turn off OEM specific cache, shadow
Try to boot with INT 19
Initialize standard devices with default values: DMA controller (8237); Programmable Interrupt Controller (8259); Programmable Interval Timer (8254); RTC chip.
C1 OEM Specific-Test to Size On-Board Memory
Initialize POST Error Manager (PEM)
C2 Initialize error loggingC3 Test the first 256K DRAM Initialize error display
function Expand the compressed codes

into temporary DRAM area including the compressed system BIOS & Option ROMs.
C4 Initialize system error handler
C5 Enable OEM Specific-Early Shadow for Fast Boot
PnPnd dual CMOS (optional)
C6 External Cache Size Detection Initialize note dock (optional)
C7 Initialize note dock late
C8 Force check (optional)
C9 Extended checksum (optional)
CA Redirect Int 15h to enable remote keyboard
CB Redirect Int 13h to Memory Technologies Devices such as ROM, RAM, PCMCIA, and serial disk
CC Redirect Int 10h to enable remote serial video
CD Re-map I/O and memory for PCMCIA
CE Initialize digitizer and display message
D0 The NMI is disabled. Power on delay is starting. Next, the initialization code checksum will be verified.
D1 Initialize the DMA controller and perform the keyboard controller BAT test. Start to refresh memory and enter 4 GB flat mode next.
D2 Unknown interrupt
D3 Start memory sizing next
D4 Return to real mode. Execute any OEM

patches and set the stack next.
D5 Pass control to the uncompressed code in shadow RAM at E000:0000h. The initialization code is copied to segment 0 and the control will be transferred to segment 0
D6 Control is in segment 0. Next, checking if <Ctrl> <Home> was pressed and verifying the system BIOS checksum. If either <Ctrl> or <Home> was pressed or the system BIOS checksum is bad, next it will go to checkpoint code E0h. Otherwise, It goes to checkpoint code D7h.
E0 The onboard floppy controller if available is initialized. Next, begin the base 512 KB memory test
Initialize the chipset
E1 E1 Setup - Page E1 Initialize the interrupt vector table next
Initialize the bridge
E2 E2 Setup - Page E2 Initialize the DMA and Interrupt controllers next.
Initialize the CPU
E3 E3 Setup - Page E3 Initialize system timerE4 E4 Setup - Page E4 Initialize system I/OE5 E5 Setup - Page E5 Check force recovery
boot
E6 E6 Setup - Page E6 Enable the floppy drive controller and Timer IRQs. Enable internal cache memory.
Checksum BIOS ROM
E7 E7 Setup - Page E7 Go to BIOS

E8 E8 Setup - Page E8 Set Huge SegmentE9 E9 Setup - Page E9 Initialize Multi ProcessorEA EA Setup - Page EA Initialize OEM special
codeEB EB Setup - Page EB Initialize PIC and DMAEC EC Setup - Page EC Initialize Memory typeED ED Setup - Page ED Initialize the floppy
drive.Initialize Memory size
EE EE Setup - Page EE Look for a floppy diskette in drive A:. Read the first sector of the diskette
Shadow Boot Block
EF EF Setup - Page EF A read error occurred while it reads the floppy drive in drive A:.
System memory test
F0 Next, search for the AMIBOOT.ROM file in the root directory.
Initialize interrupt vectors
F1 The AMIBOOT.ROM file is not in the root directory
Initialize Run Time Clock
F2 Next, read and analyze the floppy diskette FAT to find the clusters occupied by the AMIBOOT.ROM file
Initialize video
F3 Next, read the AMIBOOT.ROM file, cluster by cluster.
Initialize System Management Manager
F4 The AMIBOOT.ROM file is not the correct size
Output one beep
F5 Next, disable internal cache memory.
Clear Huge Segment
F6 Boot to Mini DOSF7 Boot to Full DOSFB Next, detect the type
of flash ROM.FC Next, erase the flash
ROM.FD Next, programme the
flash ROMFF Int 19 Boot Attempt Flash ROM

programming was successful. Next, restart the system BIOS.
⒏Description of beep code
⑴AMI BIOS beep codes (fatal error) 1 beep DRAM Refreshing Fails. Try to reseat the memory first. If the error still occurs,
replace the memory with known good chips. 2 beeps Parity Error in First 64K RAM. Try to reseat the memory first. If the error still
occurs, replace the memory with known good chips.3 beeps Base 64K RAM Failure. Try to reseat the memory first. If the error still occurs,
replace the memory with known good chips.4 beeps System timer fails5 beeps Process fails6 beeps Keyboard Controller 8042 - Gate A20 is Error. Try to reseat the keyboard
controller chip. If the error still occurs, replace the keyboard chip. If the error persists, check parts of the system relating to the keyboard, e.g. try another keyboard, check to see if the system has a keyboard fuse
7 beeps Processor Virtual Mode Exception Interrupt Error8 beeps Display Memory Read/Write Test Failure (Non-fatal). Replace the video card or
the memory on the video card.9 beeps ROM BIOS Checksum (32KB at F800:0) Failed. It is not likely that this error can
be corrected by reseating the chips. Consult the motherboard supplier or an AMI product distributor for replacement part(s).
10 beeps CMOS Shutdown Register Read/Write Error11 beeps Cache memory error
⑵. AMI BIOS beep codes (Non-fatal error) 2 short POST Failure - One or more of the hardware tests has failed1 long 2 short An error was encountered in the video BIOS ROM, or a horizontal retracing
failure has been encountered1 long 3 short Conventional/Extended memory failure1 long 8 short Display/Retrace test failed
⑶. Award BIOS beep codes1 short No error during POST2 short Any Non-fatal error, enter CMOS SETUP to reset1 long 1 short RAM or motherboard error1 long 2 short Video Error, Cannot Initialize Screen to Display Any Information1 long 3 short Keyboard Controller error1 long 9 short Flash RAM/EPROM (which on the motherboard) error. (BIOS error) Long beep Memory bank is not plugged well, or broken.
⑷.Phoenix BIOS beep codes

Beep Code Description / What to Check1-1-1-3 Verify Real Mode.1-1-2-1 Get CPU type.1-1-2-3 Initialize system hardware.1-1-3-1 Initialize chipset registers with initial POST values.1-1-3-2 Set in POST flag.1-1-3-3 Initialize CPU registers.1-1-4-1 Initialize cache to initial POST values.1-1-4-3 Initialize I/O.1-2-1-1 Initialize Power Management.1-2-1-2 Load alternate registers with initial POST values.1-2-1-3 Jump to UserPatch0.1-2-2-1 Initialize keyboard controller.1-2-2-3 BIOS ROM checksum.1-2-3-1 8254 timer initialization.1-2-3-3 8237 DMA controller initialization.1-2-4-1 Reset Programmable Interrupt Controller.1-3-1-1 Test DRAM refresh.1-3-1-3 Test 8742 Keyboard Controller.1-3-2-1 Set ES segment to register to 4 GB.1-3-3-1 28 Autosize DRAM.1-3-3-3 Clear 512K base RAM.1-3-4-1 Test 512K base address lina.1-3-4-3 Test 512K base memory.1-4-1-3 Test CPU bus-clock frequency.1-4-2-4 Reinitialize the chipset.1-4-3-1 Shadow system BIOS ROM.1-4-3-2 Reinitialize the cache.1-4-3-3 Autosize cache.1-4-4-1 Configure advanced chipset registers.1-4-4-2 Load alternate registers with CMOS values.2-1-1-1 Set Initial CPU speed.2-1-1-3 Initialize interrupt vectors.2-1-2-1 Initialize BIOS interrupts.2-1-2-3 Check ROM copyright notice.2-1-2-4 Initialize manager for PCI Options ROMs.2-1-3-1 Check video configuration against CMOS.2-1-3-2 Initialize PCI bus and devices.2-1-3-3 Initialize all video adapters in system.2-1-4-1 Shadow video BIOS ROM.

2-1-4-3 Display copyright notice.2-2-1-1 Display CPU type and speed.2-2-1-3 Test keyboard.2-2-2-1 Set key click if enabled.2-2-2-3 56 Enable keyboard.2-2-3-1 Test for unexpected interrupts.2-2-3-3 Display prompt "Press F2 to enter SETUP".2-2-4-1 Test RAM between 512 and 640k.2-3-1-1 Test expanded memory.2-3-1-3 Test extended memory address lina.2-3-2-1 Jump to UserPatch1.2-3-2-3 Configure advanced cache registers.2-3-3-1 Enable external and CPU caches.2-3-3-3 Display external cache size.2-3-4-1 Display shadow message.2-3-4-3 Display non-disposable segments.2-4-1-1 Display error messages.2-4-1-3 Check for configuration errors.2-4-2-1 Test real-time clock.2-4-2-3 Check for keyboard errors2-4-4-1 Set up hardware interrupts vectors.2-4-4-3 Test coprocessor if present.3-1-1-1 Disable onboard I/O ports.3-1-1-3 Detect and install external RS232 ports.3-1-2-1 Detect and install external parallel ports.3-1-2-3 Re-initialize onboard I/O ports.3-1-3-1 Initialize BIOS Data Area.3-1-3-3 Initialize Extended BIOS Data Area.3-1-4-1 Initialize floppy controller.3-2-1-1 Initialize hard-disk controller.3-2-1-2 Initialize local-bus hard-disk controller.3-2-1-3 Jump to UserPatch2.3-2-2-1 Disable A20 address line.3-2-2-3 Clear huge ES segment register.3-2-3-1 Search for option ROMs.3-2-3-3 Shadow option ROMs.3-2-4-1 Set up Power Management.3-2-4-3 Enable hardware interrupts.3-3-1-1 Set time of day.3-3-1-3 Check key lock.
3-3-3-1 Erase F2 prompt.3-3-3-3 Scan for F2 key stroke.3-3-4-1 Enter SETUP.3-3-4-3 Clear in-POST flag.3-4-1-1 Check for errors3-4-1-3 POST done--prepare to boot operating system.3-4-2-1 One beep.3-4-2-3 Check password (optional).3-4-3-1 Clear global descriptor table.3-4-4-1 Clear parity checkers.3-4-4-3 Clear screen (optional).3-4-4-4 Check virus and backup reminders.4-1-1-1 Try to boot with INT 19.4-2-1-1 Interrupt handler error.4-2-1-3 Unknown interrupt error.4-2-2-1 Pending interrupt error.4-2-2-3 Initialize option ROM error.4-2-3-1 Shutdown error.4-2-3-3 Extended Block Move.4-2-4-1 Shutdown 10 error.4-3-1-3 Initialize the chipset.4-3-1-4 Initialize refresh counter.4-3-2-1 Check for Forced Flash.4-3-2-2 Check HW status of ROM.4-3-2-3 BIOS ROM is OK.4-3-2-4 Do a complete RAM test.4-3-3-1 Do OEM initialization.4-3-3-2 Initialize interrupt controller.4-3-3-3 Read in bootstrap code.4-3-3-4 Initialize all vectors.4-3-4-1 Boot the Flash program.4-3-4-2 Initialize the boot device.4-3-4-3 Boot code was read OK.
⑸.IBM BIOS beep codes
Beep Code DescriptionNo Beeps No Power, Loose Card, or Short.1 Short Beep Normal POST, computer is ok.2 Short Beep POST error, review screen for error code.

Continuous Beep No Power, Loose Card, or Short.Repeating Short Beep No Power, Loose Card, or Short.One Long and one Short Beep Motherboard issue.One Long and Two short Beeps Video (Mono/CGA Display Circuitry) issue.One Long and Three Short Beeps. Video (EGA) Display Circuitry.Three Long Beeps Keyboard / Keyboard card error.One Beep, Black or Incorrect Display Video Display Circuitry.
⒐Corrective Action
⑴.If I forget the password, what can I do?
If you forget your password, don’t worry! The following will help you:①. Omnipotent passwordFor the BIOS from different manufacturer, their password is different too. Both omnipotent
password and password that users set are able to unlock the computer. Try the abbreviation of manufacturer or the character string which formed by the first letter of each word. May be it is the omnipotent password, for example:
I.AMI passwordAMI AMI Bios310 AMI!SW KILLCMOSA. M. I 589589 SMOSPWD AMISETUP ami.kezBIOS ammii AMI_SW ami? AMI.KEYAMI SW amipswd amidecod amiamiPASSWORD LKWPETER BIOSPASS AMIPSWD
II.Award passwodPASSWORD HLT biostar ?award djonetAWARD SW ALFAROME j09F 1EAAh g6PJAWARD?SW 256256 j256 admin HELGA-SAWARE_PW 589721 LKWPETER ally HLTaward_ps Alfarome ally award zjaaadcAWARD?SW APAf J322 award.sw J64SWITCHED_SW 1kwpeter SER award_? 1kw peterTTPTHA awkward SKY_FOX zbaaaca setup1kwpeter AWARD_SW Sxyz Syxz SZYXbiosstar BIOS t0ch20x BIOSTAR t0ch8801322222 CONCAT TzqF CONCAT ttptha589589 CONDO ZAAADA Awkward wodj
III.othersPhoenix BIOS: phoenix Megastar: starBiostar Biostar: Q54arwms Micron: sldkj754xyzallCompag: compag Micronies: dn 04rieConcord:last Nimble: xdfk9874t3CTX International: CTX_123 Packard Bell: bell9CyberMax: congress QDI: QDI

Daewoo: Daewuu Quantex: texl xljlbjDaytek: Daytec Research: Co12ogro2Dell: Dell Shuttle: spacveDigital Equipment: komprie Siements Nixdorf: SKY_FOXEnox: central SpeedEasy: lesarotlFreetech: Posterie SuperMicro: ksdjfg934tHP Vectra:hewlpack Tinys:tinyIBM: IBM MBIUO sertafu TMC: BIGOIwill: iwill Toshiba: 24Banc81 Toshiba toshy99JetWay: spooml Vextrec Technology: vextrexJoss Technology: 57gbz6technolgi Vobis: merlinM Technology: mMmM WIMBIOSnbsp BIOS v2.10: complertMachSpeed: sp99dd Zenith: 3098z ZenithMagic-pro: prost ZEOS: zeosx
②.Discharge by softwareCMOS ROM can be discharged by software way. Then help you to solve the password
problem. Follow these method, use the prompt “DEBUG”, all things to be easy.I. clear Award password
C: \>DEBUG
- o 70 34 or - o 70 11 - o 71 34 - o 71 ff
- q - qII. clear AMI BIOS password
C: \>DEBUG - o 70 16 or - o 70 10 - o 71 16 - o 71 0 - q - q
Note: the setup of CMOS BIOS will be erased during the discharge, so the computer is able to running until you reset it. If it is COMPAQ computer, you’d better get a floppy disk which save CMOS program first, then do the discharge, or else it is easy to discharge but hard to recover. ③. hardware jumper discharge to CMOS BIOS
All the computers could discharge to CMOS BIOS by switch or jumper, and clear any prompt (system booting prompt, CMOS setup prompt, key lock prompt). There are examples for the particularity of CMOS of some Original packaging computer:
The discharge of COMPAQ and AST is finished by close/open the switch, but except the state power off, follow these steps:
a. After the external power is turned off, push SW1 and SW1-2 to “on”.
b. External power is turned on. Restart the computer.c. Wait for 1to 5 minutes, turn off the computer.d. Push SW1 and SW1-2 to “off”e. Turn on the computer, enter CMOS setup to reset it.
Most of motherboard discharge to CMOS by jumper, and for the different board, the pin is different. During the discharge, read the user’s guide of motherboard first, if the state of CMOS discharge jumper pin is not included in it, to check that whether there are sighs on the motherboard, such as “Exit Batter”, “Clean CMOS”, “CMOS ROM Reset”. If you find these sign, connect the pin
of switch, or else, remove the battery.④.get helps from your dealerIf the problem is not solved still, please get in touch with you dealer.
⑵. How to enter CMOS SETUP?BIOS Key Screen instructionAMI <Del> or <ESC> DisplayedAward <Del> or <Ctrl>+<Alt>+<ESC> DisplayedMR <Del> or <Ctrl>+<Alt>+<ESC> NONEQuadtel <F2> DisplayedCOMPAQ Press<F10> when the cursor displayed on
top right screen NONE
AST <Del>+<Alt>+<S> NONEPhoenix <Del>+ <Alt>+<S> NONEHewlett Packard(HP)
<F2> NONE
⒑Answers of frequently-asked questionsNOTE: 1. Don’t against the rules in motherboard quality guaranty during repair the board.
⒉ Resolve the trouble only when the power is off.Error description solutionsMemory bank Memory bank is bad Replace it and try again
Pin of memory bank is dirty Clean it with student eraser and try again.It is not match the other bank. Insert the right memory bank.Plugged in the wrong direction
Insert it properly
Memory slot or extended slot
The slot is dirty or something in it
Clean it
Metallic spring slice in the slot is out of shape or ruptured.
Refit it’s shape or replace it.
Metallic spring slice in the slot is rusty or mildewy.
Wash with the pure alcohol, Inserts it and pull it out frequently after it is dry.
CPU CPU is bad Replace it. (touch it to check if it does generate heat or overheated)
The jumper setup or CMOS setup of CPU is error.
Check the setup of working voltage and frequency of CPU
CPU pin is dirty Clear the dirty things, insert and pull out it frequently.
CPU is not plugged well. Check the CPU pin
Error of POST card or it plugged by error
The pin is dirty Clean it with student eraser, insert the card and pull it out many times.
The POST card is plugged in wrong slot
Distinguish carefully between ISA slot and PCI slot
It is plugged in the wrong direction.
Make sure the component side should face to the power pin
The POST card is bad Get in touch form your dealer. ([email protected])
Power on, the code is stopped
The motherboard is not running
Check the power and CPU jumper.
There is no code export to the bus slot in which the POST card insert
Try the other slot. (See “Obligatory content”)
POST fails midway
Motherboard error According to error codes The motherboard send the error code to video display
Connect the video display, according to the message on the screen to check the error, then try again.
11. If the code is not included in the book, what can I do?
As the mainboard manufacturer defines the code, some codes haven’t been defined, so you can get in touch with you dealer and find them. Also if you have the new code meaning, you can write them down in the following table:CODE Description BIOS type (√)
Award AMI Phoenix