construct a rhombus - cape breton · construct a segment bisector: using a compass 1. draw a...
TRANSCRIPT

Construct a Segment Bisector: Using a Compass
1. Draw a segment and label it AD .
A D
2. Use a compass to draw a circle using point A as the centre. Make sure the circle cuts the segment more than half-way to point D.
A D
3. Keep the compass at the same setting. Move to point D and draw a second circle. It should intersect with the first circle at two points, above and below the segment.
A D
4. Use a straightedge to draw a line through the two points on the circles. The line will bisect the segment, forming the midpoint. The line you draw is the perpendicular bisector of the segment AD .
midpointA D
Unit 10.3: Mathematics 7: Focus on Understanding Bisect a Line Segment, Questions 1–3, Page 443 1 of 2

Construct a Segment Bisector: Using Geometer’s Sketchpad
1. Draw a segment and label it AD .
A D
2. Choose the Compass tool to draw a circle using point A as the centre. Make sure the circle cuts the segment more than half-way to point D. Measure the distance from the new point on the circle to A.
To construct a circle from a point and a measurement: Select the point (F). Select the measurement. Go to the Construct menu. Select Circle by Center + Radius.
CA = 2.0 cm
A D
C
To measure a distance: Select the two points. Go to the Measure menu. Choose Distance.
3. Draw another circle, using the same measurement, with point D as the centre. Create the points of intersection for the two circles.
CA = 2.0 cm
A D
C
To make a point of intersection: Select the objects that intersect. Go to the Construct menu. Select Intersection.
4. Select the points and draw a line through them. The point of intersection is the midpoint of segment AD . The new line is the perpendicular bisector of the segment.
CA = 2.0 cm
midpointA D
C
To construct a line: Select the two points. Go to the Construct menu. Choose Line.
A student file for these instructions is available. Refer to: 01_segment_bisector.gsp
Unit 10.3: Mathematics 7: Focus on Understanding Bisect a Line Segment, Questions 1–3, Page 443 2 of 2

Bisect an Angle: Using a Compass
1. .Draw an angle. Label it . XYZ∠
X
Y Z
2. Use the compass to draw an arc of a circle using point Y as the centre. Make sure the arc cuts both arms of the angle to form points of intersection. Label the new points F and G.
3. Set your compass to any distance greater than half way between points F and G. Mark an arc in the middle of the angle from point F. Leave the compass at the same setting and make an arc from point G, so that it intersects with the first arc. Label the point of intersection H.
G
FX
Y Z
H
G
F
X
Y Z
4. Construct a ray from point Y through H. This is the bisector of the angle.
bisectorH
G
F
X
Y Z
Unit 10.3: Mathematics 7: Focus on Understanding Bisect an Angle, Questions 4–5, Page 443 1 of 2

Bisect an Angle: Using Geometer’s Sketchpad X
Y Z
1. Draw an angle. Label it . XYZ∠
2. Choose the Compass tool to draw a circle using point Y as the centre. Make sure the circle cuts both arms of the angle to form points of intersection. Label the new points F and G.
Unit 10.3: Mathematics 7: Focus on Understanding Bisect an Angle, Questions 4–5, Page 443 2 of 2
3. Measure the distance from F to G. Draw a circle from the point F , using this measurement as the radius. Make another circle, using the same measurement, with point G as the centre.
G
FX
Y Z
To make a point of intersection: Select the objects that intersect. Go to the Construct menu. Select Intersection.
4. Construct the points of intersection for the two new circles. Call one of these points H. Construct a ray from point Y through H. This is the bisector of the angle.
G = 1.5 cm
G
FX
Y Z
To construct a circle from a point and a measurement: Select the point (F). Select the measurement. Go to the Construct menu. Select Circle by Center + Radius.
FTo measure a distance: Select the two points. Go to the Measure menu. Choose Distance.
bisectorFG = 1.5 cmH
G
FX
Y Z
To construct a ray: Select the end point (point Y) first, then a second point (point H). Go to the Construct menu. Choose Ray.
A student file for these instructions is available. Refer to: 02_angle_bisector.gsp

Construct a Perpendicular Through a Point on the Line: Using a Compass
1. Draw a segment. Label the points A and B. A point D is on the segment, but not at the centre.
A BD
2. Use the compass to draw arcs of a circle using point D as the centre. Make sure the circle cuts the segment on both sides of D. Call the two points of intersection X and Y.
YA BD
3. Using point X as the centre, draw two arcs above and below the segment. Leave the compass setting the same, and repeat from point Y.
YA BD
4. Connect the points of intersection formed by the new arcs. Join these points to form a perpendicular line through point D.
YA BD
Unit 10.3: Mathematics 7: Focus on Understanding Construct a Perpendicular of a Line Segment, Question 8 a (point on the segment), Page 444 1 of 2

Construct a Perpendicular Through a Point on the Line: Using Geometer’s Sketchpad
1. Draw a segment. Label the points A and B. A point D is on the segment, but not at the centre.
A BD
2. Choose the Compass tool to draw a circle using point D as the centre. Make sure the circle cuts the segment on both sides of D. Construct the points of intersection for the segment and the circle. Call them X and Y. Measure the distance from one of the end points (A or B) to D. Choose the larger distance.
To make points of intersection: Select the intersecting objects. Go to the Construct menu. Select Intersection.
BD = 2.9 cm
YA BD
3. Select point X followed by the measurement. Draw another circle. Repeat this for point Y.
BD = 2.9 cm
YA BDX
To construct a circle: Select the centre point (X). Select the measurement. Go to the Construct menu. Select Circle by Center + Radius.
4. Construct the points of intersection for the two new circles. Construct a line through these two points.
BD = 2.9 cm
YA BDX
To construct a line through two points: Select the two points. Go to the Construct menu. Select Line.
A student file for these instructions is available. Refer to: 03_perp_pt_on_line.gsp
Unit 10.3: Mathematics 7: Focus on Understanding Construct a Perpendicular of a Line Segment, Question 8 a (point on the segment), Page 444 2 of 2
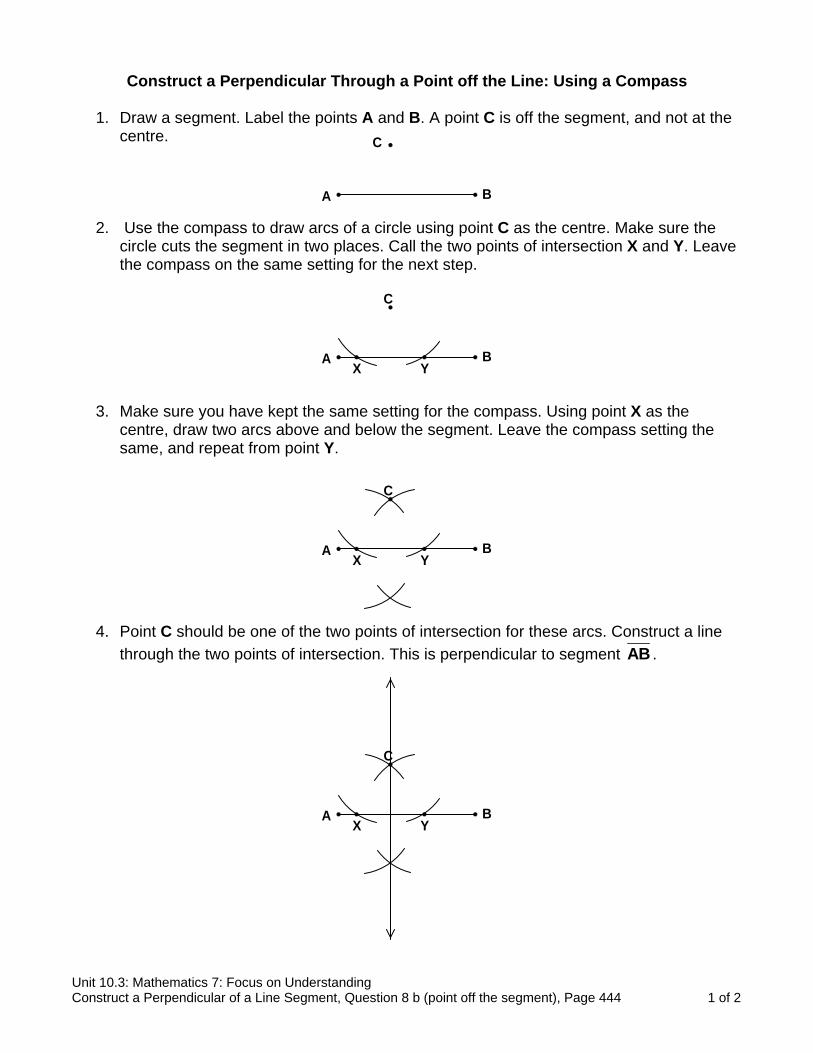
Construct a Perpendicular Through a Point off the Line: Using a Compass
1. Draw a segment. Label the points A and B. A point C is off the segment, and not at the centre.
A B
C
2. Use the compass to draw arcs of a circle using point C as the centre. Make sure the circle cuts the segment in two places. Call the two points of intersection X and Y. Leave the compass on the same setting for the next step.
C
YXA B
3. Make sure you have kept the same setting for the compass. Using point X as the centre, draw two arcs above and below the segment. Leave the compass setting the same, and repeat from point Y.
C
YXA B
4. Point C should be one of the two points of intersection for these arcs. Construct a line through the two points of intersection. This is perpendicular to segment AB .
C
YXA B
Unit 10.3: Mathematics 7: Focus on Understanding Construct a Perpendicular of a Line Segment, Question 8 b (point off the segment), Page 444 1 of 2

Construct a Perpendicular Through a Point off the Line: Using Geometer’s Sketchpad
1. Draw a segment. Label the points A and B. A point C is off the segment, and not at the centre.
A B
C
2. Choose the Compass tool to draw a circle using point C as the centre. Make sure the circle cuts the segment at two places. Construct the points of intersection for the segment and the circle. Call them X and Y. Measure the distance from X to C. Use this measurement in your next step.
XC = 1.6 cm
YXA B
C
To make points of intersection: Select the intersecting objects. Go to the Construct menu. Select Intersection.
3. Select point X followed by the measurement. Draw another circle. Repeat this for point Y.
XC = 1.6 cm
YXA B
CTo construct a circle: Select the centre point (X). Select the measurement. Go to the Construct menu. Select Circle by Center + Radius.
4. Construct the points of intersection for the two new circles. Point C should be one of them. Construct a line through these two points. This is perpendicular to segment AB .
To construct a line through two points: Select the two points. Go to the Construct menu. Select Line.
XC = 1.6 cm
YXA B
C
A student file for these instructions is available. Refer to: 04_perp_pt_off_line.gsp
Unit 10.3: Mathematics 7: Focus on Understanding Construct a Perpendicular of a Line Segment, Question 8 b (point off the segment), Page 444 2 of 2

Construct a Parallel Line and Copy an Angle: Using a Compass
1. Draw a segment and label it AB .
A B
2. Invent an angle from point A. Place a point on that arm. Call it M. Use the compass to construct an arc with A at the centre. Label the points of intersection C and X. With the compass at the same setting, construct a second arc at point M. Name the upper point of intersection Y.
Y
C
A B
M
X
3. Use the compass to draw an arc from point C to point X. Use this same setting to draw another arc, with the centre at Y. Mark the point of intersection that is above point X. Name it Z.
Z
Y
C
A B
M
X
4. Connect points M and Z. This line is parallel to AB and YMZ∠ is the same size as . CAX∠
Z
Y
C
A B
M
X
Unit 10.3: Mathematics 7: Focus on Understanding Construct a Parallel Line Segment, Question 10, Page 444 1 of 2

Construct a Parallel Line and Copy an Angle: Using Geometer’s Sketchpad
1. Draw a segment and label it AB .
A B
2. Invent an angle from point A. Place a point on that arm. Call it M. Construct a small circle with A at the centre. Construct the points of intersection on the arms of the circle. Label them C and X. Measure the distance from A to X. Construct a circle at point M. Construct the points of intersection and name the upper point Y.
AX = 1.0 cm
Y
C
A B
M
X
Unit 10.3: Mathematics 7: Focus on Understanding Construct a Parallel Line Segment, Question 10, Page 444 2 of 2
3. Measure the distance from point C to point X. Use this measurement to draw a circle, with the centre at Y. Construct the points of intersection. One point is above point X. Name it Z.
To construct a circle from a point and a measurement: Select the point (M). Select the measurement. Go to the Construct menu. Select Circle by Center + Radius.
To measure a distance between points: Select the two points (point A and then point X). Go to the Measure menu. Select Distance.
CX = 0.9 cm
AX = 1.0 cm
Z
Y
C
A B
M
X
To construct points of intersection: Select the objects. Go to the Construct menu. Select Intersection.
4. Connect points M and Z. This line is parallel to AB and YMZ∠ is the same size as . CAX∠
CX = 0.9 cm
AX = 1.0 cm
Z
Y
C
A B
M
X
A student file for these instructions is available. Refer to: 05_parallel_copy_angle.gsp

Construct a Perpendicular Bisector: Using a Compass
1. Draw a segment and label it AD .
A D
2. Use a compass to draw a circle using point A as the centre. Make sure the circle cuts the segment more than half-way to point D.
A D
3. Keep the compass at the same setting. Move to point D and draw a second circle. It should intersect with the first circle at two points, above and below the segment.
A D
4. Use a straightedge to draw a line through the two points on the circles. The line will bisect the segment, forming the midpoint. The line you draw is the perpendicular bisector of the segment .
AD
midpointA D
Unit 10.3: Mathematics 7: Focus on Understanding Construct a Perpendicular Bisector of a Line Segment, Question 11, Page 444 1 of 2

Construct a Perpendicular Bisector: Using Geometer’s Sketchpad
1. Draw a segment and label it AD .
A D
2. Choose the Compass tool to draw a circle using point A as the centre. Make sure the circle cuts the segment more than half-way to point D. Measure the distance from the new point on the circle to A.
To construct a circle from a point and a measurement: Select the point (F). Select the measurement. Go to the Construct menu. Select Circle by Center + Radius.
CA = 2.0 cm
A D
C
To measure a distance: Select the two points. Go to the Measure menu. Choose Distance.
3. Draw another circle, using the same measurement, with point D as the centre. Create the points of intersection for the two circles.
CA = 2.0 cm
A D
C
To make a point of intersection: Select the objects that intersect. Go to the Construct menu. Select Intersection.
4. Select the points and draw a line through them. The point of intersection is the midpoint of segment AD . The new line is the perpendicular bisector of the segment.
CA = 2.0 cm
midpointA D
C
To construct a line: Select the two points. Go to the Construct menu. Choose Line.
A student file for these instructions is available. Refer to: 06_perp_bisector.gsp
Unit 10.3: Mathematics 7: Focus on Understanding Construct a Perpendicular Bisector of a Line Segment, Question 11, Page 444 2 of 2

Construct an Isosceles Triangle: Using a Compass
1. Draw a segment and label it AB .
A B
2. Using your compass, construct two large arcs with the same radius (more than half the length of segment AB ), one with its centre at point A and the other with its centre at point B. Use the two points of intersection of these circles to construct the perpendicular bisector of segment AB .
A B
3. Make a point (C) on the perpendicular bisector. Construct segments AC and BC .
A B
C
4. You can check your triangle to see if it is isosceles by measuring segments AC and BC .
A B
C
Unit 10.3: Mathematics 7: Focus on Understanding Construct an Isosceles Triangle, Question 12, Page 444 1 of 2

Construct an Isosceles Triangle: Using Geometer’s Sketchpad
1. Draw a segment and label it AB .
A B
2. Construct two circles with the same radius (more than half the length of segment AB ), one with its centre at point A and the other with its centre at point B. Use the two points of intersection of these circles to construct the perpendicular bisector of segment AB .
AX = 2.6 cm
A BX
Perpendicular bisector: For detailed instructions about constructing a perpendicular bisector, see the information from the file: perpendicular_bisector.doc.
3. Make a point (C) on the perpendicular bisector. Construct segments AC and BC .
AX = 2.6 cm
A BX
C
Constructing a segment: Select the two points. Go to the Construct menu. Choose Segment.
4. Hide the extra points, the measurement, the circles, and the perpendicular line.
A B
C
3.3 cm 3.3 cm
Hiding objects: Select the objects to be hidden. Go to the Display menu. Choose Hide (Objects).
Unit 10.3: Mathematics 7: Focus on Understanding Construct an Isosceles Triangle, Question 12, Page 444 2 of 2
A student file for these instructions is available. Refer to: 07_tri_isosceles.gsp

Construct an Equilateral Triangle: Using a Compass
1. Draw a segment and label it AB .
A B
2. Using your compass, measure the distance from point A to point B. Construct two arcs with the same radius, one with its centre at point A and the other with its centre at point B. Make sure the arcs intersect above the base line, segment AB .
A B
3. Name the point of intersection C. Construct segments AC and BC .
C
A B
4. You can check your triangle to see if it is equilateral by measuring segments AB , AC , and BC . They should all have the same measurement.
C
A B
Unit 10.3: Mathematics 7: Focus on Understanding Construct an Equilateral Triangle, Question 14, Page 445 1 of 2

Construct an Equilateral Triangle: Using Geometer’s Sketchpad
1. Draw a segment and label it AB .
A B
2. Measure the distance from point A to point B. Construct two circles with the same radius, one with its centre at point A and the other with its centre at point B.
Unit 10.3: Mathematics 7: Focus on Understanding Construct an Equilateral Triangle, Question 14, Page 445 2 of 2
3. Mark the points of intersection. Label one of the points of intersection C. Construct segments AC and BC .
AB = 4.0 cm
A B
Perpendicular bisector: For detailed instructions about constructing a perpendicular bisector, see the information from the file: perpendicular_bisector.doc.
AB = 4.0 cm
C
A B
Constructing a segment: Select the two points. Go to the Construct menu. Choose Segment.
4. Hide the the measurement, and the circles. You can measure the lengths of the segments to check that the triangle is equilateral.
4.0 cm 4.0 cm
4.0 cm
C
A B
Hiding objects: Select the objects to be hidden. Go to the Display menu. Choose Hide (Objects).
A student file for these instructions is available. Refer to: 08_tri_equilateral.gsp

Construct a Square, Given One Side: Using a Compass
1. Given: Segment DE is one side of a square. Construct the square.
D E
2. Using your compass, construct perpendicular lines through both point D and point E.
D E
Perpendicular line: For detailed instructions about constructing a perpendicular line on a segment, see the information from the file: perpendicular_pt_on_line.doc. Note: You will have to extend your segment in order to form two points on either side of the endpoints.
3. Set your compass to the length of segment DE . Using point D as the centre, draw an arc to intersect the perpendicular line. Leave the compass at the same setting and repeat at point E. Label the new points formed A and B. Construct the segment AB .
BA
D E
4. You can measure the lengths of the segments and the size of the angles to check that the figure is a square.
3.5 cm
90.0°
3.5 cm
BA
D E
To construct rectangles, given one side: Set your compass to a different length for the second set of equal sides (Step 4). Then follow the rest of the instructions as given.
Unit 10.3: Mathematics 7: Focus on Understanding Construct a Square, Question 16, Page 445 1 of 2

Construct a Square, Given One Side: Using Geometer’s Sketchpad
1. Given: Segment DE is one side of a square. Construct the square. D E
2. Construct perpendicular lines through both point D and point E.
D E
Perpendicular line: For detailed instructions about constructing a perpendicular line on a segment, see the information from the file: perpendicular_pt_on_line.doc. Note: You will have to extend the segment in order to form two points on either side of the endpoints.
3. Measure the distance from D to E. Construct circles from both points, using the measurement. Construct the segments: DA , AB , and BE .
4. Hide the unnecessary objects. You can measure the lengths of the segments and the size of the angles to check that the figure is a square.
Constructing a segment: Select the two points. Go to the Construct menu. Choose Segment.
To construct rectangles, given one side: Place a point on one perpendicular line at a different length for the second set of equal sides (Step 4). Use that distance to construct a circle at the other endpoint. Then follow the rest of the instructions as given.
Hiding objects: Select the objects to be hidden. Go to the Display menu. Choose Hide (Objects).
To construct a circle from a point and a measurement: Select the point (F). Select the measurement. Go to the Construct menu. Select Circle by Center + Radius.
BA
D E
3.5 cm
90.0°
3.5 cm
BA
D E
Unit 10.3: Mathematics 7: Focus on Understanding Construct a Square, Question 16, Page 445 2 of 2

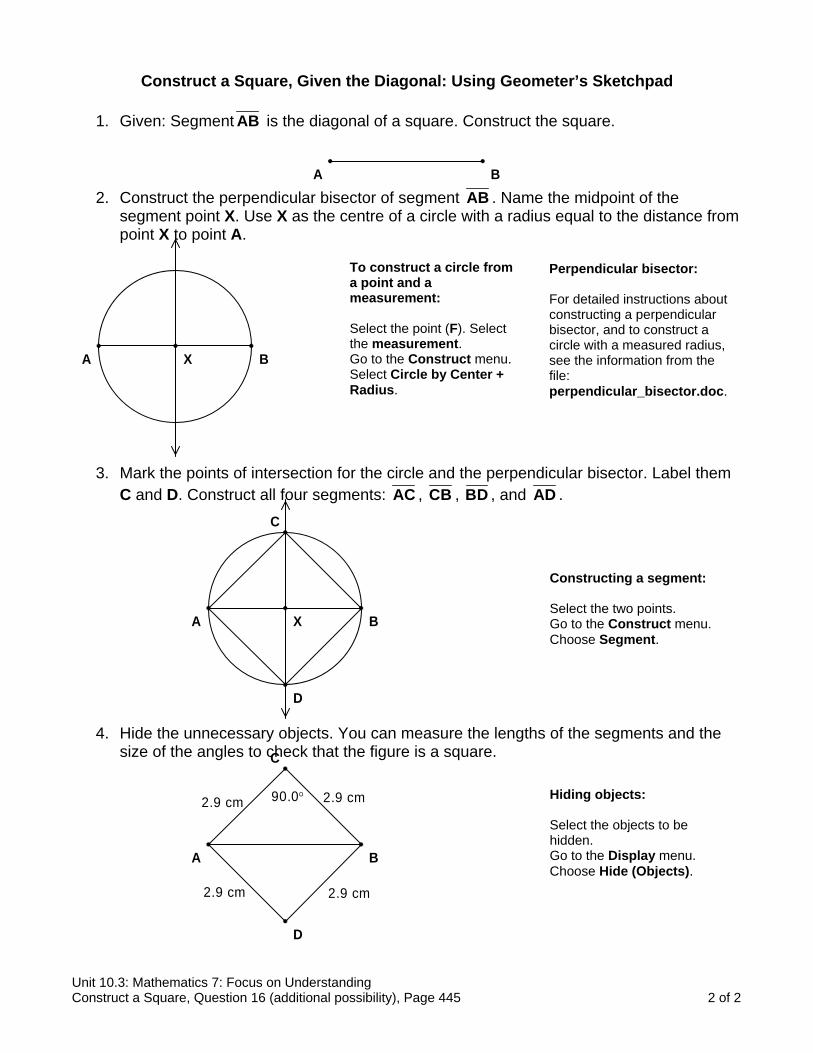
Construct a Square, Given the Diagonal: Using a Compass
1. Given: Segment AB is the diagonal of a square. Construct the square.
A B
2. Using your compass, construct the perpendicular bisector of segment AB .
A B
Perpendicular bisector: For detailed instructions about constructing a perpendicular bisector, see the information from the file: perpendicular_bisector.doc.
3. Using the midpoint as the centre of the circle, and the distance to point A as the radius, use your compass to draw a circle. Make sure it intersects the perpendicular bisector both above and below segment AB . Label the new points formed C and D. Construct all four segments: AC , CB , BD , and AD .
4. You can measure the lengths of the segments and the size of the angles to check that the figure is a square.
D
C
A B
90.0°
2.9 cm2.9 cm
2.9 cm2.9 cm
D
C
A B
Unit 10.3: Mathematics 7: Focus on Understanding Construct a Square, Question 16 (additional possibility), Page 445 1 of 2
Construct a Square, Given the Diagonal: Using Geometer’s Sketchpad
1. Given: Segment AB is the diagonal of a square. Construct the square. A B
2. Construct the perpendicular bisector of segment AB . Name the midpoint of the segment point X. Use X as the centre of a circle with a radius equal to the distance from point X to point A.
XA B
To construct a circle from a point and a measurement: Select the point (F). Select the measurement. Go to the Construct menu. Select Circle by Center + Radius.
Perpendicular bisector: For detailed instructions about constructing a perpendicular bisector, and to construct a circle with a measured radius, see the information from the file: perpendicular_bisector.doc.
3. Mark the points of intersection for the circle and the perpendicular bisector. Label them C and D. Construct all four segments: AC , CB , BD , and AD .
D
C
XA B
Constructing a segment: Select the two points. Go to the Construct menu. Choose Segment.
4. Hide the unnecessary objects. You can measure the lengths of the segments and the size of the angles to check that the figure is a square.
C
90.0°
2.9 cm2.9 cm
2.9 cm2.9 cm
D
Hiding objects: Select the objects to be hidden. Go to the Display menu. Choose Hide (Objects).
A B
Unit 10.3: Mathematics 7: Focus on Understanding Construct a Square, Question 16 (additional possibility), Page 445 2 of 2

Construct a Rectangle, Given One Diagonal: Using a Compass
1. Given: SegmentQS is the diagonal of a rectangle. Construct the rectangle.
Q S
2. Using your compass, construct the perpendicular bisector of segment AB in order to find the midpoint. Label the midpoint X.
Perpendicular bisector: For detailed instructions about constructing a perpendicular bisector, see the information from the file: perpendicular_bisector.doc.
XQ S
3. Using the midpoint as the centre of the circle, and the distance to point Q as the radius, use your compass to draw a circle. Draw a line through the midpoint, marking the points of intersection on the circle. Label the new points formed P and R. Construct all four segments: PQ , QR , RS , and SP .
R
XQ S
P
4. You can measure the lengths of the segments and the size of the angles to check that the figure is a square.
1.3 cm
1.3 cm
3.4 cm
3.4 cm
90.0°
R
Q S
P
Unit 10.3: Mathematics 7: Focus on Understanding Construct a Rectangle, Question 18, Page 445 1 of 2

Construct a Rectangle, Given One Diagonal: Using Geometer’s Sketchpad
1. Given: SegmentQS is the diagonal of a rectangle. Construct the rectangle.
Q S
2. Construct the perpendicular bisector of segment QS . Name the midpoint of the segment point X. Use X as the centre of a circle with a radius equal to the distance from point X to point Q.
To construct a circle: Select the compass tool. Roll the mouse over the first point (X) and click one when it changes colour. Roll the mouse to the second point (Q) and click when the colour changes again.
Perpendicular bisector: For detailed instructions about constructing a perpendicular bisector, and to construct a circle with a measured radius, see the information from the file: perpendicular_bisector.doc.
XQ S
3. Draw a new line, with one point on the midpoint and the other point on the circle. Construct the points of intersection (call them P and R). Construct all four segments: PQ , QR , RS , and SP
Drawing a line: Hold your mouse button down on the straightedge tool and choose the line tool. Roll the mouse over the first point (X). Click the button once when it changes colour. Roll the mouse to the circle. Click once when it changes colour.
R
XQ S
P
Constructing a segment: Select the two points. Go to the Construct menu. Choose Segment.
4. Hide the unnecessary objects. You can measure the lengths of the segments and the size of the angles to check that the figure is a square.
Hiding objects: Select the objects to be hidden. Go to the Display menu. Choose Hide (Objects).
1.3 cm
1.3 cm
3.4 cm
3.4 cm
90.0°
R
Q S
P
Unit 10.3: Mathematics 7: Focus on Understanding Construct a Rectangle, Question 18, Page 445 2 of 2

Construct a Rectangle, Given Two Sides: Using a Compass
1. Given: Two segments to be used as the lengths of the sides of a rectangle. Construct the rectangle.
A BX Y
2. Make a point (D). Construct an arc with D as the centre point, and segment AB as the radius. Place a point on the circle, name it E. Construct segment DE . Construct perpendicular lines from each point (D and E).
D E
Perpendicular line: For detailed instructions about constructing a perpendicular line on a segment, see the information from the file: perpendicular_pt_on_line.doc. Note: You will have to extend your segment in order to form two points on either side of the endpoints.
3. Construct arcs from both points, D and E, using the length of segment XY as the radius. Construct points of intersection on the perpendicular lines (F and G) and construct the segments: DF , FG , and GE .
4. You can measure the lengths of the segments and the size of the angles to check that the figure is the correct rectangle.
GF
D E
90.0°1.8 cm
3.0 cm GF
D E
Unit 10.3: Mathematics 7: Focus on Understanding Construct a Rectangle, Question 18 (additional possibility), Page 445 1 of 2

Construct a Rectangle, Given Two Sides: Using Geometer’s Sketchpad
1. Given: Two segments to be used as the lengths of the sides of a rectangle. Construct the rectangle.
A BX Y
2. Construct perpendicular lines from each point (A and B).
Perpendicular line: For detailed instructions about constructing a perpendicular line on a segment, see the information from the file: perpendicular_pt_on_line.doc. Note: You will have to extend the segment in order to form two points on either side of the endpoints.
A B
3. Construct circles from both points, A and B, using the length of segment XY as the radius. Construct points of intersection (F and G) on the perpendicular lines and construct the segments: DF , FG , and GE .
XY = 1.8 cm
F
A B
YX
GTo construct a circle from a point and a segment: Select the point (D). Select the segment XY . Go to the Construct menu. Select Circle by Center + Radius.
Constructing a segment: Select the two points. Go to the Construct menu. Choose Segment.
4. Hide the unnecessary objects. You can measure the lengths of the segments and the size of the angles to check that the figure is a square.
Hiding objects: Select the objects to be hidden. Go to the Display menu. Choose Hide (Objects).
3.0 cm
90.0°1.8 cm
GF
A B
Unit 10.3: Mathematics 7: Focus on Understanding Construct a Rectangle, Question 18 (additional possibility), Page 445 2 of 2

Construct a Rhombus, Given One Side: Using a Compass
1. Given: The length of segment AD . Set the compass to match the length of AD . You will use this compass setting for all arcs drawn.
A D
2. Place the compass at point A and draw an arc above AD . Choose any point on that arc and label it B. Place the compass at point B and draw an arc to the right of B.
A D
B
3. Then place the compass at point D and draw an arc to intersect the arc drawn from point B. Label the point of intersection C.
C
A D
B
4. Use a straightedge to draw AB , BC , and CD .
C
A D
B
Unit 10.3: Mathematics 7: Focus on Understanding Construct a Rhombus, Question 20 (first bullet), Page 446 1 of 2

Construct a Rhombus, Given One Side: Using Geometer’s Sketchpad
1. Given: the length of segment AD . Construct the segment and label it AD .
A D
2. Use the selection arrow to select first point A and then point D. Construct a circle, with centre A. Select a point nearly above point A. Name it B and draw a second circle, using B as the centre and A as the second point.
Unit 10.3: Mathematics 7: Focus on Understanding Construct a Rhombus, Question 20 (first bullet), Page 446 2 of 2
3. Construct a third circle. This time, D is the centre point, and A is the second point. Name the new intersection point C.
A D
B To construct a circle from the centre and a second point: Select the centre point (A). Select the second point (D). Go to the Construct menu. Select Circle by Center + Point.
4. Select the points and draw the segments AB , BC , and CD . You can hide the circles, if you wish.
C
A D
BConstructing a segment: Select the two points. Go to the Construct menu. Choose Segment.
Hiding objects: Select the objects. Go to the Display menu. Choose Hide (Objects).

Construct a Rhombus, Given the Diagonals: Using a Compass
1. Given: Segment AB and segment CD are the diagonals of a rhombus. Construct the rhombus.
2.3 cm
4.3 cmA B
C D
2. Using your compass, construct the perpendicular bisector of segment AB . Name the midpoint K. Do the same for segment CD . For segment CD , it is most important to find the midpoint (call it T).
Perpendicular bisector: For detailed instructions about constructing a perpendicular bisector, see the information from the file: perpendicular_bisector.doc.
K
T
A B
C D
3. Using the midpoint K as the centre of the circle, and the distance from point C to point T as the radius, use your compass to draw a arcs that intersect the perpendicular bisector both above and below segment AB . Label the new points formed C and D. Construct all four segments: AC , CB , BD , and AD .
D
C
KA B
D
C
KA B
4. You can measure the lengths of the segments to check that the figure is a rhombus.
2.4 cm
2.4 cm
D
C
KA B
Unit 10.3: Mathematics 7: Focus on Understanding Construct a Rhombus, Question 20 (second bullet), Page 446 1 of 2

Construct a Rhombus, Given the Diagonals: Using Geometer’s Sketchpad
1. Given: Segment AB and segment CD are the diagonals of a rhombus. Construct the rhombus.
2.3 cm
4.3 cmA B
C D
2. Construct the perpendicular bisectors of segment AB (name the midpoint K) and segment CD (name the midpoint T). Use K as the centre of a circle with a radius equal to the distance from point C to point T.
Perpendicular bisector: For detailed instructions about constructing a perpendicular bisector, and to construct a circle with a measured radius, see the information from the file: perpendicular_bisector.doc.
D
C
K
T
A B
C D
CT = 1.2 cm
3. Mark the points of intersection fC and D. Construct all four segm
D
C
KA
4. Hide the unnecessary objects. Ythat the figure is a rhombus.
2.4 cm
2.4 cm
D
C
KA
Unit 10.3: Mathematics 7: Focus on UnderstanConstruct a Rhombus, Question 20 (second b
To construct a circle from a point and a measurement: Measure the distance from C to T Select the point (K). Select the measurement. Go to the Construct menu. Select Circle by Center + Radius.
or the circle and the perpendicular bisector. Label them ents: AC , CB , BD , and AD .
B
Constructing a segment: Select the two points. Go to the Construct menu. Choose Segment.
ou can measure the lengths of the segments to check
Hiding objects: Select the objects to be hidden. Go to the Display menu. Choose Hide (Objects).
B
ding ullet), Page 446 2 of 2

Construct a Parallelogram, Given Two Sides and an Angle: Using a Compass
1. Given: Segments AB and DE are two sides of a parallelogram, and angle C is one angle of the parallelogram. Construct the parallelogram.
D E
BA
C
2. Trace angle C on your paper. Set your compass to the length of segment AB and draw a circle with C as its centre. Set your compass to the length of segment DE and draw a second circle, also with C as the centre.
C
3. In the sample above, the arms of angle C are longer than the inner circle. Mark the point of intersection for the inner circle and one of the arms of the angle. Call it F. Extend the other arm of angle C so that it intersects with the outer circle and mark the point of intersection. Call this point G.
G
F
C
4. Construct a line from point F that is parallel to CG . Construct a line from point G that is parallel to CF . Mark the point of intersection and call it H. This is a parallelogram.
H
G
F
C
To construct parallel sides: For detailed instructions about constructing a parallel lines, see the information from the file: parallel_copy_angle.doc.
Unit 10.3: Mathematics 7: Focus on Understanding Construct a Parallelogram, Question 22, Page 446 1 of 2
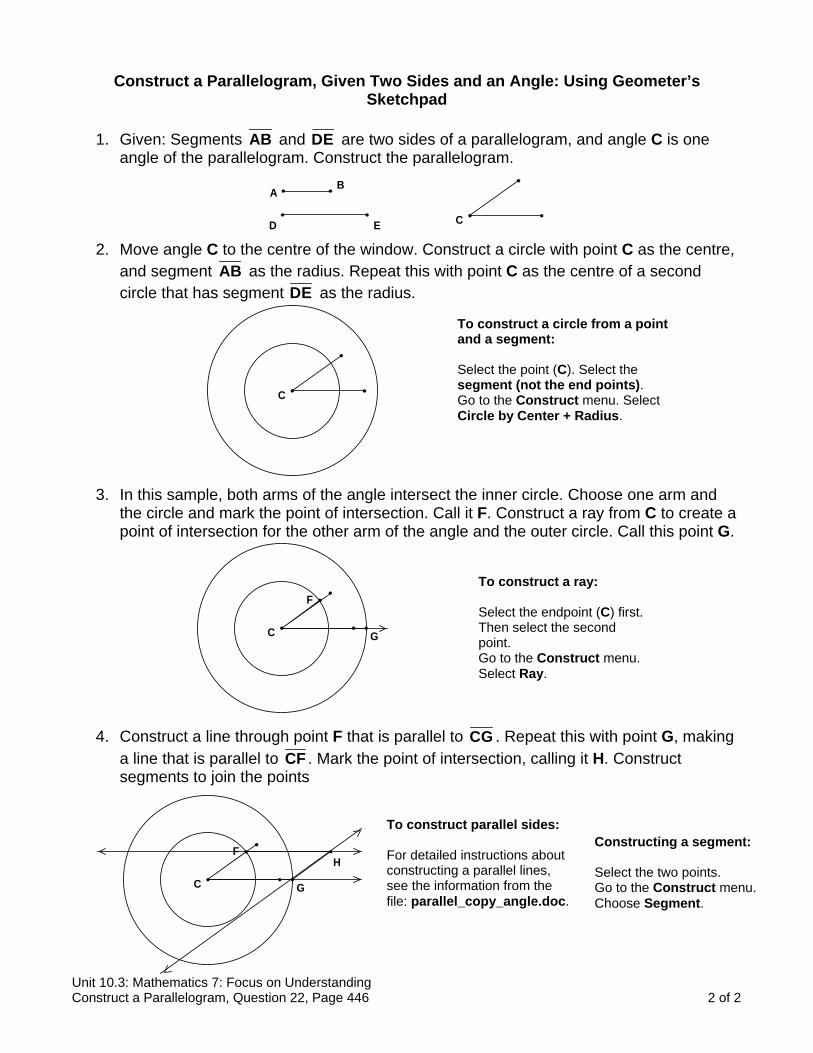
Construct a Parallelogram, Given Two Sides and an Angle: Using Geometer’s Sketchpad
1. Given: Segments AB and DE are two sides of a parallelogram, and angle C is one
angle of the parallelogram. Construct the parallelogram. D E
BA
C
2. Move angle C to the centre of the window. Construct a circle with point C as the centre, and segment AB as the radius. Repeat this with point C as the centre of a second circle that has segment DE as the radius.
C
To construct a circle from a point and a segment: Select the point (C). Select the segment (not the end points). Go to the Construct menu. Select Circle by Center + Radius.
3. In this sample, both arms of the angle intersect the inner circle. Choose one arm and the circle and mark the point of intersection. Call it F. Construct a ray from C to create a point of intersection for the other arm of the angle and the outer circle. Call this point G.
G
F
C
To construct a ray: Select the endpoint (C) first. Then select the second point. Go to the Construct menu. Select Ray.
4. Construct a line through point F that is parallel to CG . Repeat this with point G, making a line that is parallel to CF . Mark the point of intersection, calling it H. Construct segments to join the points
H
G
F
C
To construct parallel sides: For detailed instructions about constructing a parallel lines, see the information from the file: parallel_copy_angle.doc.
Constructing a segment: Select the two points. Go to the Construct menu. Choose Segment.
Unit 10.3: Mathematics 7: Focus on Understanding Construct a Parallelogram, Question 22, Page 446 2 of 2

Construct a Kite, Given the Shorter Diagonal: Using a Compass
1. Given: Segment DE is the shorter diagonal of a kite. Construct the kite.
D
E
2. Using your compass, construct the perpendicular bisector of segment DE . Name the midpoint K.
K
D
EPerpendicular bisector: For detailed instructions about constructing a perpendicular bisector, see the information from the file: perpendicular_bisector.doc.
3. Place two points on the perpendicular bisector, one on each side of the midpoint K. They do not have to be any special distance from point K. Label the new points formed F and G. Construct all four segments: DF , FE , EG , and GD .
K
D
EF
G
4. You can measure the lengths of the segments to check that the figure is a rhombus.
2.2 cm
2.2 cm
1.5 cm
1.5 cm
D
EF
G
Unit 10.3: Mathematics 7: Focus on Understanding Construct a Kite, Question 24, Page 446 1 of 2

Construct a Kite, Given the Shorter Diagonal: Using Geometer’s Sketchpad
1. Given: Segment DE is the shorter diagonal of a kite. Construct the kite. D
E
2. Construct the perpendicular bisector of segment DE . Name the midpoint K.
Perpendicular bisector: For detailed instructions about constructing a perpendicular bisector, and to construct a circle with a measured radius, see the information from the file: perpendicular_bisector.doc.
K
D
E
3. Choose any two points on the perpendicular bisector, with one point on either side of segment DE . Label them F and G Construct all four segments: DF , FE , EG , and GD .
K
D
EF
G
Constructing a segment: Select the two points. Go to the Construct menu. Choose Segment.
4. Hide the unnecessary objects. You can measure the lengths of the segments to check that the figure is a rhombus.
Hiding objects: Select the objects to be hidden. Go to the Display menu. Choose Hide (Objects).
2.2 cm
2.2 cm
1.5 cm
1.5 cm
D
EF
G
Unit 10.3: Mathematics 7: Focus on Understanding Construct a Kite, Question 24, Page 446 2 of 2