connecting software cb mobile crm - iphone user...
TRANSCRIPT

All rights reserved. No part of the document may be reproduced or transmitted in any form or by any means, electronic or mechanical, for any purpose, without the written permission of Connecting Software s.r.o. & Co. KG. Company or product names mentioned in this document may be trademarks or registered trademarks of their respective companies.
Connecting Software
CB Mobile CRM - iPhone
User Manual
Summary
This document describes the iOS app Mobile CRM, its functionality and features available. The document is intended for end users as user manual to provide knowledge about the app and its usage.
Document History
Version Date Author Changes
1.0 2014-07-14 MTO Document creation
1.1 2015-06-17 MBE Design adaption

CB Mobile CRM – iPhone User Manual Connecting Software
2015-06-17 Page 2/81
Table of Contents
1 Overview ........................................................................................................... 5
2 Intended audience .............................................................................................. 5
3 Requirements ..................................................................................................... 5
3.1 Minimal recommended device configuration ...................................................... 5
4 Installation ........................................................................................................ 5
5 Updating the app ................................................................................................ 5
6 Memory and disk space requirements .................................................................... 6
7 Security ............................................................................................................. 7
7.1 Isolated storage ............................................................................................ 7
7.1.1 What is isolated storage? .......................................................................... 7
7.2 Web service security ...................................................................................... 7
7.3 Application security ....................................................................................... 7
8 Supported devices .............................................................................................. 7
9 Basic app layout ................................................................................................. 8
First time run .......................................................................................................10
10 Look & feel ......................................................................................................11
10.1 Themes .....................................................................................................11
11 Main menu ......................................................................................................12
11.1 Main menu Items order ...............................................................................13
12 Functionality description ...................................................................................14
12.1 Dashboard .................................................................................................14
12.1.1 Chart setting options .............................................................................14
12.1.2 Data filters ...........................................................................................14
12.1.3 Chart filter combinations ........................................................................15
12.1.3.a Default chart ...................................................................................15
12.1.3.b Pipeline chart ..................................................................................16
12.1.3.c Pie chart .........................................................................................16
12.1.3.d Line chart .......................................................................................16
12.2 Map page ..................................................................................................17
12.3 Scan Code page .........................................................................................19
12.4 Calendar page ............................................................................................20
12.5 Accounts page ...........................................................................................22
12.5.1 Account detail page ...............................................................................22

CB Mobile CRM – iPhone User Manual Connecting Software
2015-06-17 Page 3/81
12.5.1.a Account detail page functionality .......................................................23
12.5.2 Account detail edit page.........................................................................25
12.5.3 Create new account ...............................................................................26
12.6 Contacts page ............................................................................................27
12.6.1 Contact detail page ...............................................................................28
12.6.1.a Contact detail page functionality........................................................28
12.6.2 Contact detail edit page .........................................................................31
12.6.3 Create new contact ...............................................................................32
12.7 Products page ............................................................................................33
12.7.1 Product detail page ...............................................................................34
12.7.2 Create new product (Currently not available)............................................35
12.8 Activities page ...........................................................................................36
12.8.1 Activity filter.........................................................................................37
12.8.1.a Filter data by typing a search string into search box ............................37
12.8.1.b Filter data by tapping on the magnifying glass ....................................38
12.8.2 Activity detail page................................................................................39
12.8.3 Create new activity ...............................................................................42
12.9 Opportunities page .....................................................................................43
12.9.1 Opportunity detail page .........................................................................44
12.9.2 Create new opportunity .........................................................................46
12.10 Leads page ..............................................................................................47
12.10.1 Lead detail page..................................................................................48
12.10.2 Create new lead ..................................................................................50
12.11 Orders page .............................................................................................51
12.11.1 Order detail page (Not yet available) .....................................................52
12.11.2 Create new order ................................................................................54
12.12 Invoices page ...........................................................................................55
12.12.1 Invoice detail page ..............................................................................56
12.12.2 Create new invoice ..............................................................................58
12.13 Quotes page ............................................................................................59
12.13.1 Quote detail page ................................................................................60
12.13.2 Create new quote ................................................................................62
12.14 Cases page ..............................................................................................63
12.14.1 Case detail page .................................................................................64
12.14.2 Create new case .................................................................................66
12.15 Notes (add notes, read notes) ....................................................................67

CB Mobile CRM – iPhone User Manual Connecting Software
2015-06-17 Page 4/81
12.16 Settings page ...........................................................................................67
12.16.1 General settings description .................................................................68
12.16.1.a Online Mode ................................................................................68
12.16.1.b Auto Sync ...................................................................................68
12.16.1.c Sync Option.................................................................................68
12.16.1.d Records per item ........................................................................69
12.16.1.e Max. size of attachment in kB .....................................................69
12.16.1.f Account wizard ............................................................................69
12.16.1.g Theme ........................................................................................69
12.16.1.h Map and Location Services..........................................................69
12.16.1.i Background Agent .......................................................................69
12.16.1.j Delete Data .................................................................................69
12.16.2 Data settings description ......................................................................70
12.17 About page ..............................................................................................71
12.18 Account wizard page .................................................................................72
12.18.1 Create new account .............................................................................73
12.18.2 Existing account ..................................................................................75
12.18.3 Modify Current Account ........................................................................76
12.19 Background Agent ....................................................................................78
12.20 Synchronization functionality......................................................................79
13 How to connect to CRM server ...........................................................................80
14 Troubleshooting ...............................................................................................81
14.1 I cannot connect to my CRM server ..............................................................81

CB Mobile CRM – iPhone User Manual Connecting Software
2015-06-17 Page 5/81
1 Overview
The Connect Bridge Mobile CRM application was developed to allow users fast and easy access to Microsoft Dynamics CRM data without the need for a PC. The application takes advantage of the currently available devices running an iOS operating system (iPad, iPhone, iPod).
This document provides a general overview of the application and its functionality. The content of this user manual is subject to change without notice.
2 Intended audience
The document is intended to provide guidance to the users on how to use the application.
3 Requirements
In order to be able to run the application, user needs a device running iOS operating system with access to iTunes. There are no specific hardware requirements, all devices running iOS operating system should be able to run the application.
3.1 Minimal recommended device configuration
To ensure that the application runs smoothly, use a device that meets the recommended requirements. The application supports all devices running iOS 6 or higher. The app supports devices from iPhone 3gs running iOS 6 to the newest devices currently available on the market.
4 Installation
To install the app, visit iTunes and start typing the app name into the search box. In the list of apps find the CB Mobile CRM app and tap on the app to view the details. Tap on the install button from the menu. The app is going to be downloaded and installed on your device.
5 Updating the app
In order to be able to update the app, the app has to be installed on the device already. The iTunes store will inform users about available update for the CB Mobile CRM application. The update is managed by apple store (iTunes) and should start automatically when the user enabled this functionality or manually when the user chooses to update the app from the store.

CB Mobile CRM – iPhone User Manual Connecting Software
2015-06-17 Page 6/81
6 Memory and disk space requirements
CB Mobile CRM app uses a local database file stored in the device’s isolated storage. To ensure all data are successfully stored into the database file during synchronization operation, the device must have enough free space. It is recommended to have at least 512 MB of disk space available on the device.

CB Mobile CRM – iPhone User Manual Connecting Software
2015-06-17 Page 7/81
7 Security 7.1 Isolated storage
7.1.1 What is isolated storage?
Isolated Storage is used to store local data a on a device running iOS. All I/O operations are restricted to isolated storage and do not have direct access to the underlying operating system file system, which helps to provide security and prevents unauthorized access and data corruption from other applications.
7.2 Web service security
The web service communicates with the server via https and is secured by SSL certificate. Also the credentials are checked when trying to connect to the Connect Bridge server. Without proper authentication an error message will be returned and any other attempt to communicate with the server will result in error until a successful connection is established.
7.3 Application security
CB Mobile CRM application uses Connect Bridge and Connect Bridge Web service in order to connect to CRM server specified by the user. To be able to connect to the Connect Bridge server proper user name and password has to be supplied. These credentials are checked by the Connect Bridge server each time the application is trying to retrieve or submit any user data to the CRM server.
The application also uses the device’s isolated storage to store a local database and any other files used by the CB Mobile CRM application. Only the CB Mobile CRM application has access to the part of the storage where local database and any other files used by the app reside.
8 Supported devices
The CB Mobile CRM application is designed to work with devices running iOS 6 operating system or later. Any device running iOS 6 or newer version of the operating system should be able to run this application. For further information about supported devices please have a look at the detailed information provided by the company or contact support.

CB Mobile CRM – iPhone User Manual Connecting Software
2015-06-17 Page 8/81
9 Basic app layout
This chapter describes basic layout of the CB Mobile CRM app. The CB Mobile CRM app can be divided into three parts:
The title frame
Main menu content
Sub page content
On the upper half of the screen there is a title frame. That title frame shows the name of the current page displayed and contains buttons to provide functionality associated with the displayed page.
If a sub page is able to navigate backwards, a back button is visible on the left side of the title frame. To navigate back to the previous page, tap on the back button icon or the back button on the device.

CB Mobile CRM – iPhone User Manual Connecting Software
2015-06-17 Page 9/81
When the displayed page has an action that can be executed by the user (for example "Save" functionality) the action button is visible on the right side of the title frame.
When the displayed page has an action that can be executed by the user and also has additional functionality available, the additional actions button is visible next to the action button. To display the list of available actions, tap on the additional actions button.
Content of the displayed page is visible under the title frame.

CB Mobile CRM – iPhone User Manual Connecting Software
2015-06-17 Page 10/81
Some of the pages display the total number of entities stored and synchronized in the local DB. Usually the page contains list of entities for the user to choose from.
First time run
When the application is run for the first time, local database is created in the applications isolated storage and demo data are loaded into the database. With the demo data loaded into the local database, the user can try out the functionality of the application before the first connection to the users CRM server is attempted.
After the local database was created and demo data loaded into the database, alert view with short notice about the executed action is displayed to the user.

CB Mobile CRM – iPhone User Manual Connecting Software
2015-06-17 Page 11/81
10 Look & feel
10.1 Themes
The user can also choose from two application themes:
Dark theme
Light theme
The themes can be changed by the user on the settings page. Default theme is set to light theme. Light theme causes higher battery consumption due to the bright colours used. When theme is changed by the user, the application has to be restarted in order to apply the settings.

CB Mobile CRM – iPhone User Manual Connecting Software
2015-06-17 Page 12/81
11 Main menu
Main menu contains the list of available application pages. The list of available entity pages can be modified on the settings page by choosing the type of entities that the user wants to see on the menu. Some of the pages are displayed by default and cannot be hidden by the user. In order to navigate to a specific page, tap on the page name in the list of pages.
Pages displayed by default:
Dashboard (Only iPad version)
Map
Scan Code
Calendar
Contacts
Accounts
Settings
About

CB Mobile CRM – iPhone User Manual Connecting Software
2015-06-17 Page 13/81
11.1 Main menu Items order
User is able to change the default order of the items displayed on the main menu to fit personal preference.
To change the order of items go to "Settings". On the following page tap on the "Reorder items" button. After tapping on the button a page where the reordering is done appears. The user has to specify the preferred order for all of the items and then confirm the setup by tapping on "OK" button

CB Mobile CRM – iPhone User Manual Connecting Software
2015-06-17 Page 14/81
12 Functionality description
12.1 Dashboard
Dashboard page (available only on iPad) contains different kinds of charts with data for specific fiscal year. The displayed charts can be modified in the chart settings by changing the setting options. The default chart is column chart, this chart cannot be hidden. Three optional charts are pie chart, pipeline chart (horizontal bars) and line chart.
12.1.1 Chart setting options
To show or hide the list of available chart options, tap on the additional actions button and a window with chart setting options will be displayed.
To show or hide additional charts, check or uncheck the checkbox representing the name of the chart to be displayed or hidden. When charts are displayed or hidden, the main chart sub page layout is modified according to the enabled chart options. The charts are automatically resized to fit the main subpage screen in order to provide best user experience.
Each chart has several options for entities that are displayed in the chart. Any combination of enabled or disabled entities is displayed in the corresponding chart. The name of the chart is displayed in the title above the settings.
12.1.2 Data filters
CB MobileCRM supports charts for last 5 fiscal years including current year. The displayed fiscal year can be changed by selecting the requested fiscal year from the combo box.
Displayed data for user selected fiscal year can be further filtered by quarters. Any combination of quarters of fiscal year is supported and the data displayed in each chart are filtered after each change.
CB MobileCRM supports advanced filter options to filter the data displayed in charts when the user needs to display data for a time period that is smaller than a quarter of fiscal year. To enable the advanced filtering options, check the "Advanced Filter" checkbox. When checked, additional window with settings is displayed.

CB Mobile CRM – iPhone User Manual Connecting Software
2015-06-17 Page 15/81
Advanced filter options include filtering by month, by week number or by exact day.
Months - advanced option representing months allows the user to filter each month from the range of enabled quarters of fiscal year.
Week number - advanced option representing week number allows the user to filter a specific week from the range of weeks for enabled range of quarters of fiscal year
Day - advanced option representing filter for exact day of current fiscal year
12.1.3 Chart filter combinations
CB MobileCRM allows the user to filter displayed entities for each of the charts, to view the results in different kinds of chart. Currently the app provides following entities:
Incident cases
Leads
Opportunities
Orders
Accounts
Contacts
12.1.3.a Default chart
The default column chart allows following combinations of enabled entities:
Only Incident cases - Displays chart with number of cases for each customer created in each quarter of fiscal year
Only Leads - Shows chart with number of accounts, contacts and opportunity entities created by qualified leads that were created and qualified in current fiscal year. The chart is divided by quarters of fiscal year.
Only Opportunities - Displays chart with the sum of estimated value of opportunities for each customer created in current fiscal year and divided by quarters of fiscal year.
Only Orders - Displays chart with sum of total value for all orders created in current fiscal year per each customer. Divided by quarters of fiscal year.
Only Accounts - Shows chart with number of associated entities (case, order, lead, opportunity, contact) created in current fiscal year from accounts or regarding accounts created in current fiscal year
Only Contacts - Shows chart with number of activities (E-mail, Task, Phone Call, Fax, Appointment, Letter) created in current fiscal year regarding contacts created in current fiscal year.
Any combination of two or more - Shows the number of entities of each type for each quarter of fiscal year

CB Mobile CRM – iPhone User Manual Connecting Software
2015-06-17 Page 16/81
12.1.3.b Pipeline chart
In current version of MobileCRM, pipeline chart only allows to display results for Leads.
Leads - Displays chart with total number of leads created in current fiscal year. Displays number of qualified leads from the total number of created leads, number of opportunities, contacts, accounts and contacts created from total number of qualified leads from currently selected fiscal year.
12.1.3.c Pie chart
Pie chart allows following combinations of enabled entities:
Only Incident cases - Displays chart with number of cases for each customer created in currently selected range of quarters of fiscal year
Only Leads - Displays chart with estimated value per lead created in currently selected range of quarters of fiscal year
Only Opportunities - Displays chart with estimated value per opportunity created in currently selected range of quarters of fiscal year
Only Orders - Displays chart with total amount per order created in currently selected range of quarters of fiscal year
Only Accounts - Displays chart with number of accounts created in each quarter of fiscal year
Only Contacts - Display chart with number of contacts created in each quarter of fiscal year
Any combination of two or more - Shows the number of entities of each type for selected range of fiscal year
12.1.3.d Line chart
Line chart allows following combinations of enabled entities:
Only Incident cases - Displays chart with number of cases for each customer created in each quarter of fiscal year
Only Leads - Shows chart with number of accounts, contacts and opportunity entities created by qualified leads that were created and qualified in current fiscal year. The chart is divided by quarters of fiscal year.
Only Opportunities - Displays chart with the sum of estimated value of opportunities for each customer created in current fiscal year and divided by quarters of fiscal year.
Only Orders - Displays chart with sum of total value for all orders created in current fiscal year per each customer. Divided by quarters of fiscal year.
Only Accounts - Shows chart with number of associated entities (case, order, lead, opportunity, contact) created in current fiscal year from accounts or regarding accounts created in current fiscal year

CB Mobile CRM – iPhone User Manual Connecting Software
2015-06-17 Page 17/81
Only Contacts - Shows chart with number of activities (E-mail, Task, Phone Call, Fax, Appointment, Letter) created in current fiscal year regarding contacts created in current fiscal year.
Any combination of two or more - Shows the number of entities of each type for each quarter of fiscal year
12.2 Map page
Map page contains a map with locations of all available accounts, contacts and leads. The user can filter displayed entities by typing a search string into the search bar. Displayed pushpins will be filtered and only pushpins containing the search string will be displayed.
In order for the app to display the user’s current location, location service has to be used. Prior to using the service, user is asked for permission with an opt-in message only on the first run of the maps. The iOS system then remembers the app and automatically allows the app to access location service. The user can however turn off the permission in the devices settings menu.

CB Mobile CRM – iPhone User Manual Connecting Software
2015-06-17 Page 18/81
In order to display precise location of entities we suggest the user to update the latitude and longitude for each entity directly in the Dynamics CRM.
NOTE: When coordinates for the entity are not available, only country and city is used to search for coordinates as there is higher probability that the Map service returns a value with coordinates. When the address line would be used as well, only precise address location would return geo coordinates. This means that the user would have to type precise full name of the street with correct numbers in order to get result.

CB Mobile CRM – iPhone User Manual Connecting Software
2015-06-17 Page 19/81
The Map page supports additional actions as indicated by the button in the title frame. To show the list of available additional actions, tap on the additional actions button and a context menu will be displayed.
The context menu contains following items:
Show My Location - Display and zoom to the users current location
Show All Entities - Display all available pushpins on the map
Show Accounts - Display only Account pushpins on the map
Show Contacts - Display only Contact pushpins on the map
Show Leads - Display only Lead pushpins on the map
Display Route - Display the route from current location to the User defined pushpin (User defines a destination pushpin by tap and hold on the map)
Get Directions - Create a task for navigation service to show directions from current location to the User defined pushpin (User defines a destination pushpin by tap and hold on the map)
12.3 Scan Code page
Scan code page enables the user to scan and process any barcode supported by the app. By default, the app supports QR codes that are commonly used on business cards.
To scan a barcode tap on the "Scan Code" button and a page with the camera feed appears. On first run of the Scan, the user is prompted to enable microphone and camera usage.

CB Mobile CRM – iPhone User Manual Connecting Software
2015-06-17 Page 20/81
Scan the desired barcode and when code was scanned successfully the camera feed disappears and a button menu appears. On the button menu user can choose the action that has to be done with the scanned barcode.
12.4 Calendar page
Calendar page contains appointments assigned to the current user. The user can further filter the appointments by selecting the appropriate view that contains information the user is looking for. The calendar page has several views. This includes:
Agenda view - displays all appointments that are due for today and later
Day view - displays appointments that are due for specific day
Week view - displays appointments that are due on specific week
Month view - displays appointments that are due on specific month

CB Mobile CRM – iPhone User Manual Connecting Software
2015-06-17 Page 21/81
Tapping on a specific appointment in the list of appointments on "Agenda" view or "Day" view will open the detail about the user selected appointment.
Tapping on a specific appointment in the "Week" view will navigate to the "Day" view for the specific day and all appointments for that day are loaded as well. This is due to the possibility that there may be more than one appointment on that specific day.
Tapping on a specific day in the "Month" view will navigate to the "Week" view where the week containing the tapped day is loaded. To load data about specific day, tap on the day in the "Week" view that was loaded.

CB Mobile CRM – iPhone User Manual Connecting Software
2015-06-17 Page 22/81
12.5 Accounts page
Accounts page contains a list of available CRM accounts. To display details about a specific account, select the account from the list by tapping on the item.
User can use filter to look for a specific account by typing a search string into the search box.
The user can sort the list of accounts according to personal preference. To sort the list choose the preferred sort type and the list will be sorted.
12.5.1 Account detail page
Account detail page contains information about a specific account. The basic account information displayed on the info page are account address, account phone number and account email.
The account detail page also contains data about entities that are associated with currently displayed account. Each entity type has its own tab bar page with the list of associated entities. Currently Mobile CRM shows associated contacts, emails, phone calls, tasks, faxes, letters and appointments.

CB Mobile CRM – iPhone User Manual Connecting Software
2015-06-17 Page 23/81
To display details about any associated entity, tap on the item in the tab bar. The app is going to navigate to a new page with details about the selected item.
12.5.1.a Account detail page functionality
(see pictures on the next page)
The basic account information displayed on the info page allow the user to execute a specific action associated with the displayed details.
To edit the address of the current account select the address item from the list and tap on the pen icon in the main title frame or tap on the house icon in the list. When the icon button is tapped, the application navigates to the account edit detail page, where user can edit the account details.
To make a phone call to the contact person for current account, select the phone number from the list and tap on the telephone icon in the main title frame or tap on the telephone icon in the list. When the icon button is tapped and the device has phone call capabilities, the application starts a phone call. When the device does not support phone calls, app tries to make a call using skype. Message is shown to the user to confirm the selected action. When the user confirms the action, a phone call is initiated.
To send an email to the contact person for the current account, select the email address from the list and tap on the envelope icon in the main title frame or tap on the envelope in the list. When the icon button is tapped, default email editor is opened and the user can type the email content.

CB Mobile CRM – iPhone User Manual Connecting Software
2015-06-17 Page 24/81

CB Mobile CRM – iPhone User Manual Connecting Software
2015-06-17 Page 25/81
12.5.2 Account detail edit page
Account detail edit page displays information about a specific account. The user can edit the record by modifying the content of the rows. To save the modified data and update the CRM account tap on the “Save” button in the title frame.
The account is immediately modified and stored in the local database. The CRM account is updated via an update query (when online mode is selected) or an update query is stored in the local database and prepared to be executed during the synchronization (when offline mode is selected) depending on the users predefined settings.

CB Mobile CRM – iPhone User Manual Connecting Software
2015-06-17 Page 26/81
12.5.3 Create new account
To create a new account, tap on the plus icon in the application title in the list of available accounts page and account detail edit page with new blank record will be displayed. The user can edit the record as required.
To save the newly created account, tap on the ”Save” button in the title frame. The account is immediately created and stored in the local database. The CRM account is created via an insert query (when online mode is selected) or an insert query is stored in the local database and prepared to be executed during the synchronization (when offline mode is selected) depending on the users predefined settings.
CB Mobile CRM – iPhone User Manual Connecting Software
2015-06-17 Page 27/81
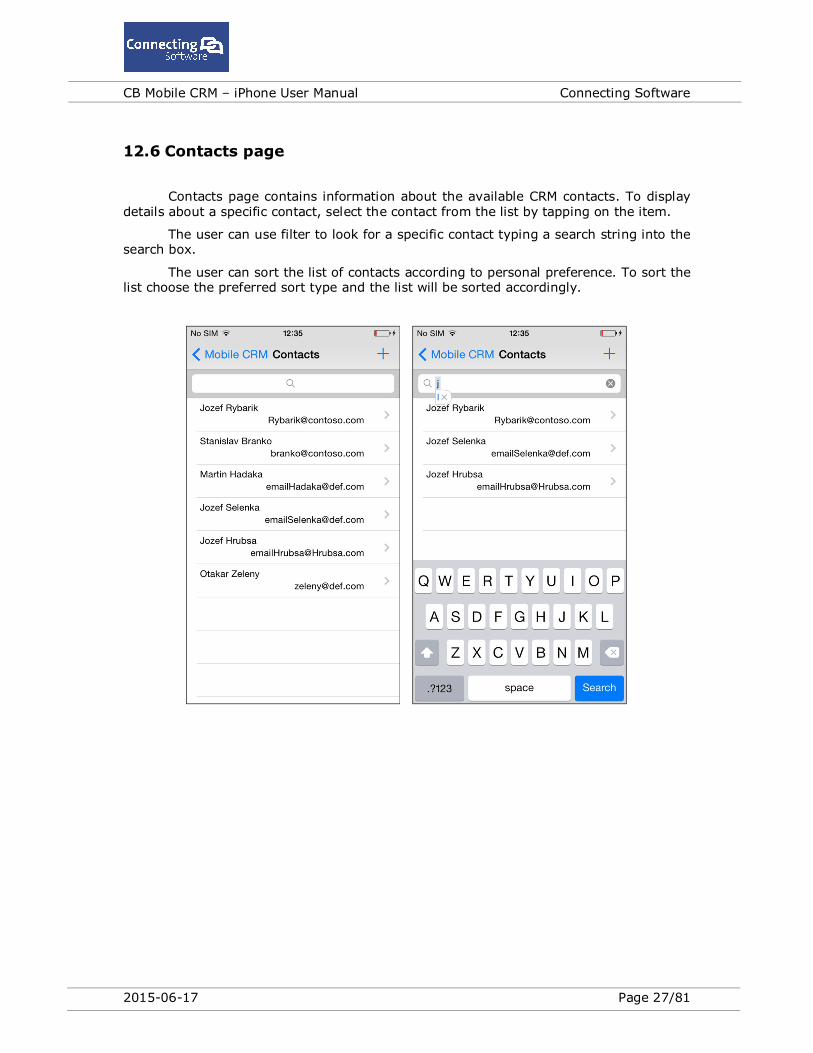
12.6 Contacts page
Contacts page contains information about the available CRM contacts. To display details about a specific contact, select the contact from the list by tapping on the item.
The user can use filter to look for a specific contact typing a search string into the search box.
The user can sort the list of contacts according to personal preference. To sort the list choose the preferred sort type and the list will be sorted accordingly.

CB Mobile CRM – iPhone User Manual Connecting Software
2015-06-17 Page 28/81
12.6.1 Contact detail page
Contact detail page contains information about a specific contact. The basic information about the contact displayed on the info page are contact address, contact phone number and contact email.
The contact detail page also contains data about entities that are associated with the currently displayed contact. Each entity type has its own tab bar page with the list of associated entities. Currently CB Mobile CRM shows associated contacts, emails, phone calls, tasks, faxes, letters and appointments.
To display details about any associated entity, tap on the item in the tab bar. The app is going to navigate to a new page with details about the selected item.
12.6.1.a Contact detail page functionality The basic contact information displayed on the info page allows the user to execute a specific action associated with the displayed details.
To edit the address of the current contact select the address item from the list and tap on the pen icon in the main title frame or tap on the house icon in the list. When the icon button is tapped, the application navigates to contact edit detail page, where the user can edit the contact details.

CB Mobile CRM – iPhone User Manual Connecting Software
2015-06-17 Page 29/81
To make a phone call to the contact, select the phone number from the list and tap on the telephone icon in the main title frame or tap on the telephone icon in the list. When the icon button is tapped, the application tries to make a phone call if the device has phone call capabilities. When the device does not support phone calls, app tries to make a call using skype. A message is shown to the user to confirm the selected action. When the user confirms the action a phone call is initiated.
To send an email to the contact, select the email address from the list and tap on the envelope icon in the main title frame or tap on the envelope in the list. When the icon button is tapped, default email editor is opened and the user can type the email content.

CB Mobile CRM – iPhone User Manual Connecting Software
2015-06-17 Page 30/81

CB Mobile CRM – iPhone User Manual Connecting Software
2015-06-17 Page 31/81
12.6.2 Contact detail edit page
Contact detail edit page displays information about a specific contact. The user can edit the record by modifying the content of the rows. To save the modified data and update the CRM contact, tap on the “Save” button in the title frame.
The contact is immediately modified and stored in the local database. The CRM contact is updated via an update query (when online mode is selected) or an update query is stored in the local database and prepared to be executed during the synchronization (when offline mode is selected) depending on the users predefined settings.

CB Mobile CRM – iPhone User Manual Connecting Software
2015-06-17 Page 32/81
12.6.3 Create new contact
To create new contact, tap on the plus icon and contact detail edit page with new blank record will be displayed. The user can edit the record as required.
To save the newly created contact, tap on the “Save” button in the title frame. The contact is immediately created and stored in the local database. The CRM contact is created via an insert query (when online mode is selected) or an insert query is stored in the local database and prepared to be executed during the synchronization (when offline mode is selected) depending on the users predefined settings.

CB Mobile CRM – iPhone User Manual Connecting Software
2015-06-17 Page 33/81
12.7 Products page
Products page contains information about the available CRM products. To display details about a specific product, select the product from the list by tapping on the item.
The user can use filter to look for a specific product by typing a search string into the search bar. The user can search by product name or product id.
The user can sort the list of products according to personal preference. To sort the list choose the preferred sort type and the list will be sorted.

CB Mobile CRM – iPhone User Manual Connecting Software
2015-06-17 Page 34/81
12.7.1 Product detail page
The product detail page displays detailed information about the selected product. Depending on the access rights of the user, the user is allowed or prohibited to edit the product. (Not available in current version). By default the user is allowed only to view the product details.
To save the changes made to the product, tap on the floppy disk icon. The product is immediately modified and stored in the local database. The product in CRM is updated via an update query (when online mode is selected) or an update query is stored in the local database and prepared to be executed during the synchronization (when offline mode is selected) depending on the users predefined settings.

CB Mobile CRM – iPhone User Manual Connecting Software
2015-06-17 Page 35/81
12.7.2 Create new product (Currently not available)
To create a new product, tap on the plus icon and the product detail page with a new blank record will be displayed. User can edit the record as required.
To save the newly created product, tap on “Save” button in the title frame. The product is immediately created and stored in the local database. The CRM product is created via an insert query (when online mode is selected) or an insert query is stored in the local database and prepared to be executed during the synchronization (when offline mode is selected) depending on the users predefined settings.

CB Mobile CRM – iPhone User Manual Connecting Software
2015-06-17 Page 36/81
12.8 Activities page
Activities page contains information about activities. User can choose to view all activities including the activities of other users or display only the user's own activities. These settings can be changed on the settings page.
There are several activity types listed in the list of activities. Each activity type has its own icon to identify the type of activity.
Currently supported activities displayed in the list are:
Appointments
Tasks
E-mails
Phone calls
Faxes
Letters
Service appointment
To display details about a specific activity, select the activity from the list by tapping on the item.

CB Mobile CRM – iPhone User Manual Connecting Software
2015-06-17 Page 37/81
12.8.1 Activity filter
CB Mobile CRM application supports filtering of activities to help the user identify and search for specific activities in the list.
There are two possibilities for the user to filter the data:
Filter data by typing a search string into search box
Filter data by tapping on the magnifying glass
12.8.1.a Filter data by typing a search string into search box
When filtering data using this option, type in a search string into the search box. The list of activities is filtered and only activities that match with the search string appear.

CB Mobile CRM – iPhone User Manual Connecting Software
2015-06-17 Page 38/81
12.8.1.b Filter data by tapping on the magnifying glass
When filtering data using this option, tap on the magnifying glass button. A popup menu with search condition appears and the user can choose what type of activity to display as well as set the due date condition for the activities. To apply the selected search condition, tap on the "Filter" button. When tapped, the list of activities is filtered and only activities that match the search condition appear.
When the filtered activities contain too much data, the user can narrow down the list by additional filtering of the records using the magnifying glass filter method.

CB Mobile CRM – iPhone User Manual Connecting Software
2015-06-17 Page 39/81
12.8.2 Activity detail page
Each activity detail page displays information about a specific activity type. Each activity type has a different layout according to the content of the activity. User can edit the record by modifying the content of the rows.

CB Mobile CRM – iPhone User Manual Connecting Software
2015-06-17 Page 40/81

CB Mobile CRM – iPhone User Manual Connecting Software
2015-06-17 Page 41/81
When the displayed activity has additional functionality enabled, the additional functionality icon is displayed on the title frame. To display the list of additional actions for the activity, tap on the additional actions icon. A context menu appears and the user can choose the action to execute.
To save modified data and update the CRM activity tap on the “Save” button in the title frame. The activity is immediately modified and stored in the local database. The CRM activity is updated via an update query (when online mode is selected) or an update query is stored in the local database and prepared to be executed during the synchronization (when offline mode is selected) depending on the users predefined settings.

CB Mobile CRM – iPhone User Manual Connecting Software
2015-06-17 Page 42/81
12.8.3 Create new activity
To create new activity, tap on the plus icon and a context menu with possible options will be displayed. Choose the type of activity to be created by tapping on the activity name. When tapped on the activity type, the specific detail page with a new blank record will be displayed. User can edit the record as required.
To save the newly created activity, tap on the “Save” button in the title frame. The activity is immediately created and stored in the local database. The CRM activity is created via an insert query (when online mode is selected) or an insert query is stored in the local database and prepared to be executed during the synchronization (when offline mode is selected) depending on the users predefined settings.

CB Mobile CRM – iPhone User Manual Connecting Software
2015-06-17 Page 43/81
12.9 Opportunities page
Opportunities page contains information about available CRM opportunities. To display details about a specific opportunity, select the opportunity from the list by tapping on the item.
User can use filter to look for a specific opportunity by typing a search string into the search box.
User can sort the list of opportunities according to personal preference. To sort the list choose the preferred sorting type and the list will be sorted.

CB Mobile CRM – iPhone User Manual Connecting Software
2015-06-17 Page 44/81
12.9.1 Opportunity detail page
The opportunity detail page displays detailed information about the selected opportunity. The user can modify the opportunity by changing the data in the specific fields.
To display the list of additional actions, tap on the additional actions icon. A context menu appears and user can choose the action to execute.

CB Mobile CRM – iPhone User Manual Connecting Software
2015-06-17 Page 45/81
To save modified data and update the CRM opportunity, tap on the “Save” button in the title frame. The opportunity is immediately modified and stored in the local database. The CRM opportunity is updated via an update query (when online mode is selected) or an update query is stored in the local database and prepared to be executed during the synchronization (when offline mode is selected) depending on the users predefined settings.

CB Mobile CRM – iPhone User Manual Connecting Software
2015-06-17 Page 46/81
12.9.2 Create new opportunity
To create a new opportunity, tap on the plus icon and the opportunity detail page with a new blank record will be displayed. User can edit the record as required.
To save the newly created opportunity, tap on the “Save” button in the title frame. The record is immediately created and stored in the local database. The CRM opportunity is created via an insert query (when online mode is selected) or an insert query is stored in the local database and prepared to be executed during the synchronization (when offline mode is selected) depending on the users predefined settings.

CB Mobile CRM – iPhone User Manual Connecting Software
2015-06-17 Page 47/81
12.10 Leads page
Leads page contains information about the available CRM leads. To display details about a specific lead, select the lead from the list by tapping on the item.
The user can use filter to look for a specific lead record by typing a search string into the search bar.
The user can sort the list of leads according to personal preference. To sort the list, choose the preferred sort type and the list will be sorted.

CB Mobile CRM – iPhone User Manual Connecting Software
2015-06-17 Page 48/81
12.10.1 Lead detail page
The Lead detail page displays detailed information about the selected lead. To modify the record change the specific fields of the record as required.
The lead detail page supports sending emails and making phone or skype calls depending on the devices capability to make phone calls. The user can send an email or make a call by tapping on the image icon next to email field or phone field.
To display the list of additional actions, tap on the additional actions icon. A context menu appears and the user can choose the action to execute.

CB Mobile CRM – iPhone User Manual Connecting Software
2015-06-17 Page 49/81
To save modified data and update the CRM Lead, tap on the “Save” button in the title frame. The Lead is immediately modified and stored in the local database. The CRM Lead is updated via an update query (when online mode is selected) or an update query is stored in the local database and prepared to be executed during the synchronization (when offline mode is selected) depending on the users predefined settings.

CB Mobile CRM – iPhone User Manual Connecting Software
2015-06-17 Page 50/81
12.10.2 Create new lead
To create new lead, tap on the plus icon and lead detail page with new blank record will be displayed. User can edit the record as required.
To save the newly created lead, tap on the “Save” button in the title frame. The lead is immediately created and stored in the local database. The CRM lead is created via an insert query (when online mode is selected) or an insert query is stored in the local database and prepared to be executed during the synchronization (when offline mode is selected) depending on the users predefined settings.

CB Mobile CRM – iPhone User Manual Connecting Software
2015-06-17 Page 51/81
12.11 Orders page
Orders page contains information about the available CRM orders. To display details about a specific order, select the order from the list by tapping on the item.
User can the use filter to look for a specific order by typing the search string into the search box.
User can sort the list of orders according to personal preference. To sort the list choose the preferred sort type and the list will be sorted.

CB Mobile CRM – iPhone User Manual Connecting Software
2015-06-17 Page 52/81
12.11.1 Order detail page (Not yet available)
The order detail page displays detailed information about the selected order. Depending on the access rights of the user, the user is allowed or prohibited to edit the order.
To display the list of additional actions, tap on the additional actions icon. A context menu appears and the user can choose the action to execute.

CB Mobile CRM – iPhone User Manual Connecting Software
2015-06-17 Page 53/81
To save modified data and update the CRM order, tap on the “Save” button in the title frame. The order is immediately modified and stored in the local database. The CRM order is updated via an update query (when online mode is selected) or an update query is stored in the local database and prepared to be executed during the synchronization (when offline mode is selected) depending on the users predefined settings.

CB Mobile CRM – iPhone User Manual Connecting Software
2015-06-17 Page 54/81
12.11.2 Create new order
To create a new order, tap on the plus icon and the order detail page with a new blank record will be displayed. User can edit the record as required.
To save the newly created order, tap on the “Save” button in the title frame. The order is immediately created and stored in the local database. The CRM order is created via an insert query (when online mode is selected) or an insert query is stored in the local database and prepared to be executed during the synchronization (when offline mode is selected) depending on the users predefined settings.

CB Mobile CRM – iPhone User Manual Connecting Software
2015-06-17 Page 55/81
12.12 Invoices page
Invoices page contains information about available CRM invoices. To display details about a specific invoice, select the invoice from the list by tapping on the item.
User can use filter to look for a specific invoice typing a search string into the search box.
User can sort the list of invoices according to personal preference. To sort the list choose the preferred sort type and the list will be sorted.

CB Mobile CRM – iPhone User Manual Connecting Software
2015-06-17 Page 56/81
12.12.1 Invoice detail page
The invoice detail page displays detailed information about the selected invoice. The user is able to edit the record as required by changing the content of the fields.
To display the list of additional actions, tap on the additional actions icon. A context menu appears and user can choose the action to execute.

CB Mobile CRM – iPhone User Manual Connecting Software
2015-06-17 Page 57/81
To save the modified data and update the CRM invoice, tap on “Save” button in the title frame. The invoice is immediately modified and stored in the local database. The CRM invoice is updated via an update query (when online mode is selected) or an update query is stored in the local database and prepared to be executed during the synchronization (when offline mode is selected) depending on the users predefined settings.

CB Mobile CRM – iPhone User Manual Connecting Software
2015-06-17 Page 58/81
12.12.2 Create new invoice
To create a new invoice, tap on the plus icon and the invoice detail page with a new blank record will be displayed. User can edit the record as required.
To save the newly created invoice, tap on the “Save” button in the title frame. The invoice is immediately created and stored in the local database. The CRM invoice is created via an insert query (when online mode is selected) or an insert query is stored in the local database and prepared to be executed during the synchronization (when offline mode is selected) depending on the users predefined settings.

CB Mobile CRM – iPhone User Manual Connecting Software
2015-06-17 Page 59/81
12.13 Quotes page
Quotes page contains information about available CRM quotes. To display details about a specific quote, select the quote from the list by tapping on the item.
User can use filter to look for a specific quote by typing a search string into the search box.
User can sort the list of quotes according to personal preference. To sort the list choose the preferred sorting type and the list will be sorted.
CB Mobile CRM – iPhone User Manual Connecting Software
2015-06-17 Page 60/81
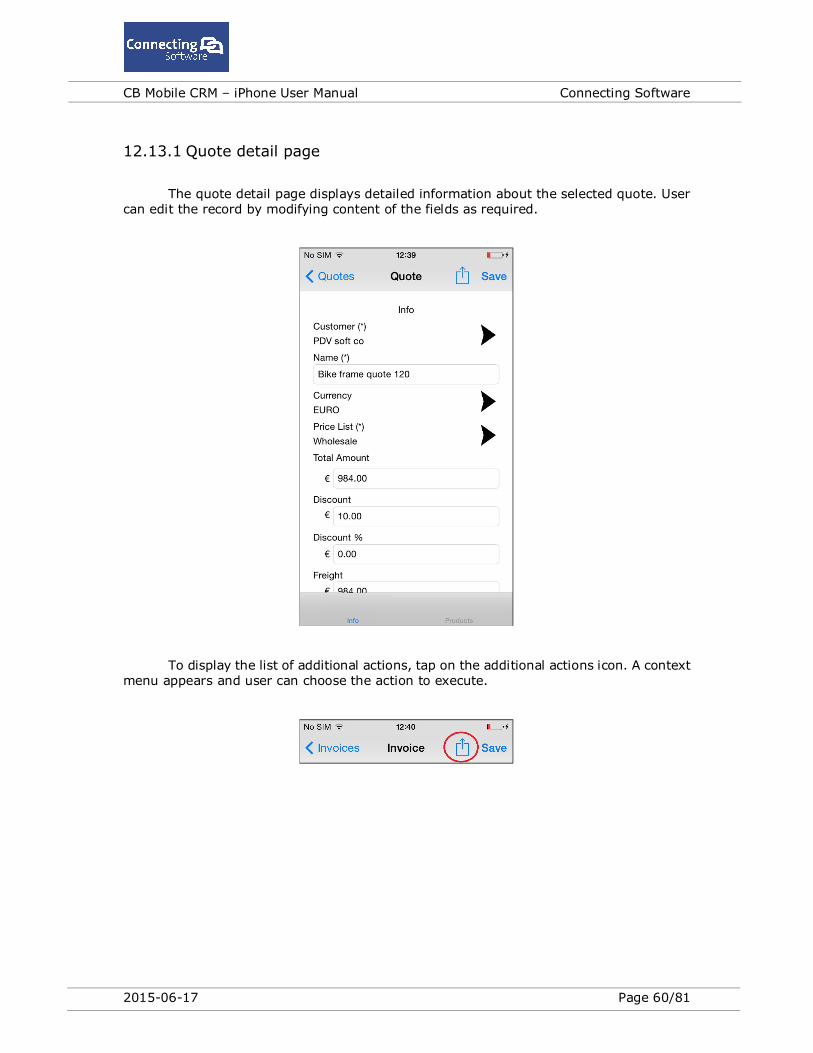
12.13.1 Quote detail page
The quote detail page displays detailed information about the selected quote. User can edit the record by modifying content of the fields as required.
To display the list of additional actions, tap on the additional actions icon. A context menu appears and user can choose the action to execute.

CB Mobile CRM – iPhone User Manual Connecting Software
2015-06-17 Page 61/81
To save the modified data and update the CRM quote, tap on the “Save” button in the title frame. The quote is immediately modified and stored in the local database. The CRM quote is updated via an update query (when online mode is selected) or an update query is stored in the local database and prepared to be executed during the synchronization (when offline mode is selected) depending on the users predefined settings.
CB Mobile CRM – iPhone User Manual Connecting Software
2015-06-17 Page 62/81
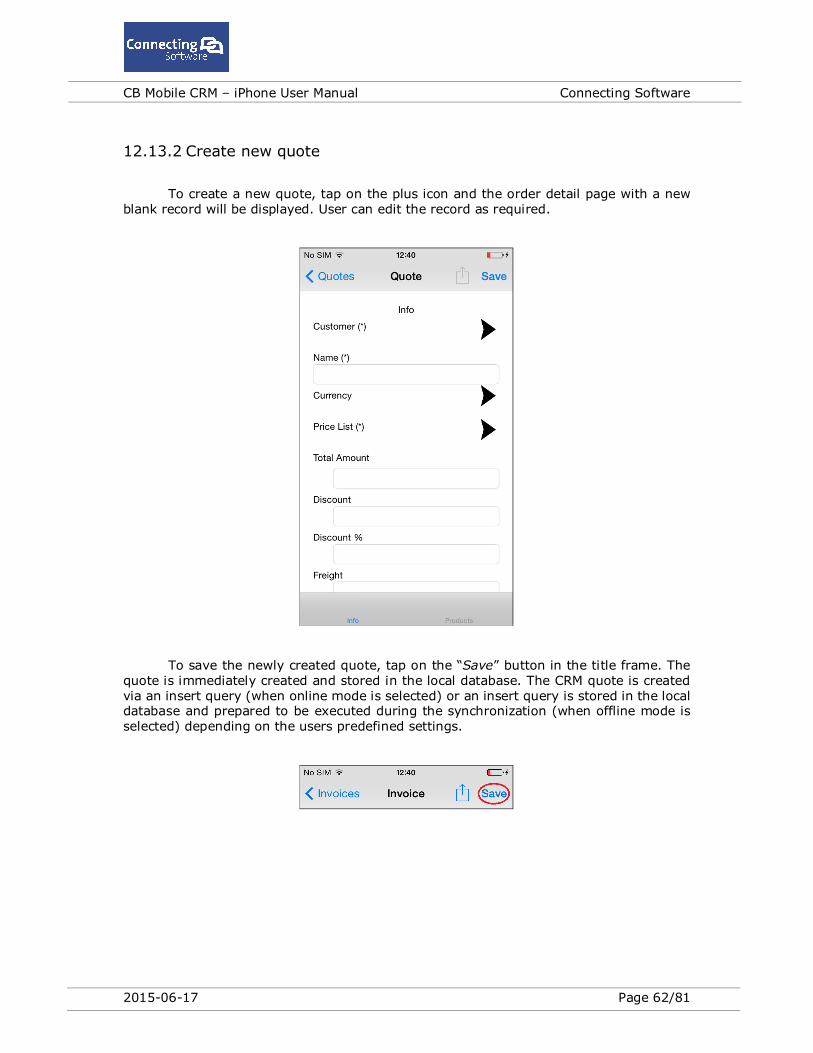
12.13.2 Create new quote
To create a new quote, tap on the plus icon and the order detail page with a new blank record will be displayed. User can edit the record as required.
To save the newly created quote, tap on the “Save” button in the title frame. The quote is immediately created and stored in the local database. The CRM quote is created via an insert query (when online mode is selected) or an insert query is stored in the local database and prepared to be executed during the synchronization (when offline mode is selected) depending on the users predefined settings.

CB Mobile CRM – iPhone User Manual Connecting Software
2015-06-17 Page 63/81
12.14 Cases page
Cases page contains information about the available CRM cases (incidents). To display details about a specific case, select the case from the list by tapping on the item.
User can use filter to look for a specific case by typing a search string into the search box.
User can sort the list of cases according to personal preference. To sort the list choose the preferred sort type and the list will be sorted.

CB Mobile CRM – iPhone User Manual Connecting Software
2015-06-17 Page 64/81
12.14.1 Case detail page
The case detail page displays detailed information about the selected case. User can modify the record by changing the content of the fields as required.
To display the list of additional action, tap on the additional actions icon. A context menu appears and the user can choose the action to execute.

CB Mobile CRM – iPhone User Manual Connecting Software
2015-06-17 Page 65/81
To save the modified data and update the CRM case, tap on the “Save” button in the title frame. The case is immediately modified and stored in the local database. The CRM case is updated via an update query (when online mode is selected) or an update query is stored in the local database and prepared to be executed during the synchronization (when offline mode is selected) depending on the users predefined settings.

CB Mobile CRM – iPhone User Manual Connecting Software
2015-06-17 Page 66/81
12.14.2 Create new case
To create a new case, tap on the plus icon and the case detail page with a new blank record will be displayed. User can edit the record as required.
To save the newly created case, tap on the “Save” button in the title frame. The case is immediately created and stored in the local database. The CRM case is created via an insert query (when online mode is selected) or an insert query is stored in the local database and prepared to be executed during the synchronization (when offline mode is selected) depending on the users predefined settings.

CB Mobile CRM – iPhone User Manual Connecting Software
2015-06-17 Page 67/81
12.15 Notes (add notes, read notes)
The user is able to view and add notes to the entities to provide additional description. To show a list of user created notes about a specific entity, navigate to the entity by selecting the specific entity from the list. Open the details about the entity and select the notes tab. When any notes about the specific entity exist a list of all notes is displayed.
To add a new note to the specific entity, tap on the plus icon in the title frame of the entity. A popup page is displayed and user can type in the note regarding the current entity. When finished typing tap on "OK" button. The note is immediately added to the entity and stored in the local database. The CRM note is added via an insert query (when online mode is selected) or an insert query is stored in the local database and prepared to be executed during the synchronization (when offline mode is selected) depending on the users predefined settings.
12.16 Settings page
To change the application settings and customize the displayed entities, tap on the settings page in the main menu. When tapped, the settings page is opened and user is able to modify the application settings.
Currently the CB Mobile CRM application settings page has two parts where the user can modify the application settings:
General settings Data settings
CB Mobile CRM – iPhone User Manual Connecting Software
2015-06-17 Page 68/81
12.16.1 General settings description
The first pivot page on the settings page is "General settings" where all settings regarding the application can be modified.
12.16.1.a Online Mode
User can choose when is the application allowed to connect to the internet
Always - the application is allowed to connect to the internet always - when wifi or 3G connection is available
Wifi only - the application is allowed to connect to the internet only when a wifi connection is available
Manual - the application is allowed to connect to the internet only when the user taps on the synchronization icon in the main menu title frame and wifi or 3G connection is available
Never - the application is not allowed to connect to the internet - any attempt to start synchronization process manually will display an error message informing the user about the online mode restriction
12.16.1.b Auto Sync
The user can choose when to process the synchronization or submit queries directly to the Dynamics CRM server
On start / change - the synchronization and submitted queries are executed when the application starts or any entity is successfully modified by the user (modified and saved)
On start - the synchronization is executed only when the application starts
On change - the synchronization and submitted queries are executed when any entity is successfully modified by the user (modified and saved)
12.16.1.c Sync Option
User is able to choose what kind of data to download during the synchronization process
My data - download and synchronize only data owned by the user
All - download and synchronize all data - can cause slow and long synchronization process times because of the huge amount of data, this is not recommended

CB Mobile CRM – iPhone User Manual Connecting Software
2015-06-17 Page 69/81
12.16.1.d Records per item
Option to restrict the number of items to download for each entity (for example only 100 items of each type)
12.16.1.e Max. size of attachment in kB
Option to restrict the size of attachment that is downloaded to the device.
12.16.1.f Account wizard
Option to manage the user account. Description of the functionality is provided separately in this document, chapter 12.18.
12.16.1.g Theme
Option to choose a user preferred theme. Mobile CRM supports both dark and light theme. The user has to restart the application in order to apply the new theme.
Dark - displays the dark theme. This theme is set as default as dark background saves the devices energy and allows the user to use the application for extended period of time
Light - displays the light theme. Light theme causes higher energy consumption on the device.
12.16.1.h Map and Location Services
Option used to enable or disable the map functionality as well as Localization service. When turned off, the Map page will not be displayed in the main menu.
12.16.1.i Background Agent Option to enable or disable background agent used to periodically update the tile and show Toast message with information about number of appointments that are scheduled to start within 30 minutes from the time the toast message was displayed.
12.16.1.j Delete Data
Option "Delete Data" button is used to clear all data from the local database only. This functionality is available to remove demo data from the local database before the user starts the synchronization process.

CB Mobile CRM – iPhone User Manual Connecting Software
2015-06-17 Page 70/81
12.16.2 Data settings description
Second part of the settings page is "Data settings" page where the user can choose what kind of data entities to display in the apps main menu.
List of available data settings:
Products - user is able to hide or display the Product entity from the main menu.
Activities - user is able to hide or display the Activities entity from the main menu.
Opportunities - user is able to hide or display the Opportunities entity from the main menu.
Invoices - user is able to hide or display the Invoices entity from the main menu.
Quotes - user is able to hide or display the Quotes entity from the main menu.
Orders - user is able to hide or display the Orders entity from the main menu.
Cases - user is able to hide or display the Cases (Incident) entity from the main menu.
Leads - user is able to hide or display the Leads entity from the main menu.

CB Mobile CRM – iPhone User Manual Connecting Software
2015-06-17 Page 71/81
12.17 About page
The about page contains information about the application. The information contain the current application version, contact email, and company logos.
User can contact the support from the about page by tapping the envelope in the title frame. When the envelope button is tapped, user has to choose what email account to use in order to send the email. When appropriate email account is selected, email editor page is opened and the user can type the content of the email to be sent to the support.

CB Mobile CRM – iPhone User Manual Connecting Software
2015-06-17 Page 72/81
12.18 Account wizard page
The account wizard page is used to manage user account used for communication with Connect Bridge server and the users Dynamics CRM server. This process requires active connection to the internet.
To get detailed step by step guide on creating new account, tap on the info icon or text describing the help message.
The page allows following operations:

CB Mobile CRM – iPhone User Manual Connecting Software
2015-06-17 Page 73/81
12.18.1 Create new account
To create a new user account, tap on the "Create new account" button. Fill in the required fields and tap on "Next" button.
Email field - email address of the user that will be used to contact and identify the true identity of the user in case it will be necessary. (Lock the account to prevent any harm when user has lost the device, ... )
Crm Login - Login name used to log into the users Dynamics CRM server. We suggest the user to type in also the domain. The login name has to be type in the same way as the CRM server requires.
NOTE: If the domain name is also required to login to your CRM server add the domain name together with login name
EXAMPLES: user@domain; domain\user; etc.
Crm Password - Password used to login to the users CRM server
Re. Password - field for retyping the Crm password to make sure that the password is correct
Crm ServerUrl - Url link to the CRM server's web service used to connect and communicate with the users CRM server
NOTES:
1. Be aware that the field is case sensitive!
2. The format how to type the url : If the CRM server runs more than one organization, user has to specify the organization which to connect to. In this case the format is as follows
http(s)://<host>:<port>/<company>
or
http(s)://<host>/<company>
when the server does not use custom port.
If the CRM server runs only one organization, the user can simply type url with following format
http(s)://<host>:<port>
or
http(s)://<host>
when the server does not use custom port.
The application will modify the link internally and add the common end tail "/XrmServices/2011/Organization.svc"

CB Mobile CRM – iPhone User Manual Connecting Software
2015-06-17 Page 74/81
Example: https://crm.cn-s.eu:1234/CrossNationalSolutions
https://crm.cn-s.eu
NOTE: Make sure that the CRM web service can be accessed by typing the whole url into the browser and checking that you get the correct response from your CRM server service !
Examples:
https://crm.cn-s.eu:1234/CrossNationalSolutions/XrmServices/2011/Organization.svc
https://crm.cn-s.eu/XrmServices/2011/Organization.svc
When any error occurs during creating the users account, user is notified by a warning message.

CB Mobile CRM – iPhone User Manual Connecting Software
2015-06-17 Page 75/81
12.18.2 Existing account
To use an already existing CRM account associated with the existing CB account, the user can use the "Existing account" button. When tapped, the user is requested to fill in missing details that will be used to identify and verify the account.
CRM Login - the login of the user for users CRM server
CRM Password - the password used to log into the users CRM server
Re. Password - field for retyping the password to make sure that the password is correct
When all fields are filled, tap on the "Next" button to verify the account and user credentials of the user. When successfully verified, the user account is set as default account (currently used account). When any error occurs during the account verification, the user is notified by error message.

CB Mobile CRM – iPhone User Manual Connecting Software
2015-06-17 Page 76/81
12.18.3 Modify Current Account
To modify the current account, tap on the "Modify Current Account" button. The details about the default (currently used) CRM account are loaded into the fields to display the currently stored values. Only "Password" and "Re. Password" fields are not loaded for obvious reasons. The user is requested to retype the password to make sure no unauthorized user is trying to modify the current CRM account.
CRM Account Name - This field cannot be modified. The field identifies the current CRM account that is being modified
Crm Login - Login name used to log into the users Dynamics CRM server
NOTE:
If the domain name is also required to login to your CRM server add the domain name together with login name
EXAMPLE:
user@domain
domain\user
etc.
Crm Password - Password used to login to the users CRM server
Re. Password - field for retyping the Crm password to make sure that the password is correct
Crm ServerUrl - Url link to the CRM server's web service used to connect and communicate with the users CRM server
NOTE:
1. Be aware that the field is case sensitive!
2. The format how to type the url : If the CRM server runs more than one organization, user has to specify the organization which to connect to. In this case the format is as follows
http(s)://<host>:<port>/<company>
or
http(s)://<host>/<company>
when the server does not use custom port.
If the CRM server runs only one organization, the user can simply type url with following format

CB Mobile CRM – iPhone User Manual Connecting Software
2015-06-17 Page 77/81
http(s)://<host>:<port>
or
http(s)://<host>
when the server does not use custom port.
The application will modify the link internally and add the common end tail "/XrmServices/2011/Organization.svc"
Example: https://crm.cn-s.eu:1234/CrossNationalSolutions
https://crm.cn-s.eu
NOTE:
Make sure that the CRM web service can be accessed by typing the whole url into the browser and checking that you get the correct response from your CRM server service !
Example:
https://crm.cn-s.eu:1234/CrossNationalSolutions/XrmServices/2011/Organization.svc
https://crm.cn-s.eu/XrmServices/2011/Organization.svc
When all modifications have been finished, tap on the "Next" button to update the CRM account. When successful the user is notified by status message in the title or a error message is displayed in case a problem occurs.

CB Mobile CRM – iPhone User Manual Connecting Software
2015-06-17 Page 78/81
12.19 Background Agent
The background agent is used to enable and display Notification messages.
To enable the background agent functionality, go to the "Settings" page from the main menu of the Mobile CRM app. Navigate to the "Background Agent" switch and turn the switch to ON position. A message is going to be displayed and the user has to accept in order to start the background agent. When the user declines, the "Background Agent" switch will be set to OFF position.
When the user enabled the Background Agent, the agent is going to display a Notification message in regular intervals - usually every 30 minutes, this depends on the iOS operating system.
The Notification message is going to display the number of appointments that are scheduled to start within the next 30 minutes from the time the background agent has returned its latest results.
NOTE:
If there is no appointment scheduled to start within the next 30 minutes from the time the background agent has returned its latest results, no Toast message is displayed.

CB Mobile CRM – iPhone User Manual Connecting Software
2015-06-17 Page 79/81
12.20 Synchronization functionality
To synchronize data between the application and CRM server, the user has to tap on the synchronization icon in the apps main menu.
When taped on the synchronization icon, the synchronization process starts. During synchronization the icon animation is played. The icon is spinning around to identify the process of synchronization as running.
The user is also informed about the current status of the synchronization. The currently synchronized item is listed in the title bar with the info about the number of records that are being synchronized.
Before the application starts the synchronization process itself, application settings regarding synchronization, available connection local database schema and available disk space is checked.
It is required to have at least 256Mb of free space available before the synchronization operation is allowed to start. When not enough disk space is available or any other problem preventing the application from starting the synchronization process appears (user defined settings do not match), a warning message is displayed to the user.
The synchronization process may take extended period of time (several minutes) depending on the amount of data to be synchronized and speed of the internet connection. The amount of data to synchronize can be modified by the user in the settings page.
During the synchronization process the app response may be slower due to the heavy data processing that the synchronization process requires. It is recommended to do the synchronization process when the user is not using the device.
Important note:
To assure a successful synchronization, do not lock the screen (prevent the device to lock the screen as well) or put the device to sleep until the synchronization animation has stopped.

CB Mobile CRM – iPhone User Manual Connecting Software
2015-06-17 Page 80/81
13 How to connect to CRM server
In order to be able to connect to a CRM server the user has to check if following conditions are met:
1. Contact your administrator and check if the CRM server has a publicly visible and running CRM server service - The application is connecting to this service to get data from CRM server.
2. Get the URL path to the CRM server service including the company identification
Crm ServerUrl - Url link to the CRM server's web service used to connect and communicate with the users CRM server
NOTE:
1. Be aware that the field is case sensitive!
2. The format how to type the url : http(s)://<host>:<port>/<company>
the application will modify the link internally and add the common end tail "/XrmServices/2011/Organization.svc"
Example:
https://crm.cn-s.eu:1234/CrossNationalSolutions
http://77.48.228.231:60127/DudeCorp
https://www.dudecomporation.com:60127/DudeCorp
3. Prepare the Login name and password used by the user to connect to the CRM server.
When the steps 1 - 3 are done, open the application settings page and scroll down to "Account Wizard" button and start the wizard. Tap on the "New Account" button and follow the procedure to create new account.

CB Mobile CRM – iPhone User Manual Connecting Software
2015-06-17 Page 81/81
14 Troubleshooting
14.1 I cannot connect to my CRM server
This problem may be caused by several reasons. To identify and resolve this problem follow this steps:
1. Check if the CRM server service is up and running by opening the URL in the web browser. When server service is running, a window is displayed with information about the web service. When server service is not running, an error is displayed. In this case contact your administrator to enable the CRM server service
2. Check if the CRM server service is publicly accessible - try to open the URL from different network, not the local network in company. (For example using the mobile operators 3G connection). When server service info is displayed, service is publicly visible. When no info are displayed, contact your administrator to enable and make the CRM server service publicly visible.
3. Check user Login name and Password.
4. Check the CRM Account details in the "Account Wizard" and "Modify Current Account" section. Mainly check the URL typed into the application for misspelling and errors, login name and password.
Example of URL path to CRM service:
http://77.48.228.231:60127/DudeCorp
https://www.dudecomporation.com:60127/DudeCorp
5. To make sure that the SSL certificate is installed, go to the "Settings" page and tap on "Install Certificate" button. Install the certificate and try again.
These steps should help the user to connect to the CRM server. If another problems prevent the user from connecting to the CRM server, please contact the support and describe the problem.