configure clientless ssl vpn (webvpn) on the asa - cisco.com · configure clientless ssl vpn...
TRANSCRIPT

Configure Clientless SSL VPN (WebVPN) on theASA
Document ID: 119417
Contributed by Jan Krupa, Cisco TAC Engineer.Jan 05, 2016
Contents
IntroductionPrerequisites Requirements Components UsedConfigure Network Diagram Background Information ConfigurationVerifyTroubleshoot Procedures Used to Troubleshoot Commands Used to TroubleshootCommon Problems User Cannot Log In Unable to Connect More Than Three WebVPN Users to the ASA WebVPN Clients Cannot Hit Bookmarks and is Grayed Out Citrix Connection Through WebVPN How to Avoid the Need for a Second Authentication for the UsersRelated Information
Introduction
This document provides a straightforward configuration for the Cisco Adaptive Security Appliance (ASA)5500 Series in order to allow Clientless Secure Sockets Layer (SSL) VPN access to internal networkresources. Clientless SSL Virtual Private Network (WebVPN) allows for limited, but valuable, secure accessto the corporate network from any location. Users can achieve secure browser-based access to corporateresources at any time. No additional client is needed in order to gain access to internal resources. The access isprovided using a Hypertext Transfer Protocol over SSL connection.
Clientless SSL VPN provides secure and easy access to a broad range of web resources and both web-enabledand legacy applications from almost any computer that can reach Hypertext Transfer Protocol Internet(HTTP) sites. This includes:
Internal websites• Microsoft SharePoint 2003, 2007, and 2010• Microsoft Outlook Web Access 2003, 2007, and 2013• Microsoft Outlook Web App 2010• Domino Web Access (DWA) 8.5 and 8.5.1• Citrix Metaframe Presentation Server 4.x• Citrix XenApp Version 5 to 6.5• Citrix XenDesktop Version 5 to 5.6, and 7.5•

VMware View 4•
A list of supported software can be found in Supported VPN Platforms, Cisco ASA 5500 Series.
Prerequisites
Requirements
Ensure that you meet these requirements before you attempt this configuration:
SSL-enabled browser• ASA with Version 7.1 or higher• X.509 certificate issued to the ASA domain name• TCP port 443, which must not be blocked along the path from the client to the ASA•
The full list of requirements can be found in Supported VPN Platforms, Cisco ASA 5500 Series.
Components Used
The information in this document is based on these software and hardware versions:
ASA Version 9.4(1)• Adaptive Security Device Manager (ASDM) Version 7.4(2)• ASA 5515-X•
The information in this document was created from the devices in a specific lab environment. All the devicesused in this document began with a cleared (default) configuration. If your network is live, make sure that youunderstand the potential impact of any command.
Configure
This article describes the configuration process for both the ASDM and the CLI. You can choose to followeither of the tools in order to configure the WebVPN, but some of the configuration steps can only beachieved with the ASDM.
Note: Use the Command Lookup Tool (registered customers only) to obtain more information about thecommands used in this section.
Network Diagram
This document uses this network setup:

Background Information
WebVPN uses the SSL protocol in order to secure the data transferred between the client and the server.When the browser initiates a connection to the ASA, the ASA presents its certificate to authenticate itself tothe browser. In order to ensure that the connection between the client and the ASA is secure, you need toprovide the ASA with the certificate that is signed by the Certificate Authority that the client already trusts.Otherwise the client will not have the means to verify authenticity of the ASA which results in the possibilityof the man-in-the-middle attack and poor user experience, because the browser produces a warning that theconnection is not trusted.
Note: By default, the ASA generates a self-signed X.509 certificate upon startup. This certificate is used inorder to serve client connections by default. It is not recommended to use this certificate because itsauthenticity cannot be verified by the browser. Furthermore, this certificate is regenerated upon each reboot soit changes after each reboot.
Certificate installation is out of the scope of this document.
Configuration
Configure the WebVPN on the ASA with five major steps:
Configure the certificate that will be used by the ASA.• Enable the WebVPN on an ASA interface.• Create a list of servers and/or Uniform Resource Locator (URL) for WebVPN access.• Create a group policy for WebVPN users.• Apply the new group policy to a Tunnel Group.•
Note: In ASA releases later than Release 9.4, the algorithm used to choose SSL ciphers has been changed (seeRelease Notes for the Cisco ASA Series, 9.4(x)).If only elliptic curve-capable clients will be used, then it issafe to use elliptic curve private key for the certificate. Otherwise the custom cipher suite should be used inorder to avoid having the ASA present a self-signed temporary certificate. You can configure the ASA to useonly RSA-based ciphers with the ssl cipher tlsv1.2 custom"AES256-SHA:AES128-SHA:DHE-RSA-AES256-SHA:DHE-RSA-AES128-SHA:DES-CBC3-SHA:DES-CBC-SHA:RC4-SHA:RC4-MD5"command.
Option 1 - Import the certificate with the pkcs12 file.
Choose Configuration > Firewall > Advanced > Certificate Management > Identity Certificates> Add. You can install it with the pkcs12 file or paste the contents in the Privacy Enhanced Mail(PEM) format.
1.

CLI:
ASA(config)# crypto ca import TrustPoint-name pkcs12 "password"
Enter the base 64 encoded pkcs12.End with the word "quit" on a line by itself:MIIJUQIBAzCCCRcGCSqGSIb3DQEHAaCCCQgEggkEMIIJADCCBf8GCSqGSIb3DQEHBqCCBfAwggXsAgEAMIIF5QYJKoZIhvcNAQcBMBwGCiqGSIb3DQEMAQYwDgQI8F3N+vkvjUgCAggAgIIFuHFrV6enVflNv3sBByB/yZswhELY5KpeALbXhfrFDpLNncABz3xMfg6JkLYR6Fag1KjShg+o4qkDh8r9y9GQpaBt8x3Ozo0JJxSAafmTWqDOEOS/7mHsaKMoao+pv2LqKTWh0O7No4Ycx75Y5sOhyuQGPhLJRdionbi1s1ioe4Dplx1b
--- output ommited ---
Enter the base 64 encoded pkcs12.End with the word "quit" on a line by itself:MIIJUQIBAzCCCRcGCSqGSIb3DQEHAaCCCQgEggkEMIIJADCCBf8GCSqGSIb3DQEHBqCCBfAwggXsAgEAMIIF5QYJKoZIhvcNAQcBMBwGCiqGSIb3DQEMAQYwDgQI8F3N+vkvjUgCAggAgIIFuHFrV6enVflNv3sBByB/yZswhELY5KpeALbXhfrFDpLNncABz3xMfg6JkLYR6Fag1KjShg+o4qkDh8r9y9GQpaBt8x3Ozo0JJxSAafmTWqDOEOS/7mHsaKMoao+pv2LqKTWh0O7No4Ycx75Y5sOhyuQGPhLJRdionbi1s1ioe4Dplx1b
quit
INFO: Import PKCS12 operation completed successfully
Option 2 - Create a self-signed certificate.

Choose Configuration > Firewall > Advanced > Certificate Management > Identity Certificates> Add.
Click the Add a new identity certificate radio button. Check the Generate self-signed certificatecheck box. Choose a Common Name (CN) that matches domain name of the ASA.
Click New in order to create the keypair for the certificate. Choose the Key Type, Name, and Size.
CLI:
ASA(config)# crypto key generate ecdsa label ECDSA_KEYPAIR noconfirm
ASA(config)# crypto ca trustpoint TrustPoint1ASA(config-ca-trustpoint)# revocation-check noneASA(config-ca-trustpoint)# id-usage ssl-ipsecASA(config-ca-trustpoint)# no fqdnASA(config-ca-trustpoint)# subject-name CN=ASA

ASA(config-ca-trustpoint)# enrollment selfASA(config-ca-trustpoint)# keypair ECDSA_KEYPAIRASA(config-ca-trustpoint)# exitASA(config)# crypto ca enroll TrustPoint1 noconfirmChoose the certificate that will be used to serve WebVPN connections.
Choose Configuration > Remote Access VPN > Advanced > SSL Settings. From the Certificatesmenu, choose the trustpoint associated with the desired certificate for the outside interface. Clickapply.
Equivalent CLI configuration:
ASA(config)# ssl trust-point <trustpoint-name> outside
2.
(Optional) Enable Domain Name Server (DNS) lookups.
WebVPN server acts as a proxy for client connections. It means that the ASA creates connections tothe resources on behalf of the client. If the clients require connections to the resources that use domainnames, then the ASA needs to perform the DNS lookup.
Choose Configuration > Remote Access VPN > DNS.
Configure at least one DNS server and enable DNS lookups on the interface that faces the DNSserver.
3.

CLI:
ASA(config)# dns domain-lookup insideASA(config)# dns server-group DefaultDNSASA(config-dns-server-group)# name-server 10.11.12.101(Optional) Create Group Policy for WEBVPN connections.
Choose Configuration > Remote Access VPN > Clientless SSL VPN Access > Group Policies >Add Internal Group Policy.
Under General Options change the Tunelling Protocols value to "Clientless SSL VPN".
4.
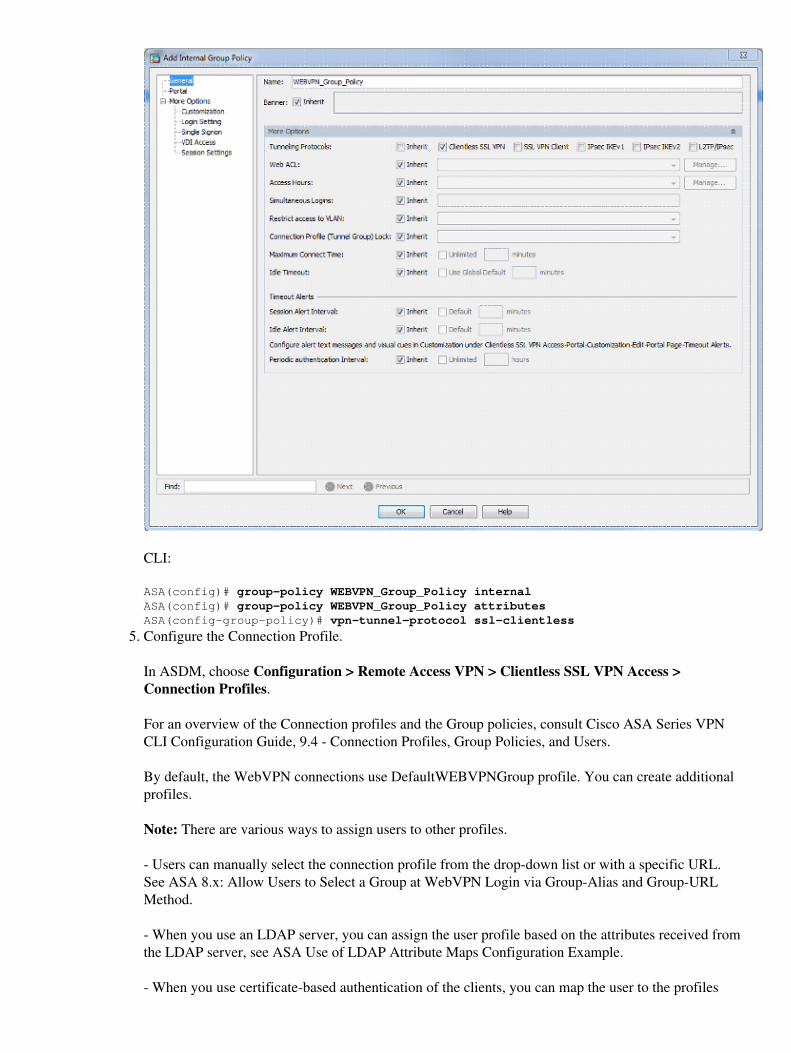
CLI:
ASA(config)# group-policy WEBVPN_Group_Policy internalASA(config)# group-policy WEBVPN_Group_Policy attributesASA(config-group-policy)# vpn-tunnel-protocol ssl-clientlessConfigure the Connection Profile.
In ASDM, choose Configuration > Remote Access VPN > Clientless SSL VPN Access >Connection Profiles.
For an overview of the Connection profiles and the Group policies, consult Cisco ASA Series VPNCLI Configuration Guide, 9.4 - Connection Profiles, Group Policies, and Users.
By default, the WebVPN connections use DefaultWEBVPNGroup profile. You can create additionalprofiles.
Note: There are various ways to assign users to other profiles.
- Users can manually select the connection profile from the drop-down list or with a specific URL.See ASA 8.x: Allow Users to Select a Group at WebVPN Login via Group-Alias and Group-URLMethod.
- When you use an LDAP server, you can assign the user profile based on the attributes received fromthe LDAP server, see ASA Use of LDAP Attribute Maps Configuration Example.
- When you use certificate-based authentication of the clients, you can map the user to the profiles
5.

based on the fields contained in the certificate, see Cisco ASA Series VPN CLI Configuration Guide,9.4 - Configure Certificate Group Matching for IKEv1.
- In order to assign the users manually to the Group policy, see Cisco ASA Series VPN CLIConfiguration Guide, 9.4 - Configuring Attributes for Individual Users
Edit the DefaultWEBVPNGroup profile and choose the WEBVPN_Group_Policy under DefaultGroup Policy.
CLI:
ASA(config)# tunnel-group DefaultWEBVPNGroup general-attributesASA(config-tunnel-general)# default-group-policy WEBVPN_Group_PolicyIn order to enable the WebVPN on the outside interface, choose Configuration > Remote AccessVPN > Clientless SSL VPN Access > Connection Profiles.
Check the Allow Access checkbox next to the outside interface.
6.

CLI:
ASA(config)# webvpnASA(config-webvpn)# enable outside(Optional) Create bookmarks for content.
Bookmarks allow the user to easily browse the internal resources without having to remember theURLs.
In order to create a bookmark, choose Configuration > Remote Access VPN > Clientless SSL VPNAccess > Portal > Bookmarks > Add.
Choose Add in order to add a specific bookmark.
7.

CLI:
It is impossible to create bookmarks via the CLI because they are created as XML files.(Optional) Assign bookmarks to a specific group policy.
Choose Configuration > Remote Access VPN > Clientless SSL VPN Access > Group Policies >Edit > Portal > Bookmark List.
8.

CLI:
ASA(config)# group-policy DfltGrpPolicy attributesASA(config-group-policy)# webvpnASA(config-group-webvpn)# url-list value My_Bookmarks
Verify
Once the WebVPN has been configured, use the address https://<FQDN of the ASA> in the browser.

After logging in you should be able to see the address bar used to navigate to websites and the bookmarks.
Troubleshoot
Procedures Used to Troubleshoot
Follow these instructions in order to troubleshoot your configuration.
In ASDM, choose Monitoring > Logging > Real-time Log Viewer > View. When a client connects to theASA, note the establishment of TLS session, selection of group policy, and successful authentication of theuser.
CLI:
ASA(config)# logging buffered debuggingASA(config)# show logging
In ASDM, choose Monitoring > VPN > VPN Statistics > Sessions > Filter by: Clientless SSL VPN. Lookfor the new WebVPN session. Be sure to choose the WebVPN filter and click Filter. If a problem occurs,temporarily bypass the ASA device to ensure that clients can access the desired network resources. Reviewthe configuration steps listed in this document.

CLI:
ASA(config)# show vpn-sessiondb webvpn
Session Type: WebVPN
Username : admin Index : 3Public IP : 10.229.20.77Protocol : ClientlessLicense : AnyConnect PremiumEncryption : Clientless: (1)AES128 Hashing : Clientless: (1)SHA256Bytes Tx : 72214 Bytes Rx : 270241Group Policy : WEBVPN_Group_Policy Tunnel Group : DefaultWEBVPNGroupLogin Time : 10:40:04 UTC Tue May 26 2015Duration : 0h:05m:21sInactivity : 0h:00m:00sVLAN Mapping : N/A VLAN : noneAudt Sess ID : 0a1516010000300055644d84Security Grp : none
Commands Used to Troubleshoot
The Output Interpreter Tool (registered customers only) (OIT) supports certain show commands. Use the OITto view an analysis of show command output.
Note: Refer to Important Information on Debug Commands before you use debug commands.
show webvpn - There are many show commands associated with WebVPN.In order to see the use of show commands in detail, see the commandreference section of the Cisco Security Appliance.
⋅
debug webvpn - The use of debug commands can adversely impact theASA. In order to see the use of debug commands in more detail, see thecommand reference section of the Cisco Security Appliance.
⋅
Common Problems
User Cannot Log In
Problem
The message "Clientless (browser) SSL VPN access is not allowed." appears in the browser after anunsuccessful login attempt. The AnyConnect Premium license is not installed on the ASA or it is not in use asshown by "Premium AnyConnect license is not enabled on the ASA."
Solution
Enable the Premium AnyConnect license with these commands:
ASA(config)# webvpnASA(config-webvpn)# no anyconnect-essentials

Problem
The message "Login failed" appears in the browser after an unsuccessful login attempt. The AnyConnectlicense limit has been exceeded.
Solution
Look for this message in the logs:
%ASA-4-716023: Group <DfltGrpPolicy> User <cisco> IP <192.168.1.100> Session could not be established: session limit of 2 reached.
Also, verify your license limit:
ASA(config)# show version | include PremiumAnyConnect Premium Peers : 2 perpetual
Problem
The message "AnyConnect is not enabled on the VPN server" appears in the browser after an unsuccessfullogin attempt. Clientless VPN protocol is not enabled in the group-policy.
Solution
Look for this message in the logs:
%ASA-6-716002: Group <DfltGrpPolicy> User <cisco> IP <192.168.1.100> WebVPN session terminated: Client type not supported.
Make sure that Clientless VPN protocol is enabled for the desired group-policy:
ASA(config)# show run all group-policy | include vpn-tunnel-protocol vpn-tunnel-protocol ikev1 ikev2 l2tp-ipsec ssl-clientless
Unable to Connect More Than Three WebVPN Users to the ASA
Problem
Only three WebVPN clients can connect to the ASA. The connection for the fourth client fails.
Solution
In most cases, this issue is related to a simultaneous login setting within the group policy. Use this illustrationin order to configure the desired number of simultaneous logins. In this example, the desired value is 20.
ASA(config)# group-policy Cisco attributesASA(config-group-policy)# vpn-simultaneous-logins 20
WebVPN Clients Cannot Hit Bookmarks and is Grayed Out
Problem
If these bookmarks were configured for users to sign in to the clientless VPN, but on the home screen under"Web Applications" they show up as grayed out, how can I enable these HTTP links so that the users are ableto click them and go into the particular URL?

Solution
You should first make sure that the ASA can resolve the websites through DNS. Try to ping the websites byname. If the ASA cannot resolve the name, the link is grayed out. If the DNS servers are internal to yournetwork, configure the DNS domain-lookup private interface.
Citrix Connection Through WebVPN
Problem
The error message "the ica client received a corrupt ica file." occurs for Citrix over WebVPN.
Solution
If you use the secure gateway mode for Citrix connection through WebVPN, the ICA file can corrupt.Because the ASA is not compatible with this mode of operation, create a new ICA file in the Direct Mode(non-secure mode).
How to Avoid the Need for a Second Authentication for the Users
Problem
When you access CIFS links on the clientless WebVPN portal, you are prompted for credentials after youclick the bookmark. Lightweight Directory Access Protocol (LDAP) is used in order to authenticate both theresources and the users already have entered LDAP credentials to log in to the VPN session.
Solution
You can use the auto-signon feature in this case. Under the specific group-policy being used and under itsWebVPN attributes, configure this:
ASA(config)# group-policy WEBVPN_Group_Policy attributesASA(config-group-policy)# webvpnASA(config-group-webvpn)# auto-signon allow uri cifs://X.X.X.X/* auth-type all
where X.X.X.X=IP of the CIFS server and *=rest of the path to reach the share file/folder in question.
An example configuration snippet is shown here:
ASA(config)# group-policy ExamplePolicy attributesASA(config-group-policy)# webvpnASA(config-group-webvpn)# auto-signon allow urihttps://*.example.com/* auth-type all
For more information about this, see Configuring SSO with HTTP Basic or NTLM Authentication.
Related Information
ASA: Smart Tunnel using ASDM Configuration Example• Technical Support & Documentation - Cisco Systems•
Updated: Jan 05, 2016 Document ID: 119417