configuration notes 290 - media5...
TRANSCRIPT
Configuration Notes 290
Configuring Mediatrix 41xx FXS Gateway with the Asterisk IP PBX System
June 22, 2011
Proprietary
2011 Media5 Corporation
Configuration Notes 290
Page 2 of 17
Table of Contents
Introduction ............................................................................................................................................................................... 3
About Mediatrix 41xx Series FXS Gateways ............................................................................................................................ 3
Application Scenario ................................................................................................................................................................. 4
Features Supported .................................................................................................................................................................. 4
Versions Supported .................................................................................................................................................................. 5
Asterisk Configuration ............................................................................................................................................................... 5
Creating an Extension ....................................................................................................................................................... 5
Mediatrix 41xx Configuration .................................................................................................................................................... 6
Using the Web interface .................................................................................................................................................... 6
Network Parameters Configuration ................................................................................................................................... 8
SIP Configuration .............................................................................................................................................................. 9
SIP Authentication .......................................................................................................................................................... 10
Codec and DTMF Configuration ..................................................................................................................................... 11
Done! .............................................................................................................................................................................. 13
Advanced Settings .................................................................................................................................................................. 14
* Star Code and # Key Dial Map ..................................................................................................................................... 14
Call Transfer SIP Interop Setting for Asterisk 1.4............................................................................................................ 15
T.38 Configuration .......................................................................................................................................................... 16
Syslog Server for Troubleshooting .................................................................................................................................. 17
References ............................................................................................................................................................................. 17
Configuration Notes 290
Page 3 of 17
Introduction
This document outlines the configuration steps to set up Mediatrix 41xx series FXS gateways with the Asterisk open-source telephone system. It assumes that you have an Asterisk server properly installed with the necessary modules. If you need technical assistance to configure your Asterisk server, the Mediatrix technical team can provide appropriate support to help you realizing your VoIP projects.
About Mediatrix 41xx Series FXS Gateways
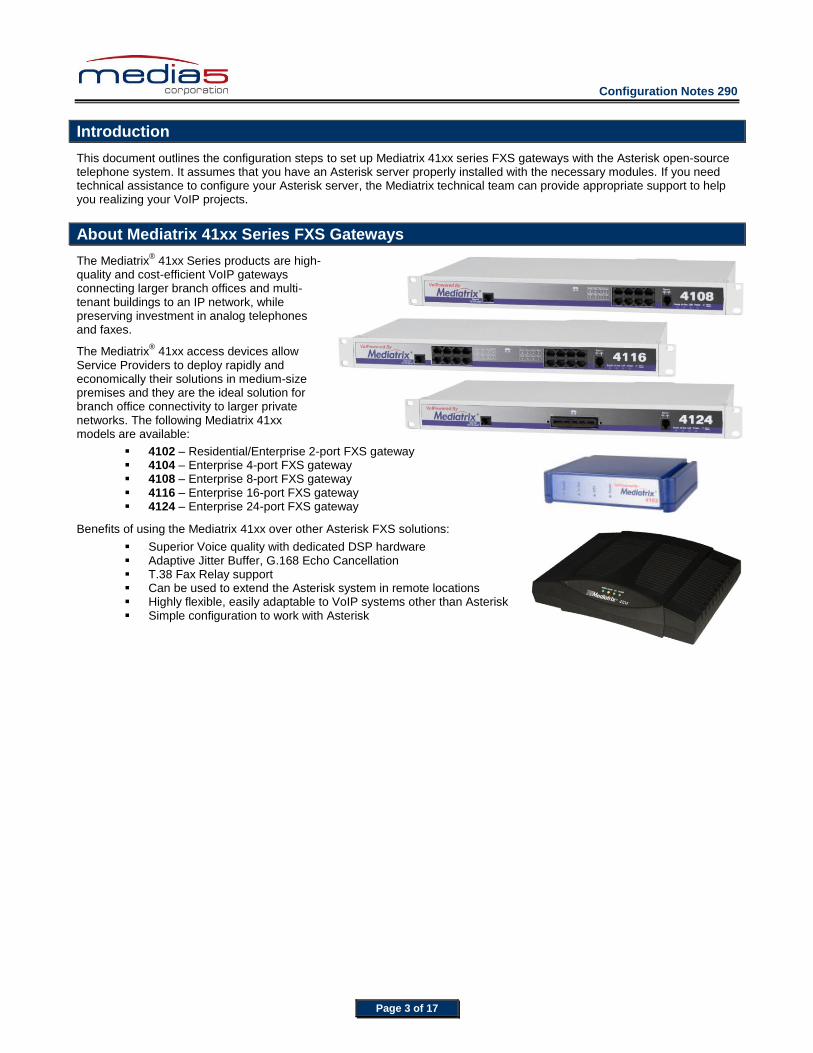
The Mediatrix® 41xx Series products are high-
quality and cost-efficient VoIP gateways connecting larger branch offices and multi-tenant buildings to an IP network, while preserving investment in analog telephones and faxes.
The Mediatrix® 41xx access devices allow
Service Providers to deploy rapidly and economically their solutions in medium-size premises and they are the ideal solution for branch office connectivity to larger private networks. The following Mediatrix 41xx models are available:
4102 – Residential/Enterprise 2-port FXS gateway 4104 – Enterprise 4-port FXS gateway 4108 – Enterprise 8-port FXS gateway 4116 – Enterprise 16-port FXS gateway 4124 – Enterprise 24-port FXS gateway
Benefits of using the Mediatrix 41xx over other Asterisk FXS solutions:
Superior Voice quality with dedicated DSP hardware Adaptive Jitter Buffer, G.168 Echo Cancellation T.38 Fax Relay support Can be used to extend the Asterisk system in remote locations Highly flexible, easily adaptable to VoIP systems other than Asterisk Simple configuration to work with Asterisk

Configuration Notes 290
Page 4 of 17
Application Scenario
This is a typical deployment scenario of Mediatrix 41xx units in a SIP-based MTU/MDU environment. The units provide connectivity to analog phones and fax machines and analog trunking to legacy PBX/KSU (for small business) in each building floor, whereas the Asterisk IP PBX provides call control and telephony services for all gateways.
FXS Gateway (41xx) – connectivity to analog phones and fax machines, analog trunking to legacy PBX/KSU.
The Asterisk IP PBX – provides:
Call routing, Dial Plan
o Including routes to local PSTN gateways
Telephony services (voicemail, call forwarding etc) SIP Endpoints management Auto-Attendant
Features Supported
The following features are supported by both Asterisk and Mediatrix 41xx:
RFC 2833, SIP INFO, and inband DTMF transports SIP Authentication Blind and Supervised Call Transfer Call Forward On Busy/On No Answer/Unconditional Call Waiting (via Asterisk only) Voice Mail Conference Call Music on Hold Caller ID G.711 (recommended), G.723.1 and G.726 codecs Fax transmission IVR
Configuration Notes 290
Page 5 of 17
Versions Supported
This configuration note was written and validated using the following platforms and versions.
Asterisk: 1.2.4 running on RedHat Linux 9 Mediatrix 41xx: SIP 5.0.18.113
The following configuration notes are not a substitute for the Mediatrix Administration Documentation for Mediatrix 41xx products. Please have the following manuals available for reference:
Mediatrix 41xx SIP Reference Manual Mediatrix 41xx SIP Quick Start Mediatrix Unit Manager Network Administration Manual All relevant Asterisk Manuals
Asterisk Configuration
The following sections describe special configuration you must perform in Asterisk in order to properly work with the Mediatrix 41xx. The configuration parameters are located in various configuration files.
Creating an Extension
In Asterisk, an extension is the equivalent of the SIP user in the Mediatrix 41xx.
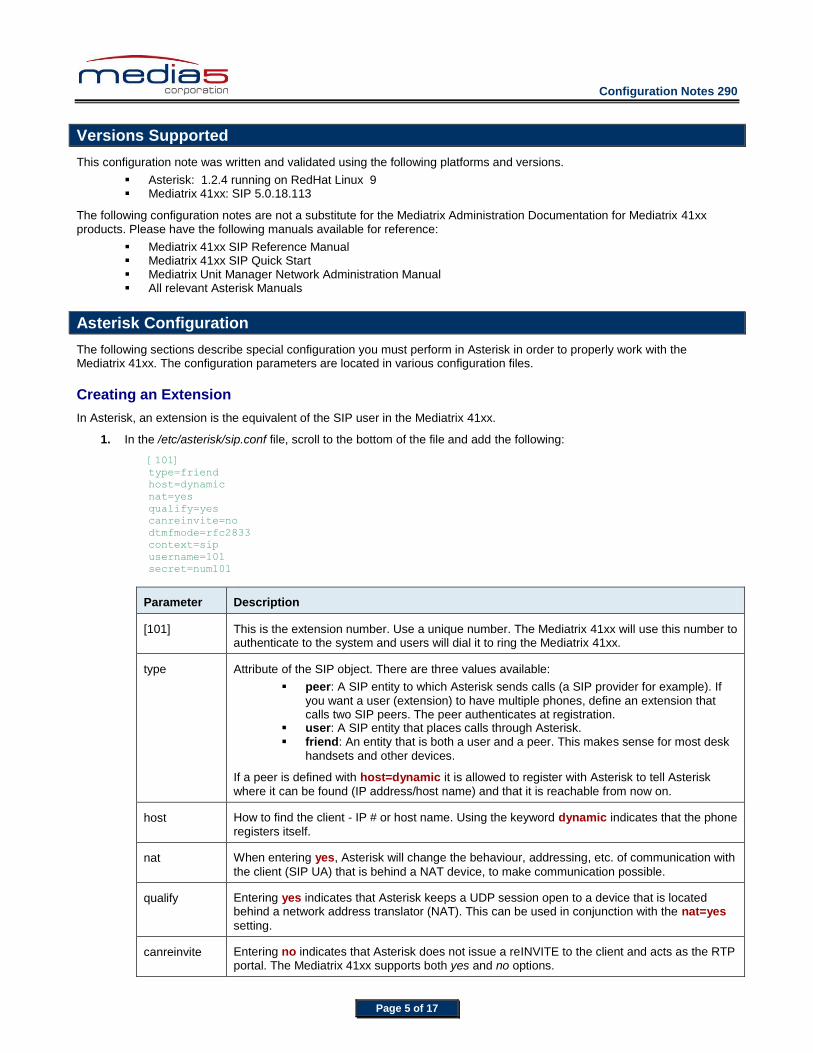
1. In the /etc/asterisk/sip.conf file, scroll to the bottom of the file and add the following:
[101]
type=friend
host=dynamic
nat=yes
qualify=yes
canreinvite=no
dtmfmode=rfc2833
context=sip
username=101
secret=num101
Parameter Description
[101] This is the extension number. Use a unique number. The Mediatrix 41xx will use this number to authenticate to the system and users will dial it to ring the Mediatrix 41xx.
type Attribute of the SIP object. There are three values available:
peer: A SIP entity to which Asterisk sends calls (a SIP provider for example). If
you want a user (extension) to have multiple phones, define an extension that calls two SIP peers. The peer authenticates at registration.
user: A SIP entity that places calls through Asterisk. friend: An entity that is both a user and a peer. This makes sense for most desk
handsets and other devices.
If a peer is defined with host=dynamic it is allowed to register with Asterisk to tell Asterisk
where it can be found (IP address/host name) and that it is reachable from now on.
host How to find the client - IP # or host name. Using the keyword dynamic indicates that the phone
registers itself.
nat When entering yes, Asterisk will change the behaviour, addressing, etc. of communication with
the client (SIP UA) that is behind a NAT device, to make communication possible.
qualify Entering yes indicates that Asterisk keeps a UDP session open to a device that is located behind a network address translator (NAT). This can be used in conjunction with the nat=yes
setting.
canreinvite Entering no indicates that Asterisk does not issue a reINVITE to the client and acts as the RTP portal. The Mediatrix 41xx supports both yes and no options.

Configuration Notes 290
Page 6 of 17
Parameter Description
dtmfmode You have the choice between rfc2833, info, and inband. You will have to enter similar information in the Mediatrix 41xx.
context Refers to the context to which the extension belongs as defined in the extensions.conf file (see
Step 2 for details).
secret If you want to use authentication for this extension, enter the proper information in the secret field. You will have to enter similar information in the Mediatrix 41xx. See SIP AuthenticationError! Reference source not found. on page 10 for more details.
2. In the /etc/asterisk/extensions.conf file, add the following:
[sip]
exten=>101,1,Dial(SIP/101)
3. Execute the following command on the server to reload the configuration:
asterisk -rx "reload"
Mediatrix 41xx Configuration
The following sections describe special configuration you must perform in the Mediatrix 41xx in order to properly work with Asterisk.
All models in the Mediatrix 41xx series feature an embedded Web server. Most of the commonly used parameters are accessible from the web interface. The Mediatrix Unit Manager Network (UMN) software is needed if access to full unit configuration is required. The UMN can be downloaded from the Mediatrix Portal:
https://support.mediatrix.com/DownloadPlus/Download.asp
It has a default 3-units limit upon installation. This will suffice for most configurations. Additional unit license can be purchased. Please contact your Mediatrix reseller for more details.
Using the Web interface
The web interface may be used to:
View the status of the Mediatrix 41xx. Set numerous parameters of the Mediatrix 41xx.
Mediatrix recommends that you use the latest version of the Microsoft® Internet Explorer web browser to properly access the
web interface. To use the web interface configuration:
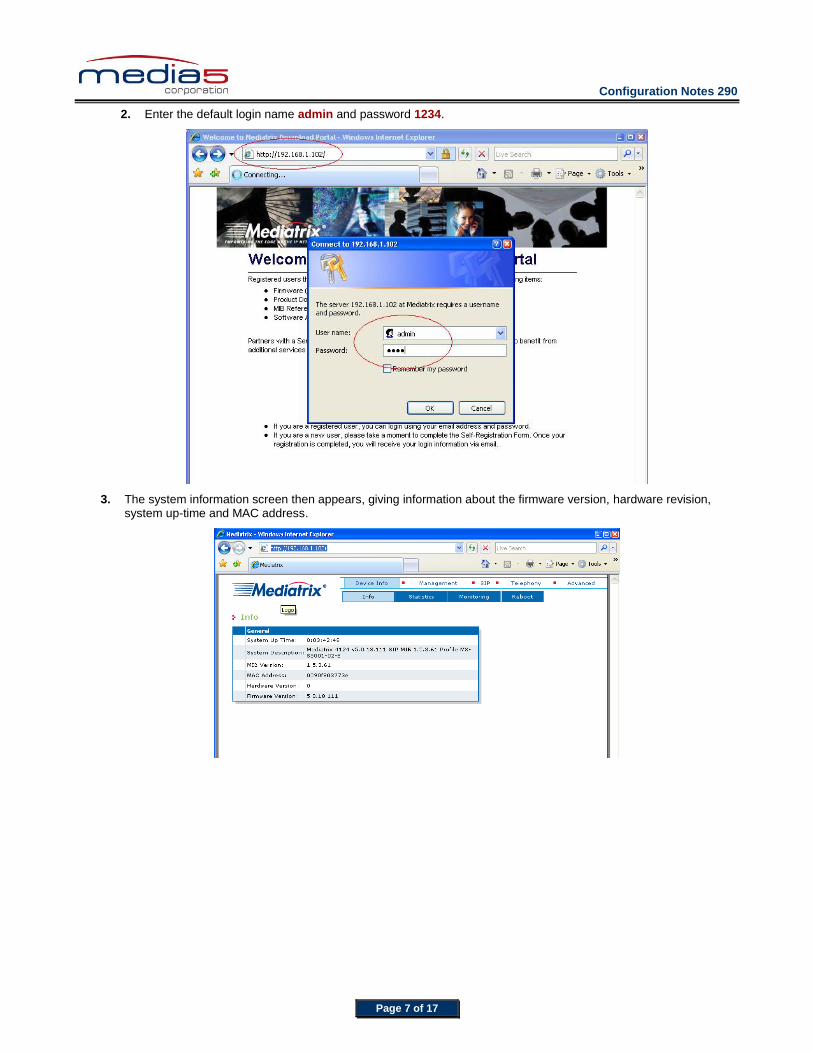
1. In the web browser’s address field, type the IP address of the Mediatrix 41xx (if you have performed a recovery mode, this is 192.168.0.1). The unit’s IP address can be found by dialing *#*0 from a phone connected to port 2 or
above.
Configuration Notes 290
Page 7 of 17
2. Enter the default login name admin and password 1234.
3. The system information screen then appears, giving information about the firmware version, hardware revision, system up-time and MAC address.

Configuration Notes 290
Page 8 of 17
Network Parameters Configuration
Network parameters are located in the Management. / Network Settings page.
1. Click Management and Network Settings to go the Network Settings web page.
2. In the IP Address Source option, select DHCP or Static.
DHCP is the default selection.
3. If you are using a Static IP address, select Static and enter the IP address, subnet mask, default router and DNS
server IP in the proper fields.
4. If SNTP is required, set the SNTP Enable option to Enable and enter the appropriate SNTP server IP address in the SNTP Host field.
5. Click Submit to apply the changes.

Configuration Notes 290
Page 9 of 17
SIP Configuration
In Asterisk, an extension is the equivalent of the SIP user in the Mediatrix 41xx. You must match the extension you have created in Asterisk in section Creating an Extension on page 5.
1. Click SIP and Configuration to go the SIP Configuration web page.
2. Choose Static as the SIP Server Source.
3. In the Registrar Host and Proxy Host fields, enter the address of the PC that hosts Asterisk.
4. In the User Name (equivalent to the phone number) column, enter a user name as defined in Asterisk.
5. You can also enter a Friendly Name for each port.
6. Click Submit to apply the changes.
Configuration Notes 290
Page 10 of 17
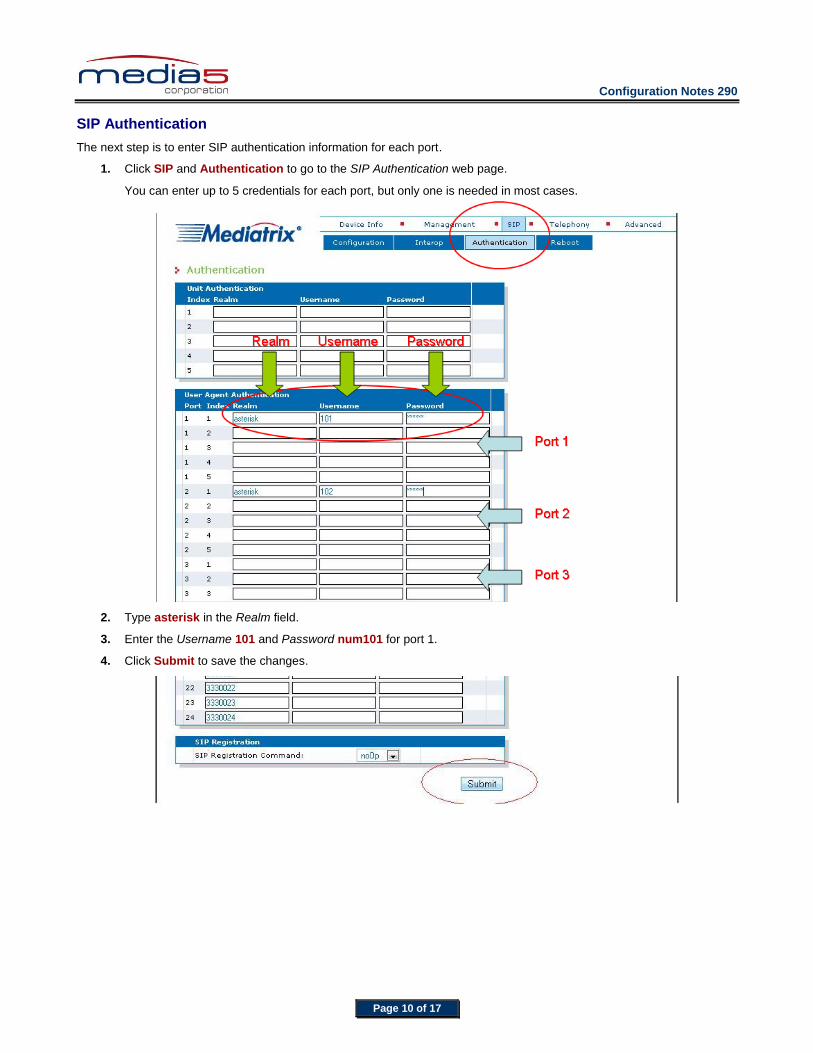
SIP Authentication
The next step is to enter SIP authentication information for each port.
1. Click SIP and Authentication to go to the SIP Authentication web page.
You can enter up to 5 credentials for each port, but only one is needed in most cases.
2. Type asterisk in the Realm field.
3. Enter the Username 101 and Password num101 for port 1.
4. Click Submit to save the changes.

Configuration Notes 290
Page 11 of 17
Codec and DTMF Configuration
1. Click Telephony and Codec to go to the Codec page.
Codec and DTMF settings are configured on a port-by-port basis.
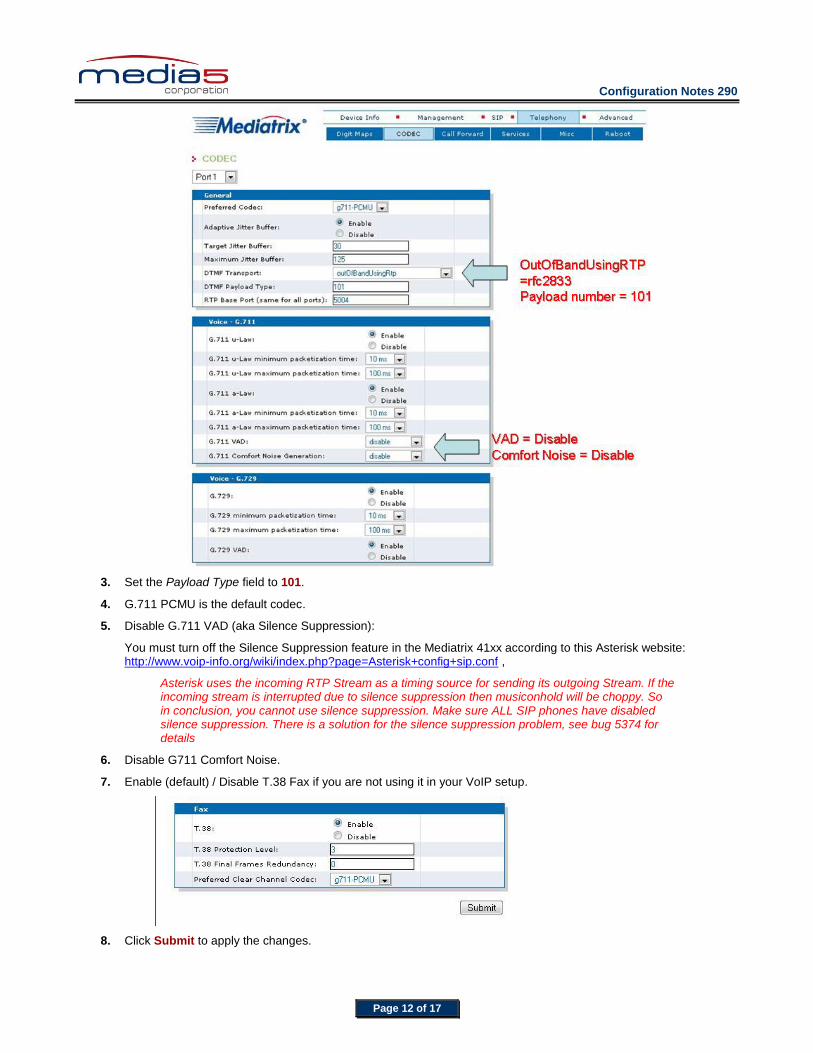
2. Set the DTMF Transport drop-down menu according to the DTMF transport mode you have defined in Asterisk.
If you have used rfc2833: set the parameter to outOfBandUsingRtp. If you have used info, set the parameter to outOfBandUsingSignalingProtocol. If you have used inband, set the parameter to inBand.
In this case, OutOfBandUsingRTP is used
Configuration Notes 290
Page 12 of 17
3. Set the Payload Type field to 101.
4. G.711 PCMU is the default codec.
5. Disable G.711 VAD (aka Silence Suppression):
You must turn off the Silence Suppression feature in the Mediatrix 41xx according to this Asterisk website: http://www.voip-info.org/wiki/index.php?page=Asterisk+config+sip.conf ,
Asterisk uses the incoming RTP Stream as a timing source for sending its outgoing Stream. If the incoming stream is interrupted due to silence suppression then musiconhold will be choppy. So in conclusion, you cannot use silence suppression. Make sure ALL SIP phones have disabled silence suppression. There is a solution for the silence suppression problem, see bug 5374 for details
6. Disable G711 Comfort Noise.
7. Enable (default) / Disable T.38 Fax if you are not using it in your VoIP setup.
8. Click Submit to apply the changes.
Configuration Notes 290
Page 13 of 17
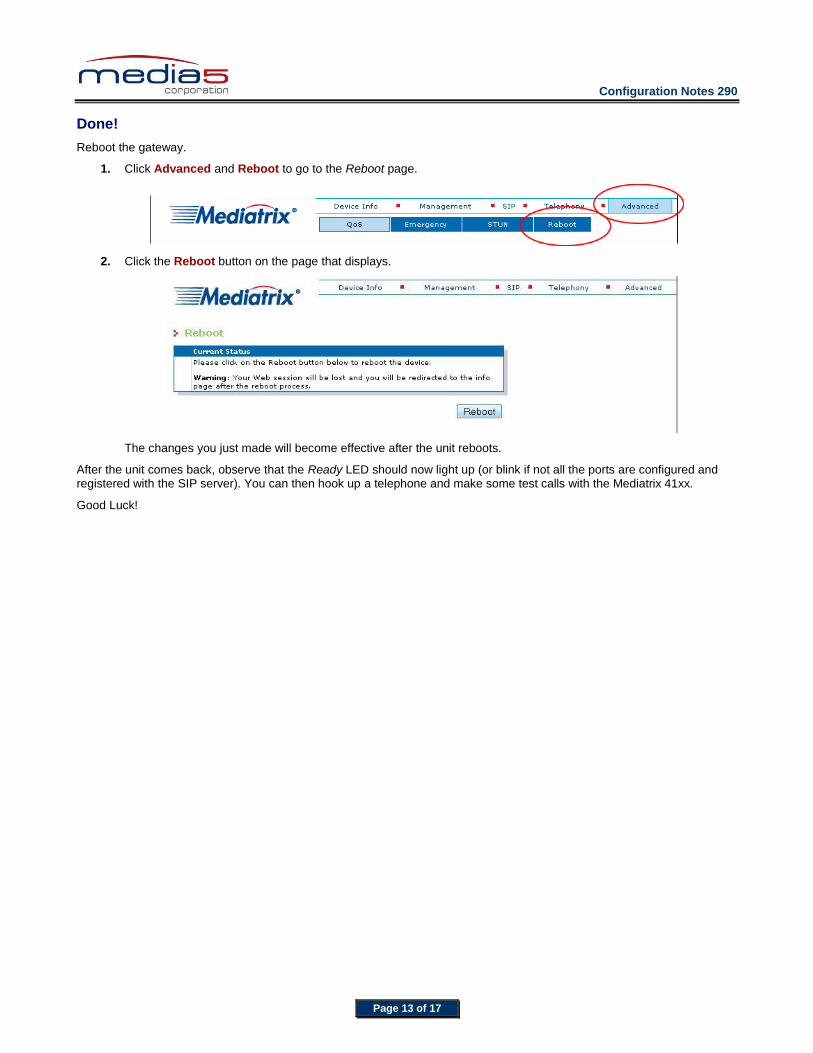
Done!
Reboot the gateway.
1. Click Advanced and Reboot to go to the Reboot page.
2. Click the Reboot button on the page that displays.
The changes you just made will become effective after the unit reboots.
After the unit comes back, observe that the Ready LED should now light up (or blink if not all the ports are configured and registered with the SIP server). You can then hook up a telephone and make some test calls with the Mediatrix 41xx.
Good Luck!
Configuration Notes 290
Page 14 of 17
Advanced Settings
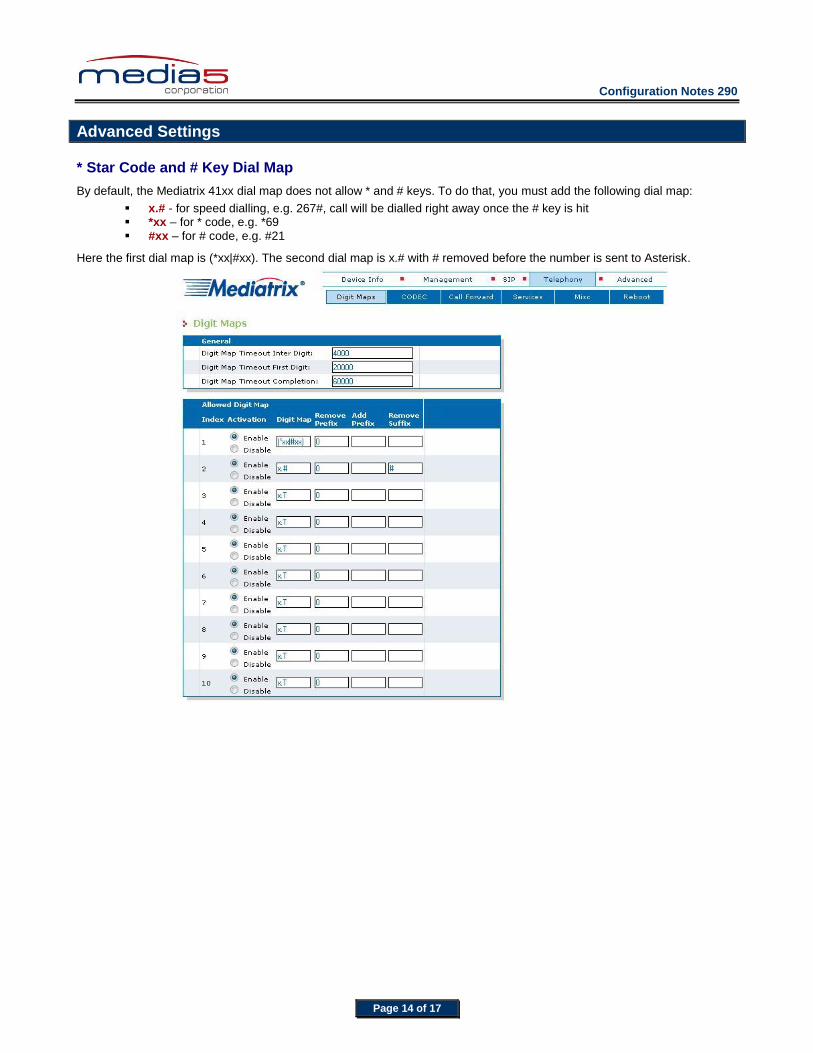
* Star Code and # Key Dial Map
By default, the Mediatrix 41xx dial map does not allow * and # keys. To do that, you must add the following dial map:
x.# - for speed dialling, e.g. 267#, call will be dialled right away once the # key is hit *xx – for * code, e.g. *69 #xx – for # code, e.g. #21
Here the first dial map is (*xx|#xx). The second dial map is x.# with # removed before the number is sent to Asterisk.

Configuration Notes 290
Page 15 of 17
Call Transfer SIP Interop Setting for Asterisk 1.4
The SIP behaviour of Asterisk in the Call transfer scenario in version 1.4 is different than in previous Asterisk versions. The following MIB on the Mediatrix 41xx must be changed. To access this MIB parameter, the Mediatrix Unit Manager Network (UMN) is required. UMN can be downloaded from the Mediatrix Download Portal:
https://support.mediatrix.com/DownloadPlus/Download.asp
The MIB parameter is: mediatrix.mediatrixExperimental.sipInteropMIB.sipInteropReplacesConfig. This MIB has to be set to useReplacesNoRequire. The default value is “useReplacesWithRequire”:
Configuration Notes 290
Page 16 of 17
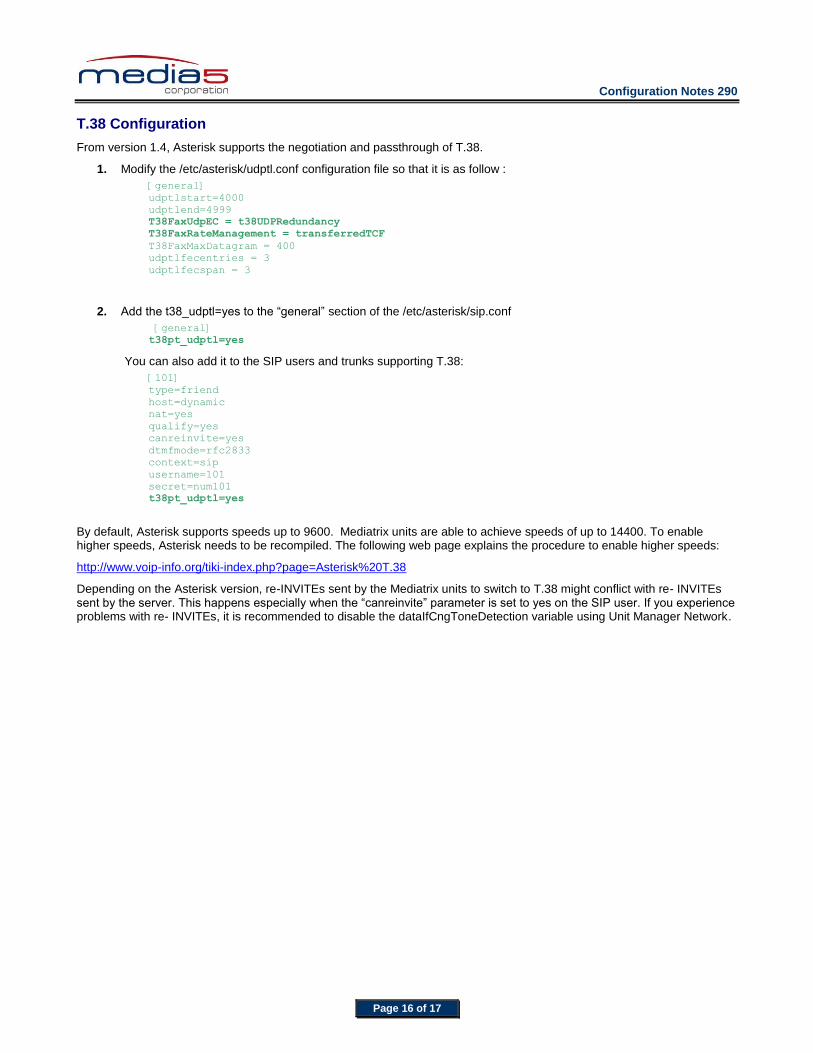
T.38 Configuration
From version 1.4, Asterisk supports the negotiation and passthrough of T.38.
1. Modify the /etc/asterisk/udptl.conf configuration file so that it is as follow :
[general]
udptlstart=4000
udptlend=4999
T38FaxUdpEC = t38UDPRedundancy
T38FaxRateManagement = transferredTCF
T38FaxMaxDatagram = 400
udptlfecentries = 3
udptlfecspan = 3
2. Add the t38_udptl=yes to the “general” section of the /etc/asterisk/sip.conf
[general]
t38pt_udptl=yes
You can also add it to the SIP users and trunks supporting T.38:
[101]
type=friend
host=dynamic
nat=yes
qualify=yes
canreinvite=yes
dtmfmode=rfc2833
context=sip
username=101
secret=num101
t38pt_udptl=yes
By default, Asterisk supports speeds up to 9600. Mediatrix units are able to achieve speeds of up to 14400. To enable higher speeds, Asterisk needs to be recompiled. The following web page explains the procedure to enable higher speeds:
http://www.voip-info.org/tiki-index.php?page=Asterisk%20T.38
Depending on the Asterisk version, re-INVITEs sent by the Mediatrix units to switch to T.38 might conflict with re- INVITEs sent by the server. This happens especially when the “canreinvite” parameter is set to yes on the SIP user. If you experience problems with re- INVITEs, it is recommended to disable the dataIfCngToneDetection variable using Unit Manager Network.
Configuration Notes 290
Page 17 of 17
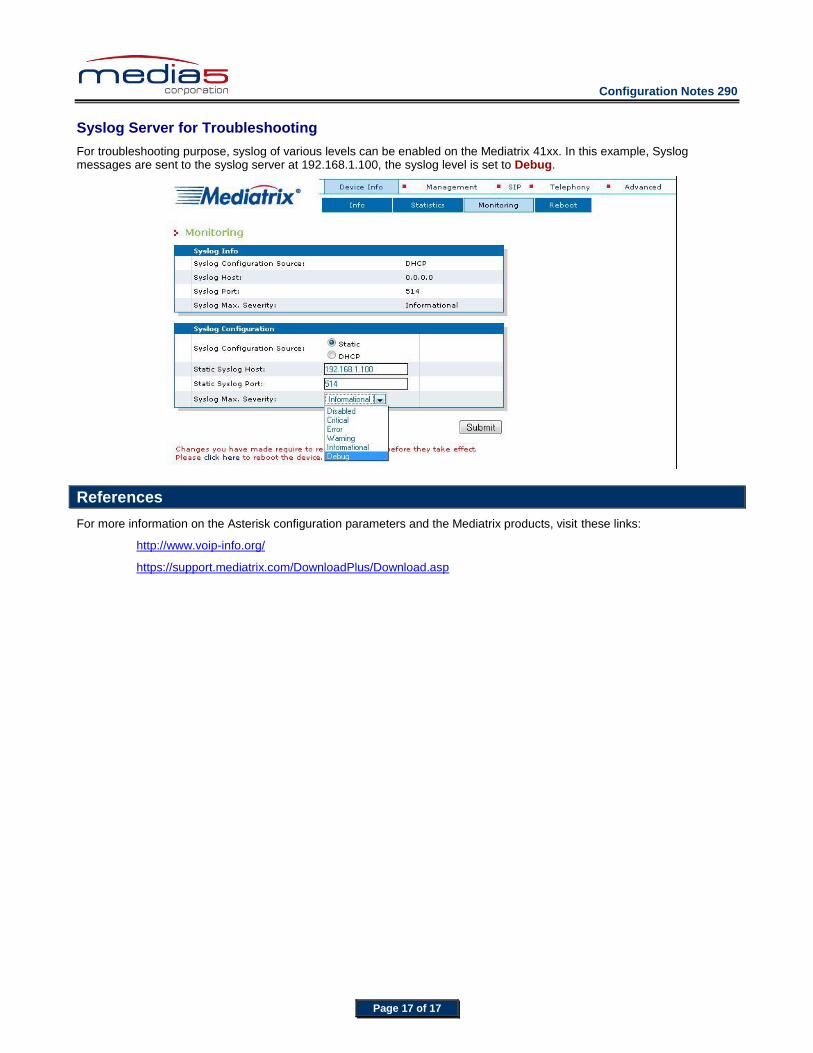
Syslog Server for Troubleshooting
For troubleshooting purpose, syslog of various levels can be enabled on the Mediatrix 41xx. In this example, Syslog messages are sent to the syslog server at 192.168.1.100, the syslog level is set to Debug.
References
For more information on the Asterisk configuration parameters and the Mediatrix products, visit these links:
http://www.voip-info.org/
https://support.mediatrix.com/DownloadPlus/Download.asp