configuration for bmc mid tier / hp web tier - java system solutions
TRANSCRIPT

SSO Plugin Configuration of BMC Mid Tier, HP Web Tier and Authentication Service
J System Solutions http://www.javasystemsolutions.com
Version 3.6

http://www.javasystemsolutions.com
Introduction.................................................................................................................................. 4
Terminology ............................................................................................................................. 4
Java version support ............................................................................................................. 4
Java web server support............................................................................................................ 4
IBM Websphere .................................................................................................................... 5
Authentication service ............................................................................................................... 5
Accessing web interface ................................................................................................................ 6
Logging into the web interface................................................................................................... 6
Configuration interface .................................................................................................................. 7
Logging .................................................................................................................................... 7
Matching the SSO username to a product account ...................................................................... 7
Default configuration ............................................................................................................. 7
Detailed overview of the username matching process.............................................................. 7
Looking up a user through a query......................................................................................... 8
Typical use cases .................................................................................................................. 9
User aliasing and Open ID ..................................................................................................... 9
Automation............................................................................................................................. 10
Automatically SSO enable accounts ...................................................................................... 10
Actions available when a user has no SSO account.................................................................... 10
Redirect user to login page .................................................................................................. 10
Redirect user to manual NTLM login page............................................................................. 10
Dynamically creating a user account in BMC AR System ........................................................ 11
Redirect to the ITSM user registration page .......................................................................... 11
Raise an incident in BMC ITSM............................................................................................. 11
Pass to Mid Tier .................................................................................................................. 11
Authentication methods............................................................................................................... 13
Integrating with an Active Directory ......................................................................................... 13
Creating the service account ................................................................................................ 14
Allowing large Kerberos tokens in Tomcat............................................................................. 14
Using a load balancer .......................................................................................................... 14
Windows Vista, 7, 2008 and AES 256 bit encryption .............................................................. 14
Enabling AD integration in IE and Firefox.............................................................................. 15
Windows native NTLM/Kerberos for Active Directory ................................................................. 15
Built-in NTLM/Kerberos for Active Directory .............................................................................. 15
Custom NTLM/Kerberos settings .............................................................................................. 16
Selecting supported protocols .............................................................................................. 16
Configuring NTLM ............................................................................................................... 16
Configuring Kerberos........................................................................................................... 17
Manually creating a computer account.................................................................................. 18
Manually configuring a service principal name....................................................................... 19

http://www.javasystemsolutions.com
Untrusted domains and the krb5.conf file ............................................................................. 20
Ports and firewalls ............................................................................................................... 21
Kerberos with load balancing / F5 / VIP / Netscaler ............................................................... 21
Mapping domain names to alternative values ........................................................................ 22
Using IIS and built-in authentication .................................................................................... 23
Windows authentication performed by IIS ................................................................................ 24
Configuring IIS ................................................................................................................... 24
Configuring Tomcat ............................................................................................................. 24
Large Kerberos tokens......................................................................................................... 25
Configuring SSO Plugin........................................................................................................ 25
Securing IIS or Apache and Tomcat ..................................................................................... 25
Open ID ................................................................................................................................. 26
CA SiteMinder / RSA Access Manager (ClearTrust) ..................................................................... 26
CA SiteMinder policy server configuration ............................................................................. 27
Login URLs ......................................................................................................................... 28
Using HTTP headers or cookies to retrieve SSO username ......................................................... 28
IBM Tivoli Access Manager (TAM) ............................................................................................ 28
OpenSSO................................................................................................................................ 29
X509 client certificates (DoD CAC, FIPS 140-2) ......................................................................... 29
Example SSL configuration using JSSE.................................................................................. 29
Example DoD CAC SSL configuration using APR .................................................................... 30
Configuring SSO Plugin........................................................................................................ 31
SAML (version 2)..................................................................................................................... 31
SAML Artifacts .................................................................................................................... 31
SAML Encryption ................................................................................................................. 32
IDP initiated SSO ................................................................................................................ 32
Integrating with ADFS 2.0 ................................................................................................... 32
Integrating with Ping Federate 6.5+..................................................................................... 36
Message security: signing and verification of messages ......................................................... 37
Symphony Identity Federation Manager and Juniper SA-4500 ................................................ 39
LDAP ...................................................................................................................................... 39
Failover .............................................................................................................................. 40
Using SSL with LDAP ........................................................................................................... 40
Central Authorisation Services (CAS) ........................................................................................ 40
Mixing authentication types ..................................................................................................... 40
Configure the JVM with an SSL certificate ..................................................................................... 41
Sharing SSO Plugin configurations between different Java web servers .......................................... 42
How it works .......................................................................................................................... 42
Redistribution ............................................................................................................................. 43

Page 4 of 43
http://www.javasystemsolutions.com
Introduction
This document covers configuration of SSO Plugin for BMC Mid Tier, HP Web Tier and products
supported by the SSO Plugin authentication service.
The JSS support website contains documents for other components and there are also many videos
to assist with installing the SSO Plugin.
Terminology
Throughout the document, the following key terms are used:
product refers to BMC Mid Tier or HP Service Manager.
Java web server refers to the product running the product, ie Apache Tomcat, JBoss,
Oracle Weblogic, Websphere, etc.
Java version support
The product is designed to support all modern versions of the Java Virtual Machine from 1.6.0 and we
recommend you use the latest version, ie 1.6.0_31.
There are issues with versions of JVM 1.7.0, 1.7.0_01, 1.7.0._02 and 1.7.0_03. Please install version
1.7.0_04 or greater if you have a need to use the 1.7 JVM.
Using IBM's Java (ie with Websphere)
The IBM 1.6 JVM is also supported, but this JVM receives far less attention from IBM than the Oracle
versions receive, so we recommend running with an Oracle JVM wherever possible. The process of
configuring Kerberos under the IBM JVM is also a little more complicated.
BMC AR System
There are no further patches required to the BMC Mid Tier when running with an IBM Java.
HP Service Manager
Websphere 7+ is supported by SSO Plugin. HP supply an ear file distribution of Web Tier but this
packaging isn't necessary and a war file can be deployed.
When using the IBM JVM (ie with Websphere) and HP Service Manager Web Tier, the jars from the
ibm-jre directory must be placed into the Web Tier WEB-INF/lib directory prior to deployment.
The automatic web.xml patching tool does not work within Websphere so the application must be
setup in a standalone environment. Therefore, prior to deploying a patched war file to Websphere,
deploy to Tomcat and configure SSO Plugin. This ensures the web.xml file is correctly patched (by
SSO Plugin) and allows the HP SM client certificates to be tested. It is also much easier to deploy and
test within a Tomcat environment than Websphere.
Java web server support
The product is designed to work across all modern Java web servers including Apache Tomcat and
"Java application servers" such as Oracle Weblogic, IBM Websphere, RedHat JBoss, etc.
The product requires write access to a configuration file jss-ssoplugin.properties on all deployments
apart from BMC AR System. It also automatically patches product files when deployed to BMC AR
System and HP Web Tier.
Reading and writing to local files can be problematic on all but Apache Tomcat when the application
is deployed from a war file, because the Java application servers typically deploy the application to a
Page 5 of 43
http://www.javasystemsolutions.com
temporary directory each time it is started. Hence, if SSO Plugin updates a local file, the changes are
lost on the next restart.
Therefore, when using a Java application server, ensure the application is deployed in an exploded
fashion and will not be copied elsewhere during deployment - consult the application server
documentation for more details on the deployment process.
It is also possible to set the JVM environment variable jss-ssoplugin.properties to a path that points at
a copy of the configuration file that is in a safe location, such as inside the web server root folder,
and manually patch the Java application, ie the contents of the war file. This will allow a fully patched
war file to be deployed with the only local file dependency being the jss-ssoplugin.properties file.
Given the range of application integrations supported by SSO Plugin, please consult JSS for further
advice.
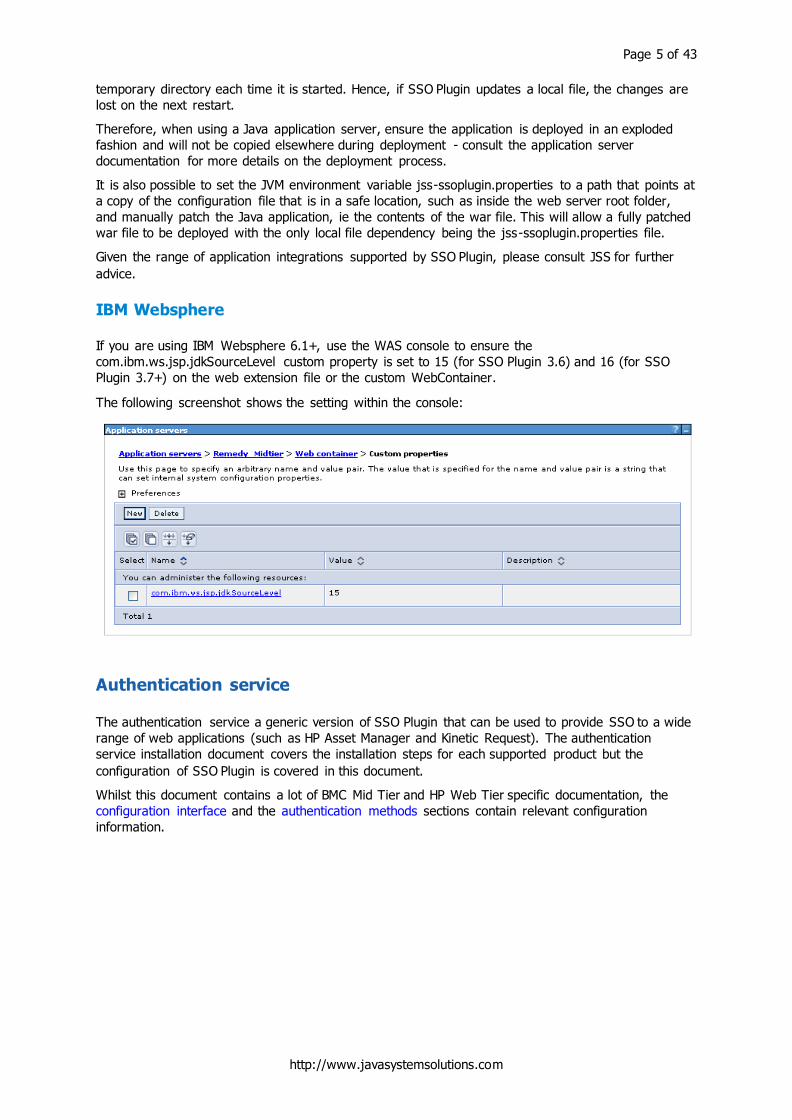
IBM Websphere
If you are using IBM Websphere 6.1+, use the WAS console to ensure the
com.ibm.ws.jsp.jdkSourceLevel custom property is set to 15 (for SSO Plugin 3.6) and 16 (for SSO
Plugin 3.7+) on the web extension file or the custom WebContainer.
The following screenshot shows the setting within the console:
Authentication service
The authentication service a generic version of SSO Plugin that can be used to provide SSO to a wide
range of web applications (such as HP Asset Manager and Kinetic Request). The authentication
service installation document covers the installation steps for each supported product but the
configuration of SSO Plugin is covered in this document.
Whilst this document contains a lot of BMC Mid Tier and HP Web Tier specific documentation, the
configuration interface and the authentication methods sections contain relevant configuration
information.

Page 6 of 43
http://www.javasystemsolutions.com
Accessing web interface
After the installation files have been copied to the web component (see the relevant product
installation guide) and the web server (ie Tomcat) has been restarted, you should be able to access
the web interface at the following URL:
BMC Mid Tier: http://host/arsys/jss-sso/index.jsp
HP Web Tier: http://host/webtier/jss-sso/index.jsp
Authentication service: The URL is present in the relevant section of the authentication
service installation document.
If you can not gain access to the SSO status page below, please consult JSS support for advice.
Logging into the web interface
The SSO interface is protected by a password and the default values are as follows:
BMC Mid Tier: The standard Mid Tier configuration interface password, ie arsystem by
default.
HP Web Tier / Authentication service: The default password is jss. You may modify this in
through the SSO setup and are advised to do so.
Once logged in, the configuration link is available allowing the product to be configured.

Page 7 of 43
http://www.javasystemsolutions.com
Configuration interface
The configuration interface provides a range of features to configure SSO Plugin in the web
component, including configuring the SSO integration, mapping the SSO username to the product
username, actions to perform when a user has no SSO enabled account in the product, and setting
the log level. Each section is described in detail below.
Logging
This controls the SSO Plugin log level which writes to the Tomcat stdout.log/catalina.out file.
We recommend you select information or 'warnings only' for production use, debugging when
configuring the SSO Plugin, and trace when you're trying to resolve an issue with the help of JSS.
Trace will generate a lot of low level logging and is required by JSS to resolve issues. It is not suitable
for production use.
Matching the SSO username to a product account
For SSO to work correctly, SSO Plugin has a range of features to match the SSO username to the
product username.
For BMC AR System, an entry must exist in the User form with a blank password.
For HP Service Manager, an entry must exist in the Operators table.
In many organisations this won't be the case, and SSO Plugin provides a range of functionality to
resolve this problem.
Default configuration
The default SSO Plugin configuration is suited to most organisations. It assumes the product user
names do not contain Windows domain names and is as follows:
1. Strip domain names, ie removing the Windows domain from the SSO username.
2. Match the user in the product case insensitively, to avoid database case sensitive login name
issues.
3. When no account is matched in the product, redirect the user to the product login page.
Detailed overview of the username matching process
The following illustrates the process of deciding how to match an SSO user to a product user:
1. If User domain is set to 'strip domain' then a Windows domain name will be stripped from the
SSO username. If the username a distinguished name (DN), as it would be if using X509/CAC
then this feature extracts the cn or uid value (ie X from “cn=X, ou=Y, ou=Z..” or “uid=X,
ou=Y, ou=Z..”).
2. If case sensitivity is set to convert to upper or lower then username is modified.
3. Perform one of the following:
1. If user aliasing is enabled, execute query against the product user database and if a user
is returned, login with that user.
2. If match case insensitively is selected then search for a user.
3. If user domain is set to try matching either way, search for a user entry with or without
the Windows domain name.

Page 8 of 43
http://www.javasystemsolutions.com
4. Query the product user database to see if a user exists matching the SSO username
when ‘strip domain’ set, or the domain name and username when ‘use domain and
username’ set.
If there is no match for any of the username matching options then run the action selected for when
a user has no SSO account.
Looking up a user through a query
This allows you to run a query against the product user database to return a product login name
using the SSO username (and optionally domain name) as part of the query. You can use any field in
the product user database as part of the query.
When writing the query, you can use the following place holders which will be replaced with real
values.
1. $SSO_USER$:
a. The SSO username.
b. The OpenID identifier, if using OpenID authentication.
c. The X509/LDAP username value of the matched user, ie if the user DN is cn=X, ou=Y,
ou=Z then $SSO_USER$ is set to X.
2. $SSO_DNS_DOMAIN$:
a. The Windows DNS domain name, if using built-in AD integration. This will always contain
the DNS domain name apart from when a client authenticates via NTLM from a domain
not configured with SSO Plugin, ie through Active Directory trust relationship. This is
because the DNS domain name isn't available in this scenario.
b. The OpenID Provider, if using OpenID authentication.
c. The X509/LDAP parent Distinguished Name of the matched user, ie if the user DN is
cn=X, ou=Y, ou=Z then $SSO_DNS_DOMAIN$ is set to ou=Y, ou=Z.
3. $SSO_NB_DOMAIN$: The Windows NetBIOS domain name (if using built-in AD).
For example, user dkellett is logged into the Windows domain CORP (dns: development.jss.com) then
the values are as follows:
1. $SSO_USER$: dkellett
2. $SSO_DNS_DOMAIN$: development.jss.com
3. $SSO_NB_DOMAIN$: DEVELOPMENT
If you want to pass the value returned from the Windows authentication system (i.e. user@domain or
DOMAIN\user) to $SSO_USER$, do not set user domain to strip domain.
BMC AR System
If no user is matched in the product after executing a user aliasing query, the request is rejected if
the BMC ITSM user provisioning module is enabled.
If the create user provisioning module is enabled, a user will be created and the query will run again,
but please note that to use this specialised feature, the query must run against both the Login Name
and custom fields.
Convert to upper or lower case
The AR query does not allow the use of toupper or tolower, standard SQL functions that are required
for case sensitive databases when dealing with mis-matched data. This is partially addressed by using
the case sensitivity drop down on the setup page, above the user aliasing controls. If this is set to
'convert to lower' or 'convert to upper', the SSO username and domain are modified appropriately
before the query is executed.

Page 9 of 43
http://www.javasystemsolutions.com
For example, if an SSO username is [email protected] and the query
'8'=”$SSO_USER$@$SSO_DNS_DOMAIN” is configured, if convert to upper is selected then the query
'8'=”[email protected]” will be executed against the User form.
Typical use cases
BMC AR System
Case 1
If the User form holds the SSO usernames in field 536870912 and the SSO user is held in this field,
set the alias query to '536870912' = “$SSO_USER$”.
When this query is executed against the User form, the $SSO_USER$ string is replaced with the
username, and the value for the Login Name field is returned. This value is then used to connect to
AR System.
Case 2
If you have a policy of storing all SSO accounts in the format [email protected] within field
536870912 on the User form, use the following query:
'536870912' = “$SSO_USER$@$SSO_DNS_DOMAIN”.
Please note
Do not use field 117, known as the “authentication field”. This has been reserved by BMC and AR
System behaves differently when passing information to AREA plugin when this field is populated.
HP Service Manager
Case 1
If the Operators table has login names that do not match the SSO usernames, a new field called
SSOid can be added and the SSO usernames placed in this field.
The alias query is set to SSOid=“$SSO_USER$”.
When this query is executed against the Operators table, the $SSO_USER$ string is replaced with the
username, and the value for the Login Name field is returned.
This value is then used to connect to Service Manager.
For example, if the SSO username is bob and the Operator entry with Login Name john has bob in
the SSOid field, a user with the SSO username bob will be logged into Service Manager as user john.
Case 2
Consider a deployment where the SSO username, in the format [email protected], is stored in the
field SSOid. However, there are existing users with the SSO username stored in the Login Name field.
The following query will search for an Operator record with SSOid set to [email protected] and if one
is not found, a record with the Login Name set to [email protected].
SSOid=“$SSO_USER$@$SSO_DNS_DOMAIN$”|name=” $SSO_USER$@$SSO_DNS_DOMAIN$”
Note, the Login Name field is referenced by the field name when using a query, because name is
defined out of the box in the Operator webservice, updated during the installation process.
User aliasing and Open ID
The user aliasing feature is used for the configuration of Open ID. When using Open ID, the
$SSO_DOMAIN$ place holder is used to hold the Open ID Provider, and $SSO_USER$ is used for the
Open ID Identifier.
Configuring Open ID is described in more detail in the Open ID section of the document.
Page 10 of 43
http://www.javasystemsolutions.com
Automation
This section contains features that improve on boarding when a user does not have an SSO enabled
account in the product.
When an account has been identified in the product user database, the following actions are
performed automatically:
For BMC AR System, disable password management is set to true, and user must change
password is set to false.
For HP Service Manager, expire password is set to false.
These actions are performed because an SSO user should not be presented with a user interface to
change their password when they login via SSO.
Automatically SSO enable accounts
This feature is specific to BMC AR System.
If a User account has a password set, it is not SSO enabled. This is one of the most common failure
points during the SSO process: a user has a password assigned.
When a user has passed through the SSO process and has a password set in the User form, this
option will remove the password, SSO enabling the account and avoiding a failed SSO login.
Please note, this does not mean the user can login manually with a blank password.
Logins with a blank password are prohibited when SSO is enabled on the AR System.
Actions available when a user has no SSO account
The SSO Plugin provides a range of options to deal with the scenario where an SSO user has no valid
SSO account in the product. This forms an important part of integrating the SSO Plugin into a
corporate environment where there are thousands of users, with many leaving and joining on a daily
basis.
The configuration page contains a section marked ‘when SSO user has no valid User form entry’ and
the options are described below.
Redirect user to login page
Users who do not have an SSO enabled account in the product will be redirected to the product login
form.
For BMC AR System, the browser redirects to the JSS login page and if SSO Plugin has been
configured to integrate with built-in authentication that includes NTLM, an option to login with
Windows credentials is provided. A Windows login requires an SSO enabled account in the User form.
If a user login is successful, the credentials are passed through the matching process as if the user
had passed through SSO. This means that user aliasing etc. will be actioned when retrieving the user
from the product for which to login.
For HP Service Manager, the browser redirects to the HP login page.
Redirect user to manual NTLM login page
This feature only exists on HP Service Manager. This Windows login page is available if SSO Plugin
has been configured with built-in authentication that includes NTLM. It allows a user to enter their
Windows login details, which are validated against the Active Directory before allowing the login.

Page 11 of 43
http://www.javasystemsolutions.com
If a user login is successful, the credentials are passed through the matching process as if the user
had passed through SSO. This means that user aliasing etc. will be actioned when retrieving the user
from the product for which to login.
Simplifying product configuration
This functionality allows you to remove the product LDAP integration configuration (ie BMC AREA
LDAP plugin(s) on BMC AR System) because by doing so, you reduce the number of components to
configure in product.
For BMC AR System and HP Service Manager, the Windows client tools requires the product LDAP
configuration so if users need to login to the client with their Windows credentials, the plugin must
still be configured. However, for many implementations, users only require browser access and hence
this functionality will be beneficial.
Dynamically creating a user account in BMC AR System
The feature is specific to BMC AR System but will be ported to HP Service Manager in the future.
When a user has no account in the User form, a new entry can be created from a template entry.
When this option is selected, the name of an existing User form entry will be required to be used as a
template for new entries. The new entry will be created by copying all fields from the template entry,
replacing the login name with the SSO user name from the request.
If a user has an existing entry but it's not correctly configured then they will be redirected to the login
page.
Redirect to the ITSM user registration page
The feature is specific to BMC AR System but will be ported to HP Service Manager in the future.
If the user doesn’t have an SSO enabled account, they will be redirected to a page that allows them
to enter some information on themselves (ie first name, last name, phone number, email address)
and a new ITSM People record will be created.
Assuming this process is completed successfully, the user will have access to BMC ITSM without
having to call the service desk and ask someone to manually create their account.
Raise an incident in BMC ITSM
The feature is specific to BMC AR System but will be ported to HP Service Manager in the future.
If the user doesn't have an SSO enabled account, or an error occurs creating one using the create
User form or ITSM user registration functionality, an incident will be raised and the user will be
redirected to a page with the incident number.
To configure this feature, use the SSO Plugin Administration Console within ITSM to map values into
the new incident. This feature is covered in more detail in the installation guide for BMC AR System.
Pass to Mid Tier
This feature is specific to BMC AR System. The AR System server has a feature to authenticate
unregistered users, where an unregistered user is defined as not having an entry in the User form.
SSO Plugin looks for the SSO user in the User form before passing back the user to Mid Tier, and
allows a login page to be displayed if there is no match in the User form. However, if authenticate
unregistered users is enabled, the administrator may wish SSO Plugin to pass the SSO user back to
Mid Tier even when there is no entry in the User form, so the SSO user is logged in as an
unregistered user.
To enable 'authenticate unregistered users' in AR System, log in as an administrator and go to AR
System Administration / Server Information and locate the EA tab..

Page 12 of 43
http://www.javasystemsolutions.com
If AR System isn't correctly configured, the default BMC Mid Tier behaviour (an ARERR623 error
page) will be exhibited after SSO Plugin has passed the SSO user into Mid Tier.
Page 13 of 43
http://www.javasystemsolutions.com
Authentication methods
There are a number of ways to integrate the product into your network and each are described in
detail in this document, however an overview follows:
1. Built-in Kerberos/NTLM for Active Directory, also known as Integrated Windows
Authentication (IWA) without IIS. This is suitable for when there is a single Java web server
and no load balancer.
2. Built-in Kerberos/NTLM, custom settings. This allows for advanced IWA configurations when
(1) is not suitable, ie when there are multiple Java web servers behind a load balancer.
Please consult this technical article for more information.
3. Integrated Windows Authentication performed by IIS. For security and simplicity, we
recommend built-in Kerberos/NTLM for Active Directory instead of this integration where
possible.
4. Using a third party authentication system such as RSA Access Manager (ClearTrust), CA
SiteMinder, Novell Access Manager, or retrieving the username from a header/cookie.
5. OpenID, which requires two new fields in the product user table and user aliasing configured.
6. Generic REMOTE_USER, a JAAS pluign or X509 client certificates.
7. SAMLv2 for integration with Microsoft ADFS2, Ping Federate, Symphony Identity Federation
Manager and other third party products.
When you set the SSO Plugin configuration, it will update the product web.xml file to add the
instructions that allow SSO Plugin to secure the product.
In rare cases where this fails, the web.xml.patch file (located in the product WEB-INF directory) can
be manually applied to the web.xml file.
Please note, the Java web server may need restarting once SSO Plugin has patched the web.xml file
and this will be communicated to the user.
Integrating with an Active Directory
The product contains an implementation of the Microsoft Integrated Windows Authentication
protocol. This allows users to open a browser, commonly IE, and navigate to the product without
being prompted to login.
When the Java web server is running on a Windows server, the Windows native NTLM/Kerberos
Active Directory integration requires no prerequisites.
When the Java web server is not running on a Windows server or a more complex IWA configuration
is required, there are a number of prerequisites:
1. Creating the service account: This is a computer account in the Active Directory used by
SSO Plugin to validate SSO tokens.
2. Enabling large Kerberos token support in Tomcat: Tomcat must be specifically configured to
allow large Kerberos tokens to avoid some users receiving authentication errors.
The sections below provide an overview of these tasks, plus other useful information that should be
reviewed before implementation.
Once you have reviewed this section, skip to either Built-in Kerberos/NTLM for Active Directory if you
are configuring a single Java web server, or Built-in Kerberos/NTLM custom settings if configuring
multiple Java web servers behind a load balancer.
The custom settings provide both advanced options and the ability to configure a single Kerberos user
account required for a load balanced configuration.
Page 14 of 43
http://www.javasystemsolutions.com
Creating the service account
The script is called set-service-account.cmd and is included in the installation files. Copy it to your
Active Directory, run it, and you can almost certainly accept the default options. It will create a
computer called JSS-SSO-SERVICE – note down the password it generates! Accept the default
option (no) for “Do not require Kerberos pre-authentication” unless otherwise instructed by JSS.
The script also asks you for the hostnames on which a user will connect to the product (typically
when running behind a load balancer) – please provide both the hostname and the fully qualified
hostname, ie myserver and myserver.domain.com.
If you do not wish to run our script, refer to the section manually creating a service account
(Computer object).
You must create a separate service account for each deployment of SSO Plugin. Name them
appropriately, ie JSS-SSO-DEV, JSS-SSO-UAT, JSS-SSO-PRD1, JSS-SSO-PRD2, etc. This means you
must create a service account for EVERY instance of a Java web server using a service account.
Allowing large Kerberos tokens in Tomcat
SSO Plugin should provide a warning on the status page if any action is required with respect to
Kerberos tokens.
Kerberos tokens are sent by the browser. By default, Tomcat has a hard coded limit of 4Kb for an
HTTP header, and if the Kerberos token exceeds 4Kb then Tomcat returns status code 400 without
passing the request to the product. The standard BMC Tomcat distribution has been known to have
8Kb set, which is inadequate.
Open the Tomcat server.xml file (in the conf directory) and look for the HTTP connector:
<Connector port="8080" protocol="HTTP/1.1"
and add a maxHttpHeaderSize attribute, which is given a value in bytes (6500 is almost 64Kb):
<Connector port="8080" protocol="HTTP/1.1" maxHttpHeaderSize=”65000”
Restart Tomcat and check the product still works as expected.
Using a load balancer
If running multiple product instances, a separate service account is required for each instance.
However, when creating the accounts, only one can have the service principal names (required for
Kerberos) associated with it.
Please review the load balancing / F5 / VIP section for more details.
Windows Vista, 7, 2008 and AES 256 bit encryption
SSO Plugin should provide a warning on the status page if any action is required with respect to
encryption.
Without a patch from Sun, due to US export rules, the standard Java Virtual Machine does not
support 256bit encryption and cannot decode AES 256bit tokens. AES 256bit tokens are often
generated by IE when using a Windows 2008 Domain Controller and a Windows Vista/7+ client.
To enable AES 256bit support, you need to download and install the Sun "Java Cryptography
Extension (JCE) Unlimited Strength Jurisdiction Policy Files", currently available from
http://java.sun.com/javase/downloads.
Installing the patch is easy: You unzip two jar files and place them in the JRE lib/security directory.
For your information, the Java Security documentation includes the following explanation:
"The JCE framework within JDK includes an ability to enforce restrictions regarding the cryptographic algorithms and maximum cryptographic strengths available to applications. Such restrictions are
Page 15 of 43
http://www.javasystemsolutions.com
specified in "jurisdiction policy files". The jurisdiction policy files bundled in Java SE limits the maximum key length. Hence, in order to use AES256 encryption type, you will need to install the JCE crypto policy with the unlimited version to allow AES with 256-bit key."
Enabling AD integration in IE and Firefox
In order to use SSO, your browser must support SSO and you must be logged into the domain. If a
logon box, or unauthorised, is presented, please review the following:
1. The client must be using a Windows operating system that is a member of the Windows
Domain to which SSO Plugin is configured. To ensure this is the case, press ctrl+alt+del and
look at the 'You are logged in as' dialog - the Windows Domain shown must be the target
domain and not the local machine.
2. If using IE, check the following:
a. The Java web server hostname must be listed in the 'Local Intranet zone'. To check this,
go to Internet Explorer -> Tools -> Internet Options -> Security -> Local Intranet and
make sure that the hostname is present in the list.
b. Automatic login must be enabled. To check this, go to Internet Explorer -> Tools ->
Internet Options -> Security -> Custom Level, scroll all the way to the bottom and make
sure 'Automatic logon only in Intranet zone' is selected.
3. If using Firefox, additional configuration is required:
a. Type about:config in the URL bar and 'trusted-uri' in the search field.
b. You will be presented with network.automatic-ntlm-auth.trusted-uris and
network.negotiate-auth.trusted-uris. Type the hostname from the URL into these fields.
c. Type 'delegated' into the search field, locate network.negotiate-auth.delegation-uris and
enter the hostnmae from the URL into this field.
d. In all cases, hostnames can be comma separated.
4. If your browser is configured to use a proxy server, the target website may need to be added
to the proxy exceptions list as SSO is known to be problematic through some proxies.
5. Ensure the clocks on the workstation and the AD are set correctly. Kerberos authentication
can fail if the clocks are skewed.
Windows native NTLM/Kerberos for Active Directory
This integration provides the NTLM protocol, the mandatory protocol within the Integrated Windows
Authentication protocol, without the need for a computer service account. However, it is only
available when the Java web server is running on a Windows server. It will be disabled on non-
Windows servers.
This is the quickest route to deployment for those using Windows servers wishing to provide IWA.
It also provides the ability to configure an optional Kerberos service account, on which Service
Principal Names can be configured. Consult this section explains how to correctly configure Kerberos
with a load balancer, the most common scenario.
When the Java web server is not running on a Windows server, or when more complex IWA
configurations are required, the Built-in Kerberos/NTLM, custom settings integration option is
recommended.
Built-in NTLM/Kerberos for Active Directory
This integration requires just four pieces of information to configure both Kerberos and NTLM
support. The integration requires a computer account to be created in the AD and we supply a script
to automate the process.

Page 16 of 43
http://www.javasystemsolutions.com
Please note, if you are using an IBM JDK then you must set up built-in Kerberos/NTLM, custom
settings and configure a krb5.conf file.
You are required to enter the following information:
1. Fully qualified DC hostname: This fully qualified hostname of the Active Directory/Domain
Controller. You can provide a comma separated list of AD hostnames for failover support.
2. Realm/domain: This is the fully qualified name of the Windows domain.
3. Computer account name and password of the computer created from the script.
Discovering the hostname of your Domain Controller
Open a command prompt and type:
echo %LOGONSERVER%
It will report the name with two backslashes, ie \\server2k3. You do not need the backslashes. The
fully qualified hostname of the DC must be added, so look it up using nslookup:
nslookup adhostname
Discovering the fully qualified domain
Open a command prompt and type:
net config workstation
The fully qualified domain name is printed by Windows Domain DNS Name.
In some cases, the fully qualified domain name is not the same as the Windows Domain DNS name.
The value should start with the Windows Domain name, and if it does not, remove the string before
this value.
For example, if the Windows Domain DNS Name is ds.jss.com, and the Windows Domain is called
JSS, the correct value for SSO Plugin jss.com.
Custom NTLM/Kerberos settings
This integration is used for multiple Java web servers behind a load balancer, or custom settings are
required.
Selecting supported protocols
The custom settings allow you to support one or both of the protocols. You should consider both
Kerberos and NTLM in production. It's unlikely you will be able to allow Kerberos only due to NTLM
being a common protocol on Windows networks, even when administrators have attempted to insist
on Kerberos only.
Configuring NTLM
You are required to enter the following information:
1. DC hostname(s): This must be the fully qualified hostname of the Active Directory/Domain
Controller. You can provide a comma separated list of AD hostnames for failover support.
They must be the actual names of ADs, not load balancers.
2. Domain name: The name of the Windows domain – this is what you can see when you login
to your machine.
3. Computer account name and password of the computer created from the script.
Press the set configuration button, restart the Java web server if prompted and go to the Test SSO
page. If SSO fails, you will get some indication of what's wrong – you can also review the Tomcat
logs or contact JSS for assistance.

Page 17 of 43
http://www.javasystemsolutions.com
Supporting multiple domains
If your domains are in a trusted relationship then you only need configure the SSO Plugin to
authenticate against one of the domains. The Domain Controller should be able to authenticate users
connecting from any other domain where that other domain is trusted. If the domains are in an
untrusted relationship then we recommend you configure Kerberos and contact JSS support for
advice.
Advanced options
There are a number of advanced options when enabling Permit NTLM:
NETBIOS Domain name: Some Windows networks are configured with NETBIOS Domain
names that are not related to the Windows Domain name, ie your Windows Domain may be
called ADMIT and the DNS domain may be devit.mycompany.com. If this is the case, set the
NETBIOS Domain name in this field.
This is an unusual configuration because most networks are configured with a NETBIOS Domain
name that is a subset of the Windows Domain name, ie NETBIOS Domain of ADMIT and a Windows
Domain name of admit.mycompany.com.
Fixed DC IP: In the unlikely event that the hostname of the Domain Controller does not
resolve to an IP address, enter the IP address.
DC fail timeout (secs): If there is a connection failure to the DC, it is marked as failed for the
period of time defined in this field. The default, 30 seconds, should suffice but the option is
configurable.
Configuring Kerberos
There are two modes for configuring Kerberos:
1. Standard, where the SSO Plugin acts as an acceptor: This only requires the username and
password of the service account so it can decode the Kerberos tokens (without contacting the
KDC).
2. Advanced, where the SSO Plugin acts as an initiator and connects to the KDC.
We recommend that the standard mode is deployed unless there are good reasons to act as an
initiator.
The initiator configuration requires two separate elements to the configuration, each of which can be
configured in two ways, providing four possible ways to configure the product:
1. A mechanism of authenticating with the KDC. This is configured by providing service account
credentials, or a keytab file created using the ktpass program.
2. The location of the Kerberos Domain Controller (KDC). This is configured by providing the
hostname of the KDC and a Kerberos realm, or by configuring a krb5.conf file (please note,
when using an IBM JDK, you must set up the krb5.conf file). One of the advantages of using
a krb5.conf file is the encryption types can be specifically set, removing the potential for the
KDC and SSO Plugin using differing types (which can happen in some cases).
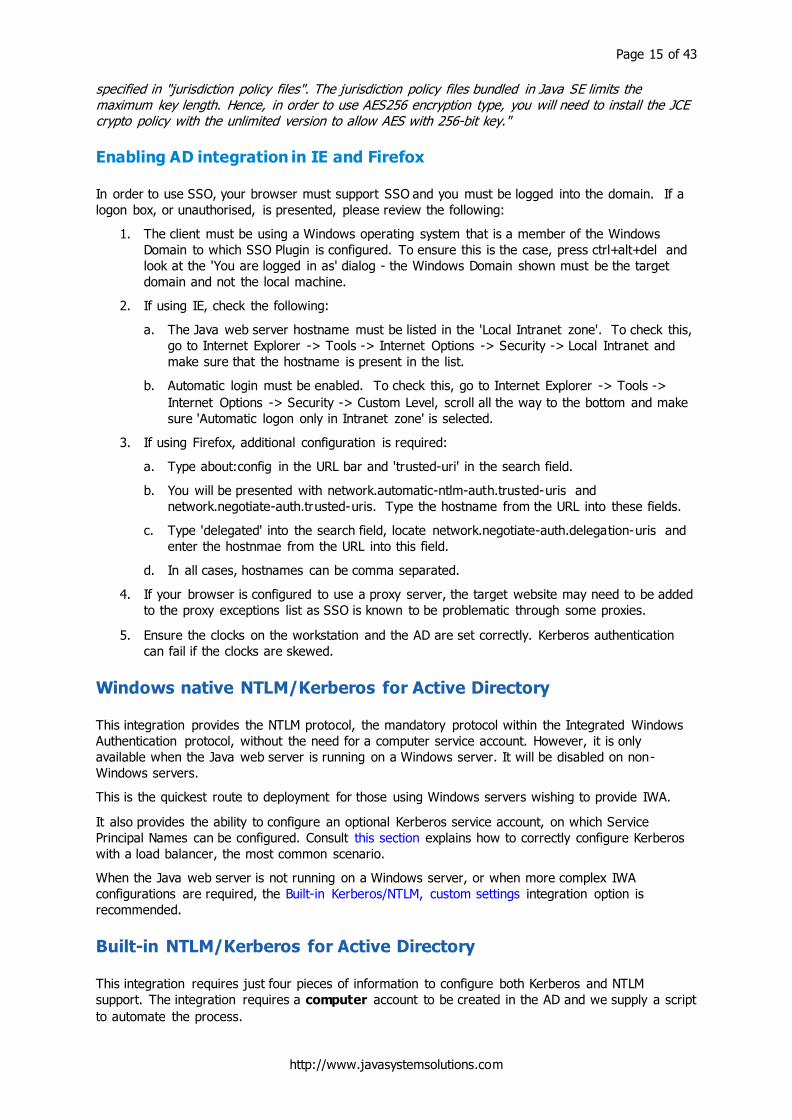
Manually creating service account
If you are creating a user account for (only) Kerberos authentication, in particular, when
implementing built-in Active Directory with a load balancer, the account must be configured to
delegate Kerberos as per the following screenshot.
Page 18 of 43
http://www.javasystemsolutions.com
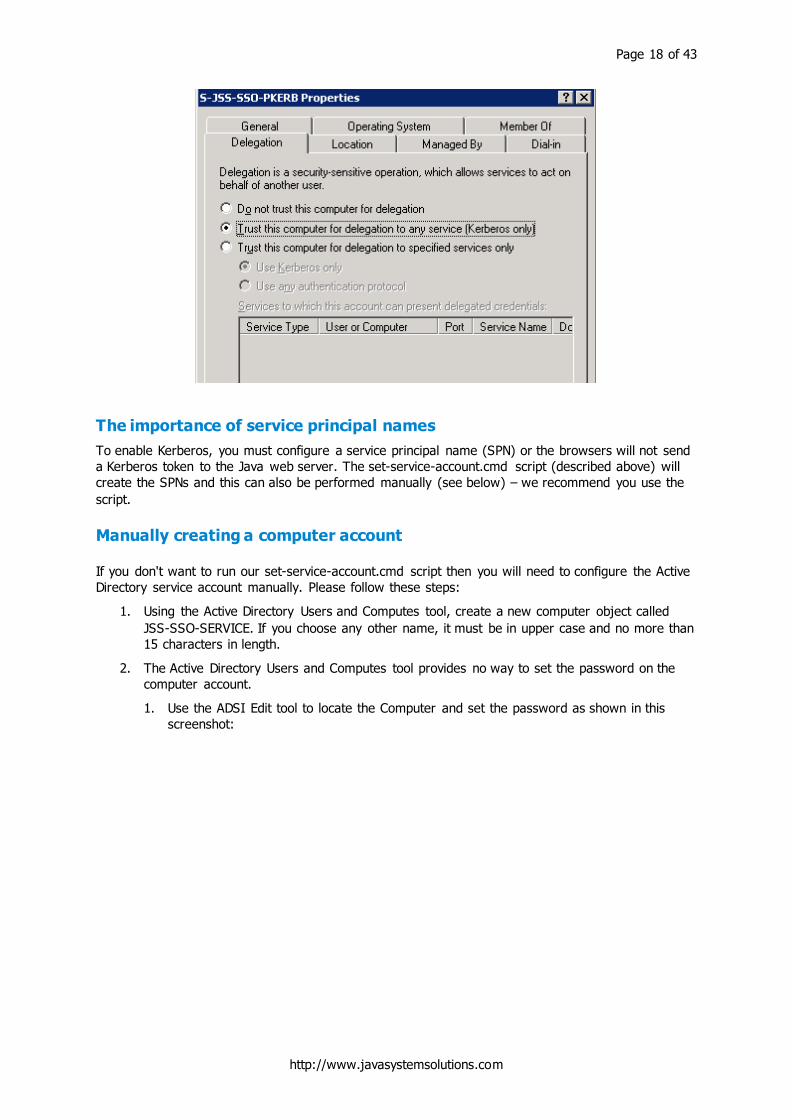
The importance of service principal names
To enable Kerberos, you must configure a service principal name (SPN) or the browsers will not send
a Kerberos token to the Java web server. The set-service-account.cmd script (described above) will
create the SPNs and this can also be performed manually (see below) – we recommend you use the
script.
Manually creating a computer account
If you don't want to run our set-service-account.cmd script then you will need to configure the Active
Directory service account manually. Please follow these steps:
1. Using the Active Directory Users and Computes tool, create a new computer object called
JSS-SSO-SERVICE. If you choose any other name, it must be in upper case and no more than
15 characters in length.
2. The Active Directory Users and Computes tool provides no way to set the password on the
computer account.
1. Use the ADSI Edit tool to locate the Computer and set the password as shown in this
screenshot:

Page 19 of 43
http://www.javasystemsolutions.com
If ADSI Edit is not installed, the following screenshot shows how to add the 'Windows feature'
that provides it:
2. A small script can be used to set the password. Please edit the LDAP path appropriately
and run from a command prompt as an administrator on the domain controller:
GetObject('LDAP://CN=JSS-SSO-
SERVICE,CN=Computers,DC=development,DC=jss,DC=com').setPassword('new-
password'); > temp.js
cscript //E:jscript temp.js
del temp.js
If you do not know the LDAP path of the computer account, the dsquery command can be
used to discover it:
dsquery computer -name JSS-SSO-SERVICE
3. Create the service principal name (see below).
Manually configuring a service principal name
For SSO Plugin to be able to authenticate clients using Kerberos, an SPN must be configured on the
Domain Controller. The setspn.exe tool is used by the administrators to create an SPN which maps
the Java web server host(s) to a service account in the Active Directory.

Page 20 of 43
http://www.javasystemsolutions.com
To find out the fully qualified hostname of the Active Directory, ping it from the command prompt
(you will see the hostname and fully qualified hostname).
We assume that:
The Windows domain is called DEVELOPMENT.
The domain's fully qualified name is development.jss.com.
The Java web server is running on a machine with the hostname itsm.jss.com.
The service account username is JSS-SSO-SERVICE.
Here is an example of how to use setspn – you must add both the hostname and the fully qualified
hostname of the Java web server:
setspn.exe -A HTTP/itsm.jss.com DEVELOPMENT\JSS-SSO-SERVICE
setspn.exe -A HTTP/itsm DEVELOPMENT\JSS-SSO-SERVICE
You can check to see if the SPN has been added by using the -L option, which lists the SPNs for a
computer or user account:
setspn.exe -L DEVELOPMENT\JSS-SSO-SERVICE
Please note, a hostname should only ever be declared against one user account – to declare it
against multiple users will confuse Active Directory.
A recent version of the setpn command includes an option to list duplicate SPNs, which can be useful
in resolving issues when browsers will not authenticate using Kerberos:
setspn.exe -X
Untrusted domains and the krb5.conf file
Organisations with multiple Windows Domains that are in an untrusted relationship will need to
configure a krb5.conf file (an example is provided with the installation). If the Domain Controllers are
in a trusted relationship then the KDC for domain A should be able to authenticate users for domain
B, and vice versa, so the krb5.conf isn't required unless there’s a need to make use of advanced
Kerberos configuration options.
If deploying a krb5.conf file, there are two ways in which the product can connect to the Kerberos
Domain Controller: Using identical service accounts in each Kerberos Domain or through a keytab.
An example krb5.conf file, named krb5.conf.example, has been provided in the WEB-INF/classes
directory of the files copied to the Java web server. Make a copy of this file, call it krb5.conf, and
modify the copy so you do not lose the file during an upgrade.
Identical service accounts
Only one service account name and password can be configured with Kerberos, hence keytabs are
popular as they allow different accounts to be configured for each domain. However, if the same
account is created in each domain, where each account has the same password, SSO Plugin can
connect to each KDC without the need for a keytab.
Creating a keytab
This is an advanced configuration: we recommend you use a service account.
Organisations that do not wish to store service account credentials with the SSO Plugin configuration
can use a keytab. Keytabs are created with the ktpass program, and plenty of examples are available
on the Internet, however it is briefly covered below.
Following on from the SPN example above, a keytab can then be created as follows:
ktpass -princ HTTP/[email protected] -out JSS-SSO-
SERVICE.keytab -mapuser JSS-SSO-SERVICE -pass service_account_password -
ptype KRB5_NT_PRINCIPAL -crypto RC4-HMAC-NT
Page 21 of 43
http://www.javasystemsolutions.com
(Note, the realm – DEVELOPMENT.JSS.COM - has to be in upper case.)
Using the above configuration, you would store the keytab in the product (we recommend under
WEB-INF) and configure the SSO Plugin by providing:
The full path to the keytab.
The service principal name, which is HTTP/[email protected]
Ports and firewalls
The NetBIOS protocol makes use of TCP port 445, therefore your Java web server must have access
to this port on the Domain Controller. If there's a firewall between the Java web server and Domain
Controller, ensure the port is open.
Kerberos with load balancing / F5 / VIP / Netscaler
When using a load balancer / F5 / VIP with a group of web servers, there are extra steps to configure
Kerberos through the load balancer hostname.
The set-service-account.cmd script will set up the accounts required for this configuration and we
recommend it is used if possible.
Kerberos relies on a service principal name (SPN) being present in the Active Directory, mapping a
hostname to a service account. Setting up SPNs has been documented above but the golden rule is
as follows: An SPN for a hostname can only exist once; if it exists more than once, it is ignored.
In a situation where there are multiple web servers, each with a service account, it is impossible to
set up an SPN for a load balancer hostname against each service account, Assume JSS-SSO-P1/2 are
two computer service accounts that are configured with two web servers, the following is invalid:
setspn -A HTTP/lbhostname.mydomain.com JSS-SSO-P1
setspn -A HTTP/lbhostname.mydomain.com JSS-SSO-P2
The solution is to create a separate service account for Kerberos only, and configure Kerberos
independently of NTLM on each web server.
The Kerberos account can be a normal user account and assuming it is called JSS -SSO-KERB, the
Active Directory administrator can enable Kerberos as follows:
setspn -A HTTP/lbhostname.mydomain.com JSS-SSO-KERB
setspn -A HTTP/lbhostname JSS-SSO-KERB
Please note, both the short hostname and fully qualified hostnames are set up to ensure that it works
whether a user types http://lbhostname or http://lbhostname.mydomain.com into a brower.
To re-configure each web server, select built-in Kerberos/NTLM, leave the NTLM set up as is (ie JSS-
SSO-P1 on one web server, and JSS-SSO-P2 on the other) and configure both with the JSS-SSO-KERB
service account in the Kerberos setup.
The individual computer accounts can also be configured with an SPN for the individual Java web
server hosts. Assuming the two individual Java web server hosts are called itsm1 and itsm2, the SPNs
would be set up as follows:
setspn -A HTTP/itsm1.mydomain.com JSS-SSO-P1
setspn -A HTTP/itsm2.mydomain.com JSS-SSO-P2
HTTPS URLs
When setting up an SPN for the URL https://lbhostname.mydomain.com, the syntax for setspn is still
HTTP/lbhostname.mydomain.com, ie the HTTP/ part of the setspn command does not change.
Example configuration
If you have two Java web servers behind a load balancer:
1. Create two computer accounts, JSS-SSO-P1 and JSS-SSO-P2.

Page 22 of 43
http://www.javasystemsolutions.com
2. Create a third user account, JSS-SSO-PK and set the load balancer hostname as an SPN
against this account.
3. Go to the SSO Plugin configuration page on the first Java web server and configure built-in
Kerberos/NTLM custom settings.
4. Check Permit Kerberos, set the client type to acceptor and enter the JSS-SSO-PK account
details.
5. Check Permit NTLM and enter the JSS-SSO-P1 account details.
6. Go to the SSO Plugin configuration page on the second Java web server and configure built-in
Kerberos/NTLM custom settings.
7. Repeat step 4.
8. Repeat step 5 but use the JSS-SSO-P2 account.
Mapping domain names to alternative values
Complex Windows networks can contain many different domains, and functionality exists to quickly
map domains (whether DNS or NETBIOS) to alternative values.
The functionality can be used with both Kerberos and NTLM tokens that are successfully
authenticated by SSO Plugin.
Consider a scenario where a company has two Windows domains below - the value in brackets is the
NETBIOS domain:
blue.abc.corp.com (BLUE).
red.def.corp.com (RED).
Yet the company stores usernames in BMC or HP in the format, [email protected]. There are now a
number of scenerios in which an SSO username could be passed to SSO Plugin:
2. BLUE\user
4. RED\user
Whilst SSO Plugin provides user aliasing functionality, the domain mapping functionality can solve this
problem.
By creating a file called domainmap.properties and placing it in the classpath (ie
tomcat/webapps/application/WEB-INF/classes), domain values (whether DNS or NETBIOS) can be
mapped to alternative values.
In the above scenario, the file will contain the following entries (it is case insensitive):
blue.abc.corp.com=corp.com
red.abc.corp.com=corp.com
BLUE=corp.com
RED=corp.com
This mapping will in users being assigned an SSO username that is either [email protected] or
corp.com\user. Whilst the latter isn't a valid NTLM formatted token, it does allow the user aliasing
feature to consistently use the $SSO_DOMAIN$ variable with corp.com in both cases.
Finally, the user can implement user aliasing to query for the correct user, ie.
'101'=”$SSO_USER$@$SSO_DOMAIN$” on BMC AR System.

Page 23 of 43
http://www.javasystemsolutions.com
Using IIS and built-in authentication
We do not recommend this configuration unless there's a good reason for IIS to be in
place, ie it is used to serve other applications.
If using a single Java web server instance, and are not engaging in software load balancing, then
there is little value in an IIS front end with built-in authentication.
The BMC Mid Tier installer will configure IIS if it's present, and while we do not recommend this
configuration, it is possible to use Internal Windows Authentication with IIS.
In order to do this, you must ensure IIS is not configured to perform any authentication. This is done
by configuring the IIS website authentication to anonymous only:
1. Open the Windows Control Panel.
2. Open Administrative Tools.
3. Open the IIS management console.
4. Locate Websites / Default website / jakarta, right click and select Properties.
5. Locate the Directory Security tab and click Edit in 'Authentication and Access Control'.
6. Ensure 'Enable anonymous access' is checked, and the 'Authenticated access' check boxes
are unchecked. The following dialog box shows the configuration:

Page 24 of 43
http://www.javasystemsolutions.com
Windows authentication performed by IIS
Please do not run the set-service-account.cmd script if using an IIS front end – it's not
required and may lead to IIS being unable to authenticate users.
While an IIS front end is fully supported, there is often little value in this configuration if IIS is doing
nothing more than sending requests to the Java web server instance because SSO Plugin has built-in
Active Directory integration, performing the authentication task that IIS performs. Using buit-in Active
Directory integration instead of an IIS front end results in one component being removed from the
overall architecture.
However, the use of an IIS front end is fully supported and without the pre-requisites for built-in
Active Directory authentication (ie a computer service account), IIS provides a quick route to a fully
featured proof of concept.
Configuring IIS
IIS must be configured to perform Integrated Windows Authentication (IWA) and anonymous. The
anonymous access is required for WUT Data Visualisation fields which are displayed in an IE
component that can not perform IWA.
Make the changes to IIS as follows:
1. Open the Windows Control Panel.
2. Open Administrative Tools.
3. Open the IIS management console.
4. Locate Websites / Default website / jakarta, right click and select Properties.
5. Locate the Directory Security tab and click Edit in 'Authentication and Access Control'.
6. Ensure 'Enable Anonymous Authentication' and 'Integrated Windows Authentication' are
checked.
Service principal names
To make IIS perform Integrated Windows Authentication (IWA), service principal names (SPNs) must
be configured. It is common to find these have already been setup on a corporate installation of IIS
but in the event IWA fails, ask the Active Directory administrators to ensure they are configured for
the hostnames on which IIS is running.
There are a number of examples of setting up SPNs in this document, and the task of setting up a
corporate IIS instance falls within the bounds of the Active Directory / network administrators.
If you require assistance, JSS are happy to help.
Configuring Tomcat
To tell Tomcat that IIS is performing Integrated Windows Authentication, locate the Tomcat
server.xml file, which will be in the Tomcat conf directory. Locate the ajp/13 connector, which looks
like this:
<Connector port="8009" protocol="AJP/1.3" redirectPort="8443" />
and add the following attribute:
tomcatAuthentication=”false”
In this example, it would now look like this:
<Connector port=”8009” tomcatAuthentication=”false” ...
Page 25 of 43
http://www.javasystemsolutions.com
Large Kerberos tokens
IE clients can send very large Kerberos tokens which can be too big to be passed between IIS and
Tomcat through the mod_jk connector (this is the software that connects the two systems). This will
cause browser issues and often only on some machines (as Kerberos tokens contain group
information, so if a user is in many groups, the token is likely to be larger than a user who is not).
To rectify this, two files must be modified:
1. The mod_jk workers.properties, also called workers.properties.minimal in some deployments.
You will need to search for this file as it could be in many locations, but is often found near
the Apache Tomcat installation. Open the file and add the line following line, where X is the
name of the worker - you will see many other similar lines from which to copy and edit:
worker.X.max_packet_size=65000
2. Locate the Tomcat server.xml file, which will be in the Tomcat conf directory. Locate the
ajp/13 'Connector, which looks like this:
<Connector port="8009" protocol="AJP/1.3" redirectPort="8443" />
and add the following attribute:
packetSize=”65000”
In this example, it would now look like this:
<Connector port=”8009” packetSize=”65000” ...
Configuring SSO Plugin
Select the authentication method Windows authentication performed by IIS.
This operation will result in a patch being applied to the product web component web.xml file (as is
the case with built-in authentication). If the web.xml file is patched, a warning message will be
displayed when you submit the setup form and you must restart the Java web server (ie
Tomcat).
Finally, it is essential to secure the link between IIS and Tomcat.
Securing IIS or Apache and Tomcat
It is important to secure Tomcat once IIS or Apache integration has been completed. This is achieved
by turning off the Tomcat HTTP Connector (so all requests must go through IIS or Apache) and
setting a secret on the Tomcat's AJP connector so it is only accessible by the IIS or Apache instance
configured.
Turning off Tomcat's AJP connector
Open the server.xml file, look for the following and comment it out by surrounding with <!-- and -->
(it is usually located directly above the AJP connector modifed above):
<Connector port=”8080” ...
Setting a secret on the AJP connector
Open the workers.properties file located with the mod_jk installation on IIS or Apache and add a
secret to the worker:
worker.X.secret=mysecretkey
Open the Tomcat server.xml file and add this attribute to the AJP connector:
<Connector port=”8009” packetSize=”16000” request.secret=”mysecretkey”
Restart both IIS or Apache and Tomcat when complete.

Page 26 of 43
http://www.javasystemsolutions.com
Open ID
The SSO Plugin can integrate with Open ID Providers such as Google, Yahoo, MyOpenID, ClaimID,
etc. Open ID requires two pieces of information – the Open ID provider and identifier. Please see
http://en.wikipedia.org/wiki/OpenID for an overview of Open ID.
To configure Open ID, follow these steps:
1. Using the product administation tool, add two new fields to the user repository table.
1. For BMC AR System: Using Developer Studio, open the User form and add two character
fields called 'Open ID Provider' (456) and 'Open ID Identifier' (123) – sample field IDs in
brackets for the purposes of this guide, you will need to note down the ones assigned by
Developer Studio.
2. For HP Service Manager:
1. Using the form designer and database manager whilst logged in as an administrator,
add two fields called ‘Open ID Provider’ and ‘Open ID Identifier’ to the Operator form
and associate to two database fields, ie openidprovider and openididentifier.
2. Locate the Operator web service in the WSDL configuration (Tailoring / Webservices /
WSDL Configuration), select operator in the name drop down field and press search.
3. Select the Operator (not Operator.700) object, to go fields, and map the two OpenID
fields - the caption column contains the value that will be used in the query.
2. Go to the SSO Plugin setup page and select the OpenID authentication method.
3. Select Strip domain in the User domain control.
4. Select Match case-sensitively in the Case sensitivity control.
5. Enable 'Alias username by User form query' and enter the following into 'User matching
condition'.
1. For BMC AR System: '123' = “$SSO_DNS_DOMAIN$” AND '456' = “$SSO_USER$” (using
the sample field IDs above).
2. For HP Service Manager:
openidprovider=”$SSO_DNS_DOMAIN$”&openididentifier=”$SSO_USER$” - using the
fields mapped in the modified Operator webservice.
6. Submit the configuration.
7. Restart the Java web server if prompted.
Open a new browser, go to the Test SSO page and you will be presented with an Open ID login form.
Select your Open ID provider, type in your Open ID and submit the login form. The browser will be
redirected to the Open ID provider's login page, and after logging in, the browser will return to the
Test SSO page.
If no user account exists in the product with the correct Open ID Provider and Identifier, they will be
provided so you can add them to the relevant user record using the new fields (for BMC AR System,
don't forget to set a blank password).
If you return to the Test SSO page then you should now see the user that has just been activated.
CA SiteMinder / RSA Access Manager (ClearTrust)
There are two ways to integrate with these products: using a native library to connect directly to the
authentication service, or by placing a webserver (ie Apache) in front of the Java web server and
letting the webserver perform the authentication.
This section covers the native integration. Please consult using HTTP header and cookie values if you
have a web server front end providing the integration to CA SiteMinder (CA SM) or RSA Access
Manager (RSA AM).

Page 27 of 43
http://www.javasystemsolutions.com
The two integrations require the native libraries to be installed in the Java webserver:
CA SM: the SDK jar files (ie cryptoj.jar, imsjavasdk.jar, smagentapi.jar, smjavaagentapi.jar,
SmJavaApi.jar, smjavasdk2.jar) must be present in the classpath of the Java web server and
the platform native libraries that accompany it must be set in the directory pointed to by the
LD_LIBRARY_PATH environment variable.
RSA AM: the ct_runtime_api.jar file must be present in the classpath of the Java web server.
When SSO Plugin detects the relevant API files, the authentication options are enabled in the web
interface. Both integrations require a set of values that can be provided by the team managing CA SM
or RSA AM. These values are:
CA SM:
o Required: Shared secret, policy server IP/hostname, trusted hostname.
o Optional (defaults):
Login URL ie http://policyserver.corp.com/login?goto= (see below),
Cookie name (SMSESSION),
Authorisation port (44443),
Authentication port (44442),
Accounting port (44441),
Connections min (2),
Connections max (25),
Connection pool increment step (2),
Connection timeout (60).
RSA AM:
o Required: Comma separated list of dispatcher hostnames. If you wish to specify a
port then use the format hostname:port. The default port is 5608.
o Optional (defaults):
Login URL ie http://policyserver.corp.com/login?ct_orig_uri= (see below),
Cookie name (CTSESSION).
CA SiteMinder policy server configuration
SSO Plugin not only authenticates the SiteMinder cookie, to extract a username, but it also checks to
see if the user is authorised to request the protected URLs. Therefore, the policy server must be set
up to authorise users to the product entry points, ie.
All products, where /context is /arsys, /webtier, etc:
/context/jss-sso/testsso.jsp,
/context/jss-sso/debug.jsp
BMC Mid Tier:
/arsys/home
/arsys/forms/*
/arsys/apps/*
HP Web Tier:
/webtier/index.do
/webtier/ess.do

Page 28 of 43
http://www.javasystemsolutions.com
Keep in mind that these URLs are only examples, because if the product root (ie /arsys) is different
then the URLs need modifying accordingly.
Additional functionality in SSO Plugin 3.6.10
Two environment variables were introduced in SSO Plugin 3.6.10 to provide early access to
functionality that will be configured through the user interface in the next major release of SSO
Plugin.
jss.ssoplugin.sm.return.attribute
The SiteMinder API provides a number of useful username formats: username, userdn and universal
ID. They are configured using the values 210, 218 and 152 respectively.
jss.ssoplugin.sm.conf.file
The SiteMinder API version 5 provides a facility to configure the API using just a trusted hostname
and a configuration file. Setting this variable to the location of an SmHost.conf file will tell SSO Plugin
to use the file and not the policy server configuration in the user interface. Note, the policy server
login URL and SiteMinder cookie name variables are still set through the UI.
Login URLs
When using RSA AM, the login URL must end with the HTTP parameter used to specify the return
URL to the login server, ie ct_orig_uri is common for RSA Access Manager.
When using CA SiteMinder, specify just the URL and SSO Plugin will add the return URL parameter.
Please note, SSO Plugin does not support the SMAGENTNAME HTTP parameter for the SiteMinder
login portal. This is because there is no known way to create the value for this variable when not
using the proprietary SiteMinder login module within Apache/IIS.
Using HTTP headers or cookies to retrieve SSO username
This integration can be used for third party SSO products where the SSO username is placed in an
HTTP header or cookie, such as:
CA SiteMinder,
RSA Access Manager,
Novell Access Manager,
IBM Tivoli Access Manager,
Oracle Identity Manager.
Typically, an SSO module is installed in a web server (ie Apache) front end to the Java web server
and the correct header/cookie can be derived from the SSO Plugin debug page located in the web
interface.
The typical HTTP header name for RSA Access Manager (ClearTrust) is CT_REMOTE_USER.
If you wish to use an Apache front end to Tomcat, configured to protect required URLs (search the
web.xml.patch file with the string <url-patthern> for a full list), it is essential to secure the link
between IIS and Tomcat.
IBM Tivoli Access Manager (TAM)
IBM provide a plugin for Tomcat that provides a mechanism of verifying a request and setting a
username for SSO Plugin (set the 'Generic' authentication type in SSO Plugin's configuration).
At the time of writing, the plugin is being maintained and ships with reasonable documentation. The
plugin can be found here:
https://www-304.ibm.com/support/docview.wss?uid=swg24021393

Page 29 of 43
http://www.javasystemsolutions.com
JSS are happy to assist with deployment of this plugin.
OpenSSO
The product is supplied with a patch for integrating with OpenSSO. In order to do this, the OpenSSO
management team must set up the Java web server so that the OpenSSO JEE filter can be inserted
into the web application without any further configuration.
The patch can be found in the web.xml.patch.opensso file within the installation files and must be
manually applied to the web application web.xml file. Apply the patch before the first <filter> tag.
The OpenSSO filter must be configured to read the username from a header set by the OpenSSO
agent – set it as the parameter value in this extract:
<init-param>
<param-name>header</param-name>
<param-value>header on which OpenSSO places username</param-value>
</init-param>
It is important to note that if SSO Plugin automatically patches the file with the standard SSO Plugin
patch (ie to set up all the standard filters for features such as supporting SSO for Business Objects),
the manual patch must be applied before the automatically applied patch. The automatically applied
patch can be easily located by looking for the string JSS and is contained within comments, ie. <!--
JSS Start --> and <!-- JSS end -->.
On Tomcat, the OpenSSO patch can be applied before the first <filter> tag to ensure the automatic
patching doesn't disrupt/remove it. On other Java web servers, please consult JSS.
X509 client certificates (DoD CAC, FIPS 140-2)
The SSO Plugin supports X509 client certificates if your webserver has been configured with an SSL
connector configured to use a server side certificate. This subject can be challenging and there are
many online tutorials, so this document provides a brief guide. JSS support would be happy to help
you configure this integration.
To make matters more complicated, Tomcat has two separate methods of configuring SSL:
the JSSE implementation provided as part of the Java Virtual Machine.
the APR implementation, which uses the OpenSSL engine by default.
The implementation depends on the Tomcat installation: if the APR native library has been installed,
then the OpenSSL engine is configured. The documentation for SSL configuration can be found on the
Tomcat website. This document provides a brief overview of both implementations.
Please note, X509 is also used by DoD Common Access Cards (CAC) and Federal Information
Processing Standard (FIPS) 140-2.
Example SSL configuration using JSSE
For the purposes of demonstrating the functionality, you can generate your own and we've provided
a script called generate-example-client-cert.bat to do this for you. It will create a fake key store and
client side certificate. This script is only for the purposes of demonstration – if your business
wishes to use SSL, you should not have to generate these files.
If you run the script and pass a username, a certificate will be created with the subject:
CN=[user],OU=jss,O=office,L=mk,S=bucks,C=uk
You can change this subject by editing the script.
The script generates two files:
1. user.p12, which should be loaded into your browser.

Page 30 of 43
http://www.javasystemsolutions.com
1. On Firefox, go to Tools / Options / Advanced / Encryption / View Certificates / Your
certificates / press import. Select the file and when prompted for a password, enter
password.
2. On IE, go to Tools / Internet Options / Content / Certificates / Personal / press import,
browse to the file / select .p12 in the file types drop down, enter password and press
next, next, finish.
2. server.jks, which is placed in the Tomcat conf directory.
To complete the setup, you must enable Tomcat's SSL port by opening the server.xml and adding this
connector:
<Connector
clientAuth="true" port="8443" minSpareThreads="5"
maxSpareThreads="75"
enableLookups="true" disableUploadTimeout="true"
acceptCount="100" maxThreads="200"
scheme="https" secure="true" SSLEnabled="true"
keystoreFile="${catalina.home}/conf/server.jks"
keystoreType="JKS" keystorePass="password"
truststoreFile="${catalina.home}/conf/server.jks"
truststoreType="JKS" truststorePass="password"
SSLVerifyClient="require" SSLEngine="on" SSLVerifyDepth="2"
sslProtocol="TLS"
/>
Example DoD CAC SSL configuration using APR
Whilst each Department Of Defence site may have a different set of documents to configure SSL to
work with the Common Access Cards, the following high level guide covers a common scenario.
To start the process, generate a public and private key using the keytool command (found in the Java
installation bin directory):
keytool.exe -genkeypair -alias servername -keystore keystore.pfx -storepass
Pa33word -validity 365 -keyalg RSA -keysize 2048 -storetype pkcs12
This will ask for a number of details and the Java web server full hostname must be entered under
'First and last name'.
Next, export the Certificate Signing Request public key:
keytool.exe -certreq -alias servername -file csr.cer -keystore keystore.pfx
-storetype pkcs12
Typically, a DoD website will be available to sign the csr.cer file, generating a signed public key.
Download this and call it public.pem.
Next, extract the private key from the keystore.pfx file generated in the first step:
openssl pkcs12 -in keystore.pfx -out private.pem -nodes
The DoD website that signed the Certificate Signing Request used a Certificate Authority (CA) and this
is required to configure Tomcat, so Tomcat can trust the client certificate sent by the browser (stored
on the CAC).
The easiest way to obtain this is using your IE instance: go to Tools -> Options -> Content ->
Certificates -> Trusted root certificate authorities and locate the DoD Root CA 2, a common root level
CA. You can verify this is the correct root CA by viewing your certificates under the Personal tab and
looking at the top most entry in the Certificate Path tab.

Page 31 of 43
http://www.javasystemsolutions.com
When the root CA is highlighted within the Trusted root certificates tab, click Export and select Base
64 (.CER). Save the certificate to a file called rootca.cer.
Finally, copy public.pem, private.pem and rootca.cer into the Tomcat conf directory and add the
following Connector to the Tomcat server.xml file:
<Connector port="8443" enableLookups="true" disableUploadTimeout="true"
acceptCount="100" scheme="https" secure="true" SSLEnabled="true"
SSLCertificateFile="${catalina.home}/conf/public.pem"
SSLCertificateKeyFile="${catalina.home}/conf/private.pem"
SSLCACertificateFile="${catalina.home}/conf/rootca.cer"
SSLVerifyClient="require"
/>
It is important to remember that SSL client certificates will only work correctly when you access the
Java web server using the hostname entered when generating the private key in step 1.
Configuring SSO Plugin
To look for an X509 client certificate, select the appropriate integration type (generic REMOTE_USER,
JAAS and X509). You can now choose a number of ways to map a subject back to the User form.
You could choose to implement user aliasing: insert a new field on the User form, enter the certificate
subject against a user and let the SSO Plugin match the record when that user accesses Mid Tier.
You could use the 'strip domain' feature which, in this case, extracts the cn or uid value (ie X from
“cn=X, ou=Y, o=Z..” or “uid=X, ou=Y, o=Z..”) and matches that against a User form Login Name, or
invoke user aliasing.
SAML (version 2)
The process of configuring SAML will require input from the SAML Identity Provider team, who will
invariably need to configure the IDP to accept authentication requests from SSO Plugin. SSO Plugin
uses the SP POST, redirect and Artifact profiles, and has been validated against two common
integrations detailed below. JSS clients have integrated SSO Plugin with Symphony Identity
Federation Manager v5.7.1 and the Juniper SA-4500 7.2R1.1 Networks appliance.
SAML Artifacts
The SAML Artifact profile is the more complicated than the POST and redirect profiles because SSO
Plugin has to connect back to the Identity Provider to verify a SAML Artifact. The process flow is as
follows:
1. User requests protected resource.
2. SSO Plugin redirects browser to IDP.
3. IDP authenticates the user and if successful, redirects the browser to SSO Plugin with a
SAMLart HTTP parameter.
4. SSO Plugin connects to the IDP and passes the SAMLart value.
5. IDP validates the SAMLart value and returns a SAML assertion, which SSO Plugin decodes to
extract a user.
This process requires that the web server running SSO Plugin has network access to the IDP, unlike
the POST and redirect profiles that are entirely driven through the browser.
SSO Plugin provides the ability to set the Artifact Resolution URL (step 4) because it is often different
to the Identity Provider URL used to initiate the SAML authentication (step 2).
For example, Microsoft ADFS2 typically uses the following values:

Page 32 of 43
http://www.javasystemsolutions.com
IDP URL: https://host/adfs/ls/.
Artifact Resolution URL: https://host/adfs/services/trust/artifactresolution (this must be
explicitly enabled in the ADFS console).
And Ping Federate uses these values:
IDP URL: https://host:9031/idp/SSO.saml2.
Artifact Resolution URL: https://host:9031/idp/ARS.ssaml2 (the double ss in saml2 is not a
mistake!).
The problem is further complicated by the use of signing/verification. Some IDPs will require the
request to resolve an artifact (step 4) is signed, and it will in turn sign the SAML assertion (step 5).
Therefore, the sign and verify certificate aliases are used for these steps if set.
These integrations are complicated so please do not hesitate to contact JSS for advice.
SSL Artifact Resolution URLs
Most IDPs require an SSL connection to resolve an artifact. This presents a challenge with respect to
configuring the JVM to trust the SSL certificate. To achieve this, you must configure the JVM to trust
the certificate.
SAML Encryption
An Identity Provider can encrypt a SAML response using a public key supplied by the Service Provider.
This also replaces the requirement for verifying the SAML response, because it's encrypted and is
validated by virtue of requiring decryption.
The product supports the decryption of a SAML response through re-using the signing private key. To
configure the IDP, the signing public key can be exported from the keystore and configured with the
IDP (in ADFS, it is set in the Encryption tab of the Relaying Party Trust configuration).
To configure SSO Plugin, select 'to IDP' in the message security selector, configure the keystore path
and password, and the name of the signing and decryption private key within the keystore. When
SSO Plugin receives an encrypted SAML response from the IDP, it will decrypt it using the private key.
Given this configuration makes use of the message signing functionality, using the same private key
to sign messages sent to the IDP, you may wish to configure the IDP to verify messages sent by SSO
Plugin.
Given this configuration makes use of the message signing private key, you may wish to configure
the IDP to verify messages sent from SSO Plugin. This is discussed in the signing messages to the
IDP section, which shows you how to export the public key required for the IDP encryption
configuration.
IDP initiated SSO
The product supports IDP initiated SSO when the RelayState HTTP parameter is set to the target
URL. No additional configuration of the product is required beyond ensuring SP initiated SSO works
correctly, ie SSO Plugin can send a SAML request to the IDP and decode the SAML response from the
IDP.
Integrating with ADFS 2.0
The Microsoft ADFS 2.0 (not 1.0, as installed with Windows 2008R2) integration involves a pre-
requisite of ensuring the Java web server can be accessed via SSL. ADFS only allows endpoints of
Service Providers (ie Mid Tier or Web Tier) to be entered as https URLs. Therefore, before proceeding
to integrate with ADFS, ensure the Java web server (ie Tomcat) is SSL enabled.
Once ensuring your Java web server supports SSL, you can configure ADFS. The first step is to
configure a Relaying Party Trust for SSO Plugin. It is performed as follows:

Page 33 of 43
http://www.javasystemsolutions.com
1. Right click on Relaying Party Trust and click Add Relaying Party Trust.
2. Press start, select 'Enter data about the relaying party manually' and press next.
3. Enter a display name, such as JSS SSO Plugin and press next.
4. Select AD FS 2.0 profile and press next.
5. The next stage allows a certificate to be supplied that's used to sign outgoing requests (from
ADFS to SSO Plugin). For now, skip this step and press next.
6. Select Enable support for the SAML 2.0 WebSSO protocol and enter the SSO Plugin test URL,
ie. https://host:8443/arsys/jss-sso/testsso.jsp, and press next.
7. Enter a relying party trust identifier, ie ssoplugin, and press next. Keep a note of the
identifier as it will be required when configuring SSO Plugin.
8. Select permit all users, press next, press next again (leaving open claim rules ticked) and
press finish.
With the claim rules dialog open, two rules are created to issue the Windows user name and DNS
domain as a Universal Principal Name (UPN), and the Active Directory groups.
The UPN format is [email protected], allowing the most flexible integration with AR System or Service
Manager where full DNS domains can be mapped to User form or Operator table entries. This is
important for multi service providers who may have two end clients with a domain called EUROPE,
where mapping the full DNS domain to the user record is vital (ie europe.company1.com and
europe.company2.com).

Page 34 of 43
http://www.javasystemsolutions.com
Rule 1: Send the Universal Principal Name (UPN) and groups
In order to send the UPN to the client, it must be mapped from the Active Directory attribute. And
whilst the information is currently not used by SSO Plugin, it is prudent to map the group information
too.
Click add rule, select "Send LDAP attributes as claims" and press next. Edit the dialog as per the
image:

Page 35 of 43
http://www.javasystemsolutions.com
Rule 2: Match Kerberos NameID and send the UPN
This rule matches the claim for the Kerberos NameID and sends the UPN mapped in rule 1.
Click add rule, select "Transform incoming claim" and press next. Edit the dialog as per the image:
The result
The Issuance claim rules should now look as follows:

Page 36 of 43
http://www.javasystemsolutions.com
Configuring SSO Plugin
The next step is to configure SSO Plugin.
1. Go to the SSO Plugin setup interface.
2. Select SAML in the list of integration types.
3. Set the SAML Binding to POST.
4. Select Kerberos in the list of Claim NameID formats.
5. Locate and enter the identity URL. To do this, go to the ADFS 2.0 interface and navigate to
Service / Endpoints. In the list of endpoints, find the row with type SAML 2.0 / WS-Federation
and note the URL path. Add this to the server hostname to give a URL. The default URL
https://server2008r2.domain2008r2.local/adfs/ls/ (replacing srever2008r2.domain2008r2.local
with the hostname of the ADFS server).
6. Enter the service provider issuer which is the identifier you entered (ie ssoplugin) when
setting up the Relaying Party Trust in step 7 of the ADFS setup process.
7. Set messaging signing to none and press set configuration.
At this point, the easiest configuration is complete and you should be able to press Test SSO.
Remember, you must test via SSL as ADFS only allows SSL endpoint URLs.
The next step is to configure message verification.
Integrating with Ping Federate 6.5+
Ping Federate 6.5+ is provided with a quick start application that includes an Identity Provider and
Service Provider configuration and sample applications. If you do not have an IDP installed, this is the
quickest route to a successful integration.
To configure the integration with SSO Plugin, a Service Provider must be added.
1. Select manage Service Providers and select create connection.
2. Connection template: Do not use a template.
3. Connection type: Browser SSO profile.
4. Connection options: Browser SSO.
5. Import metadata: Skip step.
6. General info: Most options are optional but the following are required.
1. Partner's Entity ID: urn:sp. This must be a URI, ie urn:identifier. SSO Plugin verifies the
format (as per the SAML specification).
2. Connection name: JSS SSO Plugin
7. Browser SSO.
1. SAML Profiles: Click configure browser SSO and select both IDP and SP initiated SSO.
2. Assertion lifetime: Skip.
3. Assertion creation.
1. Identity mapping: Standard.
2. Attribute contract: Accept default, unspecified mapped to SAML_SUBJECT.
3. IDP Adapter mapping.
1. Authentication type: Single two factor.
2. Adapter: IDP Adapter.
3. Assertion mapping: Use only the Adapter Contract values in the SAML assertion.

Page 37 of 43
http://www.javasystemsolutions.com
4. Attribute contract fulfilment: SAML_SUBJECT / Adapter (source) / username
(value).
4. Protocol settings: Select configure.
1. Add SSO Plugin protected URLs, ie http://host:8080/arsys/jss-sso/testsso.jsp and
http://host:8080/arsys/home, mapped to POST.
2. Allowable SAML Bindings: Select only POST.
3. Signature policy: Select always sign the assertion.
4. Encryption: None.
8. Credentials: Select configure and the certificate used for signing. This is the certificate you
will need to export when setting up messaging verification.
Configuring SSO Plugin
The next step is to configure SSO Plugin.
1. Go to the SSO Plugin setup interface.
2. Select SAML in the list of integration types.
3. Set the SAML Binding to POST.
4. Select Unspecified in the list of Claim NameID formats, or whatever was mapped when
configuring assertion creation in the Ping Federate interface
5. Set the identity URL to point at Ping Federate, ie. https://host:9031/idp/SSO.saml2.
6. Enter the service provider issuer which is the partner entity ID you entered (ie urn:ssoplugin)
under general info in the Ping Federate interface.
7. Optionally, set the identity provider issuer to the one set in the Ping Federate interface.
8. Set messaging signing to none and press set configuration.
When complete, test SSO Plugin without signing or message verification to ensure the integration
functions. After this test, the next step is to configure message verification.
Message security: signing and verification of messages
There are two ways in which certificate are used when communicating with the IDP: for signing the
request to the IDP, and verifying the response from the IDP. On the SSO Plugin setup page, the
select field titled message security can be used to select message signing to the IDP, message
verification from the IDP or both signing and verification.
It is recommended to test signing and verification individually before selecting both, however in
practice, signing messages sent to the IDP has little value and only the message verification feature is
required for a secure solution.
Signing messages to the IDP
In order to sign messages to the IDP, the Java keytool command is used to generate a private/public
key pair. The keytool command creates a keystore that contains the private key. The keystore is
designed to hold a collection of keys, including the IDP key to sign messages sent to the IDP.
To generate a new private key, run this command from the Java bin directory. The command will ask
for a keystore password, and will also prompt for a password to secure the key. When prompted for a
password for “the alias”, press enter, which tells keytool that you don't want an additional password.
The keystore can quickly become confusing if individual passwords are assigned to certificates - it is
not a great piece of design.
keytool -genkeypair -keyalg rsa -sigalg SHA256withRSA -keysize 2048 -
keystore keystore.jks -alias sp
To verify the key is in the keystore:

Page 38 of 43
http://www.javasystemsolutions.com
keytool -list -keystore keystore.jks
Finally, to export a certificate for the IDP (to verify messages):
keytool -exportcert -keystore keystore.jks -alias sp -file sp.cer
When exporting a certificate for Ping Federate, add the -rfc option to export a Base64 version (to
create a PEM file).
This certificate can also be used to configure the encryption functionality on the IDP.
Configuring Microsoft ADFS 2.0
Load the exported certificate using the Signature tab on the Relaying Party Trust. Also set the secure
hash algorithm to SHA-1 if the keytool example above was used to generate the certificate.
If you wish ADFS to encrypt SAML responses, configure the certificate with under the Encryption tab.
Verifying messages from the IDP
This functionality allows SSO Plugin, the Service Provider, to be sure that messages sent from the
Identity Provider are authentic. This involves exporting a public key from the IDP, which will have
been used to sign the SAML response, and importing it into a keystore.
To export the public key from ADFS, follow this example, and then import it to the keystore following
the steps below.
Importing a public key into a keystore
Once you have obtained the IDP's public key, it must be imported into a keystore. If you followed the
previous example (verifying messages from the IDP) then you can re-use this keystore, otherwise a
new one will be created. In both cases, run this command:
keytool -keystore keystore.jks -import -alias idp -file idp.cer -noprompt
If you need to re-import a certificate, the previous one must be deleted:
keytool -keystore keystore.jks -delete -alias idp
Configuring SSO Plugin to verify messages
After exporting the certificate, import into the keystore as above and configure with SSO Plugin:
1. Go to the SSO Plugin setup interface and navigate to the SAML integration, that should
already be configured with the IDP.
2. In the message security control, select from IDP (verification).
3. Enter the keystore filename into the keystore name field and place the keystore file into the
Java web server classpath, ie place into the Mid Tier or Web Tier WEB-INF/classes directory.
4. Enter the keystore password.
5. Enter the name of the alias into the verification key alias field, ie if you specified -alias idp
when importing into keytool, enter idp.
6. Press set configuration and test.
7. If this does not work, using the message security control, select none and ensure the
integration still works.
Exporting the certificate from Microsoft ADFS 2.0
The certificate is exported from the ADFS management interface.
1. Navigate to services / certificates.
2. Right click and view the certificate under token signing.
3. Select the details tab and click copy to file.
4. Click next, select the first radio option (DER encoded binary), click next and select a file –
call the file idp.cer. Click next and finish.

Page 39 of 43
http://www.javasystemsolutions.com
Exporting the certificate from Ping Federate 6.5+
The certificate is exported from the administration interface:
1. Go to the management interface overview page.
2. Click Digital Signing & XML Decryption Keys & Certificates.
3. Export the certificate for the IDP, ie for the quick start application the DN is CN=localhost,
O=Quick Start App, C=US.
Symphony Identity Federation Manager and Juniper SA-4500
Some IDPs do not support multiple SP URLs in a single configuration, ie SSO Plugin cannot make a
request for any protected URL requested by the client browser and expect the IDP to process the
request. This is technically referred to as the SP only supporting a single Assertion Consumer URL.
The SSO Plugin configuration interface provides a checkbox that can be selected in this instance,
causing SSO Plugin to set the Assertion Consumer URL to http://host/arsys/jss-sso/saml/authenticate
(replacing http://host/arsys for your hostname and the application, ie webtier for Service Manager).
When this configuration has been enabled in the SSO Plugin setup interface, the IDP should be
configured to accept requests to the http://host/arsys/jss-sso/saml/authenticate URL.
After the IDP has authenticated a user and sent a SAML response to SSO Plugin via the authenticate
URL, if a username is successfully retrieved, the browser is redirected to the protected URL requested
by the client at the start of the process.
LDAP
The LDAP authentication type provides a traditional integration with an LDAP repository. This does
not provide a seamless sign-on, ie open a web browser, navigate to a web application and login, but
it does provide a single point of sign on between different applications deployed through SSO Plugin
(ie BMC Mid Tier and SAP Business Objects).
To configure this authentication type, three pieces of information are required:
1. The LDAP authentication URL. This contains the hostname, basedn, attribute, scope and filter
in the format ldap://host:port/basedn?attribute?scope?filter. The values are configured as
follows:
a. ldap://host:port: The LDAP URL used to locate the LDAP.
b. attribute: The attribute on which to search for a username, default uid.
c. scope: One level (one) or sub-tree (sub), default is sub.
d. filter: The filter that will be combined with the attribute=username, default
(objectClass=*).
For example, if the filter is set to a=b then the search will use the combined filter:
(&(a=b)(attribute=username))
2. The bind DN: This must be the distinguished name (DN) of a user that has access to read the
users that will be connecting, ie those defined by the LDAP authentication URL.
3. The password for the bind DN.
The SSO username is set to a value with this format "attribute=ssousername,parentdn" but when
'Remove domain part' is enabled, ssousername is returned to the application. The non-stripped
username provides a unique value for the purposes of user aliasing.
The parentdn value is set as the $SSO_DNS_DOMAIN$ user aliasing variable.

Page 40 of 43
http://www.javasystemsolutions.com
Failover
Multiple URLs can be configured by separating with a space, however the attribute, filter and scope
settings must be configured against the first URL.
For example, this string configures two LDAP servers:
ldap://host:389/cn=users,dc=corp,dc=com?samAccountName?sub
ldap://failoverhost:389/cn=users,dc=corp,dc=com
Using SSL with LDAP
To use an SSL connection with LDAP, the ldaps URL can be used, ie
ldaps://host:port/basedn?attribute?scope?filter.
If the LDAP server uses a self-signed SSL certificate, you need to configure the JVM to trust the
certificate.
Central Authorisation Services (CAS)
The product can be configured to integrate with a Central Authorisation Service. This version of the
product requires a manual patch to the web.xml file and an additional jar file (available from JSS), but
version 4.0 of SSO Plugin will include a user interface based integration option with no manual
configuration.
1. To configure this version of SSO Plugin with CAS, follow these steps:
2. Stop the Java web server, ie BMC Mid Tier or HP Web Tier.
3. Place the cas-client jar file (obtained from JSS) in the application WEB-INF/lib directory.
4. Locate up the application WEB-INF/web.xml file, open it up in a text editor and find the first
<filter> element.
5. Open the web.xml.patch.cas file in a text editor (from the WEB-INF directory), select all and
paste it before the <filter> element identified in (3).
6. Set the two CAS service URLs and local host URLs in the patch you've just pasted. They are
commented. The CAS value is: https://cas.kku.edu.sa/cas
7. Save the web.xml file and send it to me for verification.
8. Start the Java web server, go to the SSO Plugin configuration page (ie /arsys/jss-
sso/setup.jsp), select 'Generic' integration and press set configuration.
9. Click Test SSO. You should be redirected to CAS for login and back to SSO Plugin.
Mixing authentication types
It is possible to mix some authentication types but these are exotic configurations and we
recommend you speak to JSS for assistance.

Page 41 of 43
http://www.javasystemsolutions.com
Configure the JVM with an SSL certificate
If the target server (ie LDAP or SAML IDP) makes use of a self-signed SSL certificate then this will
need to be imported into a trust store or the JVM’s cacerts file (located in the JRE installation
directory), typically as follows:
keytool -importcert -file sslcertificate.cer -keystore cacerts -alias
server.hostname
Where the server.hostname is the hostname entered into the LDAP URL or the SAML IDP. When
prompted for a password, enter changeit.
If a separate trust store (ie not using cacerts) is created, the path and password (to the trust store)
need to be configured as JVM options:
-Djavax.net.ssl.trustStore=/path/to/truststore
-Djavax.net.ssl.trustStorePassword=truststore-password
There are many online examples of importing self-signed certificates into a trust store and JSS are
happy to help with this often complicated subject.
The SSO Plugin jss.sso.ignore.ssl.host.verification environment variable can be set to trust any
remote host. It is set as an option to the JVM as follows:
-Djss.sso.ignore.ssl.host.verification=true
We recommend that the JVM is correctly configured to trust the SSL certificate in a production
environment.
Page 42 of 43
http://www.javasystemsolutions.com
Sharing SSO Plugin configurations between different Java web servers
This section is only relevant for BMC Mid Tier. The HP Service Manager implementation uses
individual configurations on each Java web server.
The BMC Mid Tier configuration is held in the BMC AR System database and hence can be shared
between all Mid Tier instances using the same authentication server. For the majority of deployments
where configuration information per Mid Tier is required (ie when using built-in Active Directory
authentication), shared configuration is not possible.
However, for configurations that are identical across Mid Tiers, the shared configuration functionality
allows each Mid Tier load and save the same configuration. This is set through the selector on the
setup page, and loaded on each individual Mid Tier by a button marked reload configuration on the
status page.
How it works
The configuration is managed by SSO Plugin so you should not have to perform any manual steps in
AR System, however we appreciate that administrators may wish to understand how the
configuration is stored.
The Mid Tier configuration is stored in the JSS:SSO:MidTier:Config form within AR System.
Configurations are stored by creating additional entries with a field set to the Mid Tier unique key,
which is placed in the Mid Tier config.properties file when the setup is saved. The entry with the field
blank is considered to be the global configuration for Mid Tiers that are set to use the global
configuration.

Page 43 of 43
http://www.javasystemsolutions.com
Redistribution
Like most modern commercial products, SSO Plugin makes use of a number of open source third
party libraries. SSO Plugin is distributed with, and gives thanks to, the following open source products
that are redistributed: Apache commons codec, Apache commons HTTP client, Apache commons
logging, jcifs, Java Native Access, log4j, openid4java, Picketlink, xmlsec and Bouncy Castle. More
information on these products can be found on their relevant websites.