concord fax online administrator guidedownloads.concordfax.com/documents/guides/concord fax...
TRANSCRIPT

V. 4.0.0 (2010)
Concord Technologies
Concord Fax Online Administrator Guide

Concord Fax Online Administrator Guide Page | 2
Publication Notice
The contents of this publication and the specifications of this application are subject to change without
notice.
Concord reserves the right to make changes without notice to this publication, Concord software, and
services, and shall not be responsible for any damages, consequential or otherwise, caused by reliance
on the materials presented herein, including typographical errors.
This is the second edition of this publication.
Version
This guide describes the Account Administration Center version 2.2, release date February 20, 2009,
and revised May 11, 2010.

Concord Fax Online Administrator Guide Page | 3
Contents
Publication Notice ......................................................................................................... 2
Version ...................................................................................................................... 2
About Concord Fax Online ............................................................................................... 4
Audience .................................................................................................................... 5
Supporting Documentation .............................................................................................. 5
Administering Concord Fax Online ..................................................................................... 6
Managing User Accounts ............................................................................................... 6
Cover Page Control ..................................................................................................... 7
Creating An Attractive Fax Cover Page ............................................................................. 8
Customizing Cover Pages and Notification Messages .............................................................. 10
Example Initial Notification Message ............................................................................... 11
Example Delivery Notification Message ............................................................................ 11
Submitting the Files ................................................................................................... 11
Call Detail Records .................................................................................................... 12
Download Call Detail Records ....................................................................................... 12
Appendix A – Supported File Formats ................................................................................ 13
Appendix C – Email-To-Fax Notification Message Data ........................................................... 15
Appendix D – Fax-to-Email Notification Message Data ............................................................ 16
Appendix E – Common Error Descriptions ........................................................................... 17
Appendix F – Frequently Asked Questions ........................................................................... 18
1) How do I change the CSID for a User? ...................................................................... 18
2) How do I select a cover page by location? .............................................................. 18-20
3) How to I change the address on the cover page? ........................................................ 22
4) How do I create departments? .............................................................................. 23
5) How do I change a user’s sending or receiving email address ...................................... 23-23
Appendix G – Concord Fax Online for Microsoft Exchange 2010.............................................. 24-26

Concord Fax Online Administrator Guide Page | 4
About Concord Fax Online
Concord Fax Online is a bundle of Concord fax services designed to meet the needs of enterprise and
mid-sized businesses with individuals and groups who use fax as part of their business process.
Concord Fax Online services include two key components:
Concord Desktop Faxing - Email to Fax (E2F) and Concord Fax to Email (F2E) – the business
fax service that includes paperless processing of fax documents, automatic cover page
generation, customized cover page design, and a variety of fax reception and delivery options.
Concord E2F and F2E options can be set independently at the “Company”, “Department”, and
“End User” levels of the organization.
Account Administration Center (AAC) – the online application for creation and ongoing
maintenance of fax user accounts. The AAC provides fax administrators with a full set of
controls over the fax functions available to each user. The AAC is described more fully in the
“Account Administration Center Administrator’s Guide”.
Availible Features:
Outgoing faxing from email to fax device, using any email client on any email-capable device Incoming faxing from any fax machine, sent to a personal fax number assigned to the user, and
forwarded as email to the users email address Unique sending email address for each personal fax number Multiple receiving email addresses for each personal fax number Automatic cover page generation for any outgoing fax document Unique fax cover pages for the company, department, or the individual user Web Services for integration of fax functions into software applications Fax delivery options for easy integration with document management applications User account creation and management tool User fax activity tracking reports available to the fax administrator and to individual users Downloadable Call Detail Reports, suitable for use in corporate accounting systems, containing
records of individual fax user activity
With Concord Fax Online, business organizations are able to streamline their business processes by
reducing or totally eliminating paper fax documents. Additional phone lines and fax equipment are also
not needed. Overall efficiency is greatly increased.

Concord Fax Online Administrator Guide Page | 5
Audience
This guide is both an instruction manual and a reference guide that is structured to meet the needs of
anyone responsible for setup and maintenance of account information for users of Concord E2F and
F2E, the desktop fax service component of the Concord Fax Online.
Supporting Documentation
Several other guides are available from Concord to supplement the information presented here. Please
visit http://www.concordfax.com/support/userguides.aspx for the latest versions of Concord
instructional material.
Concord Fax Online User Guide – Reference information for individual users of Concord Fax Online.
Account Administration Center Administrator Guide – Instruction manual for those responsible for
setup and maintenance of group user account data using the Account Administration Center (AAC). The
document details the functions available to fax administrators.
Account Administration Center User Guide – Instruction manual that describes functions available to
individual users of the Account Administration Center (AAC).
Concord Fax Online Administrator Guide Page | 6
Administering Concord Fax Online
Managing User Accounts
Fax Administrators use the Accounts Administration Center to maintain account data for all Fax Online
users in the company. It is the Fax Administrator’s role to create user accounts, delete them, and
suspend them in accordance with the company policy. Administrators may also modify user profiles,
get reports on user fax activity, and control access to email and server domains owned by the
company.
When a new fax user account is created, a welcome email message is optionally generated and sent to
the new user. The AAC allows user’s limited access to their individual account settings. The welcome
email message contains the information needed to login to the AAC for the first time. Users are
encouraged to log in to their fax accounts, and to set a preferred password on the first login.
In addition the AAC allows the user to monitor their inbound and outbound fax activity by generating
activity reports.
The Account Administration Center (in the “My Account” section at accounts.concordfax.com) may be
accessed and used from any Internet-accessible location.
Details of account set up and administration using the AAC can be found in the Account Administration
Center Administrator’s Guide and the Account Administration Center User’s Guide. Both are
available in the Support section at www.concordfax.com.

Concord Fax Online Administrator Guide Page | 7
Cover Page Control
Whenever a fax is sent using the email-to-fax (E2F) feature, you can choose to include an “Automatic”
cover page, to have a cover page submitted “On Demand,” or “No Cover Page.”
Blank cover pages, also called cover page templates, are stored in a Concord database for each
company that uses the Concord fax service. When personnel at the company send a fax, the default
template may be retrieved from the database and filled in with fields from the email message.
Cover page templates can be designed by anyone in the company familiar with using Microsoft Word.
Typically a cover page template will include a “header” section, which appears at the top of the page.
The header section will contain all the relevant information about the fax itself, such as
To Fax Number: the dialed fax number
From: the name of the sender
Date: date and time at which the fax was sent from the Concord network
Subject: text taken from the subject line of the email message, with tokens
removed
Number of Pages: the number of pages faxed including the cover page
A footer section can also be created to provide more information about the sender at the end of the
cover page. Examples of footer content include promotional messages and company contact
information.

Concord Fax Online Administrator Guide Page | 8
Creating An Attractive Fax Cover Page
The procedure for creating and submitting cover pages to the database:
1. Design a cover page layout using Microsoft Word. The header and footer should be created in separate Word documents. Do not create a single document including the header and footer.
2. Include any text, tables, and graphics you want in the cover page design as long as these are in Black and White. Color and Gray Scale do not translate to faxing without pixilation. Graphics may be embedded in the MS Word document or submitted in separate files (jpeg, max. 200x200 pixels). The design should also include character strings called tokens, which will be replaced with actual data when the cover page is processed. Tokens are enclosed in tilde characters (~).
3. Submit the Word document containing the cover page design to Concord Premium Support or to your Concord Account Executive. Premium Support will update the account settings for your company by entering the cover page into the database.
More than one cover page template can be stored for your company. Only the default template can be
generated on demand. Contact Concord Premium Support to change the default cover page setting.
See the appendix for information on the tokens that are available for cover pages.

Concord Fax Online Administrator Guide Page | 9
Cover Page Image
Figure 2. A sample cover page header with tokens. It could be created as a table in Microsoft Word.
The color image above would need to be converted to all black and dithered (often resulting in looking
fuzzy) to approximate the color variations and differences.
The greyscale image above (often referred to as B&W) would need to be converted to All Black and
dithered (often resulting in looking fuzzy) to approximate the variations in grey.
The above image is All Black and would not need to be converted or dithered and should result in a
sharp and clear image. This is All Black and would not need to be converted or dithered and should
result in a sharp and clear image.

Concord Fax Online Administrator Guide Page | 10
Customizing Cover Pages and Notification Messages
Concord Fax Online allows business to offer fax services to its personnel, or to its customers,
with its own corporate branding. Custom branding may occur at several customer touch points.
Cover pages – the cover page design can include corporate branding in the header and footer.
Cover page creation is discussed above.
Notification Messages – these are email messages that result when an outbound fax is sent and
when an inbound fax is delivered. A typical notification message is the “successful delivery”
message.
Notification messages are created as files in either text or HTML format. Several files are needed for a
complete branding exercise, as depicted in the following table.
Notification
Message Type Description Instructions
Initial Notification
Message
Message retuned to a sender using email-to-
fax. It acknowledges that the fax request has
been received.
Create two files.
1. The Subject line of the initial notification email
2. The contents of the initial notification email
E2F Delivery
Notification Message
Message returned to a sender using email-to-
fax. It describes the successful delivery
status of the fax.
Create two files.
1. The Subject line of the delivery notification email
2. The contents of the delivery notification email. Note that this message type is only for successful fax delivery.
Failure Notification
Message
Message returned to a sender using email-to-
fax. It describes any failure that occurs
during fax processing and transmission.
Create two files.
1. The Subject line of the failure notification email
2. The contents of the failure notification email. Note that this message type is only for unsuccessful fax delivery. A variety of error codes can be included with this type of message. Please contact Concord Premium Support for a list of these codes.
F2E Delivery
Notification Message
Message delivered to a predetermined user
email address when a fax is received (fax-to-
email). Note that the email containing the
fax attachment is delivered to one address,
while this notification message is delivered
to a separate address.
Create two files.
1. The Subject line of the delivery notification email
2. The contents of the delivery notification email. Note that this message type is only for successful fax delivery.
See the appendix for information on the kinds of data that can be included in customized
notification messages.
The following examples illustrate the two message files that should be created in order to revise the
notification messages.
Concord Fax Online Administrator Guide Page | 11
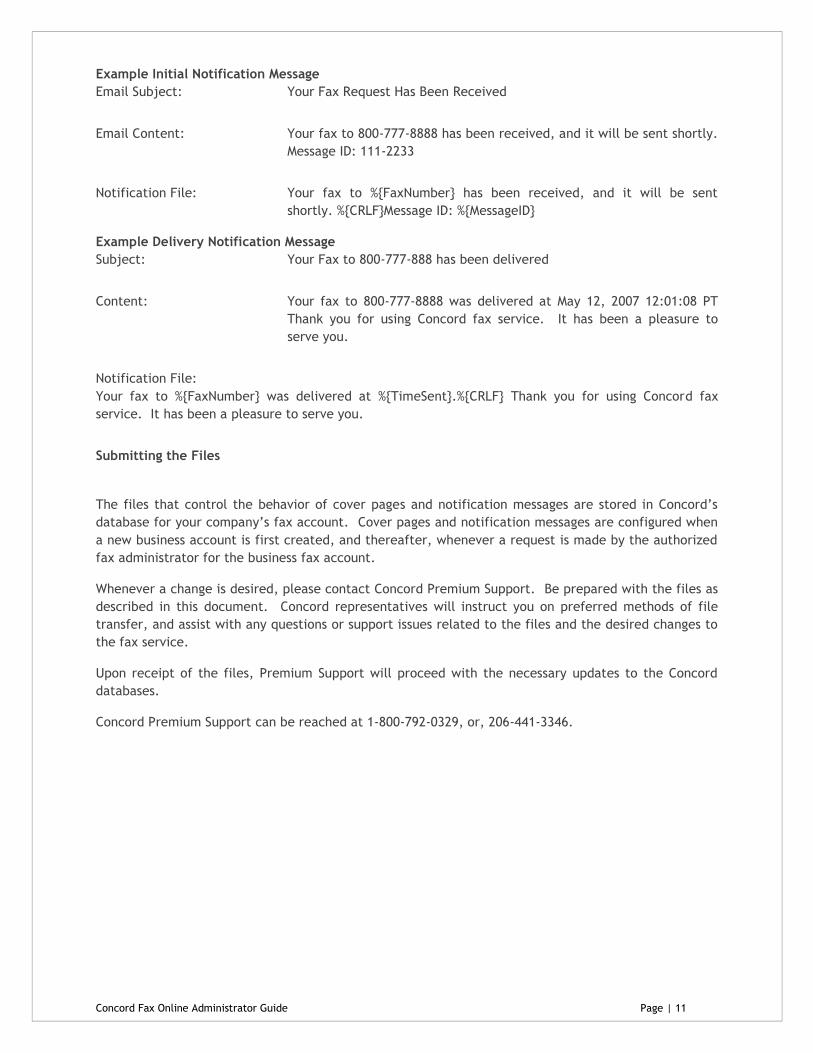
Example Initial Notification Message
Email Subject: Your Fax Request Has Been Received
Email Content: Your fax to 800-777-8888 has been received, and it will be sent shortly.
Message ID: 111-2233
Notification File: Your fax to %{FaxNumber} has been received, and it will be sent
shortly. %{CRLF}Message ID: %{MessageID}
Example Delivery Notification Message
Subject: Your Fax to 800-777-888 has been delivered
Content: Your fax to 800-777-8888 was delivered at May 12, 2007 12:01:08 PT
Thank you for using Concord fax service. It has been a pleasure to
serve you.
Notification File:
Your fax to %{FaxNumber} was delivered at %{TimeSent}.%{CRLF} Thank you for using Concord fax
service. It has been a pleasure to serve you.
Submitting the Files
The files that control the behavior of cover pages and notification messages are stored in Concord’s
database for your company’s fax account. Cover pages and notification messages are configured when
a new business account is first created, and thereafter, whenever a request is made by the authorized
fax administrator for the business fax account.
Whenever a change is desired, please contact Concord Premium Support. Be prepared with the files as
described in this document. Concord representatives will instruct you on preferred methods of file
transfer, and assist with any questions or support issues related to the files and the desired changes to
the fax service.
Upon receipt of the files, Premium Support will proceed with the necessary updates to the Concord
databases.
Concord Premium Support can be reached at 1-800-792-0329, or, 206-441-3346.

Concord Fax Online Administrator Guide Page | 12
Call Detail Records
Concord Fax Online allows our customers to monitor and retrieve all of their inbound and outbound fax
activity by a large number of fields from any or all of the prior 6 months, up to the last full day of
faxing activity.
Many of the fields that can be retrieved by Call Detail Records are shown in the table below.
CompanyID CountryCode FaxPhoneNumber TollFreeFlag
User ID LastName FirstName EmailAddress
PageCount Date Time TimeZone
FaxDestNumber EventType Desciption Subject UserFields
Download Call Detail Records
When you login into the AAC there is a primary field called “Call Detail Records.” This field offers
downloadable access to the last 6 months of “Available CDR files.” (See below)
In order for the “Current Month” to be created you must click on the “Generate Current Month”
button. (see below)
Except for “Current Month,” the records of each month of activity stored in Call Detail Records is found
in a single file. The “Current Month” record is stored as a series of files, created every day there is
activity. So, depending on which day you look there may be as many as 31 files.
Instructions are also found within the AAC (Call Detail Records/Download CDR).

Concord Fax Online Administrator Guide Page | 13
Appendix A – Supported File Formats
The following file types can be attached to an email message and converted to a fax by the Concord
network. Other file types have not been tested for compatibility. Results may vary if other file types
are used.
Microsoft Word (*.doc, *.docx)
Microsoft Excel (*.xls, *.xlsx)
Microsoft Power Point (*.ppt, *.pptx)
Microsoft Visio (*.vsd)
HyperText Markup Language (*.html, *.mhtml)
Adobe Acrobat (*.pdf)
JPEG image (*.jpg)
TIFF image (*.tif)
ASCII Text (*.txt)
Rich Text (*.rtf)
NOTE: Be mindful of the file sizes of the documents you are faxing, particularly if you are sending
scanned images, as they can be quite large. While most source documents faxed are usually quite
small (less than 200 KB), Concord will limit the maximum size of attached file(s) with either a single
file or multiple files. The current limit is: 10,240KB (10MB).
Files exceeding these limits are most always high-resolution, multi-color, scanned images. In addition
to exceeding size limits, such images are not typically “fax friendly”. Documents should contain no
color, shading, or gray-scale, and never printed as “photo-quality”. Color, or shaded documents do not
translate well to fax and will contribute to exceedingly large file sizes and longer transmission times.
Documents with graphic art content should be limited to solid black, with no shading, or gray-scale.
Concord Fax Online Administrator Guide Page | 14
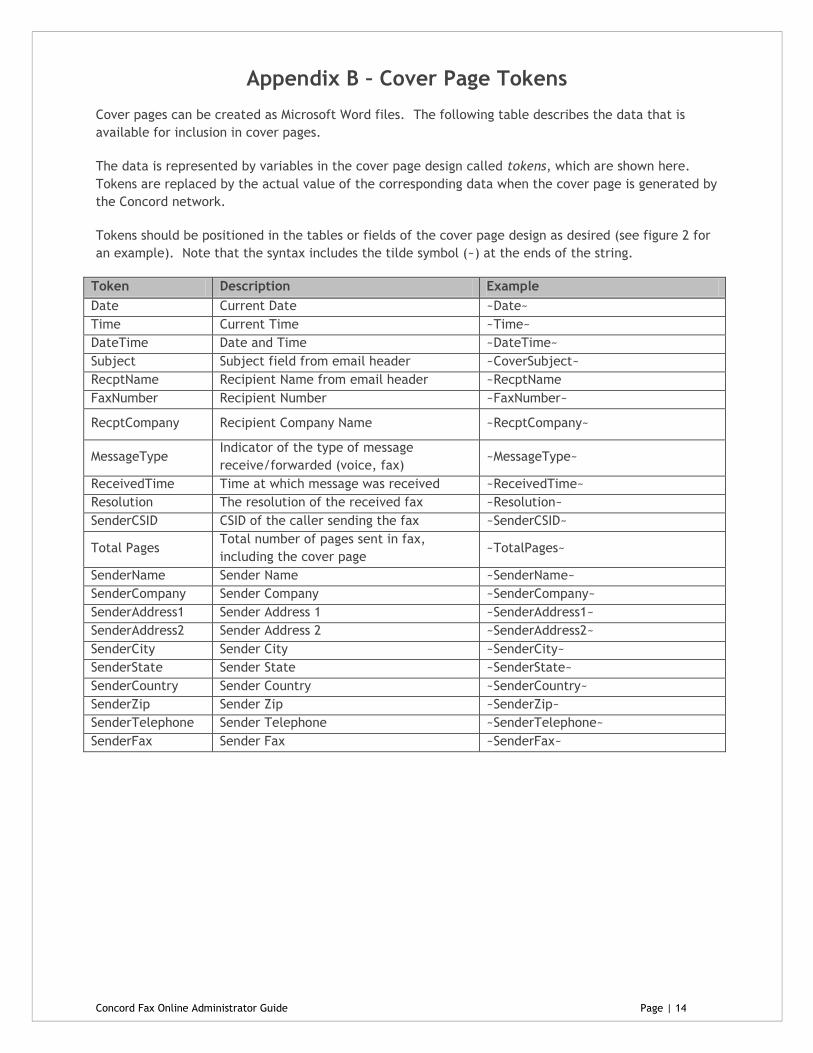
Appendix B – Cover Page Tokens
Cover pages can be created as Microsoft Word files. The following table describes the data that is
available for inclusion in cover pages.
The data is represented by variables in the cover page design called tokens, which are shown here.
Tokens are replaced by the actual value of the corresponding data when the cover page is generated by
the Concord network.
Tokens should be positioned in the tables or fields of the cover page design as desired (see figure 2 for
an example). Note that the syntax includes the tilde symbol (~) at the ends of the string.
Token Description Example
Date Current Date ~Date~
Time Current Time ~Time~
DateTime Date and Time ~DateTime~
Subject Subject field from email header ~CoverSubject~
RecptName Recipient Name from email header ~RecptName
FaxNumber Recipient Number ~FaxNumber~
RecptCompany Recipient Company Name ~RecptCompany~
MessageType Indicator of the type of message
receive/forwarded (voice, fax) ~MessageType~
ReceivedTime Time at which message was received ~ReceivedTime~
Resolution The resolution of the received fax ~Resolution~
SenderCSID CSID of the caller sending the fax ~SenderCSID~
Total Pages Total number of pages sent in fax,
including the cover page ~TotalPages~
SenderName Sender Name ~SenderName~
SenderCompany Sender Company ~SenderCompany~
SenderAddress1 Sender Address 1 ~SenderAddress1~
SenderAddress2 Sender Address 2 ~SenderAddress2~
SenderCity Sender City ~SenderCity~
SenderState Sender State ~SenderState~
SenderCountry Sender Country ~SenderCountry~
SenderZip Sender Zip ~SenderZip~
SenderTelephone Sender Telephone ~SenderTelephone~
SenderFax Sender Fax ~SenderFax~

Concord Fax Online Administrator Guide Page | 15
Appendix C – Email-To-Fax Notification Message Data
Notification messages are returned to the sender when using email-to-fax. The types of notification
messages include the initial notification message, the delivery notification message, and the failure
notification message.
Notification messages may be created in text file format. The following table depicts the data that is
available for inclusion in notification messages.
The data is represented in the notification message file by the tokens shown here. Tokens are replaced
by the actual value of the corresponding data when the notification message is generated by the
Concord network.
Tokens should be positioned in the text of the notification message file as desired. Note that the
syntax includes the delimiters %{} at the ends of the string.
Token Description Example
CallDuration
Duration of the call in which fax was delivered
This token used on delivery confirmation messages
only.
%{CallDuration}
CRLF New line %{CRLF}
MessageID Unique message identifier assigned to email submission %{MessageID}
NumPages
Number of pages in the fax.
This token used on delivery confirmation messages
only
%{NumPages}
PreProcError
Error details for a job that failed before submission to
the fax delivery platform.
This token used on initial notification messages only
%{PreProcError}
ReferenceID User specified identifier assigned to submission %{ReferenceID}
Status
Final Status of the entire submission
This token used on delivery confirmation messages
only.
%{Status}
Tab Tab Character %{Tab}
TimeSent
Date and time when the fax was sent to the recipient.
This token used on delivery confirmation messages
only.
%{TimeSent}
FaxNumber Fax number to fax to (Destination Fax Number) %{FaxNumber}
ErrorCode Internal Error Code %{ErrorCode}
ErrorClass Internal Error Code %{ErrorClass}
ErrorExtra Additional Error Information %{ErrorExtra}
ErrorString Detailed Error string %{ErrorString}
Subject Subject of the original email request %{Subject}
OriginalSender Sender Email [note space in %{Original Sender}] %{Orginal Sender}
OriginalTime Time request was received by the SMTP Gateway %{OrginalTime}

Concord Fax Online Administrator Guide Page | 16
Appendix D – Fax-to-Email Notification Message Data
Notification messages are optionally delivered to the email recipient when using fax-to-email (F2E).
F2E notification occurs upon successful delivery of the fax, and the notification message is delivered to
an email address different from the address where the fax is delivered.
Notification messages may be created in text file format. The following table depicts the data that is
available for inclusion in notification messages.
The data is represented in the notification message file by the tokens shown here. Tokens are replaced
by the actual value of the corresponding data when the notification message is generated by the
Concord network.
Tokens should be positioned in the text of the notification message file as desired. Note that the
syntax includes the delimiters %{} at the ends of the string.
Token Description Example
Account The identifier of the account receiving the fax This value is generally used for internal purposes only, it may have limited benefit for the partner’s customers
%{Account}
CalledNumber The number dialed by the fax sender %{Called Number}
CallerName The name (if available) of the person sending the fax %{CallerName}
CallerNumber The number from which the fax was sent %{CallerNumber}
CRLF New line %{CRLF}
Date Date on which message was received %{Date}
Duration Time taken to transmit the fax from caller with IVR. %{Duration}
Email Message recipient’s email address %{Email}
MessageId Identifier assigned to the message upon receipt by the IVR
%{MessageId}
MessageType Indicator of the type of message received/forwarded (voice, fax)
%{MessageType}
ReceivedTime Time at which message was received %{ReceivedTime}
Resolution The resolution of the received fax %{Resolution}
SenderCSID CSID of the caller sending the fax %{SenderCSID}
Speed The transmission speed of the call on which the fax was sent
%{Speed}
Tab Tab character %{Tab}
TimeZone The time zone in which the recipient receives and views messages
%{TimeZone}

Concord Fax Online Administrator Guide Page | 17
Appendix E – Common Error Descriptions
Error Message Enhanced Error Description
Busy "Busy" Indicates that the called number (phone line) is already in use or engaged.
No Answer
"No Answer" indicates that the line was not picked up (answered) by a fax
machine or person before timing out. The timeout is sufficient to ensure at a
minimum of 5-8 standard rings.
Not a Fax Machine
"Not a fax machine" indicates that a fax device has failed to answer the call.
Specifically, fax tones or the fax signal from a remote machine has not been
detected. This may for a number of reason including but not limited to, a wrong
number, a machine not configured to automatically answer, or a device that has
stopped answering because it is out of paper or has a paper jam.
Voice Answer "Voice Answer" indicates that either a person or voicemail message answered the
call.
Fast Busy
“Fast Busy" indicates that there was no available path to the attempted fax
number. This normally indicates that the destination is currently overloaded, or
that there is an outage with the specific number or in the area attempted such
as that due to a fibre cut. This can also be caused by severe weather conditions
in the area of the destination. In most cases Fast Busy conditions are temporary,
please verify the fax number you’re trying to reach is valid and if so please try
again later.
Sit-Tone / Operator Msg
"Sit-Tone / Operator Msg" indicates that the call was intercepted by the special
situation information tones followed by an operator message, examples include
"The number you have dialed is disconnected or is no longer in service. Please
check the listing and try your call again.", "The number you have dialed has been
changed…the new number is…XXX-XXX-XXXX", "All circuits are currently busy,
please try your call again later". "Operator Msg" indicates the same issue
however the special situation information tones were not detected.
Negotiation Failed
“Negotiation Failed” indicates the call was answered by a fax device but during
the initial training phase of the call, communication between the fax transmitter
and the receiving fax device failed or the two devices could not agree on the
parameters to be used for the call. This often indicates a phone line quality
issue and may occur at the beginning of the fax transmission, or, during the fax
transmission between pages on a multi-page fax.
Transmission Failed
"Transmission Failed“ indicates the receiving fax machine has answered and
connected but the fax was not able to be fully and successfully transmitted.
This can be caused by line quality issues, fax device issues, the sharing of phone
line with other devices such as credit card processing terminals. Temporary
conditions such as severe weather conditions in the destination area can also

Concord Fax Online Administrator Guide Page | 18
cause transmissions failures.
Exceeded ECM Retransmit
“Exceeded ECM Retransmit” indicates the call was answered by a fax device and
connected using ECM or Error Correction Mode. Due to poor line quality or a
poor connection for that specific call attempt the transmission of the fax
required an excessive amount of data to be retransmitted to the receiving device
to get acknowledgment of successful reception of the fax, the call was aborted
to allow a retry or new attempt to get a better connection and to ensure the call
duration did not ensure excessive overtime charges.
Job Cancelled "Job Cancelled" indicates that the job or recipient number was cancelled or the
set time for delivery expired.
General Error
"General Error" indicates that another uncommon error not listed above has
occurred resulting in the failure to transmit your fax. Please retry the fax job or
recipient again. If you get the same error again please contact Concord
customer service for further assistance and investigation.

Concord Fax Online Administrator Guide Page | 19
Appendix F – Frequently Asked Questions
Below you will see a series of “How do I…?” scenarios that can make use of your Company’s AAC.
1) How do I change the CSID for a User?
Login to your company AAC and go to the User Administration / Manage User field.
At the bottom of the Manage User Account page click on “Search.”
This will take you to the list of Users.
Select a user and click on “account settings” at the bottom of the page.
On the User Account Settings page that comes up you will see the following in “Sending Options.”
As you can see, this user’s Fax CSID is <faxnumber>, the default. This may be edited.
You may put anything you wish in this CSID field. (20 characters maximum)
Save your changes by clicking on update at the bottom of the page.

Concord Fax Online Administrator Guide Page | 20
2) How do I select a cover page by location?
a. Generally, this is done by creating Departments (see item 4 on page 21) and creating a specific Cover Page for each Department.
b. You may also create specific cover pages for specific users. c. You can have multiple Cover Pages in your account, however, the correct cover page
must be associated with the appropriate user or Department. d. At the Company Level in the AAC there is a Field that allows you to assign Cover Pages.
e. You can do this by going to the Company Settings under Account Settings. f. At the top of this field you can choose whether the Cover Pages will be Automatic, On
Demand, or, No Cover Pages at all. In the image below On Demand Cover Pages is chosen.
g. Towards the bottom of the Company Account Settings screen is the Cover Page Selection field.
h. In this field you can select the Cover Page for the whole company. i. There is another option to select Cover Pages at the department and user level. j. If you go to “Manage Users” under “User Administration” you will see the following.
k. When you click on the “Search” button at the bottom of the screen you see the following User List. (image below only a partial list)

Concord Fax Online Administrator Guide Page | 21
l. When you check a specific user and click on the Account Settings at the bottom of the page you will see the following at the top of the page.
m. Towards the bottom of the User Account Settings screen is the Cover Page Selection field.
n. This is the location where you could determine which Cover Page a specific User should have.
Concord Fax Online Administrator Guide Page | 22
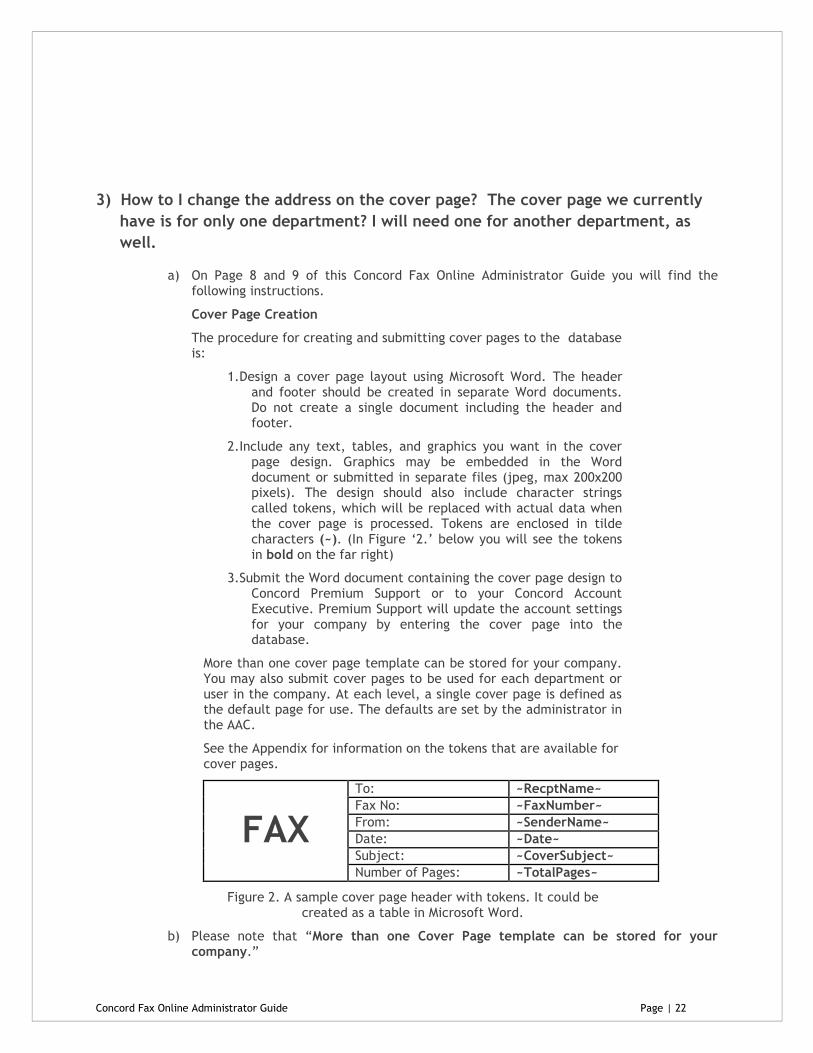
3) How to I change the address on the cover page? The cover page we currently
have is for only one department? I will need one for another department, as
well.
a) On Page 8 and 9 of this Concord Fax Online Administrator Guide you will find the following instructions.
Cover Page Creation
The procedure for creating and submitting cover pages to the database is:
1. Design a cover page layout using Microsoft Word. The header and footer should be created in separate Word documents. Do not create a single document including the header and footer.
2. Include any text, tables, and graphics you want in the cover page design. Graphics may be embedded in the Word document or submitted in separate files (jpeg, max 200x200 pixels). The design should also include character strings called tokens, which will be replaced with actual data when the cover page is processed. Tokens are enclosed in tilde characters (~). (In Figure ‘2.’ below you will see the tokens in bold on the far right)
3. Submit the Word document containing the cover page design to Concord Premium Support or to your Concord Account Executive. Premium Support will update the account settings for your company by entering the cover page into the database.
More than one cover page template can be stored for your company. You may also submit cover pages to be used for each department or user in the company. At each level, a single cover page is defined as the default page for use. The defaults are set by the administrator in the AAC.
See the Appendix for information on the tokens that are available for cover pages.
FAX
To: ~RecptName~
Fax No: ~FaxNumber~
From: ~SenderName~
Date: ~Date~
Subject: ~CoverSubject~
Number of Pages: ~TotalPages~
Figure 2. A sample cover page header with tokens. It could be created as a table in Microsoft Word.
b) Please note that “More than one Cover Page template can be stored for your company.”
Concord Fax Online Administrator Guide Page | 23
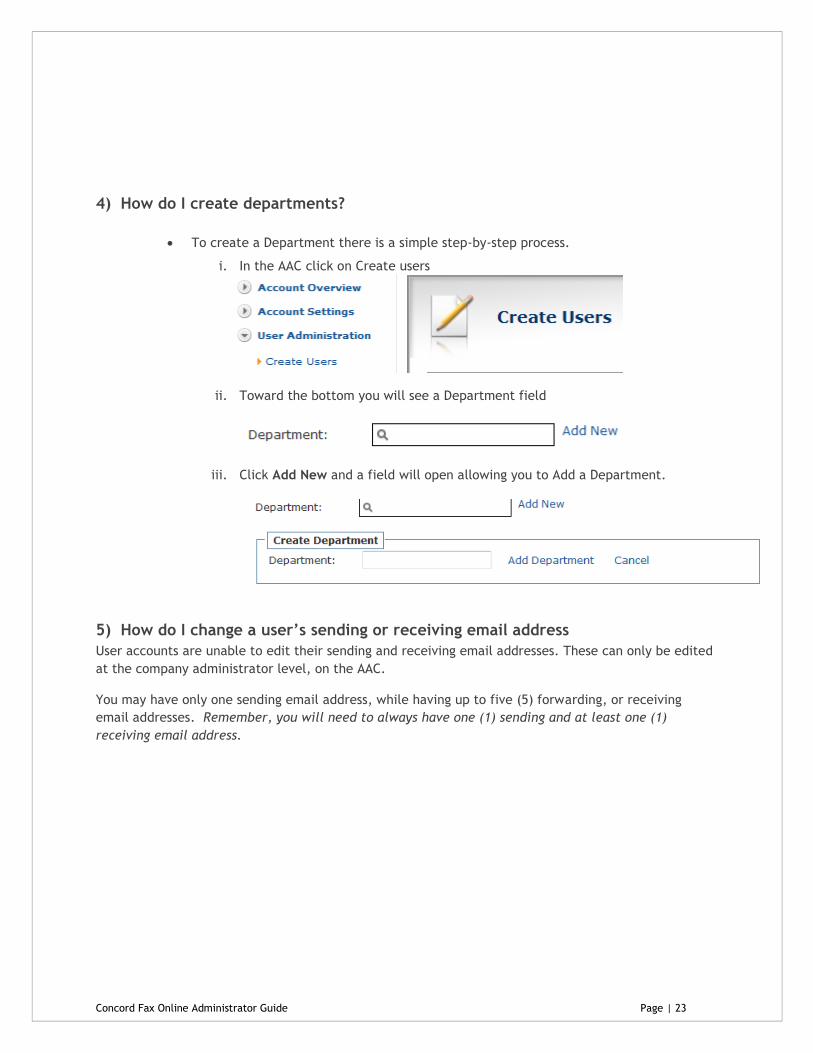
4) How do I create departments?
To create a Department there is a simple step-by-step process.
i. In the AAC click on Create users
ii. Toward the bottom you will see a Department field
iii. Click Add New and a field will open allowing you to Add a Department.
5) How do I change a user’s sending or receiving email address
User accounts are unable to edit their sending and receiving email addresses. These can only be edited
at the company administrator level, on the AAC.
You may have only one sending email address, while having up to five (5) forwarding, or receiving
email addresses. Remember, you will need to always have one (1) sending and at least one (1)
receiving email address.

Concord Fax Online Administrator Guide Page | 24
Here are the steps to make this change using the Company AAC…
Log into the AAC and go to User Administration and Manage Users (see image below)
At the bottom of Manage Users click on the SEARCH button
This will take you to the Manage user Account screen (see image)
Put a check mark in the box of the user you wish to edit and click on “user details.”
This brings you to the Manage User screen for this user. (see image)
On this page you will see the inbound email addresses field. (see image)
Once you make the change you can click on “update” at the bottom of this page and the account will be updated with the new information.
The same process may be used for configuring the sending email address.

Concord Fax Online Administrator Guide Page | 25
Appendix G: Concord Fax Online for Microsoft Exchange 2010
Your test account has been set up based on the information you have provided in your test application.
In order to use Concord Fax Online for Microsoft Exchange, you must Exchange 2010 Unified Messaging
installed and enabled . In your UM Policy, you have to enable inbound faxes and you have to specify the
URI and setting for testing:
sip:tsip.concordfax.com:5060;transport=tcp for T38 sip:gsip.concordfax.com:5060;transport=tcp for G711
Unless you have specifically requested your account to be configured for G711, your account is set for
T38. Your media gateway or phone system MUST support T38 in that case. If you have problems
transmitting a fax, make sure your firewall allows outbound SIP connections to
sip1.beta.concordfax.com and that DNS settings allow that name to resolve (You can enter the IP
address directly if needed).
This screenshot shows the Exchange UI where you enter
the URI listed above, If you find yourself getting
voicemails with fax tones, fax tone detection might need
to be turned on in Exchange:
Open
<Exch. Server Install>\v14\bin\MSExchangeUM.config in notepad Set “EnableInbandFaxDetection” to true. Restart Unified Messaging service
Configure Mailbox policy with URI and
allow inbound faxes
Verify that your gateway or phone
system supports the transmission type
you selected in your test account
request. The default is T38. G711 can
ONLY be used if specifically requested
Verify that your Gateway/Phone System
has valid DNS settings and can resolve
the Concord URI
Verify that your gateway/phone system
can connect to IP addresses outside your
local network
Checklist:

Concord Fax Online Administrator Guide Page | 26
Tips and Tricks:
The fax transmission is successful, but no fax is received
Sometimes Concord receives the faxes correctly and the sending fax machine reports a success, but no
message is received in the users inbox.
While Microsoft Exchange 2010 is supposed to automatically trust Concord’s messages, some customers
have reported problems. If that happens to you, you can work around this by creating a receive
connector that implicitly trusts Concord’s mail servers.
1. From Exchange Management console, click on Microsoft Exchange on premises / Server Configuration / Hub Transport 2. Right click on the receive Connectors window and select 'new Receive Connector' from the popup window. 3. Enter the following a. Name : 'FromConcord' b. Intended Use : Custom c. Remote Network settings, Delete the existing Range and add the following IP addresses i. 216.187.65.179 ii. 216.187.65.178 4. Save the connector and click on Properties a. Under authentication Enable only 'Externally Secured' b. Under Permission group, enable all. c. Save the changes.
If you have any existing connectors (Default), remove the two Concord IP addresses from those Connector ranges.
1. Select properties of the Default connector. 2. Under 'Receive mails from these remote servers' a. Remove the default IP range :0.0.0.0-255.255.255.255 and add the following IP ranges i. 0.0.0.0-216.187.65.177 ii. 216.187.65.180-255.255.255.255
Faxes are not answered by the Concord Network
When Exchange UM detects a fax tone, it issues a REFER to VOIP Gateway with the following SIP
Headers set.
REFER-TO: sip:sip1.beta.concordfax.com.com:5060;transport=tcp REFERRED-BY: XXXXX (String from Exchange which identifies your account and other settings)
The Voip Gateway then tries to initiate a call to Concord (using REFER-TO:). The Voip Gateway
needs to pass pass the SIP Header “REFERRED-BY:” to Concord. Concord requires the
REFERRED-BY: header to validate the caller and will not accept the call if it is missing.
Verify that your phone system or gateway is transmitting the REFERRED-BY: header.
In order for the RTP to flow between the Concord and the Voip Gateway at the customers end, appropriate ports needs to be opened. Normal port ranges are between 20000-30000 UDP or 40000-60000 UDP. However this range depends on the Voip Gateway the customer uses. The port range opened should match what is configured on the Voip Gateway “RTP Port range”

Concord Fax Online Administrator Guide Page | 27
If it still doesn’t work:
Contact Concord Customer Service at [email protected]. Note that actual Concord customers
have access to priority e-mail support and free telephone support.
When you contact support, it helps to speed up the process if you can provide the following:
Wireshark traces from exchange UM and Voip Gateway. If you are using SSL, provide us with the decoded traces or you need to provide us with the certificate for decoding.
UM and VoiP Gateway logs , traces. Also any messages in the event log.
If you have a fax number externally available routed to UM, Concord will be able to trouble shoot without the need to request customers to send faxes. So if possible, provide us with a number to test
VOIP gateway (or PBX) make, model and firmware version number.
Exchange build version number.