concepts and skills bank concepts and skills even … concepts and skills bank use operations with...
TRANSCRIPT

R64 Concepts and Skills Bank
Use Operations with Even and Odd NumbersEven numbers are whole numbers that have 0, 2, 4, 6, or 8 in the ones place. Whole numbers that have a 1, 3, 5, 7, or 9 in the ones place are odd numbers.
Even numbers Odd numbers
0, 2, 4, 6, 8, 10, 12… 192, 194, 196… 2,930, 2,932…
1, 3, 5, 7, 9, 11, 13… 281, 283, 285… 45,933, 45,935…
Key ConceptEven and Odd Numbers
The expressions below show different combinations of even and odd numbers.
Addition even + even4 + 6
odd + odd3 + 9
even + odd 2 + 3
odd + even7 + 2
Subtraction even - even8 - 4
odd - odd7 - 5
even - odd 8 - 7
odd - even9 - 6
Multiplication even × even6 × 2
odd × odd5 × 3
even × odd 4 × 7
odd × even1 × 8
Division even ÷ even8 ÷ 2
odd ÷ odd9 ÷ 3
even ÷ odd 6 ÷ 3
odd ÷ even5 ÷ 2
ExercisesSolve each equation. Then use odd or even to complete the sentence.
1. 32 + 12 = � 44 2. 55 + 27 = � 82 3. 38 + 83 = � 121 even + even = � even odd + odd = � even even + odd = �
4. 72 - 25 = � 47 5. 62 - 18 = � 6. 87 - 29 = �
even - odd = � odd even - even = � odd - odd = �
Use odd or even to complete each sentence.
7. odd × odd = � odd 8. even × even = � even 9. odd × even = �
10. even ÷ even = � 11. odd ÷ odd = � odd 12. even ÷ odd = �
oddodd
eveneven
odd or evenodd or eveneveneven
Conc
epts
and
Ski
lls Concepts and Skills Bank
R64-R76_G3CS_105732.indd R64 10/8/07 5:26:31 PM
R64 Concepts and Skills Bank
Activate Prior KnowledgeLead a discussion about how to identify even and odd numbers.
• • Write 567 on the chalkboard. Ask students to identify the number as either even or odd. Have them explain their thinking to the class.
• • Discuss how even and odd numbers differ by looking at the ones place. Even numbers have 0, 2, 4, 6, or 8 in the ones place. Odd numbers have 1, 3, 5, 7, or 9 in the ones place. Explain that even numbers begin at 0 and skip count by two, whereas odd numbers begin at 1 and skip count by two.
Using student page R64.• • Divide students into four groups and hand out
envelopes containing operation rules written on strips of paper. For example, the addition group would receive four strips of paper in their envelope with addition number sentences (i.e., even + even = even) on them. When creating the strips, make at least one of the number sentences false.
Use Operations with Even and Odd Numbers
Lesson PlannerObjectiveDraw conclusions about the answers to expressions involving even and/or odd numbers.
Vocabularyeven numbers, odd numbers
Materials: 4 envelopes, poster paper (optional)
• • Assign groups the task of determining which number sentences are true and which are false.
• • Have groups record their findings on poster paper or the chalkboard, and then share their results with the class. If time, invite students to try to disprove other groups’ findings.
Using the ExercisesExercises 1–6 Before solving each numerical expression, ask students to determine the answer to the verbal expressions. Then, have students check their answers by solving the expressions.
Exercises 7–12 Challenge students to determine the answers without looking at the operation rules posted by the groups.
Assess and CloseAssess students’ understanding by asking them to solve two verbal expressions, such as “odd × even,” without access to the posted rules. Ask students to support their answers by explaining their thinking with both numbers and words.

Concepts and Skills Bank R57
Concepts and Skills
Divisibility Rules for 2, 5, and 10A whole number is divisible by another number if the remainder is 0 when the first number is divided by the second. The divisibility rules for 2, 5, and 10 are stated below.
Words Examples
A whole number is divisible by:
• 2 if the ones digit is divisible by 2.
• 5 if the ones digit is 0 or 5.
• 10 if the ones digit is 0.
2, 4, 6, 8, 10, 12, …
5, 10, 15, 20, 25, …
10, 20, 30, 40, 50, …
Key ConceptsDivisibility Rules for 2, 5, and 10
A whole number is even if it is divisible by 2. A whole number is odd if it is not divisible by 2.
ExercisesTell whether each number is divisible by 2, 5, or 10. They classify each number as even or odd.
1. 40 2. 65 3. 78 4. 91
5. 115 6. 136 7. 150 8. 194
9. 216 10. 280 11. 311 12. 345
13. Find a number that is divisible 14. Find a number that is divisible by both 2 and 5. 50 by 2, 5, and 10. 90
Use Divisibility Rules
Tell whether the number 340 is divisible by 2, 5, or 10. Then classify the number as even or odd.
Use the divisibility rules to determine if 340 is divisible by 2, 5, or 10.
2: Yes, the ones digit, 0, is divisible by 2.
5: Yes, the ones digit is 0.
10: Yes, the ones digit is 0.
Since 340 is divisible by 2, it is an even number.
So, 340 is divisible by 2, 5, and 10, and it is an even number.
EXAMPLEEXAMPLE
11
2, 5, 10; even 5; odd 2; even none; odd
5; odd 2; even 2, 5, 10; even 2; even
2; even 2, 5, 10; even none; odd 5; odd
2, 5, 10; even 5; odd 2; even none; odd
5; odd 2; even 2, 5, 10; even 2; even
2; even 2, 5, 10; even none; odd 5; odd
R056_R076_EM_CSB_105733.indd R57 10/8/07 2:45:31 PM
FPO
Concepts and Skills Bank R65
Concepts and Skills
Add and Subtract Money with DecimalsThe steps to follow when adding or subtracting money with decimals are similar.
Add Money with Decimals
1 $3.93 + $5.25
Step 1 Line up the decimal points. $3.93
−−−−− + $5.25
.Step 2 Before adding, place a decimal point for the answer. Line it up under the decimal points.
Step 3 Add the numbers as you would if you were adding whole numbers. Place a dollar sign ($) in front of the sum.
So, $3.93 + $5.25 = $9.18.
1$3.93
−−−−− + $5.25
$9.18
EXAMPLE
EXAMPLE Subtract Money with Decimals
2 $15.28 - $8.12
Step 1 Line up the decimal points. $15.28
−−−−−− - $8.12
.Place the decimal point.
Step 2 Subtract. Place a dollar sign ($) in front of the difference.
So, $15.28 - $8.12 = $7.16.
$15.28
−−−−−− - $ 8.12
$ 7.16
ExercisesAdd or subtract.
1. $7.22 + $5.37 $12.59 2. $8.04 + $4.63 $12.67 3. $13.44 + $35.52
4. $9.68 - $7.35 $2.33 5. $7.42 - $3.31 $4.11 6. $12.83 - 11.52 $1.31
$48.96$48.96
THINK 93¢
−−−− + 25¢
118¢Since 100¢ =$1.00, regroup 118¢ as $1.18.
R64-R76_G3CS_105732.indd R65 10/8/07 5:26:34 PM
Concepts and Skills Bank R65
Activate Prior Knowledge• • Lead a discussion about how to write various
amounts of money.
• • Point out that either a cent sign (¢) or a dollar sign accompanied by a decimal point are used when writing monetary amounts.
Using student page R65.• • Display a variety of classroom objects, each
with an appropriate price. Ask students to use addition to find various totals using the displayed objects. For example, “What is the total price of a backpack ($20.95) and a box of markers ($6.50)?” Remind students to line up the decimal points when writing a problem.
• • After finishing a problem, ask students to look at their answers to ensure they make sense.
• • Present a number story to the class that requires subtraction to solve, such as “How much more does a globe ($47.25) cost than a pencil sharpener ($1.99)?” Again, remind students of the importance of lining up the decimal points before solving the problem.
Using the ExercisesExercises 1–3 Show students how to use subtraction to check the answers to these addition problems.
Exercises 4–6 Suggest using the strategy of using addition to check the answers to these exercises.
Assess and CloseAsk each student to write two number stories, one that requires addition to solve and another that requires subtraction to solve. Remind the class to end each number story with a question. If time, students can meet with the teacher or another student for brief proofreading sessions to ensure their stories make sense and are well written. Proofreading could be done overnight by the teacher to allow him/her to assess students’ understanding of the number story writing process. Finally, have students switch stories with someone in the classroom and solve, or include the most well written number stories in a class assessment piece.
Add and Subtract Money with Decimals
Lesson PlannerObjectiveAdd and subtract monetary amounts containing decimal points.
Materials: 4 envelopes, poster paper (optional)

R66 Concepts and Skills Bank
Conc
epts
and
Ski
lls
Multiply MoneyMultiplying money can be used to find the total cost of many items that have the same price.
Multiplying Money
1 Suppose a notebook costs $2.15. How much would 6 notebooks cost?
Step 1 Write the problem as shown.
Step 2 Multiply the hundredths place.
Step 3 Multiply the tenths place.
Step 4 Multiply the ones.
Step 5 Since there are two digits behind the decimal point, place the decimal point two places in front of the last digit of the answer. Write a dollar sign ($) in front of the product.
So, 6 notebooks cost $12.90.
EXAMPLE
$2.15
−−−− × 6
3$2.15
−−−− × 6
0 3$2.15
−−−− × 6
1290
0 3$ 2.15
−−−−− × 6
$12.90
0
ExercisesMultiply.
1. $5.24
−−−−− × 3$15.72 2. $3.74
−−−−− × 5$18.70 3. $4.98
−−−−− × 7$34.86
4. $7.02
−−−−− × 4$28.08 5. $2.33
−−−−− × 8$18.64 6. $6.02
−−−−− × 9$54.18
0 3$2.15
−−−− × 6
90
R64-R76_G3CS_105732.indd R66 10/8/07 5:26:35 PM
R66 Concepts and Skills Bank
Activate Prior Knowledge• • Invite students to share strategies for finding
the total cost of 4 slices of pizza if the price of each slice is $1.25.
• • Call students to the chalkboard to share their solutions.
Using student page R66.• • Share with students that while addition can be
used to solve problems such as the one above, multiplication is usually faster.
• • Explain to students that they do not need to line up decimal points when writing a multiplication problem involving money. However, they do need to include a dollar sign and a decimal point in the answer. After solving the problem, they must bring the decimal point straight down into the answer or count the number of digits behind the decimal point. A dollar sign must be placed in front of the answer.
• • Divide students into small groups. Display a food menu. If the menu prices are in dollars only, add a decimal point and some cents to each item. Pose problems for small groups to solve using the menu.
• • If time permits, assign students the task of “ordering” lunch for their entire group. Ask students to record their menu choices and to determine the total cost of lunch for their group. Tell students they are required to use both multiplication and addition to determine the total cost.
Using the ExercisesExercises 1–6 Remind students to always place a dollar sign and a decimal point in their answers. Also, ask students to use repeated addition to check at least two of the exercises.
Assess and CloseInform students that they have a budget of $60 to plan a party for 8 people. Provide them with the list of party items below. Working alone or in groups, students can choose items for the fun feast.
Ask students to create a table showing how many of which items they bought and the cost involved.
ITEM COST1 bag of 8 hot dog buns $1.99
1 package of 10 hot dogs $2.50
1 bag of potato chips $3.50
1 bag of rice cakes $3.19
1 case of bottled water (6 waters included) $3.79
1 2–liter of juice $1.50
1 bag of apples (6 apples included) $5.49
1 package of napkins (50 napkins included) $1.39
1 package of plastic cups (20 cups included) $3.50
1 package of paper plates (20 plates included) $2.25
1 small bag of ice (enough for 6 people) $2.35
1 large bag of ice (enough for 10 people) $5.25
Multiply Money
Lesson PlannerObjectiveSolve 3-digit by 1-digit multiplication problems involving monetary amounts.
Materials: food menu(s) (class copy or 1 per group), list of party items (1 per student or small group)

Concepts and Skills Bank R67
Concepts and Skills
Relate Fractions to a ClockClocks can be used to show fractions. The hours and minutes divide a clock into equal parts.
The clock shows 4:15. The minute hand started at the 12 on the clock at the beginning of the 4:00 hour. It has moved around 1_
4 of the clock since 4:00. Compare the clock to the fraction model.
112
6 5
3
2
9
87
10 11
333
1 Write the fraction of the clock that the minute hand has traveled since 7:00.
The minute hand started at the 12 and has traveled half way around the clock. So, the minute hand has traveled 1_
2 of the clock.
EXAMPLE
ExercisesWrite the fraction of the clock that the minute hand has traveled since the beginning of the hour.
1. 3 _ 4 2.
112
6 5
3
2
9
87
10 11
666
1 _ 2 3.
1
6 5
3
2
9
87
10 11 12
0 _ 1
Use the clock at the right for Exercises 4–7. Write the fraction of the clock that the minute hand will travel for each given time.
4. 3:15 1 _ 4 5. 3:20 1 _
3
112
6 5
3
2
9
87
1011 122
6. 3:45 3 _ 4 7. 3:50 5 _
6
R64-R76_G3CS_105732.indd R67 10/8/07 5:26:36 PM
Concepts and Skills Bank R67
Relate Fractions to a Clock
Lesson PlannerObjectiveGain a better understanding of both fractions and telling time by relating common fractions to the minute hand on a clock.
Materials: page of blank clock faces (1 per student), notebook paper (1 piece per student)
Manipulatives: class set of manipulative clocks
Activate Prior KnowledgePass out class set of clocks and initiate practice of telling time to the nearest five-minute interval.
• • Dictate different times for students to show on their clocks, such as 5:00, 8:45, 1:20, and 9:40.
• • Draw a large circle on the chalkboard. Invite a volunteer to write the numbers 1 through 12 on the circle as they would appear on a clock. Ask the class how many equal parts the volunteer divided the clock into. Discuss how the clock is divided into 12 equal parts, or twelfths. Each part is 1 ___ 12 of the whole, and 12 ___ 12 equals one whole hour.
Using student page R67.• • Discuss with students how much of the hour
has passed when the minute hand points to 4 4 ___ 12 , to 6 6 ___ 12 , to 9 9 ___ 12 , and to 12 12 ___ 12 .
• • Pass out a page of blank clock faces to each student. Give the class time to divide the clocks into equal parts in different ways.
• • Have students share their work with a partner. Invite students to share their findings on the chalkboard until all fractional possibilities have been recorded (halves, thirds, fourths, sixths, and twelfths).
Using the ExercisesExercises 1–3 Tell the class they may use their blank clock faces to help them solve these exercises. Point out the example of 4:15 and the corresponding 1 __ 4 shaded on the circle at the top of the lesson. Students may also use manipulative clocks.
Exercises 4–7 Ask students who finish early to write equivalent fractions for each time. For example, the fractions 1 __ 4 and 3 ___ 12 can be written for Exercise 4.
Assess and CloseTime Trial Have students number from 1 to 10 on a piece of notebook paper. Dictate fractional times (such as 6 ___ 12 of the hour past 4, or 4 and 6 ___ 12 of the hour) and ask students to record the corresponding times (4:30) on their papers.

R68 Concepts and Skills Bank
Conc
epts
and
Ski
lls
Points, Lines, Line Segments, Rays, and AnglesA point is shown by a dot. A line is a set of points that form a straight path that goes in opposite directions without ending. A ray is a line that has an endpoint and goes on forever in one direction. A line segment is a part of a line between two endpoints. An angle is made up of two rays that meet at the endpoints.
point line ray
A C D S T
line segment angle
G H
EXAMPLE Identify a Figure
Describe the figure at the right.
The figure has one endpoint. The arrowindicates that it goes on forever in one direction.
So, it is a ray.
11
ExercisesDescribe each figure as a point, line, ray, line segment, or angle.
1.
W
X
2. 3.
4.
P
5. 6.
C
D
C
D
FE FE
R
Q
R
Q
KJ
line ray
line segment
point ray angle
R64-R76_G3CS_105732.indd R68 10/8/07 5:26:39 PM
R68 Concepts and Skills Bank
Points, Lines, Line Segments, Rays, and Angles
Lesson PlannerObjectiveSolve 3-digit by 1-digit multiplication problems involving monetary amounts.
Vocabularypoint, line, ray, line segment, angle
Materials: small, handmade posters of geometric figures, 5 index cards per student
Activate Prior KnowledgeDisplay the posters of each geometric figure, or draw them on the chalkboard.
• • Teach students the following song, which is sung to the tune of Do-Re-Mi.
Point, a point, a spot or dot Ray, reminds me of the sun Angle, two rays from just one point Line, has a long, long way to run Segment, a section of a line That has two endpoints every time These geometric figures are on my mind
Which brings us back to point (Repeat)
• • Ask students to identify the figures.
Using student page R68.• • Divide students into small groups and distribute
copies of a table similar to the one shown. Embark on a geometric safari around the room. Have students find and record the various figures.
• • If time permits, invite students to share the results of their safari with their fellow classmates.
Type Location Draw It
Using the ExercisesExercises 1–6 Remind students to think of the lyrics to the song they learned to help them identify each figure. Encourage them to be mindful of arrows which extend beyond points when determining the name of each figure.
Assess and CloseAssign students the task of creating study cards. On each index card, students are to write the name of a figure, draw it, and write at least two facts about it. Note cards can then be used to study for any upcoming assessments.

Concepts and Skills Bank R69
Concepts and Skills
Attributes of CirclesA circle is a two-dimensional closed figure in which all points are the same distance from a fixed point, called the center. The distance around the circleis called the circumference. The parts of a circle are below.
Key ConceptsParts of a CircleA line segment that connects the center of a circle to a point on the circle is a radius of the circle.
A line segment thatconnects two points on a circle and goes through the center of a circle is a diameter of a circle.
F G
Line segment FG
is the radius.
C D
Line segment CD
is the diameter.
EXAMPLE
Identify point R and line segment TU.R
T U
S
Point R is in the middle of the circle. Line segment TU connects two points on a circle and goes through the center of the circle.
So, point R is the center, and line segment TU is the diameter.
11
ExercisesIdentify the given points or line segments for each circle.
1. line segment JK 2. line segment LN 3. point V
H KJ
L NM V
U W
T
radius diameter center
R64-R76_G3CS_105732.indd R69 10/8/07 5:26:43 PM
Concepts and Skills Bank R69
Attributes of Circles
Lesson PlannerObjectiveRecognize and understand the properties of a circle.
Vocabularycircle, center, circumference, radius, diameter
Materials: sticky notes (1 per student); yarn, Venn diagram (1 per student)
Activate Prior KnowledgeDistribute a sticky note to each student. Instruct students to write something they know about circles on the note.
• • Invite students to post finished notes on the chalkboard. Read aloud and discuss the information on all of the notes.
Using student page R69.• • Have students gather in a large circle. Explain
that the distance around a circle is called the circumference. Choose a student to serve as the center of the circle.
• • Give a student standing in the circumference one end of a length of yarn. Then, give the student standing in the center the other end of the piece of yarn. Discuss the radius. Name the radius after the first letter of the name of each student. Repeat a few more times.
• • Continue the activity above, but with a longer piece of yarn to signify the circle’s diameter.
Using the ExercisesExercises 1–3 Before students complete the exercises, invite them to ponder why a ray or line cannot serve as the radius or diameter of a circle. If students are having a difficult time distinguishing between radius and diameter, relate to them that the word radius is shorter than diameter, and the radius of a circle is always shorter than its diameter.
Assess and CloseVenn Diagram Have students complete the three-ring Venn diagram shown below with facts they have learned about each term. Challenge students to record at least two facts in each region of the diagram.
DiameterRadius
Centeris a point
are linesegments
R70 Concepts and Skills Bank
Conc
epts
and
Ski
lls
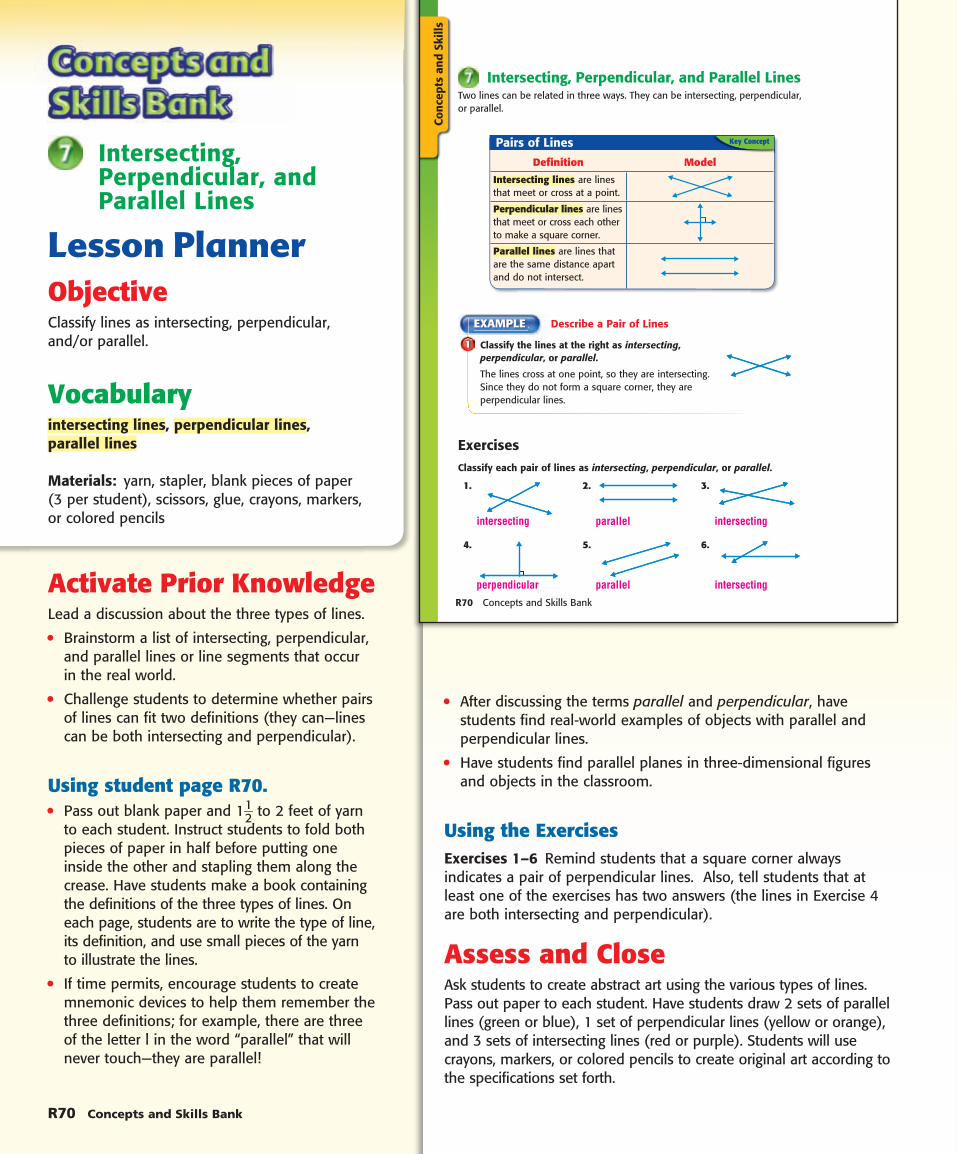
Intersecting, Perpendicular, and Parallel LinesTwo lines can be related in three ways. They can be intersecting, perpendicular, or parallel.
Key ConceptPairs of Lines
Definition Model
Intersecting lines are lines that meet or cross at a point.
Perpendicular lines are lines that meet or cross each other to make a square corner.
Parallel lines are lines that are the same distance apart and do not intersect.
Describe a Pair of Lines
Classify the lines at the right as intersecting,perpendicular, or parallel.
The lines cross at one point, so they are intersecting. Since they do not form a square corner, they are perpendicular lines.
11
EXAMPLE
ExercisesClassify each pair of lines as intersecting, perpendicular, or parallel.
1. 2. 3.
4. 5. 6.
intersecting
perpendicular
parallel
parallel
intersecting
intersecting
R64-R76_G3CS_105732.indd R70 10/8/07 5:26:44 PM
R70 Concepts and Skills Bank
Intersecting, Perpendicular, and Parallel Lines
Lesson PlannerObjectiveClassify lines as intersecting, perpendicular, and/or parallel.
Vocabularyintersecting lines, perpendicular lines, parallel lines
Materials: yarn, stapler, blank pieces of paper (3 per student), scissors, glue, crayons, markers, or colored pencils
Activate Prior KnowledgeLead a discussion about the three types of lines.
• • Brainstorm a list of intersecting, perpendicular, and parallel lines or line segments that occur in the real world.
• • Challenge students to determine whether pairs of lines can fit two definitions (they can—lines can be both intersecting and perpendicular).
Using student page R70.• • Pass out blank paper and 1 1 __ 2 to 2 feet of yarn
to each student. Instruct students to fold both pieces of paper in half before putting one inside the other and stapling them along the crease. Have students make a book containing the definitions of the three types of lines. On each page, students are to write the type of line, its definition, and use small pieces of the yarn to illustrate the lines.
• • If time permits, encourage students to create mnemonic devices to help them remember the three definitions; for example, there are three of the letter l in the word “parallel” that will never touch—they are parallel!
• • After discussing the terms parallel and perpendicular, have students find real-world examples of objects with parallel and perpendicular lines.
• • Have students find parallel planes in three-dimensional figures and objects in the classroom.
Using the ExercisesExercises 1–6 Remind students that a square corner always indicates a pair of perpendicular lines. Also, tell students that at least one of the exercises has two answers (the lines in Exercise 4 are both intersecting and perpendicular).
Assess and CloseAsk students to create abstract art using the various types of lines. Pass out paper to each student. Have students draw 2 sets of parallel lines (green or blue), 1 set of perpendicular lines (yellow or orange), and 3 sets of intersecting lines (red or purple). Students will use crayons, markers, or colored pencils to create original art according to the specifications set forth.

Concepts and Skills Bank R71
Concepts and Skills
Classify AnglesAngles can be classified by how far the rays spread apart. An angle that has the type of corner found on a square is called a right angle. Any angle that is smaller than a right angle is called an acute angle. An angle that is largerthan a right angle but smaller than a straight line is called an obtuse angle.
EXAMPLES
Classify the angle as right, acute, or obtuse.
1 2
The angle shown looks like the corner of a square. So, the angle is a right angle.
The angle shown is smaller than a right angle. So, it is an acute angle.
ExercisesClassify the angle at the right as right, acute, or obtuse. Use a square pattern block if needed.
1. 2. 3.
4. 5. 6.
7. Give a real-world example of each type of angle. Sample answer: acute: capital A; right: book corner; obtuse: lawn chair
acute angleright angle obtuse angle
acute right obtuse
obtuseacute right
rightangle
R64-R76_G3CS_105732.indd R71 10/8/07 5:26:48 PM
Concepts and Skills Bank R71
Classify Angles
Lesson PlannerObjectiveRecognize and understand properties of three types of angles: right, acute, and obtuse.
Vocabularyright angle, acute angle, obtuse angle
Materials: blank piece of 8 1 __ 2 x 11” paper (1 per student); poster-sized paper (1 per group); straws, pipe cleaners, or toothpicks
Manipulatives: square pattern blocks
Activate Prior KnowledgeReview with students the definition for “angle,” which was learned in a previous Concept and Skills Lesson.
• • Ask students to explain how an angle is different from other geometric figures they have learned about, such as a ray or line segment.
Using student page R71.• • Lead students in “Angle Calisthenics.” Show
students how to make the different angles using their arms or legs, and then call out angle types at random for students to create.
• • Have students make a pamphlet detailing the three types of angles. On each face of the pamphlet students can include the definition of each angle, details about its measure in degrees, examples of where it can be found in the classroom, and a graphic representation of the angle using straws, pipe cleaners, or toothpicks as the sides of the angles.
Using the ExercisesExercises 1–6 Show students how to use a square pattern block to determine an angle’s type. Also, point out that an angle does not have to have points drawn on it to be an angle (such as the angle shown in Exercise 1).
Exercise 7 If time permits, encourage students to write more than one example for each type of angle.
Assess and CloseDivide students into small groups. Have them circulate around the classroom and collect objects which have angles. When they return to their workspace, have each group draw a large 3-ring Venn diagram on their piece of poster-sized paper. Instruct students to label the three main regions “right angle,” “acute angle,” and “obtuse angle.” Finally, have students categorize their objects by placing them in the correct region of the Venn diagram. Those objects that contain more than one type of angle should be placed where the main regions overlap.

R72 Concepts and Skills Bank
Conc
epts
and
Ski
lls
TrianglesYou can classify triangles by the lengths of their sides or by their angles.
Key ConceptsClassify Triangles by SidesIsosceles
at least two sides have the same
length
Equilateral
all sides have the same length
Scalene
no sides have the same length
Key ConceptsClassify Triangles by AnglesAcute
3 acute angles
Right
1 right angle, 2 acute angles
Obtuse
1 obtuse angle,2 acute angles
EXAMPLE
Classify the triangle by its sides and by its angles.
None of the sides have the same length. There is one obtuse angle and 2 acute angles.
So, the figure shown is a scalene triangle and an obtuse triangle.
11
ExercisesClassify each triangle by its sides and by its angles.
1.
cm4 c
2. 3. 4.
isosceles; acute scalene; right scalene; obtuse equilateral; acute
R64-R76_G3CS_105732.indd R72 10/8/07 5:26:49 PM
R72 Concepts and Skills Bank
Triangles
Lesson PlannerObjectiveRecognize and understand the properties of the six types of triangles.
Vocabularyisosceles triangle, equilateral triangle, scalene triangle, acute triangle, right triangle, obtuse triangle
Materials: books, magazines, or Internet sites containing photographs of architecture; blank paper (1 piece per student)
Manipulatives: square pattern blocks
Activate Prior KnowledgeLead a discussion about triangles.
• • Discuss how triangles differ from other shapes (i.e., number of sides/angles).
• • Have students go on a triangle scavenger hunt by looking through books and magazines, or looking online as a class at photographs of architecture.
Using student page R72.• • Using the two charts on page R72, classify the
triangles students find by their sides and angles.
• • As a class or in small groups, brainstorm mnemonic devices to aid students in memorizing the different types of triangles. For example, “An acute triangle has such cute little angles!” Teach students to sing “Oh isosceles, Oh isosceles; You look just like a pine tree” to the tune of “O Tannenbaum.”
• • Challenge students to think of triangle side and angle combinations that are impossible, such as a right, equilateral triangle or an obtuse, equilateral triangle.
Using the ExercisesExercises 1–4 Tell students they may use a square pattern block to identify right triangles. Remind students to use the brainstormed mnemonic devices to help them classify each triangle.
Assess and CloseHave students fold a blank piece of paper in half three times and then unfold it to reveal eight regions. Tell students to number the squares 1 through 8. Describe different triangles for students to draw in each region. For example, students could be instructed to draw an acute, equilateral triangle in the first region.

Concepts and Skills Bank R73
Concepts and Skills
Similar and Congruent FiguresTwo figures that have the same shape but different sizes are called similar.When figures have the same size and the same shape, they are congruent.
similar
same shapedifferent size
congruent
same shapesame size
1 Classify the set of figures as similar or congruent.
The figures are the same shape and same size.
So, the figures are congruent.
EXAMPLE
ExercisesClassify each set of figures as similar or congruent.
1. 2. 3.
4. 5. 6.
7. Write a real-world example of a pair of objects that are similar. Sample answer: a small paperclip and a large paperclip.
congruent
congruent
similar
similar
congruent
congruent
R64-R76_G3CS_105732.indd R73 10/8/07 5:26:52 PM
Concepts and Skills Bank R73
Similar and Congruent Figures
Lesson PlannerObjectiveClassify geometric figures as either similar or congruent.
Vocabularysimilar, congruent
Materials: paper cut-outs of two similar figures; scrap paper; tracing paper, an overhead transparency, or any sheet of paper that is thin and easy to see through; scissors; glue; blank piece of paper (1 per student); colored paper
Manipulatives: various pattern blocks
Activate Prior KnowledgePass out pairs of pattern blocks to small groups of students, such as two triangles, two squares, two trapezoids, etc. Ask students to find exact matches among the blocks.
• • Tell students that when two objects have exactly the same size and shape, they are congruent.
Using student page R73.• • Hold up paper cut-outs of two similar figures
and invite a volunteer to place them on top of each other to determine if they are congruent. When the student determines that they are not, introduce the term “similar.”
• • Have students draw examples of similar figures on paper. Then, invite students to the chalkboard to draw their favorite set of similar figures on the chalkboard.
Using the ExercisesExercises 1–6 Before students attempt to classify each set of figures, show them how to trace one of them and then lay the tracing on top of the other to determine if they are either congruent or similar. They can use tracing paper, an overhead transparency, or any sheet of paper that is thin and easy to see through. Inform students that they may have to rotate the tracing because figures do not always have the same orientation.
Exercise 7 After students have recorded an example and if time permits, encourage them to draw the objects.
Assess and CloseShape Sort Supply each student with a piece of blank paper and some colored paper. Have them fold the piece of blank paper into three equal regions and label them “similar,” “congruent,” and “neither.” Next, have students use the colored paper to cut out 2 shapes for each region. Explain that they are to write why each set of shapes belongs in the particular regions.
R74 Concepts and Skills Bank
Conc
epts
and
Ski
lls
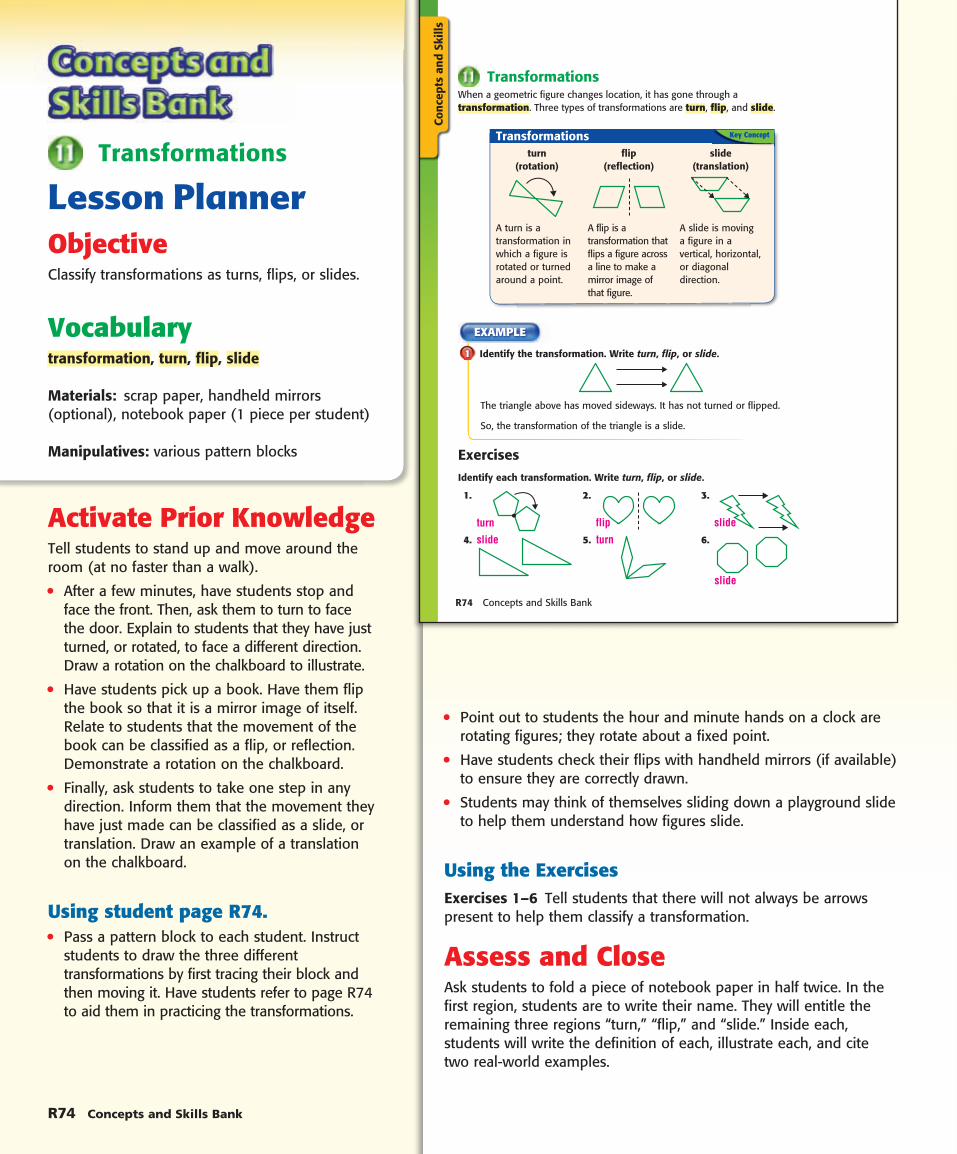
TransformationsWhen a geometric figure changes location, it has gone through a transformation. Three types of transformations are turn, flip, and slide.
Key ConceptTransformationsturn
(rotation)
A turn is a transformation in which a figure is rotated or turned around a point.
flip(reflection)
A flip is a transformation that flips a figure across a line to make a mirror image of that figure.
slide(translation)
A slide is moving a figure in a vertical, horizontal, or diagonal direction.
1 Identify the transformation. Write turn, flip, or slide.
The triangle above has moved sideways. It has not turned or flipped.
So, the transformation of the triangle is a slide.
EXAMPLE
ExercisesIdentify each transformation. Write turn, flip, or slide.
1. 2. 3.
4. 5. 6.
turnslide
flip
turn
slide
slide
R64-R76_G3CS_105732.indd R74 10/8/07 5:26:55 PM
R74 Concepts and Skills Bank
Transformations
Lesson PlannerObjectiveClassify transformations as turns, flips, or slides.
Vocabularytransformation, turn, flip, slide
Materials: scrap paper, handheld mirrors (optional), notebook paper (1 piece per student)
Manipulatives: various pattern blocks
Activate Prior KnowledgeTell students to stand up and move around the room (at no faster than a walk).
• • After a few minutes, have students stop and face the front. Then, ask them to turn to face the door. Explain to students that they have just turned, or rotated, to face a different direction. Draw a rotation on the chalkboard to illustrate.
• • Have students pick up a book. Have them flip the book so that it is a mirror image of itself. Relate to students that the movement of the book can be classified as a flip, or reflection. Demonstrate a rotation on the chalkboard.
• • Finally, ask students to take one step in any direction. Inform them that the movement they have just made can be classified as a slide, or translation. Draw an example of a translation on the chalkboard.
Using student page R74.• • Pass a pattern block to each student. Instruct
students to draw the three different transformations by first tracing their block and then moving it. Have students refer to page R74 to aid them in practicing the transformations.
• • Point out to students the hour and minute hands on a clock are rotating figures; they rotate about a fixed point.
• • Have students check their flips with handheld mirrors (if available) to ensure they are correctly drawn.
• • Students may think of themselves sliding down a playground slide to help them understand how figures slide.
Using the ExercisesExercises 1–6 Tell students that there will not always be arrows present to help them classify a transformation.
Assess and CloseAsk students to fold a piece of notebook paper in half twice. In the first region, students are to write their name. They will entitle the remaining three regions “turn,” “flip,” and “slide.” Inside each, students will write the definition of each, illustrate each, and cite two real-world examples.

Concepts and Skills Bank R75
Concepts and Skills
Minimum, Maximum, Mode, and RangeData are pieces of information that often use numbers. One way to describe a set of data is to use the mode. The mode of a set of data is the number that occurs most often. The range is the difference between the least (minimum) and the greatest (maximum) numbers.
1 Find the mode, minimum, maximum, and range in the set of data to the right.
To find the mode, find the most common numbers. Five is the number that occurs most often.
To find the range, subtract the minimum from the maximum.
So, 5 is the mode in the set of data. The minimum is 2, the maximum is 9, and the range is 7.
EXAMPLE
5, 2, 3, 9, 5, 5, 2
2, 2, 3, 5, 5, 5, 9
maximum minimum range
9 - 2 = 7
ExercisesFor each set of data, find the mode, minimum, maximum, and range.
1. 6, 1, 4, 5, 4 2. 8, 1, 9, 3, 1 3. 3, 3, 3, 1, 5, 10
4. 4, 2, 4, 2, 4, 8 5. 12, 11, 4, 33, 3, 12 6. 15, 3, 5, 3, 51
7. SCHOOL Five students took a spelling test. The scores were 90, 88, 99, 100, and 99. Find the range of the scores. 100 - 88 = 12
8. TRUCKS A delivery truck company has seven trucks. Two of the trucks drove 25 miles. Three of the trucks drove 39 miles. The rest of the trucks drove 40 miles. Write the number of miles each truck drove to show the set of data. Find the mode.25, 25, 39, 39, 39, 40, 40; mode = 39
4, 1, 6, 5 1, 1, 9, 8 3, 1, 10, 9
4, 2, 8, 6 12, 3, 33, 30 3, 3, 51, 48
R64-R76_G3CS_105732.indd R75 10/8/07 5:26:58 PM
Concepts and Skills Bank R75
Minimum, Maximum, Mode, and Range
Lesson PlannerObjectiveGiven a set of data, identify the minimum, maximum, mode, and range.
Vocabularymode, range, minimum, maximum
Materials: sticky notes (1 per student), notebook paper (1 piece per student)
Manipulatives: number cube (1 per student)
Activate Prior KnowledgeChoose a data type, such as number of siblings, and instruct students to record it on a sticky note. Next, have the class arrange themselves numerically by the data recorded on their sticky notes before adhering them to the chalkboard.
• • Invite volunteers to name the smallest and greatest numbers posted on the board. Introduce the terms “minimum” and “maximum.”If students need help differentiating between the two, point out that “minimum” contains “mini-,” which pertains to small as in the word “miniature” (miniature golf, miniature pony, miniature poodle, etc.).
Using student page R75.• • Point out to students the algorithm used to
determine range on page R75. Ask them to determine the range of the class data set.
• • Next, show students how to find the mode, or the number that occurs the most.
• • Discuss with students why it is important to arrange numbers in a data set from smallest to largest or largest to smallest (makes it easier to find minimum and maximum as well as the mode).
Using the ExercisesExercises 1–6 Remind students to arrange the data numerically before identifying the mode, minimum, maximum, and range.
Exercises 7–8 Again, ask students to arrange the data numerically before solving each problem.
Assess and ClosePass out a piece of notebook paper and a number cube to each student. Instruct students to fold the piece of paper in half and then unfold it. Tell students to roll their number cube five times, recording the number rolled each time in the first region of their notebook paper. Next, they are to identify the minimum, maximum, mode, and range of their data set. Repeat the experiment in the second area of the paper, but this time by rolling the number cube ten times.

R76 Concepts and Skills Bank
Conc
epts
and
Ski
lls
Circle GraphsCircle Graphs are used to compare parts of a whole.
1 What is the most common way students arrive at school?
The circle is divided into three parts. The parts are not equally divided. The sector or part that is the largest represents students that walk to school.
So, the most common way students arrive at a school is by walking to school.
EXAMPLE
ExercisesFor Exercises 1–3, use the circle graph at the right.
1. Are there more boys or more girls in the class? boys
2. How many students are in the class altogether?
3. What would happen to the graph if there were 10 boys and 10 girls? Both parts would be equal.
For Exercises 4–6, use the circle graph at the right.
4. Which fruit is liked the least? pear
5. How many students like oranges? 64 students
6. How many more students like apples than pears? 75 students
7. Create a circle graph with 3 sectors. Which part represents the most? See students’ work.
How Students Arrive at School
Car3
Bus15Walk
22
20 studentsBoys11
Girls9
Third Grade Class
Favorite Fruits
Orange64
Pear15
Apple90
R64-R76_G3CS_105732.indd R76 10/8/07 5:26:59 PM
R76 Concepts and Skills Bank
Circle Graphs
Lesson PlannerObjectiveExplore how data is represented in circle graphs.
Vocabularycircle graphs
Materials: class list (1 per student), blank piece of paper (1 per student – optional)
Manipulatives: compasses, or cardboard circles for tracing
Activate Prior KnowledgeTake a poll on how students get to school. Create a tally chart based on their responses. Then, create a circle graph using the data from the tally chart.
• • Ask students questions about the circle graph, such as: What is the most/least popular way to get to school? How many people ride the bus to school? How many more people ride in a bus than in a car to school? How many people answered the survey?
• • Compare the class circle graph to the one shown on page R76. How are they different/alike?
Using student page R76.• • Ask students to take a survey of their
classmates. Each student should devise a question to ask his/her classmates, along with three to five possible answers from which the students can choose. Have students make a tally chart to collect the data.
• • Have the students make their circle graphs using the data they collected. Compasses or cardboard circles for tracing will aid students with drawing their circle graphs.
• • Finally, remind students to label each sector of their circle graphs and to give them titles.
Using the ExercisesExercises 1–6 Advise students to look carefully at the labels for the different sectors. Also, students should look for key words in the questions to determine which operation to use; for example, the word “altogether” signals that addition is needed to solve the problem.
Exercise 7 Make available compasses or cardboard circles for students to trace when creating their circle graphs.
Assess and CloseQ & A Once students have created their own circle graphs using their surveys, have them write three questions about their circle graphs along with the answers to them. Tell students that subtraction must be used to answer at least one of their questions.