complete control mobile programming manual for … u s i n g c c p e d i t o r t o p r o g r a m the...
TRANSCRIPT
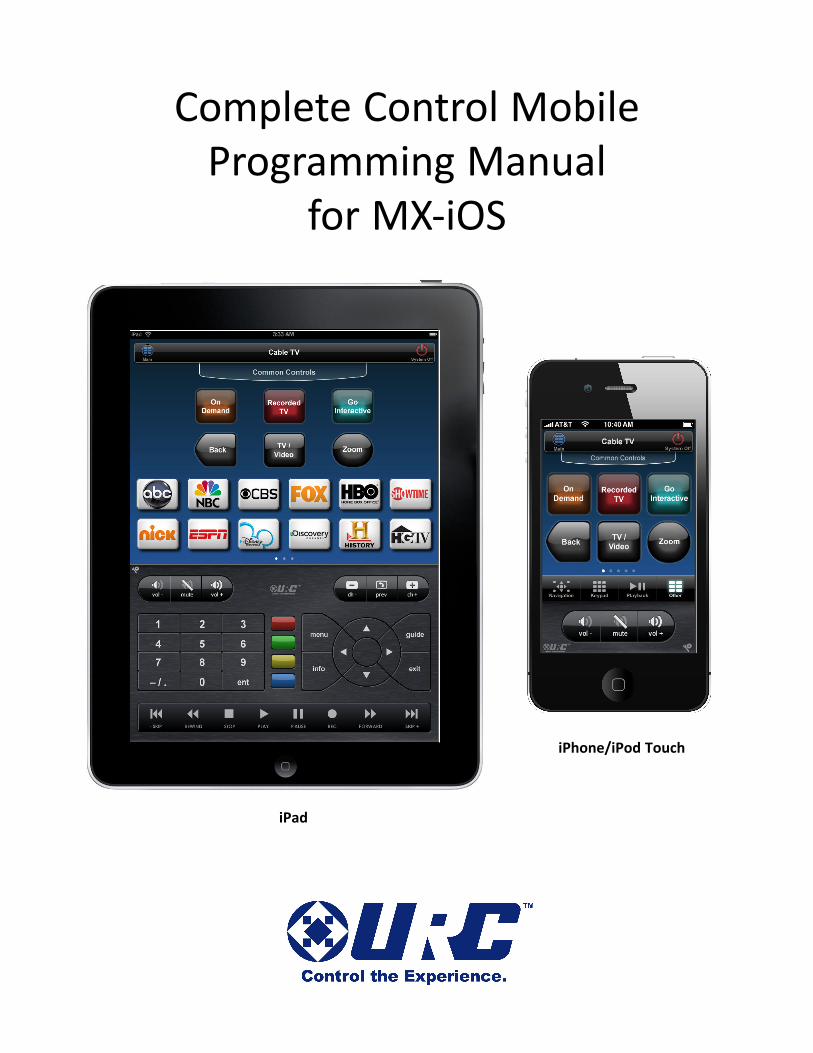
Complete Control Mobile
Programming Manual
for MX-iOS
iPad
iPhone/iPod Touch

Complete Control Mobile Programming Manual for MX-iOS© 2012 Universal Remote Control, Inc.
The information in this manual is copyright protected. No part of this manual may be copied or reproduced in any form
without prior written consent from Universal Remote Control, Inc.
UNIVERSAL REMOTE CONTROL, INC. SHALL NOT BE LIABLE FOR OPERATIONAL, TECHNICAL OR EDITORIAL
ERRORS/OMISSIONS MADE IN THIS MANUAL.
The information in this manual may be subject to change without prior notice.
Complete Control is a registered trademark of Universal Remote Control, Inc. Entertainment Made Simple is a
trademark of Universal Remote Control, Inc. All other brand or product names are trademarks or registered
trademarks of their respective companies or organizations.
500 Mamaroneck Avenue
Harrison, NY 10528
Phone: (914) 835-4484
Fax: (914) 835-4532

1
USING
CCP
EDITOR
TO
PROGRAM
The MX-iOS iPhone/iPad/iPod Touch remote can control up to 255 devices with up to 255 pages each.
Control these devices over the network via a base station, indoors and out, through walls and floors, and in
other rooms. Increase or decrease the living room television volume from your kitchen or other room
without pointing towards the TV. Before we can accomplish this, we need to program the MX-iOS in the
Complete Control Program.
This manual will guide you through the steps of programming your MX-iOS remote control, based on
the Programming in CCP manual found within CCP or in the URC Control Room. Each of the programming
steps below, are represented by symbols which compare that step with the programming process described
in the Programming in CCP manual. These symbols will help point out which steps are the same (green),
similar (yellow) or completely different (red) from the process described there. Make sure to review all of
the red (different) and yellow (similar) steps, because the programming procedure will be different. If you
would like further information regarding a specific step, refer to the Programming in CCP Manual.
Introduction
Different
STOP, you need to review this step. When you see this symbol make sure to stop and read the
information provided. This step is totally different than described in the Programming in CCP manual.
Similar
Review this step as there are slight changes in the programming process. This step is similar to what is
described in the Programming in CCP manual.
Same
You may skip this step. It’s the same process shown in the Programming in CCP manual.
Complete Control Mobile Programming Manual for MX-iOS
2
Configure Home
In this section you will...
● Add a room, base station and the MX-iOS to your project.
This step is different than Configure Home: System Configuration found in the Programming in
CCP manual.
Button Properties
In this section you will…
● Modify a button image, text, position or add a variable to it.
This step is different as it is not found in the Programming in CCP manual.
Setup Code
In this section you will…
● Purchase and add a setup code to CCP for establishing a communication line between the iOS
device an MRX Base Station.
This step is different as it is not found in the Programming in CCP manual.
Create & Name Devices
In this section you will…
● Add every component that you would like to control to your project.
This step is different than Create & Name Devices found in the Programming in CCP manual.
Create & Edit Layouts
In this section you will…
● Add a theme and button layout to each device.
This step is different, as it is not found in the Programming in CCP manual.
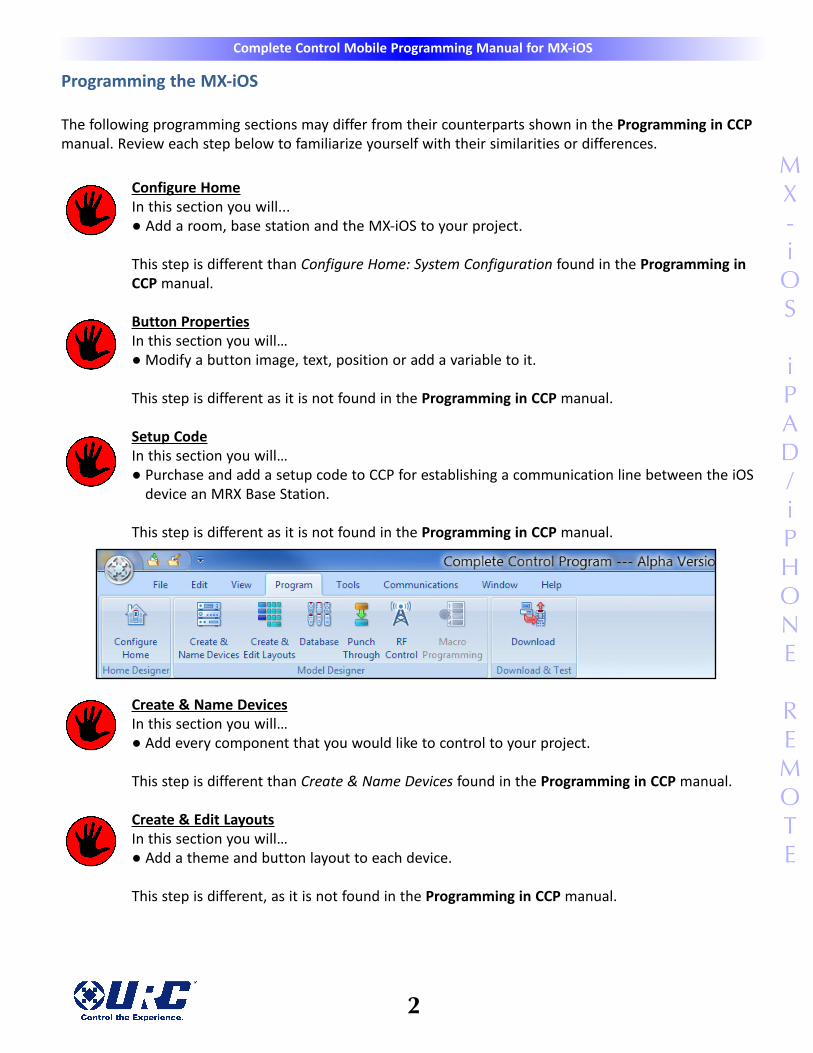
Programming the MX-iOS
The following programming sections may differ from their counterparts shown in the Programming in CCP
manual. Review each step below to familiarize yourself with their similarities or differences.
MX-iOS
iPAD/iPHONE
REMOTE
Complete Control Mobile Programming Manual for MX-iOS

3
USING
CCP
EDITOR
TO
PROGRAM
Database
In this section you will…
● Select and save the manufacturer’s IR codes to control each of your newly added devices.
This step is similar to IR Database found in the Programming in CCP manual.
Punch Through
In this section you will…
● Save commands from one device (i.e. AVR) to another device (i.e. Cable).
This step is identical to Programming Punch Through found in the Programming in CCP manual.
RF Control
In this section you will…
● Select the optional base station to use in your project.
● Route IR commands to specific ports for better reliability.
This step is identical to RF Control found in the Programming in CCP manual.
Macro Programming
In this section you will…
● Record a sequence of commands that is executed when the end-user selects a button.
This step is different than Macro Programming found in the Programming in CCP manual.
Download
In this section you will…
● Download the MX-iOS App for the iOS device.
● Send all of your programming to the MX-iOS .
This step is identical to Downloading found in the Programming in CCP manual.
Complete Control Mobile Programming Manual for MX-iOS
4
MX-iOS
iPAD/iPHONE
REMOTE
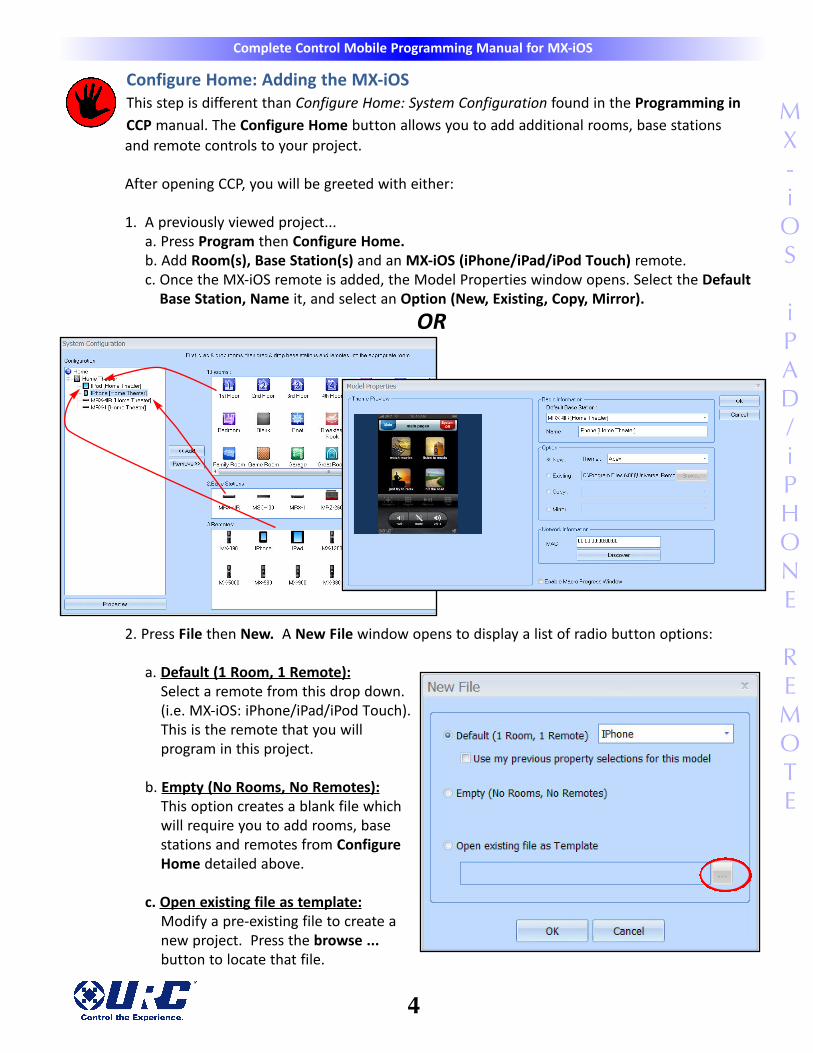
Configure Home: Adding the MX-iOS
This step is different than Configure Home: System Configuration found in the Programming in
CCP manual. The Configure Home button allows you to add additional rooms, base stations
and remote controls to your project.
After opening CCP, you will be greeted with either:
1. A previously viewed project...
a. Press Program then Configure Home.
b. Add Room(s), Base Station(s) and an MX-iOS (iPhone/iPad/iPod Touch) remote.
c. Once the MX-iOS remote is added, the Model Properties window opens. Select the Default
Base Station, Name it, and select an Option (New, Existing, Copy, Mirror).
OR
2. Press File then New. A New File window opens to display a list of radio button options:
a. Default (1 Room, 1 Remote):
Select a remote from this drop down.
(i.e. MX-iOS: iPhone/iPad/iPod Touch).
This is the remote that you will
program in this project.
b. Empty (No Rooms, No Remotes):
This option creates a blank file which
will require you to add rooms, base
stations and remotes from Configure
Home detailed above.
c. Open existing file as template:
Modify a pre-existing file to create a
new project. Press the browse ...
button to locate that file.
Complete Control Mobile Programming Manual for MX-iOS

Button PropertiesThis step is different as it is not found in the Programming in CCP manual. Since MX-iOS,
iPhone/iPad/iPod Touch, is a graphical remote, you can tweak a button by adding text and
modifying its image using Button Properties.
1. Click on a user interface button to view the Button Properties window on the right side of
CCP. Or click on the Properties tab to open the Button Properties window.
2. Modify a button by using the following options:
Variable: Create (press New) or assign a variable from the drop down list to change
the state of a button from normal to pressed. This is an optional feature. For
further details, refer to the Advanced Applications - Variables section in this
manual.
Button ID: Not used in programming. This internal Button ID is used by CCP as a
button identifier.
IR ID: This ID is used by the CCP databases to map commands to the correct soft
button locations when using the "Save All" function of the database. It is usually
not modified during typical programming, but it can be manipulated using the pull-
down list in order to assign a desired IR ID to a button.
Text: Click on the Text Entry box and use the keyboard to edit the label of a
button. Text tools allow you to change the Font, Color, Style and Position of the
text on a button. The Text window also allows you to have different text on the
Normal button state and the Pressed button state.
Image: Each button has a pre-selected
image that can be modified to a BMP,
GIF, JPG or animated GIF. Normal and
Pressed are detailed on the next page.
Position and Size: Modify the button
location using the X,Y coordinates of the
MX-iOS user screen. You may ONLY
modify the button height and width on
NEW buttons, when right-clicking and
selecting Add Button. The image file
cannot be modified because of its
predetermined size. Keep in mind the
button can never be larger than the
customizable screen of 640 x 600
(iPhone/iPod Touch) or 1536 x 1124
(iPad).
5
USING
CCP
EDITOR
TO
PROGRAM
Only one line of text is visible in the text box
window. Use the keyboard Arrow Up and
Arrow Down keys to edit multi-line text.
Complete Control Mobile Programming Manual for MX-iOS

6
MX-iOS
iPAD/iPHONE
REMOTE
Complete Control Mobile Programming Manual for MX-iOS
MX-iOS
iPAD/iPHONE
REMOTE
Normal: This image appears on the button before it is pressed.
Pressed: This image appears after the button is pressed.
Delete:
Click on this button to
delete the currently
loaded image.
Background Color:
Click on this button to
open the color window
and pick a color for a
rectangular button
without art.
Image preview:
An image of the
before (normal) state
is displayed.
Image name:
This field displays
the file name.
Import:
Click on this button to
browse your computer
for a graphic you would
like to import.
Export:
Click on this button to
browse your computer
and save the existing
image as a file anywhere
on your PC.
Invert the Normal Image:
As a shortcut you can opt to
simply invert all the colors of
the “Normal” image after
the button is pressed.
Delete
Click on this button to
delete the currently
loaded image.
Background Color:
Click on this button to
open the color window
and pick a color for a
rectangular button
without art.
Import:
Click on this button to
browse your computer
for a graphic you would
like to import.
Export:
Click on this button to
browse your computer
and save the existing
image as a file anywhere
on your pc.
Image name:
This field displays
the file name.
Image preview:
An image of the
after (pressed)
state is displayed.
Want to import your own images?
First, make sure the image is no larger then 640 x 600 (iPhone/iPod Touch) or 1536 x 1124 (iPad), for background
images, then copy and paste an image into a CCP image folder.
iPad directory (C:\Program Files (x86)\Universal Remote Control, Inc\Complete Control
Program\iPad\Images\Activities\All)
iPhone directory (C:\Program Files (x86)\....iPhone\Images\Activities\All)
Choose from one of these folders (Activities, Blanks, Brands, Buttons & Backgrounds, Devices, Favorite Channel
Icons, Rooms) and then place the image inside the All folder.
7
Complete Control Mobile Programming Manual for MX-iOS
USING
CCP
EDITOR
TO
PROGRAM
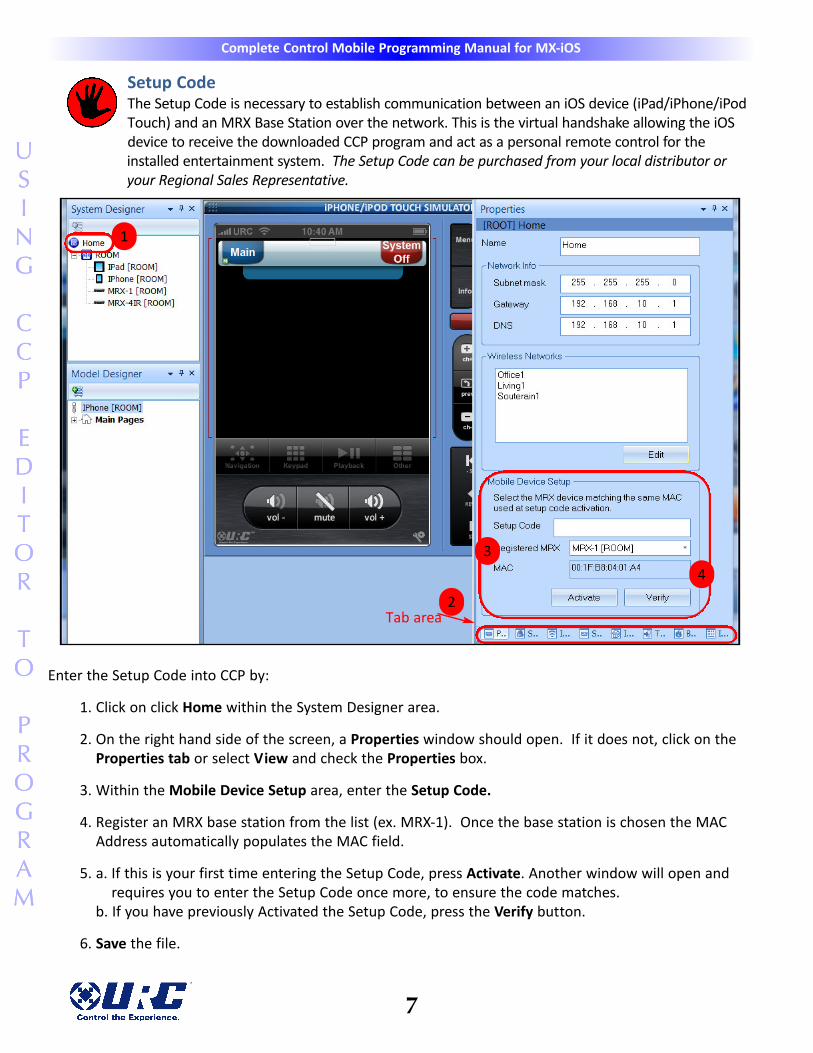
Setup CodeThe Setup Code is necessary to establish communication between an iOS device (iPad/iPhone/iPod
Touch) and an MRX Base Station over the network. This is the virtual handshake allowing the iOS
device to receive the downloaded CCP program and act as a personal remote control for the
installed entertainment system. The Setup Code can be purchased from your local distributor or
your Regional Sales Representative.
USING
CCP
EDITOR
TO
PROGRAM
Enter the Setup Code into CCP by:
1. Click on click Home within the System Designer area.
2. On the right hand side of the screen, a Properties window should open. If it does not, click on the
Properties tab or select View and check the Properties box.
3. Within the Mobile Device Setup area, enter the Setup Code.
4. Register an MRX base station from the list (ex. MRX-1). Once the base station is chosen the MAC
Address automatically populates the MAC field.
5. a. If this is your first time entering the Setup Code, press Activate. Another window will open and
requires you to enter the Setup Code once more, to ensure the code matches.
b. If you have previously Activated the Setup Code, press the Verify button.
6. Save the file.
Tab area2
3
4
1
8
MX-iOS
iPAD/iPHONE
REMOTE
Complete Control Mobile Programming Manual for MX-iOS
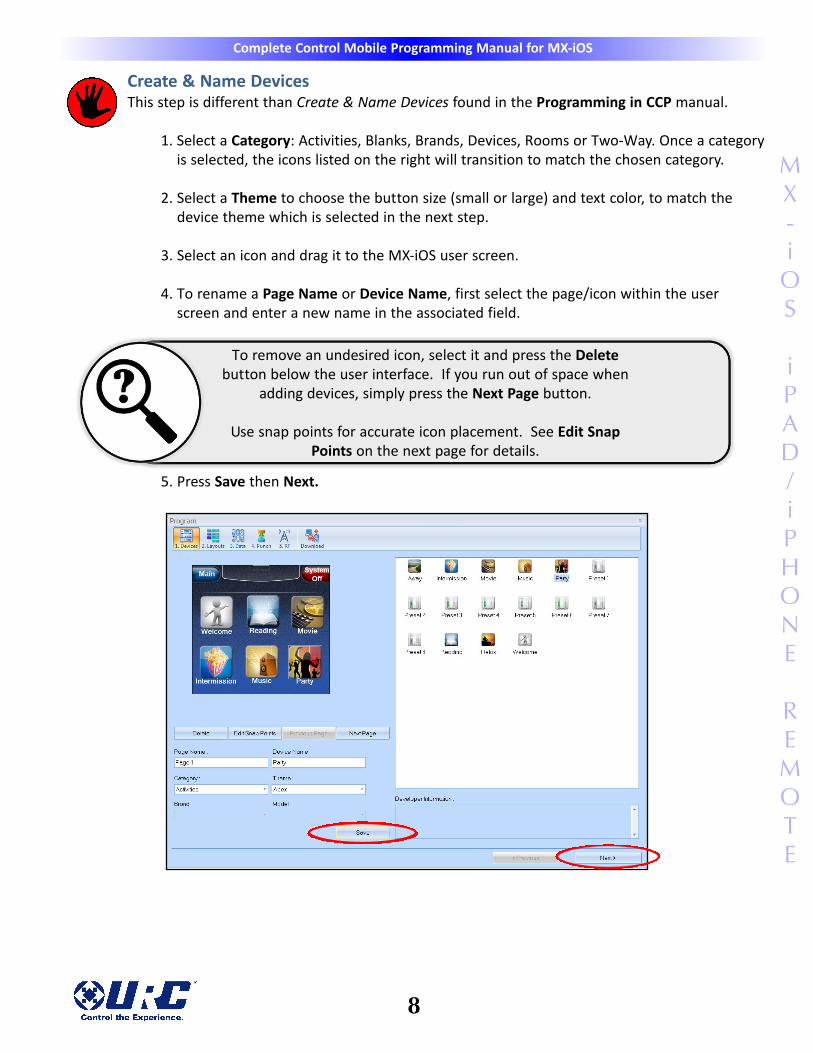
Create & Name DevicesThis step is different than Create & Name Devices found in the Programming in CCP manual.
1. Select a Category: Activities, Blanks, Brands, Devices, Rooms or Two-Way. Once a category
is selected, the icons listed on the right will transition to match the chosen category.
2. Select a Theme to choose the button size (small or large) and text color, to match the
device theme which is selected in the next step.
3. Select an icon and drag it to the MX-iOS user screen.
4. To rename a Page Name or Device Name, first select the page/icon within the user
screen and enter a new name in the associated field.
5. Press Save then Next.
To remove an undesired icon, select it and press the Delete
button below the user interface. If you run out of space when
adding devices, simply press the Next Page button.
Use snap points for accurate icon placement. See Edit Snap
Points on the next page for details.
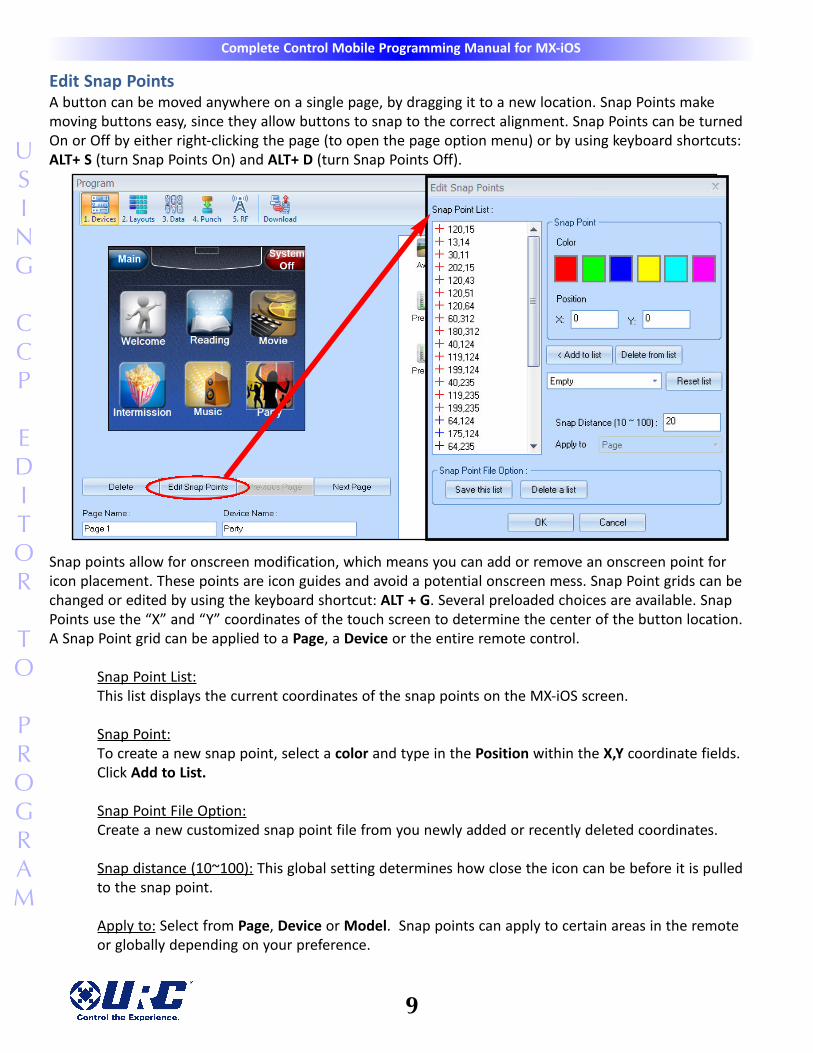
Edit Snap PointsA button can be moved anywhere on a single page, by dragging it to a new location. Snap Points make
moving buttons easy, since they allow buttons to snap to the correct alignment. Snap Points can be turned
On or Off by either right-clicking the page (to open the page option menu) or by using keyboard shortcuts:
ALT+ S (turn Snap Points On) and ALT+ D (turn Snap Points Off).
Snap points allow for onscreen modification, which means you can add or remove an onscreen point for
icon placement. These points are icon guides and avoid a potential onscreen mess. Snap Point grids can be
changed or edited by using the keyboard shortcut: ALT + G. Several preloaded choices are available. Snap
Points use the “X” and “Y” coordinates of the touch screen to determine the center of the button location.
A Snap Point grid can be applied to a Page, a Device or the entire remote control.
Snap Point List:
This list displays the current coordinates of the snap points on the MX-iOS screen.
Snap Point:
To create a new snap point, select a color and type in the Position within the X,Y coordinate fields.
Click Add to List.
Snap Point File Option:
Create a new customized snap point file from you newly added or recently deleted coordinates.
Snap distance (10~100): This global setting determines how close the icon can be before it is pulled
to the snap point.
Apply to: Select from Page, Device or Model. Snap points can apply to certain areas in the remote
or globally depending on your preference.
9
Complete Control Mobile Programming Manual for MX-iOS
USING
CCP
EDITOR
TO
PROGRAM
10
MX-iOS
iPAD/iPHONE
REMOTE
Complete Control Mobile Programming Manual for MX-iOS
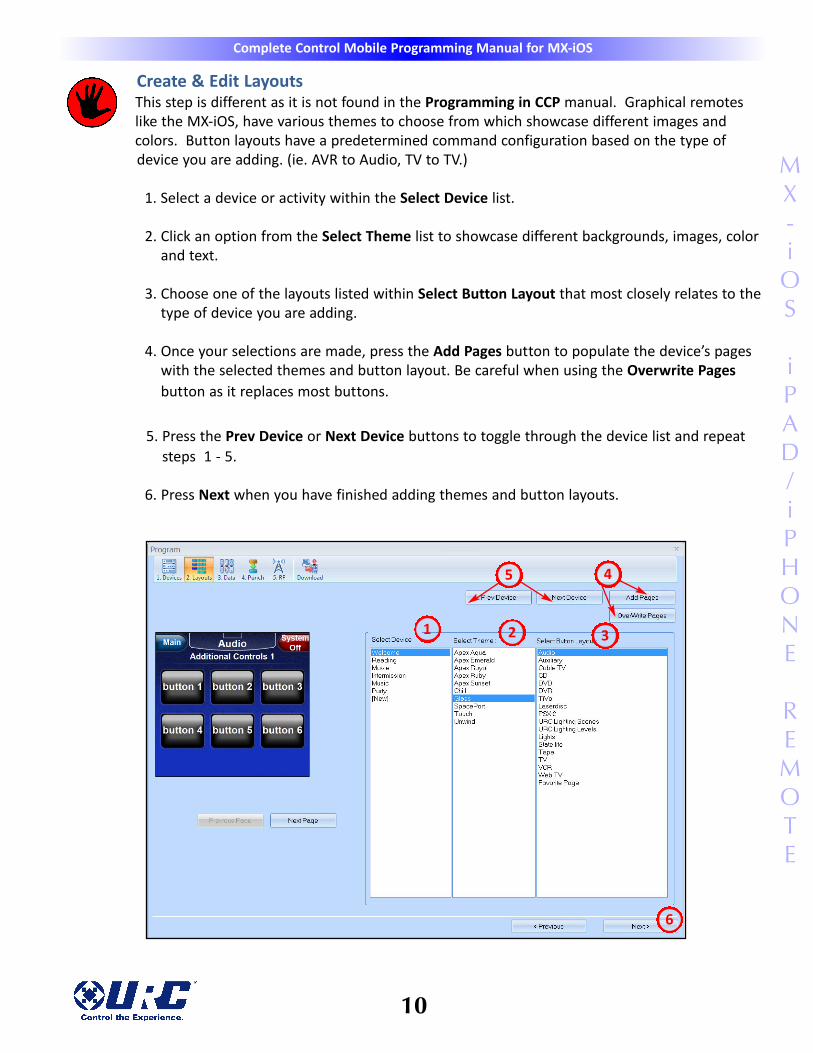
Create & Edit LayoutsThis step is different as it is not found in the Programming in CCP manual. Graphical remotes
like the MX-iOS, have various themes to choose from which showcase different images and
colors. Button layouts have a predetermined command configuration based on the type of
device you are adding. (ie. AVR to Audio, TV to TV.)
1. Select a device or activity within the Select Device list.
2. Click an option from the Select Theme list to showcase different backgrounds, images, color
and text.
3. Choose one of the layouts listed within Select Button Layout that most closely relates to the
type of device you are adding.
4. Once your selections are made, press the Add Pages button to populate the device’s pages
with the selected themes and button layout. Be careful when using the Overwrite Pages
button as it replaces most buttons.
5. Press the Prev Device or Next Device buttons to toggle through the device list and repeat
steps 1 - 5.
6. Press Next when you have finished adding themes and button layouts.
45
6
2 31

11
Complete Control Mobile Programming Manual for MX-iOS
USING
CCP
EDITOR
TO
PROGRAM
DatabaseThis step is similar to the IR Database found in the Programming in CCP manual but it also
includes a Serial and an IP database. The separate databases function the same as the IR
database; RS232 or Serial commands control RS232 devices and IP commands control devices
connected via the network.
1. Select a device from the Device list.
2. Choose from one of the databases (IR, Serial, IP) by selecting its radio button.
3. Continue to make your selections for IR Data From, Brand, and Model.
4. Press the Save All button after choosing the brand and model for each device.

Download the MX-iOS appIn order to complete the communication between the MRX Base Station and the iOS device, the
Complete Control app will need to be downloaded and installed.
12
MX-iOS
iPAD/iPHONE
REMOTE
Complete Control Mobile Programming Manual for MX-iOS
MX-iOS
iPAD/iPHONE
REMOTE
MX-iOS
iPAD/iPHONE
REMOTE
Downloading from the App Store
1. Within the iOS device, click on
the App Store icon.
2. Search the App Store for the
Complete Control app and
download it.
3. Once installed the app icon
looks like this.
Downloading from CCP to iOS
After programming the iOS
device in CCP:
1. OPEN the Complete Control
Mobile App in the iOS device.
2. Press Download from CCP.
The Complete Control Mobile App has two options, Version and
Disable Auto-Lock, accessible from the iOS Settings menu within
the iOS device. To access the settings options, click on the Settings
icon and scroll down to the App area and click on the MX iOS App.
Version:
Identifies the Complete Control Mobile software version currently
installed on the iOS device.
Disable Auto-Lock:
The iOS device automatically locks after the amount of time
designated in the iOS’s Settings> General> Auto-Lock. Turning on
the Disable Auto Lock feature prevents the iOS device from locking
while the Complete Control App is active.
To close or reset the Complete Control Mobile app, double-click the
Home button to access the “task manager bar”. Press and hold the
Complete Control Mobile app for 2 seconds. Once the icon begins
to shake and displays a minus sign (-),click it to close the app.
Make sure the Complete Control Mobile App is
opened when Discovering or Downloading to
the iPad or iPhone/iPod Touch. If it is not
opened, communication will not be established.

13
Complete Control Mobile Programming Manual for MX-iOS
USING
CCP
EDITOR
TO
PROGRAM
USING
CCP
EDITOR
TO
PROGRAM
Macro ProgrammingThis step is different than Macro Programming found in the Programming in CCP manual.
Basic Macro Functions
TEST Execute the list of commands in the macro window via the IR port of the connected remote.
RECORD Starts the macro recording process, which enables you to navigate to any page and click on a
button to create an “alias” to it. This “alias” is added to the list of the commands in the macro
window.
STOP Stops the recording of macro steps.
DELETE Deletes the highlighted macro step(s).
DELAY Opens the Delay window so that you can specify a delay time between macro steps.
Advanced Macro Functions
JUMP TO Enables you to jump to any device or main page of the remote.
TEXT Opens a Text window to type in text that will appear on the button as a macro step.
Program a delay at the same time as the text to determine how long the new text will
appear on the button. You can have as many text steps as you like (to the maximum of 255).
IR This button opens the IR Database Navigator within the Properties area above the macro window.
DATABASE
SLEEP This feature allows the user to determine when the recorded macro executes.
TIMER
VARIABLE Opens the Action Variable Setting window, which enables you to choose a previously
created variable and set it to True, False or Invert its status. If you want to create a
variable, click on “Add New” at the bottom of the window.
IP This button opens the IP Database Navigator within the Properties area.
DATABASE
IF/ELSE Enables you to create a conditional macro. (If [condition] is True, do [action]... Else do [action]).
TOGGLE Enables you to create a list of commands that the button will “toggle” through.
SERIAL Communicate with RS232 devices using the available commands stored in the Serial
DATABASE Database Navigator.
RELAY Control devices like curtains and lifts using Relay commands.
An “alias” references the command
on the original button.
Basic Macro Functions
These basic functions are at the heart of macro creation. Without these functions, how else would you
create a macro? You can record your commands, stop the recording process, delete unnecessary
commands, add a delay to the macro list (i.e. if a device needs time after power up to receive a command)
and finally test the macro list.
Advanced Macro Functions
The advanced macro functions consist of Jump to, Text, IR, Serial and IP database, Learn, Sleep Timer,
Relay, Variable, If/Else, and Toggle.
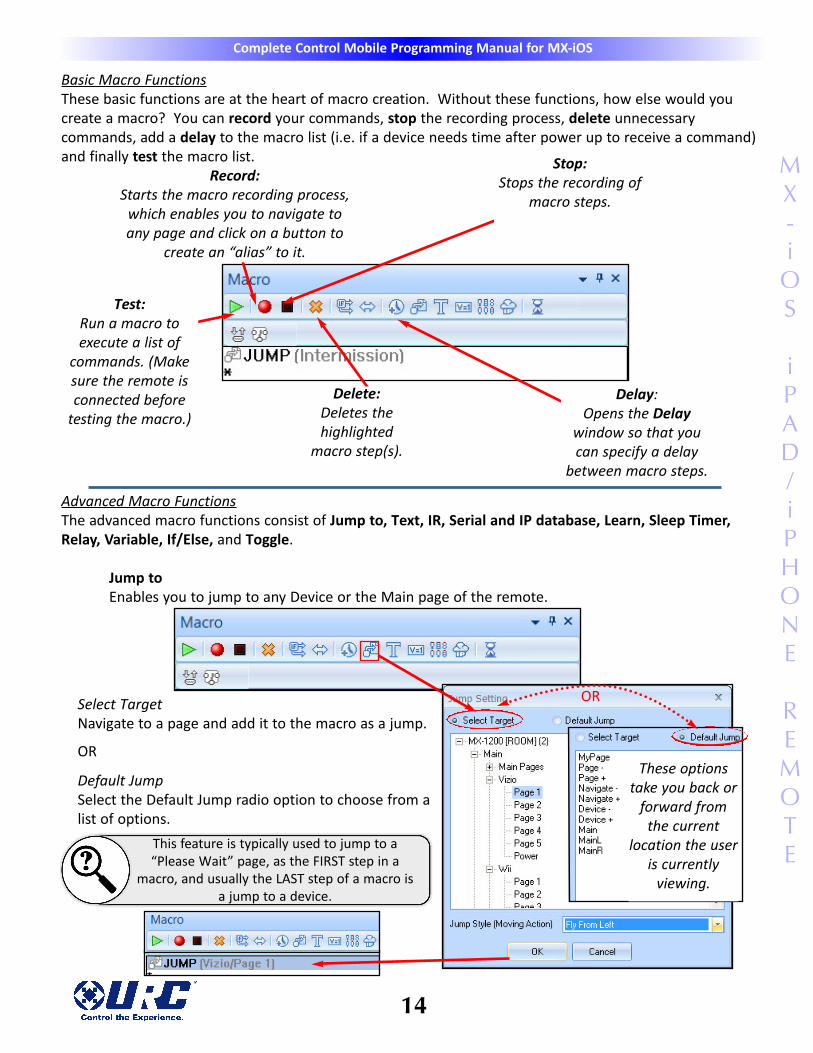
Jump to
Enables you to jump to any Device or the Main page of the remote.
14
MX-iOS
iPAD/iPHONE
REMOTE
Complete Control Mobile Programming Manual for MX-iOS
Select Target
Navigate to a page and add it to the macro as a jump.
OR
Default Jump
Select the Default Jump radio option to choose from a
list of options.
OR
These options
take you back or
forward from
the current
location the user
is currently
viewing.
This feature is typically used to jump to a
“Please Wait” page, as the FIRST step in a
macro, and usually the LAST step of a macro is
a jump to a device.
Delay:
Opens the Delay
window so that you
can specify a delay
between macro steps.
Delete:
Deletes the
highlighted
macro step(s).
Test:
Run a macro to
execute a list of
commands. (Make
sure the remote is
connected before
testing the macro.)
Record:
Starts the macro recording process,
which enables you to navigate to
any page and click on a button to
create an “alias” to it.
Stop:
Stops the recording of
macro steps.

Text
This macro feature displays dynamic text on the button where the macro is created.
IR Database
This step is identical to IR Database found in the Programming in CCP manual. This button opens
the IR Database Navigator within the Properties area above the macro window.
15
Complete Control Mobile Programming Manual for MX-iOS
USING
CCP
EDITOR
TO
PROGRAM
Program a delay at the same
time as the text to determine
how long the new text will
appear on the button. You can
have as many text steps as you
like (maximum of 255).
Click and drag a command from the IR
database window into the macro area.
Type a desired
message here, like
Watching TV.
Opens a Text window to type
in text that will appear on the
button as a macro step.

Serial Database Navigator
This step is similar to the IR Database. When pressed, the database opens and contains Serial
Commands.
IP Database Navigator
This step is similar to the IR Database except that the database contains IP commands.
16
MX-iOS
iPAD/iPHONE
REMOTE
Complete Control Mobile Programming Manual for MX-iOS
Click and drag a command from the
Serial database window into the macro
area or onto a device or activity button.
Click and drag a command from the IP
database window into the macro area
or onto a device or activity button.
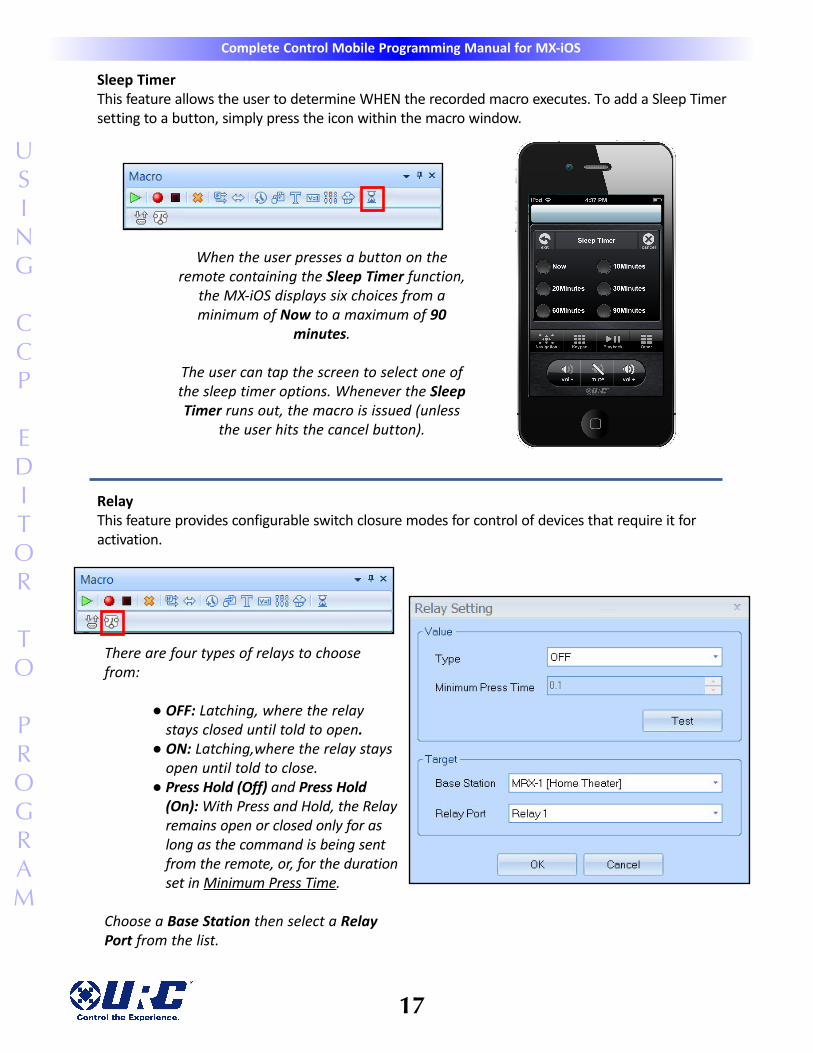
Sleep Timer
This feature allows the user to determine WHEN the recorded macro executes. To add a Sleep Timer
setting to a button, simply press the icon within the macro window.
Relay
This feature provides configurable switch closure modes for control of devices that require it for
activation.
17
Complete Control Mobile Programming Manual for MX-iOS
USING
CCP
EDITOR
TO
PROGRAM
When the user presses a button on the
remote containing the Sleep Timer function,
the MX-iOS displays six choices from a
minimum of Now to a maximum of 90
minutes.
The user can tap the screen to select one of
the sleep timer options. Whenever the Sleep
Timer runs out, the macro is issued (unless
the user hits the cancel button).
There are four types of relays to choose
from:
● OFF: Latching, where the relay
stays closed until told to open.
● ON: Latching,where the relay stays
open until told to close.
● Press Hold (Off) and Press Hold
(On): With Press and Hold, the Relay
remains open or closed only for as
long as the command is being sent
from the remote, or, for the duration
set in Minimum Press Time.
Choose a Base Station then select a Relay
Port from the list.

18
MX-iOS
iPAD/iPHONE
REMOTE
Complete Control Mobile Programming Manual for MX-iOS
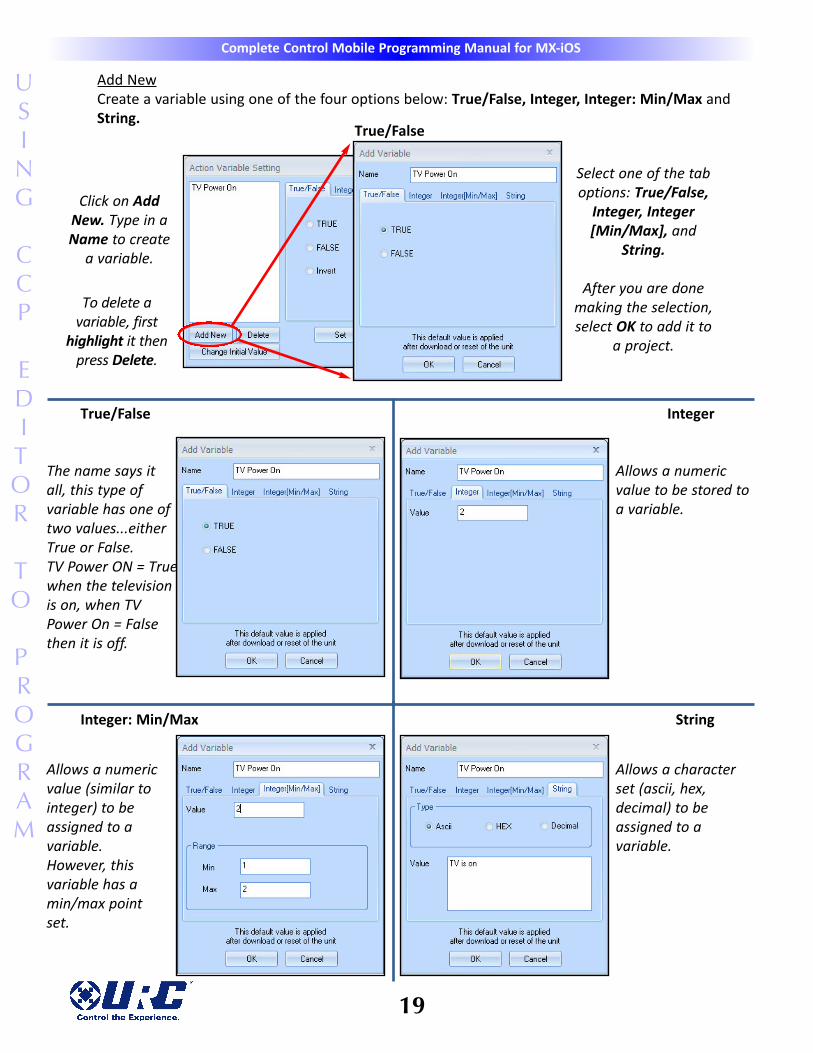
Variable
A variable is a placeholder for a value. In CCP, this value can be one of four categories: True/False,
Integer, Integer[Min/Max], or String. Clever use of variables can enable you to add all kinds of
elegant improvements to operation.
Add a Variable to the Macro
Follow the steps below to include a variable in a macro.
Highlight one of the previously created
variables listed in the field on the left . Modify
the state of the variable, i.e. True, False or
Invert, to include in a macro.
For example: When a television is off, modify
the state of the TV Power On variable to False.
Send a power on command and modify the
variable to TV Power On is true.
Press Set to include the variable in the macro.
If you need to create a new variable, refer to
Add New section on the next page.
Press the Variable icon to
open the Action Variable
Setting window.
19
Complete Control Mobile Programming Manual for MX-iOS
USING
CCP
EDITOR
TO
PROGRAM
Add New
Create a variable using one of the four options below: True/False, Integer, Integer: Min/Max and
String.
Allows a numeric
value (similar to
integer) to be
assigned to a
variable.
However, this
variable has a
min/max point
set.
Allows a character
set (ascii, hex,
decimal) to be
assigned to a
variable.
Allows a numeric
value to be stored to
a variable.
Integer: Min/Max
Integer
String
Click on Add
New. Type in a
Name to create
a variable.
True/False
The name says it
all, this type of
variable has one of
two values...either
True or False.
TV Power ON = True
when the television
is on, when TV
Power On = False
then it is off.
Select one of the tab
options: True/False,
Integer, Integer
[Min/Max], and
String.
After you are done
making the selection,
select OK to add it to
a project.
True/False
To delete a
variable, first
highlight it then
press Delete.
20
MX-iOS
iPAD/iPHONE
REMOTE
Complete Control Mobile Programming Manual for MX-iOS
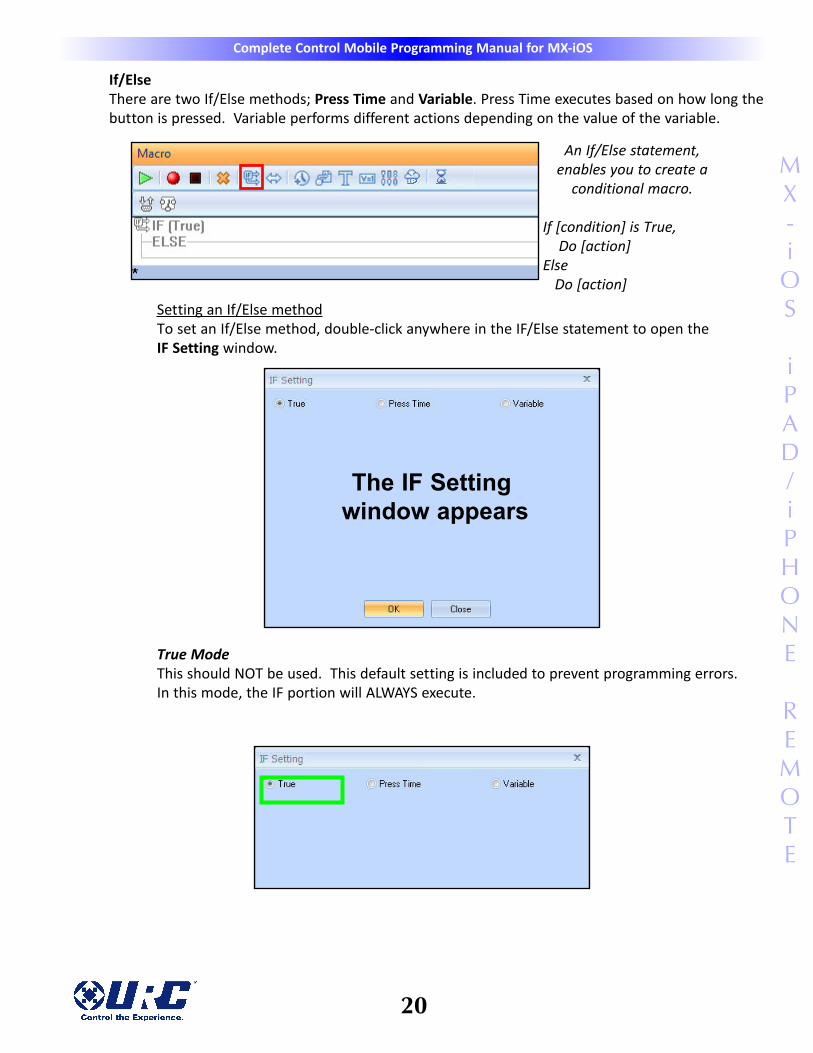
If/Else
There are two If/Else methods; Press Time and Variable. Press Time executes based on how long the
button is pressed. Variable performs different actions depending on the value of the variable.
Setting an If/Else method
To set an If/Else method, double-click anywhere in the IF/Else statement to open the
IF Setting window.
True Mode
This should NOT be used. This default setting is included to prevent programming errors.
In this mode, the IF portion will ALWAYS execute.
The IF Setting
window appears
An If/Else statement,
enables you to create a
conditional macro.
If [condition] is True,
Do [action]
Else
Do [action]

21
Complete Control Mobile Programming Manual for MX-iOS
USING
CCP
EDITOR
TO
PROGRAM
Press Time Mode
When Press Time mode is selected, the branch (If/Else) is determined by how long the button
is pressed. The “IF” macro is issued if the button is pressed Less than (< ) or Greater than /
Equal to ( >= ) the specified time. The “ELSE” statement executes when the IF condition is not
met.
In the example below, the “Navigation Down Arrow” is using Press Time mode with two
branches of actions associated with it. If the button is held down for one second or more
(Press Time >= 1 Second), the button will issue a “Cable Page Down” IR command. If it is held
down for less then one second, it will issue a “Cable Down” IR command.
Variable Mode
Selecting this mode allows the IF/Else statement to evaluate the variable (True/False, Integer)
and to execute either the If or Else portion of the statement based upon on the variable value.
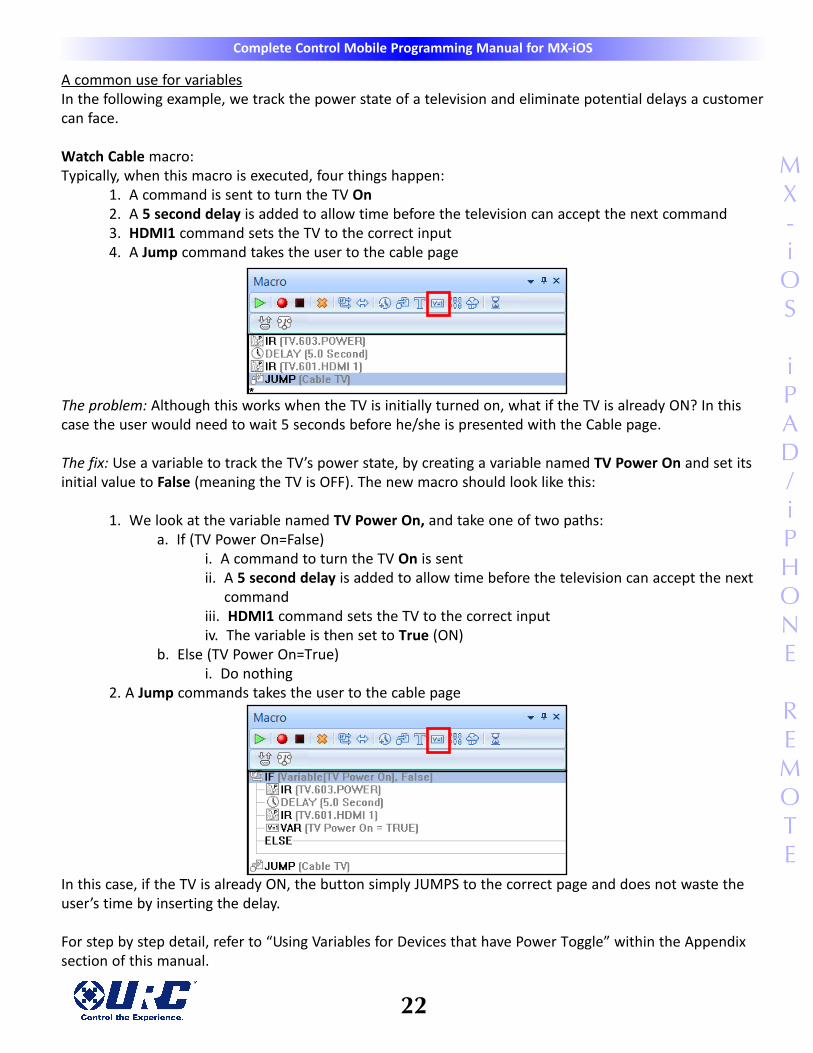
A common use for variables
In the following example, we track the power state of a television and eliminate potential delays a customer
can face.
Watch Cable macro:
Typically, when this macro is executed, four things happen:
1. A command is sent to turn the TV On
2. A 5 second delay is added to allow time before the television can accept the next command
3. HDMI1 command sets the TV to the correct input
4. A Jump command takes the user to the cable page
The problem: Although this works when the TV is initially turned on, what if the TV is already ON? In this
case the user would need to wait 5 seconds before he/she is presented with the Cable page.
The fix: Use a variable to track the TV’s power state, by creating a variable named TV Power On and set its
initial value to False (meaning the TV is OFF). The new macro should look like this:
1. We look at the variable named TV Power On, and take one of two paths:
a. If (TV Power On=False)
i. A command to turn the TV On is sent
ii. A 5 second delay is added to allow time before the television can accept the next
command
iii. HDMI1 command sets the TV to the correct input
iv. The variable is then set to True (ON)
b. Else (TV Power On=True)
i. Do nothing
2. A Jump commands takes the user to the cable page
In this case, if the TV is already ON, the button simply JUMPS to the correct page and does not waste the
user’s time by inserting the delay.
For step by step detail, refer to “Using Variables for Devices that have Power Toggle” within the Appendix
section of this manual.
22
MX-iOS
iPAD/iPHONE
REMOTE
Complete Control Mobile Programming Manual for MX-iOS

Toggle
This feature enables you to create a list of commands that the button will cycle through when
pressed.
23
Complete Control Mobile Programming Manual for MX-iOS
USING
CCP
EDITOR
TO
PROGRAM
Take discrete commands and add them to a
Toggle macro to create a pseudo toggle button.
For example, in the image above, locate the
user’s TV model number and drag over inputs
Video 1 - 6 into a Toggle macro. Now when the
Toggle macro button is pressed, the button will
cycle through each of the video inputs.
Common uses for toggle macros are:
● aspect ratio
● inputs
● surround modes

24
MX-iOS
iPAD/iPHONE
REMOTE
Complete Control Mobile Programming Manual for MX-iOS
Appendix: Examples of Common Macros
Programming a Power On Macro
Before programming a Power On macro, set up your laptop with the connected remote within operational
range of the home audio video equipment. Power On macros usually require extensive testing of delays
and you can expect to do a lot of experimenting. Take a look at the Main page(s) and decide which compo-
nents you want to power on.
1 Select the System Power On button on the Main page. (Create a Power On button if necessary.)
2 Click on the Record icon.
3 Navigate to each device and add their Power On commands to the list by navigating to the device
and page where the codes are located and clicking on the buttons with the Power On commands.
Select the device by clicking its button on the Main menu or by clicking on an expanded tree view
page.
4 Now, click on the button with the device’s Power On command. The new step appears in the
Macro window.
5 After adding all of the chosen Power On commands, re-arrange them as desired by clicking and
dragging them into whatever order you want.
6 Ask the client what they think they will watch most often (TV, satellite, DVD, etc.). Program stepsto select the correct TV and Receiver input for that activity. In this example, both the televisionand the receiver have discrete input codes and the client’s favored activity is watching Satellite.
Select the Rcvr by clicking its button on the Main menu. Now, click on the button with the SATinput command. The new step appears in the list.
7 Select the TV by clicking its button on the Main menu. Now, click on the button with the correct
input command. The new step appears in the list. Press the Stop button to stop recording “alias-
es.”
8 Optional - Program a jump to the Device and
Page they use for their favorite activity. Click on
the Jump icon. Select the correct device and
page from the Jump window. The jump appears
in the Macro window in the column under Jump.

25
Complete Control Mobile Programming Manual for MX-iOS
USING
CCP
EDITOR
TO
PROGRAM
9 First, turn the TV and the Receiver to the wrong input, then turn off everything in the theater.
Point the connected MX-iOS at the system. Select the first step in the list by clicking on it. Now,
click on the Test button. Observe the television and the receiver. Did they both switch to the
correct input?
10 Programming additional delay in the macro is sometimes necessary. Each macro step usually
takes some time, so there may be enough built in delay for the television and the receiver to both
be fully active by the time the input commands are sent. Sometimes the component is not fully
awake. It is fashionable for many modern televisions and receivers to require 5 or more seconds of
warm up time before they are responsive to new commands. In a case like that, you will need to
add more delay between steps.
11 Select the Delay icon. Now, click on the preset amount of delay or enter any time between .1 sec-
ond and 30 seconds in the delay setting window.
12 The new step appears in the list. Now, drag the delay step to the correct location.
13 Again, turn the TV and the Receiver to the wrong input, then turn off everything in the theater.
Point the connected MX-iOS at the system. Select the first step in the list by clicking on it. Now,
click on the Test button. Observe the television and the receiver. Did they both switch to the
correct input? Continue to revise the macro with delays or changes in order and test until the
macro ALWAYS correctly turns everything on and
switches the surround sound receiver and
television to the correct input. When the macro
is perfect, click on the Save in the File Menu.
Sometimes a change in order can
provide the delay you need.

Programming a Power Off Macro
A Power Off macro is much simpler than a Power On macro, since there are rarely any delays to test, etc.
Usually, to give the client some feedback that the macro is working, the TV is turned off first.
When you are forced to use a workaround for a DVD player or VCR without a discrete off command, you will
make the macro more reliable if you place the time consuming anchor (the play command) at the beginning.
Make sure to turn off the DVD player before testing this kind of workaround. You are testing the worst case,
you know that a toggle type power command will turn the DVD player off, you are concerned about an event
that might happen. The DVD player is already off, but the client presses the MAIN Power Off to turn
everything else on. If you only programmed a toggle Power command, everything else would turn off, but
the DVD player would turn on. This workaround ensures that the DVD player turns off.
Programming Activity Macros on MAIN Page LCD “Device” Buttons
An Activity Macro is typically programmed to be as fast as possible. They simply select the correct input on
both the television and the surround sound receiver, since all the components have already been powered
on by the Power On macro.
There is no need to program a JUMP to a page in a MAIN “Device” button created by Create and
Name Devices. They are automatically programmed to JUMP to the Device.
Sometimes activity macros will share the same input settings. Here, a DVD player doubles as a CD player.
The programmer has copied the DVD device, named it CD, so that there are two identical devices (with the
same DVD player IR codes). The only difference between them is the Activity Macros you see below. The
DVD Activity Macro selects THX Surround Sound with 5 speakers with the TV on, while the CD Activity
selects Stereo with 4 speakers and forces the TV off. For components that have play commands it is typically
ok to have a “Play” command in the macro. Watch out for components with toggle type play/pause
buttons. That kind of “Play/Pause” command should not be placed in an Activity Macro without a preceding
“Stop” command, to make sure that the toggle can only play the component!
One DVD Player - Two Devices and Two Activity Macros
DVD Activity Macro CD Activity Macro
Note how the programmer is using the same DVD input
on the surround sound receiver for both activities, the
macro simply changes the surround sound settings.
26
MX-iOS
iPAD/iPHONE
REMOTE
Complete Control Mobile Programming Manual for MX-iOS
Don’t OVER AUTOMATE, make sure
that every step is truly useful!

Using Variables for Devices that have Power Toggle
The key to using this technique is reliable IP communication between the MX-iOS and the MRX Base Station.
This is typically used to track Power ON devices that do not have discrete power commands (i.e. toggle-only).
Fundamentally, you are going to program the MX-iOS device to track whether the component (a Cable Box in
this example) is On or Off, and only issue the toggle type Power command when needed. Note: The system
can easily get out of sync if the client turns on the TV with another remote control or manually.
1 Open the Cable Box Power page.
2 Click on the Cable Box Power On button first.
3 In the Macro window, click on the Variable icon button.
4 The Action Variable Setting window opens up.
27
Complete Control Mobile Programming Manual for MX-iOS
USING
CCP
EDITOR
TO
PROGRAM

5 Click on the Add New variable button .
6 The Add Variable window opens up. Type Cable TV On in the name field and give the new vari-
able a value of True in our example, and then click OK..
7 Next, go back to the Macro window and click on the IF/ELSE icon to add as a macro step.
8 Double click on the IF (True) line of the IF /Else statement to open the If Setting window. Select
Variable to open the Variable mode view. Highlight Cable TV On in the variable list, click on the
False radio button and then click on the OK button.
28
MX-iOS
iPAD/iPHONE
REMOTE
Complete Control Mobile Programming Manual for MX-iOS

9 Use the existing IR Power command and the new variable you just created to build the IF / Else
statement: If, the <Cable TV Power On> is FALSE (Which means the Cable Box is turned Off) , issue
the Cable TV Power IR command to turn it On, Else, do nothing (Leave the Else section blank).
Then add the Cable TV On variable as another macro step and change the state to True, (Because
the Cable Box has been turned On).
Now let’s set up the Cable Box Power Off button.
10 Click on the Cable Box Power Off button.
11 In the Macro window, click on the IF/ELSE icon.
12 Use the existing IR Power command and the new variable you just created to build the IF / Else
statement: If, the <Cable TV Power On> is True, (Which means the Cable Box is turned On) , issue
the Cable TV Power IR command to turn it Off, Else, do nothing (Leave the Else section blank).
Then add the Cable TV On variable as another macro step and change the state to False,
(Because the Cable Box has been turned Off).
You’ve essentially created a discreet Power On and Power Off buttons for the Cable Box that track their
state. Program all buttons you want to turn the Cable Box on, with the Cable Power On button. Program
the System Off button to turn the Cable box off with the Cable Power Off button.
29
Complete Control Mobile Programming Manual for MX-iOS
USING
CCP
EDITOR
TO
PROGRAM

500 Mamaroneck Avenue
Harrison, NY 10528
Phone: (914) 835-4484
Fax: (914) 835-4532
www.universalremote.com