company name equipment/job identification: conveyorman ... · company name equipment/job...
TRANSCRIPT

Company Name Equipment/Job Identification: Conveyorman Type of Equipment: Conveyor Make: Model: Year: Use:
Mine Name: Date of Analysis:
Pre-Assessment:
Part 46 Training: New Miner, Newly Employed Experienced Miner, or Annual Refresher Training Task trained on: Water Truck, Lock/Tag Out Procedures, and Confined Space Company Orientation including company policy Pre-Assessment Audiogram
Duty 1: Start of Shift Activities
Learner will explain the importance of start-of-shift activities. The learner will explain each job step, why it is conducted, any associated risk, and how to implement appropriate controls. Start-of-shift activities include the following job steps:
Job Steps Importance Narrative Importance Ranking Satisfactory
or Needs Work
Procedures/Risk Resolution/ Notes/Comments
(Consider Safety, Production, Maintenance)
1=Important 2=Very
Important 3=Critical
Clock In Don PPE To prevent serious injury and comply
with company policy Company policy says you must wear steel toed boots, gloves, safety glasses and hard hat at all times.
• Steel Toed Boots To prevent serious injury and comply with company policy
Rubber or Leather
• Gloves To prevent serious injury and comply with company policy
Work Gloves / Welding Gloves
• Safety Glasses To prevent serious injury and comply with company policy
Clear / Shaded
• Hard Hat To prevent serious injury and comply with company policy
• Hearing Protection To prevent serious injury and comply with company policy
Use hearing protection where required and noted with signs. Both plugs and muffs are available based on individual preference.

Job Steps Importance Narrative Importance Ranking Satisfactory
or Needs Work
Procedures/Risk Resolution/ Notes/Comments
(Consider Safety, Production, Maintenance)
1=Important 2=Very
Important 3=Critical
Obtain Communication (Radio) Independent work • Get radio from charger • Put on Channel 1 • Turn Radio On Listen for audible beep for function. • Secure Radio in pocket or
holder Talk to Supervisor
• Discuss any special tasks or duties
• Discuss and turn over information from maintenance shift
Attend Safety Meeting Could cause poor performance and lead to down time; missed important safety information
Wednesday’s at 6:30am
Obtain the detailed checklist for the Preoperational Vehicle Inspection
• Red tag and inform shop mechanic if defects are found on any safety items
Be sure no one operates the vehicle to prevent injury and/or equipment damage
• Check Park brake Could cause injury and/or equipment failure
.
• Set brake and attempt to move while in third gear
Could cause injury and/or equipment failure
Conduct in safe place.
• Check Service Brakes Could cause injury and/or equipment failure
• Check Fluids Could lead to equipment failure • Check Oil Could lead to equipment failure • Check Coolant Could lead to equipment failure • Check Power Steering • Check Windshield Wiper • Check Fuel Ensure the correct type of fuel is used • Check Brake Could lead to equipment failure
• Check Lights For cleanliness and operational • Check Back-Up Alarm If alarm doesn’t work, someone could be
seriously injured. If defective, red tag and inform shop mechanic.
2
Job Steps Importance Narrative Importance Ranking Satisfactory
or Needs Work
Procedures/Risk Resolution/ Notes/Comments
(Consider Safety, Production, Maintenance)
1=Important 2=Very
Important 3=Critical
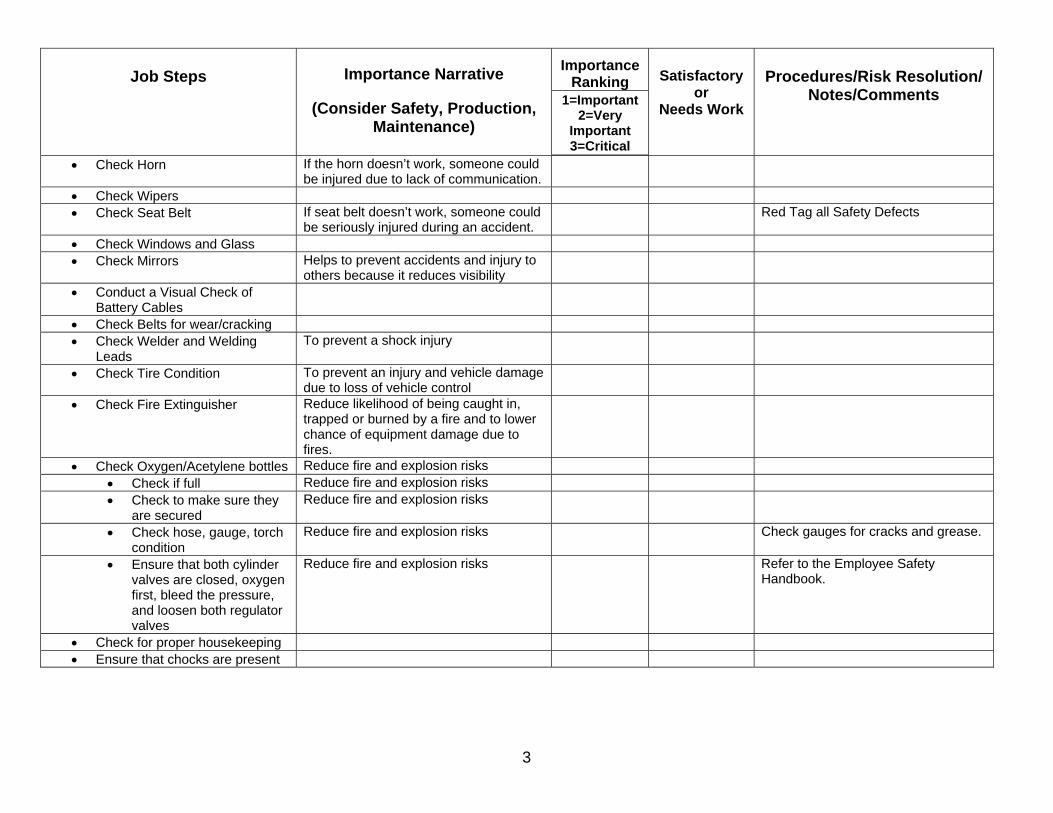
• Check Horn If the horn doesn’t work, someone could be injured due to lack of communication.
• Check Wipers • Check Seat Belt If seat belt doesn’t work, someone could
be seriously injured during an accident. Red Tag all Safety Defects
• Check Windows and Glass • Check Mirrors Helps to prevent accidents and injury to
others because it reduces visibility • Conduct a Visual Check of
Battery Cables • Check Belts for wear/cracking • Check Welder and Welding
Leads To prevent a shock injury
• Check Tire Condition To prevent an injury and vehicle damage due to loss of vehicle control
• Check Fire Extinguisher Reduce likelihood of being caught in, trapped or burned by a fire and to lower chance of equipment damage due to fires.
• Check Oxygen/Acetylene bottles Reduce fire and explosion risks • Check if full Reduce fire and explosion risks • Check to make sure they
are secured Reduce fire and explosion risks
• Check hose, gauge, torch condition
Reduce fire and explosion risks Check gauges for cracks and grease.
• Ensure that both cylinder valves are closed, oxygen first, bleed the pressure, and loosen both regulator valves
Reduce fire and explosion risks Refer to the Employee Safety Handbook.
• Check for proper housekeeping • Ensure that chocks are present
3

Duty 2: Fire-Up
Learner will demonstrate how to safely fire-up the “B” Pit. Learner will also explain the job steps, why they are conducted, any associated risk, and how to implement appropriate controls. A safe and thorough method of firing up the “B” Pit includes the following job steps:
Job Steps Importance Narrative Importance Ranking Satisfactory
or Needs Work
Procedures/Risk Resolution/
Notes/Comments (Consider Safety, Production, Maintenance)
1=Important 2=Very
Important 3=Critical
Radio “A” Pit Conveyorman to start when he is ready.
To prevent accidental injury due to premature start up
Inspect to ensure that conveyors are operating, while in vehicle
• Check for proper belt tracking • Check Splices
• Look for General Malfunctions • Check for Misalignment • Look for Smoke • Listen for Unusual Noises Listening for unusual noises will help
prevent equipment failure • Check for Slipping • Inspect Guarding Improper guarding could cause
serious injury if someone could touch a moving part; company policy
Always put guards back in place when finished; shut down operation if guards needs replaced or fixed.
• Notice Gearbox Problems Noticing gearbox problems will help prevent equipment failure
Look for leaks, heat, and noises.
• Check V-Belts • Ensure Start Up Alarm is
working by listening for it. Start up without alarm could cause injury or death.
Inspect and Start Trash Pump • Check Oil • Fill up with Gas • Prime the Pump
• Remove Cap • Fill with Water and leave cap
off • Turn on Switch • Pull the Choke
4

Job Steps Importance Narrative Importance Ranking Satisfactory
or Needs Work
Procedures/Risk Resolution/
Notes/Comments (Consider Safety, Production, Maintenance)
1=Important 2=Very
Important 3=Critical
• Pull the Start Cord • Turn off Choke after pump starts • Check for circulation on pump
(observe water gushing from pump cap area)
• Turn on/off switch to off position • Replace prime cap • Turn switch back on • Pull start cord to start pump
Ensure Material Flow • Observe the transfer points • Ensure material is flowing on belts • Check for spillage • Check for blockage
Look for General Malfunctions • Check for Misalignment • Look for Smoke • Listen for Unusual Noises Listening for unusual noises will help
prevent equipment failure • Check for Slipping • Inspect Guarding Improper guarding could cause
serious injury if someone could touch a moving part; company policy
Shut down operation to repair or replace defective guarding; Ensure that it is secure and in place; No contact with moving parts.
• Look for any Gearbox Problems Noticing gearbox problems will help prevent equipment failure
• Check V-Belts
5

Duty 3: Berm & Highwall Inspections
Learner will demonstrate how to conduct a safe and thorough inspection of berms and highwalls during the “B” Pit Inspection. Learner will also explain the job steps, why they are conducted, any associated risk, and how to implement appropriate controls. A safe and thorough inspection of the berms and highwalls in the “B” Pit includes the following steps:
Job Steps Importance Narrative Importance Ranking Satisfactory
or Needs Work
Procedures/Risk Resolution/ Notes/Comments
(Consider Safety, Production, Maintenance)
1=Important 2=Very
Important 3=Critical
Obtain and Follow Workplace Examination Checklist
If any defects are found, contact supervisor and/or loader operator. Refer to MSHA’s and Company Policy.
Observe and follow all posted safety signs Non compliance could result in unsafe acts and entering unsafe areas.
Check Berms • Check areas of the pond, highwall,
and feeder ramp berms • Ensure they are mid-axle
height to the largest equipment on roadway.
This is a back up check for the loader operator.
Check Pit Floor (rocks & steel) This is a back up check for the loader operator.
Check highwall This is a back up check for the loader operator.
• Check height This is a back up check for the loader operator.
• Check Angle of Repose This is a back up check for the loader operator.
• Check for Undercuts This is a back up check for the loader operator.
Notify the loader and Marion operator that Conveyorman is in the area
To avoid unnecessary accidents and collisions
Loader and Marion operators have the right of way at all times; stay away from the travel path of Marion
6

Duty 4: Inspection (Belts & Feeder)
Learner will demonstrate how to work safely when inspecting belts and feeders during the “B” Pit Inspection. Learner will also explain the job steps, why they are conducted, any associated risk, and how to implement appropriate controls. The proper procedures for working safely during the “B” Pit inspection of belts and feeders include the following job steps:
Job Steps Importance Narrative Importance Ranking Satisfactory
or Needs Work
Procedures/Risk Resolution/ Notes/Comments
(Consider Safety, Production, Maintenance)
1=Important 2=Very
Important 3=Critical
Check for proper guarding Improper guarding could cause serious injury if someone came in contact of a moving part; company policy; probability of long term injury or death.
Shut down operation to repair or replace defective guarding
Check belts Check rollers Check bearings It could lead to extensive damage to
equipment and cause down time. Check Gear Box It could lead to extensive damage to
equipment and cause down time. Check Head Pulley Check Tail Pulley Check Wipers Check for Water Flow at the belly of the feeder belt
Reduces heat build-up and helps clean stray material
Check the Grizzly Pump • Check for hydraulic leaks Environmental implications and
equipment failure Refer to Glacier’s Environmental Response Plan
• Check for fluid level on hydraulic pump
Environmental implications and equipment failure
Refer to Glacier’s Environmental Response Plan; check the site glass for proper fluid level
7

Duty 5: Inspect FC16 Conveyor Belt
Learner will demonstrate how to safely and efficiently inspect the FC 16 conveyor belt. Learner will also explain the job steps, why they are conducted, any associated risk, and how to implement appropriate controls. A safe and efficient FC16 conveyor belt Inspection includes the following steps:
Job Steps Importance Narrative Importance Ranking Satisfactory
or Needs Work
Procedures/Risk Resolution/ Notes/Comments
(Consider Safety, Production, Maintenance)
1=Important 2=Very
Important 3=Critical
Check Tail Pulley Area • Check the impact rubber for
cracks, lagging, and alignment • Ensure that skirting is secured
• Check for wear • Check tail bearing It could lead to extensive damage to
equipment and cause down time. Check for heat and unusual noises
• Check tail pulley Visual inspection • Check for proper guarding Improper guarding could cause serious
injury if someone could touch a moving part; company policy
Shut down operation to repair or replace defective guarding; Ensure that it is secure and in place; No contact with moving parts.
Check Head Pulley Area
• Check for proper guarding Improper guarding could cause serious injury if someone could touch a moving part; company policy
Shut down operation to repair or replace defective guarding; Ensure that it is secure and in place; No contact with moving parts.
• Check head pulley Check for Cracks, lagging, alignment • Check Bearings It could lead to extensive damage to
equipment and cause down time. Check for Over-heating, unusual noise
• Check Gear Box It could lead to extensive damage to equipment and cause down time.
Check for leaks, noise, over-heating
• Check wiper Check for contact to the belt • Check Snubber Pulley Check for cracks and wear • Check Motor It could lead to injury, extensive damage
to equipment, and cause down time. Check for heat and unusual noise; Check electrical connections; Check for proper bushing and bare wires
• Check V-Belts Check for alignment, wear & tension 8

Job Steps Importance Narrative Importance Ranking Satisfactory
or Needs Work
Procedures/Risk Resolution/ Notes/Comments
(Consider Safety, Production, Maintenance)
1=Important 2=Very
Important 3=Critical
Inspect FC16 Mid Section
• Check for bad rollers Proper spinning, holes, rollers aren’t cutting the belt or return roller brackets.
Inspect E-Stop Cords • Check for proper tension Improper tension will cause the e-stop to
malfunction • Check for proper box
mounting Improper box mounting and anchoring will cause malfunction.
9

Duty 6: Inspect FC15 Conveyor Belt
Learner will demonstrate how to safely and efficiently inspect the FC 15 conveyor belt. Learner will also explain the job steps, why they are conducted, any associated risk, and how to implement appropriate controls. A safe and efficient FC15 conveyor belt Inspection includes the following steps:
Job Steps Importance Narrative Importance Ranking Satisfactory
or Needs Work
Procedures/Risk Resolution/ Notes/Comments
(Consider Safety, Production, Maintenance)
1=Important 2=Very
Important 3=Critical
Check Tail Pulley Area • Check the impact rubber for
cracks, lagging, and alignment • Ensure that skirting is secured
• Check for wear • Check tail bearing It could lead to extensive damage to
equipment and cause down time. • Check tail pulley Visual inspection • Check for proper guarding Improper guarding could cause serious
injury if someone could touch a moving part; company policy
Shut down operation to repair or replace defective guarding; Ensure that it is secure and in place; No contact with moving parts.
Check Head Pulley Area
• Check for proper guarding Improper guarding could cause serious injury if someone could touch a moving part; company policy
Shut down operation to repair or replace defective guarding; Ensure that it is secure and in place; No contact with moving parts.
• Check head pulley Check for Cracks, lagging, alignment. • Check Bearings It could lead to extensive damage to
equipment and cause down time. • Check Gear Box It could lead to extensive damage to
equipment and cause down time. Check for leaks, noise, over-heating.
• Check wiper Check for contact to the belt. • Check Snubber Pulley Check for cracks and wear. • Check Motor It could lead to injury, extensive damage
to equipment, and cause down time. Check for heat and unusual noise; Check electrical connections; Check for proper bushing and bare wires.
• Check V-Belts Check for alignment, wear & tension. 10
Job Steps Importance Narrative Importance Ranking Satisfactory
or Needs Work
Procedures/Risk Resolution/ Notes/Comments
(Consider Safety, Production, Maintenance)
1=Important 2=Very
Important 3=Critical
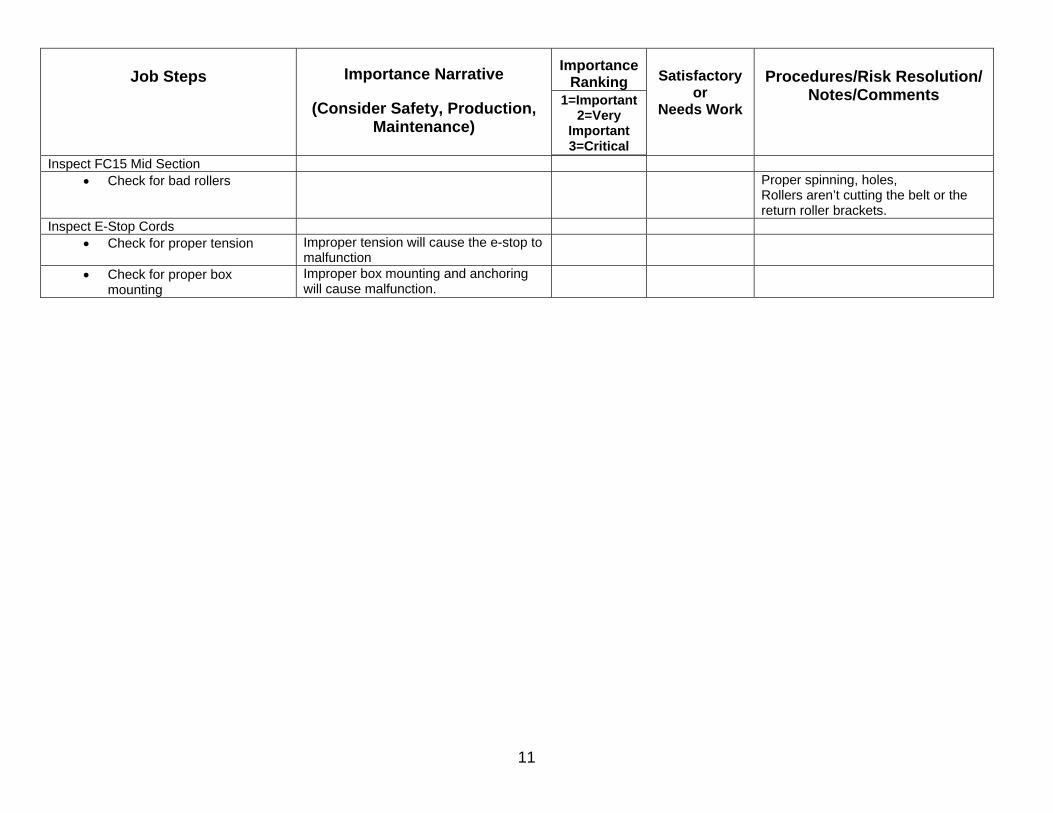
Inspect FC15 Mid Section • Check for bad rollers Proper spinning, holes,
Rollers aren’t cutting the belt or the return roller brackets.
Inspect E-Stop Cords • Check for proper tension Improper tension will cause the e-stop to
malfunction • Check for proper box
mounting Improper box mounting and anchoring will cause malfunction.
11

Duty 7: Inspection of MCC (Motor Control Center)
Learner will demonstrate how to safely and efficiently inspect the Pit “B” Motor Control Center. Learner will also explain the job steps, why they are conducted, any associated risk, and how to implement appropriate controls. A safe and efficient inspection of the Pit “B” Motor Control Center includes the following job steps:
Job Steps Importance Narrative Importance Ranking Satisfactory
or Needs Work
Procedures/Risk Resolution/ Notes/Comments
(Consider Safety, Production, Maintenance)
1=Important 2=Very
Important 3=Critical
Inspect fire extinguisher Reduce likelihood of being caught in, trapped or burned by a fire and to lower chance of equipment damage due to fires.
Inspect housekeeping To prevent slips, trips, falls, and control combustible materials
Remove all combustible materials from the MCC.
Ensure that lock out tag out board is maintained Check for hazardous electrical conditions
• Check lights and light covers • Check cable installation Prevent contact with bare wires and
possible fatal injuries • Check labels Prevent miners from making lock / tag
out mistakes • Check cover plates
12
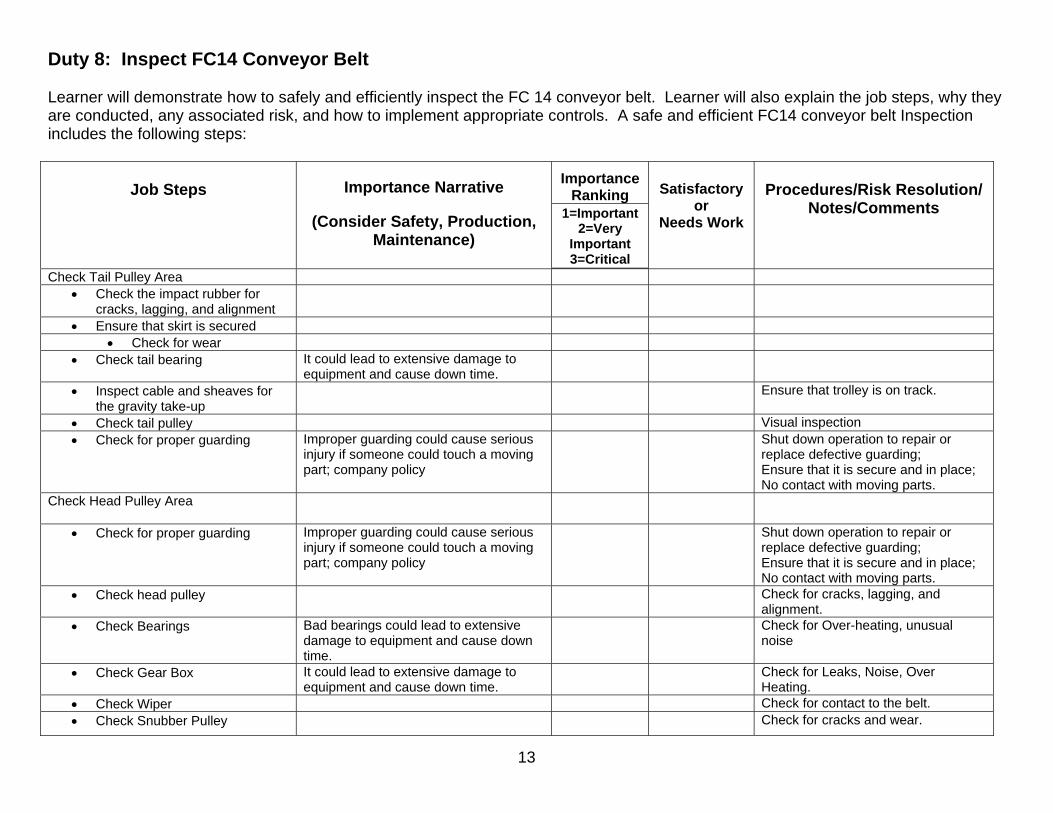
Duty 8: Inspect FC14 Conveyor Belt
Learner will demonstrate how to safely and efficiently inspect the FC 14 conveyor belt. Learner will also explain the job steps, why they are conducted, any associated risk, and how to implement appropriate controls. A safe and efficient FC14 conveyor belt Inspection includes the following steps:
Job Steps Importance Narrative Importance Ranking Satisfactory
or Needs Work
Procedures/Risk Resolution/ Notes/Comments
(Consider Safety, Production, Maintenance)
1=Important 2=Very
Important 3=Critical
Check Tail Pulley Area • Check the impact rubber for
cracks, lagging, and alignment • Ensure that skirt is secured
• Check for wear • Check tail bearing It could lead to extensive damage to
equipment and cause down time. • Inspect cable and sheaves for
the gravity take-up Ensure that trolley is on track.
• Check tail pulley Visual inspection • Check for proper guarding Improper guarding could cause serious
injury if someone could touch a moving part; company policy
Shut down operation to repair or replace defective guarding; Ensure that it is secure and in place; No contact with moving parts.
Check Head Pulley Area
• Check for proper guarding Improper guarding could cause serious injury if someone could touch a moving part; company policy
Shut down operation to repair or replace defective guarding; Ensure that it is secure and in place; No contact with moving parts.
• Check head pulley Check for cracks, lagging, and alignment.
• Check Bearings Bad bearings could lead to extensive damage to equipment and cause down time.
Check for Over-heating, unusual noise
• Check Gear Box It could lead to extensive damage to equipment and cause down time.
Check for Leaks, Noise, Over Heating.
• Check Wiper Check for contact to the belt. • Check Snubber Pulley Check for cracks and wear.
13

Job Steps Importance Narrative Importance Ranking Satisfactory
or Needs Work
Procedures/Risk Resolution/ Notes/Comments
(Consider Safety, Production, Maintenance)
1=Important 2=Very
Important 3=Critical
• Check Motor It could lead to injury, extensive damage to equipment, and cause down time.
Check for heat and unusual noise; Check electrical connections; Check for proper bushing and bare wires
• Check V-Belts Check for alignment, wear & tension
Inspect FC14 Mid Section
• Check for bad rollers Proper spinning, holes, rollers aren’t cutting the belt or return roller brackets.
Inspect E-Stop Cords • Check for proper tension Improper tension will cause the e-stop to
malfunction • Check for proper box mounting Improper box mounting and anchoring
will cause malfunction.
14

Duty 9: Inspect FC13 Conveyor Belt
Learner will demonstrate how to safely and efficiently inspect the FC 13 conveyor belt. Learner will also explain the job steps, why they are conducted, any associated risk, and how to implement appropriate controls. A safe and efficient FC13 conveyor belt Inspection includes the following steps:
Job Steps Importance Narrative Importance Ranking Satisfactory
or Needs Work
Procedures/Risk Resolution/ Notes/Comments
(Consider Safety, Production, Maintenance)
1=Important 2=Very
Important 3=Critical
Check Tail Pulley Area • Check the impact rubber for
cracks, lagging, and alignment • Ensure that skirting is secured
• Check for wear • Check Tail Bearing It could lead to extensive damage to
equipment and cause down time. • Check tail pulley Visual inspection • Check for proper guarding Improper guarding could cause serious
injury if someone could touch a moving part; company policy
Shut down operation to repair or replace defective guarding; Ensure that it is secure and in place; No contact with moving parts.
Check Head Pulley Area
• Check for proper guarding Improper guarding could cause serious injury if someone could touch a moving part; company policy
Shut down operation to repair or replace defective guarding; Ensure that it is secure and in place; No contact with moving parts.
• Check Head Pulley Check for cracks, lagging, alignment. • Check Bearings It could lead to extensive damage to
equipment and cause down time. Check for Over-heating, unusual noise.
• Check Gear Box It could lead to extensive damage to equipment and cause down time.
Check for leaks, noise, over-heating.
• Check Wiper Check for contact to the belt • Check Snubber Pulley Check for cracks and wear. • Check motor It could lead to injury, extensive damage
to equipment, and cause down time. Check for heat and unusual noise; Check electrical connections; Check for proper bushing and bare wires.
• Check V-Belts Check for alignment, wear & tension 15
Job Steps Importance Narrative Importance Ranking Satisfactory
or Needs Work
Procedures/Risk Resolution/ Notes/Comments
(Consider Safety, Production, Maintenance)
1=Important 2=Very
Important 3=Critical
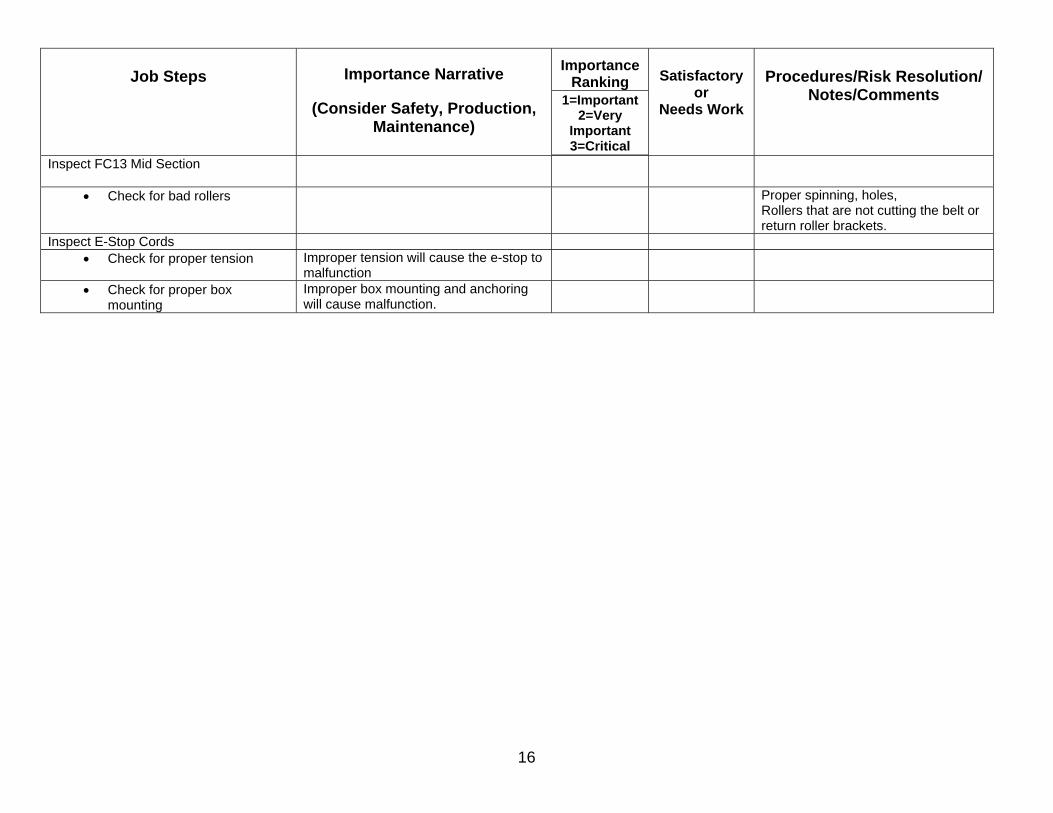
Inspect FC13 Mid Section
• Check for bad rollers Proper spinning, holes, Rollers that are not cutting the belt or return roller brackets.
Inspect E-Stop Cords • Check for proper tension Improper tension will cause the e-stop to
malfunction • Check for proper box
mounting Improper box mounting and anchoring will cause malfunction.
16

Duty 10: Inspect FC12 Conveyor Belt
Learner will demonstrate how to safely and efficiently inspect the FC 12 conveyor belt. Learner will also explain the job steps, why they are conducted, any associated risk, and how to implement appropriate controls. A safe and efficient FC12 conveyor belt Inspection includes the following steps:
Job Steps Importance Narrative Importance Ranking Satisfactory
or Needs Work
Procedures/Risk Resolution/ Notes/Comments
(Consider Safety, Production, Maintenance)
1=Important 2=Very
Important 3=Critical
Check Tail Pulley Area • Check the impact rubber for
cracks, lagging, and alignment • Ensure that skirting is secured
• Check for wear • Check tail bearing It could lead to extensive damage to
equipment and cause down time. • Check tail pulley Visual inspection • Check for proper guarding Improper guarding could cause serious
injury if someone could touch a moving part; company policy
Shut down operation to repair or replace defective guarding; Ensure that it is secure and in place; No contact with moving parts.
Check Head Pulley Area
• Check for proper guarding Improper guarding could cause serious injury if someone could touch a moving part; company policy
Shut down operation to repair or replace defective guarding; Ensure that it is secure and in place; No contact with moving parts.
• Check head pulley Check for Cracks, lagging, alignment • Check Bearings It could lead to extensive damage to
equipment and cause down time. Check for Over-heating, unusual noise
• Check Gear Box It could lead to extensive damage to equipment and cause down time.
Check for Leaks, Noise, Over Heating
• Check Wiper Check for contact to the belt • Check Snubber Pulley Check for cracks and wear • Check Motor It could lead to injury, extensive damage
to equipment, and cause down time. Check for heat and unusual noise; Check electrical connections; Check for proper bushing and bare wires
• Check V-Belts Check for alignment, wear & tension
17

Job Steps Importance Narrative Importance Ranking Satisfactory
or Needs Work
Procedures/Risk Resolution/ Notes/Comments
(Consider Safety, Production, Maintenance)
1=Important 2=Very
Important 3=Critical
Inspect FC12 Mid Section
• Check all rollers Proper spinning, holes, rollers aren’t cutting the belt or return roller brackets.
• Inspect lighting in tunnel Ensure that lights are working and guards are in place
• Inspect housekeeping To prevent slips, trips, and falls; can affect the belt operation
Check for clear walkway and no accumulations of extra materials
Inspect E-Stop Cords
• Check for proper tension Improper tension will cause the e-stop to malfunction
• Check for proper box mounting
Improper box mounting and anchoring will cause malfunction.
18

Duty 11: Inspect FC 12 MCC (Motor Control Center)
Learner will demonstrate how to safely and efficiently inspect the FC 12 Motor Control Center. Learner will also explain the job steps, why they are conducted, any associated risk, and how to implement appropriate controls. A safe and efficient inspection of the FC 12 Motor Control Center includes the following job steps:
Job Steps Importance Narrative Importance Ranking Satisfactory
or Needs Work
Procedures/Risk Resolution/ Notes/Comments
(Consider Safety, Production, Maintenance)
1=Important 2=Very
Important 3=Critical
Inspect fire extinguisher Reduce likelihood of being caught in, trapped or burned by a fire and to lower chance of equipment damage due to fires.
Inspect housekeeping To prevent slips, trips, falls, and control combustible materials
Remove all combustible materials from the MCC.
Ensure that lock out tag out board is maintained Check for hazardous electrical conditions
• Check Lights and light covers • Check Cable installation Prevent contact with bare wires and
possible fatal injuries • Check Labels Prevent miners from making lock / tag
out mistakes • Check Cover Plates
19

Duty 12: Preventative Maintenance
Learner will demonstrate how to safely and efficiently perform preventative maintenance. Learner will also explain the job steps, why they are conducted, any associated risk, and how to implement appropriate controls. Safe and efficient preventative maintenance procedure includes the following job steps:
Job Steps Importance Narrative Importance Ranking Satisfactory
or Needs Work
Procedures/Risk Resolution/ Notes/Comments
(Consider Safety, Production, Maintenance)
1=Important 2=Very
Important 3=Critical
Obtain grease from the oil containment area
Oil container is in shop
Fill grease gun Follow Grease Schedule Grease the bearings that are listed
• Inspect the grease lines and zerk fittings
If broken line is discovered, repair if accessible. If not accessible, make appropriate note on PM Sheet.
• Look for visible grease around the bearing
This ensures that the bearing is properly lubricated. The old grease is pushed out, and new grease is inserted.
20

Duty 13: Housekeeping
Learner will demonstrate how to safely and efficiently maintain proper housekeeping. Learner will also explain the job steps, why they are conducted, any associated risk, and how to implement appropriate controls. Safe and efficient housekeeping includes the following job steps:
Job Steps Importance Narrative Importance Ranking Satisfactory
or Needs Work
Procedures/Risk Resolution/ Notes/Comments
(Consider Safety, Production, Maintenance)
1=Important 2=Very
Important 3=Critical
Obtain Water truck Conveyorman must be properly task trained prior to operating the water truck.
Ensure that wheels are properly chocked Prevents accidental roll a ways causing damage to property or injury
Start water truck to build air on truck This starts automatically upon starting.
Turn valve on to start water to fill water truck up
Valve is located at the bottom of the water stand pipe.
Turn off water when truck is full Preventing and/or Reporting spillage is a condition of employment; environmental concerns
This is done to prevent spillage. If spillage occurs, halt water flow path. If it is entering the sough; estimate the cleanliness and volume of the water and immediately notify plant manager.
Proceed to “B” pit via “A” pit Roadway To prevent travel through dangerous area.
If gate is locked, call supervisor. Proceed in low gear down hill. Refer to site map and policy.
Proceed to areas that require cleanup Go to the dirtiest area first. Refer to work area exam.
Park truck in a safe location Set parking brake To prevent unexpected movement Engage PTO To start the pump Engage throttle to maximum To provide maximum water pressure Chock wheels To prevent injury or property damage
due to unexpected roll a ways Remove and un-wind water hose Lay out hose in the proper area
before opening water valve. Open valve on rear of truck slowly Grab the end of the water hose Discharge end Open the hose nozzle slowly Prevent Falling Injury To maintain control of the hose.
21

Job Steps Importance Narrative Importance Ranking Satisfactory
or Needs Work
Procedures/Risk Resolution/ Notes/Comments
(Consider Safety, Production, Maintenance)
1=Important 2=Very
Important 3=Critical
Clean transfer points thoroughly as possible
Do not spray water directly on bearings or electrical motors/equipment.
Roll up water hose Remove and Store wheel chocks Store chocks in storage box on rear of
truck. Reset Throttle to idle Prevent damage to the PTO if left
running This is done to disengage the PTO and to prevent equipment damage
Turn off pump by disengaging PTO Prevent pump damage Do this when water pressure drops for the first time.
Disengage Parking Brake Prevent repetitive brake maintenance Return to water stand and repeat fill up procedures
When traveling the ”B” Pit road, beware of potential slippery road conditions. Do not follow other persons or equipment up roadway.
Proceed to any other areas that need to be cleaned after water truck is filled again
Refer to work place examination for areas that require clean up.
22

Duty 14: Spill Response
Learner will demonstrate how to safely and efficiently respond to a spill. Learner will explain the job steps, why they are conducted, any associated risk, and how to implement appropriate controls. Safe and efficient spill response includes the following job steps:
Job Steps Importance Narrative Importance Ranking Satisfactory
or Needs Work
Procedures/Risk Resolution/ Notes/Comments
(Consider Safety, Production, Maintenance)
1=Important 2=Very
Important 3=Critical
Ensure personal and co-worker safety Prevent injury or death caused by fire or inhalation exposure
Determine the source of the spill and halt if possible
Preventing greater environmental impact Refer to company policy
Collect appropriate cleanup/containment materials
Containment materials are at the shop: diapers, booms (worst case use berms or cover with soil).
Contain, limit, or stop the spill Preventing greater environmental impact Notify the supervisor immediately Company policy; authorities need to be
notified in a timely manner If supervisor is not available, use environmental call-out and response plan sheet until someone is contacted.
Determine the type, approximate time, location, and quantity of the spill
Information is needed to properly document, report, and clean up spill.
Bag contaminated soil and clean-up materials
To minimize environmental impact
Place in proper container Must follow up procedures to ensure proper disposal
23

Duty 15: Unplug Transfer Points
Learner will demonstrate how to safely and efficiently unplug transfer points. Learner will explain the job steps, why they are conducted, any associated risk, and how to implement appropriate controls. A safe and efficient method of unplugging transfer points includes the following job steps:
Job Steps Importance Narrative Importance Ranking Satisfactory
or Needs Work
Procedures/Risk Resolution/ Notes/Comments
(Consider Safety, Production, Maintenance)
1=Important 2=Very
Important 3=Critical
Shutdown the two preceding, and following belts of the plugged area
To ensure the safety of miners, and to prevent further damage to the equipment
This prevents injury and equipment damage.
Lock-out and tag-out the belts that were turned off
To ensure the safety of miners, and to prevent further damage to the equipment
Follow the company policy regarding lock and tag-out procedures.
Analyze and discuss the task prior to beginning work
To ensure the safety of miners, and to prevent further damage to the equipment
To gain consensus in the safest and most effective way to correct the problem.
Obtain tools, equipment and/or safety items that are required to make the proper repair
May need fall protection and/or confined space permit.
Remove the accessible material • Hose out Material – Step 1 This is the first step that must be
taken Hose out as much material as possible from the top first
• Unplug from the top – Step 2 • Dislodge as much material
as possible If this step is not successful, dislodge as much materials as possible from the bottom.
• Unplug from the bottom – Step 3 If this step is not successful, proceed with confined space entry.
• Remove the back door, and dislodge as much material as possible
Miner should use caution when opening door because of falling material hazards.
• Entering transfer point – Step 4 • Obtain a confined space
entry permit from the MCC room
• Obtain a cell phone from the shop
24

Job Steps Importance Narrative Importance Ranking Satisfactory
or Needs Work
Procedures/Risk Resolution/ Notes/Comments
(Consider Safety, Production, Maintenance)
1=Important 2=Very
Important 3=Critical
• Obtain (multi-gas) “sniffer” located at the shop
• Obtain life line from the shop
• Obtain ladder • Fill out confined space
permit • Ensure that there is an
attendant and/or an entry supervisor at the rock box before entry
To prevent injury or death due to engulfment or confine space hazards, and/or rescue
Without an attendant, you can’t enter the confined space
• Take gas test and document readings (done by attendant)
To ensure that air levels are within the parameters
No entry permitted if outside gas parameters
• Inspect and put on safety harness
To ensure that harnesses are in working order, and method of rescue
• Complete inspection documents
• Locate and hook up the life line to the appropriate attachment point
Enables prompt rescue
• Position and tie off the ladder
To prevent injury/fall See company policy on ladders.
• Attach lanyard to the attachment point
To prevent injury from impact Device will be capable of supporting 5000 pounds or more.
• Place pry bar in box • Descend ladder Injury may occur if miner doesn’t
descend ladder correctly Maintain three points of contact. Do not carry tools while descending or ascending the ladder.
• Take and record another gas test (done by the attendant)
To ensure that air levels are within the parameters
• Dislodge materials To clear the transfer point If unsuccessful, contact supervisor and assess the condition.
• Exit the confined space Job is complete
25
Job Steps Importance Narrative Importance Ranking Satisfactory
or Needs Work
Procedures/Risk Resolution/ Notes/Comments
(Consider Safety, Production, Maintenance)
1=Important 2=Very
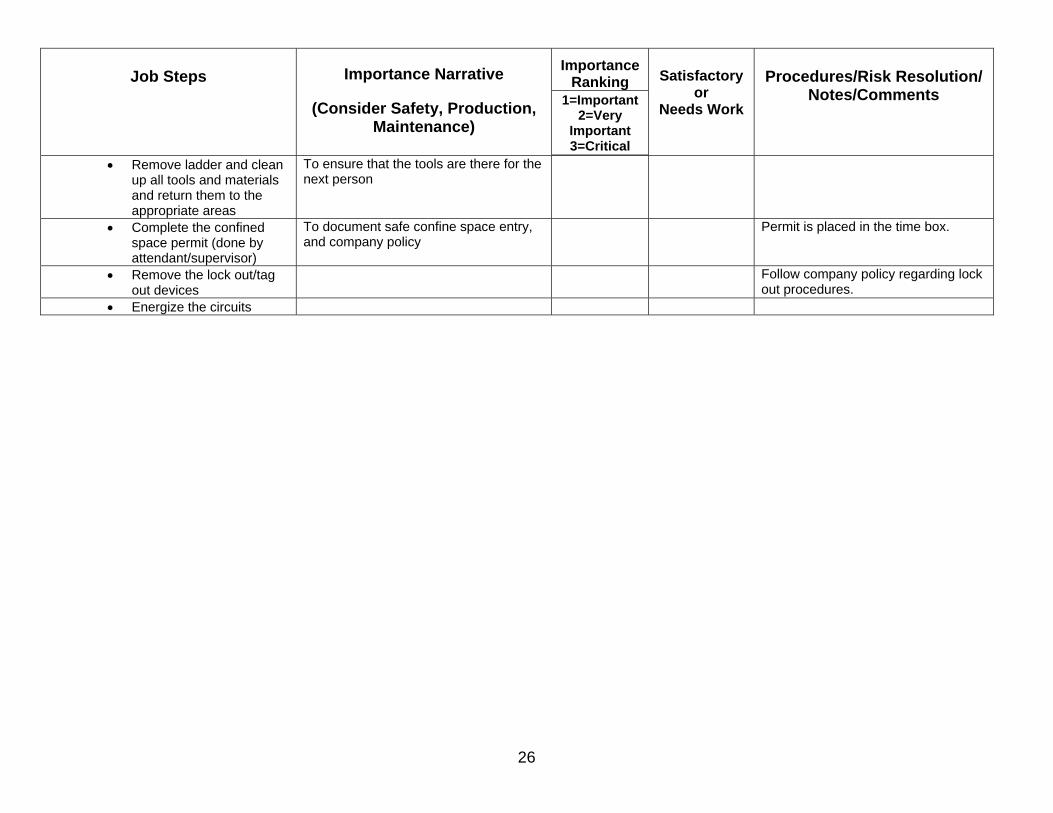
Important 3=Critical
• Remove ladder and clean up all tools and materials and return them to the appropriate areas
To ensure that the tools are there for the next person
• Complete the confined space permit (done by attendant/supervisor)
To document safe confine space entry, and company policy
Permit is placed in the time box.
• Remove the lock out/tag out devices
Follow company policy regarding lock out procedures.
• Energize the circuits
26
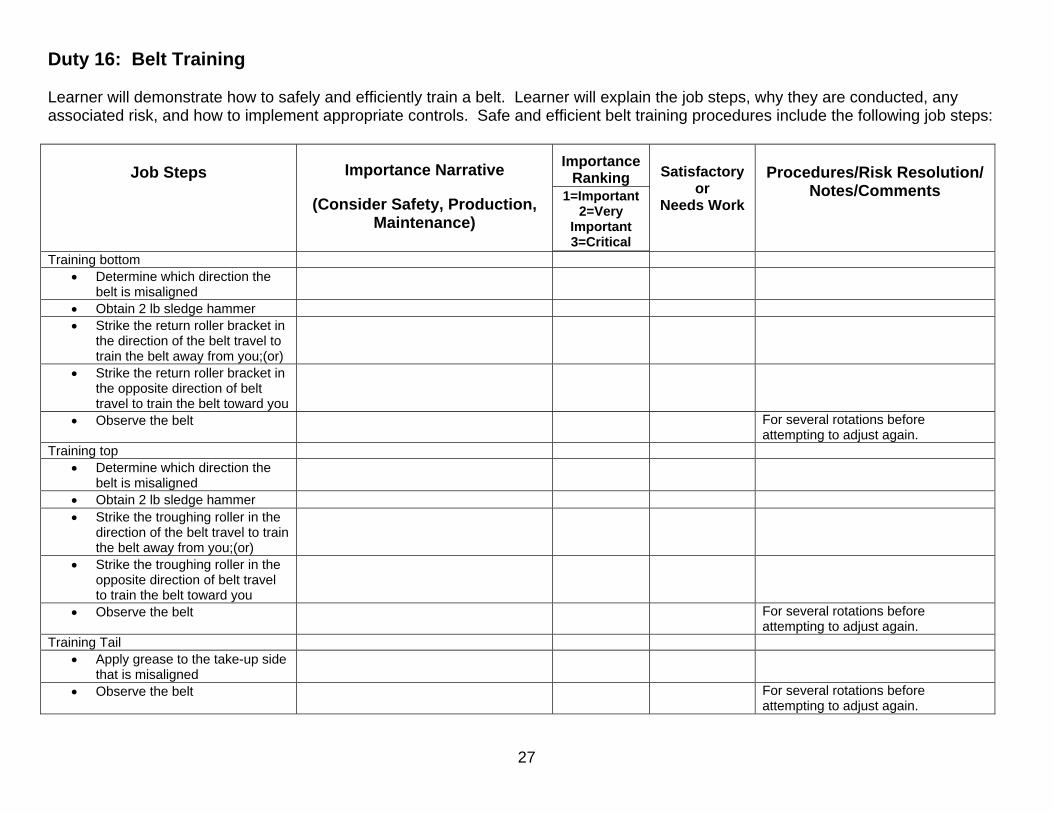
Duty 16: Belt Training
Learner will demonstrate how to safely and efficiently train a belt. Learner will explain the job steps, why they are conducted, any associated risk, and how to implement appropriate controls. Safe and efficient belt training procedures include the following job steps:
Job Steps Importance Narrative Importance Ranking Satisfactory
or Needs Work
Procedures/Risk Resolution/ Notes/Comments
(Consider Safety, Production, Maintenance)
1=Important 2=Very
Important 3=Critical
Training bottom • Determine which direction the
belt is misaligned • Obtain 2 lb sledge hammer • Strike the return roller bracket in
the direction of the belt travel to train the belt away from you;(or)
• Strike the return roller bracket in the opposite direction of belt travel to train the belt toward you
• Observe the belt For several rotations before attempting to adjust again.
Training top • Determine which direction the
belt is misaligned • Obtain 2 lb sledge hammer • Strike the troughing roller in the
direction of the belt travel to train the belt away from you;(or)
• Strike the troughing roller in the opposite direction of belt travel to train the belt toward you
• Observe the belt For several rotations before attempting to adjust again.
Training Tail • Apply grease to the take-up side
that is misaligned • Observe the belt For several rotations before
attempting to adjust again.
27

Duty 17: Belt Splicing
Learner will demonstrate how to safely and efficiently splice a belt. Learner will explain the job steps, why they are conducted, any associated risk, and how to implement appropriate controls. Safe and efficient belt splicing includes the following job steps:
Job Steps Importance Narrative Importance Ranking Satisfactory
or Needs Work
Procedures/Risk Resolution/ Notes/Comments
(Consider Safety, Production, Maintenance)
1=Important 2=Very
Important 3=Critical
Spot the belt Important for safe access to splice Position the splice in a safe location of the top side of belt.
Assess the position of the splice and make adjustments if necessary
Important for safe access to splice Follow company Lock-out/tag-out procedure.
Lock/Tag Out Belt Prevent serious injury from unexpected start-up
Refer to company policy
Obtain the following tools needed to splice belt:
To prevent injury, and loss of production from unsafe tools
• Template to determine belt and clips size
• Four clamp bars and four glow meters
• Two 3 ton com-a-longs Check for bent hooks, safety latch, and damage to the chain.
• Impact gun Be certain it has been ground tested. • Flexco splicing tools Driver, spoon, cutters, and breaker • Bucket of Flexcos • Splicing board • Razor knife Requires sharp blade • Straight edge or square • Claw hammer • Extension cord Be certain it has been ground tested. • Face shield To be used when grinding. • 4.5 inch grinder Be certain it has been ground tested,
and has guard. Inspect tools needed to splice the belt Obtain, Inspect, and Use Fall Protection To prevent injuries from falls To be used when there is a danger of
falling. Place the required tools at or near the location of the splice
28

Job Steps Importance Narrative Importance Ranking Satisfactory
or Needs Work
Procedures/Risk Resolution/ Notes/Comments
(Consider Safety, Production, Maintenance)
1=Important 2=Very
Important 3=Critical
Install Belt Clamps Leave enough room to space the clamps as far as the com-a-longs will permit.
Position and tension both come-a-longs simultaneously Position splice board under belt and on top of com-a-long chain
The board should be centered on the existing splice.
Cut out the old splice using a straight edge
The cut needs to be straight.
Install Splicing Template
Drill holes
Remove Template
Install Flexcos (Clips) on both sides Realign both sides of the belt.
Install caps and nuts
Tighten nuts with a nut driver
Break off the studs using a breaker tool
Grind and Clean to remove sharp edges Use face shield.
Loosen the com-a-longs simultaneously
Remove com-a-longs
Remove clamps
Remove splice board
Clean up and re-store tools
Remove locks and tags
29

Duty 18: End of Shift Activities
Learner will demonstrate how to safely and efficiently perform end of shift activities. Learner will explain the job steps, why they are conducted, any associated risk, and how to implement appropriate controls. Safe and efficient end of shift activities include the following job steps:
Job Steps Importance Narrative Importance Ranking Satisfactory
or Needs Work
Procedures/Risk Resolution/ Notes/Comments
(Consider Safety, Production, Maintenance)
1=Important 2=Very
Important 3=Critical
Signal the loader operator to stop feeding the plant
At the appropriate time
Proceed to the Control Tower Turn off power to feeder, FC 16, 15, 14, 13, and FC 12
To prevent undo wear and tear on equipment, and reduce operational costs
Ensure the belts are cleaned off prior to turning off power. Remove power in proper sequence.
Pick up Loader Operators if required Shut and Lock Gate if last person out To keep out unauthorized persons The permit requires that no activity
occurs after 6pm. Park service truck on the line Chock tires when parked on-line. Post-Op Service Truck This is a company policy.
• Lock tool box • Check oxygen and acetylene
bottles To prevent fire and explosion if there is a defect in the system, to prevent personal injury, and property damage
Replace if necessary, make sure they are bled off and secure.
• Note any damage that may have occurred during the shift
To prevent the operation of a vehicle left in an unsafe condition
Leave the vehicle in an operational condition for the next individual.
Return PPE to locker Replace any unusable PPE. Place radio in charger Turn in paperwork
• Grease schedule • Pre-Op To prevent the operation of a vehicle left
in an unsafe condition • “B” Pit Inspection Sheet To prevent the operation of the
equipment in “B” Pit left in an unsafe condition or not mechanically safe
• Safety Harness Inspection Clock Out Go home in the condition you came in
30