compact disc player cmx-3000 - pioneer … disc player cmx-3000. ... damaged, cracked or warped...
TRANSCRIPT

Operating Instructions
COMPACT DISC PLAYER
CMX-3000

2 <DRB1307>
Read before use
Thank you for buying this Pioneer product.Please read through these operating instructions so you will knowhow to operate your model properly. After you have finishedreading the instructions, put them away in a safe place for futurereference.In some countries or regions, the shape of the power plug andpower outlet may sometimes differ from that shown in theexplanatory drawings. However the method of connecting andoperating the unit is the same. K015 En

<DRB1307> 3
Read before use
IMPORTANT NOTICEThe serial number for this equipment is located on the rear panel.Please write this serial number on your enclosed warranty card andkeep it in a secure area. This is for your security.

4 <DRB1307>
CAUTIONS REGARDING HANDLING
Location
Install the player in a well-ventilated location where it will not beexposed to high temperatures or humidity.Do not install the player in a location which is exposed to directsunlight, or near stoves or radiators. Excessive heat canadversely affect the cabinet and internal components.Installation of the player in a damp or dusty environment mayaiso result in a malfunction and can be hazardous. Avoidinstallation near cookers etc., where the player may be exposedto oily smoke, steam or heat.
Installation guidelines
÷ Placing and using the compact disc player for long periods onheat-generating sources such as amplifiers or nearspotlights, etc. will affect product performance. Avoid placingthe player on heat-generating sources.
÷ Install this compact disc player as far as possible away fromtuners and TV sets. A compact disc player installed in closeproximity to such equipment may cause noise or degradationof the picture.
÷ Noise may be noticeable when an indoor antenna is used. Insuch cases, make use of an outdoor antenna or turn offpower to the compact disc player.
÷ When the unit is used in a loud-sound environment, e.g., neara speaker, sound skip may occur. Install the unit away fromthe speaker or reduce the listening volume.
÷ Place this unit on a level surface and a stable platform.÷ Be sure the player, including its audio and power supply
cords, does not touch vibrating materials. Any cause ofvibration other than the insulators may cause the disc to skip.Take special care when using the player while it is installed ina carrying case.
Installing the CMX-3000 in an EIA rack
The screw holes on the front panel o the CMX-3000 aredesigned for use in attaching the unit to a 19-inch EIA rack.÷ Remove the five legs on the unit before installing the unit in
the rack.÷ Attach the unit to the rack using screws of the appropriate
size (screws not provided with the unit).Note
÷ Never place this CD player directly above a power amplifier,as the heat given off by the amplifier might result in damageto the unit. Placing the CD player directly above a poweramplifier might also result in ham radio signals being pickedup or in other types of interference.
÷ Always be sure to remove the CD player from its rack beforeshipping.
÷ When moving the CD player while still installed in its rack,exercise caution to avoid subjecting the player to shocks orvibration.
Cleaning the player
To clean the PLAYER wipe with a polishing or a soft, dry cloth.For stubborn dirt, moisten a soft cloth with a weak solution ofneutral detergent (diluted in five to six parts water), wring thecloth well, and wipe away the dirt. Use a dry cloth to wipe thesurface dry. Do not use volatile liquids such as benzene orthinner which will damage to the unit.
CD lens cleaner
The player’s pickup lens should not become dirty in normal use.If for some reason, the lens becomes soiled and malfunctions,contact your nearest PIONEER authorized service center. Lenscleaners for CD players are commercially available, but specialcare should be exercised in their use as some may causedamage to the lens.
Storing discs
÷ Discs are made of the same kinds of plastic used forconventional analog audio records. Be careful not to allowdiscs to warp. Always store discs in their cases vertically,avoiding locations with high heat, humidity, or extremely lowtemperatures. Avoid leaving discs in cars; the interior of a carin direct sunlight can become extremely hot.
÷ Always read and abide by the precautionary notes listed ondisc labels.
Condensation
When this unit is brought into a warm room from previously coldsurroundings or when the room temperature rises sharply,condensation may form inside the unit and impair itsperformance. In such cases, allow the unit to stand for about anhour or raise the room temperature gradually.
Read before use
Do not place on or againstvibrating materials!

<DRB1307> 5
'
Do not play a CD with a special shapeDo not play a CD having other shape than a circular disc, such asheart shaped disc. Otherwise malfunction may occur.
FORCED DISC EJECTIONIf the EJECT button fails to work and it becomes impossibleto eject a disc, the disc may be ejected by inserting the discejection pin in the manual disc ejection hole located on thefront panel of the player.Always be sure to observe the following points whenmanually ejecting discs.1 Be sure to turn off the power to the CD player and wait
for 1 minute or more before ejecting the disc.Manually ejecting a disc immediately after the
power to the unit has been turned off may
result in one of the following problems from
occurring, and care should accordingly be
taken never to eject discs immediately after the
power has been turned off.
÷ The disc will still be spinning when it is ejected, thusresulting in cuts to the fingers or other forms of bodilyinjury.
÷ The disc clamps will spin in an unstable state, thusresulting in scratching of discs.
2 Be sure to use only the disc ejection pin included withyour CMX-3000 (i.e., never use a paper clip or any otherobject).Inserting the disc ejection pin into the hole until it
encounters resistance will cause the disc to be ejectedsome 5 to 10 millimeters from the insertion slot. Thedisc may then be removed by grasping it by hand andpulling.
Read before use
Manualdisc ejection hole
÷ If a disc becomes very dirty, dampen a soft cloth with water,(be sure to wring it out well) and wipe the away dirt gently.Remove any water drops with another soft, dry cloth.
÷ Do not use record cleaning sprays or anti-static agents ondiscs. Never clean discs with benzene, thinner, or othervolatile solvents or damage to the disc surface may result.
÷ With this player, use only thosediscs which display the markshown right (Optical audio digitaldiscs).
÷ When holding discs, do not touch their signal surfaces. Holdby the edges, or by one edge and the center hole.
÷ Do not affix gummed labels or tape to the disc surface. Also,do not scratch or damage the label.
÷ Discs rotate at high speeds inside the player. Do not usedamaged, cracked or warped discs.
Cleaning and handling compact discs
÷ The presence of fingerprints or smudges on the surface ofthe disc will not directly affect the recorded signals, but,depending on the degree of contamination, the brightness ofthe light reflected from the signal surfaces may be reducedcausing degradation of sound quality. Always keep your discsclean by wiping them gently with a soft cloth from the inneredge toward the outer edge.

6 <DRB1307>
SPECIFICATIONS
1.GeneralSystem ................................ Compact disc digital audio systemDiscs used.......................................................... Compact discsPower requirements ........................................ AC 120 V, 60 HzPower consumption .......................................................... 49 WOperating temperature............ +5˚C to +35˚C (+41°F to +95°F)Operating humidity................................................... 5% to 85%
(There should be no condensation of moisture.)Weight
Remote controller ...................................... 2.0 kg (4 lbs 7 oz)Player ....................................................... 5.6 kg (12 lbs 6 oz)
DimensionsRemote controller ................. 482 (W) x 132 (D) x 82 (H) mm
18-31/32 (W) x 5-3/16 (D) x 3-7/32 (H) in.Player .................................... 482 (W) x 252 (D) x 90 (H) mm
18-31/32 (W) x 9-15/16 (D) x 3-9/16 (H) in.
2. Audio sectionFrequency response ...........................................4 Hz to 20 kHzSignal-to-noise ratio ........................................... 115 dB or moreDistortion rate ............................................................... 0.006%
3.Accessories÷ Operating instructions ......................................................... 1÷ Power cord .......................................................................... 1÷ Audio cable .......................................................................... 2÷ Control cord ......................................................................... 2÷ Forced ejection pin ............................................................... 1÷ Specialized connection cable for the remote controller ....... 1÷ Limited warranty .................................................................. 1
NOTE:
Specifications and design are subject to possible modificationwithout notice.
Applications
ADVANCED OPERATIONS ......................................... 15Scratch Play ........................................................... 15Hot Cue .................................................................. 15Loop Playback ........................................................ 16WAVE Display ........................................................ 16CD TEXT Display .................................................... 16Mixing (Segueing) Different Tracks ....................... 17Beat Synchro ......................................................... 17Auto BPM Synchro ................................................ 17Fader Start Playback .............................................. 18Relay Play Using Two Players ............................... 18Data Copy .............................................................. 18
Appendix
TROUBLESHOOTING ................................................. 19Error Message Display ........................................... 20Cleaning the Jog Dial ............................................. 20
Read before use
CAUTIONS REGARDING HANDLING .......................... 4SPECIFICATIONS.......................................................... 6FEATURES .................................................................... 7PANEL FACILITIES ....................................................... 8
Player ....................................................................... 8Remote Control Unit ................................................ 8
CONNECTIONS .......................................................... 10
Basic operation
DISC LOADING/UNLOADING .................................... 11DJ PLAYER OPERATION............................................ 12
Auto Cueing ........................................................... 12Starting Playback ................................................... 12Stopping Playback .................................................. 12Pausing Playback ................................................... 12Skipping Tracks ...................................................... 12Fast Forward and Rewind ...................................... 13Cueing Point Settings ............................................ 13Changing Playback Speed ..................................... 13Setting a Master Tempo ........................................ 13Jog Dial Functions ................................................. 14
CONTENTS
Read before use

<DRB1307> 7
FEATURES
JOG DIALThe large 110 mm diameter Jog dial enables better handling
than an analog turntable.
÷ SCRATCH PLAYWhen the jog dial is rotated in the SCRATCH mode, playback willoccur in response to the direction and speed of jog-dial rotation.
÷ PITCH BENDThis function changes the music tempo depending on direction ofJog dial rotation and speed of movement.
÷ FRAME SEARCHMoves the disc from pause position in frame increments (1/75 sec)when the Jog dial is rotated in pause mode.
÷ SUPER FAST SEARCHYou can search the disc faster than normal search or track search byholding down a SEARCH button or TRACK SEARCH button as youturn the Jog dial.
WAVE DISPLAYThis display makes it possible to find the breakpoint between tracksin advance and use it as mix point or end point in the same way asyou can on an analog record by checking the position of the needlein the groove.
BPM SYNCHRO HOT CUEEach of the players can be preset with up to three Hot Cue points (1,2, 3), thus allowing you so begin play instantly from any of thepoints. Also, by setting the BPM with either auto or TAP button, thatBPM value can be used for HOT CUE synchro playback.
TEMPO CONTROL60 mm high-precision slider coupled with a 0.05% incrementdigital display (within a ±6% range) allows exact control of speed tomake tempo adjustments easy and accurate.
÷ TEMPO CONTROL RANGEThe maximum variable range can be set to four variable ranges:±6%, ±10%, ±16% and WIDE to facilitate adjustment.
÷ MASTER TEMPO
Changes music tempo without changing pitch.
CUE÷ BACK CUE
After storing the Cue point in memory, press the CUE button whileplaying the unit to go back to the Cue point and start over.
÷ AUTO CUEAuto cue automatically locates the song’s start point even if itdiffers from the track’s frame, allowing the player to start instantlyat a press of the PLAY/PAUSE (38) button.
÷ CUE POINT SAMPLERThe sound from the memorized cue point can be reproduced by onetouch, which can be used as the start point check and the sampler.
REAL TIME SEAMLESS LOOPThis function simplifies setting and releasing loops. This functionlets you set a loop while you are playing a track. A loop can also beset at the end of the track so that the track does not stop. Inaddition, an ADJUST mode has been added to enable one-touchadjustment to the Loop-out point and facilitate loop operation.
RELOOPAllows you to replay a loop any number of times.
Press the RELOOP button after releasing loop play to return to theloop start point. Clever use of on and off in combination with therhythm make it possible to create new sound effects.
LOOP PLAY MEMORYLoop information can be programmed in the HOT CUE button, sothe desired loop play begins instantly when accessed.
EMERGENCY LOOPWhen this function is used to designate a loop in-point, the loop out-point is automatically set and loop play begins.
PLAYING ADDRESSThis bar graph provides a visual representation of track playbackprogress that enables you to see current playback position just likeyou can on an analog record by checking needle position. Thelength of the bar shows current position and a flashing bar providesadvance notice of track end.
SLOT INDiscs are loaded directly without opening doors or trays, makingtrack selection that much faster.
FADER STARTQUICK START and BACK CUE can be performed using the faderfunction on DJ mixers DJM-500, DJM-600 and DJM-300 (all mixersare sold separately).
MULTI READCD-R, CD-RW discs can be replayed. (However, due to certainspecial characteristics of some discs, recorders as well as dirty ordamaged discs, some discs may not replay properly.)
CD TEXTCD TEXT informations are displayed if the CD includes the CD TEXTinformation.
Read before use
The Pioneer CMX-3000 is a twin CD player designed for use by DJs which provides not only the features and performance required ina discotheque sound system in a CD player but also provides new features only possible in a CD player.

8 <DRB1307>
PANEL FACILITIES
1 Manual ejection hole (see p. 5)2 Disc insertion slot (see p. 11)
When using 3 inch/8 cm discs, discs must be inserted in thecommercially available CD adapter before insertion.
3 Disc loading indicatorThis indicator flashes when a disc is being inserted into orejected from the disc insertion slot and lights up when a dischas been inserted.
4 EJECT button (0)Pressing this button while cueing is on standby or play ispaused will eject the disc from the player.
Player
5 DIGITAL MODE switch (see p. 11)Set to On when the digital output is to be used. When set toOn, the DJ functions do not function. (Functions marked * donot operate in this mode.) And the muted pause mode isused instead of the audible pause mode.
6 POWER switch and indicatorThe following settings are maintained in the internal memoryeven when the power is turned off:÷ TEMPO RANGE ÷ TIME MODE÷ AUTO CUE ÷ MASTER TEMPO÷ CD TEXT/WAVE ÷ AUTO CUE LEVEL
Remote Control Unit
Read before use
1 EJECT button (0)
2 CD TEXT/WAVE button (see p. 16)Each time the button is pressed the function changesalternately as follows:
During digital mode, switches betweenCD TEXT 2 3 CD TEXT
disc title display track title display
3 LOOP control buttons (*) (see p. 16)
4 EMERGENCY LOOP button (*) (see p. 16)When this button is pressed, the current point is set as theloop in-point, and loop play begins with an automatically setout-point.
5 TEMPO controls (*) (see p. 13)Tempo control range button (TEMPO RANGE):
Pressing this button causes the variable range of the tempocontrol slide to change each time the button is pressed.MASTER TEMPO button and indicator:
Pressing this button causes the master tempo feature to bepowered on or off each time it is pressed.Tempo control slide:
Moving this slider in the positive (+) direction away from thecenter position (normal playback tempo) causes the tempo tobecome faster, and moving it in the negative (–) directioncauses the tempo to become slower.PITCH BEND buttons (+, –):
When pressed during playback, causes pitch bend. Pressingthe “+” button causes pitch to accelerate, while pressing the“–” button causes pitch to decelerate.
Operation buttons indicated by an asterisk (*) are not supported in
digital mode.
3 WAVE display 3 CD TEXT 3 CD TEXTdisc title display track title display

<DRB1307> 9
6 Time mode/Auto cueing button (*)
(TIME MODE/AUTO CUE)TIME MODE:
Pressing this button causes the elapsed time and remainingtime (REMAIN) of the current track to be displayed insuccession on the time display of the display unit.AUTO CUE: (see p. 12)
7 TRACK SEARCH button (4, ¢) (see p. 12)8 SEARCH button (1, ¡) (see p. 13)9 CUE button and indicator (*)
Cueing point settings (see p. 13)Cueing point sampler (see p. 13)Back cueing (see p. 13)Cueing point adjust (see p. 13)
0 PLAY/PAUSE button (3 8) and indicator (see p. 12)- JOG MODE button (*)
Each time this button is pressed, the jog mode switchesalternately between CDJ jog mode and SCRATCH jog mode.
= Display
~ Jog dial (+ FWD/– REV) (*) (see p. 14)! TAP button (*)
When pressed during playback, the BPM counter switches tomanual mode, and the BPM value is calculated from theinterval at which the TAP button is pressed. A BPM value inthe range 40 to 199 BPM (varies with the tempo change rate)can be entered when the tempo change rate is 0%.
@ AUTO button (*)Press for automatic BPM count
# BPM synchro button (BPM SYNC) and indicator (*)
(see p. 17)Each time the button is pressed, switches BPM synchrofunction ON/OFF. BMP SYNC indicator flashes during ON,and lights steadily when OFF.
$ RELAY PLAY button and indicator (*) (see p. 18)% HOT CUE recording mode button (REC) and
indicator (*) (see p. 15)Press to switch the HOT CUE button’s function (record/access). In the record mode, the indicator lights.
^ HOT CUE buttons (1, 2, 3) and indicator (*) (see p. 15)Use to select the memory (1, 2, 3) into which you wish toprogram hot cue point information and loop information.
Read before use (Panel facilities)
Display1 TRACK number display
Displays the track number of the track currently being played.2 Playback speed display
Tempo control range display (±6, ±10, ±16, WIDE)Displays the variable range mode of the tempo control slide.MASTER indicatorMASTER indicator on the master player lights during BPMsynchro play.Tempo change rate displayDisplays the rate of change of the tempo as specified usingthe tempo control slide.
3 Ring displayDuring relay play, displays disc rotation status. During BPMsynchro mode, the display occurs in rhythm with the beat.
4 Auto cueing indicator (A. CUE)Lights up when auto cueing is turned on.
5 SCRATCH indictorWhen jog mode is set to “SCRATCH,” flashes during write tothe scratch memory, and lights steadily when data is fullywritten to the memory.
6 EMERGENCY LOOP indicatorFlashes during loop play in the Emergency Loop mode.
7 RELOOP indicatorLights to indicate loop play is possible, and during loop play.
8 LOOP indicatorLights during loop play.
9 Automatic BPM Count indicator (AUTO)Lights during automatic BPM count mode.
0 TAP mode indicatorLights during TAP BPM count mode. Indicator goes out forapproximately 0.2 second the instant TAP button is pressed.
- Time displayUsed to display the elapsed playback time (when theREMAIN indicator is unlit) or the remaining playback time(when the REMAIN indicator is lit) of the current track inminutes (M), seconds (S), and frames (F).
= WAVE Display / Character DisplayDuring WAVE display, indicates the volume level of thecurrently playing track. During character display, displays CDTEXT. Characters displayable are limited to alphabet,numerals, and certain symbols. The array displays either thedisc title or the track title. When disc title is displayed, the mark lights.
~ Playback position displayUsed to display a full-scale bar graph for the track beingplayed to make it possible to get an intuitive feel of theelapsed and remaining play time.÷ Display as it appears when displaying elapsed time:
All indicators unlit and then indicators light up insequence from left
÷ Display as it appears when displaying remaining time:All indicators lit and then indicators are turned off insequence from left
÷ Display as it appears when there are less than 30 secondsremaining in a track:
Slow flashing÷ Display as it appears when there are less than 15 seconds
remaining in a track:Rapid flashing
! BPM displayUsed to display the number of BPM for the current track.Note that it may not be possible to count BPM in theautomatic BPM count mode for some tracks. Then use theTAP BPM count mode to do this.

10 <DRB1307>
CMX-3000controlcord
Before connecting or disconnecting any cables, be sure to first turn off the power switch and remove the power cord from its
socket. The CD player may be damaged if cables are connected when the power is on.
1. Connecting the player to the remote control unitFirst connect the CD player to the remote control unit.
CONNECTIONS
Read before use
2. Connecting the system to a DJ mixer (DJM-300, DJM-500, or DJM-600)
(connecting audio output and control jack cables)Using the audio cables provided with your CMX-3000 CD player system, insert the white plugs into the left (L) jacks and the red plugsinto the right (R) jacks. Note that it is also possible to use the CMX-3000 control cord to control the CMX-3000 from a mixer to makeit possible to use fader startup or back cueing. (This does not apply, however, during relay playback.)
LINEPHONO
LINE1PHONO1/LINE2
CH - 1
CONTROL
L
R
LINEPHONO
LINE3PHONO2/LINE4
CH - 2
CONTROL
L
R
CMX-3000audio cable
CMX-3000audiocable
Remote control unit
Player
Specializedconnection cable
Player
CMX-3000control cord
¶ When connecting to a DJM-300, DJM-500 or DJM-600 mixer, use the CMX-3000 audio cables to connect CD1 to A PLAYER andCD2 to B PLAYER as indicated in the diagram above.
3. Connecting the CMX-3000 to other devices
A Connecting the CMX-3000 to other mixersTo connect the CMX-3000 to other mixers, connect the CMX-3000 AUDIO OUT jacks to the line input jacks or AUX jacks of the mixer.(Do not connect to PHONO jacks, as doing so would result in the sound being distorted and in being unable to obtain normal playbackquality.)

<DRB1307> 11
INPUT
CD
R
L
Stereo
amplifier
Player
Connect audio cable to CD or AUX input jacks.(Do not connect to PHONO input jacks.)
CMX-3000 audio cable
Read before use (Connections)
COAXIALOPTICAL
DIGITAL INPUT
CD recorder or other device withdigital input amplifier
Player
Digital signalcable
C Connecting the CMX-3000 to devices with digital input jacks
¶ When using the digital output jacks, the DIGITAL MODE switch must be set to ‘ON’.
Note:
Turning the DIGITAL MODE switch ‘ON’ causes all DJ features (i.e., CUE, LOOP, RELOOP, TEMPO CONTROL, MASTERTEMPO, increase/reduce speed by the jog dial or HOT CUE) to be disabled. Also note that when using digital output pausingresults not in a start playback pause but in a silent pause instead.
4. Connecting the power cordWhen all connections have been made, connect the power cord to the AC inlet on the rear panel of the player and connect the powerplug to an AC wall outlet or to a power receptacle on the rear panel of the amplifier.
B Connecting the CMX-3000 to stereo amplifiers (when not using a DJ mixer)
DISC LOADING/UNLOADING
1. Press POWER switch on front of player to turn power
on.
Do not force a disc into the unit when the POWER switch is set
to OFF as this may damage the disc and the unit.
2. Insert a disc.¶ Hold the disc with label surface upwards, and insert into the
front panel disc insertion slot .¶ When playing an 3 inch/8 cm disc, place the disc in a
commercially available CD adapter before inserting in theinsertion slot.
¶ Each insertion slot can only accommodate one disc at a time.Never attempt to load more than one disc at the same time,or attempt to load a second disc when one disc has alreadybeen loaded.
¶ When loading a disc, do not placing any twisting force on thedisc, or try to force the disc into the slot. Also, do not attemptto interrupt or defeat the motion of the disc when the playerbegins to draw a disc into the slot or to eject a disc, sincedamage to the disc or player could occur.
3. During playback, press the PLAY/PAUSE button
(38) or if a cue point has been specified press the
CUE button to back-cue before pressing the EJECT
button (0) to eject a disc¶ When the EJECT button is pressed, disc rotation stops and
the disc is ejected from the loading slot.¶ If the disc fails to be ejected when the EJECT button is
pressed, the accessory forced eject pin can be inserted intothe front-panel’s forced eject hole to eject the disc. (see p. 5)
CAUTION:Do not attempt to press a disc back into the slot when the EJECTindicator appears. Pressing a disc back into the slot while theEJECT indicator appears may cause the player to stop. In this case,press the EJECT button again and wait until the EJECT indicatorgoes out before reinserting the disc.
Label surface up
Insert straight
POWER switch

12 <DRB1307>
Basic Operation
Auto Cueing (*)
Auto cueing is used to automatically specify the cueing point(see p. 13) to be used before sound actually begins to play wheninserting a disc or when performing track searching.¶ Turning auto cueing on and off
Pressing the TIME MODE/AUTO CUE button and holding itdown for a second or more causes auto cueing to bealternately turned on and off.When auto cueing is on, the auto cueing indicator (A. CUE)will be lit up.
¶ AUTO CUE on/off status is stored in memory and persistseven when the power is turned off.
¶ The Auto Cue level can be changed.
7 Varying the Auto Cue Level
1. Hold the TIME MODE/AUTO CUE button depressed
for 5 seconds or more.¶ The display will show “A.CUE – 60” (when default
setting).2. Press the PITCH BEND buttons (+, –) to change the
value.¶ The value can be changed to either –42 dB, –48 dB, –54
dB, or –60 dB.¶ Either press the TIME MODE/AUTO CUE button or else
wait for 15 seconds; the variable level mode will be cancel.¶ This setting is written to non-volatile memory, and will not
be changed when power is interrupted or disconnected.
Starting Playback
1. Insert a disc into Player A or Player B.
2. If auto cueing is on, press the PLAY/PAUSE button
(38).¶ Wait for the CUE button indicator to light up before
pressing the button. The silent portion at the beginning ofthe displayed track will be skipped and playback will begininstantaneously from the first bars of the track.
DJ PLAYER OPERATION
Playing discs on Player A (Operation identical for Player B)
EJECT
EJECT
TIME MODE/AUTOCUE
PLAY/PAUSE(3 8)
CUE(1,¡)
(4,¢) SEARCH
TRACKSEARCH
JOG MODE LOOP IN/REALTIME CUE
MASTER TEMPOPITCHBEND TEMPO RANGE
Player
Discinsertionslot
Jog dial Tempo control slide
Operations indicated by * cannot be used when the DIGITAL
MODE switch is set to on (and the digital output terminal is used).
Remote control unit
Once the first track has been played, the player willautomatically search for the beginning of the next track to beplayed. The cueing indicator (CUE) will light up, the PLAY/PAUSE button indicator will flash, and the player will then waitfor the PLAY/PAUSE button (38 ) to be pressed beforebeginning playback of the next track.3. If auto cueing is off, playback will begin automati-
cally from the first track.¶ When auto cueing is off, playback will continue after the
first track has been played, with all subsequent tracksbeing played in sequence.
¶ When playback of the final track is complete, playback willautomatically come to an end.
Stopping Playback
During playback, press the PLAY/PAUSE button (38)
or if a cue point has been specified press the CUE
button to back-cue before pressing the EJECT button
(0) to eject the disc.¶ Disc rotation stops and the disc is ejected.¶ Note that the CMX-3000 does not come with a stop button.¶ Pressing the EJECT button during playback has no effect.
Pausing Playback
To pause playback, press the PLAY/PAUSE button
(38).¶ The PLAY/PAUSE button indicator and cueing indicator (CUE)
will flash and playback will pause.¶ Pressing the PLAY/PAUSE button again will then cause the
button indicator to light up and for playback to be resumed.¶ In the CDJ mode broken sound will still be audible during the
standby mode; if you wish to stop all sound, lower the outputsound volume on your audio mixer.
¶ If no operator whatsoever is performed for 80 minutes ormore after pausing playback, the rotation of the disc will beautomatically brought to a halt. Pressing the PLAY/PAUSEbutton at this time will then cause playback to be resumed.
Skipping Tracks
7 Skipping tracks using the TRACK SEARCH buttons
(4, ¢)Press the forward or reverse TRACK SEARCH button
(4, ¢).
¶ Each time the button is pressed, the player will skip to thenext track in the specified direction. (To skip to theprevious track while a track is being played, press thereverse TRACK SEARCH button (4 ) two times insuccession.)
¶ Pressing the forward or reverse TRACK SEARCH button(4, ¢) and holding down on the button will causemultiple tracks to be skipped in succession. Holding downthe button for two seconds or more will cause theforward/reverse skipping speed to increase.
¶ Pressing the reverse TRACK SEARCH button (4) at thebeginning of the first track will cause the player to skip tothe final track.
¶ Pressing the forward TRACK SEARCH button (¢) fromthe last track will cause the player to skip to the first track(i.e., Track No. 1).

<DRB1307> 13
Basic Operation (DJ player operation)
Fast Forward and Rewind
7 Using the SEARCH button (1, ¡) to fast forward
or rewindDuring playback, press the forward or reverse SEARCH
button (1, ¡).
Pressing the forward SEARCH button (¡) and keeping itpressed will cause the CD to fast-forward. Pressing thereverse SEARCH button (1) and keeping it pressed willcause the CD to rewind.
7 Super-fast searchingTurn the jog dial while pressing either SEARCH button
(1, ¡).
¶ Turning the jog dial in the direction you wish to searchwhile pressing the forward or reverse SEARCH button(1, ¡) will cause the player to enter high-speed fast-forward or high-speed reverse mode.
¶ CD will be searched in the same direction as that in whichthe jog dial is rotated. The direction indicated by theSEARCH button actually pressed will be ignored.
¶ Playback will resume when the jog dial is no longer beingturned.
¶ Releasing the SEARCH button causes the player to leavehigh-speed search mode.
Cueing Point Settings (*)
Once a cueing point has been stored in memory, it can be usedto place the player in a state where it is ready to begin playbackfrom the cueing point by pressing the CUE button.7 Manual cueing
1. During playback, press the PLAY/PAUSE button (38)
to pause playback at the point from which you wish to
begin playback.
2. Search for the precise position of the cueing point.
7 Using frame numbers to specify cueing points
Cueing points may be specified in 1-frame units (where 75frames are equivalent to 1 second).Use the jog dial or the forward or reverse SEARCH button(1, ¡) to advance to the desired frame. Rotating thejog dial once causes the player to advance or rewind 75frames in the specified direction. Similarly, pressing theforward or reverse SEARCH button causes the player toadvance or rewind 1 frame in the specified direction.
7 Listen to the sound at the current frame to determine
the cueing point
Turn the jog dial slowly and then return it to just before thepoint from which you wish to begin playback. (The cueingpoint thus defined will consist of that point directly afterthe sound which can be heard during a cueing pause.)
7 Super-fast track searchingTurn the jog dial while pressing either TRACK SEARCH
button (4, ¢).
¶ Turning the jog dial in the direction you wish to skip whilepressing the forward or reverse TRACK SEARCH button(4, ¢) will cause the player to enter high-speedskipping mode, with the speed being adjusted inaccordance with the degree to which the jog dial is turned.
¶ Tracks will be skipped in the same direction as that inwhich the jog dial is rotated. The direction indicated by theTRACK SEARCH button actually pressed will be ignored.
¶ Releasing the TRACK SEARCH button causes the playerto leave high-speed skipping mode.
3. Press the CUE button when you reach the desired
frame number or hear the sound at the point from
which you wish to begin cueing.
¶ When the sound is muted and the cueing indicator (CUE)lights up, the cueing point will have been stored tomemory.
¶ Each time a new cueing point is stored to memory, theprevious cueing point will be cleared from memory.
7 Real-time cueingDuring playback, press the LOOP IN/REALTIME CUE
button at the desired cueing point.
This point will then be recorded as the new cueing point.7 Checking cueing points (Cueing point sampler)
After specifying a cueing point, press the CUE button.
¶ The sound at the specified cueing point will continue toplay as long as the CUE button is pressed.
7 Returning to a cueing point (Back cueing)1. During playback, press the CUE button.
¶ The player will return to the specified cueing point.2. Press the PLAY/PAUSE button (38).
¶ Playback will begin immediately from the specifiedcueing point.
7 Changing cueing points (Cueing point adjust)1. During playback, press the CUE button.
¶ The player will return to the currently specified cueingpoint.
2. Press the forward or reverse SEARCH button (1,
¡).
¶ The cueing point will be shifted forward or backward in1-frame units.
¶ The cueing point may also be shifted forward orbackward by pressing the forward or reverse SEARCHbutton (1, ¡) and then turning the jog dial.
3. Press the CUE button.
¶ The point where the CUE button is pressed willbecome the new cueing point.
Changing Playback Speed (*)
Pull the tempo control slide towards you.
Slide the knob towards you (+) to increase the tempo and slide itaway from you (–) to decrease it.¶ The rate of change in playback speed (tempo) is shown in the
display.¶ The playback speed can be changed without changing the
pitch (� “Setting a Master Tempo”).7 Selecting the tempo adjust range
Press the TEMPO RANGE button.
Each time the button is pressed, the range of adjustmentpossible with the tempo control slide changes (±6%, ±10%,±16%, WIDE). At ±6%, the adjustment unit is 0.05%, at±10% and ±16%, the adjustment unit is 0.1%. When set toWIDE and the tempo can be set in adjustment units of 0.5%in the range ±100%.¶ The selected variable adjustment range is shown on the
display.
Setting a Master Tempo (*)
During playback, press the MASTER TEMPO button.
When this is done, the MASTER TEMPO will light, and even ifthe tempo control slide is used to change the speed (tempo),the sound (key, pitch) will not change.¶ Since sound is produced digitally in this mode, the sound
quality will change.
14 <DRB1307>
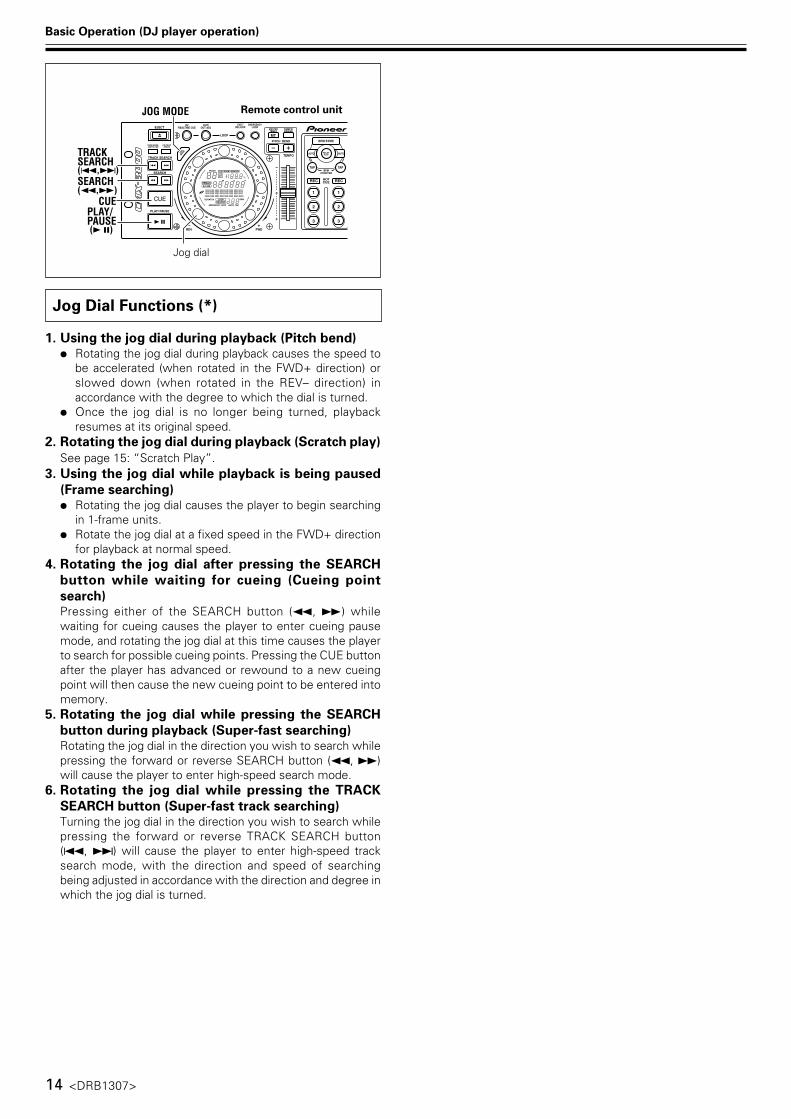
Jog Dial Functions (*)
1. Using the jog dial during playback (Pitch bend)÷ Rotating the jog dial during playback causes the speed to
be accelerated (when rotated in the FWD+ direction) orslowed down (when rotated in the REV– direction) inaccordance with the degree to which the dial is turned.
÷ Once the jog dial is no longer being turned, playbackresumes at its original speed.
2. Rotating the jog dial during playback (Scratch play)
See page 15: “Scratch Play”.3. Using the jog dial while playback is being paused
(Frame searching)÷ Rotating the jog dial causes the player to begin searching
in 1-frame units.÷ Rotate the jog dial at a fixed speed in the FWD+ direction
for playback at normal speed.4. Rotating the jog dial after pressing the SEARCH
button while waiting for cueing (Cueing point
search)Pressing either of the SEARCH button (1, ¡) whilewaiting for cueing causes the player to enter cueing pausemode, and rotating the jog dial at this time causes the playerto search for possible cueing points. Pressing the CUE buttonafter the player has advanced or rewound to a new cueingpoint will then cause the new cueing point to be entered intomemory.
5. Rotating the jog dial while pressing the SEARCH
button during playback (Super-fast searching)Rotating the jog dial in the direction you wish to search whilepressing the forward or reverse SEARCH button (1, ¡)will cause the player to enter high-speed search mode.
6. Rotating the jog dial while pressing the TRACK
SEARCH button (Super-fast track searching)Turning the jog dial in the direction you wish to search whilepressing the forward or reverse TRACK SEARCH button(4, ¢) will cause the player to enter high-speed tracksearch mode, with the direction and speed of searchingbeing adjusted in accordance with the direction and degree inwhich the jog dial is turned.
PLAY/PAUSE(3 8)
JOG MODE
(1,¡)
(4,¢) SEARCH
TRACKSEARCH
CUE
Basic Operation (DJ player operation)
Remote control unit
Jog dial

<DRB1307> 15
ADVANCED OPERATIONS
Applications
Operations indicated by * cannot be used when the DIGITAL
MODE switch is set to on (and the digital output terminal is used).
PLAY/PAUSE(3 8)
JOG MODE HOT CUE REC
HOT CUE 1,2,3
Remote control unit
Jog dial
Scratch Play (*)
When the jog mode is set to SCRATCH, rotating the jog dialcauses the disc to play in the direction and speed correspondingto the direction and speed in which the jog dial is turned.
1. Press the JOG MODE button.÷ The SCRATCH indicator will flash and data is stored in the
memory. When all data is stored in the memory, theSCRATCH indicator lights steadily. If the jog dial is movedharshly while the indicator is flashing, the sound may skip.
2. Rotate the jog dial in the direction and at the speed
you wish playback to occur.÷ Disc play will occur in response to the jog dial’s direction
and speed of rotation.3. Stop jog dial operation.
÷ CD playback will return to its original status.÷ When the SEARCH button is pressed during a pause in the
SCRATCH jog mode, the playback mode changes fromslow to normal playback and search depending on howlong the button is held down.
Hot Cue (*)
Up to three Hot Cue points (1, 2, 3) can be programmed in thememory, allowing you to begin playback instantly from either ofthose points.Cue points and loop points can also be programmed in thememory and recalled with one touch.
7 Setting a Hot Cue Point
1. Press the HOT CUE REC button to set the HOT CUE
recording mode (the REC button lights).
2. During playback or playback pause, press either
HOT CUE button 1, 2, or 3 at the place you wish to
set as a Hot Cue point.÷ The pressed button will flash for 2 seconds then light
steadily.÷ If Hot Cue is set during cueing pause or cue standby, the
cue point and loop information (when LOOP indicator islighted) will be recorded.
3. After completing the setting, press the HOT CUE
REC button to switch to access mode (the button
light goes out).
7 Hot Cue start
1. During playback, during pause, or during cue
standby, press the HOT CUE button (1, 2, or 3)
programmed with the desired start point.÷ Playback will begin instantly from the programmed point.÷ If loop information is programmed into the HOT CUE
button, loop playback will begin.
7 Hot Cue Information Programming and Restoring÷ Hot Cue information is programmed in the player's memory
at the time a disc is removed from the player.÷ A restore must be performed to use programmed Hot Cue
setting information for the next disc.The Hot Cue button will flash when previously Hot Cuesetting information is present upon the insertion of a disc.When the flashing HOT CUE button is pressed, the RECbutton will flash and the information will be restored. Whenthe Hot Cue point has been restored, the REC button lightwill turn off, and the HOT CUE button will light steadily.If programmed Hot Cue information is not to be used, pressthe REC button to turn off the flashing HOT CUE button. Torestore again, insert the disc again.
÷ The player’s memory is non-volatile, so informationprogrammed in the player’s memory will be maintained evenif power is interrupted or disconnected. Including WAVEinformation, the memory is capable of holding information onabout 1000 CDs. If the memory becomes full, the memory isautomatically overwritten, beginning with the oldest, mostinfrequently used information.
÷ Setting contents for the original disc cannot be read in thecase of discs copied to CD-R or CD-RW, however.

16 <DRB1307>
Applications (Advanced operations)
PLAY/PAUSE(3 8)
(1,¡) SEARCH
LOOP IN/REALTIME CUE
LOOP OUT/OUT ADJ EXIT/
RELOOPEMERGENCYLOOP
Remote control unit
Jog dial
Loop Playback (*)
7 Defining a loop1. Press the PLAY/PAUSE button (38) to begin
playback.
2. During playback, press the LOOP IN/REALTIME CUE
button at the point from which you wish to start the
loop.
¶ Note that this operation need not be performed if aprerecorded cueing point is to be used as the loop in-point.
3. During playback, press the LOOP OUT/OUT ADJ
button at the point from which you wish to end the
loop.
¶ Loop playback will begin, with playback looping fromthe loop in-point to the loop out-point.
7 Stopping loop playbackDuring loop playback, press the EXIT/RELOOP button.
¶ Once this has been done, playback will continue insequence from the loop out-point without returning to theloop in-point.
7 Changing the loop out-point1. During loop playback, press the LOOP OUT/OUT ADJ
button.
¶ The loop out-point time will be displayed on the displaypanel, the LOOP OUT/OUT ADJ button will beginflashing rapidly, and the IN/REALTIME CUE button willbe unlit.
2. Press the forward or reverse SEARCH button (1,
¡) or turn the Jog dial.
¶ The loop out-point will be shifted forward or backwardin 1-frame units.
¶ Pressing the LOOP OUT/OUT ADJ button or waiting for30 seconds or longer will cause the player to exit fromupdate loop input point mode and to resume loopplayback.
7 Returning to loop playbackAfter loop playback has been stopped, press the EXIT/
RELOOP button during playback to return to loop
playback.
¶ The player will return to the currently defined loop in-pointand begin loop playback (i.e., relooping) again from thatpoint.
7 To program Loop play informationLoop play information can be programmed into a HOT CUEbutton to allow one-touch loop play. See the section “HotCue” (p. 15).
7 To automatically set loop end (Emergency Loop)During playback, press the EMERGENCY LOOP button.
¶ Normal loop play display occurs (button flashes and LOOPindicator lights), and EMERGENCY LOOP indicatorflashes.
¶ The point at which the button is pressed becomes theloop in-point, and a loop out-point will be set automaticallyas follows:¶ If the immediately preceding BPM value is known, the
loop out-point will be set 4 beats after the loop in-point.¶ If the immediately preceding BPM value is not known,
the loop out-point will be set 4 seconds after the loopin-point.
¶ If either of the above conditions (4 beats later or 4seconds later) occurs later than the track end, the trackend will be set as the loop out-point.
¶ If the EXIT/RELOOP button is pressed, loop playback iscanceled and normal playback resumes.
WAVE Display (*)
This display shows the track’s low tone beats (bass drum, etc.),thus letting you know the track’s break points and end points.¶ Together with playback of the current track, the WAVE is
displayed.Once displayed, the WAVE information is memorized, so thatit will be displayed immediately next time. Setting contentsfor the original disc cannot be read, however, in the case ofdiscs copied to CD-R or CD-RW.
¶ Up to 99 tracks can be memorized for each disc.¶ In the event a track has little change in low-register beat
levels, the break point may not be displayed correctly.¶ During playback, if operations such as scan, jog dial, or pause
are attempted, the WAVE data may fail to be recorded in thevicinity where the said operation was attempted. In that case,rerecording of the WAVE data is required.
CD TEXT Display
CDs supporting CD TEXT function will show a consecutivelyscrolling display of the disc title and track title (limited toalphanumerics and certain symbol characters). During display ofthe disc title, the disc mark lights.

<DRB1307> 17
Mixing (Segueing) Different Tracks (*)
Example:
To use a DJ mixer to mix the sounds of the track currentlyplaying (Player A) and heard form the speakers, with thesounds of the subsequent track B (in Player B).
¶ Connect Player A to the CH1 input port and Player B to theCH2 input port of the DJ mixer.
¶ Raise the trim, channel faders, and master VR of the DJmixer to the desired level so that sound is output from PlayerA.
1. Slide the CROSS FADER control on the DJ mixer to
the left (CH1 side).¶ Sound from track A will then be output from the speakers.
2. Insert a disc into Player B.
3. Press the forward or reverse TRACK SEARCH but-
ton (4, ¢) on Player B to select track B.
4. Press the PLAY/PAUSE button (38). (Note that
auto cueing must be turned on.)
5. Use the DJ mixer MONITOR SELECTOR button to
monitor CH2.
6. Turn the DJ mixer MONITOR LEVEL dial to output
the sound from track B to the headphones.¶ Speaker output will come only from track A.
7. Listening to the sound from the headphones, cue
to the opening of track B.1 Set player B to playback, and measure the BPM.
¶ If BPM is not displayed, either try playing back a bitlonger than usual, or use the TAP button to manuallyinput the BPM.
2 Press the PLAY/PAUSE button (38) in the vicinity of thearea you wish to cue the track.¶ Player B will enter cueing pause mode.
3 Turn the Player B jog dial to find the cueing point (i.e., theopening bar).
4 Once the cueing point has been found, press the Player BCUE button.¶ The sound will be muted and cueing will have been
completed.8. Listening to the sound from track A from the speak-
ers, wait for the press the Player B PLAY/PAUSE
button (38).¶ Speaker output will come only from track A.¶ Sound from track B will be output to the headphones.
CUEPLAY/PAUSE(3 8)
(4,¢)
TRACKSEARCH
MASTERTEMPO BPM SYNC
RELAY PLAYPITCH BEND+,–
Remote control unit
Jog dial Tempo control slide
Applications (Advanced operations)
9. Adjust the speed of track B to the speed (BPM=
beats per minute) of track A.Adjust the Player B tempo control slide so that the number ofBPM displayed for track B is the same as the number of BPMdisplayed for track A.¶ If you do not wish to change the pitch or key of track B,
press the Player B MASTER TEMPO button beforeadjusting the tempo control slide.
¶ Once the number of BPM displayed for both tracks are thesame, the tempo adjustment will have been finished.
10.Press the Player B CUE button.¶ Player B will then enter standby mode at the cueing point.
11.Listening to the sound from track A from the
speakers, wait for the correct timing and then
press the Player B PLAY/PAUSE button (38).¶ Track B will then begin to play.
12.While checking the sound from the headphones,
gradually shift the DJ mixer CROSS FADER control
to the right.¶ The sound from track A coming from the speakers will
become mixed with the sound from track B.¶ When the DJ mixer CROSS FADER control has been
shifted all the way to the right, the segueing from track Ato track B will have been completed.
7 Long mixed playbackAs long as the number of BPM is the same, track A and trackB may be cleanly mixed even with the CROSS FADER controlset in the middle.
7 Fader start playbackIf the DJM-300, DJM-500, or DJM-600 cross fader startfeature is used, step 11 above may be omitted, thus makingit even easier to perform mixing. If the CROSS FADERcontrol is also returned to its original position, it will cause theplayer to return to the state described in step 10, thus makingit possible to perform cueing repeatedly.
Beat Synchro (*)
After synchronizing the tempos of Player A and Player B, thePitch Bend function can be used to adjust the timing of the beat.For example, if you wish Player A to be the reference for beattiming, if the beat timing on Player B lags behind that of PlayerA, slowly rotate the jog dial on Player B in the clockwisedirection. When this is done, Player B’s playback speed willgradually become faster; release the jog dial at the point thebeat timing of Player A and Player B are in synch. When the dialis released, the tempo returns to normal, and the synchronizedbeat timing is maintained.If Player B’s beat timing is in advance of Player A’s, slowly rotatePlayer B’s jog dial counterclockwise. When this is done, PlayerB’s playback speed will gradually slow; when the beat timing ofPlayer A and Player B are in synch, release the jog dial.Besides the jog dial, Beat Sync can also be achieved by pressingthe PITCH BEND + or – buttons.
Auto BPM Synchro (*)
This function can be used to automatically synchronize the BPMof two players (A, B). The currently playing player is called the“master”; this player’s BPM is used as the reference for settingthe BPM of the second player currently in pause or CUE mode(the “slave”), or a program tempo recorded in the HOT CUEbutton.

18 <DRB1307>
Applications (Advanced operations)
CUEPLAY/PAUSE(3 8)
(4,¢)
TRACKSEARCH
MASTERTEMPO BPM SYNC
RELAY PLAYPITCH BEND+,–
Remote control unit
Jog dial Tempo control slide
Press the BPM SYNC button.
¶ The BPM SYNC button will flash and the player enters theBPM synchro playback mode.
¶ If both players are currently in playback mode, nosynchronization is possible until playback is stopped on oneof the players. When one player is stopped, the player stillplaying back is considered the master.
¶ If start is begun when the BPM on the slave player isunknown, synchro playback will begin at the point the slave’sBPM value is measured.
¶ During BPM synchro, the MASTER indicator will light on the“master” player’s display. On the slave player, the tempocontrol range display will turn off and the tempo change ratedisplay will show the tempo compensation value.
¶ During BPM synchro, the slave player’s tempo will change tomatch any tempo changes on the master side. In this case,the tempo and pitch bend of the slave player cannot beindependently adjusted.
¶ If playback is interrupted on the master player, the slaveplayer will become the master.When this occurs, if the tempo control of the new masterplayer is at a different setting from the tempo of the currentlyplaying track, the display will alternately show the messagedEc (or Inc), and the amount of tempo deviation. To reducethe tempo deviation to zero, move the tempo control slide tothe "–" side if dEc is displayed, and to the "+" side if Inc isdisplayed. Speed control using the tempo control slidebecomes possible when the tempo has been adjusted.
7 Correcting beat timing¶ When beat is detected during BPM synchro, the ring display
will light to graphically indicate the four-beat timing.¶ The four-beat timing of the currently playing track on players
A, B can be designated by tapping the TAP button with thattiming once on each of the two players. The beat timing ofthe slave player will be automatically brought intocorrespondence with that of the master player, so as tomatch the designated beat timing.
NOTES:
¶ It may not be possible to correctly measure the BPM valuefor some tracks. If this happens, press the TAP button in timewith the beat to enable a more accurate BPM synchroplayback. However, if the BPM synchro range is outside theadjustable range of the player, appropriate BPM synchroplayback may not be possible.
¶ During BPM synchro, the tempo control slide and pitch bendoperations are disabled on the slave player.
Fader Start Playback (*)
The provided control cable may be used to connect the controljack on the CMX-3000 to a control jack on a DJM-300, DJM-500,or DJM-600 mixer, thus making it possible to exit from cueingstandby mode and to start playback immediately by raising theDJ mixer CHANNEL FADER. The CROSS FADER may also beused to perform fading starts on the player as well. The fadermay also be returned to its original position to return the playerto the cueing point (i.e., to perform back cueing). (This does notapply, however, during auto playback.) (See p. 10 forinstructions on how to connect the player and mixer.)
Relay Play Using Two Players (*)
÷ Set both player’s auto cue function to ON (the A. CUEindicators will light in the displays).
÷ Set your DJ mixer’s fader control to its center position.
1. Press the RELAY PLAY button to blink the button
indicator.
2. Begin playback on the first player.
3. When the currently playing track ends, playback
will begin automatically on the standby player.
4. The first player will enter cue standby mode at the
beginning of the next track on its disc.¶ By repeating this operation, the two players can be used
to perform continuous relay play.¶ By loading new discs on the standby player, you can
construct a continuous program of whatever tracks youwish.
¶ By setting a Cue point on the standby player, you canperform relay to any desired Cue point on the selectedtrack (see page 13: Cueing Point Settings).
NOTES:
÷ Fader start and relay play cannot be performed simultane-ously.
÷ When the Auto Cue function is off, replay will be performedof the entire disc.
Data Copy
WAVE and other data recorded in this unit can be copied toanother CMX-3000 if desired.
1. With the unit power off, use a control cord to
connect the two player’s DATA IN/OUT connec-
tors.
2. On each CMX-3000, turn on power while simulta-
neously pressing the EJECT buttons on players A
and B. (The remote control unit’s EJECT button
cannot be used for this operation.)÷ The power will turn on, and data copy mode (slave mode)
will be established; the display will show “SLAVE M”.3. With both units in the data copy mode (“slave
mode”), press the CD TEXT/WAVE button on the
player A holding the WAVE data you wish to copy.
Hold the button depressed for one second.÷ This unit will enter the master mode and the display will
show “MASTER.”4. Press the PLAY/PAUSE button (38) of Player A on
the “master” unit.÷ Data copying will begin, and the 38 indictor will flash.÷ About ten minutes will be required for the copy operation.
END is displayed on the master when copying iscompleted.
5. Turn off the power on both units and disconnect
the control cord.÷ When power is turned on again, operation will return to
normal mode.
NOTES:
÷ Do not turn off the power or disconnect cables duringcopying to prevent corruption of the copying data.
÷ If the ERROR message is displayed during data copy, checkyour connections and perform the data copy function again.

<DRB1307> 19
Description of problem
A disc fails to be ejected even after theEJECT button (0) has been pressed.
Playback doesn’t begin even when adisc is inserted.
Playback comes to a halt almostimmediately after it begins.
No sound is output.
Sound is distorted or full of noise.
A large amount of noise is generatedwhen playing back a certain disc ordiscs. Playback halts unexpectedly.
Track searching fails to halt with AutoCue function turned ON.
The jog dial doesn’t work.
The jog dial performs a differentfunction from that desired.
Back cueing fails to work when theCUE button is pressed during playback.
Unable to produce loop playback bypressing the LOOP OUT/OUT ADJbutton.
Unable to perform DJ operations
Auto cue and other settings are notstored.
WAVE data is not stored.
HOT CUE data is not stored.
Television pictures are distorted ornoise appears in FM broadcasts.
Disc is not rotating even though powerhas been turned on.
Possible cause of problem
÷ Power cord has not been plugged in.÷ A track is being played back.
÷ EJECT button (0) is broken.
÷ Auto Cue function is turned ON.
÷ Disc has been inserted upside down.÷ Disc is dirty or covered with condensation.
÷ Audio cable has come loose or has not beenproperly plugged in.
÷ DJ mixer is not working properly.
÷ Jacks or jack plugs are dirty.÷ Player is currently in pause mode.
÷ Audio cable has not been properly plugged in.
÷ Jacks or jack plugs are dirty.÷ Player is subject to noise from a nearby television
set.
÷ Disc is seriously warped or scratched.÷ Disc is unusually dusty or dirty.
÷ Track searching sometimes takes longer thanexpected when the length of silent portionsbetween tracks is unusually long.
÷ If the length of a silent portion between two tracksis longer than 10 seconds in duration, the secondtrack cannot be played back unless Auto Cuefunction is turned OFF.
÷ The DIGITAL MODE switch is set to ON.
÷ The jog mode is incorrect.
÷ No cueing point has been defined.÷ The DIGITAL MODE switch is set to ON.
÷ No cueing point (i.e., starting point) has beendefined.
÷ The DIGITAL MODE switch is set to ON.
÷ The DIGITAL MODE switch is set to ON.
÷ The power was turned off right after a setting wasmade.
÷ The data is stored when playback of the currenttrack is completed.
÷ The HOT CUE data is stored in memory when thedisc is ejected.
÷ Interference caused by CD player.
÷ Disc rotation is automatically halted when nooperation is performed for 80 minutes or longerwhen in pause mode.
÷ When the last track on the disc is over the discstops rotating.
Recommended action
÷ Plug in power cord.÷ Set the player to pause or cue standby mode
before pressing the EJECT button (0).÷ See p. 5.
÷ Press the PLAY/PAUSE button (38) to beginplay.
÷ Hold the TIME MODE/AUTO CUE buttondepressed for 1 second or more to set theAuto Cue mode to OFF.
÷ Reinsert with label side facing upward.÷ Wipe disc to remove dust or condensation.
÷ Plug in audio cable properly.
÷ Check switch and volume settings on DJmixer.
÷ Wipe away dust or dirt and reinsert plugs.÷ Press the PLAY/PAUSE button (38) to begin
play.
÷ Connect audio cable to line input jack of DJmixer. Do not connect to microphone jack.
÷ Wipe away dust or dirt and reinsert plugs.÷ Turn off power to television set or move
television set further away from CD player.
÷ Replace with new disc.÷ Wipe away dust or dirt from disc.
÷ Hold the TIME MODE/AUTO CUE buttondepressed for 1 second or more to set theAuto Cue mode to OFF.
÷ Set the DIGITAL MODE switch to OFF.
÷ Press the JOG MODE button to select thedesired function.
÷ Specify the desired cueing point. (See p. 13.)÷ Set the DIGITAL MODE switch to OFF.
÷ Specify the desired cueing point. (See p. 13.)
÷ Set the DIGITAL MODE switch to OFF.
÷ Set the DIGITAL MODE switch to OFF.
÷ Wait 10 seconds before turning off thepower after a change.
÷ Wait until playback of the current track iscompleted.
÷ Eject the disc. (Then turn off the power.)
÷ Turn off the power to the CD player or movethe player further away from the radio ortelevision set.
÷ Press the PLAY/PAUSE button (38) to beginplayback. Alternatively, press the EJECTbutton (0) to eject the disc.
If you believe your CD player is failing to work properly, check the following troubleshooting table for tips. Sometimes simple mistakesin setup or operation may appear like serious problems. There are also times when the problem in question may be caused bysomething else other than your CD player, and at times like these you should check any other electronic devices being used at thesame time.If the problem in question continues to persist even after checking the troubleshooting table below and taking whatever correctiveaction is recommended, contact your nearest Pioneer Service Station or contact the store from which you purchased your player forfurther assistance.
TROUBLESHOOTING
Appendix

20 <DRB1307>
Published by Pioneer Corporation.Copyright © 2001 Pioneer Corporation.All rights reserved.
PIONEER CORPORATION 4-1, Meguro 1-Chome, Meguro-ku, Tokyo 153-8654, JapanPIONEER ELECTRONICS (USA) INC.
Multimedia and Mass Storage Division: 2265 East 220th Street, Long Beach, CA 90810, U.S.A. TEL: 800-444-OPTI (6784)PIONEER ELECTRONICS OF CANADA, INC.
Industrial Products Department: 300 Allstate Parkway, Markham, Ontario L3R OP2, Canada TEL: 905-479-4411
Printed in <DRB1307-B><TSZRF/01I00000>
Appendix (Troubleshooting)
Error Message Display
When the CMX-3000 CD player is unable to operate properly, an error code is displayed on the display panel. Check the error codedisplayed against the following table and take the recommended action to correct the error. If an error code other than any of theerror codes listed in the table below is displayed or if the same error code is displayed even after corrective action has been taken,contact your nearest Pioneer Service Station or contact the store from which you purchased your player for assistance.
Error Code
E-7201
E-83 01E-83 02E-83 03
E-91 01
Description
Player unable to read TOC data.
Player unable to play back currentlyinserted disc.
Mechanical operation has failed tocomplete within specified timeinterval.
Possible cause and recommended action
Disc is cracked.= Recommended action: replace disc.
Disc is soiled or dirty.= Recommended action: clean disc.
If other discs play normally, the problem iswith the disc itself.
Dust or some other form of foreign particleshave found their way into disc insertion slot.= Recommended action: remove dust orother foreign particles.
Error Type
TOC READ ERROR
PLAYER ERROR
MECHANICAL TIMEOUT
Cleaning the Jog Dial
To clean the PLAYER wipe with a polishing or a soft, dry cloth. Forstubborn dirt, moisten a soft cloth with a weak solution of neutraldetergent (diluted in five to six parts water), wring the cloth well,and wipe away the dirt. Use a dry cloth to wipe the surface dry.Applying alcohol, paint thinner, benzene, insecticides, or otherstringent substances to the jog dial may cause the markings orfinishing of the dial to peel or become discolored, and the use ofany such substances should accordingly be avoided.
300 Allstate Parkway
Markham, ON L3R OP2
(905) 479-4411
1 (877) 283-5901
For warranty information please see the Limited Warrantysheet included with your product.
Should this product require service in Canada, please contact aPioneer Canadian Authorized Dealer to locate the nearest Pio-neer Authorized Service Company in Canada.Alternatively, please contact the Customer Service Departmentat the following address:
Pioneer Electronics of Canada, Inc.
Should this product require service in the U.S.A. and you wishto locate the nearest Pioneer Authorized Independent ServiceCompany, or if you wish to purchase replacement parts,operating instructions, service manuals, or accessories, pleasecall the number shown below.
800 – 872 – 4159Please do not ship your product to Pioneer without first callingthe Customer Support Division at the above listed number forassistance.PIONEER ELECTRONICS (USA) INC.
CUSTOMER SUPPORT DIVISION
P.O. BOX 1760, LONG BEACH,
CA 90801-1760, U.S.A.
For warranty information please see the Limited Warrantysheet included with your product.
÷ There may be times when the CMX-3000 fails to operate properly as a result of static electricity or some other form of interference from an outsidesource. If any such problem occurs, turn off the power to the CMX-3000, wait for the currently inserted disc to come to a full stop, and then turn onthe power again to see if that fixes the problem in question.
÷ The CMX-3000 cannot be used to replay partially-written CD-R or CD-RW discs.÷ The CMX-3000 cannot be used to replay non-standard-shaped discs or any discs other than 5 inch/12 cm discs or 3 inch/8 cm discs which have been
inserted into an 3 inch/8 cm disc adapter. (Note that attempting to replay such discs may result in damage or breakdown.)÷ The BPM value measured by the CMX-3000 may differ from the BPM value recorded on a CD or from our DJ mixer, but this difference is a result of
differences in the BPM value measurement method; not a result of a fault with the player.