colorado school of mines -...
TRANSCRIPT

COLORADO SCHOOL OF MINES
AlgoBOWL
by
Arnaud Filliat, Justin Frazer, Robyn King, Vy Ta
Dinesh P. Mehta
Electrical Engineering and Computer Science
June 2015

Contents
List of Figures iii
1 Introduction 1
1.1 Dr. Dinesh Mehta . . . . . . . . . . . . . . . . . . . . . . . . . . . . . . . . . . . . . 1
1.2 Product Vision . . . . . . . . . . . . . . . . . . . . . . . . . . . . . . . . . . . . . . . 1
2 Requirements 2
2.1 Functional Specifications . . . . . . . . . . . . . . . . . . . . . . . . . . . . . . . . . . 2
2.2 Non-Functional Specifications . . . . . . . . . . . . . . . . . . . . . . . . . . . . . . . 2
3 System Architecture 3
3.1 System Hierarchies . . . . . . . . . . . . . . . . . . . . . . . . . . . . . . . . . . . . . 3
3.2 Database . . . . . . . . . . . . . . . . . . . . . . . . . . . . . . . . . . . . . . . . . . 4
3.2.1 Database Design . . . . . . . . . . . . . . . . . . . . . . . . . . . . . . . . . . 4
4 Technical Design 6
4.1 Submission Page . . . . . . . . . . . . . . . . . . . . . . . . . . . . . . . . . . . . . . 6
4.2 Verification Page . . . . . . . . . . . . . . . . . . . . . . . . . . . . . . . . . . . . . . 6
5 Design Decisions 9
5.1 CS CONNECT and Laravel . . . . . . . . . . . . . . . . . . . . . . . . . . . . . . . . 9
5.2 Admin Permissions . . . . . . . . . . . . . . . . . . . . . . . . . . . . . . . . . . . . . 9
5.3 Field Session Code . . . . . . . . . . . . . . . . . . . . . . . . . . . . . . . . . . . . . 10
5.4 Webpage Views . . . . . . . . . . . . . . . . . . . . . . . . . . . . . . . . . . . . . . . 10
5.5 Directory Structure . . . . . . . . . . . . . . . . . . . . . . . . . . . . . . . . . . . . . 10
6 Conclusion 11
6.1 Performance Testing Results . . . . . . . . . . . . . . . . . . . . . . . . . . . . . . . . 11
6.2 Future Work . . . . . . . . . . . . . . . . . . . . . . . . . . . . . . . . . . . . . . . . 11
6.3 Lessons Learned . . . . . . . . . . . . . . . . . . . . . . . . . . . . . . . . . . . . . . 12
A AlgoBOWL Admin User Guide 13
A.1 Setting Up AlgoBOWL . . . . . . . . . . . . . . . . . . . . . . . . . . . . . . . . . . 13
A.1.1 Adding and Deleting Students . . . . . . . . . . . . . . . . . . . . . . . . . . 14
A.1.2 Forming Groups . . . . . . . . . . . . . . . . . . . . . . . . . . . . . . . . . . 14
i

Contents ii
A.1.3 Setting the Type of Problem . . . . . . . . . . . . . . . . . . . . . . . . . . . 14
A.2 Viewing Each Group’s Information . . . . . . . . . . . . . . . . . . . . . . . . . . . . 14
A.3 Changing Scores . . . . . . . . . . . . . . . . . . . . . . . . . . . . . . . . . . . . . . 15
A.4 Viewing Rankings . . . . . . . . . . . . . . . . . . . . . . . . . . . . . . . . . . . . . 15
A.5 Resetting AlgoBOWL . . . . . . . . . . . . . . . . . . . . . . . . . . . . . . . . . . . 15
B CS CONNECT 16
B.1 Getting Started (for Windows) . . . . . . . . . . . . . . . . . . . . . . . . . . . . . . 16
B.2 Getting Started on Toilers . . . . . . . . . . . . . . . . . . . . . . . . . . . . . . . . . 16
B.3 Prerequisites for Making Site Changes . . . . . . . . . . . . . . . . . . . . . . . . . . 17
B.4 Making Site Changes . . . . . . . . . . . . . . . . . . . . . . . . . . . . . . . . . . . . 17

List of Figures
3.1 Student System Hierarchy . . . . . . . . . . . . . . . . . . . . . . . . . . . . . . . . . 3
3.2 Admin System Hierarchy . . . . . . . . . . . . . . . . . . . . . . . . . . . . . . . . . 4
3.3 Original Database Schema . . . . . . . . . . . . . . . . . . . . . . . . . . . . . . . . . 4
3.4 Final Database Schema . . . . . . . . . . . . . . . . . . . . . . . . . . . . . . . . . . 5
4.1 Conceptual Submission Page View . . . . . . . . . . . . . . . . . . . . . . . . . . . . 7
4.2 Final Submission Page View . . . . . . . . . . . . . . . . . . . . . . . . . . . . . . . . 7
4.3 Conceptual Verification Page View . . . . . . . . . . . . . . . . . . . . . . . . . . . . 8
4.4 Final Verification Page View . . . . . . . . . . . . . . . . . . . . . . . . . . . . . . . 8
iii

Introduction
1.1 Dr. Dinesh Mehta
Dr. Dinesh Mehta has been with the Colorado School of Mines since 2000, where he is currently a
Professor in the Department of Electrical Engineering and Computer Science. He received degrees
in Computer Science from the Indian Institute of Technology Bombay, the University of Minnesota
and the University of Florida. Before joining Mines in 2000, Dr. Mehta was on the faculty of the
University of Tennessee Space Institute, where he received the Vice President’s Award for Teaching
Excellence in 1997. He was a Visiting Professor at Intel’s Strategic CAD Labs for several months
in 1996 and 1997 and at the Tata Research Design and Development Center (in Pune, India) in
2007. He has also received graduate teaching awards at Mines in 2007, 2008 and 2009. Dr. Mehta
enjoys working with students and has advised or co-advised five PhD students and several Masters
students.
1.2 Product Vision
Every semester, Dr. Mehta’s undergraduate Algorithms class participates in an AlgoBOWL, a head-
to-head competition in which groups strive to develop an algorithm that computes an approximate
solution to an NP-hard optimization problem. Currently, there is no real structure to how this is
conducted. During the AlgoBOWL, each group must develop an input to share with every team
and then provide an output for each input shared using their optimization algorithm. Each group
validates the output provided by the other groups to verify that it is a correct solution, and the
other groups receive a rank based on how well their Algorithm completes the optimization problem.
Dr. Mehta then ranks the groups overall based on the outputs through an excel spreadsheet using
the sum of their ranks. Our project was to create a web-based solution that would automate the
AlgoBOWL and implement it in the CS CONNECT website.
1

Requirements
For this project, we developed on an existing website, CS CONNECT. In order to automate Algo-
BOWL, we needed to have a way for the students to be able to provide their input file, download
the other input files, and upload each output file. The students also need to verify every output
file given to them. The following are specific requirements for this project.
2.1 Functional Specifications
• Input file submission
• Output file submission
• Output validation
• Team ranking computation
• Dynamic visualization of rankings
• Resubmission of files
• Different permissions for Students and Professor
• Access control
• Integrate with the CS CONNECT system
2.2 Non-Functional Specifications
• Good aesthetics
• Have the application respond quickly
2
System Architecture
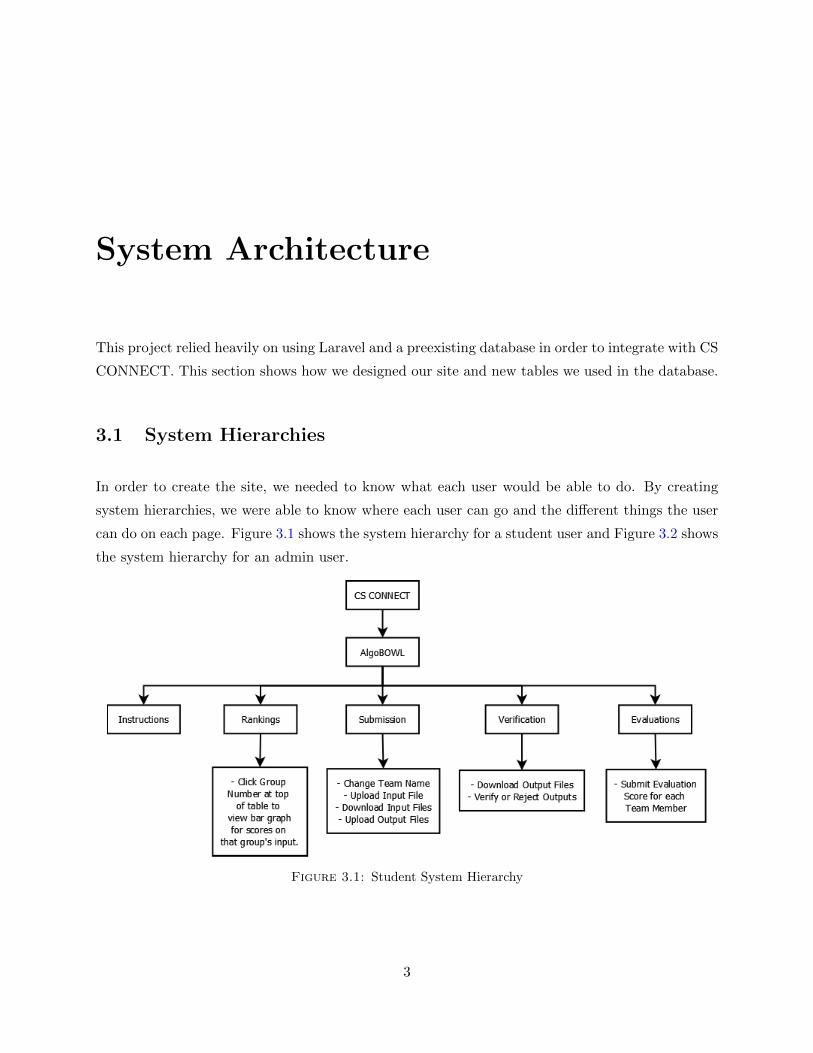
This project relied heavily on using Laravel and a preexisting database in order to integrate with CS
CONNECT. This section shows how we designed our site and new tables we used in the database.
3.1 System Hierarchies
In order to create the site, we needed to know what each user would be able to do. By creating
system hierarchies, we were able to know where each user can go and the different things the user
can do on each page. Figure 3.1 shows the system hierarchy for a student user and Figure 3.2 shows
the system hierarchy for an admin user.
Figure 3.1: Student System Hierarchy
3

AlgoBOWL 4
Figure 3.2: Admin System Hierarchy
3.2 Database
Throughout the project, the design of our database changed dramatically as we implemented each
part. Figure 3.3 shows our original, basic database schema at the beginning of the project, and
Figure 3.4 shows our final database schema.
Figure 3.3: Original Database Schema
3.2.1 Database Design
The design of the database involves a group table, a student table, an output table, and a user
table, which already exists within CS CONNECT. The group table includes the statistics for the
scoring and ranking which is how the spreadsheet page on CS CONNECT is populated. This table
interacts heavily with the student and user tables to display info on the admin group page as well as
other group pages. Another important table is the student table which has a team id column and
a user id column which connects the user to their assigned group within AlgoBOWL. The output
table is used to store which group(s) has submitted an output file to another group as well as if
the output has been verified and the score provided in the first line of the output file. The use of

AlgoBOWL 5
Figure 3.4: Final Database Schema
an SQL database greatly enhances the speed and efficiency with which we work because it allows
the creation and storing of data and other aspects of the website.

Technical Design
Throughout the process of creating the AlgoBOWL site, we changed some of our original designs
to better fit our client’s needs and to make the site more intuitive for the users. The following
describes some of the differences in designs.
4.1 Submission Page
The submission page has places for the student to change their team name, upload their input file,
download every group’s input file and upload their output for each input. It also shows the group
if their output has been verified or not. Figure 4.1 shows the conceptual view of the submission
page for the students and Figure 4.2 shows the final view of the submission page.
4.2 Verification Page
The verification page shows output files submitted by other groups to the user’s group. It allows
the user to download the files and then verify if they are a correct solution or not. Figure 4.3 shows
the conceptual view of the verification page for the students and Figure 4.4 shows the final view of
the verification page.
6

AlgoBOWL 7
Figure 4.1: Conceptual Submission Page View
Figure 4.2: Final Submission Page View

AlgoBOWL 8
Figure 4.3: Conceptual Verification Page View
Figure 4.4: Final Verification Page View

Design Decisions
Our project presented us with multiple areas to make design decisions that would best fit our
client’s needs as well as make our code easier to understand and maintain. The following are some
of the design decisions that we made.
5.1 CS CONNECT and Laravel
By integrating our AlgoBOWL with CS CONNECT, we had access to an SQL Database, basic
Laravel framework, a working domain, existing code to base our site on and a consistent design
layout to follow. One of the key parts of integrating with CS CONNECT was that we were required
to use Laravel. Laravel is a PHP web application framework that is used within CS CONNECT
and boasts a model-view-controller design. By using Laravel, we are able to communicate with the
database easily as well as have a strong syntax and layout for our code.
5.2 Admin Permissions
The permissions of the user in the user table allows the user to access various views of AlgoBOWL
depending on if they are an admin or a student. This enables Dr. Mehta to have access to
special features, including the creation and editing of groups and an enhanced view with editing
for the ranking and scores spreadsheet. In the ranking spreadsheet, Dr. Mehta is unable to change
the rank, but is able to change the score because the automatic update feature on the rank is
calculated based on the score. Another aspect that we decided on was to allow Dr. Mehta to view
the verification and submission pages for any group so that he can see the files being exchanged
between groups as well as edit the verifications as needed.
9

AlgoBOWL 10
5.3 Field Session Code
Because we needed to have a way to only allow for certain students to view the AlgoBOWL page on
CS CONNECT, we decided to reuse some of the code from the Field Session page on CS CONNECT.
We implemented the same code for allowing the AlgoBOWL admin to select or upload the students
who are in Algorithms so that they can see the AlgoBOWL student views. We also used the Field
Session code to allow the admin to edit the AlgoBOWL teams by clicking and dragging a student
to the desired team.
5.4 Webpage Views
Each of the views we created involved a design decision that would best fit the needs of our client
and future users. We needed to ensure high usability and make sure it is aesthetically pleasing.
Because we are working with CS CONNECT, we decided to follow the current look and feel of the
website. We used tables as the main structure to deliver a lot of information while keeping things
simple and intuitive.
5.5 Directory Structure
Throughout an AlgoBOWL competition, there will be multiple uploading and downloading of files.
In order to be as organized as possible while making sure implementation of this process is not
overly complex, we decided to create two directories within our assets/AlgoBOWL directory for
inputs and outputs. Within the inputs directory will be the input files from each group, and within
the outputs directory will be directories for each group, each of which contain the output files of
other groups who have uploaded to the corresponding group. This not only helps with simplifying
the code, but also ensures a concise way to maintain who owns which files. File names will be
changed to clearly describe what the file represents. For example, an input file will be named
input groupN.txt and an output file will be named output from N to N.txt.

Conclusion
6.1 Performance Testing Results
Testing our site was difficult when it was not a published or live website. By working on our local
machines, we were unable to see files uploaded by others, unless that file was in the same location
on our computer as it was on their computer. It was also difficult to test with only a limited
number of people. Ideally, we would have tested with a group of students on a live site to make
sure everything runs smoothly, but since this was not possible, we did as many tests as we could
on our own. Throughout the tests performed on our site, we were able to catch multiple bugs
and fix them. One such bug was that if the students were not assigned to a group by the admin
yet, the site would throw an error when they attempted to go to the Rankings, Submissions, or
Verifications tabs. We also tested our site on various web browsers including: Chrome, Internet
Explorer, Firefox, and Opera which all performed as expected.
6.2 Future Work
While we were able to implement everything that Dr. Mehta wanted for the AlgoBOWL site,
there are still some possibilities for future work that can be done to better improve the site. Some
possibilities include:
• Add features to the Rankings page that would give more statistics and possibly make it more
interactive for the students
• Have a way to automatically create groups using Dr. Mehtas group forming algorithm
11

AlgoBOWL 12
6.3 Lessons Learned
Although this project was not too technically challenging, we were able to learn more about Laravel
and the tools that come with it. Laravel provides a great framework to build web applications
and multiple additional tools to make web development easier. Although two team members had
previous experience in Laravel, their experience was limited, and there was still a lot of learning
to do. As a team, we were able to learn how to use the framework in such a way that made our
implementation fit in with the already existing project, CS CONNECT, as seamlessly as possible.

AlgoBOWL Admin User Guide
A.1 Setting Up AlgoBOWL
At the beginning of every semester, the following steps will help with the setup of AlgoBOWL.
1. Log into CS CONNECT, click on the AlgoBOWL icon, and go to the Students tab
2. Add Students
(a) Import a .txt file containing a list of emails of the students in Algorithms (one e-mail
per line)
(b) Add students by hand by selecting their names from a list
3. Delete student by finding their name on the list and hitting the delete button next to their
name
4. Form Groups
(a) Click on the Edit tab
(b) Input how many groups there are and hit submit
(c) Click and drag each student to their appropriate group and hit submit when finished
5. Setting the Type of Problem
(a) Click on the Edit tab
(b) Select whether the optimization problem for the semester is a Minimization or Maxi-
mization problem and hit submit
13

AlgoBOWL 14
A.1.1 Adding and Deleting Students
The first step is to add the students in Algorithms. This is done by logging onto CS CONNECT,
going to the AlgoBOWL icon, and going to the Students tab. There, you are able to import a .txt
file containing a list of emails of the students in Algorithms (one e-mail per line) or you can add
students by hand by selecting their names from a list. Only students who have a CS CONNECT
account will be able to be added, so make sure every student has an account. After the students are
added, they will be able to see the AlgoBOWL site. If a student happens to drop the course, you
can simply remove the student from the list by finding their name and hitting the delete button
next to their name.
A.1.2 Forming Groups
After you have added the students, you can now form their groups by going to the Edit tab. First,
input how many groups there are and hit submit. Then you will see a box for each group and a list
of all the students on the left of the page. Next, you simply need to click and drag each student to
their appropriate group and hit submit when finished. You can change who is in which group as
many times as you like by clicking and dragging the student.
A.1.3 Setting the Type of Problem
Also on the Edit page, you will see a place to select Minimization or Maximization. This is used
to calculate the scores and therefore the rankings of each group throughout the competition. The
default is set to Minimization, but if the problem for the semester is a Maximization problem, you
can switch it by selecting Maximization and hitting submit.
A.2 Viewing Each Group’s Information
If you want to view the information for a certain group, including input and output files, simply
add yourself to that group in the Edit page. Then when you click on the Submission tab, you will
see that group’s input file. Likewise, when you click on the Verification tab, you will see every
output file that each group has submitted to them and be able to change the verification of the file
if necessary.

AlgoBOWL 15
A.3 Changing Scores
If you ever need to change a score for a specific output from a group, go to the Edit Scores tab.
There you will see a table of the total score for each team. You can change any of these scores by
clicking on the text box of the score, changing it to what you want and hitting submit.
A.4 Viewing Rankings
To view the individual scores for each group on each input, go to the Rankings tab. There you
will see a 2D array of all the scores sorted by the ranks. There is also a bar chart underneath the
array that shows the scores for each team. This page will automatically refresh every 15 seconds
to continually update the ranks whenever a new score is submitted. You can also click on a group
number from the top of the 2D array. This will show you a bar chart based on the scores on that
group’s input.
A.5 Resetting AlgoBOWL
Resetting for each semester is simple. At the end of the AlgoBOWL, after you have collected all
the information that you need, go to the Students tab and hit the Reset AlgoBOWL button. A
dialog box will pop up asking if you are sure you want to reset. If yes, click Ok, otherwise click
Cancel.

CS CONNECT
B.1 Getting Started (for Windows)
Fork the CS-CONNECTv2 repository at https://github.com/CONNECT-Mines/CS-CONNECTv2
to your github account.
Install XAMPP.
Under htdocs (C:/xampp/htdocs) run:
git clone https://github.com/jeremykerr/CS-CONNECTv2.git
(this is what it was for my username, your git command should include your repository)
After you have cloned the repository into htdocs, you should be able to open the XAMPP control
panel, press Start on the Apache Module, and navigate to
http://localhost/CS-CONNECTv2/public/
Your local version of the site will not include profile pictures and some other minor site content,
but it should work for most development purposes.
B.2 Getting Started on Toilers
After making some changes, you may find that XAMPP throws some errors. For example, when
working with email functionality, the module the site uses was not installed on my local machine.
For this, the easiest way to continue development is to commit the changes to git (in your forked
version of the site) and make changes on toilers.mines.edu.
16

AlgoBOWL 17
To launch a dev site on toilers, you have to ssh into toilers (Ask Professor Camp for permissions
for this step, she will know who the toilers admin is) and navigate to the /home/www directory
and run
mkdir csconnect-jkerr
cd csconnect-jkerr
git clone https://github.com/jeremykerr/CS-CONNECTv2.git
cd CS-CONNECTv2/app
chmod o+w -R storage/
cd ../public/assets
chmod o+w -R csproject files/
chmod o+w -R project files/
chmod o+w -R submission files/
If everything has been done correctly, the dev site should now be accessible at
http://toilers.mines.edu/csconnect-jkerr/CS-CONNECTv2/public/ in your browser.
This is good for testing site functionality that may not be installed on a local machine.
B.3 Prerequisites for Making Site Changes
Understand HTTP GET, POST, PUT, and DELETE
Know Laravel – at the very least, build a couple of sample apps to understand how to use Laravel
before you try messing with the site
B.4 Making Site Changes
The best way to go about making site changes, after having some familiarity with Laravel, is to
first open your browser and navigate to the page you want to make changes to.
When you get to the page you want to edit (such as your profile page), look at the URL (con-
nect.mines.edu/newprofile).
Open the routes file (CS-CONNECTv2/app/routes.php) and find the route corresponding to the
URL (gets newprofile). The routes file has groups for routes that can only be accessed if a user is

AlgoBOWL 18
logged in, or is an administrator, as well as global routes which can be viewed without being logged
in.
In this case, the route would be
Route::get(’newprofile/id’,’NewProfileController@showProfile’);
nested under login (Route::group(array(’before’ =¿ ’auth’), function()) so a user must be logged in
to view a profile
Route::get(’newprofile/id’,’NewProfileController@showProfile’); tells us that the profile is constructed
by the showProfile function under the NewProfileController controller.
We can open the NewProfileController
(CS-CONNECTv2/app/controllers/NewProfileController.php). If we are making changes for the
user, then we can look at the first part of the showProfile function without worrying too much
about the rest.
In particular, we can see that the function returns a View (newprofile) with three sets of data:
current user, posts, and high scores.
We can open the view (CS-CONNECTv2/app/views/newprofile.blade.php) and see that the view
makes use of all three sets of data mentioned prior. In the showProfile function, we can see that
two models have been used to retrieve current user and posts (User and Newpost).
The view assumes that data has been passed in, so to make site changes we can modify the view and
pass in the data from the function in the controller that was called. It is important to remember
to call -¿get() at the end of any data request in the controller, to ensure that the view is given a
dataset, and not just a query object. It is best practice to use models for retrieving and modifying
data, however, and to avoid using raw sql whenever possible.
After opening the model for either User or Newpost
(CS-CONNECTv2/app/models/User.php or CS-CONNECTv2/app/models/Newpost.php), we can
see that there are functions available that retrieve additional data.
To make a site change, you need to do the following:
1. Check the route. If the route does not exist, you need to create it (if you are adding a new
page to the site).
2. Find the controller and function that returns the view for the page. If you are adding a new
page, you may need to make a new controller, or a new function. If you are adding redundant
functionality, it may be sufficient to call an existing controller function.

AlgoBOWL 19
3. Make sure the function passes in all the data you need for the views. It is relatively easy
to test the data that is passed in by converting it to json. Php has a builtin function for
converting datasets to json, this is a good step to make sure you have what you need.
4. Modify the view to use the data as you see fit. The site makes use of a modified Twitter
Bootstrap (using Bootswatch, bootswatch.com to modify Bootstrap)
After making and thoroughly testing changes, commit to your forked repo. Merge the original
repository down to confirm that no conflicts exist, and then join the repositories.