co =ocutting tool may contact hidden wiring. contact with a '`live" wire will make exposed...
TRANSCRIPT
>.- I..UI.-
_ocoouJ
UJ v*'
co,<,,,._drm
co =o
z_>,oa_:
Zco
o o
© ©
_N_"
Or)U.I
Or)
@
0"0
0.
U)
DEWALT Industrial Tool Co., 701 East Joppa Road, Baltimore, MD 21286(NOV04) Form 626185-00 DW937, DW938, DC385 Copyright © 2004 DEWALT
The following are trademarks for one or more DEWALT power tools: the yellow and black color scheme; the "D" shaped
air intake grill; the array of pyramids on the handgrip; the kit box configuration; and the array of lozenge-shaped humpson the surface of the tool.
IF YOU HAVE ANY QUESTIONS OR COMMENTS ABOUT THIS OR ANY DEWALT TOOL,CALL US TOLL FREE AT: 1-800-4-DEWALT (1-800-433-9258)
General Safety Rules - For All Battery Operated Tools
A ARNING! Read and understand all instructions. Failure to follow allinstructions listed below may result in electric shock, fire and/or seriouspersonal injury.
SAVE THESE INSTRUCTIONS
WORK AREA
• Keep your work area clean and welllit. Cluttered benches and dark areas invite accidents.
• Do not operate power tools in explosive atmospheres, such as in the presence offlammable liquids, gases, or dust. Power tools create sparks which may ignite the dustor fumes.
• Keep bystanders, children, and visitors away while operating a power toolDistractions can cause you to lose control
ELECTRICAL SAFETY
• Do not abuse the cord. Never use the cord to carry the tool Keep cord away fromheat, oil, sharp edges or moving parts. Replace damaged cords immediately.Damaged cords may create a fire.
• A battery operated tool with integral batteries or a separate battery pack must berecharged only with the specified charger for the battery. A charger that may be suit-able for one type of battery may create a risk of fire when used with another battery.
• Usebatteryoperatedtoolonlywiththespecificallydesignedbatterypack. Useofanyother batteries may create a risk of fire.
PERSONAL SAFETY
• Stay alert, watch what you are doing and use common sense when operating apower tool. Do not use tool while tired or under the influence of drugs, alcohol, ormedication. A moment of inattention while operating power tools may result in serious per-sonal injury,
• Dress properly. Do not wear loose clothing or jewelry. Contain long hair. Keep yourhair, clothing, and gloves away from moving parts. Loose clothing, jewe/_ or long haircan be caught in moving parts. Air vents often cover moving parts and should also beavoided.
• Avoid accidental starting. Be sure switch is in the locked or off position beforeinserting battery pack. Carrying tools with your finger on the switch or inserting the bat-tery pack into a tool with the switch on invites accidents.
• Remove adjusting keys or wrenches before turning the tool on. A wrench or key thatis left attached to a rotating part of the tool may result in personal injury,
• Do not overreach. Keep proper footing and balance at all times. Proper footing and bal-ance enables better control of the tool in unexpected situations.
• Use safety equipment. Always wear eye protection. Dust mask, non-skid safety shoes,hard hat, or hearing protection must be used for appropriate conditions.
TOOL USE AND CARE
• Use clamps or other practical way to secure and support the workpiece to a stableplatform. Holding the work by hand or against your body is unstable and may lead to a lossof control
• Do not force tool. Use the correct tool for your application. The correct tool will do thejob better and safer at the rate for which it is designed.
• Do not use tool if switch does not turn it on or off. Any tool that cannot be controlledwith the switch is dangerous and must be repaired.
• Disconnect battery pack from tool or place the switch in the locked or off positionbefore making any adjustments, changing accessories, or storing the tool. Suchpreventative safety measures reduce the risk of starting the tool accidentally.
• Store idle tools out of reach of children and other untrained persons. Tools are dan-gerous in the hands of untrained users.
• When battery pack is not in use, keep it away from other metal objects like: paperclips, coins, keys, nails, screws, or other small metal objects that can make a con-nection from one terminal to another. Shorting the battery terminals together may causesparks, bums, or a fire.
• Maintain tools with care. Keep cutting tools sharp and clean. Properly maintainedtools, with sharp cutting edges are less likely to bind and are easier to control
• Check for misalignment or binding of moving parts, breakage of parts, and any othercondition that may affect the tool's operation. If damaged, have the tool servicedbefore using. Many accidents are caused by poorly maintained tools.
• Use only accessories that are recommended by the manufacturer for your modelAccessories that may be suitable for one tool may become hazardous when used onanother tool
SERVICE
• Tool service must be performed only by qualified repair personnel Service or main-tenance performed by unqualified personnel could result in a risk of injury.
• When servicing a tool, use only identical replacement parts. Follow instructions inthe Maintenance section of this manual Use of unauthorized parts or failure to followMaintenance Instructions may create a risk of electric shock or injury,
Additional Specific Safety Rules• Hold tool by insulated gripping surfaces when performing an operation where the
cutting tool may contact hidden wiring. Contact with a '`live" wire will make exposedmetal parts of the tool "live" and shock the operator.
• Keep hands away from moving parts. Never place your hands near the cutting area.
• Use extra caution when cutting overhead and pay particular attention to overheadwires which may be hidden from view. Anticipate the path of falling branches and debrisahead of time.
• Do not operate this tool for long periods of time. Vibration caused by the operatingaction of this tool may cause permanent injury to fingers, hands, and arms. Use gloves toprovide extra cushion, take frequent rest periods, and limit daily time of use.
_,CAUTION: Shock hazard. When sawing into walls, floors or wherever "live" electrical wiresmay be encountered, DO NOT TOUCH ANY METAL PARTS OF THE TOOL! Hold the tool onlyby the plastic handle and housing to prevent electric shock if you saw into a "live" wire._,CAUTION: Wear appropriate personal hearing protection during use. Under some con-ditions and duration of use, noise from this product may contribute to hearing loss.J_CAUTION: When not in use, place tool on its side on a stable surface where it will notcause a tripping or falling hazard. Some tools with large battery packs will stand upright onthe battery pack but may be easily knocked over._WARNING: Some dust created by power sanding, sawing, grinding, drilling, and other con-struction activities contains chemicals known to cause cancer, birth defects or other reproduc-tive harm. Some examples of these chemicals are:
• lead from lead-based paints,
• crystalline silica from bricks and cement and other masonry products, and• arsenic and chromium from chemically-treated lumber (CCA).
Your risk from these exposures varies, depending on how often you do this type of work. Toreduce your exposure to these chemicals: work in a well ventilated area, and work withapproved safety equipment, such as those dust masks that are specially designed to filter outmicroscopic particles.• Avoid prolonged contact with dust from power sanding, sawing, grinding, drilling,
and other construction activities. Wear protective clothing and wash exposed areaswith soap and water. Allowing dust to get into your mouth, eyes, or lay on the skin maypromote absorption of harmful chemicals.
_WARNING: Use of this tool can generate and/or disburse dust, which may cause seriousand permanent respiratory or other injury. Always use NIOSH/OSHA approved respiratory pro-tection appropriate for the dust exposure. Direct particles away from face and body,• The label on your tool may include the following symbols. The symbols and their definitions
are as follows:V................ volts
Hz .............. hertz
min ............ minutes
.... .......... direct current
[] .............. Class II Construction
.............. safety alert symbol
A .............. amperesW .............. watts
"_ ............ alternating current
no .............. no load speed
.............. earthing terminal
.../min ........ revolutions per minute
Important Safety Instructions for Battery PacksYour tool uses a DEWALT battery pack. When ordering replacement battery packs, be sure toinclude catalog number and voltage: Extended Run-Time battery packs deliver more run-timethan standard battery packs. Consult the chart at the end of this manual for compatibility ofchargers and battery packs.NOTE: Your tool will accept either standard or Extended Run Time battery packs. However, besure to select proper voltage. Batteries slowly lose their charge when they are not on thecharger, the best place to keep your battery is on the charger at all times.The battery pack is not fully charged out of the carton. Before using the battery pack andcharger, read the safety instructions below. Then follow charging procedures outlined.
READ ALL INSTRUCTIONS
• Do not incinerate the battery pack even if it is severely damaged or is completelyworn out. The battery pack can explode in a fire.
• A smallleakage of liquid from the battery pack cells may occur under extreme usageor temperature conditions. This does not indicate a failure. However, if the outer seal isbroken and this leakage gets on your skin:a. Wash quickly with soap and water.b. Neutralize with a mild acid such as lemon juice or vinegar.c. If battery liquid gets into your eyes, flush them with clean water for a minimum of 10 min-
utes and seek immediate medical attention. (Medical note: The liquid is 25-35% solu-tion of potassium hydroxide.)
• Charge the batterypacks onlyin D_WALTchargers.• DO NOT splash or immerse in water or other liquids.• Donotstoreorusethetoolandbatterypackinlocationswherethetemperaturemay
reach or exceed 105°F (such as outside sheds or metal buildings in summer)._DANGER: Electrocution hazard. Never attempt to open the battery pack for any reason. Ifbattery pack case is cracked or damaged, do not insert into charger. Electric shock or electro-cution may result. Damaged battery packs should be retumed to service center for recycling.NOTE: Battery storage and carrying caps are provided for use whenever thebattery is out of the tool or charger. Remove cap before placing battery incharger or tool._WARNING: Fire hazard. Do not store or carry battery so that metalobjects can contact exposed battery terminals. For example, do not placebattery in aprons, pockets, tool boxes, product kit boxes, drawers, etc., with loosenails, screws, keys, etc. without battery cap. Transporting batteries can possibly causefires if the battery terminals inadvertently come in contact with conductive materialssuch as keys, coins, hand tools and the like. The US Department of TransportationHazardous Material Regulations (HMR) actually prohibit transporting batteries in commerce oron airplanes (i.e., packed in suitcases and carry-on luggage) UNLESS they are properly pro-tected from short circuits. So when transporting individual batteries, make sure that the batteryterminals are protected and well insulated from materials that could contact them and cause ashort circuit.
The RBRC TM SealThe RBRC TM (Rechargeable Battery Recycling Corporation) Seal on the ,,_nickel-cadmium battery (or battery pack) indicates that the costs to recycle thebattery (or battery pack) at the end of its useful life have already been paid byDEWALT. In some areas, it is illegal to place spent nickel-cadmium batteries inthe trash or municipal solid waste stream and the RBRC program provides anenvironmentally conscious alternative.RBRC TM in cooperation with DEWALT and other battery users, has established programs inthe United States to facilitate the collection of spent nickel-cadmium batteries. Help protect ourenvironment and conserve natural resources by returning the spent nickel-cadmium battery toan authorized DEWALT service center or to your local retailer for recycling. You may also con-tact your local recycling center for information on where to drop off the spent battery.RBRCTM is a registered trademark of the Rechargeable Battery Recycling Corporation.
Important Safety Instructions for Battery ChargersSAVE THESE INSTRUCTIONS: This manual contains important safety instructions for batterychargers.• Before using charger, read all instructions and cautionary markings on charger, battery
pack, and product using battery pack._DANGER: Electrocution hazard. 120 volts are present at charging terminals. Do not probewith conductive objects.AWARNING: Shock hazard. Do not allow any liquid to get inside charger._,CAUTION: Burn hazard. To reduce the risk of injury, charge only DEWAL T nickel cadmiumrechargeable batteries. Other types of batteries may burst causing personal injury and damage./&CAUTION." Under certain conditions, with the charger plugged in to the power supply, theexposed charging contacts inside the charger can be shorted by foreign material Foreign mate-rials of a conductive nature such as, but not limited to, steel wool aluminum foil, or any buildupof metallic particles should be kept away from charger cavities. Always unplug the charger fromthe power supply when there is no battery pack in the cavity, Unplug charger before attemptingto clean.
• DO NOT attempt to charge the battery pack with any chargers other than the ones inthis manual. The charger and battery pack are specifically designed to work together.
• These chargers are notintended forany uses other than charging DEWALTrecharge-able batteries. Any other uses may result in risk of fire, electric shock or electrocution.
• Do not expose charger to rain or snow.
• Pullbyplugratherthancordwhendisconnectingcharger.Thiswillreduceriskofdam-age to electric plug and cord.
• Make sure that cord is located so that it will not be stepped on, tripped over, or oth-erwise subjected to damage or stress.
• Donotuseanextensioncordunlessitisabsolutelynecessary. Useofimproperexten-sion cord could result in risk of fire, electric shock, or electrocution.
• An extension cord must have adequate wire size (AWG or American Wire Gauge) forsafety. The smaller the gauge number of the wire, the greater the capacity of the cable, thatis 16 gauge has more capacity than 18 gauge. When using more than one extension tomake up the total length, be sure each individual extension contains at least the minimumwire size.
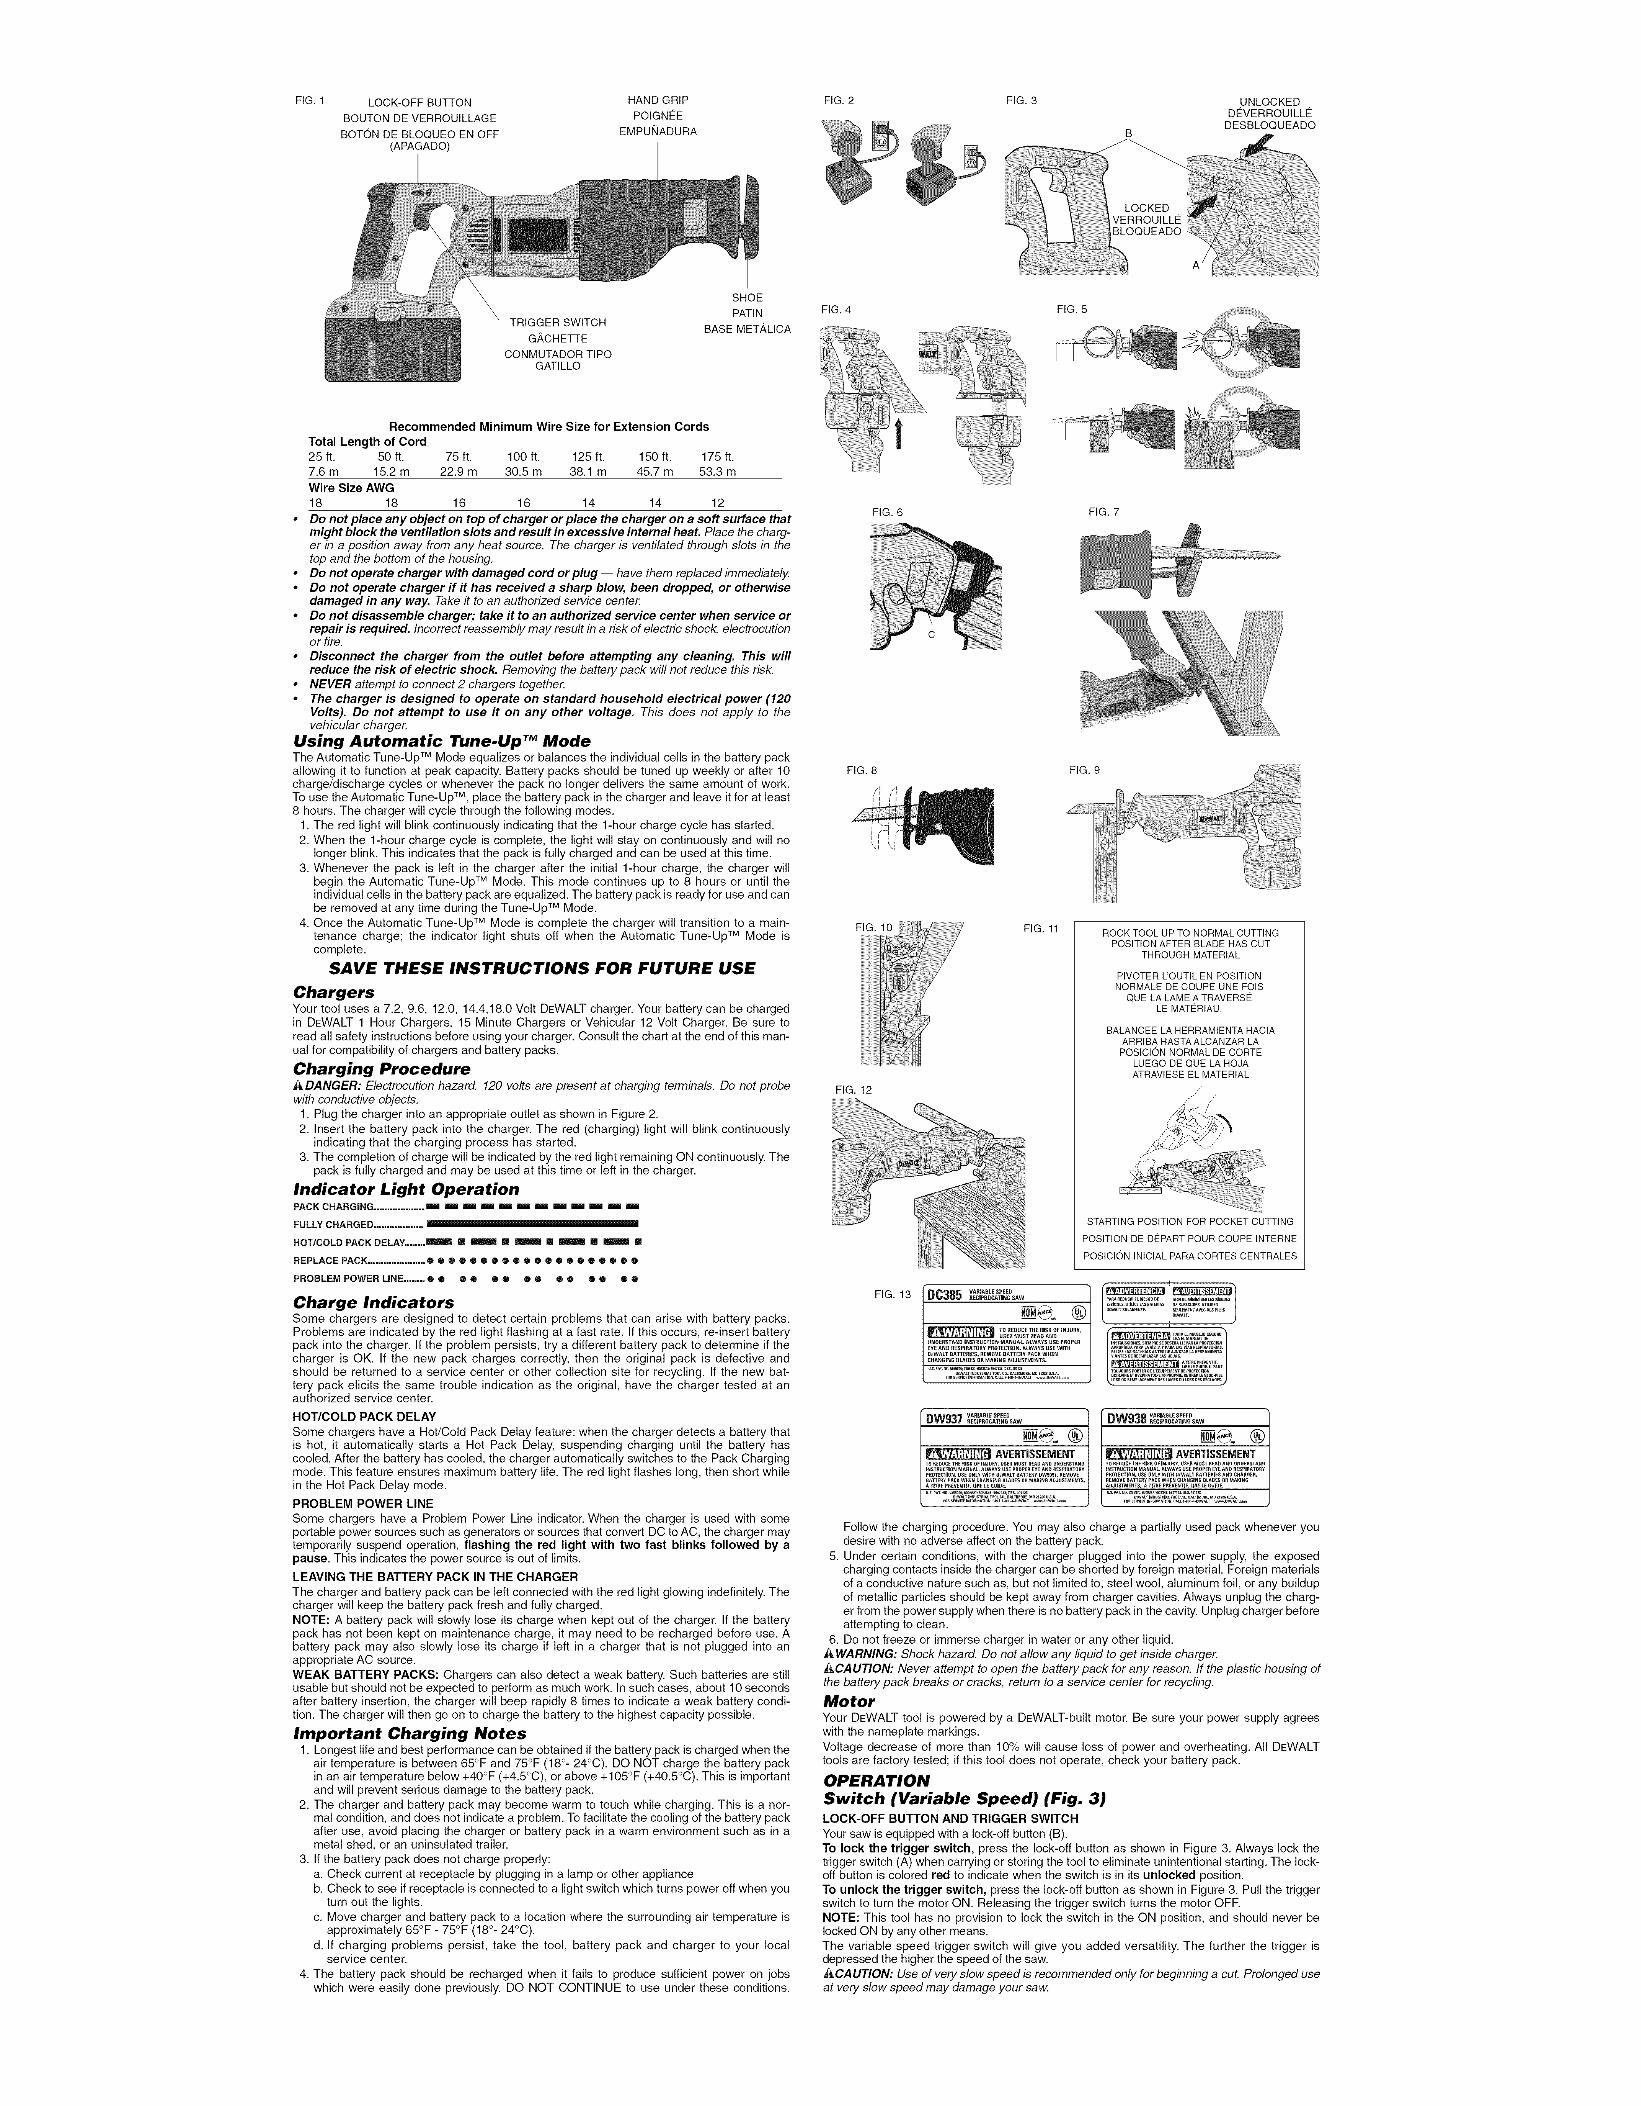
FIG. 1 LOCK-OFF BUTTON
BOUTON DE VERROUILLAGE
BOTON DE BLOQUEO EN OFF
(APAGADO)
HAND GRIP
POIGNEE
EMPUNADURA
FIG. 2 FIG. 3
LOCKEDVERROUILLEBLOQUEADO
UNLOCKEDDEVERROUILLE
DESBLOQUEADO
TRIGGER SWITCH
G,&,CHETTE
CONMUTADOR TIPOGATILLO
SHOE
PATIN
BASE METALICA
FIG. 4 FIG. 5
Recommended Minimum Wire Size for Extension Cords
Total Length of Cord25 ft. 50 ft. 75 ft. 100 ft. 125 ft. 150 ft. 175 ft.7.6 m 15.2 m 22.9 m 30.5 m 38.1 m 45.7 m 53.3 m
Wire Size AWG
18 18 16 16 14 14 12
• Do not place any object on top of charger or place the charger on a soft surface thatmight block the ventilation slots and result in excessive internal heat. Place the charg-er in a position away from any heat source. The charger is ventilated through slots in thetop and the bottom of the housing.
• Do not operate charger with damaged cord or plug -- have them replaced immediately.• Do not operate charger if # has received a sharp blow, been dropped, or otherwise
damaged in any way. Take it to an authorized service center.• Do not disassemble charger; take # to an authorized service center when service or
repair is required. Incorrect reassembly may result in a risk of electric shock, electrocutionor fire.
• Disconnect the charger from the outlet before attempting any cleaning. This willreduce the risk of electric shock. Removing the battery pack will not reduce this risk.
• NEVER attempt to connect 2 chargers together.• The charger is designed to operate on standard household electrical power (120
Volts). Do not attempt to use it on any other voltage. This does not apply to thevehicular charger.
Using Automatic Tune.Up TM ModeThe Automatic Tune-Up TM Mode equalizes or balances the individual ceils in the battery packallowing it to function at peak capacity. Battery packs should be tuned up weekly or after 10charge/discharge cycles or whenever the pack no longer delivers the same amount of work.To use the Automatic Tune-Up TM, place the battery pack in the charger and leave it for at least8 hours. The charger will cycle through the following modes.
1. The red light will blink continuously indicating that the 1-hour charge cycle has started.2. When the 1-hour charge cycle is complete, the light will stay on continuously and will no
longer blink. This indicates that the pack is fully charged and can be used at this time.3. Whenever the pack is left in the charger after the initial 1-hour charge, the charger will
begin the Automatic Tune-Up TM Mode. This mode continues up to 8 hours or until theindividual cells in the battery pack are equalized. The battery pack is ready for use and canbe removed at any time during the Tune-Up TM Mode.
4. Once the Automatic Tune-Up TM Mode is complete the charger will transition to a main-tenance charge; the indicator light shuts off when the Automatic Tune-Up TM Mode iscomplete.
SAVE THESE INSTRUCTIONS FOR FUTURE USE
ChargersYour tool uses a 7.2, 9.6, 12.0, 14.4,18.0 Volt DEWALT charger. Your battery can be chargedin DEWALT 1 Hour Chargers, 15 Minute Chargers or Vehicular 12 Volt Charger. Be sure toread all safety instructions before using your charger. Consult the chart at the end of this man-ual for compatibility of chargers and battery packs.
Charging Procedure,&DANGER: Electrocution hazard. 120 volts are present at charging terminals. Do not probewith conductive objects.
1. Plug the charger into an appropriate outlet as shown in Figure 2.2. Insert the battery pack into the charger. The red (charging) light will blink continuously
indicating that the charging process has started.3. The completion of charge will be indicated by the red light remaining ON continuously. The
pack is fully charged and may be used at this time or left in the charger.
Indicator Light OperationPACK CHARGING ................... m m _ _ _ _ _ m _ _ _
FULLY CHARGED ................... --
HOT/COLD PACK DELAY ........ _ [] _ [] _ [] _ [] _ []
REPLACE PACK ...................... 00®Q0000®®0®®00®0®00
PROBLEM POWER LiNE ........ ® • ® • ® O ® O ® ® e ® 0 0
Charge IndicatorsSome chargers are designed to detect certain problems that can arise with battery packs.Problems are indicated by the red light flashing at a fast rate. If this occurs, re-insert batterypack into the charger. If the problem persists, try a different battery pack to determine if thecharger is OK. If the new pack charges correctly, then the original pack is defective andshould be returned to a service center or other collection site for recycling. If the new bat-tery pack elicits the same trouble indication as the original, have the charger tested at anauthorized service center.
HOT/COLD PACK DELAY
Some chargers have a Hot/Cold Pack Delay feature: when the charger detects a battery thatis hot, it automatically starts a Hot Pack Delay, suspending charging until the battery hascooled• After the battery has cooled, the charger automatically switches to the Pack Chargingmode. This feature ensures maximum battery life. The red light flashes long, then short whilein the Hot Pack Delay mode.
PROBLEM POWER LINE
Some chargers have a Problem Power Line indicator. When the charger is used with someportable power sources such as generators or sources that convert DC to AC, the charger maytemporarily suspend operation, flashing the red light with two fast blinks followed by apause. This indicates the power source is out of limits.
LEAVING THE BATTERY PACK IN THE CHARGER
The charger and battery pack can be left connected with the red light glowing indefinitely. Thecharger will keep the battery pack fresh and fully charged.NOTE: A battery pack will slowly lose its charge when kept out of the charger. If the batterypack has not been kept on maintenance charge, it may need to be recharged before use. Abattery pack may also slowly lose its charge if left in a charger that is not plugged into anappropriate AC source.WEAK BATTERY PACKS: Chargers can also detect a weak battery. Such batteries are stillusable but should not be expected to perform as much work. In such cases, about 10 secondsafter battery insertion, the charger will beep rapidly 8 times to indicate a weak battery condi-tion. The charger will then go on to charge the battery to the highest capacity possible.
Important Charging Notes1. Longest life and best performance can be obtained if the battery pack is charged when the
air temperature is between 65°F and 75°F (18 °- 24°C). DO NOT charge the battery packin an air temperature below +40°F (+4.5°C), or above +105°F (+40.5°C). This is importantand will prevent serious damage to the battery pack.
2. The charger and battery pack may become warm to touch while charging. This is a nor-mal condition, and does not indicate a problem. To facilitate the cooling of the battery packafter use, avoid placing the charger or battery pack in a warm environment such as in ametal shed, or an uninsulated trailer.
3. If the battery pack does not charge properly:a. Check current at receptacle by plugging in a lamp or other applianceb. Check to see if receptacle is connected to a light switch which turns power off when you
turn out the lights.c• Move charger and battery pack to a location where the surrounding air temperature is
approximately 65°F - 75°F (18 °- 24°C).
d. If charging problems persist, take the tool, battery pack and charger to your localservice center.
4. The battery pack should be recharged when it fails to produce sufficient power on jobswhich were easily done previously. DO NOT CONTINUE to use under these conditions.
FIG. 6 FIG. 7
FIG. 9
FIG. 12
FIG. 11 ROCK TOOL UP TO NORMAL CUTTINGPOSITION AFTER BLADE HAS CUT
THROUGH MATERIAL
PIVOTER UOUTIL EN POSITIONNORMALE DE COUPE UNE FOIS
QUE LA LAME A TRAVERSELE MATERIAU.
BALANCEE LA HERRAMIENTA HACIA
ARRIBA HASTAALCANZAR LAPOSICIONNORMALDE CORTE
LUEGODEQUELA HOJAATRAVIESEELMATERIAL
/• ,•/ ,"
,/'
STARTING POSITION FOR POCKET CUTTING
POSITION DE DISPART POUR COUPE INTERNE
POSICION INICIAL PARA CORTES CENTRALES
FIG. 13 DC385 V.,,.,LE,_EE°}tECJPROCATJN[_ SAW
TO REDUCETH[ RISKOFINJUFtY,USERMUST READAN_UNDE]ISTAt_D INSYNUCTION MANUAL. ALWAYS USE PSOPERgYE AND R[SPJRATORy PROTEDTION, ALWAYS US[ WITH
B_WALT BATTERIES. R£MOV£ BATTE_ty PACK WH£N
CHA_GING BLADES OR MAKING ADJUSIMENTS.
I
T_JeURSpORTE_O__•t_UpEME__E_O_ECll_
LO_S_URE_E_T_SlaMES OULOHS_S _;,
VARIA_LE SPEED
®AVERTiSSEMENT
TO _t_DUCE THE I_ISK OF IN JIJ_Y, USER MUST READ AND U_OERSTANBiNSTRUCTiON MANUAL, ALWAYS US_ PROPER EYE AND RESPIRATORYP_OTECTION. USE ONLY WiTH O_WALT BATTerY BW9091. REMOVE
TI_E P_v_l_, LI_ELE6UlOE.
VARIABLE SPEED
AVERTISSEMENTTO REBtJCE THE ttlSK OF INJIIRY, I_SE_ MUST READ AND UNDERSTANDI_ST_UCTION MANUAL ALWAYS USE PROPER EYE ANO RESPIRATORY
PROTECTI01_, USE ONLY WITH £_WALT BATTERIES AN0 _HARGER,REMOVE BATTEry PACK WHEN _HAN_HNG BLADES OR MAI(JNOA_)JUSTMENT$, A TITRE PREVENTIF, LI_tE LE GUI{)£,
Follow the charging procedure. You may also charge a partially used pack whenever youdesire with no adverse affect on the battery pack.
5. Under certain conditions, with the charger plugged into the power supply, the exposedcharging contacts inside the charger can be shorted by foreign material. Foreign materialsof a conductive nature such as, but not limited to, steel wool, aluminum foil, or any buildupof metallic particles should be kept away from charger cavities. Always unplug the charg-er from the power supply when there is no battery pack in the cavity. Unplug charger beforeattempting to clean.
6. Do not freeze or immerse charger in water or any other liquid./&WARNING: Shock hazard. Do not allow any liquid to get inside charger._CAUTION: Never attempt to open the battery pack for any reason. If the plastic housing ofthe battery pack breaks or cracks, return to a service center for recycling.
MotorYour DEWALT tool is powered by a DEWALT-built motor. Be sure your power supply agreeswith the nameplate markings.
Voltage decrease of more than 10% will cause loss of power and overheating. All DEWALTtools are factory tested; if this tool does not operate, check your battery pack.
OPERATION
Switch (Variable Speed) (Fig. 3)LOCK-OFF BUTTON AND TRIGGER SWITCH
Your saw is equipped with a lock-off button (B).To lock the trigger switch, press the lock-off button as shown in Figure 3. Always lock thetrigger switch (A) when carrying or storing the tool to eliminate unintentional starting. The lock-off button is colored red to indicate when the switch is in its unlocked position.To unlock the trigger switch, press the lock-off button as shown in Figure 3. Pull the triggerswitch to turn the motor ON. Releasing the trigger switch turns the motor OFRNOTE: This tool has no provision to lock the switch in the ON position, and should never belocked ON by any other means.The variable speed trigger switch will give you added versatility. The further the trigger isdepressed the higher the speed of the saw.,&CAUTION: Use of very slow speed is recommended only for beginning a cut. Prolonged useat very slow speed may damage your saw.

Installing and Removing the Battery PackNOTE: Make sure your battery pack is fully charged.t&CAUTION: Lock trigger switch before removing or installing battery.
To install the battery pack into the tool handle, align the base of the tool with the notchinside the tool's handle and slide the battery pack firmly into the handle until you hear the locksnap into place as shown in Figure 4.To remove the battery pack from the tool, press the release buttons and firmly pull the bat-tery pack out of the tool handle. Insert it into the charger as described in the charger manual.
Blade Installation and RemovalDifferent blade lengths are available. Use the appropriate blade for the application. The bladeshould be longer than 3-1/2" and should extend past the shoe and the thickness of the work-piece during the cut. Do not use jigsaw blades with this tool.AWARNING: Cut hazard. Blade breakage may occur ff the blade does not extend past theshoe and the workpiece during the cut (Fig. 5). Increased risk of personal injury, as well asdamage to the shoe and workpiece may result.ACAUTION: LOCK TRIGGER SWITCH AND REMOVE BATTERY PACK.
TO INSTALL BLADE INTO SAW
1. Open blade clamp release lever (C) up (Fig. 6).2. Insert blade shank from the front.
3. Close blade clamp release lever down.4. Note blade can be installed upside-down to assist in flush-to cutting, see Figure 10.
TO REMOVE BLADE FROM SAW
Z&CAUTION: Bum hazard. Do not touch the the blade immediately after use. Contact with theblade may result in personal injury.
1. Open up blade clamp release lever.2. Remove blade.
Cutting with Blade in Horizontal Position (Fig. 7)Your saw may or may not be equipped with a horizontal blade clamp. Installing a blade in thehorizontal orientation allows cutting close to floors, walls or ceilings where limited clearance isavailable. Ensure that the shoe is pressed against the framing to avoid kickback.
Adjustable Shoe (Fig. 8)_CAUTION: LOCK TRIGGER SWITCH AND REMOVE BATTERY.
Your saw may or may not come with an adjustable shoe. The shoe will adjust to limit the depthof cut. Hold the saw with the underside facing up. Push the button on the hand grip and slidethe shoe out to one of the three settings and release the button.I&CAUTION: Cut hazard. To prevent loss of control, never use tool without shoe.
Cutting (Figure 9)_&WARNING: Always wear eye protection while operating this power tool._WARNING: Exercise extra caution when cutting towards operator. Always hold saw firmlywith both hands while cutting.
Before cutting any type of material, be sure it is firmly anchored or clamped to prevent slip-ping. Place blade lightly against work to be cut, switch on saw motor and allow it to obtainmaximum speed before applying pressure. Whenever possible, the saw shoe must be heldfirmly against the material being cut. This will prevent the saw from jumping or vibrating andminimize blade breakage. Any cut which puts pressure on the blade such as angle or scrollcuts increase potential for vibration, kickback, and blade breakage._WARNING: Use extra caution when cutting overhead and pay particular attention to over-head wires which may be hidden from view. Anticipate the path of falling branches and debrisahead of time.
l& WARNING: Inspect work site for hidden gas pipes, water pipes, or electrical wires beforemaking blind or plunge cuts. Failure to do so may result in explosion, property damage,electric shock, and/or serious personal injury.
FLUSH-TO CUTTING (FIGURE 10)The compact design of the saw motor housing and spindle housing permits extremely close cut-ting to floors, corners and other difficult areas.
POCKET/PLUNGE CUTTING - WOOD ONLY (FIG. 11)The initial step in pocket cutting is to measure the surface area to be cut and mark clearly witha pencil, chalk or scriber. Use the appropriate blade for the application. The blade should belonger than 3-1/2" and should extend past the shoe and the thickness of the workpiece duringthe cut. Insert blade in blade clamp.Next, tip the saw backward until the back edge of the shoe is resting on the work surface andthe blade clears the work surface. Now switch motor on, always permitting blade to attain max-imum speed. Grip handle steadily and begin a slow, deliberate upward swing with the handle ofthe saw. Blade will begin to feed into material. Always be sure blade is completely through mate-rial before continuing with pocket cut.NOTE: In areas where blade visibility is limited, use the edge of the saw shoe as a guide. Linesfor any given cut should be extended beyond edge of cut to be made.
METAL CUTTING (FIGURE 12)This unit has different metal cutting capacities depending upon type of blade used and themetal to be cut. Use a finer blade for ferrous metals and a coarse blade for non-ferrous mate-rials. In thin gauge sheet metals it is best to clamp wood to both sides of sheet. This will insurea clean cut without excess vibration or tearing of metal. Always remember not to force cuttingblade as this reduces blade life and causes costly blade breakage.NOTE: It is generally recommended that when cutting metals you should spread a thin filmof oil or other lubricant along the line ahead of the saw cut for easier operation and longerblade life.
MAINTENANCE
CleaningCHARGER CLEANING INSTRUCTIONS
A WARNING: Shock hazard. Disconnect the charger from the AC outlet before cleaning. Dirtand grease may be removed from the exterior of the charger using a cloth or soft non-metal-lic brush. Do not use water or any cleaning solutions.
LubricationYour tool was properly lubricated before leaving the factory. In two to six months, dependingupon use, take or send your tool to a Service Center, or authorized service station, for a com-plete cleaning, inspection and lubrication. Tools used constantly on production jobs will needrelubrication more often. Also, tools "out of service" for long periods should be relubricatedbefore being put back to work.
RepairsTo assure product SAFETY and RELIABILITY, repairs, maintenance and adjustment (includ-ing brush inspection and replacement) should be performed by authorized service centers orother qualified service personnel, always using identical replacement parts.
AccessoriesRecommended accessories for use with your tool are available at extra cost from your localdealer or authorized service center. If you need assistance in locating any accessory foryour tool, contact: DEWALT Industrial Tool Co., 701 East Joppa Road, Baltimore, MD21286.
_t,CAUTION: The use of any other accessory not recommended for use with this tool couldbe hazardous.
Three Year Limited WarrantyDEWALT will repair, without charge, any defects due to faulty materials or workmanship forthree years from the date of purchase. This warranty does not cover part failure due to normalwear or tool abuse. For further detail of warranty coverage and warranty repair information,visit www.dewalt.com or call 1-800-4-DEWALT (1-800-433-9258). This warranty does not applyto accessories or damage caused where repairs have been made or attempted by others. Thiswarranty gives you specific legal rights and you may have other rights which vary in certainstates or provinces.
In addition to the warranty, DEWALT tools are covered by our:
1 YEAR FREE SERVICE
DEWALT will maintain the tool and replace worn parts caused by normal use, for free, any timeduring the first year after purchase.
2 YEARS FREE SERVICE ON XRP rM BATTERY PACKS
DC9096, DC9091 and DC9071
90 DAY MONEY BACK GUARANTEE
If you are not completely satisfied with the performance of your DEWALT Power Tool, Laser,or Nailer for any reason, you can return it within 90 days from the date of purchase with areceipt for a full refund - no questions asked.
RECONDITIONED PRODUCT: Reconditioned product is covered under the 1 Year FreeService Warranty. The 90 Day Money Back Guarantee and the Three Year Limited Warrantydo not apply to reconditioned product.
FREE WARNING LABEL REPLACEMENT: If your warning labels (Fig. 13) become illegibleor are missing, call 1-800-4-DEWALT for a free replacement.
POUR TOUTE QUESTION OU REMARQUE AU SUJET DE CET OUTIL OU DE TOUTAUTRE OUTIL DEWALT, COMPOSER LE NUMI:tRO SANS FRAIS :
1 800 4-DEWALT (1 800 433-9258)
R_gles de s_curit_ g_n_rales - Pour tous les outilsaliment_s par piles
AVERTISSEMENT : II faut fire et comprendre toutes les directives, Le non-respect des directives pr#sent#es ci-dessous pourrait causer un choc #lec-
trique, un incendie et/ou des blessures graves.
CONSERVER CES DIRECTIVES
AIRE DE TRAVAIL
• L'aire de travail doit #tre propre et bien #clair#e. Les etablis encombres et le manquede lumiere peuvent entraTner des accidents.
• Ne pas faire fonctionner des outils #lectriques clans des atmosph#res explosives,comme en pr#sence de liquides, de gaz et de poussi#res inflammables. Les outilselectriques produisent des etincelles qui peuvent enflammer la poussiere ou les vapeurs.
• Tenir les spectateurs, les enfants et les visiteurs _/'#cart Iorsqu'on uh'lise I'outil. Lesdistractions peuvent entrafner une perte de ma#rise.
REGLES DE SECURITE RELATIVES h. L'ELECTRICITE
• Manipuler le cordon avec soin. Ne jamais I'utiliser pour transporter I'outil. Tenir lecordon _ I'#cart de la chaleur, de I'huile, des ar#tes vires ou des pi#ces mobiles.Remplacer imm#diatement les cordons endommag#s, car ils peuvent causer unincendie.
• Un outil aliment# par piles, dot# de piles int#gr#es ou d'un bloc-piles distinct, doit#tre recharg# uniquement au moyen du chargeur indiqu# pour la pile. Un chargeurpeut convenir a un type de pile, mais creer un risque d'incendie Iorsqu'il est utilise avec uneautre pile.
• N'utiliser I'outil qu'avec le bloc-piles sp#cialement concu pour celui-ci. L'utilisationd'autres blocs peut causer un risque d'incendie.
SECURITE PERSONNELLE
• Demeurer alerte, pr#ter attention _ ce que I'on fait et faire preuve de bons sensIorsqu'on utilise un outil #lectrique. Ne pas utiliser un outil Iorsqu'on ressent de lafatigue ou apr#s avoir consomm# des drogues, de I'alcool ou des m#dicament& Unmoment d'inattenfion durant I'utilisation dbufils electriques peut entrMner de gravesblessures.
• Porter des v#tements appropri#& Ne pas porter des v#tements amples ni des bijoux.Attacher les cheveux longs. Tenir les cheveux, les v#tements et les gants _ I'#cart despi#ces mobiles. Les v#tements amples, les bijoux et les cheveux longs peuvent #trehappes par des pieces mobiles. Los orificios de venfilaci6n suelen cubrir piezas enmovimiento, por Io que tambien se deben evitar.
• Eviter le d#marrage accidentel. S'assurer que I'interrupteur est verrouiil# ou plac# enposition d'arr#t avant d'ins#rer un bloc-pile& Le fa# de transporter les outils en appuyantsur la g_chette ou d'inserer le bloc-piles alors que I'interrupteur est en position de marchepeut causer des accidents.
• D#poser les cl#s de r#glage ou de serrage avant de me#re I'outil sous tension. Si unecl# demeure fixee a une piece rotative de Ibutil, des blessures peuvent survenir.
• Ne pas tendre le bras trop loin. fl faut demeurer en #quilibre en tout temps. Un bonequilibre permet une meilleure maftrise de Ibutil clans les situations inattendues.
• Utiliser du mat#riel de s#curit#. Toujours porter un protecteur oculaire, fl faut utiliser,au besoin, un masque antipoussieres, des chaussures de securit6 antiderapantes, uncasque de securit6 ou des protecteurs dbreilles.
UTILISATION DES OUTILS ET PRECAUTIONS
• Utiliser des pinces ou un autre moyen pratique de fixer et de soutenir la pi#cetravailler sur une plateforme stable. Le fait de tenir la piece avec la main ou de rappuyercontre le corps ne permet pas de la stabiliser et cela risque de causer une perte de maTtrise.
• Ne pas forcer I'outil. Utiliser I'outil convenant au travail _ effectuer. Lbutil adequat ferale travail de fa¢on plus convenable et securitaire s'il est employe au regime pour lequel il aete con;u.
• Ne pas utiliser I'outil sil'interrupteur ne permet pas de le me#re sous ou hors tension.Tout outil impossible a commander au moyen de I'interrupteur est dangereux et doit #trerepare.
• D#brancher le bloc-piles de I'outil ou r#gler I'interrupteur en position de verrouillageou d'arr#t avant d'effectuer des r#glages, de changer d'accessoire ou de ranger I'outil.De telles mesures preventives reduisent le risque de le me#re en marche accidentellement.
• Ranger les outils hors de la port#e des enfants et des autres personnes nonqualifi#e& Les outils sont dangereux entre les mains d'utilisateurs non qualifies.
• Lorsque la pile n'est pas utifis#e, I'#loigner des autres objets m#talliques, comme lestrombones, les pi#ces de monnaie, les cl#s, les clous, les vis ou autres petits objetsm#talliques, pouvant #tablir une connexion entre les deux borne& Un court-circuit auxbomes de piles peut causer des etincelles, des brOlures ou un incendie.
• Veiller _ entretenir correctement les outil& AffOter et nettoyer les accessoires decoupe. Des outils bien entretenus, et dont les ar#tes sont coupantes, sont moinssusceptibles de se coincer et sont plus faciles a manier.
• V#rifier la pr#sence de pi#ces mobiles real align#es ou coinc#es, de pi#ces bris#esou de toute autre condition pouvant alt#rer le fonctionnement de I'outil. $i I'outil estendommag#, il faut le faire r#parer avant de I'utiliser. De nombreux accidents sontcauses par des outils mal entretenus.
• Utiliser seulement des accessoires recommand#s par le fabricant du mod#le. Desaccessoires convenant a un outil peuvent #tre dangereux Iorsqu' on les installe sur un autreoutil.
REPARATION
• Seules des personnes qualifi#es peuvent r#parer les outil& Une reparation ou unentretien effectue par une personne non qualifiee risque d'entraTner des blessures.
• II faut utiliser uniquement des pi#ces de rechange identiques pour r#parer un outil.Suivre les directives figurant clans la section Entretien du pr#sent manuel. L'emploi depieces inadequates ou le non-respect des directives d'entretien peut provoquer un chocelectrique ou des blessures.
R_gles de s_curit_ particuli_res• Tenir I'outil par les surfaces de saisie isol#es pour les travaux ob I'outil de coupe
risque de toucher _ des ills dissimul#& Tout contact avec un fil "sous tension" provoquera'l'electrisation" des parties metalliques exposees et I'electrocution de rutilisateur.
• Tenir les mains _ I'#cart de toute pi#ce mobile. Ne jamais approcher les mains deszones de coupes.
• Prendre des pr#cautions suppl#mentaires pour d#couper au-dessus de la t#te. Faireparticuli#rement attention aux ills #lectriques qui pourraient y #tre dissimul#&Anticiper toute chute de branches ou debris.
• Ne pas utiliser cet outil pendant des p#riodes prolong#e& Les vibrations causees parraction de fonctionnement de routil peuvent blesser en permanence les doigts, les mainset les bras. Porter des gants pour amortir les vibrations, faire des pauses frequentes et lim-iter le temps d'utilisation quofidien de routil.
_,MISE EN GARDE : Risques de choc electrique. Pendant le sciage de murs, planchers outout endroit ob des ills electr/iques sous tension pourraient se trouver, NE JAMAIS TOUCHERAUCUNE DES PARTIES METALLIQUES DE L 'OUTIL ! Maintenir I'outil par sa poignee ou sonboftier plastifie pour prevenir tout choc electrique dans I'eventualite ou un fil sous tension seraitcoupe.i_MISE EN GARDE : Porter des protecteurs d'oreilles appropri#s durant I'utilisation.Selon les conditions et la duree d'utilisation, le bruit emis par cet outil peut causer une perteauditive.
AMISE EN GARDE : Apr#s utilisation, ranger I'outil sur son c6t# sur une surface stable14cO il ne pourra faire ni tr#bucher ni tomber personne. Certains outils equipes d'un largebloc-pile peuvent tenir a la verticale sur ce demier mais ils sont alors facilement destabilises._AVERTI$$EMENT : Certaines poussieres creees par le pon_age, le sciage, le meulage etle forage mecaniques ainsi que d'autres activites de construction contiennent des produitschimiques dont on sait qu'ils causent le cancer, des anomalies congenitales ou d'autres anom-alies liees a la reproduction. Parmi ces produits chimiques, citons notamment :
• le plomb provenant des peintures au plomb ;• la silice cristalline provenant des briques, du beton et d'autres materiaux de ma_onnerie ;• rarsenic et le chrome provenant du bois traite (arseniate de cuivre et de chrome).
Le risque associe aces expositions varie selon la frequence de ces types de travaux. Pourreduire rexposition aux produits chimiques : travailler clans un local bien ventile et utiliser dumateriel de securite approuve, comme les masques antipoussieres specialement con€us pourfiftrer les particules microscopiques.• F.viter le contact prolong# avec la poussi#re provenant du poncage, du sciage, du
meulage et du forage m#canique ainsi que d'autres activit#s de construction. Porterdes v#tements de protection et laver les parties expos#es au savon et _ I'eau. Lapoussiere qui pourrait penetrer clans la bouche et les yeux ou se deposer sur la peau peutfavoriser I'absorption de produits chimiques nocifs.
/AAVERTISSEMENT : Cet outil peut produire et repandre de la poussiere susceptible decauser des dommages serieux et permanents au systeme respiratoire. Toujours utiliser unappareil respiratoire anti-poussieres approuve par le NIOSH ou I'OSHA. Diriger les particulesclans le sens oppose du visage et du corps.• L'etiquette apposee sur Ibutil peut comprendre les symboles suivants. Voici les symboles
et leurs d#finitions :
V .................. volts A .................. amperesHz ................ hertz W ................ wattsmin ................ minutes "_ ................ courant altematif

.... ............ courant direct no ................ regime sans charge[] .................. construction de classe II G ................ bome de mise 4 la terre
_ ................ symbole de risque de choc .../min .......... tours par minute
Consignes de s_curit_ importantes pour les blocs.pilesL'outil est dote d'un bloc-pile DEWALT. Lorsqu'on commande un bloc-pile de rechange, s'as-surer d'inclure le num@o de catalogue et la tension. Les bloc-piles 4 duree prolongee durentplus Iongtemps que les bloc-piles standard. Consulter le diagramme 4 la fin du present manuelafin de v@ifier la compatibilite du chargeur avec le bloc-pile.REMARQUE : Bien que I'outil puisse fonctionner au moyen de I'un ou I'autre de ces bloc-piles,on dolt s'assurer d'en choisir un de tension appropriee. Un bloc-pile perd graduellement sacharge s'il n'est pas laisse dans le chargeur; il est donc recommande de le laisser dans lechargeur en tout temps.Le bloc-pile n'est pas completement charge au moment de sa livraison. Avant d'utiliser le bloc-pile et le chargeur, lire attentivement toutes les consignes de securit6 enum@6es ci-dessous,ainsi que les remarques, les notes et les methodes de chargement.
LIRE TOUTES LES CONSIGNES
• Ne pas incinerer le bloc-piles m_me s'il est tres endommage ou completement use. IIrisque d'exploser si on le jette au feu.
• fl peut y avoir une I#gere fuite de liquide en provenance des #l#ments du bloc-pilesclans des conditions d'utilisation ou _ des temp#ratures extr#mes. Ceci n'est pas unsigne de defaillance. Cependant, si le sceau d'etanch6it6 exterieur est brise et si le liquideentre en contact avec la peau :
a. la laver rapidement au savon et 4 I'eau ;b. neutraliser avec un acide doux, comme du jus de citron ou du vinaigre ;c. si le liquide des piles entre en contact avec les yeux, les rincer 4 I'eau claire pendant au
moins 10 minutes et consulter immediatement un medecin. (Remarque d'ordremedical : Le liquide est une solution composee 4 25-35% d'hydroxyde de potassium.)
• Ne charger les blocs-piles que clans les chargeurs DEWALT.• NE PAS eclabousser ni immerger clans I'eau ou d'autres liquides.• Ne pas ranger ou utiliser I'outil et le bloc-piles clans des endroits ob la temperature
peut atteindre ou depasser 105°F (par exemple, clans les cabanons ou les b#timentsmetalliques, en ete).
A DANGER : Risques d'electrocution. On ne dolt en aucun cas tenter d'ouvrir le bloc-piles. Sison bottler est fissure ou endommage, ne pas inserer le bloc clans le chargeur au risque desubir un chec electrique ou une electrocution. Les blocs-piles endommages deivent #treretoumes 4 un centre de service ob ils serent recycles.NOTA : Des capuchons sont fournis pour le rangement et le transport des pilesIorsqu'elles sont hors de I'outil ou du chargeur. Enlever le capuchon avant deplacer la pile dans le chargeur ou I'outil.AAVERTISSEMENT : Risques d'incendie. S'assurer, au moment de rangerou de transporter un bloc-pile ou une pile, qu'aucun objet metallique n'en-tre en contact avec leurs bornes _ decouvert de celui-ci. Par exemple, il fauteviter de placer un bloc-pile ou une pile sans capuchon clans un tablier, une poche, une bofte4 outils ou un tiroir (etc.) contenant des objets tels que des clous, des vis ou des cles, car toutcontact entre les bornes _ decouvert et un objet metallique comme une cle, une piecede monnaie, un outil _ main. etc. pourrait causer un incendie. En effet, les reglementsamericains Hazardous Material Regulations (HMR) du US Department of Transportation inter-disent le transport d'un bloc-pile ou d'une pile clans tout moyen de transport commercial ouaeronef (que ce soit clans une valise ou le bagage de cabine) SAUF s'ils sent bien proteg6scentre les courts-circuits. On dolt donc s'assurer, Iorsqu'on transporte un bloc-pile ou une pilesepar6ment, de bien proteger et isoler les bomes centre tout materiau qui risque d'entrer encontact avec eux et de causer un court-circuit.
Sceau RBRC McLe sceau RBRC Mc(Rechargeable Battery Recycling Corporation) sur la pile(ou le bloc-piles) au nickel-cadmium indique que les coQts de recyclage de la pile(ou du bloc-piles) 4 la fin de sa vie utile ont dej4 ete payes par DEWALT. Danscertaines regions, il est illegal de jeter les piles au nickel-cadmium usees avec lesordures ou dans la production municipale de dechets solides. Le programmeRBRC offre une solution ecologique 4 ce probleme. Aux ¢:tats-Unis, la RBRC Mc,en collaborationavec DEWALT et d'autres societ6s utilisatrices de piles, a mis sur pied des programmes facilitantla collecte des piles au nickel-cadmium usees. Afin de proteger I'environnement et de conservernos ressources naturelles, les utilisateurs de piles sont encourages 4 retourner les piles aunickel-cadmium usees 4 un centre de service DEWALT autorise ou 4 leur detaillant local pourleur recyclage. IIs peuvent egalement se renseigner aupr&_sde leur centre de recyclage localqui leur indiquera 4 quel site deposer les piles usees.RBRC Mcest une marque de commerce de I'organisme am_ricain Rechargeable Battery RecyclingCorporation.
Consignes de s_curit_ importantes pour les chargeursCONSERVER CES CONSIGNES : Ce manuel contient des consignes de securite importantespour les chargeurs.• Avant d'utiliser le chargeur, lire toutes les censignes et tousles marquages de securite sur
le chargeur, le bloc-piles et le produit utilisant le bloc-piles.ADANGER : Risques d'electrocution. Les bomes de charge regeivent une tension de 120volts. Ne pas les toucher avec des objets conducteurs.J_AVERTISSEMENT : Risques de choc electrique. Ne laisser aucun liquide s'infiltrer clans lechargeur.J_,MISE EN GARDE : Risques de br_lure. Pour reduire les risques de blessures, ne chargerque les piles au nickel-cadmium rechargeables DEWAL T. Les autres types de piles risquentd'eclater, et d'entrMner ainsi des blessures et des dommages.,&MISE EN GARDE : Dans certains cas, Iorsque le chargeur est branche clans la sourced'alimentation, il est possible que des corps etrangers court-circuitent les contacts de charge 4nu 4 I'interieur du chargeur. Les corps etrangers conducteurs, notamment la laine d'acier, lepapier d'aluminium ou toute accumulation de particules metalliques, doivent #tre tenus 4distance des cavites du chargeur. On dolt teujeurs debrancher le chargeur de la sourced'alimentation Iorsqu'il n'y a pas de bloc-piles clans la cavite. Debrancher le chargeur avant detenter de le nettoyer.• NE PAS tenter de charger le bloc-piles avec un chargeur autre que ceux du present
manuel Le chargeur et le bloc-piles sent specifiquement congus pour #tre utilisesconjointement.
• Ces chargeurs ne sont con¢us que pour charger des piles rechargeables DEWALT. Toutautre usage peut entrafner un incendie, un choc electrique ou une electrocution.
• Ne pas exposer le chargeur _ la pluie ni _ la neige.• Tirer sur la fiche et non sur le cordon pour debrancher le chargeur. Ainsi, on risque
moins d'endemmager la fiche et le cordon d'alimentation electrique.• S'assurer que le cordon est positionne de fa¢on _ emp#cher qu'on ne le pietine ou
qu'on ne trebuche dessus, ou bien qu'il soit expose _ des contraintes ou desdommages quelconques.
• On utflisera une rallonge seulement si c'est absolument necessaire. Une rallongeinadequate peut entrMner un incendie, un choc electrique ou une electrocution.
• Pour des raisons de securite, la rallonge dolt comporter un diametre de fil (AWG ouAmerican Wire Gauge) approprie. Plus le numero de jauge du fil est petit, plus la capacitedu c4ble est grande ; par exemple, un numero de jauge egal 4 16 correspond 4 une capaciteplus grande qu'un numero de jauge egal 4 18. Lorsqu'on utilise plusieurs rallonges pourebtenir la Iongueur totale, on dolt s'assurer que les ills de chacune d'elles sent au meins ducalibre minimum necessaire.
Calibre de fil minimum recommand_ pour les rallonges
Longueur totale de la rallonge25 pi 50 pi 75 pi 100 pi 125 pi 150 pi 175 pi7,6 m 15,2 m 22,9 m 30,5 m 38,1 m 45,7 m 53,3 mCalibre AWG
18 18 16 16 14 14 12
• Ne poser aucun objet sur le chargeur et ne pas poser le chargeur sur une surface nonrigide risquant d'obstruer les prises d'air et d'entra_ner ainsi une surchauffe internede I'appareil. Placer le chargeur 4 I'ecart de toute source de chaleur. II est aere par desfentes clans le haut et le bas du boftier.
• Ne pas utiliser le chargeur si le cordon d'alimentation ou la fiche sont endommages-- Les faire remplacer immediatement.
• Ne pas utiliser le chargeur s'il a re¢u un coup violent, si on I'a #chappe ou s'il a eteendommage d'une fa¢on quelconque. On dolt alors I'apporter 4 un centre de serviceautorise.
• Ne pas demonter le chargeur; il faut plutSt I'apporter _un centre de service autorises'il requiert de I'entretien ou des reparations. Un reassemblage inadequat risqued'entrMner un choc electrique, une electrocution ou un incendie.
• Debrancher le chargeur avant de tenter tout nettoyage. On reduit ainsi les risques dechocs electriques. Le seul fait d'enlever le bloc-piles ne reduit pas ces risques.
• NE JAMAIS tenter de raccorder deux chargeurs I'un 4 I'autre.• Le chargeur est con¢u pour #tre alimente par un courant electrique domestique
normal (120 volts). Ne tentez pas de I'alimenter au moyen de toute autre tension. Celane s'applique pas au chargeur pour poste mobile.
Utilisation du mode Tune.Up _c AutomatiqueLe mode Tune-Up McAutomatique equilibre les diff@ents elements du bloc-piles afin de luipermettre de fonctionner 4 pleine capacit& Les blocs-piles doivent _tre mis au point chaquesemaine ou apres 10 cycles de charge/decharge, ou quand ils n'offrent plus le m_merendement. Pour utiliser le mode Tune-Up _cAutomatique, placer le bloc-piles dans le chargeurpendant une p@iode d'au moins huit heures. Le chargeur execute les cycles suivants.
1. Le voyant rouge clignotera en continu, ce qui indique que le cycle de charge d'une dureed'une heure est amorc&
2. Lorsque le cycle de charge d'une duree d'une heure est termine, le voyant reste allumecontinuellement et ne clignote plus. Cela indique que le bloc est entierement charge et peut_tre utilis&
3. Lorsque le bloc demeure dans le chargeur apres la p@iode de charge initiale de une heure,le chargeur passe en mode Tune-Up McAutomatique. Ce mode se maintient pendant huitheures ou jusqu'a ce que les diff@ents elements de la pile soient equilibres. Le bloc-pilesest pr_t 4 _tre utilise et peut _tre retire en tout temps au cours du mode Tune-Up _c .
4. Une fois que le mode Tune-Up _c Automatique est termine, le chargeur passe en charge demaintien ; le voyant s'eteint quand le mode Tune-Up _cAutomatique est termin&
CONSERVER CES CONSlGNESPOUR UTILISATION ULTERIEURE
ChargeursL'outil utilise un chargeur DEWALT de 7.2, 9.6, 12.0, 14.4, ou 18 volts. Les piles peuvent _trechargees au moyen d'un chargeur DEWALT d'une heure ou de 15 minutes, ou d'un chargeurpour vehicules de 12 volts. S'assurer de lire toutes les consignes de securite avant d'utiliser lechargeur. Consulter le diagramme 4 la fin du present manuel afin de v@ifier la compatibilite duchargeur avec le bloc-pile.
M_thode de chargei&DANGER : Risques d'electrocution. Les bornes de charge regoivent une tension de 120volts. Ne pas les toucher avec des objets conducteurs.1. Brancher le chargeur 4 une prise de courant appropriee (Fig. 2).2. Inserer le bloc-piles dans le chargeur. Le voyant rouge (recharge) clignotera
continuellement, ce qui indique que le cycle de charge est amorc&3. Le bloc-piles est compl&;tement charge Iorsque le voyant rouge reste allume
continuellement. Le bloc-piles est alors completement charge et on peut I'utiliser ou lelaisser dans le chargeur.
Fonctionnement du voyantCHARGEMENT DUBLOC-PILES ................................ _ _ _ _ _ _ _ _ _ _ _
CHARGI_ _, BLOC .......................
RETARDEMENT BLOC-PILESCHAUD/FROID ............................. _ [] _ [] _ [] _ [] _ []
REMPLACER LE BLOC-PILES... _ _ ® _ ® ® ® O ® _ _ _ _ _ _ _ _ _ _ •
SOURCE D'ALJMENTATIONiNADEQUATE ............................... _ _ ® O _ _ ® ® _ ® _ _ll _
Indicateurs de chargeCertains chargeurs sont con(,_us pour detecter certains problemes pouvant alt@er lefonctionnement des blocs-piles. Les problemes sont signales par le clignotement rapide duvoyant rouge. Si cela se produit, reintroduire le bloc-piles dans le chargeur. Si le problemepersiste, essayer un autre bloc-piles pour determiner si le chargeur est en bon etat. Si la chargedu nouveau bloc-piles se fait sans probleme, le bloc original est defectueux et il faut le retourner4 un centre de service ou 4 un site de collecte pour qu'il soit recycl& Si I'indication de pannepersiste avec le nouveau bloc-piles, faire tester le chargeur 4 un centre de service autorise.
RETARDEMENT- BLOC-PILES CHAUD/FROID
Certains chargeurs sont munis d'une fonction de retardement en raison d'un bloc-pileschaud/froid : Iorsque le chargeur detecte une pile chaude, il declenche automatiquement unretardement -- bloc-piles chaud, interrompant la charge jusqu'a ce que la pile ait refroidi.Lorsque les piles sont refroidies, le chargeur passe automatiquement en mode de chargementdu bloc. Cette fonction permet de maximiser la vie utile des piles. Lorsque le chargeur est enmode de retardement en raison du bloc-piles chaud, le voyant rouge clignote en emettantalternativement des signaux de lumiere longs et brefs.
SOURCE D'ALIMENTATION INAD#QUATE
Certains chargeurs comportent un indicateur de source d'alimentation defectueuse. Lorsque lechargeur est utilise avec certaines sources d'alimentation portatives, comme des gen@atricesou des convertisseurs c.c.-c.a., il peut cesser de fonctionner temporairement ; le t_moin rouge_mettant alors un clignotements constitue de deux signaux rapides suivis d'une pause.Cela indique que la source d'alimentation est hors limites.
BLOC-PILES LAISSI_ DANS LE CHARGEUR
On peut laisser le chargeur et le bloc-piles branches avec le voyant rouge allume indefiniment.Le chargeur maintiendra le bloc-piles completement charg&NOTA : Un bloc-piles se decharge lentement hors du chargeur. S'il n'etait pas alimente par lacharge de maintien, il faudrait peut-_tre le charger de nouveau avant de I'utiliser. Un bloc-pilespeut egalement se decharger lentement si on le laisse dans un chargeur qui n'est pas branche4 une source de courant c.a. appropriee.BLOCS-PILES FAIBLES : Les chargeurs peuvent egalement detecter si des piles sont faibles.Celles-ci sont utilisables mais on ne dolt pas s'attendre 4 ce qu'elles offrent le m_me rendement.Pour signaler qu'un bloc-piles est faible, le chargeur emet huit bips rapides environ 10secondes apres qu'on y a insere le bloc. Le chargeur commence ensure 4 charger les pilesjusqu'& leur capacite maximale dans les circonstances.
Notes importants concernant le chargement1. Pour Line dur_,e de vie prolongee et des performances optimales, recharger le bloc-piles 4
une temp@ature ambiante de 18° 4 24 °C (65 °F 4 75 °F ). NE PAS recharger le bloc-pilesdans un lieu ou la temp@ature ambiante est inf@ieure 4 +4.5 °C (+40 °F), ou sup@ieure4 +40.5 °C (+105 °F). C'est important pour prevenir tout dommage serieux au bloc-piles.
2. Le chargeur et son bloc-piles peuvent devenir chaud au toucher pendant le rechargement.C'est normal et ne represente en aucun cas une defaillance du produit. Pour faciliter lerefroidissement du bloc-piles apres usage, eviter de laisser le chargeur ou le bloc-piles laou la temp@ature ambiante est elevee comme dans un hangar metallique ou une cara-vane non isolee.
3. Si le bloc-piles ne se recharge pas correctement :a. Verifier le courant 4 la prise en y branchant une lampe ou tout autre appareil.b. V@ifier que la prise n'est pas commandee par un interrupteur qui coupe le courant en
eteignant les lumieres.c. Deplacer le chargeur et le bloc-piles dans un lieu ou la temp@ature ambiante est
entre environ 18° et 24 °C (65 °F et 75 °F).d. Si le probleme persiste, ramener I'appareil, le bloc-piles et le chargeur 4 un centre de
service local.
4. Recharger le bloc-piles Iorsqu'il ne produit plus assez de puissance pour effectuer un tra-vail qu'il faisait facilement auparavant. NE PAS CONTINUER 4 utiliser dans ces condi-tions. Suivre la methode de rechargement. II est aussi possible de recharger partiellementun bloc-piles vide si necessaire sans effet adverse pour le bloc-piles.
5. Sous certaines conditions, Iorsque le chargeur est enfiche au bloc d'alimentation, les con-tacts de charge exposes 4 I'int@ieur du chargeur peuvent _tre court-circuites par descorps etrangers. Les corps etrangers de nature conductrice telle que, mais pas limite a, lapaille de fer, les feuilles d'aluminium, ou tout accumulation de particules metalliquesdoivent _tre tenus eloignes des cavites du chargeur. Toujours debrancher le chargeur dubloc d'alimentation Iorsque le bloc-pile n'y est pas insere ou avant de le nettoyer.
6. Ne pas congeler ou immerger le chargeur de pile dans I'eau ou tout autre liquide.A A VERTISSEMENT: Risques de choc electrique. Ne jamais laisser de liquide s'infiltrer 4 rin-terieur du chargeur afin d eviter les risques de choc electrique.ZcMISE EN GARDE : Ne jamais tenter dbuvrir le bloc-piles pour quelque raison que ce soit.Si le boftier plastique du bloc-piles casse ou se fend, le retoumer 4 un centre de service poury #tre recycle.
MoteurCet outil DEWALT est muni d'un moteur fabrique par DEWALT. S'assurer que le blocd'alimentation correspond 4 I'indication sur la plaque signaletique.Une chute de tension de plus de 10% entrafnera une perte de puissance et une surchauffe.Tousles outils DEWALT font I'objet d'essais en usine ; si I'outil ne fonctionne pas, v@ifier lebloc-piles.
FONCTIONNEMENT
Interrupteur (a vitesse variable) (Fig. 3)BOUTON DE VERROUILLAGE ET GACHETTE
Votre scie est equipee d'un bouton de verrouillage (B).Pour verrouiller la g_chette, appuyer sur le bouton de verrouillage (Fig. 3). Toujours ver-rouiller la g4chette (A) avant de transporter ou ranger I'outil pour eliminer tout demarrage acci-dentel. Le bouton de verrouillage est rouge Iorsqu'il est inactif (deverrouille).Pour d_verrouiller la g_chette, appuyer sur le bouton de verrouillage (Fig. 3). Pousser lag4chette pour mettre le moteur en marche. Degager la g4chette pour arr_ter le moteur.REMARQUE : Cet outil n'est pas equipe d'un bouton de verrouillage pour le maintenir en posi-tion de marche, et ne dolt en aucune maniere _tre verrouille par tout autre moyen.La g4chette 4 vitesse variable offre une grande versatilit& Plus loin la g4chette est pousseeplus grande est la vitesse atteinte par la scie.Z&MISE EN GARDE : La vitesse tres lente n'est recemmande que pour debuter une coupe.L'utilisation prolongee d'une vitesse lente pourrait endommager la scie.
Installation et retrait du bloc.pilesNOTA : S'assurer que le bloc-piles est entierement charg&_, MISE EN GARDE : Verrouiller la g4chette avant de retirer ou installer la pile.
Pour installer le bloc-piles clans la poign_e de I'outil, aligner la base de I'outil sur la rainure 4I'interieur de la poignee et faire glisser le bloc fermement dans la poignee jusqu'& ce qu'un son deverrouillage se fasse entendre (Fig. 4).

Pour retirer le bloc-piles de I'outil, appuyer sur les boutons de degagement et tirer fermementsur le bloc-piles pour le retirer de la poignee de routil. L'ins@er dans le chargeur tel qu'indique dansla section du present manuel qui traite du chargeur.
Installation et retrait des lamesII existe diff@entes Iongueur de lames. Utiliser la lame appropriee all travail en cours. LaIongueur de la lame dolt 6tre sup@ieure gt 3-1/2" (89mm) et depasser la grandeur du patin etI'epaisseur de la piece a decouper. Ne pas utiliser de lames a scie sauteuse avec cet outil._AVERTI$$EMENT : Risques de coupure. Pendant la coupe, la lame peut se briser si saIongueur n'est pas superieure a celle du patin et de la piece a decouper (Fig. 5). fl y a alorsrisques de dommages corporels et d'endommagement du patin et de la piece a travailler.Z&MISE EN GARDE : VERROUILLER LA G,4CHETTE ET RETIRER LE BLOC-PILES.
POUR INSTALLER LA LAME SUR LA SCIE
1. Lever le levier (C) de degagement de la bride de serrage de la lame (Fig. 6).2. Ins@er la tige de la lame par I'avant.3. Rabaisser le levier (C) de degagement de la bride de serrage de la lame.4. Remarque la lame peut 6tre installee a renvers pour une coupe au-ras (Fig. 10).
POUR RETIRER LA LAME DE LA SClE
_MISE EN GARDE : Risques de br_lure. Ne pas toucher la lame immediatement apresusage. Tout contact avec la lame pose des risques de blessure.
1. Lever le levier de degagement de la bride de serrage de la lame.2. Retirer la lame.
Coupe avec la lame en position horizontale (Fig. 7)II se peut que votre scie soit ou pas equipGe d'un serre-lame horizontal. Le fait d'installer lalame horizontalement permet de couper au raz du sol, d'un mur ou d'un plafond, la off la lib-erte de manoeuvre est limitee. S'assurer de bien presser le patin contre la structure pour eviterles rebonds.
Patin r_glable (Fig. 8)t&MISE EN GARDE : VERROUILLER LA G,4CHETTE ET RETIRER LA PILE.
Votre scie peut venir avec ou sans patin reglable. Le patin se regle afin de limiter la profondeurde coupe. Saisir la scie en la renversant. Pousser le bouton sur la poignee et faire glisser lepatin dans I'une des trois positions, puis relacher le bouton.AMISE EN GARDE : Risques de coupure. Pour eviter de perdre son contrSle, ne jamais utilis-er I'eutil sans son patin.
Sciage (Figure 9)_A VERTISSEMENT : Toujours porter des lunettes de protection pendant I'utilisation de cetoutiL
_A VERTI$$EMENT : Prendre des precautions supplementaires pour toute deceupe a faireen direction de rutilisateur. Maintenir la scie fermement a deux mains pendant utilisation.Avant toute decoupe de tout type de mat@iel, s'assurer qu'il est ancre et fixe solidement poureviter tout deplacement. Approcher legerement la lame de la pi&_cea decouper, mettre le moteuren marche et attendre qu'il prenne sa vitesse maximale avant d'appliquer toute pression.Chaque fois que possible, le patin de la scie dolt 6tre maintenu fermement contre la pi&_ceadecouper. Cela evite que la scie saute ou vibre et minimise les bris de lame. Toute decoupeappliquant de la pression sur la lame comme les coupes angulaires ou de contours augmentele potentiel de vibrations, rebonds et bris de lame._,AVERTI$$EMENT : Prendre des precautions supplementaires pour decouper au-dessusde la t#te, et faire particufierement attention aux ills electriques qui pourraient y #tre dis-simules. Anticiper toute chute de branches eu debris._&AVERTISSEMENT : Verifier qu'il n' existe pas sur la zone de travail de tuyaux de gaz, canal-isatiens d'eau ou ills electriques caches avant de commencer teute coupe aveugle ou enplongee. Tout manquement a cette clause augmente les risques d'explosion, de dommagesmateriels, chocs electriques, et/ou de dommages corporels serieux.
SClAGE AU-RAS (FIGURE 10)La forme compacte du boftier du moteur et de la broche permet des coupes extr_mement pre-cises des planchers, coins et tout autre endroit delicat.
COUPES INTERNE/EN PLONGI_E - BOIS SEULEMENT (FIG. 11)
II faut tout d'abord, pour une coupe interne, mesurer la surface a decouper et la delimiterclairement au crayon, a la craie ou pointe a tracer. Utiliser la lame appropriee au travail afaire. La Iongueur de la lame dolt 6tre sup@ieure a 3-1/2" (89mm) et depasser la grandeurdu patin et I'epaisseur de la piece a decouper. Ins@er la tige de la lame dans sa bride deserrage. Puis incliner la scie vers I'arri@e jusqu'a ce que le bord arriere du patin appuie surla surface a travailler et que la lame la depasse. Mettre alors le moteur en marche, enpermettant toujours a la lame de prendre sa pleine vitesse. Maintenir la poignee fermementtout en donnant un mouvement lent mais delib@6 a la scie vers le haut. La lame commencera
a entamer le mat@iau. S'assurer que la lame a bien completement traverse le mat@iau avantde continuer la coupe interne.REMARQUE : Dans les endroits ou la visibilite de la lame est limitee, utiliser le bord du patincomme guide. Toute ligne de coupe dolt continuer au-dela de la coupe a effectuer.
D#COUPE DU MI_TAL (FIGURE 12)Cet outil a des capacites de coupe diff@entes selon le type de lames utilisees et de metala decouper. Utiliser une lame fine pour les metaux ferreux et epaisse pour les metaux nonferreux. Pour la tSle mince, il est conseille d'arrimer du bois sur les deux cStes de la tSlepour assurer une coupe nette et reduire tout risque de vibrations ou dechirure de la tSle. Nejamais forcer sur les lames pour augmenter leur duree de vie et reduire les coQts lies a leurchangement.REMARQUE : II est gen@alement recommande pour les decoupes du metal d'enduire d'unleger film d'huile ou tout autre lubrifiant la ligne precedant la decoupe pour faciliter I'op@ationet augmenter la duree de vie de la lame.
ENTRETIEN
NettoyageINSTRUCTION DE NETTOYAGE DU CHARGEUR
_, AVERTISSEMENT : Risques de choc electrique. Debrancher le chargeur avant tout nettoy-age. Toute salete ou graisse sur la partie exteme du chargeur peut #tre nettoyee a raide d'unchiffon ou d'une brosse non metallique. Ne pas utiliser d'eau ou tout autre liquide nettoyant.
LubrificationVotre outil a ete parfaitement lubrifie avant son depart d'usine. Dans les deux a six mois, selonla frequence d'utilisation, ramener ou envoyer I'outil a un Centre de service ou un centre dereparation autorise pour nettoyage complet, inspection et lubrification. Les outils utilises con-stamment pour des travaux de production necessiteront d'etre lubrifies plus souvent. Les out-ils inutilises pendant des p@iodes prolongees doivent _tre relubrifies avant reutilisation.
R_parationsPour assurer la S¢:CURIT¢: et la FIABILIT¢: du produit, les centres de service autorises ouautres services de reparation competents doivent effectuer les reparations, I'entretien et lereglage. Toujours utiliser des pieces de rechange identiques.
AccessoiresDes accessoires recommandes pour I'utilisation avec routil sont disponibles gt un cot:it sup-plementaire aupres du detaillant ou du centre de service autorise local. Afin d'obtenir de I'aidepour se procurer un accessoire destine a cet outil, communiquer avec : DEWALT IndustrialTool Co., 701 East Joppa Road, Baltimore, MD 21286._MISE EN GARDE : L'utilisation de tout autre accessoire non recommande avec cet outil
pourra# _tre dangereux.
Garantie limit_e de trois ansDEWALT reparera, sans frais, tout produit defectueux cause par un defaut de mat@iel ou defabrication pour une p@iode de trois arts a compter de la date d'achat. La presente garantiene couvre pas les pieces dont la defectuosite a ete causee par une usure normale ou I'usageabusif de routil. Pour obtenir de plus amples renseignements sur les pieces ou les reparationscouvertes par la presente garantie, visiter le site www.dewalt.com ou composer le 1 800 433-9258 (1 800 4-DEWALT). Cette garantie ne s'applique pas aux accessoires et ne vise pas lesdommages causes par des reparations effectuees par un tiers. Cette garantie conf@e desdroits legaux particuliers a racheteur, mais celui-ci pourrait aussi beneficier d'autres droits vari-ant d'un etat ou d'une province a I'autre.
En plus de la presente garantie, les outils DEWALT sont couverts par notre :
CONTRAT D'ENTRETIEN GRATUlT D'UN AN
DEWALT entretiendra I'outil et remplacera les pi&_cesusees au cours d'une utilisation normaleet ce, gratuitement, pendant une p@iode d'un an a compter de la date d'achat.
CONTRAT D'ENTRETIEN GRATUlT DE DEUX ANSSUR LES BLOC-PILES XRt :_c
DC9096, DC9091 et DC9071, et la
GARANTIE DE REMBOURSEMENT DE 90 JOURS
Si racheteur n'est pas enti@ement satisfait, pour quelque raison que ce soit, du rendement deI'outil electrique, du laser ou de la cloueuse DEWALT, celui-ci peut le retourner, accompagned'un regu, dans les 90 jours a compter de la date d'achat pour obtenir un remboursement inte-gral, sans aucun problg_me.
PRODUlT RENOVE : Tout produit renove est couvert par une garantie gratuite d'entretien d'unan. Les garantie de remboursement sous 90 jours et garantie limitee de trois ans ne s'ap-pliquent pas aux produits renoves.
REMPLACEMENT GRATUlT DES ETIQUETTES D'AVERTISSEMENT : Si les etiquettesd'avertissement (fig. 13) deviennent illisibles ou sont perdues, composer le 1 800 4-DEWALTpour en obtenir le remplacement gratuit.
Normas generales de seguridad - Para todas lasherramientas que funcionan con bateriaA DVERTENCIA: Lea todas las instrucciones hasta comprenderlas. No
ajustarse alas instrucciones siguientes puede set causa de cheque electrico,
incendio o lesiones graves.
CONSERVE ESTAS INSTRUCCIONES
AREA DE TRABAJO
• Mantenga el 4tea de trabajo limpia y bien iluminada. Las bancadas desordenadas y laszonas oscuras propician los accidentes.
• No opere herramientas el#ctricas en atmdsferas explosivas, como en presencia deI[quidos, gases o polvos inflamables. Las herramientas electricas producen chispas quepueden originar la ignicidn del pore o los vapores.
• Mientras opere una herramienta electrica, mantenga lejos a los observadores, nifiosy visitantes. Las distracciones pueden ocasionar que pierda el control
SEGURIDAD ELI_CTRICA
• No maltrate el cable. Nunca Ileve la herramienta por el cable. Mantenga el cablealejado de las fuentes de calor, el ace#e, las orillas afiladas o las piezas enmovimiento. Cambie inmediatamente los cables dafiados. Los cables dafiados puedenprovocar un incendio.
• Una herramienta que funciona con bater[as integrales o con una bater[a separadasdlo deben recargarse con el cargador de bater[as especificado. Un cargador puedeser adecuade para un tipo de baterfas y, sin embargo, crear riesgo de incendio cuando seusa con otras.
• Las herramientas que operan con bater[as se deben utilizar sdlo con bater(asdise#adas especialmente. La uhTizacidn de otras baterfas comporta riesgo de incendio.
SEGURIDAD PERSONAL
• AI utilizar una herremienta el#ctrica, est# atento, conc#ntrese en Io que hace y apliqueel sentido comdn. No utilice la herramienta si se encuentra fatigado o bajo lainfluencia de drogas, alcohol o f4rmacos. Mientras se utilizan herramientas electricas,basta un instante de distraccidn para sufrir lesiones graves.
• Lleveropaadecuada.Noutfliceropasueltanijoyas.Recdjaseelcabellolargo.Mantengael cabello, la ropa y los guantes apartados de las piezas en movimiento. Las partesmdviles pueden atrapar las prendas de vestir sueltas, las joyas y el cabello. Los orificios deventilacidn suelen cubrir piezas en movimiento, por Io que tambien se deben evitar.
• Evite puestas en marcha accidentales. Antes de insertar la bater[a asegE_rese de queel interruptor este en posicidn de bloqueo o de apagado. Transportar herramientas conel dedo sobre el interrupter o insertar la baterfa en la herramienta con el interrupter enposicidn de encendido favorece los accidentes.
• Antes de poner en marcha la herramienta, retire las Ilaves de ajuste. Una Ilave que sedeje en una pieza giratoria de la herramienta puede provocar lesiones.
• No ponga en peligro su estabilidad. Mantengase siempre bien apoyado y equilibredo. Unbuen apoyo y equilibrio permiten controlar meier la herramienta si se produce alg#n imprevisto.
• Utflice elequipo de seguridad. Lleve siempre lentes protectores. Cuande sea adecuado,tambien se debe usar mascarilla antipolvo, zapatos de suela antideslizante, casco o protectoresauditives.
USO Y CUIDADOS DE LA HERRAMIENTA
• Utilice abrazaderas u otro elemento adecuado para sujetar y apoyar la pieza detrabajo en una plataforma estable. Sujetar la pieza con la mane o contra el cuerpo esinestable y facilita la perdida de control.
• No fuerce la herramienta. Utilice la herramienta correcta para carla aplicacidn. Laherramienta correcta hace el trabajo mejer y mbs segure dentre del range para el que se hadisefiado.
• No utilice la herramienta si elinterruptor no la enciende y apaga. Cualquier herramientaque no pueda controlarse con el interrupter es peligrosa y se debe reparar.
• Desconecte la bater[a de la herramienta o ponga elinterruptor en posicidn de bloqueoo de apagado antes de realizar ajustes, cambiar accesorios o guardar la herramienta.Estas medidas de seguridad prevenfiva reducen el riesge de pener en marcha laherramienta accidentalmente.
• Cuando no las utilice, guarde las herramientas fuera del alcance de los nifios o decualquier persona no capacitada. Las herramientas son petigrosas en manes de usuariosno capacitados.
• Cuando no utilice la bater(a, mantengala alejada de otros objetos met41icos tales como:clips, monedas, Ilaves, clavos, tornillos y otros objetos pequefios de metal que puedenhacer contacto entre una terminal y otra. Un cortocircuito entre terminales de baterfa puedeecasionar chispas, quemaduras e un incendio.
• Cuide las herramientas. Conserve las herramientas de corte afiladas y limpias. Unasherramientas adecuadamente cuidadas y con los bordes de corte afilados se deformanmenes y son mas faciles de controlar.
• Compruebe si las piezas mdviles se desalinean o deforman, si hay alguna pieza rotao cualquier otra circunstancia que pueda afectar la operacidn de la herramienta. $i laherramienta est4 dafiada, h4gala reparar antes de usarla. Muchos accidentes losprovocan unas herramientas mal cuidadas.
• Utilice dnicamente los accesorios recomendados pot el fabricante para su modelo.Un mismo accesorio puede ser adecuado para una herramienta, pero peligroso si se usaen otra.
SERVIClO
• El servicio a la herramienta sdlo debe realizarlo personal cualificado. El servicio omantenimiento realizados per personal no catificado puede dar come resultado un riesgode lesiones.
• AI proceder al mantenimiento de una herramienta, utilice dnicamente refaccionesidenticas. $iga las instrucciones de la seccion "Mantenimiento'" de este manual. Lautflizacidn de piezas no autorizadas o no respetar las Instrucciones de mantenimiento puedesuponer un peligro de cheque electrico o de lesiones.
Normas especificas de seguridad adicionales• Sujete la herramienta por/as superficies aislantes si Ileva a cabo una operacidn en
que la herramienta puede tocar un conductor oculto. El contacto con un conductoractive prevocara que las piezas metaticas de la herramienta conduzcan electricidad y queel operader reciba una descarga electrica.
• Mantenga las manos alejadas de las piezas en movimiento. Nunca ponga las manesen proximidad del area de corte.
• Seam4scautelosocuandocorteobjetosqueseencuentrenencimadeustedysobretodo ponga atencidn a los cables que se encuentren encima de Listed que podr[anestar ocultos. Tenga en cuenta las posibles trayectorias que seguirfan ramas y desechosal caerse.
• No opere esta herramienta durante per[odos largos de tiempo. La vibracidn causadaper la accidn de eperacidn de la herramienta puede causar lesienes permanentes a susdedos, manes y brazes. Use guantes para un meier amortiguamiento, descanse confrecuencia y limite el tiempo diario de use.
_PRECAUClON: Peligro de descarga electrica. Cuando aserruche muros, pisos u otroslugares que podrfan ocultar cables cargados, iNO TOQUE NINGUNA PARTE METALICA ENLA HERRAMIENTA! Sostenga la herramienta de su empufiadura y caja externa plasticas paraprevenir descargas electricas si acaso cortara un cable cargade con la sierra.APRECAUClON: Utilice una proteccidn auditiva apropiada durante el uso. En determi-nadas condiciones y con utflizaciones prolongadas, el ruido generado per este productopuede favorecer la perdida de audicidn.APRECAUClGN: Cuando no se use, guarde la herramienta en posicidn horizontalsobre una superficie estable, donde no interrumpa el paso o provoque una ca[da.Algunas herramientas con baterfas grandes se sostienen sobre la baterfa, pero pueden caerfacilmente.AADVERTENClA: Parte del pore generado al lijar, serrar, esmerilar o taladrar, as[ come alreatizar otras actividades del sector de la censtruccidn, contienen preductes qufmices quepueden preducir cancer, defectos cengenitos u otras afecciones repreductivas. Ejemplos deesas substancias qufmicas sen:
• plomo procedente de pinturas basadas en plomo,• dxido de silicio cristalino procedente de ladrillos, cemento y otros productos de
mamposterfa, y• arsenico y creme procedentes de madera tratada qufmicamente (CCA).
El peligro derivado de estas exposiciones que usted enfrente varfa en funcidn de la frecuenciacon que se realice este tipo de trabajo. Para reducir la exposicidn a esas sustancias qufmicas:trabaje en una zona bien ventilada y Ilevando equipos de seguridad aprobados, comemascarillas antipolvo especialmente disefiadas para filtrar partfculas microscdpicas.• Evite el contacto prolongado con elpolvo procedente del lijado, serrado, esmerilado
y taladrado electricos, as[ como de otras actividades del sector de la construccidn.Lleve ropa protectora y lave con agua y jabdn las zonas expuestas. Si permite que elpore se introduzca en la boca u ojos o quede sobre la piel, puede favorecer la absorcidnde productos qufmicos peligrosos.
ADVERTENClA: La utflizacidn de esta herramienta puede originar pore o dispersarlo, Io quepodrfa causar dafios graves y permanentes al sistema respiratorio, as[ come otras lesiones.Siempre use proteccidn respiratoria aprebada per NIOSH/OSHA, apropiada para su use encondiciones de exposicidn al pore. Procure que las partfculas no se preyecten directamentesobre su rostro o su cuerpo.• Laetiquetade_aherramientapuedeinC_uir__ss_mb___ssiguientes.Ac_ntinuaCi_nseindican
los sfmbolos y sus definiciones.V .............. volts A ............ amperesHz ............ hertz W .......... watts
min ............ minutes "%, ........ corriente alterna
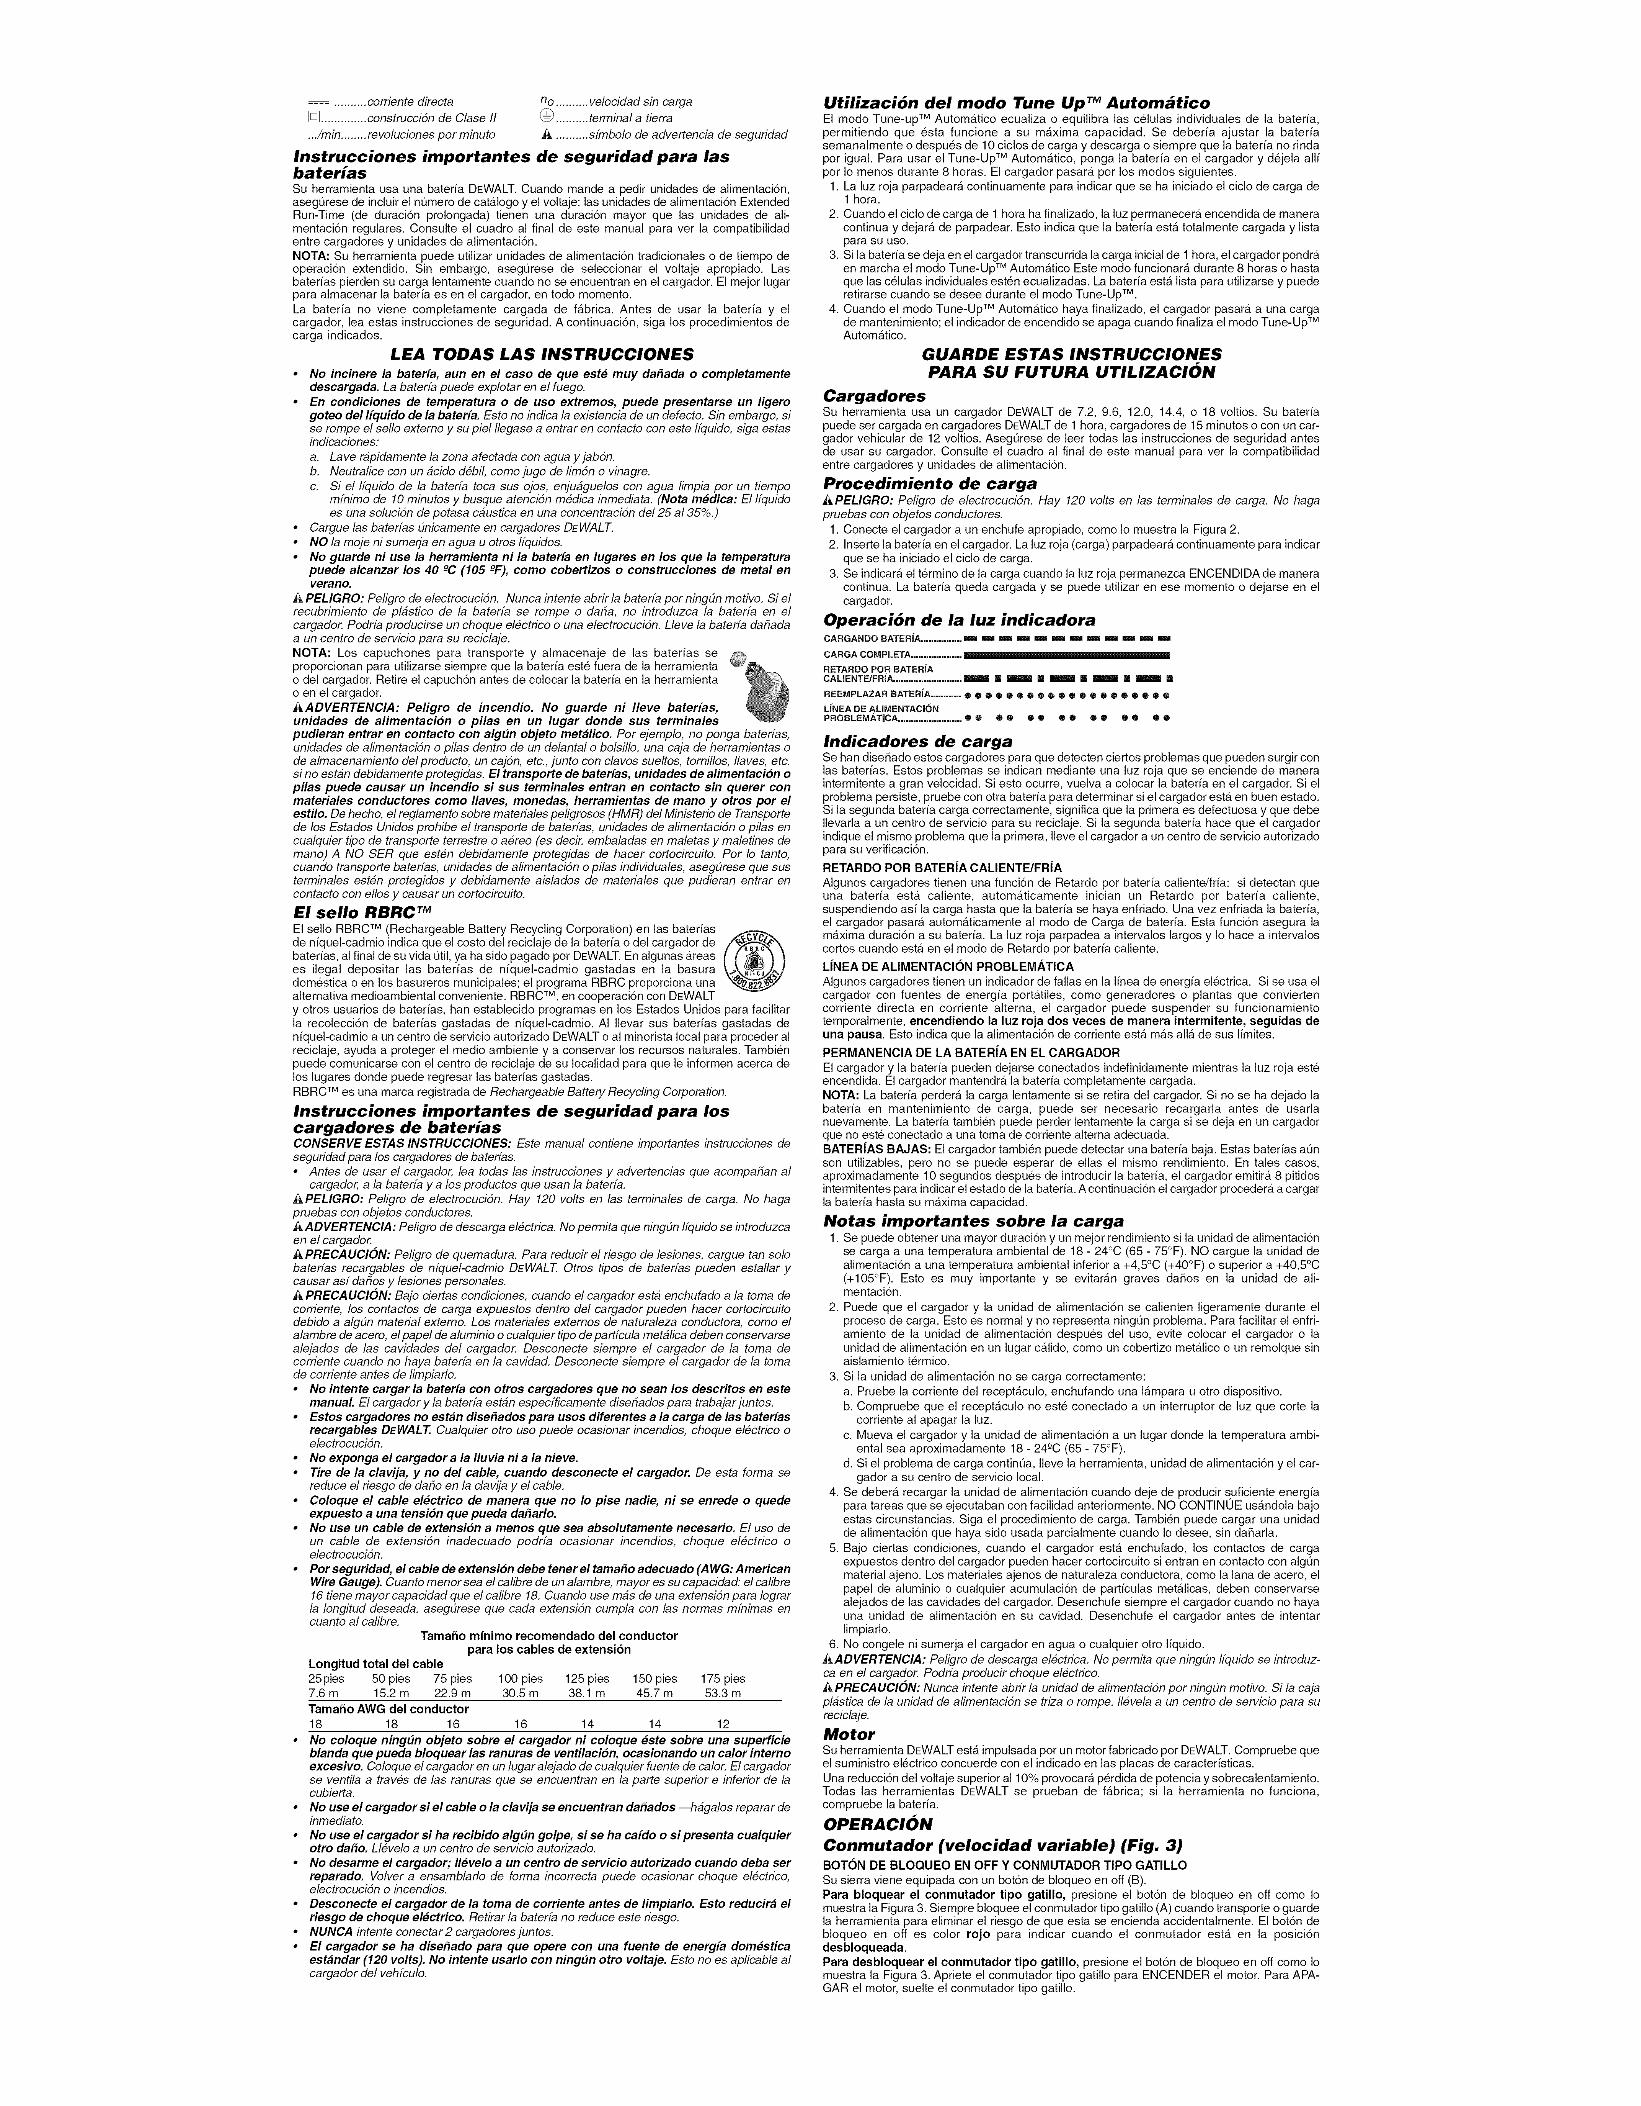
.... . ......... corriente directa no .......... velocidad sin carga[] .............. construccidn de Clase II _ .......... terminal a tierra
.../min ........ revoluciones por minuto _, .......... sfmbolo de advertencia de seguridad
Instrucciones importantes de seguridad para lasbateriasSu herramienta Lisa una bateria DEWALT. Cuando mande a pedir unidades de alimentacion,asegurese de incluir el nOmero de catalogo y el voltaje: las unidades de alimentacion ExtendedRun-Time (de duraci6n prolongada) tienen una duracion mayor que las unidades de ali-mentacion regulares. Consulte el cuadro al final de este manual para ver la compatibilidadentre cargadores y unidades de alimentacion.NOTA: Su herramienta puede utilizar unidades de alimentacion tradicionales o de tiempo deoperacion extendido. Sin embargo, asegurese de seleccionar el voltaje apropiado. Lasbaterias pierden su carga lentamente cuando no se encuentran en el cargador. El mejor lugarpara almacenar la bateria es en el cargador, en todo momento.
La baterfa no viene completamente cargada de fAbrica. Antes de usar la bateria y elcargador, lea estas instrucciones de seguridad. A continuaci6n, siga los procedimientos decarga indicados.
LEA TODAS LAS INSTRUCCIONES
• No incinere la bater[a, aun en el caso de que este muy da#ada o completamentedescargada. La baterfa puede explotar en el fuego.
• En condiciones de temperatura o de uso extremos, puede presentarse un ligerogoteo del l[quido de la bater[a. Esto no indica la existencia de un defecto. Sin embargo, sise rompe el sello externo y su piel Ilegase a entrar en contacto con este Ifquido, siga estasindicaciones:
a. Lave r#pidamente la zona afectada con agua yjab6n.b. Neutralice con un #cido debil, come jugo de lim6n o vinagre.
c. Si el Ifquido de la baterfa toca sus ojos, enjuaguelos con agua limpia per un tiempomfnimo de 10 minutos y busque atenci6n medica inmediata. (Nota m#dica: El Ifquidoes una soluci6n de potasa c#ustica en una concentraci6n de125 a135%.)
• Cargue las baterfas Onicamente en cargadores DEWALT.• NO la moje ni sumerja en agua u otros Ifquidos.• No guarde ni use la herramienta ni la bater[a en lugares en los que la temperatura
puede alcanzar los 40 -oC(105 -°F), como cobertizos o construcciones de metal enverano.
Z¢PELIGRO: Peligro de electrocucidn. Nunca intente abrir la baterfa per ningOn motive. Si elrecubrimiento de plastico de la baterfa se rompe o da#a, no introduzca la baterfa en elcargador. Podrfa producirse un choque electrico o una electrocuci6n. Lleve la baterfa da#adaa un centre de servicio para su reciclaje.NOTA: Los capuchones para transporte y almacenaje de las baterias seproporcionan para utilizarse siempre que la bateria este fuera de la herramientao del cargador. Retire el capuch6n antes de colocar la bateria en la herramientao en el cargador.AADVERTENCIA: Peligro de incendio. No guarde ni Ileve baterfas,unidades de alimentaci6n o pilas en un lugar donde sus terminalespudieran entrar en contacto con algOn objeto met#lico. Per ejemplo, no ponga baterfas,unidades de alimentaci6n o pilas dentro de un delantal o bolsillo, una caja de herramientas ode almacenamiento del producto, un caj6n, etc., junto con clavos sueltos, tornillos, Ilaves, etc.si no estan debidamente protegidas. El transporte de baterfas, unidades de alimentaci6n opilas puede causar un incendio si sus terminales entran en contacto sin querer conmateriales conductores como Ilaves, monedas, herramientas de mano y otros pot elestilo. De hecho, el reglamento sobre materiales peligrosos (HMR) del Ministerio de Transportede los Estados Unidos prohibe el transporte de baterfas, unidades de alimentaci6n o pilas encualquier tipo de transporte terrestre o aereo (es decir, embaladas en maletas y maletines demano) A NO SER que esten debidamente protegidas de hacer cortocircuito. Per Io tanto,cuando transporte baterfas, unidades de alimentaci6n o pilas individuales, asegOrese que susterminales esten protegidos y debidamente aislados de materiales que pudieran entrar encontacto con ellos y causar un cortocircuito.
E1 sello RBRC TM
El sello RBRC TM (Rechargeable Battery Recycling Corporation) en las bateriasde niquel-cadmio indica que el costo del reciclaje de la baterfa o del cargador de j/'_baterias, al final de su vida util, ya ha sido pagado por DEWALT. En algunas Areases ilegal depositar las baterias de niquel-cadmio gastadas en la basuradomestica o en los basureros municipales; el programa RBRC proporciona unaalternativa medioambiental conveniente. RBRC TM, en cooperacion con DEWALTy otros usuarios de baterias, han establecido programas en los Estados Unidos para facilitarla recoleccion de baterias gastadas de niquel-cadmio. AI Ilevar sus baterias gastadas deniquel-cadmio a un centro de servicio autorizado DEWALT o al minorista local para proceder alreciclaje, ayuda a proteger el medio ambiente y a conservar los recursos naturales. Tambi_'npuede comunicarse con el centro de reciclaje de su Iocalidad para que le informen acerca delos lugares donde puede regresar las baterias gastadas.RBRC TM es una marca registrada de Rechargeable Battery Recycling Corporation.
Instrucciones importantes de seguridad para loscargadores de bateriasCONSERVE ESTAS INSTRUCCIONES: Este manual contiene importantes instrucciones deseguridad para los cargaderes de baterfas.• Antes de usar el cargader, lea todas las instrucciones y advertencias que acempa#an al
cargador, a la baterfa y a los preductos que usan la baterfa.i_,PELIGRO: Peligre de electrecuci6n. Hay 120 volts en las terminales de carga. No hagapruebas con objetos conductores._,ADVERTENClA: Peligro de descarga electrica. No permita que ning#n Ifquido se introduzcaen el cargador.i_,PRECA UClON: Peligro de quemadura. Para reducir el riesgo de lesiones, cargue tan solobaterfas recargables de nfquel-cadmio DEWALT. Otros tipos de baterfas pueden estallar ycausar asf da#os y lesiones personales.i_ PRECAUClON: Bajo ciertas condiciones, cuando el cargador esta enchufado a la toma decorriente, los contactos de carga expuestos dentro del cargador pueden hacer cortocircuitodebido a algOn material extemo. Los materiales externos de naturaleza conductor& come elalambre de acero, el papel de aluminio o cualquier tipo de partfcula metalica deben conservarsealejados de/as cavidades del cargader. Desconecte siempre el cargador de la toma decorriente cuando no haya baterfa en la cavidad. Desconecte siempre el cargader de la tomade cerriente antes de limpiarlo.• No intente cargar la bater[a con otros cargadores que no sean los descritos en este
manual El cargador y la baterfa estan especfficamente dise#ados para trabajar juntos.• Estos cargadores no est#n dise#ados para usos diferentes a la carga de las bater[as
recargables DEWALT. Cualquier otro use puede ocasionar incendios, cheque electrico oelectrocuci6n.
• No exponga el cargador a la Iluvia ni a la nieve.• Tire de la clavija, y no del cable, cuando desconecte el cargador. De esta forma se
reduce el riesgo de da#o en la clavija y el cable.• Coloque el cable electrico de manera que no Io pise nadie, ni se enrede o quede
expuesto a una tensi6n que pueda da#arlo.• No use un cable de extensi6n a menos que sea absolutamente necesario. El use de
un cable de extensi6n inadecuado podrfa ocasionar incendios, cheque electrico oelectrocuci6n.
• Pot seguridad, el cable de extensi6n debe tener el tama#o adecuado (AWG: AmericanWire Gauge). Cuanto menor sea el calibre de un alambre, mayor es su capacidad: el calibre16 tiene mayor capacidad que el calibre 18. Cuande use mas de una extensi6n para Iograrla Iongitud deseada, aseg#rese que cada extensi6n cumpla con las normas mfnimas encuanto al calibre.
TamaSo mfnimo recomendado del conductorpara los cables de extensi6n
Longitud total del cable25pies 50 pies 75 pies 100 pies 125 pies 150 pies 175 pies7.6 m 15.2 m 22.9 m 30.5 m 38.1 m 45.7 m 53.3 m
TamaSo AWG del conductor18 18 16 16 14 14 12
• No coloque ningOn objeto sobre el cargador ni coloque este sobre una superficieblanda que pueda bloquear las ranuras de ventilaci6n, ocasionando un calor internoexcesivo. Coleque el cargador en un lugar alejado de cualquier fuente de caler. El cargadorse ventila a traves de las ranuras que se encuentran en la parte superior e inferior de lacubierta.
• No use el cargador si el cable o la clavija se encuentran da#ados --hagalos reparar deinmediato.
• No use el cargador si ha recibido algOn golpe, si se ha ca|do o si presenta cualquierotto da#o. Llevele a un centre de servicie auterizade.
• No desarme el cargador; Ilevelo a un centro de servicio autorizado cuando deba setreparado. Volver a ensamblarlo de forma incorrecta puede ocasionar cheque electrico,electrocuci6n o incendios.
• Desconecte el cargador de la toma de corriente antes de limpiarlo. Esto reducir# elriesgo de choque electrico. Retirar la baterfa no reduce este riesgo.
• NUNCA intente cenectar2 cargadoresjuntes.• El cargador se ha dise#ado para que opere con una fuente de energ[a domestica
est#ndar (120 volts). No intente usarlo con ningOn otto voltaje. Esto no es aplicable alcargador del vehfculo.
Utilizaci6n del modo Tune Up TM AutomdticoEl modo Tune-up TM Automatico ecualiza o equilibra las celulas individuales de la bateria,permitiendo que esta funcione a su maxima capacidad. Se deberia ajustar la bateriasemanalmente o despues de 10 ciclos de carga y descarga o siempre que la bateria no rindapor igual. Para usar el Tune-Up TM Automatico, ponga la bateria en el cargador y dejela all/por Io menos durante 8 horas. El cargador pasarA por los modos siguientes.
1. La luz roja parpadeara continuamente para indicar que se ha iniciado el ciclo de carga de1 hora.
2. Cuando el ciclo de carga de 1 hora ha finalizado, la luz permanecera encendida de maneracontinua y dejara de parpadear. Esto indica que la bateria esta totalmente cargada y listapara su uso.
3. Si la bateria se deja en el cargador transcurrida la carga inicial de 1 hora, el cargador pondraen marcha el modo Tune-Up TM AutomAtico Este modo funcionara durante 8 horas o hastaque las celulas individuales esten ecualizadas. La bateria estA lista para utilizarse y puederetirarse cuando se desee durante el modo Tune-Up TM.
4. Cuando el modo Tune-Up TM AutomAtico haya finalizado, el cargador pasarA a una cargade mantenimiento; el indicador de encendido se apaga cuando finaliza el modo Tune-Up TM
Automatico.
GUARDE ESTAS INSTRUCCIONESPARA SU FUTURA UTILIZACI(_N
CargadoresSu herramienta usa un cargador DEWALT de 7.2, 9.6, 12.0, 14.4, o 18 voltios. Su bateriapuede ser cargada en cargadores DEWALT de 1 hora, cargadores de 15 minutos o con un car-gador vehicular de 12 voltios. Asegurese de leer todas las instrucciones de seguridad antesde usar su cargador. Consulte el cuadro al final de este manual para ver la compatibilidadentre cargadores y unidades de alimentacion.
Procedimiento de cargaAPELIGRO: Peligro de electrocucidn. Hay 120 volts en las terminales de carga. No hagapruebas con objetos conductores.
1. Conecte el cargador a un enchufe apropiado, como Io muestra la Figura 2.2. Inserte la bateria en el cargador. La luz roja (carga) parpadeara continuamente para indicar
que se ha iniciado el ciclo de carga.3. Se indicarA el termino de la carga cuando la luz roja permanezca ENCENDIDA de manera
continua. La bateria queda cargada y se puede utilizar en ese momento o dejarse en elcargador.
Operaci6n de la luz indicadoraCARGANDO BATERJA ................ m m _ _ _ _ m _ _ _ _
CARGA COMPLETA ....................
RETARDO POR BATER[ACAUENTE/FRIA ........................... _ [] _ [] _ [] _ [] _ []
REEMPLAZAR BATER[A ............ • • • O • ® O O O • @ • O O ® ® O ® ® O
L[NEA DE ALIMENTAC|ONPROBLEMAT|CA ......................... ® • • • _ ® • ® ® O _ _ ® ®
Indicadores de cargaSe hart dise_ado estos cargadores para que detecten ciertos problemas que pueden surgir conlas baterias. Estos problemas se indican mediante una luz roja que se enciende de maneraintermitente a gran velocidad. Si esto ocurre, vuelva a colocar la bateria en el cargador. Si elproblema persiste, pruebe con otra bateria para determinar si el cargador esta en buen estado.Si la segunda bateria carga correctamente, significa que la primera es defectuosa y que debeIlevarla a un centro de servicio para su reciclaje. Si la segunda bateria hace que el cargadorindique el mismo problema que la primera, Ileve el cargador a un centro de servicio autorizadopara su verificacion.
RETARDO POR BATER[A CALIENTE/FR[A
Algunos cargadores tienen una funci6n de Retardo por bateria caliente/fria: si detectan queuna bateria esta caliente, automAticamente inician un Retardo por bateria caliente,suspendiendo as/la carga hasta que la bateria se haya enfriado. Una vez enfriada la bateria,el cargador pasarA automaticamente al modo de Carga de bateria. Esta funcion asegura lamaxima duracion a su bateria. La luz roja parpadea a intervalos largos y Io hace a intervaloscortos cuando esta en el modo de Retardo por bateria caliente.
L|NEA DE ALIMENTACION PROBLEMATICA
Algunos cargadores tienen un indicador de [alias en la Iinea de energia electrica. Si se LIsa elcargador con fuentes de energia portatiles, como generadores o plantas que conviertencorriente directa en corriente alterna, el cargador puede suspender su funcionamientotemporalmente, encendiendo la luz roja dos veces de manera intermitente, seguidas deuna pausa. Esto indica que la alimentacion de corriente esta mas alia de sus limites.
PERMANENCIA DE LA BATER|A EN EL CARGADOR
El cargador y la bateria pueden dejarse conectados indefinidamente mientras la luz roja esteencendida. El cargador mantendra la bateria completamente cargada.NOTA: La bateria perdera la carga lentamente si se retira del cargador. Si no se ha dejado labateria en mantenimiento de carga, puede ser necesario recargarla antes de usarlanuevamente. La bateria tambien puede perder lentamente la carga si se deja en un cargadorque no este conectado a una toma de corriente alterna adecuada.BATERiAS BAJAS: El cargador tambien puede detectar una bateria baja. Estas baterias aunson utilizables, pero no se puede esperar de elias el mismo rendimiento. En tales casos,aproximadamente 10 segundos despues de introducir la bateria, el cargador emitira 8 pitidosintermitentes para indicar el estado de la bateria. A continuacion el cargador procedera a cargarla bateria hasta su maxima capacidad.
Notas importantes sobre la carga1. Se puede obtener una mayor duraci6n y un mejor rendimiento si la unidad de alimentaci6n
se carga a una temperatura ambiental de 18 - 24°C (65 - 75°F). NO cargue la unidad dealimentacion a una temperatura ambiental inferior a +4,5°C (+40°F) o superior a +40,5-°C(+105°F). Esto es muy importante y se evitaran graves da5os en la unidad de ali-mentacion.
2. Puede que el cargador y la unidad de alimentacion se calienten ligeramente durante elproceso de carga. Esto es normal y no representa ningOn problema. Para facilitar el enfri-amiento de la unidad de alimentacion despues del uso, evite colocar el cargador o launidad de alimentacion en un lugar calido, como un cobertizo metalico o un remolque sinaislamiento termico.
3. Si la unidad de alimentacion no se carga correctamente:a. Pruebe la corriente del receptaculo, enchufando una lampara u otro dispositivo.b. Compruebe que el receptaculo no este conectado a un interruptor de luz que corte la
corriente al apagar la luz.c. Mueva el cargador y la unidad de alimentacion a un lugar donde la temperatura ambi-
ental sea aproximadamente 18 - 24-°C (65 - 75°F).d. Si el problema de carga contint_a, Ileve la herramienta, unidad de alimentacion y el car-
gador a su centro de servicio local.4. Se debera recargar la unidad de alimentaci6n cuando deje de producir suficiente energia
para tareas que se ejecutaban con facilidad anteriormente. NO CONTINUE usandola bajoestas circunstancias. Siga el procedimiento de carga. Tambien puede cargar una unidadde alimentacion que haya sido usada parcialmente cuando Io desee, sin daSarla.
5. Bajo ciertas condiciones, cuando el cargador esta enchufado, los contactos de cargaexpuestos dentro del cargador pueden hacer cortocircuito si entran en contacto con algunmaterial ajeno. Los materiales ajenos de naturaleza conductora, como la lana de acero, elpapel de aluminio o cualquier acumulacion de particulas metalicas, deben conservarsealejados de las cavidades del cargador. Desenchufe siempre el cargador cuando no hayauna unidad de alimentacion en su cavidad. Desenchufe el cargador antes de intentarlimpiarlo.
6. No congele ni sumerja el cargador en agua o cualquier otro Iiquido.
AADVERTENClA: Peligro de descarga electrica. No permita que ningOn Ifquido se introduz-ca en el cargador. Podrfa producir choque electrico.i_ PRECA UClON: Nunca intente abrir la unidad de alimentaddn per ning#n motive. Si la cajaplastica de la unidad de alimentacidn se triza o rompe, Ilevela a un centro de servicio para sureciclaje.
MotorSu herramienta DEWALT esta impulsada por un motor fabricado por DEWALT. Compruebe queel suministro electrico concuerde con el indicado en las placas de caracteristicas.Una reduccion del voltaje superior a110% provocara perdida de potencia y sobrecalentamiento.Todas las herramientas DEWALT se prueban de fabrica; si la herramienta no funciona,compruebe la bateria.
OPERACION
Conmutador (velocidad variable) (Fig. 3)BOTON DE BLOQUEO EN OFF Y CONMUTADOR TIPO GATILLO
Su sierra viene equipada con un bot6n de bloqueo en off (B).Para bloquear el conmutador tipo gatillo, presione el boton de bloqueo en off como Iomuestra la Figura 3. Siempre bloquee el conmutador tipo gatillo (A) cuando transporte o guardela herramienta para eliminar el riesgo de que esta se encienda accidentalmente. El boton debloqueo en off es color rojo para indicar cuando el conmutador esta en la posiciondesbloqueada.Para desbloquear el conmutador tipo gatillo, presione el boton de bloqueo en off como Iomuestra la Figura 3. Apriete el conmutador tipo gatillo para ENCENDER el motor. Para APA-GAR el motor, suelte el conmutador tipo gatillo.
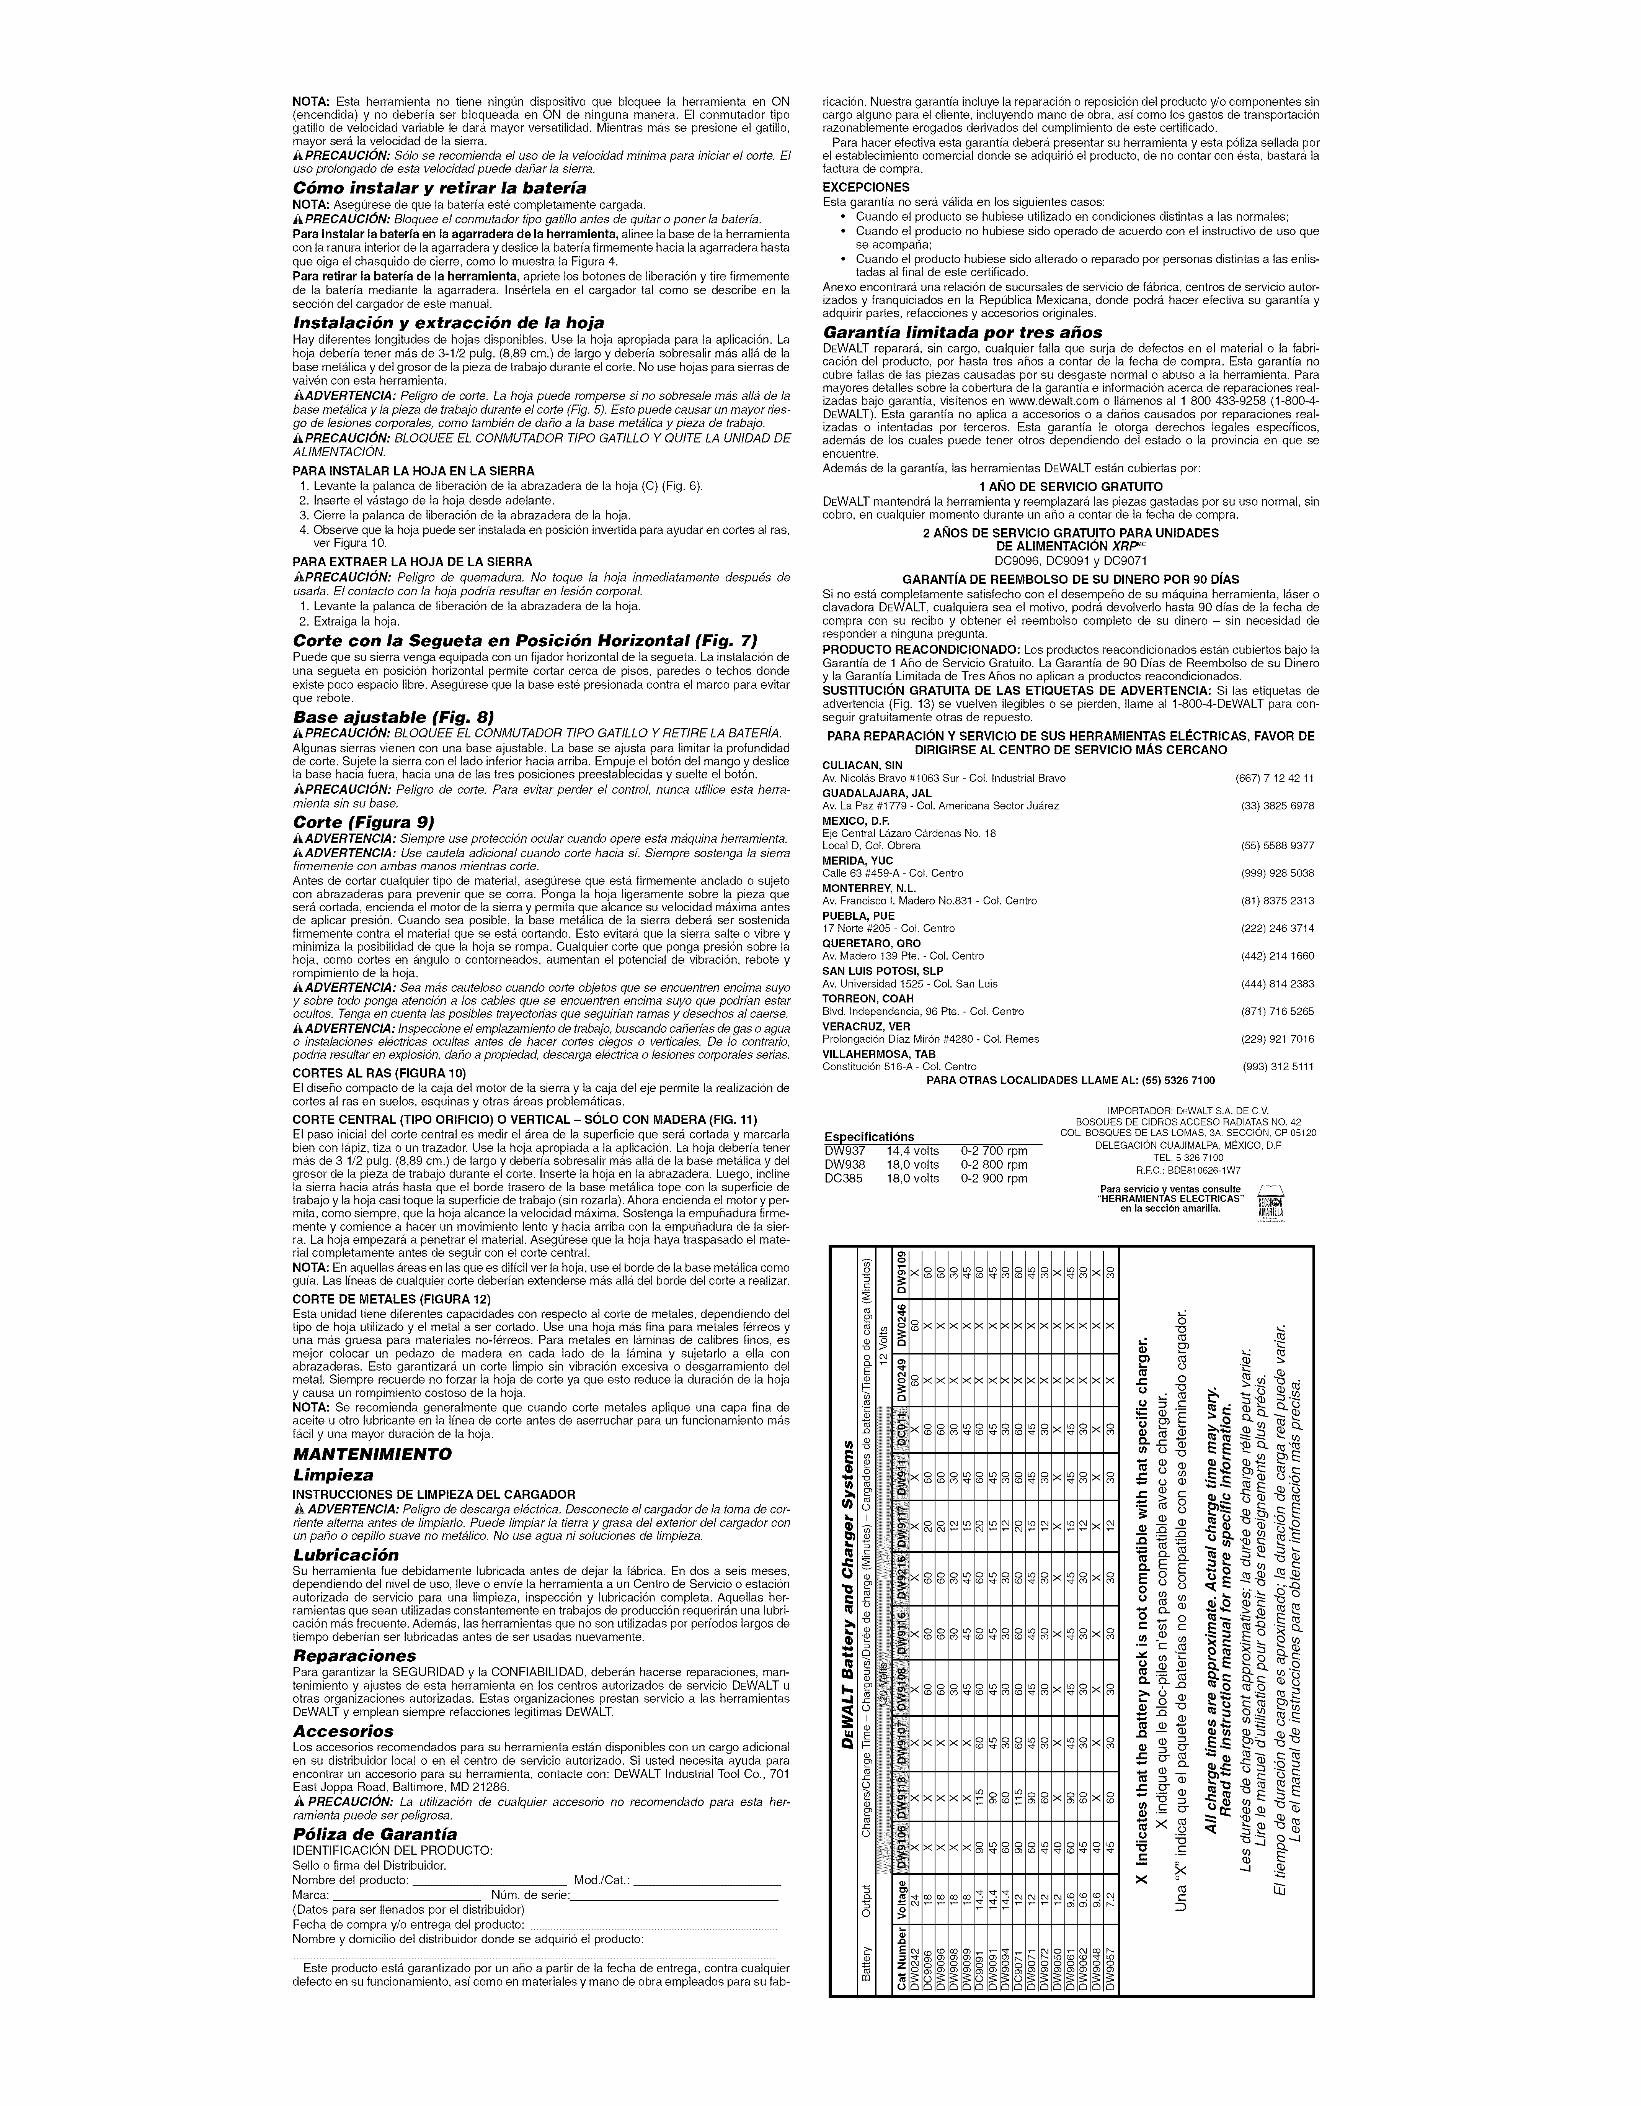
NOTA:Estaherramientano tieneningundispositivoquebloqueelaherramientaenON(encendida)y nodeberfaserbloqueadaenONdeningunamanera.Elconmutadortipogatillodevelocidadvariableledaramayorversatilidad.Mientrasmassepresioneelgatillo,mayorseralavelocidaddelasierra.APRECAUClON:Sale se recomienda el use de la velocidad mfnima para iniciar el corte. Eluse prolongado de esta velocidad puede dahar la sierra.
C6mo instalar y retirar la bateriaNOTA: Asegt:lrese de que la bateria este completamente cargada.A PRECAUCl6N: Bloquee el conmutador tipo gatillo antes de quitar oponer la baterfa.
Para instalar la baterfa en la agarradera de la herramienta, alinee la base de la herramientacon la ranura interior de la agarradera y deslice la bateria firmemente hacia la agarradera hastaque oiga el chasquido de cierre, come Io muestra la Figura 4.Para retirar la bateria de la herramienta, apriete los botones de liberacion y tire firmementede la baterfa mediante la agarradera. Insertela en el cargador tal come se describe en laseccion del cargador de este manual.
Instalaci6n y extracci6n de la hojaHay diferentes longitudes de hojas disponibles. Use la hoja apropiada para la aplicacion. Lahoja deberia tener mas de 3-1/2 pulg. (8,89 cm.) de largo y deberia sobresalir mas alia de labase metalica y del grosor de la pieza de trabajo durante el corte. No use hojas para sierras devaiven con esta herramienta.
_ADVERTENClA: Peligro de corte. La hoja puede romperse si no sobresale mas alia de labase metalica y la pieza de trabajo durante el corte (Fig. 5). Esto puede causar un mayor ties-go de lesiones corporales, come tambien de daho a la base metalica y pieza de trabajo.APRECAUCl6N: BLOQUEE EL CONMUTADOR TIPO GATILLO Y QUITE LA UNIDAD DEALIMENTACION.
PARA INSTALAR LA HOJA EN LA SIERRA
1. Levante la palanca de liberacion de la abrazadera de la hoja (C) (Fig. 6).2. Inserte el vastago de la hoja desde adelante.
3. Cierre la palanca de liberaci6n de la abrazadera de la hoja.4. Observe que la hoja puede ser instalada en posicion invertida para ayudar en cortes al ras,
ver Figura 10.
PARA EXTRAER LA HOJA DE LA SIERRA
APRECAUCldN: Peligro de quemadura. No toque la hoja inmediatamente despues deusarla. El contacto con la hoja podrfa resultar en lesidn corporal
1. Levante la palanca de liberacion de la abrazadera de la hoja.2. Extraiga la hoja.
Corte con la Segueta en Posici6n Horizontal (Fig. 7)Puede que su sierra venga equipada con un fijador horizontal de la segueta. La instalacion deuna segueta en posicion horizontal permite cortar cerca de pisos, paredes o techos derideexiste poco espacio libre. Asegurese que la base este presionada contra el marco para evitarque rebote.
Base ajustable (Fig. 8)i_PRECAUCl6N: BLOQUEE EL CONMUTADOR TIPO GATILLO Y RETIRE LA BATERfA.
Algunas sierras vienen con una base ajustable. La base se ajusta para limitar la profundidadde corte. Sujete la sierra con el lade inferior hacia arriba. Empuje el boton del mango y deslicela base hacia fuera, hacia una de las tres posiciones preestablecidas y suelte el boton._,PRECAUClON: Peligro de corte. Para evitar perder el control, nunca utilice esta herra-mienta sin su base.
Corte (Figura 9)AADVERTENClA: Siempre use proteccidn ocular cuando opere esta maquina herramienta.AADVERTENClA: Use cautela adicional cuande corte hacia sL Siempre sestenga la sierrafirmemente con ambas manes mientras corte.
Antes de cortar cualquier tipo de material, asegt_lrese que esta firmemente anclado o sujetocon abrazaderas para prevenir que se corra. Ponga la hoja ligeramente sobre la pieza quesera cortada, encienda el motor de la sierra y permita que alcance su velocidad maxima antesde aplicar presion. Cuando sea posible, la base metalica de la sierra debera ser sostenidafirmemente contra el material que se esta cortando. Esto evitara que la sierra salte o vibre yminimiza la posibilidad de que la hoja se rompa. Cualquier corte que ponga presion sobre lahoja, come cortes en angulo o contorneados, aumentan el potencial de vibracion, rebote yrompimiento de la hoja.AADVERTENClA: Sea mas cauteloso cuando corte objetos que se encuentren encima suyoy sobre todo ponga atencidn a los cables que se encuentren encima suyo que podrfan estarocultos. Tenga en cuenta las posibles trayectorias que seguirfan ramas y desechos al caerse.AADVERTENClA: Inspeccione el emplazamiento de trabajo, buscando caherfas de gas o aguae instalaciones electricas ecultas antes de hacer certes ciegos e verticales. De le centrario,podrfa resultar en explosidn, daho a propiedad, descarga electrica o lesiones corporales serias.
CORTES AL RAS (FIGURA 10)El diseBo compacto de la caja del motor de la sierra y la caja del eje permite la realizacion decortes al ras en suelos, esquinas y otras Areas problematicas.
CORTE CENTRAL (TIPO ORIFIClO) O VERTICAL - SOLO CON MADERA (FIG. 11)
El paso inicial del corte central es medir el Area de la superficie que sera cortada y marcarlabien con lapiz, tiza o un trazador. Use la hoja apropiada a la aplicacion. La hoja deberia tenermas de 3 1/2 pulg. (8,89 cm.) de largo y deberia sobresalir mas alia de la base metalica y delgrosor de la pieza de trabajo durante el corte. Inserte la hoja en la abrazadera. Luego, inclinela sierra hacia atras hasta que el borde trasero de la base metalica tope con la superficie detrabajo y la hoja casi toque la superficie de trabajo (sin rozarla). Ahora encienda el motor y per-mita, come siempre, que la hoja alcance la velocidad maxima. Sostenga la empuSadura firme-mente y comience a hacer un movimiento lento y hacia arriba con la empuBadura de la sier-ra. La hoja empezara a penetrar el material. Asegurese que la hoja haya traspasado el mate-rial completamente antes de seguir con el corte central.NOTA: En aquellas areas en las que es dificil ver la hoja, use el horde de la base metalica comeguia. Las lineas de cualquier corte deberian extenderse mas alia del borde del corte a realizar.
CORTE DE METALES (FIGURA 12)Esta unidad tiene diferentes capacidades con respecto al corte de metales, dependiendo deltipo de hoja utilizado y el metal a ser cortado. Use una hoja mas fina para metales ferreos yuna mas gruesa para materiales no-ferreos. Para metales en laminas de calibres fines, esmejor colocar un pedazo de madera en cada lade de la lamina y sujetarlo a ella conabrazaderas. Esto garantizara un corte limpio sin vibracion excesiva o desgarramiento delmetal. Siempre recuerde no forzar la hoja de corte ya que esto reduce la duracion de la hojay causa un rompimiento costoso de la hoja.NOTA: Se recomienda generalmente que cuando corte metales aplique una capa fina deaceite u otro lubricante en la linea de corte antes de aserruchar para un funcionamiento masfacil y una mayor duracion de la hoja.
MANTENIMIENTO
LimpiezaINSTRUCClONES DE LIMPIEZA DEL CARGADOR
_, ADVERTENClA: Peligro de descarga electrica. Desconecte el cargader de la toma de cor-riente alterna antes de limpiarlo. Puede limpiar la tierra y grasa del exterior del cargador conun paho o cepillo suave no metalico. No use agua ni soluciones de limpieza.
Lubricaci6nSu herramienta fue debidamente lubricada antes de dejar la fabric& En dos a seis meses,dependiendo del nivel de use, Ileve o envie la herramienta a un Centre de Servicio o estacionautorizada de servicio para una limpieza, inspecci6n y lubricacion completa. Aquellas her-ramientas que sean utilizadas constantemente en trabajos de producci6n requeriran una lubri-cacion mas frecuente. Ademas, las herramientas que no son utilizadas per periodos largos detiempo deberian set lubricadas antes de ser usadas nuevamente.
ReparacionesPara garantizar la SEGURIDAD y la OONFIABILIDAD, deberan hacerse reparaciones, man-tenimiento y ajustes de esta herramienta en los centros autorizados de servicio DEWALT uotras organizaciones autorizadas. Estas organizaciones prestan servicio a las herramientasDEWALT y emplean siempre refacciones legitimas DEWALT.
AccesoriosLos accesorios recomendados para su herramienta estan disponibles con un cargo adicionalen su distribuidor local o en el centre de servicio autorizado. Si usted necesita ayuda paraencontrar un accesorio para su herramienta, contacte con: DEWALT Industrial Tool Co., 701East Joppa Road, Baltimore, MD 21286._, PRECAUClON: La utflizacidn de cualquier accesorio no recomendado para esta her-ramienta puede ser peligrosa.
P61iza de GarantiaIDENTIFICACION DEL PRODUCTO:Sello o firma del Distribuidor.
Nombre del producto: Mod./Cat.:Marca: Nt_lm.de serie:
(Dates para ser Ilenados per el distribuidor)Fecha de compra y/o entrega del producto:Nombre y domicilio del distribuidor donde se adquirio el producto:
Este producto esta garantizado per un are a partir de la fecha de entrega, contra cualquierdefecto en su funcionamiento, asi come en materiales y mane de obra empleados para su fab-
ricacion. Nuestra garantia incluye la reparacion o reposicion del producto y/o componentes sincargo alguno para el cliente, incluyendo mane de obra, asi come los gastos de transportacionrazonablemente erogados derivados del cumplimiento de este certificado.
Para hacer efectiva esta garantia debera presentar su herramienta y esta poliza sellada perel establecimiento comercial donde se adquirio el producto, de no contar con esta, bastara lafactura de compra.
EXCEPCIONES
Esta garantia no sera valida en los siguientes cases:• Cuando el producto se hubiese utilizado en condiciones distintas alas normales;• Cuando el producto no hubiese side operado de acuerdo con el instructive de use que
se acompaRa;• Cuando el producto hubiese side alterado o reparado per personas distintas a las enlis-
tadas al final de este certificado.
Anexo encontrara una relacion de sucursales de servicio de fabrica, centros de servicio autor-izados y franquiciados en la Rept_lblica Mexicana, donde podra hacer efectiva su garantia yadquirir partes, refacciones y accesorios originales.
Garantia limitada por tres a_osDEWALT reparara, sin cargo, cualquier falla que surja de defectos en el material o la fabri-caci6n del producto, per hasta tres ares a contar de la fecha de compra. Esta garantia nocubre fallas de las piezas causadas per su desgaste normal o abuse a la herramienta. Paramayores detalles sobre la cobertura de la garantia e informacion acerca de reparaciones real-izadas bajo garantia, visitenos en www.dewalt.com o Ilamenos al 1 800 433-9258 (1-800-4-DEWALT). Esta garantia no aplica a accesorios o a dares causados per reparaciones real-izadas o intentadas per terceros. Esta garantia le otorga derechos legales especificos,ademas de los cuales puede tener otros dependiendo del estado o la provincia en que seencuentre.
Ademas de la garantia, las herramientas DEWALT estan cubiertas per:
1 ANO DE SERVlClO GRATUlTO
DEWALT mantendra la herramienta y reemplazara las piezas gastadas per su use normal, sincobro, en cualquier memento durante un are a contar de la fecha de compra.
2 ANOS DE SERVlClO GRATUlTO PARA UNIDADESDE ALIMENTAClON XRI _c
DC9096, DC9091 y DC9071
GARANT|A DE REEMBOLSO DE SU DINERO POR 90 D|AS
Si no esta cempletamente satisfecho con el desempeRo de su maquina herramienta, laser oclavadora DEWALT, cualquiera sea el motive, podra devolverlo hasta 90 dias de la fecha decompra con su recibo y obtener el reembolso complete de su dinero - sin necesidad deresponder a ninguna pregunta.
PRODUCTO REACONDIClONADO: Los productos reacondicionados estan cubiertos bajo laGarantia de 1 ARe de Servicio Gratuito. La Garantia de 90 Dias de Reembolso de su Dinero
y la Garantia Limitada de Tres ARes no aplican a productos reacondicionados.SUSTITUClON GRATUlTA DE LAS ETIQUETAS DE ADVERTENClA: Si las etiquetas deadvertencia (Fig. 13) se vuelven ilegibles o se pierden, Ilame al 1-800-4-DEWALT para con-seguir gratuitamente otras de repuesto.
PARA REPARAClON Y SERVlClO DE SUS HERRAMIENTAS ELI_CTRICAS, FAVOR DEDIRIGIRSE AL CENTRO DE SERVlClO MAS CERCANO
CULIACAN, SINAv. NicolAs Bravo #1063 Sur - Col. Industrial Bravo (667) 7 12 42 11GUADALAJARA, JALAv. La Paz #1779 - Col. Americana Sector Juarez (33) 3825 6978MEXICO, D.F.Eje Central Lazaro CArdenas No. 18Local D, Col. Obrera (55) 5588 9377MERIDA, YUCCalle 63 #459-A - Col. Centre (999) 928 5038
MONTERREY, N.L.Av. Francisco I. Madero No.831 - Col. Centre (81) 8375 2313PUEBLA, PUE17 Norte #205 - Col. Centre (222) 246 3714QUERETARO, QROAv. Madero 139 Pte. - Col. Centre (442) 214 1660SAN LUIS POTOSl, SLPAv. Universidad 1525 - Col. San Luis (444) 814 2383TORREON, COAHBlvd. Independencia, 96 Pte. - Col. Centre (871) 716 5265VERACRUZ, VERProlongaci6n Dl'az Mir6n #4280 - Col. Remes (229) 921 7016VlLLAHERMOSA, TABConstituci6n 516-A - Col. Centre (993) 312 5111
PARA OTRAS LOCALIDADES LLAME AL: (55) 5326 7100
Especificati6nsDW937 14,4 volts 0-2 700 rpmDW938 18,0 volts 0-2 800 rpmDC385 18,0 volts 0-2 900 rpm
IMPORTADOR: DEWALT S.A. DE C.V.BOSQUES DE CIDROS ACCESO RADIATAS NO. 42
COL. BOSQUES DE LAS LOMAS, 3A. SECCION, CP 05120
DELEGACION CUAJIMALPA, MEXICO, D.F
TEL. 5 326 7100
R.EC.: BDE810626-1W7
Para servicio y ventas consulte Z_"HERRAMIENTAS ELECTRICAS" SEI_
en la seccibn amarilla. A_AR!![A
iq}
*4
o*5
o_
"iiiiiiiiii
iiiiiiiiiii_ iiiiiiiiii................_ iiiiiiiiiii
_ iiiiiiiiii
o iiiiiiiiiii!i;ii!ii iiiiiiiiiii
_'iiiiiiiiiiiiii!_!"_ iiiiiiiiiiiii
_ iiiiiii!_:ii:ii:i_i_iiii!i_:_:¢ !i!i!i!i!i!i!_!!ili!i!ii_i
"_ iiiiiiiiiiii!i__,_ iiiiiiiiiii_ iiiiiiiiiii
8 ,i,ilili!!!:!
iiiiiiiiiiii:i i ¢ iiiiiiiiiiic_ iiiiiiiiii_iii_i
iiiiiiiiii!iii i _ iiiiiiiiiiiii_
& iiiiiiiiiii_
_D iiiiiiiiiii
XXX_XXX_XXK_X
_XXX_XXX_XX_X
x_88_858x_×_
x_822_228_2x2_×2
_ _'_ '_'_Q _ _
o
e- oo .'_
r-- ,_
"_ ._e.-- kX =
D
_2
cz
_E
re :{b
(3-..4