cms training manual - 360psg.com
TRANSCRIPT

CMS Manual
1
CMS Training ManualA brief overview of your website’s content management system (CMS) with screenshots.

CMS Manual
2
ContentsLogging In: ...................3
Dashboard: ...................4
Page List / Search Filter: ...................5
Common Icons: ...................6
Adding a New Page: ...................7
Content Editor: ...................8
Paste: ...................9
Headings: ...................10
Inserting a New Image: ...................11
Link List: ...................13
External Links: ...................14
Link to a Document: ...................15
Search Engines/Optimization: ...................16
Search Optimization Details: ...................17
Menus: ...................18
Add New Menu Item: ...................19
Modules: ...................21
Create a New Module: ...................22
Configure Module Settings: ...................24
Assign Module to Page(s): ...................25

CMS Manual
3
Logging In:There are two parts to your site: the “front end” and the “back end”. The “front end” is the public view of your website, everything that the visitors see.
• To login to the “backend” of your website, type in your full URL (website address), followed by /login.
• You will be brought to your login screen where you will enter your username and password.
*Click images to see larger view. Click “Back to Section” in larger view to jump back to the section you were reading.

CMS Manual
4
Dashboard:Once you login to the backend of your site, you will be brought to your dashboard. This iswhereyouwillfindallofyourquicklaunchtools. From your dashboard you can edit your Menus, Page List, Modules, Image Manager, News Manager, Event Manager, and Showcase Manager items, like Portfolio Pieces and Testimonials.
You can return to your Dashboard at any time by clicking on the dashboard menu item located in the top left corner of your CMS.
Allofyourquicklaunchoptionsarealso available in the top menu, so it isn’t necessary to return to your dashboard when you want to move from component to component in the backend of your site.

CMS Manual
5
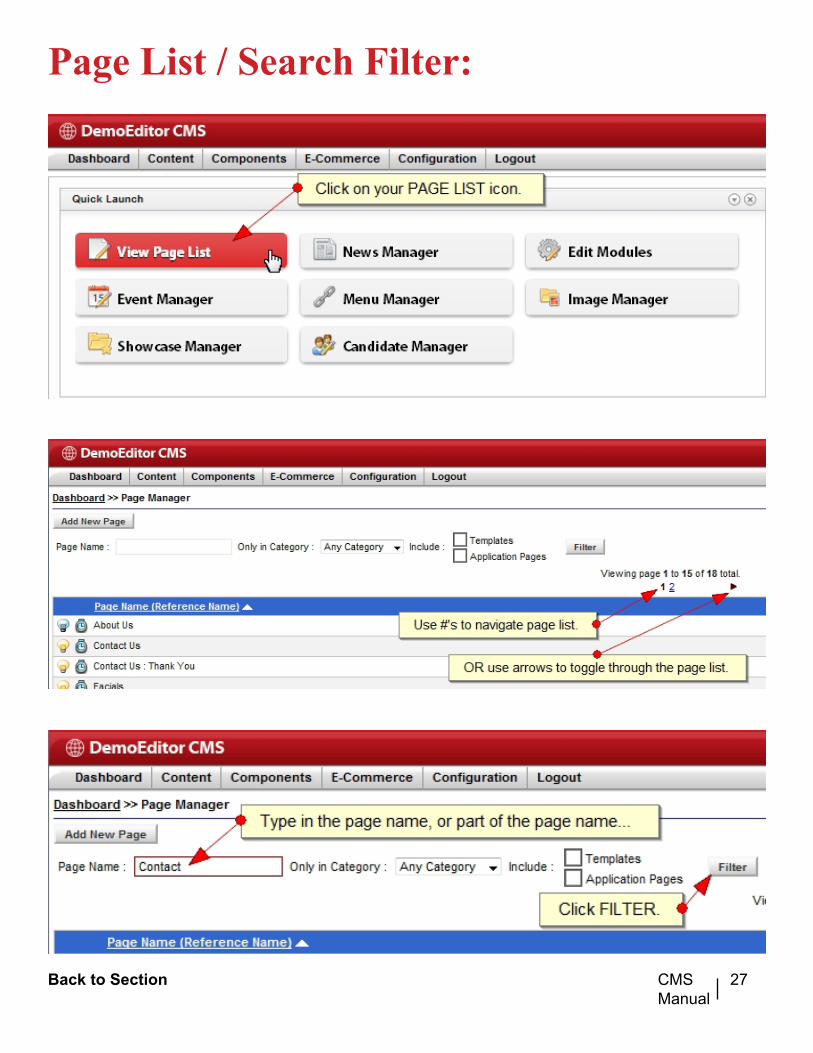
Page List / Search Filter:• When you click on your page list icon, you
will be brought to your page list.
Your pages are listed in alphabetical order by page name,15 pages at a time.
• You can toggle through your page list using the arrows located above the blue bar in the center of your screen.
• Or, you can click on the numbers located between the arrows to move forward or backward on your page list.
There is also a search filter, in case you don’t want to toggle through your entire page list to findthepageyouwanttoedit.
• Type the page name, or part of the page name,intothesearchboxandclickfilter.Your page will refresh and only pages with the word(s) you typed in the search box will display. To get back to your full page list, simply delete the text in the search box and clickfilteragain.

CMS Manual
6
Common Icons:Throughout your training you will encounter familiar icons.
• Light Bulb–Ontheleft,youwillfindyourlight bulb icon. The light bulb is used to toggle pages, menu items, modules, and other items on and off on your website. A yellow light means that an element is “on.” Click a yellow bulb to turn it off. When a light bulb is clear, or not lit, it means that page, menu item, or module is turned off on the front end of your website.
• Delete – On the right side of your page list,youwillfindanorangeX icon, which will delete a page. If you choose to delete something, you will be prompted with a message that asks, “Are you sure that you want to delete this page permanently?” Once you click “okay,” the page or element that you chose to delete will be permanently deleted. If you decide you want that information back, you will have to recreate it from scratch.
Unless you are 100% sure that you want to delete an item from your site, we recommend that you use the light bulb to toggle that information off instead.
• Edit This Item – Next to the orange x is the edit this item icon. The edit this item icon allows you to edit a page or element that already exists in your system.

CMS Manual
7
Adding a New Page:• Toaddanewpagetoyoursite,firstclick
the “add new page” button located above or below your page list on the left hand side.
• Enter a Page Name. The page name is for your use only; it displays only in the backend of your site, alphabetically in your page list. You want to make sure that you name your pages logically with relevance to the page content so that they are easy to findwhenyouwanttoeditthem.
• Once you’ve named your page, click Save.
Next, your page information will display.
• Click the second tab, which is your Content Editor tab. (For information about the Content Editor, see the appropriate section).

CMS Manual
8
Once you’ve named and saved your page, you have the option to Save and Close your page at any time. This will save your changes and close your editor window.
Like the Save and Close button, Apply saves all of your changes but leaves your editor window open so you can continue editing your page.
* It’s important that you save your progress because your CMS will time out after 15 minutes if no work is done on a page.
Close - This will close your editor window but will NOT save any of your changes.
Content Editor:This is your WYSIWYG editor. WYSIWYG stands for “What You See Is What You Get.” That just means that you can see all of your changes in the editor window as you make them.

CMS Manual
9
Paste:In your editor window you can copy and paste text. You can copy text from anywhere (a website, a Word document, or an email) and paste it right in your editor window.
• Place your cursor in the editor window. After you’ve copied your text, press CTRL V to paste it in the window.
• A paste window will open where you can paste your text. (The paste window opens to ensure that no bad characters or fonts that aren’t safe for the web get pasted onto your site).
• Once you’ve pasted your text in the “paste as plain text” window, click INSERT to add your text to your page.
Once your text has been pasted in your editor window you can format your content. You have very basic tools like bold, italicize, and underline. You can also left, center, right align and justify your text.
You can also add tables, videos, links, and forms.
CMS Manual
10
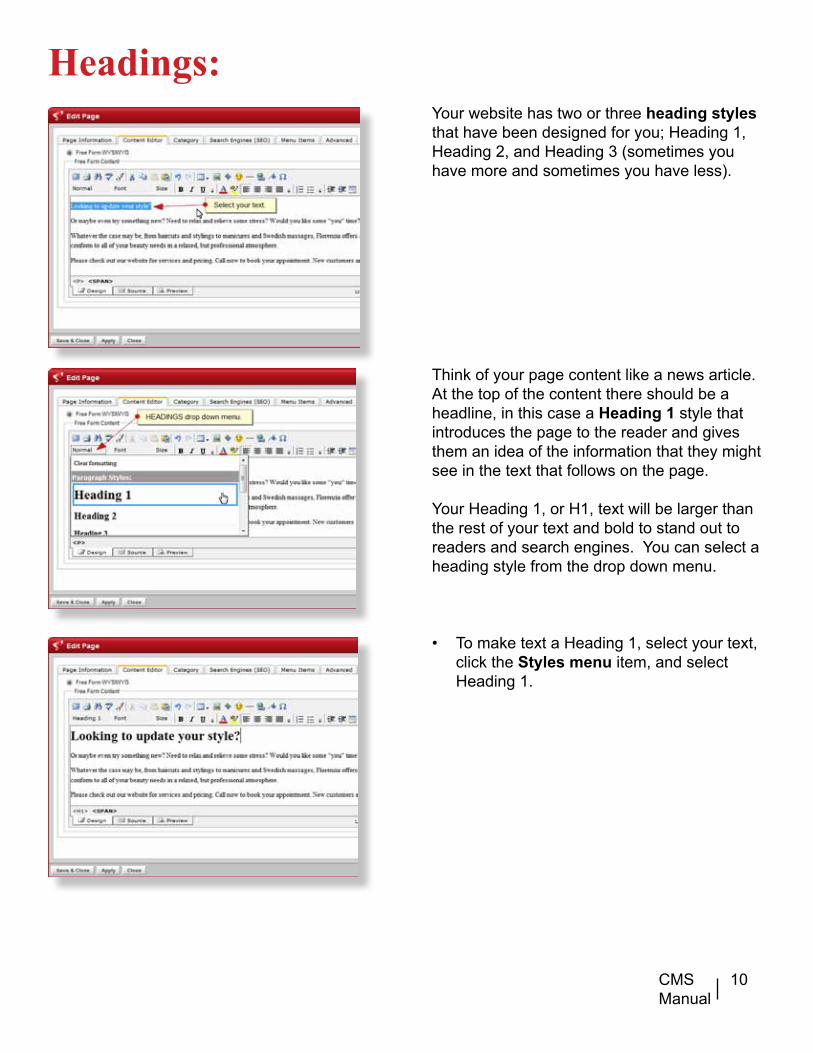
Headings:Your website has two or three heading styles that have been designed for you; Heading 1, Heading 2, and Heading 3 (sometimes you have more and sometimes you have less).
Think of your page content like a news article. At the top of the content there should be a headline, in this case a Heading 1 style that introduces the page to the reader and gives them an idea of the information that they might see in the text that follows on the page.
Your Heading 1, or H1, text will be larger than the rest of your text and bold to stand out to readers and search engines. You can select a heading style from the drop down menu.
• To make text a Heading 1, select your text, click the Styles menu item, and select Heading 1.

CMS Manual
11
Inserting a New Image:• To insert an image on your page, place
your cursor in the WYSIWYG editor window where you want your image to appear.
• Select the Insert/Edit Image icon to open your Insert/Edit Image window.
• In the left menu, Images should be highlighted in blue indicating that you are in your Images directory.
• To upload a new image to your directory, select the Upload icon to open your Browse window.
Uploading a New Image:
• Click the Browse button.
• You can also upload more than one image (up to 20) at a time by selecting the desired number from the drop down picker.
* Recommended image size: smaller than 3 MB.
• Find the image on your computer that you wish to upload to your system. Click Open andyourfilepathwillappearinthebrowsebox.

CMS Manual
12
• Click upload and your image directory will refresh to show you a preview of your recently uploaded image(s).
When you’ve uploaded your desired image, select by clicking on the image. An image preview will appear in the window to the right ofyourdirectorywithdimensions,filetype,anddatemodifiedinformationlistedbelowit.
• Click Insert and your image will appear in your editor window.

CMS Manual
13
Link List:There are three ways to create a link on your page.Thefirstwaytolinkistoapageonyourwebsite.
• Select the text or image that you would like to make a link.
• Select the Insert/Edit Hyperlink icon.
• In the left column, Page On This Site should be highlighted blue.
Inthecentercolumn,youwillfindalistofallofyour existing pages.
• Click on the page that you would like to link to.
In the right column, a preview of the page you’ve selected to link to will appear.
• Click Insert.
Your text will be linked in your editor window. If you hover your cursor over the linked text, your “Image Description” will appear.

CMS Manual
14
External Links:The second way to link is to an external website.
• Select the text or image that you would like to make a link.
• Select the Insert/Edit Hyperlink icon.
• In the left column, select Web Location.
• Below the preview window on the right, type in the full URL (website address) of the website that you wish to link to.
• Click the Load Preview icon to the right of the address bar to preview the website that you are linking to.
• From the Open In drop down, select New Window.
This is your link target, or where your new link will open when someone clicks on it.
It’s very important that you choose to open an external link in a new window. If someone clicks on the link to open a site that they do not wishtovisit,theirfirstinstinctisto“x”outofthat site to close it. If your link opens in a new window, then your site will remain open even when they “x” out of the linked site.
• Click Apply and your link to the external site will be inserted.
CMS Manual
15
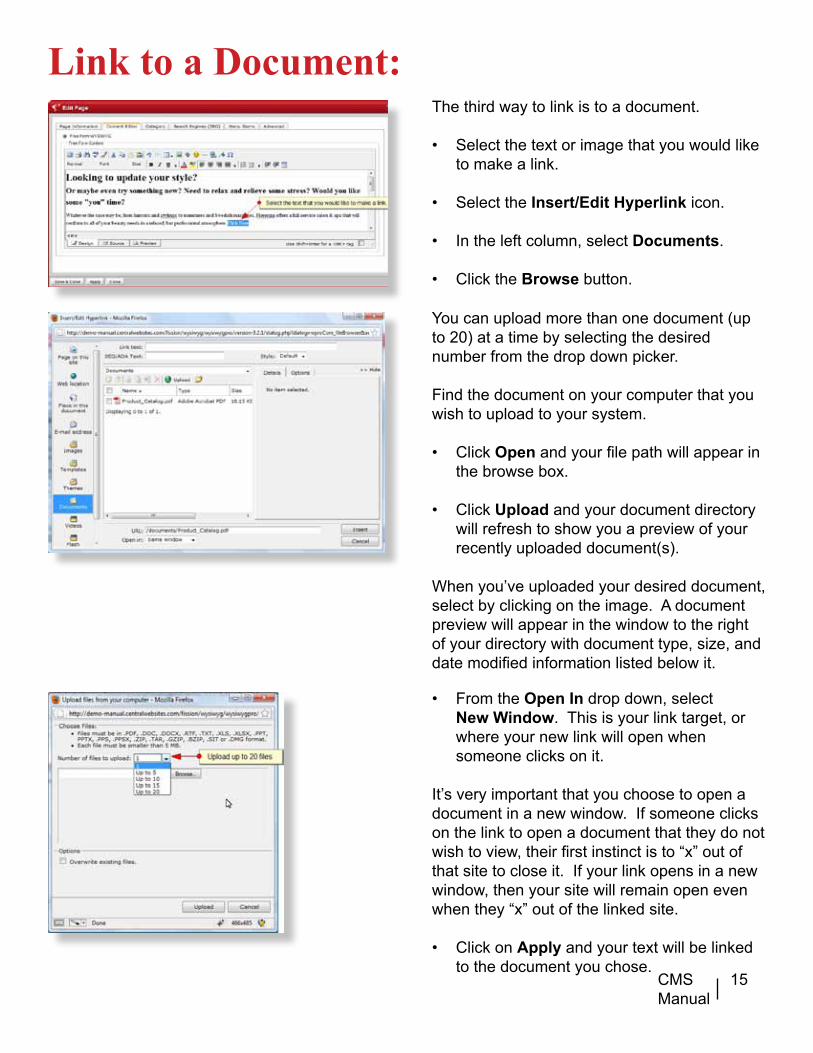
Link to a Document:The third way to link is to a document.
• Select the text or image that you would like to make a link.
• Select the Insert/Edit Hyperlink icon.
• In the left column, select Documents.
• Click the Browse button.
You can upload more than one document (up to 20) at a time by selecting the desired number from the drop down picker.
Find the document on your computer that you wish to upload to your system.
• Click Openandyourfilepathwillappearinthe browse box.
• Click Upload and your document directory will refresh to show you a preview of your recently uploaded document(s).
When you’ve uploaded your desired document, select by clicking on the image. A document preview will appear in the window to the right of your directory with document type, size, and datemodifiedinformationlistedbelowit.
• From the Open In drop down, select New Window. This is your link target, or where your new link will open when someone clicks on it.
It’s very important that you choose to open a document in a new window. If someone clicks on the link to open a document that they do not wishtoview,theirfirstinstinctisto“x”outofthat site to close it. If your link opens in a new window, then your site will remain open even when they “x” out of the linked site.
• Click on Apply and your text will be linked to the document you chose.

CMS Manual
16
Search Engines/Optimization:Under your search engines tab you have the ability to control more of your page information. In the firstsectionlabeledSearch-FriendlyURL,youcangiveyourpageafilenamethatis“searchfriendly.”
File Name:Your file name appears in the address bar at the end of your URL. All of your pages will havetheprefix/content/pages.Youhave control over what comes next.
Whenaddingafilenametoyourpage,youwant to use all lowercase letters and separate words with a hyphen.
Like adding a page name, you want your page title to be concise but relevant to the page content. For example, if you are creating anAboutUsPage,yourfilenamecouldbe“about-us.”

CMS Manual
17
Custom Title:You can add a Custom Page Title to your page. Your title is displayed on the front end of your website, usually in the very top left corner of your browser window next to the browser icon.
Keywords:You can add custom keywords and keyphrases to every one of your pages.
• Select Custom Keywords from the drop down and type your keywords/keyphrases in the box.
Separate your keywords or phrases with a comma. We usually recommend using between 5 and 8 keywords per page.
META Description:You can add a custom META Description to every one of your pages.
• Select Custom Description from the drop down and type your META Description in the box.
META Descriptions display on the front end in search engine results under the page link. Try to keep your META Descriptions under 140 characters.
• Onceyou’refinished,clickSave & Close.

CMS Manual
18
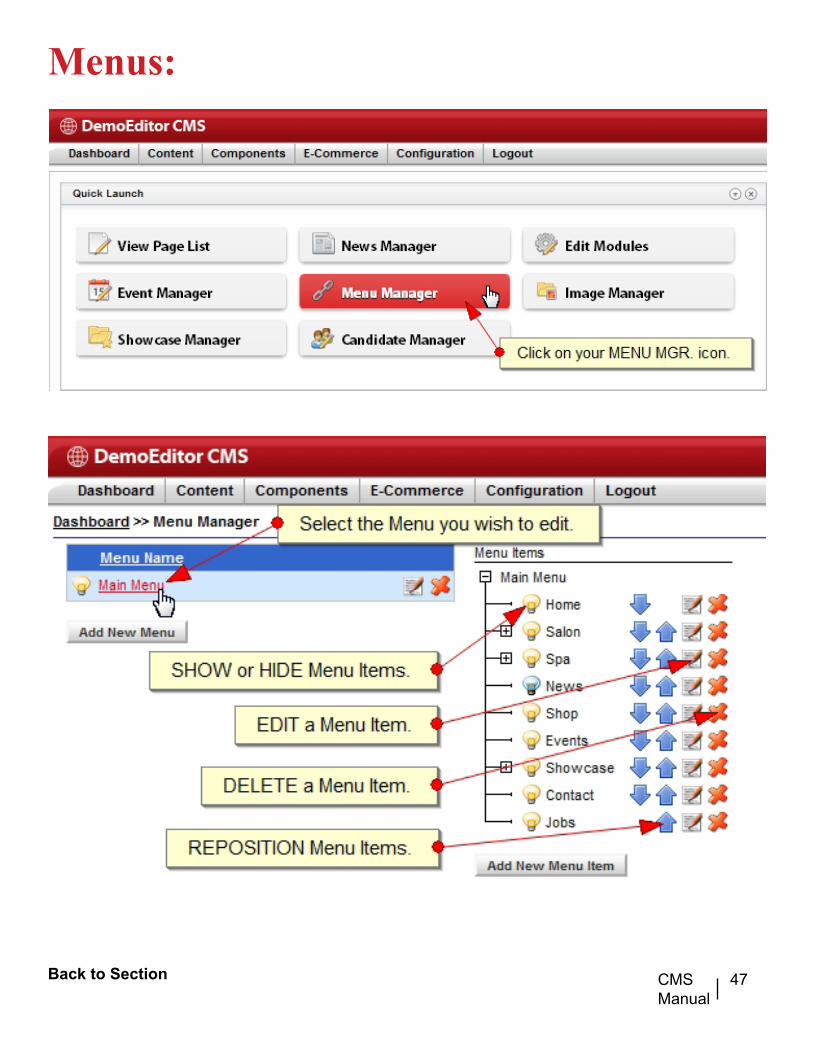
Menus:• Click on the Menu that you would like to
edit. (Click on the Text and not the Edit This Item icon.)
Like most of the other elements in the Fission CMS, you will notice your menu items have Light Bulbs, an Edit This Item icon, and a Delete This Item icon.
Inaddition,youwillfindBlue Arrows next to each of your menu items. The Blue Arrows will allow you to reposition your menu items.

CMS Manual
19
Add New Menu Item:
Name – Your menu name is for back end use only. It will appear in your menu item list.
YoucantabdowntoautofillyourCaptionfield.
Caption – Your menu item Caption is the text that your menu item will display as on the front end of your website.
• Select the Add New Menu Item button.

CMS Manual
20
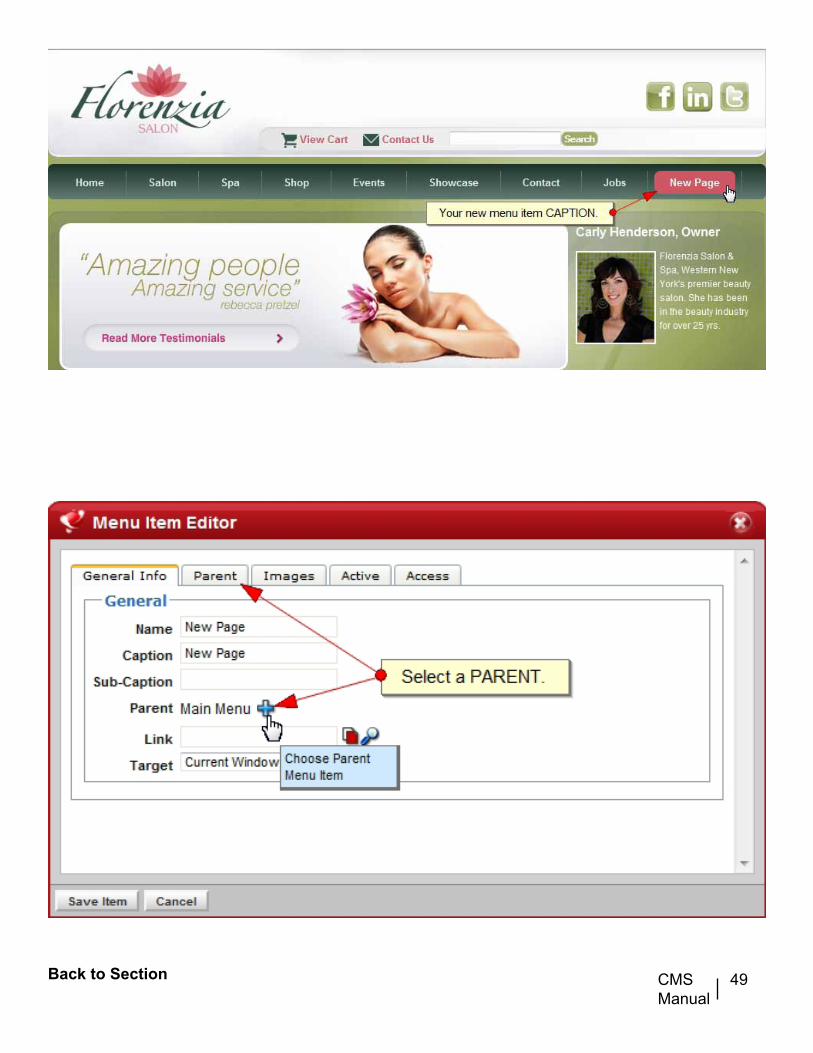
Parent – The Parent is where your menu item will show up. By default, every menu item is set to have Main Menu as the Parent. This means that your new Menu Item will show up in the Main Menu on your website.
You can add a Menu Item as a Sub-Menu Item (Child) of a menu item by selecting a new parent from the menu list. That means that your new menu item will appear in a dropdown menu under the menu item that you specify as the parent.
Link – When you create a new menu item, you need to assign a link to it, otherwise when a visitor clicks on the menu item it won’t take them anywhere.
• To add a link to a menu item, click on the Select Page icon to the right of the link box.
• From the Show Linking Group drop down, select Content : Pages.
• Find the page that you want to link to from the list provided.
• Click on the icon to the left of the page name to select the page.
• Click Save Item.

CMS Manual
21
Modules:Modules are dynamic blocks of content that you can move around your website. You can have a module be visible on every page of your site or specify pages to hide it on.
Your Module List is laid out a little differently than your Page List. Rather than being listed alphabetically, your modules are grouped by Module Position.
Like most of the other elements in the Fission CMS, you will notice your modules have Light Bulbs, the Blue Arrows, and a Delete This Item icon.
• To make changes to an existing module, click Edit Module.

CMS Manual
22
Create a New Module:
Module Type – It’s especially important that you select the correct Module Type. Module Types are the only thing that you cannot edit once a module has been saved. Module Type defaultstoEventList,asitisthefirstchoiceinthe drop down menu.
• To select a different Module Type, use the drop down menu.
• Click Add New Module button to open your New Module window.
Most of the time you will want to create a Static Content Module.

CMS Manual
23
Name – First, you will need to give your module a Name. Just like naming a content page, your Module Name is for your use only. Your module Name only appears in the back end of your website, but it is important that you keep your Module Name relevant to the module’s content.
Position – Your module positions were definedinyourtemplate.Youmayhaveoneortwo module positions or you may have several defined,dependingonyourwebsitedesign.
Theme – For now, you can leave the theme at default.
• Once you’ve named your module, selected a module type, and a module position, you can choose to Add & Configure your new module.
Your Configure Module Settings window will open.

CMS Manual
24
Configure Module Settings:Module Title – Below your Module Name, you will see a new box for Module Title.
Your Module Title will appear above your module on the front end of your website if you choose to include one.
* If you set your Module Theme to “Blank” then a Module Title will not appear above your module whether you provide one or not.
If you choose NOT to include a Module Title andjustleavethefieldblank,thesystemwilluse the Module Name as the Module Title.
• If you decide not to include a Module Title, remember to check the Hide Module Title box.
Details Tab – Under the Details Tab, you can edit your module content. In a Static Content module, you will have a full WYSIWYG editor, just like you did when creating a Content Page. Which means you can add text, links, images, videos, and anything else that you can add to a full page of content.
• Once you’ve added your content, click Save and Close to close your module.
Light Bulb – Unlike creating a new Content Page, when you create a new module, its Light Bulb will remain “off” until you toggle it “on.” This is just a safety feature, as you may not want your module to appear on every page of your site.

CMS Manual
25
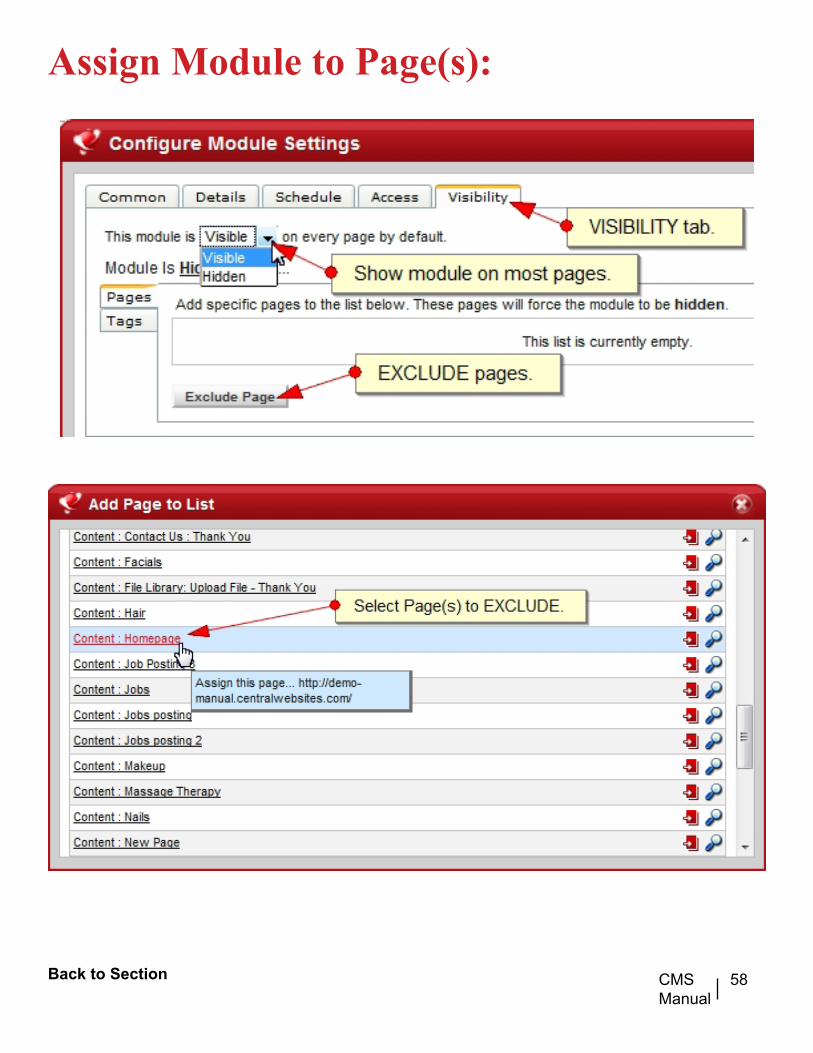
Assign Module to Page(s):You can have your module show up on one page and be hidden on all of the rest of your pages OR you can have your module appear on every page on your site except for one.
• To change the visibility of your module, choose to Edit Your Module Settings.
Visibility Tab – Lets you know if the module is visible or hidden on every page by default.
If you want to Show a module on every page except for one, you will leave the module setting on Visible On Every Page.
Below you will see “Module is Hidden when…”
This is where you can Exclude pages (or tell your module what pages not to show up on).
• To exclude a page click on the Exclude Page button.
• Find the page on the list. Click Assign This Page to the Exclusions List icon to the right of the page.
Your page will appear in your Exclusions List.
• Press Save and Close when you are done excluding pages.

CMS Manual
26
Logging In:
Dashboard:
Back to Section
CMS Manual
27
Page List / Search Filter:
Back to Section

CMS Manual
28
Common Icons:
Back to Section

CMS Manual
29
Adding a New Page:
Back to Section

CMS Manual
30
Content Editor:
Save & Close Button:
Back to Section

CMS Manual
31
Apply Button:
Back to Section

CMS Manual
32
Close Button:
Back to Section

CMS Manual
33
Paste:
Back to Section

CMS Manual
34
Editor Tools:
Back to Section

CMS Manual
35
Headings:
Back to Section

CMS Manual
36Back to Section

CMS Manual
37
Inserting a New Image:
Back to Section

CMS Manual
38
Uploading a New Image:
Back to Section

CMS Manual
39Back to Section

CMS Manual
40Back to Section

CMS Manual
41
Link List:
Back to Section

CMS Manual
42Back to Section

CMS Manual
43
External Links:
Back to Section

CMS Manual
44
Link to a Document:
Back to Section

CMS Manual
45
Search Engines/Optimization:
File Name:
Custom Title:
Back to Section

CMS Manual
46
Keywords:
META Description:
Back to Section
CMS Manual
47
Menus:
Back to Section

CMS Manual
48
Add New Menu Item:
Back to Section
CMS Manual
49Back to Section

CMS Manual
50Back to Section

CMS Manual
51Back to Section

CMS Manual
52
Modules:
Back to Section

CMS Manual
53
Create New Module:
Back to Section

CMS Manual
54Back to Section

CMS Manual
55Back to Section

CMS Manual
56
Configure Module Settings:
Back to Section

CMS Manual
57Back to Section
CMS Manual
58
Assign Module to Page(s):
Back to Section

CMS Manual
59Back to Section