cloud services - sparx systems...enterprise architect cloud services introduction the sparx systems...
TRANSCRIPT

Enterprise Architect
Cloud Services
Cloud Services
Contents
Introduction..................................................................................................................2
Overview......................................................................................................................2Security considerations....................................................................................................................... 2
Installation...................................................................................................................3
Server Configuration.....................................................................................................4Management Client Connection.......................................................................................................... 4General Settings.................................................................................................................................. 4Enterprise Architect Client Connection Properties...............................................................................5Restarting the Sparx Cloud Server....................................................................................................... 6
Using the Management Client.......................................................................................6Adding a new Database....................................................................................................................... 8Database Configuration...................................................................................................................... 9Server Options.................................................................................................................................. 10
Connecting Enterprise Architect as a Client.................................................................11
Additional Functionality..............................................................................................13Open Services for Lifecycle Collaboration (OSLC)...............................................................................13Re-usable Asset Service..................................................................................................................... 13Scheduled Tasks................................................................................................................................ 13IIS Integration (optional)................................................................................................................... 14
HTTP Module............................................................................................................................................14ISAPI Module............................................................................................................................................18Configuration settings..............................................................................................................................20
Appendix....................................................................................................................20Sample Server config file................................................................................................................... 20Activity Logs...................................................................................................................................... 21Troubleshooting................................................................................................................................ 22
Creating a Self-Signed Certificate using OpenSSL...............................................................................23
Enterprise Architect © 2014 Sparx Systems
Enterprise Architect
Cloud Services
IntroductionThe Sparx Systems Cloud Services application provides a convenient mechanism for hostingmodels. It provides easy access to your model by people within your team, and optionally byexternal customers and consultants anywhere around the world.
This document aims to:
1. Familiarize you with the concepts of the Cloud Services2. Discuss considerations of when and where you should use a Cloud server3. Walk you through the process of setting up a server with one or more models4. Walk you through the process of connecting for the first time5. Highlight some of the additional functionality available through the Cloud server
OverviewEnterprise Architect models are stored in databases. Prior to the introduction of Cloud Services, Enterprise Architect required users to install the appropriate drivers for the database and create a connection. The system would then use that connection to directly connect to the database and run the model.
With the introduction of Cloud Services that procedure has changed in ways that provide a number of benefits:
1. Improved performance for models used for distributed development. The Cloud server provides benefits to connections that involve high latency and reduced data transfer speeds.
2. The process of setting up drivers and connections can now be performed once by an administrator during the server configuration. The only set-up required on a user machine is to install Enterprise Architect and connect to any model on the Cloud server.
3. Database servers no longer have to be exposed through a firewall; the Cloud server can be run from insidea corporate firewall. All model connections are now created using HTTP, allowing firewalls to completely isolate your database server.
4. A Cloud server can be configured to encrypt all communication. Using standard TLS/SSL protocols, you canbe confident that your data is not intercepted during transmission on insecure networks.
5. A Cloud server can be configured to provide HTTP-level authorization to any model taken directly from themodel user list. Even when the model is exposed on a public network, you can be assured that only authorized users are able to access your model.
6. A Cloud server can be configured to provide read-only access to any model; for example, for clients required to review a model.
Security considerationsAs with any web connected service, there are a number of security concerns that must be considered when setting up a new service.
To help you minimize risks, consider these points:
If any data is considered private, always use an HTTPS connection and require user authentication. There is an option on each of the service's database configurations to prompt for this.
Enterprise Architect © 2014 Sparx Systems

Enterprise Architect
Cloud Services
There is an implicit trust in sharing a model with anyone. Security is available in models, which prevents a wide range of possible interactions. However, due to Enterprise Architect's flexibility determined users cancircumvent this. In particular Model Search SQL queries can be run in a number of places that allow data to be read that would not otherwise be accessible. Of note, this includes user IDs and hashes of their passwords. To prevent this type of access to a list of users, you could use Global Authentication instead ofModel Authentication. This is discussed further in the Enterprise Architect Client Connection Properties section below.
InstallationThe Sparx Systems Cloud Server runs as a Windows Service, accepting network connections from Enterprise Architect clients and sending the data required by the system back over the network. The service installer can be downloaded from the registered user section of the Sparx website:http://www.sparxsystems.com.au/registered/index.html
Installing the service and editing configuration files will both require you to have Administration rights. To ensure that you are running as Administrator, right click on the downloaded installer and select 'Run as Administrator'.
The installation provides options for the components to install.
Figure 1: Initial dialog for the Cloud Service Setup
These options are:
Enterprise Architect © 2014 Sparx Systems
Enterprise Architect
Cloud Services
1. Sparx Systems Cloud Service – The Windows service that will accept connections from Enterprise Architect and the management client.
2. Http Support - Optional component for integration with IIS. This is discussed further in the Added Functionality section below.
3. Management Client - This is used for management tasks including configuration of databases to connect to, and some server options.
Server ConfigurationIn the service install directory is the configuration file SSCloudServices.config.
An example of the contents of this file is included in the Sample Server Config File page in the appendix of this document.
To edit the configuration file, open it in a text editor (running as an administrator).
If you are launching the editor from the Windows Server 2012 start screen, you can right-click the selectededitor and run it as administrator using this button.
Once opened, you can edit this file to set configuration options, including the ports the server will listen on.
Management Client ConnectionThe first settings you will see in the configuration file are to control how the Management Client will connect to theserver. The default values are:
SERVER_PORT=803SERVER_PASSWORD=
SERVER_PORT is sued when you connect to the administration client or opt to use the IIS integration instead of the integrated web-server. For more detail see the IIS integration topic.We recommend that this port is not exposed to any external networks, as encryption cannot be applied toit.
SERVER_PASSWORD is the password to protect the administration functions of the server. This can also be changed directly within the Management client.
Use of the management client is discussed in the Management Client section.
General SettingsThe next list of settings is the default global settings across the entire service:
DBMAN_DEFAULTMAXSIMQUERIES=10AUDIT_TIME_PERIOD=3600TEMP_DIRECTORY=%SERVICE_PATH%\TempLOGGING_LEVEL=SYSTEMLOGGING_DIRECTORY=%SERVICE_PATH%\Logs
Enterprise Architect © 2014 Sparx Systems

Enterprise Architect
Cloud Services
LOGGING_FILECOUNT=3LOGGING_FILESIZE=1048576
DBMAN_DEFAULTMAXSIMQUERIES is the default maximum number of queries that can be run at a time for any configured database. It can be changed directly within the Management Client (see Default Max Simultaneous Queries under Server Options).
AUDIT_TIME_PERIOD is the number of seconds between the system logs recording activity on each database.
TEMP_DIRECTORY is the location to write temporary files before they are sent to clients. You should not generally need to change this.
LOGGING_LEVEL determines how verbose the server should be when writing log files. The valid values are: OFF, FATAL, WARNING, INFO and SYSTEM. This value can be changed directly within the Managementclient. (See Logging Level under Server Options).
LOGGING_DIRECTORY defines where the log files are to be stored. The default is set to =%SERVICE_PATH%\Logs.
LOGGING_FILECOUNT, LOGGING_FILESIZE collectively determines the maximum number of rolling log files kept and the maximum file size of each log file. When the logging file size is reached a new log file is created. When the file count is exceeded, the oldest file is automatically deleted.
Note: The =%SERVICE_PATH% refers to the directory where the Cloud service is installed.
For more details on using the logs see the Activity Logs page in the Appendix.
Enterprise Architect Client Connection PropertiesUsing the Cloud server you can define an arbitrary number of different ports on which to listen for connections from Enterprise Architect, each with a different configuration. Each port is denoted in the configuration file with open and close parentheses on their own lines.
(SERVER_PORT=80REQUIRE_SSL=0DEFAULT_MODEL=MODEL_AUTHENTICATION=GLOBAL_AUTHENTICATION=user modelOSLC_SUPPORT=1)
SERVER_PORT is the port on which the server will listen for HTTP connections; each connection must be unique and not used by any other services on the machine. You must check that no firewalls are blocking this port on the client or server. Using the standard HTTP port (80) or HTTPS port (443) is best.
REQUIRE_SSL should be set to 1 to enable HTTPS on this port; HTTPS should be enabled for all connections that are being exposed on public networks. HTTPS requires a private key file (server.pem), to be included in the same directory as the configuration file, before it will run. Note: This unique file must be user-created. See Creating a Self-Signed Certificate using OpenSSL.
Enterprise Architect © 2014 Sparx Systems

Enterprise Architect
Cloud Services
DEFAULT_MODEL allows a single model to be exposed on a port, making it possible to use a different port for each model. Model Names are discussed further in the Connecting Enterprise Architect as a Client section below.
MODEL_AUTHENTICATION can be set to 1 to request HTTP authorization using the user security in the model being connected to. Note that if you are not using SSL to connect, the usernames and passwords will be sent in plain text. This option is mutually exclusive with GLOBAL_AUTHENTICATION.
GLOBAL_AUTHENTICATION can be set to the name of a model with security enabled that will provide the list of users for all models accessed by the connection. This is helpful if you want to provide multiple models but only manage one list of users. This option is mutually exclusive with MODEL_AUTHENTICATION.
OSLC_SUPPORT is enabled by default. It allows models to be queried using the Open Services for Lifecycle Collaboration standard. This is discussed further in the section Open Services for Lifecycle Collaboration.Set to 0 to disable.
Restarting the Sparx Cloud ServerIf you make any changes to the configuration file you must restart the server for the changes to take effect. A server restart is carried out in the Windows Services application.
Depending on the server operating system, there are two methods for restarting the Cloud Server, as shown:
1) Figure 2 shows how to restart the service using Window Services. This is available in all versions of Windows (see Control Panel | Administrative Tools | Services).
Figure 2: Start and Stop options for Cloud Services in the Windows Services view
2) Figure 3 shows how to restart the service using the Server Manager on Windows Server 2012.
Figure 3: Start and Stop options in Windows 2012 Server
Using the Management Client
Enterprise Architect © 2014 Sparx Systems

Enterprise Architect
Cloud Services
At any point after installation you can connect to the service using the Management Client (SSCloudServicesClient.exe).
Note: By default this is accessible from: ..\Program Files (x86)\Sparx Systems\Client.
When you run SSCloudServicesClient.exe the Cloud Service Logon dialog displays.
Figure 4: Cloud Services Logon dialog
In the Cloud Services Logon dialog enter these details:
1. Server Address The Management Client can be used from any machine, but note that it should not be used outside a secure network because the communication is not secured. The Server Address format is:
<ServerURI>:< Port>
The server URI can be ‘localhost’, an IP address, a DNS name or a machine name; e.g. MyWebServer.If you are working on the web server, “localhost” will be sufficient.Details on where the port is defined are provided in Manage Client Connection.
2. PasswordEnter the password as defined in Manage Client Connection. By default this password is blank.
After you connect to the server the Sparx Systems Cloud Services Configuration Client dialog displays:
Enterprise Architect © 2014 Sparx Systems
Enterprise Architect
Cloud Services
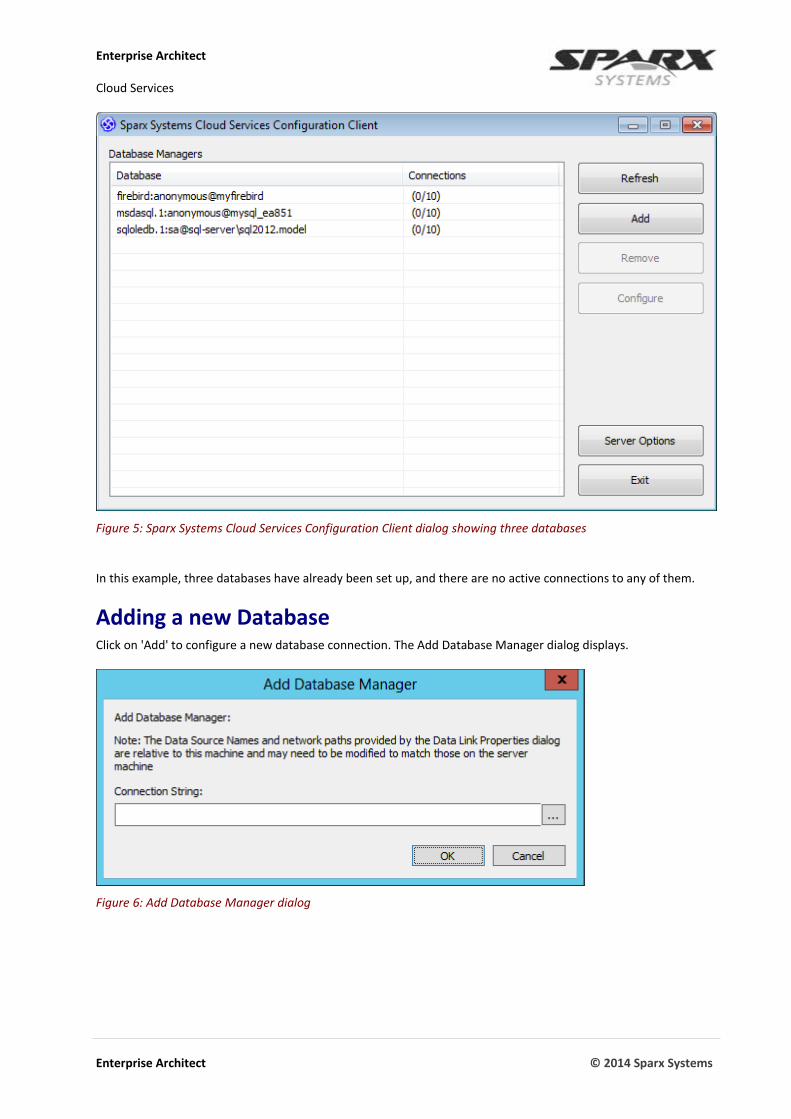
Figure 5: Sparx Systems Cloud Services Configuration Client dialog showing three databases
In this example, three databases have already been set up, and there are no active connections to any of them.
Adding a new DatabaseClick on 'Add' to configure a new database connection. The Add Database Manager dialog displays.
Figure 6: Add Database Manager dialog
Enterprise Architect © 2014 Sparx Systems

Enterprise Architect
Cloud Services
For the Connection String field you have two options:
1. Connect to an existing DBMSTo connect to an existing database, specify the connection string to the database. If you are running the admin client on the same machine as the server you can click on the ellipsis (...) button to open the Data Link Properties dialog to build the connection string.
For details on creating a project database and the ODBC drivers required for connection to your specific DBMS, see the Enterprise Architect Server based Repositories Help pages.
Note: Configure the ODBC connection for a System DSN not a User DSN.
2. Create a Firebird DatabaseYou can create a new Firebird database by entering a model name followed by the extension '.feap'. A new Firebird database with this name is automatically created under the %SERVICE_PATH%\Models\ directory. A connection string is defined to connect to this new file.
Database ConfigurationOnce you have entered a connection to a database you can configure the setting for it:
1. Select any database entry in the main dialog (see Figure 5).
2. Click on the Configure button to adjust settings for this database.Figure 7 shows the details of the connections and provides a number of options that apply to the database.
Figure 7: Configuration details of a DBMS connection
The options on the Configure Database Manager dialog are:
Accept Queries must be selected to allow users to connect to this database.
Max Simultaneous Queries is a control on the maximum number of simultaneous connections that will be created to this model. The default value for this field when creating a new connectionis configurable in the Default Max Simultaneous Queries option in the Configure Server dialog.
Enterprise Architect © 2014 Sparx Systems

Enterprise Architect
Cloud Services
To maintain constraints of system performance against resource usage you can look at the audit history for each database (in the Activity Logs), to see how many connections have been used in the specified time period.
Run Scheduled Tasks triggers the server to run periodic updates to this model. This is discussed further in Run Scheduled Tasks , below.
Read-only connection allows a model to be shared without allowing any changes to be made.Note: The same database can be set up with two different connection settings: one Read/Write, one Read-Only, with the Read-Only typically being accessible for clients to review.
Require a secure and authenticated connection flags that security is required for this model. No connections will be accepted unless via HTTPS, with either model authentication or global authentication set.
Server OptionsAlong with the database connection options, there are options you can set for the web server.
1. Open the Sparx Systems Cloud Services Configuration Client dialog (See Figure 5).
2. Click on the Server Options buttonThe Configure Server dialog displays, on which you to change the basic options on the server.
Figure 8: Configure Server dialog
The options on the Configure Server dialog are:
Protocol Version allows you to see the protocol being provided to communicate with Enterprise Architect. This is preset to 5.
Default Max Simultaneous Queries is the default setting for the number of queries that a new database manager will accept on creation. See Max Simultaneous Queries in Database Configuration and Audit History in Activity Logs
Log Level allows you to change the level of detail that is included in the logs generated by the service. For details on the settings see Activity Logs.
Enterprise Architect © 2014 Sparx Systems

Enterprise Architect
Cloud Services
Set New Password allows you to modify the password required to use the Management Client for this server.
Each of these options can also be set in the configuration file; however, the service does not require a restart if set using this dialog (see Genera l Settings ).
Connecting Enterprise Architect as a ClientOnce your server has been set up with at least one port listening for communication and at least one model you can connect to, you can connect to the model using Enterprise Architect's Connect to Cloud option.
When you open Enterprise Architect the Open Project dialog displays. The Connect to Server button on the top right provides access to Cloud connections. This dialog can also be opened using the menu option File | Open Project.
Figure 9: Open Project dialog showing the Connect To Cloud option.
Alternatively, you can click on the Connect to Cloud option on the Start Page.
The Cloud Connection dialog prompts you for the details of the model.
Enterprise Architect © 2014 Sparx Systems
Figure 10: Start page option for connecting to a Cloud model

Enterprise Architect
Cloud Services
Figure 10: The Cloud Connection dialog.
The option details for the Cloud Connection dialog are:
Name is the text that the model will be identified as on your machine. It can be any value and does not need to match any values on the server. In the example, 'Example Cloud Connection' will appear in the recent model list.
URL provides the protocol, path and port for the server, in the format:
<Protocol>://<MachineName>:<Port>
In the example, we are connecting to the machine sparxcloud.com, using the HTTPS protocol on port 443.
Where a protocol of https:// is used, http:// would also be valid.
The machine name sparxcloud.com can be specified as a machine name or as the IP address of your server.
The port number (:443) is optional if using port 80 for HTTP or port 443 for HTTPS.
Model Name is a pointer to the model as configured on the server:
• For a DBMS it is the DataSource or DB Instance name as defined in the ODBC connection set on the Cloud server
• For a Firebird model it is the name of the file with no extension (no .feap suffix)
The Model Name can be derived from the Connection String field in Figure 7. Below are some examples ofthese strings. The bold text is what is entered in the Model Name field:
Firebird model: firebird:anonymous@FBmodelODBC data source – Data Source: msdasql.1:anonymous@postgresSQL server OLE DB - Database name: sqloledb.1:sa@sql-server\sql2012.MsSQLOracle OLE DB: oraoledb.oracle.1:ea851@ora11g
Enterprise Architect © 2014 Sparx Systems

Enterprise Architect
Cloud Services
If the Cloud Server specified a default model for the port you are connecting to, this field is not required.
Fields are also available for Username and Password. These are not generally required as Enterprise Architect will prompt if the server requires authentication.
Additional FunctionalityIn addition to the core functionality of providing a model over an HTTP connection, Cloud Services offer three morefacilities that add value to setting up a server.
Open Services for Lifecycle Collaboration (OSLC)Open Services for Lifecycle Collaboration (OSLC) is an initiative to allow easier integration between requirement tools. It uses HTTP to list, add, modify and delete requirements.
The service provider definition to which to direct any OSLC client is:
<protocol>://<server>:<port>/<model_name>/oslc/sp/
For example, if you are connecting to a server running on your own machine using the default settings, the connection will be:
http://localhost:804/model/oslc/sp/
For more information see http://open-services.net/.
Re-usable Asset ServiceThe Re-usable Asset Service (RAS) portion of the Cloud Server allows packages to be defined that can be used in any model. Enterprise Architect and the Cloud Server will track cross-package dependencies and ensure that everything required by a package is available when the package is requested.
Scheduled TasksThe Cloud Server includes optional support for running time based updates to data.
This is currently limited to updating a Time Series chart automatically to provide a dynamic view of how a model is changing over time. For more information see the Enterprise Architect Help topic Define a Time Series chart.
Enterprise Architect © 2014 Sparx Systems

Enterprise Architect
Cloud Services
IIS Integration (optional)Although the built in web-server provides a number of benefits and is the preferred means for providing Cloud Services for Enterprise Architect, the Cloud Server can optionally be integrated with an IIS server.
If this is required, you must include HTTP support when installing this service.
To configure IIS to host the Cloud Service, you must open in Windows the Internet Information Services (IIS) Manager and configure it to send requests to the appropriate module. This is discussed in the following sections onthe IIS modules:
1. HTTP Module
2. I S A PI Module
3. Configuration Settings
These will require an Application pool that is 32-bit and not managed code.
Note: For more details see: http://www.iis.net/learn/get-started/introduction-to-iis/iis-modules-overview
HTTP ModuleTo set up the HTTP module in Internet Information Services (IIS) Manager:
1. In the Connections panel, select the machine properties (top of the tree).
2. Double-click on the Modules icon in the middle panel. This returns the Modules list and the Actions view.
Figure 11: Internet Information Services (IIS) Manager showing the Modules option.
Enterprise Architect © 2014 Sparx Systems

Enterprise Architect
Cloud Services
3. In the Actions list, click on the Configure Native Modules… option.
Figure 12: IIS Modules listing and related Actions
4. This opens the Configure Native Modules view.
5. Click on the Register button to open the Register Native Module dialog.
Figure 13: Dialog for registering a native module.
6. Type in the Name and the Path to the SSCSIISHttpLink.dll file.
Enterprise Architect © 2014 Sparx Systems
Figure 13: Configure Native Modules dialog

Enterprise Architect
Cloud Services
7. Click on the OK button. The SSCloudServices checkbox will now be selected.
8. Click on OK to close the Configure Native Modules dialog.
9. In the Connections panel (see Step 10), select your web site.
10. Double-click the Handler Mappings in the middle pane.
Figure 14: IIS Manager showing the Handler Mappings option.
This opens the Handler Mappings view:
Enterprise Architect © 2014 Sparx Systems

Enterprise Architect
Cloud Services
Figure 15: IIS Handler Mappings listing and related Actions
11. In the Actions list, click on the Add Module Mapping option to open the Add Module Mapping dialog.
12. In the Add Module Mapping dialog (Figure16), set the Request path, Module and Name. From the Module drop-down select the module added in step 6.
Figure 16: IIS Add Module Mapping dialog with the Cloud Service settings.
13. Click on the Request Restrictions button and, on the Request Restrictions dialog, select the Access tab. Select the Execute radio button to enable Execute permission.
Enterprise Architect © 2014 Sparx Systems

Enterprise Architect
Cloud Services
14. Click on the OK button.
15. Close the Add Module Mapping dialog by clicking on the OK button.
ISAPI ModuleTo configure an ISAPI module instead of the HTTP module:
1. In the Connections panel, select the machine properties:
2. Double-click on the Handler Mappings icon:
Enterprise Architect © 2014 Sparx Systems
Figure 17: Selecting IIS Machine Properties

Enterprise Architect
Cloud Services
3. In the Actions list, click on the Add Module Mapping option.
4. In the Add Module Mapping dialog, set Request path to SSCloudLink.sseap, Module to IsapiModule, and Executable to SSCSIISIsapiLink.dll, as shown.
Figure 17: IIS Add Module Mapping dialog with the Cloud Service settings.
5. Click on the OK button to close the dialog.
Enterprise Architect © 2014 Sparx Systems

Enterprise Architect
Cloud Services
Configuration settingsThe path containing SSCSIISHttpLink.dll and SSCSIISIsapiLink.dll contains a configuration file SSCloudLink.sseap. Referring to the example in Figure 17 the path is “C:\Program Files (x86)\Sparx Systems\Cloud Services\ISAPI”.
Edit this in a text editor running as an Administrator. The default contents are:
[cloud]server=localhostport=4444
Change these values to reference the connection details for the administration port of the server.
You should now be able to connect to a model using Enterprise Architect via your IIS server.
AppendixSample Server config file# Default port for all TCP connections to this service# including management requests and connections routed# through the ISAPI module.# It is not recommended to expose this port outside of# your private network.SERVER_PORT=803SERVER_PASSWORD=
# General server properties.DBMAN_DEFAULTMAXSIMQUERIES=10# Audit once every 4 hoursAUDIT_TIME_PERIOD=14400TEMP_DIRECTORY=%SERVICE_PATH%\Temp
# LOGGING OPTIONS# LOG_LEVEL – Valid log levels, from lowest to highest, are:# 1. FATAL# 2. WARNING# 3. INFO# 4. SYSTEMLOGGING_LEVEL=SYSTEMLOGGING_DIRECTORY=%SERVICE_PATH%\LogsLOGGING_FILECOUNT=3LOGGING_FILESIZE=1048576
(# Run simple http port to allow public access to our public api modelSERVER_PORT=80
# Warning: There is no security applied to this connection.REQUIRE_SSL=0
# Provide the public api directly when accessing via httpDEFAULT_MODEL=public api)
(# https port running on the default https port, provided for our# internal modelsSERVER_PORT=443
Enterprise Architect © 2014 Sparx Systems

Enterprise Architect
Cloud Services
REQUIRE_SSL=1# Ensure all users have to log on to the server with credentials# matching the requested modelMODEL_AUTHENTICATION=1)
Activity LogsThe activity of the Sparx Systems Cloud Service is logged to file according to the options specified in the configuration file SSCloudServices.config. For more details see General Settings .
See the entry/setting: LOGGING_DIRECTORY. By default this output is set to:
=%SERVICE_PATH%\Logs
The log content resembles the following:
The level of messages that will be written to the log file is defined by the LOG_LEVEL option in the Configuration file. Higher log levels include messages from the lower levels that precede them. Valid log levels, from lowest to highest, are:
FATAL Events that result in termination of the service's execution
WARNING Events outside the normal scope of the service's operation, but not fatal (such as a wrong password supplied by a client)
INFO Events generated within the normal scope of the service's operation
SYSTEM Detailed system level events (such as client connection/disconnection)
Audit HistoryTo maintain constraints of system performance against resource usage you can look at the audit history (in the activity log) for each database, to see how many connections have been used in a specified period.
Enterprise Architect © 2014 Sparx Systems
Enterprise Architect
Cloud Services
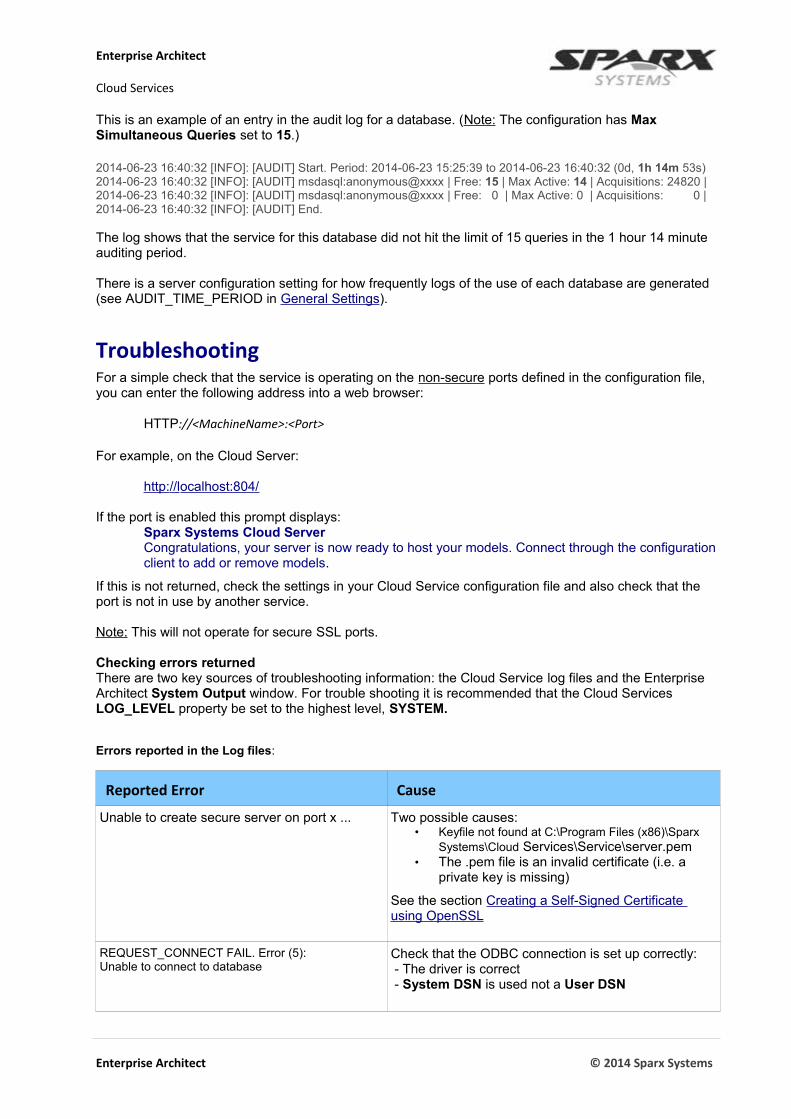
This is an example of an entry in the audit log for a database. (Note: The configuration has Max Simultaneous Queries set to 15.)
2014-06-23 16:40:32 [INFO]: [AUDIT] Start. Period: 2014-06-23 15:25:39 to 2014-06-23 16:40:32 (0d, 1h 14m 53s) 2014-06-23 16:40:32 [INFO]: [AUDIT] msdasql:anonymous@xxxx | Free: 15 | Max Active: 14 | Acquisitions: 24820 |2014-06-23 16:40:32 [INFO]: [AUDIT] msdasql:anonymous@xxxx | Free: 0 | Max Active: 0 | Acquisitions: 0 |2014-06-23 16:40:32 [INFO]: [AUDIT] End.
The log shows that the service for this database did not hit the limit of 15 queries in the 1 hour 14 minute auditing period.
There is a server configuration setting for how frequently logs of the use of each database are generated (see AUDIT_TIME_PERIOD in General Settings).
TroubleshootingFor a simple check that the service is operating on the non-secure ports defined in the configuration file, you can enter the following address into a web browser:
HTTP://<MachineName>:<Port>
For example, on the Cloud Server:
http: // l ocalhost:804/
If the port is enabled this prompt displays:Sparx Systems Cloud ServerCongratulations, your server is now ready to host your models. Connect through the configurationclient to add or remove models.
If this is not returned, check the settings in your Cloud Service configuration file and also check that the port is not in use by another service.
Note: This will not operate for secure SSL ports.
Checking errors returnedThere are two key sources of troubleshooting information: the Cloud Service log files and the Enterprise Architect System Output window. For trouble shooting it is recommended that the Cloud Services LOG_LEVEL property be set to the highest level, SYSTEM.
Errors reported in the Log files:
Reported Error Cause
Unable to create secure server on port x ... Two possible causes:• Keyfile not found at C:\Program Files (x86)\Sparx
Systems\Cloud Services\Service\server.pem• The .pem file is an invalid certificate (i.e. a
private key is missing)
See the section Creating a Self-Signed Certificate using OpenSSL
REQUEST_CONNECT FAIL. Error (5): Unable to connect to database
Check that the ODBC connection is set up correctly: - The driver is correct - System DSN is used not a User DSN
Enterprise Architect © 2014 Sparx Systems

Enterprise Architect
Cloud Services
Errors reported via Enterprise Architect's System Output window.
Reported Error Cause
Cloud Service: Unable to connect to cloud Database
Check that the ODBC connection has been configured for System DSN not User DSN.
Cloud Service: The database manager for this database was shut down.
Configure Database Manager dialog for the DBMS has [x] Accept Queries set.
Cloud Services: HTTP Status Code: 401 Access denied"
The Cloud Database Configuration requires secure and authenticated connection (REQUIRE_SSL = 1).
The problem could be:
• Connection to a model with an un-secure connection (i.e. Database Connection requires SSL, but tried to connect on port 80)
• Both MODEL_AUTHENTICATION= and GLOBAL_AUTHENTICATION= are set (these are exclusive)
• Username and password is incorrect
Cloud Services: Unable to connect to service: HTTP status: 500
Either a firewall is blocking the port or you have tried connecting to a port the server isn't listeningon.
Enterprise Architect © 2014 Sparx Systems

Enterprise Architect
Cloud Services
Creating a Self-Signed Certificate using OpenSSLTo use HTTPS the service requires a unique user-defined security file (security.pem).Supplied with the Cloud Service is the Openssl.exe which can be used for creating self-signed Certificates.
The creation of certificates and the interaction with a service provider on implementing them is outside thescope of this document; however, you can reference web links covering this operation.
We provide a simple batch file method of creating a server.pem file. If you paste this code into a batch file and run it with the target hostname as a parameter, it will generate an appropriate key file.
echo off
if not "%1" == "" goto generate
echo ERROR: No target specifiedecho USAGE: %0 urlecho EXAMPLE %0 localhostgoto end
:generateecho onopenssl genrsa -out %1.key 2048 openssl req -new -x509 -key %1.key -out %1.cert -days 3650 -subj /CN=%1 copy /b %1.cert+%1.key server.pem
:end
The server.pem file must be installed in the same directory as the SSCloudServices.config file (..\SparxSystems\Cloud Services\Service).
Note: you may need to download an openssl config file (openssl.cnf) from the net.
Enterprise Architect © 2014 Sparx Systems