clinical information center pro v5 (cic pro) -...
TRANSCRIPT

GE Healthcare
Clinical SystemsClinical and Educational Development
Clinical Information Center Pro v5 (CIC Pro)Participant Reference Guide


i.
Clinical Information Center Pro v5 Clinical Systems, Clinical Education and Development
WelcomeWe would like to take a moment to thank you for choosing GE Healthcare for your patient care needs. Our goal is to provide you with the best training service available, and continue to support you while you use our products.
Program Description
This course is designed to give participants the information and product knowledge needed to proficiently operate the CIC Pro central monitoring system using telemetry or hardwire GE Healthcare Monitors. This course will use discussion, scenarios and return demonstrations to teach the monitoring platform and the application of problem-solving techniques for issues that may arise.
Program Objectives
The objective of the program is to partner with participants to gain knowledge or expand their knowledge base of the CIC Pro. The course will enable participants to more efficiently operate the CIC Pro central monitoring system as it pertains to his or her nursing care area.
Participant Learning Objectives
At the completion of this program, the learner with be able to:
Identify components of the CIC Pro system.
Identify specific areas on the screens and navigate through each area.
View another unit and bed.
Print an individual strip as well as unit strips.
Configure real time trends window.
Set up the CIC Pro for your individual preference, font size, color and number of waveforms.
Verbalize the levels of alarms for GE Monitoring System.
View and adjust patient alarms.
View patient data, events, trends and vital signs.
Change scale and time range of viewing graphic trends and change sorting groups.
View vital signs, change sorting and interval for viewing.
Silence alarms; conduct smart alarms when patient is off the monitor.
Configure full disclosure page.
Print a full disclosure strip.
Take measurements of ECG waveform using calipers feature.
•
•
•
•
•
•
•
•
•
•
•
•
•
•
•

ii Clinical Information Center Pro v5 Clinical Systems, Clinical Education and Development
Customer Support Center 800-558-7044For Technical issues, choose Clinical Systems Technical Support.
For Clinical questions and issues, choose Clinical Systems Applications Support.
Note: The Customer Support Representative will request the product name and serial number to process your call.
For more details on using the CIC Pro system, see the ‘CIC Pro Clinical Information Center software version 5 Operator’s Manual’.
Notice:
The materials contained in this document are intended for educational purposes only. This document does not establish specifications, operating procedures or maintenance methods for any of the products referenced. Always refer to the official written materials provided with the product for specifications, operating procedures and maintenance requirements.

iii.
Clinical Information Center Pro v5 Clinical Systems, Clinical Education and Development
Table of Contents
Overview of Equipment
CIC Pro ................................................................ 1-1
ApexPro CH Transmitter .................................. 1-2
ApexPro FH Transceiver ................................... 1-3
Display
Multi-Patient Viewer ........................................ 2-1Multi-Patient Viewer Main Menu Buttons .... 2-2
Multi-Patient Viewer - Patient Window ......... 2-3
Real-Time Trend Graph Configuration .......... 2-4
Real-Time Trend Graph Configuration Window .....2-5
Single Patient Viewer ....................................... 2-6Single Patient Viewer Menu Buttons .............. 2-7
Second Display - Optional ............................... 2-8
Managing Patients
Monitoring Modes ............................................. 3-1
Admit ................................................................... 3-2
Admit Using Manual Entry .................................. 3-2
Admit Using a Networked Database .............. 3-3
Discharge ........................................................... 3-4
Transfer .............................................................. 3-5
Monitor Setup
Alarms - Categories and Structure ............... 4-2
Patient Status Alarms ............................................ 4-2
System Status Alarms ........................................... 4-3
Alarms- Silencing Alarms ................................ 4-4
Alarms- NO COMM ............................................ 4-5
Alarm Pause- Telemetry Only ......................... 4-6
Adjusting Alarm Control Settings .................. 4-7
Adjusting Parameter Control Settings .......... 4-8
ECG ................................................................................. 4-9
SPO2/Resp .................................................................4-10
Pressures ...................................................................4-11
Patient Data Retrieval
Second Display- Optional ................................ 5-2
Events Directory and Events Strip ................. 5-3
Events Directory-Sort by Type or Time of Event ..5-4
Vital Signs ........................................................... 5-5
Graphic Trends .................................................. 5-6

iv Clinical Information Center Pro v5 Clinical Systems, Clinical Education and Development
Full Disclosure Overview ................................. 5-7
Full Disclosure- FD Strip ........................................ 5-7
Full Disclosure- FD Page ...................................... 5-8
Customizing the FD Page .................................... 5-9
Printing a Full Disclosure Report ....................5-10
Second Display- Optional .............................. 5-11
Calipers ............................................................. 5-12
CIC Pro v5 Post Test
CIC Pro v5 Skills Check List
Program and Speaker Evaluation
Clinical Information Center Pro v5 - Overview of Equipment Clinical Systems, Clinical Education and Development
1-1
MUSE Cardiology System Assistance
Overview of Equipment
CIC ProPrimary Display
Keyboard Mouse
MD
.108
.096
Second Display
Speakers
Processor
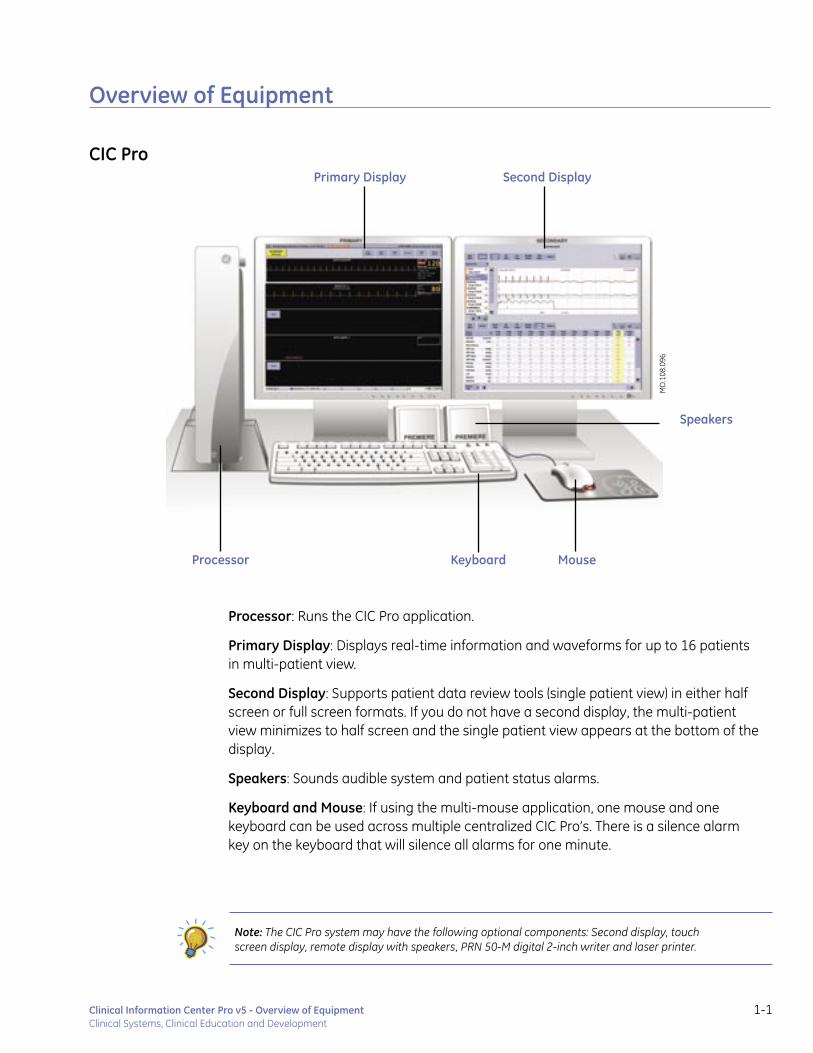
Processor: Runs the CIC Pro application.
Primary Display: Displays real-time information and waveforms for up to 16 patients in multi-patient view.
Second Display: Supports patient data review tools (single patient view) in either half screen or full screen formats. If you do not have a second display, the multi-patient view minimizes to half screen and the single patient view appears at the bottom of the display.
Speakers: Sounds audible system and patient status alarms.
Keyboard and Mouse: If using the multi-mouse application, one mouse and one keyboard can be used across multiple centralized CIC Pro’s. There is a silence alarm key on the keyboard that will silence all alarms for one minute.
Note: The CIC Pro system may have the following optional components: Second display, touch screen display, remote display with speakers, PRN 50-M digital 2-inch writer and laser printer.

Clinical Information Center Pro v5 - Overview of Equipment Clinical Systems, Clinical Education and Development
1-2
ApexPro CH Transmitter
Verify Leads: When pressed, checks the lead/skin preparation quality.
Lead Verification LEDs: Illuminated LEDs for one minute signify good electrode connection.
Change Battery LED: Flashes when battery power is low. Approximately one hour of charge remains when flashing. A message, “change battery” will appear on the CIC Pro patient window.
Graph: When pressed, initiates a 20-second graph at the printer and stores a “sample” 10 second strip in Events.
Pause Alarm LED: Pressing the Verify Leads and Graph buttons simultaneously will initiate a five minute alarm pause. The amber Pause Alarm LED will flash and “alarm pause” is shown in the patient window at the CIC Pro.
Event Marker: Marks a patient event in Events. When pressed, a blue border is placed around the patient window and an alarm tone sounds. The words “remote event” appear beneath the ECG parameter box in the patient window and a 20-second graph is initiated.
Battery Compartment: Slide open to install two AA batteries. Battery life is approximately 120 hours for the CH transmitter.
Interface Connector Ports: There are two ports used for connecting serial interface devices such as Apex Oximeter, Xpod oximeter, Accutracker NBP monitor or the Dinamap series monitors. These are optional devices.
Verify Leads
Lead Verification LEDs Change Battery LED
Pause Alarm LED
Graph
Event Marker
Battery Compartment
Interface Connector Ports
MD
.101
.066

Clinical Information Center Pro v5 - Overview of Equipment Clinical Systems, Clinical Education and Development
1-3
ApexPro FH Transceiver
ECG Leadset Connector: Allows the ECG leadset to attach to the ApexPro FH transceiver.
Attendant Present/Procedure Alarm Silence (PAS) Unlock Button: Press both buttons simultaneously to illuminate the electrode status indicator lights. If PAS (procedure alarm silence) is enabled, press and hold for two seconds to unlock so you can use the PAS button.
Remote Record Button: Prints a 20-second strip at the CIC.
Event Marker: Marks the patient event in Events. When pressed, a blue border is placed around the patient window and an alarm tone sounds. The words “remote event” appear beneath the ECG parameter box in the patient window and a 20-second graph is initiated.
Electrode Status Indicators: Each LED is illuminated with a solid light when there is good electrode connection.
Battery Compartment: Flip open to insert a new 9-volt battery. Battery life is approximately 30 hours.
Procedure Alarm Silence (PAS) Button and Indicator: When the PAS button is flashing, you can press for a 2-minute alarm pause at the CIC Pro. The indicator is illuminated when the PAS function is active.
Low Battery, RF, and I/O Connector Link Indicators: Solid battery light indicates good voltage and flashes when battery life is low. When RF is illuminated there is a good communication with the CIC Pro. There is no communication with the CIC Pro when RF flashes. I/O is illuminated when connected to an external device.
External Serial Device Connector: Allows an external serial device or programming cable to connect and maintain a logical communication link with the transceiver, the CIC Pro, and the device.
ECG Leadset Connector
Attendant Present/Procedure Alarm
Silence Unlock Button
Remote Record Button
Event Marker
Electrode Status Indicators
Battery Compartment
Procedure Alarm Silence Button and Indicator
Low Battery, RF, and I/O Connector
Link Indicators
External Serial Device Connector
MD
.101
.065

Clinical Information Center Pro v5 - Overview of Equipment Clinical Systems, Clinical Education and Development
1-4

Clinical Information Center Pro v5 - Display Clinical Systems, Clinical Education and Development
2-1
MUSE Cardiology System Assistance
Display
Multi-Patient ViewerThe multi-patient viewer can display up to 16 patients. Beds can be locked into a particular window. They also can be unlocked, allowing them to be moved around the CIC Pro. Unlocked beds can be removed, creating empty slots that allow addition of new beds or beds to be viewed from another unit.
Note: Locking and unlocking beds requires a service level password.
MD
.108
.097
A. Alarm Display Unit Line (ADU Line): The four highest priority alarms within the care unit are displayed left to right. A red background indicates a crisis alarm and a yellow background indicates warning and advisory alarms.
B. Patient Window: Left mouse click in the patient window to display the single patient view.
C. Multi-Viewer Main Menu Buttons: The buttons that are available in the Multi-Viewer Main Menu are determined by the options that were purchased.
D. Window Borders: A white border indicates the patient selected for single patient viewing. A red border indicates a patient in crisis alarm, and a yellow border indicates a patient in warning alarm.
E. Locked Bed: Empty patient window ready to admit patient.
F. Unlocked Bed: Empty patient window ready to admit patient.
A
B
C
D
E
F

Clinical Information Center Pro v5 - Display Clinical Systems, Clinical Education and Development
2-2
MD
.108
.097
Multi-Patient Viewer Main Menu Buttons
There are six main menu buttons located at the top of the Multi-patient Viewer. The buttons that are available are determined by the options purchased.
Auto Display: Removes any unlocked unoccupied beds, adds at least one empty patient window with an ADMIT button and resizes the remaining patient windows to maximize the amount of patient data displayed.
View Other: Displays a list of networked units and beds. Click on the desired unit, then choose the bed to view that bed in a single patient view.
Setup CIC: Enables display of the CIC Pro center default settings and access to customizable user-level defaults.
Browser: Provides access to Citrix Client or the hospital’s Intranet browser for viewing other applications such as the hospital information system or other sources of patient data such as labs or images.
Graph All: Select Limits or Waveforms and then click OK to print all the limits or waveforms for the displayed patients on the Multi-patient Viewer.
Silence Alarms: Silences audible alarms for one minute. If a new patient alarm condition occurs, a new alarm will sound.

Clinical Information Center Pro v5 - Display Clinical Systems, Clinical Education and Development
2-3
Multi-Patient Viewer - Patient Window
A. ECG Waveform and Lead Label: A maximum of four waveforms can be displayed in the patient window.
Right mouse click in the patient window to add additional waveforms or change the colors of each waveform if desired.
B. ECG Parameter Window: Displays HR, Pace Detection, PVC, ST segment data, and Alarm Silence icon. A print icon appears when you position the cursor over the ECG parameter window.
Left mouse click in the ECG parameter window to activate an individual strip.
C. Asterisk: An asterisk next to the bed number indicates a telemetry bed, and distinguishes it from a bedside monitor.
D. Real-time Trend Graph: The real-time trend graph displays the recent trends for a maximum of two parameters and contains one hour of data displayed at one-minute intervals.
MD
.108
.097
A
BC
D
MD
.108
.099

Clinical Information Center Pro v5 - Display Clinical Systems, Clinical Education and Development
2-4
Real-Time Trend Graph Configuration
There are two ways to access the Real-time Trend Graph Configuration Window.
1. Right mouse click in the patient window and choose Configuration. This will display the Real-Time Trend Graph Configuration window.
2. A. Left mouse click in the selected patient’s window to display the single patient view. B. Click Real-Time View to display the real-time view screen. C. Click Configuration to display the Real-time Trend Graph Configuration window.
MD
.108
.005
MD
.108
.083
B
A
C

Clinical Information Center Pro v5 - Display Clinical Systems, Clinical Education and Development
2-5
Real-Time Trend Graph Configuration Window
Here you have the option to turn on or off the Real-time Trend Graph in the patient window. You can choose the parameters you want to display, as well as the scale and color of each parameter displayed.
MD
.108
.069
Clinical Information Center Pro v5 - Display Clinical Systems, Clinical Education and Development
2-6
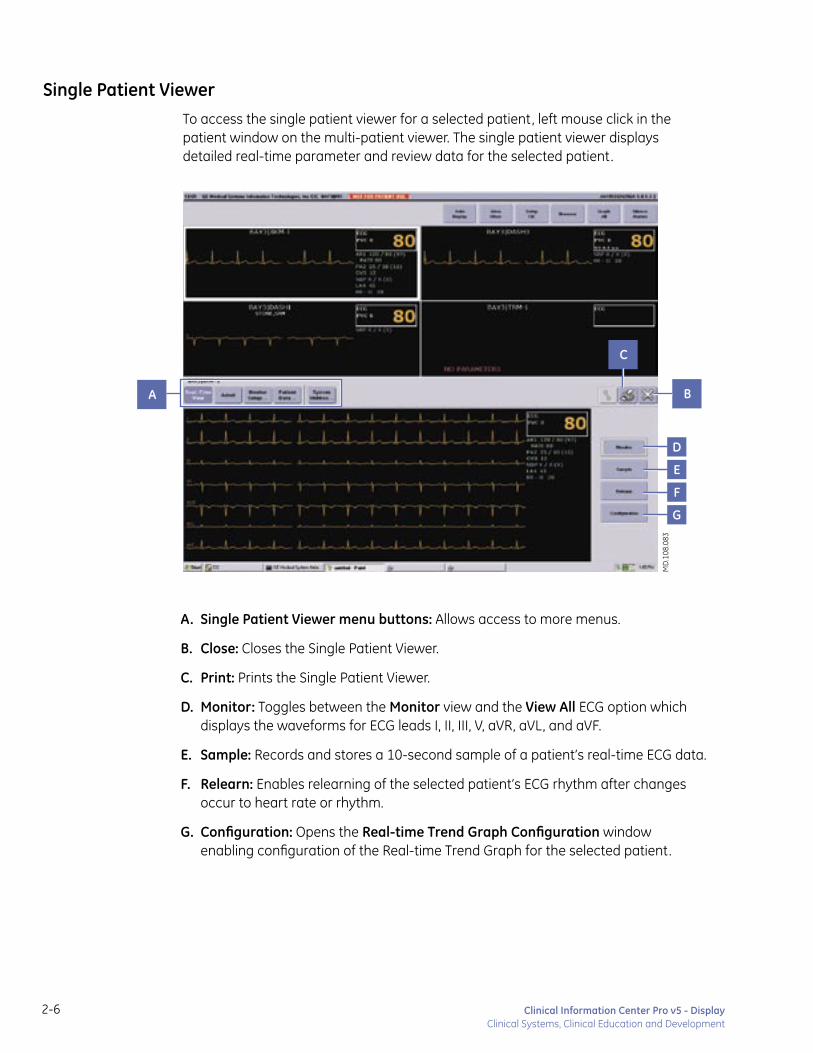
Single Patient ViewerTo access the single patient viewer for a selected patient, left mouse click in the patient window on the multi-patient viewer. The single patient viewer displays detailed real-time parameter and review data for the selected patient.
MD
.108
.083
A. Single Patient Viewer menu buttons: Allows access to more menus.
B. Close: Closes the Single Patient Viewer.
C. Print: Prints the Single Patient Viewer.
D. Monitor: Toggles between the Monitor view and the View All ECG option which displays the waveforms for ECG leads I, II, III, V, aVR, aVL, and aVF.
E. Sample: Records and stores a 10-second sample of a patient’s real-time ECG data.
F. Relearn: Enables relearning of the selected patient’s ECG rhythm after changes occur to heart rate or rhythm.
G. Configuration: Opens the Real-time Trend Graph Configuration window enabling configuration of the Real-time Trend Graph for the selected patient.
D
B
C
E
F
G
A

Clinical Information Center Pro v5 - Display Clinical Systems, Clinical Education and Development
2-7
Single Patient Viewer Menu buttons
Real-Time View: Enables viewing of real-time patient data.
Admit: Displays the admit window.
Monitor Setup: Allows access to the patient parameters, alarm, and print control settings.
Patient Data: Allows access to stored events, graphic trends, vital sign, and full disclosure of patient data. The Calipers review tool is found here as well.
System Utilities: Enables access to web access server data.
MD
.108
.083

Clinical Information Center Pro v5 - Display Clinical Systems, Clinical Education and Development
2-8
Note: You can view three tools only when one of the review tools is the Events directory.
Second Display- OptionalA second display allows uninterrupted viewing of the patient waveforms and information on multi-patient viewer. All single patient viewer and review tool screens will be displayed on the second screen. The second display can be split into two zones so you can view up to three separate review tools on the selected patient.
MD
.108
.068
Primary Display Secondary Display
Zone 2
Zone 1

Clinical Information Center Pro v5 - Managing Patients Clinical Systems, Clinical Education and Development
3-1
MUSE Cardiology System Assistance
Managing Patients
Monitoring ModesYou can admit patients to the CIC Pro when the source of the ECG data comes from either a bedside monitor or a telemetry transmitter. The source of ECG data determines the monitoring mode for the CIC Pro.
The monitoring mode is configured during installation. Below is the chart explaining the different modes:
Mode Description
Standard • The monitor is stationary and always in the same room. • The patient is not connected to a telemetry transmitter.
Rover • The monitor moves (roves) from room to room. • The patient is not connected to a telemetry transmitter.
Combo • The patient can be connected to a telemetry transmitter (for ECG signal) and a stationary monitor (for other types of monitoring) at the same time. • The monitor is stationary and always in the same room.
Rover-Combo • The patient can be connected to a telemetry transmitter (for ECG signal) and a stationary monitor (for other types of monitoring) at the same time. • The monitor can move (rove) from room to room.
Clinical Information Center Pro v5 - Managing Patients Clinical Systems, Clinical Education and Development
3-2
1
MD
.108
.060
2
3
4
5
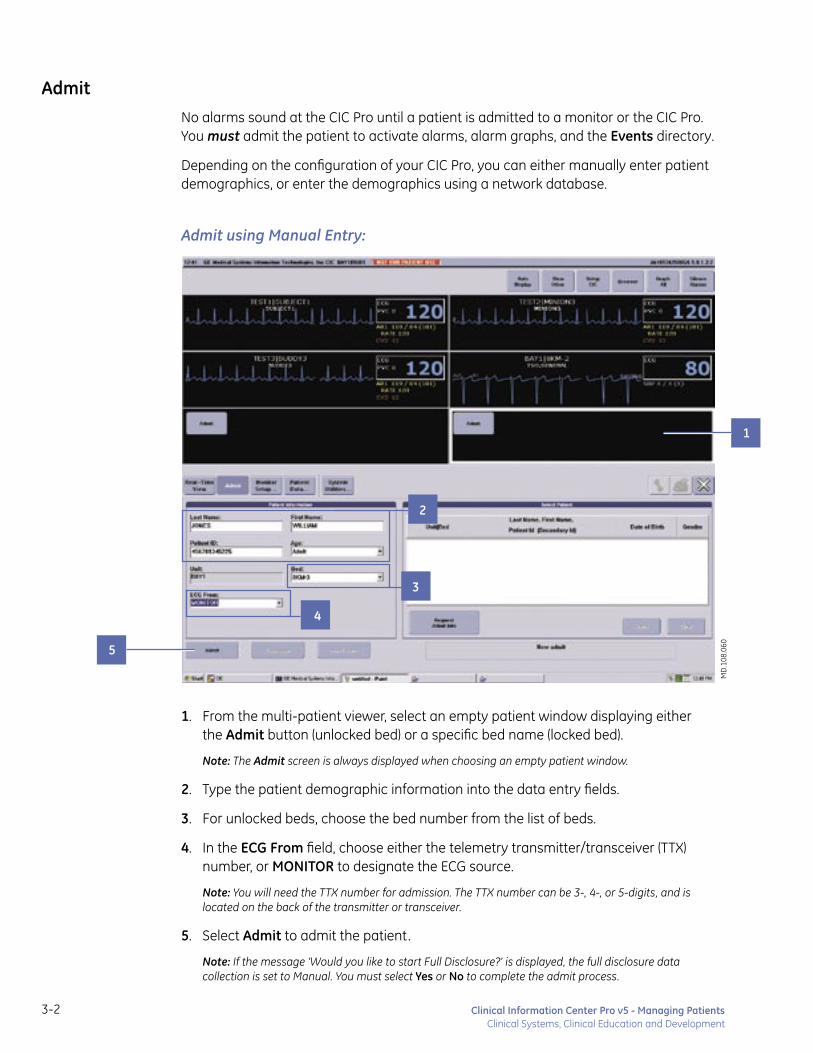
AdmitNo alarms sound at the CIC Pro until a patient is admitted to a monitor or the CIC Pro. You must admit the patient to activate alarms, alarm graphs, and the Events directory.
Depending on the configuration of your CIC Pro, you can either manually enter patient demographics, or enter the demographics using a network database.
Admit using Manual Entry:
1. From the multi-patient viewer, select an empty patient window displaying either the Admit button (unlocked bed) or a specific bed name (locked bed).
Note: The Admit screen is always displayed when choosing an empty patient window.
2. Type the patient demographic information into the data entry fields.
3. For unlocked beds, choose the bed number from the list of beds.
4. In the ECG From field, choose either the telemetry transmitter/transceiver (TTX) number, or MONITOR to designate the ECG source.
Note: You will need the TTX number for admission. The TTX number can be 3-, 4-, or 5-digits, and is located on the back of the transmitter or transceiver.
5. Select Admit to admit the patient.
Note: If the message ‘Would you like to start Full Disclosure?’ is displayed, the full disclosure data collection is set to Manual. You must select Yes or No to complete the admit process.
Clinical Information Center Pro v5 - Managing Patients Clinical Systems, Clinical Education and Development
3-3
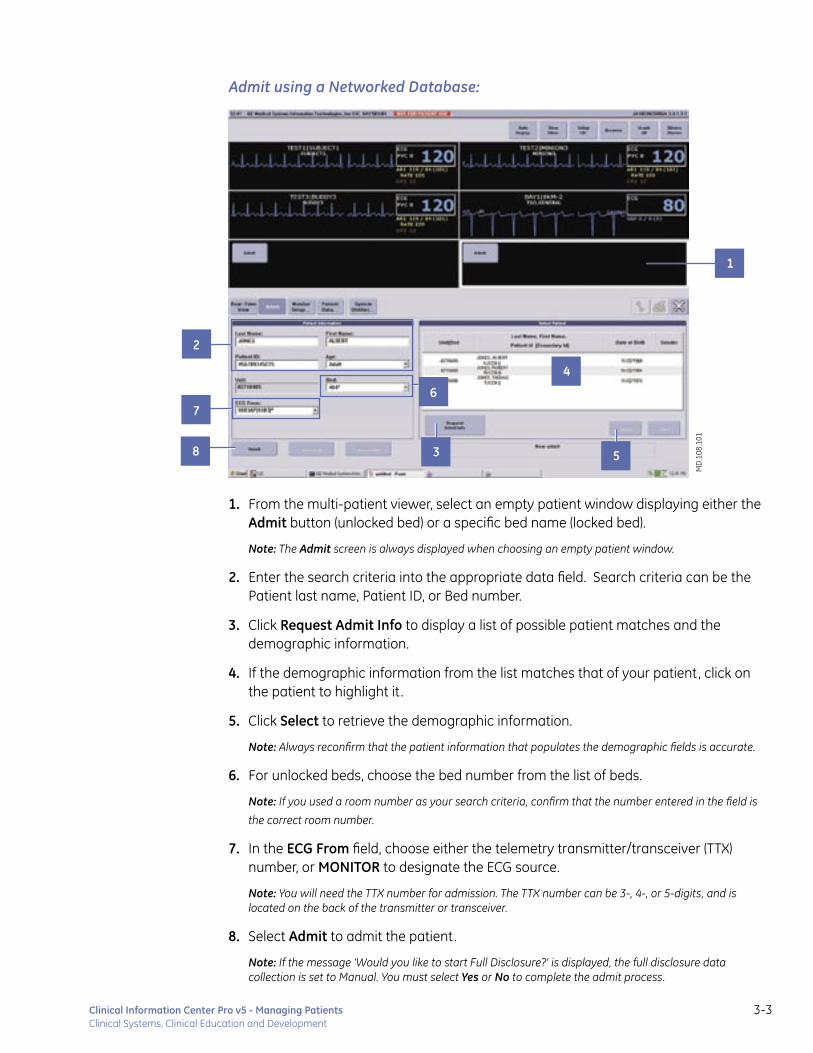
Admit using a Networked Database:
1. From the multi-patient viewer, select an empty patient window displaying either the Admit button (unlocked bed) or a specific bed name (locked bed).
Note: The Admit screen is always displayed when choosing an empty patient window.
2. Enter the search criteria into the appropriate data field. Search criteria can be the Patient last name, Patient ID, or Bed number.
3. Click Request Admit Info to display a list of possible patient matches and the demographic information.
4. If the demographic information from the list matches that of your patient, click on the patient to highlight it .
5. Click Select to retrieve the demographic information.
Note: Always reconfirm that the patient information that populates the demographic fields is accurate.
6. For unlocked beds, choose the bed number from the list of beds.
Note: If you used a room number as your search criteria, confirm that the number entered in the field is
the correct room number.
7. In the ECG From field, choose either the telemetry transmitter/transceiver (TTX) number, or MONITOR to designate the ECG source.
Note: You will need the TTX number for admission. The TTX number can be 3-, 4-, or 5-digits, and is located on the back of the transmitter or transceiver.
8. Select Admit to admit the patient.
Note: If the message ‘Would you like to start Full Disclosure?’ is displayed, the full disclosure data collection is set to Manual. You must select Yes or No to complete the admit process.
MD
.108
.101
6
5
4
2
7
8 3
1

Clinical Information Center Pro v5 - Managing Patients Clinical Systems, Clinical Education and Development
3-4
DischargeDischarging a patient from the CIC Pro deletes the patient’s locally stored data from the monitor. If the patient is a non-telemetry patient, it will also discharge the patient from the bedside monitor.
To discharge a patient, follow these steps:
1. Select the patient you wish to discharge from the multi-patient viewer.
2. Select the Admit button in the single patient viewer to display the admit screen for the selected patient.
3. Select Discharge.
4. Confirm discharge action in the Patient Discharge prompt by selecting Yes or No.
MD
.108
.100
Note: All information is eliminated when the patient is discharged unless connected to a patient data server.
1
42
3

Clinical Information Center Pro v5 - Managing Patients Clinical Systems, Clinical Education and Development
3-5
TransferThere may be times when you will move an in-unit patient from one bed to another.
Follow these steps to transfer a patient:
1. Select the patient you wish to move from the multi-patient viewer.
2. Select the Admit button in the single patient viewer to display the admit screen for the selected patient.
3. Click on the down arrow next to Bed to display the list of available beds and choose the new desired bed.
4. Select Move.
5. Confirm transfer in the transfer confirmation prompt by selecting Yes.
Note: Be sure to choose the appropriate bed number. An asterisk after the number indicates telemetry, whereas, absence of asterisk indicates a monitor.
MD
.108
.062
5
1
2
4
3

Clinical Information Center Pro v5 - Managing Patients Clinical Systems, Clinical Education and Development
3-6

Clinical Information Center Pro v5 - Monitor Setup Clinical Systems, Clinical Education and Development
4-1
MUSE Cardiology System Assistance
Monitor SetupOnce you admit a patient to the CIC Pro, there may be several things you would like to do to customize the patient’s parameter control settings or alarm limits and levels. Any changes you make to customize the parameter control settings or alarm limits and levels are temporary. Once you discharge the patient, any changes made will revert back to the unit default.
The customizable parameter control settings, alarm limits and levels are found under the Monitor Setup button in the single patient viewer of the designated patient.
MD
.108
.108

Clinical Information Center Pro v5 - Monitor Setup Clinical Systems, Clinical Education and Development
4-2
Patient Status Alarms
Triggered by a patient condition that exceeds parameter limits, or by an arrhythmia condition. There are four levels of Patient Status alarms:
CRISIS: Life-threatening events. Crisis alarms sound until silenced by the user.
WARNING: Serious but not life threatening events. Warning alarms sound until the condition is resolved or silenced by the user.
ADVISORY: Events that require monitoring, but not serious or life-threatening. Advisory alarms sound until the condition is resolved or silenced by the user.
MESSAGE: Additional information only. Message alarms have no auditory indication.
Alarms - Categories and StructureThe CIC Pro categorizes alarms into Patient Status and System Status alarms.
Patient Status Alarms
Indicator CRISIS WARNING ADVISORY MESSAGE
Alarm Tone Three Beeps Two Beeps One Beep --
Alarm Light Red Yellow
On-Screen Message ✓ ✓ ✓ ✓
Automatic Print ✓ ✓
Alarm History ✓ ✓ ✓
Alarm Broadcast ✓ ✓ ✓
Remote Alarm Terminal ✓ ✓ ✓
Note: You can change Patient Status Alarm levels and limits. Each level applies to Parameter Alarms and Arrhythmia Alarms. The only difference between the Parameter and Arrhythmia Alarms is that the Arrhythmia Alarms store in the Events directory, and the Parameter Alarms do not.

Clinical Information Center Pro v5 - Monitor Setup Clinical Systems, Clinical Education and Development
4-3
System Status Alarms
System Status Alarms
Triggered by mechanical or electrical problems and are of lesser priority than patient status alarms. There are three levels of System Status alarms:
WARNING: Serious mechanical or electrical problems. A repeating foghorn alarm sounds until the condition is resolved or silenced by the user.
ADVISORY: Mechanical or electrical problems. A single foghorn alarm sounds until the condition is resolved or silenced by the user.
MESSAGE: Additional information only.
Indicator WARNING ADVISORY MESSAGE
Alarm Tone Repeating Foghorn Single Foghorn --
Alarm Light Yellow
On-Screen Message ✓ ✓ ✓
Alarm Broadcast ✓
Remote Alarm Terminal ✓
Note: You cannot change System Status Alarm levels and limits.

Clinical Information Center Pro v5 - Monitor Setup Clinical Systems, Clinical Education and Development
4-4
Alarms- Silencing AlarmsOnce you are notified of an alarm condition, you can silence the alarm for one minute by pressing the Silence Alarms button.
By using the Silence Alarms button:
• All alarms for all patients are silenced simultaneously.
• All alarms remain silent for one minute unless a new patient alarm condition occurs.
• The CIC Pro automatically prints alarm strips and stores the alarm data in the Events directory depending on the alarm severity and configuration of CIC Pro defaults.
Note: An alarm silence icon appears in the ECG parameter window of the patient whose alarm is silenced.
MD
.108
.112

Clinical Information Center Pro v5 - Monitor Setup Clinical Systems, Clinical Education and Development
4-5
Alarms- NO COMMWhen there is no communication between the monitor and the CIC Pro, a NO COMM alarm is broadcast across the network and the following icon and message appears in the individual patient window.
MD
.108
.067
MD
.108
.066
Note: The NO COMM message automatically stops displaying when communication with the monitor resumes.
Note: An example of no communication is when the monitor has been transported out of the network coverage area or becomes disconnected from the network.

Clinical Information Center Pro v5 - Monitor Setup Clinical Systems, Clinical Education and Development
4-6
Alarm Pause- Telemetry Only If the patient needs to be taken off telemetry for an extended period of time such as going to a procedure, there is an option to temporarily pause the patient’s alarms from the CIC Pro.
To temporarily pause a selected telemetry patient’s alarm, perform the following steps:
1. Click the Alarm Control button from the Monitor Setup menu.
2. Click Alarm Pause-Smart Alarm.
3. Click the down arrow to display a list of reasons for pausing the alarm.
4. Select the reason for pausing the alarm from the drop-down list.
5. Selecting the desired reason activates the alarm pause and places a label in the patient’s window.
Note: If the default setting “Allow alarms off on the CIC” is set to No, the OFF smart alarm will be grayed out. If the default setting is set to Yes, you can select OFF, but if you want the alarms to be turned back on again, you will need to turn them back ON manually.
MD
.108
.010
2
3
4
1
5
Clinical Information Center Pro v5 - Monitor Setup Clinical Systems, Clinical Education and Development
4-7
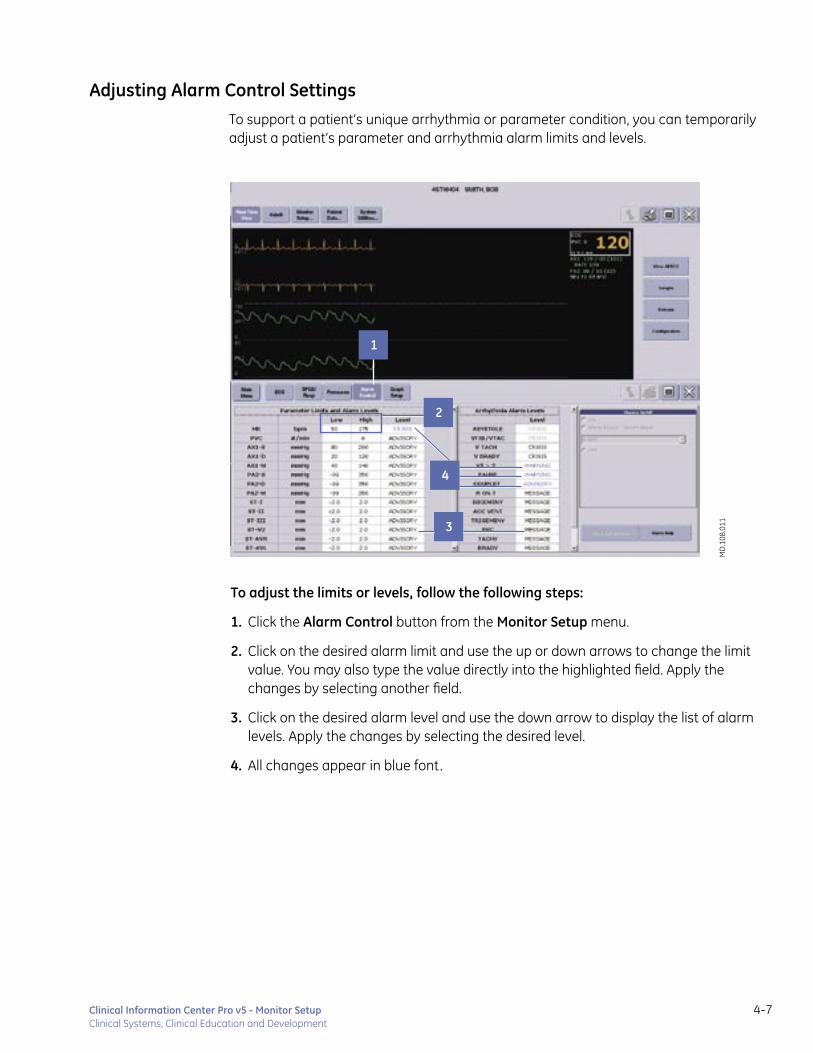
Adjusting Alarm Control SettingsTo support a patient’s unique arrhythmia or parameter condition, you can temporarily adjust a patient’s parameter and arrhythmia alarm limits and levels.
To adjust the limits or levels, follow the following steps:
1. Click the Alarm Control button from the Monitor Setup menu.
2. Click on the desired alarm limit and use the up or down arrows to change the limit value. You may also type the value directly into the highlighted field. Apply the changes by selecting another field.
3. Click on the desired alarm level and use the down arrow to display the list of alarm levels. Apply the changes by selecting the desired level.
4. All changes appear in blue font.
MD
.108
.011
1
3
2
4

Clinical Information Center Pro v5 - Monitor Setup Clinical Systems, Clinical Education and Development
4-8
Adjusting Parameter Control SettingsYou can adjust particular parameter control settings from the CIC Pro. What appears under each button depends on what is hooked up to the patient on the bedside monitor. For example, if you do not have invasive lines attached to the patient from the bedside monitor, there will not be any control settings displayed under Pressures for invasive lines.
MD
.108
.011
Parameter buttons
To temporarily adjust control settings for applicable parameters on a particular patient, perform the following on the CIC Pro monitor:
1. Click on the desired parameter button from the Monitor Setup menu.
2. Click any of the active options to make changes.

Clinical Information Center Pro v5 - Monitor Setup Clinical Systems, Clinical Education and Development
4-9
ECG
A. Display Lead: Sets the top or first lead displayed on the monitor and on the CIC Pro center.
B. Size: Sets the waveform size. The standard size is 1X.
C. Detect Pace: Detects the pacemaker functioning. Pace 2 - Normal pacemaker detection. Pace 1 - Alternate pacemaker detection mode when pace 2 does not adequately detect pacemaker spikes.
D. Pace Help: Enables viewing of solutions to common pacemaker detection problems.
Note: A pacemaker pulse can be counted as a QRS during asystole in either pace mode. Keep pacemaker patients under close observation.
E. Lead Analysis: Single lead - Uses the top display lead only for ECG and arrhythmia data processing. Multi-lead - Uses leads I,II,III and V lead for ECG and arrhythmia data processing.
F. Arrhythmia: Sets the arrhythmia detection level. Full - Detects all arrhythmia conditions defined by the software. Lethal - Detects lethal arrhythmia conditions only. Off - Turns off all arrhythmia detection.
MD
.108
.109
E
F
G I
H
AB
C
D
J
G. PVC Limit: When turned On, it will place a PVC count per minute in the ECG parameter window.
H. ST: When turned On, displays ST information, stores and enables ST alarms.
I. V Lead: Labels the V Lead position.
J. Relearn: Enables relearning of the selected patient’s ECG rhythm after changes occur to heart rate or rhythm.
Note: Off appears dimmed and not selectable if the Allow Alarms Off on this CIC is set to No under the service level default.

Clinical Information Center Pro v5 - Monitor Setup Clinical Systems, Clinical Education and Development
4-10
SPO2/Resp
A. Rate: When turned On, will display the SpO2 heart rate on the CIC Pro.
B. Size: Sets the waveform size.
C. Sensitivity: Sets the breath detection threshold. To increase the detection of shallow breaths, decrease the percentage number.
D. Waveform Size: Sets the waveform size.
E. Auto Size: Automatically sizes the waveform to fit the available display space.
F. Cardifact Alarm: When turned On, it will alert you when the respiratory rate is within 50% of the heart rate over a span of 30 consecutive breaths. This is an ADVISORY patient status alarm.
G. Lead: Sets the lead to derive the respiration rate.
H. Relearn: Enables relearning of the respiration pattern of eight current breaths when changes occur to the respiratory pattern.
MD
.108
.110
F
G
C D
A
B
E
H

Clinical Information Center Pro v5 - Monitor Setup Clinical Systems, Clinical Education and Development
4-11
Pressures
A. Auto: Turns Off automatic NBP measurements. When turned on at the monitor, NBP measurements are acquired automatically at regular intervals.
B. Cuff Size: Set the inflation pressure used during the first NBP measurement and for calculating the NBP pressure:
Adult: 160 mmHg Pediatric: 130 mmHg Neonatal: 100mmHg
C. Clear Message: Clears the display of inflation messages and current NBP readings.
D. Scales: Sets the size of the displayed waveforms. The higher the scale number, the smaller the waveform size.
E. Pulse Rate: When turned On, displays the arterial pressure pulse rate in the ART, FEM, or UAC parameter windows.
F. IABP: When turned On, displays the pressure values in the ART or FEM parameter windows. A letter “I” precedes the invasive arterial pressure site label to identify this pressure value.
G. Smart BP: When turned On, activates the arterial (ART) artifact rejection program for the ART and FEM pressure sites. This program substantially reduces the alarms associated with zeroing the transducer, fast flushing the system, and drawing blood.
Note: You cannot turn on the auto NBP from the CIC Pro.
Note: Invasive control options apply only if using a bedside monitor. Invasive pressure control settings follow your monitor settings.
MD
.108
.111
B
A
E
C
F
G
D

Clinical Information Center Pro v5 - Monitor Setup Clinical Systems, Clinical Education and Development
4-12

Clinical Information Center Pro v5 - Patient Data Retrieval Clinical Systems, Clinical Education and Development
5-1
MUSE Cardiology System Assistance
Patient Data RetrievalFrom the CIC Pro, you can retrieve in-unit parameter data from networked patient monitors as well as data from certain secondary devices. Stored events, parameter numeric data, graphic trends, and full disclosure patient data is identified by the date and time the data was collected.
You can review and print stored patient data from the following data review tools:
EventsEvent StripFD StripFD PageGraphic TrendsVital SignsCalipers
These review tools can be found under the Patient Data button on the single patient viewer of the selected patient.
•••••••
MD
.108
.113

Clinical Information Center Pro v5 - Patient Data Retrieval Clinical Systems, Clinical Education and Development
5-2
Second Display- OptionalWhen using a second display, you can display up to three different review tools. You can do this only when one of the review tools is the Events directory.
This enables you to choose the event, see the strip, the vital sign data, and the graphic trend or full disclosure data all with the same time focus.
MD
.108
.116
Second Display

Clinical Information Center Pro v5 - Patient Data Retrieval Clinical Systems, Clinical Education and Development
5-3
Note: For telemetry monitoring, up to 100 arrhythmia events can be viewed and printed. For bedside monitoring, 36 arrhythmia events can be viewed and printed. If you have a Patient Data Server, you can view and print 500 of the arrhythmia events. Once you have reached maximum capacity, the oldest events are deleted to accommodate the newer events.
Events Directory and Event StripUsing the Events directory and the Event Strip, you can view and print any crisis, warning or advisory level arrhythmia, or ST event. You can also view and print an ECG sample that has been stored.
The Events directory can be displayed along with other data review tools. Clicking the Events button will display the directory if it is not displayed with the other data review tools.
A. Sort Tool: Enables you to sort by Type of event or Time of event.
B. Quantity of Event Type: The number within the parenthesis depicts the quantity of each type of event.
C. Event List: (-) Collapses event list and (+) expands the list.
D. Delete Button: Deletes the event.
E. Up and Down Buttons: Allows you to scroll up and down through the directory list.
F. Print Directory Button: Prints the directory list.
G. Print Button: Prints a 10-second strip of what is displayed (Event strip, ECG sample, or ST complexes).
H. Close Button: Closes the review tool.
MD
.108
.038
A
CB
D E F
G H

Clinical Information Center Pro v5 - Patient Data Retrieval Clinical Systems, Clinical Education and Development
5-4
Event Directory- Sort by Type or Time of Event
MD
.108
.037
MD
.108
.038

Clinical Information Center Pro v5 - Patient Data Retrieval Clinical Systems, Clinical Education and Development
5-5
Vital SignsThe CIC Pro continuously retrieves vital signs for a maximum of 24 hours. After 24 hours, the oldest vital sign data is deleted as new data is collected.
Non-episodic parameters (for example, heart rate) are sampled every two seconds. A median value is determined and then stored for display at one-minute resolution. Episodic parameters (for example, NBP) are stored every time an episode occurs.
A. Sort By: Enables you to choose the data group you want to view first.
B. Interval: Enables you to choose the time interval for viewing vital sign data. Choices are 1-, 5-, 15-, 30-, and 60 min interval.
C. Scroll Bars: Allows you to move up and down or right and left through the vital signs data.
D. Print Button: Prints the Vital Signs page displayed.
E. Close Button: Closes the review tool.
Note: There are predetermined factory groups or they can be customized and named accordingly under service level password.
MD
.108
.093
A
B
C
D E

Clinical Information Center Pro v5 - Patient Data Retrieval Clinical Systems, Clinical Education and Development
5-6
Graphic TrendsThe CIC Pro can display all the collected numeric data in a graphical format. The data is collected for a maximum of 24 hours. After 24 hours, the oldest data is deleted to accommodate the newer data.
You can view graphic trends in varying time scales and print them to either a laser printer or digital writer.
Note: In split screen mode, you can view up to six parameters in graphic format (three on the right and three on the left). In full screen (only available with a second display), you can view up to 12 parameters in graphic format (six on the right and six on the left).
A. Graphic Trend Button: Enables you to change the scale of the graphic trend.
B. Graphic Trend Scales: Scales are labeled next to each graphic trend button that it applies to.
C. Event Summary: Displays a brief overview of the type and number of events that occurred during a specific time focus.
Note: Event Summary will be shown only if it has been configured as part of a named group.
D. Graphic Trends Range: Enables you to choose the specific time range for which you would like to display the trends.
E. Time Focus Cursor and Label: Marks date, time, and parameter numeric data at the cursor placement.
F. Scroll Bar: Allows you to move backward or forward in time.
G. Graphic Trends Groups: Enables you to choose the trend group you want to display.
Note: There are pre-determined factory groups or they can be customized and named accordingly under service level password.
H. Print Button: Prints the graphic trends that are displayed for that range of time.
I. Close Button: Closes the review tool.
MD
.108
.115
D
C
AB
H I
GE
F

Clinical Information Center Pro v5 - Patient Data Retrieval Clinical Systems, Clinical Education and Development
5-7
Full Disclosure OverviewThe type of licenses installed on your CIC Pro determines the amount of Full Disclosure data collected for a patient. You can collect up to 72 hours of full disclosure data.
You can view full disclosure data using two review tools: Full Disclosure Strip (FD Strip) and Full Disclosure Page (FD Page).
Full Disclosure-FD Strip
An FD strip displays a maximum of 10-seconds of available full disclosure parameter waveform and numeric data. You can choose to view all the parameter waveforms and numeric data, or just view all the ECG waveforms and numeric data.
A. Numeric Data: Displays the parameter data corresponding to the cursor’s time focus.
B. Speed: Adjusts the sweep speed of the waveforms viewed. For example, if you choose 25 mm/sec, the displayed data is shown in eight-second increments.
C. Scan Older/Scan Newer: Scans through the full disclosure data.
Note: During scanning, the button function pressed changes to STOP. You can stop the scan at any time by clicking on the STOP button.
D. View All ECG: Displays all the available ECG leads and numeric data. This button toggles between MONITOR and View All ECG. MONITOR will display all the parameter waveforms and numeric data.
E. Cursor: Identifies the date and time of the data you are viewing.
Note: Placing the cursor at a specific area of interest allows you to view other types of patient data stored at this time focus.
F. Scroll Bar: Allows viewing of older and newer data. If you click inside the scroll bar, the data scrolls in time increments defined by the speed setting. If you click the scroll bar arrows, the data moves in one-second increments.
G. Print Button: Prints the full disclosure waveform and numeric data for the selected time focus.
H. Close Button: Closes the review tool.
MD
.108
.106
B
C
D
E
F
AG H

Clinical Information Center Pro v5 - Patient Data Retrieval Clinical Systems, Clinical Education and Development
5-8
Full Disclosure- FD Page
The FD page allows you to view and examine the full range of stored waveforms, zoom in on an area of interest, and print a customized Full Disclosure Report.
A. Zoom Box: Clicking and holding down the left mouse button inside the zoom box displays a magnified view of the selected area. To re-position the zoom box, click on another area of interest.
B. Time and Date Stamp: Identifies the time and date for the row of waveform data. You can view up to five waveforms per row.
C. Zoom Window: Enables you to view the enlarged waveform selected in the zoom box.
MD
.108
.106
B
C
E F G
D
Note: The zoom window can be shown or hidden. This is configured in the customize window.
D. Scroll Bar: Allows viewing of older and newer data.
E. Tools Icon: This allows customization of the on-screen display of the full disclosure data.
F. Print Button: Allows you to customize and print an Full Disclosure Report.
G. Close Button: Closes the review tool.
A

Clinical Information Center Pro v5 - Patient Data Retrieval Clinical Systems, Clinical Education and Development
5-9
Customizing the FD Page
To customize how you would like to view a selected patient’s FD Page, click on the tools icon.
A. Time Per Line: Sets the amount of data displayed in each row of waveform data. Choices are 15-, 30- seconds, and 1 minute.
B. Zoom Window: Enables you to toggle between Show and Hide. Show will display the zoom window at the bottom of the FD Page, while Hide will remove it.
C. Configure Waveforms: Enables you to interchange the waveforms displayed on the FD Page, between Selected and Available by using the right and left arrows.
MD
.108
.042
C
A
B

Clinical Information Center Pro v5 - Patient Data Retrieval Clinical Systems, Clinical Education and Development
5-10
MD
.108
.001
Printing a Full Disclosure Report
To print a Full Disclosure Report, perform the following steps on your CIC Pro.
1. Click on the print icon in the FD Page review tool to display the Full Disclosure Report window.
2. Change the start and end times by moving the scroll bars, change the amount of data displayed in each report line (time per line), and add or delete any waveforms to be included in the report.
A. Start and End Time: Enables you to click the scroll bar arrows to move the start and end time by one minute increments, or click and drag the scroll box to move the start and end time to wherever you want.
B. Time per Line: Enables you to change the amount of data displayed in each report line.
C. Waveform Selection box: Allows you to add or delete any waveforms to be included in the report.
D. Full Disclosure Report Print Preview: The report print preview automatically redraws when you change the waveform selection or time per line setting.
3. After making your selections, press Print to print the report.
Note: If you want to print just the strip that is selected in the zoom box of the FD Page, go to the FD Strip and print the strip from there.
A
B
C D

Clinical Information Center Pro v5 - Patient Data Retrieval Clinical Systems, Clinical Education and Development
5-11
Second Display- OptionalWith a second display, the FD Page review tool can be viewed as a full display, or as a split screen with another review tool open on the same time focus.
FD Page- Full Display
FD Page- Split Screen with FD Strip and Events
Note: When you select a specific time focus on the FD Page, the FD Strip automatically displays that 10- second strip. When you select an alarm event from the Events, the FD Page and FD strip will automatically zoom to that time focus. The event must occur within the time limit of your full disclosure license.
MD
.108
.040
MD
.108
.106

Clinical Information Center Pro v5 - Patient Data Retrieval Clinical Systems, Clinical Education and Development
5-12
CalipersWhen full disclosure data is collected and stored at the CIC Pro, you can use the Calipers measurement tool to measure PR, QRS, QT and R-R waveform intervals and the ST waveform amplitude.
A. Measurement Table: To enter data into the table, click on the type of measurement you want to record in the table, measure your value on the strip, and then click Apply to enter the value in the table.
Note: The QTc value is automatically calculated once you measure and enter the QT and R-R intervals.
B. Measurement: This identifies the lead that is displayed in the window for measurement. Choices are I, II, III, V, AVR, AVL, and AVF.
Note: For telemetry, only a second V lead would be available for display.
C. Reference: Select Enable to display a second waveform in the window for reference.
Note: For telemetry, only a second V lead is available for reference. Measurements taken on the reference lead are not recorded in the measurement table.
MD
.108
.025
A
B
C
D
E F G H
I
J
K
M N
L

Clinical Information Center Pro v5 - Patient Data Retrieval Clinical Systems, Clinical Education and Development
5-13
D. Gain: Allows the change of gain for the displayed waveform.
E. Marching Calipers: When checked, places vertical lines on the waveform that are equal to the span of the caliper arms. This helps to compare the rate of multiple beats.
F. Grid: When checked, applies a background grid on the waveform window.
G. Zoom: When clicked, will cycle through the choices of 1x, 2x, 3x zoom.
H. Speed: Click the down arrow to display different sweep speed choices for the waveform displayed.
I. Scroll Bars: Allows you to move up or down, left or right through the displayed data.
J. Calipers Central Handle: To position, click and drag this handle on a desired waveform complex.
K. Caliper Arm Handles: You can resize or reposition the caliper arms over the waveform by clicking and dragging these handles.
L. Calculated Measurement Label: This can be repositioned on the screen by clicking and dragging the label.
M. Print: Prints the caliper measurement report.
Note: The waveform always prints at a 1x zoom and the background grid is always applied. The report can only be printed to a laser printer.
N. Close: Closes the caliper review tool.

Clinical Information Center Pro v5 - Patient Data Retrieval Clinical Systems, Clinical Education and Development
5-14

Clinical Information Center Pro v5 - Post Test Clinical Systems, Clinical Education and Development
6-1
Knowledge Check
CIC Pro v5 Post Test1. Which of the following is an optional component of the CIC Pro?
A. Mouse
B. Speakers
C. Second Display
D. Keyboard
2. When pausing alarms from any transmitter or transceiver, and Pause Alarm Breakthrough is enabled, only crisis level alarms will break through the pause.
A. True
B. False
3. What is the maximum number of patients that can be displayed on the multi-patient viewer?
A. 6
B. 8
C. 12
D. 16
4. You can print the waveforms for the displayed patients on the CIC Pro from the Graph All main menu button.
A. True
B. False
5. Under Setup CIC main menu button, which option cannot be changed without a service level password?
A. CIC Alarm volume
B. CIC Arrhythmia alarm levels
C. Font size
D. Display Configuration
6. Where do you click your mouse to print an individual patient’s ECG Strip?
A. In real-time trend graph
B. On the patient’s name
C. On the Graph All Main Menu Button
D. In the ECG Parameter box of the patient

Clinical Information Center Pro v5 - Post Test Clinical Systems, Clinical Education and Development
6-2
7. How many ways are there to access the Real-time trend graph configuration window?
A. 1
B. 2
C. 4
D. 5
8. What can be shown on the second display?
A. Vital signs
B. Full disclosure
C. Graphic trends
D. Any single patient view
E. All of the above
9. You must admit a patient to the CIC Pro in order to activate alarms.
A. True
B. False
10. What menu button do you click in single patient view to change an alarm level?
A. Admit
B. Monitor setup
C. Patient data
11. A Crisis level patient status alarm continues to alarm until silenced by the user.
A. True
B. False
12. What alarm is broadcast across the network if a monitor becomes disconnected or leaves the networked coverage area?
A. Parameter alarm
B. NO COMM alarm
C. Bothersome alarm
D. Message alarm

Clinical Information Center Pro v5 - Post Test Clinical Systems, Clinical Education and Development
6-3
13. What menu buttons would you select if you want to increase the size of your ECG waveform?
A. Real- time view, then configure
B. Monitor Setup, then Alarm Control
C. Monitor Setup, then ECG
D. Patient Data, then FD Page
14. The Event directory shows the list of stored Arrhythmia and ST events, and stored Sample strips.
A. True
B. False
15. You can display the Event directory with other review tools (full disclosure, graphic trends, vital signs and calipers).
A. True
B. False
16. Which interval time is not an option to view vital signs?
A. 1 minute
B. 10 minute
C. 30 minute
D. 60 minute
17. How many graphic trends can you view in split screen mode?
A. 2
B. 4
C. 6
D. 8
18. Selecting an Event from the Event directory, or choosing a time focus in Vital signs or Graphic trends will automatically display the full disclosure data for that time focus when viewing the FD Page.
A. True
B. False

Clinical Information Center Pro v5 - Post Test Clinical Systems, Clinical Education and Development
6-4
19. How many waveforms can you view on each row of the FD Page?
A. 2
B. 3
C. 4
D. 5
20. What values must you enter to automatically get the QTc calculation?
A. PR and QRS
B. QT and R-R Interval
C. QRS and QT
D. You cannot get the QTc automatically calculated
Answers1. C 2. A 3. D 4. A 5. B 6. D 7. B 8. E 9. A10. B 11. A 12. B 13. C 14. A 15. A 16. B 17. C 18. A 19. D 20. B

Clinical Information Center Pro v5 - Skills Check List Clinical Systems, Clinical Education and Development
7-1
CIC Pro v5 Skills Check List
Participant Name: ______________________________________________________________
Hospital/Facility Name: __________________________________________________________
City/State: _____________________________________________________________________
Date of Class/Presenter: _________________________________________________________
Skills Checklist Yes NO NA
Admit a patient
Add an additional waveform to the patients window
Configure the patient window to show the real-time trend graph
Print a single patient strip
Alarm pause a patient for a procedure
Adjust high and low HR limits
Adjust an arrhythmia alarm level
Change the display lead
Initiate pacemaker detection mode
Change the sorting type in the Events Directory
Review a patients vital signs and change the time interval for viewing
View a patients graphic trends and change the grouping to display
Change the scale of one graphic trend
After choosing an Event from the Event Directory, view the FD (full disclosure) Page
Change the time per line for the FD Page
Add another waveform to view on the FD Page
Select a waveform to measure using Calipers
Measure a PR interval
Skills checklist is intended for facility use only. The GE Healthcare Clinical Applications Specialist is responsible only for presenting the information. The facility utilizes the skills checklist for participants as it determines necessary.

Clinical Information Center Pro v5 - Skills Check List Clinical Systems, Clinical Education and Development
7-2

Clinical Information Center Pro v5 - Program and Speaker Evaluation Clinical Systems, Clinical Education and Development
8-1
Knowledge Check
Program and Speaker EvaluationThis is your opportunity to let us know about your learning experience. Please fill out the information below.
Date: __________________________________________________
Class Title: ___________________________________________________________________________________
Presenter: ___________________________________________________________________________________
Program Evaluation
Please rate the following using a scale of 1-7, with 1=poor, 4=average, 7=excellent.
1. Program objectives met. 1 2 3 4 5 6 7
2. Content covered adequately. 1 2 3 4 5 6 7
3. Overall quality of this program. 1 2 3 4 5 6 7
4. Presentation meets your personal objectives. 1 2 3 4 5 6 7
5. Program information can be incorporated into your practice. 1 2 3 4 5 6 7
Speaker Evaluation
Please rate the following using a scale of 1-7, with 1=poor, 4=average, 7=excellent.
1. Instructor was prepared for the training session. 1 2 3 4 5 6 7
2. Presenter was knowledgeable about the product. 1 2 3 4 5 6 7
3. Trainer was able to effectively present the program. 1 2 3 4 5 6 7
4. Instructor was able to answer participant‘s questions. 1 2 3 4 5 6 7
5. Rate the overall effectiveness of the Trainer. 1 2 3 4 5 6 7
Additional Comments
____________________________________________________________________________________________
____________________________________________________________________________________________
____________________________________________________________________________________________
____________________________________________________________________________________________
____________________________________________________________________________________________
____________________________________________________________________________________________
____________________________________________________________________________________________
____________________________________________________________________________________________
____________________________________________________________________________________________

Clinical Information Center Pro v5 - Program and Speaker Evaluation Clinical Systems, Clinical Education and Development
8-2


PN: 2020786-PG-001A 10-06 Printed in U.S.A.
© 2006 General Electric Company – All rights reserved.
GE and GE Monogram are trademarks of General Electric Company.
ApexPro, CIC Pro, PRN 50-M and Dinamap are trademarks of GE Medical Systems Information technologies.
Xpod is a trademark of NONIN Medical, Inc.
Accutracker is a trademark of SunTech Medical, Inc.
Citrix is a trademark of Citrix Systems, Inc.
GE Medical Systems Information Technology, a General Electric company, doing business as GE Healthcare.
Notice: The materials contained in this document are intended for educational purposes only. This document does not establish specifications, operating procedures or maintenance methods for any of the devices referenced. Always refer to the original Operator User Manual and Service Manuals provided with the device for specifications, operating procedures and maintenance requirements.
GE Healthcare9900 Innovation DriveWauwatosa, WI 53226USA
www.gehealthcare.com