client connect - res.cloudinary.com
TRANSCRIPT
OWNER: IT Training UPDATED: 12/17/19
ALL INFORMATION IN THIS DOCUMENT IS PROPRIETARY TO AND CONFIDENTIAL INFORMATION OF UNITED SHORE
Page | 1
CLIENT CONNECT
IMPORTING YOUR CLIENT LIST FROM ENCOMPASS & CALYX
JOB AID
UPDATED: 12/17/19 Page | 2
TABLE OF CONTENTS CLIENT CONNECT: IMPORTING YOUR CLIENT LIST FROM ENCOMPASS ........................................................ 3
CREATE NEW REPORT FUNCTION ........................................................................................................... 5
GENERATING THE REPORT ...................................................................................................................... 8
UPLOADING LEADS TO CLIENT CONNECT ............................................................................................... 8
CLIENT CONNECT: IMPORTING YOUR CLIENT LIST FROM CALYX ................................................................ 13
IMPORT CLIENT LIST FUNCTION ........................................................................................................... 13
CREATING A NEW REPORT IN CALYX .................................................................................................... 14
IMPORT REPORT TEMPLATE ................................................................................................................. 14
VERIFY IMPORT ..................................................................................................................................... 16
GENERATE AND EXPORT REPORT ............................................................................................................ 16
UPLOADING LEADS TO CLIENT CONNECT ............................................................................................... 18

UPDATED: 12/17/19 Page | 3
CLIENT CONNECT: IMPORTING YOUR CLIENT LIST FROM ENCOMPASS
Overview Client Connect is a component of Brand 360 that assists the Loan Officer by combining Unite, Uconnect, Client Loyalty Manager, Market Watch, Equity Watch and Credit Watch. This Job Aid instructs users on how to import their client list from Encompass.
CREATING A NEW REPORT IN ENCOMPASS
IMPORTANT: All imported files must be in an Excel .xlsx or .xml format. Prepare to Create New Report Function
1. On the Encompass Home page, click the Reports tab.
2. On the Reports tab, click Public Folders for the Folder type.
NOTE: After the report is created and saved in Public Folders, it can later be copied and saved to Personal Folder 3. Click the New Report image
• A highlighted line item appears at the bottom of the Reports list box.

UPDATED: 12/17/19 Page | 4
4. Type a report name in the text box. • Example: 2015 Closed Loans
5. Click on the report name line item. • The Report Details pane is enabled.
6. On Report Setup, choose loans for the Data Source. 7. On Report Setup, select table for the Report Type
8. Click the milestones tab. 9. Click define the loans to include in the report by milestone criteria. 10. On the loans list, select the following checkboxes:
• Funding • Pre-Audit

UPDATED: 12/17/19 Page | 5
• Completion
11. Click the folders tab. 12. Click select loan folders manually. 13. On Folders, select the checkboxes for the folders to include on the report.
NOTE: The folder names will be different for every user based on how each user sets up their folder system.
CREATE NEW REPORT FUNCTION To create a new report, complete the following:
1. Click the Fields tab. 2. Click Add Field.
• The Field Properties dialog box appears.
UPDATED: 12/17/19 Page | 6
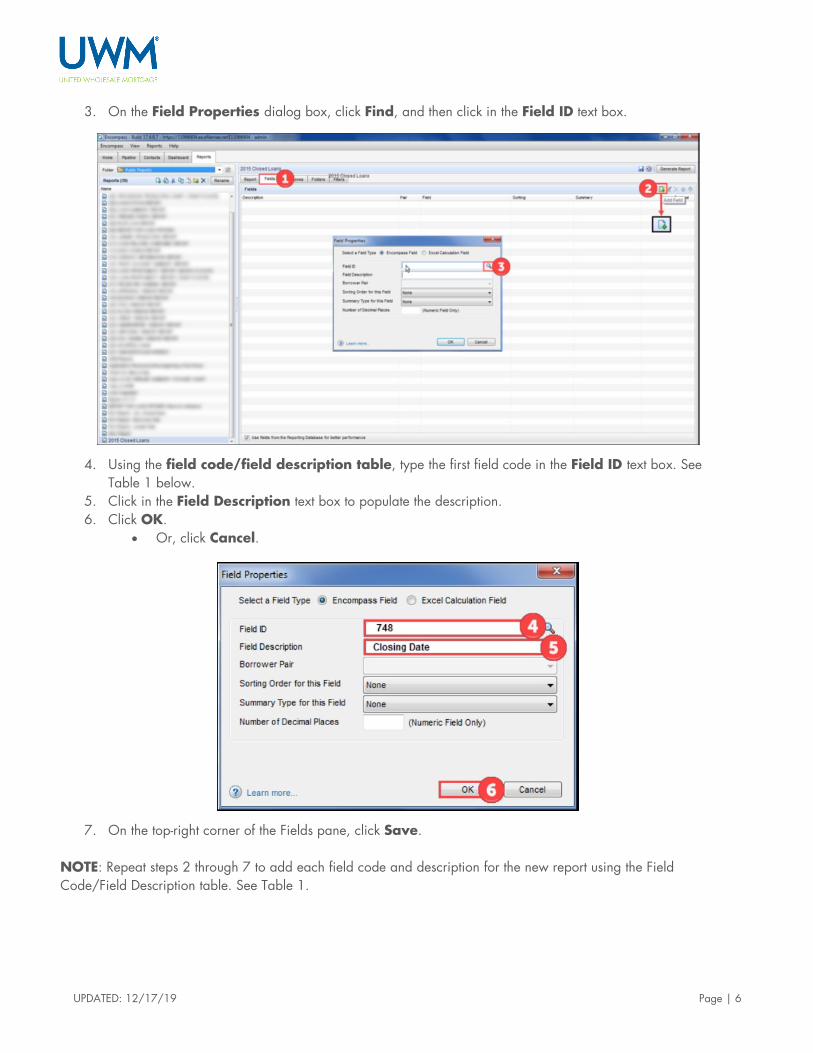
3. On the Field Properties dialog box, click Find, and then click in the Field ID text box.
4. Using the field code/field description table, type the first field code in the Field ID text box. See Table 1 below.
5. Click in the Field Description text box to populate the description. 6. Click OK.
• Or, click Cancel.
7. On the top-right corner of the Fields pane, click Save. NOTE: Repeat steps 2 through 7 to add each field code and description for the new report using the Field Code/Field Description table. See Table 1.

UPDATED: 12/17/19 Page | 7
Table 1
FIELD CODE FIELD DESCRIPTION
36 Borrower First Name 37 Borrower Last Name 1240 Borr Email 364 Loan number 748 Closing Date FR0104 Borr Present Addr FR0106 Borr Present City FR0107 Borr Present State FR0108 Borr Present Zip 66 Borrower Home Phone 3 Note Rate 1402 Borr DOB 353 Closing LTV 1172 Loan Type 11 Subject Property Address 12 Subject Property City 14 Subject Property State 15 Subject Property Zip 13 Subject Property County 4004 Co-Borrower First Name 4006 Co-Borrower Last Name 1403 Co-Borr DOB 98 Co-Borrower Home Phone 1268 Co-Borr Email 19 Loan Purpose 4 Loan Term 608 Trans Details Amort Type 356 Appraised Value 228 Expenses Proposed Mtg Pymt 995 Trans Details Amort Type ARM Descr 1811 Occupancy Type 1109 Loan Amount 1041 Property Type 67 Borr Experian 1450 Borr TransUnion 1414 Borr Equifax 60 Co-Borr Experian 1452 Co-Borr TransUnion 1415 Co-Borr Equifax

UPDATED: 12/17/19 Page | 8
GENERATING THE REPORT After all of the field codes and field descriptions are entered on the Field Properties dialog box, you will be able to
generate the report and export the data to Excel before importing the template in Client Connect. To generate the new report, complete the following: On the top-right corner of the Fields pane, click Generate Report. The Reports dialog box appears and shows the exporting progress.
NOTE: The report is automatically exported to Excel and is located near the taskbar where it will have to be saved on the user's computer.
UPLOADING LEADS TO CLIENT CONNECT After the .xlsx file is exported from Encompass and saved on your computer, complete the following from in Client Connect:

UPDATED: 12/17/19 Page | 9
1. Click the Contacts tab.
2. Click Import File.
3. Click Add Files.
4. In File Explorer, locate the .xlsx file and click on it.

UPDATED: 12/17/19 Page | 10
5. Click Open.
6. On the Upload Leads dialog box, click Upload.
• The information is uploaded to Client Connect.
Or, complete the following: 1. After the .xlsx file is exported from Encompass and is saved on your computer, go back to the Upload Leads
dialog box in Client Connect, and click Add Files. 2. In File Explorer, locate the .xlsx file and click on it. 3. Drag and drop the file anywhere on the Upload Leads dialog box.
• A Confirm All Data Fields window appears. 4. Map the missing fields by selecting the drop down field box where “None” is displayed. 5. Click Save.

UPDATED: 12/17/19 Page | 11

UPDATED: 12/17/19 Page | 12
After the client list is imported to Client Connect, the Success! pop-up window appears
UPDATED: 12/17/19 Page | 13
CLIENT CONNECT: IMPORTING YOUR CLIENT LIST FROM CALYX
Overview Client Connect is a component of Brand 360 that assists the Loan Officer by combining Unite, UConnect, Client Loyalty Manager, Market Watch, Equity Watch and Credit Watch. This Job Aid instructs users on how to import their client list from Calyx.
CREATING A NEW REPORT IN CALYX
IMPORTANT: All imported files must be in an Excel .xlsx or .xml format. IMPORT CLIENT LIST FUNCTION
To import a client list, complete the following after selecting Client Connect:
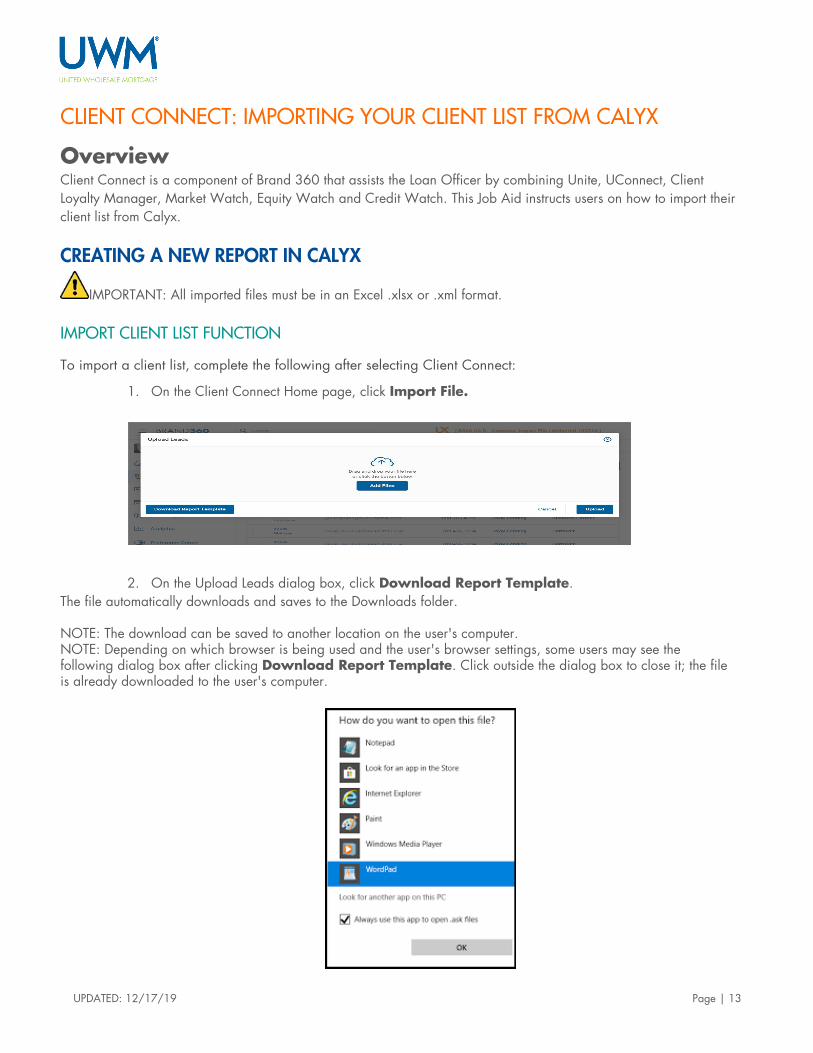
1. On the Client Connect Home page, click Import File.
2. On the Upload Leads dialog box, click Download Report Template.
The file automatically downloads and saves to the Downloads folder. NOTE: The download can be saved to another location on the user's computer. NOTE: Depending on which browser is being used and the user's browser settings, some users may see the following dialog box after clicking Download Report Template. Click outside the dialog box to close it; the file is already downloaded to the user's computer.
UPDATED: 12/17/19 Page | 14
CREATING A NEW REPORT IN CALYX
IMPORT REPORT TEMPLATE
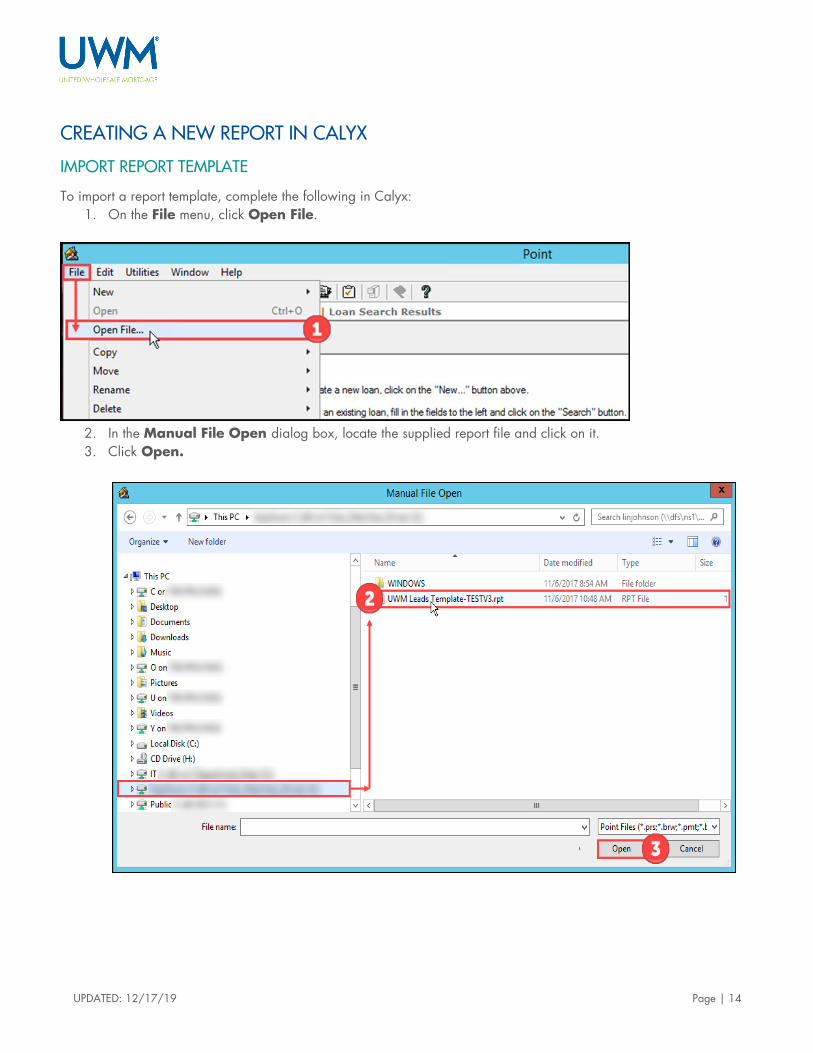
To import a report template, complete the following in Calyx: 1. On the File menu, click Open File.
2. In the Manual File Open dialog box, locate the supplied report file and click on it. 3. Click Open.

UPDATED: 12/17/19 Page | 15
4. On the file menu, click Save As.
5. In the Save As dialog box, click Save. NOTE: the file name can be edited before saving.
NOTE: The import report template process will only need to be done one time when importing the Calyx file.

UPDATED: 12/17/19 Page | 16
VERIFY IMPORT To make sure the template was imported and saved as the file name, complete the following:
1. On the Navigation Panel, click Templates. • Make sure to select the Report & Marketing radio button.
2. In the File Name list, scroll to find the file name.
GENERATE AND EXPORT REPORT To generate and export reports, complete the following:
1. On the Navigation Panel, click Reports & Marketing. • Make sure to select the Reports radio button.
2. In Current Status, select or clear check boxes to filter loans. 3. In the Reports drop-down list, select the Supplied Report Template. 4. Click Generate.
5. On the generated table report, click File.

UPDATED: 12/17/19 Page | 17
6. Click Export. 7. Click XML.
8. On the export report dialog box, in the File Name box, type the name of the file. 9. In file explorer, choose where to save the file. 10. Click Save.

UPDATED: 12/17/19 Page | 18
UPLOADING LEADS TO CLIENT CONNECT After the .XML file is exported from Calyx and saved on your computer, complete the following in Client Connect:
1. Click the Contacts tab.
2. Click Import File.
3. Click Add Files.
UPDATED: 12/17/19 Page | 19
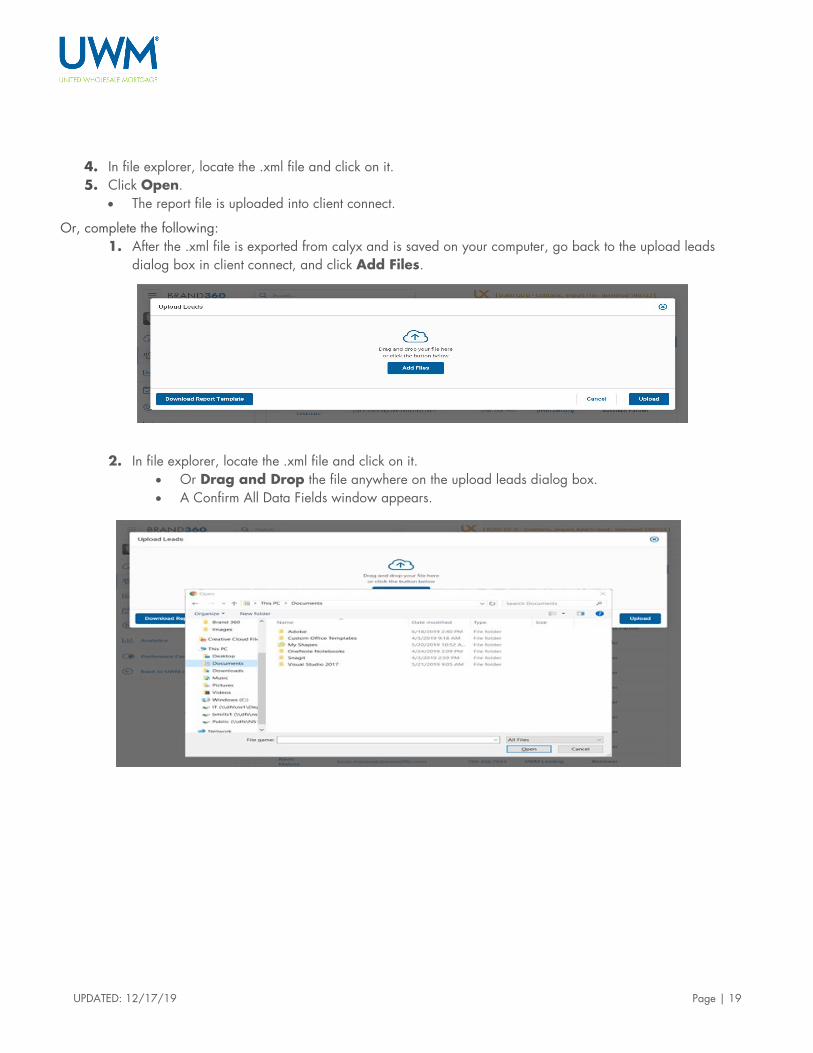
4. In file explorer, locate the .xml file and click on it. 5. Click Open.
• The report file is uploaded into client connect.
Or, complete the following: 1. After the .xml file is exported from calyx and is saved on your computer, go back to the upload leads
dialog box in client connect, and click Add Files.
2. In file explorer, locate the .xml file and click on it.
• Or Drag and Drop the file anywhere on the upload leads dialog box. • A Confirm All Data Fields window appears.
UPDATED: 12/17/19 Page | 20
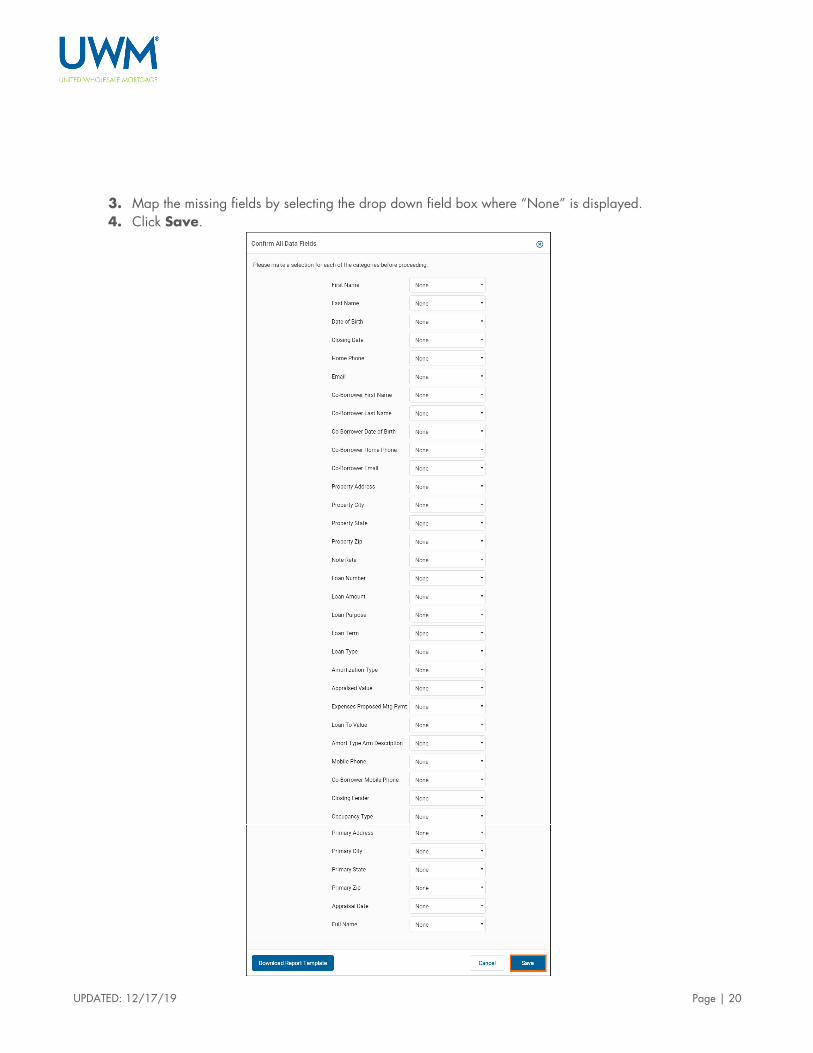
3. Map the missing fields by selecting the drop down field box where “None” is displayed. 4. Click Save.

UPDATED: 12/17/19 Page | 21
After the client list is imported to Client Connect, the success pop-up window appears