client automation technical requirements - … whitepaper describes some technical aspects of...
TRANSCRIPT


This whitepaper describes some technical aspects of working with Ariba Client Automation.
Ariba Client Automation provides a seamless integration between the Ariba application and the
user’s machine. This high interactivity environment allows the following to occur:
DFS allows the Ariba application (usually Ariba Contract Management and Ariba Analysis) to integrate with Microsoft Office on documents that the user has selected from the Ariba
application. Some examples of integration include the following:
Understanding the content of a word document along with the document properties.
Creating a contract document representation in the Ariba application.
Going directly to the clause in a document in Microsoft Word that the user has selected in
the Ariba application.
Regenerating the document through Microsoft Word on the user’s machine to represent
the changes the user made in the Ariba application.
DFS allows files the user has selected to be downloaded automatically to a designated place on
their machine and opened in the appropriate application.
Updates done to those files are detected and the user is presented with a dialog in the Ariba
application that they have changed the file.
To use the export capabilities and Desktop File Sync (DFS), each client machine must load the
Ariba Client Automation software. There are two ways to distribute this software to your client machines:
Automatic deployment. You can configure your applications to download Ariba Client
Automation to client desktops on demand, when the user initiates an action that requires client automation. Users must acknowledge and accept the download.
Manual deployment. You can distribute Ariba Client Automation to all personal computers in your organization.
In order to support Microsoft Vista and later releases on the client side, Ariba made changes and updates to the Ariba supplied and authenticated ActiveX control. Users with the previous ActiveX
control must update to the most recent version.
DFS relies on the Ariba ActiveX control to create a seamless integration with the user’s desktop.
Set up of DFS from the client side occurs on the User Preferences Page. Users click the Enable
button and follow a simple wizard. The wizard performs a number of checks to see if the ActiveX control has been installed or can be installed on the user’s machine. It prompts the user to
download and install the ActiveX control from the server. Once installed, the control tests basic integration with the User’s machine. If basic integration passes, the user is prompted to set a
directory where files can be stored.
Sample screens of the DFS wizard:

Once the ActiveX control is installed, users upload documents as before. When they click on a
document to view it, the document is automatically downloaded to the correct place in their DFS directory and opened by the correct application on their machine. The document can then be
modified by the user. Upon their return to the Ariba application, the application will detect that the user has changed the document. They may choose to update the document at that time.
There is no requirement for the Ariba application to be opened while modifying and saving
documents.
Same as Active X Control for setup.
Same as Active X Control
User must have write permission to the directory that they select during DFS setup.
DFS sets the following browser cookie:
Key = SmartClienthttp://<aribaserver><userid>
Value = SCV2000
Ariba encrypts the key.
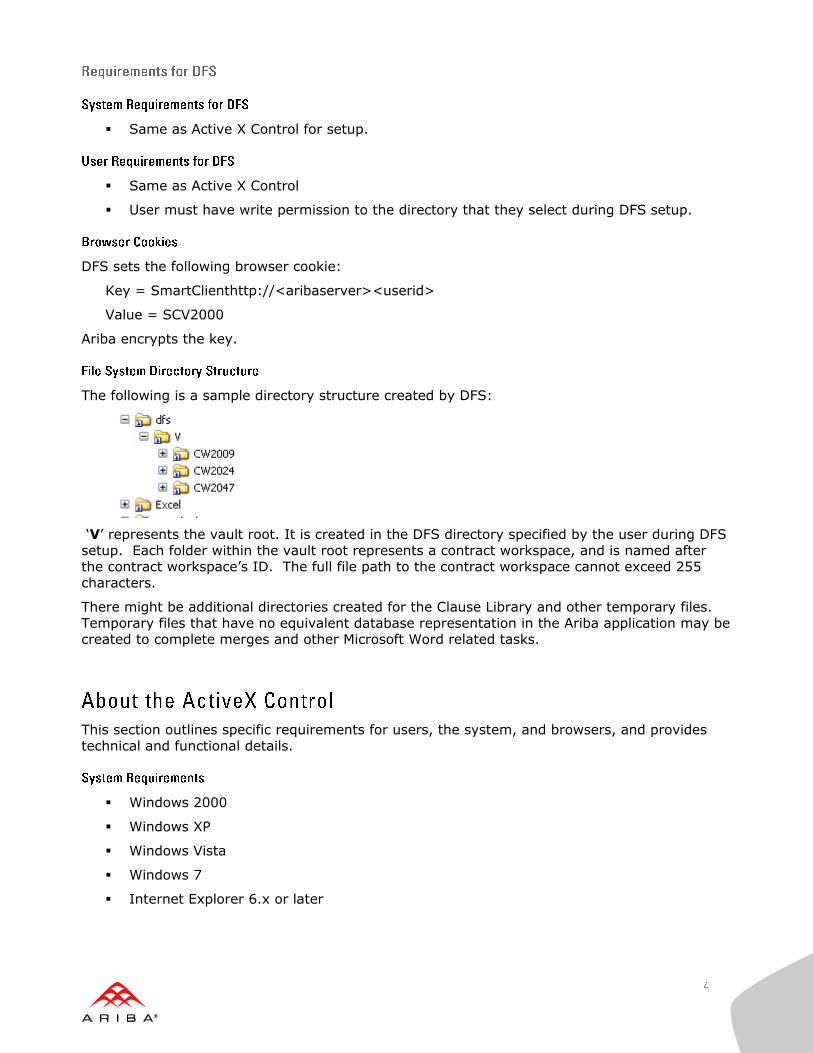
The following is a sample directory structure created by DFS:
‘V’ represents the vault root. It is created in the DFS directory specified by the user during DFS
setup. Each folder within the vault root represents a contract workspace, and is named after the contract workspace’s ID. The full file path to the contract workspace cannot exceed 255
characters.
There might be additional directories created for the Clause Library and other temporary files.
Temporary files that have no equivalent database representation in the Ariba application may be created to complete merges and other Microsoft Word related tasks.
This section outlines specific requirements for users, the system, and browsers, and provides
technical and functional details.
Windows 2000
Windows XP
Windows Vista
Windows 7
Internet Explorer 6.x or later

The user must be in the Administrator group on the client machine (for installing the ActiveX
control, can be installed in a bulk way). Once ActiveX is installed, the user does not require any
special permissions or access, but if ActiveX needs to be uninstalled and reinstalled, the user must be added back to the Administrator group.
For Internet Explorer 6 or 7:
o The following security settings must be set for the zone the Ariba server is in (typically the Local intranet zone, most of these settings are defaults for that
zone):
For Internet Explorer 8 or later:
o The Ariba server must be added as a Trusted Site under the Security tab in
Internet Explorer in order to work correctly. In addition, the default settings for
the Trusted Site zone (Medium security level) must be selected.

Administrators for on-demand solutions can configure enhanced security for the ActiveX
exchange used to install the DFS ActiveX control file. This feature was introduced in Ariba
release 102 SP2 and is not available for customers using installed Ariba (CD) products (version 9r1 or earlier). This security feature is not enabled by default; Ariba recommends that
customers enable it as soon as it is convenient for them.
When the enhanced security feature is enabled, the Ariba host uses an enhanced security
certificate to authenticate itself during the ActiveX exchange. This certificate has the following enhancements:
The certificate is issued by VeriSign and uses SHA-1 and a 2048-bit RSA key for its signature algorithm.
The Ariba host uses a password-protected secure storage scheme to protect its private
key.
The enhanced security feature also includes a new CAB archive file that contains a DFS ActiveX
control file. The certificate used to sign the CAB file was updated with a new expiration date.
To configure enhanced ActiveX security, Ariba Customer Support Administrators can set the
following parameter to Yes:
Application.Base.EnableVerisign2048CertificateAuthentication
If this parameter is enabled, the Ariba solution will download a new security certificate and new
CAB file for DFS ActiveX control (signed by the private key associated with the certificate) when a user first enables DFS. Users who already have DFS enabled will continue to use the existing
CAB file, but will be prompted to accept the new certificate and CAB file if they disable and then re-enable DFS.
The default value for Application.Base.EnableVerisign2048CertificateAuthentication is
No (continue using the existing certificate and CAB file).
In addition to the enhanced security feature introduced in 10s2 SP2, the 10s2 SP3 release and
later releases include a CAB file for customers that have
Application.Base.EnableVerisign2048CertificateAuthentication set to Yes. The new
CAB file contains a DFS ActiveX control file with security enhancements that prevent the
execution of unathorized code on client systems.
The Ariba Client Automation Control clientautomation.dll makes the following
ActiveXObject calls:
ActiveXObject(“ADOBD.Stream”);
ActiveXObject(“Excel.Application”);
ActiveXObject(“MSXML2.DOMDocument”);
ActiveXObject(“MSXML2.XMLHTTP.3.0”);
ActiveXObject(“Msxml2.DOMDcoument.3.0”);
ActiveXObject(“Outlook.Application”);
ActiveXObject(“Scripting.FileSystemObject”);
ActiveXObject(“WScript.Shell”);
ActiveXObject(“Word.Application”);

The Ariba Client Automation Control does not specifically use svchost.exe, or control what other programs it uses. Once the Ariba Client Automation Control has made the calls listed above,
Microsoft’s ActiveX code implements those calls to invoke programs on Windows. Ariba engineering suspects that the ActiveX code uses the registry to map from the object names to
executables that implement them, and that the MSXML2.*, ADOB.*, Scripting.FileSystemObject, Wscript.Shell, ClientAutomationControl, and Scripting.Dictionary objects are implemented within
the ActiveX automation DLLs without needing to invoke other application executables. Since this part of the functionality is part of Microsoft code and not Ariba code, Ariba engineering
cannot be sure. However, the list of application executables should include:
Excel.Application
Outlook.Application
Word.Application
Excel automation is used during DFS enablement; by certain actions related to Excel export in
analytical reports in Ariba Analysis; and in Ariba Sourcing events.
Word automation is used during DFS enablement and for contract authoring in workspaces,
templates, and within the Clause Library in the Ariba Contract Management Pro solution.
Outlook automation is used for the feature that allows users to export tasks from the Ariba
Spend Management My Tasks content item to an Outlook Tasks tab when DFS is enabled.
Note: ActiveX cannot access files or folders outside of the configured folder.
Ariba recommends Automatic deployment, which ensures that client desktops are always upgraded with newer releases of Ariba Client Automation as necessary. Users with
administrative privileges on the client machine are automatically prompted to install the newest control. To support this configuration, users must set the following browser options on the
Internet Options (Security tab):
Download signed ActiveX controls Either Prompt or Enabled
Run ActiveX controls and plug-ins Either Prompt or Enabled
The following images show examples of what the prompt might look like for installing the
ActiveX control and the certificate. Views might differ depending on which operating system is
being used:

For more information on what happens if a user chooses the Prompt setting, and the screens visible to users in this situation, see the online help for your web server.
If your security policies do not allow on-demand deployment, you can run an installation program that installs the Ariba Client Automation software on each client desktop. With this
option, your IT department (or end users) can manually install the Ariba Client Automation software on each user desktop, and perform manual upgrades whenever the software is
upgraded.
In this configuration, the browser settings for downloading and running ActiveX controls can be
set to Administrator approved, which is more restrictive.
This section describes how to install the Ariba Client Automation control on a user’s desktop. For
general information on how to distribute software or files over a network to individual personal
computers, see the Microsoft documentation.
To install this control, you must first extract the dynamic load library clientautomation.dll
from the archive file. On Ariba 9r1 systems, the archive file is clientautomation.cab and is
located in the following directory:
installRoot/install/docroot/ariba/resource/locale/lib
Where installRoot is the root installation directory for the server.
On Ariba 12s systems, log a service request to get the file. If you are using standard security for
DFS ActiveX (Application.Base.EnableVerisign2048CertificateAuthentication is No),
request the following archive file:
clientautomation.cab
If you are using enhanced security for DFS ActiveX
(Application.Base.EnableVerisign2048CertificateAuthentication is Yes), request the
following archive file:
clientautomation_v20.cab
Open the CAB file using Internet Explorer or a file extraction utility.
1. Copy the Ariba control file (clientautomation.dll) to the same directory where
Internet Explorer searches for installed ActiveX controls. For example: copy clientautomation.dll "c:\WINDOWS\Downloaded Program
Files\clientautomation.dll"
2. Register the control with the Windows operating system:
regsvr32 -s "c:\WINDOWS\Downloaded Program Files\clientautomation.dll"
In addition, you can load or publish the Ariba certificate in a location so that it is automatically
retrieved by the clients instead of requiring each user to install the certificate locally. For
example, you can use the Microsoft Certificate Manager or certmgr utility to load the certificate
in a folder in a server’s certificate store, such as in the Trusted People folder. If the certificate is
installed (or automatically downloaded) for users, they will not see the security warning asking “Do you want to install this software?” for the Ariba ActiveX control. (Screenshots of those
warnings are shown earlier in this document under the Automatic Deployment section.)
On Ariba 9r1 systems, the certificate file is available on the server in the following location:
installRoot/install/docroot/etc/certs/trustedPublisher/ariba.cer
On Ariba 12s systems, log a service request to get the certificate file. If you are using standard
security for DFS ActiveX
(Application.Base.EnableVerisign2048CertificateAuthentication is No), request the
following certificate file:
ariba.cer

If you are using enhanced security for DFS ActiveX
(Application.Base.EnableVerisign2048CertificateAuthentication is Yes), request the
following certificate files:
svcstagess.ariba.com.cer (for use when connecting to the stage service)
s1.ariba.com.cer (for use when connecting to a production service)
Install the certificate on the Microsoft Active Directory server, or use the Microsoft certmgr
utility to load the certificate in the client’s certificate store or a Microsoft Enterprise CA. You
could use a syntax similar to the following:
certmgr -add -c -n commonNameInCertificate cer_file -s TrustedPeople
Where:
commonNameInCertificate is the commonName (CN) attribute of the distinguishedName (DN)
of the certificate subject. Microsoft Explorer displays this in the Issued to field of a certificate.
cer_file is the name of the certificate file.
For example: certmgr -add -c -n "analysis.ariba.com" ariba.cer -s TrustedPeople
1. Unregister clientautomation.dll with the Windows operating system:
regsvr32 -s /u "c:\WINDOWS\Downloaded Program Files\clientautomation.dll"
2. (Optional) Remove the web server certificate from the certificate store.
certmgr -del -c -n [commonNameInCertificate] -s TrustedPeople
For example:
certmgr -del -c -n analysis.ariba.com -s TrustedPeople
You can check if the Ariba Client Automation controls have been installed by reviewing the browser settings. You can also use these steps to delete the Ariba Client Automation control
from your machine.
1. In Internet Explorer, in the Tools menu, choose Internet Options.
2. On the General tab of Internet Options, click Settings in the Temporary Internet Files area.
3. In the Settings window, click View Objects.
4. Look for Ariba Client Automation ActiveX Control.
If that file is labeled as Installed in the Downloaded Program Files directory, the Ariba-
signed control has been installed on the computer.
To enable Desktop File Sync (DFS) on Microsoft Vista you must add your Ariba server URL as a trusted site. To add a trusted site:
1. In Internet Explorer 7 browser, choose Tools > Internet Options.
2. Click the Security tab.

3. Choose Trusted Sites and click the Sites button.
4. Enter your Ariba server URL and click Add. Your Ariba site will be listed under Websites.
5. Click Close.
You can use the following utilities to troubleshoot Ariba Client Automation operations:
Logging. You can log DFS and client automation events.
Secure script debugging. The Javascript that runs on the client can be nonsecure or
secure. The secure Javascript includes code that accesses user data, such as code to synchronize files for DFS and to generate assembled contract documents.
Nonsecure Javascript debugging. Nonsecure Javascript is used for actions that do not access files on the client’s system, such as resizing a browser page. Nonsecure Javascript
debugging generates large amounts of data and is available only on non-production
systems.
The following categories can be used to debug DFS and client automation related issues. You can use Inspector or Administrator to set the following categories to the debug level:
authoring - acw.authoring Java logging category used for authoring done to Contract
Assembled Documents and related items (Main Agreements, Contract Addendums, Clauses for example).
clientscript - acw.clientscript Logs through a popup window while script is running in the ActiveX control. Typically used to find out what is being sent, run, and returned
through Microsoft Office.
generation - acw.generation Java logging category that deals with generating
Assembled Documents.
smartclient - acw.smartclient Java logging category that logs the server action that a
contract generation JavaScript has called. Example actions can be saving the sync history
of a document or an incremental syncup of the document or just page that we want to get back to when the JavaScript is done.
sync - acw.sync Java logging category that logs if the document has ever been synced on the user’s machine before.
clientautomation Java logging category specific to the ActiveX control that typically deals with authentication of the ActiveX control.
1. Navigate to the Inspector using a URL like http://<acmServerName>/ACM/inspector
2. Click the logging category link at the top (or scroll down to the logging section)
3. Select the logging category (Example: clientautomation)
4. Change the Severity to ‘DEBUG’
5. Click ‘Change Logging’

1. Log into Ariba Spend Management as an administrator.
2. Choose Manage > Administration.
3. Choose Server Manager > Log Settings.
4. Find the logging category you’re interested in
5. Select ‘Debug’ from the ‘Logging Level’ drop down.
6. Click Save
Ariba solutions use secure Javascript when accessing user data, such as when using DFS to synchronize files and when generating assembled contract documents. The secure Javascript
using a popup logging window. Secure script debugging is intended for internal use only and can be enabled from the user interface by the following users:
Ariba on-demand users with the SupportAdmin permission (by default, only the
Customer Support Admin user has this permission)
Ariba 9r1 users with who are members of the Support Administrator group on systems
with a software version that supports this feature, such as SP13 HF6
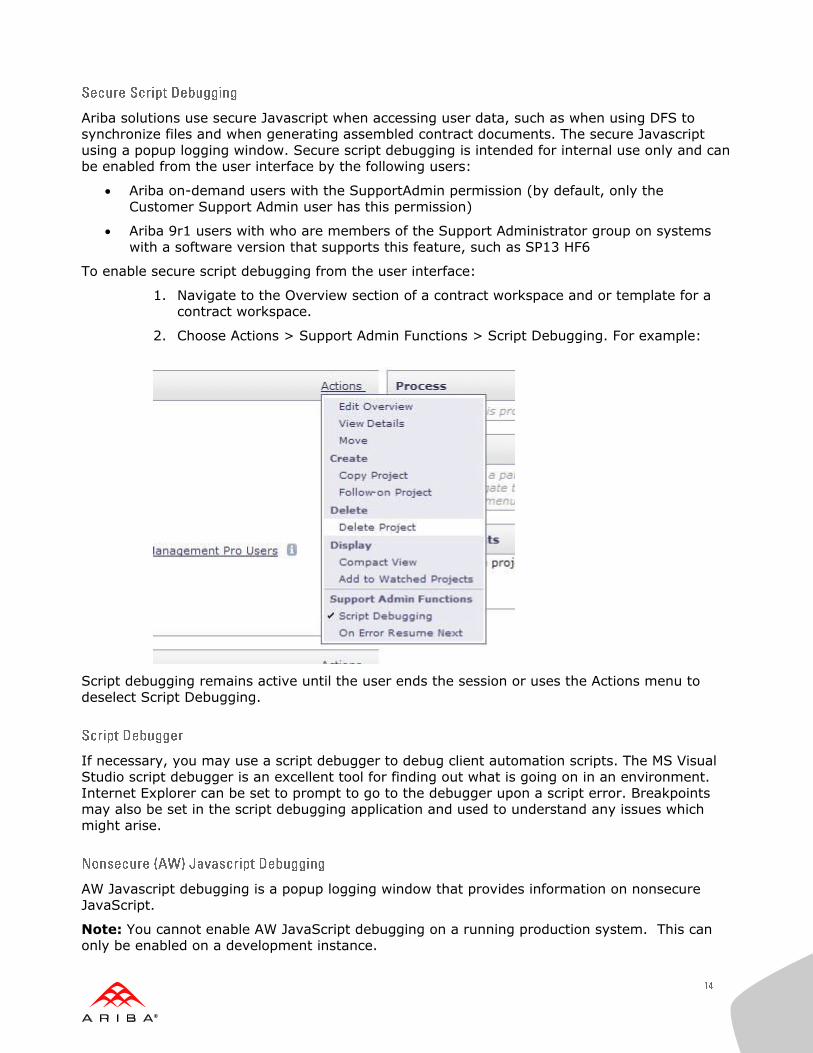
To enable secure script debugging from the user interface:
1. Navigate to the Overview section of a contract workspace and or template for a contract workspace.
2. Choose Actions > Support Admin Functions > Script Debugging. For example:
Script debugging remains active until the user ends the session or uses the Actions menu to
deselect Script Debugging.
If necessary, you may use a script debugger to debug client automation scripts. The MS Visual
Studio script debugger is an excellent tool for finding out what is going on in an environment.
Internet Explorer can be set to prompt to go to the debugger upon a script error. Breakpoints may also be set in the script debugging application and used to understand any issues which
might arise.
AW Javascript debugging is a popup logging window that provides information on nonsecure
JavaScript.
Note: You cannot enable AW JavaScript debugging on a running production system. This can
only be enabled on a development instance.

1. Set Debug to true in Parameters.table and restart the server.
2. Log in as the desired user.
3. Click the AW Options pull-down menu at the very top of the page:
4. Click AW Config Panel.
5. Enable the AW Javascript debugging options you want to use.
6. Click Done.
This section outlines some methods of troubleshooting an instance or issue with suspected roots in the ActiveX control. It should be noted that this area of the Ariba products is highly
integrated and dependent on other applications and connections and issues are not always where they first seem. It is important to take a broad approach when troubleshooting issues,
and to narrow things down as you go.
In certain cases, the Ariba ActiveX control, like any other control, might become corrupted. If you suspect this, take the following steps:
1. Log out
2. Disable DFS
3. Enable DFS and select a new directory (make sure the new directory is not a subdirectory
of the previous directory)
4. If you still have problems opening documents then disable DFS again
5. Remove the entry from the registry in HKEY_LOCAL_MACHINE\SOFTWARE\Ariba\ACM
6. Enable DFS and select a new directory (make sure the new directory is not a subdirectory
of the previous directory)
All SCV information is stored in the database and can be accessed through a query. This may
help in debugging issues with DFS. The specific SCV object for the user can be found using the
following AQL query in inspector:
select scv, scv.InternalId, scv.User
from ariba.collaborate.core.SmartClientVault scv
where scv.User.UniqueName = '<username>'
scv scv.InternalId scv."User"
6r79.9l SCV2000 6oxt.51
See the section earlier in this document for information on mapping the fields on the Smart
Client Vault object to the entries in the registry.
While not recommended, it will only cause a minor inconvenience to the user. The user will see some warnings in the Ariba application that they document was synced to the desktop, but could
not be found. The next time the user opens a document, it will be downloaded to the new DFS
directory (recreated if need be) and the error will go away. Unsaved documents will be lost when the user deletes or changes the DFS directory.
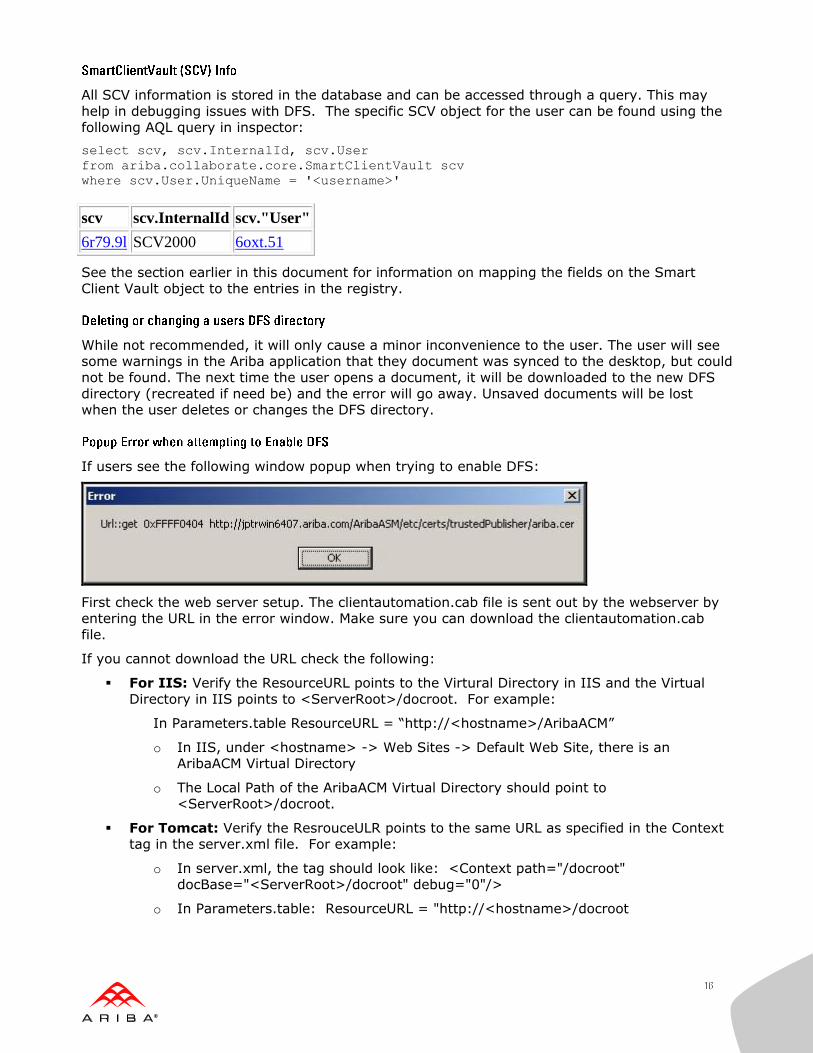
If users see the following window popup when trying to enable DFS:
First check the web server setup. The clientautomation.cab file is sent out by the webserver by entering the URL in the error window. Make sure you can download the clientautomation.cab
file.
If you cannot download the URL check the following:
For IIS: Verify the ResourceURL points to the Virtural Directory in IIS and the Virtual
Directory in IIS points to <ServerRoot>/docroot. For example:
In Parameters.table ResourceURL = “http://<hostname>/AribaACM”
o In IIS, under <hostname> -> Web Sites -> Default Web Site, there is an AribaACM Virtual Directory
o The Local Path of the AribaACM Virtual Directory should point to <ServerRoot>/docroot.
For Tomcat: Verify the ResrouceULR points to the same URL as specified in the Context tag in the server.xml file. For example:
o In server.xml, the tag should look like: <Context path="/docroot"
docBase="<ServerRoot>/docroot" debug="0"/>
o In Parameters.table: ResourceURL = "http://<hostname>/docroot

For the webserver virtual directory or alias (depending on what webserver you are
using), set execution permission to “scripts only”. Otherwise, it won’t be able to return certificate files such as ariba.cer
Make sure the Access Control List for the ariba.cer file is 555 (r-xr-xr-x)
Check if the install was successful. In IE, Tools -> Internet Options -> General -> Settings -> View Objects
If you see a GUID or nothing there, the ActiveX control might not be installed or might have a
corrupted install. Also check the Status of the install. Check the requirements for installing
ActiveX controls and try again. For reference, A GUID (global unique identifier) is a term used by Microsoft for a number that its programming generates to create a unique identity for an
entity such as a Word document. GUIDs are widely used in Microsoft products to identify interfaces, replica sets, records, and other objects.
Check the web server setup. The clientautomation.cab file is being sent out by the webserver. Make sure that you’re able to download the clientautomation.cab file.

In rare circumstances, you might see a series of popups in the Ariba Contract Workbench UI,
frequently when enabling DFS, which appear similar to the following graphics below. These popups normally occur in succession, with each following the other. These errors are caused by
a malfunction in the RSA directory of your client machine.
To remove these errors, delete all the sub-directories under:
C:\Documents and Settings\username\Application Data\Microsoft\Crypto\RSA
Where username is your username. You do not need to reboot your machine, simply log back in
to Ariba Contract Workbench, and you should be able to successfully enable DFS.
The following is a list of all things which might cause DFS to become disabled:
The user's profile is unavailable from disk or the network and Microsoft Windows logs
them into a temporary profile. While using or enabling DFS, a message with "aquire"
shows up in this case.
Microsoft Office is removed from the machine
The cookie containing the users DFS information is deleted or cleared. Resetting the browser to default settings can clear this information.
The cookie will expire if the user does not log in for 6 months. The cookie is refreshed each time the user logs in.
The user manually disables DFS. The DFS directory is cleared in this case, but can be set back with no issues to the same DFS directory. It is always recommended to use a new
DFS directory if the DFS has been disabled for a long period of time.
DFS directory is no longer writable. The user encounters save popups in this case.
The hard drive containing the DFS directory is full.

Additionally, DFS will act strangely if a user deletes the DFS directory without disabling DFS or
setting DFS to a new directory in the Ariba application first.
This section outlines other, non-native Ariba concepts which might interact with Ariba’s ActiveX and Microsoft Integration.
In certain scenarios, applications like RMS, WebSeal, or other applications designed to manage
documents and web traffic might interfere with the messages the Ariba applications send to and
from the Client desktop using Client Automation. It is important to evaluate any such protocol or software in conjunction with the Ariba Client Automation design to make sure everything
works properly. It is important to test all aspects on a live and representative system.
Some customers who have deployed RMS at their sites have experienced a problem in which the user’s browser will freeze and hang whenever the user tries to open a document via DFS.
DFS does the following:
Makes a MSXML2.XMLHTTP.3.0 Get request to the Ariba server for the Word doc that is opened
in Contracts
Opens an ADODB.STREAM and writes the file to the DFS folder, creating the folder if it does not
exist
Executes an Active/X automation command to open the Word doc
When RMS is deployed to a user’s desktop or laptop Windows system, it writes an entry to the
registry that causes the browser to freeze during the XMLHTTP.3.0 Get request, if the requested
URL ends in .doc or .xls. This is intended to guard against scripts downloading MS Office documents that might contain malicious macros, but it has the effect of blocking the download
by DFS of any MS Office documents.
The following VB script can be executed administratively on the user’s Windows system to delete the “PROTOCOLS\Filter\application/msword” registry key that RMS has added, and restore DFS
functionality:
const HKEY_LOCAL_MACHINE = &H80000002 const HKEY_CLASSES_ROOT = &H80000000 strComputer = "." Set oReg=GetObject("winmgmts:{impersonationLevel=impersonate}!\\" &_ strComputer & "\root\default:StdRegProv") strKeyPath = "PROTOCOLS\Filter\application/msword" oReg.DeleteKey HKEY_CLASSES_ROOT, strKeyPath

Ariba has no way to offer explicit support for every possible add on, scripting method, or plug in
to Microsoft Word. If you are having trouble enabling DFS, or DFS doesn’t seem to be working properly for documents, though it seems to be installed, you should investigate any scripting
added either to that particular document, or to the system as a whole. Applications do exist which automatically run scripts every time a Microsoft Word session is opened, and this might
interfere with Ariba’s access to those documents. This section is left purposefully broad, as there are many different ways companies use and extend Microsoft products, and Ariba has no
way of certifying or testing them all.
Additionally, adding certain scripts to the Normal.dot Word template might cause issues.
Shared drives work fine as long as:
The shared drive is mounted to a drive letter
The shared drive is available at login
The user has write access to the directory on the drive.
Using network mount paths such as <\\machinename\directory_name\> is not supported
because it causes trouble if the machine becomes unavailable. The mounted directory must be there at all times while the user is working in the Ariba application.