clickers – basic windows training session clicker pc... · from the main dashboard you can select...
TRANSCRIPT

ITS—Office of Teaching, Learning, & Technology [email protected] 319-384-4357
Clickers – Basic Windows Training Session
Today’s Session
1. Clickers Overview 2. Exercises (Hands On)
Downloading TurningPoint: 5.3.1 Software TurningPoint software is available for free to all University of Iowa faculty and staff. Please go to http://helpdesk.its.uiowa.edu/software/signin.htm to download the most current version of the software available on campus or call the ITS Help Desk for assistance with the install.
Figure 1:ITS Software Site
Figure 2: Clicker Software
The University of Iowa Clickers Website: http://its.uiowa.edu/srs 1
ITS—Office of Teaching, Learning, & Technology [email protected] 319-384-4357
Figure 3: Start Menu
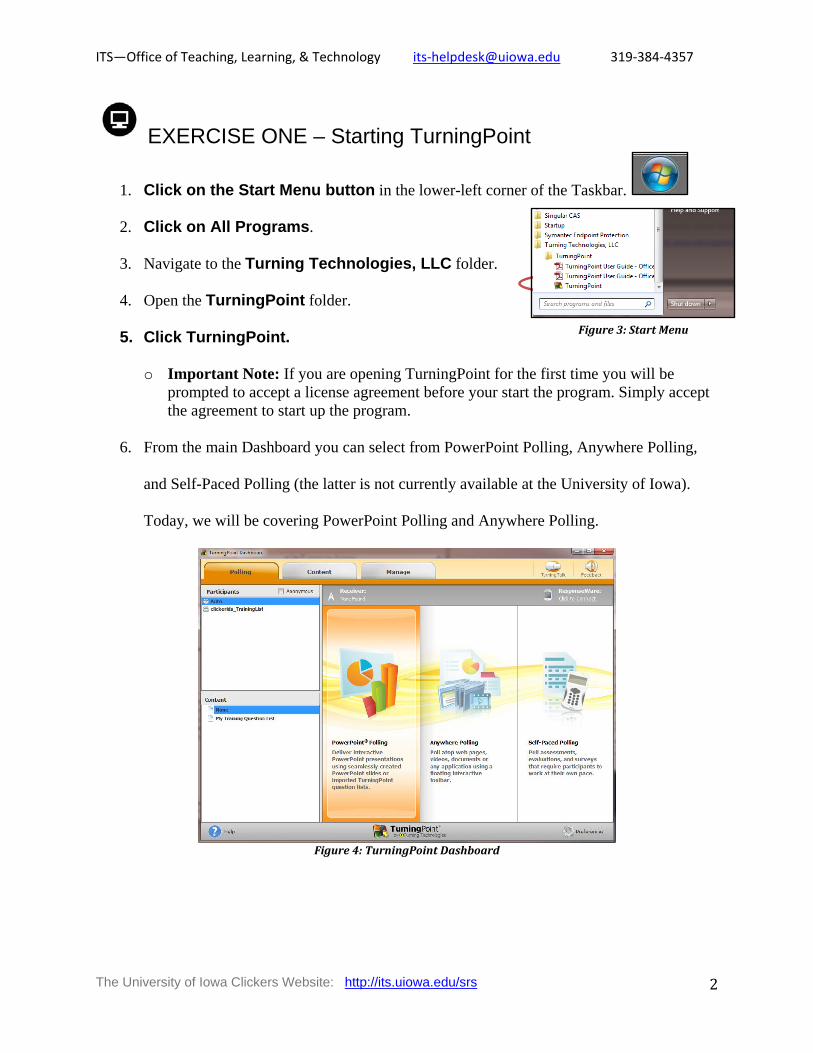
EXERCISE ONE – Starting TurningPoint
1. Click on the Start Menu button in the lower-left corner of the Taskbar.
2. Click on All Programs.
3. Navigate to the Turning Technologies, LLC folder.
4. Open the TurningPoint folder.
5. Click TurningPoint.
o Important Note: If you are opening TurningPoint for the first time you will be prompted to accept a license agreement before your start the program. Simply accept the agreement to start up the program.
6. From the main Dashboard you can select from PowerPoint Polling, Anywhere Polling,
and Self-Paced Polling (the latter is not currently available at the University of Iowa).
Today, we will be covering PowerPoint Polling and Anywhere Polling.
Figure 4: TurningPoint Dashboard
The University of Iowa Clickers Website: http://its.uiowa.edu/srs 2

ITS—Office of Teaching, Learning, & Technology [email protected] 319-384-4357
EXERCISE TWO – Hardware Set Up There are 2 hardware components (the receiver and the response devices) that need to be set to the same channel before you can use clickers to capture real-time responses. Receiver Set Up:
1. Plug your receiver into the USB slot of your computer.
2. In the TurningPoint dashboard, look for the Receiver icon right above PowerPoint
polling.
3. Click on the Receiver Channel Number to prompt a pop-up window.
Figure 5: Receiver Number
4. Next to Receiver, select your Channel in the drop down menu.
o Important Note: Your USB receiver retains the channel it was last set to. So if you set the receiver channel now, it will be retained if you use the same receiver with a different computer.
o Important Note: If your USB receiver is “Not Found” by TurningPoint, you may need to restart your computer.
5. Refer to the General Classroom Channel
Assignment list at:
http://its.uiowa.edu/support/article/100170 to find the classroom you teach in.
o If you don’t see a number listed for your classroom, check with your local IT support person for clickers. If there is no number assigned for your room, use an odd numbered channel to prevent conflicting with an assigned number.
Figure 6: Receiver Channels
The University of Iowa Clickers Website: http://its.uiowa.edu/srs 3

ITS—Office of Teaching, Learning, & Technology [email protected] 319-384-4357
EXERCISE THREE – Creating a Question List The primary advantage of the Turning Point Question List is that a question list can be used in both PowerPoint Polling and Anywhere Polling
1. While in the main TurningPoint
dashboard, click on the Content tab at
the top.
2. Click on Content, and then New Question List.
3. Name your Question List My Training Question List
4. Click Save. You have the option of changing the format
of your questions by clicking Preferences in the
Question List Wizard.
5. Click the Question button , and click Add
or press Ctrl + N.
6. Keep selecting add or pressing Ctrl + N until you have
3 questions.
7. To enter or edit a question, double click on it or click on the pencil/edit button
Figure 10: Edit Questions
Figure 9: Question List Wizard
Figure 7: TurningPoint Dashboard - Content Tab
Figure 8: New Question List
The University of Iowa Clickers Website: http://its.uiowa.edu/srs 4

ITS—Office of Teaching, Learning, & Technology [email protected] 319-384-4357
8. Enter your Question text (see table below) in
the first box.
• When you click on the letter in the multiple choice
area, a text editor will open for you to enter your
answer responses. You can also Tab through
the answer options.
9. Click the Close button after editing the question to return to
your question list.
10. Complete entering the two remaining questions in your question list. You can use the following questions or create your own multiple choice questions.
An observation that has
been repeatedly confirmed
and for all practical
purposes is accepted as
“true” is a(n) _______.
Of the three major types of
galaxies, the most common in
our universe is the:
We can confuse learners when we:
A. Law B. Hypothesis C. Fact D. Theory
A. Spiral B. Elliptical C. Irregular D. None of the Above
A. fail to complete… B. inconsistent grammar in the
options. C. veer off into another idea
entirely. D. Yes.
11. Once you have 3 questions, click Close and then the Save and Close button.
• Cancel will allow you to exit the question editor but not save your changes.
Figure 13: Close Question Editing
Figure 14: Save and Close Question List
Figure 11: Enter Questions and Answer Options
Figure 12: Close Question Editing
The University of Iowa Clickers Website: http://its.uiowa.edu/srs 5

ITS—Office of Teaching, Learning, & Technology [email protected] 319-384-4357
EXERCISE FOUR – Creating Chart Slides in TurningPoint The alternative to using the Question List is to create slides directly in PowerPoint.
1. After you close your question list, you will find yourself back on the TurningPoint
Dashboard.
2. Click on the Polling tab at the top.
Figure 15:TurningPoint Dashboard - Polling Tab
3. Select and highlight the question list you just created in the lower left box
under Content.
Figure 16: Select Question List
4. Click on PowerPoint Polling in the main window of the dashboard.
Figure 17: Turning Point Dashboard
5. You may see a pop-up window that indicates “importing question list” (if you have many
questions, this may take a minute or two to import).
The University of Iowa Clickers Website: http://its.uiowa.edu/srs 6

ITS—Office of Teaching, Learning, & Technology [email protected] 319-384-4357
• Important note: You may find in these imported slides, you’ll have to adjust the position of the graph or increase/decrease font size in order to get individual slides to appear or look correctly.
6. Select Slide #3 in the navigation area on the left-hand side.
7. Click New, then Multiple Choice.
8. In the new slide (#4), replace the Enter Question Text…
heading with: What do you want to learn today?
9. Replace Enter Answer Text… with Clicker Basics
then press Enter.
10. For answer B, type in: UICapture and hit Enter.
11. For answer C, type in: ICON and hit Enter.
12. For answer D, type in: Other.
13. Click somewhere outside of the answer text box to get the chart to update.
14. Repeat steps 7-13 for any subsequent questions you would like to add.
Figure 18: New Question Dropdown Menu
Figure 19: Fourth Question Slide
The University of Iowa Clickers Website: http://its.uiowa.edu/srs 7

ITS—Office of Teaching, Learning, & Technology [email protected] 319-384-4357
• You can modify your chart by clicking on the chart
area within your PPT slide. This will bring up a
chart context menu (Slide Preferences: Chart
Colors) to the right. Feel free to experiment with
changing some of the available options.
15. Experiment with deleting and adding new chart
types using the Objects menu.
• Go up to Objects and select Charts.
• In this case, start with Horizontal. Feel free to experiment with using the other chart types and consider what kind of data each is useful for.
Figure 20: Slide Preferences
Figure 21: Objects: Charts
The University of Iowa Clickers Website: http://its.uiowa.edu/srs 8

ITS—Office of Teaching, Learning, & Technology [email protected] 319-384-4357
EXERCISE FIVE – Assigning Values You can assign point totals and set one or more correct answers per slide.
1. Select the slide that begins – An observation that has been …
2. When you click in the answers box on the left-side of the slide, you should see the Slide
Preferences pane open up on the right-hand side of the TurningPoint
window. If this does not display immediately, click on the Preferences
menu option.
3. Click on Scoring Options.
4. Change the Correct Point Value in the Scoring Options area to 10.
5. Leave the Incorrect Point Value at 0.
6. Click the No Value dropdown next to C and select Correct.
7. Repeat the same process (steps 2-5) for Slide Two that begins Of the
three major types of galaxies…
8. The correct answer for Slide Two is B.
9. Go to slide that has the question: – We can confuse learners when we:
10. Change the Correct Point Value in the Scoring Options area to: 0.
11. Leave the Incorrect Point Value as 0.
12. Change “No Value” for A to be Correct. You’ll notice that when
you change one answer option to Correct, other values become Incorrect
by default, unless you change their values. Change all answer
options to Correct.
13. Save your PowerPoint either to your flash drive or your H: (shared) drive.
Figure 22: Preferences
Figure 23: Scoring Options
Figure 24: Multiple Correct Answers
The University of Iowa Clickers Website: http://its.uiowa.edu/srs 9

ITS—Office of Teaching, Learning, & Technology [email protected] 319-384-4357
EXERCISE SIX – Adding Objects Turning Point Objects can be added to slides, to prompt users to answer within a set time limit or immediately, to indicate correct answers, and/or give the audience statistics.
1. Begin by selecting the slide that begins with Of the three
major types of galaxies … (Slide 2)
2. On the menu bar, select Objects and Countdown
Clock.
3. By default the timer reads 30 seconds.
4. Click in the center of the timer.
5. In the Countdown Properties window that opens, change
Countdown Seconds from 30 to 10.
6. Click OK. The clock will now display 10 seconds.
7. Click Objects.
8. Select Correct Answer Indicator Checkmark
o Important Note: You must have a correct answer
selected before a checkmark can be added to your slide.
See Exercise Five – Assigning Values.
9. Save your PowerPoint show to either a flash drive
or your H: drive.
Figure 25: Objects: Countdown Timers
Figure 26: Timer Preferences
Figure 27: Objects: Correct Answer Indicators
Figure 28: Completed Slide
The University of Iowa Clickers Website: http://its.uiowa.edu/srs 10

ITS—Office of Teaching, Learning, & Technology [email protected] 319-384-4357
EXERCISE SEVEN –Demographic Comparison 1. Select the last slide in your PowerPoint presentation.
2. Click the New button and select Demographic
Assignment.
3. Enter in the question box at the top: What is your age?
4. Add the following answer options: • 0-14 • 15-29 • 30-44 • 45-59 • 60+
5. Next click on Tools and select Demographic
Comparison.
6. In the Demographic drop down menu,
select the question we just created
7. Select any of the questions you created earlier to compare. For example, you
can select the “An observation that has been … ” question (Slide 1)
8. Click Insert.
9. The slide that you have just added will
populate a demographic comparison graph
AFTER you run your slideshow in
presentation mode. A sample demographic
comparison chart is pictured below.
Figure 29: New Demographic Assignment Question
Figure 30: Tools: Demographic Comparisons
Figure 31: Assigning Comparison Tool
The University of Iowa Clickers Website: http://its.uiowa.edu/srs 11

ITS—Office of Teaching, Learning, & Technology [email protected] 319-384-4357
• Important Note: You’ll notice that the demographic question answers are indicated by the color key and the question you are examining is listed next to each bar in the bar graph. The demographic responses are indicated by the colored bars. Percentages for each color or demographic variable add up to 100%.
Figure 32: Demographic Comparison
• Important Note: Keep in mind you may want or need to use anonymous settings when
polling on sensitive questions.
The University of Iowa Clickers Website: http://its.uiowa.edu/srs 12
ITS—Office of Teaching, Learning, & Technology [email protected] 319-384-4357
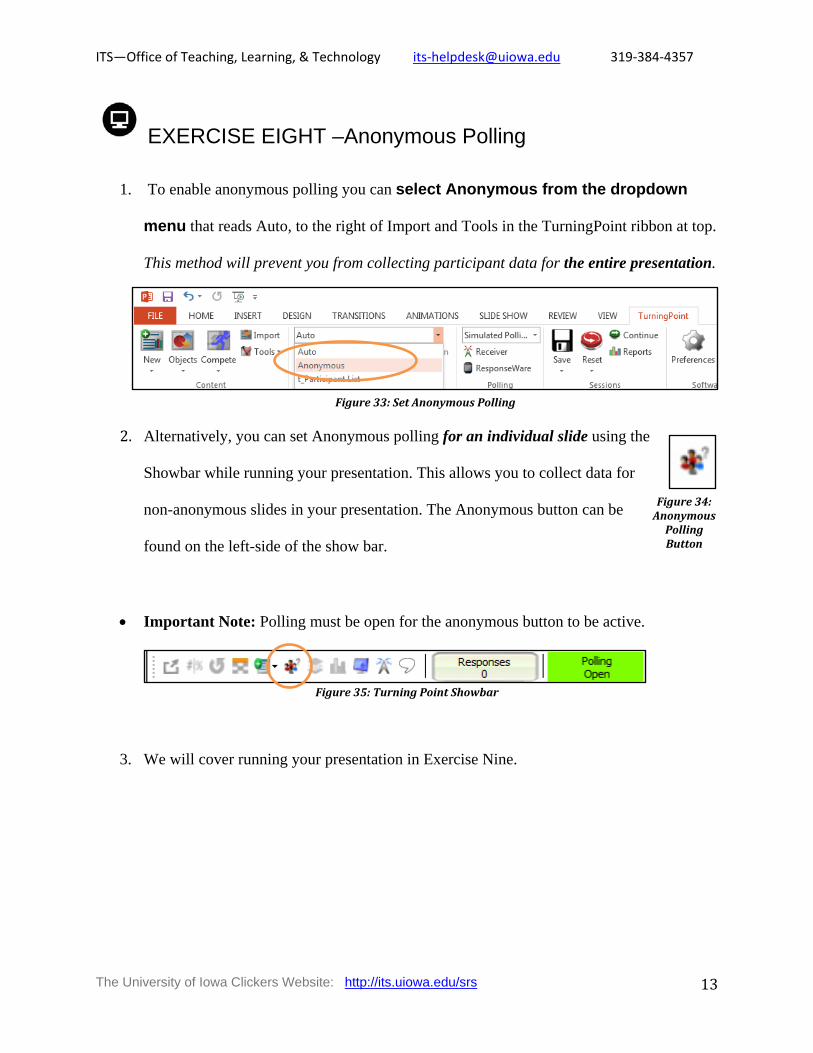
EXERCISE EIGHT –Anonymous Polling
1. To enable anonymous polling you can select Anonymous from the dropdown
menu that reads Auto, to the right of Import and Tools in the TurningPoint ribbon at top.
This method will prevent you from collecting participant data for the entire presentation.
2. Alternatively, you can set Anonymous polling for an individual slide using the
Showbar while running your presentation. This allows you to collect data for
non-anonymous slides in your presentation. The Anonymous button can be
found on the left-side of the show bar.
• Important Note: Polling must be open for the anonymous button to be active.
Figure 35: Turning Point Showbar
3. We will cover running your presentation in Exercise Nine.
Figure 33: Set Anonymous Polling
Figure 34: Anonymous
Polling Button
The University of Iowa Clickers Website: http://its.uiowa.edu/srs 13

ITS—Office of Teaching, Learning, & Technology [email protected] 319-384-4357
EXERCISE NINE – Testing your Slides BEST PRACTICE: Always reset your session before testing or polling in class, unless you are using the Continue Prior Session feature. This will remove any previously collected response data. You will be prompted to save any existing data.
1. Select Reset from the menu bar.
2. Select Session.
3. If you have existing data you wish to keep, choose Save.
4. Change Live Polling to Simulated Polling in the drop
down menu.
5. Select Slide 1 from thumbnails on the left.
6. Run your PowerPoint in Slide Show mode.
7. Click slowly through each polling slide, waiting for the Responses box to change
from zero to thirty, before clicking again. (You can also use the right arrow key.) Make
sure you wait until the responses reach 30 before moving on (see screenshot below).
Figure 38: Polling closed after reaching 30 responses
8. Notice as you have polling open, the interactive show bar at the top allows you to do the following functions:
a. Minimize or Maximize Showbar b. Show/Hide Response Grid
c. Insert New Question d. Set Anonymous e. Display Participant Monitor
f. Show/Hide (receiver) connection info
g. Display Messaging Window (not used with RF clickers)
Figure 36: Reset Session
Figure 37: Simulated Polling
The University of Iowa Clickers Website: http://its.uiowa.edu/srs 14

ITS—Office of Teaching, Learning, & Technology [email protected] 319-384-4357
9. When polling is closed, you have the following additional options: a. Toggle between percentages and counts b. Repoll Question c. Data Slice d. View Original Chart
10. When you are completely finished, change the Simulated Data drop down back to
Live Polling.
11. Select Reset to reset the session.
Figure 39: Reset Data
12. Select Save. (NOTE: normally, we would delete simulated data, but we’ll use this data
in the next exercise.)
Figure 40: Save Session Data
13. For this activity, save the collected data to the Desktop and call it: Simulated
Data TurningPoint. Click Save.
Figure 41: Save As “Simulated Data TurningPoint”
14. Click on the red window X in the top right corner to close PowerPoint
or go to File Exit to quit the program.
The University of Iowa Clickers Website: http://its.uiowa.edu/srs 15

ITS—Office of Teaching, Learning, & Technology [email protected] 319-384-4357
EXERCISE TEN – Running Reports
1. When you exit PPT you should find yourself back on the TurningPoint dashboard (if not,
re-launch the application), Click on the Manage tab at the top.
Figure 42: TurningPoint Dashboard: Manage Tab
2. Select Session Import
3. Navigate to your desktop and choose the Simulated Data
TurningPoint file.
4. You have the option to Leave in Place or Move Session.
If you Move Session TurningPoint will be able to locate the file
more easily in the future, so we will use Move Session.
5. Click OK after making your selection.
o Important Note: When you select Move Session, your file will be moved from your original file location (flash drive or H:\ drive). Before using Move Session, you may want to make multiple copies of the file. You can choose to Leave in Place, but you may have to reimport your session again the next time you want to use it, as it will not automatically be detected by TurningPoint.
o You can find the file location by highlighting your imported session file under the Manage tab (see screenshot).
Figure 44: Import Session
Figure 43: Move Session File
The University of Iowa Clickers Website: http://its.uiowa.edu/srs 16

ITS—Office of Teaching, Learning, & Technology [email protected] 319-384-4357
Figure 45: Session File Location
6. An Import Summary will display your Filename and Action Description. The Status will
be the listing that your data will be categorized by. For example, below, my Filename is
Simulated Data TurningPoint and the file has been Added to Auto.
Figure 46: Import Summary
7. Click OK again.
8. Back in the Manage tab, look under Auto and select the name and date of your
session.
o Auto indicates that no participant list was used during polling. If you loaded a
participant list before polling, your session will be listed under the name of your
participant list instead of Auto.
The University of Iowa Clickers Website: http://its.uiowa.edu/srs 17

ITS—Office of Teaching, Learning, & Technology [email protected] 319-384-4357
9. With the new Session Filename selected, click the Reports button at the bottom-
right.
Figure 47: Reports button
10. Under the reports window, click on Results by Question in
the dropdown at the top-right to see the report type options.
Look at some of the different ones to see which would be most
useful for you. For our training purposes, select Results by
Question.
11. Finally select Export Excel to generate a report.
12. When you are finished click Close to exit the Results Manager.
Figure 48: Available Reports
Figure 50: Close Reports
Figure 49: Export Reports
The University of Iowa Clickers Website: http://its.uiowa.edu/srs 18

ITS—Office of Teaching, Learning, & Technology [email protected] 319-384-4357
EXERCISE ELEVEN – Creating Questions in TurningPoint Anywhere
For this exercise, you’ll want to plug your USB receiver into the computer.
1. From the TurningPoint Dashboard Polling tab, select the question list you created
under Content in the lower-left box.
2. With your original Question List highlighted, click on Anywhere Polling in the center
pane.
Figure 51: TurningPoint Dashboard
3. You should immediately notice your first question is loaded
in the dropdown menu below the play button. You can
toggle between your questions by selecting them in the
question drop-down.
4. Click the play button to begin polling your audience.
5. Use a clicker to respond to each question to test polling. Watch the “Responses” increase.
• Important Note: Polling is open when the Play button shifts to a Stop button and vice versa when polling is closed.
Figure 52: Anywhere Polling
The University of Iowa Clickers Website: http://its.uiowa.edu/srs 19

ITS—Office of Teaching, Learning, & Technology [email protected] 319-384-4357
6. Click the Stop button to end polling and display results.
7. Cycle through your 3 questions until you reach the end by pressing Play and Stop.
8. To add a new question, click the down arrow adjacent
to the big green play button. Then select Custom…
9. In the box under Enter question text… type: What are
the advantages of using TurningPoint
Anywhere?
10. Where it says “Enter answer text…”
Type Polling on top of websites in the first line,
Press enter to return to the next line.
Each new line or return represents another answer for up to
ten lines.
11. On the next lines, type in: Screenshot function,
Use with non-PPT applications, and All of the
above. Press Enter after each phrase.
12. Select Start Polling at the bottom-right corner of the Custom Question window.
13. Your question will begin polling. Answer the question with your clicker. You can click
the Stop button to end polling and regain control of the Anywhere panel.
Figure 53: Adding Questions
Figure 54: Start Polling
The University of Iowa Clickers Website: http://its.uiowa.edu/srs 20

ITS—Office of Teaching, Learning, & Technology [email protected] 319-384-4357
EXERCISE TWELVE – Running TurningPoint Anywhere BEST PRACTICE: Always reset your session before testing or polling in class, unless you are using the Continue Prior Session feature. This will remove any previously collected response data. You will be prompted to save any existing data.
1. Select the Settings gear from the lower-left hand corner
of the TP Anywhere Window.
2. Select Session, then Reset
Session.
3. Click the Green Play button to begin running
your Presentation.
4. Using a clicker or multiple clickers, if available, try
testing your polls to ensure that they populate your
graphs correctly.
a. Important Note: You may have to check the channel on the clicker to make sure
the receiver is collecting the response by pressing Channel button + channel
number + Channel button. You will see a green light in the upper right and the
correct channel number in the LCD screen if you are successful.
5. Try opening a browser and asking a few on-the-fly questions, using the “Custom
Question” tool adjacent to a website of your choice, as demonstrated in Exercise Eleven.
Figure 55: TurningPoint Anywhere Settings
Figure 56: Reset Session
The University of Iowa Clickers Website: http://its.uiowa.edu/srs 21

ITS—Office of Teaching, Learning, & Technology [email protected] 319-384-4357
6. Notice as you have polling open, the interactive show bar at the top allows you to do the following functions:
a. Show/Hide Chart
b. Show/Hide Presentation
c. Show/Hide Response Grid
d. Show/Hide Countdown Timer
e. Show/Hide Connection Info
f. Display Messaging Window
g. Minimize and Maximize the Showbar
7. When you are finished polling a question, press the Stop button to end polling.
8. Cycle through Start and Stop until you reach the end of your questions, pausing to use your clicker to respond while your question is live, then stopping the poll and moving onto the next question.
9. Click Once again on the Settings gear , and find Session.
10. Select Save Session to retain a copy of your collected data.
11. Save this data to a flash drive or your shared drive
and call it: Anywhere Test Data TurningPoint.
Figure 58: Save As
Figure 57: Save Anywhere Session
The University of Iowa Clickers Website: http://its.uiowa.edu/srs 22

ITS—Office of Teaching, Learning, & Technology [email protected] 319-384-4357
12. Exit out of Anywhere Polling by clicking the X in the top-right
corner of the Polling window.
13. Exercise Ten on running reports can be repeated with your
TurningPoint Anywhere data, except you’ll want to set correct
answers for any questions you might have inserted that were not previously in a question
list. If you do not do this, student correct or incorrect responses will not be tabulated in
your results.
14. To assign correct answers to Custom or multiple response questions from Anywhere
Polling:
a. Import your TurningPoint Anywhere session data as detailed in Exercise Ten.
b. Highlight your session under the TurningPoint Dashboard Manage tab.
c. Select Edit Session.
Figure 60: Edit Session
d. Find your Custom or Multiple Response questions and click the edit pencil.
e. Under Scoring Options, select the correct answer (See Exercise Five on
Assigning Values).
f. This will assign the correct answers retroactively and tabulate correct and incorrect percentages when you run a report.
Figure 59: Closing TurningPoint Anywhere
The University of Iowa Clickers Website: http://its.uiowa.edu/srs 23

ITS—Office of Teaching, Learning, & Technology [email protected] 319-384-4357
EXERCISE THIRTEEN – Turning Point Anywhere Screenshots
1. Click the Manage tab at the top of the TurningPoint Dashboard.
Figure 61: TurningPoint Dashboard Manage Tab
2. Look under Auto and select the name and date of your session.
o Auto indicates that no participant list was used during polling. If you loaded a
participant list before polling, your session will be listed under the name of your
participant list instead of Auto.
3. With the new Session Filename selected, click the Reports button at the bottom-
right.
Figure 62: Reports Button
4. Under the reports window, click on Results by Question in the dropdown at the top-
right to see the report type options.
5. Select Screenshots.
6. TurningPoint Anywhere captures a screenshot when polling is
closed. If you are working with multiple displays, the screenshot
captures both. These images are available in the Turning Point
results and when the results are exported to Excel.
Figure 63: Screenshots
The University of Iowa Clickers Website: http://its.uiowa.edu/srs 24

ITS—Office of Teaching, Learning, & Technology [email protected] 319-384-4357
Figure 64: Report Display With Screenshot
7. When you are finished click Close to exit the Results Manager.
Figure 65: Close Reports
The University of Iowa Clickers Website: http://its.uiowa.edu/srs 25

ITS—Office of Teaching, Learning, & Technology [email protected] 319-384-4357
REFERENCE – ICON & Participant List Set Up TurningPoint has three polling options for tracking responses: Anonymous, Auto, or a pre-made participant list. Anonymous collects responses, but does not identify who gave them. Auto collects responses and which device they were connected with. A pre-made participant list identifies the responses by device ID number and other variables like clicker owners’ names. It is very important to not use the Anonymous participant list if you plan to use the results for grading. If you forget to choose your pre-made participant list before you run your session, you can pair the session data with your list later as long as you have run the session in Auto mode. ICON can be used to auto-generate the pre-made participant list, based on your students’ pre-registering their clickers using the Student Tools in ICON.
1. In your ICON site’s main page, click on Download Clicker Roster.
Figure 66: ICON Instructor Tools
2. To use the Participant list in the classroom we recommend saving it to your H:drive
AND/OR a flash drive to bring with you to the classroom.
3. You will need to save this participant list to your classroom computer’s local drive before
you run your presentation.
The University of Iowa Clickers Website: http://its.uiowa.edu/srs 26

ITS—Office of Teaching, Learning, & Technology [email protected] 319-384-4357
4. To use the participant list while running PowerPoint Polling, click Load List.
Figure 67: Load Clicker Roster within PowerPoint
Browse for your saved Clicker Roster file on either your flash drive or shared drive.
5. To add it to the saved participant lists, begin at the TurningPoint Dashboard, select the
Manage tab. Select the Participant List dropdown menu
Figure 68: Import Participant List
6. Select Import and browse for your saved file on either your flash drive or H:drive.
7. To use your participant List, return to the Polling tab in the dashboard.
8. Make sure your Participant List is highlighted under Participants in the top-left corner.
Figure 69: Selected (Active) Clicker Roster and Question List in TurningPoint
The University of Iowa Clickers Website: http://its.uiowa.edu/srs 27

ITS—Office of Teaching, Learning, & Technology [email protected] 319-384-4357
9. Keep in mind that if you’re using both the Participant List and Question List, you’ll want
to make sure both are highlighted before you begin PowerPoint Polling or Anywhere
Polling in the center pane (see screenshot).
ICON Integration TurningPoint sessions that have point values attached to answers can be used for grading. See http://its.uiowa.edu/support/article/100302 for specific directions.
The University of Iowa Clickers Website: http://its.uiowa.edu/srs 28