city of thousand oaks - toaks.org
TRANSCRIPT


3
CITY OF THOUSAND OAKS
PLANTING & MAINTENANCE MANUALApril 2017
Thousand Oaks City Hall 2100 E. Thousand Oaks Boulevard Thousand Oaks, California 91362 (805) 449-2100
City Council Claudia Bill-de la Peña, Mayor Andrew P. Fox, Mayor Pro Tem Al Adam, Councilmember Rob McCoy, Councilmember Joel Price, Councilmember
Planning Commission David Newman, Chair Doug Nickles, Vice-Chair Sharon McMahon, Commissioner Andrew Pletcher, Commissioner Don Lanson, Commissioner
Public Works Jay T. Spurgin, Director
Community Development Mark A. Towne, Director
City Manager Andrew P. Powers
Consultants SWA Group in association with Rincon Consultants, Inc.

4 THOUSAND OAKS PLANTING & MAINTENANCE MANUAL
CONTENTS1 Introduction 61.1 The Purpose of this Manual 6
1.2 How to Use and Modify this Manual 6
1.3 Responsibilities 6
1.4 Scheduling Procedures 7
1.5 Training And Education 9
1.6 Safety 9
2 Before You Plant 122.1 Site-Specific Tree Selection 12
2.2 Choosing Plant Sizes 12
2.3 Quality Of Stock 13
2.4 Purchasing the Tree 17
2.5 Growing Trees In Streetscape Containers 18
3 Planting Guidelines 223.1 Planting the Tree 22
3.2 Preparing the Planting Area 23
3.3 Preparing Planting Holes and Placing the Tree 28
3.4 Why Trees Sometimes Die After Planting 30
3.5 Planting Shrubs, Vines and Ground Covers 31
4 Tree Pruning 344.1 Why is Pruning Needed? 34
4.2 Qualifications of Pruning Personnel 35
4.3 Pruning Techniques 35
4.4 Types of Cuts 36
4.5 Establishing a Pruning Maintenance Schedule 38
4.6 The Five Tree Groups 40
4.7 Pruning Mature Trees 43
4.8 Pruning Old Trees 44
4.9 Tree Removals 46
5 Tree Watering 505.1 Watering Basics 50
5.2 Watering Frequency Guidelines 51
5.3 Methods of Irrigation 51
5.4 Irrigation Repair 52
5.5 Watering During Drought 52
6 Fertilizing 566.1 Scheduling 56
6.2 How to Apply Fertilizer 56
6.3 How Much to Apply 56
6.4 Alternative / Supplemental Materials 57
6.5 Nutrient Deficiency Symptoms 57
6.6 Symptoms of Excess Minerals in the Soils 58
7 Tree Pests and Diseases 607.1 Factors Leading to Pest and Disease Problems 60
7.2 Integrated Pest Management 60
7.3 Chemical Insect Controls 61
7.4 Identification and Control of Pests and Diseases 61
7.5 Insect and Disease Problems in Thousand Oaks 68
8 Other Tree Maintenance 748.1 Stakes and Ties 74
8.2 In and Around the Base of the Tree 74
8.3 Hazardous Tree Assessment 76
8.4 Ventura County Fire Safety Guidelines 76
9 Protection of Existing Trees 809.1 Basic Tree Protection 80
10 Shrubs, Vines and Ground Covers 8410.1 Pruning 84
10.2 Watering 84
10.3 Fertilizing 86
10.4 Weeding 87
10.5 Pest Control 87
11 Turf 9011.1 Appropriate Places for Turf 90
11.2 Maintenance 90
11.3 Types of Turf for Thousand Oaks 91
12 Bee City USA Advocacy 94


6 THOUSAND OAKS PLANTING & MAINTENANCE MANUAL
1 Introduction
This chapter provides the rationale for creating a planting and maintenance manual. It explains how different users of the manual, such as city crews, outside contractors and homeowners, will use it. In addition, it identifies ways these users can gain additional training and education in tree care.
1.1 The Purpose of this Manual
The purpose of this manual is to provide a day-to day manual of proper planting and maintenance practices to enhance the professionalism of city crews and others working in the city’s forest. The manual will serve as a field reference for crews; offer instruction to contractors working in the city; make inspection of work more objective, and help the public understand the techniques being used by the city crews and the reasons for using them.
The most important factors in growing healthy trees are thorough, careful and timely tree selection and installation procedures, and careful maintenance during the first four years of a tree’s life. Proper pruning and irrigation practices during this young stage will produce a tree that requires less care in later years, when maintenance tasks such as pruning are significantly more expensive.
This manual provides specific instruction in planting and maintenance procedures and techniques, and addresses the timing of tasks. Since plants respond so strongly to seasonal influences and weather changes, it is important that tasks be performed at the time which elicits the best plant response with the least investment. Advance planning will allow for the necessary materials to be on hand and for crews to be efficiently scheduled.
1.2 How to Use and Modify this Manual
This manual will be of benefit for maintaining existing trees as well as newly planted trees. When planting new trees, the site and species should be selected first, following the guidelines in the Forestry Master Plan Volume 2. This manual
details the process of planting and maintenance after these decisions are made. The primary user will be Public Works Department maintenance personnel. Other users include outside contractors; other public and semi-public agency maintenance personnel such as the Conejo Valley Unified School District, Conejo Valley Recreation and Park District, Conejo Open Space Conservation Agency, Caltrans, and Southern California Edison; business people; and home owners. The Public Works Director or designee is the key contact person for use of this manual. The manual is written to a technical level compatible with the educational and professional requirements of those two job classifications.
The manual is arranged for direct access and flexible use. Each chapter covers a particular planting or maintenance task. It identifies the task, describes how it should be implemented, and explains the reasons for the recommended method of action. In addition to the text, supporting graphics, charts and sketches are included. As new technical information is published, which is pertinent to these subjects, it should be added to or substituted for appropriate sections of this document. All manual holders will receive notice of these changes and copies of the new information.
1.3 Responsibilities
The protection, enhancement and maintenance of the community forest requires the involvement of all the citizens of Thousand Oaks, as well as the city maintenance personnel and other agencies. The responsibility of the city is to maintain trees and other plants on city rights of way in a healthy, safe condition.
Citizens should understand the laws and ordinances which pertain to the community forest and city owned or privately owned trees adjacent to their property. Citizens and developers must obtain a city permit to plant or remove any tree in the public right of way or public service easement areas. Pruning any limb in these areas may require a permit, and should be done with the supervision of a certified arborist, landscape architect, or registered professional forester. A permit is also required for any pruning or removal of oak trees or landmark trees, even on private land.Citizens can help by giving deep watering once a month to street trees adjacent to their homes and businesses; notifying the city when they observe pest and disease problems or broken
CHAPTER 1. INTRODUCTION

7
limbs; and notifying the city when they observe illegal pruning or removals.
The responsibility of institutions, businesses, and other organizations (such as homeowners’ associations) is to hire qualified contractors who are recognized by the city, and who follow these guidelines and cooperate with the goals of the Forestry Master Plan.
The responsibility of other public agencies, such as the Conejo Valley Park and Recreation District, is to maintain trees and other plants under their jurisdiction in a healthy, safe condition.
1.4 Scheduling Procedures
To realize the goal of creating a healthy, balanced community forest for Thousand Oaks, a proactive schedule for tree planting, maintenance, and removals is essential. Quantifiable yearly allocations for each of these three operations must be planned, budgeted, and implemented so that a stable forest of uneven age and diverse species is attained.
Guidelines for tree planting, maintenance, and tree removal
should be developed and prioritized based on public health and safety followed by sustainability and functionality.The first step in developing these guidelines is collecting an inventory of existing trees and vacant areas. (The information needed to compile this inventory is described in the Forestry Master Plan Implementation Recommendations).
The information collected in the inventory will assist in establishing a yearly schedule of tasks. This schedule can be used to draw up a budget.
Scheduling of Planting and Maintenance
Tasks Planting is most successful when done at the time of year when rapid rooting can occur. Installing plants in Nov.-Dec. is optimum, because new roots can expand rapidly into soil at a time when moisture demand is at a minimum. This produces a tree which is ready to produce rapid new growth in spring, supported by active new roots.
In order to make this planting schedule work efficiently, the appropriate trees must be on hand at the right time. Since fall planting is becoming an industry-wide goal, competition for the best nursery stock is strong, resulting in poor availability of desired species or of high quality stock. Thus, getting good
SEASONAL MAINTENANCE SCHEDULE
JAN FEB MAR APR MAY JUN JUL AUG SEP OCT NOV DEC
PLANTING: container
ball and burlap
bare root
PRUNING once yearly: deciduous
broadleaf evergreen
conifers
WATERING:
1st Year: fall and spring: once weekly
summer: twice weekly
2nd Year: fall and spring: twice monthly
summer: once weekly
3rd Year: once monthly
4th Year: once monthly
FERTILIZER once per year:
Table 1
8 THOUSAND OAKS PLANTING & MAINTENANCE MANUAL
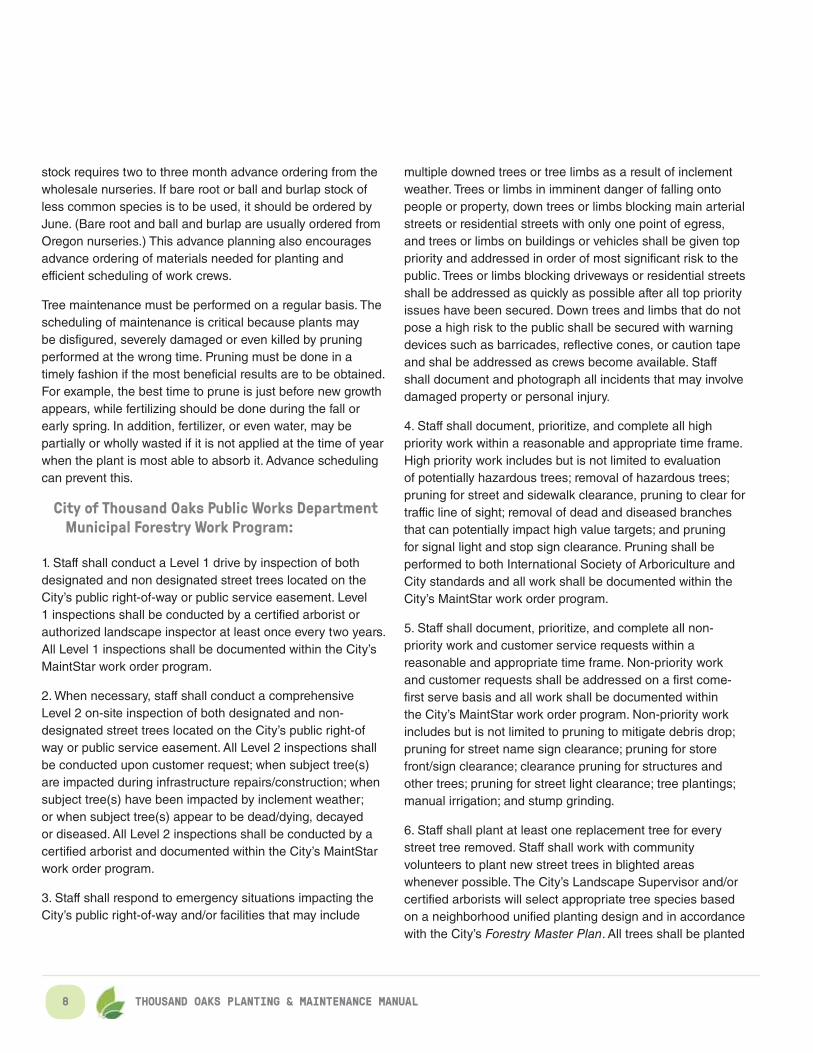
stock requires two to three month advance ordering from the wholesale nurseries. If bare root or ball and burlap stock of less common species is to be used, it should be ordered by June. (Bare root and ball and burlap are usually ordered from Oregon nurseries.) This advance planning also encourages advance ordering of materials needed for planting and efficient scheduling of work crews.
Tree maintenance must be performed on a regular basis. The scheduling of maintenance is critical because plants may be disfigured, severely damaged or even killed by pruning performed at the wrong time. Pruning must be done in a timely fashion if the most beneficial results are to be obtained. For example, the best time to prune is just before new growth appears, while fertilizing should be done during the fall or early spring. In addition, fertilizer, or even water, may be partially or wholly wasted if it is not applied at the time of year when the plant is most able to absorb it. Advance scheduling can prevent this.
City of Thousand Oaks Public Works Department Municipal Forestry Work Program:
1. Staff shall conduct a Level 1 drive by inspection of both designated and non designated street trees located on the City’s public right-of-way or public service easement. Level 1 inspections shall be conducted by a certified arborist or authorized landscape inspector at least once every two years. All Level 1 inspections shall be documented within the City’s MaintStar work order program.
2. When necessary, staff shall conduct a comprehensive Level 2 on-site inspection of both designated and non-designated street trees located on the City’s public right-of way or public service easement. All Level 2 inspections shall be conducted upon customer request; when subject tree(s) are impacted during infrastructure repairs/construction; when subject tree(s) have been impacted by inclement weather; or when subject tree(s) appear to be dead/dying, decayed or diseased. All Level 2 inspections shall be conducted by a certified arborist and documented within the City’s MaintStar work order program.
3. Staff shall respond to emergency situations impacting the City’s public right-of-way and/or facilities that may include
multiple downed trees or tree limbs as a result of inclement weather. Trees or limbs in imminent danger of falling onto people or property, down trees or limbs blocking main arterial streets or residential streets with only one point of egress, and trees or limbs on buildings or vehicles shall be given top priority and addressed in order of most significant risk to the public. Trees or limbs blocking driveways or residential streets shall be addressed as quickly as possible after all top priority issues have been secured. Down trees and limbs that do not pose a high risk to the public shall be secured with warning devices such as barricades, reflective cones, or caution tape and shal be addressed as crews become available. Staff shall document and photograph all incidents that may involve damaged property or personal injury.
4. Staff shall document, prioritize, and complete all high priority work within a reasonable and appropriate time frame. High priority work includes but is not limited to evaluation of potentially hazardous trees; removal of hazardous trees; pruning for street and sidewalk clearance, pruning to clear for traffic line of sight; removal of dead and diseased branches that can potentially impact high value targets; and pruning for signal light and stop sign clearance. Pruning shall be performed to both International Society of Arboriculture and City standards and all work shall be documented within the City’s MaintStar work order program.
5. Staff shall document, prioritize, and complete all non-priority work and customer service requests within a reasonable and appropriate time frame. Non-priority work and customer requests shall be addressed on a first come- first serve basis and all work shall be documented within the City’s MaintStar work order program. Non-priority work includes but is not limited to pruning to mitigate debris drop; pruning for street name sign clearance; pruning for store front/sign clearance; clearance pruning for structures and other trees; pruning for street light clearance; tree plantings; manual irrigation; and stump grinding.
6. Staff shall plant at least one replacement tree for every street tree removed. Staff shall work with community volunteers to plant new street trees in blighted areas whenever possible. The City’s Landscape Supervisor and/or certified arborists will select appropriate tree species based on a neighborhood unified planting design and in accordance with the City’s Forestry Master Plan. All trees shall be planted

9
to International Society of Arboriculture and City standards and entered into the City’s computerized street tree inventory database.
7. Staff shall utilize an integrated pest management program to address damaging insects, including the annual release of beneficial insects (ladybugs) in late spring. Staff shall perform as needed insecticide spot treatments with direct trunk injections or band spraying per manufacturer’s labels and in accordance with all state and local regulations.
8. All tree maintenance operations are to be conducted as per the guidelines specified within the City’s Standard Operating Procedures (SOPs) and Job Safety Analysis. Please note special requirements for Oak Trees within the City’s Public Right-of-Way.
9. Staff shall receive both in-house and offsite training whenever necessary or practical. Training shall be safety centric, focusing on the proper operation and implementation of equipment and techniques; industry standards for care and maintenance; policies, procedures, and guidelines; and communication and professionalism.
10. Staff shall endeavor to promote environmental sustainability by recycling green waste whenever practical and utilizing biochar to enhance soil properties. Recycling green waste includes, but is not limited to, the utilization of wood chips derived from the City’s tree maintenance operations. Wood chips shall be placed throughout the City’s landscape areas and made available to the public at the Grant Brimhall Library Complex.
1.5 Training And Education
It is ultimately the maintenance person’s responsibility to acquire the necessary knowledge and skills to perform his or her job. However, the city should encourage and support attendance at pertinent college classes and seminars. Attendance at a minimum level of such seminars should be encouraged to seek certification for each job classification. All personnel should be encouraged to take the International Society of Arboriculture (ISA) examination for Certified Arborist.
It is imperative that outside contractors working either for the city, other agencies, or for private citizens be certified
for work in the city. They should have an ISA-certified arborist on the job, and require that these personnel comply with the Western Chapter ISA Pruning Specifications. The responsibility for providing crew members with this expertise lies with the individual contractor.
Training should be provided by this maintenance manual; by continuing education (college or junior college, University of California Cooperative Extension Service classes); and by training sessions conducted on a regular basis by city staff. Tests should be given and graded after these sessions. Training should also be provided by outside consultants, with tests given periodically. Whether conducted by in-house staff or outside consultants, these sessions should be a combination of classroom instruction immediately followed by field practice. Information regarding landscape maintenance subjects will be understood and retained far more successfully using this technique.
1.6 Safety
• Always assume that an electrical wire or cable is energized and dangerous.
• If an electrical hazard exists in a tree, only a qualified line-clearance tree trimmer should do the work. A second specialist may have to be present (see ANSI standards for details). All other workers must remain at least ten feet from the power lines (and in some cases more - see ANSI standards).
• If a branch is hanging on a power line, the utility company should be called. Insulated equipment must be used to remove it.
• Rubber footwear is not to be considered protection from electrical hazards.
• When ladders, platforms, and aerial devices contact a live wire, they should be considered energized and dangerous.
• Work should be suspended when an emergency condition develops involving electrical conductors.
• Emergency rescue should only be attempted by properly trained persons familiar with electrical hazards. Southern California Edison offers classes.

10 THOUSAND OAKS PLANTING & MAINTENANCE MANUAL
• Pole pruners and pole saws should be made of non-conducting poles and cords. Ladders used near power lines should be of non-conducting materials.
Vehicle Safety
• Always set out safety cones when working near traffic, and use a flagperson if needed to direct traffic.
• When trucks with obscured rear vision must back up, outside guidance is necessary.
• All materials carried on vehicles should be stored so as not to fall off the truck during transit.
• Workers should not ride outside or on top of a truck unless this is required by the job, such as in roadside spraying.
• Do not leave vehicles unattended while running, or leave ignition keys in the vehicles.
• Do not leave wood chips in truck beds for extended periods, as spontaneous combustion may result.
Gasoline-powered machinery
• Do not refuel gasoline-powered equipment while the engine is running.
• Do not smoke around gasoline-powered machinery.
• Store gas only in approved safety cans.
• Refuel machinery at least ten feet away from where the equipment is being used.
Hand Power Tools
• All portable electric hand tools should be equipped with a grounded three-prong cord, be double-insulated, or be connected to the power source through an isolated transformer
• When using a lawn mower, make sure that the area to be mowed is free of rocks, bottles, or other objects which could come into contact with the mower blade. When starting and operating a mower, keep feet and hands
clear of the blade. Disconnect the mower (if electric) or remove the contact to the spark plug (if gas-powered) before doing any repair or maintenance near the mower blade.
Lifting
• Be sure clear ground is available if the weight is to be carried from one place to another.
• Decide exactly how the object should be grasped.
• Make a preliminary lift to be sure the load can be safely handled.
• Place your feet solidly.
• Crouch as close to the load as possible with the legs bent at an angle of about 90 degrees.
• Keep the back as straight as possible. It may be far from vertical but should not be hunched. Lift with the legs, not the back.
Other Guidelines
• See the ANSI standards for other specific rules concerning aerial lifts, brush chippers, sprayers, stump cutters and grinders, hoists, trucks, portable power tools, chainsaws, backpack power units, hand tools, electrical hazards, mobile equipment, safe work procedures in tree pruning and removal, and general safety requirements.

12 THOUSAND OAKS PLANTING & MAINTENANCE MANUAL
CHAPTER 2. BEFORE YOU PLANT
2 Before You Plant
Choosing the appropriate type of tree for a particular location is the beginning of the planting process, and is covered in the Volume 2 of the Forestry Master Plan. Choosing the plant size and purchasing the stock is the next step. This chapter guides the user through the necessary preparations before planting.
2.1 Site-Specific Tree Selection
New trees will have to meet different functional requirements, depending on the areas where they are to be used (see design guidelines in the Forestry Master Plan). Common denominators for all new trees must be:
• Adaptation to the soils of the microsite in which they are to be planted.
• Ability to survive with minimal soil for root growth.
• Lack of severe insect or disease problems.
• Lack of serious structural problems or tendency to produce surface roots.
• Ability to grow into a structurally sound tree without frequent pruning.
Many commonly used tree species and cultivars cause serious, expensive problems as they mature. For example, Liquidambar styraciflua causes sidewalk damage with its shallow roots, and often loses large limbs in early fall wind storms. Cinnamomum camphora is notorious for causing sidewalk damage. In addition, when under stress it is very susceptible to verticillium wilt, a vascular fungus disease. Both of these trees are useful in medians and wide parkways, but should not be used in narrow planting areas.
Planting site conditions create ultimate control of the longevity and health of any plant. Poor conditions cannot always be improved, and trees must be chosen which are as tolerant as possible to the particular problems of the site.
If tree roots are constrained by a small opening to air and water, as a street tree in a 2 ft. by 2 ft. opening in concrete, the tree cannot be expected to grow as rapidly, be as healthy
or live as long as if it were installed in an open field.
If the top soil is shallow, and underlain with impervious clay, tree roots may expand adequately when young, but with age, they will be adversely affected by the poor drainage of water below the root system and begin to decline.
If the top soil or sub-soil is highly alkaline, roots will not be able to absorb the broad range of balanced minerals needed for normal growth and will develop chlorosis, which limits growth and produces unhealthy foliage.
In saturated soil, root tips are killed by lack of oxygen and excessive water. They no longer carry water to foliage crowns, and plants die.
Some of these problems will cause a tree to fail early in its life. However, many such problems do not appear until the trees have been in the ground for many years, and are serving the function for which they were intended. Removal of troublesome trees at this stage is expensive and unpopular. Citizens often do not want a tree to be removed.
The objective is to consider the long-term results of tree selection, instead of selecting trees based on such short-term benefits as fast growth rate or ease of availability. (See Forestry Master Plan Volume 2 for guidelines on how to choose the appropriate tree for a particular location.)
2.2 Choosing Plant Sizes
The nursery plant size to use in any given site is often decided when the species is selected. In general, smaller plants will develop more rapidly and be healthier than larger plants, and have a higher survivability rate if cared for properly. Purchasing larger specimens will create greater impact at planting time, but have a lower survivability rate under the normal stressful urban growing conditions. The various sizes available for planting are:
• Seed: Hydromulching of large areas. Hand seeding of acorns or other large seeds can be done; these may be planted in revegetation areas with or without concurrent hydroseeding.
• Liners: These are small pots, usually 2” to 4” square.

13
They are commonly used when large quantities of ground cover are needed, or in native plant revegetation.
• One-gallon containers: Shrubs and ground covers are usually installed from this size. Trees can be installed from this size in naturalized and open-space areas, due to rapid establishment by the young plant. Careful inspection of roots must accompany their use. (See 2.3 for a discussion of inspection of stock.) (See 3.3 about using “Tuley tubes” to protect one gallon trees.)
• Five-gallon containers: This size is often used when an instant effect in shrub plantings is desired. In most cases, one-gallon shrubs will outgrow five-gallon plants. Trees can be installed in this size in naturalized and open space areas, and on the street, if well protected.
• Fifteen-gallon containers: This size is the most commonly used for street trees, although five gallon trees can also be used. Where vandalism is especially high, an even larger size than fifteen gallon is recommended. On steep slopes, this size is the largest that should be planted, due to the difficulty in watering and stabilizing root growth in larger sizes on slopes.
• Bare Root: This is a logical substitute for five gallon or fifteen-gallon trees but must be ordered several months in advance. They would arrive between December 15 and February 15. If bare root trees are properly stored on arrival and the roots are not allowed to dry out before installation, a survival rate of at least 90% should be expected. (See 2.3 checklist for bare root stock.) If city crews are unaccustomed to planting bare root trees, a small number should be ordered at first so that successful procedures can be learned. (See 2.4 for species suitable for Thousand Oaks.)
• 24” Box: This is a logical substitute for fifteen gallon street trees in many cases where quick results are necessary, and when there is a sufficiently large pavement opening for the root ball. (A planting area can be enlarged by redesign of the hardscape and/or removal of concrete.)
• Ball and Burlap: These would be purchased almost exclusively from Oregon and would arrive in March. They would usually be alternatives to fifteen-gallon, 24” box or 36” box trees. (See 2.4 for species suitable for Thousand
Oaks.) Large ball and burlap trees may be purchased for 30 to 35% of the price of equivalent boxed tree sizes. Much greater care must be taken in the storage, installation and care of ball and burlap trees. A loss factor of 10% is common.
• Larger specimens: These become geometrically more expensive, greater in weight, and more difficult to install as the size increases. They should only be used where a large, instant impact is essential. It is to be noted that the city will enlist the services of an outside contractor to perform the installation of trees 48” box size or larger.(See 2.3 for standards for size of trees purchased from the nursery.)
2.3 Quality Of Stock
Nursery stock purchased should be carefully inspected at the site before acceptance. The investment in installation and several years of care far exceed the cost of the plant. It makes no sense to install a severely root bound or genetically inferior specimen if the installation and maintenance costs are not rewarded by excellent growth.
Note: Trees should never be handled by the trunks (except bare root trees). Handle all trees by their containers or root balls.
Guidelines for Quality of Stock:Tree vigor
• Trees should have green leaf color or other color typical of healthy specimens of the species (if leafed out at the time of inspection).
• Vigorous trees will have larger leaves and denser foliage than weaker specimens of the same species (if leafed out at the time of inspection).
• Shoot growth should be at least 12” per year for faster and 6” per year for slower growing species.
• Bark should be smooth or shiny on most species, rather than rough and dull.
• Trunks should taper, with the widest part near the soil level. Trunks with no taper or a reverse taper should be avoided.

14 THOUSAND OAKS PLANTING & MAINTENANCE MANUAL
Lack of serious insect and disease pests
• Knowledge of the pests likely to be found is necessary for this inspection. (See Chapter 7) in general, stock showing symptoms of pest or disease problems should be avoided.
Well-formed root systems
• Some white root tips should be visible on the perimeter of the root ball or root mass.
• Older roots should be firm and healthy, and white or light yellow in color beneath the bark.
• There should not be any large kinked roots. If a taproot or major branch root is bent more than 90 degrees, and less than 20% of its lateral roots are above the kink, it should be rejected. The root ball will probably not provide good support for the trunk when the stakes are removed. (See Figure 1).
• Trees with circling or girdling roots which wrap around 60% or more of the root ball mass should also be rejected.
• Multi-trunk trees should have one root ball. They should not be made up of several trees in the same container.
Well-formed crown (See Figure 2)
• At least half of the branches should arise from points on the lower two-thirds of the trunk.
• Trees should be purchased with a skirt of foliage to within one foot of the ground, whenever possible. (Most bare root trees are not available in this form.) The skirt is the group of branches between ground level and the permanent scaffold branches. These temporary branches feed the tree and accelerate the growth rate of the tree.
• Single-trunk trees should have a definite central leader (the highest upright stem, which holds terminal buds extending the growth upward).
Lack of shipping damage or other injury
• Inspect the tree at delivery time for shipping damage to the trunk or branch breakage, or being unstable in the container.
Delivery of the species ordered
• When ordering, specify that each tree be delivered with a tag indicating the species and cultivar. When the trees are delivered, check the label to assure that the cultivar or species ordered was actually delivered. This is an item that is not usually checked. Since many nurseries will ship whichever closely related plant they have to fill an order, and different cultivars of the same species often produce quite different growth habits at maturity, this is quite important.
Figure 1. - Kinked Root
Figure 2 - Tree Structure

15
Checklist for Container StockInspection
• 2% of the trees to be purchased should be carefully removed from their containers, and the root system checked. They should have roots sufficiently developed to the perimeter of the root ball to hold the root ball together, but should not display roots of 1/4” diameter or larger.
• Check all other relevant guidelines for quality of stock
• Whenever possible trees should be inspected at the nursery prior to being ordered and/or delivered
Storage
• Newly received trees should be placed in a predetermined storage area and watered with a wetting agent/water mix (Aqua-gro or equivalent).
• Standards for Size.
• The tree must have produced between 6” to 18” of new growth (depending on species) during the previous growing season. This implies healthy root growth.
• A tree measured at 6” to 8” above the root ball must have the height and trunk caliper found in Table 2 for acceptance. These standards are derived from the “American Standard for Nursery Stock”, ANSI z60.1, 1980. They do not apply to multi-trunked trees.
• The minimum standards for planting oak trees to replace oaks which have been removed, as described in the Oak Tree Preservation Ordinance, appear in Table 3.
Checklist for Bare Root StockInspection
• When the trees arrive, cut the bundles apart, separate the trees and check for shipping damage, such as broken major roots or broken main branches. Broken roots should be pruned off at this stage. Reject all trees which do not meet the following standards:
• No more than 20% of major roots may be broken.
• No fungus cankers allowed on the trunk or
CONTAINER STOCK STANDARDS
Tree Type Size Height Caliper
broadleaf 1 gal. 1 to 2 ft. ht.2 to 4 ft. ht.
1/4”1/2”
broadleaf 5 gal. 4 to 6 ft ht. 1/2” to 5/8”
conifers 5 gal. to 6 ft.ht. 5/8” to 3/4”
broadleaf 15 gal. 7 to 10 ft. ht10 to 12 ft. ht
3/4” to 7/8”7/8” to 1”
conifers 15 gal. 6 to 8 ft. ht. 7/8” to 1”
broadleaf 24” box 10 to 12 ft. ht.12 to 15 ft. ht.
1” to 1-1/4”1-1/4”-1-3/4”
conifers 24” box 8 to 12 ft. ht. 7/8” to 1-1/4”
TABLE 2
OAK REPLACEMENT STANDARDS
Size Height Spread Caliper
15 gal. 7 to 8 ft. 2 to 3 ft. 1-1/4” to 2”
24” box 8 to 10 ft. 5 to 6 ft. 2” to 2-1/2”
30” box 10 to 12 ft. 6 to 8 ft. 2-1/2” to 3”
36” box 12 to 14 ft. 8 to 10 ft. 3” to 3-1/2”
42” box 14 to 16 ft. 10 to 12 ft. 3-1/2” to 4”
48” box 16 to 18 ft. 12 to 13 ft. 4” to 4-1/2”
54” box 18 ft. + 13 to 14 ft. 4-1/2” to 5”
60” box 20 ft. + 14 to 15 ft. 5” to 6”
72” box 22 ft. + 15 ft. + 6”+
TABLE 3
BARE ROOT STANDARDS
DIAMETER OF CALIPER ROOT SPREAD
1/2 to 3/4” 12”
3/4 to 1” 16”
1 to 1-1/4” 18”
1-1/2” to 1-3/4” 22”
1-3/4” to 2” 24”
2 to 2-1/2” 28”
2-1/2” to 3” 32”
3 to 3-1/2” 38”
TABLE 4

16 THOUSAND OAKS PLANTING & MAINTENANCE MANUAL
branches.
• Individual trees should be similar in their vigor and branch structure.
• Check all other relevant guidelines for quality of stock.
Storage
• Dig holes in prepared piles of wet sand and insert each tree’s entire root mass in the hole. Backfill the hole with sand and water each tree immediately.
Standards for Size
• Bare root stock should meet the standards listed in Table 4. (Caliper measured 6” to 8” from the root mass.)
Checklist for Ball and Burlap StockInspection
• When delivered, check for specimens whose trunks move in the root ball. Reject all specimens whose trunks move more than 12 degrees. Reject all specimens whose trunks do not recover to their original position when tested.
• Check for cracked attachments of main limbs to the trunk.
• Check for squashed root balls, due to excessive stacking in truck.
• Check all other relevant guidelines for quality of stock.
• Water with a wetting agent/water mix (Aqua gro or equivalent).
Standards for size
• Ball and burlap trees should meet the following standards listed in Table 5(caliper measured 6” to 8” from the bottom of the trunk).
BALL & BURLAP STANDARDS
STANDARD AND BROADLEAF EVERGREENS
Caliper Ball Diameter
1/2 to 3/4” 12”
3/4 to 1” 14”
1 to 1-1/4” 16”
1-1/4 to 1-1/2” 18”
1-1/2 to 1-3/4” 20”
1-3/4 to 2” 22”
2 to 2-12” 24”
1-1/2 to 3” 28”
3 to 3-1/2” 32”
3-1/2” to 4” 38”
4-1/2” to 4-1/2” 42”
4-1/2” to 5” 48”
5 to 5-1/2” 54”
SMALL UPRIGHT TREES
Height Ball Diameter
2-3’ 10”
3-4’ 12”
4-5’ 14”
5-6’ 16”
6-7’ 18”
7-8’ 20”
8-9’ 22”
9-10’ 24”
10-12’ 26”
CONIFERS
Height Ball Diameter
1 to 1-1/2’ 10”
2 to 3’ 12”
3 to 4’ 14”
4 to 5’ 16”
5 to 6’ 20”
6-7’ 22”
7 to 8’ 24”
8 to 9’ 27”
9-10’ 30”
10 to 12’ 34”
12 to 14’ 38”
14 to 16’ 42”
18 to 20’ 50”
TABLE 5

17
Contract Growing
Containers:
• An alternative to purchasing existing nursery stock is container contract growing. This offers the opportunity for the city to be assured that the species of tree needed will be available in the quantity and quality required. The process should start by inspecting the available stock at several wholesale nurseries, and discussing contract growing procedures with the managers. Questions to ask include the following:
• Will they separate your order from their other stock of the same species? If not, your carefully selected plants may be taken by other customers.
• Will they assure that the stock they deliver will have been in the containers in which they are delivered for at least 9 months (for fifteen-gallons) or one year (for 24” boxes)?
• Will they allow the designated city representative to select the five-gallon trees which are transplanted into fifteen-gallons for delivery 9 to 12 months later? (This may not be necessary if the nursery commonly produces only very high quality stock.)
• The growing contract should be signed at least one year before the desired delivery date, allowing the grower time to purchase or reserve high quality five-gallon or fifteen-gallon stock for transplanting into the fifteen-gallon or 24” box containers. If the contract is signed less than 9 months from delivery date, stock already in the containers must be used and should be carefully selected for vigorous growth produced during the previous growing season, and for well-formed structural limbs. A 20% deposit is commonly required.
• It is essential that the designated representative of the Public Works Department inspect fifteen-gallon or larger size trees in the nursery at least once during the life of the contract.
Bare Root Contract Growing:
• Another option is bare root tree contract growing. Bare root contract growing arrangements are simpler since
2.4 Purchasing the Tree
Buying Trees at the Nursery
The City
• For container grown trees, the designated Public Works Department representative will hand-pick trees at a wholesale grower’s yard before delivery, or inspect them very carefully upon delivery for the following:
• Correct identification of species and cultivar
• Root binding
• Root health
• Top growth
• Transportation damage
• Insects or diseases
• (See 2.3 for details on inspecting trees.)
The Developer or Outside Contractor:
• Trees purchased by the developer or contractor should meet the specifications noted for each species, as well as passing the inspection noted above. The designated representative of the will inspect trees before they are installed. Each tree should have a printed nursery label on it in order to assure that the required species and cultivar has been delivered.
The Homeowner:
• Retail nurseries may not carry all of the trees which are on the recommended tree list. Some retail nurseries will custom-order trees.
• Trees are usually purchased at a wholesale or retail nursery out of available stock. However, the available stock may not include the species desired, and/or the quality and quantity required, especially at fall planting time. If trees are to be purchased out of available stock, it is critical that they be handpicked and tagged at the nursery.

18 THOUSAND OAKS PLANTING & MAINTENANCE MANUAL
the production/digging cycle is controlled by the size of the plant and is relatively inflexible. As a result, the plants available for the growing contract will already be at some stage of production in the field at the inception of the contract arrangements. There are few bare root growers in the west, so selection of a grower is more limited.
• Use of bare root rather than container produced trees requires very good planning, since they are dug between the middle of December and the middle of February, and will be delivered by the grower soon after digging. Sand piles must be prepared for heeling-in of the trees when they arrive and they must be installed by the middle of February if transplant losses are to be kept to a minimum.
• Species which are well suited to this method are:
• Acer sp. Fraxinus sp. Quercus palustris
• Quercus rubra
• Sophora japonica
• Zelkova serrata
• The benefits of bare-root contract growing are:
• A tree the same size as a fifteen-gallon tree (3/4” to 1-1/4” diameter) can be grown for one third the price.
• Roots become established in the backfill soil quickly without problems of interface. Planting labor cost is reduced since installation is simpler.
Ball and Burlap Contract Growing:
• Trees may also be contract-grown in ball and burlap form. Ball and burlap stock of large sizes may be purchased for much less than equivalent container grown trees. Unfortunately, the clay root balls often create the same interface with the surrounding soil seen when containerized stock is used, reducing new growth and often resulting in high losses. Some species are more adaptable to this technique than others, including Acer rubrum and Zelkova serrata.
In-House Nursery Production:
An alternative to purchasing stock is in-house nursery production. Nursery production is a very specialized profession which requires knowledge of a broad range of specialized topics that are not necessarily common to other parts of the “green” industry. Even when it is successful, the actual cost per plant installed is always higher than if it were purchased from a wholesale nursery. The only potential benefit is improved quality, acclimated stock and timely availability. Unfortunately, even these benefits are seldom really achieved, due to lack of experience by personnel. Several cities which have already attempted in house growing have found that the quality of stock produced was inferior, but since city crew time was invested in its production, it was installed in spite of the poor quality. It is far wiser to hand pick high quality plants from a good grower and not be burdened by the inferior plants seen in any crop.
2.5 Growing Trees In Streetscape Containers
Trees in streetscape containers have particular maintenance needs. More frequent watering is necessary-up to once a week, depending on the species, exposure, and size of the container. Fertilizing will be needed monthly if applied as a top dressing, and quarterly if applied below the surface. Species must be selected which will tolerate living in containers. Drainage out of the containers across pavement can be a liability problem. The containers should be at least three feet in diameter in order to be in scale with the streetscape.
One method that cities sometimes use is to install a young tree in a large container and use this as a temporary street tree. When the tree begins to outgrow the container, it is planted in the ground. This is a way of buying younger trees at a lower cost. In three years, a bare root or five gallon tree can reach the size of a 24-inch box specimen. However, the cost of maintenance will be higher for a containerized tree than for the same tree planted in the ground, and the tree will not develop as quickly in the container. In addition, the cost of moving and replanting the tree must be figured in. Concrete containers, , can get chipped or broken during transplanting, and then could not be reused. Wood and fiberglass are more vandal-prone than concrete, however tannins from wood containers can stain pavement.

19
BARE ROOT SPECIES THAT COULD BE USED IN CONTAINERS
INCLUDE:
Fraxinus oxycarpa ‘Raywood’
Pyrus calleryana ‘Aristocrat’
Fraxinus holotricha ‘Moraine’
Zelkova serrata ‘Village Green’
GOOD CHOICES FOR PLANTING IN CONTAINERS FROM
5-GALLON SIZE ARE:
Melaleuca linarifolia
Fraxinus oxycarpa ‘Raywood’
Pyrus calleryana ‘Aristocrat’
Ulmus parviflora ‘Drake’
TABLE 6

20 THOUSAND OAKS PLANTING & MAINTENANCE MANUAL


22 THOUSAND OAKS PLANTING & MAINTENANCE MANUAL
CHAPTER 3. PLANTING GUIDELINES
3 Planting Guidelines
This chapter describes the actual installation of a tree, an event which is the culmination of the careful process of site and species selection. Proper planting techniques can greatly affect the lifelong health of the tree.
3.1 Planting the Tree
The location for planting a tree has been determined. Underground utilities have been identified and the planting area sited so that the tree will not be in conflict with them. An appropriate species has been selected which meets the design guidelines, matches the environmental conditions, and fits the size of the planting area. The tree has been acquired and is ready for planting. (See Fig. 3.)
The time of year when the tree is planted has a major impact on the long term success of a tree.
Installation of trees during the months of November and December will facilitate movement of new roots in the surrounding soil before the hot weather arrives, and thereby accelerate the establishment of the tree in its new soil environment. It will also save on maintenance costs since much of the watering during the first four to five months will be taken care of by the winter rains. This timing has such a significant effect on the proportion of success in establishment of new trees that sincere efforts should be made to avoid planting street trees at any other time of the year than late fall.
By contrast, the worst time to install street trees is mid-spring through summer, when the maximum demand for moisture is taking place. At this time it is most difficult to resupply moisture to the root mass as fast as it is being used by the foliage canopy of the tree. Transplant success ratios for trees installed during these months are significantly less than for those installed in early winter.
When spring or early summer planting is necessary, the following steps must be taken:
• Soak the rootball in wetting agent before removal from the container.
• Fill the planting hole with water and let settle before planting.
• Check rootball moisture at least two times per month.
Guidelines for Tree Planting
• Contact utility companies to locate underground utilities.
• Obtain the necessary permit from the Community Development Department and/or Public Works Department.
• Notify nearby property owners if they have not been previously notified.
• Gather tools and materials needed (see the checklist which follows). If the tree is to be planted by city crews, or by a resident during an approved neighborhood planting, tools and materials may be available from the city’s corporation yard. A release of liability waiver form must be filled out and approved. City personnel must supervise or operate city tools and equipment
• Set up safety barricades.
• Prepare the planting area (min. 4 ft. by 6 ft. by depth of root ball).
• Cut the pavement, if needed.
• Dig the planting area.
• Check for soil and drainage problems.
• Add special materials such as root control barriers or drainage materials.
• When possible, include modular suspended pavement support system.
• Fill the area with backfill and water to allow settlement overnight.
• Check for drainage problems the next day. If water has not drained, choosing a different planting location is highly recommended.
• Dig planting holes and plant and water the tree.

23
• Install non-wire stakes and tree ties.
• Add mulch over the planting area.
• Place paving materials, tree guards and tree grates if required.
• Clean up.
• Record the tree planting in the city inventory database.
Checklist for Planting
The Basics
• Trees
• Source of water
• People-power
Power tools
• Concrete saw cutter
• Backhoe
• Auger
• Dump truck
Hand tools
• Mattock
• Planting bar
• Shovel
• Stake pounder
• Broom
• Can snips
• Gloves
Materials
• Mulch
• Backfill
• Gravel
• Modular suspended pavement support system
• Water retaining polymer
• Water wetting agent
• Fertilizer
• PVC perforated drainpipe, 36” min. lengths
• Tree stakes
• Tree ties
• Paving materials
• Interlocking pavers
• Cobbles
• Decomposed granite
• Bricks
• Gravel
3.2 Preparing the Planting Area
The lifespan of a street tree planted in typical urban conditions (i.e., a 36” square planting hole surrounded by extensive paving, with frequent pedestrian traffic) can be as brief as ten years. Providing the largest available amount of uncompacted soil volume for growth is the most important factor in helping a tree grow to maturity.
Make the planting area as wide as possible
Most tree roots grow horizontally in the first 12” to 30” of soil below finish grade. The minimum planting area is 4 ft. by 6 ft. wide by 3 ft. deep. Larger planting areas (6ft. by 6ft. by 3ft.) are recommended on major streets and wherever possible. Parkways and tree wells that do not meet these standards must be widened by cutting the concrete.
24 THOUSAND OAKS PLANTING & MAINTENANCE MANUAL
Soil is purposely compacted in urban areas to facilitate construction of pavement and buildings. In construction work a stable surface which will not settle is desired. Usually soil is compacted to 95% of the possible maximum. When trees grow in compacted soil their access to oxygen is limited, and both percolation and drainage of water are slowed. A tree’s roots cannot absorb needed nutrients without sufficient aeration and good moisture levels. In addition, deep rooting is discouraged.
Often trees grown near pavement in compacted soil will put their roots under the hardscape as they seek water and air. (Shallow irrigation can also be a factor in this, and some tree species are naturally shallow rooted and/or aggressive in their rooting habits.) Moisture tends to collect under pavement, and the gravel layer often present there is a source of air. The temperature under pavement is often less vulnerable to extreme changes than the temperature of soil exposed to air. Creating a large uncompacted planting area, providing good drainage and aeration, using deep watering practices, and fertilizing will all help mitigate the problem of compaction. Preparing the planting area allows soil compaction to be lowered from the usual 95% to a maximum of 85%. Using a backhoe or power auger greatly eases the task of digging the planting hole. If the hole is dug with an augur, the walls must be roughened with a planting bar to allow roots to penetrate the soil after the tree is planted.
Trees require about 1.5 to 2 cubic feet of loam soil per square foot of canopy area, defined as the area within the mature diameter of the trees canopy spread. An industry rough rule of thumb is that 1,000 cubic feet of loam soil is the minimum required, but this is still not sufficient to support a large mature tree such as an Oak or Plane tree. There are many optional approaches to adding loam soil under pavement, each is different in its effectiveness. Stone based structural soil only contains 20% loam soil and thus requires 5,000 cubic feet of material to get to the 1,000 cubic feet minimum. Sand based structural soils have limited testing and have not performed nearly as well as loam soil. The most efficient system is to increase the loam soil under pavement by using a modular suspended pavement system filled with unscreened loam soil. (thefield.asla.org - Urban Design and Tree Planting Spaces by James Urban FASLA 01.05.16)
Locate Underground Utilities
• Every home and business in Thousand Oaks is served by public utilities: water, wastewater, gas, electric, telephone, and cable television. Wastewater laterals are particularly susceptible to damage and stoppages due to root intrusion by trees and even large shrubs, especially in times of drought. This results in both added and unnecessary costs to the city as well as the individual property owners.
• City crews and/or property owners must contact the various utility companies prior to scheduling planting to determine the location of their respective utility laterals prior to digging. The location of a water service lateral is usually obvious because the water meter should be visible at the ground surface. This is not, however, true with the other utilities. It is not uncommon to dig or drill directly into a gas main or wastewater lateral. People may not be aware that they have hit a wastewater lateral and unknowingly plant their tree, resulting in possible flooding at a later date. There is also potential danger from cutting into a gas main (resulting in explosions or fire), or electrical conduit (causing shock or electrocution).
Planting in Tree Wells
• Cutting existing pavement may be needed to create an adequate tree well. This work requires the use of heavy equipment and should only be done by city crews or an appointed contractor with a permit from the city. A diamond saw cutter, jackhammer, backhoe, loader and dump truck may all be required depending on the situation.
Check For Soil and Drainage Problems
• While digging and preparing the planting area, it is recommended that you check for any adverse or unusual soil conditions such as alkalinity, poor drainage, rocks or debris, or compaction. These conditions must be remedied prior to planting.
• Alkalinity may be found by looking at color. Gray or white soil usually indicates an alkaline condition. The use of alkaline-tolerant species is recommended. (See Forestry Master Plan Volume 2 for such species.)

25
Figure 3

26 THOUSAND OAKS PLANTING & MAINTENANCE MANUAL
• Poor drainage can be identified by filling a planting hole with water and seeing how long it takes to drain. If water in the hole has not settled at least one inch in one hour, do not plant before special drainage preparations are tried. If the water has not drained overnight, a new planting location should be chosen. Also check the species selected to be sure it will grow in poorly drained soil. If not, contact the Public Works Director or designee.
• Visual inspection of the soil by digging a pit, using a soil probe or simply finding an exposed area can give more specific information about a site. Particle size, moisture content and rockiness can be appraised.
• An important clue to chemical make-up is the presence of white deposits of calcium carbonate in many parts of the city, indicating very high alkalinity.
• The soil on construction sites is often compacted - either unintentionally, due to the movement of heavy equipment and materials, or deliberately, to help the soil bear the weight of buildings and pavement. These compacted soils can create conditions similar to both bedrock and hardpan, especially when the existing soil has a high clay content. Trees should never be planted in soils which have a compaction rate higher than 85%.
• If compaction is severe, a breaker bar may be needed to loosen the soil or drill through hardpan. (See the following section on improving drainage.)
Backfill
• When preparing and planting trees in clay soils, do not add soil amendments unless special conditions require it, such as highly alkaline soil. Although organic materials can improve the structure and permeability of any soil, if you add a large quantity to a planting hole in clay soil you can, in effect create an underground “container” for a new tree’s roots. Upon reaching the perimeter of the planting hole and its soft, permeable, conditioned soil, roots will then run into dense native clay and have difficulty penetrating it. Excess water also collects in the amended planting hole, waterlogging the root zone and possibly killing the tree from lack of air in the soil.
• In the clay soils typical of Thousand Oaks, the backfill
mix should be native soil which has been loosened by excavation of the planting area.
• Water immediately after placing the backfill in the planting area and tamp to settle the backfill and add soil as necessary to achieve finish grade before digging planting hole.
• Soil amendments and/or import soil should only be used in the case of highly alkaline native soils. The use of amendments or improved soil mixes in the planting pit of a newly planted tree can create a sharp boundary between “improved” and native soils, inhibiting roots from venturing beyond the boundary and inhibiting water movement into the pit. The use of natural soil, without amendments, is preferred.
• Laboratory analysis. For large plantings, soil samples from several spots on the site should be submitted to a professional soil laboratory. The resulting chemical analysis gives both the makeup of the soil and recommendations for corrective measures and appropriate plants.
Improving Drainage
• Constantly wet soil prevents active root growth. Trees should never be planted in swales or depressions. Various methods for assuring acceptable drainage in the planting area should be used.
• In the very worst cases, where no percolation takes place, and the layer creating the problem is too thick to drill through, planter holes must be thought of as bathtubs. A drain line must run from the bottom of the “bathtub” to a common drain.
• Where a hardpan layer is encountered, drill numerous 2” diameter holes through the hardpan.
• In clay soils which drain fairly slowly but in which the top soil is at least 6 ft. deep, and continuous (the dominant condition in Thousand Oaks). Irrigation should be thorough and infrequent. If water does not drain when tested while preparing the planting area, 6” diameter holes augured to a depth of 2 ft. minimum, and filled with gravel, may help keep water away from the roots.

27
• In deeper soils with an uninterrupted soil profile to a depth of 10 ft. or more, no drainage arrangements should be needed.
Root Control Barriers
• The recommended minimum planting area is 4 ft. by 8ft. Root control devices should be used when ever the tree must be in a 48” square or smaller opening of a pavement area. They should also be used when a tree is planted in an area adjacent to pavement, within 5 ft. of the pavement. Any tree species, in most soils, will eventually damage surrounding pavement in openings less than 36” square without root control, and many will cause damage in areas of less than 48”. While barriers help direct the tree’s root growth downward, they should not be thought of as removing the need for proper species selection (See Figure 4).
• Trees with vigorous root systems may eventually crack pavement even with root control, with the deep root barrier only delaying this occurrence. Examples include Cinnamomum camphora and Fraxinus uhdei. Root barrier strips 24” in depth are more effective than root control boxes. They may be installed either during tree planting or near established trees. They may also be used to help direct roots away from underground utilities. Root pruning may be required for established trees (see Chapter 4). Barrier strips are installed flush on the pavement side; the compacted soil beneath the roadway usually serves as an adequate barrier on the curb side. No more than two sides of the tree should have root barriers so that roots have some horizontal room to grow.
• An alternate method of root control is to use a bio barrier. This is a geotextile fabric (a synthetic textile which can be placed underground) impregnated with an herbicide.
Trees in Turf Areas
• In turf areas, when appropriate, trees are to be installed with a 3 x 3 ft. wood header to keep turf away from the tree trunk. Lawn mowers and weed whips cause tremendous destruction of the cambium layer, and must be kept away from tree trunks.
Figure 4 - Root Control Barrier
Figure 5 - Tree in Turf Area

28 THOUSAND OAKS PLANTING & MAINTENANCE MANUAL
Bare root
• Soak the tree’s roots in water or keep them in a moist plastic bag while preparing planting hole.
• Form a mound or cone of soil in the center of the planting hole.
• Place the roots of the tree on this mound, carefully spreading them out at their natural angles. Roots should fit the planting hole without bending or cutting them.
• Plant the tree at the same depth that it had been previously growing. Look for a distinct color change in the bark on the trunk just above the root flare. The mark indicates the former soil level. Position the tree in the planting hole so that this point is about an inch above the soil surface (it will settle down to grade when watered in).
• With the tree positioned on the cone of soil, fill in about half of the hole with backfill soil. Add slow release fertilizer and water-retaining polymer. Use Osmocote (4 oz.) or equivalent, and Broadleaf P-4 (1 oz.) or equivalent per cubic foot of soil in the planting hole. Soak the soil.
• When the water has drained away, fill in the rest of the planting hole with more backfill and water it. If the tree settles too low in the process, you can raise it to the proper position while the soil is moist by grasping it firmly and gently, lifting it up with a side-to-side rocking motion until it is at the proper height.
• Apply more soil and water until the tree remains at the correct level.
• Form a watering basin which is the same diameter as the root system, and fill up the basin three times, letting the water drain each time.
Ball and burlap
• Soak the root ball thoroughly with a wetting agent/water mix (Aqua-gro or equivalent) one to two days before installation.
• Dig a planting hole twice the diameter of the root ball and 6” deeper than the depth of the root ball.
3.3 Preparing Planting Holes and Placing the Tree
After the planting areas have been prepared, drainage, and root barrier systems have been installed, and the back fill has been well settled, the planting holes are dug and the trees planted.
Container grown trees
• When possible, soak the root ball thoroughly with a wetting agent/water mix (Aqua-gro) for 15 minutes, preferably eight to twelve hours before planting. Avoid planting recently saturated root balls, which can fall apart when handled. Dry root balls should never be planted, since it is very difficult to wet a dry root ball after installation.
• Dig the planting hole at least twice as wide as the root ball, and only as deep as the root ball.
• Remove the tree from the container, carefully supporting the root ball from below. Trees should never be handled by the trunks (except bare-root trees). Handle all trees by their containers or root balls.
• Check the root ball for signs of being rootbound. Reject any badly rootbound trees, or trees with kinked roots. (See Chapter 2) Otherwise, sever any circling roots 3/16” diameter or more with a sharp shears or a knife.
• Set the tree in the planting hole so that the top of the root ball is 2” above grade. (The tree will settle to grade when watered.)
• Fill in about half the hole with backfill and soak the soil. When the water has drained away, place slow release fertilizer (3 oz. Osmocote 18-6-12 or equivalent for a fifteen-gallon tree) and water retaining polymer (1-1/2 oz. Broadleaf P-4 or equivalent for a 15-gallon tree) on the soil. These materials placed adjacent to the root ball will provide for the needs of newly emerging roots during the first two years. Fill in the rest of the planting hole.
• Form a watering basin of the same diameter as the root ball, and fill up the basin three times, letting the water drain each time.

29
• Form a mound of soil to set the root ball on, and tamp it down firmly. Set the still-wrapped root ball on the mound. Do not break the root ball. Check the level of the root ball, making sure that the top of the root ball is 2” higher than the level of the surrounding soil to allow for settling.
• After the tree is properly positioned in the planting hole, fill the hole to half its height with backfill soil and water. Untie the burlap wrapping and pull the burlap to the edge of the root ball. You don’t need to remove the burlap from the root ball.
• Finish backfilling with soil and add slow-release fertilizer and polymer (4 oz. Osmocote and 1 oz. Broadleaf P-4 or equivalent per cubic foot of soil in the planting hole).
• Form a watering basin which is the same diameter as the root ball, and fill up the basin three times, letting the water settle in between soakings.
Staking the Tree
• The purpose of staking is to stabilize the root ball until the roots can anchor the tree, supporting the trunk in an upright position, and protecting the trunk from injury. Whenever possible, it is better to not stake a tree if it can stand without one. The tree will develop a strong trunk in a shorter period without staking. Conifers, upright growing trees, and trees planted bare root may not need staking. However, most nursery-grown trees will need staking for stability and protection from injury.
• As support stakes for five-gallon to 24-inch box trees, install two 2” diameter (or 2” by 2”) stakes per tree, tall enough for the particular tree. Install the stakes outside the root ball and a minimum 30” below grade to ensure stability.
• Supplemental stakes for anchoring the root ball or for protection should be 3 ft. long, with half the length of the stake below grade.
• Support stakes should be perpendicular to the prevailing wind direction. A 1” by 3” cross bar in may be added for stability. On windy sites where the wind comes from several directions, a three stake system may be needed.
• Ties should be flexible to allow for growth of the trunk.
Wire ties should never be used. Install ties at one point only, at 6” above the natural bend point of the tree. To find the bend point, remove the nursery stake (the small stick attached to the trunk at the nursery) and pull the top of the crown to one side, holding the trunk with one hand. The point on the trunk where the canopy will snap back to an upright position by itself is the natural bend point. Pruning the tree at planting time, when indicated, will lighten the weight of the canopy and raise the natural bend point. (See Chapter 4 for pruning guidelines.)
• Cut the tops of the stakes so that they are only 2” to 3” taller than the point where the ties are placed. This prevents the top of the tree from rubbing against the stakes in strong winds.
• The nursery stake should usually be removed at planting time. However, if the trunk is too weak to stand without the stake, it should be cut and reattached as an auxiliary stake. The auxiliary stake should be attached 2” above the root ball and no higher than 24” from the tip of the tree’s central leader.An even better auxiliary support in this case would be a flexible spring steel rod (or other flexible support stake such as fiberglass or bamboo) extending from 2” above the root ball to 6” above the natural bend point of the tree. The rod should be 1/4” diameter for five-gallon cans and 3/8” diameter for fifteen-gallon cans. Tie the rod to the trunk with one-inch-wide plastic tape at 6” to 10” on center.
• Auxiliary stakes do not take the place of support stakes. Their sole purpose is to help strengthen and straighten the trunk while allowing movement.
• Ties should contact the trunk with a broad surface to minimize rubbing or girdling, and should have some elasticity. Wire should never be used. Elastic webbing, tire cording, or heavy polyethylene tape (for small trees) can be used. The tie should be loosely looped around the trunk. Two ties, one from each stake, should be used.
• Larger trees, 36” box or larger, may require a guying system for anchorage. The least hazardous method for pedestrians is an underground auger anchor, such as Duckbill earth anchors. Above grade guy wires should not be used.

30 THOUSAND OAKS PLANTING & MAINTENANCE MANUAL
Installing Tree Guards and Grates
• In high-traffic areas more protection is needed for young trees. In some cases aesthetics may demand iron tree guards, but they must be removed as the tree matures or they will strangle the tree.
• Perforated iron tree grates or precast concrete tree covers with perforations may be used if they are self-supporting above the soil. The perforations allow air and water to reach the soil. The grates must be expandable (by means of knock-out sections) to allow for trunk growth. Pea gravel is the recommended mulch material when tree grates are used.
Turf and Ground Covers
• Turf and ground covers should not be installed within a tree’s watering basin, as they will compete with the tree for nutrients; the tree may also suffer mower- or weed-whip damage.
• Frequently when trees are planted, ground cover is kept at least 3 or 4 ft. from the tree. However, sometimes the aesthetic benefit of ground cover, or the need to protect or enhance trees in high traffic areas, outweighs the problem of competition for nutrients. This is a design decision that needs to made for each situation.
Cleaning Up
• The work area should be swept, debris removed, and tools returned.
3.4 Why Trees Sometimes Die After Planting
• Loss of roots from too severe root pruning (roots are often pruned to compensate for a root bound condition in containers) or from a root ball breaking apart when handled.
• Drying of roots from exposure to sunlight before planting, in bare root trees.
• Air pockets, stones, or hard clumps in the soil which
• For small trees which may need protection against weed competition and human and machine damage, tree shelters known as “Tuley tubes” can be installed. These are twin-walled, translucent, photodegradable polypropylene tubes from two to six feet high, which serve as miniature green houses for the trees. The use of these tubes can allow a mass planting to be done at a fraction of the cost. The tubes allow a seedling or one gallon tree to be used rather than a five or fifteen gallon specimen.
Adding Mulch
• A 4”-deep layer of shredded bark or bark chips should be spread over the entire planting area outside the watering basin at planting time wherever possible, to conserve soil moisture, inhibit weed growth, and prevent baking of the soil by the sun. Mulch will also improve soil fertility and soil structure as it degrades into the soil. For trees in tree wells or narrow planting strips, where mulch would tend to spill out on the pavement, it may be necessary to use a thinner layer. Shredded bark is preferable on slopes as it has less tendency to slip than bark chips.
• Mulch should not be in contact with the tree trunk and be kept clear of the root flare.
Placing Paving Materials
• Paving materials laid flush with the soil in a tree well generally cause compaction and limit access for watering, but are a better method than planting in smaller cutouts. They will also cause crown rot problems if they touch the trunk. In high-traffic areas, where the planting areas need to be diminished to allow for pedestrian movement, use a tree grate or other self-supporting system which does not compact the soil.
• Where new paving is installed, it should slope away from the planting area so that excess runoff does not drain toward the tree in the winter. Water from paved surfaces also carries alkaline chemicals and motor oil residue into the soil.
• When possible, install a modular suspended pavement support system per manufacturer’s most recent recommendations prior to replacing or installing new pavement.

31
prevent contact of the roots with the soil.
• Insufficient preparation of the planting area, so that soil compaction is not corrected.
• Crowding of the roots into too small a planting hole.
• Overwatered, soggy soil.
• Lack of water.
• Failure to correct alkalinity in the soil and to plant an alkaline-tolerant species.
3.5 Planting Shrubs, Vines and Ground Covers
• Since the focus of this manual is trees, all references to shrubs, vines and ground covers will be for those that are planted under trees in the public right of way. This includes street medians and parking lots. In general, recommendations for purchasing, planting, and maintaining trees also apply to other plant materials.
• Although the plant palette recommends drought tolerant species, all new plantings require water for at least the first two growing seasons. Since shrubs have smaller, shallower root systems, they require more frequent watering than trees.
• Staking of shrubs is usually not necessary.
• Scarification of the root ball of container grown material is recommended prior to planting.
Figure 6 - Planting a Shrub

32 THOUSAND OAKS PLANTING & MAINTENANCE MANUAL


34 THOUSAND OAKS PLANTING & MAINTENANCE MANUAL
4 Tree Pruning
This chapter describes proper pruning techniques for trees in Thousand Oaks, from young plants through maturity, decline and removal.
4.1 Why is Pruning Needed?
Pruning is the removal of parts of the tree to protect its health, preserve and enhance its natural form, create and maintain a strong structure, and protect people, property and utilities. In general, a tree should be left to grow into its own natural form. Correct pruning will not destroy the natural form of a tree.
Pruning of trees in the public right-of-way and public service easement can only be done by the city. Pruning private trees on private property should be done under the supervision of a certified arborist or other licensed professional. Pruning of oaks or landmark trees on either public or private land requires a permit. Pruning of trees on commercial, industrial and common areas may also need a permit. The following lists some reasons for pruning.
To train young plants:
• Pruning should take advantage of the tree’s growth habit, accenting its natural form, seldom modifying its natural form greatly. Prune to keep the tree’s growth in balance, to establish a strong scaffold structure (the framework of the trunk and major limbs), and to maintain a dominant leader.
• Branches forming the scaffold should be well spaced and crotches should be wide-angled. Nar row crotches are usually weak and may split out as the tree matures. (In a narrow crotch, more bark can be embedded between the branch and trunk, reducing the proportion of connective wood.)
• Remove crossing and interfering branches, water sprouts (vertical shoots growing from the trunk or main branches) dead and diseased branches, and root suckers (vertical shoots growing from the rootstock).
• A few minutes of proper pruning on a young tree can eliminate hours of costly corrective pruning on a mature
tree. It is easier and less costly to cut a two-inch diameter branch on a young tree than to wait and have to cut the same branch when it is ten inches in diameter, leaving a space in the tree canopy. Also, when a tree is young, cuts heal much faster and the likelihood of disease or pest problems at the cut surface are greatly reduced.
To maintain the health and appearance of a tree:
• Pruning is used to remove dead, diseased, injured, broken, rubbing and crowded limbs. A dense crown may be thinned lightly to allow for passage of light and air to the interior of the tree, and to decrease wind resistance.
To control the size of a tree:
• Pruning can reduce shade, interference with utility wires, and prevent obstruction of views and traffic. Safety clearance at signs and corners, and pruning of lower branches which obstruct parked cars and street sweepers is particularly important. Choosing a tree that will be an appropriate size for its location will minimize the need for pruning. If a tree must be pruned more than every five to seven years, it is the wrong tree for the location. A tree should not need heading back.
• (Much of the section on why pruning is needed is adapted from Dr. Richard Harris’ book Arboriculture: Care of Trees, Shrubs, and Vines in the Landscape).
Pruning QuestionsThe following questions should be asked before making
pruning decisions.
• What will the tree do in response to the pruning? Grow taller, or be shorter or narrower? Grow slower or faster? Produce increased new foliage?
• Is the tree healthy enough to respond to the pruning?
• Is pruning being done to accentuate the species’ natural form and habit?
• Is this the time of the year to prune this species?
• If the answer to any of the last three questions is “no,” do not prune at that time.
CHAPTER 4. TREE PRUNING

35
4.2 Qualifications of Pruning Personnel
The person responsible for leading and training the forestry crew should be a trained arborist who is certified by the Western Chapter, International Society of Arboriculture (ISA), and has at least five years field experience. He or she should also be capable of supervising and managing the crew.
If outside contractors are to be used, a list should be prepared of companies who have demonstrated competence in pruning some of the important large trees in Thousand Oaks, such as Quercus agrifolia, Quercus lobata, Eucalyptus rudis, and Platanus racemosa. Companies that practice stub cutting techniques (heading back large limbs) should not be allowed for work in the city. Tree workers should not be allowed to use climbing spikes except when removing trees.
4.3 Pruning Techniques
The latest edition of the Pruning Standards of the Western Chapter of the International Society of Arboriculture (ISA) will serve as the City’s specifications manual. Publications/ standards from the ISA are: ANSI A300 (Part-1) – 2008 Pruning; Best Management Practices – Pruning; Best Management Practices – Utility Pruning. These standards, reproduced here with adaptations, are presented as general working guidelines. The tree pruner will sometimes have to vary slightly from these rules, since individual trees may have unique needs.
General Guidelines
• Pruning cuts should be clean and smooth with the bark at the edge of the cut firmly attached to the wood.
• Large or heavy cut branches should be lowered on ropes or thrown clear to prevent injury to personnel, the tree, or other property. (See section 1.6. safety, and section 4.9, tree removal.)
• Pruning tools should be kept sharp and rust-free. When pruning diseased branches, the pruning blade should be dipped in a disinfectant after each cut. A 10% chlorine bleach solution is often used.
• Wound dressings and tree paints have not been shown to be effective in preventing or reducing decay. They are therefore not recommended.
• When pruning a limb which is more than 1” in diameter at the point of the cut, use a three step cutting method to prevent splitting of wood and bark. First make an undercut about six inches away from the branch collar, and then cut the limb off an inch or two farther out from the trunk. Finish by trimming the branch stub just outside the branch collar.
Order of Tasks
• Pruning should start at the top of the tree and proceed downward.
• Remove broken and diseased limbs first.
• Then remove crossing branches and those which grow towards the center of the tree, or which otherwise interfere with the tree’s shape and growth, including water sprouts.
• Finally, thin the remaining branches if needed. Root suckers should also be removed at each pruning.
Climbing Techniques
• Pruning large trees is a dangerous, specialized task, and requires experience and care if injury to workers, the public, and damage to property are to be avoided. Pruning should always be performed under the supervision of a qualified tree specialist. Tree climbers should have an ISA Climber’s Certificate and on-the-job rope training.
Climbing and pruning practices should not injure the tree
• Climbing spurs or gaffs should not be used when pruning, unless the branches are more than throw-line distance apart. In such cases, the spurs should be removed once the climber is tied in.
• Spurs may be used to reach an injured climber and when removing a tree.
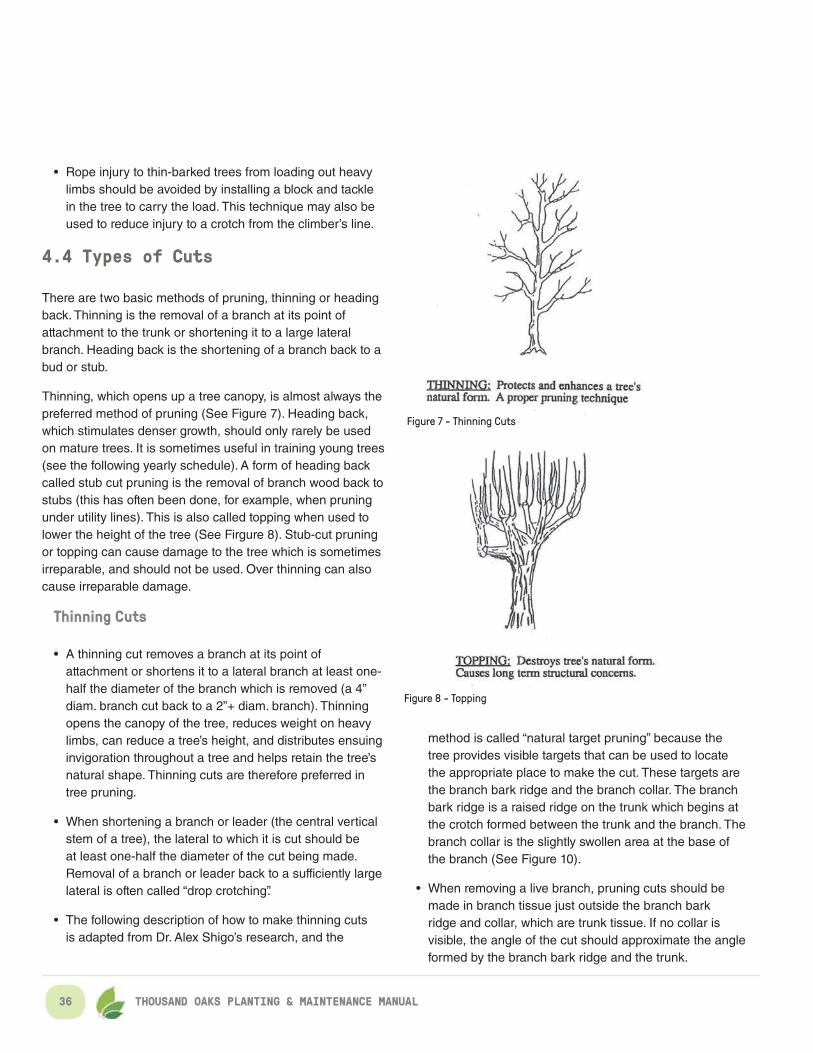
36 THOUSAND OAKS PLANTING & MAINTENANCE MANUAL
method is called “natural target pruning” because the tree provides visible targets that can be used to locate the appropriate place to make the cut. These targets are the branch bark ridge and the branch collar. The branch bark ridge is a raised ridge on the trunk which begins at the crotch formed between the trunk and the branch. The branch collar is the slightly swollen area at the base of the branch (See Figure 10).
• When removing a live branch, pruning cuts should be made in branch tissue just outside the branch bark ridge and collar, which are trunk tissue. If no collar is visible, the angle of the cut should approximate the angle formed by the branch bark ridge and the trunk.
• Rope injury to thin-barked trees from loading out heavy limbs should be avoided by installing a block and tackle in the tree to carry the load. This technique may also be used to reduce injury to a crotch from the climber’s line.
4.4 Types of Cuts
There are two basic methods of pruning, thinning or heading back. Thinning is the removal of a branch at its point of attachment to the trunk or shortening it to a large lateral branch. Heading back is the shortening of a branch back to a bud or stub.
Thinning, which opens up a tree canopy, is almost always the preferred method of pruning (See Figure 7). Heading back, which stimulates denser growth, should only rarely be used on mature trees. It is sometimes useful in training young trees (see the following yearly schedule). A form of heading back called stub cut pruning is the removal of branch wood back to stubs (this has often been done, for example, when pruning under utility lines). This is also called topping when used to lower the height of the tree (See Firgure 8). Stub-cut pruning or topping can cause damage to the tree which is sometimes irreparable, and should not be used. Over thinning can also cause irreparable damage.
Thinning Cuts
• A thinning cut removes a branch at its point of attachment or shortens it to a lateral branch at least one-half the diameter of the branch which is removed (a 4” diam. branch cut back to a 2”+ diam. branch). Thinning opens the canopy of the tree, reduces weight on heavy limbs, can reduce a tree’s height, and distributes ensuing invigoration throughout a tree and helps retain the tree’s natural shape. Thinning cuts are therefore preferred in tree pruning.
• When shortening a branch or leader (the central vertical stem of a tree), the lateral to which it is cut should be at least one-half the diameter of the cut being made. Removal of a branch or leader back to a sufficiently large lateral is often called “drop crotching”.
• The following description of how to make thinning cuts is adapted from Dr. Alex Shigo’s research, and the
Figure 7 - Thinning Cuts
Figure 8 - Topping

37
Figure 10 - Natural Target Pruning

38 THOUSAND OAKS PLANTING & MAINTENANCE MANUAL
• When removing a dead branch, the final cut should be made outside the collar of live callus tissue. If the collar has grown out along the branch stub, only the dead stub should be removed. The live collar should remain intact and uninjured.
• When a tree has more than one major limb of roughly equal size (co-dominance) thin the foliage of one limb (choose the one which is slightly smaller) to slow its growth and develop a stronger branch attachment. If a limb is more than three quarters the size of the parent limb, it is said to be co-dominant.
• When thinning a limb back to a large lateral branch, the final cut should be made just beyond the branch bark ridge. The cut should approximately bisect the angle formed by the branch bark ridge and an imaginary line perpendicular to the branch being cut.
Heading Back
• A heading cut removes a branch to a stub, a bud or a lateral branch not large enough to assume the terminal role. Heading cuts should seldom be used because vigorous, weakly attached upright sprouts are forced just below such cuts, and the tree’s natural form is altered.
If weakly attached sprouts are allowed to mature, they become limbs which have a high potential for breaking. In some situations, branch stubs die or produce only weak sprouts. Often these sprouts produce structurally weak branches. Heading back is allowed only under special conditions as approved by the Public Works Director or designee (See Figure 9).
4.5 Establishing a Pruning Maintenance Schedule
Defining Priorities
• To establish a pruning schedule, the first task is to inventory and categorize the trees to be maintained. Timing should include consideration of the benefits to the tree’s health and growth and the wisest scheduling of maintenance personnel. The city can be divided into pruning areas based on the city’s main roads and neighborhood boundaries.
• In order to keep routine pruning schedule on track the city will enlist (when possible) the services of outside contractors.
• Outside contractors are to be enlisted for all tree trimming that is around power lines, on landscape slopes, in fuel modification areas, over a designated height or too close to a residence.
• Trees which present a safety hazard should be the highest priority. Define how many trees in each area need this kind of attention, and multiply by the number of person-hours needed for each. This will help budget the time needed for a particular area visit (See Table 1).
• Safety hazard and trees which receive ‘customer complaints’ are provided priority and will be addresses on an ‘as soon as possible’ basis by a designated ‘hot shot’ type crew.
Inspection Process
• Tree inspection processes (refer also to section 1.4: Scheduling Procedures):
Figure 9 - Heading Back

39
• ‘Level 1’ - tree crew leaders perform routine drive-by inspections on city maintained trees and take notation of tree only if they see issues with the health or growth of the tree.
• ‘Level 2’ – a visual assessment (walk around) of a tree noted with health or growth issues will be performed and if required a work order will be issued.
• ‘Level 3’ – climbers will be contracted to perform additional inspection and a 3rd party registered consulting arborist will perform graph readings, dig for root flare inspection and inspect for other requested tree health information.
The Seasonal Schedule
• Current studies indicate that pruning can be done on a more flexible schedule than was previously thought, but there are times of the year when pruning can be very harmful.
• Pruning should not be done from Aug.-Sept. Pruning at this time could produce new growth in late fall, which would not have sufficient time to harden off before winter. At this time of year, plant foliage is manufacturing carbohydrates for transmission to the trunk and roots for winter storage. Pruning at these times reduces stored carbohydrates and minerals and thereby reduces vigor in spring. In an already weak tree, this can lead to its death.
• Prune deciduous trees between leaf-fall and February 1.
• Prune broadleaf evergreens between February 1 and March 15, or between July 1 and August 1.
• Prune conifers in the winter to avoid bark beetle attack.
• Chip, bury or burn all pine and eucalyptus wood, or stack and cover with a sealed 6 mil. Clear plastic tarp for at least six months.
• Avoid pruning trees between April and June 1. In the spring, carbohydrates stored in the trunk and roots are used to manufacture new foliage. Then the foliage, through photosynthesis, makes more food to restore supplies to the trunk and roots, primarily in late summer.
The Yearly Schedule
• The pruning of a tree can be defined by the three main stages of its life:
• The first stage is the first two to four years after installation when the tree is anchoring its roots in the soil, growing a heavy enough trunk to stand without a stake, and establishing its basic branching structure.
• In the second stage, the majority of the life of the tree, it develops a crown and maintains itself as a vigorous maturing specimen.
• The third stage is a period of old age, declining vigor, and reduction in annual shoot growth accompanied by greater likelihood of limb drop.
Figure 11 - Pruning Skirt Branches

40 THOUSAND OAKS PLANTING & MAINTENANCE MANUAL
4.6 The Five Tree Groups
The trees in Thousand Oaks fall into one of five groups. These categories form a convenient framework around which a yearly maintenance schedule can be designed for Thousand Oaks. The tasks deal generally with timing required to create a branch structure, prune the temporary skirt, and, later in the tree’s life, promote maximum size and mass of a healthy, structurally sound tree.
• Group 1: Round-headed trees (slow to moderate growth rate). Examples: Cinnamomum camphora, Ceratonia siliqua, Cupaniopsis anacardioides, Podocarpus gracilior, Pyrus calleryana ‘Aristocrat’, Quercus agrifolia. (See Figure 12).
• Group 2: Round to oval upright (very fast growth rate. Examples: Eucalyptus species, Fraxinus uhdei, Tristania conferta. (See Figure 13).
• Group 3: Deciduous pyramidal. Examples: Acer rubrum ‘Armstrong’, Liquidambar styraciflua. (See Figure 14).
• Group 4: Vase-shaped. Examples: Celtis australis, Ulmus americana, Zelkova serrata. (See Figure 15).
• Group 5: Conifers and conifer-like. Examples: Pinus, Cedrus, Casuarina. (See Figure 16).
Figure 12
Group 1At planting time:
• Remove one-third of the branches in the skirt. (The skirt is the group of branches between ground level and the permanent scaffold branches. These temporary branches feed the tree and speed the growth rate of the tree. See Fig. 11) Select the largest diameter of these to remove (the larger the branch, the more competition with the leader for nutrients). Leave the balance distributed up and down and around the trunk, and shorten by about 10% of their length, pruning to buds or laterals facing outward from the trunk. This step is essential to proper health and development of the tree.
• Remove or reduce by 50% any branches challenging the leader.
At 2 years
• Remove half of the remaining branches in the skirt.
• Select the main scaffold limbs, remove competing limbs, and thin the remaining crown up to 20%.
At 3 years
• Remove the remaining branches in the skirt.
Every 5 to 8 years thereafter
• Perform crown cleaning or thinning as needed. (See the following section, Pruning Mature Trees).

41
Figure 13
Group 2At planting time
• Remove one-third of the branches in the skirt between the permanent branches and the soil. Select the largest diameter of these to remove. Leave the balance distributed up and down and around the trunk, and shorten by about 10% of their length, pruning back to outward-facing buds or laterals.
• Select the main scaffold limbs and remove competing limbs, including any branches challenging the leader.
• Thin balance of crown up to 10% of remaining foliage.
At 1 year
• Remove half of the remaining branches in the skirt to diminish competition with the crown while still promoting caliper growth of the trunk.
• Remove limbs which compete with the main scaffold branches. Branches should be spaced evenly around the trunk, and at least 8” to 12” apart.
At 2 years
• Remove the remaining branches in the skirt.
At 2 years and every 5 years thereafter
• Perform crown cleaning or thinning as needed. (See the following section, Pruning Mature Trees.)
Figure 14
Group 3At planting time
• Remove one-quarter of the side branches over the full height of the tree. Select the largest diameter branches to remove, leaving the balance well distributed up and down the trunk.
• Remove or reduce by three-quarters any branches competing with the leader.
• Shorten the remaining branches by 10% of their length, pruning back to outward-facing buds or laterals.
At 2 years
• Remove or reduce branches which compete with the leader.
• Shorten the remaining branches by 10%, and shorten limbs which protrude beyond the canopy. Prune back to outward-facing laterals.
At 3 years
• Remove one-third of the branches in the lower skirt up to the height that will be needed to allow vehicle and pedestrian clearance. Shorten the remaining branches up to this height by 20% of their length.
At 4 to 5 years, and thereafter as needed
• Remove branches as needed for clearance.

42 THOUSAND OAKS PLANTING & MAINTENANCE MANUAL
Figure 15
Group 4At planting time
• Select the main scaffold branches, which will all be clustered near one point on the trunk. Remove up to one third of the main branches, leaving scaffold branches distributed as far apart as possible.
• Shorten branches in the skirt of the tree by 10% of their length. Remove any branches in the skirt which are 50% of the diameter of the trunk or greater.
At 2 years
• Remove half of the remaining branches on the trunk
• Remove any crossing limbs.
At 4 years, and every 5 years thereafter
• Perform crown cleaning or thinning as needed.
Group 5At planting time:
• Shorten the side branches by 10% of their length.
At 1year• Remove one-third of the branches over the entire
height of the tree if increased height is the goal. Select the largest diameter branches to remove, leaving the remainder evenly distributed along the trunk.
• Shorten the remaining branches by 10% of their length.
At 2 to 3 years, and every 5 years thereafter
• Conifers do not respond well to heavy pruning. Mature wood will not develop any new needles. Shears or saws can be used on immature growth when the candles have hardened, about six weeks after they have started to elongate in the spring. The central leader on a branch should never be removed, but can be shortened about halfway to keep the distance down between laterals on the branch. Make the cut at an angle, so one of the new buds will dominate.
Figure 16

43
4.7 Pruning Mature Trees
These recommendations apply to all of the five tree groups previously described.
Crown Cleaning
• Crown cleaning or cleaning out is the removal of dead, dying, diseased, crowded, weakly attached, and low-vigor branches and watersprouts from a tree crown. This should not include removal of live branches other than those mentioned. If there is a problem with sunscald, or with a hole in the canopy because of poor pruning in the past, some watersprouts may be left on the tree.
Crown Thinning
• Crown thinning includes crown cleaning and the selective removal of branches to increase light penetration and air movement into the crown. Increased light and air stimulates and maintains interior foliage, which in turn improves branch taper and strength. Thinning reduces the wind-sail effect of the crown and the weight of heavy limbs. It can emphasize the structural beauty of the trunk and branches as well as improve growth of plants beneath the tree by increasing light penetration.
• Crown thinning is the most important pruning procedure in the development of the structure of a young tree, and in the maintenance of a mature tree. The amount of live wood removed depends on the species and the vigor of the tree. It is important at all stages to avoid leaving gaps in the perimeter canopy, to keep a well formed tree and to avoid sun scald on interior branches.
• A young vigorous tree can have as much as 35% of its foliage removed as the scaffold structure is being established.
• When thinning the crown of mature trees, no more than one-third of the live foliage should be removed.
• At least half of the foliage should be on branches in the lower two-thirds of the trees.
• Avoid the practice of removing all interior branches when thinning. Thin lateral branches selectively and evenly
throughout the interior of the canopy. Pruning this way will distribute stress more evenly throughout the tree.
• An effect known as “lion’s tailing” results from pruning out the inside lateral branches. Lion’s tailing, by removing all the inner foliage, displaces the weight to the ends of the branches and may result in sunburned branches, water sprouts, weakened branch structure, and limb breakage. Lion’s tailing should be avoided.
• A goal of structural pruning is to maintain the diameter of lateral branches at less than three fourths the diameter of the branch or trunk to which they are attached. If the branch is co -dominant or nearly the size of the parent branch, thin the branch’s foliage by 15% to 25%, particularly near the terminal. Thin the parent branch much less, if at all. This will allow the parent branch to grow at a faster rate, will reduce the weight of the lateral branch, slow its total growth, and develop a stronger branch attachment. If this does not appear appropriate, the branch may need to be shortened to a large lateral or be completely removed.
• On large-growing trees, except whorl-branching conifers (trees such as pines which have several branches growing from the same joint on a limb) branches that are more than one-third the diameter of the trunk should be spaced along the trunk at least 18” apart, on center. If this is not possible because of the present size of the tree, such branches should have their foliage thinned 15% to 25%, particularly near their terminals, and/or be shortened.
Crown Reduction
• Crown reduction is the reduction of the height and/ or spread of a tree. Since the goal of the Forestry Master Plan is maximum shade canopy, it should be done only as necessary for safety. Crown reduction may be needed when trees interfere with power lines or with other nearby trees, although crown thinning usually provides the same result in a better way. Try to prune to fit power lines through the natural form of the tree. Thinning cuts are most effective in maintaining the structural integrity and natural form of a tree and in delaying the time when it will need to be pruned again. The lateral to which a branch

44 THOUSAND OAKS PLANTING & MAINTENANCE MANUAL
or trunk is cut should be at least one-half the diameter of the cut being made. Conifers should never have their crowns reduced.
• Stub cuts should be avoided in utility line clearance. Thinning cuts will not stimulate as many vertical shoots as stub cuts, and trees will not have to be pruned as often.
• Crown reduction is most often used for extremely vigorous species such as Fraxinus uhdei. This particular species may not produce side branches which can be easily thinned. The tree will produce 4 to 8ft. long shoots annually, which will need to be headed back in order to effect a crown reduction. Without this pruning the tree will develop a weak structure composed of many long vertical shoots.
• This procedure is used on less vigorous species such as oaks when individual limbs produce heavy, vigorous branch ends beyond the canopy. It is critical in this case that the cut be made to a side branch of at least half the diameter of the limb being removed (a 4” diameter limb is cut back to at least a 2” branch).
• With Eucalyptus species which have not been previously stub cut, a well formed crown which does not need frequent repruning can be created.
Crown Restoration
• Crown restoration is the rehabilitation of the structure and appearance of trees that have been topped or severely pruned using heading cuts. Restoration may require several prunings over a number of years.
• One to three sprouts on main branch stubs should be selected to reform a more natural appearing crown.
• Selected vigorous sprouts may need to be thinned to a lateral, or even headed, to control length growth in order to ensure adequate attachment for the size of the sprout.
Crown Raising
• Crown raising removes the lower branches of a tree in order to provide clearance for buildings, vehicles, pedestrians, and vistas.
• It is important that a tree have at least one-half of its foliage on branches that originate in the lower two-thirds of its crown to insure a well formed, tapered structure and to uniformly distribute stress within the tree. Short side branches may have to be retained temporarily during crown raising.
• When pruning for view, it is preferable to develop “windows” through the foliage of the tree, rather than to severely raise or reduce the crown.
General Note: Each type of pruning cut can be done to different levels of refinement. The removal of many small branches rather than a few large branches will require more time, but will produce a less pruned appearance, will force fewer water sprouts and will help maintain the vitality and structure of the tree.
4.8 Pruning Old Trees
Trees which have entered a stage of maturity in which there is declining vigor and reduction in annual shoot growth should be pruned somewhat more conservatively than other full grown trees. In any given year, the maximum amount of foliage removed should not exceed 20% of the tree. Avoid limb cuts of more than 8” in diameter if possible since healing is slower in these trees.
Root Pruning
Root pruning may be needed when trees lift sidewalks and other pavement, destroying hardscape and utilities. The Publid Works Director or designee must determine when root pruning can be safely done without injuring the tree. Some cases may require removal of the tree. The decision is based on the vigor of the specimen, the proportion of roots which will be cut, and the particular species involved. Removal must meet the criteria of the tree ordinance, and be approved by the Public Works Director or designee.
Guidelines for Root Pruning
• A general rule to follow for root pruning is to take the diameter of the trunk 12” above ground, and multiply by seven. This will tell you how close to the tree you can prune. Measure the distance from the face of the trunk,

45
not the center of the trunk. (See Figure 17).
• When root pruning is done to trees over 8” in caliper, prune only one-quarter of the tree each year.
• When a tree 12” in caliper or larger is in a 3 to 4 ft. square cutout, root cutting on all sides in the same year may cause the tree to decline and may reduce its stability. Cutting one side per year for four successive years is a safer procedure. At most, two sides could be cut each winter for two years. If a decision is made to cut all four sides at once, monthly deep waterings for several months should precede the root pruning.
• If several roots of more than 3” diameter must be cut, removal of the tree should be evaluated.
Trees Which Are Intolerant of Root Pruning
Certain species are intolerant of severe root pruning, which may cause these trees to decline within 3 to 5 years after pruning. Only minor root pruning is recommended for the following trees:
• Cinnamomum camphora
• Brachychiton populneus
• Fraxinus velutina glabra
• Ulmus americana
• Eucalyptus globulus
• Liriodendron tulipifera
• Liquidambar styraciflua
• Grevillea robusta
Canopy Thinning When Root Pruning • Trees will require some canopy thinning (compensatory
pruning) before root pruning.
• When root pruning is done within four trunk diameters of the tree, remove about 30% of the foliage.
• When root pruning is done within seven trunk diameters from the tree, remove 20% of the foliage.
• Trees with dense crowns may need more end weight removal (drop crotch pruning - see the preceding discussion of thinning cuts).
Care After Root Pruning
• After root pruning, backfill the cut with 3/4” to 1-1/4” gravel, to promote deep watering to the new root zone.
• When root pruning has been done, 2 ft. deep root barriers should be installed adjacent to the pavement in strips 10 to 15ft. long, centered on the tree.
• If roots over 1 inch in diameter are cut, immediately cover the cut with a plastic bag tied with a rubber band or tape. This will facilitate the development of new roots from the cut end.
Figure 17

46 THOUSAND OAKS PLANTING & MAINTENANCE MANUAL
4.9 Tree Removals
All trees eventually will need to be removed due to old age, disease, death, or problems with hard scape destruction. Once that decision has been made, permits acquired, and nearby property owners notified, the tree is ready for removal.
Removal of any tree of 15 feet in height or more is a procedure which, like tree pruning, should have the supervision of a qualified tree specialist. Tree climbers should have an ISA Climber’s Certificate and on-the-job rope training. It is a dangerous operation requiring specialized knowledge and equipment, and care must be taken to avoid injury to workers or the public, or damage to property.
Tree Removal
• STEP ONE: An evaluation is made by the city whether a city crew or outside contractor may remove the tree.
• STEP TWO: A removal notice is posted at the tree.
• STEP THREE: Nearby property owners are notified.
• STEP FOUR: Safety barricades are set up.
• STEP FIVE: Tree is removed.
Guidelines for Tree Removal
Limb and Branch Removal
• Work from the top of the tree down.
• Remove suckers and small branches.
• Remove larger limbs (any limbs which cannot be safely dropped to the ground) in sections of 6ft. maximum length. Remove dead limbs first. Leave 12” stubs on tree to facilitate climbing.
• Lower limbs to the ground with ropes to minimize damage to understory plants and property.
• Remove the trunk in sections small enough to be lowered by ropes.
• Cut the trunk and all limbs over 4” in diameter into firewood length.
• Chip all remaining vegetation into mulch.
• Deliver firewood and mulch to the city yard, or to a designated location. The city has a goal of minimizing additions to landfills.
• Wood infected with wood boring insects such as shot hole borer, eucalyptus longhorn beetle, or pine bark beetle must be handled differently because of insect problems. Chip, bury, burn, or tarp all infected wood. Tarp with 6 mil thick clear plastic, and leave stored for at least 6 months. It is inappropriate to transport infected firewood outside of city limits and depending on type of pest and local regulations, may be illegal. (See Section 7 for more on the shot hole borer, eucalyptus longhorn beetle and the pine bark beetle.)
• Trees infected with the shot hole borer must also be handled differently. Wood should be chipped to help limit the spread of the beetle/fungus complex. Wood should be chipped to pieces smaller than 1”. Unchipped logs should be stacked into small piles and treated by solarizing/tarping under clear plastic.
Stump Removal
• Stumps should be ground out or pulled out even if they aren’t in the way of replanting. They provide sites for insect infestations and fungus infections, particularly the fungus Armillaria mellea (honey mushroom fungus). Pine stumps are also attractive to the pine bark beetle, and the California turpentine beetle. Eucalyptus stumps can harbor eucalyptus longhorn beetle. These infestations can spread to nearby live trees.
• Stumps should be removed to a depth of 18” for most trees. For larger trees the rule of thumb should be at least three times as deep as the diameter of the trunk.
• For large stumps such as Eucalyptus which can resprout, if grinding is not practical, frill cut around the circumference of the stump and treat with glyphosate (Roundup). However, if a stump is located in a grove of trees of the same species (or even the same genus

47
in the case of poplars, alders or willows), a herbicide should not be used since the chemical will move through root grafts to nearby trees.
Replanting
The Public Works Director or designee will indicate, on the tree removal permit, the type, quantity, and size of trees to be replanted. (Follow planting instructions in Chapter 3.)

48 THOUSAND OAKS PLANTING & MAINTENANCE MANUAL

50 THOUSAND OAKS PLANTING & MAINTENANCE MANUAL
5 Tree Watering
This chapter describes the best ways to water trees, and how often to water them.
5.1 Watering Basics
No absolute rule exists that will tell you precisely how often to water trees. Watering frequency will be influenced by the type of tree, weather conditions, soil type, root competition from other plants, and how well the tree is established.
A basic goal of this the Forestry Master Plan is to plant trees which are compatible with the natural watercycles of this dry Southern California valley. Most of the trees on the recommended list will survive on normal rainfall once they are established.
Proper tree irrigation creates a root zone that will be moist enough to encourage growth of new roots but not so wet that air is excluded from the soil pore space, which hampers growth. In addition, proper irrigation should encourage deep root penetration that can sustain a tree in dry periods. This also keeps the tree from developing shallow roots which can crack pavement. Infrequent, slowly applied, deep watering is the best way to accomplish these goals. Frequent light sprinklings or surface irrigation, such as turf watering, will discourage deep rooting. A new 15-gallon tree will need to have the soil moistened to a depth of at least 12”, and a mature tree to a depth of at least 24” with each irrigation.
Newly installed trees can easily have their root balls dry out, even when the surrounding soil is very wet. Care must be taken to make sure that water is getting to the root ball by making the watering basin of a newly installed tree the same size as the root ball.
As a general rule, clay soils, which are typical in Thousand Oaks, absorb water very slowly. But since clay soils retain water longer, water less frequently than you would in a sandy soil. Let the soil dry between waterlogs as this allows the soil to take in air as water drains out. Table 7 explains how soil texture affects water infiltration.
The use of a mulch around the tree is recommended to slow the evaporation of water. A 4” layer of shredded bark or bark
chips will help retain moisture and discourage weed growth. Most standards call for a 2” minimum layer, but recent studies show that a 4” layer is 5 times more effective in retaining moisture and discouraging weed growth. In tree wells and narrow planting strips where there might not be enough room for the full 4” depth, install as deep a layer as possible without spilling over. Note: mulch should never be placed against the trunk of the tree or root flare.
Using a soil probe to determine the soil moisture content in the root zone is the most effective way to schedule watering. If the soil is wet enough to make a solid, firm ball, the tree should not be watered.
According to the infiltration rate chart, it will take water from 20 to 120 hours to wet a clay loam soil to a depth of one foot (the most important variable is the slope of the soil). Thus the use of watering basins around young trees is very important in order to retain water in place long enough to be absorbed. It is also important to begin irrigating in the spring before the soil has dried out, in order to make use of the reservoir of water from the winter rains. It requires much less irrigating to replace the water lost through a week of evapotranspiration than it does to totally recharge the planting area reservoir.
CHAPTER 5. TREE WATERING
INFILTRATION RATES
SOIL TEXTURE INFILTRATION RATE
(INCHES/HOUR)
Sand 1-10
Sandy loam 0.5 to 3
Loam 0.3 to 0.8
Clay loam 0.1 to 0.6
Clay 0.01 to 0
TABLE 7

51
5.2 Watering Frequency Guidelines
These guidelines assume average weather conditions and rainfall.
For the first 2 to 3 weeks after planting:• New trees may require water every 2-4 days, especially
in hot weather. In winter, container-grown evergreens need water at least once a month.
First year:• Fall and spring: once weekly
• Summer: twice weekly
Second year:• Fall and spring: twice monthly
• Summer: once weekly
Third year:• Once a month during the dry season
Fourth year and after:• Two waterlogs during the entire dry season, if needed.
• Drought tolerant trees often do not need any further irrigation.
• In times of drought, a normal watering program may not be possible, even if the regular program has been a careful, conserving one. It will be most important in these times to give a deep watering at the beginning of the dry season. Established drought-tolerant trees should be able to survive the dry season with just one watering.
5.3 Methods of Irrigation
By hand with a hose: Care should be taken to water long enough to soak the root ball deeply. Flow through the hose should be gentle enough that it does not destroy the watering basin or compact the soil. A mulch helps prevent compaction.
With a water truck: One unit with a one or two person crew can efficiently irrigate many trees. This is the most cost-effective method, since most trees will need only infrequent
irrigation once established. A watering truck typically provides water to sidewalk cutouts, and community trees where there is no existing irrigation (no meter). It is to be noted that a watering truck is limited to using water from within the designated landscape assessment district to water the material that is within that district.
Automatic irrigation: Hard pipe bubblers connected to a weather based, smart irrigation controller. Hard pipe bubblers are municipal friendly considering that they are easy to work on, can be inspected easily, deliver a sufficient amount of water in minimal time, and do not cause overspray.
It is necessary to change the location and number of emitters as the trees mature, so that water continues to get to the feeder roots around the driplines of the trees. As a tree grows, emitters should be placed so that, at a minimum, an area between the dripline and 3 ft. toward the trunk from the dripline is irrigated (if the tree continues to need irrigation).
SOIL MOISTURE
AMOUNT OF
MOISTURE
FEEL OR APPEARANCE OF SOIL
Close to 0% field capacity. Little or no moisture available
Sandy loam: dry, loose; flows through fingersClay foam: Somewhat crumbly; will hold together with pressure
50-75%. Enough available moisture.
Sandy loam: Tends to ball under pressure but will seldom hold together.Clay loam: Forms a ball; somewhat plastic; may stick slightly with pressure
75%. Plenty of available
moisture.
Sandy loam: Forms weak ball; breaks
easily.
Clay loam: Forms a ball, very pliable;
may be
TABLE 8

52 THOUSAND OAKS PLANTING & MAINTENANCE MANUAL
When a valve doesn’t open, or doesn’t close, it can sometimes take some troubleshooting to determine if the problem is caused by a valve or controller. Most controller problems are not fixable in the field, since most modem controllers are solid-state computerized models. The clock will need to be replaced or fixed at the factory. Care must be taken if automatic controllers are used, that if power failures interrupt the programs, the clocks are reprogrammed. Most controllers have battery backups, but the batteries must be replaced every year.
When valves, controllers, heads, and other equipment need to be replaced, it is important that the quality of the replacement parts be at least equal to the original parts. If poor-quality parts have been used originally, the quality should be upgraded when the parts are replaced.
When irrigation repair is needed, often the repair crew will need to refer to the as-built drawings in order to locate various components of the system. It is important that accurate as-built plans are filed with the city when an irrigation system is constructed.
5.5 Watering During Drought
Signs of Drought Stress:
• Wilting of leaves and shoots
• Less deep green leaves
• Smaller than normal leaves
• Early leaf drop and thinning canopy
• Browning of leaf edges
Steps to Improve a Tree’s Drought Tolerance
• Remove turf (lawn/grass) from under the dripline as turf competes for soil moisture.
• Remove any impervious surfaces as they impair the movement or water, nutrients and air into the soil.
• Decompact the soil within the dripline using a garden fork, air tool or auger. This adds holes that create air circulation within the soil.
5.4 Irrigation Repair
Any irrigation system needs to be monitored to make sure it is operating properly. The most obvious and important sign is plant material that looks unhealthy. Too much or too little water should be one of the first things considered when this occurs.
“Automatic” systems are not maintenance free, and need care in terms of programming to fit weather conditions, and monitoring to see that the system is working properly. This is particularly important since most systems are programmed to run in very early morning. This means that the system will go on when no one is there to see how it’s functioning. Periodic “early bird” inspections are needed to check the functioning of the systems. In systems which cover a large area, such as in parks, it may be helpful to use a clock which can be controlled by a remote control device. Inspections, adjustments, and repairs can be made without having to travel back and forth from the clock to the area being worked on.
The irrigation systems should be monitored for problems with sprinkler heads, which are commonly of three kinds. Either the riser has been broken off and needs to be replaced, or the sprinkler is blocked by foliage which needs to be pruned away from the head, or the head has be come clogged and needs to be removed and cleaned out. Sometimes a head only needs to be adjusted to get better coverage, but it may be that the adjustment is needed because of partial clogging, so this should be checked.
Frequent clogging may be a sign of a small break in the pipe. A broken pipe can cause large amounts of water to be wasted. Usually the problem will be obvious, with a telltale area of standing water and mud. When a sprinkler head needs to be replaced, if the identical head is not available it is important that the replacement has a similar precipitation rate and radius of throw. Manufacturer’s catalogues will have this information. Another common problem is a stuck valve, which can prevent the water from shutting off at the end of a cycle. This can waste a large amount of water in a short time if not reported, as well as overwatering the plants. Most valve manufacturers sell replacement kits for the innards of the valve. Valves should always be installed with a union connection to the pipe, so they can be more easily removed and replaced.

53
• Install four inches of organic mulch under the dripline, improving root growth and soil condition, reducing weeds and the need for water by conserving moisture.
• Do not remove or turn off turf irrigation that is also watering a tree. Slowly reduce the amount of irrigation or replace it with another watering method.
• Monitor and adjust to save water by measuring soil moisture. Provide soil moisture to 18-24” beneath as much of the dripline as possible. A soil probe used one to two hours after watering should be able to penetrate into the soil to a depth of 12” fairly easily. The soil should feel slightly damp and be darker in color.
• Continue to monitor the tree’s health, consider increasing the frequency and/or watering volume if it continues to show signs of drought stress.

54 THOUSAND OAKS PLANTING & MAINTENANCE MANUAL


56 THOUSAND OAKS PLANTING & MAINTENANCE MANUAL
6 Fertilizing
This chapter gives scheduling information for fertilizing trees, describes how to apply fertilizer and how much is needed, and identifies deficiency symptoms as well as symptoms of excess minerals in the soil.
6.1 Scheduling
The First Year:• The first feeding for trees is done when the tree is
planted. (See 3.3) About 3 ounces of actual nitrogen is needed for the first year. Fertilizer should be a slow release type, Osmocote 18-6-12 or equivalent. In alkaline soils, include iron chelate with the fertilizer.
Years Two to Five:• Fertilizing once a year in winter is sufficient.
After Five Years:• A fertilizer schedule of one application every five years
may be sufficient.
During a Drought:• If the watering schedule is going to be cut back, it is best
not to fertilize the trees. New growth stimulated by the fertilizer will need water to survive.
When a Tree is Weak:• Fertilizing a weak tree can be harmful in some cases,
although it may be indicated in others. If there is a pest or disease problem, or any other problem affecting the vigor of the tree other than lack of fertilizer, check with a qualified professional before fertilizing.
6.2 How to Apply Fertilizer
For young trees, fertilizer can be spread in the planting basin and watered in thoroughly.
For established trees, fertilizing should be done through drilling small holes in the ground around the tree and pouring fertilizer down them (if the soil is exposed). Using a soil auger or sampling tube, make holes 12” to 18” deep, and 3 to 6 ft. apart in a ring in the area around the dripline. One ring
of holes should be made for each 2” of trunk caliper. Rings should be 3 to 4ft. apart. Angle the holes away from the trunk of the tree. (See Figure 18).
The practice of top dressing fertilizer is not recommended, since it encourages surface rooting, and because phosphorous and potash do not infiltrate the soil very well.
In all cases, when conditions allow, it is preferred to utilize organic fertilizer methods, refer to the following section, Alternative / Supplemental materials.
6.3 How Much to Apply
The amount of actual nitrogen needed by an established tree is the most important factor.
Measure the diameter of the trunk at a point 4.5 ft. above the ground.
The diameter in inches, multiplied by itself, and then divided by 30, equals the pounds of actual nitrogen needed.
The fertilizer formula, such as 10-6-4, tells the percentages of nitrogen, phosphorous, and potash, respectively, in the
CHAPTER 6. TREE FERTILIZING
Figure 18

57
fertilizer. For example, a trunk with a diameter of 6” would need 36 [6x6] divided by 30 = 1.2 pounds of nitrogen. If you used a fertilizer with a 10-6-4 formula, you would apply 12 pounds of fertilizer (12 X 10% = 1.2).
A slow release nitrogen source, as urea or IBDU, is always preferred.
Note: When feasible a soils test should be performed to indicate the nutrient deficiency and proper amendment requirements to achieve horticulturally fertile soil conditions.
6.4 Alternative / Supplemental Materials
• Biochar - a soil amendment with the intention to improve soil functions and to reduce emissions from biomass that would otherwise naturally degrade to greenhouse gases.Biochar attracts and holds soil nutrients, it potentially reduces fertilizer requirements. As a result, fertilization costs are minimized and fertilizer (organic or chemical) is retained in the soil for longer. Typical practice is to amend backfill with one part biochar to 4 parts native soil.
• Worm Castings - contain a highly active biological mixture of bacteria, enzymes, remnants of plant matter and animal manure; castings are rich in water-soluble plant nutrients, and minerals that are essential for plant growth, such as concentrated nitrates, phosphorus, magnesium, potassium and calcium. It also contains manganese, copper, zinc, cobalt, borax, iron, carbon and nitrogen.
• Horticultural Liquid Molasses – provides a natural food source for the indigenous microbial populations in the soil. It is recommended for many types of plants growing in organic growing programs. Molasses is compatible with most natural biological soil stimulators and helps increase the microbial activity in the soil.
• Mycorrhizal Fungi Inoculum– dual soil-conditioning biological inoculum system of endo- and ecto- mycorrhizal, used to further aid the plant’s ability to efficiently uptake available soil nutrients and increase resistance to drought. Applications of mycorrhizal
inoculum should be applied at the prescribed application rate, per the manufacturer’s written recommendations.
6.5 Nutrient Deficiency Symptoms
Nitrogen: The leaves are yellow-green and small. They have fewer leaves, high fall color, and drop early. Shoots are short, small, and may be reddish to reddish brown. There may be heavy flower bloom.
Phosphorus: Leaves are darker green than usual, and slightly smaller. Veins, petioles, or lower surface may be reddish-purple, especially when young. Shoots are smaller diameter, and bloom is light. In pines, lower needles die.
Potassium: Leaves are crinkled and roll up (older leaves show the problem first). Shoot tips die back late in the season. Lateral buds grow short and brushy, in a zigzag pattern. Herbicide toxicity can also cause these symptoms.
Iron: Leaves are yellow with green veins, showing on young leaves first. Shoots are of small diameter, and can die back if the condition is severe. In Thousand Oaks this may be caused by excessive calcium in the soil (lime induced chlorosis).
Boron: Leaves may be red, bronzed, or scorched, with young leaves showing the problem first. Veins are yellowish. Some species show leaf distortion. New growth dies back. Shoots are zigzag, short, and brushy.
Zinc: Leaves are green with yellow blotches between the veins. Leaves may have dead spots. Shoots are of small diameter and may have a tuft of leaves at the tips. Twigs may die back.
Sulfur: The entire leaf is pale yellow-green, and may be small in some species.
Magnesium: Thin and brittle leaves which drop early, and look yellow with green veins.
Manganese: Young leaves are yellow with wide green bands along the veins, followed by dead spots.

58 THOUSAND OAKS PLANTING & MAINTENANCE MANUAL
6.6 Symptoms of Excess Minerals in the Soils
Calcium: Leaves develop dead tissue at the tips, and gradually down the margins. It is often accompanied by iron, zinc, and/or manganese deficiency symptoms. Oversupply of calcium combines with iron, zinc, and manganese to make them unavailable to plant roots.
Magnesium: This is usually found when calcium supply is excessive, and the same symptoms are shown.
Boron: The leaves show scorching on the tips and margins. Dark dead spots appear. The condition will look worse at the base of shoots than at the tips. Shoots swell and crack below buds. Excess boron usually occurs together with calcium, magnesium, and sometimes sodium oversupply.
Sodium: Leaves show scorching at the tips and margins.
Chloride: Leaves show scorching at the tips and margins.

60 THOUSAND OAKS PLANTING & MAINTENANCE MANUAL
7 Tree Pests and Diseases
This chapter describes the most common pest and disease problems in Thousand Oaks, how to treat them, and which species are most likely to be affected. Also included is a tree-by-tree list of pest and disease problems.
7.1 Factors Leading to Pest and Disease Problems
Most pests are attracted to weakened trees more quickly than to trees in optimum health. For this reason, the most effective pest and disease control measures involve keeping the trees in top health. When a problem is caused by an adverse environ mental condition, chemically treating the disease or pest condition will not prevent its recurrence, but will be symptomatic treatment only.
Trees should be chosen for the soils and climatic conditions they prefer. Good watering, fertilizing and pruning programs will help a tree stay healthy. Soils which are too wet or too dry, over-shaded trees, or trees which have been excessively pruned are all examples of conditions which can lead to disease problems, due to weakened vigor and increased susceptibility of the tree. For example, Pyrus kawakamii, if grown in a constantly wet soil, will be very susceptible to fungal leaf spot.
7.2 Integrated Pest Management
The concept of integrated pest management (IPM) is the guiding principle for Thousand Oaks. In IPM a proactive maintenance program, including a good system of monitoring and record keeping, is considered the first line of defense. Biological controls and relatively safe chemicals are then considered for use, often in combination, with stronger chemicals being a last resort.
When there is a minimal level of infestation or disease, it is often not enough of a problem to warrant treatment. In some cases the pests will disappear on their own. For example, maple aphids will disappear in late May. In some cases, however, such as plum leaf aphids, it is known that a minimal infestation is likely to expand rapidly.
As the name implies, IPM uses combination of maintenance and control measures to forestall the use of chemicals, while trying to correct the underlying environmental problems. Important factors in the success of an IPM program include:
• Knowledge of the existing site, with its typical vegetation and prevalent problems.
• Planting vegetation best suited to the site.
• Having an active monitoring program.
• Proactive maintenance to keep plants in vigorous condition.
• A control and sanitation program when necessary.
• Adequate record keeping.
Integrated pest management may have a higher initial cost than just using a spraying pro gram, but in the long term it is often cost-effective, and results in healthier trees and wildlife and lower spraying costs. Frequent spraying can result in a chemical dependent situation, where an insect comes back stronger than it was before. Increasing doses and frequency of spraying are then needed for control of the pest. For example, pesticides which kill aphids also kill aphid predators. Since aphids reproduce more quickly than their predators, when they return to the tree, their natural enemies will be gone, and they may also become resistant to the pesticide. The following lists some non-toxic methods used in the IPM method.
Non-toxic Insect Controls
• Biological controls - lacewing larvae, ladybugs. Useful for aphids. Lacewings are effective against mites.
• Mechanical controls - Tanglefoot tree barrier. Can keep ants from carrying aphids onto a tree.
• Bacillus thurengiensis (Thuricide, Dipel, Bi otrol). Effective against various caterpillars.
• Insecticidal soap (Safer’s). Effective against aphids, whiteflies, scale crawlers, cottony cushion scale, leafhoppers, others.
• Oil spray (some trees are sensitive to oil sprays,
CHAPTER 7. TREE PESTS AND DISEASES

61
including maples). Effective against scale, mites and aphids. Usually applied in the winter to deciduous trees, when it kills eggs overwintering on the trees. Can be used in the summer in a more dilute form.
7.3 Chemical Insect Controls
Any planned use of chemicals registered as “Restricted” must be reported to the Ventura County Agricultural Commissioner’s office. In California such chemicals require a permit for their use. This list is not intended to be a complete list of available controls, but is selected for the various problems most likely to appear in Thousand Oaks. Recommendations for each specific situation in the field can only be made by a Licensed Pest Control Applicator (LPCA). The directions on the product label must be followed strictly. All city personnel should be trained in safe use of chemicals. Clothing and apparatus for respiratory, eye and skin protection should be used. Spraying operations should be performed when there is no wind, and at times when the site is not being used by the public.
Chemical controls are listed with their LD-50 number, which is the number of milligrams of chemical per kilogram of body weight needed to cause death in 50% of laboratory animals tested. (Listed in order of increasing toxicity; the larger the number, the safer the chemical.)
• Pyrethrins. LD-50=2500. Toxic to fish and swine. Effective against many insects.
• Fenbutatin-oxide (Vendex or Hexakis). LD-50=2361. Effective against spider mites.
• Malathion. LD-50=1200. The smell may be objectionable in public areas, and it is toxic to honeybees. Effective against a variety of insects.
• Acephate (Orthene). LD-50=900. Effective against a variety of insects. A systemic (it is absorbed into the leaf tissue, which makes it effective for a long period of time).
• Carbaryl (Sevin) LD-50=700. Toxic to bees and earthworms (Sevin XLR liquid is somewhat less toxic to bees). Effective against a variety of insects. This chemical is on the restricted list in California and requires a permit from the Ventura County Agricultural
Commission.
• Diazinon. LD-50=350. Toxic to birds. Effective against a variety of insects.
• Fluvalinate (Mavrik). LD-50=261. Effective against spider mites, whitefly and aphids.
• Rotenone. LD-50=132. Toxic to fish and mam mals, especially swine. Effective against a variety of insects. Usually combined with pyrethrins, which do not persist as long, and are less toxic.
Fungicides
• Sulfur. Non-toxic.
• Benomyl. LD-50=10,000. A systemic fungicide.
• Chlorothalonil. LD-50=10,000
• Fixed copper. LD-50=1,000
7.4 Identification and Control of Pests and Diseases
This list is not intended to be exhaustive, but describes the most common and serious problems likely to be found in Thousand Oaks. Specific situations in the field must be treated under the supervision of a Licensed Pest Control Applicator. Additional help is available from the Ventura County Agricultural Inspector.
Alder aphid
• TREES AFFECTED: Alnus species
• SYMPTOMS: Foliage will be sticky and black. Aphids are yellow-green.
• CONTROLS: Lacewings and ladybugs are biological controls. Insecticidal soap can be sprayed on insects. (Spray again 10 days later.) If ants are maintaining the colonies, use Tanglefoot tree barrier on the trunk to keep ants off the tree. Wrap the trunk with plastic tape and put the Tanglefoot on the tape. Chemical controls: Rotenone-pyrethrin, malathion or acephate.

62 THOUSAND OAKS PLANTING & MAINTENANCE MANUAL
Restrict use of acephate or carbaryl to the summer brood. Honeybees may be present in the spring if the oaks are flowering, and these chemicals will kill bees on contact. Carbaryl will kill bees as a residual.
California turpentine beetle
• TREES AFFECTED: Pinus radiata, P. muricata, P. canariensis, P. thunbergiana
• SYMPTOMS: Beetles are cinnamon brown, about 1/4” long. Attacks the base of the trunk, rarely above 6 to 8’, and can cause moderate damage.Turpentine beetles cause 1” long bronze pitch tubes to appear near ground level, accompanied by white or pink granular droppings. It may weaken the tree and invite attack by more aggressive species, such as pine bark beetle. Pine bark beetles are attracted by the pheremones of turpentine beetles.
• CONTROLS: Use carbaryl if more than one pitch tube or dust pile is found per foot of trunk circumference: apply to tree base where beetles attack. Spray the basal 6 ft. of trunk with a high pressure sprayer. Mix carbaryl with a wetting agent. Spray in April.
Coryneum canker fungus
• TREES AFFECTED: Cupressocyparis leylandii
• SYMPTOMS: Cankers on trunk at 4 to 6ft. high, leading to decline and eventual death. CONTROLS: None practical.
Dutch elm disease
• TREES AFFECTED: Ulmus americana
• SYMPTOMS: Wilted foliage in summer, then leaves turn yellow and fall, tree declines and dies over a period of years. This disease is a fungus disease spread by the elm bark beetle. Beetles are brown to black, 18” long. Larvae are white legless grubs which overwinter in bark.
• CONTROLS: Remove infected trees and dispose of the wood. Do not prune trees when beetles are active (March to September.) Report all elms showing yellowing
Ash anthracnose
• TREES AFFECTED: Fraxinus ‘Modesto’, F. velutina, occasionally F. uhdei
• SYMPTOMS: Large brown blotches appear on leaves, which drop; twigs may die back.
• CONTROLS: Use copper spray or benomyl. Spray benomyl when buds break, then again two weeks later. Additional applications may be needed as new growth appears, or if rain washes the spray off.
• Anthracnose diseases can cause cankers (other diseases can also cause them), which are oval discolored areas on branches or the trunk. Cut infected branches below the canker, or trace out and remove trunk cankers. Disinfect tools after each cut. If treat ment would seriously affect the tree’s appearance, consult a tree specialist.
Ash curl aphid
• TREES AFFECTED: Fraxinus ‘Modesto’, Fraxinus velutina, Fraxinus uhdei
• SYMPTOMS: Leaves at branch tips are curled, twisted and galled. Pale green or grey insects.
• CONTROLS: Non-toxic: Use lacewings or ladybugs. Chemical control: Rotenone-pyrethrum mixture, malathion, acephate or carbaryl. Spray before foliage curls up. Once foliage has curled, a systemic such as acephate would be necessary for control.
California oak leaf caterpillar (oak moth)
• TREES AFFECTED: Quercus agrifolia, Q. ilex, Q. lobata
• SYMPTOMS: Moths emerge in May or June, and then again in October and November. Damage is not usually severe, but can defoliate trees.
• CONTROLS: Spray in spring after deciduous trees have leafed out, and again in summer when the second brood of caterpillars emerge. Non-toxic: Use Bacillus thurengiensis when caterpillars are young. Chemical controls: Rotenone-pyrethrum, acephate, or carbaryl.

63
• CONTROLS: No chemical controls are available.
• Keep the trees in a good state of vigor. Give the trees infrequent deep watering, and avoid fertilizer if adequate watering cannot be done. Avoid changes in watering patterns, grading and drainage. Quick detection of infestation, and removal and disposal of infested trees is important to keep the insects from spreading. Report all infested trees to the County. If trees are removed, grind the stumps; if this is not practical, cut as close to the ground as possible. Frill cutting around the circumference of the stump and applying glyphosate (Roundup) will prevent regrowth. Chip, bury, tarp or burn all infected wood. Avoid heavy pruning, and prune only in winter and spring (beetles are least active then).
• It is illegal to transport infected eucalyptus fire wood. Tarp all firewood with 6 mil thick clear plastic, and leave stored for at least 6 months.
Fungal leaf spot
• TREES AFFECTED: Pyrus kawakamii, some Malus cultivars
• SYMPTOMS: Red, brown, or yellow spots appear on the leaves.
• CONTROLS: Use copper, sulfur, benomyl or chlorothalonil. Spray the trees in the spring as soon as flower buds open. Clean up dead leaves and other refuse under the tree. Avoid overwatering trees, which creates saturated soil conducive to this problem.
Fruit tree leafroller
• TREES AFFECTED: Quercus agrifolia, Q. lobata, Q.ilex, Platanus, Fraxinus
• SYMPTOMS: One generation of moths per year; green caterpillars in spring, hanging on threads; mottled brown and tan moths in late spring. Leaves are rolled together with silken threads and tender new leaves are chewed. Defoliation may occur in severe cases.
• CONTROLS: Non-toxic - Bacillus thurengiensis is effective if caterpillars are less than 1/4” long. Chemical
or wilting in the spring to the County Agricultural Commissioner. Do not plant this species unless the new resistant cultivar ‘Centennial’ is used.
Elm anthracnose
• TREES AFFECTED: Ulmus parvifolia
• SYMPTOMS: Brown spots on leaves; leaves turn brown in early spring and drop off.
• CONTROLS: Copper spray or benomyl may be effective. Spray in spring as new leaves unfold. Anthracnose diseases can cause cankers (other diseases can also cause them), which are oval discolored areas on branches or the trunk. Cut infected branches below the canker, or trace out and remove trunk cankers. Disin fect tools after each cut. If treatment would seriously affect the tree’s appearance, consult a tree specialist. Ulmus parvifolia ‘Drake’ is resistant.
Elm leaf beetle
• TREES AFFECTED: All Ulmus species
• SYMPTOMS: Orange eggs, black larvae, yellow-green adults with a black stripe on wings, 1/4” long. They live on underside of leaves. In late spring or early summer, they cause skeletonizing of leaves, which turn brown and often drop.
• CONTROLS: Use carbaryl, 1 pound per 100 gals. of water, or 6 tbs. of 50% carbaryl in 3 gals. of water. Apply to the undersides of foliage in spring when new larvae appear, and again if a second crop of larvae appear. Acephate is also effective.
Eucalyptus longhorn borer
• TREES AFFECTED: Eucalyptus species
• SYMPTOMS: Dying or dead limbs appear on trees, or entire trees die. Broad tunnels are found beneath bark, and sawdust can sometimes be seen outside the bark. Adult beetles are 3/4” to 1-1/4” long, reddish brown, and are found under loose strips of bark during the day in spring. Larvae beneath bark are off-white, 1”-1-1/2” long when mature, found spring to fall.

64 THOUSAND OAKS PLANTING & MAINTENANCE MANUAL
controls - Pyrethrum-rotenone mixture, carbaryl or diazinon (also more effective on young caterpillars than older ones.)
Honey mushroom fungus
• TREES AFFECTED: Quercus agritolia, Q. lobata, most fruit trees, Cinnamomum camphora
• SYMPTOMS: Also known as oak root fungus. Symp toms may start as dull or yellowed leaves, or sparse foliage. Leaves may wilt, and branches die. Beneath the bark of the tree near ground level there will be a mat of white fungus. In late autumn or early winter, a cluster of tan mushrooms may appear at the tree’s base.
• CONTROLS: No chemical control is available. If infection sites can be cleaned of diseased tissue with hammer and chisel, and the cuts painted with de-natured alcohol, the disease can sometimes be arrested. Remove soil from the base of the tree to find these sites. If the tree must be replaced, choose a resistant species. Trees on the recommended list which are resistant are Cupaniopsis, Eucalyptus, Fraxinus, Geijira, Ginkgo, Jacaranda, Liquidambar, Melaleuca styphelioides, Pistacia, Pyrus calleryana, Sapium, and Ulmus.
Lime-induced chlorosis
• TREES AFFECTED: Any tree exposed to high levels of calcium.
• SYMPTOMS: Leaves are yellow or brown, and veins may remain green. This is a deficiency disease caused when trace minerals like iron, zinc and manganese form compounds with calcium and magnesium, which make the true minerals unavailable to plant roots.
• CONTROLS: Treat with iron and zinc chelate.
Oak anthracnose fungus
• TREES AFFECTED: Quercus agrifolia, Q. lobata, Q. ilex
• SYMPTOMS: Brown leaves on dead twigs appear in rainy spring weather. Leaves remain on the tree.
• CONTROLS: Non-toxic - Prune out infected twigs and
branches if feasible. Chemical controls - A fixed copper and light oil mixture can be used in late winter. Benomyl can be applied in spring. Treatments are not reliably effective.
Oak mildew
• TREES AFFECTED: Quercus agrifolia, Q. lobata
• SYMPTOMS: Leaves are covered with a white powder, new leaf shoots are shortened and excessively branched and leaves are small and distorted. New growth is stimulated, and will be infected, with a typical “Witches broom” look.
• CONTROLS: Non-toxic - Avoid excessive pruning, irrigation and fertilizing. Remove diseased young growth. Chemical control - use copper spray or benomyl. Treatments are not reliably effective.
Oak pit scale
• TREES AFFECTED: Quercus lobata; occasionally Q. agrifolia
• SYMPTOMS: Brown or green scales are found in small volcano-like depressions on twigs. They may cause dieback of twigs in mid to late summer; dead leaves stay on twigs over the winter.
• CONTROLS: Non-toxic - Use a 2% oil spray in the winter, 22 gals. oil to 100 gals. of water. Large oaks will need a high pressure sprayer to reach the tops of the trees. Chemical control - If necessary, use a summer oil mixture with malathion or carbaryl, applied once in late April to July.
Oak treehopper
• TREES AFFECTED: Quercus lobata; occasionally Q. agrifolia.
• SYMPTOMS: 1/4” long incisions in a spiral pattern appear on twigs. Adults are 1/4” long, olive green to brown with red dots. Larvae tunnel in the phloem tissue of the twigs.
• CONTROLS: Pyrethrin-rotenone mix or carbaryl in May

65
• SYMPTOMS: Doughnut-like pits in leaflets, petioles, and young twigs. Leaves appear grayish-green, stunted and distorted, and trees are sparsely foliated. Adult insects are green, 1/16” long.
• CONTROLS: Acephate. Use 1 lb. Orthene Tree and Ornamental Spray (75% soluble powder) to 100 gallons of water. This has controlled the insect for at least 35 days in experiments in Ventura County.
Pine bark aphids and pine needle aphids • TREES AFFECTED: Pinus radiata, P. muricata, P.
sylvestris, P. thunbergiana, P. pinea
• SYMPTOMS: Cottony white material appears on bark, twigs and needles.
• CONTROLS: Non-toxic - Lacewings and ladybugs are biological controls. Dormant oil spray in winter. Chemical controls - Rotenone-pyrethrin, malathion, or carbaryl in the spring, and add a miticide such as sulfur, fenbutatin-oxide, or fluvalinate if needed. A wetting agent and high pressure spray will improve control.
Pine bark beetle
• TREES AFFECTED: Pinus radiata, Pinus muricata
• SYMPTOMS: Some beetle species are benign, but the California five-spined engraver beetle is very destructive. Adults are brown to black, 1/8 to 1/4” long. Trees may die quickly. Boring dust will be found in crotches of the tree or surface of bark. Pine bark beetles are attracted by the pheremones of turpentine beetles. Turpentine beetles cause 1” long bronze pitch tubes to appear in trunks near ground level, accompanied by white or pink granular droppings.
• CONTROLS: Spray with carbaryl, and add sulfur, hexakis, or fluvalinate as spider mites are often a secondary problem. For turpentine beetles, spray the basal 6 ft. of the trunk with a high pressure spray of carbaryl mixed with a wetting agent. Spray in Feb. to protect pines for the entire season. Prune trees in winter when beetles are not active. Chip, bury or burn all pruned wood, or store under a 6 mil. clear plastic tarp for at least
Oak twig borers
• TREES AFFECTED: Quercus agrifolia
• SYMPTOMS: Look for tunnels under the bark of twigs which have patches of dead leaves. In May and June, 1/4” long brown beetles are outside the bark.
• CONTROLS: Non-toxic - If practical, prune out infested wood. Chemical control - carbaryl
Pear blight (fireblight)
• TREES AFFECTED: Pyrus kawakamii, some Malus cultivars
• SYMPTOMS: The blossoms will first look as if they had been water-soaked. They wilt and turn dark brown. Flowering shoots die suddenly and look as if they had been scorched. Cankers can also form. Young terminal shoots are occasionally infected in moist spring weather.
• CONTROLS: Prune out and burn diseased wood in June. Cut 6” below infected wood on small branches; 12” on larger ones. Disinfect tools between cuts in 10% bleach solution. Spray the next spring with agricultural streptomycin, every 4 to 5 days during flowering. Spray when temperatures are between 65 and 86 degrees, which is when the bacterium is active.
• If the tree dies, replace it with a species that is not susceptible to the disease. (Pyrus kawakamii is the only tree on the recommended plant list which is susceptible, but shrubs growing near the tree which may become infected include Cotoneaster, Pyracantha, Chaenomeles, Heteromeles arbutifolia.) Cultural practices which can lead to fireblight include planting in poorly drained sites, heavy pruning of the tree, too heavy fertilizing or fertilizing too late in the year. Root suckers and water sprouts are especially susceptible to infection and should be removed each dormant sea son. Cankers should also be removed.
Peppertree Psyllid
• TREES AFFECTED: Schinus molle

66 THOUSAND OAKS PLANTING & MAINTENANCE MANUAL
bark. No insecticide is useful. Avoid pruning pines in the summer, as the moths are laying eggs then, and they are attracted to pruning cuts and other mechanical injuries to the tree.
Shot hole borer
• TREES AFFECTED: over 200 species of trees in the region. Thirty-three tree species have been confirmed as reproductive hosts including the native species: Quercus agrifolia, Platanus racemosa, Populus fremontii, Salix laevigata, and Alnus rhombifolia; and 52 species (about 57%) of the most common street trees in the area, including Acer negundo, Liquidambar styraciflua, and Wisteria floribunda.
• SYMPTOMS: The beetle produces a very precise, perfectly round, tiny (< 0.1 inches in diameter) entry hole in most trees. Infection with the fungus can cause a dry or wet and oily dark stain surrounding the entry holes, discolored wood, leaf discoloration and wilting, and dieback of entire branches.
• CONTROLS: relocation/removal of infected wood; systemic insecticides generally are poor for treating ambrosia beetles. Prophylactic spraying of the bark could be used to protect uninfected trees in some situations. Sterilize pruning tools between uses to avoid spreading the fungus. Chip to pieces smaller than 1” and store infected wood under a 6 mil. clear plastic tarp for at least six months.
Shot hole fungus
• TREES AFFECTED: Prunus species
• SYMPTOMS: Red, brown, or yellow spots form on leaves, and drop out, leaving holes in the leaves.
• CONTROLS: Use copper, sulfur, benomyl or chlorotha lonil. Spray when blossoms open in the spring. Clean up dead leaves under the tree.
six months. Avoid any wounds to bark, including nailing signs to trees. Avoid stressing trees by cutting or filling near trunks. Give occasional deep watering.
Pink rot
• TREES AFFECTED: Washingtonia, Archontophoenix species, Phoenix canariensis.
• SYMPTOMS: Plant appears weakened with many dead sheaths. Often pink spore masses appear on the surfaces of infected tissues at the base of the plant.
• CONTROLS: Use benomyl. Disinfect pruning tools after each cut. Do not overwater.
Plum leaf aphid
• TREES AFFECTED: Prunus blieriana
• SYMPTOMS: These aphids can be a serious problem, quickly becoming a severe infestation.
• CONTROLS: If trees have been infested in previous years, treatment should be preventative. The timing is important. In early March, as the new leaves unfold, spray with acephate or carbaryl.
Pseudomonas canker
• TREES AFFECTED: Olea europaea
• SYMPTOMS: Gray galls on twigs and branches.
• CONTROLS: Remove galls by pruning where practical. They seldom kill trees.
Sequoia pitch moth
• TREES AFFECTED: Pinus radiata, P. muricata
• SYMPTOMS: This moth causes 1 to 2” diameter masses of white, yellow or pink pitch to form on the branches. Although messy looking, little harm is done to the tree.
• CONTROLS: Non-toxic - If control is needed for aesthetic reasons, scrape away the pitch masses and kill the larvae, which are found just below the surface of the

67
Sycamore scale
• TREES AFFECTED: Platanus species
• SYMPTOMS: White dots on leaves and white wooly bits under bark in severe cases.
• CONTROLS: Non-toxic: Spray with dormant oil in winter. Chemical control: If infestation is severe, mix a light oil with malathion or diazinon; spray in May-June.
Tent caterpillar
• TREES AFFECTED: A broad range of species.
• SYMPTOMS: Will defoliate tree in severe cases.
• CONTROLS: Non-toxic: Use Bacillus thurengiensis. Cut off branches containing nests. Chemical control: Use carbaryl in severe cases.
Tulip poplar aphid
• TREES AFFECTED: Liriodendron tulipifera
• SYMPTOMS: Leaves will be sticky and black. Aphids are green, and form colonies on the undersides of leaves. Ground may be sticky from aphid secretions.
• CONTROLS: Non-toxic: If ants are present, use Tanglefoot tree barrier applied over a band of plastic taped to the trunk. Chemical control: Rotenonepyrethrin mixture, malathion, acephate or diazinon. These are seldom effective over a long period.
Tulip poplar scale
• TREES AFFECTED: Liriodendron tulipifera
• SYMPTOMS: 1/4” to 1/2” brown, round scale insects accumulate in rows on twigs.
• CONTROLS: Non-toxic: In winter, use dormant oil. When scales are young in spring, before hard shells have developed, use light oil. Chemical control: Severe infestations man need carbaryl, malathion, diazinon, or acephate. Apply in May.
Spider mites
• TREES AFFECTED: A broad range of trees
• SYMPTOMS: Leaves have yellow stippling on them, and may have fine webbing and silvery coloring on the undersides. Mites are tiny specks of red, yellow, or green.
• CONTROLS: Non-toxic: Lacewing larvae are a biological control. Light oil spray is an option. Chemical control: Pyrethrin-rotenone mixture, sulfur, fenbutatin oxide, fluvalinate; respray 7 to 10 days later. If a miticide is needed more than occasionally, alternate two or more chemicals, as mites adapt rapidly to any one chemical.
Sycamore anthracnose
• TREES AFFECTED: Platanus species
• SYMPTOMS: Leaves, buds and shoots are blighted in the spring. Irregular dead areas appear along the veins of leaves.
• CONTROLS: Non-toxic: Prune out infected twigs and branches. Fertilize trees after the rainy season is over. Chemical control: Spray when leaves first begin to unfurl in the spring with chlorothalonil. Repeat two weeks later. (In dry springs, the first application may be sufficient.) Control by spraying will be more effective on young trees, as it is difficult to spray large trees as thoroughly. Variety ‘Bloodgood’ is resistant. Sycamore anthracnose can cause cankers (as can other diseases), which are oval discolored areas on twigs.
Sycamore mildew
• TREES AFFECTED: Platanus species
• SYMPTOMS: A white or gray powdery coating forms on young leaves and stems in May or later.
• CONTROLS: Non-toxic: Do not prune trees severely. Variety ‘Yarwood’ is resistant. Chemical control: Sulfur, copper, benomyl. In May and June, mix 1/2 lb. benomyl and 6 lbs. agricuhural sulphur per 100 gallons.

68 THOUSAND OAKS PLANTING & MAINTENANCE MANUAL
Verticillium wilt
• TREES AFFECTED: Acer, Cinnamomum, Schinus, and many others.
• SYMPTOMS: In late spring one side of the tree may wilt. The leaves turn yellow, and the wood just under the bark turns dark brown, olive green or black.
• CONTROLS: Give deep infrequent irrigation and fertilize with a low-nitrogen formula. If replacement of the tree is necessary, choose a species that is resistant to the disease. Resistant trees on the recommended list are Eucalyptus, Liquidambar, Pinus, Platanus, Quercus, and Pyrus. Those which are susceptible to verticillium wilt are Acer, Cinnamomum, Cupaniopsis, Fraxinus, Olea, and Ulmus.
• There is no chemical control available.
Western pine rust galls
• TREES AFFECTED: Pinus radiata, P. halapensis.
• SYMPTOMS: Swellings surround small branches. In spring, yellowish orange powdery spores are produced in fissures on the galls.
• CONTROLS: Prune out infected branches before spores form in the spring.
Water mold fungus
• TREES AFFECTED: Any species in very wet soil.
• SYMPTOMS: Leaves may die or look scorched, and there will be little or no new growth.
• CONTROLS: Non-toxic: Correcting drainage and irrigation problems is the best control. Chemical control: Metalaxyl (LD 669) or aliette (LD 5800) are two chemicals for control.
Whitefly
• TREES AFFECTED: Betula species, Liquidambar, Platanus acerifolia, others.
• SYMPTOMS: A cloud of tiny white insects fly around frantically when disturbed. Yellow spots appear on undersides of leaves where chlorophyll has been removed by them. Usually caused by overwatering.
• CONTROLS: Non-toxic: Put lacewing eggs in cups tied to affected trees. Reduce frequency of watering. Chemical: If severe, spray alternately with Mavrik and Vendex in April-May.
7.5 Insect and Disease Problems in Thousand Oaks
Analysis and identification of tree problems is important, and if there is doubt about a diagnosis a tree specialist should be consulted. Some root problems cause foliage symptoms which look like those caused by insects. For example, Pythium water molds, which kill absorbing root tips, may cause foliar symptoms which are similar to nitrogen deficiency symptoms. Pythium can also increase susceptibility of the tree to fungal leaf spot.
Table 9 lists the most common problems associated with tree species found in Thousand Oaks. If a tree is not listed, it does not have any significant pest or disease problem in Thousand Oaks at this time.

69
PESTS AND DISEASES COMMON TO THOUSAND OAKS
TREE PROBLEM
Acacia species chlorosis in alkaline soils
Acer campestre occasional aphids
Acer rubrum ‘Armstrong’, Armstrong red maple aphids
Acer rubrum ‘October Glory’ caterpillars in May (ignore aphids in April)
Alnus rhombifolia, California white alder alder aphid, tent caterpillar
Alnus cordata, Italian alder alder aphid
Betula alba, White birch aphids
Callistemon species, Bottlebrush chlorosis in alkaline soils
Ceratonia siliqua, Carob root crown rot if watered frequentl. Squirrel damage to branches
Carpinus Betulus ‘Fastigiata’ Upright European hornbeam occasional black scale
Celtis occidentalis, Common hackberry caterpillars
Cedrus atlantica, Atlas cedar oak root fungus in heavily watered turf
Cedrus deodara, Deodar cedar oak root fungus in heavily watered turf
Cercis occidentalis, Western redbud water molds, Rhizoctoria root rot, black stem fungus
Cinnamomum camphora, Camphor tree honey mushroom fungus verticillium wilt
Cupaniopsis anacardioides, Carrotwood aphids in the spring
Cupressocyparis leylandii, Leyland cypress Serious coryneum canker fungus
Eriobotrya deflexa, Bronze loquat firehlight, black scale
Erythrina caffra, Coral tree caterpillars in summer
Eucalyptus species lime-induced chlorosis in alkaline soil, Eucalyptus longhorn borer
Fraxinus ‘Moraine’, Moraine ash ash lygus bug a minor problem
Fraxinus velutina glabra, Modesto ash ash anthracnose, ash curl aphid, honey mushroom fungus
Gelijera paryiflora, Australian willow occasional black scale
Jacaranda mimositolia, Jacaranda caterpillars in the spring
Lagerstroemia indica, Crape myrtle mildew (new hybrids are resistant)
Liriodendron tulipifera tulip poplar aphid, tulip poplar scale
Ligustrum lucidum, Glossy privet black scale
Liquidambar styraciflua, American sweetgum brown softshell scale
Magnolia grandiflora, Southern magnolia aphids in spring
Maytenus boaria, Mayten thrips in late May, carrying a virus. Cottony cushion scale.
Olea europaea, Olive black scale, Pseudomonas syringa canker
Pinus canariensis, Canary Island pine pine bark aphid, pine needle aphid
Pinus coulteri, Coulter pine Pine scale
Pinus halapensis, Aleppo pine pine bark aphid, pine needle aphid western pine rust gall, Sequoia pitch moth,
severe spider mite
Pinus pinea, Italian stone pine pine bark aphid, pine needle aphid, Sequoia pitch moth, occasional spider mite
Table 9 (page 1 of 2)

70 THOUSAND OAKS PLANTING & MAINTENANCE MANUAL
PESTS AND DISEASES COMMON TO THOUSAND OAKS
TREE PROBLEM
Pinus thunbergiana, Japanese black pine pine bark aphid, pine needle aphid
Pinus radiata, Monterey pine pine bark beetle, California turpentine beetle, pine bark aphid, pine needle aphid, western pine rust galls, sequoia pitch moth, very severe spider mite
Pinus roxburghii, Indian longlead pine pine scale
Pittosporum tobira, Tobira aphids, scale
Pittoosporum undulatum, Victorian box aphids in the spring
Platanus acerifolia, London plane tree sycamore mildew, syc scale, syc anthracnose
Platanus racemosa, Western sycamore sycamore anthracnose, sycamore scale
Prunus caroliniana, Carolina cherry laurel chlorosis in alkaline soils
Prunus caroliniana, Purple plum shot hole fungus, water mold fungi (in over-wet soils), plum leaf aphid (in
variety ‘Bijeriana’)
Pyrus kawakamii, Evergreen pear aphid, pear blight, fungal leaf spot
Pyrus calleryana varieties, Ornamentalpear check for fireblight
Quercus agrifolia, Coast live oak fruit tree leaf roller, oak leaf caterpillar, oak twigborer, oak tree hopper, honey
mushroom fungus
Quercus ilex, Holly oak fruit tree leaf roller, oak leaf caterpillar, oak tree hopper, oak mildew
Quercus lobata, Valley oak fruit tree leaf roller, oak leaf caterpillar, oak tree hopper, honey mushroom
fungus, oak pit scale, oak anthracnose fungus
Quercus robur, English oak fruit tree leaf roller, oak mildew
Quercus rubra, Red oak oak leaf caterpillar
Quercus palustris ‘Village Green’, Pin oak oak leaf caterpillar
Robinia pseudoacacia ‘Umbraculifera’, Mophead locust aphids
Schinus molle, California pepper pepper tree psyllid
Schinus terebinthifolius, Brazilian pepper verticillium wilt
Tipuana tipu, Tipu tree aphids
Tristania conferta, Brisbane box chlorosis
Ulmus americana, American elm elm bark beetle (Dutch elm disease)
Ulmus parvifolia, Evergreen elm elm anthracnose, elm leaf beetle
Table 9 (page 2 of 2)

71
TIPS FOR DIAGNOSING TREE PROBLEMS CAUSED BY PETSBy C. S. Koehler
Cooperative Extension, U.C. Berkeley
1. More then half of the problems brought to your attention will be attributable to factors other then insects and mites.2. The cause of poor plant performance may not be evident on the plant sample given to you for diagnosis. The cause may lie farther down the plant.3. The mere presence of insects or mites does not always mean that they are the real cause of poor plant performance. (Improper
maintenance or poor plant selection also
contribute.
4. If the entire tree is dead, the chances
are great that insects or mites were not the
cause of death. Insects and mites seldom kill
their host plants.
5. Most insects and mites show specificity
in their choice of plants. Some are general
feeders, but most are not. Knowing the
name of the affected plant is therefore
extremely helpful in determining the identity
of the offending insect or mite, because
lists of pests and other references are often
organized by host plant.
6. The application of a pesticide is not the
solution to every problem.
7. By the time many people notice a pest
problem and seek your advice, it is often too
late in the season to take corrective action.
8. Especially when reporting by telephone,
people tend to magnify the actual size of an
insect.
9. Insects and mites must feed in order to survive and reproduce. Evidence of their feeding will nearly always remain on the
plant after the pest is gone. Most signs and
symptoms of pest activity fit into one or more of the categories listed in this table.
Symptom or Sign Probable Pest ResopnseI. Chewed leaves, blossoms Caterpillars, beetles, sawflies, snails,
slugs. Also leafminers (chewing is inside leaf)
II. Stippled, bleached, yellowed, or bronzed leaves
Leafhoppers, aphids, psyllids, thrips, lace bugs, spider mites
III. Distortion (twisting, cupping, swelling of plant parts
Thrips, aphids, blister (bud) mites, gallmakers
IV. Dieback of plant parts Borers, scales, gallmakers
V. Presence of excrement, sooty mold
flocculence, froth, cast skins, tents, pitch
tubes, or other insect product
Aphids, soft scales, meatybugs, whitefly,
adelgids, thrips, lace bugs, spittlebugs,
certain caterpillars, etc.
Table 10.
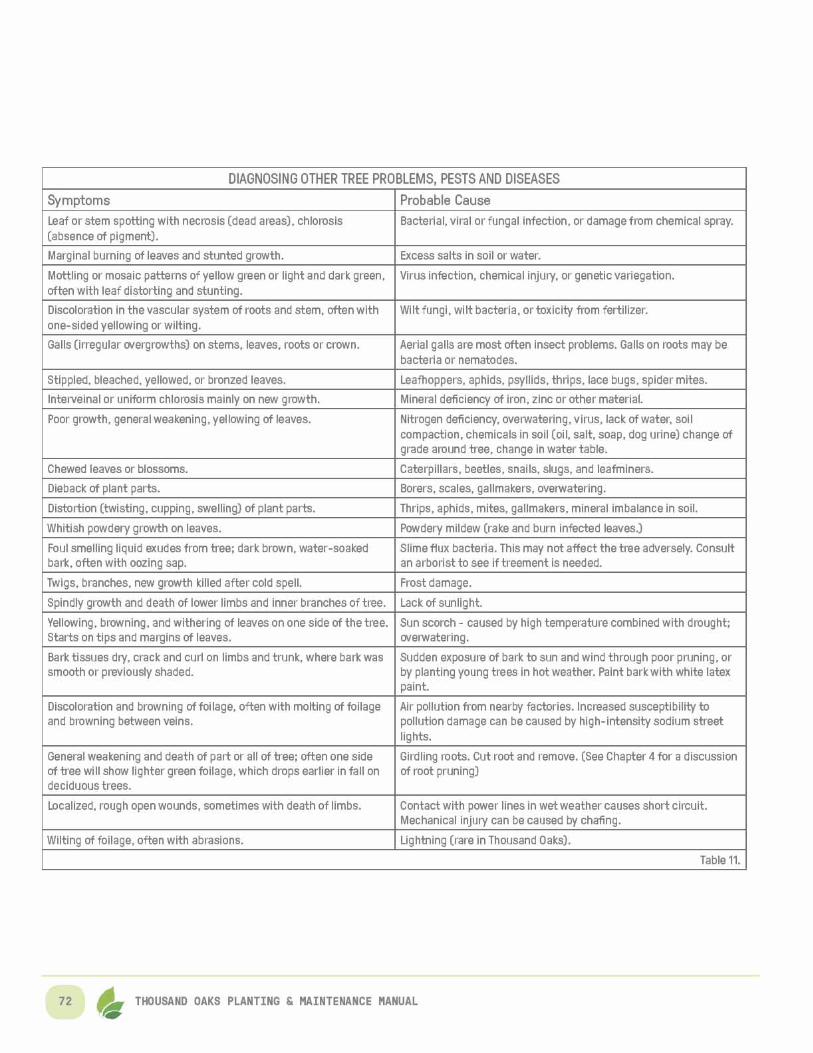


74 THOUSAND OAKS PLANTING & MAINTENANCE MANUAL
8 Other Tree Maintenance
This section describes how to maintain the “furniture” of tree planting - stakes, paving, grates, etc. - as well as detailing tree protection and hazardous tree assessment. The final section includes a summary of fire preventive maintenance.
8.1 Stakes and Ties
Check stakes and ties several times during the year to see if they are intact, and if there is any slipping of the ties or girdling of the trunk.
Ties must be flexible to allow for the trunk of the tree to expand. Ties must not prevent the trunk from being able to move. The tree will develop a much stronger trunk if the trunk is not immobilized. Remove all wire tree ties which may have been used. Replace them with rubber ties if support is still needed. Wire ties should never be used when planting and maintaining trees.
Check stakes and ties for possible removal starting at the first year after planting. The stakes should be removed if the tree can stand alone. Auxiliary stakes can usually be removed before the support stakes. In most cases, anchor stakes are unnecessary after the first year. If protection is still needed, the ties can be undone and the anchor stakes left in place.
Test the tree for its ability to stand without stakes. Grasp the tree 3 to 4 ft. above the ground and move it back and forth at least 12”. If the root ball doesn’t move but the stem bends, the stake can probably be removed. If the root ball moves, the tree will probably never form a sufficient root system and should be considered for removal.
If trees have blown over they are usually not worth saving.
If trees have pulled out of wet soil without severe damage, they can often be pulled back to an upright position. Thin about one third of the canopy. Anchor the trees.
Tree Cabling and Bracing
• Even when trees are properly trained, maintained and pruned, they may develop weak or poor structure and require special care. Horizontal branches, branches
weakened by decay or storms, and branches of equal size arising from the same level on the trunk can all create structural problems. Cabling involves attaching a flexible steel cable between branches to limit motion of the limbs. Bracing uses bolts or threaded rods to secure split crotches, trunks or branches, and hold rubbing limbs together or apart. (See Figure 19).
• Cabling or bracing should be undertaken under the direction of a certified arborist. An assessment of the value of the tree and the cost of the work should first be undertaken to determine if the tree is worth the effort.
8.2 In and Around the Base of the Tree
Tree Grates and Paving Materials
• As the tree trunk increases in diameter, it will need a larger opening. Punch out sections of the grate as needed, or remove tree well covers.
Watering Basins
• Usually the basins are needed through the first two growing seasons. If the tree is being watered by a drip system, the basins are only necessary for the initial hand watering at planting time.
Protecting Tree Trunks
• Trees, especially newly planted trees, can be damaged by electric weed whips which trim weeds and ground cover right up to the trunk. The trimmer can easily cut the cambium layer of the tree bark and kill the tree. All trees must have trunk protection in sod areas.
• Existing trees without headers could benefit from a plastic or rubber tree boot to protect the trunk until the tree is mature, or the soil could be removed and a wood header installed.
CHAPTER 8. OTHER TREE MAINTENANCE

75
Figure 19

76 THOUSAND OAKS PLANTING & MAINTENANCE MANUAL
8.3 Hazardous Tree Assessment
Each time tree maintenance is performed, personnel should carry out an overall check for hazardous conditions. City maintenance workers should be trained to check for these conditions.
Checklist for Hazards
• Thinning out foliage and/or branches
• Faults in the branch structure (poor branch attachments, poor spacing of major branches, many water sprouts or suckers)
• Cavities in the trunk or major branches
• Decay in major branches
• Old pruning wounds that haven’t healed
• Insect infestation
• Fungus infection
• Cracks in the bark (indicating dead cambium)
• Evidence of hollowness (tap with a wooden mallet) or use a shigometer or increment borer
• Cankers at the root flare or on large roots
• Dead vascular tissue at the root flare or on large roots
• Decay at the root flare or on large roots
• Available targets in the form of people or property
If a tree is judged to be hazardous, all protective measures such as pruning, cabling, bolting or bracing, etc. should be evaluated and considered before removal.
Tree Wounds
Improper pruning or branch breakage may result in branch stubs which do not callus properly. Wind breakage, maintenance equipment such as lawn mowers, nailing signs to trees, and repeated trunk injection of pesticides may cause trunk wounds which do not heal easily. In these cases a
cavity may form in the trunk or branch as a result of decay organisms entering the wood. The cavity may weaken the tree structurally, serves as a breeding place for insects, and may reduce the vigor of the tree. In an old tree decay may progress rapidly enough to be a serious threat to the tree. (See Chapter 9 for a discussion of root wounds.)
• Remove dead and loose bark from around the wound with a sharp knife. Leave live attached bark, and form a clean smooth surface of healthy wood and bark. Smooth any damaged wood into an elliptical wound, pointed at the bottom, so it will not trap water.
• Press any remaining loose bark tightly against the wood and hold it in place with small aluminum nails.
• Trim branch stubs back to the branch collar, leaving the collar intact. (See Chapter 4 for a discussion of pruning.)
• Proper watering and fertilizing will promote wound healing.
• If a cavity is present in the trunk or limb, siphon water out of it with a turkey baster, and cover the cavity with a piece of sheet metal to prevent further moisture accumulation.
• If the bark is sunburned, it will blister, crack, dry, and peel away from the wood. Carefully remove loose bark with a knife. Paint the wounded bark with light gray latex paint to reflect sunlight. This condition most often occurs when newly installed trees’ root balls are not properly watered, resulting in reduced sap flow and de creased resistance to sunscald.
8.4 Ventura County Fire Safety Guidelines1
Ventura County residents and property owners cannot ignore the fact that dry, poorly maintained vegetation is a natural volatile fuel for fast spreading wildfires. The goal is to maintain trees and vegetation that beautify and benefit a
1 Adapted from the VCDF Fire Hazard Reduction Program pamphlet

77
property, and to remove hazardous vegetation that creates a combustible fuel supply for wildfire.
When possible, the goal is to establish ‘Defensible Space’. Defensible space refers to an area around the perimeter of structures or developments in the wildlands. Recommended practices include:
• Discing and rototilling are acceptable methods for removing small types of vegetation. The material shall be tilled or disced into the soil in a manner to eliminate possible fire spread.
• Clearance from all structures shall not be less than 100 feet. Within the 100 foot perimeter, all brush, flammable vegetation, ot combustible growth identified as a fire hazard by an inspecting officer shall be mowed to stubble height not to exceed 3 inches. All cuttings shall be removed from the property.
• Single specimen trees, ornamental shrubbery or groundcovers are permissible provided that they do not form a means of rapidly transmitting fire from the native growth to any structure. Such specimens shall be spaced a minimum of 15 feet from other specimens, structures or surrounding native brush. All trees and shrubs shall be maintained free of deadwood and litter, and shall be trimmed up to 5 feet from the ground or 1/3 of the height, whichever is less.
• Access roads shall be maintained with a minimum 10 foot clearance on each side of the traveled section. Trees and shrubs protruding over the access roadway shall be trimmed to a minimum height of 13 feet 6 inches to allow proper access for emergency equipment.
• Vacant parcels located in areas defined as Hazardous Fire Areas, such as vacant parcels in a city of highly developed area, shall be cleared entirely of combustible material.
• Large vacant parcels located in Hazardous Fire Areas bordering on developed areas in the Wildland Urban Interface (WUI) shall have a 100 foot fuel break cleared along the entire interface border. When possible, the fuel break may be placed in such a manner so that it is obscured from the public view.

78 THOUSAND OAKS PLANTING & MAINTENANCE MANUAL


80 THOUSAND OAKS PLANTING & MAINTENANCE MANUAL
9 Protection of Existing Trees
This chapter explains how to protect existing trees when construction work is taking place around them.
9.1 Basic Tree Protection
No mature amenity tree in the city on public property, may be removed without authorization from the city.
It is to be noted that the city has multiple protected tree species (ordinance trees) among which are the California Bay Laurel, Toyon, Black Walnut, California Sycamore and all Oaks. Ordinace trees require specific maintenance requests and routines. Consult with the Public Works Director or designee prior to proceeding with any work on or around ordinance tree species.
Before construction work is undertaken near existing trees, procedures for protection of the trees should be understood. Specific procedures for protection during and after construction should be agreed upon and approved by the Public Works Director or designee. It is important to realize that the result of damage to the root system of the tree may appear anywhere from five to fifteen years after the work has been done.
The following guidelines are basic tree protection practices. The city may require additional conditions as part of their plan review or permit process.
Compaction
• Do not compact the soil any closer than 5 ft. out from the dripline of any tree during construction (the tree’s “protected zone”). Fence off the tree at the outermost edge of the protected zone before any equipment is allowed on the site.
Cut and Fill
• In general, no cut or fill is permitted beneath the protected zone of existing trees in Thousand Oaks. Filling will require installation of drainage and aeration tubes to protect the tree (refer to the discussion of paving below).
• When soil is cut (removed), promptly apply a 4” to 6” layer of mulch to conserve soil moisture. Fill should not be placed closer to the trunk than three times its diameter, and a minimum of 6 ft. from the trunk. Do not store any excess fill under the tree. The natural root flair of the trunk should always be visible. With native oaks, limit the depth of cut or fill to 6”.
Trenching
• Utilities and footings for buildings and walls should be designed and located to minimize disturbance to tree roots. If a footing must be laid near a tree, use only pier and grade beam footings with bridge foundations within the dripline. Do not use a continuous grade beam footing. Dig 30” deep pilot holes with a two-man power auger, using an 8” bit. If roots of 4” in diameter or greater are encountered, move the proposed location of the pier 12”. If utility lines must travel through a dripline the trenches must be dug by hand. Tunnel under any roots encountered rather than cutting the roots.
• Trenching under oaks can only legally be done with hand tools.
Root Damage
• If roots over 1” are broken, cut the root cleanly and immediately cover the cut with a plastic bag tied with a rubber band or tape. No oak roots over 1” may legally be cut.
• If a major root (over 3” in diameter) is removed, or a large portion of smaller roots are damaged, the tree canopy must be pruned to balance the tree. Prune the same percentage of canopy that have been lost in root mass, up to 30% of the canopy. For example, if 10% of the roots are damaged, prune out 10% of the canopy.
Branch Pruning
• See Chpater 4 for guidelines.
CHAPTER 9. PROTECTION OFEXISTING TREES
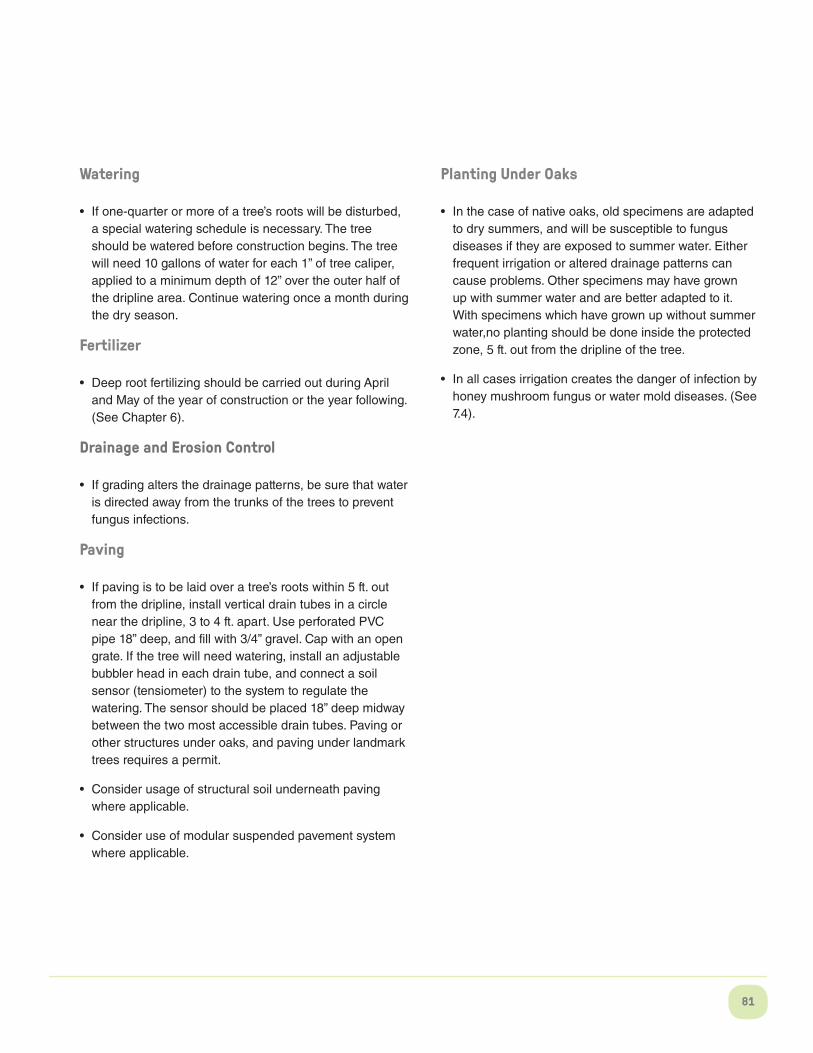
81
Watering
• If one-quarter or more of a tree’s roots will be disturbed, a special watering schedule is necessary. The tree should be watered before construction begins. The tree will need 10 gallons of water for each 1” of tree caliper, applied to a minimum depth of 12” over the outer half of the dripline area. Continue watering once a month during the dry season.
Fertilizer
• Deep root fertilizing should be carried out during April and May of the year of construction or the year following. (See Chapter 6).
Drainage and Erosion Control
• If grading alters the drainage patterns, be sure that water is directed away from the trunks of the trees to prevent fungus infections.
Paving
• If paving is to be laid over a tree’s roots within 5 ft. out from the dripline, install vertical drain tubes in a circle near the dripline, 3 to 4 ft. apart. Use perforated PVC pipe 18” deep, and fill with 3/4” gravel. Cap with an open grate. If the tree will need watering, install an adjustable bubbler head in each drain tube, and connect a soil sensor (tensiometer) to the system to regulate the watering. The sensor should be placed 18” deep midway between the two most accessible drain tubes. Paving or other structures under oaks, and paving under landmark trees requires a permit.
• Consider usage of structural soil underneath paving where applicable.
• Consider use of modular suspended pavement system where applicable.
Planting Under Oaks
• In the case of native oaks, old specimens are adapted to dry summers, and will be susceptible to fungus diseases if they are exposed to summer water. Either frequent irrigation or altered drainage patterns can cause problems. Other specimens may have grown up with summer water and are better adapted to it. With specimens which have grown up without summer water,no planting should be done inside the protected zone, 5 ft. out from the dripline of the tree.
• In all cases irrigation creates the danger of infection by honey mushroom fungus or water mold diseases. (See 7.4).

82 THOUSAND OAKS PLANTING & MAINTENANCE MANUAL


84 THOUSAND OAKS PLANTING & MAINTENANCE MANUAL
10 Shrubs, Vines and Ground Covers
Shrubs and ground covers should be chosen to complement their location so they require only minimal care. A maintenance schedule for shrubs and ground covers only needs to deal with problems, such as a lack of water or fertilizer, insects or pests, dead plants, dead wood which needs to be removed, conflicts with trees and other plants, or to open up sight lines for safety.
This chapter details the maintenance practices needed to ensure the health of the tree as well as the plants at its base.
10.1 Pruning
In general, no pruning should ever be needed for the shrub species recommended to be planted in the right of way areas. A rule of thumb should be to prune only for the health of the plant or safety of the community.
The majority of shrub species used in the landscape, if allowed to form their own shape, without direction by pruning, would become rounded forms, in many cases, broader than tall, and would be branched to the ground. If the goal of the landscape maintenance pruning is to achieve the healthiest, best looking plant with the least possible work, the best means to that goal is to encourage the plant to grow into the form that it would achieve naturally. The common practice of pruning all shrubs into a “round ball” form with hedge shears is not recommended for reasons of economy, aesthetics, or in some cases the health of the plant. Shrubs which have been pruned this way can be restored by letting them grow and performing thinning operations over a period of several years to help restore their natural shape.
Where the shrub is pruned from the ground up into a “round ball” shape more soil surface is exposed, evaporation from that soil is accelerated, and the plant’s roots become dry much more rapidly. When this soil is blown or raked clean, so that no organic material or foliage covers the soil, it becomes very difficult for air or water to penetrate the surface and the water which is applied runs off into the surrounding lower areas. All of these factors increase the cost of maintenance and reduce the vigor of the shrub.
Where ground covers grow up beneath shrub canopies, the
ground cover should be removed in favor of the expansion of the canopy of the shrub. The shrub should not be pruned to facilitate maintenance of the ground cover.
Some ground cover species, including Hedera, Hypericum calycinum, and Osteospermum fruticosum, require mowing to eliminate dead wood build-up, which can be unhealthy for the plant, and can become a fire hazard. Mow every two years, in late winter, to a height of 12”. Use a flail mower for the job.
10.2 Watering
Irrigation duration and frequency should be determined by the needs of the shallowest rooted plants in the area, which will need more frequent irrigation. Generally, ground cover and shrub areas should have their own valves, with trees watered separately, or with adjustable bubblers if they are on the same valve. In addition, slopes should be valved separately from flat areas, and shady areas separated from sunny ones. These separations allow different watering requirements to be met. Irrigation systems should be designed by a land scape architect or irrigation consultant.
As with trees, the use of a mulch in all areas is highly recommended, to slow the rate of evaporation of water from the soil. This also keeps the soil surface from baking in the sun, allows air to keep reaching the roots, and is a good weed control barrier. As the bark breaks down it gradually improves soil structure and fertility. Use a 4” layer of shredded bark or bark chips. Note, mulch is to be held away from the base of shrubs.
In general, try to set an irrigation schedule to water as deeply and infrequently as possible. This encourages deep-rooted, vigorous plants which can withstand hot spells. Established drought tolerant material may need only monthly waterings; some get by with two waterings in a dry season, and some drought tolerant plants prefer no summer water at all.
Moisture checks should be made periodically, preferably twice a month during the first year, with the use of a soil probe in various ground cover areas. When an automatic controller is used, a soil tensiometer can be installed with the controller which will override the controller program to water when necessary, and to shut off the program if no water is needed. As these sensors are not foolproof, they
CHAPTER 10.SHRUBS, VINES, & GROUND COVERS

85
should not be thought to take the place of moisture checks and intelligent programming. However, studies on the value of tensiometers have shown that a significant reduction in water use can be accomplished through the use of them. It is usually not necessary to install a sensor on each valve of a system; using strategic locations are sufficient.
The soil should be kept moist to a depth of 12” during the establishment of new plantings, in order to facilitate deep rooting of plants and to keep the root balls of new plants from drying out. The amount of water needed each week is a function of the type of plant, weather conditions, soil type, competition by other plants, and the stage of development the plant has attained. The timing of irrigation cycles is also a function of the precipitation rate of the sprinklers and the time it takes before runoff begins. The slope and soil type affects the runoff time.
Generally, plants in Thousand Oaks will need about 1-1/4” of water per week to replace evapotranspiration losses in hot weather, and 1/2” to 3/4” per week in cooler weather. (Evapotranspiration is the amount of water the plant transpires through its leaves plus the amount lost to solar evaporation). However, established drought tolerant plants may need only 1” to 1-1/2” applied monthly.
Each irrigation system is unique, and is best programmed after installation and observation of how it functions, using both the expertise of the designer and field personnel. The use of repeat cycles, available with most modem controllers, can minimize runoff on slopes and in tight soils. Program the cycles a half-hour apart to allow water to percolate into the soil. Usually three different schedules per year, a hot-weather, a spring and fall, and a winter schedule, are needed. During the first two or three years irrigation will have to be more frequent. When the plants are older and well established, less frequent, deeper waterings can be programmed. Sprinklers should be programmed to go on in the early morning, to minimize the chance of fungus diseases which can occur if leaves of the plants are wet all night, and to avoid inconvenience to people from the spray.
Drip irrigation, while very conserving of water, does require more maintenance than bubbler systems and is therefore discouraged from use in public rights-of-way. The emitters clog fairly often, so regular inspection of the system and regular cleaning of the filter is important. Do not use emitters
with a precipitation rate less than one gallon per hour, as they tend to clog more easily. It is best to use rigid PVC pipe in the system and put multi-emitters on adapters which connect to PVC risers. This is a more permanent and lower maintenance solution than polyethylene pipe.
Weeding and cultivating the soil around plants can damage the system. In medians and other areas where foot traffic or machinery may be a problem, the emitters need to be installed below ground, so regular inspection is time consuming. On slopes, however, a drip system is often chosen because it will produce the least amount of runoff. Also on slopes there is less danger of damage to the emitters from foot traffic, and so they can be installed above grade, thus being easier to inspect. Emitters on slopes should be installed upslope from the root balls of the plants.
With large shrubs, it is necessary to change the location and number of emitters as the plants mature, so that water continues to get to the feeder roots around the driplines of the plants (if irrigation is still needed). Automatically controlled irrigation systems are usually only cost-efficient for large areas. For the safety of maintenance personnel, it is also best to use a controller in all street medians. The controller should be placed in the sidewalk right of way so that maintenance personnel can visually inspect the median system without having to cross the street. Manual irrigation systems should only be used if frequent and regular maintenance is available. Hand watering is usually not efficient or cost-effective for large planting beds.
Drought strategies:
• In a drought situation, give a deep watering early in the growing season. Established drought tolerant plants should be able to survive with no further irrigation.
• If necessary, give one or two additional deep waterlogs during the growing season. Wait until symptoms of water stress occur before irrigating.
• If planting beds are crowded, removal of some plants will lessen competition for moisture.
• An anti-transpirant can be sprayed on the leaves of plants to reduce the transpiration rate.

86 THOUSAND OAKS PLANTING & MAINTENANCE MANUAL
• Micronutrients: If the soil is deficient in micro nutrients, an application of a micronutrient (trace mineral) fertilizer once or twice yearly may be helpful.
In times of drought:• Do not fertilize. Any new growth will increase the water
requirements of the plant.
When in ill-health:
• Never fertilize a declining plant, unless the problem has been diagnosed as a deficiency. The pest or disease must be treated first, and any underlying environmental problem corrected, before the plant is fertilized.
Alternative / supplemental materials:
• Biochar - A soil amendment with the intention to improve soil functions and to reduce emissions from biomass that would otherwise naturally degrade to greenhouse gases.Biochar attracts and holds soil nutrients, it potentially reduces fertilizer requirements. As a result, fertilization costs are minimized and fertilizer (organic or chemical) is retained in the soil for longer. Typical practice is to amend backfill with one part biochar to 4 parts native soil.
• Worm Castings - contain a highly active biological mixture of bacteria, enzymes, remnants of plant matter and animal manure; castings are rich in water-soluble plant nutrients, and minerals that are essential for plant growth, such as concentrated nitrates, phosphorus, magnesium, potassium and calcium. It also contains manganese, copper, zinc, cobalt, borax, iron, carbon and nitrogen.
• Horticultural Liquid Molasses – provides a natural food source for the indigenous microbial populations in the soil. It is recommended for many types of plants growing in organic growing programs. Molasses is compatible with most natural biological soil stimulators and helps increase the microbial activity in the soil
• Mycorrhizal Fungi Inoculum– Dual soil-conditioning biological inoculum system of endo- and ecto- mycorrhizal, used to further aid the plants ability to efficiently uptake available soil nutrients and increase
10.3 Fertilizing
Note: When feasible a soils test should be performed to indicate the nutrient deficiency and proper amendment requirements to achieve horticulturally fertile soil conditions.
At planting time:
• Shrubs, vines and ground covers should be fertilized at planting time with a slow release type. It can be the same fertilizer as is used for the trees. (See section 6.2.) The fertilizer should be mixed into the planting holes or planting beds before installing the plants. AboutF 1/4 pound of actual nitrogen per 1000 square feet is recommended.
The first year:
• If there is time before summer, follow this initial application with another, about three months later, applying 1/4- to 1/2-pound of actual nitrogen per 1,000 square feet. Avoid fertilizing during the warm summer months, when the weather would stimulate too-rapid growth.
Established plants:
• Established plants need one fertilization yearly, with some exceptions. Some native plants prefer no fertilizer, and some established plants do not require it. Fertilizing can be done in early spring, or it can be done in two stages, with half in early fall and half in early spring. A minimum of one half to one pound of actual nitrogen per 1,000 square feet is required. If a ground cover is sheared in the spring, it should be fertilized at that time.
• Mix the fertilizer with an equal amount of sand, soil, or peat moss, and scatter the mix around the outer two-thirds of the area around shrubs and vines. Do not concentrate fertilizer against the main stems of shrubs. If there is ground cover, scatter the mix throughout the ground cover and around the shrubs and lightly water in, taking care not to wash the fertilizer away from the bed or the root zone of the shrubs.

87
can be combined with a pre-emergent herbicide which will kill seeds. Consult the manufacturer’s recommendations for effectiveness against particular weeds, and for safety with particular ground covers. It is difficult to find post- emergent herbicides which will kill weeds without damaging shrubs and ground cover. In addition, the look of dead weeds is even less desirable than live ones, so they have to be removed anyway.
Weeds in pavement can be controlled by weed oil. Safer’s Sharpshooter, a non-toxic product, can also be used. Persistent perennial weeds may have to be sprayed with glyphosate (Roundup).
Weed whips can kill ornamental plants by cutting through the cambium layer of the bark. They should be used with care.
10.5 Pest Control
Healthy shrubs, vines and ground covers will be able to withstand minor insect and disease damage. Routine or preventative insecticide or fungicide applications should not be done unless there is a known severe problem. Where unusually high infestations occur, chemical pesticides may be necessary. Spraying should always be done with protective equipment, and according to the manufacturer’s directions. Care should be taken in the disposal of leftover materials and containers.
The concept of integrated pest management should be the guiding principle (See 7.2). This combines good plant selection and maintenance with the least toxic methods of pest control, and uses chemical pesticides as a last resort. Healthy, well maintained plants are much less susceptible to disease. If a plant is in the wrong exposure, in the wrong kind of soil, or is over or under watered or fertilized, diseases are more likely to result. In some instances, removal of the affected portions of the trees/shrubs (leaves and/or branches) is the best defense. The first line of defense may be to replace the plant with one better suited to the site. Mechanical controls, such as handpicking, water jets, barriers such as Tree Tanglefoot, and biological controls such as Bacillus thurengiensis can often reduce a pest population. Bacillus thuringiensis (BT) is one of several pathogenic bacteria registered for use on edible plants in the United States. It reproduces only in the digestive tracts of caterpillars and is harmless to humans and all other wildlife, including earthworms, birds, and mammals. It is exceptionally
resistance to drought. Applications of mycorrhizal inoculum should be applied at the prescribed application rate, per the manufacturer’s written recommendations.
10.4 Weeding
The best weed control in ground cover areas is to keep the planting healthy and actively growing so as to establish complete coverage as soon as possible. If there is no ground cover, often a weed control fabric can be laid, and covered with bark mulch or gravel. This should be done using a header board or pavement to keep the bark from spilling onto walkways or streets. The bark or gravel should not be at a higher grade than the surrounding walkway. Shrubs and trees can be planted in holes in the fabric. Fabrics which are available today allow air and water to pass through to the soil. Do not use impermeable plastic sheeting.
A mulch of bark or gravel without weed control fabric can also be used, although weed control will not be as thorough with this method. The high initial cost of the fabric may be justified in many situations by subsequent savings in labor costs, since less hand weeding and /or spraying will be needed. Clear plastic sheeting, however, may be used as a pre-emergent weed control method in warm weather if there is sufficient time. This technique will also kill many soil borne diseases and pests. The area is watered to promote germination and then 1 to 4 mil. clear sheeting is laid and secured, typically by burying the edges in a trench, and/or gluing strips together with heat resistant glue. Avoid air pockets. The weed seeds and seedlings are cooked by the sun. The sheeting should be left in place for four to six weeks. June and July are the best months for this, but good results may be obtained from May through September, depending on the weather. This method can be used on areas where turf grass has been removed. Another control method before planting is to encourage weed growth by watering, and then rototill or cultivate into the soil before any flowering occurs (this method is not as effective with turf removal areas).
Weeds in ground cover areas can usually be controlled with hand-weeding. It is important to do this frequently enough that weeds do not have a chance to go to seed. If weeds are young when this is done, they can often be left in the planting bed to decompose (common Bermuda grass is an exception to this). If there is a persistent problem, this method

88 THOUSAND OAKS PLANTING & MAINTENANCE MANUAL
effective against a wide range of caterpillars, such as tomato hornworms and fruitworms, cabbage worms and loopers, grape leaf rollers, corn borers, cutworms, fall webworms, and tent caterpillars. It is mass-produced and sold in a powdered spore form at nurseries and garden supply stores under the trade names of Dipel, Biotrol, and Thuricide. The powder is mixed with water and applied as a spray.
Sprays such as dormant oil, sulfur fungicides, pyrethrum and rotenone should be tried as the next line of defense. Only if these fail should stronger pesticides be used. If pesticides must be used regularly over a long period of time in an area, it is best if several different chemicals can be alternated so that the insect population does not become immune to the effects of any one insecticide.

90 THOUSAND OAKS PLANTING & MAINTENANCE MANUAL
11 Turf
This chapter describes what kind of environment turf should be restricted to, and details all turf maintenance practices.
11.1 Appropriate Places for Turf
Turf is a high maintenance ground cover that requires a great deal of water, fertilizer, and labor in mowing. Its use is therefore best in park areas where people will need a surface to walk, play, and lie on, and in high-visibility public areas. Its use should be eliminated in sidewalk and median strips and other areas where another ground cover or design approach would be more economical and water conserving. No lawn is to be planted in medians, except as indicated in the Forestry Master Plan. Existing lawn in medians should be removed and replanted with drought tolerant ground covers from the recommended list. (See Forestry Master Plan Volume 2). Many communities and water districts in California have passed regulations limiting turf in new landscape designs to no more than 20 to 25% of the total square footage of landscaped area. When new turf is installed, consideration should be given to the more drought-resistant tall fescue or Bermuda grass.
When trees are planted in a lawn, it is best to have an area around the trunk which is mulch rather than turf. A square 3ft. by 3ft. or 3-ft diameter circle can be edged with a headerboard, railroad ties or other methods. This prevents mower damage to the trunk of the tree, and keeps the lawn from competing with the tree for nutrients when the tree is young. Installing mowing strips is also recommended. It is an excellent labor saving device, as it makes mowing and edging much easier next to buildings and planting beds, and helps keep grass out of other landscaped areas.
11.2 Maintenance
Mowing
Generally mowing at the higher rather than lower end of a grass species’ tolerance is preferred, to help shade the roots and soil from the sun. Grass mowed short will usually need more water and fertilizer than the same stand mowed higher.
Do not allow the turf to exceed twice the recommended mowing height before cutting it. Cutting only a third of the existing blade is even better. If this practice is followed, the clippings can be left on the lawn without contributing to thatch build up. Avoid mowing turf when the soil is very wet, since the machinery wheels will cause ruts and compaction. Keep mower blades sharp. Dull blades will tear the grass and cause a brown, burned look to the top of the grass blades.
Irrigation
The evapotranspiration rate in the Thousand Oaks area is about 1” to 1-1/4” a week in the summer, and 3/4” to 1” a week in the cooler months of the dry season. The ability of turf to withstand less water than this varies with the type of grass. The soil should be replenished to a depth of 6” to 8” to promote deep rooting. A soil probe can be helpful in determining the depth and adequacy of watering. It is preferable to water two or three times a week rather than every day. Daily lawn waterings can promote fungus diseases and soil compaction.
As with shrub watering, early morning is preferable to evening watering to prevent fungus diseases. Short multiple cycles can be used on an automatic controller to prevent runoff. Lawns usually should not be valved together with shrub areas, because of different watering needs. In some cases the use of a wetting agent such as Aqua-gro may help a lawn which is browning out despite what seems to be a good watering and maintenance program. This may be helpful if the soil is very compacted, or has poor drainage, or stratified layers (where water will not move downward from one layer to another).
Fertilizing
Slow release fertilizer gives a more even supply of nutrients to the lawn, does not burn the turf when applied, and reduces labor costs since it does not need to be applied as often. Milorganite or other sewage sludge products, cottonseed meal, or other organic fertilizers are excellent slow release fertilizers which do not leach large amounts of nitrates into the ground water. They can be applied twice a year, in early spring and early fall. Fertilization can be combined with aeration at these times. Over-fertilizing turf can weaken it and encourage diseases.
CHAPTER 11. TURF

91
Aeration
Turf tends to get compacted from frequent waterings and use. Aeration should be done twice a year in problem areas, in early spring and early fall. Manual or piston type aerators can be used for small areas, with roller types for larger areas. If manual types are used, do not use a tool which only pokes holes in the ground. The aerator should remove cores of soil. Fertilization can be done after aeration, and a top dressing of compost or other organic material applied at that time. In areas of particularly heavy pedestrian traffic, or where light vehicle use may be necessary, a porous pavement system such as “grass-cel” or “Ritter rings” is recommended.
Thatching
Thatch is a buildup of dead plant material just above the soil surface. It tends to prevent water and air from infiltrating the soil, and needs to be removed whenever it becomes a problem. When the thatch is 3/4” thick or more, dethatching should be performed in the spring or fall with a vertical power mower. No more than 1/4” of thatch should be left. Usually aeration is done first, then thatching, and then fertilization.
Weed Control
When lawns receive proper care, weeds should not be a major problem. Proper mowing height, fertilization, thatch control and aeration, and infrequent deep waterings should enable turf to compete successfully with weeds. If herbicides must be used, they should be chosen for their ability to selectively kill the offending weeds. A specific program should be designed for each problem.
Spraying should be done when there is no wind and no people around, and protective clothing should always be worn. Herbicides should not be applied if the temperature is above 80 degrees, as they may burn the grass. Herbicides can be mixed with a sticker-spreader to help insure proper application. The manufacturer’s instructions may advise that the lawn not be watered for a period after application, until the chemical is taken up by the plants. For large areas, a tractor-drawn sprayer can be used more efficiently than a hand sprayer.
Pest and Disease Control
Fungus diseases are the most common problem of lawns. Given good cultural practices, they will most frequently occur in lawns planted in heavy shade, or in areas where maturing trees or new buildings have increased the amount of shade. The turf is usually weakened in these areas, and there is usually too much moisture in the soil. There are also some fungus diseases which are encouraged by periods of drought followed by watering. Also, if soil acidity is too high, with pH below 6.0, fungi are encouraged and turf is weakened. Drainage problems will also need to be corrected in order to control fungus diseases. If spraying is necessary, follow the same precautions noted about herbicides
The same precautions should be followed if spraying for insect control is necessary. Significant insect damage in lawns is almost always a sign that cultural practices need to be adjusted.
11.3 Types of Turf for Thousand Oaks
The grasses recommended for Thousand Oaks are Bermuda grass and tall fescue. Following is a comparison of the characteristics of these grasses.
Drought tolerance
• Hybrid Bermuda - highest
• Common bermuda - high
• Tall fescue - moderate
Heat tolerance
• Hybrid Bermuda – high
• Common Bermuda – high
• Tall fescue – moderate

92 THOUSAND OAKS PLANTING & MAINTENANCE MANUAL
Disease incidence
• Hybrid Bermuda – low to moderate
• Tall fescue – low to moderate
• Common Bermuda – low
Shade tolerance
• Tall fescue – moderate
• Hybrid Bermuda – low
• Common Bermuda – low
Wear resistance
• Hybrid Bermuda – high
• Tall Fescue – high
• Common Bermuda – high
Overall maintenance cost and effort
• Hybrid Bermuda – high
• Tall fescue – low
• Common Bermuda – low
Cold tolerance
• Tall fescue – moderate
• Common Bermuda – low
• Hybrid Bermuda – low (harder than common Bermuda to overseed)
Texture
• Tall fescue – coarse
• Common Bermuda – moderately fine
• Hybrid Bermuda – fine
Mowing height adaptation
• Tall fescue – high cut, ½” to 2”
• Common Bermuda – low cut, ½” to ¾”
• Hybrid Bermuda – very low cut, ¼” to ½”
Nitrogen fertilizer requirement
• Hybrid Bermuda – high
• Common Bermuda – moderate
• Tall fescue – low to moderate


94 THOUSAND OAKS PLANTING & MAINTENANCE MANUAL
12 Bee City USA Advocacy
It is currently the desire of the City of Thousand Oaks to explore participation (when deemed feasible) in the Bee City USA program. This program endorses a set of commitments for creating sustainable habitats for pollinators. Some of these commitments will guide landscape maintenance practices.
Bee City USA affiliates strive to:
• Provide diverse and abundant pollinator food sources (nectar and pollen from blooming plants) that bloom in succession from spring to fall.
• Provide water for drinking, nest-building and cooling, diluting stored honey, and butterfly “puddling.”
• Build your habitat with mostly, if not all, native species of grasses, perennials, shrubs and trees. *Many native pollinators prefer or depend on the native plants with which they co-evolved for millions of years.
• Provide undisturbed spaces (leaf piles, unmowed fields, fallen trees) for nesting and overwintering for native pollinators.
• Use pesticide-free materials and source plants from nurseries that do not treat seeds with neonicotinoid pesticides, which permeate the entire plant and remain active for as much as years in woody plants. *Not all retailers reveal pesticide treatments on plant labels; sometimes a plant may be labeled “bee-friendly” even though it was treated with a neonicotinoid- (systemic) pesticide.
• Provide for safe and humane removal of honey bees when required.
• Raise pollinator awareness by designating pollinator zones in public spaces with explanatory signage.
CHAPTER 12BEE CITY USA ADVOCACY