city of philadelphia · • register with the city of philadelphia by completing an online...
TRANSCRIPT

CITY OF PHILADELPHIA
Seller Administrator User Guide Maintaining PHLContracts Vendor Information

Maintaining PHLContracts Vendor Information
Table of Contents Working With the PHLContracts Procurement System ................................................... 1
Overview of the PHLContracts Vendor Portal ................................................................. 1
Vendor Roles and Activities ............................................................................................ 1
Responsibilities of the Seller Administrator Role ............................................................. 2
Responsibilities of the Seller Role ................................................................................... 3
Maintaining Company Information ................................................................................... 3
Maintaining General Company Information ............................................................................. 3
Creating a BidSync Account ................................................................................................... 5
Maintaining Emergency Vendor Information ........................................................................... 6
Adding & Maintaining Attachments to Vendor Profile .............................................................. 7
Adding & Maintaining Company Addresses ............................................................................ 7
Maintaining Categories & Certification Information ................................................................10
Maintaining Commodity & Service Codes ..............................................................................14
1. Select Individual NIGP Class and Item Combinations ...................................................15
2. Select from a NIGP Class List .......................................................................................17
3. Use NIGP Keyword Search ...........................................................................................18
Adding System Users .................................................................................................... 20
Step 1. Select Add Users on This Account ........................................................................20
Step 2. Enter and Save User Information ..........................................................................21
Step 3. Advise New User of their Login Information ..........................................................21
Resetting User Passwords ............................................................................................ 22
Step 1. Select Maintain Users on This Account .................................................................22
Step 2. Select the User Record Maintain ..........................................................................22
Step 3. Edit the User’s Record ..........................................................................................23
Step 4. Advise User of their Login Information ..................................................................23
Set-Up Associated Organizations ................................................................................. 24
Appendix A – PHLContracts Navigation Overview ........................................................ 27
Header & Navigation Bars .....................................................................................................27
NIGP Code Browse ...............................................................................................................27
My Account ...........................................................................................................................28
Red and Yellow Error Messages ...........................................................................................28
Appendix B – Frequently Asked Questions ................................................................... 29

Maintaining PHLContracts Vendor Information
For additional information on Seller Administrator functions, please refer to the Seller Administrator’s Guide available by clicking the Help icon (question mark) located in the upper right portion of the main user menu.

Maintaining PHLContracts Vendor Information
1
Working With the PHLContracts Procurement System
Overview of the PHLContracts Vendor Portal The City of Philadelphia Procurement system (PHLContracts) is powered by Periscope Holdings Inc.’s BuySpeed software, an Internet-enabled application that provides decentralized purchasing functionality specifically designed for government agencies.
The PHLContracts Vendor Portal allows sellers (vendors) of goods and services to:
• Register with the City of Philadelphia by completing an online application and Consent and Authorization Agreement
• Maintain their organization information
• Maintain information on commodities and services they offer
• Maintain information on certifications and categories they belong to
• View bid opportunities indexed by commodity and service then respond electronically online
• View active contracts and search contracts and bids
• View purchase orders (contracts) sent to them
• Receive procurement news and information directly from the City
Vendor Roles and Activities Registered vendor users are assigned one of two roles in the PHLContracts system:
Seller Administrator Organizational maintenance focus Seller Purchasing information focus
Important concepts related to vendors and vendor users:
• Our goal is for vendors to use the PHLContracts system to initially register and to maintain their organizational information *
• Vendors must complete their registration and maintain ‘Active’ status in order to be eligible to submit responses to City bids.
Maintaining PHLContracts Vendor Information
2
• Seller Administrators can perform all of the Seller role functions
• Registered vendor organizations may have multiple Seller Administrators and multiple Sellers
• The individual who initially registers their organization in PHLContracts will by default be assigned the Seller Administrator role
• Each vendor organization must maintain at least one individual assigned the Seller Administrator role
* As part of the initial roll out of the PHLContracts system, vendors with active and recent purchase orders will be automatically registered in the system. Please refer to additional user guides related to ‘Migrated Vendors’ for specific information on what these vendors need to do to complete required organization information, including submitting the Consent and Authorization Agreement.
Responsibilities of the Seller Administrator Role Seller Administrators should be prepared to perform the following tasks:
• Maintain vendor organization information including:
o Company general profile
o Ensure the organization’s Consent and Authorization Agreement (“Agreement”) is completed and uploaded to the organization’s profile. The Agreement can be found by clicking here
o Address information
o Commodity and service information
o Certification and category information
• Manage access to the PHLContracts system for company representatives, including Sellers and other Seller Administrators
• Review Vendor News and Vendor Alerts issued by the City of Philadelphia through the PHLContracts system
Seller Administrators should refer to the Seller Administration User Guide available by clicking the Help icon (question mark) located in the upper right portion of the main user menu. Additional questions may be directed to the City of Philadelphia Procurement Customer Service Representatives at (215) 686-4755 / (215) 686-4720 or by email at [email protected].

Maintaining PHLContracts Vendor Information
3
Responsibilities of the Seller Role Sellers should be prepared to perform the following tasks:
• Regularly access the PHLContracts system to review available bids
• Respond with quotes and other requested information required by City buyers to conduct procurements and purchases
Sellers should refer to the Seller User Guide available by clicking the Help icon (question mark) located in the upper right portion of the main user menu. Additional questions may be directed to Procurement Customer Service at (215) 686-4755 / (215) 686-4720 or by email at [email protected].
Maintaining Company Information Maintaining General Company Information For this example, we use a hypothetical vendor, ABC Supply whose Seller Administrator is Jack Lantern.
When Jack logs into PHLContracts, by default he will be in the Seller role as shown below.
In order to switch to the Seller Administrator role, he simply needs to click the Seller Administrator tab in the upper right corner of the screen.
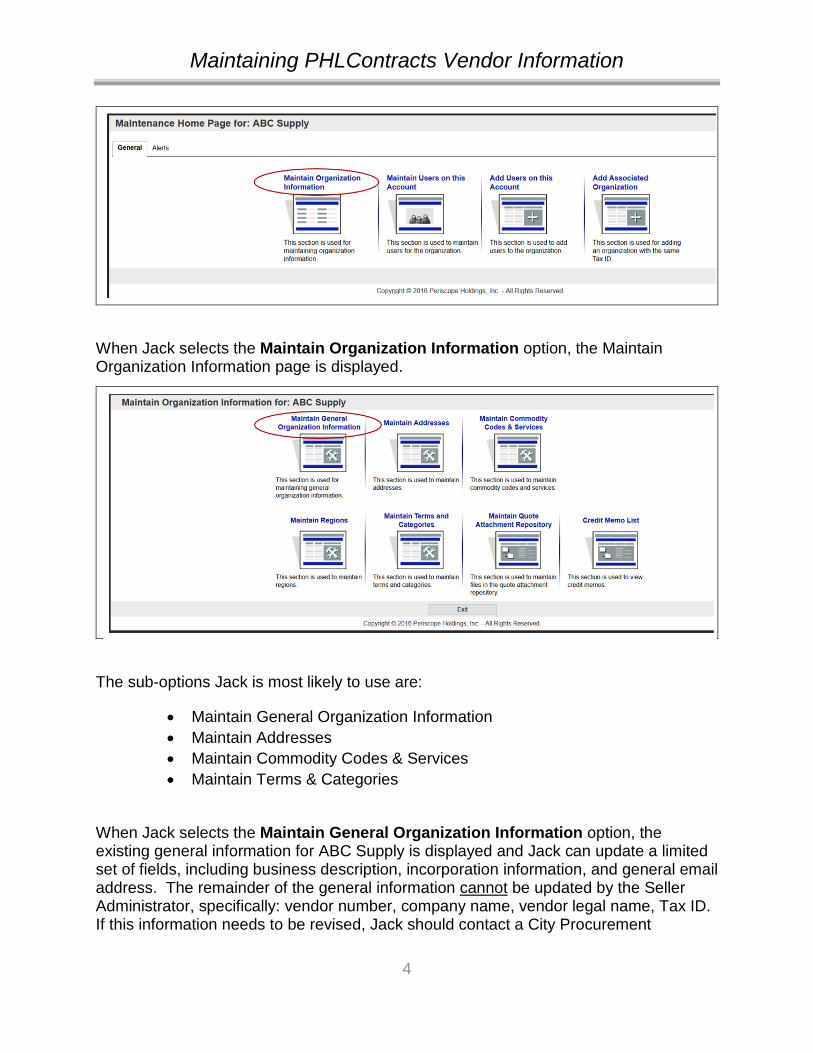
Below is the Maintenance Home page displayed when Jack switches to the Seller Administrator role. The Maintain Organization Information option contains several sub-options for specific types of vendor information.
Maintaining PHLContracts Vendor Information
4
When Jack selects the Maintain Organization Information option, the Maintain Organization Information page is displayed.
The sub-options Jack is most likely to use are:
• Maintain General Organization Information • Maintain Addresses • Maintain Commodity Codes & Services • Maintain Terms & Categories
When Jack selects the Maintain General Organization Information option, the existing general information for ABC Supply is displayed and Jack can update a limited set of fields, including business description, incorporation information, and general email address. The remainder of the general information cannot be updated by the Seller Administrator, specifically: vendor number, company name, vendor legal name, Tax ID. If this information needs to be revised, Jack should contact a City Procurement

Maintaining PHLContracts Vendor Information
5
Customer Service Representative at (215) 686-4755 / (215) 686-4720 or email [email protected].
Creating a BidSync Account BidSync is an integrated seller network that is linked to the PHLContracts system. The network allows sellers to be notified of bidding opportunities with other public sector organizations: a network comprised of over 900,000 seller organizations. Opting into the BidSync network is NOT REQUIRED of PHLContracts vendors; however, the network may provide benefits to vendors.
First, even with a non-paid subscription to BidSync, vendors will receive periodic notifications of bidding opportunities with other public sector organizations. Further, a number of large national vendors use the BidSync network to search for subcontractors and partners. For PHLContracts vendors who possess special certifications (e.g., MBE, WBE, MWBE, DSWBE, SBE), becoming part of the BidSync network may provide additional opportunities to work with prime vendors across the network.

Maintaining PHLContracts Vendor Information
6
When a PHLContracts vendor registers with BidSync, they are likely to be contacted in the future by BidSync to expand their account to a paid service (with a greater number of identified opportunities). This service is not related in any way to their relationship with the City of Philadelphia.
If a PHLContracts vendor would like to opt into the BidSync network, they may simply click on the icon shown below.
The vendor can either register from scratch or link their existing PHLContracts vendor account to BidSync. Simply follow the instructions that follow through the links in order to register, provide information on certifications, select types of opportunities your company is interested in being notified about, etc.
Maintaining Emergency Vendor Information Vendors who anticipate providing product and services on an emergency basis should complete the Emergency Supplier fields):
• Emergency Supplier check button (yes or no – default)
• Emergency Phone Number*
• Emergency Contact Name*
• Emergency Email*
• Emergency Info Comment Note: Fields which are required if ‘Emergency Supplier’ is checked (Yes) are identified with an asterisk
Emergency Supplier information may be added/revised at any time by the Seller Administrator.

Maintaining PHLContracts Vendor Information
7
Adding & Maintaining Attachments to Vendor Profile Jack can add forms and attachments to ABC Supply’s company profile. Use of forms is explained in another User Guide. Examples of attachments include scanned copies of signed documents, certificates, and licenses. The process of uploading attachments is intuitive. All common file types may be uploaded as attachments.
When attachments are added to your vendor profile, you may choose to make certain files confidential. When you make an attachment confidential, it may only be viewed and used by City personnel.
Based on the nature of business that a vendor does with the City, certain attachments are required to be added to a vendor’s profile. However, all vendors using PHLContracts.phila.gov, must complete and submit the Consent and Authorization Agreement.
When finished, Jack clicks on the Save & Exit button to return to the previous option menu.
Adding & Maintaining Company Addresses PHLContracts allows vendors to add and maintain three types of addresses:

Maintaining PHLContracts Vendor Information
8
1. General/Corporate Mailing Address (only one may be specified)
2. Remit Addresses (for payments to the vendor from the City)
3. Sales Addresses (for shipment of documents to vendors during the bidding process, etc.)
To add or modify an existing address, follow the steps below. From the main maintenance page, click on Maintain Addresses.
When you select the Maintain Addresses menu option, a list of your company’s current addresses will be displayed (both active and inactive addresses are shown).
You can select one of the existing addresses to review, revise, or inactivate by clicking on the Address Name, or select the Add Another Address button to create a new address.
Vendors may have multiple Remit and Sales Addresses. If a vendor has more than one active address for any type, one of those addresses should be selected as ‘Default’.

Maintaining PHLContracts Vendor Information
9
Below is an example of the page provided for entering a new address. You would select the Address Type (Sales or Remit) and enter the required information for this address. Note that the current default address for the Remit Address type is listed. You can choose to retain this as the default address for this type or set the new address as the default type.
The list of ABC Supply’s addresses now reflects a new sales address. We did not have to designate this sales address as the primary remit address because it is the only sales address specified for ABC Supply.
Maintaining PHLContracts Vendor Information
10
Click the Add Another Address button to add another address, or click Exit if you have completed all address changes
Maintaining Categories & Certification Information Vendor Category and Certification information is important to the City and to Vendors because it specifies characteristics about the vendor which are used to determine eligibility for certain types of procurements or purchases. As you will see in the table below, updates to most of the vendor categories are restricted to City of Philadelphia Vendor Administrators (Procurement Department personnel). However, vendors are encouraged to input information on certain categories and their related certifications.
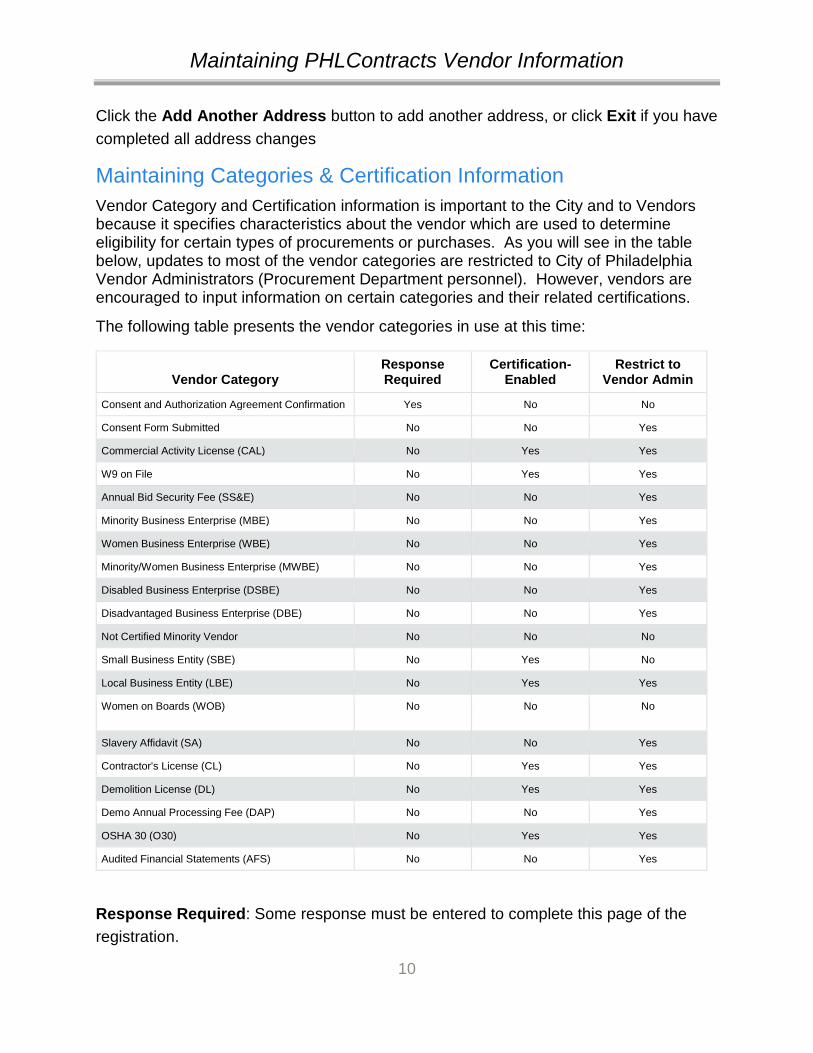
The following table presents the vendor categories in use at this time:
Vendor Category Response Required
Certification- Enabled
Restrict to Vendor Admin
Consent and Authorization Agreement Confirmation Yes No No
Consent Form Submitted No No Yes
Commercial Activity License (CAL) No Yes Yes
W9 on File No Yes Yes
Annual Bid Security Fee (SS&E) No No Yes
Minority Business Enterprise (MBE) No No Yes
Women Business Enterprise (WBE) No No Yes
Minority/Women Business Enterprise (MWBE) No No Yes
Disabled Business Enterprise (DSBE) No No Yes
Disadvantaged Business Enterprise (DBE) No No Yes
Not Certified Minority Vendor No No No
Small Business Entity (SBE) No Yes No
Local Business Entity (LBE) No Yes Yes
Women on Boards (WOB) No No No
Slavery Affidavit (SA) No No Yes
Contractor's License (CL) No Yes Yes
Demolition License (DL) No Yes Yes
Demo Annual Processing Fee (DAP) No No Yes
OSHA 30 (O30) No Yes Yes
Audited Financial Statements (AFS) No No Yes
Response Required: Some response must be entered to complete this page of the registration.

Maintaining PHLContracts Vendor Information
11
For example, the “Consent and Authorization Agreement Confirmation” category is a required field. Upon selecting “Yes” the Seller Administrator agrees to upload the completed Agreement form to the organization’s profile. The Agreement can also be submitted as an attachment to the first quote submitted by a vendor in PHLContracts.
Failure to complete, sign, and submit the Consent and Authorization Agreement (“Agreement”) will result in any quote submitted by a vendor being deemed non-responsive. The Agreement can be found at www.phila.gov/procurement.
Certification Enabled: Vendor must provide documentation of eligibility for this category designation by a recognized authority.
Restricted to Vendor Administrator: Only the Vendor Administrator can enter the selection (upon receipt of certification documentation or document).
PHLContracts allows vendors the ability to update the values of certain vendor categories and to add supporting certification information to the vendor category.
In order to view and update vendor categories and certification, click on the Maintain Terms and Categories menu option.
When you enter the page, review all of the values on your company’s profile. If you need to modify a value (e.g. Yes), you can simply click the check box. If you determine that a value on your profile is incorrect and you cannot edit it, contact Procurement Customer Service at (215) 686-4755 / (215) 686-4720 or [email protected] for assistance.

Maintaining PHLContracts Vendor Information
12
For certain vendor categories (e.g., Small Business Entity), the Seller Administrator should add related certification information (e.g., a license or certification from an authorized organization). If a category is shown with an Add Certification option, click the link and enter the appropriate information on the certification (e.g. licensing information).
A typical certification will look like this when the link is clicked.
Based on the entity that issued the Certification, use the scroll down menu to select the appropriate source (e.g., Small Business Administration). Then input the ID of the Certification. In most cases, this will be a license number or certification or authorization tracking number issued by the certifying agency.
Maintaining PHLContracts Vendor Information
13
Finally input the beginning (effective) and end (expiration) date of the certification. If the certification does not have an end date, input 1/1/2025.
Once you have completed inputting information on the certification, click Save & Exit. Now this certification information will be reflected under the related category.
You may also want to provide documentation that substantiates the certification information on your company profile. To add a copy of a license, certification from an authorized organization (e.g., US Small Business Administration), or other supporting documentation, navigate to the Maintain General Organization Information page and upload the Attachments there.

Maintaining PHLContracts Vendor Information
14
Maintaining Commodity & Service Codes
Select the Maintain Commodity Codes & Services menu option to receive a list of your organization’s current Commodity Code selections. Another option is to display inactive Commodity Codes).
The current list of ABC Supply’s selected Commodity Codes is displayed as follows.

Maintaining PHLContracts Vendor Information
15
Jack can deactivate codes from this list by checking the Deactivate box preceding the line and clicking the Deactivate Selected Items button.
Jack can add additional codes by clicking the Add Additional Codes button.
The process for adding additional codes is the same as explained for initial registration. There are three techniques for selecting and adding codes:
1. Select Individual NIGP Class and Item Combinations The first method is to select individual NIGP Classes and Class Items using the Class and Item drop down lists. Select Class Code 052 ‘Art Objects’ from the NIGP Class drop down list.
Then, select the NIGP Class Item 76 ‘Recycled Art Objects’ from that drop down list because ABC Supply supplies recycled arts to institutions and governments.

Maintaining PHLContracts Vendor Information
16
Save this specific product/service to ABC Supply’s profile by checking the box preceding it and pressing the Save and Add More button. Repeat this process, selecting individual codes, but could also select multiple codes at a time.

Maintaining PHLContracts Vendor Information
17
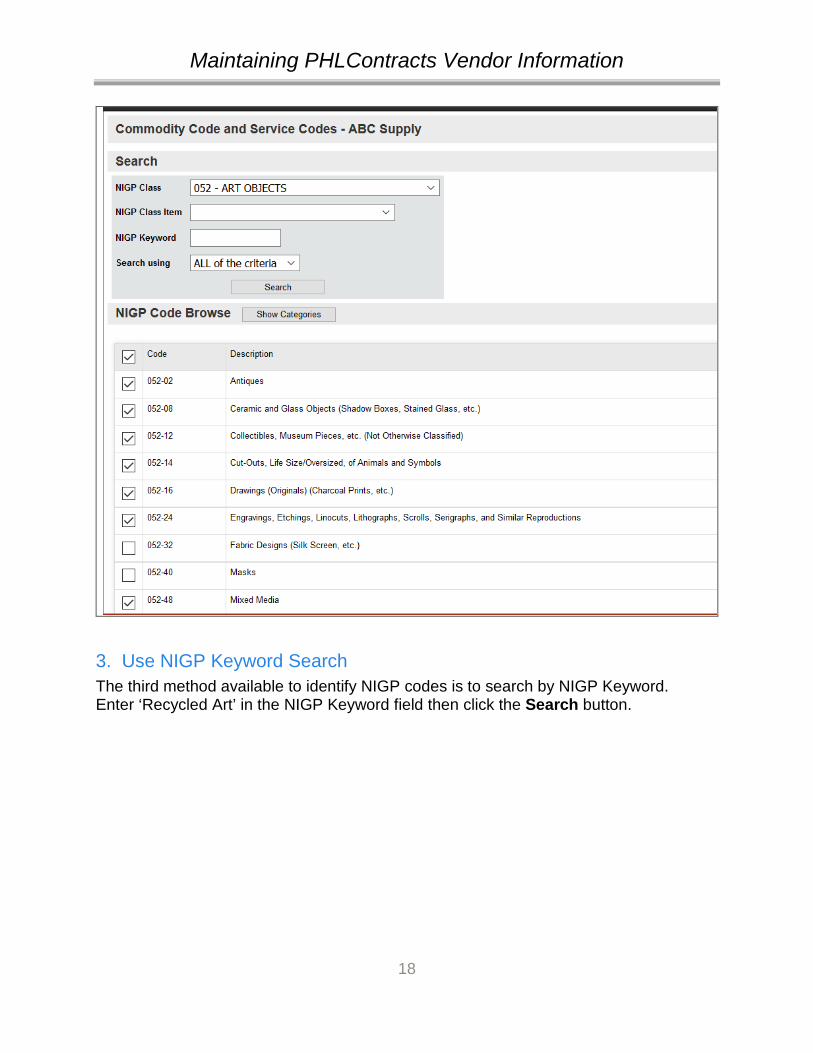
2. Select from a NIGP Class List In the second method, you select the NIGP Class 052 – Art Objects, which returns a list of all NIGP Class Items within that class. You can select multiple items or all items within that class list by checking the boxes.
These selections must be saved before you go on to identify more codes (Save and Add More).
Maintaining PHLContracts Vendor Information
18
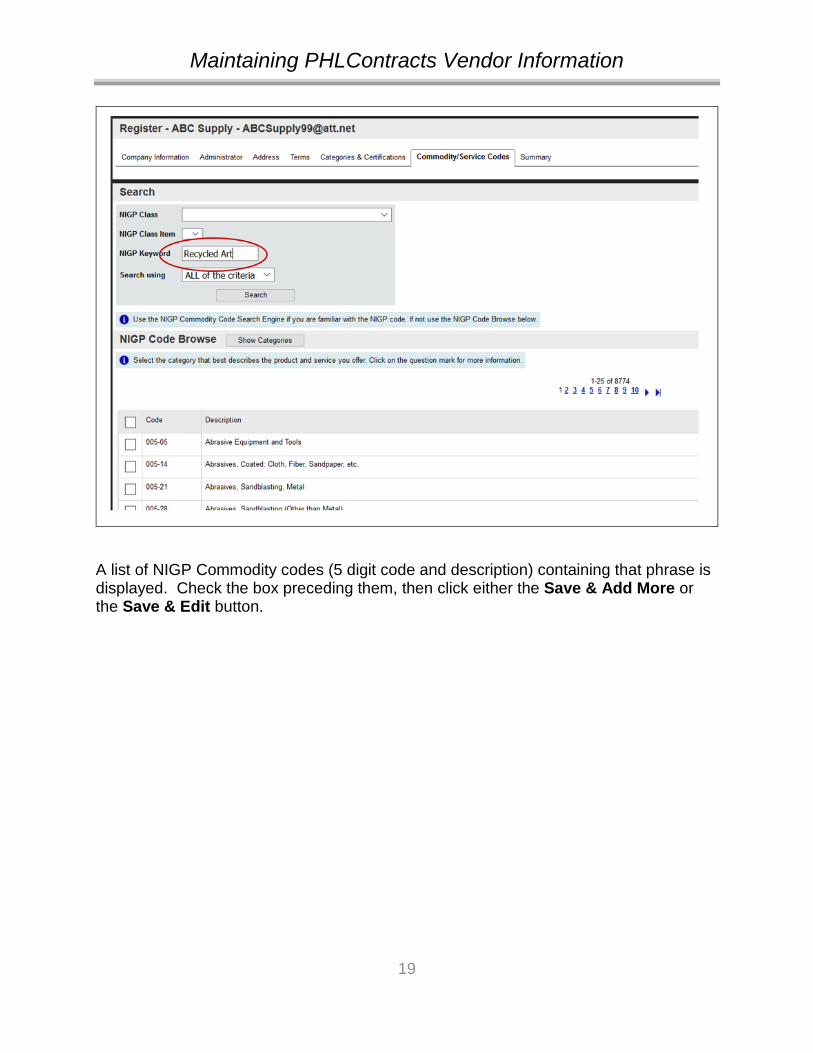
3. Use NIGP Keyword Search The third method available to identify NIGP codes is to search by NIGP Keyword. Enter ‘Recycled Art’ in the NIGP Keyword field then click the Search button.
Maintaining PHLContracts Vendor Information
19
A list of NIGP Commodity codes (5 digit code and description) containing that phrase is displayed. Check the box preceding them, then click either the Save & Add More or the Save & Edit button.
Maintaining PHLContracts Vendor Information
20
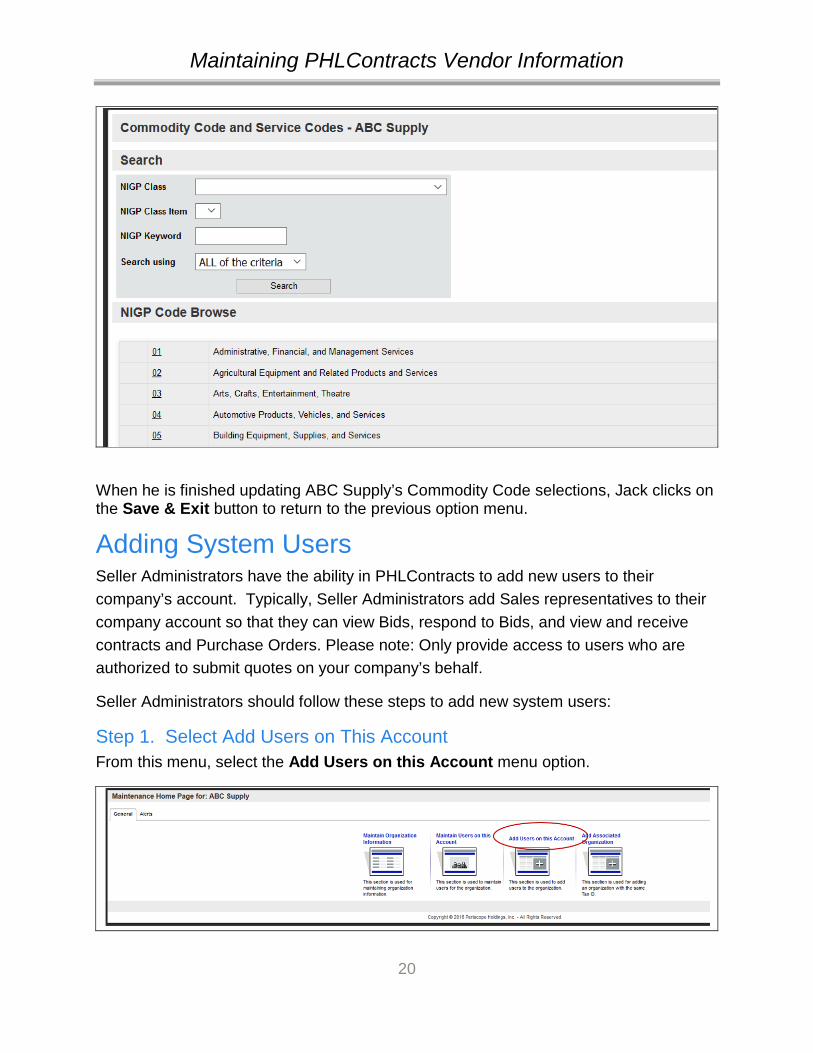
When he is finished updating ABC Supply’s Commodity Code selections, Jack clicks on the Save & Exit button to return to the previous option menu.
Adding System Users Seller Administrators have the ability in PHLContracts to add new users to their company’s account. Typically, Seller Administrators add Sales representatives to their company account so that they can view Bids, respond to Bids, and view and receive contracts and Purchase Orders. Please note: Only provide access to users who are authorized to submit quotes on your company’s behalf.
Seller Administrators should follow these steps to add new system users:
Step 1. Select Add Users on This Account From this menu, select the Add Users on this Account menu option.

Maintaining PHLContracts Vendor Information
21
Step 2. Enter and Save User Information A page containing general information fields for a new user is displayed. The required fields are:
• First Name* • Last Name* • Job Title* • Phone Number* • Email Address* • Login ID* • Password* / Confirm Password* (this is the temporary password) • Login Question* (select from dropdown list) • Login Answer* • Role(s)* (in this example the new users is being assigned the Seller role)
Note: Fields highlighted with an asterisk are required Login IDs must be from 6 to 100 characters long and are not case sensitive.
The temporary password buysp55d! should be entered in both the Password and Confirm Password fields.
Once you have entered and reviewed the user information, click the Save & Exit button to complete the transaction.
Step 3. Advise New User of their Login Information Donald Leeds should be notified and given the temporary password to use to log in. He will be prompted to select a new password upon log in.
Passwords must conform to the following format and are case sensitive:
• Must be between 6 and 15 characters • Must include both alpha and numeric characters
Maintaining PHLContracts Vendor Information
22
• Must include at least one special character (e.g., #, @, %, $, !)
Additional requirements for passwords:
• Passwords must be changed every 180 days • A password cannot be reused until 5 other passwords have been used • After 4 unsuccessful attempts to login, the account will be locked
Resetting User Passwords Seller Administrators should follow these steps to reset one of their organization’s users’ password.
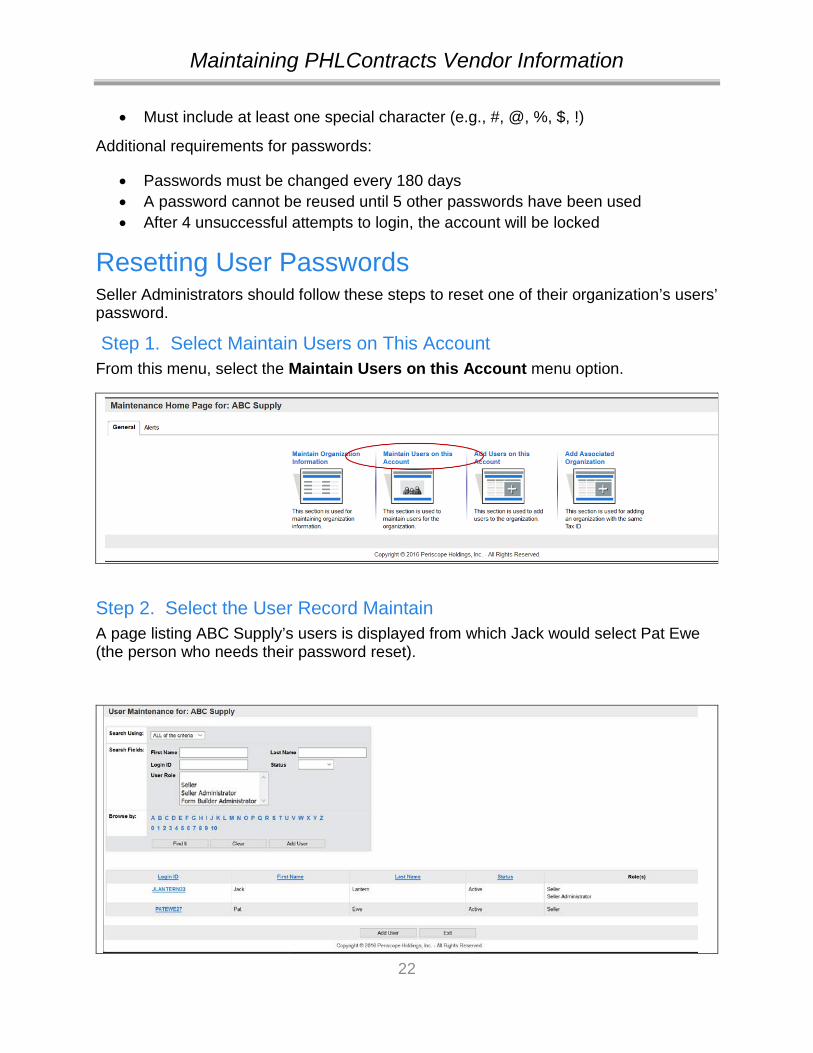
Step 1. Select Maintain Users on This Account From this menu, select the Maintain Users on this Account menu option.
Step 2. Select the User Record Maintain A page listing ABC Supply’s users is displayed from which Jack would select Pat Ewe (the person who needs their password reset).
Maintaining PHLContracts Vendor Information
23
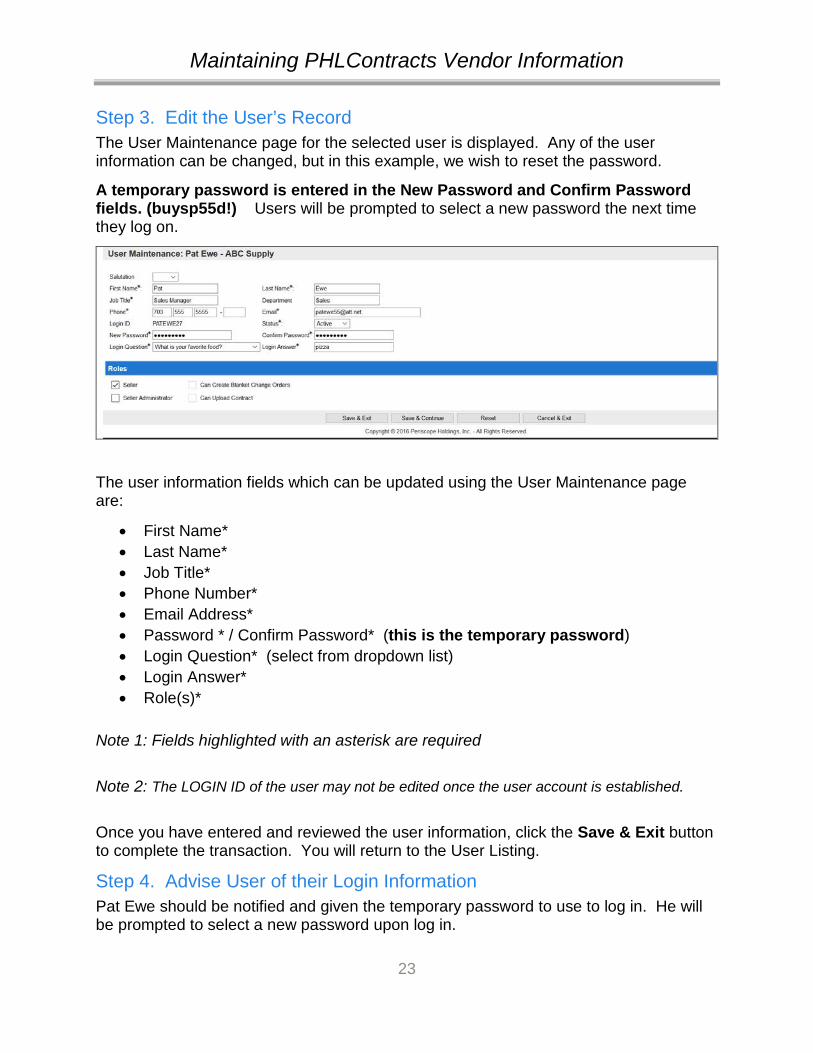
Step 3. Edit the User’s Record The User Maintenance page for the selected user is displayed. Any of the user information can be changed, but in this example, we wish to reset the password.
A temporary password is entered in the New Password and Confirm Password fields. (buysp55d!) Users will be prompted to select a new password the next time they log on.
The user information fields which can be updated using the User Maintenance page are:
• First Name* • Last Name* • Job Title* • Phone Number* • Email Address* • Password * / Confirm Password* (this is the temporary password) • Login Question* (select from dropdown list) • Login Answer* • Role(s)*
Note 1: Fields highlighted with an asterisk are required Note 2: The LOGIN ID of the user may not be edited once the user account is established. Once you have entered and reviewed the user information, click the Save & Exit button to complete the transaction. You will return to the User Listing.
Step 4. Advise User of their Login Information Pat Ewe should be notified and given the temporary password to use to log in. He will be prompted to select a new password upon log in.

Maintaining PHLContracts Vendor Information
24
Passwords must conform to the following format and are case sensitive:
• Must be between 6 and 15 characters • Must include both alpha and numeric characters • Must include at least one special character (e.g., #, @, %, $, !)
Additional requirements for passwords:
• Passwords must be changed every 180 days • A password cannot be reused until 5 other passwords have been used • After 4 unsuccessful attempts to login, the account will be locked
Set-Up Associated Organizations For vendors who have associated organizations, such as Doing Business As (DBA) or multiple locations sharing the same central ownership (legal entity), PHLContracts provides an option on the Seller Administrator Home page which allows them to request the DBA vendor to register and be associated with the “parent” vendor profile. Associated businesses can participate in procurement transactions independently, but share common Tax ID and remit addresses. DBA vendors are required to submit their own Consent and Authorization Agreement.
When the Seller Administrator clicks on the Add Associated Organization option, an https://www.google.com/email screen appears. The Seller Administrator enters the email address for the DBA vendor and a message in the Text field onscreen.

Maintaining PHLContracts Vendor Information
25
The email address the request is directed to will receive an email which looks like the following:
When the second business organization follows the web link provided, they will complete the registration process and be automatically linked to the ‘inviting’ organization. The Tax ID of the associated organization should not be edited by the user.
From: [email protected] Date: Fri, Aug 5, 2016 at 12:20 PM Subject: ABC Supply requests you register with PHLContracts.
Please register a second branch of your organization. Use the link below to register with the City of Philadelphia, Procurement Department’s eProcurement system using the same tax ID as ABC Supply.
http://phlcontractsphila.gov/bso/external/vendor/regCompanyInfo.sdo?reg_code=UJ9Hk7NusfOq0PfoxFA-KH0XKOhNxqIPt1yBVMaaEmi9wwty5qWa93RpPGufGTtZGmlsOzSbH2iwPAEBDfU&mode=init_new_vendor
Use this link to log on to PHLContracts Online: http://phlcontracts.phila.gov.

Maintaining PHLContracts Vendor Information
26
The page above shows the General Organization Information City of Philadelphia staff see for the DBA vendor. The information now includes the DBA of Vendor field, linking this vendor record to the main vendor record.
If City procurement staff use the Search option of the Vendor Lookup page and enter the Tax ID# 388447788, both businesses will appear in the list returned.
A ‘Best Practice’ to follow when establishing Associated Businesses is to use the EXACT same business name and append that name with a qualifier, such as shown in the example above. Good qualifiers include:
- City name example: NAPA Auto Parts – Flint Ridge Store - Region example: NAPA Auto Parts – East Store - Branch number example: NAPA Auto Parts – Store 112

Maintaining PHLContracts Vendor Information
27
Appendix A – PHLContracts Navigation Overview Header & Navigation Bars
The navigation menu allows you to move within the application and gives you access to open and closed bids, purchase orders, contracts, quotes and account maintenance. As you travel through the application, you will always see this menu at the top of each page.
Left Side
Right Side
There are several key icons in the navigation menu.
Access to the on-line help manual.
Log out of PHLContracts
NIGP Code Browse
The NIGP Code Browse link in the Header bar allows you to search commodity codes by Class and Class Item codes set up and maintained in your PHLContracts database.
Maintaining PHLContracts Vendor Information
28
My Account
The My Account link in the navigation menu allows you to keep your individual user profile current. Modifying your personal login information does not change your company’s general information with the agency. To maintain the overall organization information with an agency, you must have the role of Internal Administrator and must use the Maintain Agency Users functions.
Use the Edit button to update your personal information. You can change your title, contact information, as well as your login password and login security question and answer. You may also select the default tab that you wish to begin on once you log in and view your home page. You must enter your password for the changes to become effective.
NOTE: This is where you can change your PHLContracts password.
Red and Yellow Error Messages
PHLContracts has developed a series of messages that will display when data inside your document is not right, criteria are not met or when required fields are not properly filled out. Messages in yellow are errors that do not require any intervention. The document can continue the message is strictly for your information. Pop-up messages will also appear when required fields were left blank or invalid data was entered.
Maintaining PHLContracts Vendor Information
29
Appendix B – Frequently Asked Questions The follow are some typical questions often asked by vendors.
Can a User change his/her password?
Yes. Any currently logged in user can change his/her password by clicking on the My Account option on the upper menu bar. Click on the Edit Button next to the My Information heading. The user can edit general profile information as well as select a new password. Note: The current password must be entered at the bottom of the page.
Can a vendor change his/her login ID? / How can a vendor change his/her Login ID?
A vendor (Seller Administrator) can select the login ID for new user account when they originally create it. The login ID cannot be changed after that point. If you are unhappy with your login, the Seller Administrator can create a new Seller or Seller Administrator account and you can start using it (previous login ID can be inactivated).
Can a vendor have more than one Seller Administrator?
Yes. As many as they want but they must always have one active Seller Administrator.
What if I forget my login ID or Password?
If you are a Seller, contact your organization’s Seller Administrator. They can advise what your login ID is and can assign you a temporary password so you can login and assign a new password.
If you are a Seller Administrator (or are a Seller and cannot contact your Seller Administrator) you can contact the City Procurement Customer Service Representative and upon confirmation of your identity, can have a temporary password assigned so you can log in.
What are NIGP Commodity Codes and why is the City using them?
The NIGP Commodity/Services Code is an acronym for the National Institute of Governmental Purchasings' Commodity/Services Code. The NIGP Code is a coding taxonomy used primarily to classify products and services procured by state and local governments in North America.
There are two parts to the ‘why’ question. First, why employ a taxonomy at all? The City’s objective is to improve the matching of possible suppliers to product and service requirements. Allowing vendors to specify the products and services they provide via ‘codes’ allows the City buyers to identify possible suppliers of specific requirements more efficiently. The City is using NIGP because it is a leading taxonomy in use by governments. Vendors serving other state and municipal agencies may already somewhat familiar with NIGP.
What if a vendor registers but doesn’t select a Commodity Code?

Maintaining PHLContracts Vendor Information
30
A vendor’s registration is not complete until they have specified at least one select commodity code. Vendors are encouraged to specify several commodity codes to increase their chances of matching items included on a bid.
Why does the system tells me my Login ID or Password is incorrect?
If you use the ‘Remember Login / Password’ option of your operating system, you may find that it fills in information on the PHLContracts Login Page which does not match your PHLContracts account. You may need to clear out the prefilled information and enter your login ID and password.
Is there a downloadable ‘App’ available so I can access the system through my smartphone?
No. You do not need to use a downloadable App to access the City procurement system from your tablet or Smartphone. Any device which can access the internet from one of the supported web browsers (MS Internet Explorer, Google Chrome, FireFox, or Apple Safari) can access the system. Key vendor actions such as checking for bids, responding to bids, and viewing message, work well on smaller devices. Other functions requiring file attachments and spreads may require traditional devices.
How does a Vendor know if they are already registered in the City vendor database or if they need to register?
Here are two ways:
1. Use the Registered Vendor Search facility provided on the PHLContracts login page. The URL for this is: https://phlcontracts.phila.gov/bso/login.sdo
2. Start the registration process. If the system alerts you that the Tax ID you enter (the first step of the process) is already being used, then you know your organization is already registered. In this case you may just need to contact the person within your organization who is managing registration with the City (the Seller Administrator), or you can contact the City Procurement Customer Service Representative who can research your registration.
Will vendors be able to search through all available bids, even if they are not registered? Or have registered but do not match the Commodity Codes of that bid?
Yes. You do not need to be a registered vendor to use the Open Bids Search facility provided on the PHLContracts login page. The URL for this is https://phlcontracts.phila.gov/bso/login.sdo
You must be a registered vendor to be able to respond to open bids.

Maintaining PHLContracts Vendor Information
31
I completed all of the information on the Vendor Information tabs and pressed the Save and Continue Registration buttons along the way, then closed my browser window. None of the information was retained. Why?
It appears that you did not press the Complete Registration button at the bottom of the Summary tab before you closed your browser session. No information is saved in PHLContracts until the Complete Registration button is pressed. The (new) vendor registration sequence is designed to step the vendor through all of the tabs, concluding at the Summary tab. The Complete Registration button becomes available only if all required information has been entered. This prevents incomplete vendor records being created.
How will my employees who are Sellers know that the Consent and Authorization to Bid Agreement has been completed and submitted?
It is the responsibility of each registered entity to ensure the Consent and Authorization Agreement (“Agreement”) is uploaded to each of its PHLContracts organizational profile. No quote will be considered for evaluation if the responding organization’s Agreement is not completed and uploaded to its profile before any bid closing.
Must the Consent and Authorization to Bid Agreement (“Agreement”) be submitted with my Quote too?
The Agreement must be completed uploaded to your organization’s PHLContracts profile before your first quote is submitted. If it is not completed and uploaded to your organization’s profile before your first quote is submitted, the Agreement must be completed and uploaded as an attachment to your first quote. After that initial upload of the Agreement, your organization will no longer need to submit the Agreement unless directed otherwise by the City.
If I submit the Agreement with my first quote, how will it be uploaded to my organization’s profile?
Your organization’s Seller Administrator should—as soon as possible—also attach a scan of the fully executed Agreement, including any attachments, to the vendor’s profile in PHLContracts. If you have questions/concerns, please contact Procurement Customer Service at at (215) 686-4755 / (215) 686-4720 or by email at [email protected].