citrix xenserver hypervisor - silver peak · pn 200789-001 rev e » r7.3 1 of 15 quick start guide...
TRANSCRIPT

PN 200789-001 Rev E » R7.3 1 of 15
Quick Start Guide
VRX· VIRTUAL REPLICATION
ACCELERATOR ·
Citrix XenServer Hypervisor
· Server Mode ·(Single-Interface Deployment)
Silver Peak Systems, Inc.2860 De La Cruz Blvd.Suite 100Santa Clara, CA 95050
1.877.210.7325 (toll-free in USA)+1.408.935.1850www.silver-peak.com/support
© 2
015
Silv
er P
eak
Syst
ems,
Inc.
Before You Begin
Comply with the VRX Virtual Appliance Host System Requirements [PN 200778-001]
Download the virtual appliance ISO file to the XenServer ISO library:
- For a 30-day free trial, go to the Silver Peak Marketplace.
- If you’ve purchased the product, then log in at the Silver Peak Support portal.
Obtain a VRX Virtual Replication Accelerator activation license key
If not using DHCP, then an IP address for the Silver Peak appliance.
If you’re not using Citrix XenCenter 6.0, your screens may vary.
This Quick Start Guide only covers single-interface Server mode, which uses mgmt0 for data traffic.
SUMMARY OF TASKS
1 Configure the virtual network
2 Create the virtual machine
3 Establish management connectivity
4 Run the Appliance Manager initial configuration wizard
5 Configure storage for redirection

Velocity Replication Accelerator / Citrix XenServer Hypervisor / Server Mode [Single-Interface Deployment]
FIRST . . .
• Download the ISO image from the Silver Peak website to a drive that’s accessible to your Citrix server. This could be any CIFS or NFS mountable network drive, which you designate as an ISO library before proceeding further.
• Refer to Citrix documentation for more on creating or mapping an ISO library.
THEN . . . Launch Citrix XenServer from the desktop, and connect to the target XenServer host.
1 Configure the virtual network
a. Select the Networking tab.
For mgmt0, you can use the NIC that the Management Interface is currently using, or you can pick a different one.In this example, we’ll pair NIC 0 with mgmt0.
To do this, we’ll rename Network0 to mgmt0.
2 of 15 PN 200789-001 Rev E » R7.3

Quick Start Guide
b. To configure for mgmt0, select Network0 and click Properties. The ‘Network0’ Properties screen appears.
c. In the Name field, enter mgmt0.
d. On the left, click Network Settings. The Network Settings screen appears.
e. Clear the checkbox, Automatically add this network to new virtual machines.
PN 200789-001 Rev E » R7.3 3 of 15

Velocity Replication Accelerator / Citrix XenServer Hypervisor / Server Mode [Single-Interface Deployment]
f. Click OK. The Networking tab displays the new name, mgmt0, with No in the Auto column.
g. After naming mgmt0, any remaining NICs (Networks) won’t be used, and we don’t want them to automatically add themselves to the new virtual machine.
Therefore, for any and all remaining NICs, do the following:
Select the NIC (usually named Network n, where n is a number), and click Properties.
In the Network n Properties window, leave the name unchanged and click Network Settings.
Clear the checkbox, Automatically add this network to new virtual machines and click OK.
You are finished when each NIC has No in the Auto column.
4 of 15 PN 200789-001 Rev E » R7.3

Quick Start Guide
2 Create the virtual machine
Before continuing, make sure that you’ve saved the downloaded ISO file from Silver Peak’s Support portal to the XenServer’s ISO library.
a. In the XenCenter menu bar, click New VM.
The New VM Template page appears.
b. Scroll down to select Other install media and click Next.
The New VM Name page appears.
PN 200789-001 Rev E » R7.3 5 of 15

Velocity Replication Accelerator / Citrix XenServer Hypervisor / Server Mode [Single-Interface Deployment]
c. In the Name field, enter MySilverPeak and click Next.
The New VM Installation Media page appears.
You should already have downloaded the .iso file to an ISO library. If that ISO library is not attached to this host, then click New ISO library and follow the instructions.
Now, from the Install from ISO library or DVD drive field’s drop-down menu, select the ISO file that you downloaded from Silver Peak’s Support portal.
d. Click Next. The New VM Home Server page appears.
6 of 15 PN 200789-001 Rev E » R7.3

Quick Start Guide
e. Verify that the server listed is the one you created earlier, and click Next.
The New VM CPU & Memory page appears.
For your VRX model, refer to the VRX Virtual Appliance Host System Requirements document, under Processor Cores, for the number of vCPUs your virtual appliance must have. In this example, we’ll use the value for the VRX-4, which is 4.
• For the Number of vCPUs field, look for the number of Processor Cores required. In this instance of the VRX-4, it’s 4.
• For the Memory field, look for the number of Memory (Gigabytes) required. In this instance of the VRX-4, it’s 7 GB. Multiply this by 1024 MB/GB for a total of 7168 MB.
f. Enter the value in In the Number of vCPUs field, and click Next.
The New VM Storage page appears.
PN 200789-001 Rev E » R7.3 7 of 15

Velocity Replication Accelerator / Citrix XenServer Hypervisor / Server Mode [Single-Interface Deployment]
At this point, you need to add one virtual disks — for the System.
Again, refer to the VRX Virtual Appliance Host System Requirements document — this time for Storage (Gigabytes).
g. Click Add. The Add Virtual Disk screen appears.
h. In the Name field, enter System, and in the Size field, enter 30 GB.This size (30 GB) is the appropriate value for all VRX appliances. A larger allocation does not improve performance, and the excess remains unused.
i. Click Add. The New VM Storage screen appears, listing the newly assigned storage.
8 of 15 PN 200789-001 Rev E » R7.3
Quick Start Guide
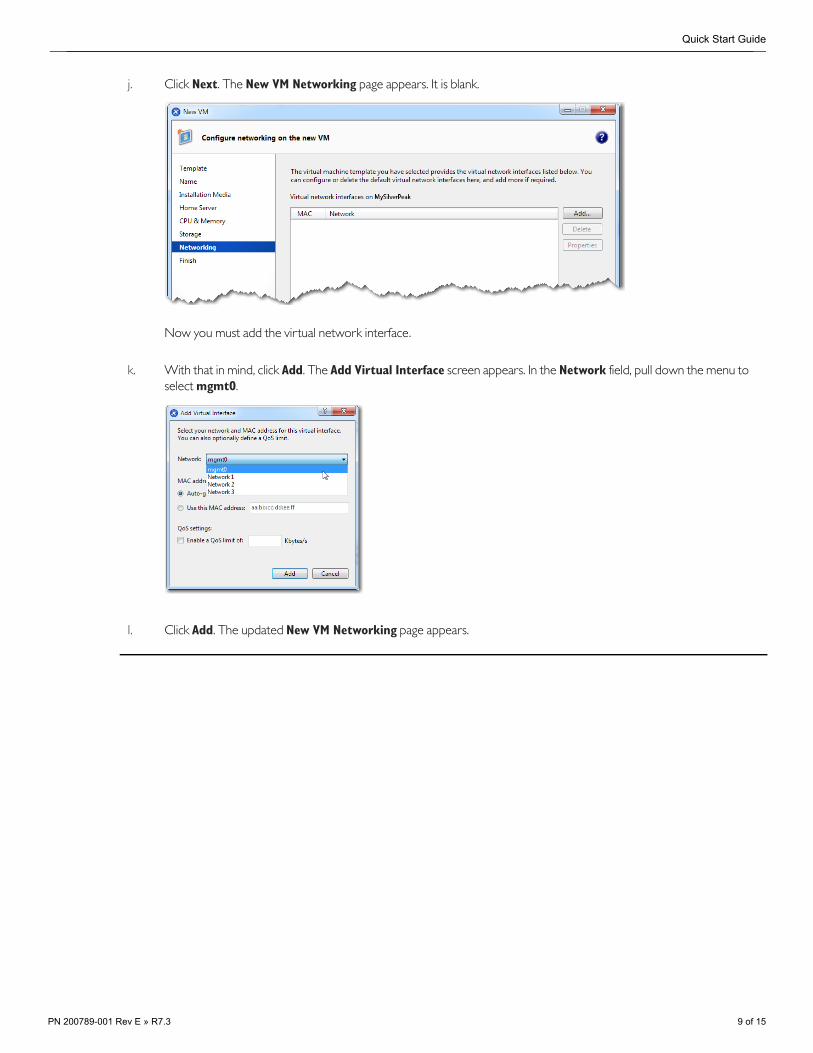
j. Click Next. The New VM Networking page appears. It is blank.
Now you must add the virtual network interface.
k. With that in mind, click Add. The Add Virtual Interface screen appears. In the Network field, pull down the menu to select mgmt0.
l. Click Add. The updated New VM Networking page appears.
PN 200789-001 Rev E » R7.3 9 of 15

Velocity Replication Accelerator / Citrix XenServer Hypervisor / Server Mode [Single-Interface Deployment]
m. Click Next. The New VM Finish page appears.
n. After reviewing the settings, click Finish.
The VM starts automatically, and the XenCenter General tab appears, with a progress bar in the lower right corner.
10 of 15 PN 200789-001 Rev E » R7.3

Quick Start Guide
o. When the console displays the Confirm screen, asking, “Install Silver Peak Appliance on Xen platform?”, press Enter to accept Okay.
The appliance installs on the Xen platform. This may take a few minutes to complete.
p. When installation is complete, press Enter to eject the CD. Afterwards, the virtual machine restarts automatically.
PN 200789-001 Rev E » R7.3 11 of 15

Velocity Replication Accelerator / Citrix XenServer Hypervisor / Server Mode [Single-Interface Deployment]
After the appliance boots up, The Silver Peak Console User Interface appears.
12 of 15 PN 200789-001 Rev E » R7.3

Quick Start Guide
3 Establish management connectivity
To access the VRX appliance’s user interface, you’ll need to discover the IP address for its mgmt0 interface and enter it into a browser.
a. The next task is to determine the virtual appliance’s IP address:
• If you’re using DHCP, the virtual appliance IP address displays in Silver Peak’s Console User Interface.
• If you’re not using DHCP, then you must configure the static IP address and default gateway.
In the virtual appliance console, press function key, F4, and complete the remaining steps.
b. To verify connectivity, press function key, F1, and enter the following command sequence:
[vx-appliance] > enable [ENTER]
[vx-appliance] # show ip default-gateway [ENTER]
[vx-appliance] # ping <default-gateway> [ENTER]
To stop the pinging, enter CTRL-C.
You are now ready to complete the Silver Peak virtual appliance initial configuration wizard.
When prompted to choose the type of management interface, select Static (as opposed to DHCP).
After selecting Apply, you can review the settings by selecting function key, F2.
PN 200789-001 Rev E » R7.3 13 of 15

Velocity Replication Accelerator / Citrix XenServer Hypervisor / Server Mode [Single-Interface Deployment]
4 Run the Appliance Manager initial configuration wizard
a. In a browser, enter the mgmt0 IP address you just discovered or configured. The Silver Peak Appliance Management Console login page appears.
b. For both the User Name and Password, enter admin. The initial configuration wizard appears.
c. Complete the remaining wizard screens.
d. On the last wizard screen, click Apply. The Appliance Manager takes a few minutes to reboot and return to the login page.
14 of 15 PN 200789-001 Rev E » R7.3

Quick Start Guide
5 Configure storage for redirection
a. Configure storage for redirection. There are two ways to accomplish this:
• Configure a static route to direct replication traffic to the VRX appliance
• Change the default gateway for all replication ports to use the VRX appliance
b. You can download specialized storage configuration guides from the Velocity section of Silver Peak’s website.
PN 200789-001 Rev E » R7.3 15 of 15