cisco ucs director bare metal agent installation and ... · cisco ucs director bare metal agent...
TRANSCRIPT

Cisco UCS Director Bare Metal Agent Installation and ConfigurationGuide, Release 6.0First Published: 2016-09-16
Americas HeadquartersCisco Systems, Inc.170 West Tasman DriveSan Jose, CA 95134-1706USAhttp://www.cisco.comTel: 408 526-4000 800 553-NETS (6387)Fax: 408 527-0883

THE SPECIFICATIONS AND INFORMATION REGARDING THE PRODUCTS IN THIS MANUAL ARE SUBJECT TO CHANGE WITHOUT NOTICE. ALL STATEMENTS,INFORMATION, AND RECOMMENDATIONS IN THIS MANUAL ARE BELIEVED TO BE ACCURATE BUT ARE PRESENTED WITHOUT WARRANTY OF ANY KIND,EXPRESS OR IMPLIED. USERS MUST TAKE FULL RESPONSIBILITY FOR THEIR APPLICATION OF ANY PRODUCTS.
THE SOFTWARE LICENSE AND LIMITEDWARRANTY FOR THE ACCOMPANYING PRODUCT ARE SET FORTH IN THE INFORMATION PACKET THAT SHIPPED WITHTHE PRODUCT AND ARE INCORPORATED HEREIN BY THIS REFERENCE. IF YOU ARE UNABLE TO LOCATE THE SOFTWARE LICENSE OR LIMITED WARRANTY,CONTACT YOUR CISCO REPRESENTATIVE FOR A COPY.
The Cisco implementation of TCP header compression is an adaptation of a program developed by the University of California, Berkeley (UCB) as part of UCB's public domain versionof the UNIX operating system. All rights reserved. Copyright © 1981, Regents of the University of California.
NOTWITHSTANDINGANYOTHERWARRANTYHEREIN, ALL DOCUMENT FILES AND SOFTWARE OF THESE SUPPLIERS ARE PROVIDED “AS IS"WITH ALL FAULTS.CISCO AND THE ABOVE-NAMED SUPPLIERS DISCLAIM ALL WARRANTIES, EXPRESSED OR IMPLIED, INCLUDING, WITHOUT LIMITATION, THOSE OFMERCHANTABILITY, FITNESS FORA PARTICULAR PURPOSEANDNONINFRINGEMENTORARISING FROMACOURSEOFDEALING, USAGE, OR TRADE PRACTICE.
IN NO EVENT SHALL CISCO OR ITS SUPPLIERS BE LIABLE FOR ANY INDIRECT, SPECIAL, CONSEQUENTIAL, OR INCIDENTAL DAMAGES, INCLUDING, WITHOUTLIMITATION, LOST PROFITS OR LOSS OR DAMAGE TO DATA ARISING OUT OF THE USE OR INABILITY TO USE THIS MANUAL, EVEN IF CISCO OR ITS SUPPLIERSHAVE BEEN ADVISED OF THE POSSIBILITY OF SUCH DAMAGES.
Any Internet Protocol (IP) addresses and phone numbers used in this document are not intended to be actual addresses and phone numbers. Any examples, command display output, networktopology diagrams, and other figures included in the document are shown for illustrative purposes only. Any use of actual IP addresses or phone numbers in illustrative content is unintentionaland coincidental.
Cisco and the Cisco logo are trademarks or registered trademarks of Cisco and/or its affiliates in the U.S. and other countries. To view a list of Cisco trademarks, go to this URL: http://www.cisco.com/go/trademarks. Third-party trademarks mentioned are the property of their respective owners. The use of the word partner does not imply a partnershiprelationship between Cisco and any other company. (1110R)
© 2016 Cisco Systems, Inc. All rights reserved.

C O N T E N T S
P r e f a c e Preface vii
Audience vii
Recommended Knowledge vii
Conventions viii
Related Documentation ix
Documentation Feedback ix
Obtaining Documentation and Submitting a Service Request x
C H A P T E R 1 New and Changed Information for this Release 1
New and Changed Information 1
C H A P T E R 2 Overview 3
Cisco UCS Director Bare Metal Agent 3
Minimum System Requirements 3
Guidelines and Limitations 4
Network Configuration Options 5
Provisioning Bare Metal Servers through Bare Metal Agent 7
Upgrade of Bare Metal Agent 7
C H A P T E R 3 Installing Cisco UCS Director Bare Metal Agent 9
Installing Cisco UCS Director Bare Metal Agent on VMware vSphere 9
Installing Cisco UCS Director Bare Metal Agent on Microsoft Hyper-V 10
C H A P T E R 4 Configuring Cisco UCS Director Bare Metal Agent 13
Adding a Bare Metal Agent Account 13
Configuring the DHCP Server for a Bare Metal Agent Account 15
Configuring the Interface for the PXE Network 16
Cisco UCS Director Bare Metal Agent Installation and Configuration Guide, Release 6.0 iii
Adding an NFS Mount Point 16
C H A P T E R 5 Managing Bare Metal Agent 17
Changing the Default Bare Metal Agent Account 17
Starting and Stopping Bare Metal Agent Services 18
Checking the Status of a Bare Metal Agent 18
Viewing the DHCP Configuration for a Bare Metal Agent Account 18
Viewing the DHCP Logs for a Bare Metal Agent Account 19
Viewing the Logs for a Bare Metal Agent Account 19
Viewing Operating System Images 20
Viewing PXE Service Requests 20
C H A P T E R 6 Adding Non-Windows OS Images 21
Adding a Non-Windows OS Image in Bare Metal Agent 21
Manually Adding a Linux OS Image in Bare Metal Agent 23
Manually Adding a VMware vSphere ESXi OS Image in Bare Metal Agent 24
C H A P T E R 7 Adding Windows OS Images 27
Windows Operating Systems Images for Cisco UCS Director Bare Metal Agent 27
Guidelines and Limitations for Windows Operating System Images 28
Windows Server 2008 R2 x64 Operating System Images 28
Prerequisites for Setting Up Windows Server 2008 R2 x64 Operating System Images 29
Creating a Customized WinPE 29
Preparing Windows Server 2008 R2 Installation Files 31
Creating a Boot Configuration Data File 32
Verifying the Installation files For All Editions of Windows 2008 R2 34
Customizing and Copying the WinPE.wim and PXE Boot Files for Windows 2008 R2 34
Copying the Customized Windows Installation Files to the Bare Metal Agent VM 37
Windows Server 2012 x64 and 2012 R2 x64 Operating System Images 38
Prerequisites for Setting UpWindows Server 2012 x64 and 2012 R2 x64 Operating System
Images 38
Creating a Custom WinPE and Copying the PXE Supported Files for Windows 2012 39
Creating a Custom WinPE and Copying the PXE Supported Files for Windows 2012
R2 41
Installing and Setting Up the Boot Configuration Data File 44
Cisco UCS Director Bare Metal Agent Installation and Configuration Guide, Release 6.0iv
Contents
Copying the Windows Installation Files to the Server Folder 45
Windows Server 2016 x64 Operating System Images 46
Prerequisites for Setting Up Windows Server 2016 x64 Operating System Images 46
Creating a Custom WinPE and Copying the PXE Supported Files for Windows 2016 47
Installing and Setting Up the Boot Configuration Data File 49
Copying the Windows Installation Files to the Server Folder 50
Using MEMDISK for Deploying Multiple Versions of Windows Simultaneously 51
Requirements for Using MEMDISK 51
Creating Bootable WINPE File for Windows Server 2008 R2, 2012, 2012 R2, or 2016 52
Modifying MAC File Template 52
C H A P T E R 8 Provisioning OS Images through Orchestration Workflow Tasks 55
Orchestration Workflow Tasks for PXE Boot 55
Prerequisites for Workflows with PXE Boot Tasks 56
Execution of the Setup PXE Boot Tasks 57
Determining the Windows OS Edition 58
Inputs for the Setup PXE Boot Task 59
Inputs for the Setup PXE Boot with BMA Selection Task 61
Inputs for the Setup Windows PXE Boot Task 63
Outputs from the Setup PXE Boot Task and Setup Windows PXE Boot Task 65
Creating a PXE Boot Request in Cisco UCS Director 66
PXE Boot States 68
Monitor PXE Boot Setup Task 69
Inputs for the Monitor PXE Boot Task 69
Outputs from the Monitor PXE Boot Task 69
Remove PXE Boot Setup Task 69
Inputs for the Remove PXE Boot Setup Task 69
Outputs from the Remove PXE Boot Setup Task 70
Injecting Drivers When Installing RHEL 7 or CentOS 7 on UCS Modular Servers 70
Simultaneous Deployment of Windows Server Operating Systems 71
Files and Folders Used In Simultaneous Deployment 71
Example: Simultaneous Deployment of Windows Server Operating Systems 72
A P P E N D I X A Sample Operating System Configuration Template Files 77
Sample Linux Configuration Template Files 77
Cisco UCS Director Bare Metal Agent Installation and Configuration Guide, Release 6.0 v
Contents

Sample Kickstart Configuration Template File for Linux Operating Systems 77
Sample PXE Configuration Template File for Linux Operating Systems 78
Sample VMware vSphere ESXi Configuration Template Files 79
Sample Kickstart Configuration Template File for VMware vSphere ESXi Operating
Systems 79
Sample PXE Configuration Template File for VMware vSphere ESXi Operating
Systems 80
Sample Windows Answer File 80
A P P E N D I X B Ports 85
Cisco UCS Director TCP and UDP Port Usage 85
Port List 85
Multi-Node Port Requirements 87
Cisco UCS Director Bare Metal Agent Installation and Configuration Guide, Release 6.0vi
Contents
Preface
• Audience, page vii
• Conventions, page viii
• Related Documentation, page ix
• Documentation Feedback, page ix
• Obtaining Documentation and Submitting a Service Request, page x
AudienceThis guide is intended primarily for data center administrators who use Cisco UCS Director and who haveresponsibilities and expertise in one or more of the following:
• Server administration
• Storage administration
• Network administration
• Network security
• Virtualization and virtual machines
Recommended KnowledgeTo deploy and manage Cisco UCS Director Bare Metal Agent, you should be familiar with the following:
• DHCP configuration
• PXE boot
• TFTP functionality
• HTTP functionality
• Linux
• Virtualization technologies
Cisco UCS Director Bare Metal Agent Installation and Configuration Guide, Release 6.0 vii
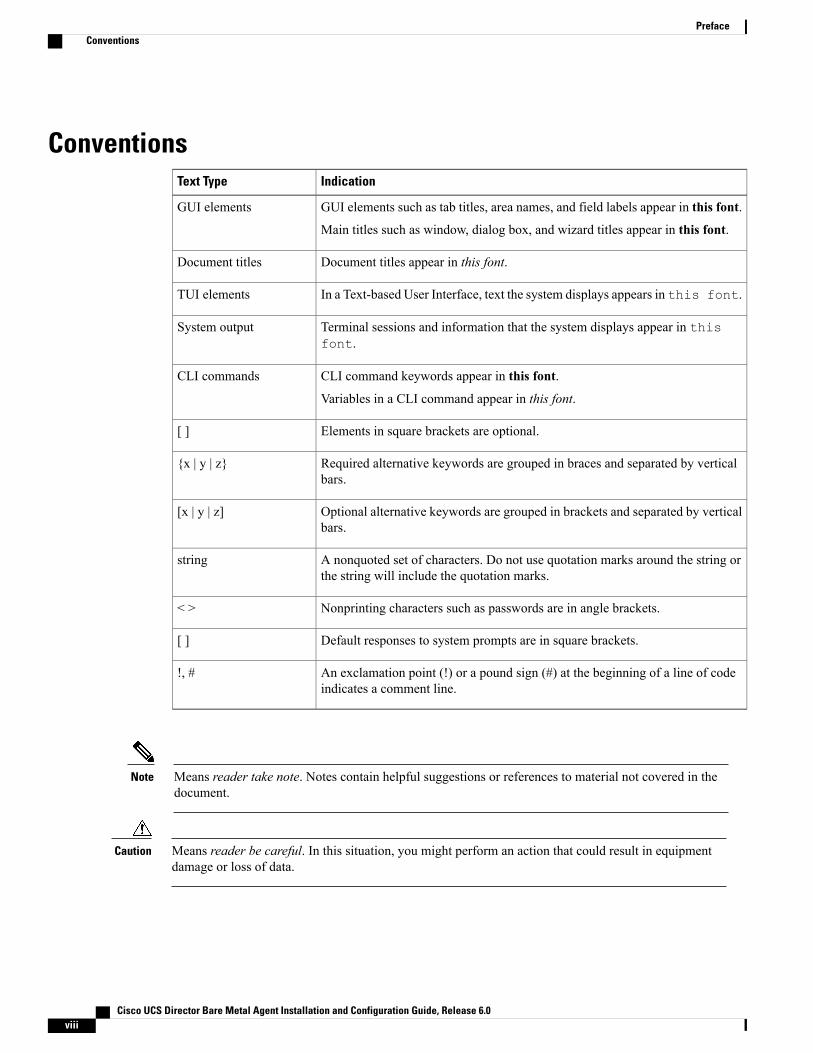
ConventionsIndicationText Type
GUI elements such as tab titles, area names, and field labels appear in this font.
Main titles such as window, dialog box, and wizard titles appear in this font.
GUI elements
Document titles appear in this font.Document titles
In a Text-based User Interface, text the system displays appears in this font.TUI elements
Terminal sessions and information that the system displays appear in thisfont.
System output
CLI command keywords appear in this font.
Variables in a CLI command appear in this font.
CLI commands
Elements in square brackets are optional.[ ]
Required alternative keywords are grouped in braces and separated by verticalbars.
{x | y | z}
Optional alternative keywords are grouped in brackets and separated by verticalbars.
[x | y | z]
A nonquoted set of characters. Do not use quotation marks around the string orthe string will include the quotation marks.
string
Nonprinting characters such as passwords are in angle brackets.< >
Default responses to system prompts are in square brackets.[ ]
An exclamation point (!) or a pound sign (#) at the beginning of a line of codeindicates a comment line.
!, #
Means reader take note. Notes contain helpful suggestions or references to material not covered in thedocument.
Note
Means reader be careful. In this situation, you might perform an action that could result in equipmentdamage or loss of data.
Caution
Cisco UCS Director Bare Metal Agent Installation and Configuration Guide, Release 6.0viii
PrefaceConventions

Means the following information will help you solve a problem. The tips information might not betroubleshooting or even an action, but could be useful information, similar to a Timesaver.
Tip
Means the described action saves time. You can save time by performing the action described in theparagraph.
Timesaver
IMPORTANT SAFETY INSTRUCTIONS
This warning symbol means danger. You are in a situation that could cause bodily injury. Before youwork on any equipment, be aware of the hazards involved with electrical circuitry and be familiar withstandard practices for preventing accidents. Use the statement number provided at the end of each warningto locate its translation in the translated safety warnings that accompanied this device.
SAVE THESE INSTRUCTIONS
Warning
Related DocumentationCisco UCS Director Documentation Roadmap
For a complete list of Cisco UCS Director documentation, see the Cisco UCS Director DocumentationRoadmap available at the following URL: http://www.cisco.com/en/US/docs/unified_computing/ucs/ucs-director/doc-roadmap/b_UCSDirectorDocRoadmap.html.
Cisco UCS Documentation Roadmaps
For a complete list of all B-Series documentation, see theCiscoUCS B-Series Servers Documentation Roadmapavailable at the following URL: http://www.cisco.com/go/unifiedcomputing/b-series-doc.
For a complete list of all C-Series documentation, see theCiscoUCSC-Series Servers Documentation Roadmapavailable at the following URL: http://www.cisco.com/go/unifiedcomputing/c-series-doc.
The Cisco UCS B-Series Servers Documentation Roadmap includes links to documentation for CiscoUCSManager and Cisco UCSCentral. TheCiscoUCSC-Series Servers Documentation Roadmap includeslinks to documentation for Cisco Integrated Management Controller.
Note
Documentation FeedbackTo provide technical feedback on this document, or to report an error or omission, please send your commentsto [email protected]. We appreciate your feedback.
Cisco UCS Director Bare Metal Agent Installation and Configuration Guide, Release 6.0 ix
PrefaceRelated Documentation
Obtaining Documentation and Submitting a Service RequestFor information on obtaining documentation, using the Cisco Bug Search Tool (BST), submitting a servicerequest, and gathering additional information, see What's New in Cisco Product Documentation.
To receive new and revised Cisco technical content directly to your desktop, you can subscribe to the What'sNew in Cisco Product Documentation RSS feed. RSS feeds are a free service.
Cisco UCS Director Bare Metal Agent Installation and Configuration Guide, Release 6.0x
PrefaceObtaining Documentation and Submitting a Service Request
C H A P T E R 1New and Changed Information for this Release
This chapter contains the following section:
• New and Changed Information, page 1
New and Changed InformationThe following table provides an overview of the significant changes to this guide for the current release. Thetable does not provide an exhaustive list of all changes made to this guide or of all new features in this release.
Where DocumentedDescriptionFeature
Adding a Bare Metal AgentAccount, on page 13
You now have the option to create aSamba user when adding Bare MetalAgent account to Cisco UCS Director.
Creating a Samba user
Cisco UCS DirectorAdministration Guide
You can now provision bare metalservers through Cisco UCSDirector byusing a pre-defined bare metal serverprovisioning policy. To create thispolicy, create a bare metal servercatalog, and then create a servicerequest with bare metal catalog type.
Bare metal server provisioningpolicy
Cisco UCS Director Bare Metal Agent Installation and Configuration Guide, Release 6.0 1

Cisco UCS Director Bare Metal Agent Installation and Configuration Guide, Release 6.02
New and Changed Information for this ReleaseNew and Changed Information

C H A P T E R 2Overview
This chapter contains the following sections:
• Cisco UCS Director Bare Metal Agent, page 3
• Minimum System Requirements, page 3
• Guidelines and Limitations, page 4
• Network Configuration Options, page 5
• Provisioning Bare Metal Servers through Bare Metal Agent, page 7
• Upgrade of Bare Metal Agent, page 7
Cisco UCS Director Bare Metal AgentCiscoUCSDirector BareMetal Agent (BMA) automates the process of using a Preboot Execution Environment(PXE) to install operating systems on bare metal servers or virtual machines. Bare Metal Agent provides thefollowing services that are required for a functional PXE install environment:
• Dynamic Host Control Protocol (DHCP)
• Hypertext Transfer Protocol (HTTP)
• Trivial File Transfer Protocol (TFTP)
When this environment is operational and BareMetal Agent and Cisco UCSDirector are correctly configured,you can build PXE installation tasks into any Cisco UCS Director infrastructure workflow.
You can access Bare Metal Agent through Secure Shell (SSH). You can also perform services on Bare MetalAgent, such as DHCP configuration and starting and stopping services, through Cisco UCS Director. A singleCisco UCS Director node can support multiple Bare Metal Agent applications.
Minimum System RequirementsFor proper installation and operation of Bare Metal Agent, your environment must meet the minimum systemrequirements.
Cisco UCS Director Bare Metal Agent Installation and Configuration Guide, Release 6.0 3
Minimum Requirements for VMware vSphere
RequirementsName
4.0 and laterVMware vCenter Server
Minimum number of CPUs—2
Memory—3 GB
Hard disk—40 GB
Minimum reservation in VMwarevCenter
Minimum Requirements for Microsoft Hyper-V
RequirementsName
Windows Server 2008 R2 or Windows Server 2012 with one of thefollowing:
• 2.0
• 3.1
Hyper-V
Minimum number of CPUs—2
Memory—3 GB
Hard disk—40 GB
Minimum reservation in Hyper-V
Guidelines and LimitationsBefore you install Bare Metal Agent, take note of the following guidelines and limitations.
Bare Metal Agent Connections
Each Bare Metal Agent application can connect to only one Cisco UCS Director node.
Network Availability
After installation and configuration, your environment must have the following network availability:
• Bare Metal Agent must be able to reach Cisco UCS Director over the network.
• Cisco UCS Director must be able to reach Bare Metal Agent over the network.
• The bare metal servers (blade or rack) must be able to reach the DHCP network of the Bare Metal Agentduring the initial stage of operating system installation over PXE.
DHCP Configuration
If you use DHCP, locate a DHCP server in the same PXE VLAN as Bare Metal Agent. Then configure thatDHCP server with the IP address range required by your DHCP server.
Cisco UCS Director Bare Metal Agent Installation and Configuration Guide, Release 6.04
OverviewGuidelines and Limitations
VLAN Configuration
When setting up the network configuration, the most common configuration uses one PXE VLAN and oneManagement VLAN (separate VLANs). However, Bare Metal Agent supports one VLAN for both, if youprefer.
Configure the VLANs end-to-end between Cisco UCS, Cisco UCSDirector, and BareMetal Agent. However,when you configure Bare Metal Agent, do not assume that routing occurs between the PXE_VLAN Layer 2network and the Management VLAN network.
If you configure Bare Metal Agent to use DHCP, locate and configure the DHCP server in the PXE VLANand its subnet. This DHCP server serves the transient IP address required for the PXE process. In an environmentwith two VLANs, the server is allocated an IP address from the subnet of the Management VLAN. An IPaddress pool managed by Cisco UCS Director assigns this IP address.
If you configure Bare Metal Agent with two VLANs, set up two IP address attributes:
• An IP address for Bare Metal Agent in the PXE VLAN
• A second IP address for Bare Metal Agent in the Management VLAN
TFTP Server
With BareMetal Agent, use the Cisco UCSDirector TFTP server to ensure that configurations such as dynamicvariables function properly.
When you add a Bare Metal Agent account, Bare Metal Agent configures the TFTP server when services arestarted.
Network Configuration OptionsYou can choose between the following network configuration options for Bare Metal Agent
• Single network for management and Preboot Execution Environment (PXE)
• Separate networks for management and PXE
Choose the network configuration option that best meets the requirements of your environment.
Single Network for Management and PXE
We recommend that you choose this network configuration option if your environment permits the followingto be hosted on the same VLAN (Layer 2) network (see the following figure):
• Services provided by Bare Metal Agent, such as DHCP, TFTP, and HTTP
Cisco UCS Director Bare Metal Agent Installation and Configuration Guide, Release 6.0 5
OverviewNetwork Configuration Options
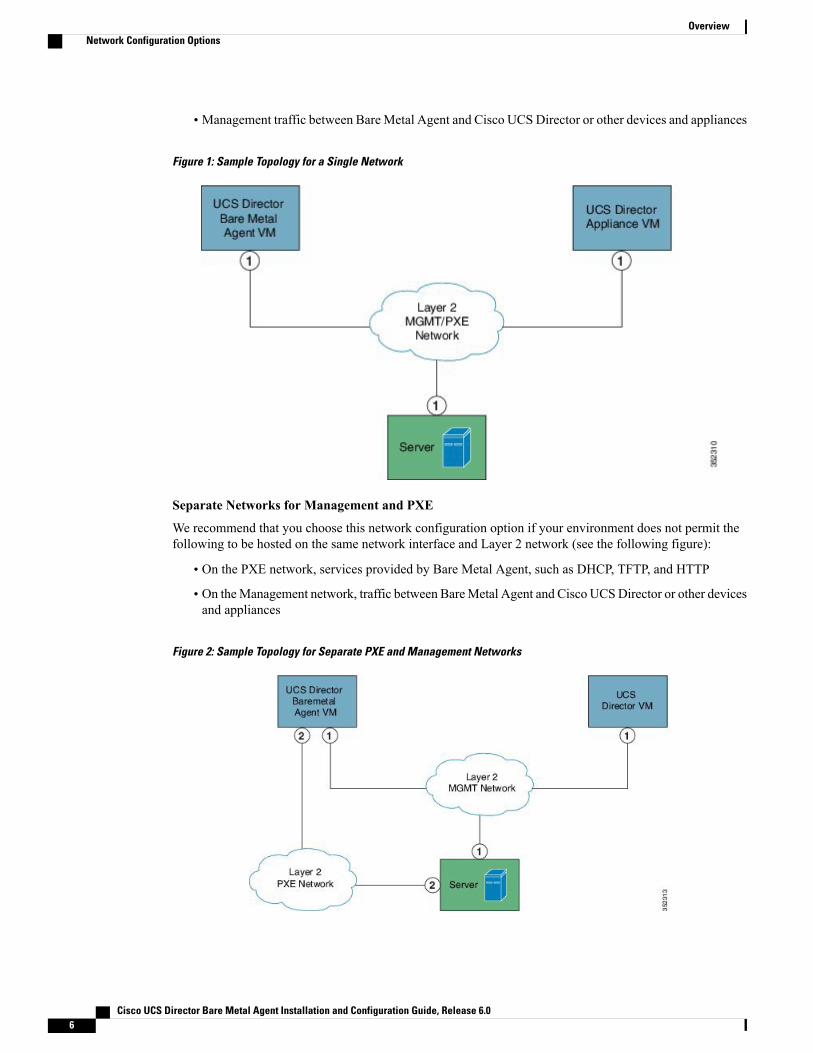
• Management traffic between Bare Metal Agent and Cisco UCS Director or other devices and appliances
Figure 1: Sample Topology for a Single Network
Separate Networks for Management and PXE
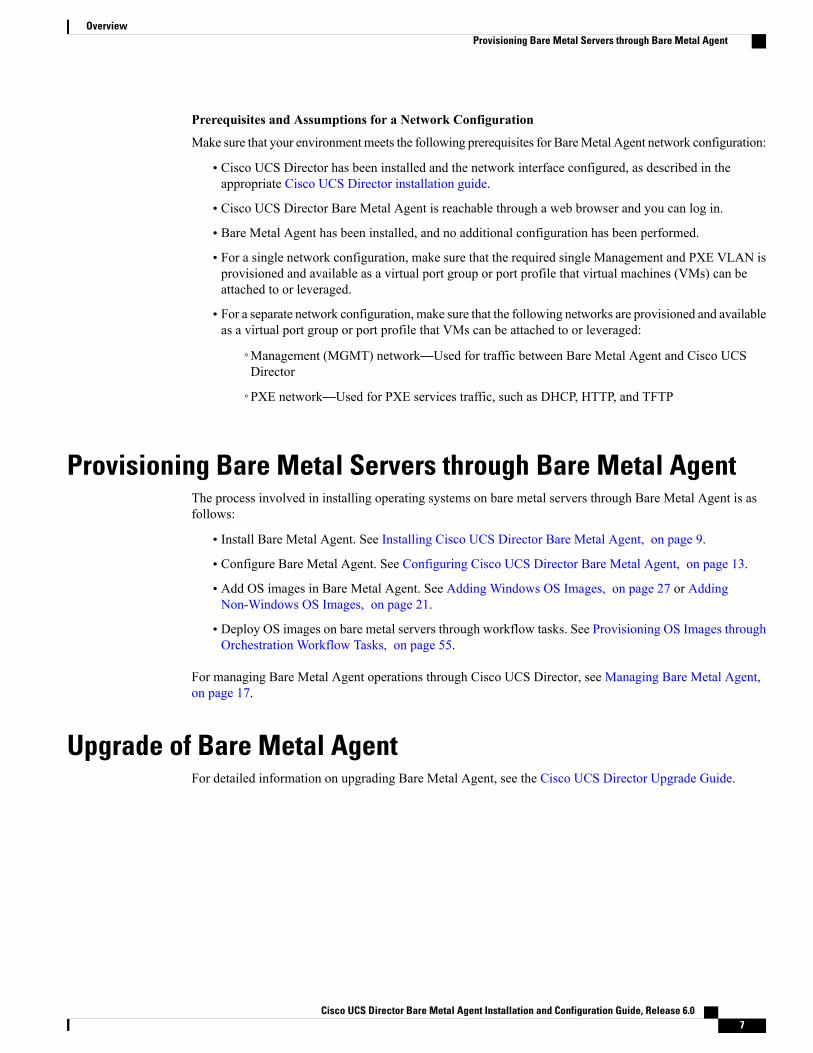
We recommend that you choose this network configuration option if your environment does not permit thefollowing to be hosted on the same network interface and Layer 2 network (see the following figure):
• On the PXE network, services provided by Bare Metal Agent, such as DHCP, TFTP, and HTTP
• On theManagement network, traffic between BareMetal Agent and Cisco UCSDirector or other devicesand appliances
Figure 2: Sample Topology for Separate PXE and Management Networks
Cisco UCS Director Bare Metal Agent Installation and Configuration Guide, Release 6.06
OverviewNetwork Configuration Options
Prerequisites and Assumptions for a Network Configuration
Make sure that your environmentmeets the following prerequisites for BareMetal Agent network configuration:
• Cisco UCS Director has been installed and the network interface configured, as described in theappropriate Cisco UCS Director installation guide.
• Cisco UCS Director Bare Metal Agent is reachable through a web browser and you can log in.
• Bare Metal Agent has been installed, and no additional configuration has been performed.
• For a single network configuration, make sure that the required single Management and PXE VLAN isprovisioned and available as a virtual port group or port profile that virtual machines (VMs) can beattached to or leveraged.
• For a separate network configuration, make sure that the following networks are provisioned and availableas a virtual port group or port profile that VMs can be attached to or leveraged:
◦Management (MGMT) network—Used for traffic between Bare Metal Agent and Cisco UCSDirector
◦PXE network—Used for PXE services traffic, such as DHCP, HTTP, and TFTP
Provisioning Bare Metal Servers through Bare Metal AgentThe process involved in installing operating systems on bare metal servers through Bare Metal Agent is asfollows:
• Install Bare Metal Agent. See Installing Cisco UCS Director Bare Metal Agent, on page 9.
• Configure Bare Metal Agent. See Configuring Cisco UCS Director Bare Metal Agent, on page 13.
• Add OS images in Bare Metal Agent. See Adding Windows OS Images, on page 27 or AddingNon-Windows OS Images, on page 21.
• Deploy OS images on bare metal servers through workflow tasks. See Provisioning OS Images throughOrchestration Workflow Tasks, on page 55.
For managing Bare Metal Agent operations through Cisco UCS Director, see Managing Bare Metal Agent,on page 17.
Upgrade of Bare Metal AgentFor detailed information on upgrading Bare Metal Agent, see the Cisco UCS Director Upgrade Guide.
Cisco UCS Director Bare Metal Agent Installation and Configuration Guide, Release 6.0 7
OverviewProvisioning Bare Metal Servers through Bare Metal Agent

Cisco UCS Director Bare Metal Agent Installation and Configuration Guide, Release 6.08
OverviewUpgrade of Bare Metal Agent
C H A P T E R 3Installing Cisco UCS Director Bare Metal Agent
This chapter contains the following sections:
• Installing Cisco UCS Director Bare Metal Agent on VMware vSphere, page 9
• Installing Cisco UCS Director Bare Metal Agent on Microsoft Hyper-V, page 10
Installing Cisco UCS Director Bare Metal Agent on VMwarevSphere
Before You Begin
• You must have system administrator privileges for VMware vSphere or vCenter.
• If you want to use a static IP address rather than DHCP, you must know the following information:
◦IP address
◦Subnet mask
◦Default gateway
Step 1 On the Cisco.com download site for Cisco UCS Director, download Cisco UCS Director Bare Metal Agent and unzipthe OVF file.
Step 2 Log in to VMware vSphere Client.Step 3 In the Navigation pane, click the vSphere host on which you want to deploy Cisco UCS Director Bare Metal Agent.Step 4 Choose File > Deploy OVF Template.Step 5 In the Source screen of theDeploy OVFTemplatewindow, do one of the following to choose your OVF source location
and then click Next:
• If the OVF file is stored on your local computer, browse to the location, choose the file, and click Open.
Cisco UCS Director Bare Metal Agent Installation and Configuration Guide, Release 6.0 9
• If the OVF file is stored on a server on your local area network, enter the location of the file including the IP addressor fully qualified domain name of the server.
Step 6 In the OVF Template Details screen, verify the details and click Next.Step 7 In the End User License Agreement screen, review the license agreement and click Accept.Step 8 In the Name and Location screen, do the following:
a) In the Name field, enter a unique name for the VM.b) In the Inventory Location area, choose the location where you want the VM to reside.c) Click Next.
Step 9 In the Storage screen, choose the storage location for the VM and click Next.Step 10 In the Disk Format screen, click Next to accept the default radio button for Thick Provision (Lazy Zeroed) format.Step 11 In the Network Mapping screen, choose the network for the VM and click Next.Step 12 In the Properties screen, do the following:
a) In the BMA Root User Password field, enter the password that you want to use as the root password.b) Configure the IP addresses for both the NICs (eth0 and eth1) that you want to assign, as follows:
• To use DHCP to assign the IP addresses, leave the default of 0.0.0.0 in the IP address fields.
• To use static IP addresses, enter the desired IP addresses in the IP address fields. If you only want to configureone NIC, only complete one set of IP addresses and leave the second set at the default.
c) Click Next.
Step 13 In the Ready to Complete screen, verify the settings and click Finish.A message appears to indicate that Cisco UCS Director Bare Metal Agent is being deployed.
Step 14 In the Navigation pane, right-click the VM host and choose Edit Settings.Step 15 Make sure that the VM host has sufficient resources to power on.
For more information about the required resources, see Minimum System Requirements, on page 3.
Step 16 Power on the VM.
Installing Cisco UCS Director Bare Metal Agent on MicrosoftHyper-V
We recommend that you deploy Cisco UCS Director Bare Metal Agent on the Hyper-V Manager host,rather than the Microsoft System Center Virtual Machine Manager (SCVMM) console.
Note
Before You Begin
• You must have system administrator privileges for Microsoft Hyper-V.
• If you want to use a static IP address rather than DHCP, you must know the following information:
Cisco UCS Director Bare Metal Agent Installation and Configuration Guide, Release 6.010
Installing Cisco UCS Director Bare Metal AgentInstalling Cisco UCS Director Bare Metal Agent on Microsoft Hyper-V

◦IP address
◦Subnet mask
◦Default gateway
Step 1 On the Cisco.com download site for Cisco UCS Director, download Cisco UCS Director Bare Metal Agent and unzipthe *.vhd file into a folder.
Step 2 Log into the Hyper-V host.Step 3 Choose Start > Administrative Tools to open Hyper-V Manager.Step 4 In the Hyper-V Manager dialog box, choose Action > New Virtual Machine.Step 5 In the Before You Begin pane, click Next to accept the custom configuration option.Step 6 In the Specify Name and Location pane, enter a unique name for the virtual machine (VM) name in the Name field.Step 7 In the Name and Location pane, do the following:
a) Check the Store the virtual machine in a different location checkbox.b) Enter the alternate location.c) Click Next.
Step 8 In the Assign Memory pane, enter the amount of memory to allocate to this VM (3 GB minimum) and click Next.Step 9 In the Configure Networking pane, in the Connection field, click Next to accept the Not Connected default option.Step 10 In the Connect Virtual Hard Disk pane, click Next to accept the Attach a virtual disk later default option.Step 11 In the Completing the New Virtual Machine Wizard pane, verify the settings and click Finish.Step 12 In the left pane, right-click the VM and choose Edit Settings.Step 13 Delete the existing network adapter and click Apply.Step 14 In the Navigation pane, click Processor.Step 15 In the Number of virtual processors field, enter 2 vCPU.Step 16 In the Navigation pane, click Add Hardware.Step 17 In the Add Hardware pane, choose the Legacy Network Adapter and click OK.Step 18 In the Legacy Network Adapter pane, in the Virtual Switch drop-down list, choose the virtual network device.Step 19 In the Navigation pane, click IDE Controller.Step 20 In the IDE Controller pane, choose Hard Drive and click Add.Step 21 Browse to the .vhd file and choose it.Step 22 Click Apply, and then click OK.Step 23 Power on the VM to configure network properties.
Optionally, you can configure network properties from the Shell Admin.
What to Do Next
After Cisco UCS Director Bare Metal Agent has started, configure DHCP or a static IP address.
Cisco UCS Director Bare Metal Agent Installation and Configuration Guide, Release 6.0 11
Installing Cisco UCS Director Bare Metal AgentInstalling Cisco UCS Director Bare Metal Agent on Microsoft Hyper-V

Cisco UCS Director Bare Metal Agent Installation and Configuration Guide, Release 6.012
Installing Cisco UCS Director Bare Metal AgentInstalling Cisco UCS Director Bare Metal Agent on Microsoft Hyper-V

C H A P T E R 4Configuring Cisco UCS Director Bare Metal Agent
This chapter contains the following sections:
• Adding a Bare Metal Agent Account, page 13
• Configuring the DHCP Server for a Bare Metal Agent Account, page 15
• Configuring the Interface for the PXE Network, page 16
• Adding an NFS Mount Point, page 16
Adding a Bare Metal Agent AccountBefore You Begin
Before you add a Bare Metal Agent account, do the following:
• Make sure that the Bare Metal Agent is installed.
• Make sure that the Bare Metal Agent VM is completely booted up, and that the VM Console is closed.You must have the IP address of the Bare Metal Agent VM.
• Set up the environment required to support a single or separate PXE and Management networkconfiguration, with the appropriate VLANs.
• To provide required DHCP services, ensure that at least one DHCP server is located in the same PXEVLAN as Bare Metal Agent and configure that DHCP server with an appropriate IP address range.
Step 1 On the menu bar, choose Administration > Physical Accounts.Step 2 Click the Bare Metal Agents tab.Step 3 In the Add Bare Metal Agent Appliance dialog box, complete the following fields:
DescriptionName
The name you assign to this Bare Metal Agent account.Account Name field
(Optional) A description of this Bare Metal Agent.Description field
Cisco UCS Director Bare Metal Agent Installation and Configuration Guide, Release 6.0 13

DescriptionName
Check this box if your configuration uses separate networksfor the PXE server and the management network that hoststhe traffic manager.
Bare Metal Agent uses different interfaces for mgmtand PXE traffic box
The IP address assigned to the Management network forBare Metal Agent. If your configuration uses a singlenetwork for the Management and PXE networks, this IPaddress is automatically assigned as the PXE address.
This address must be reachable from Cisco UCSDirector.
Note
Management/PXE Address field
The IP address for the Bare Metal Agent PXE network, ifyour configuration uses separate networks.
This field appears only if the Bare Metal Agentuses Different Interfaces for Management andPXE Traffic box has been checked.
Note
PXE Interface Address field
An account with administrative privileges that you can useto log in to Bare Metal Agent.
Login ID field
The password for the account.Password field
Samba is used for Bare Metal Agent to install WindowsOperating Systems. Check this box if you want to installWindows Operating Systems.
Enable Samba service for Windows PXE box
Enter the password for the Samba service.Samba Password field
Confirm the password for the Samba service.Confirm Samba Password field
(Optional) The location of this Bare Metal Agent, such asa physical location.
Location field
Choose the IP address that is associated with the CiscoUCSDirector database that this BareMetal Agent will use.
If you are configuring Bare Metal Agent formulti-node deployment, choose the IP address ofthe Inventory Database node.
Note
Database Address drop-down list
Step 4 Click Submit.
What to Do Next
Configure the DHCP Server for Bare Metal Agent.
Cisco UCS Director Bare Metal Agent Installation and Configuration Guide, Release 6.014
Configuring Cisco UCS Director Bare Metal AgentAdding a Bare Metal Agent Account

Configuring the DHCP Server for a Bare Metal Agent Account
For a multi-home DHCP configuration, use this procedure to configure the first subnet for the DHCPserver. For the remaining subnets, you must manually edit the DHCP configuration file(/etc/dhcpd.conf).
Note
Before You Begin
To provide required DHCP services, ensure that at least one DHCP server is located in the same PXE VLANas Bare Metal Agent. Configure the DHCP server with an appropriate IP address range. The DHCP server,together with the TFTP server, is used to communicate with a PXE server.
Step 1 Log in to the Cisco UCS Director server with the following credentials:a) User—adminb) Password—admin
Step 2 On the menu bar, choose Administration > Physical Accounts.Step 3 Click the Bare Metal Agents tab.Step 4 Click the row for the Bare Metal Agent account for which you want to configure the DHCP server.Step 5 Click Service Status to verify that services for the Bare Metal Agent account are stopped.Step 6 Click Configure DHCP.Step 7 In the Configure DHCP dialog box, complete the following fields and click Submit.
• DHCP Subnet
• DHCP Netmask
• DHCP Start IP
• DHCP End IP
• Router IP Address
The DHCP IP address assignments are updated, and the DHCP service is restarted.
Step 8 Click the row for the Bare Metal Agent account and click Start Services.Step 9 After the services have started, do the following:
• Verify that the status of the account in the Status column is Active.
• Verify that the Enabled Services column shows that all services are running. If this status indicates that one ormore services are stopped, verify the configuration of your DHCP server and try again.
• Click Service Status to verify that the status of all expected services is up:
◦Network Services status in the Bare Metal Agent appliance
◦Database connectivity status from the Bare Metal Agent appliance
Cisco UCS Director Bare Metal Agent Installation and Configuration Guide, Release 6.0 15
Configuring Cisco UCS Director Bare Metal AgentConfiguring the DHCP Server for a Bare Metal Agent Account
What to Do Next
Set up PXE boot requests.
Configuring the Interface for the PXE NetworkYou can use this to change or add an IP address for the PXE network used by Bare Metal Agent.
Step 1 On the menu bar, choose Administration > Physical Accounts.Step 2 Click the Bare Metal Agents tab.Step 3 Click the row for the Bare Metal Agent account for which you want to configure the interface for the PXE network.Step 4 Click Configure Interface.Step 5 In the Configure PXE Interface dialog box, complete the following fields:
a) From the Interface Name drop-down list, choose the interface that you want to use for the PXE network.b) Enter the IP address and subnet mask for the PXE network.c) Click Submit.
Adding an NFS Mount Point
Step 1 On the menu bar, choose Administration > Physical Accounts.Step 2 Click the Bare Metal Agents tab.Step 3 Click the row for the Bare Metal Agent account for which you want to view PXE service requests.Step 4 Click View Details.Step 5 Click the NFS Mount Point tab.Step 6 Click Add.Step 7 In the Add NFS Mount Point dialog box, do the following:
a) In the NFS Server IP Address field, enter the IP address of the NFS server where you plan to store the OS imagesfor Bare Metal Agent to use.
b) In the NFS Server Path field, enter the location on the NFS server where the OS images are stored.c) Click Submit.After you add the NFS mount point, all content in the imageRepository folder in the NFS server is available underthe /mnt/external folder. You include this path in the isoExtractor.sh file when you create a non-Windowsimage template.
Cisco UCS Director Bare Metal Agent Installation and Configuration Guide, Release 6.016
Configuring Cisco UCS Director Bare Metal AgentConfiguring the Interface for the PXE Network

C H A P T E R 5Managing Bare Metal Agent
This chapter contains the following sections:
• Changing the Default Bare Metal Agent Account, page 17
• Starting and Stopping Bare Metal Agent Services, page 18
• Checking the Status of a Bare Metal Agent, page 18
• Viewing the DHCP Configuration for a Bare Metal Agent Account, page 18
• Viewing the DHCP Logs for a Bare Metal Agent Account, page 19
• Viewing the Logs for a Bare Metal Agent Account, page 19
• Viewing Operating System Images, page 20
• Viewing PXE Service Requests, page 20
Changing the Default Bare Metal Agent AccountThe first Bare Metal Agent account that you create is designated as the default account. This account is usedby default in legacy workflows. To use a different account in the legacy workflows, you must designate thatBare Metal Agent account as the default.
Step 1 On the menu bar, choose Administration > Physical Accounts.Step 2 Click the Bare Metal Agents tab.Step 3 Click the row for the Bare Metal Agent account that you want designate as the default.Step 4 Click Set Default BMA.
Cisco UCS Director Bare Metal Agent Installation and Configuration Guide, Release 6.0 17

Starting and Stopping Bare Metal Agent Services
Step 1 On the menu bar, choose Administration > Physical Accounts.Step 2 Click the Bare Metal Agents tab.Step 3 Click the row for the Bare Metal Agent account whose services you want to start or stop.Step 4 Click one of the following:
• Start Services
• Stop Services
Step 5 Click Service Status and check the status displayed in the Enabled Services column to ensure that services have startedor stopped as desired.If services do not start, check the status displayed in the Enabled Services column. If this status indicates that servicesare not enabled, verify the configuration of your DHCP server and try again.
Checking the Status of a Bare Metal Agent
Step 1 On the menu bar, choose Administration > Physical Accounts.Step 2 Click the Bare Metal Agents tab.Step 3 Click the row for the Bare Metal Agent account whose status you want to check.Step 4 To see if services for the Bare Metal Agent account are Active or Inactive, check the Status column.Step 5 To check the status of the services, click Service Status.Step 6 To view the SSH-based test connection status, check the Reachable column.
Viewing the DHCP Configuration for a Bare Metal Agent Account
Step 1 On the menu bar, choose Administration > Physical Accounts.Step 2 Click the Bare Metal Agents tab.Step 3 Click the row for the Bare Metal Agent account for which you want to view the DHCP configuration.Step 4 Click View DHCP Configuration.
You might need to click the Down arrow at the end of the button bar to access the View DHCP Configuration option.
Cisco UCS Director Bare Metal Agent Installation and Configuration Guide, Release 6.018
Managing Bare Metal AgentStarting and Stopping Bare Metal Agent Services

The View DHCP Server Configuration window displays the contents of the DHCP server configuration file for theaccount.
Viewing the DHCP Logs for a Bare Metal Agent Account
Step 1 On the menu bar, choose Administration > Physical Accounts.Step 2 Click the Bare Metal Agents tab.Step 3 Click the row for the Bare Metal Agent account for which you want to view the DHCP logs.Step 4 Click the down arrow at the end of the button bar and choose View DHCP Logs.
The View Bare Metal Agent DHCP Log window displays the contents of the DHCP server logs for the account.
Viewing the Logs for a Bare Metal Agent Account
Step 1 On the menu bar, choose Administration > Physical Accounts.Step 2 Click the Bare Metal Agents tab.Step 3 Click the row for the Bare Metal Agent account for which you want to view the logs.Step 4 Click the down arrow at the end of the button bar and choose View BMA Logs.
The View Bare Metal Agent Log window displays the logs for the account.
Cisco UCS Director Bare Metal Agent Installation and Configuration Guide, Release 6.0 19
Managing Bare Metal AgentViewing the DHCP Logs for a Bare Metal Agent Account

Viewing Operating System ImagesYou can view a list of the operating system (OS) images that have been created and are available for a BareMetal Agent account.
Step 1 On the menu bar, choose Administration > Physical Accounts.Step 2 Click the Bare Metal Agents tab.Step 3 Click the row for the Bare Metal Agent account for which you want to view OS images.Step 4 Click View Details.Step 5 Click the BMA OS List tab.
Viewing PXE Service RequestsYou can view information about PXE requests made through a workflow that have an associated servicerequest. You cannot view details of PXE requests that are not made through a workflow, as those requestsare not associated with a service request.
The information provided about each PXE request includes the following:
• Service request ID
• Request type
• User who initiated the request
• Name of the catalog or workflow that was used to create the request
• Any comments provided by the user who initiated the request
• Time of the request
• Status of the request
• Rollback type, if applicable
Step 1 On the menu bar, choose Administration > Physical Accounts.Step 2 Click the Bare Metal Agents tab.Step 3 Click the row for the Bare Metal Agent account for which you want to view PXE service requests.Step 4 Click View Details.Step 5 Click the PXE Service Requests tab.
Cisco UCS Director Bare Metal Agent Installation and Configuration Guide, Release 6.020
Managing Bare Metal AgentViewing Operating System Images

C H A P T E R 6Adding Non-Windows OS Images
This chapter contains the following sections:
• Adding a Non-Windows OS Image in Bare Metal Agent, page 21
• Manually Adding a Linux OS Image in Bare Metal Agent, page 23
• Manually Adding a VMware vSphere ESXi OS Image in Bare Metal Agent, page 24
Adding a Non-Windows OS Image in Bare Metal AgentThis procedure creates a Non-Windows OS image template in Bare Metal Agent. You must add the OS imagetemplate before you can request a PXE boot for the OS image.
You cannot use this procedure to create supportedWindows operating systems images. Formore informationabout how to set up Windows OS images, see Adding Windows OS Images, on page 27.
Note
Before You Begin
You must have all resources and requirements in place for each operating system image that you want toinstall through a Bare Metal Agent PXE boot request.
Step 1 Copy the OS image(s) to one of the following locations:
• An appropriate location in the Bare Metal Agent directory structure
• An NFS mount point that you have added to Bare Metal Agent
Step 2 Navigate to /opt/infra and run isoExtractor.sh.
Example:The following sample isoExtractor.sh file shows a scenario for an OS image in the Bare Metal Agent directory structure.The image path field contains the location of the VMware image in the /opt/image/ folder.
Cisco UCS Director Bare Metal Agent Installation and Configuration Guide, Release 6.0 21
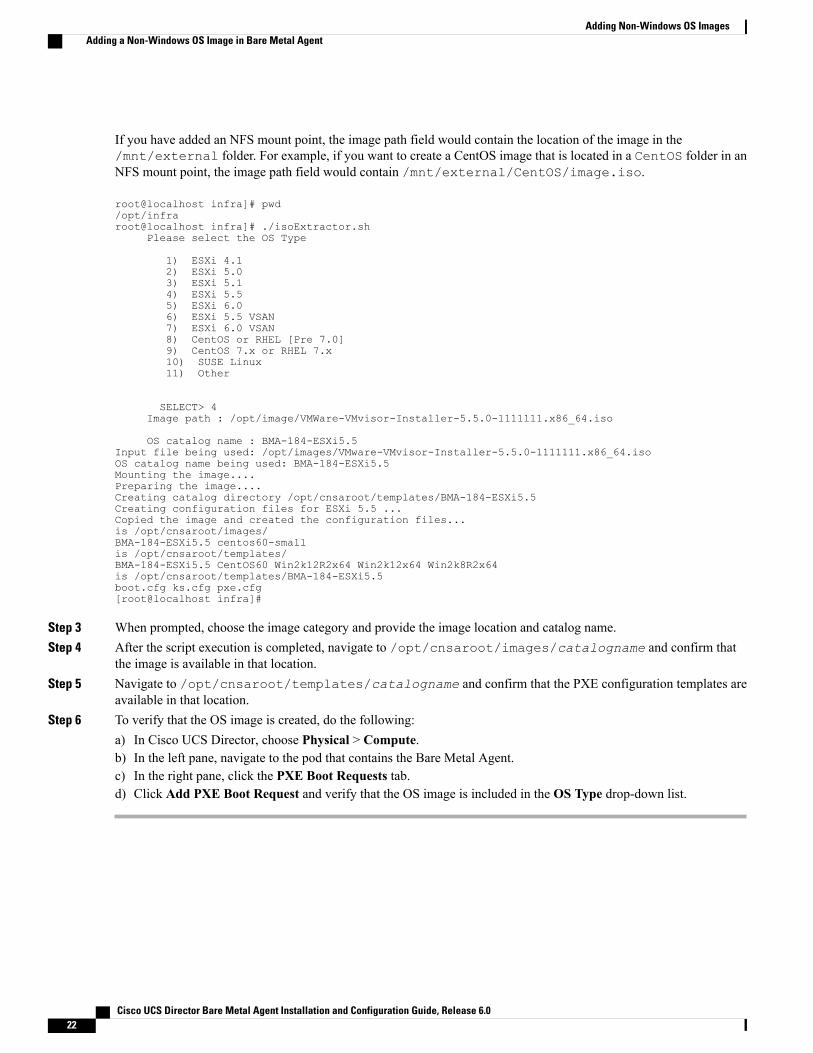
If you have added an NFS mount point, the image path field would contain the location of the image in the/mnt/external folder. For example, if you want to create a CentOS image that is located in a CentOS folder in anNFS mount point, the image path field would contain /mnt/external/CentOS/image.iso.
root@localhost infra]# pwd/opt/infraroot@localhost infra]# ./isoExtractor.sh
Please select the OS Type
1) ESXi 4.12) ESXi 5.03) ESXi 5.14) ESXi 5.55) ESXi 6.06) ESXi 5.5 VSAN7) ESXi 6.0 VSAN8) CentOS or RHEL [Pre 7.0]9) CentOS 7.x or RHEL 7.x10) SUSE Linux11) Other
SELECT> 4Image path : /opt/image/VMWare-VMvisor-Installer-5.5.0-1111111.x86_64.iso
OS catalog name : BMA-184-ESXi5.5Input file being used: /opt/images/VMware-VMvisor-Installer-5.5.0-1111111.x86_64.isoOS catalog name being used: BMA-184-ESXi5.5Mounting the image....Preparing the image....Creating catalog directory /opt/cnsaroot/templates/BMA-184-ESXi5.5Creating configuration files for ESXi 5.5 ...Copied the image and created the configuration files...is /opt/cnsaroot/images/BMA-184-ESXi5.5 centos60-smallis /opt/cnsaroot/templates/BMA-184-ESXi5.5 CentOS60 Win2k12R2x64 Win2k12x64 Win2k8R2x64is /opt/cnsaroot/templates/BMA-184-ESXi5.5boot.cfg ks.cfg pxe.cfg[root@localhost infra]#
Step 3 When prompted, choose the image category and provide the image location and catalog name.Step 4 After the script execution is completed, navigate to /opt/cnsaroot/images/catalogname and confirm that
the image is available in that location.Step 5 Navigate to /opt/cnsaroot/templates/catalogname and confirm that the PXE configuration templates are
available in that location.Step 6 To verify that the OS image is created, do the following:
a) In Cisco UCS Director, choose Physical > Compute.b) In the left pane, navigate to the pod that contains the Bare Metal Agent.c) In the right pane, click the PXE Boot Requests tab.d) Click Add PXE Boot Request and verify that the OS image is included in the OS Type drop-down list.
Cisco UCS Director Bare Metal Agent Installation and Configuration Guide, Release 6.022
Adding Non-Windows OS ImagesAdding a Non-Windows OS Image in Bare Metal Agent
Manually Adding a Linux OS Image in Bare Metal Agent
Step 1 Create a directory for the operating system image in the /opt/cnsaroot/images directory of the BareMetal AgentVM.mkdir /opt/cnsaroot/images/image_name
This directory is used to store the operating system image files required for PXE installation.
This directory name is included in the OS Type drop-down list in the Setup PXE Boot task. We recommendthat you make the directory name descriptive enough that you can identify the operating system of the imageswithin it. For example, we recommend that you name the directory RHEL6.2 or CentOS5.
Note
Step 2 Create a directory for the operating system image with the same name as the one that you created in Step 1 in the/opt/cnsaroot/templates directory of the Bare Metal Agent VM.mkdir /opt/csnaroot/templates/new_image_name
This directory is used to store the Kickstart and PXE configuration template files for the operating system image.
Step 3 Copy the .iso file or files for the required operating system to the /tmp directory of the Bare Metal Agent VM.Step 4 Mount the .iso file to the iso directory.
mount –o loop /tmp/.iso_file /mnt/iso
Step 5 Copy the entire contents of the .iso file to the /opt/cnsaroot/images/image_name directory that you createdin Step 1.cp –R /mnt/iso/* /opt/cnsaroot/images/image_name
Make sure that you use the cp –R command to recursively copy the entire contents of the .iso file. Thiscommand copies the underlying directories and their contents also.
Note
Step 6 When the copy operation is complete, unmount the .iso file.umount /mnt/iso
Step 7 If the operating system image consists of more than one .iso file, repeat Steps 5, 6, and 7 for each .iso file until thecontents of all .iso files have been copied to the /opt/cnsaroot/images/image_name directory.
Step 8 Create a ks.cfg file and a pxe.cfg file in the /opt/cnsaroot/templates/image_name directory that youcreated in Step 2.
touch /opt/cnsaroot/templates/image_name/ks.cfgtouch /opt/cnsaroot/templates/image_name/pxe.cfg
Step 9 Add the required configuration information to the ks.cfg and pxe.cfg files.For sample ks.cfg and pxe.cfg files and more information about these files, see Sample Operating SystemConfiguration Template Files, on page 77.
Step 10 Create a soft link in the /var/www/html directory for this operating system image.ln –s /opt/cnsaroot/images/image_name /var/www/html/
Step 11 (Optional) If necessary, update the initrd.img and vmlinuz files for the operating system image as follows:a) Copy the initrd.img and vmlinuz files from the /opt/cnsaroot/images/image_name directory to
the /opt/cnsaroot/ directory.
Cisco UCS Director Bare Metal Agent Installation and Configuration Guide, Release 6.0 23
Adding Non-Windows OS ImagesManually Adding a Linux OS Image in Bare Metal Agent
b) Overwrite the current files in this location.
Step 12 In Cisco UCS Director, verify that the operating system image is available from theOS Type drop-down list in the SetupPXE Boot task.Wait two minutes, or for whatever duration has been set for the Bare Metal Agent synchronization frequency. By default,Bare Metal Agent is synchronized with Cisco UCS Director every two minutes. You can change this frequency with thebma.sync.frequency property in service.properties.template file under /opt/infra in the Bare Metal Agent VM.
Manually Adding a VMware vSphere ESXi OS Image in BareMetal Agent
Step 1 Create a directory for the operating system image data in the /opt/cnsaroot directory of the Bare Metal Agent VM.mkdir /opt/cnsaroot/images
This directory is used to store the operating system image files required for PXE installation.
This directory name is included in the OS Type drop-down list in the Setup PXE Boot task. We recommendthat you make the directory name descriptive enough that you can identify the operating system of the imageswithin it. For example, we recommend that you name the directory ESXi5.0-update1 or ESXi5.1.
Note
Step 2 Create a directory for the operating system image with the same name as the one that you created in Step 1 in the/opt/cnsaroot/templates directory of the Bare Metal Agent VM.mkdir /opt/csnaroot/templates/new_image_name
This directory is used to store the Kickstart and PXE configuration template files for the operating system image.
Step 3 Copy the .iso file or files for the required operating system to the /tmp directory of the Bare Metal Agent VM.Step 4 Mount the .iso file to the iso directory.
mount –o loop /tmp/.iso_file /mnt/iso
Step 5 Copy the entire contents of the .iso file to the /opt/cnsaroot/image_name directory that you created in Step1.cp –R /mnt/iso/* /opt/cnsaroot/image_name
Make sure that you use the cp –R command to recursively copy the entire contents of the .iso file. Thiscommand copies the underlying directories and their contents also.
Note
Step 6 When the copy operation is complete, unmount the .iso file.umount /mnt/iso
Step 7 If the operating system image consists of more than one .iso file, repeat Steps 5, 6, and 7 for each .iso file until thecontents of all .iso files have been copied to the /opt/cnsaroot/image_name directory.
Step 8 Create a ks.cfg file and a pxe.cfg file in the /opt/cnsaroot/templates/image_name directory that youcreated in Step 2.
touch /opt/cnsaroot/templates/image_name/ks.cfg
Cisco UCS Director Bare Metal Agent Installation and Configuration Guide, Release 6.024
Adding Non-Windows OS ImagesManually Adding a VMware vSphere ESXi OS Image in Bare Metal Agent

touch /opt/cnsaroot/templates/image_name/pxe.cfg
Step 9 Add the required configuration information to the ks.cfg and pxe.cfg files.For sample ks.cfg and pxe.cfg files and more information about these files, see Sample Operating SystemConfiguration Template Files, on page 77.
Step 10 Copy the boot.cfg file from the /opt/cnsaroot/image_name directory to the/opt/cnsaroot/templates/image_name directory.
cd /opt/cnsaroot/templates/image_name/cp /opt/cnsaroot/image_name/boot.cfg ./
Step 11 Edit the boot.cfg file in the /opt/cnsaroot/templates/image_name directory as follows:a) After the title= line, add a prefix=/image_name/ line.b) Append pxebooting ks=$PXE_KS_URL to the end of the kernelopt=runweasel line.c) Remove the leading / from all modules listed in the boot.cfg file.d) Save the edited file.
Step 12 In Cisco UCS Director, verify that the operating system image is available from theOS Type drop-down list in the SetupPXE Boot task.Wait two minutes, or for whatever duration has been set for the Bare Metal Agent synchronization frequency. By default,Bare Metal Agent is synchronized with Cisco UCS Director every two minutes. You can change this frequency with thebma.sync.frequency property in service.properties.template file under /opt/infra in the Bare Metal Agent VM.
Cisco UCS Director Bare Metal Agent Installation and Configuration Guide, Release 6.0 25
Adding Non-Windows OS ImagesManually Adding a VMware vSphere ESXi OS Image in Bare Metal Agent

Cisco UCS Director Bare Metal Agent Installation and Configuration Guide, Release 6.026
Adding Non-Windows OS ImagesManually Adding a VMware vSphere ESXi OS Image in Bare Metal Agent
C H A P T E R 7Adding Windows OS Images
This chapter contains the following sections:
• Windows Operating Systems Images for Cisco UCS Director Bare Metal Agent, page 27
• Guidelines and Limitations for Windows Operating System Images, page 28
• Windows Server 2008 R2 x64 Operating System Images, page 28
• Windows Server 2012 x64 and 2012 R2 x64 Operating System Images, page 38
• Windows Server 2016 x64 Operating System Images, page 46
• Using MEMDISK for Deploying Multiple Versions of Windows Simultaneously, page 51
Windows Operating Systems Images for Cisco UCS DirectorBare Metal Agent
Cisco UCS Director Bare Metal Agent (Bare Metal Agent) supports the followingWindows operating system(OS) images and the automated creation of their required answer files:
•Windows Server 2008 R2 x64
•Windows Server 2012 x64
•Windows Server 2012 R2 x64
You can set up all three OS images in Bare Metal Agent. However, a single Bare Metal Agent cannotsimultaneously provision more than one version of the Windows OS. For example, you can use a single BareMetal Agent to simultaneously provision several servers with Windows Server 2012 R2, but you cannot usethe same Bare Metal Agent to simultaneously provision both Windows Server 2008 R2 and Windows Server2012 R2.
You can use the same answer file for local boot and SAN boot.
The steps for setting up a Windows OS image depend upon the operating system. Make sure you use theappropriate procedure for the OS image that you are setting up. See the the "Adding Windows OperatingSystem Images" chapter.
Cisco UCS Director Bare Metal Agent Installation and Configuration Guide, Release 6.0 27
After adding Bare Metal Agent to Cisco UCS Director and running inventory, Cisco UCS Director shows asifWindows images are added by default. But noWindows images are added. InstallWindows imagesmanually.
Guidelines and Limitations for Windows Operating SystemImages
Consider the following guidelines and limitations when you set upWindows Server OS images for provisioning:
Follow a Strict Naming Convention
You must follow a strict naming convention when you configure the files for Windows OS images. The pathsand file names are case sensitive.
Mistakes in naming will require you to modify the names throughout the Bare Metal Agent datainfrastructure.
Note
Ensure That File Names, Drive Letters, and Other Information Match in All Files
If you use the automatically generated answer file, Bare Metal Agent ensures that the file names, drive lettersand other information match.
However, if you manually edit the answer file, you must ensure that the drive letter in the WinPE.wimmatches the drive letter provided in the answer file. With this configuration you are defining WinPE.wimsuch that it installs Windows from a particular location by using an answer file setup option. The static names,paths, IP addresses, drive letters, answer file name, and user name credentials must be correct.
File and folder names are case sensitive: WinPE.wim names must exactly match entries in the BootConfiguration Data (BCD) store.
Use Single Path Workflow for SAN Boot
Because the Windows installation does not support multi-path SAN boot, you must use the single pathworkflow to achieve SAN boot.
Warning
Windows Server 2008 R2 x64 Operating System ImagesThe Windows Server 2008 R2 x64 OS (Windows 2008 OS) supports PXE boot and installation operations.You can use this OS image in bare metal provisioning workflows.
Cisco UCS Director Bare Metal Agent Installation and Configuration Guide, Release 6.028
Adding Windows OS ImagesGuidelines and Limitations for Windows Operating System Images
Prerequisites for Setting Up Windows Server 2008 R2 x64 Operating SystemImages
To install and set up the environment and files that are required for the setup of Windows Server 2008 R2x64 OS images, you must first download the following:
•Windows Assessment and Deployment Kit (ADK, sometimes called as Windows ADK). Seehttps://www.microsoft.com/en-us/download/details.aspx?id=30652. The Windows ADK enables youto generate a customized WinPE. Make sure Windows ADK is compatible with Windows Server 2008R2 version.
•Windows Server 2008 R2 x64 ISO version.
You need not manually create a Windows answer file when setting up the Windows OS images. BareMetal Agent builds the Windows answer file necessary to support your PXE Boot request, based on theinformation you provide when you create the PXE boot request.
Note
Before installing theWindows 2008 R2 operating system using the BareMetal Agent VM, set up and configurethe following prerequisites:
• A customized Windows Pre-installation Environment (WinPE)
• Boot Configuration Data (BCD) file (optional)
•Windows installation files (the files extracted from the ISO image file)
We recommend that you use the Windows 2008 R2 OS ISO image file, which contains all editions,including Standard, Enterprise, Datacenter, and Web. You can typically remove all editions except forStandard and Datacenter.
Tip
After customizing the WinPE image and creating the BCD file, you must do the following:
• Set up WinPE and copy the supporting files to the Bare Metal Agent VM for the PXE boot.
• Extract the Windows 2008 R2 OS ISO image files into the appropriate image repository directory.
Creating a Customized WinPEYou need to create and customize the Windows Preinstallation Environment (WinPE) for Windows 2008 R2x64. The initial WinPE includes the minimum boot image necessary to load kernel and default device driverssupported by the Windows OS. Most servers require additional drivers, such as network interface cards andstorage controllers that enable Windows OS to detect the network and disks during installation. You mustadd these drivers to the WinPE.wim image.
Add the device drivers to the WinPE image by using the Deployment Image Servicing and Management(DISM.exe) command tool, which is installed with the Windows ADK. Make sure that you download therequired device drivers before you execute the associated DISM commands.
Cisco UCS Director Bare Metal Agent Installation and Configuration Guide, Release 6.0 29
Adding Windows OS ImagesPrerequisites for Setting Up Windows Server 2008 R2 x64 Operating System Images
The following procedure includes a sample configuration that is for reference only. The sample configurationmight or might not work in your environment. For information about adding device drivers to the WinPEimage through DISM.exe, see the documentation provided by Microsoft.
Important
Before You Begin
Complete the prerequisites listed in Prerequisites for Setting Up Windows Server 2008 R2 x64 OperatingSystem Images, on page 29.
Download the following:
•Windows Assessment and Deployment Kit (Windows ADK) specifically for Windows 2008 R2 x64.
• Required device drivers to be added to the WinPE.wim image.
Step 1 Launch the command prompt (click Start > All Programs > Accessories > Command Prompt).Step 2 Change the directory to Windows ADK installation directory.
cd C:\Program Files (x86)\Windows Kits\8.0\Assessment and Deployment Kit\Windows PreinstallationEnvironment
Here,C:\Program Files (x86)\Windows Kits\8.0\Assessment and Deployment Kit\WindowsPreinstallation Environment is the directory where Windows ADK has been installed.
Step 3 Create a new WinPE environment folder using ‘copype.cmd’ command.copype.cmd amd64 c:\win2k8r2x64
Here, c:\win2k8r2x64 is the directory where the new WinPE environment is created.Step 4 Extract the device drivers to a folder. For example, c:\cisco\drivers.Step 5 Add the device drivers to the WinPE image by using the DISM.exe command.
• Mount the WinPE.wim image:DISM.exe /mount-wim /wimfile:c:\win2k8r2x64\WinPE.wim /index:1 mountdir:c:\win2k8r2x64\mount
• Add the device drivers to WinPE.wim image by using the individual driver’s absolute path:DISM.exe /image:c:\win2k8r2x64\mount /Add-Driver /driver:C:\cisco\drivers\1.inf/driver:C:\cisco\drivers\2.inf /driver:C:\cisco\drivers\3.inf
• Alternatively, add the device drivers to theWinPE.wim image by automatically searching through all the subfoldersof the device drivers directory:DISM.exe /image:c:\win2k8r2x64\mount /Add-Driver /driver:C:\cisco\drivers /Recurse
Step 6 Unmount the WinPE.wim image and commit the changes:DISM.exe /unmount-wim /mountdir:c:\win2k8r2x64\mount /commit
When all the device drivers have been added, the WinPE.wim image is ready to be used.
Cisco UCS Director Bare Metal Agent Installation and Configuration Guide, Release 6.030
Adding Windows OS ImagesCreating a Customized WinPE
Preparing Windows Server 2008 R2 Installation Files
Before You Begin
You must have the following in place:
•WindowsAssessment andDeployment Kit (ADK, sometimes called asWindowsADK) that is compatiblewith the Windows 2008 R2 operating system
•Windows 2008 R2 ISO image
Step 1 Launch the command prompt (click Start > All Programs > Accessories > Command Prompt).Step 2 Create a new folder and extract the Windows 2008 R2 ISO image installation files to the folder.
mkdir c:\win2k8r2x64-iso
Step 3 Take a backup copy of the install.wim file.cd c:\win2k8r2x64-iso\sourcescopy install.wim install.wim.backup
The backup is recommended as device drivers will be added to the install.wim file in the subsequent steps. The devicedrivers are used during the installation of the Windows 2008 R2 operating system.
Step 4 Create a folder to mount the c:\win2k8r2x64-iso\sources\install.wim file.mkdir c:\win2k8r2x64-mount
Step 5 Change the directory to the Windows ADK installation directory.cd C:\Program Files (x86)\Windows Kits\8.0\Assessment and Deployment Kit\Deployment Tools\amd64\DISM
Step 6 Add the device drivers to the install.wim image by using the DISM.exe command from the Windows ADK installationdirectory.
Step 7 List the supported Windows 2008 R2 Editions.dism.exe /Get-ImageInfo /imagefile:c:\win2k8r2x64-iso\sources\install.wim
The supported Windows 2008 R2 editions are listed, with each edition represented by an Index ID. Choose thecorresponding Index ID of the Windows 2008 R2 Edition that you want to install through PXE.
Index : 1Name : Windows Server 2008 R2 SERVERSTANDARDDescription : Windows Server 2008 R2 SERVERSTANDARDSize : 10,510,509,480 bytes
Index : 2Name : Windows Server 2008 R2 SERVERSTANDARDCOREDescription : Windows Server 2008 R2 SERVERSTANDARDCORESize : 3,563,998,339 bytes
Index : 3Name : Windows Server 2008 R2 SERVERENTERPRISEDescription : Windows Server 2008 R2 SERVERENTERPRISESize : 10,510,890,698 bytes
Index : 4Name : Windows Server 2008 R2 SERVERENTERPRISECOREDescription : Windows Server 2008 R2 SERVERENTERPRISECORESize : 3,563,972,455 bytes
Cisco UCS Director Bare Metal Agent Installation and Configuration Guide, Release 6.0 31
Adding Windows OS ImagesPreparing Windows Server 2008 R2 Installation Files
Index : 5Name : Windows Server 2008 R2 SERVERDATACENTERDescription : Windows Server 2008 R2 SERVERDATACENTERSize : 10,510,997,874 bytes
Index : 6Name : Windows Server 2008 R2 SERVERDATACENTERCOREDescription : Windows Server 2008 R2 SERVERDATACENTERCORESize : 3,564,010,572 bytes
Index : 7Name : Windows Server 2008 R2 SERVERWEBDescription : Windows Server 2008 R2 SERVERWEBSize : 10,520,088,768 bytes
Index : 8Name : Windows Server 2008 R2 SERVERWEBCOREDescription : Windows Server 2008 R2 SERVERWEBCORESize : 3,562,616,654 bytes
Step 8 Mount the install.wim image with Index ID 5 to install Windows 2008 R2 Datacenter Edition.DISM.exe /mount-wim /wimfile:c:\win2k8r2x64-iso\sources\install.wim /index:5mountdir:c:\win2k8r2x64-mount
Step 9 Add device drivers to the install.wim image by using the individual driver's absolute path.DISM.exe /image:c:\win2k8r2x64-mount /Add-Driver /driver:C:\cisco\drivers\1.inf/driver:C:\cisco\drivers\2.inf /driver:C:\cisco\drivers\3.inf
Alternatively, you can add the device drivers to the install.wim image by automatically searching through all the subfoldersof the device drivers directory.DISM.exe /image:c:\win2k8r2x64-mount /Add-Driver /driver:C:\cisco\drivers /Recurse
Step 10 Unmount the install.wim image and commit the changes.DISM.exe /unmount-wim /mountdir:c:\win2k8r2x64-mount /commit
When all the device drivers have been added, the install.wim image is ready to beused.
Note
Creating a Boot Configuration Data FileThe Boot Configuration Data (BCD) file contains the boot configuration parameters. It controls how theoperating system is started inWindows and is used to load the base kernel (WinPE.wim) from the PXE server.Creating a new BCD file is optional. The Bare Metal Agent provides a BCD file with default configurationout of the box. The absolute location path of the BCD file is /opt/cnsaroot/Boot/BCD. The defaultBCD file can be used to install any Windows OS version, unless it is required to be customized for a specificversion of Windows.
By default, the BCD file points to /opt/cnsaroot/Boot/WinPE.wim and/opt/cnsaroot/Boot/boot.sdi files. These filenames are case sensitive.
Cisco UCS Director Bare Metal Agent Installation and Configuration Guide, Release 6.032
Adding Windows OS ImagesCreating a Boot Configuration Data File

The new BCD file can be created through the BCDEdit command-line tool. This tool is commonly availablein the Windows operating system under root directory, C:\Windows\system32.
Step 1 Launch the command prompt (click Start > All Programs > Accessories > Command Prompt).Step 2 Create a new working directory to create a new BCD file. (At the command prompt, type C:\> mkdir
C:\NewBCDStore)Step 3 Change the directory to C:\NewBCDStore. (At the command prompt, type C:\> cd C:\NewBCDStore)Step 4 Run the below sequence of commands to create a new BCD file:
C:\NewBCDStore> C:\Windows\System32\bcdedit.exe /createstore BCD
C:\NewBCDStore> C:\Windows\System32\bcdedit.exe /store BCD /create {ramdiskoptions} /d "Ramdiskoptions"
C:\NewBCDStore> C:\Windows\System32\bcdedit.exe /store BCD /set {ramdiskoptions} ramdisksdideviceboot
C:\NewBCDStore> C:\Windows\System32\bcdedit.exe /store BCD /set {ramdiskoptions} ramdisksdipath\Boot\boot.sdi
C:\NewBCDStore> C:\Windows\System32\bcdedit.exe /store BCD /create /d "My WinPE Boot Image"/application osloader
Running the above command generates and displays a new GUID as the command output.Step 5 Run the following commands. When you run these commands, replace the GUID (for example:
{a20f8db8-7459-11e2-8ec3-00155d37efa7}) with the GUID generated from your system:
C:\NewBCDStore> C:\Windows\System32\bcdedit.exe /store BCD /set {a20f8db8-7459-11e2-8ec3-00155d37efa7}systemroot \Windows
C:\NewBCDStore> C:\Windows\System32\bcdedit.exe /store BCD /set {a20f8db8-7459-11e2-8ec3-00155d37efa7}detecthal Yes
C:\NewBCDStore> C:\Windows\System32\bcdedit.exe /store BCD /set {a20f8db8-7459-11e2-8ec3-00155d37efa7}winpe Yes
C:\NewBCDStore> C:\Windows\System32\bcdedit.exe /store BCD /set {a20f8db8-7459-11e2-8ec3-00155d37efa7}osdevice ramdisk=[boot]\Boot\WinPE.wim,{ramdiskoptions}
C:\NewBCDStore> C:\Windows\System32\bcdedit.exe /store BCD /set {a20f8db8-7459-11e2-8ec3-00155d37efa7}device ramdisk=[boot]\Boot\WinPE.wim,{ramdiskoptions}
C:\NewBCDStore> C:\Windows\System32\bcdedit.exe /store BCD /create {bootmgr} /d "Windows 2008r2BootManager"
C:\NewBCDStore> C:\Windows\System32\bcdedit.exe /store BCD /set {bootmgr} timeout 30
C:\NewBCDStore> C:\Windows\System32\bcdedit.exe /store BCD /displayorder{a20f8db8-7459-11e2-8ec3-00155d37efa7}
Use the following command to verify that the configurations are correct:C:\NewBCDStore> C:\Windows\System32\bcdedit.exe /store BCD /enum all
Cisco UCS Director Bare Metal Agent Installation and Configuration Guide, Release 6.0 33
Adding Windows OS ImagesCreating a Boot Configuration Data File

What to Do Next
Verify that you have appropriate Windows 2008 R2 OS installation files inside the ISO image.
Verifying the Installation files For All Editions of Windows 2008 R2
Before You Begin
Mount or extract the Windows 2008 R2 ISO image.
Verify that you have the following CLG files under the SOURCE folder of mounted or extracted Windows 2008 R2 ISOimage:
• install_Windows Server 2008 R2 SERVERDATACENTER.clg
• install_Windows Server 2008 R2 SERVERDATACENTERCORE.clg
• install_Windows Server 2008 R2 SERVERENTERPRISE.clg
• install_Windows Server 2008 R2 SERVERENTERPRISECORE.clg
• install_Windows Server 2008 R2 SERVERSTANDARD.clg
• install_Windows Server 2008 R2 SERVERSTANDARDCORE.clg
• install_Windows Server 2008 R2 SERVERDATAWEB.clg
• install_Windows Server 2008 R2 SERVERDATAWEBCORE.clg
What to Do Next
Edit theWinPE.wim image file to add PowerShell packages and modify the startnet.cmd file with PXE installcommands and parameters as described in Customizing and Copying the WinPE.wim and PXE Boot Filesfor Windows 2008 R2, on page 34.
Customizing and Copying the WinPE.wim and PXE Boot Files for Windows2008 R2
Step 1 Launch the command prompt (click Start > All Programs > Accessories > Command Prompt).Step 2 Change the directory to WinPE environment that was created.
cd c:\win2k8r2x64
Cisco UCS Director Bare Metal Agent Installation and Configuration Guide, Release 6.034
Adding Windows OS ImagesVerifying the Installation files For All Editions of Windows 2008 R2

Step 3 Mount WinPE.wim image to a folder called 'mount' under the c:\win2k8r2x64 directory.DISM.exe /mount-wim /wimfile:c:\win2k8r2x64\WinPE.wim /index:1 /mountdir:c:\win2k8r2x64\mount
Step 4 In WinPE.wim, add the required PowerShell packages and edit the paths in each command with the correct mount pointand ADK installation path for your environment.
The Powershell package files shown below are provided for your reference only. The PowerShell packages andfile names that you need to add to WinPE.wim are dependent upon the version ofWindows and WinPE.wim.Todetermine which PowerShell packages you need to add, see the compliance report on the Microsoft website.For information about the commands to add the necessary packages for PowerShell, see the WinPE: AddingPowerShell support to Windows PE Technet Page.
Note
Dism /Add-Package /Image:"C:\win2k8r2x64\mount" /PackagePath:"C:\Program Files (x86)\WindowsKits\8.0\Assessment and Deployment Kit\Windows PreinstallationEnvironment\amd64\WinPE_OCs\WinPE-WMI.cab"
Dism /Add-Package /Image:"C:\win2k8r2x64\mount" /PackagePath:"C:\Program Files (x86)\WindowsKits\8.0\Assessment and Deployment Kit\Windows PreinstallationEnvironment\amd64\WinPE_OCs\en-us\WinPE-WMI_en-us.cab"
Dism /Add-Package /Image:"C:\win2k8r2x64\mount" /PackagePath:"C:\Program Files (x86)\WindowsKits\8.0\Assessment and Deployment Kit\Windows PreinstallationEnvironment\amd64\WinPE_OCs\WinPE-NetFX.cab"
Dism /Add-Package /Image:"C:\win2k8r2x64\mount" /PackagePath:"C:\Program Files (x86)\WindowsKits\8.0\Assessment and Deployment Kit\Windows PreinstallationEnvironment\amd64\WinPE_OCs\en-us\WinPE-NetFX_en-us.cab"
Dism /Add-Package /Image:"C:\win2k8r2x64\mount" /PackagePath:"C:\Program Files (x86)\WindowsKits\8.0\Assessment and Deployment Kit\Windows PreinstallationEnvironment\amd64\WinPE_OCs\WinPE-Scripting.cab"
Dism /Add-Package /Image:"C:\win2k8r2x64\mount" /PackagePath:"C:\Program Files (x86)\WindowsKits\8.0\Assessment and Deployment Kit\Windows PreinstallationEnvironment\amd64\WinPE_OCs\en-us\WinPE-Scripting_en-us.cab"
Dism /Add-Package /Image:"C:\win2k8r2x64\mount" /PackagePath:"C:\Program Files (x86)\WindowsKits\8.0\Assessment and Deployment Kit\Windows PreinstallationEnvironment\amd64\WinPE_OCs\WinPE-PowerShell.cab"
Dism /Add-Package /Image:"C:\win2k8r2x64\mount" /PackagePath:"C:\Program Files (x86)\WindowsKits\8.0\Assessment and Deployment Kit\Windows PreinstallationEnvironment\amd64\WinPE_OCs\en-us\WinPE-PowerShell_en-us.cab"
Dism /Add-Package /Image:"C:\win2k8r2x64\mount" /PackagePath:"C:\Program Files (x86)\WindowsKits\8.0\Assessment and Deployment Kit\Windows PreinstallationEnvironment\amd64\WinPE_OCs\WinPE-StorageWMI.cab"
Dism /Add-Package /Image:"C:\win2k8r2x64\mount" /PackagePath:"C:\Program Files (x86)\WindowsKits\8.0\Assessment and Deployment Kit\Windows PreinstallationEnvironment\amd64\WinPE_OCs\en-us\WinPE-StorageWMI_en-us.cab"
Dism /Add-Package /Image:"C:\win2k8r2x64\mount" /PackagePath:"C:\Program Files (x86)\WindowsKits\8.0\Assessment and Deployment Kit\Windows PreinstallationEnvironment\amd64\WinPE_OCs\WinPE-DismCmdlets.cab"
Cisco UCS Director Bare Metal Agent Installation and Configuration Guide, Release 6.0 35
Adding Windows OS ImagesCustomizing and Copying the WinPE.wim and PXE Boot Files for Windows 2008 R2

Dism /Add-Package /Image:"C:\win2k8r2x64\mount" /PackagePath:"C:\Program Files (x86)\WindowsKits\8.0\Assessment and Deployment Kit\Windows PreinstallationEnvironment\amd64\WinPE_OCs\en-us\WinPE-DismCmdlets_en-us.cab"
Step 5 Navigate to the mount folder (c:\win2k8r2x64\mount in the code example above) and verify that you can see thedata inside the mount folder.
Step 6 Navigate to \windows\system32 in the mount folder and do the following:a) Edit startnet.cmd.b) Paste the following entries into the file in the order shown, to update the IP address and other details as required for
your environment:
wpeinitwpeutil.exe InitializeNetworkwpeutil.exe disablefirewallECHO OFFnet use R: \\Baremetal_Agent_PXE_IP_Address\bits /user:user_id passwordECHO ONR:Powershell.exe -NonInteractive -NoLogo -ExecutionPolicy bypass -command R:\enroute.ps1
Note • Use the drvload command when a driver has failed to be installed. For example, include the following linein the startnet.cmd file to install a fnic driver:
drvload <ipaddress of share>:\\<the_fnic.inf>
Use the drvload command only when you face issues in installing drivers. Otherwise, follow the standardprocess to inject a driver to WinPE.
• Make sure that you modify the IP address in all the entries so that they point to the Bare Metal Agent IPaddress.
• All drive letter references (such as the reference to an R: drive) must match in both the startnet.cmdfile and the Windows answer file. By default, Bare Metal Agent comes with an R: drive letter assignment.
Step 7 Save the startnet.cmd file.Step 8 After you have confirmed that thestartnet.cmd is updated correctly, unmountWinPE.wimwith the DISMUnmount
command and use the /commit option to save the modified startnet.cmd file.
DISM.exe /Unmount-Wim /Mountdir:c:\win2k8r2x64\mount /commit
Do not leave any files open that are located in the mounted directory when you unmount WinPE.wim. Ifyou have any files open, the unmount process might fail.
Caution
What to Do Next
Copy the customized Windows installation files to the Bare Metal Agent VM.
Cisco UCS Director Bare Metal Agent Installation and Configuration Guide, Release 6.036
Adding Windows OS ImagesCustomizing and Copying the WinPE.wim and PXE Boot Files for Windows 2008 R2
Copying the Customized Windows Installation Files to the Bare Metal AgentVM
Before You Begin
You must have the following in place:
• Customized WinPE.wim image file
• Customized install.wim image file
• Customized BCD file (optional)
•Windows 2008 R2 ISO image
Step 1 Copy the following files into the Bare Metal Agent VM. You can use either WinSCP or an equivalent tool to copy thefiles.
• Customized WinPE.wim image file from c:\win2k8r2x64 to the /opt/cnsaroot/Boot folder.
• Customized BCD file from c:\NewBCDStore to the /opt/cnsaroot/Boot folder (optional).
• Customized install.wim image file from c:\win2k8r2x64-iso\sources to /tmp folder.
•Windows 2008 R2 ISO image file into the /tmp folder.
Step 2 Log on to the Bare Metal Agent VM using SSH client as 'root' user.Step 3 Change the folder to /tmp.Step 4 Mount the Windows 2008 R2 ISO image to the /mnt folder.
mount -o loop /tmp/(Windows-2008R2-ISO-Filename) /mnt
Step 5 Copy the Windows 2008 R2 install files to /samba/Win2k8R2x64 folder.cd /samba/Win2k8R2x64cp -r /mnt/*
Step 6 Verify that all the Windows 2008 R2 installation files are copied.Step 7 Move the install.wim image file from /tmp to /samba/Win2k8R2x64/sources folder.
mv /tmp/install.wim /samba/Win2k8R2x64/sources/
Step 8 Unmount the Windows 2008 R2 ISO image from the /mnt folder.umount /mnt
Step 9 Open the /samba/notifications/notify.ps1 file and verify that the IP address in the file matches that of thePXE IP address of Bare Metal Agent.
Cisco UCS Director Bare Metal Agent Installation and Configuration Guide, Release 6.0 37
Adding Windows OS ImagesCopying the Customized Windows Installation Files to the Bare Metal Agent VM
Windows Server 2012 x64 and 2012 R2 x64 Operating SystemImages
Cisco UCS Director Bare Metal Agent supports PXE boot and installation operations for Windows 2012 x64or 2012 R2 x64 OS images and PXE boot tasks used in bare metal provisioning workflows.
If you need to support bothWindows 2012 and 2012 R2, you must perform the image setup process twice,once for each OS. Although it is possible to set up a single WinPE file that supports multiple WindowsOS versions, we recommend that you set up a separate WinPE file for each OS.
Note
Prerequisites for Setting Up Windows Server 2012 x64 and 2012 R2 x64Operating System Images
Before you can install a Windows 2012 or 2012 R2 OS image in the /opt/cnsaroot/Boot directory ofthe Bare Metal Agent VM, you must install and set up the following prerequisites:
•WindowsAssessment andDeployment Kit (WindowsADK, version 8.0 or later recommended, dependingon the Windows version compatibilities with respect to the WinPE.wim file)
• A customized Windows Preinstallation Environment (WinPE.wim) and PXE supporting files
• Boot Configuration Data (BCD) file
•Windows installation files (the files extracted from the ISO)
You do not need to manually create a Windows answer file when setting up Windows OS images. BareMetal Agent builds the Windows answer file necessary to support your PXE Boot request, based on theinformation you provide when you create the PXE boot request.
Note
To install and set up the images, download the following:
•Windows Assessment and Deployment Kit that supports Windows Server 2012 and Windows Server2012 R2. For more information, see http://technet.microsoft.com/en-us/library/dn613859.aspx.
•Windows Server 2012 x64 and/or 2012 R2 x64 (Standard and Datacenter editions are required).
We recommend that you use the ISO download file, which contains all editions, including Standard,Enterprise, Datacenter, andWeb. You can typically remove all editions except for Standard and Datacenter.
Tip
After the system image is in place, perform the following additional procedures:
• Set up WinPE and copy the supporting files to the Network Service Agent server for the PXE boot.
• Copy the Windows installation files to the server path.
Cisco UCS Director Bare Metal Agent Installation and Configuration Guide, Release 6.038
Adding Windows OS ImagesWindows Server 2012 x64 and 2012 R2 x64 Operating System Images

Creating a Custom WinPE and Copying the PXE Supported Files for Windows2012
The /opt/cnsaroot/Boot folder is static, and each Bare Metal Agent can have only one boot folder.Note
Before You Begin
Complete the prerequisites listed in Prerequisites for Setting Up Windows Server 2012 x64 and 2012 R2 x64Operating System Images, on page 38.
Step 1 Download an ADK version that supports Windows 2012 and install it on a Windows 2012 machine.When you specify the features to include in the download, you must include the Windows PE and DeploymentTools.
Note
Step 2 Navigate to the Windows Pre-installation Environment folder in the ADK tools and execute copype.cmd to create thefiles that WinPE requires.
Copype.cmd amd64 C:\WinPE_amd64
The target directory contains the WinPE.wim file. The latest ADK versions create a boot.vim file, which needs tobe renamed to WinPE.wim.
Step 3 In the Windows machine that has the ADK tools installed, create a directory. Copy the WinPE.wim file from/opt/cnsaroot/Boot to the directory you have created.
Step 4 At the command line, navigate to the ADK installed folder.Step 5 Add the drivers from their folder locations to the WinPE image.
Use the following DISM.exe command when you know the paths to the drivers that you want to add.
// The DISM.exe command mounts the WinPE to a folder.// In this example, the c:\win2k12x64 directory and the \mount subdirectory have been created beforerunning the command.DISM.exe /mount-wim /wimfile:c:\win2k12x64\WinPE.wim /index:1 /mountdir:c:\win2k12x64\mount
// To add individual driver files to WinPE image, use the following format.DISM.exe /image:c:\win2k12x64\mount /Add-Driver /driver:C:\test\drivers\1.inf/driver:C:\test\drivers\2.inf /driver:C:\test\drivers\3.inf
Use the following DISM.exe command when you do not know the paths to the drivers that you want to add and needto query all subfolders.
// The DISM.exe command mounts the WinPE to a folder.// In this example, the c:\win2k12x64 directory and the \mount subdirectory have been created beforerunning the command.DISM.exe /mount-wim /wimfile:c:\win2k12x64\WinPE.wim /index:1 /mountdir:c:\win2k12x64\mount
// To add individual driver files to WinPE image, use the following format.
Cisco UCS Director Bare Metal Agent Installation and Configuration Guide, Release 6.0 39
Adding Windows OS ImagesCreating a Custom WinPE and Copying the PXE Supported Files for Windows 2012

DISM.exe /image:c:\win2k12x64\mount /Add-Driver /driver:c:\test\drivers /Recurse
Step 6 Mount WinPE.wim to a folder.Step 7 In WinPE.wim, add the required PowerShell packages and edit the paths in each command with the correct mount point
and ADK installation path for your environment.The PowerShell packages and file names that you need to add to WinPE.wim are dependent upon the versionof Windows and WinPE.wim.To determine which PowerShell packages you need to add, see the compliancereport on the Microsoft website. For information about the commands to add the necessary packages forPowerShell, see theWinPE: Adding PowerShell support toWindows PE Technet Page. The PowerShell packagefiles shown below are provided for reference andwill vary depending on the version ofWindows andWinPE.wim.
Note
\\ Sample PowerShell package files.\\ The PowerShell packages and file names that you need to add to WinPE.wim vary depending on theversion of Windows and WinPE.wim.
Dism /Add-Package /Image:"C:\win2k12x64\mount" /PackagePath:"C:\Program Files\WindowsKits\8.1\Assessment and Deployment Kit\Windows PreinstallationEnvironment\amd64\WinPE_OCs\WinPE-WMI.cab"
Dism /Add-Package /Image:"C:\win2k12x64\mount" /PackagePath:"C:\Program Files\WindowsKits\8.1\Assessment and Deployment Kit\Windows PreinstallationEnvironment\amd64\WinPE_OCs\en-us\WinPE-WMI_en-us.cab"
Dism /Add-Package /Image:"C:\win2k12x64\mount" /PackagePath:"C:\Program Files\WindowsKits\8.1\Assessment and Deployment Kit\Windows PreinstallationEnvironment\amd64\WinPE_OCs\WinPE-NetFX.cab"
Dism /Add-Package /Image:"C:\win2k12x64\mount" /PackagePath:"C:\Program Files\WindowsKits\8.1\Assessment and Deployment Kit\Windows PreinstallationEnvironment\amd64\WinPE_OCs\en-us\WinPE-NetFX_en-us.cab"
Dism /Add-Package /Image:"C:\win2k12x64\mount" /PackagePath:"C:\Program Files\WindowsKits\8.1\Assessment and Deployment Kit\Windows PreinstallationEnvironment\amd64\WinPE_OCs\WinPE-Scripting.cab"
Dism /Add-Package /Image:"C:\win2k12x64\mount" /PackagePath:"C:\Program Files\WindowsKits\8.1\Assessment and Deployment Kit\Windows PreinstallationEnvironment\amd64\WinPE_OCs\en-us\WinPE-Scripting_en-us.cab"
Dism /Add-Package /Image:"C:\win2k12x64\mount" /PackagePath:"C:\Program Files\WindowsKits\8.1\Assessment and Deployment Kit\Windows PreinstallationEnvironment\amd64\WinPE_OCs\WinPE-PowerShell.cab"
Dism /Add-Package /Image:"C:\win2k12x64\mount" /PackagePath:"C:\Program Files\WindowsKits\8.1\Assessment and Deployment Kit\Windows PreinstallationEnvironment\amd64\WinPE_OCs\en-us\WinPE-PowerShell_en-us.cab"
Dism /Add-Package /Image:"C:\win2k12x64\mount" /PackagePath:"C:\Program Files\WindowsKits\8.1\Assessment and Deployment Kit\Windows PreinstallationEnvironment\amd64\WinPE_OCs\WinPE-StorageWMI.cab"
Dism /Add-Package /Image:"C:\win2k12x64\mount" /PackagePath:"C:\Program Files\WindowsKits\8.1\Assessment and Deployment Kit\Windows Preinstallation
Cisco UCS Director Bare Metal Agent Installation and Configuration Guide, Release 6.040
Adding Windows OS ImagesCreating a Custom WinPE and Copying the PXE Supported Files for Windows 2012
Environment\amd64\WinPE_OCs\en-us\WinPE-StorageWMI_en-us.cab"
Dism /Add-Package /Image:"C:\win2k12x64\mount" /PackagePath:"C:\Program Files\WindowsKits\8.1\Assessment and Deployment Kit\Windows PreinstallationEnvironment\amd64\WinPE_OCs\WinPE-DismCmdlets.cab"
Dism /Add-Package /Image:"C:\win2k12x64\mount" /PackagePath:"C:\Program Files\WindowsKits\8.1\Assessment and Deployment Kit\Windows PreinstallationEnvironment\amd64\WinPE_OCs\en-us\WinPE-DismCmdlets_en-us.cab"
Step 8 Navigate to \windows\system32 in the mount folder. In the startnet.cmd, update the IP address for BareMetalAgent.Note • Do not change any information in the startnet.cmd file, except for the Bare Metal Agent IP address.
• Make sure that you modify the IP addresses in all the entries so that they point to the Bare Metal AgentIP address.
• All drive letter references (such as the reference to an R: drive) must match in both the startnet.cmdfile and the Windows answer file. By default, Bare Metal Agent comes with an R: drive letter assignment.
Step 9 Unmount theWinPE, commit the changes, and copy the file to the /opt/cnsaroot/Boot directory in the BareMetalAgent VM.DISM.exe /Unmount-Wim /Mountdir:c:\win2k12x64\mount /commit
What to Do Next
Install and set up (as necessary) the Boot Configuration Data (BCD) file.
Creating a Custom WinPE and Copying the PXE Supported Files for Windows2012 R2
For Windows Server 2012 R2 x64, Bare Metal Agent provides the WinPE and supported PXE files. You needonly add any required drivers to the WinPE.wim file, and then edit the WinPE.wim file to change the IPaddress in the startnet.cmd file to the PXE IP address for your Bare Metal Agent.
The /opt/cnsaroot/Boot folder is static, and each Bare Metal Agent can have only one boot folder.Note
Before You Begin
Complete the prerequisites listed in Prerequisites for Setting Up Windows Server 2012 x64 and 2012 R2 x64Operating System Images, on page 38.
Step 1 Download an ADK version that supports Windows 2012 R2 and install it on a Windows 2012 R2 machine.When you specify the features to include in the download, you must include the Windows PE and DeploymentTools.
Note
Cisco UCS Director Bare Metal Agent Installation and Configuration Guide, Release 6.0 41
Adding Windows OS ImagesCreating a Custom WinPE and Copying the PXE Supported Files for Windows 2012 R2

Step 2 In the Windows machine that has the ADK tools installed, create a directory. Copy the WinPE.wim file from/opt/cnsaroot/Boot to the directory you created.
Step 3 At the command line, navigate to the ADK installed folder.Step 4 Add the drivers from their folder locations to the WinPE image.
Use the following DISM.exe command when you know the paths to the drivers that you want to add.
// The DISM.exe command mounts the WinPE to a folder.// In this example, the c:\win2k12r2x64 directory and the \mount subdirectory have been createdbefore running the command.DISM.exe /mount-wim /wimfile:c:\win2k12r2x64\WinPE.wim /index:1 /mountdir:c:\win2k12r2x64\mount
// To add individual driver files to WinPE image, use the following format.DISM.exe /image:c:\win2k12r2x64\mount /Add-Driver /driver:C:\test\drivers\1.inf/driver:C:\test\drivers\2.inf /driver:C:\test\drivers\3.inf
Use the following DISM.exe command when you do not know the paths to the drivers that you want to add and needto query all subfolders.
// The DISM.exe command mounts the WinPE to a folder.// In this example, the c:\win2k12r2x64 directory and the \mount subdirectory have been createdbefore running the command.DISM.exe /mount-wim /wimfile:c:\win2k12r2x64\WinPE.wim /index:1 /mountdir:c:\win2k12r2x64\mount
// To add individual driver files to WinPE image, use the following format.DISM.exe /image:c:\win2k12r2x64\mount /Add-Driver /driver:c:\test\drivers /Recurse
Step 5 Mount winPE.wim to a folder.Step 6 In WinPE.wim, add the required PowerShell packages and edit the paths in each command with the correct mount point
and ADK installation path for your environment.The PowerShell packages and file names that you need to add to WinPE.wim are dependent on the version ofWindows and WinPE.wim. To determine which PowerShell packages you need to add, see the compliancereport on the Microsoft website. For information about the commands to add the necessary packages forPowerShell, see theWinPE: Adding PowerShell support toWindows PE Technet Page. The PowerShell packagefiles shown below are provided for reference andwill vary depending on the version ofWindows andWinPE.wim.
Note
\\ Sample PowerShell package files.\\ The PowerShell packages and file names that you need to add to WinPE.wim vary depending on theversion of Windows and WinPE.wim.
Dism /Add-Package /Image:"C:\win2k12r2x64\mount" /PackagePath:"C:\Program Files\WindowsKits\8.1\Assessment and Deployment Kit\Windows PreinstallationEnvironment\amd64\WinPE_OCs\WinPE-WMI.cab"
Dism /Add-Package /Image:"C:\win2k12r2x64\mount" /PackagePath:"C:\Program Files\WindowsKits\8.1\Assessment and Deployment Kit\Windows PreinstallationEnvironment\amd64\WinPE_OCs\en-us\WinPE-WMI_en-us.cab"
Dism /Add-Package /Image:"C:\win2k12r2x64\mount" /PackagePath:"C:\Program Files\WindowsKits\8.1\Assessment and Deployment Kit\Windows PreinstallationEnvironment\amd64\WinPE_OCs\WinPE-NetFX.cab"
Dism /Add-Package /Image:"C:\win2k12r2x64\mount" /PackagePath:"C:\Program Files\WindowsKits\8.1\Assessment and Deployment Kit\Windows Preinstallation
Cisco UCS Director Bare Metal Agent Installation and Configuration Guide, Release 6.042
Adding Windows OS ImagesCreating a Custom WinPE and Copying the PXE Supported Files for Windows 2012 R2

Environment\amd64\WinPE_OCs\en-us\WinPE-NetFX_en-us.cab"
Dism /Add-Package /Image:"C:\win2k12r2x64\mount" /PackagePath:"C:\Program Files\WindowsKits\8.1\Assessment and Deployment Kit\Windows PreinstallationEnvironment\amd64\WinPE_OCs\WinPE-Scripting.cab"
Dism /Add-Package /Image:"C:\win2k12r2x64\mount" /PackagePath:"C:\Program Files\WindowsKits\8.1\Assessment and Deployment Kit\Windows PreinstallationEnvironment\amd64\WinPE_OCs\en-us\WinPE-Scripting_en-us.cab"
Dism /Add-Package /Image:"C:\win2k12r2x64\mount" /PackagePath:"C:\Program Files\WindowsKits\8.1\Assessment and Deployment Kit\Windows PreinstallationEnvironment\amd64\WinPE_OCs\WinPE-PowerShell.cab"
Dism /Add-Package /Image:"C:\win2k12r2x64\mount" /PackagePath:"C:\Program Files\WindowsKits\8.1\Assessment and Deployment Kit\Windows PreinstallationEnvironment\amd64\WinPE_OCs\en-us\WinPE-PowerShell_en-us.cab"
Dism /Add-Package /Image:"C:\win2k12r2x64\mount" /PackagePath:"C:\Program Files\WindowsKits\8.1\Assessment and Deployment Kit\Windows PreinstallationEnvironment\amd64\WinPE_OCs\WinPE-StorageWMI.cab"
Dism /Add-Package /Image:"C:\win2k12r2x64\mount" /PackagePath:"C:\Program Files\WindowsKits\8.1\Assessment and Deployment Kit\Windows PreinstallationEnvironment\amd64\WinPE_OCs\en-us\WinPE-StorageWMI_en-us.cab"
Dism /Add-Package /Image:"C:\win2k12r2x64\mount" /PackagePath:"C:\Program Files\WindowsKits\8.1\Assessment and Deployment Kit\Windows PreinstallationEnvironment\amd64\WinPE_OCs\WinPE-DismCmdlets.cab"
Dism /Add-Package /Image:"C:\win2k12r2x64\mount" /PackagePath:"C:\Program Files\WindowsKits\8.1\Assessment and Deployment Kit\Windows PreinstallationEnvironment\amd64\WinPE_OCs\en-us\WinPE-DismCmdlets_en-us.cab"
Step 7 Navigate to \windows\system32 in the mount folder. In the startnet.cmd, update the IP address for BareMetalAgent.Note • Do not change any information in the startnet.cmd file, except the IP address for Bare Metal Agent.
• Make sure that you modify the IP address in all the entries so that they point to the Bare Metal Agent IPaddress.
• All drive letter references (such as the reference to an R: drive) must match in both the startnet.cmdfile and the Windows answer file. By default, Bare Metal Agent comes with an R: drive letter assignment.
Step 8 Unmount theWinPE, commit the changes, and copy the file to the /opt/cnsaroot/Boot directory in the BareMetalAgent VM.DISM.exe /Unmount-Wim /Mountdir:c:\win2k12r2x64\mount /commit
What to Do Next
Install and set up (as necessary) the Boot Configuration Data (BCD) file.
Cisco UCS Director Bare Metal Agent Installation and Configuration Guide, Release 6.0 43
Adding Windows OS ImagesCreating a Custom WinPE and Copying the PXE Supported Files for Windows 2012 R2
Installing and Setting Up the Boot Configuration Data FileThe Boot Configuration Data (BCD) file contains the boot configuration parameters. It controls how theoperating system is started inWindows and is used to load the base kernel (WinPE.wim) from the PXE server.You do not need to create a BCD file. Bare Metal Agent provides a BCD file with default paths that you canuse.
By default, the BCD file points to the /Boot/WinPE.wim and boot.sdi files. These filenames are casesensitive.
We recommend that you use a set of standard names for Bare Metal Agent configuration purposes. Thefolder name should be Boot. The winpe file name should be WinPE.wim. Use corresponding filenamessuch as boot.sdi. The created BCD file should be in uppercase, and this file will not have any file extension.Bare Metal Agent delivers the BCD file to /opt/cnsaroot/Boot, which contains a default pathpointing to /opt/cnsaroot/Boot/WinPE.wim. This file can be used by anyWindows OS version,unless you change the path names.
Note
The command bcdedit.exe used to create BCD files is commonly available in theWindows operating systemsroot directory: c:\windows\system32.
Before You Begin
Create a custom WinPE and copy the PXE supported files
Step 1 Navigate to the directory that contains the bcdedit.exe command and run the following sequence of commands to createthe BCD file.The bcdedit.exe command is commonly available in the Windows operating systems root directory:c:\windows\system32.
Step 2 bcdedit.exe /createstore BCDStep 3 bcdedit.exe /store BCD /create {ramdiskoptions} /d "Ramdisk options"Step 4 bcdedit.exe /store BCD /set {ramdiskoptions} ramdisksdidevice bootStep 5 bcdedit.exe /store BCD /set {ramdiskoptions} ramdisksdipath \Boot\boot.sdiStep 6 bcdedit.exe /store BCD /create /d "My WinPE Boot Image" /application osloader
At this point, the GUID is displayed. Replace {a20f8db8-7459-11e2-8ec3-00155d37efa7} in the following steps withthe GUID from your system.
Step 7 bcdedit.exe /store BCD /set {a20f8db8-7459-11e2-8ec3-00155d37efa7} systemroot \WindowsStep 8 bcdedit.exe /store BCD /set {a20f8db8-7459-11e2-8ec3-00155d37efa7} detecthal YesStep 9 bcdedit.exe /store BCD /set {a20f8db8-7459-11e2-8ec3-00155d37efa7} winpe YesStep 10 bcdedit.exe /store BCD /set {a20f8db8-7459-11e2-8ec3-00155d37efa7} osdevice
ramdisk=[boot]\Boot\WinPE.wim,{ramdiskoptions}Step 11 bcdedit.exe /store BCD /set {a20f8db8-7459-11e2-8ec3-00155d37efa7} device
ramdisk=[boot]\Boot\WinPE.wim,{ramdiskoptions}Step 12 One of the following:
• bcdedit.exe /store BCD /create {bootmgr} /d "Windows 2012r2 BootManager"
Cisco UCS Director Bare Metal Agent Installation and Configuration Guide, Release 6.044
Adding Windows OS ImagesInstalling and Setting Up the Boot Configuration Data File
• bcdedit.exe /store BCD /create {bootmgr} /d "Windows 2012 BootManager"
Step 13 bcdedit.exe /store BCD /set {bootmgr} timeout 30Step 14 bcdedit.exe /store BCD /displayorder {a20f8db8-7459-11e2-8ec3-00155d37efa7}Step 15 Use the following command to verify that the configuration names are correct: bcdedit.exe /store BCD /enum all
What to Do Next
Copy the Windows installation ISO image to the server folder.
Copying the Windows Installation Files to the Server Folder
Before You Begin
You must have the following in place:
• Customized winPE.wim and PXE boot files in the opt/cnsaroot/Boot directory in the BareMetal Agent VM.
• Configured BCD file in the /opt/cnsaroot/Boot directory in the Bare Metal Agent VM.
•Windows installation files (ISO version).
Step 1 Extract the downloaded ISO that you obtained and validated.Step 2 Copy the folders and files from the downloaded ISO to the appropriate directory in the Bare Metal Agent VM.
Server PathWindows OS Version
/samba/Win2k12R2x64Windows 2012 R2
/samba/Win2k12x64Windows 2012
Do not change the folder paths, filenames, or foldernames.
Note
The following is a sample of the contents of a Win2k12R2x64 folder after the Window installation files have beencopied to it:
bootefisourcessupportautorun.infbootmgr.efisetup.exe
Step 3 Open the /samba/notifications/notify.ps1 file and verify that the IP address matches the PXE IP addressof Bare Metal Agent.
Cisco UCS Director Bare Metal Agent Installation and Configuration Guide, Release 6.0 45
Adding Windows OS ImagesCopying the Windows Installation Files to the Server Folder
Windows Server 2016 x64 Operating System ImagesCisco UCS Director Bare Metal Agent supports PXE boot and installation operations for Windows 2016 x64OS images and PXE boot tasks used in bare metal provisioning workflows.
Prerequisites for Setting Up Windows Server 2016 x64 Operating SystemImages
Before you can install a Windows 2016 OS image in the /opt/cnsaroot/Boot directory of the BareMetal Agent VM, you must install and set up the following prerequisites:
•WindowsAssessment andDeployment Kit (WindowsADK, version 8.0 or later recommended, dependingon the Windows version compatibilities with respect to the WinPE.wim file)
• A customized Windows Preinstallation Environment (WinPE.wim) and PXE supporting files
• Boot Configuration Data (BCD) file
•Windows installation files (the files extracted from the ISO)
You do not need to manually create a Windows answer file when setting up Windows OS images. BareMetal Agent builds the Windows answer file necessary to support your PXE Boot request, based on theinformation you provide when you create the PXE boot request.
Note
To install and set up the images, download the following:
•Windows Assessment and Deployment Kit that supports Windows Server 2016. For more information,see http://technet.microsoft.com/en-us/library/dn613859.aspx.
•Windows Server 2016 x64.
We recommend that you use the ISO download file, which contains all editions, including Standard,Enterprise, Datacenter, andWeb. You can typically remove all editions except for Standard and Datacenter.
Tip
After the system image is in place, perform the following additional procedures:
• Set up WinPE and copy the supporting files to the Network Service Agent server for the PXE boot.
• Copy the Windows installation files to the server path.
Cisco UCS Director Bare Metal Agent Installation and Configuration Guide, Release 6.046
Adding Windows OS ImagesWindows Server 2016 x64 Operating System Images
Creating a Custom WinPE and Copying the PXE Supported Files for Windows2016
The /opt/cnsaroot/Boot folder is static, and each Bare Metal Agent can have only one boot folder.Note
Before You Begin
Complete the prerequisites listed in Prerequisites for Setting UpWindows Server 2016 x64 Operating SystemImages, on page 46.
Step 1 Download an ADK version that supports Windows 2016 and install it on a Windows 2016 machine.When you specify the features to include in the download, you must include the Windows PE and DeploymentTools.
Note
Step 2 Navigate to the Windows Pre-installation Environment folder in the ADK tools and execute copype.cmd to create thefiles that WinPE requires.
Copype.cmd amd64 C:\WinPE_amd64
The target directory contains the WinPE.wim file. The latest ADK versions create a boot.vim file, which needs tobe renamed to WinPE.wim.
Step 3 In the Windows machine that has the ADK tools installed, create a directory. Copy the WinPE.wim file from/opt/cnsaroot/Boot to the directory you have created.
Step 4 At the command line, navigate to the ADK installed folder.Step 5 Add the drivers from their folder locations to the WinPE image.
Use the following DISM.exe command when you know the paths to the drivers that you want to add.
// The DISM.exe command mounts the WinPE to a folder.// In this example, the c:\win2k16x64 directory and the \mount subdirectory have been created beforerunning the command.DISM.exe /mount-wim /wimfile:c:\win2k16x64\WinPE.wim /index:1 /mountdir:c:\win2k16x64\mount
// To add individual driver files to WinPE image, use the following format.DISM.exe /image:c:\win2k16x64\mount /Add-Driver /driver:C:\test\drivers\1.inf/driver:C:\test\drivers\2.inf /driver:C:\test\drivers\3.inf
Use the following DISM.exe command when you do not know the paths to the drivers that you want to add and needto query all subfolders.
// The DISM.exe command mounts the WinPE to a folder.// In this example, the c:\win2k16x64 directory and the \mount subdirectory have been created beforerunning the command.DISM.exe /mount-wim /wimfile:c:\win2k16x64\WinPE.wim /index:1 /mountdir:c:\win2k16x64\mount
// To add individual driver files to WinPE image, use the following format.
Cisco UCS Director Bare Metal Agent Installation and Configuration Guide, Release 6.0 47
Adding Windows OS ImagesCreating a Custom WinPE and Copying the PXE Supported Files for Windows 2016

DISM.exe /image:c:\win2k16x64\mount /Add-Driver /driver:c:\test\drivers /Recurse
Step 6 Mount WinPE.wim to a folder.Step 7 In WinPE.wim, add the required PowerShell packages and edit the paths in each command with the correct mount point
and ADK installation path for your environment.The PowerShell packages and file names that you need to add to WinPE.wim are dependent upon the versionof Windows and WinPE.wim.To determine which PowerShell packages you need to add, see the compliancereport on the Microsoft website. For information about the commands to add the necessary packages forPowerShell, see theWinPE: Adding PowerShell support toWindows PE Technet Page. The PowerShell packagefiles shown below are provided for reference andwill vary depending on the version ofWindows andWinPE.wim.
Note
\\ Sample PowerShell package files.\\ The PowerShell packages and file names that you need to add to WinPE.wim vary depending on theversion of Windows and WinPE.wim.
Dism /Add-Package /Image:"C:\win2k16x64\mount" /PackagePath:"C:\Program Files\WindowsKits\10\Assessment and Deployment Kit\Windows PreinstallationEnvironment\amd64\WinPE_OCs\WinPE-WMI.cab"
Dism /Add-Package /Image:"C:\win2k16x64\mount" /PackagePath:"C:\Program Files\WindowsKits\10\Assessment and Deployment Kit\Windows PreinstallationEnvironment\amd64\WinPE_OCs\en-us\WinPE-WMI_en-us.cab"
Dism /Add-Package /Image:"C:\win2k16x64\mount" /PackagePath:"C:\Program Files\WindowsKits\10\Assessment and Deployment Kit\Windows PreinstallationEnvironment\amd64\WinPE_OCs\WinPE-NetFX.cab"
Dism /Add-Package /Image:"C:\win2k16x64\mount" /PackagePath:"C:\Program Files\WindowsKits\10\Assessment and Deployment Kit\Windows PreinstallationEnvironment\amd64\WinPE_OCs\en-us\WinPE-NetFX_en-us.cab"
Dism /Add-Package /Image:"C:\win2k16x64\mount" /PackagePath:"C:\Program Files\WindowsKits\10\Assessment and Deployment Kit\Windows PreinstallationEnvironment\amd64\WinPE_OCs\WinPE-Scripting.cab"
Dism /Add-Package /Image:"C:\win2k16x64\mount" /PackagePath:"C:\Program Files\WindowsKits\10\Assessment and Deployment Kit\Windows PreinstallationEnvironment\amd64\WinPE_OCs\en-us\WinPE-Scripting_en-us.cab"
Dism /Add-Package /Image:"C:\win2k16x64\mount" /PackagePath:"C:\Program Files\WindowsKits\10\Assessment and Deployment Kit\Windows PreinstallationEnvironment\amd64\WinPE_OCs\WinPE-PowerShell.cab"
Dism /Add-Package /Image:"C:\win2k16x64\mount" /PackagePath:"C:\Program Files\WindowsKits\10\Assessment and Deployment Kit\Windows PreinstallationEnvironment\amd64\WinPE_OCs\en-us\WinPE-PowerShell_en-us.cab"
Dism /Add-Package /Image:"C:\win2k16x64\mount" /PackagePath:"C:\Program Files\WindowsKits\10\Assessment and Deployment Kit\Windows PreinstallationEnvironment\amd64\WinPE_OCs\WinPE-StorageWMI.cab"
Dism /Add-Package /Image:"C:\win2k16x64\mount" /PackagePath:"C:\Program Files\WindowsKits\10\Assessment and Deployment Kit\Windows Preinstallation
Cisco UCS Director Bare Metal Agent Installation and Configuration Guide, Release 6.048
Adding Windows OS ImagesCreating a Custom WinPE and Copying the PXE Supported Files for Windows 2016

Environment\amd64\WinPE_OCs\en-us\WinPE-StorageWMI_en-us.cab"
Dism /Add-Package /Image:"C:\win2k16x64\mount" /PackagePath:"C:\Program Files\WindowsKits\10\Assessment and Deployment Kit\Windows PreinstallationEnvironment\amd64\WinPE_OCs\WinPE-DismCmdlets.cab"
Dism /Add-Package /Image:"C:\win2k16x64\mount" /PackagePath:"C:\Program Files\WindowsKits\10\Assessment and Deployment Kit\Windows PreinstallationEnvironment\amd64\WinPE_OCs\en-us\WinPE-DismCmdlets_en-us.cab"
Step 8 Navigate to \windows\system32 in the mount folder. In the startnet.cmd, update the IP address for BareMetalAgent.Note • Do not change any information in the startnet.cmd file, except for the Bare Metal Agent IP address.
• Make sure that you modify the IP addresses in all the entries so that they point to the Bare Metal AgentIP address.
• All drive letter references (such as the reference to an R: drive) must match in both the startnet.cmdfile and the Windows answer file. By default, Bare Metal Agent comes with an R: drive letter assignment.
Step 9 Unmount theWinPE, commit the changes, and copy the file to the /opt/cnsaroot/Boot directory in the BareMetalAgent VM.DISM.exe /Unmount-Wim /Mountdir:c:\win2k16x64\mount /commit
What to Do Next
Install and set up (as necessary) the Boot Configuration Data (BCD) file.
Installing and Setting Up the Boot Configuration Data FileThe Boot Configuration Data (BCD) file contains the boot configuration parameters. It controls how theoperating system is started inWindows and is used to load the base kernel (WinPE.wim) from the PXE server.You do not need to create a BCD file. Bare Metal Agent provides a BCD file with default paths that you canuse.
By default, the BCD file points to the /Boot/WinPE.wim and boot.sdi files. These filenames are casesensitive.
We recommend that you use a set of standard names for Bare Metal Agent configuration purposes. Thefolder name should be Boot. The winpe file name should be WinPE.wim. Use corresponding filenamessuch as boot.sdi. The created BCD file should be in uppercase, and this file will not have any file extension.Bare Metal Agent delivers the BCD file to /opt/cnsaroot/Boot, which contains a default pathpointing to /opt/cnsaroot/Boot/WinPE.wim. This file can be used by anyWindows OS version,unless you change the path names.
Note
The command bcdedit.exe used to create BCD files is commonly available in theWindows operating systemsroot directory: c:\windows\system32.
Cisco UCS Director Bare Metal Agent Installation and Configuration Guide, Release 6.0 49
Adding Windows OS ImagesInstalling and Setting Up the Boot Configuration Data File

Before You Begin
Create a custom WinPE and copy the PXE supported files
Step 1 Navigate to the directory that contains the bcdedit.exe command and run the following sequence of commands to createthe BCD file.The bcdedit.exe command is commonly available in the Windows operating systems root directory:c:\windows\system32.
Step 2 bcdedit.exe /createstore BCDStep 3 bcdedit.exe /store BCD /create {ramdiskoptions} /d "Ramdisk options"Step 4 bcdedit.exe /store BCD /set {ramdiskoptions} ramdisksdidevice bootStep 5 bcdedit.exe /store BCD /set {ramdiskoptions} ramdisksdipath \Boot\boot.sdiStep 6 bcdedit.exe /store BCD /create /d "My WinPE Boot Image" /application osloader
At this point, the GUID is displayed. Replace {a20f8db8-7459-11e2-8ec3-00155d37efa7} in the following steps withthe GUID from your system.
Step 7 bcdedit.exe /store BCD /set {a20f8db8-7459-11e2-8ec3-00155d37efa7} systemroot \WindowsStep 8 bcdedit.exe /store BCD /set {a20f8db8-7459-11e2-8ec3-00155d37efa7} detecthal YesStep 9 bcdedit.exe /store BCD /set {a20f8db8-7459-11e2-8ec3-00155d37efa7} winpe YesStep 10 bcdedit.exe /store BCD /set {a20f8db8-7459-11e2-8ec3-00155d37efa7} osdevice
ramdisk=[boot]\Boot\WinPE.wim,{ramdiskoptions}Step 11 bcdedit.exe /store BCD /set {a20f8db8-7459-11e2-8ec3-00155d37efa7} device
ramdisk=[boot]\Boot\WinPE.wim,{ramdiskoptions}Step 12 bcdedit.exe /store BCD /create {bootmgr} /d "Windows 2016 BootManager"Step 13 bcdedit.exe /store BCD /set {bootmgr} timeout 30Step 14 bcdedit.exe /store BCD /displayorder {a20f8db8-7459-11e2-8ec3-00155d37efa7}Step 15 Use the following command to verify that the configuration names are correct: bcdedit.exe /store BCD /enum all
What to Do Next
Copy the Windows installation ISO image to the server folder.
Copying the Windows Installation Files to the Server Folder
Before You Begin
You must have the following in place:
• Customized winPE.wim and PXE boot files in the opt/cnsaroot/Boot directory in the BareMetal Agent VM.
• Configured BCD file in the /opt/cnsaroot/Boot directory in the Bare Metal Agent VM.
Cisco UCS Director Bare Metal Agent Installation and Configuration Guide, Release 6.050
Adding Windows OS ImagesCopying the Windows Installation Files to the Server Folder
•Windows installation files (ISO version).
Step 1 Extract the downloaded ISO that you obtained and validated.Step 2 Copy the folders and files from the downloaded ISO to the appropriate directory in the Bare Metal Agent VM.
Server PathWindows OS Version
/samba/Win2k16x64Windows 2016
Do not change the folder paths, filenames, or foldernames.
Note
The following is a sample of the contents of a Win2k16x64 folder after the Window installation files have been copiedto it:
bootefisourcessupportautorun.infbootmgr.efisetup.exe
Step 3 Open the /samba/notifications/notify.ps1 file and verify that the IP address matches the PXE IP addressof Bare Metal Agent.
Using MEMDISK for Deploying Multiple Versions of WindowsSimultaneously
Currently, Bare Metal Agent adopts the Microsoft Windows PXE boot process, which expects WinPE.wimto be placed in the /tftproot/Boot folder. This process results in maintaining a single WinPE for deployingmultiple versions of Windows simultaneously from Bare Metal Agent. To use different WinPE files fordeploying different versions of Windows simultaneously, you have to rename eachWinPE.wim file manuallyaccording to the BCD file. To overcome this limitation, you can use MEMDISK to boot the ISO file. TheMEMDISK file is available in the /opt/cnsaroot folder in Bare Metal Agent, as part of syslinux. When youuse MEMDISK , the ISO file can be placed anywhere in the TFTP root directory in Bare Metal Agent.
Requirements for Using MEMDISKTo use MEMDISK in Bare Metal Agent, create a bootable WINPE ISO file and then modify the MAC filetemplate.
Cisco UCS Director Bare Metal Agent Installation and Configuration Guide, Release 6.0 51
Adding Windows OS ImagesUsing MEMDISK for Deploying Multiple Versions of Windows Simultaneously

Creating Bootable WINPE File for Windows Server 2008 R2, 2012, 2012 R2, or 2016
Before You Begin
Install Windows Assessment and Deployment Kit (Windows ADK) that is compatible with the WindowsServer version you want to deploy.
Step 1 Launch the Deployment and Imaging Tools Environment.Step 2 Create a new WinPE environment folder:
Copype.cmd amd64 C:\WinPE_amd64
The ‘copype.cmd’ command creates a "WinPE_amd64" folder with three subfolders: fwfiles, media and mount. Thefolders created are based on the ADK version.
Step 3 Delete bootfix.bin from /media/Boot folder.Deleting bootfix.bin helps you avoid pressing a key to boot the ISO if any partition is detected on the hard disk drive.
Step 4 Create the customized WinPE.wim (available in the /media/Sources folder) by making the following changes:a) Inject PowerShell packages.b) Inject drivers (if any)c) Edit Startnet.cmd.For injecting PowerShell packages and editing Startnet.cmd for the Windows Server version you are deploying, see
• Customizing and Copying the WinPE.wim and PXE Boot Files for Windows 2008 R2, on page 34
• Creating a Custom WinPE and Copying the PXE Supported Files for Windows 2012, on page 39
• Creating a Custom WinPE and Copying the PXE Supported Files for Windows 2012 R2, on page 41
Step 5 Execute the following command from the terminal to create the bootable WINPE ISO file:Makewinpemedia.cmd /iso C:\WinPE_amd64 C:\WinPE_amd64.iso
Modifying MAC File TemplateTo support the MEMDISK boot process in Bare Metal Agent, the MAC file template has to be modified. The/opt/cnsaroot/templates folder in Bare Metal Agent has the configuration files templates for all thethree versions of Windows.
As the MAC template file is static, you can either implement the Windows PXE boot process or theMEMDISK boot process. You cannot implement both of them.
Note
Cisco UCS Director Bare Metal Agent Installation and Configuration Guide, Release 6.052
Adding Windows OS ImagesModifying MAC File Template
DETAILED STEPS
PurposeCommand or Action
After creating the bootableWINPE ISO file, create a folder called 'windows' under /opt/cnsaroot(folder name is not static) in the BMA tftp root directory.
Step 1
Copy the working bootable WINPE ISO file to the windows folder.Step 2
When the MEMDISK module is loaded, it adds the ISO image to the memory (specified as INITRDin the MAC File).
Step 3
Pass the two parameters, iso and raw, to MEMDISK using APPEND. (This instructs MEMDISK toload an ISO image and enter in protected mode directly).
Step 4
Example:For example, if you want to boot Windows Server 2012 R2 using MEMDISK, make the followingchanges in pxe.cfg available in the Win2k12R2x64 folder:
default 1timeout 100prompt 1label 1KERNEL memdiskINITRD /windows/WinPE.isoAPPEND iso raw
Cisco UCS Director Bare Metal Agent Installation and Configuration Guide, Release 6.0 53
Adding Windows OS ImagesModifying MAC File Template

Cisco UCS Director Bare Metal Agent Installation and Configuration Guide, Release 6.054
Adding Windows OS ImagesModifying MAC File Template

C H A P T E R 8Provisioning OS Images through OrchestrationWorkflow Tasks
This chapter contains the following sections:
• Orchestration Workflow Tasks for PXE Boot, page 55
• Prerequisites for Workflows with PXE Boot Tasks, page 56
• Execution of the Setup PXE Boot Tasks , page 57
• Determining the Windows OS Edition, page 58
• Inputs for the Setup PXE Boot Task, page 59
• Inputs for the Setup PXE Boot with BMA Selection Task, page 61
• Inputs for the Setup Windows PXE Boot Task, page 63
• Outputs from the Setup PXE Boot Task and Setup Windows PXE Boot Task, page 65
• Creating a PXE Boot Request in Cisco UCS Director, page 66
• PXE Boot States, page 68
• Monitor PXE Boot Setup Task, page 69
• Remove PXE Boot Setup Task, page 69
• Injecting Drivers When Installing RHEL 7 or CentOS 7 on UCS Modular Servers, page 70
• Simultaneous Deployment of Windows Server Operating Systems, page 71
Orchestration Workflow Tasks for PXE BootThe orchestration workflow tasks for PXE boot enable you to create workflows within Cisco UCS Directorthat use the functionality of Cisco UCS Director Bare Metal Agent.
When you include any of the PXE boot tasks in an orchestration workflow, the task prepares the Bare MetalAgent environment to receive a PXE install request for a physical or virtual machine.
The values for each input required within the task can be supplied in one of the following ways:
Cisco UCS Director Bare Metal Agent Installation and Configuration Guide, Release 6.0 55

• As user inputs by the user who executes the workflow
• Through outputs from a previous task in the workflow
• Through admin inputs that are assigned by the Cisco UCS Director user who creates the workflow
The following orchestration workflow tasks are available:
• Setup PXE Boot task
• Setup PXE Boot with BMA Selection task
• Setup Windows PXE Boot task
• Monitor PXE Boot task
• Remove PXE Boot Setup task
To set up a PXE boot for a Windows Server operating system, you must use the PXE boot setup task thatis defined specifically for Windows. To set up a PXE boot for all other supported operating systems, usethe Setup PXE Boot task or the Setup PXE Boot with BMA Selection task.
Note
You can access these workflow tasks in the Network Services area of the Cisco UCS Director WorkflowDesigner Task Library.
Most inputs and outputs are the same for the Setup PXE Boot task, the Setup PXE Boot with BMA Selectiontask, and the Setup Windows PXE Boot task, with the following notable exceptions:
• The Setup PXE Boot with BMA Selection task has an input field for selecting the target Bare MetalAgent.
• The Setup PXE Boot task does not have an option to select the target Bare Metal Agent. This legacyworkflow task uses the default Bare Metal Agent as the target Bare Metal Agent.
• The Setup Windows PXE boot task has an input field for selecting the target Bare Metal Agent.
For the legacy Setup PXE Boot task, the default Bare Metal Agent is the first Bare Metal Agent added.However, you can change the default Bare Metal Agent. See Changing the Default Bare Metal AgentAccount, on page 17.
Tip
Prerequisites for Workflows with PXE Boot TasksIf you plan to create orchestration workflows that include one or more of the PXE boot tasks, your Cisco UCSDirector and Cisco UCS Director Bare Metal Agent environment must meet the following prerequisites:
• CiscoUCSDirector has been installed and the network interface configured as described in the appropriateCisco UCS Director installation guide.
• Cisco UCS Director is reachable through a web browser and you can log in.
• Cisco UCS Director Bare Metal Agent has been installed as described in Installing Cisco UCS DirectorBare Metal Agent, on page 9.
Cisco UCS Director Bare Metal Agent Installation and Configuration Guide, Release 6.056
Provisioning OS Images through Orchestration Workflow TasksPrerequisites for Workflows with PXE Boot Tasks

• The required network/VLAN has been configured as the native, or default, VLAN on the server. Forexample, for a Cisco UCS server, edit the vNIC template associated with the server and choose the PXEnetwork/VLAN as the native VLAN. You can perform this configuration through an orchestrationworkflow.
• Each BareMetal Agent account that you want to use in a workflow has been set up, is active, has a testedconnection, and has services that have been enabled and started.
Execution of the Setup PXE Boot TasksThe following Setup PXE Boot tasks are available for use in workflows:
• Setup PXE Boot task
• Setup PXE Boot with BMA Selection task
• Setup Windows PXE Boot task
Each time that one of these tasks is executed within a workflow, Cisco UCSDirector uses the following valuesfor the inputs to complete a set of configuration files for that particular PXE request:
• Dynamic values received from previous tasks in the workflow or from the user at run-time.
• Static values that you enter when you create the workflow.
• Template configuration files—the ks.cfg Kickstart files—that were created when the chosen operatingsystem was added to Bare Metal Agent. For more information about these files, see Sample OperatingSystem Configuration Template Files, on page 77.
When the workflow is executed, Bare Metal Agent and Cisco UCS Director use the values gathered throughthe task and perform the following steps to prepare for a PXE installation request on the specified server:
NotesActionStep
You can view these PXE requests and PXE IDson the PXE Boot Requests tab for a pod in CiscoUCS Director.
Creates a new directory in the Cisco UCSDirector Bare Metal Agent VM thatcorresponds to the PXE ID request in the/opt/cnsaroot/web/ks-repository/directory.
1
For example, to create the customized ks.cfgfile for the PXE installation,Cisco UCS Directortakes the template ks.cfg file from the/opt/cnsaroot/templates/Operating_System/directory and fills in the variables provided in theSetup PXE Boot task. This customized ks.cfgfile is saved in a directory that corresponds to thePXE ID, such as/opt/cnsaroot/web/ks-repository/PXE_ID.
Adds the required unique configuration filesto the/opt/cnsaroot/web/ks-repository/PXE_IDdirectory for the PXE installation specific tothis request, including the ks.cfg, orKickstart Configuration, file. Depending uponthe operating system, other configuration filesmight be added to this directory, such as theboot.cfg file required for an ESXiinstallation.
2
Cisco UCS Director Bare Metal Agent Installation and Configuration Guide, Release 6.0 57
Provisioning OS Images through Orchestration Workflow TasksExecution of the Setup PXE Boot Tasks
NotesActionStep
The workflow appends "01-" to the MAC addressof the server to create the filename. This fileincludes information about where the image filesare located and is generated through the pxe.cfgfile in the/opt/cnsaroot/templates/Operating_System/directory.
Creates a file corresponding to the MACaddress of the server in the/opt/cnsaroot/pxelinux.cfg/directory in the Bare Metal Agent VM.
3
Bare Metal Agent automatically creates Windows answer files for the supported operating systems. Thesame answer file is used for local boot and SAN boot. TheWindows installation does not support multi-pathSAN boot, but you can use a single path workflow to achieve SAN boot.
Note
Determining the Windows OS EditionThe exact Windows OS edition is required for successful PXE boot of a Windows Server image. You mustenter the exact character string used by Windows PE (WinPE). This string is case sensitive. The WindowsOS edition follows a consistent naming convention. Some examples of OS editions are as follows:Windows Server 2008 R2 SERVERSTANDARDWindows Server 2008 R2 SERVERSTANDARDCOREWindows Server 2008 R2 SERVERENTERPRISEWindows Server 2008 R2 SERVERENTERPRISECOREWindows Server 2008 R2 SERVERDATACENTERWindows Server 2008 R2 SERVERDATACENTERCOREWindows Server 2008 R2 SERVERWEBWindows Server 2008 R2 SERVERWEBCOREWindows Server 2012 SERVERSTANDARDWindows Server 2012 SERVERSTANDARDCOREWindows Server 2012 R2 SERVERSTANDARDWindows Server 2012 R2 SERVERSTANDARDCOREWindows Server 2012 R2 SERVERDATACENTERWindows Server 2012 R2 SERVERDATACENTERCORE
Step 1 Navigate to the extracted ISO files for the Windows OS image.Step 2 For aWindows 2012 R2 image, navigate to C:\win2k12r2\sources\install.wim and use a PowerShell cmdlet
to find the edition.An example of the use of this cmdlet is as follows:
PS C:\Windows\system32> Get-WindowsImage -ImagePathC:\win2k12r2\sources\install.wimIndex : 1Name : Windows Server 2012 R2 SERVERSTANDARDCOREDescription : Windows Server 2012 R2 SERVERSTANDARDCORESize : 6,653,342,051 bytesIndex : 2Name : Windows Server 2012 R2 SERVERSTANDARDDescription : Windows Server 2012 R2 SERVERSTANDARD
Cisco UCS Director Bare Metal Agent Installation and Configuration Guide, Release 6.058
Provisioning OS Images through Orchestration Workflow TasksDetermining the Windows OS Edition
Size : 11,807,528,410 bytesIndex : 3Name : Windows Server 2012 R2 SERVERDATACENTERCOREDescription : Windows Server 2012 R2 SERVERDATACENTERCORESize : 6,653,031,430 bytes<etcetera>
Step 3 For a Windows 2008 image, use the DISM.EXE syntax from the computer on which you installed the WAIK tools.An example of the use of this syntax is as follows:
C:\Program Files\Windows AIK\Tools\>dism/get-wiminfo /wimfile:e:\\Win2k8r2x64\sources\install.wimDeployment Image Servicing and Management toolVersion: 6.1.7600.16385Details for image : e:\Username_Windowsbits\Win2k8r2x64\sources\install.wimIndex : 1Name : Windows Server 2008 R2 SERVERSTANDARDDescription : Windows Server 2008 R2 SERVERSTANDARDSize : 10,510,503,883 bytesIndex : 2Name : Windows Server 2008 R2 SERVERSTANDARDCOREDescription : Windows Server 2008 R2 SERVERSTANDARDCORESize : 3,563,695,852 bytes<etcetera>
Inputs for the Setup PXE Boot TaskThe following table describes the inputs for the Setup PXE Boot task. Because the information for one ormore of these inputs can be obtained from a previous task or from a user at run-time, the values for theseinputs can be dynamic and change with each execution of the workflow.
For legacy Setup PXE Boot tasks, the default Bare Metal Agent is the first Bare Metal Agent added.However, you can change the default Bare Metal Agent. See Changing the Default Bare Metal AgentAccount, on page 17.
Note
Table 1: Setup PXE Boot Task Inputs
DescriptionInput
The OS image that you want this PXE boot request to install on theserver. The drop-down list includes all OS images that have beencreated and are available for PXE installation.
OS Type drop-down list
Cisco UCS Director Bare Metal Agent Installation and Configuration Guide, Release 6.0 59
Provisioning OS Images through Orchestration Workflow TasksInputs for the Setup PXE Boot Task

DescriptionInput
The MAC address of the server that requires the PXE installation.This input is typically mapped to the MAC address output from theCreate UCS Service Profile task.
Server MAC Address
The IP Address that you want to assign to the server. This IP addressis given to the server after the PXE installation process is complete,and is the final IP address for the server.
This IP address can be on a different network or subnet than the PXEnetwork or Management network that you configured for Bare MetalAgent.
Server IP Address field
The subnet mask that you want to assign to the server after the PXEinstallation process is complete.
Server Net Mask field
The hostname that you want to assign to the server after the PXEinstallation process is complete.
Server Host Name field
The default gateway IP address that you want to assign to the serverafter the PXE installation process is complete.
Server Gateway field
(Optional) The DNS server that you want the server to use.
If no DNS server is required, leave this input blank.
Server Name Server field
(Optional) The VLAN ID that you want to assign to the managementinterface on the server after the PXE installation process is complete.
This setting is typically used in ESX/ESXi deployments where VLANtagging is prevalent on the virtual switch. It sets the VLAN ID fortagging on the management vmkernel port.
Management VLAN field
The password that you want to assign to the root user on the server.Root Password field
The time zone in which you want to configure the server.Timezone field
Cisco UCS Director Bare Metal Agent Installation and Configuration Guide, Release 6.060
Provisioning OS Images through Orchestration Workflow TasksInputs for the Setup PXE Boot Task
DescriptionInput
Interface to add, edit, or delete single-line parameters that are usedadditionally for the PXE boot request. You can add multipleparameters using this interface.
To add an additional parameter, click (+). In the Add AdditionalParameter box that appears, enter the parameter name and the valuefor the parameter. Use the Edit button to modify the parameter nameor its value. Use the Delete button to delete a parameter.
For example, you can use an additional parameter to customize theks.cfg file template and provide a value for the parameter here. Theparameter is then updated with the appropriate value in the ks.cfg filetemplate.
Suppose the existing firewall configuration in ks.cfg is as follows:
# Firewall configurationfirewall --disabledYou can customize the configuration as following:
# Firewall configurationfirewall —$FIREWALL_CONFIGIn the Additional Parameter interface here, you can includeFIREWALL_CONFIG as the parameter name and provide the value asdisabled. The value of the parameter can also be mapped to a userinput ${variable}. This parameter is updated with the appropriatevalue in the ks.cfg file template.
The ks.cfg file templates used by Bare Metal Agent are available in/opt/cnsaroot/templates/IMAGE_CATALOG_NAME/ks.cfg.For example, the ks.cfg file for CentOS 6.0 is available in/opt/cnsaroot/templates/CentOS60/ks.cfg
Additional Parameters interface
Inputs for the Setup PXE Boot with BMA Selection TaskThe following table describes the inputs for the Setup PXE Boot with BMA Selection task. Because theinformation for one or more of these inputs can be obtained from a previous task or from a user at run-time,the values for these inputs can be dynamic and change with each execution of the workflow.
The Setup PXE Boot with BMA Selection task does not support the Windows OS and does not acceptinputs for that OS.
Note
Cisco UCS Director Bare Metal Agent Installation and Configuration Guide, Release 6.0 61
Provisioning OS Images through Orchestration Workflow TasksInputs for the Setup PXE Boot with BMA Selection Task

Table 2: Setup PXE Boot with BMA Selection Task Inputs
DescriptionInput
The Bare Metal Agent accounts that have been added to Cisco UCSDirector and are available for use.
Target BMA field
The OS image that you want this PXE boot request to install on theserver. The drop-down list includes all OS images that have beencreated and are available for PXE installation.
OS Type drop-down list
The MAC address of the server that requires the PXE installation.This input is typically mapped to the MAC address output from theCreate UCS Service Profile task.
Server MAC Address
The IP Address that you want to assign to the server. This IP addressis given to the server after the PXE installation process is completeand is the final IP address for the server.
This IP address can be on a different network or subnet than the PXEnetwork or Management network that you configured for Bare MetalAgent.
Server Address field
The subnet mask that you want to assign to the server after the PXEinstallation process is complete.
Server Net Mask field
The hostname that you want to assign to the server after the PXEinstallation process is complete.
Server Host Name field
The default gateway IP address that you want to assign to the serverafter the PXE installation process is complete.
Server Gateway field
(Optional) The DNS server that you want the server to use.
If no DNS server is required, leave this input blank.
Server Name Server field
(Optional) The VLAN ID that you want to assign to the managementinterface on the server after the PXE installation process is complete.
This setting is typically used in ESX/ESXi deployments where VLANtagging is prevalent on the virtual switch. It sets the VLAN ID fortagging on the management vmkernel port.
Management VLAN field
The password that you want to assign to the root user on the server.Root Password field
The time zone in which you want to configure the server.Timezone field
Cisco UCS Director Bare Metal Agent Installation and Configuration Guide, Release 6.062
Provisioning OS Images through Orchestration Workflow TasksInputs for the Setup PXE Boot with BMA Selection Task
DescriptionInput
Interface to add, edit, or delete single-line parameters that are usedadditionally for the PXE boot request. You can add multipleparameters using this interface.
To add an additional parameter, click (+). In the Add AdditionalParameter box that appears, enter the parameter name and the valuefor the parameter. Use the Edit button to modify the parameter nameor its value. Use the Delete button to delete a parameter.
For example, you can use an additional parameter to customize theks.cfg file template and provide a value for the parameter here. Theparameter is then updated with the appropriate value in the ks.cfg filetemplate.
Suppose the existing firewall configuration in ks.cfg is as follows:
# Firewall configurationfirewall --disabledYou can customize the configuration as following:
# Firewall configurationfirewall —$FIREWALL_CONFIGIn the Additional Parameter interface here, you can includeFIREWALL_CONFIG as the parameter name and provide the value asdisabled. The value of the parameter can also be mapped to a userinput ${variable}. This parameter is updated with the appropriatevalue in the ks.cfg file template.
The ks.cfg file templates used by Bare Metal Agent are available in/opt/cnsaroot/templates/IMAGE_CATALOG_NAME/ks.cfg.For example, the ks.cfg file for CentOS 6.0 is available in/opt/cnsaroot/templates/CentOS60/ks.cfg
Additional Parameters interface
Inputs for the Setup Windows PXE Boot TaskThe following table describes the inputs for the Setup Windows PXE Boot task. Because the information forone or more of these inputs can be obtained from a previous task or from a user at run-time, the values forthese inputs can be dynamic and change with each execution of the workflow.
Bare Metal Agent automatically createsWindows answer files for supportedWindows operating systems.You can use the same answer file for local boot and SAN boot. TheWindows installation does not supportmulti-path SAN boot, but you can use a single path workflow to achieve SAN boot.
Note
Cisco UCS Director Bare Metal Agent Installation and Configuration Guide, Release 6.0 63
Provisioning OS Images through Orchestration Workflow TasksInputs for the Setup Windows PXE Boot Task
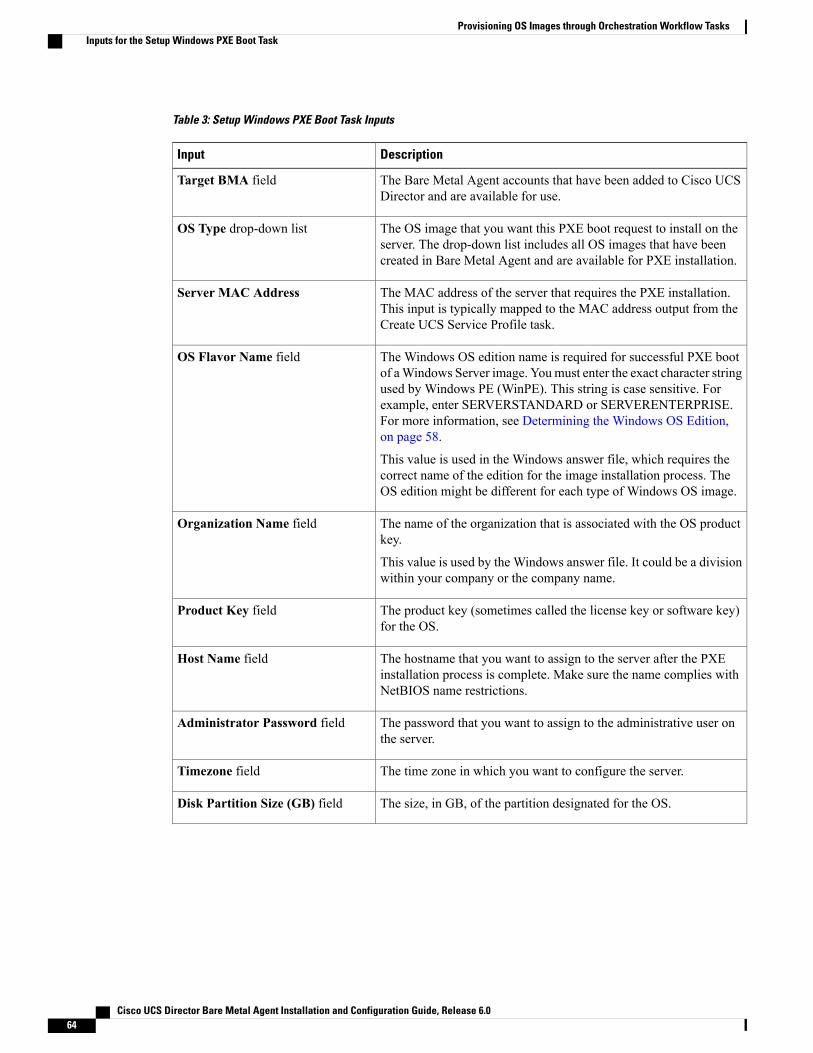
Table 3: Setup Windows PXE Boot Task Inputs
DescriptionInput
The Bare Metal Agent accounts that have been added to Cisco UCSDirector and are available for use.
Target BMA field
The OS image that you want this PXE boot request to install on theserver. The drop-down list includes all OS images that have beencreated in Bare Metal Agent and are available for PXE installation.
OS Type drop-down list
The MAC address of the server that requires the PXE installation.This input is typically mapped to the MAC address output from theCreate UCS Service Profile task.
Server MAC Address
The Windows OS edition name is required for successful PXE bootof aWindows Server image. Youmust enter the exact character stringused by Windows PE (WinPE). This string is case sensitive. Forexample, enter SERVERSTANDARD or SERVERENTERPRISE.For more information, see Determining the Windows OS Edition,on page 58.
This value is used in the Windows answer file, which requires thecorrect name of the edition for the image installation process. TheOS edition might be different for each type of Windows OS image.
OS Flavor Name field
The name of the organization that is associated with the OS productkey.
This value is used by the Windows answer file. It could be a divisionwithin your company or the company name.
Organization Name field
The product key (sometimes called the license key or software key)for the OS.
Product Key field
The hostname that you want to assign to the server after the PXEinstallation process is complete. Make sure the name complies withNetBIOS name restrictions.
Host Name field
The password that you want to assign to the administrative user onthe server.
Administrator Password field
The time zone in which you want to configure the server.Timezone field
The size, in GB, of the partition designated for the OS.Disk Partition Size (GB) field
Cisco UCS Director Bare Metal Agent Installation and Configuration Guide, Release 6.064
Provisioning OS Images through Orchestration Workflow TasksInputs for the Setup Windows PXE Boot Task

DescriptionInput
Interface to add, edit, or delete single-line parameters that are usedadditionally for the PXE boot request. You can add multipleparameters using this interface.
To add a parameter, click (+). In theAddAdditional Parameter boxthat appears, enter the parameter name and the value for the parameter.Use the Edit button to modify the parameter name or its value. Usethe Delete button to delete a parameter.
For example, you can use parameters to provide the minimumrequirements for theWindows answer file. You can define parametersand their values to enhance the answer file to meet the requirementsof your environment. These parameters are updated with theappropriate values in the Answer file template.
The answer file templates used by Bare Metal Agent are available inthe following locations:
•Windows 2012 R2x64—/opt/cnsaroot/templates/Win2k12R2x64/autounattend.xml
•Windows 2012x64—/opt/cnsaroot/templates/Win2k12x64/autounattend.xml
•Windows 2008 R2x64—/opt/cnsaroot/templates/Win2k8R2x64/autounattend.xml
Additional Parameters field
Outputs from the Setup PXE Boot Task and Setup Windows PXEBoot Task
The following table describes the outputs from both the Setup PXE Boot task and the Setup Windows PXEBoot task.
Table 4: Setup PXE Boot and Windows PXE Boot Task Outputs
DescriptionInput
The ID of the PXE boot request that was set up through theworkflow task.
OUTPUT_PXE_BOOT_ID
Cisco UCS Director Bare Metal Agent Installation and Configuration Guide, Release 6.0 65
Provisioning OS Images through Orchestration Workflow TasksOutputs from the Setup PXE Boot Task and Setup Windows PXE Boot Task
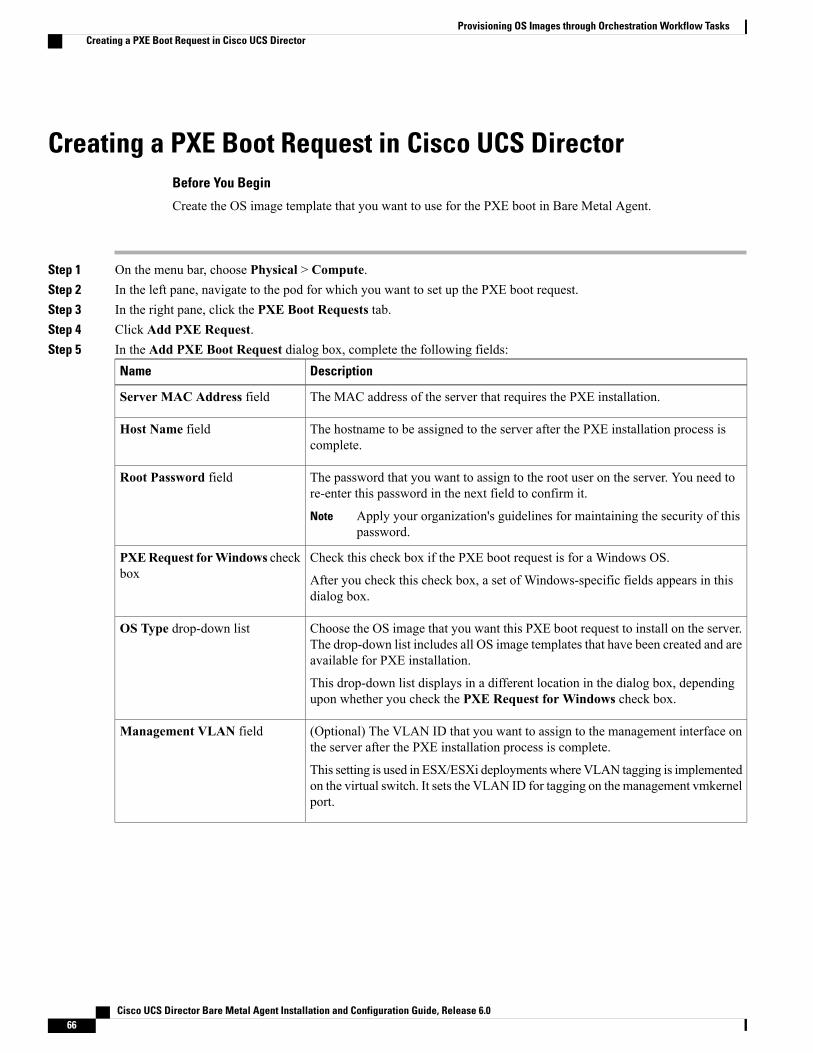
Creating a PXE Boot Request in Cisco UCS DirectorBefore You Begin
Create the OS image template that you want to use for the PXE boot in Bare Metal Agent.
Step 1 On the menu bar, choose Physical > Compute.Step 2 In the left pane, navigate to the pod for which you want to set up the PXE boot request.Step 3 In the right pane, click the PXE Boot Requests tab.Step 4 Click Add PXE Request.Step 5 In the Add PXE Boot Request dialog box, complete the following fields:
DescriptionName
The MAC address of the server that requires the PXE installation.Server MAC Address field
The hostname to be assigned to the server after the PXE installation process iscomplete.
Host Name field
The password that you want to assign to the root user on the server. You need tore-enter this password in the next field to confirm it.
Apply your organization's guidelines for maintaining the security of thispassword.
Note
Root Password field
Check this check box if the PXE boot request is for a Windows OS.
After you check this check box, a set of Windows-specific fields appears in thisdialog box.
PXERequest forWindows checkbox
Choose the OS image that you want this PXE boot request to install on the server.The drop-down list includes all OS image templates that have been created and areavailable for PXE installation.
This drop-down list displays in a different location in the dialog box, dependingupon whether you check the PXE Request for Windows check box.
OS Type drop-down list
(Optional) The VLAN ID that you want to assign to the management interface onthe server after the PXE installation process is complete.
This setting is used in ESX/ESXi deployments whereVLAN tagging is implementedon the virtual switch. It sets the VLAN ID for tagging on the management vmkernelport.
Management VLAN field
Cisco UCS Director Bare Metal Agent Installation and Configuration Guide, Release 6.066
Provisioning OS Images through Orchestration Workflow TasksCreating a PXE Boot Request in Cisco UCS Director

DescriptionName
(Required for a Windows OS only) The Windows OS edition name is required forsuccessful PXE boot of aWindows Server image. Youmust enter the exact characterstring used by Windows PE (WinPE). This string is case sensitive. For example,enter SERVERSTANDARD or SERVERENTERPRISE. For more information,see Determining the Windows OS Edition, on page 58.
This value is used in the Windows answer file, which requires the correct name ofthe edition for the image installation process. The OS edition name might bedifferent for each type of Windows OS image.
OS Flavor Name field
(Required for a Windows OS only) The name of the organization that is associatedwith the OS product key.
This value is used by the Windows answer file. It could be a division within yourcompany or the company name.
Organization Name field
(Required for a Windows OS only) The product key (sometimes called the licensekey or software key) for the OS.
Product Key field
Choose the time zone in which you want to configure the server.Timezone drop-down list
(Required for a Windows OS only) The size, in GB, of the partition designated forthe OS.
Disk Partition Size (GB) field
Interface to add, edit, or delete single-line parameters that are used additionally forthe PXE boot request. You can add multiple parameters using this interface.
To add a parameter, click (+). In theAdd Additional Parameter box that appears,enter the parameter name and the value for the parameter. Use the Edit button tomodify the parameter name or its value. Use theDelete button to delete a parameter.
For example, for a Windows OS, you can use parameters to provide the minimumrequirements for the Windows answer file. You can define parameters and theirvalues to enhance the answer file to meet the requirements of your environment.These parameters are updated with the appropriate values in the Answer filetemplate.
The answer file templates used by Bare Metal Agent are available in the followinglocations:
•Windows 2012 R2x64—/opt/cnsaroot/templates/Win2k12R2x64/autounattend.xml
•Windows 2012x64—/opt/cnsaroot/templates/Win2k12x64/autounattend.xml
•Windows 2008 R2x64—/opt/cnsaroot/templates/Win2k8R2x64/autounattend.xml
Additional Parameters interface
Cisco UCS Director Bare Metal Agent Installation and Configuration Guide, Release 6.0 67
Provisioning OS Images through Orchestration Workflow TasksCreating a PXE Boot Request in Cisco UCS Director
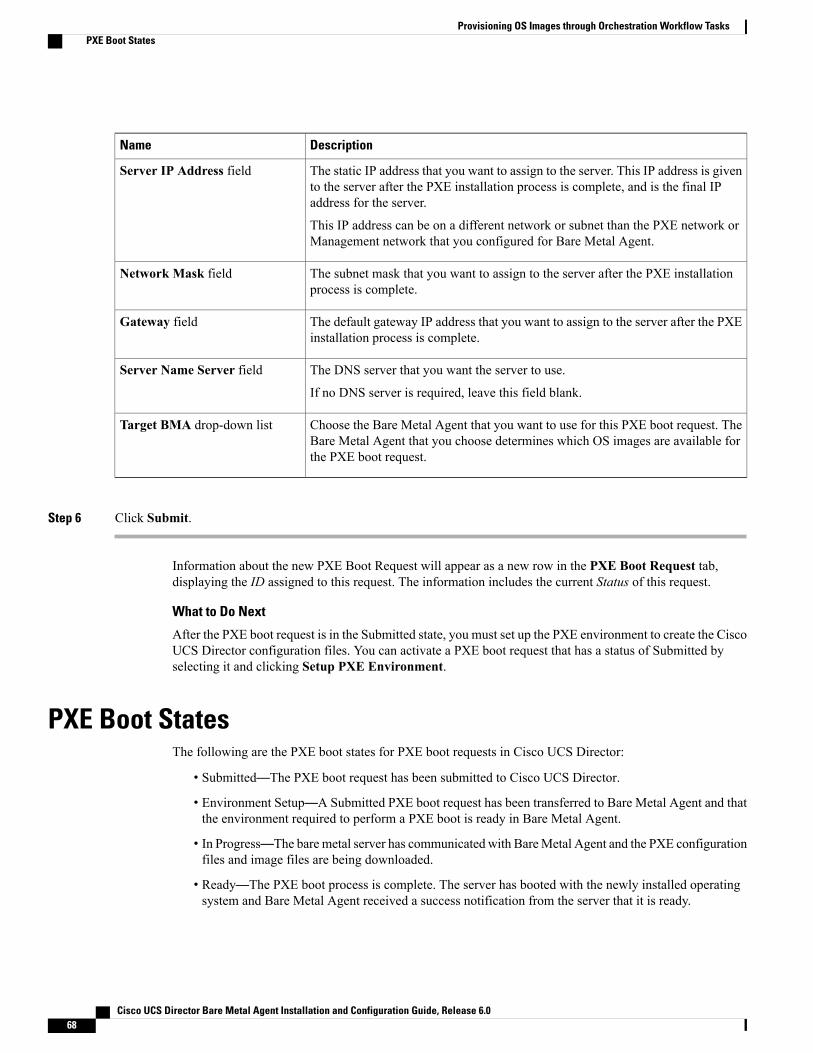
DescriptionName
The static IP address that you want to assign to the server. This IP address is givento the server after the PXE installation process is complete, and is the final IPaddress for the server.
This IP address can be on a different network or subnet than the PXE network orManagement network that you configured for Bare Metal Agent.
Server IP Address field
The subnet mask that you want to assign to the server after the PXE installationprocess is complete.
Network Mask field
The default gateway IP address that you want to assign to the server after the PXEinstallation process is complete.
Gateway field
The DNS server that you want the server to use.
If no DNS server is required, leave this field blank.
Server Name Server field
Choose the Bare Metal Agent that you want to use for this PXE boot request. TheBare Metal Agent that you choose determines which OS images are available forthe PXE boot request.
Target BMA drop-down list
Step 6 Click Submit.
Information about the new PXE Boot Request will appear as a new row in the PXE Boot Request tab,displaying the ID assigned to this request. The information includes the current Status of this request.
What to Do Next
After the PXE boot request is in the Submitted state, you must set up the PXE environment to create the CiscoUCS Director configuration files. You can activate a PXE boot request that has a status of Submitted byselecting it and clicking Setup PXE Environment.
PXE Boot StatesThe following are the PXE boot states for PXE boot requests in Cisco UCS Director:
• Submitted—The PXE boot request has been submitted to Cisco UCS Director.
• Environment Setup—A Submitted PXE boot request has been transferred to Bare Metal Agent and thatthe environment required to perform a PXE boot is ready in Bare Metal Agent.
• In Progress—The bare metal server has communicated with BareMetal Agent and the PXE configurationfiles and image files are being downloaded.
• Ready—The PXE boot process is complete. The server has booted with the newly installed operatingsystem and Bare Metal Agent received a success notification from the server that it is ready.
Cisco UCS Director Bare Metal Agent Installation and Configuration Guide, Release 6.068
Provisioning OS Images through Orchestration Workflow TasksPXE Boot States
• Failed—The PXE boot process started, but Bare Metal Agent did not receive a success notification fromthe server after the defined wait period expired.
• Archived—The PXE Request task included a rollback or delete.
Monitor PXE Boot Setup TaskWhen included in an orchestration workflow, theMonitor PXEBoot task monitors a particular PXE ID requestuntil
• The PXE boot is ready.
• The maximum number of hours specified is reached before the PXE boot is ready.
Inputs for the Monitor PXE Boot TaskThe following table describes the inputs for the Monitor PXE Boot Task:
Table 5: Monitor PXE Boot Task Inputs
DescriptionInput
The ID of the PXE boot request that you want to monitor through the workflow.PXE Boot Id
The maximum length of time, in hours, that you want the task to wait for thePXE boot request to be ready.
Max Wait time (Hours)
Outputs from the Monitor PXE Boot TaskThe Monitor PXE Boot task has no outputs.
Remove PXE Boot Setup TaskWhen included in an orchestration workflow, the Remove PXE Boot Setup task removes the directory andfiles that are created by the Setup PXE Boot task for a particular PXE ID request.
Inputs for the Remove PXE Boot Setup TaskThe following table describes the inputs for the Remove PXE Boot Setup Task.
Cisco UCS Director Bare Metal Agent Installation and Configuration Guide, Release 6.0 69
Provisioning OS Images through Orchestration Workflow TasksMonitor PXE Boot Setup Task

Table 6: Remove PXE Boot Setup Task Inputs
DescriptionInput
The ID of the PXE boot request for which you want to remove the setupdirectory and files.
PXE Boot Id
Outputs from the Remove PXE Boot Setup TaskThe Remove PXE Boot Setup task has no outputs.
Injecting Drivers When Installing RHEL 7 or CentOS 7 on UCSModular Servers
When you install RHEL 7 or CentOS 7 on the UCS servers, manually inject drivers through the PXE.cfg file.The PXE.cfg file is available in the following location:/opt/cnsaroot/templates/(RHEL 7/CentOS7 OS Catalog name).
The default PXE.cfg file contains the following line:append initrd=images/(RHEL 7/CentOS 7 OS Catalog name)/isolinux/initrd.img ramdisk_size=9216noapic acpi=off ip=dhcp ks=$PXE_KS_URLksdevice= inst.repo=http://$PXE_NATIVE_WEBSERVER/(RHEL 7/CentOS 7 OS Catalog name)net.ifnames=0 biosdevname=0
Here RHEL 7/CentOS 7 OS Catalog name is the name of the OS image provided in the ISO extractorscript while creating the RHEL 7 or CentOS 7 OS image template in Bare Metal Agent.
Note
To inject the drivers, update the location of the drivers in the PXE.cfg file by updating the line as shownbelow:append initrd=images/(RHEL 7/CentOS 7 OS Catalog name)/isolinux/initrd.img ramdisk_size=9216noapic acpi=off ip=dhcp ks=$PXE_KS_URLksdevice= inst.repo=http://$PXE_NATIVE_WEBSERVER/(RHEL 7/CentOS 7 OS Catalog name)inst.dd=http://$PXE_NATIVE_WEBSERVER/(RHEL 7/CentOS 7 OS Catalog name )/(name of the driver disk) net.ifnames=0 biosdevname=0
The driver disk should be in the ISO image format and placed in the following location:/opt/cnsa/images/(RHEL 7/CentOS 7 OS Catalog name)/
Note • Download the driver ISO image from the UCS Servers download page on the Cisco website.
• The parameter inst.dd helps load the driver images during PXE install.
Cisco UCS Director Bare Metal Agent Installation and Configuration Guide, Release 6.070
Provisioning OS Images through Orchestration Workflow TasksOutputs from the Remove PXE Boot Setup Task
Simultaneous Deployment of Windows Server OperatingSystems
You can use Bare Metal Agent to run parallel workflows and simultaneously deploy Windows server imageson multiple bare metal servers.
Prerequisites for Simultaneous Deployment
To ensure that you can perform simultaneous deployment of Windows Server operating system images, youmust perform the appropriate configuration required for the versions of the operating system that are describedin the following topics, including:
• Adding the PowerShell packages to the WinPE.wim file
• Updating startnet.cmd with the IP addresses and other information required for your environment
Bare Metal Workflows
You do not need to make any changes to your existing bare metal provisioning workflows to supportsimultaneous deployment of Windows server operating systems.
A PXE boot task in a workflow can only provision one server with a Windows operating system. You cannotuse a single PXE boot task to provision multiple servers, but you can execute PXE boot tasks simultaneouslymultiple times.
Maximum Number of Simultaneous Deployments
The maximum number of simultaneous deployments is dependent upon the bandwidth of your TFTP andPXE networks.
One Windows Version for Each Bare Metal Agent
Due to a limitation in the process of the Windows unattended installation, you can only deploy one versionof Windows with each Bare Metal Agent added to Cisco UCS Director. If you want to deploy a differentversion of Windows, you must add another Bare Metal Agent to Cisco UCS Director.
Minimum Supported Level of Bare Metal Agent
Simultaneous deployment of Windows server operating systems requires a minium of Bare Metal Agent,Release 5.4. It is not supported in earlier releases of Bare Metal Agent.
Files and Folders Used In Simultaneous DeploymentThe following files and folders are used during simultaneous deployment of Windows operating systems:
PXElinux.cfg File
The PXElinux.cfg file contains the MAC addresses for each of the servers and points to the WinPE.wimfile.
Cisco UCS Director Bare Metal Agent Installation and Configuration Guide, Release 6.0 71
Provisioning OS Images through Orchestration Workflow TasksSimultaneous Deployment of Windows Server Operating Systems
Samba Folder
The /samba folder contains a folder for each of the following items. Additional information about the scriptand folder is provided below.
•Windows images to be deployed on the bare metal servers
• EnRoute.ps1 script
• as-repository folder
AS-Repository Folder
The /samba/as-repository folder contains a folder for each MAC address of the servers for which aWindows operating is to be deployed. The PXE boot task creates and stores a separate Windows answer filefor each of these servers in the appropriate MAC address folder. This folder might not be created until afterthe first PXE boot workflow is run.
EnRoute.ps1 Script
The EnRoute.ps1 script determines which Windows answer file in the as-repository folder belongsto the server that is being provisioned. If desired, you can customize this script. However, when you add theBare Metal Agent to Cisco UCS Director, the script in the as-repository folder will revert to the defaultscript without the customizations.
By default, the EnRoute.ps1 script is hardcoded with the Windows Server 2012 R2 operating system.To deploy a different supported Windows Server operating system, replace the default value of$OsPath="R:\Win2k12R2x64\" with one of the following values:
Note
• For Windows Server 2012: $OsPath="R:\Win2k12x64\"
• For Windows Server 2008 R2: $OsPath="R:\Win2k8R2x64\"
Windows Answer File
The Windows answer file contains settings and values that are used during the deployment of a Windowsoperating system. This answer file is typically named unattend.xml. During simultaneous deployment, aseparate Windows answer file is created in each MAC address folder and then sent to the server to be usedduring the Windows operating system setup.
When the installation is successfully completed, the name of the answer file is changed to include "Completed."
For more information, see the Microsoft TechNet article on Understanding Answer Files.
Example: Simultaneous Deployment of Windows Server Operating SystemsThis example describes what actions Bare Metal Agent performs when you execute two workflows at thesame time, with each workflow designed to provision a bare metal server with a Windows operating system.
Cisco UCS Director Bare Metal Agent Installation and Configuration Guide, Release 6.072
Provisioning OS Images through Orchestration Workflow TasksExample: Simultaneous Deployment of Windows Server Operating Systems
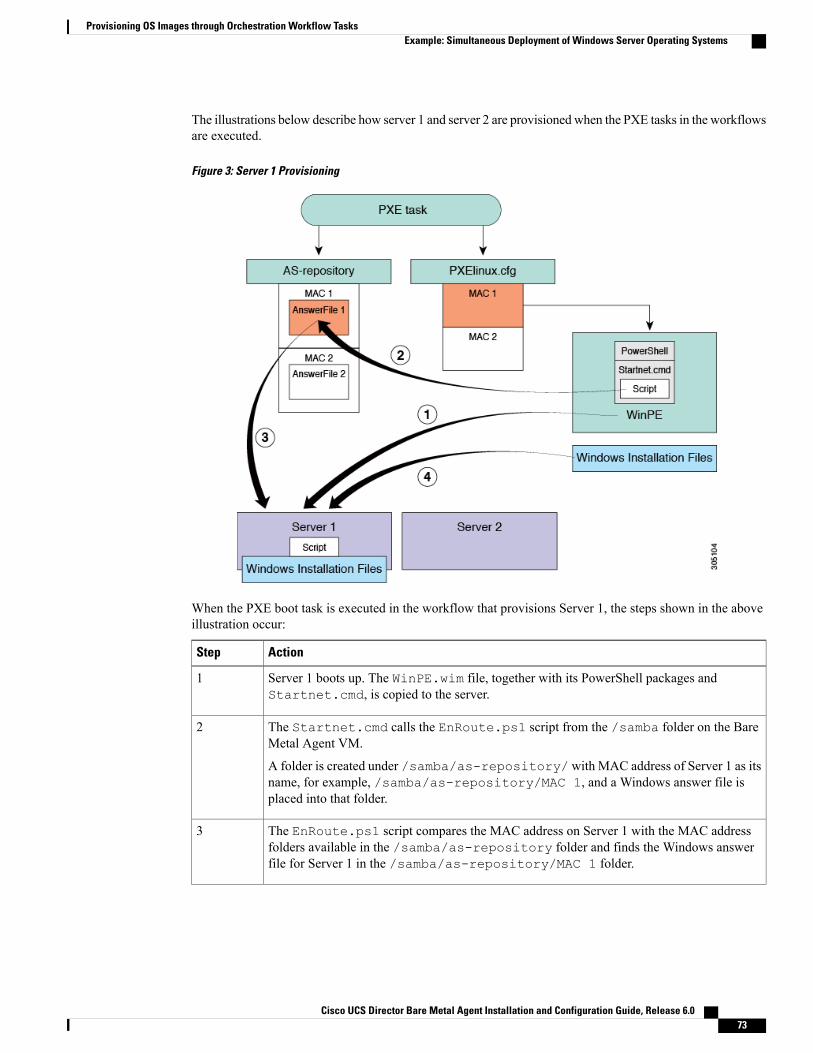
The illustrations below describe how server 1 and server 2 are provisioned when the PXE tasks in the workflowsare executed.
Figure 3: Server 1 Provisioning
When the PXE boot task is executed in the workflow that provisions Server 1, the steps shown in the aboveillustration occur:
ActionStep
Server 1 boots up. The WinPE.wim file, together with its PowerShell packages andStartnet.cmd, is copied to the server.
1
The Startnet.cmd calls the EnRoute.ps1 script from the /samba folder on the BareMetal Agent VM.
A folder is created under /samba/as-repository/with MAC address of Server 1 as itsname, for example, /samba/as-repository/MAC 1, and a Windows answer file isplaced into that folder.
2
The EnRoute.ps1 script compares the MAC address on Server 1 with the MAC addressfolders available in the /samba/as-repository folder and finds the Windows answerfile for Server 1 in the /samba/as-repository/MAC 1 folder.
3
Cisco UCS Director Bare Metal Agent Installation and Configuration Guide, Release 6.0 73
Provisioning OS Images through Orchestration Workflow TasksExample: Simultaneous Deployment of Windows Server Operating Systems

ActionStep
Using theWindows answer file, the appropriateWindows operating system (shown asWindowsinstallation files) is installed on Server 1.
When the installation is successfully completed, the name of the answer file is changed toinclude "Completed."
4
Figure 4: Server 2 Provisioning
At the same time as Server 1 is being provisioned, when the PXE boot task is executed in the workflow thatprovisions Server 2, the steps shown in the above illustration occur:
ActionStep
Server 2 boots up. The WinPE.wim file, together with its PowerShell packages andStartnet.cmd, is copied to the server.
The Startnet.cmd calls the EnRoute.ps1 script from the /samba folder on the BareMetal Agent VM.
A folder is created under /samba/as-repository/with MAC address of Server 2 as itsname, for example, /samba/as-repository/MAC 2, and a Windows answer file isplaced into that folder.
5
Cisco UCS Director Bare Metal Agent Installation and Configuration Guide, Release 6.074
Provisioning OS Images through Orchestration Workflow TasksExample: Simultaneous Deployment of Windows Server Operating Systems

ActionStep
The EnRoute.ps1 script compares the MAC address on Server 2 with the MAC addressfolders available in the /samba/as-repository folder and finds the Windows answerfile for Server 2 in the /samba/as-repository/MAC 2 folder.
6
Using theWindows answer file, the appropriateWindows operating system (shown asWindowsinstallation files) is installed on Server 2.
When the installation is successfully completed, the name of the answer file is changed toinclude "Completed."
7
Cisco UCS Director Bare Metal Agent Installation and Configuration Guide, Release 6.0 75
Provisioning OS Images through Orchestration Workflow TasksExample: Simultaneous Deployment of Windows Server Operating Systems

Cisco UCS Director Bare Metal Agent Installation and Configuration Guide, Release 6.076
Provisioning OS Images through Orchestration Workflow TasksExample: Simultaneous Deployment of Windows Server Operating Systems
A P P E N D I X ASample Operating System ConfigurationTemplate Files
This chapter contains the following sections:
• Sample Linux Configuration Template Files, page 77
• Sample VMware vSphere ESXi Configuration Template Files, page 79
• Sample Windows Answer File, page 80
Sample Linux Configuration Template Files
Sample Kickstart Configuration Template File for Linux Operating SystemsThe following example shows the Kickstart configuration template file (ks.cfg) that is required for Linuxoperating system images:
#platform=x86, AMD64, or Intel EM64T
# System authorization informationauth --useshadow --enablemd5
# System bootloader configurationbootloader --append="rhgb quiet" --location=mbr --driveorder=sda
# Partition clearing informationclearpart --linux --initlabel
# Use text-based installtext
# Firewall configurationfirewall –-disabled
# Run the Setup Agent on first bootfirstboot -–disable
# System keyboardkeyboard us
# System language
Cisco UCS Director Bare Metal Agent Installation and Configuration Guide, Release 6.0 77
lang en_US
# Installation logging levellogging --level=info
# Provide url/location of image over http.url --url=http://$PXE_NATIVE_WEBSERVER/image_name
#Reboot after installationreboot
# Network informationnetwork --bootproto=static --device=eth0 --ip=$PXE_IP--netmask=$PXE_NETMASK --gateway=$PXE_GATEWAY--hostname=$PXE_NAME --onboot=on
#Root passwordrootpw $PXE_PASSWD
# SELinux configurationselinux --disabled
# System timezonetimezone --utc America/New_York
# Install OS instead of upgradeinstall
# Disk partitioning informationpart / --fstype="ext3" --size=8000
#Install required packages%packages --nobasewget
%postwget http://$PXE_WEBSERVER/$PXEID/notify.html
Sample PXE Configuration Template File for Linux Operating SystemsThe following example shows the PXE configuration template file (pxe.cfg) that is required for Linuxoperating system images:
default linux
label linuxkernel vmlinuz
append initrd=initrd.img ramdisk_size=9216 noapic acpi=off ip=dhcp ks=$PXE_KS_URL
prompt 0timeout 0
Cisco UCS Director Bare Metal Agent Installation and Configuration Guide, Release 6.078
Sample Operating System Configuration Template FilesSample PXE Configuration Template File for Linux Operating Systems
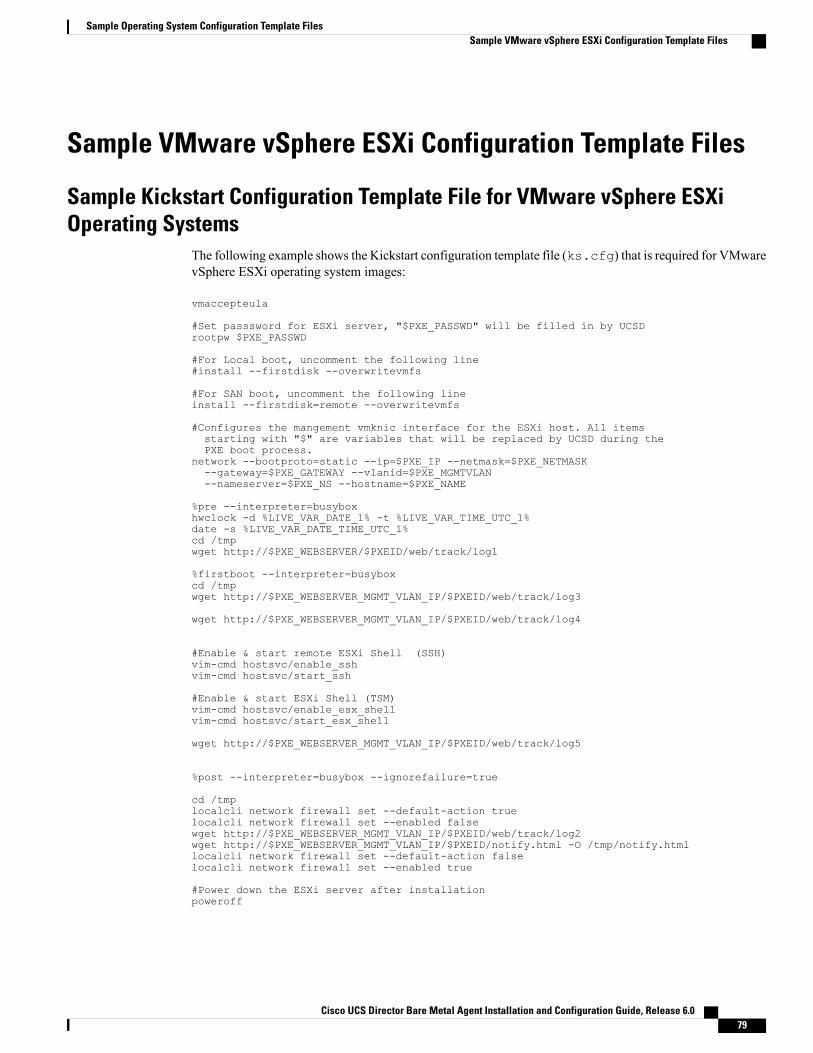
Sample VMware vSphere ESXi Configuration Template Files
Sample Kickstart Configuration Template File for VMware vSphere ESXiOperating Systems
The following example shows the Kickstart configuration template file (ks.cfg) that is required for VMwarevSphere ESXi operating system images:
vmaccepteula
#Set passsword for ESXi server, "$PXE_PASSWD" will be filled in by UCSDrootpw $PXE_PASSWD
#For Local boot, uncomment the following line#install --firstdisk --overwritevmfs
#For SAN boot, uncomment the following lineinstall --firstdisk=remote --overwritevmfs
#Configures the mangement vmknic interface for the ESXi host. All itemsstarting with "$" are variables that will be replaced by UCSD during thePXE boot process.
network --bootproto=static --ip=$PXE_IP --netmask=$PXE_NETMASK--gateway=$PXE_GATEWAY --vlanid=$PXE_MGMTVLAN--nameserver=$PXE_NS --hostname=$PXE_NAME
%pre --interpreter=busyboxhwclock -d %LIVE_VAR_DATE_1% -t %LIVE_VAR_TIME_UTC_1%date -s %LIVE_VAR_DATE_TIME_UTC_1%cd /tmpwget http://$PXE_WEBSERVER/$PXEID/web/track/log1
%firstboot --interpreter=busyboxcd /tmpwget http://$PXE_WEBSERVER_MGMT_VLAN_IP/$PXEID/web/track/log3
wget http://$PXE_WEBSERVER_MGMT_VLAN_IP/$PXEID/web/track/log4
#Enable & start remote ESXi Shell (SSH)vim-cmd hostsvc/enable_sshvim-cmd hostsvc/start_ssh
#Enable & start ESXi Shell (TSM)vim-cmd hostsvc/enable_esx_shellvim-cmd hostsvc/start_esx_shell
wget http://$PXE_WEBSERVER_MGMT_VLAN_IP/$PXEID/web/track/log5
%post --interpreter=busybox --ignorefailure=true
cd /tmplocalcli network firewall set --default-action truelocalcli network firewall set --enabled falsewget http://$PXE_WEBSERVER_MGMT_VLAN_IP/$PXEID/web/track/log2wget http://$PXE_WEBSERVER_MGMT_VLAN_IP/$PXEID/notify.html -O /tmp/notify.htmllocalcli network firewall set --default-action falselocalcli network firewall set --enabled true
#Power down the ESXi server after installationpoweroff
Cisco UCS Director Bare Metal Agent Installation and Configuration Guide, Release 6.0 79
Sample Operating System Configuration Template FilesSample VMware vSphere ESXi Configuration Template Files
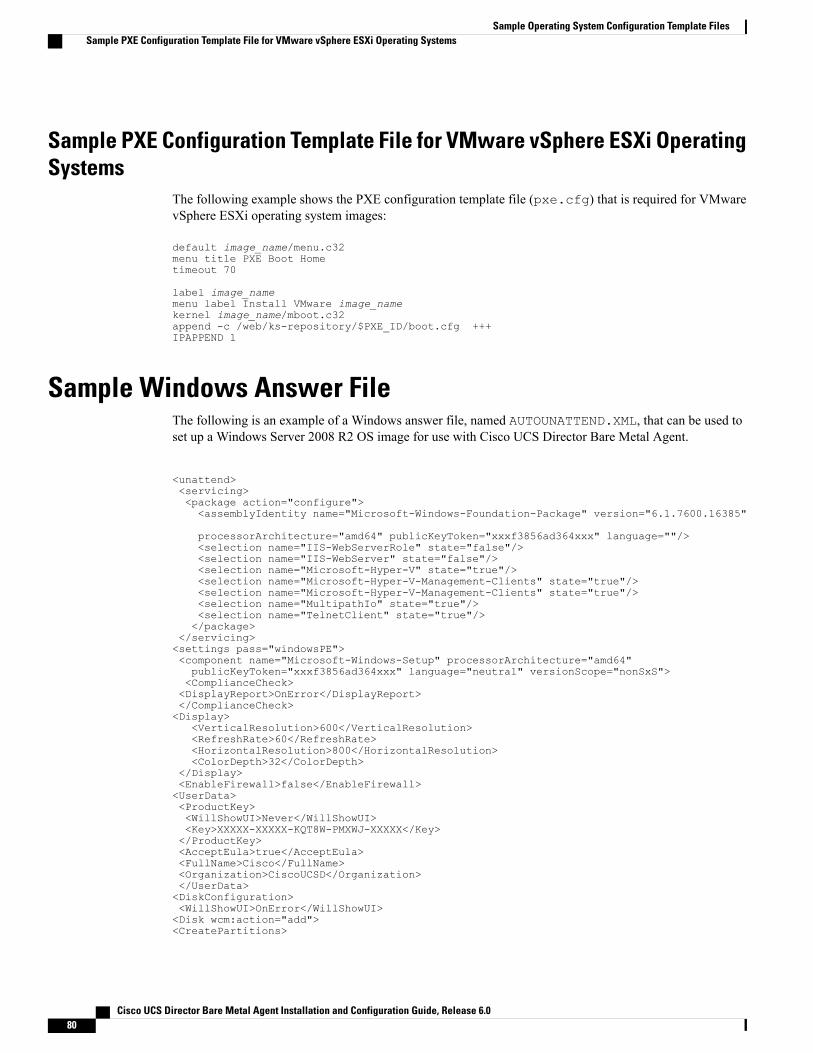
Sample PXE Configuration Template File for VMware vSphere ESXi OperatingSystems
The following example shows the PXE configuration template file (pxe.cfg) that is required for VMwarevSphere ESXi operating system images:
default image_name/menu.c32menu title PXE Boot Hometimeout 70
label image_namemenu label Install VMware image_namekernel image_name/mboot.c32append -c /web/ks-repository/$PXE_ID/boot.cfg +++IPAPPEND 1
Sample Windows Answer FileThe following is an example of a Windows answer file, named AUTOUNATTEND.XML, that can be used toset up a Windows Server 2008 R2 OS image for use with Cisco UCS Director Bare Metal Agent.
<unattend><servicing><package action="configure"><assemblyIdentity name="Microsoft-Windows-Foundation-Package" version="6.1.7600.16385"
processorArchitecture="amd64" publicKeyToken="xxxf3856ad364xxx" language=""/><selection name="IIS-WebServerRole" state="false"/><selection name="IIS-WebServer" state="false"/><selection name="Microsoft-Hyper-V" state="true"/><selection name="Microsoft-Hyper-V-Management-Clients" state="true"/><selection name="Microsoft-Hyper-V-Management-Clients" state="true"/><selection name="MultipathIo" state="true"/><selection name="TelnetClient" state="true"/></package>
</servicing><settings pass="windowsPE"><component name="Microsoft-Windows-Setup" processorArchitecture="amd64"publicKeyToken="xxxf3856ad364xxx" language="neutral" versionScope="nonSxS"><ComplianceCheck><DisplayReport>OnError</DisplayReport></ComplianceCheck><Display>
<VerticalResolution>600</VerticalResolution><RefreshRate>60</RefreshRate><HorizontalResolution>800</HorizontalResolution><ColorDepth>32</ColorDepth>
</Display><EnableFirewall>false</EnableFirewall><UserData><ProductKey><WillShowUI>Never</WillShowUI><Key>XXXXX-XXXXX-KQT8W-PMXWJ-XXXXX</Key></ProductKey><AcceptEula>true</AcceptEula><FullName>Cisco</FullName><Organization>CiscoUCSD</Organization></UserData><DiskConfiguration><WillShowUI>OnError</WillShowUI><Disk wcm:action="add"><CreatePartitions>
Cisco UCS Director Bare Metal Agent Installation and Configuration Guide, Release 6.080
Sample Operating System Configuration Template FilesSample PXE Configuration Template File for VMware vSphere ESXi Operating Systems

<CreatePartition wcm:action="add"><Order>1</Order><Type>Primary</Type><Size>40000</Size></CreatePartition></CreatePartitions><DiskID>0</DiskID><WillWipeDisk>true</WillWipeDisk><ModifyPartitions><ModifyPartition wcm:action="add"><Active>true</Active><Extend>false</Extend><Format>NTFS</Format><Label>OS</Label><Letter>C</Letter><Order>1</Order><PartitionID>1</PartitionID></ModifyPartition></ModifyPartitions></Disk></DiskConfiguration><ImageInstall><OSImage><InstallTo><DiskID>0</DiskID><PartitionID>1</PartitionID></InstallTo><WillShowUI>Never</WillShowUI><InstallFrom><MetaData wcm:action="add"><Key>/IMAGE/NAME</Key><Value>Windows Server 2008 R2 SERVERDATACENTER</Value></MetaData><Path>\\000.00.90.31\bits\sources\install.wim</Path></InstallFrom></OSImage></ImageInstall></component><component name="Microsoft-Windows-International-Core-WinPE" processorArchitecture="amd64"
publicKeyToken="nnnf3856ad364nnn" language="neutral" versionScope="nonSxS"><SetupUILanguage><UILanguage>en-US</UILanguage></SetupUILanguage><UserLocale>en-US</UserLocale><UILanguage>en-US</UILanguage><SystemLocale>en-US</SystemLocale></component></settings><settings pass="specialize"><component name="Microsoft-Windows-International-Core" processorArchitecture="amd64"publicKeyToken="nnnf3856ad364nnn" language="neutral" versionScope="nonSxS"><SystemLocale>en-US</SystemLocale><UILanguage>en-US</UILanguage><UILanguageFallback>en-US</UILanguageFallback><UserLocale>en-US</UserLocale></component><component name="Microsoft-Windows-TerminalServices-LocalSessionManager"processorArchitecture="amd64" publicKeyToken="nnnf3856ad364nnn"language="neutral" versionScope="nonSxS"><fDenyTSConnections>false</fDenyTSConnections></component><component name="Microsoft-Windows-Deployment" processorArchitecture="amd64"publicKeyToken="31bf3856ad364nnn" language="neutral" versionScope="nonSxS"><RunSynchronous><RunSynchronousCommand wcm:action="add"><Description>Disable IPv6</Description><Path>reg add HKLM\SYSTEM\CurrentControlSet\Services\tcpip6\Parameters /v DisabledComponents/tREG_DWORD /d 255 /f</Path><Order>1</Order></RunSynchronousCommand><RunSynchronousCommand wcm:action="add">
Cisco UCS Director Bare Metal Agent Installation and Configuration Guide, Release 6.0 81
Sample Operating System Configuration Template FilesSample Windows Answer File
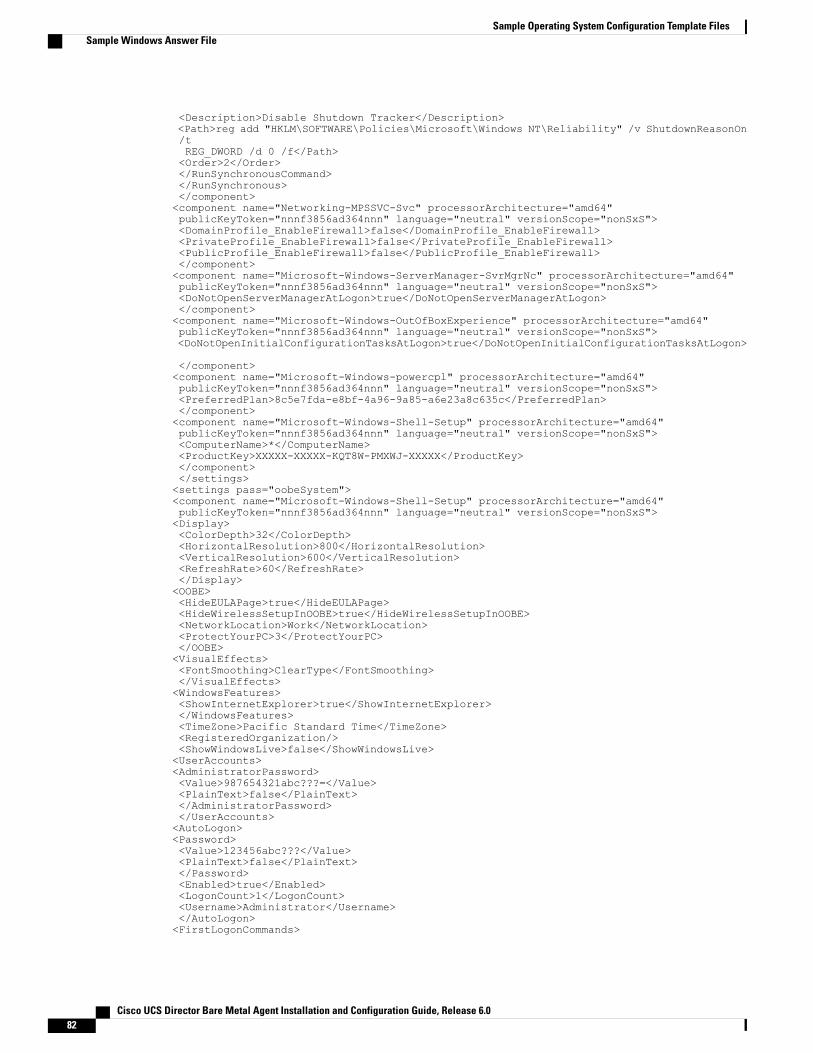
<Description>Disable Shutdown Tracker</Description><Path>reg add "HKLM\SOFTWARE\Policies\Microsoft\Windows NT\Reliability" /v ShutdownReasonOn/tREG_DWORD /d 0 /f</Path><Order>2</Order></RunSynchronousCommand></RunSynchronous></component><component name="Networking-MPSSVC-Svc" processorArchitecture="amd64"publicKeyToken="nnnf3856ad364nnn" language="neutral" versionScope="nonSxS"><DomainProfile_EnableFirewall>false</DomainProfile_EnableFirewall><PrivateProfile_EnableFirewall>false</PrivateProfile_EnableFirewall><PublicProfile_EnableFirewall>false</PublicProfile_EnableFirewall></component><component name="Microsoft-Windows-ServerManager-SvrMgrNc" processorArchitecture="amd64"publicKeyToken="nnnf3856ad364nnn" language="neutral" versionScope="nonSxS"><DoNotOpenServerManagerAtLogon>true</DoNotOpenServerManagerAtLogon></component><component name="Microsoft-Windows-OutOfBoxExperience" processorArchitecture="amd64"publicKeyToken="nnnf3856ad364nnn" language="neutral" versionScope="nonSxS"><DoNotOpenInitialConfigurationTasksAtLogon>true</DoNotOpenInitialConfigurationTasksAtLogon>
</component><component name="Microsoft-Windows-powercpl" processorArchitecture="amd64"publicKeyToken="nnnf3856ad364nnn" language="neutral" versionScope="nonSxS"><PreferredPlan>8c5e7fda-e8bf-4a96-9a85-a6e23a8c635c</PreferredPlan></component><component name="Microsoft-Windows-Shell-Setup" processorArchitecture="amd64"publicKeyToken="nnnf3856ad364nnn" language="neutral" versionScope="nonSxS"><ComputerName>*</ComputerName><ProductKey>XXXXX-XXXXX-KQT8W-PMXWJ-XXXXX</ProductKey></component></settings><settings pass="oobeSystem"><component name="Microsoft-Windows-Shell-Setup" processorArchitecture="amd64"publicKeyToken="nnnf3856ad364nnn" language="neutral" versionScope="nonSxS"><Display><ColorDepth>32</ColorDepth><HorizontalResolution>800</HorizontalResolution><VerticalResolution>600</VerticalResolution><RefreshRate>60</RefreshRate></Display><OOBE><HideEULAPage>true</HideEULAPage><HideWirelessSetupInOOBE>true</HideWirelessSetupInOOBE><NetworkLocation>Work</NetworkLocation><ProtectYourPC>3</ProtectYourPC></OOBE><VisualEffects><FontSmoothing>ClearType</FontSmoothing></VisualEffects><WindowsFeatures><ShowInternetExplorer>true</ShowInternetExplorer></WindowsFeatures><TimeZone>Pacific Standard Time</TimeZone><RegisteredOrganization/><ShowWindowsLive>false</ShowWindowsLive><UserAccounts><AdministratorPassword><Value>987654321abc???=</Value><PlainText>false</PlainText></AdministratorPassword></UserAccounts><AutoLogon><Password><Value>123456abc???</Value><PlainText>false</PlainText></Password><Enabled>true</Enabled><LogonCount>1</LogonCount><Username>Administrator</Username></AutoLogon><FirstLogonCommands>
Cisco UCS Director Bare Metal Agent Installation and Configuration Guide, Release 6.082
Sample Operating System Configuration Template FilesSample Windows Answer File
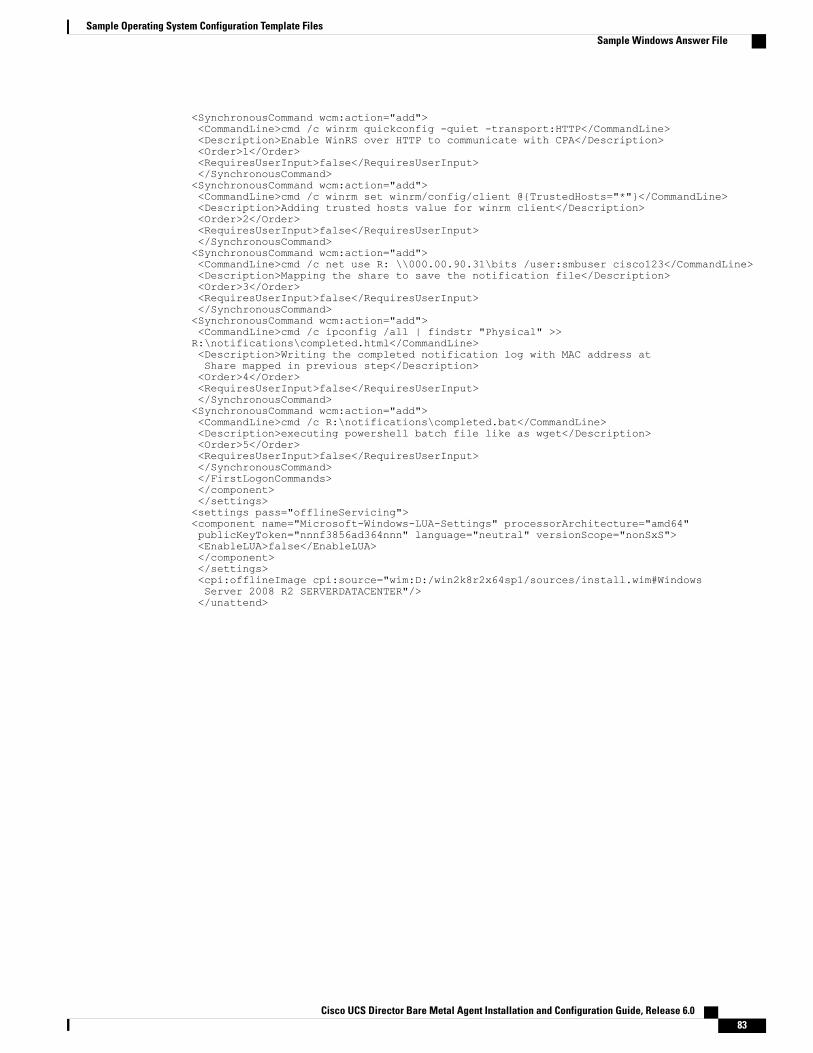
<SynchronousCommand wcm:action="add"><CommandLine>cmd /c winrm quickconfig -quiet -transport:HTTP</CommandLine><Description>Enable WinRS over HTTP to communicate with CPA</Description><Order>1</Order><RequiresUserInput>false</RequiresUserInput></SynchronousCommand><SynchronousCommand wcm:action="add"><CommandLine>cmd /c winrm set winrm/config/client @{TrustedHosts="*"}</CommandLine><Description>Adding trusted hosts value for winrm client</Description><Order>2</Order><RequiresUserInput>false</RequiresUserInput></SynchronousCommand><SynchronousCommand wcm:action="add"><CommandLine>cmd /c net use R: \\000.00.90.31\bits /user:smbuser cisco123</CommandLine><Description>Mapping the share to save the notification file</Description><Order>3</Order><RequiresUserInput>false</RequiresUserInput></SynchronousCommand><SynchronousCommand wcm:action="add"><CommandLine>cmd /c ipconfig /all | findstr "Physical" >>R:\notifications\completed.html</CommandLine><Description>Writing the completed notification log with MAC address atShare mapped in previous step</Description><Order>4</Order><RequiresUserInput>false</RequiresUserInput></SynchronousCommand><SynchronousCommand wcm:action="add"><CommandLine>cmd /c R:\notifications\completed.bat</CommandLine><Description>executing powershell batch file like as wget</Description><Order>5</Order><RequiresUserInput>false</RequiresUserInput></SynchronousCommand></FirstLogonCommands></component></settings><settings pass="offlineServicing"><component name="Microsoft-Windows-LUA-Settings" processorArchitecture="amd64"publicKeyToken="nnnf3856ad364nnn" language="neutral" versionScope="nonSxS"><EnableLUA>false</EnableLUA></component></settings><cpi:offlineImage cpi:source="wim:D:/win2k8r2x64sp1/sources/install.wim#WindowsServer 2008 R2 SERVERDATACENTER"/></unattend>
Cisco UCS Director Bare Metal Agent Installation and Configuration Guide, Release 6.0 83
Sample Operating System Configuration Template FilesSample Windows Answer File

Cisco UCS Director Bare Metal Agent Installation and Configuration Guide, Release 6.084
Sample Operating System Configuration Template FilesSample Windows Answer File
A P P E N D I X BPorts
This appendix contains the following sections:
• Cisco UCS Director TCP and UDP Port Usage, page 85
• Port List, page 85
• Multi-Node Port Requirements, page 87
Cisco UCS Director TCP and UDP Port UsageThis section provides a list of the TCP and UDP ports that Cisco UCS Director uses for connections andcommunications with external applications or devices.
The following figure shows the network ports used for communication between the Cisco UCS Directorappliance andmanaged devices, ESX servers, BareMetal Agent, PowerShell Agent, NTP, andActive Directory.
Port ListDescriptionProtocolDefault Port
SSHTCP22
HTTPTCP/UDP80
HTTP for Cisco UCS Director Bare Metal AgentTCP8888
HTTPSUDP443
Citrix licensingTCP27000/7279/8082 (Mgmt)
Virtual Desktop Agent for DesktopsTCP2598/1494/2112/2513
DHCPUDP67/68
Cisco UCS Director Bare Metal Agent Installation and Configuration Guide, Release 6.0 85

DescriptionProtocolDefault Port
Active DirectoryTCP/UDP
TCP
389/636
3268/3269
DNSTCP/UDP53
NTPTCP/UDP123
MySQLTCP/UDP3306
Cisco UCS Director + VNC ConnectivityTCP8787/5900-5964
Cisco UCS Director + RDP ConnectivityTCP/UDP3389
Cisco UCS Director + NetApp ConnectivityTCP/UDP80/443/8080
Cisco UCS Director + Cisco UCS ManagerConnectivity
UDP80/443
Cisco UCS Director + vCenter ConnectivityUDP80/443
RDPTCP/UDP3389
SMB/RPCTCP135/445
KerberosTCP/UDP88
NetBIOS Name (nbname)TCP/UDP137
NetBIOS datagram (nbdatagram)TCP/UDP138
NetBIOS session (nbsession)TCP139
Desktop Delivery Controller <--> vCenterUDP80/443
Desktop Delivery Controller <--> Virtual DesktopsTCP8080 through ICA
Users (Citrix Recvr) <--> Virtual DesktopsTCP1494/2598/2512/2513
Desktop Delivery Controller <--> Active DirectoryTCP/UDP389/636 (LDAP Ports)
Virtual Desktops <--> Active Directory + DNSTCP/UDP389/636, 3268/3269, 53
PowerShell Agent <-> Xendesktop through WinRMTCP5985/5986
Cisco UCS Director <--> PowerShell AgentTCP/UDP43891
XenAppTCP80/8081
Cisco UCS Director Bare Metal Agent Installation and Configuration Guide, Release 6.086
PortsPort List

DescriptionProtocolDefault Port
VMwareESXi host management andVMcustomizationand to execute VIX tasks
TCP902
VMwareESXi host management andVMcustomizationand to execute VIX tasks (for Vmware vCenter releasesprior to 5.0)
TCP903
Multi-Node Port RequirementsThe ports listed in Cisco UCS Director TCP and UDP Port Usage, on page 85 are applicable for both singleand multi-node setups.
For a multi-node setup, the following ports need to be opened between the nodes:
• From the primary and service node(s) to database nodes: port 3306
• From the primary node to service node(s): ports 80 and 443
Cisco UCS Director Bare Metal Agent Installation and Configuration Guide, Release 6.0 87
PortsMulti-Node Port Requirements

Cisco UCS Director Bare Metal Agent Installation and Configuration Guide, Release 6.088
PortsMulti-Node Port Requirements