cisco nexus 9000 series nx-os programmability guide, release 7 · containertrackersupport 12 part i...
TRANSCRIPT

Cisco Nexus 9000 Series NX-OS Programmability Guide, Release 7.xFirst Published: 2015-01-31
Last Modified: 2019-09-23
Americas HeadquartersCisco Systems, Inc.170 West Tasman DriveSan Jose, CA 95134-1706USAhttp://www.cisco.comTel: 408 526-4000
800 553-NETS (6387)Fax: 408 527-0883

THE SPECIFICATIONS AND INFORMATION REGARDING THE PRODUCTS IN THIS MANUAL ARE SUBJECT TO CHANGE WITHOUT NOTICE. ALL STATEMENTS,INFORMATION, AND RECOMMENDATIONS IN THIS MANUAL ARE BELIEVED TO BE ACCURATE BUT ARE PRESENTED WITHOUT WARRANTY OF ANY KIND,EXPRESS OR IMPLIED. USERS MUST TAKE FULL RESPONSIBILITY FOR THEIR APPLICATION OF ANY PRODUCTS.
THE SOFTWARE LICENSE AND LIMITED WARRANTY FOR THE ACCOMPANYING PRODUCT ARE SET FORTH IN THE INFORMATION PACKET THAT SHIPPED WITHTHE PRODUCT AND ARE INCORPORATED HEREIN BY THIS REFERENCE. IF YOU ARE UNABLE TO LOCATE THE SOFTWARE LICENSE OR LIMITED WARRANTY,CONTACT YOUR CISCO REPRESENTATIVE FOR A COPY.
The Cisco implementation of TCP header compression is an adaptation of a program developed by the University of California, Berkeley (UCB) as part of UCB's public domain version ofthe UNIX operating system. All rights reserved. Copyright © 1981, Regents of the University of California.
NOTWITHSTANDING ANY OTHERWARRANTY HEREIN, ALL DOCUMENT FILES AND SOFTWARE OF THESE SUPPLIERS ARE PROVIDED “AS IS" WITH ALL FAULTS.CISCO AND THE ABOVE-NAMED SUPPLIERS DISCLAIM ALL WARRANTIES, EXPRESSED OR IMPLIED, INCLUDING, WITHOUT LIMITATION, THOSE OFMERCHANTABILITY, FITNESS FOR A PARTICULAR PURPOSE AND NONINFRINGEMENT OR ARISING FROM A COURSE OF DEALING, USAGE, OR TRADE PRACTICE.
IN NO EVENT SHALL CISCO OR ITS SUPPLIERS BE LIABLE FOR ANY INDIRECT, SPECIAL, CONSEQUENTIAL, OR INCIDENTAL DAMAGES, INCLUDING, WITHOUTLIMITATION, LOST PROFITS OR LOSS OR DAMAGE TO DATA ARISING OUT OF THE USE OR INABILITY TO USE THIS MANUAL, EVEN IF CISCO OR ITS SUPPLIERSHAVE BEEN ADVISED OF THE POSSIBILITY OF SUCH DAMAGES.
Any Internet Protocol (IP) addresses and phone numbers used in this document are not intended to be actual addresses and phone numbers. Any examples, command display output, networktopology diagrams, and other figures included in the document are shown for illustrative purposes only. Any use of actual IP addresses or phone numbers in illustrative content is unintentionaland coincidental.
All printed copies and duplicate soft copies of this document are considered uncontrolled. See the current online version for the latest version.
Cisco has more than 200 offices worldwide. Addresses and phone numbers are listed on the Cisco website at www.cisco.com/go/offices.
Cisco and the Cisco logo are trademarks or registered trademarks of Cisco and/or its affiliates in the U.S. and other countries. To view a list of Cisco trademarks, go to this URL: www.cisco.comgo trademarks. Third-party trademarks mentioned are the property of their respective owners. The use of the word partner does not imply a partnership relationship between Cisco and anyother company. (1721R)
© 2015–2019 Cisco Systems, Inc. All rights reserved.

C O N T E N T S
Preface xvP R E F A C E
Audience xv
Document Conventions xv
Related Documentation for Cisco Nexus 9000 Series Switches xvi
Documentation Feedback xvi
Communications, Services, and Additional Information xvi
New and Changed Information 1C H A P T E R 1
New and Changed Information 1
Overview 7C H A P T E R 2
Programmability Overview 7
Standard Network Manageability Features 8
Advanced Automation Feature 8
Power On Auto Provisioning Support 8
Chef and Puppet Integration 8
OpenStack Integration 9
OpenDayLight Integration and OpenFlow Support 10
Programmability Support 10
NX-API Support 11
Python Scripting 11
Tcl Scripting 11
Broadcom Shell 11
Bash 11
Bash Shell Access and Linux Container Support 11
Guest Shell 11
Cisco Nexus 9000 Series NX-OS Programmability Guide, Release 7.xiii

Container Tracker Support 12
Shells and Scripting 13P A R T I
Bash 15C H A P T E R 3
About Bash 15
Guidelines and Limitations 15
Accessing Bash 16
Escalate Privileges to Root 17
Examples of Bash Commands 18
Displaying System Statistics 18
Running Bash from CLI 19
Managing Feature RPMs 19
RPM Installation Prerequisites 19
Installing Feature RPMs from Bash 20
Upgrading Feature RPMs 21
Downgrading a Feature RPM 21
Erasing a Feature RPM 22
Managing Patch RPMs 22
RPM Installation Prerequisites 22
Adding Patch RPMs from Bash 23
Activating a Patch RPM 24
Committing a Patch RPM 26
Deactivating a Patch RPM 26
Removing a Patch RPM 28
Persistently Daemonizing an SDK- or ISO-built Third Party Process 29
Persistently Starting Your Application from the Native Bash Shell 30
An Example Application in the Native Bash Shell 30
Guest Shell 33C H A P T E R 4
About the Guest Shell 33
Guidelines and Limitations 34
Accessing the Guest Shell 38
Resources Used for the Guest Shell 39
Cisco Nexus 9000 Series NX-OS Programmability Guide, Release 7.xiv
Contents

Capabilities in the Guest Shell 39
NX-OS CLI in the Guest Shell 40
Network Access in Guest Shell 40
Access to Bootflash in Guest Shell 42
Python in Guest Shell 43
Installing RPMs in the Guest Shell 43
Security Posture for Virtual Services 45
Digitally Signed Application Packages 45
Kernel Vulnerability Patches 45
ASLR and X-Space Support 45
Namespace Isolation 45
Root-User Restrictions 46
Resource Management 46
Guest File System Access Restrictions 46
Managing the Guest Shell 46
Disabling the Guest Shell 50
Destroying the Guest Shell 50
Enabling the Guest Shell 51
Replicating the Guest Shell 52
Exporting Guest Shell rootfs 52
Importing Guest Shell rootfs 52
Importing YAML File 53
show guestshell Command 57
Verifying Virtual Service and Guest Shell Information 57
Persistently Starting Your Application From the Guest Shell 59
Procedure for Persistently Starting Your Application from the Guest Shell 60
An Example Application in the Guest Shell 60
Broadcom Shell 63C H A P T E R 5
About the Broadcom Shell 63
Accessing the Broadcom Shell (bcm-shell) 63
Accessing bcm-shell with the CLI API 63
Accessing the Native bcm-shell on the Fabric Module 65
Accessing the bcm-shell on the Line Card 66
Cisco Nexus 9000 Series NX-OS Programmability Guide, Release 7.xv
Contents

Examples of Broadcom Shell Commands 67
Displaying L2 Entries 67
Displaying Routing Information from FM and LC ASIC Instances 67
Displaying Spanning Tree Group Entries 68
Display T2 Counters for Interface xe0 68
Displaying L3 Information 68
Python API 69C H A P T E R 6
About the Python API 69
Using Python 69
Cisco Python Package 69
Guidelines and Limitations 70
Using the CLI Command APIs 70
Invoking the Python Interpreter from the CLI 72
Display Formats 72
Non-interactive Python 74
Running Scripts with Embedded Event Manager 75
Python Integration with Cisco NX-OS Network Interfaces 75
Cisco NX-OS Security with Python 76
Examples of Security and User Authority 76
Example of Running Script with Scheduler 78
Scripting with Tcl 79C H A P T E R 7
About Tcl 79
Tclsh Command Help 79
Tclsh Command History 80
Tclsh Tab Completion 80
Tclsh CLI Command 80
Tclsh Command Separation 80
Tcl Variables 81
Tclquit 81
Tclsh Security 81
Running the Tclsh Command 81
Navigating Cisco NX-OS Modes from the Tclsh Command 82
Cisco Nexus 9000 Series NX-OS Programmability Guide, Release 7.xvi
Contents

Tcl References 84
iPXE 85C H A P T E R 8
About iPXE 85
Netboot Requirements 86
Guidelines and Limitations 86
Boot Mode Configuration 86
Verifying the Boot Order Configuration 87
Kernel Stack 89C H A P T E R 9
About Kernel Stack 89
Guidelines and Limitations 89
Changing the Port Range 90
Applications 93P A R T I I
Third-Party Applications 95C H A P T E R 1 0
About Third-Party Applications 95
Guidelines and Limitations 95
Installing Third-Party Native RPMs/Packages 95
Persistent Third-Party RPMs 97
Installing RPM from VSH 98
Package Addition 98
Package Activation 99
Deactivating Packages 99
Removing Packages 100
Displaying Installed Packages 100
Displaying Detail Logs 100
Upgrading a Package 101
Downgrading a Package 101
Third-Party Applications 101
NX-OS 101
DevOps Configuration Management Tools 102
V9K 102
Cisco Nexus 9000 Series NX-OS Programmability Guide, Release 7.xvii
Contents

Automation Tool Educational Content 102
collectd 102
Ganglia 102
Iperf 103
LLDP 103
Nagios 103
OpenSSH 103
Quagga 103
Splunk 104
tcollector 104
tcpdump 104
TShark 104
Ansible 107C H A P T E R 1 1
Prerequisites 107
About Ansible 107
Cisco Ansible Module 107
Puppet Agent 109C H A P T E R 1 2
About Puppet 109
Prerequisites 109
Puppet Agent NX-OS Environment 110
ciscopuppet Module 110
Using Chef Client with Cisco NX-OS 113C H A P T E R 1 3
About Chef 113
Prerequisites 113
Chef Client NX-OS Environment 114
cisco-cookbook 114
Nexus Application Development - ISO 117C H A P T E R 1 4
About ISO 117
Installing the ISO 117
Using the ISO to Build Applications 118
Cisco Nexus 9000 Series NX-OS Programmability Guide, Release 7.xviii
Contents

Using RPM to Package an Application 119
Nexus Application Development - SDK 121C H A P T E R 1 5
About the Cisco SDK 121
Installing the SDK 121
Procedure for Installation and Environment Initialization 122
Using the SDK to Build Applications 123
Using RPM to Package an Application 124
Creating an RPM Build Environment 125
Using General RPM Build Procedure 125
Example to Build RPM for collectd with No Optional Plug-Ins 126
Example to Build RPM for collectd with Optional Curl Plug-In 127
NX-SDK 129C H A P T E R 1 6
About the NX-SDK 129
Install the NX-SDK 130
Building and Packaging C++ Applications 130
Installing and Running Custom Applications 133
NX-API 137P A R T I I I
NX-API CLI 139C H A P T E R 1 7
About NX-API CLI 139
Transport 139
Message Format 139
Security 140
Using NX-API CLI 140
Escalate Privileges to Root on NX-API 142
Sample NX-API Scripts 143
NX-API Management Commands 143
Working With Interactive Commands Using NX-API 145
NX-API Request Elements 145
NX-API Response Elements 149
Restricting Access to NX-API 150
Cisco Nexus 9000 Series NX-OS Programmability Guide, Release 7.xix
Contents

Updating an iptable 151
Making an Iptable Persistent Across Reloads 152
Table of NX-API Response Codes 153
NX-API REST 155C H A P T E R 1 8
About NX-API REST 155
Guidelines and Limitations 155
NX-API Developer Sandbox 157C H A P T E R 1 9
About the NX-API Developer Sandbox 157
Guidelines and Restrictions for the Developer Sandbox 158
Configuring the Message Format and Command Type 158
Using the Developer Sandbox 160
Using the Developer Sandbox to Convert CLI Commands to REST Payloads 160
Using the Developer Sandbox to Convert from REST Payloads to CLI Commands 163
Model-Driven Programmability 169P A R T I V
Infrastructure Overview 171C H A P T E R 2 0
About Model-Driven Programmability 171
About the Programmable Interface Infrastructure 171
Managing Components 175C H A P T E R 2 1
About the Component RPM Packages 175
Preparing For Installation 176
Downloading Components from the Cisco Artifactory 177
Installing RPM Packages 178
Installing the Programmable Interface Infrastructure RPM Packages 178
Installing Common Model RPM Packages 179
Installing Agent RPM Packages 180
NETCONF Agent 181C H A P T E R 2 2
About the NETCONF Agent 181
Guidelines and Limitations 183
Cisco Nexus 9000 Series NX-OS Programmability Guide, Release 7.xx
Contents
Configuring the NETCONF Agent 183
Using the NETCONF Agent 184
Error Messages 186
Troubleshooting the NETCONF Agent 188
Converting CLI Commands to Network Configuration Format 189C H A P T E R 2 3
Information About XMLIN 189
Licensing Requirements for XMLIN 189
Installing and Using the XMLIN Tool 190
Converting Show Command Output to XML 190
Configuration Examples for XMLIN 191
RESTConf Agent 195C H A P T E R 2 4
About the RESTConf Agent 195
Guidelines and Limitations 196
Configuring the RESTConf Agent 196
Using the RESTConf Agent 196
Troubleshooting the RESTConf Agent 197
gRPC Agent 199C H A P T E R 2 5
About the gRPC Agent 199
Guidelines and Limitations 200
Configuring the gRPC Agent 200
Using the gRPC Agent 201
Troubleshooting the gRPC Agent 203
gRPC Protobuf File 203
Dynamic Logger 211C H A P T E R 2 6
Prerequisites 211
Reference 211
Model-Driven Telemetry 219C H A P T E R 2 7
About Telemetry 219
Telemetry Components and Process 219
Cisco Nexus 9000 Series NX-OS Programmability Guide, Release 7.xxi
Contents

High Availability of the Telemetry Process 221
Licensing Requirements for Telemetry 221
Installing and Upgrading Telemetry 221
Guidelines and Restrictions for Telemetry 222
Configuring Telemetry Using the CLI 226
Configuring Telemetry Using the NX-OS CLI 226
Configuration Examples for Telemetry Using the CLI 230
Displaying Telemetry Configuration and Statistics 233
Displaying Telemetry Log and Trace Information 239
Configuring Telemetry Using the NX-API 241
Configuring Telemetry Using the NX-API 241
Configuration Example for Telemetry Using the NX-API 250
Telemetry Model in the DME 253
Additional References 254
Related Documents 254
Hardware Telemetry 255C H A P T E R 2 8
About Streaming Statistics Export (SSX) 255
Packet Format 255
Metadata Format 256
Payload 256
SSX Applications 257
Configuring SSX 257
SSX Counters 259
SSX show Commands 260
Example: Read MAC MIBs 261
XMLManagement Interface 263P A R T V
XMLManagement Interface 265C H A P T E R 2 9
About the XML Management Interface 265
Information About the XML Management Interface 265
NETCONF Layers 265
Cisco Nexus 9000 Series NX-OS Programmability Guide, Release 7.xxii
Contents

SSH xmlagent 266
Licensing Requirements for the XML Management Interface 266
Prerequisites to Using the XML Management Interface 267
Using the XML Management Interface 267
Configuring the SSH and the XML Server Options Through the CLI 267
Starting an SSHv2 Session 268
Sending a Hello Message 269
Obtaining XML Schema Definition (XSD) Files 269
Sending an XML Document to the XML Server 270
Creating NETCONF XML Instances 270
RPC Request Tag 271
NETCONF Operations Tags 272
Device Tags 273
Extended NETCONF Operations 275
NETCONF Replies 279
RPC Response Tag 279
Interpreting the Tags Encapsulated in the data Tag 279
Information About Example XML Instances 280
Example XML Instances 280
NETCONF Close Session Instance 281
NETCONF Kill Session Instance 281
NETCONF Copy Config Instance 282
NETCONF Edit Config Instance 282
NETCONF Get Config Instance 283
NETCONF Lock Instance 284
NETCONF Unlock Instance 285
NETCONF Commit Instance: Candidate Configuration Capability 285
NETCONF Confirmed Commit Instance 286
NETCONF Rollback-On-Error Instance 286
NETCONF Validate Capability Instance 287
Additional References 287
Streaming Telemetry Sources 289A P P E N D I X A
About Streaming Telemetry 289
Cisco Nexus 9000 Series NX-OS Programmability Guide, Release 7.xxiii
Contents

Guidelines and Limitations 289
Data Available for Telemetry 289
Cisco Nexus 9000 Series NX-OS Programmability Guide, Release 7.xxiv
Contents

Preface
This preface includes the following sections:
• Audience, on page xv• Document Conventions, on page xv• Related Documentation for Cisco Nexus 9000 Series Switches, on page xvi• Documentation Feedback, on page xvi• Communications, Services, and Additional Information, on page xvi
AudienceThis publication is for network administrators who install, configure, and maintain Cisco Nexus switches.
Document ConventionsCommand descriptions use the following conventions:
DescriptionConventionBold text indicates the commands and keywords that you enter literallyas shown.
bold
Italic text indicates arguments for which you supply the values.Italic
Square brackets enclose an optional element (keyword or argument).[x]
Square brackets enclosing keywords or arguments that are separated bya vertical bar indicate an optional choice.
[x | y]
Braces enclosing keywords or arguments that are separated by a verticalbar indicate a required choice.
{x | y}
Nested set of square brackets or braces indicate optional or requiredchoices within optional or required elements. Braces and a vertical barwithin square brackets indicate a required choice within an optionalelement.
[x {y | z}]
Cisco Nexus 9000 Series NX-OS Programmability Guide, Release 7.xxv

DescriptionConvention
Indicates a variable for which you supply values, in context where italicscannot be used.
variable
A nonquoted set of characters. Do not use quotation marks around thestring or the string includes the quotation marks.
string
Examples use the following conventions:
DescriptionConventionTerminal sessions and information the switch displays are in screen font.screen font
Information that you must enter is in boldface screen font.boldface screen font
Arguments for which you supply values are in italic screen font.italic screen font
Nonprinting characters, such as passwords, are in angle brackets.< >
Default responses to system prompts are in square brackets.[ ]
An exclamation point (!) or a pound sign (#) at the beginning of a lineof code indicates a comment line.
!, #
Related Documentation for Cisco Nexus 9000 Series SwitchesThe entire Cisco Nexus 9000 Series switch documentation set is available at the following URL:
http://www.cisco.com/en/US/products/ps13386/tsd_products_support_series_home.html
Documentation FeedbackTo provide technical feedback on this document, or to report an error or omission, please send your commentsto [email protected]. We appreciate your feedback.
Communications, Services, and Additional Information• To receive timely, relevant information from Cisco, sign up at Cisco Profile Manager.
• To get the business impact you’re looking for with the technologies that matter, visit Cisco Services.
• To submit a service request, visit Cisco Support.
• To discover and browse secure, validated enterprise-class apps, products, solutions and services, visitCisco Marketplace.
• To obtain general networking, training, and certification titles, visit Cisco Press.
• To find warranty information for a specific product or product family, access Cisco Warranty Finder.
Cisco Nexus 9000 Series NX-OS Programmability Guide, Release 7.xxvi
PrefaceRelated Documentation for Cisco Nexus 9000 Series Switches

Cisco Bug Search Tool
Cisco Bug Search Tool (BST) is a web-based tool that acts as a gateway to the Cisco bug tracking systemthat maintains a comprehensive list of defects and vulnerabilities in Cisco products and software. BST providesyou with detailed defect information about your products and software.
Cisco Nexus 9000 Series NX-OS Programmability Guide, Release 7.xxvii
PrefacePreface

Cisco Nexus 9000 Series NX-OS Programmability Guide, Release 7.xxviii
PrefacePreface

C H A P T E R 1New and Changed Information
This chapter provides release-specific information for each new and changed feature in the Cisco Nexus 9000Series NX-OS Programmability Guide, Release 7.x.
• New and Changed Information, on page 1
New and Changed InformationThis table summarizes the new and changed features for theCisco Nexus 9000 Series NX-OS ProgrammabilityGuide, Release 7.x and where they are documented.
Table 1: New and Changed Features
Where DocumentedChangedinRelease
DescriptionFeature
Displaying TelemetryConfiguration and Statistics
7.0(3)I7(7)Enhanced show telemetrycontrol database sensor-pathsto show details about encoding,collection, transport, andstreaming.
Model-Driven Telemetry
Converting CLI Commands toNetwork Configuration Format,on page 189
7.0(3)I7(5)Support for converting NX-OSCLI commands to NetworkConfiguration format isdocumented.
CLI Command output forNETCONF
XML Management Interface,on page 265
7.0(3)I7(5)Support for managing the CiscoNexus 9000 switches with anXML-based tool through theXML-based NetworkConfiguration Protocol(NETCONF) is documented.
XML Management Interface
Hardware Telemetry, on page255
7.0(3)I7(5)Support is now added forStreaming Statistics Export(SSX).
Support for Streaming StatisticsExport (SSX)
Cisco Nexus 9000 Series NX-OS Programmability Guide, Release 7.x1

Where DocumentedChangedinRelease
DescriptionFeature
Hardware Telemetry, on page255
7.0(3)I7(5)A new counter type, averagedepth per output queue, is nowadded to SSX in this release.
A new counter type, averagedepth per output queue, isavailable for SSX
NX-API CLI, on page 1397.0(3)I7(4)JSON-RPC is now an acceptedNX-API input request format.
JSON-RPC as anNX-API inputrequest format
NX-API CLI, on page 1397.0(3)I7(4)The rollback NX-API requestelement is now available inXML, JSON and JSON-RPCinput request formats.
rollback NX-API requestelement
Bash, on page 157.0(3)I7(3)Added instructions formanaging patch RPMs.
Patch RPM support
Model-Driven Telemetry, onpage 219
7.0(3)I7(3)Added information on UDPtelemetry.
UDP telemetry
Guidelines and Limitations, onpage 15
7.0(3)F3(1)Added support for Nexus 9508running NX-OS 7.0(3)F3(1).
Nexus 9508 Bash shell support
Guidelines and Limitations, onpage 70
7.0(3)F3(1)Added support for Nexus 9508running NX-OS 7.0(3)F3(1).
Nexus 9508 Python APIsupport
Guidelines and Limitations, onpage 86
7.0(3)F3(1)Added support for Nexus 9508running NX-OS 7.0(3)F3(1).
Nexus 9508 iPXE support
Guidelines and Limitations, onpage 89
7.0(3)F3(1)Added support for Nexus 9508running NX-OS 7.0(3)F3(1).
Nexus 9508 Kernel Stacksupport
About Third-PartyApplications, on page 95
7.0(3)F3(1)Added support for Nexus 9508running NX-OS 7.0(3)F3(1).
Nexus 9508 RPMs forThird-Party application support
Puppet Agent, on page 1097.0(3)F3(1)Added support for Nexus 9508running NX-OS 7.0(3)F3(1).
Nexus 9508 Puppet Agentsupport
Using Chef Client with CiscoNX-OS , on page 113
7.0(3)F3(1)Added support for Nexus 9508running NX-OS 7.0(3)F3(1).
Nexus 9508 Chef client support
Guidelines and Limitations, onpage 155
7.0(3)F3(1)Added support for Nexus 9508running NX-OS 7.0(3)F3(1).
Nexus 9508 NX-API RESTsupport
About the Guest Shell, on page33
7.0(3)F3(1)Added support for Nexus 9508running NX-OS 7.0(3)F3(1).
Nexus 9508Guest Shell support
Replicating the Guest Shell , onpage 52
7.0(3)I7(1)Support to export a specificGuest Shell rootfs and deployit onto multiple devices.
Export rootfs of Guest Shellonto multiple devices.
Cisco Nexus 9000 Series NX-OS Programmability Guide, Release 7.x2
New and Changed InformationNew and Changed Information

Where DocumentedChangedinRelease
DescriptionFeature
Telemetry Components andProcess, on page 219
7.0(3)I7(1)Added telemetry support forUDP and secure UDP (DTLS)protocols
Telemetry support for UDP andsecure UDP (DTLS) protocols
Guidelines and Restrictions forTelemetry, on page 222
7.0(3)I7(1)Added support forauthentication with self signedSSL certificate.
Authentication with self signedSSL certificate
Guidelines and Restrictions forTelemetry, on page 222
7.0(3)I7(1)Added telemetry VRF support.Telemetry VRF Support
Guidelines and Restrictions forTelemetry, on page 222
7.0(3)I7(1)Added support for telemetrycompression for gRPCtransport.
Telemetry Compression forgRPC Transport
About the Component RPMPackages, on page 175
7.0(3)I7(1)NX-OS ProgrammableInterface Component RPMpackages included in theNX-OS image.
NX-OS ProgrammableInterface Component RPMpackages
Container Tracker Support, onpage 12
7.0(3)I6(1)Added support to communicatewith the Kubernetes APIServer.
Container Tracker
NX-SDK, on page 1297.0(3)I6(1)SDK to create native NX-OSapplications.
NX-SDK
NETCONFAgent, on page 1817.0(3)I6(1)Users can change NETCONFconfigurations and then chosewhen to commit those changes.
NETCONF Candidate
Dynamic Logger, on page 2117.0(3)I6(1)Users can now updateconfigurations withoutrestarting the switch
Dynamic Logger
Model-Driven Telemetry, onpage 219
7.0(3)I6(1)Telemetry supports thefollowing features:
• JSON over HTTP
• SSL/TLS certificates overgRPC
Model-Driven Telemetry
NX-API Developer Sandbox,on page 157
7.0(3)I6(1)The Sandbox can convert RESTJSON payloads into equivalentCLI commands
NX-API Developer Sandbox
Cisco Nexus 9000 Series NX-OS Programmability Guide, Release 7.x3
New and Changed InformationNew and Changed Information

Where DocumentedChangedinRelease
DescriptionFeature
Guest Shell, on page 337.0(3)I5(2)Version updated from 2.1 to2.2. Guest shell now includesthe following features:
• User accounts will havethe same name as the oneused to log into the switch,
• The dohost utility willsend the logged-in username over the NX-APIconnection,
• A network administratorcan configurenon-administrativeaccounts within the guestshell.
Guest Shell
NX-API Developer Sandbox,on page 157
7.0(3)I5(1)The Sandbox now supports thegeneration of YANG andNX-API REST payloads.
NX-API Developer Sandbox
Model-DrivenProgrammability, on page 169
7.0(3)I5(1)Data modeling provides aprogrammatic andstandards-based method ofwriting configurations to thenetwork device.
Model-Driven Programmability
Model-Driven Telemetry, onpage 219
7.0(3)I5(1)Enables the push model ofstreaming network data,providing near-real-time accessto monitoring data.
Model-Driven Telemetry
Replaced in a later release byModel-Driven Programmability
7.0(3)I4(1)Added the use of XMLManagement Interface toconfigure devices.
XML Management Interface
7.0(3)i2(1)The Cisco SDK is adevelopment kit based onYocto1.2. It contains all of the toolsneeded to build applications forexecution on a Cisco Nexusswitch.
Nexus ApplicationDevelopment
Kernel Stack, on page 897.0(3)I2(1)Uses well-known Linux APIsto manage routes and frontpanel ports.
Kernel Stack
Cisco Nexus 9000 Series NX-OS Programmability Guide, Release 7.x4
New and Changed InformationNew and Changed Information

Where DocumentedChangedinRelease
DescriptionFeature
Nexus ApplicationDevelopment - ISO, on page117
7.0(3)i2(1)The ISO image is a bootableWind River 5 environment thatincludes the necessary tools,libraries, and headers to buildand RPM-package third-partyapplications to run natively ona Cisco Nexus switch.
ISO
iPXE, on page 857.0(3)i2(1)Open source network bootfirmware.
iPXE
Using Chef Client with CiscoNX-OS , on page 113
7.0(3)i2(1)Chef is an open-source softwarepackage developed by ChefSoftware, Inc.
Chef
Puppet Agent, on page 1097.0(3)i2(1)The Puppet software package,developed by Puppet Labs, isan open source automationtoolset for managing serversand other resources byenforcing device states, such asconfiguration settings.
Puppet
Third-Party Applications, onpage 95
7.0(3)i2(1)Open source applicationsadded.
Third-Party Applications
Guest Shell, on page 337.0(3)i2(1)Updated to Guest Shell 2.0Guest Shell
iPXE, on page 857.0(3)i2(1)Open source network bootfirmware.
iPXE
Kernel Stack, on page 897.0(3)i2(1)Uses well known Linux APIsto manage the routes and frontpanel ports.
Kernel Stack
7.0(3)I1(1)No updates since release 6.x
Cisco Nexus 9000 Series NX-OS Programmability Guide, Release 7.x5
New and Changed InformationNew and Changed Information

Cisco Nexus 9000 Series NX-OS Programmability Guide, Release 7.x6
New and Changed InformationNew and Changed Information

C H A P T E R 2Overview
• Programmability Overview, on page 7• Standard Network Manageability Features, on page 8• Advanced Automation Feature, on page 8• Programmability Support, on page 10
Programmability OverviewThe Cisco NX-OS software running on the Cisco Nexus 9000 Series devices is as follows:
• Resilient
Provides critical business-class availability.
• Modular
Has extensions that accommodate business needs.
• Highly Programmatic
Allows for rapid automation and orchestration through Application Programming Interfaces (APIs).
• Secure
Protects and preserves data and operations.
• Flexible
Integrates and enables new technologies.
• Scalable
Accommodates and grows with the business and its requirements.
• Easy to use
Reduces the amount of learning required, simplifies deployment, and provides ease of manageability.
With the Cisco NX-OS operating system, the device functions in the unified fabric mode to provide networkconnectivity with programmatic automation functions.
Cisco NX-OS contains Open Source Software (OSS) and commercial technologies that provide automation,orchestration, programmability, monitoring, and compliance support.
Cisco Nexus 9000 Series NX-OS Programmability Guide, Release 7.x7

For more information on Open NX-OS, see https://developer.cisco.com/site/nx-os/.
Standard Network Manageability Features• SNMP (V1, V2, V3)
• Syslog
• RMON
• NETCONF
• CLI and CLI scripting
Advanced Automation FeatureThe enhanced Cisco NX-OS on the device supports automation. The platform includes support for Power OnAuto Provisioning (POAP).
The enhanced Cisco NX-OS on the device supports automation. The platform includes the following featuresthat support automation:
• Power On Auto Provisioning (POAP) support
• Chef and Puppet integration
• OpenStack integration
• OpenDayLight integration and OpenFlow support
Power On Auto Provisioning SupportPower On Auto Provisioning (POAP) automates the process of installing and upgrading software images andinstalling configuration files on Cisco Nexus devices that are being deployed in the network for the first time.It reduces the manual tasks that are required to scale the network capacity.
When a Cisco Nexus device with the POAP feature boots and does not find the startup configuration, thedevice enters POAPmode. It locates a DHCP server and bootstraps itself with its interface IP address, gateway,and DNS server IP addresses. The device obtains the IP address of a TFTP server or the URL of an HTTPserver and downloads a configuration script that enables the device to download and install the appropriatesoftware image and configuration file.
Chef and Puppet IntegrationChef and Puppet are two intent-based infrastructure automation frameworks.
Chef allows you to define your intent with a recipe. A recipe is a reusable set of configuration or managementtasks. Chef allows the recipe to be deployed on numerous devices. When deployed on a Nexus 9000, a recipetranslates into a network configuration or a set of commands for gathering statistics and analytics information.A recipe provides a way for automated configuration and management of a Nexus 9000 switch.
Cisco Nexus 9000 Series NX-OS Programmability Guide, Release 7.x8
OverviewStandard Network Manageability Features

Puppet provides a similar intent definition construct that is called a manifest. When deployed on a Nexus9000 switch, a manifest translates into a network configuration or a set of commands for gathering informationfrom the switch.
The Cisco Nexus 9000 switch supports both the Puppet and Chef frameworks. The Puppet client and the Chefclient are both integrated into the enhanced NX-OS on the Nexus 9000 switch.
OpenStack IntegrationThe Cisco Nexus 9000 Series devices support the Cisco Nexus plug-in for OpenStack Networking, also knownas Neutron (http://www.cisco.com/web/solutions/openstack/index.html). The plug-in allows you to build aninfrastructure as a service (IaaS) network and to deploy a cloud network. With OpenStack, you can build anon-demand, self-service, multitenant computing infrastructure. However, implementing OpenStack's VLANnetworking model across virtual and physical infrastructures can be difficult.
The OpenStack Networking extensible architecture supports plug-ins to configure networks directly. However,when you choose a network plug-in, only the target technology of that plug-in is configured. When you arerunning OpenStack clusters across multiple hosts with VLANs, a typical plug-in configures either the virtualnetwork infrastructure or the physical network, but not both.
The Cisco Nexus plug-in solves this difficult problem by including support for configuring both the physicaland virtual networking infrastructure.
The Cisco Nexus plug-in accepts OpenStack Networking API calls and uses the Network ConfigurationProtocol (NETCONF) by default or the RESTAPI to configure Cisco Nexus devices and Open vSwitch (OVS)that runs on the hypervisor. The Cisco Nexus plug-in configures VLANs on both the physical and virtualnetwork. It also allocates scarce VLAN IDs by deprovisioning them when they are no longer needed andreassigning them to new tenants whenever possible. VLANs are configured so that virtual machines that runon different virtualization (compute) hosts that belong to the same tenant network transparently communicatethrough the physical network. In addition, connectivity from the compute hosts to the physical network istrunked to allow traffic only from the VLANs that are configured on the host by the virtual switch.
We recommend configuring the REST API driver. For more configuration details, go to:
http://docwiki.cisco.com/wiki/Neutron_ML2_Driver_For_Cisco_Nexus_Devices_Ocata_Release
Note
The following table lists the features of the Cisco Nexus plug-in for OpenStack Networking:
Table 2: Summary of Cisco Nexus Plug-In Features for OpenStack Networking (Neutron)
Cisco Nexus Plug-InDescriptionConsiderations
Accepts networking API calls andconfigures both physical and virtualswitches.
VLANsmust be configured on bothphysical and virtual networks.OpenStack Networking supportsonly a single plug-in at a time. Youmust choose which parts of thenetworks to manually configure.
Extension of tenant VLANs acrossvirtualization hosts
Cisco Nexus 9000 Series NX-OS Programmability Guide, Release 7.x9
OverviewOpenStack Integration

Cisco Nexus Plug-InDescriptionConsiderations
Efficiently uses limited VLAN IDsby provisioning and deprovisioningVLANs across switches as tenantnetworks are created and destroyed.
Static provisioning of VLAN IDson every switch rapidly consumesall available VLAN IDs. This limitsscalability and makes the networkvulnerable to broadcast storms.
Efficient use of scarce VLAN IDs
Dynamically provisionstenant-network-specific VLANs onswitch ports that are connected tovirtualization hosts through theNexus plug-in driver.
You must statically provision allavailable VLANs on all physicalswitches. This process is manualand error prone.
Easy configuration of tenantVLANs in a top-of-rack (ToR)switch
Configures switch ports that areconnected to virtualization hostsonly for the VLANs thatcorrespond to the networksconfigured on the host. This featureenables accurate port and VLANassociations.
Switch ports that are connected tovirtualization hosts are configuredto handle all VLANs. Hardwarelimits are reached quickly.
Intelligent assignment of VLANIDs
Supports Cisco Nexus 2000 SeriesFabric Extenders to enable large,multirack deployments andeliminates the need for anaggregation switch VLANconfiguration.
When compute hosts run in severalracks, you must fully meshtop-of-rack switches or manuallytrunk aggregation switches.
Aggregation switch VLANconfiguration for large multirackdeployments.
OpenDayLight Integration and OpenFlow SupportCisco Nexus 9000 switches support integration with the open source OpenDayLight project. OpenDayLighthelps meet some of the requirements of operators and application developers for infrastructure:
• Real-time orchestration and operation of integrated virtual compute, application, and network.
• Simple interface to the network. An underlying detail such as a router, switch, or topology can be madeabstract and more simple.
For OpenDayLight orchestration of CiscoNexus 9000 switches, support is also available for other programmaticinterfaces, such as NETCONF, that OpenDaylight can use in the southbound flow.
Cisco Nexus 9000 switches also support OpenFlow to enable use cases such as network TAP aggregation.
Programmability SupportCisco NX-OS on Cisco Nexus 9000 devices support several capabilities to aid programmability.
Cisco Nexus 9000 Series NX-OS Programmability Guide, Release 7.x10
OverviewOpenDayLight Integration and OpenFlow Support

NX-API SupportCisco NX-API allows for HTTP-based programmatic access to the Cisco Nexus 9000 platform. This supportis delivered by NX-API, an open source webserver. NX-API provides the configuration and managementcapabilities of the Cisco NX-OS CLI with web-based APIs. The device can be set to publish the output of theAPI calls in XML or JSON format. This API enables rapid development on the Cisco Nexus 9000 platform.
Python ScriptingCisco Nexus 9000 devices support Python v2.7.5 in both interactive and noninteractive (script) modes.
The Python scripting capability on the devices provides programmatic access to the switch CLI to performvarious tasks, and to Power-On Auto Provisioning (POAP) and Embedded Event Manager (EEM) actions.Responses to Python calls that invoke the Cisco NX-OS CLI return text or JSON output.
The Python interpreter is included in the Cisco NX-OS software.
Tcl ScriptingCisco Nexus 9000 Series devices support Tcl (Tool Command Language). Tcl is a scripting language thatenables greater flexibility with CLI commands on the switch. You can use Tcl to extract certain values in theoutput of a show command, perform switch configurations, run Cisco NX-OS commands in a loop, or defineEEM policies in a script.
Broadcom ShellThe Cisco Nexus 9000 Series device front panel and fabric module line cards contain Broadcom NetworkForwarding Engine (NFE). You can access the Broadcom command-line shell (bcm-shell) from these NFEs.
BashCisco Nexus 9000 devices support direct Bourne-Again Shell (Bash) access. With Bash, you can access theunderlying Linux system on the device and manage the system.
Bash Shell Access and Linux Container SupportThe Cisco Nexus 9000 switches support direct Linux shell access and Linux containers. With Linux shellaccess, you can access the underlying Linux system on the Nexus 9000 switch and manage the underlyingsystem. You can also use Linux containers to securely install your own software and to enhance the capabilitiesof the Nexus 9000 switch. For example, you can install bare-metal provisioning tools like Cobbler on a Nexus9000 device to enable automatic provisioning of bare-metal servers from the top-of-rack switch.
Guest ShellThe Cisco Nexus 9000 Series devices support a guest shell that provides Bash access into a Linux executionspace on the host system that is decoupled from the host Cisco Nexus 9000 NX-OS software. With the guestshell, you can add software packages and update libraries as neededwithout impacting the host system software.
Cisco Nexus 9000 Series NX-OS Programmability Guide, Release 7.x11
OverviewNX-API Support

Container Tracker SupportCisco NX-OS is configured to communicate with the Kubernetes API Server to understand the capabilitiesof the containers behind a given switch port.
The following commands communicate with the Kubernetes API Server:
• The show containers kubernetes command obtains data from kube-apiserver using API calls overHTTP.
• The kubernetes watch resource command uses a daemon to subscribe to requested resources and processstreaming data from kube-apiserver.
• The action assigned in the watch command is performed on pre-defined triggers. (For example, Add orDelete of a Pod.)
Cisco Nexus 9000 Series NX-OS Programmability Guide, Release 7.x12
OverviewContainer Tracker Support

P A R T IShells and Scripting
• Bash, on page 15• Guest Shell, on page 33• Broadcom Shell, on page 63• Python API, on page 69• Scripting with Tcl, on page 79• iPXE, on page 85• Kernel Stack, on page 89


C H A P T E R 3Bash
• About Bash, on page 15• Guidelines and Limitations, on page 15• Accessing Bash, on page 16• Escalate Privileges to Root, on page 17• Examples of Bash Commands, on page 18• Managing Feature RPMs, on page 19• Managing Patch RPMs, on page 22• Persistently Daemonizing an SDK- or ISO-built Third Party Process, on page 29• Persistently Starting Your Application from the Native Bash Shell, on page 30• An Example Application in the Native Bash Shell, on page 30
About BashIn addition to the NX-OS CLI, Cisco Nexus9000 Series devices support access to the Bourne-Again SHell(Bash). Bash interprets commands that you enter or commands that are read from a shell script. Using Bashenables access to the underlying Linux system on the device and to manage the system.
Guidelines and LimitationsThe Bash shell has the following guidelines and limitations:
• Starting with NX-OS 7.0(3)F3(1), the Bash shell is supported on the Cisco Nexus 9508 switch.
• The binaries located in the /isan folder are meant to be run in an environment which is setup differentlyfrom that of the shell entered from the run bash command. It is advisable not to use these binaries fromthe Bash shell as the behavior within this environment is not predictable.
• When importing Cisco Python modules, do not use Python from the Bash shell. Instead use the morerecent Python in NX-OS VSH.
Cisco Nexus 9000 Series NX-OS Programmability Guide, Release 7.x15

Accessing BashIn Cisco NX-OS, Bash is accessible from user accounts that are associated with the Cisco NX-OS dev-opsrole or the Cisco NX-OS network-admin role.
The following example shows the authority of the dev-ops role and the network-admin role:switch# show role name dev-ops
Role: dev-opsDescription: Predefined system role for devops access. This rolecannot be modified.Vlan policy: permit (default)Interface policy: permit (default)Vrf policy: permit (default)-------------------------------------------------------------------Rule Perm Type Scope Entity-------------------------------------------------------------------4 permit command conf t ; username *3 permit command bcm module *2 permit command run bash *1 permit command python *
switch# show role name network-admin
Role: network-adminDescription: Predefined network admin role has access to all commandson the switch-------------------------------------------------------------------Rule Perm Type Scope Entity-------------------------------------------------------------------1 permit read-write
switch#
Bash is enabled by running the feature bash-shell command.
The run bash command loads Bash and begins at the home directory for the user.
The following examples show how to enable the Bash shell feature and how to run Bash.switch# configure terminalswitch(config)# feature bash-shell
switch# run?run Execute/run programrun-script Run shell scripts
switch# run bash?bash Linux-bash
switch# run bashbash-4.2$ whoamiadminbash-4.2$ pwd/bootflash/home/adminbash-4.2$
Cisco Nexus 9000 Series NX-OS Programmability Guide, Release 7.x16
Shells and ScriptingAccessing Bash

You can also execute Bash commands with run bash command.
For instance, you can run whoami using run bash command:run bash whoami
You can also run Bash by configuring the user shelltype:username foo shelltype bash
This command puts you directly into the Bash shell upon login. This does not require feature bash-shell tobe enabled.
Note
Escalate Privileges to RootThe privileges of an admin user can escalate their privileges for root access.
The following are guidelines for escalating privileges:
• admin privilege user (network-admin / vdc-admin) is equivalent of Linux root privilege user in NX-OS
• Only an authenticated admin user can escalate privileges to root, and password is not required for anauthenticated admin privilege user.
• Bash must be enabled before escalating privileges.
• SSH to the switch using root username through a non-management interface will default to Linux Bashshell-type access for the root user. Type vsh to return to NX-OS shell access.
NX-OS network administrator users must escalate to root to pass configuration commands to the NX-OSVSH if:
• The NX-OS user has a shell-type Bash and logs into the switch with a shell-type Bash.
• The NX-OS user that logged into the switch in Bash continues to use Bash on the switch.
Run sudo su 'vsh -c "<configuration commands>"' or sudo bash -c 'vsh -c "<configuration commands>"'.
The following example demonstrates with network administrator user MyUser with a default shell type Bashusing sudo to pass configuration commands to the NX-OS:ssh -l MyUser 1.2.3.4-bash-4.2$ sudo vsh -c "configure terminal ; interface eth1/2 ; shutdown ; sleep 2 ; showinterface eth1/2 brief"
--------------------------------------------------------------------------------Ethernet VLAN Type Mode Status Reason Speed PortInterface Ch #--------------------------------------------------------------------------------Eth1/2 -- eth routed down Administratively down auto(D) --
The following example demonstrates with network administrator user MyUser with default shell type Bashentering the NX-OS and then running Bash on the NX-OS:ssh -l MyUser 1.2.3.4-bash-4.2$ vsh -h
Cisco Nexus 9000 Series NX-OS Programmability Guide, Release 7.x17
Shells and ScriptingEscalate Privileges to Root

Cisco NX-OS SoftwareCopyright (c) 2002-2016, Cisco Systems, Inc. All rights reserved.Nexus 9000v software ("Nexus 9000v Software") and related documentation,files or other reference materials ("Documentation") arethe proprietary property and confidential information of CiscoSystems, Inc. ("Cisco") and are protected, without limitation,pursuant to United States and International copyright and trademarklaws in the applicable jurisdiction which provide civil and criminalpenalties for copying or distribution without Cisco's authorization.
Any use or disclosure, in whole or in part, of the Nexus 9000v Softwareor Documentation to any third party for any purposes is expresslyprohibited except as otherwise authorized by Cisco in writing.The copyrights to certain works contained herein are owned by otherthird parties and are used and distributed under license. Some partsof this software may be covered under the GNU Public License or theGNU Lesser General Public License. A copy of each such license isavailable athttp://www.gnu.org/licenses/gpl.html andhttp://www.gnu.org/licenses/lgpl.html**************************************************************************** Nexus 9000v is strictly limited to use for evaluation, demonstration ** and NX-OS education. Any use or disclosure, in whole or in part of ** the Nexus 9000v Software or Documentation to any third party for any ** purposes is expressly prohibited except as otherwise authorized by ** Cisco in writing. ****************************************************************************switch# run bashbash-4.2$ vsh -c "configure terminal ; interface eth1/2 ; shutdown ; sleep 2 ; show interfaceeth1/2 brief"
--------------------------------------------------------------------------------Ethernet VLAN Type Mode Status Reason Speed PortInterface Ch #--------------------------------------------------------------------------------Eth1/2 -- eth routed down Administratively down auto(D) --
Do not use sudo su - or the system hangs.Note
The following example shows how to escalate privileges to root and how to verify the escalation:switch# run bashbash-4.2$ sudo su rootbash-4.2# whoamirootbash-4.2# exitexit
Examples of Bash CommandsThis section contains examples of Bash commands and output.
Displaying System StatisticsThe following example displays system statistics:
Cisco Nexus 9000 Series NX-OS Programmability Guide, Release 7.x18
Shells and ScriptingExamples of Bash Commands

switch# run bashbash-4.2$ cat /proc/meminfo<snip>MemTotal: 16402560 kBMemFree: 14098136 kBBuffers: 11492 kBCached: 1287880 kBSwapCached: 0 kBActive: 1109448 kBInactive: 717036 kBActive(anon): 817856 kBInactive(anon): 702880 kBActive(file): 291592 kBInactive(file): 14156 kBUnevictable: 0 kBMlocked: 0 kBSwapTotal: 0 kBSwapFree: 0 kBDirty: 32 kBWriteback: 0 kBAnonPages: 527088 kBMapped: 97832 kB<\snip>
Running Bash from CLIThe following example runs ps from Bash using run bash command:switch# run bash ps -elF S UID PID PPID C PRI NI ADDR SZ WCHAN TTY TIME CMD4 S 0 1 0 0 80 0 - 528 poll_s ? 00:00:03 init1 S 0 2 0 0 80 0 - 0 kthrea ? 00:00:00 kthreadd1 S 0 3 2 0 80 0 - 0 run_ks ? 00:00:56 ksoftirqd/01 S 0 6 2 0 -40 - - 0 cpu_st ? 00:00:00 migration/01 S 0 7 2 0 -40 - - 0 watchd ? 00:00:00 watchdog/01 S 0 8 2 0 -40 - - 0 cpu_st ? 00:00:00 migration/11 S 0 9 2 0 80 0 - 0 worker ? 00:00:00 kworker/1:01 S 0 10 2 0 80 0 - 0 run_ks ? 00:00:00 ksoftirqd/1
Managing Feature RPMs
RPM Installation PrerequisitesUse these procedures to verify that the system is ready before installing or adding an RPM.
Procedure
PurposeCommand or Action
Before running Bash, this step verifies that thesystem is ready before installing or adding anRPM.
switch# show logging logfile | grep -i "Systemready"
Step 1
Proceed if you see output similar to thefollowing:
Cisco Nexus 9000 Series NX-OS Programmability Guide, Release 7.x19
Shells and ScriptingRunning Bash from CLI
PurposeCommand or Action
2018 Mar 27 17:24:22 switch%ASCII-CFG-2-CONF_CONTROL:Systemready
Loads Bash.switch# run bash sudo su
Example:
Step 2
switch# run bash sudo su
bash-4.2#
Installing Feature RPMs from Bash
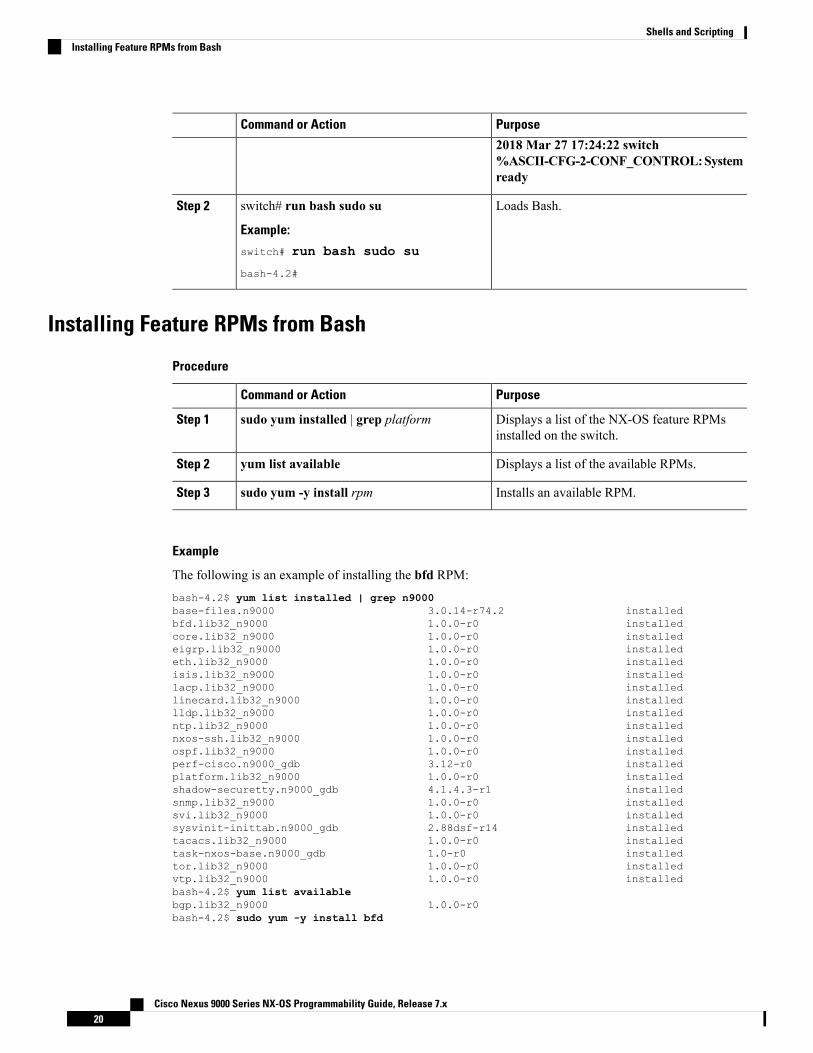
Procedure
PurposeCommand or Action
Displays a list of the NX-OS feature RPMsinstalled on the switch.
sudo yum installed | grep platformStep 1
Displays a list of the available RPMs.yum list availableStep 2
Installs an available RPM.sudo yum -y install rpmStep 3
Example
The following is an example of installing the bfd RPM:bash-4.2$ yum list installed | grep n9000base-files.n9000 3.0.14-r74.2 installedbfd.lib32_n9000 1.0.0-r0 installedcore.lib32_n9000 1.0.0-r0 installedeigrp.lib32_n9000 1.0.0-r0 installedeth.lib32_n9000 1.0.0-r0 installedisis.lib32_n9000 1.0.0-r0 installedlacp.lib32_n9000 1.0.0-r0 installedlinecard.lib32_n9000 1.0.0-r0 installedlldp.lib32_n9000 1.0.0-r0 installedntp.lib32_n9000 1.0.0-r0 installednxos-ssh.lib32_n9000 1.0.0-r0 installedospf.lib32_n9000 1.0.0-r0 installedperf-cisco.n9000_gdb 3.12-r0 installedplatform.lib32_n9000 1.0.0-r0 installedshadow-securetty.n9000_gdb 4.1.4.3-r1 installedsnmp.lib32_n9000 1.0.0-r0 installedsvi.lib32_n9000 1.0.0-r0 installedsysvinit-inittab.n9000_gdb 2.88dsf-r14 installedtacacs.lib32_n9000 1.0.0-r0 installedtask-nxos-base.n9000_gdb 1.0-r0 installedtor.lib32_n9000 1.0.0-r0 installedvtp.lib32_n9000 1.0.0-r0 installedbash-4.2$ yum list availablebgp.lib32_n9000 1.0.0-r0bash-4.2$ sudo yum -y install bfd
Cisco Nexus 9000 Series NX-OS Programmability Guide, Release 7.x20
Shells and ScriptingInstalling Feature RPMs from Bash

Upon switch reload during boot up, use the rpm command instead of yum for persistent RPMs.Otherwise, RPMs initially installed using yum bash or install cli shows reponame or filenameinstead of installed.
Note
Upgrading Feature RPMs
Before you begin
There must be a higher version of the RPM in the Yum repository.
Procedure
PurposeCommand or Action
Upgrades an installed RPM.sudo yum -y upgrade rpmStep 1
Example
The following is an example of upgrading the bfd RPM:bash-4.2$ sudo yum -y upgrade bfd
Downgrading a Feature RPM
Procedure
PurposeCommand or Action
Downgrades the RPM if any of the Yumrepositories has a lower version of the RPM.
sudo yum -y downgrade rpmStep 1
Example
The following example shows how to downgrade the bfd RPM:bash-4.2$ sudo yum -y downgrade bfd
Cisco Nexus 9000 Series NX-OS Programmability Guide, Release 7.x21
Shells and ScriptingUpgrading Feature RPMs

Erasing a Feature RPM
The SNMP RPM and the NTP RPM are protected and cannot be erased.
You can upgrade or downgrade these RPMs. It requires a system reload for the upgrade or downgrade to takeeffect.
For the list of protected RPMs, see /etc/yum/protected.d/protected_pkgs.conf.
Note
Procedure
PurposeCommand or Action
Erases the RPM.sudo yum -y erase rpmStep 1
Example
The following example shows how to erase the bfd RPM:bash-4.2$ sudo yum -y erase bfd
Managing Patch RPMs
RPM Installation PrerequisitesUse these procedures to verify that the system is ready before installing or adding an RPM.
Procedure
PurposeCommand or Action
Before running Bash, this step verifies that thesystem is ready before installing or adding anRPM.
switch# show logging logfile | grep -i "Systemready"
Step 1
Proceed if you see output similar to thefollowing:
2018 Mar 27 17:24:22 switch%ASCII-CFG-2-CONF_CONTROL:Systemready
Loads Bash.switch# run bash sudo su
Example:
Step 2
switch# run bash sudo su
bash-4.2#
Cisco Nexus 9000 Series NX-OS Programmability Guide, Release 7.x22
Shells and ScriptingErasing a Feature RPM

Adding Patch RPMs from Bash
Procedure
PurposeCommand or Action
Displays a list of the patch RPMs present onthe switch.
yum list --patch-onlyStep 1
Adds the patch to the repository, whereURL_of_patch is a well-defined format, such
sudo yum install --add URL_of_patchStep 2
as bootflash:/patch, not in standardLinux format, such as /bootflash/patch.
Displays a list of the patches that are added tothe repository but are in an inactive state.
yum list --patch-only availableStep 3
Example
The following is an example of installing thenxos.CSCab00001-n9k_ALL-1.0.0-7.0.3.I7.3.lib32_n9000 RPM:bash-4.2# yum list --patch-onlyLoaded plugins: downloadonly, importpubkey, localrpmDB, patchaction, patching,
: protect-packagesgroups-repo | 1.1 kB 00:00 ...localdb | 951 B 00:00 ...patching | 951 B 00:00 ...thirdparty | 951 B 00:00 ...bash-4.2#bash-4.2# sudo yum install --addbootflash:/nxos.CSCab00001-n9k_ALL-1.0.0-7.0.3.I7.3.lib32_n9000.rpmLoaded plugins: downloadonly, importpubkey, localrpmDB, patchaction, patching,
: protect-packagesgroups-repo | 1.1 kB 00:00 ...localdb | 951 B 00:00 ...patching | 951 B 00:00 ...thirdparty | 951 B 00:00 ...[############## ] 70%Install operation 135 completed successfully at Tue Mar 27 17:45:342018.
[####################] 100%bash-4.2#
Once the patch RPM is installed, verify that it was installed properly. The following command liststhe patches that are added to the repository and are in the inactive state:bash-4.2# yum list --patch-only availableLoaded plugins: downloadonly, importpubkey, localrpmDB, patchaction, patching,
: protect-packagesgroups-repo | 1.1 kB 00:00 ...localdb | 951 B 00:00 ...patching | 951 B 00:00 ...thirdparty | 951 B 00:00 ...nxos.CSCab00001-n9k_ALL.lib32_n9000 1.0.0-7.0.3.I7.3 patchingbash-4.2#
Cisco Nexus 9000 Series NX-OS Programmability Guide, Release 7.x23
Shells and ScriptingAdding Patch RPMs from Bash

You can also add patches to a repository from a tar file, where the RPMs are bundled in the tar file.The following example shows how to add two RPMs that are part of thenxos.CSCab00002_CSCab00003-n9k_ALL-1.0.0-7.0.3.I7.3.lib32_n9000 tar file to the patchrepository:bash-4.2# sudo yum install --addbootflash:/nxos.CSCab00002_CSCab00003-n9k_ALL-1.0.0-7.0.3.I7.3.lib32_n9000.tarLoaded plugins: downloadonly, importpubkey, localrpmDB, patchaction, patching,
: protect-packagesgroups-repo | 1.1 kB 00:00 ...localdb | 951 B 00:00 ...patching | 951 B 00:00 ...thirdparty | 951 B 00:00 ...[############## ] 70%Install operation 146 completed successfully at Tue Mar 27 21:17:392018.
[####################] 100%bash-4.2#bash-4.2# yum list --patch-onlyLoaded plugins: downloadonly, importpubkey, localrpmDB, patchaction, patching,
: protect-packagesgroups-repo | 1.1 kB 00:00 ...localdb | 951 B 00:00 ...patching | 951 B 00:00 ...patching/primary | 942 B 00:00 ...patching 2/2thirdparty | 951 B 00:00 ...nxos.CSCab00003-n9k_ALL.lib32_n9000 1.0.0-7.0.3.I7.3 patchingnxos.CSCab00002-n9k_ALL.lib32_n9000 1.0.0-7.0.3.I7.3 patchingbash-4.2#
Activating a Patch RPM
Before you begin
Verify that you have added the necessary patch RPM to the repository using the instructions in Adding PatchRPMs from Bash, on page 23.
Procedure
PurposeCommand or Action
Activates the patch RPM, where patch_RPM isa patch that is located in the repository. Do notprovide a location for the patch in this step.
sudo yum install patch_RPM --nocommitStep 1
Adding the --nocommit flag to thecommandmeans that the patch RPMis activated in this step, but notcommitted. See Committing a PatchRPM, on page 26 for instructionson committing the patch RPM afteryou have activated it.
Note
Cisco Nexus 9000 Series NX-OS Programmability Guide, Release 7.x24
Shells and ScriptingActivating a Patch RPM

Example
The following example shows how to activate thenxos.CSCab00001-n9k_ALL-1.0.0-7.0.3.I7.3.lib32_n9000 patch RPM:bash-4.2# sudo yum install nxos.CSCab00001-n9k_ALL-1.0.0-7.0.3.I7.3.lib32_n9000 --nocommitLoaded plugins: downloadonly, importpubkey, localrpmDB, patchaction, patching,
: protect-packagesgroups-repo | 1.1 kB 00:00 ...localdb | 951 B 00:00 ...patching | 951 B 00:00 ...thirdparty | 951 B 00:00 ...Setting up Install ProcessResolving Dependencies--> Running transaction check---> Package nxos.CSCab00001-n9k_ALL.lib32_n9000 0:1.0.0-7.0.3.I7.3 will be installed--> Finished Dependency Resolution
Dependencies Resolved
===================================================================================Package Arch Version Repository Size===================================================================================Installing:nxos.CSCab00001-n9k_ALL lib32_n9000 1.0.0-7.0.3.I7.3 patching 28 k
Transaction Summary===================================================================================Install 1 Package
Total download size: 28 kInstalled size: 82 kIs this ok [y/N]: yDownloading Packages:Running Transaction CheckRunning Transaction TestTransaction Test SucceededRunning TransactionInstalling : nxos.CSCab00001-n9k_ALL-1.0.0-7.0.3.I7.3.lib32_n9000 1/1
[################## ] 90%error: reading/var/sysmgr/tmp/patches/CSCab00001-n9k_ALL/isan/bin/sysinfo manifest, non-printable charactersfound
Installed:nxos.CSCab00001-n9k_ALL.lib32_n9000 0:1.0.0-7.0.3.I7.3
Complete!Install operation 140 completed successfully at Tue Mar 27 18:07:40 2018.
[####################] 100%bash-4.2#
Enter the following command to verify that the patch RPM was activated successfully:bash-4.2# yum list --patch-onlyLoaded plugins: downloadonly, importpubkey, localrpmDB, patchaction, patching,
: protect-packagesgroups-repo | 1.1 kB 00:00 ...localdb | 951 B 00:00 ...patching | 951 B 00:00 ...thirdparty | 951 B 00:00 ...
Cisco Nexus 9000 Series NX-OS Programmability Guide, Release 7.x25
Shells and ScriptingActivating a Patch RPM

nxos.CSCab00001-n9k_ALL.lib32_n9000 1.0.0-7.0.3.I7.3 installedbash-4.2#
Committing a Patch RPM
Procedure
PurposeCommand or Action
Commits the patch RPM. The patch RPMmustbe committed to keep it active after reloads.
sudo yum install patch_RPM --commitStep 1
Example
The following example shows how to commit thenxos.CSCab00001-n9k_ALL-1.0.0-7.0.3.I7.3.lib32_n9000 patch RPM:bash-4.2# sudo yum install nxos.CSCab00001-n9k_ALL-1.0.0-7.0.3.I7.3.lib32_n9000 --commitLoaded plugins: downloadonly, importpubkey, localrpmDB, patchaction, patching,
: protect-packagesgroups-repo | 1.1 kB 00:00 ...localdb | 951 B 00:00 ...patching | 951 B 00:00 ...thirdparty | 951 B 00:00 ...Install operation 142 completed successfully at Tue Mar 27 18:13:16 2018.
[####################] 100%bash-4.2#
Enter the following command to verify that the patch RPM was committed successfully:bash-4.2# yum list --patch-only committedLoaded plugins: downloadonly, importpubkey, localrpmDB, patchaction, patching,
: protect-packagesgroups-repo | 1.1 kB 00:00 ...localdb | 951 B 00:00 ...patching | 951 B 00:00 ...thirdparty | 951 B 00:00 ...nxos.CSCab00001-n9k_ALL.lib32_n9000 1.0.0-7.0.3.I7.3 installedbash-4.2#
Deactivating a Patch RPM
Procedure
PurposeCommand or Action
Deactivates the patch RPM.sudo yum erase patch_RPM --nocommitStep 1
Adding the --nocommit flag to thecommandmeans that the patch RPMis only deactivated in this step.
Note
Cisco Nexus 9000 Series NX-OS Programmability Guide, Release 7.x26
Shells and ScriptingCommitting a Patch RPM

PurposeCommand or Action
Commits the patch RPM. You will get an errormessage if you try to remove the patch RPMwithout first committing it.
sudo yum install patch_RPM --commitStep 2
Example
The following example shows how to deactivate thenxos.CSCab00001-n9k_ALL-1.0.0-7.0.3.I7.3.lib32_n9000 patch RPM:bash-4.2# sudo yum erase nxos.CSCab00001-n9k_ALL-1.0.0-7.0.3.I7.3.lib32_n9000 --nocommitLoaded plugins: downloadonly, importpubkey, localrpmDB, patchaction, patching,
: protect-packagesSetting up Remove ProcessResolving Dependencies--> Running transaction check---> Package nxos.CSCab00001-n9k_ALL.lib32_n9000 0:1.0.0-7.0.3.I7.3 will be erased--> Finished Dependency Resolution
Dependencies Resolved
===================================================================================Package Arch Version Repository Size===================================================================================Removing:nxos.CSCab00001-n9k_ALL lib32_n9000 1.0.0-7.0.3.I7.3 @patching 82 k
Transaction Summary===================================================================================Remove 1 Package
Installed size: 82 kIs this ok [y/N]: yDownloading Packages:Running Transaction CheckRunning Transaction TestTransaction Test SucceededRunning Transaction[###### ] 30%error: reading/var/sysmgr/tmp/patches/CSCab00001-n9k_ALL/isan/bin/sysinfo manifest, non-printable charactersfoundErasing : nxos.CSCab00001-n9k_ALL-1.0.0-7.0.3.I7.3.lib32_n9000 1/1
[################## ] 90%Removed:nxos.CSCab00001-n9k_ALL.lib32_n9000 0:1.0.0-7.0.3.I7.3
Complete!Install operation 143 completed successfully at Tue Mar 27 21:03:47 2018.
[####################] 100%bash-4.2#
You must commit the patch RPM after deactivating it. If you do not commit the patch RPM afterdeactivating it, you will get an error message if you try to remove the patch RPM using the instructionsin Removing a Patch RPM, on page 28.bash-4.2# sudo yum install nxos.CSCab00001-n9k_ALL-1.0.0-7.0.3.I7.3.lib32_n9000 --commitLoaded plugins: downloadonly, importpubkey, localrpmDB, patchaction, patching,
: protect-packages
Cisco Nexus 9000 Series NX-OS Programmability Guide, Release 7.x27
Shells and ScriptingDeactivating a Patch RPM

groups-repo | 1.1 kB 00:00 ...localdb | 951 B 00:00 ...patching | 951 B 00:00 ...thirdparty | 951 B 00:00 ...Install operation 144 completed successfully at Tue Mar 27 21:09:28 2018.
[####################] 100%bash-4.2#
Enter the following command to verify that the patch RPM has been committed successfully:bash-4.2# yum list --patch-onlyLoaded plugins: downloadonly, importpubkey, localrpmDB, patchaction, patching,
: protect-packagesgroups-repo | 1.1 kB 00:00 ...localdb | 951 B 00:00 ...patching | 951 B 00:00 ...thirdparty | 951 B 00:00 ...nxos.CSCab00001-n9k_ALL.lib32_n9000 1.0.0-7.0.3.I7.3 patchingbash-4.2#
Removing a Patch RPM
Procedure
PurposeCommand or Action
Removes an inactive patch RPM.sudo yum install --remove patch_RPMStep 1
Example
The following example shows how to remove thenxos.CSCab00001-n9k_ALL-1.0.0-7.0.3.I7.3.lib32_n9000 patch RPM:bash-4.2# sudo yum install --remove nxos.CSCab00001-n9k_ALL-1.0.0-7.0.3.I7.3.lib32_n9000Loaded plugins: downloadonly, importpubkey, localrpmDB, patchaction, patching,
: protect-packagesgroups-repo | 1.1 kB 00:00 ...localdb | 951 B 00:00 ...patching | 951 B 00:00 ...thirdparty | 951 B 00:00 ...[########## ] 50%Install operation 145 completed successfully at Tue Mar 27 21:11:052018.
[####################] 100%bash-4.2#
If you see the following error message after attempting to remove the patch RPM:
Install operation 11 "failed because patch was not committed". at Wed Mar 28 22:14:05 2018
Then you did not commit the patch RPM before attempting to remove it. See Deactivating a PatchRPM, on page 26 for instructions on committing the patch RPM before attempting to remove it.
Note
Cisco Nexus 9000 Series NX-OS Programmability Guide, Release 7.x28
Shells and ScriptingRemoving a Patch RPM

Enter the following command to verify that the inactive patch RPM was removed successfully:bash-4.2# yum list --patch-onlyLoaded plugins: downloadonly, importpubkey, localrpmDB, patchaction, patching,
: protect-packagesgroups-repo | 1.1 kB 00:00 ...localdb | 951 B 00:00 ...patching | 951 B 00:00 ...patching/primary | 197 B 00:00 ...thirdparty | 951 B 00:00 ...bash-4.2#
Persistently Daemonizing an SDK- or ISO-built Third PartyProcess
Your application should have a startup Bash script that gets installed in /etc/init.d/application_name.This startup Bash script should have the following general format (for more information on this format, seehttp://linux.die.net/man/8/chkconfig).#!/bin/bash## <application_name> Short description of your application## chkconfig: 2345 15 85# description: Short description of your application#### BEGIN INIT INFO# Provides: <application_name># Required-Start: $local_fs $remote_fs $network $named# Required-Stop: $local_fs $remote_fs $network# Description: Short description of your application### END INIT INFO# See how we were called.case "$1" instart)# Put your startup commands here# Set RETVAL to 0 for success, non-0 for failure;;stop)# Put your stop commands here# Set RETVAL to 0 for success, non-0 for failure;;status)# Put your status commands here# Set RETVAL to 0 for success, non-0 for failure;;restart|force-reload|reload)# Put your restart commands here# Set RETVAL to 0 for success, non-0 for failure;;*)echo $"Usage: $prog {start|stop|status|restart|force-reload}"RETVAL=2esac
exit $RETVAL
Cisco Nexus 9000 Series NX-OS Programmability Guide, Release 7.x29
Shells and ScriptingPersistently Daemonizing an SDK- or ISO-built Third Party Process

Persistently Starting Your Application from the Native BashShell
Procedure
Step 1 Install your application startup Bash script that you created into /etc/init.d/application_name
Step 2 Start your application with /etc/init.d/application_name start
Step 3 Enter chkconfig --add application_nameStep 4 Enter chkconfig --level 3 application_name on
Run level 3 is the standard multi-user run level, and the level at which the switch normally runs.
Step 5 Verify that your application is scheduled to run on level 3 by running chkconfig --list application_name andconfirm that level 3 is set to on
Step 6 Verify that your application is listed in /etc/rc3.d. You should see something like this, where there is an'S' followed by a number, followed by your application name (tcollector in this example), and a link toyour Bash startup script in ../init.d/application_name
bash-4.2# ls -l /etc/rc3.d/tcollector
lrwxrwxrwx 1 root root 20 Sep 25 22:56 /etc/rc3.d/S15tcollector -> ../init.d/tcollector
bash-4.2#
An Example Application in the Native Bash ShellThe following example demonstrates an application in the Native Bash Shell:bash-4.2# cat /etc/init.d/hello.sh#!/bin/bash
PIDFILE=/tmp/hello.pidOUTPUTFILE=/tmp/hello
echo $$ > $PIDFILErm -f $OUTPUTFILEwhile truedo
echo $(date) >> $OUTPUTFILEecho 'Hello World' >> $OUTPUTFILEsleep 10
donebash-4.2#bash-4.2#bash-4.2# cat /etc/init.d/hello#!/bin/bash## hello Trivial "hello world" example Third Party App#
Cisco Nexus 9000 Series NX-OS Programmability Guide, Release 7.x30
Shells and ScriptingPersistently Starting Your Application from the Native Bash Shell

# chkconfig: 2345 15 85# description: Trivial example Third Party App#### BEGIN INIT INFO# Provides: hello# Required-Start: $local_fs $remote_fs $network $named# Required-Stop: $local_fs $remote_fs $network# Description: Trivial example Third Party App### END INIT INFO
PIDFILE=/tmp/hello.pid
# See how we were called.case "$1" instart)
/etc/init.d/hello.sh &RETVAL=$?
;;stop)
kill -9 `cat $PIDFILE`RETVAL=$?
;;status)
ps -p `cat $PIDFILE`RETVAL=$?
;;restart|force-reload|reload)
kill -9 `cat $PIDFILE`/etc/init.d/hello.sh &RETVAL=$?
;;*)echo $"Usage: $prog {start|stop|status|restart|force-reload}"RETVAL=2esac
exit $RETVALbash-4.2#bash-4.2# chkconfig --add hellobash-4.2# chkconfig --level 3 hello onbash-4.2# chkconfig --list hellohello 0:off 1:off 2:on 3:on 4:on 5:on 6:offbash-4.2# ls -al /etc/rc3.d/*hello*lrwxrwxrwx 1 root root 15 Sep 27 18:00 /etc/rc3.d/S15hello -> ../init.d/hellobash-4.2#bash-4.2# reboot
After reloadbash-4.2# ps -ef | grep helloroot 8790 1 0 18:03 ? 00:00:00 /bin/bash /etc/init.d/hello.shroot 8973 8775 0 18:04 ttyS0 00:00:00 grep hellobash-4.2#bash-4.2# ls -al /tmp/hello*-rw-rw-rw- 1 root root 205 Sep 27 18:04 /tmp/hello-rw-rw-rw- 1 root root 5 Sep 27 18:03 /tmp/hello.pidbash-4.2# cat /tmp/hello.pid8790bash-4.2# cat /tmp/helloSun Sep 27 18:03:49 UTC 2015Hello WorldSun Sep 27 18:03:59 UTC 2015Hello WorldSun Sep 27 18:04:09 UTC 2015Hello World
Cisco Nexus 9000 Series NX-OS Programmability Guide, Release 7.x31
Shells and ScriptingAn Example Application in the Native Bash Shell

Sun Sep 27 18:04:19 UTC 2015Hello WorldSun Sep 27 18:04:29 UTC 2015Hello WorldSun Sep 27 18:04:39 UTC 2015Hello Worldbash-4.2#
Cisco Nexus 9000 Series NX-OS Programmability Guide, Release 7.x32
Shells and ScriptingAn Example Application in the Native Bash Shell

C H A P T E R 4Guest Shell
• About the Guest Shell, on page 33• Guidelines and Limitations, on page 34• Accessing the Guest Shell, on page 38• Resources Used for the Guest Shell, on page 39• Capabilities in the Guest Shell, on page 39• Security Posture for Virtual Services, on page 45• Guest File System Access Restrictions , on page 46• Managing the Guest Shell, on page 46• Verifying Virtual Service and Guest Shell Information, on page 57• Persistently Starting Your Application From the Guest Shell, on page 59• Procedure for Persistently Starting Your Application from the Guest Shell, on page 60• An Example Application in the Guest Shell, on page 60
About the Guest ShellIn addition to the NX-OS CLI and Bash access on the underlying Linux environment, the Cisco Nexus 9000Series devices support access to a decoupled execution space running within a Linux Container (LXC) calledthe “Guest Shell”.
From within the Guest Shell the network-admin has the following capabilities:
• Access to the network over Linux network interfaces.
• Access to Cisco Nexus 9000 bootflash.
• Access to Cisco Nexus 9000 volatile tmpfs.
• Access to Cisco Nexus 9000 CLI.
• Access to Cisco NX-API REST.
• The ability to install and run python scripts.
• The ability to install and run 32-bit and 64-bit Linux applications.
Decoupling the execution space from the native host system allows customization of the Linux environmentto suit the needs of the applications without impacting the host system or applications running in other LinuxContainers.
Cisco Nexus 9000 Series NX-OS Programmability Guide, Release 7.x33

On NX-OS devices, Linux Containers are installed and managed with the virtual-service commands. TheGuest Shell will appear in the virtual-service show command output.
By default, the Guest Shell occupies approximately 5 MB of RAM and 200 MB of bootflash when enabled.Beginning with Cisco NX-OS Release 7.0(3)I2(1) the Guest Shell occupies approximately 35 MB of RAM.Use the guestshell destroy command to reclaim resources if the Guest Shell is not used.
Note
Beginning with NX-OS 7.0(3)F3(1), the Guest Shell is supported on the Cisco Nexus 9508 switch.Note
Guidelines and LimitationsThe Guest Shell has the following guideline and limitations:
Common Guidelines Across All Releases
If you have performed customwork inside your installation of the Guest Shell, save your changes to bootflash,off-box storage, or elsewhere outside the Guest Shell root file system before performing an upgrade.
The guestshell upgrade command essentially performs a guestshell destroy and guestshell enable
in succession.
Important
• Use the run guestshell CLI command to access the Guest Shell on the Cisco Nexus device: The runguestshell command parallels the run bash command used to access the host shell. This commandallows you to access the Guest Shell and get a bash prompt or run a command within the context of theGuest Shell. The command uses password-less SSH to an available port on the localhost in the defaultnetwork namespace.
• sshd utility can secure the pre-configured SSH access into the Guest Shell by listening on localhostto avoid connection attempts from ouside the network. sshd has the following features
• It is configured for key-based authentication without fallback to passwords.
• Only root can read keys use to access the Guest Shell after Guest Shell restarts.
• Only root can read the file that contains the key on the host to prevent a non-privileged user withhost bash access from being able to use the key to connect to the Guest Shell. Network-admin usersmay start another instance of sshd in the Guest Shell to allow remote access directly into the GuestShell, but any user that logs into the Guest Shell is also given network-admin privilege
Cisco Nexus 9000 Series NX-OS Programmability Guide, Release 7.x34
Shells and ScriptingGuidelines and Limitations

Introduced in Guest Shell 2.2 (0.2), the key file is readable for whom the useraccount was created for.
In addition, the Guest Shell accounts are not automatically removed, and mustbe removed by the network administrator when no longer needed.
Guest Shell installations prior to 2.2 (0.2) with Cisco Nexus release 7.0(3)I5(2)will not dynamically create individual user accounts.
Note
• Installing the Cisco Nexus series switch software release on a fresh out-of-the-box Cisco Nexus switchwill automatically enable the Guest Shell. Subsequent upgrades to the Cisco Nexus series switch softwarewill NOT automatically upgrade Guest Shell.
• Guest Shell releases increment the major number when distributions or distribution versions change.
• Guest Shell releases increment the minor number when CVEs have been addressed. The Guest Shell willupdate CVEs only when CentOS makes them publically available.
• Cisco recommends using yum update to pick up third-party security vulnerability fixes directly fromthe CentOS repository. This provides the flexibility of getting updates as, and when, available withoutneeding to wait for a Cisco NX-OS software update.
Alternatively, using the guestshell update command would replace the existing Guest Shell rootfs. Anycustomizations and software package installations would then need to be performed again within thecontext of this new Guest Shell rootfs.
Upgrading from Guest Shell 1.0 to Guest Shell 2.x
Guest Shell 2.x is based upon a CentOS 7 root file system. If you have an off-box repository of .conf filesand/or utilities that pulled the content down into Guest Shell 1.0, you will need to repeat the same deploymentsteps in Guest Shell 2.x. Your deployment script may need to be adjusted to account for the CentOS 7differences.
Guest Shell 2.x
The Cisco NX-OS automatically installs and enables the Guest Shell by default on systems with sufficientresources. However, if the device is reloaded with a Cisco NX-OS image that does not provide Guest Shellsupport, the installer will automatically remove the existing Guest Shell and issue a%VMAN-2-INVALID_PACKAGE.
Systems with 4GB of RAM will not enable Guest Shell by default. Use the guestshell enable command toinstall and enable Guest Shell.
Note
The install all command validates the compatibility between the current Cisco NX-OS image against thetarget Cisco NX-OS image.
The following is an example output from installing an incompatible image:switch#Installer will perform compatibility check first. Please wait.
Cisco Nexus 9000 Series NX-OS Programmability Guide, Release 7.x35
Shells and ScriptingGuidelines and Limitations

uri is: /2014 Aug 29 20:08:51 switch %$ VDC-1 %$ %VMAN-2-ACTIVATION_STATE:Successfully activated virtual service 'guestshell+'Verifying image bootflash:/n9kpregs.bin for boot variable "nxos".[####################] 100% -- SUCCESSVerifying image type.[####################] 100% -- SUCCESSPreparing "" version info using image bootflash:/.[####################] 100% -- SUCCESSPreparing "bios" version info using image bootflash:/.[####################] 100% -- SUCCESSPreparing "" version info using image bootflash:/.[####################] 100% -- SUCCESSPreparing "" version info using image bootflash:/.[####################] 100% -- SUCCESSPreparing "nxos" version info using image bootflash:/.[####################] 100% -- SUCCESSPreparing "" version info using image bootflash:/.[####################] 100% -- SUCCESSPreparing "" version info using image bootflash:/.[####################] 100% -- SUCCESS"Running-config contains configuration that is incompatible with the new image (strictincompatibility).Please run 'show incompatibility-all nxos <image>' command to find out which featureneeds to be disabled.".Performing module support checks.[####################] 100% -- SUCCESSNotifying services about system upgrade.[# ] 0% -- FAIL.Return code 0x42DD0006 ((null))."Running-config contains configuration that is incompatible with the new image (strictincompatibility).Please run 'show incompatibility-all nxos <image>' command to find outwhich feature needs to be disabled."Service "vman" in vdc 1: Guest shell not supported, do 'guestshell destroy' to removeit and then retry ISSUPre-upgrade check failed. Return code 0x42DD0006 ((null)).switch#
As a best practice, remove the Guest Shell with the guestshell destroy command before reloading an olderCisco Nexos image that does not support the Guest Shell.
Note
Pre-Configured SSHD Service
The Guest Shell starts an OpenSSH server upon boot up. The server listens on a randomly generated port onthe localhost IP address interface 127.0.0.1 only. This provides the password-less connectivity into the GuestShell from the NX-OS vegas-shell when the guestshell keyword is entered. If this server is killed or itsconfiguration (residing in /etc/ssh/sshd_config-cisco) is altered, access to the Guest Shell fromthe NX-OS CLI might not work.
The following steps instantiate an OpenSSh server within the Guest Shell as root:
1. Determine which network namespace or VRF you want to establish your SSH connections through.
2. Determine port you want OpenSSH to listen on. Use the NX-OS command show socket connection toview ports already in use.
Cisco Nexus 9000 Series NX-OS Programmability Guide, Release 7.x36
Shells and ScriptingGuidelines and Limitations

The Guest Shell sshd service for password-less access uses a randomized port starting at 17680 through 49150.To avoid port conflict choose a port outside this range.
Note
The following steps start the OpenSSH server. The examples start the OpenSSH server for management netnson IP address 10.122.84.34:2222:
1. Create the following files: /usr/lib/systemd/systm/sshd-mgmt.service and/etc/ssh/sshd-mgmt_config. The files should have the following configurations:-rw-r--r-- 1 root root 394 Apr 7 14:21 /usr/lib/systemd/system/sshd-mgmt.service-rw------- 1 root root 4478 Apr 7 14:22 /etc/ssh/sshd-mgmt_config
2. Copy the Unit and Service contents from the /usr/lib/systemd/system/ssh.service fileto sshd-mgmt.service.
3. Edit the sshd-mgmt.service file to match the following:[Unit]Description=OpenSSH server daemonAfter=network.target sshd-keygen.serviceWants=sshd-keygen.service
[Service]EnvironmentFile=/etc/sysconfig/sshdExecStartPre=/usr/sbin/sshd-keygenExecStart=/sbin/ip netns exec management /usr/sbin/sshd -f /etc/ssh/sshd-mgmt_config-D $OPTIONSExecReload=/bin/kill -HUP $MAINPIDKillMode=processRestart=on-failureRestartSec=42s[Install]WantedBy=multi-user.target
4. Copy the contents of /etc/ssh/sshd-config to /etc/ssh/sshd-mgmt_config. Modifythe ListenAddress IP and port as necessary.Port 2222ListenAddress 10.122.84.34
5. Start the systemctl daemon using the following commands:sudo systemctl daemon-reloadsudo systemctl start sshd-mgmt.servicesudo systemctl status sshd-mgmt.service -l
6. (optional) Check the configuration.ss -tnldp | grep 2222
7. SSH into Guest Shell:ssh -p 2222 [email protected]
8. Save the configuration across multiple Guest Shell or switch reboots.sudo systemctl enable sshd-mgmt.service
9. For passwordless SSH/SCP and remote execution, generate the public and private keys for the user IDyou want to user for SSH/SCP using the ssh-keygen -t dsa command.
The key is then stored in the id_rsa and id_rsa.pub files in the /.ssh directory:
Cisco Nexus 9000 Series NX-OS Programmability Guide, Release 7.x37
Shells and ScriptingGuidelines and Limitations

[root@node01 ~]# cd ~/.ssh[root@node02 .ssh]# ls -ltotal 8-rw-------. 1 root root 1675 May 5 15:01 id_rsa-rw-r--r--. 1 root root 406 May 5 15:01 id_rsa.pub
10. Copy the public key into the machine you want to SSH into and fix permissions:cat id_rsa.pub >> /root/.ssh/authorized_keyschmod 700 /root/.sshchmod 600 /root/.ssh/*
11. SSH or SCP into the remote switch without a password:ssh -p <port#> userid@hostname [<remote command>]scp -P <port#> userid@hostname/filepath /destination
localtime
The Guest Shell shares /etc/localtime with the host system.
If you do not want to share the same localtime with the host, this symlink can be broken and a Guest Shellspecific /etc/localtime can be created.
Note
switch(config)# clock timezone PDT -7 0switch(config)# clock set 10:00:00 27 Jan 2017Fri Jan 27 10:00:00 PDT 2017switch(config)# show clock10:00:07.554 PDT Fri Jan 27 2017switch(config)# run guestshellguestshell:~$ dateFri Jan 27 10:00:12 PDT 2017
Accessing the Guest ShellIn Cisco NX-OS, the Guest Shell is accessible to the network-admin. It is automatically enabled in the systemand can be accessed using the run guestshell command. Consistent with the run bash command, thesecommands can be issued within the Guest Shell with the run guestshell command form of the NX-OS CLIcommand.
The Guest Shell is automatically enabled on systems with more than 4 GB of RAM.Note
switch# run guestshell ls -al /bootflash/*.ova-rw-rw-rw- 1 2002 503 83814400 Aug 21 18:04 /bootflash/pup.ova-rw-rw-rw- 1 2002 503 40724480 Apr 15 2012 /bootflash/red.ova
When running in the Guest Shell, you have network-admin level privileges.Note
Cisco Nexus 9000 Series NX-OS Programmability Guide, Release 7.x38
Shells and ScriptingAccessing the Guest Shell

The Guest Shell starting in 2.2(0.2) will dynamically create user accounts with the same as the user loggedinto switch. However, all other information is NOT shared between the switch and the Guest Shell useraccounts.
In addition, the Guest Shell accounts are not automatically removed, and must be removed by the networkadministrator when no longer needed.
Note
Resources Used for the Guest ShellBy default, the resources for the Guest Shell have a small impact on resources available for normal switchoperations. If the network-admin requires additional resources for the Guest Shell, the guestshell resize {cpu| memory | rootfs} command changes these limits.
Minimum/MaximumDefaultResource
1/20%1%CPU
256/3840MB256MBMemory
200/2000MB200MBStorage
The CPU limit is the percentage of the system compute capacity that tasks running within the Guest Shell aregiven when there is contention with other compute loads in the system. When there is no contention for CPUresources, the tasks within the Guest Shell are not limited.
A Guest Shell reboot is required after changing the resource allocations. This can be accomplished with theguestshell reboot command.
Note
Capabilities in the Guest ShellThe Guest Shell has a number of utilities and capabilities available by default.
The Guest Shell is populated with CentOS 7 Linux which provides the ability to Yum install software packagesbuilt for this distribution. The Guest Shell is pre-populated with many of the common tools that would naturallybe expected on a networking device including net-tools, iproute, tcpdump and OpenSSH. Python 2.7.5 isincluded by default as is the PIP for installing additional python packages.
By default the Guest Shell is a 64-bit execution space. If 32-bit support is needed, the glibc.i686 package canbe Yum installed.
The Guest Shell has access to the Linux network interfaces used to represent the management and data portsof the switch. Typical Linux methods and utilities like ifconfig and ethtool can be used to collect counters.When an interface is placed into a VRF in the NX-OS CLI, the Linux network interface is placed into anetwork namespace for that VRF. The name spaces can be seen at /var/run/netns and the ip netnsutility can be used to run in the context of different namespaces. A couple of utilities, chvrf and vrfinfo, are
Cisco Nexus 9000 Series NX-OS Programmability Guide, Release 7.x39
Shells and ScriptingResources Used for the Guest Shell

provided as a convenience for running in a different namespace and getting information about whichnamespace/vrf a process is running in.
systemd is used to manage services in CentOS 7 environments, including the Guest Shell.
NX-OS CLI in the Guest ShellThe Guest Shell provides an application to allow the user to issue NX-OS commands from the Guest Shellenvironment to the host network element. The dohost application accepts any valid NX-OS configuration orexec commands and issues them to the host network element.
When invoking the dohost command each NX-OS command may be in single or double quotes:
dohost "<NXOS CLI>"
The NX-OS CLI can be chained together:
[guestshell@guestshell ~]$ dohost "sh lldp time | in Hold" "show cdp global"Holdtime in seconds: 120Global CDP information:CDP enabled globallyRefresh time is 21 secondsHold time is 180 secondsCDPv2 advertisements is enabledDeviceID TLV in System-Name(Default) Format[guestshell@guestshell ~]$
The NX-OS CLI can also be chained together using the NX-OS style command chaining technique by addinga semicolon between each command. (A space on either side of the semicolon is required.):
[guestshell@guestshell ~]$ dohost "conf t ; cdp timer 13 ; show run | inc cdp"Enter configuration commands, one per line. End with CNTL/Z.cdp timer 13[guestshell@guestshell ~]$
For release 7.0(3)I5(2) using Guest Shell 2.2 (0.2), commands issued on the host through the dohost commandare run with privileges based on the effective role of the Guest Shell user.
Prior versions of Guest Shell will run command with network-admin level privileges.
The dohost command fails when the number of UDS connections to NX-API are at the maximum allowed.
Note
Network Access in Guest ShellThe NX-OS switch ports are represented in the Guest Shell as Linux network interfaces. Typical Linuxmethodslike view stats in /proc/net/dev, through ifconfig or ethtool are all supported:
The Guest Shell has a number of typical network utilities included by default and they can be used on differentVRFs using the chvrf vrf command command.[guestshell@guestshell bootflash]$ ifconfig Eth1-47Eth1-47: flags=4163<UP,BROADCAST,RUNNING,MULTICAST> mtu 1500
Cisco Nexus 9000 Series NX-OS Programmability Guide, Release 7.x40
Shells and ScriptingNX-OS CLI in the Guest Shell

inet 13.0.0.47 netmask 255.255.255.0 broadcast 13.0.0.255ether 54:7f:ee:8e:27:bc txqueuelen 100 (Ethernet)RX packets 311442 bytes 21703008 (20.6 MiB)RX errors 0 dropped 185 overruns 0 frame 0TX packets 12967 bytes 3023575 (2.8 MiB)TX errors 0 dropped 0 overruns 0 carrier 0 collisions 0
Within the Guest Shell, the networking state can bemonitored, but may not be changed. To change networkingstate, use the NX-OS CLI or the appropriate Linux utilities in the host bash shell.
The tcpdump command is packaged with the Guest Shell to allow packet tracing of punted traffic on themanagement or switch ports.
The sudo ip netns exec management ping utility is a common method for running a command in the contextof a specified network namespace. This can be done within the Guest Shell:[guestshell@guestshell bootflash]$ sudo ip netns exec management ping 10.28.38.48PING 10.28.38.48 (10.28.38.48) 56(84) bytes of data.64 bytes from 10.28.38.48: icmp_seq=1 ttl=48 time=76.5 ms
The chvrf utility is provided as a convenience:guestshell@guestshell bootflash]$ chvrf management ping 10.28.38.48PING 10.28.38.48 (10.28.38.48) 56(84) bytes of data.64 bytes from 10.28.38.48: icmp_seq=1 ttl=48 time=76.5 ms
Commands that are run without the chvrf command are run in the current VRF/network namespace.Note
For example, to ping IP address 10.0.0.1 over the management VRF, the command is “chvrf managementping 10.0.0.1”. Other utilities such as scp or ssh would be similar.
Example:
switch# guestshell[guestshell@guestshell ~]$ cd /bootflash[guestshell@guestshell bootflash]$ chvrf management scp [email protected]:/foo/[email protected]'s password:index.html 100% 1804 1.8KB/s 00:00[guestshell@guestshell bootflash]$ ls -al index.html-rw-r--r-- 1 guestshe users 1804 Sep 13 20:28 index.html[guestshell@guestshell bootflash]$[guestshell@guestshell bootflash]$ chvrf management curl cisco.com<!DOCTYPE HTML PUBLIC "-//IETF//DTD HTML 2.0//EN"><html><head><title>301 Moved Permanently</title></head><body><h1>Moved Permanently</h1><p>The document has moved <a href="http://www.cisco.com/">here</a>.</p></body></html>[guestshell@guestshell bootflash]$
To obtain a list of VRFs on the system, use the show vrf command natively from NX-OS or through thedohost command:
Example:
Cisco Nexus 9000 Series NX-OS Programmability Guide, Release 7.x41
Shells and ScriptingNetwork Access in Guest Shell

[guestshell@guestshell bootflash]$ dohost 'sh vrf'VRF-Name VRF-ID State Reasondefault 1 Up --management 2 Up --red 6 Up --
Within the Guest Shell, the network namespaces associated with the VRFs are what is actually used. It canbe more convenient to just see which network namespaces are present:[guestshell@guestshell bootflash]$ ls /var/run/netnsdefault management red[guestshell@guestshell bootflash]$
To resolve domain names from within the Guest Shell, the resolver needs to be configured. Edit the/etc/resolv.conf file in the Guest Shell to include a DNS nameserver and domain as appropriate for the network.
Example:
nameserver 10.1.1.1domain cisco.com
The nameserver and domain information should match what is configured through the NX-OS configuration.
Example:
switch(config)# ip domain-name cisco.comswitch(config)# ip name-server 10.1.1.1switch(config)# vrf context managementswitch(config-vrf)# ip domain-name cisco.comswitch(config-vrf)# ip name-server 10.1.1.1
If the Cisco Nexus 9000 device is in a network that uses an HTTP proxy server, the http_proxy andhttps_proxy environment variables must be set up within the Guest Shell also.
Example:
export http_proxy=http://proxy.esl.cisco.com:8080export https_proxy=http://proxy.esl.cisco.com:8080
These environment variables should be set in the .bashrc file or in an appropriate script to ensure that theyare persistent.
Access to Bootflash in Guest ShellNetwork administrators can manage files with Linux commands and utilities in addition to using NX-OS CLIcommands. Bymounting the system bootflash at /bootflash in the Guest Shell environment, the network-admincan operate on these files with Linux commands.
Example:
find . –name “foo.txt”rm “/bootflash/junk/foo.txt”
Cisco Nexus 9000 Series NX-OS Programmability Guide, Release 7.x42
Shells and ScriptingAccess to Bootflash in Guest Shell

Python in Guest ShellPython can be used interactively or python scripts can be run in the Guest Shell.
Example:
guestshell:~$ pythonPython 2.7.5 (default, Jun 24 2015, 00:41:19)[GCC 4.8.3 20140911 (Red Hat 4.8.3-9)] on linux2Type "help", "copyright", "credits" or "license" for more information.>>>guestshell:~$
The pip python package manager is included in the Guest Shell to allow the network-admin to install newpython packages.
Example:[guestshell@guestshell ~]$ sudo su[root@guestshell guestshell]# pip install MarkdownCollecting MarkdownDownloading Markdown-2.6.2-py2.py3-none-any.whl (157kB)100% |################################| 159kB 1.8MB/sInstalling collected packages: MarkdownSuccessfully installed Markdown-2.6.2[root@guestshell guestshell]# pip list | grep MarkdownMarkdown (2.6.2)[root@guestshell guestshell]#
You must enter the sudo su command before entering the pip install command.Note
Installing RPMs in the Guest ShellThe /etc/yum.repos.d/CentOS-Base.repo file is set up to use the CentOS mirror list by default. Followinstructions in that file if changes are needed.
Yum can be pointed to one or more repositories at any time by modifying the yumrepo_x86_64.repofile or by adding a new .repo file in the repos.d directory.
For applications to be installed inside Guest Shell, go to the CentOS 7 repo at http://mirror.centos.org/centos/7/os/x86_64/Packages/.
Yum resolves the dependancies and installs all the required packages.[guestshell@guestshell ~]$ sudo chvrf management yum -y install glibc.i686Loaded plugins: fastestmirrorLoading mirror speeds from cached hostfile* base: bay.uchicago.edu* extras: pubmirrors.dal.corespace.com* updates: mirrors.cmich.eduResolving Dependencies"-->" Running transaction check"--->" Package glibc.i686 0:2.17-78.el7 will be installed"-->" Processing Dependency: libfreebl3.so(NSSRAWHASH_3.12.3) for package:glibc-2.17-78.el7.i686"-->" Processing Dependency: libfreebl3.so for package: glibc-2.17-78.el7.i686
Cisco Nexus 9000 Series NX-OS Programmability Guide, Release 7.x43
Shells and ScriptingPython in Guest Shell

"-->" Running transaction check"--->" Package nss-softokn-freebl.i686 0:3.16.2.3-9.el7 will be installed"-->" Finished Dependency Resolution
Dependencies Resolved
============================================================================================================================================================================Package Arch Version Repository Size============================================================================================================================================================================Installing:glibc i686 2.17-78.el7 base 4.2 MInstalling for dependencies:nss-softokn-freebl i686 3.16.2.3-9.el7 base 187 k
Transaction Summary============================================================================================================================================================================Install 1 Package (+1 Dependent package)
Total download size: 4.4 MInstalled size: 15 MDownloading packages:Delta RPMs disabled because /usr/bin/applydeltarpm not installed.(1/2): nss-softokn-freebl-3.16.2.3-9.el7.i686.rpm | 187 kB 00:00:25(2/2): glibc-2.17-78.el7.i686.rpm | 4.2 MB 00:00:30----------------------------------------------------------------------------------------------------------------------------------------------------------------------------Total 145 kB/s | 4.4 MB 00:00:30Running transaction checkRunning transaction testTransaction test succeededRunning transactionInstalling : nss-softokn-freebl-3.16.2.3-9.el7.i686 1/2Installing : glibc-2.17-78.el7.i686 2/2error: lua script failed: [string "%triggerin(glibc-common-2.17-78.el7.x86_64)"]:1: attemptto compare number with nilNon-fatal "<"unknown">" scriptlet failure in rpm package glibc-2.17-78.el7.i686Verifying : glibc-2.17-78.el7.i686 1/2Verifying : nss-softokn-freebl-3.16.2.3-9.el7.i686 2/2
Installed:glibc.i686 0:2.17-78.el7
Dependency Installed:nss-softokn-freebl.i686 0:3.16.2.3-9.el7
Complete!
Whenmore space is needed in the Guest Shell root file system for installing or running packages, the guestshellresize roofs size-in-MB command is used to increase the size of the file system.
Note
Some open source software packages from the repository might not install or run as expected in the GuestShell as a result of restrictions that have been put into place to protect the integrity of the host system.
Note
Cisco Nexus 9000 Series NX-OS Programmability Guide, Release 7.x44
Shells and ScriptingInstalling RPMs in the Guest Shell

Security Posture for Virtual ServicesUse of the Guest Shell and virtual services in Cisco Nexus 9000 series devices are only two of the many waysthat the network-admin canmanage or extend the functionality of the system. These options are geared towardsproviding an execution environment that is decoupled from the native host context. This separation allowsthe introduction of software into the system that may not be compatible with the native execution environment.It also allows the software to run in an environment that does not interfere with the behavior, performance,or scale of the system.
Digitally Signed Application PackagesBy default, Cisco network elements require applications to provide a valid Cisco digital signature at runtime.The Cisco digital signature ensures the integrity of Cisco-developed packages and applications.
The Cisco Nexus 9000 Series switches support the configuration of a signing level policy to allow for unsignedOVA software packages. To allow unsigned and Cisco-signed packages for creating virtual-services, thenetwork-admin can configure the following:
virtual-servicesigning level unsigned
The Guest Shell software package has a Cisco signature and does not require this configuration.Note
Kernel Vulnerability PatchesCisco responds to pertinent CommonVulnerabilities and Exposures (CVEs) with platform updates that addressknown vulnerabilities.
ASLR and X-Space SupportCisco Nexus 9000 NX-OS supports the use of Address Space Layout Randomization (ASLR) and ExecutableSpace Protection (X-Space) for runtime defense. The software in Cisco-signed packages make use of thiscapability. If other software is installed on the system, it is recommended that it be built using a host OS anddevelopment toolchain that supports these technologies. Doing so reduces the potential attack surface that thesoftware presents to potential intruders.
Namespace IsolationThe host and virtual service are separated into separate namespaces. This provides the basis of separating theexecution spaces of the virtual services from the host. Namespace isolation helps to protect against data lossand data corruption due to accidental or intentional data overwrites between trust boundaries. It also helps toensure the integrity of confidential data by preventing data leakage between trust boundaries: an applicationin one virtual service cannot access data in another virtual service
Cisco Nexus 9000 Series NX-OS Programmability Guide, Release 7.x45
Shells and ScriptingSecurity Posture for Virtual Services

Root-User RestrictionsAs a best practice for developing secure code, it is recommend running applications with the least privilegeneeded to accomplish the assigned task. To help prevent unintended accesses, software added into the GuestShell should follow this best practice.
All processes within a virtual service are subject to restrictions imposed by reduced Linux capabilities. If yourapplication must perform operations that require root privileges, restrict the use of the root account to thesmallest set of operations that absolutely requires root access, and impose other controls such as a hard limiton the amount of time that the application can run in that mode.
The set of Linux capabilities that are dropped for root within virtual services follow:
CAP_SYS_PACCTCAP_MKNODCAP_SYS_BOOT
CAP_SYS_RESOURCECAP_MAC_OVERRIDECAP_SYS_MODULE
CAP_AUDIT_WRITECAP_SYS_RAWIOCAP_SYS_TIME
CAP_NET_ADMINCAP_SYS_NICECAP_AUDIT_CONTROL
CAP_SYS_PTRACECAP_MAC_ADMIN
As root within a virtual service, bind mounts may be used as well as tmpfs and ramfs mounts. Other mountsare prevented.
Resource ManagementADenial-of-Service (DoS) attack attempts to make a machine or network resource unavailable to its intendedusers.Misbehaving ormalicious application code can causeDoS as the result of over-consumption of connectionbandwidth, disk space, memory, and other resources. The host provides resource-management features thatensure fair allocation of resources among all virtual services on the host.
Guest File System Access RestrictionsTo preserve the integrity of the files within the virtual services, the file systems of the virtual services are notaccessible from the NX-OS CLI. If a given virtual-service allows files to be modified, it needs to provide analternate means by which this can be done (i.e. yum install, scp, ftp, etc).
bootflash: and volatile: of the host are mounted as /bootflash and /volatile within the GuestShell. A network-admin can access files on this media using the NX-OS exec commands from the host orusing Linux commands from within the Guest Shell.
Managing the Guest ShellThe following are commands to manage the Guest Shell:
Table 3: Guest Shell CLI Commands
DescriptionCommands
Cisco Nexus 9000 Series NX-OS Programmability Guide, Release 7.x46
Shells and ScriptingRoot-User Restrictions

DescriptionCommands
• When guest shell OVA file is specified:
Installs and activates the Guest Shell using theOVA that is embedded in the system image.
Installs and activates the Guest Shell using thespecified software package (OVA file) or theembedded package from the system image (whenno package is specified). Initially, Guest Shellpackages are only available by being embeddedin the system image.
When the Guest Shell is already installed, thiscommand enables the installed Guest Shell.Typically this is used after a guestshell disablecommand.
• When rootfs-file-URI is specified:
Imports a Guest Shell rootfs when the GuestShell is in a destroyed state. This commandbrings up the Guest Shell with the specifiedpackage.
guestshell enable {package [guest shell OVA file |rootfs-file-URI]}
Exports a Guest Shell rootfs file to a local URI(bootflash, USB1, etc.). (7.0(3)I7(1) and later releases)
guestshell export rootfs package destination-file-URI
Shuts down and disables the Guest Shell.guestshell disable
Cisco Nexus 9000 Series NX-OS Programmability Guide, Release 7.x47
Shells and ScriptingManaging the Guest Shell

DescriptionCommands
• When guest shell OVA file is specified:
Deactivates and upgrades the Guest Shell usingthe specified software package (OVA file) or theembedded package from the system image (if nopackage is specified). Initially Guest Shellpackages are only available by being embeddedin the system image.
The current rootfs for the Guest Shell is replacedwith the rootfs in the software package. TheGuest Shell does not make use of secondaryfilesystems that persist across an upgrade.Without persistent secondary filesystems, aguestshell destroy command followed by aguestshell enable command could also be usedto replace the rootfs. When an upgrade issuccessful, the Guest Shell is activated.
You are prompted for a confirmation prior tocarrying out the upgrade command.
• When rootfs-file-URI is specified:
Imports a Guest Shell rootfs file when the GuestShell is already installed. This command removesthe existing Guest Shell and installs the
specified package.
guestshell upgrade {package [guest shell OVA file| rootfs-file-URI]}
Deactivates the Guest Shell and then reactivates it.
You are prompted for a confirmation prior to carryingout the reboot command.
This is the equivalent of a guestshelldisable command followed by a guestshellenable command in exec mode.
This is useful when processes inside theGuest Shell have been stopped and needto be restarted. The run guestshellcommand relies on sshd running in theGuest Shell.
If the command does not work, the sshdprocess may have been inadvertentlystopped. Performing a reboot of the GuestShell from the NX-OS CLI allows it torestart and restore the command.
Note
guestshell reboot
Cisco Nexus 9000 Series NX-OS Programmability Guide, Release 7.x48
Shells and ScriptingManaging the Guest Shell

DescriptionCommands
Deactivates and uninstalls the Guest Shell. Allresources associated with the Guest Shell are returnedto the system. The show virtual-service globalcommand indicates when these resources becomeavailable.
Issuing this command results in a prompt for aconfirmation prior to carrying out the destroycommand.
guestshell destroy
Connects to the Guest Shell that is already runningwith a shell prompt. No username/password isrequired.
guestshell
run guestshell
Executes a Linux/UNIX commandwithin the contextof the Guest Shell environment.
After execution of the command you are returned tothe switch prompt.
guestshell run command
run guestshell command
Changes the allotted resources available for the GuestShell. The changes take effect the next time the GuestShell is enabled or rebooted.
Resize values are cleared when theguestshell destroy command is used.
Note
guestshell resize [cpu |memory | rootfs]
On systems that have active and standby supervisors,this command synchronizes the Guest Shell contentsfrom the active supervisor to the standby supervisor.The network-admin issues this command when theGuest Shell rootfs has been set up to a point that theywould want the same rootfs used on the standbysupervisor when it becomes the active supervisor. Ifthis command is not used, the Guest Shell is freshlyinstalled when the standby supervisor transitions toan active role using the Guest Shell package availableon that supervisor.
guestshell sync
In the event that the guestshell or virtual-servicescannot be managed, even after a system reload, thereset command is used to force the removal of theGuest Shell and all virtual-services. The system needsto be reloaded for the cleanup to happen. No GuestShell or additional virtual-services can be installed orenabled after issuing this command until after thesystem has been reloaded.
You are prompted for a confirmation prior to initiatingthe reset.
virtual-service reset force
Cisco Nexus 9000 Series NX-OS Programmability Guide, Release 7.x49
Shells and ScriptingManaging the Guest Shell

Administrative privileges are necessary to enable/disable and to gain access to the Guest Shell environment.Note
The Guest Shell is implemented as a Linux container (LXC) on the host system. On NX-OS devices, LXCsare installed and managed with the virtual-service commands. The Guest Shell appears in the virtual-servicecommands as a virtual service named guestshell+.
Note
Disabling the Guest ShellThe guestshell disable command shuts down and disables the Guest Shell.
When the Guest Shell is disabled and the system is reloaded, the Guest Shell remains disabled.
Example:
switch# show virtual-service listVirtual Service List:Name Status Package Name-----------------------------------------------------------guestshell+ Activated guestshe11.ovaswitch# guestshell disableYou will not be able to access your guest shell if it is disabled. Are you sure you wantto disable the guest shell? (y/n) [n) y
2014 Jul 30 19:47:23 switch %$ VDC-1 %$ %VMAN-2-ACTIVATION_STATE: Deactivating virtualservice 'guestshell+'2014 Jul 30 18:47:29 switch %$ VDC-1 %$ %VMAN-2-ACTIVATION_STATE: Successfully deactivatedvirtual service 'guestshell+'switch# show virtual-service listVirtual Service List:Name Status Package Nameguestshell+ Deactivated guestshell.ova
The Guest Shell is reactivated with the guestshell enable command.Note
Destroying the Guest ShellThe guestshell destroy command uninstalls the Guest Shell and its artifacts. The command does not removethe Guest Shell OVA.
When the Guest Shell is destroyed and the system is reloaded, the Guest Shell remains destroyed.switch# show virtual-service listVirtual Service List:Name Status Package Name-------------------------------------------------guestshell+ Deactivated guestshell.ova
switch# guestshell destroy
Cisco Nexus 9000 Series NX-OS Programmability Guide, Release 7.x50
Shells and ScriptingDisabling the Guest Shell

You are about to destroy the guest shell and all of its contents. Be sure to save your work.Are you sure you want to continue? (y/n) [n] y2014 Jul 30 18:49:10 switch %$ VDC-1 %$ %VMAN-2-INSTALL_STATE: Destroying virtual service'guestshell+'2014 Jul 30 18:49:10 switch %$ VDC-1 %$ %VMAN-2-INSTALL_STATE: Successfully destroyedvirtual service 'guestshell +'
switch# show virtual-service listVirtual Service List:
The Guest Shell can be re-enabled with the guestshell enable command.Note
If you do not want to use the Guest Shell, you can remove it with the guestshell destroy command. Once theGuest Shell has been removed, it remains removed for subsequent reloads. This means that when the GuestShell container has been removed and the switch is reloaded, the Guest Shell container is not automaticallystarted.
Note
Enabling the Guest ShellThe guestshell enable command installs the Guest Shell from a Guest Shell software package. By default,the package embedded in the system image is used for the installation. The command is also used to reactivatethe Guest Shell if it has been disabled.
When the Guest Shell is enabled and the system is reloaded, the Guest Shell remains enabled.
Example:
switch# show virtual-service listVirtual Service List:switch# guestshell enable2014 Jul 30 18:50:27 switch %$ VDC-1 %$ %VMAN-2-INSTALL_STATE: Installing virtual service'guestshell+'2014 Jul 30 18;50;42 switch %$ VDC-1 %$ %VMAN-2-INSTALL_STATE: Install success virtualservice 'guestshell+'; Activating
2014 Jul 30 18:50:42 switch %$ VDC-1 %$ %VMAN-2-ACTIVATION_STATE: Activating virtual service'guestshell+'2014 Jul 30 18:51:16 switch %$ VDC-1 %$ %VMAN-2-ACTIVATION_STATE: Successfully activatedvirtual service 'guestshell+'
switch# show virtual-service listVirtual Service List:Name Status Package Nameguestshell+ Activated guestshell.ova
Cisco Nexus 9000 Series NX-OS Programmability Guide, Release 7.x51
Shells and ScriptingEnabling the Guest Shell

Replicating the Guest ShellBeginning with Cisco NX-OS release 7.0(3)I7(1), a Guest Shell rootfs that is customized on one switch canbe deployed onto multiple switches.
The approach is to customize and then export the Guest Shell rootfs and store it on a file server. A POAPscript can download (import) the Guest Shell rootfs to other switches and install the specific Guest Shellacross many devices simultaneously.
Exporting Guest Shell rootfs
Use the guestshell export rootfs package destination-file-URI command to export a Guest Shell rootfs.
The destination-file-URI parameter is the name of the file that the Guest Shell rootfs is copied to. This fileallows for local URI options (bootflash, USB1, etc.).
The guestshell export rootfs package command:
• Disables the Guest Shell (if already enabled).
• Creates a Guest Shell import YAML file and inserts it into the /cisco directory of the rootfs ext4 file.
• Copies the rootfs ext4 file to the target URI location.
• Re-enables the Guest Shell if it had been previously enabled.
Importing Guest Shell rootfs
When importing a Guest Shell rootfs, there are two situations to consider:
• Use the guestshell enable package rootfs-file-URI command to import a Guest Shell rootfs when theGuest Shell is in a destroyed state. This command brings up the Guest Shell with the specified package.
• Use the guestshell upgrade package rootfs-file-URI command to import a Guest Shell rootfs when theGuest Shell is already installed. This command removes the existing Guest Shell and installs the specifiedpackage.
The rootfs-file-URI parameter is the rootfs file stored on local storage (bootflash, USB, etc.).
When this command is executed with a file that is on bootflash, the file is moved to a storage pool on bootflash.
As a best practice, you should copy the file to the bootflash and validate the md5sum before using theguestshell upgrade package rootfs-file-URI command.
The guestshell upgrade package rootfs-file-URI command can be executed from within the Guest Shell.Note
The rootfs file is not a Cisco signed package, you must configure to allow unsigned packages before enablingas shown in the example:
(config-virt-serv-global)# signing level unsignedNote: Support for unsigned packages has been user-enabled. Unsigned packages are not endorsedby Cisco. User assumes all responsibility.
Note
Cisco Nexus 9000 Series NX-OS Programmability Guide, Release 7.x52
Shells and ScriptingReplicating the Guest Shell

To restore the embedded version of the rootfs:
• Use the guestshell upgrade command (without additional parameters) when the Guest Shell has alreadybeen installed.
• Use the guestshell enable command (without additional parameters) when the Guest Shell had beendestroyed.
Note
When running this command from within a Guest Shell, or outside a switch using NX-API, you must setterminal dont-ask to skip any prompts.
Note
The guestshell enable package rootfs-file-URI command:
• Performs basic validation of the rootfs file.
• Moves the rootfs into the storage pool.
• Mounts the rootfs to extract the YAML file from the /cisco directory.
• Parses the YAML file to obtain VM definition (including resource requirements).
• Activates the Guest Shell.
Example workflow for guestshell enable :
switch# copy scp://[email protected]/my_storage/gs_rootfs.ext4 bootflash: vrf managementswitch# guestshell resize cpu 8Note: System CPU share will be resized on Guest shell enableswitch# guestshell enable package bootflash:gs_rootfs.ext4Validating the provided rootfsswitch# 2017 Jul 31 14:58:01 switch %$ VDC-1 %$ %VMAN-2-INSTALL_STATE: Installing virtualservice 'guestshell+'2017 Jul 31 14:58:09 switch %$ VDC-1 %$ %VMAN-2-INSTALL_STATE: Install success virtualservice 'guestshell+'; Activating2017 Jul 31 14:58:09 switch %$ VDC-1 %$ %VMAN-2-ACTIVATION_STATE: Activating virtual service'guestshell+'2017 Jul 31 14:58:33 switch %$ VDC-1 %$ %VMAN-2-ACTIVATION_STATE: Successfully activatedvirtual service 'guestshell+'
Workflow for guestshell upgrade is preceded by the existing Guest Shell being destroyed.Note
Resize values are cleared when the guestshell upgrade command is used.Note
Importing YAML FileA YAML file that defines some user modifiable characteristics of the Guest Shell is automatically created asa part of the export operation. It is embedded into the Guest Shell rootfs in the /cisco directory. It is not a
Cisco Nexus 9000 Series NX-OS Programmability Guide, Release 7.x53
Shells and ScriptingImporting YAML File

complete descriptor for the Guest Shell container. It only contains some of the parameters that are usermodifiable.
Example of a Guest Shell import YAML file:
---import-schema-version: "1.0"info:name: "GuestShell"version: "2.2(0.3)"description: "Exported GuestShell: 20170216T175137Z"
app:apptype: "lxc"cpuarch: "x86_64"resources:cpu: 3memory: 307200disk:- target-dir: "/"capacity: 250
...
The YAML file is generated when the guestshell export rootfs package command is executed. The filecaptures the values of the currently running Guest Shell.
The info section contains non-operational data that is used to help identify the Guest Shell. Some of theinformation will be displayed in the output of the show guestshell detail command.
The description value is an encoding of the UTC time when the YAML file was created. The time stringformat is the same as DTSTAMP in RFC5545 (iCal).
The resources section describes the resources required for hosting the Guest Shell. The value "/" for thetarget-dir in the example identifies the disk as the rootfs.
If resized values were specified while the Guest Shell was destroyed, those values take precedence over thevalues in the import YAML file when the guestshell enable package command is used.
Note
The cpuarch value indicates the CPU architecture that is expected for the container to run.
You can modify the YAML file (such as the description or increase the resource parameters, if appropriate)after the export operation is complete .
Cisco provides a python script that you can run to validate a modified YAML file with a JSON schema. It isnot meant to be a complete test (for example, device-specific resource limits are not checked), but it is ableto flag common errors. The python script with examples is located athttps://github.com/datacenter/opennxos/tree/master/guestshell_import_export. The following JSON filedescribes the schema for version 1.0 of the Guest Shell import YAML .
{"$schema": "http://json-schema.org/draft-04/schema#","title": "Guest Shell import schema","description": "Schema for Guest Shell import descriptor file - ver 1.0","copyright": "2017 by Cisco systems, Inc. All rights reserved.","id": "","type": "object","additionalProperties": false,"properties": {"import-schema-version": {
Cisco Nexus 9000 Series NX-OS Programmability Guide, Release 7.x54
Shells and ScriptingImporting YAML File

"id": "/import-schema-version","type": "string","minLength": 1,"maxLength": 20,"enum": [
"1.0"]
},"info": {"id": "/info","type": "object","additionalProperties": false,"properties": {"name": {"id": "/info/name","type": "string","minLength": 1,"maxLength": 29
},"description": {"id": "/info/description","type": "string","minLength": 1,"maxLength": 199
},"version": {"id": "/info/version","type": "string","minLength": 1,"maxLength": 63
},"author-name": {"id": "/info/author-name","type": "string","minLength": 1,"maxLength": 199
},"author-link": {"id": "/info/author-link","type": "string","minLength": 1,"maxLength": 199
}}
},"app": {"id": "/app","type": "object","additionalProperties": false,"properties": {"apptype": {"id": "/app/apptype","type": "string","minLength": 1,"maxLength": 63,"enum": ["lxc"
]},"cpuarch": {"id": "/app/cpuarch","type": "string","minLength": 1,"maxLength": 63,
Cisco Nexus 9000 Series NX-OS Programmability Guide, Release 7.x55
Shells and ScriptingImporting YAML File

"enum": ["x86_64"
]},"resources": {"id": "/app/resources","type": "object","additionalProperties": false,"properties": {"cpu": {"id": "/app/resources/cpu","type": "integer","multipleOf": 1,"maximum": 100,"minimum": 1
},"memory": {"id": "/app/resources/memory","type": "integer","multipleOf": 1024,"minimum": 1024
},"disk": {"id": "/app/resources/disk","type": "array","minItems": 1,"maxItems": 1,"uniqueItems": true,"items": {"id": "/app/resources/disk/0","type": "object","additionalProperties": false,"properties": {"target-dir": {"id": "/app/resources/disk/0/target-dir","type": "string","minLength": 1,"maxLength": 1,"enum": ["/"
]},"file": {"id": "/app/resources/disk/0/file","type": "string","minLength": 1,"maxLength": 63
},"capacity": {"id": "/app/resources/disk/0/capacity","type": "integer","multipleOf": 1,"minimum": 1
}}
}}
},"required": ["memory","disk"
]}
},
Cisco Nexus 9000 Series NX-OS Programmability Guide, Release 7.x56
Shells and ScriptingImporting YAML File

"required": ["apptype","cpuarch","resources"
]}
},"required": ["app"
]}
show guestshell CommandThe output of the show guestshell detail command includes information that indicates whether the GuestShell was imported or was installed from an OVA.
Example of the show guestshell detail command after importing rootfs.
switch# show guestshell detailVirtual service guestshell+ detailState : ActivatedPackage informationName : rootfs_puppetPath : usb2:/rootfs_puppetApplicationName : GuestShellInstalled version : 2.3(0.0)Description : Exported GuestShell: 20170613T173648Z
SigningKey type : UnsignedMethod : Unknown
LicensingName : NoneVersion : None
Verifying Virtual Service and Guest Shell InformationYou can verify virtual service and Guest Shell information with the following commands:
Cisco Nexus 9000 Series NX-OS Programmability Guide, Release 7.x57
Shells and Scriptingshow guestshell Command

DescriptionCommand
Displays the global state andlimits for virtual services.
show virtual-service globalswitch# show virtual-service global
Virtual Service Global State and Virtualization Limits:
Infrastructure version : 1.9Total virtual services installed : 1Total virtual services activated : 1
Machine types supported : LXCMachine types disabled : KVM
Maximum VCPUs per virtual service : 1
Resource virtualization limits:Name Quota Committed Available-----------------------------------------------------------------------system CPU (%) 20 1 19memory (MB) 3840 256 3584bootflash (MB) 8192 200 7992switch#
Displays a summary of thevirtual services, the status ofthe virtual services, andinstalled software packages.
show virtual-service list
switch# show virtual-service list *
Virtual Service List:
Name Status Package Name------------------------------------------------------------------guestshell+ Activated guestshell.ovachef Installed chef-0.8.1-n9000-spa-k9.ova
Cisco Nexus 9000 Series NX-OS Programmability Guide, Release 7.x58
Shells and ScriptingVerifying Virtual Service and Guest Shell Information

DescriptionCommand
Displays details about theguestshell package (such asversion, signing resources, anddevices).
show guestshell detail
switch# show guestshell detailVirtual service guestshell+ detailState : ActivatedPackage informationName : guestshell.ovaPath : /isan/bin/guestshell.ovaApplicationName : GuestShellInstalled version : 2.2(0.2)Description : Cisco Systems Guest Shell
SigningKey type : Cisco keyMethod : SHA-1
LicensingName : NoneVersion : None
Resource reservationDisk : 250 MBMemory : 256 MBCPU : 1% system CPU
Attached devicesType Name Alias---------------------------------------------Disk _rootfsDisk /cisco/coreSerial/shellSerial/auxSerial/Syslog serial2Serial/Trace serial3
Persistently Starting Your Application From the Guest ShellYour application should have a systemd / systemctl service file that gets installed in/usr/lib/systemd/system/application_name.service. This service file should have the followinggeneral format:[Unit]Description=Put a short description of your application here
[Service]ExecStart=Put the command to start your application hereRestart=alwaysRestartSec=10s
[Install]WantedBy=multi-user.target
To run systemd as a specific user, add User=<username> to the [Service] section of your service.Note
Cisco Nexus 9000 Series NX-OS Programmability Guide, Release 7.x59
Shells and ScriptingPersistently Starting Your Application From the Guest Shell

Procedure for Persistently Starting Your Application from theGuest Shell
Procedure
Step 1 Install your application service file that you created above into/usr/lib/systemd/system/application_name.service
Step 2 Start your application with systemctl start application_nameStep 3 Verify that your application is running with systemctl status -l application_name
Step 4 Enable your application to be restarted on reload with systemctl enable application_nameStep 5 Verify that your application is running with systemctl status -l application_name
An Example Application in the Guest ShellThe following example demonstrates an application in the Guest Shell:root@guestshell guestshell]# cat /etc/init.d/hello.sh#!/bin/bash
OUTPUTFILE=/tmp/hello
rm -f $OUTPUTFILEwhile truedo
echo $(date) >> $OUTPUTFILEecho 'Hello World' >> $OUTPUTFILEsleep 10
done[root@guestshell guestshell]#[root@guestshell guestshell]#[root@guestshell system]# cat /usr/lib/systemd/system/hello.service[Unit]Description=Trivial "hello world" example daemon
[Service]ExecStart=/etc/init.d/hello.sh &Restart=alwaysRestartSec=10s
[Install]WantedBy=multi-user.target[root@guestshell system]#[root@guestshell system]# systemctl start hello[root@guestshell system]# systemctl enable hello[root@guestshell system]# systemctl status -l hellohello.service - Trivial "hello world" example daemon
Loaded: loaded (/usr/lib/systemd/system/hello.service; enabled)Active: active (running) since Sun 2015-09-27 18:31:51 UTC; 10s ago
Main PID: 355 (hello.sh)CGroup: /system.slice/hello.service
Cisco Nexus 9000 Series NX-OS Programmability Guide, Release 7.x60
Shells and ScriptingProcedure for Persistently Starting Your Application from the Guest Shell

##355 /bin/bash /etc/init.d/hello.sh &##367 sleep 10
Sep 27 18:31:51 guestshell hello.sh[355]: Executing: /etc/init.d/hello.sh &[root@guestshell system]#[root@guestshell guestshell]# exitexit[guestshell@guestshell ~]$ exitlogoutswitch# reloadThis command will reboot the system. (y/n)? [n] y
After reload[root@guestshell guestshell]# ps -ef | grep helloroot 20 1 0 18:37 ? 00:00:00 /bin/bash /etc/init.d/hello.sh &root 123 108 0 18:38 pts/4 00:00:00 grep --color=auto hello[root@guestshell guestshell]#[root@guestshell guestshell]# cat /tmp/helloSun Sep 27 18:38:03 UTC 2015Hello WorldSun Sep 27 18:38:13 UTC 2015Hello WorldSun Sep 27 18:38:23 UTC 2015Hello WorldSun Sep 27 18:38:33 UTC 2015Hello WorldSun Sep 27 18:38:43 UTC 2015Hello World[root@guestshell guestshell]#
Running under systemd / systemctl, your application is automatically restarted if it dies (or if youkill it). The Process ID is originally 226. After killing the application, it is automatically restarted with aProcess ID of 257.[root@guestshell guestshell]# ps -ef | grep helloroot 226 1 0 19:02 ? 00:00:00 /bin/bash /etc/init.d/hello.sh &root 254 116 0 19:03 pts/4 00:00:00 grep --color=auto hello[root@guestshell guestshell]#[root@guestshell guestshell]# kill -9 226[root@guestshell guestshell]#[root@guestshell guestshell]# ps -ef | grep helloroot 257 1 0 19:03 ? 00:00:00 /bin/bash /etc/init.d/hello.sh &root 264 116 0 19:03 pts/4 00:00:00 grep --color=auto hello[root@guestshell guestshell]#
Cisco Nexus 9000 Series NX-OS Programmability Guide, Release 7.x61
Shells and ScriptingAn Example Application in the Guest Shell

Cisco Nexus 9000 Series NX-OS Programmability Guide, Release 7.x62
Shells and ScriptingAn Example Application in the Guest Shell

C H A P T E R 5Broadcom Shell
• About the Broadcom Shell, on page 63• Accessing the Broadcom Shell (bcm-shell), on page 63• Examples of Broadcom Shell Commands, on page 67
About the Broadcom ShellThe Cisco Nexus 9000 Series device front panel and fabric module line cards contain Broadcom NetworkForwarding Engines (NFE). The number of NFEs varies depending upon the specific model of the front panelline card (LC) or the fabric module (FM).
Guidelines and Limitations
You can access and read information from the T2 ASICs without any limitations. However, Cisco does notrecommend changing the T2 configuration settings. Use caution when accessing the Broadcom Shell.
Accessing the Broadcom Shell (bcm-shell)The following sections describe approaches to access the Broadcom Shell (bcm-shell).
Accessing bcm-shell with the CLI APIThe bcm-shell commands are passed directly from the Cisco Nexus 9000 Series CLI to the specific T2 ASICinstance. The T2 ASIC instance can be on the fabric module or on the front panel line card.
The command syntax is as follows:
bcm-shell module module_number [instance_number:command]
Where
Module number in the chassis.module_number
T2 instance number
• When not specified, the T2 instance number defaults to 0.
• When a wildcard ('*') is specified, all T2 instances are processed.
instance_number
Cisco Nexus 9000 Series NX-OS Programmability Guide, Release 7.x63

Broadcom commandcommand
Cisco NX-OS command extensions such as ‘pipe include’ or ‘redirect output to file’ can be used to managecommand output.
Note
Entering commands with the CLI API are recorded in the system accounting log for auditing purposes.Commands that are entered directly from the bcm-shell are not recorded in the accounting log.
Note
The following is an example when the T2 instance number not entered.:switch# bcm-shell module 26 "ports"Executing ports on bcm shell on module 26ena/ speed/ link auto STP lrn inter max loopport link duplex scan neg? state pause discrd ops face frame backhg0 !ena 42G FD HW No Forward None FA XGMII 16360hg1 !ena 42G FD HW No Forward None FA XGMII 16360hg2 !ena 42G FD HW No Forward None FA XGMII 16360hg3 !ena 42G FD HW No Forward None FA XGMII 16360hg4 !ena 42G FD HW No Forward None FA XGMII 16360<snip>
The following is an example when accessing the bcm-shell ‘ports’ display on module 26, T2 instance 1, andusing the pipe to display only the ports in ‘up’ state:switch# bcm-shell module 26 "1:ports" | inc upport link duplex scan neg? state pause discrd ops face frame backhg9 up 42G FD HW No Forward None FA XGMII 16360hg10 up 42G FD HW No Forward None FA XGMII 16360hg11 up 42G FD HW No Forward None FA XGMII 16360
The following example when the T2 instance number specified as a wildcard ('*').:
The first set in the output is the result for T2 instance 0. The second set is the result for instance 1 on the fabricmodule.switch# bcm-shell module 26 "*:ports" | inc up
port link duplex scan neg? state pause discrd ops face frame backhg9 up 42G FD HW No Forward None FA XGMII 16360hg10 up 42G FD HW No Forward None FA XGMII 16360hg11 up 42G FD HW No Forward None FA XGMII 16360
port link duplex scan neg? state pause discrd ops face frame backhg9 up 42G FD HW No Forward None FA XGMII 16360hg10 up 42G FD HW No Forward None FA XGMII 16360hg11 up 42G FD HW No Forward None FA XGMII 16360
Cisco Nexus 9000 Series NX-OS Programmability Guide, Release 7.x64
Shells and ScriptingAccessing bcm-shell with the CLI API

Alternatively, you can access the bcm-shell on amodule (LC or FM) directly from the supervisor. The followingis an example of how to access the bcm-shell from the supervisor.switch# bcm-shell module 3Entering bcm shell on module 3Available Unit Numbers: 0 1bcm-shell.0>
Note
Accessing the Native bcm-shell on the Fabric ModuleAn eight-slot line card (LC) chassis can host a maximum of six fabric modules (FMs). These slots are numbered21 through 26.You must specify the FM that you wish to access the bcm-shell on.
The following example shows how to access the bcm-shell on the FM in slot 24, access context help, and exitthe bcm-shell.
• Use the show module command to display the FMs.nexus-spine1# show moduleMod Ports Module-Type Model Status--- ----- ----------------------------------- ------------------ ----------3 36 36p 40G Ethernet Module N9k-X9636PQ ok4 36 36p 40G Ethernet Module N9k-X9636PQ ok21 0 Fabric Module Nexus-C9508-FM ok22 0 Fabric Module Nexus-C9508-FM ok23 0 Fabric Module Nexus-C9508-FM ok24 0 Fabric Module Nexus-C9508-FM ok25 0 Fabric Module Nexus-C9508-FM ok26 0 Fabric Module Nexus-C9508-FM ok27 0 Supervisor Module Nexus-SUP-A active *29 0 System Controller Nexus-SC-A active
• Attach to module 24 to gain access to the command line for the FM in slot 24.nexus-spine1# attach module 24Attaching to module 24 ...To exit type 'exit', to abort type '$.'
• Enter the command to gain root access to the fabric module software.module-24# test hardware internal bcm-usd bcm-diag-shellAvailable Unit Numbers: 0 1bcm-shell.0> 1
At this point, you are at the Broadcom shell for the fabric module in slot 24, T2 ASIC instance 1. Anycommands that you enter are specific to this specific ASIC instance.
• Enter ‘?’ for the context help and to display the available commands.help: "??" or "help" for summaryCommands common to all modes:? ?? ASSert BackGround BCMBCMX break BroadSync CASE CDcint CONFig CONSole CoPy CPUDBCTEcho CTInstall CTSetup DATE DBDumpDBParse DeBug DeBugMod DELAY DEVice
Cisco Nexus 9000 Series NX-OS Programmability Guide, Release 7.x65
Shells and ScriptingAccessing the Native bcm-shell on the Fabric Module

Uppercase characters indicate command abbreviations.Note
The Cisco CLI feature of using TAB to complete a command entry is not available.Note
• Enter an abbreviated command.bcm-shell.1> conf ?Usage (CONFig): Parameters: show <substring> | refresh |
save [filename=<filename>] [pattern=<substring>] |add [<var>=<value>] | delete <var>
If no parameters are given, displays the current config vars.show display current config vars.
Next parameter (optional) maybe a substring to matchrefresh reload config vars from non-volatile storagesave save config vars to non-volatile storage.
it can optionally save current config to any given fileproviding the optional <pattern> will only save variables
matching the pattern<var>=<value> change the value of a config varadd <var>=<value> create a new config vardelete <var> deletes a config varclear deletes all config vars= prompt for new value for each config var
NOTE: changes are not retained permanently unless saved
• Use the exit command to exit the bcm-shell and to detach from the FM.
bcm-shell.1> exitmodule-24# exitrlogin: connection closed.
Accessing the bcm-shell on the Line CardWhen connecting to the T2 ASIC on the line card (LC), you first attach to the module, enter root mode, runthe shell access exec, and select the ASIC instance to which you want to attach. The number of availableASICs depends on the model of the line card to which you are attached.
The following example shows how to access the bcm-shell of ASIC instance 1 on the LC in slot 2 and exitthe bcm-shell on an LC that contains three T2 instances.
• Attach to module 2 to gain access to the command line for the LC in slot 2.
nexus-spine1# attach module 2Attaching to module 2 ...To exit type 'exit', to abort type '$.'Last login: Wed Aug 7 14:13:15 UTC 2013 from sup27 on ttyp0
• Enter the command to gain root access to the line card software.
module-2# test hardware internal bcm-usd bcm-diag-shellAvailable Unit Numbers: 0 1 2bcm-shell.0> 1bcm-shell.1>
At this point, you are at the Broadcom shell for the line card module in slot 2, T2 ASIC instance 1.
Cisco Nexus 9000 Series NX-OS Programmability Guide, Release 7.x66
Shells and ScriptingAccessing the bcm-shell on the Line Card

• Use the exit command to exit the bcm-shell and detach from the FM.bcm-shell.1> exitmodule-2# exitrlogin: connection closed.
Examples of Broadcom Shell CommandsThis section contains examples of Broadcom shell commands and output.
Displaying L2 EntriesTo compare the L2 entries on an FM and an LC, display the L2 entries on the T2 instance.
• Attach to a T2 instance on an LC in the chassis and enter the show the l2_mem_entries command.switch# bcm-shell module 2 “config show l2_mem_entries”l2_mem_entries=163840
• Attach to a T2 instance on an FM in the chassis and enter the show the l2_mem_entries command.switch# bcm-shell module 24 “config show l2_mem_entries”l2_mem_entries=32768
In this example, the ASICs have different values that are configured for L2 entries because the operationmodesetting of the T2 ASIC is different on the LC and the FM.
Displaying Routing Information from FM and LC ASIC InstancesThe following shows how to display the routing information from an FM instance and an LC ASIC instance.
• FM module ASIC instances maintain the longest prefix match (LPM) entries.
• LC module ASIC instances maintain host routes.
Note
• Attach to the bcm-shell of one of the FM ASIC instances and enter the l3 defip show command.switch# bcm-shell module 22 “l3 defip show”Unit 0, Total Number of DEFIP entries: 16385# VRF Net addr Next Hop Mac INTF MODID PORT PRIO CLASS HIT VLAN0 1 192.168.1.0/24 00:00:00:00:00:00 10000 4 0 0 0 0 n0 1 192.168.2.0/24 00:00:00:00:00:00 10000 4 0 0 0 0 n
• Attach to the bcm-shell of one of the LC ASIC instances and enter the l3 defip show command.switch# bcm-shell module 2 “l3 defip show”Unit 2, Total Number of DEFIP entries: 8193# VRF Net addr Next Hop Mac INTF MODID PORT PRIO CLASS HIT VLAN2048 Override 0.0.0.0/0 00:00:00:00:00:00 10000 4 0 0 0 0 n
Cisco Nexus 9000 Series NX-OS Programmability Guide, Release 7.x67
Shells and ScriptingExamples of Broadcom Shell Commands

Displaying Spanning Tree Group EntriesThe following shows how to display spanning tree group (STG) entries.switch# bcm-shell module 2 “stg show”STG 0: contains 7 VLANs (4032-4035,4042,4044,4095)Forward: xe,hgSTG 1: contains 1 VLAN (4043)Disable: xeForward: hgSTG 4: contains 1 VLAN (1)Block: xeForward: hgSTG 5: contains 1 VLAN (100)Block: xeForward: hg
Display T2 Counters for Interface xe0The following shows how to display T2 counters for interface xe0 that maps to a front panel port.switch# bcm-shell module 2 “show counters xe0”RDBGC1.xe0 : 38,169 +4R127.xe0 : 37,994 +4R511.xe0 : 16,562 +2RPKT.xe0 : 55,046 +6RMCA.xe0 : 54,731 +6<snip>
The numbers in the output on the far right denoted with '+', indicate the change in the counter value since thelast show command was executed.
Note
Displaying L3 InformationThe following shows how to display L3 information from the T2.switch# bcm-shell module 2 “l3 l3table show”Unit 0, free L3 table entries: 147448Entry VRF IP address Mac Address INTF MOD PORT CLASS HIT1 1 10.100.100.2 00:00:00:00:00:00 100006 0 0 0 n2 1 10.101.101.2 00:00:00:00:00:00 100006 0 0 0 y3 1 10.101.101.1 00:00:00:00:00:00 149151 0 0 0 y (LOCAL ROUTE)4 1 10.100.100.1 00:00:00:00:00:00 149151 0 0 0 n (LOCAL ROUTE)5 1 10.101.101.0 00:00:00:00:00:00 100000 0 0 0 n (LOCAL ROUTE)6 1 10.100.100.0 00:00:00:00:00:00 100000 0 0 0 n (LOCAL ROUTE)7 1 10.101.101.255 00:00:00:00:00:00 149150 0 0 0 n8 1 10.100.100.255 00:00:00:00:00:00 149150 0 0 0 n
Cisco Nexus 9000 Series NX-OS Programmability Guide, Release 7.x68
Shells and ScriptingDisplaying Spanning Tree Group Entries

C H A P T E R 6Python API
• About the Python API , on page 69• Using Python, on page 69
About the Python APIPython is an easy to learn, powerful programming language. It has efficient high-level data structures and asimple but effective approach to object-oriented programming. Python's elegant syntax and dynamic typing,together with its interpreted nature, make it an ideal language for scripting and rapid application developmentin many areas on most platforms.
The Python interpreter and the extensive standard library are freely available in source or binary form for allmajor platforms from the Python website:
http://www.python.org/
The same site also contains distributions of and pointers to many free third-party Python modules, programsand tools, and more documentation.
The Cisco Nexus 9000 Series devices support Python v2.7.5 in both interactive and noninteractive (script)modes and are available in the Guest Shell.
The Python scripting capability gives programmatic access to the device's command-line interface (CLI) toperform various tasks and Power On Auto Provisioning (POAP) or Embedded EventManager (EEM) actions.Python also can be accessed from the Bash shell.
The Python interpreter is available in the Cisco NX-OS software.
For information about using Python with Cisco Nexus devices, see the Cisco Nexus 9000 Series Python SDKUser Guide and API Reference at this URL: https://developer.cisco.com/site/nx-os/docs/apis/python/.
Using PythonThis section describes how to write and execute Python scripts.
Cisco Python PackageCisco NX-OS provides a Cisco Python package that enables access to many core network-device modules,such as interfaces, VLANs, VRFs, ACLs, and routes. You can display the details of the Cisco Python package
Cisco Nexus 9000 Series NX-OS Programmability Guide, Release 7.x69

by entering the help() command. To obtain additional information about the classes and methods in a module,you can run the help command for a specific module. For example, help(cisco.interface) displays the propertiesof the cisco.interface module.
For more Python modules, you can install the python-modules-nxos RPM(python-modules-nxos-1.0.0-9.2.1.lib32_x86.rpm) fromhttps://devhub.cisco.com/artifactory/open-nxos/9.2.1/x86_64/. Refer to the "Manage Feature RPMs" section for instructions on installing an RPM.
The following is an example of how to display information about the Cisco Python package:>>> import cisco>>> help(cisco)Help on package cisco:
NAMEcisco
FILE/isan/python/scripts/cisco/__init__.py
PACKAGE CONTENTSaclbgpcisco_secretcisco_socketfeatureinterfacekeyline_parsermd5sumnxcliospfroutemaproutessection_parsersshsystemtacacsvrf
CLASSES__builtin__.object
cisco.cisco_secret.CiscoSecretcisco.interface.Interfacecisco.key.Key
Guidelines and LimitationsThe Python API has the following guidelines and limitations:
• Starting with NX-OS 7.0(3)F3(1), the Python API is supported on the Cisco Nexus 9508 switch.
Using the CLI Command APIsThe Python programming language uses three APIs that can execute CLI commands. The APIs are availablefrom the Python CLI module.
Cisco Nexus 9000 Series NX-OS Programmability Guide, Release 7.x70
Shells and ScriptingGuidelines and Limitations

These APIs are listed in the following table. You must enable the APIs with the from cli import * command.The arguments for these APIs are strings of CLI commands. To execute a CLI command through the Pythoninterpreter, you enter the CLI command as an argument string of one of the following APIs:
Table 4: CLI Command APIs
DescriptionAPI
Returns the raw output of CLI commands, includingcontrol or special characters.
The interactive Python interpreter printscontrol or special characters 'escaped'. Acarriage return is printed as '\n' and givesresults that can be difficult to read. Theclip() API gives results that are morereadable.
Note
cli()
Example:string = cli (“cli-command”)
Returns JSON output for cli-command, if XMLsupport exists for the command, otherwise anexception is thrown.
This API can be useful when searching theoutput of show commands.
Note
clid()
Example:json_string = clid (“cli-command”)
Prints the output of the CLI command directly tostdout and returns nothing to Python.
clip (“cli-command”)
is equivalent tor=cli(“cli-command”)print r
Note
clip()
Example:clip (“cli-command”)
When two or more commands are run individually, the state is not persistent from one command to subsequentcommands.
In the following example, the second command fails because the state from the first command does not persistfor the second command:>>> cli("conf t")>>> cli("interface eth4/1")
When two or more commands are run together, the state is persistent from one command to subsequentcommands.
In the following example, the second command is successful because the state persists for the second andthird commands:>>> cli("conf t ; interface eth4/1 ; shut")
Commands are separated with " ; " as shown in the example. The semicolon ( ; ) must be surrounded withsingle blank characters.
Note
Cisco Nexus 9000 Series NX-OS Programmability Guide, Release 7.x71
Shells and ScriptingUsing the CLI Command APIs

Invoking the Python Interpreter from the CLIThe following example shows how to invoke Python from the CLI:
The Python interpreter is designated with the ">>>" or "…" prompt.Note
switch# pythonPython 2.7.5 (default, Oct 8 2013, 23:59:43)[GCC 4.6.3] on linux2Type "help", "copyright", "credits" or "license" for more information.>>> from cli import *>>> import json>>> cli('configure terminal ; interface loopback 5 ; no shut')''>>> intflist=json.loads(clid('show interface brief'))>>> i=0>>> while i < len(intflist['TABLE_interface']['ROW_interface']):... intf=intflist['TABLE_interface']['ROW_interface'][i]... i=i+1... if intf['state'] == 'up':... print intf['interface']...mgmt0Ethernet2/7Ethernet4/7loopback0loopback5>>>
Display FormatsThe following examples show various display formats using the Python APIs:
Example 1:>>> from cli import *>>> cli("conf ; interface loopback 1")''>>> clip('where detail')mode:username: adminvdc: switchrouting-context vrf: default
Example 2:>>> from cli import *>>> cli("conf ; interface loopback 1")''>>> cli('where detail')' mode: \n username: admin\n vdc:switch\n routing-context vrf: default\n'>>>
Example 3:>>> from cli import *>>> cli("conf ; interface loopback 1")
Cisco Nexus 9000 Series NX-OS Programmability Guide, Release 7.x72
Shells and ScriptingInvoking the Python Interpreter from the CLI

''>>> r = cli('where detail') ; print rmode:username: adminvdc: EOR-1routing-context vrf: default
>>>
Example 4:>>> from cli import *>>> import json>>> out=json.loads(clid('show version'))>>> for k in out.keys():... print "%30s = %s" % (k, out[k])...
kern_uptm_secs = 21kick_file_name = bootflash:///nxos.9.2.1.bin.S246
rr_service = Nonemodule_id = Supervisor Module
kick_tmstmp = 07/11/2018 00:01:44bios_cmpl_time = 05/17/2018bootflash_size = 20971520
kickstart_ver_str = 9.2(1)kick_cmpl_time = 7/9/2018 9:00:00
chassis_id = Nexus9000 C9504 (4 Slot) Chassisproc_board_id = SAL171211LX
memory = 16077872manufacturer = Cisco Systems, Inc.
kern_uptm_mins = 26bios_ver_str = 05.31
cpu_name = Intel(R) Xeon(R) CPU D-1528 @ 1.90GHzkern_uptm_hrs = 2
rr_usecs = 816550rr_sys_ver = 9.2(1)rr_reason = Reset Requested by CLI command reloadrr_ctime = Wed Jul 11 20:44:39 2018
header_str = Cisco Nexus Operating System (NX-OS) SoftwareTAC support: http://www.cisco.com/tacCopyright (C) 2002-2018, Cisco and/or its affiliates.All rights reserved.The copyrights to certain works contained in this software areowned by other third parties and used and distributed under their ownlicenses, such as open source. This software is provided "as is," and unlessotherwise stated, there is no warranty, express or implied, including but notlimited to warranties of merchantability and fitness for a particular purpose.Certain components of this software are licensed underthe GNU General Public License (GPL) version 2.0 orGNU General Public License (GPL) version 3.0 or the GNULesser General Public License (LGPL) Version 2.1 orLesser General Public License (LGPL) Version 2.0.A copy of each such license is available athttp://www.opensource.org/licenses/gpl-2.0.php andhttp://opensource.org/licenses/gpl-3.0.html andhttp://www.opensource.org/licenses/lgpl-2.1.php andhttp://www.gnu.org/licenses/old-licenses/library.txt.
host_name = switchmem_type = kB
kern_uptm_days = 0>>>
Cisco Nexus 9000 Series NX-OS Programmability Guide, Release 7.x73
Shells and ScriptingDisplay Formats

Non-interactive PythonA Python script can run in non-interactive mode by providing the Python script name as an argument to thePython CLI command. Python scripts must be placed under the bootflash or volatile scheme. A maximum of32 command-line arguments for the Python script are allowed with the Python CLI command.
The Cisco Nexus 9000 Series device also supports the source CLI command for running Python scripts. Thebootflash:scripts directory is the default script directory for the source CLI command.
The following example shows a script and how to run it:switch# show file bootflash:deltaCounters.py#!/isan/bin/python
from cli import *import sys, time
ifName = sys.argv[1]delay = float(sys.argv[2])count = int(sys.argv[3])cmd = 'show interface ' + ifName + ' counters'
out = json.loads(clid(cmd))rxuc = int(out['TABLE_rx_counters']['ROW_rx_counters'][0]['eth_inucast'])rxmc = int(out['TABLE_rx_counters']['ROW_rx_counters'][1]['eth_inmcast'])rxbc = int(out['TABLE_rx_counters']['ROW_rx_counters'][1]['eth_inbcast'])txuc = int(out['TABLE_tx_counters']['ROW_tx_counters'][0]['eth_outucast'])txmc = int(out['TABLE_tx_counters']['ROW_tx_counters'][1]['eth_outmcast'])txbc = int(out['TABLE_tx_counters']['ROW_tx_counters'][1]['eth_outbcast'])print 'row rx_ucast rx_mcast rx_bcast tx_ucast tx_mcast tx_bcast'print '========================================================='print ' %8d %8d %8d %8d %8d %8d' % (rxuc, rxmc, rxbc, txuc, txmc, txbc)print '========================================================='
i = 0while (i < count):time.sleep(delay)out = json.loads(clid(cmd))rxucNew = int(out['TABLE_rx_counters']['ROW_rx_counters'][0]['eth_inucast'])rxmcNew = int(out['TABLE_rx_counters']['ROW_rx_counters'][1]['eth_inmcast'])rxbcNew = int(out['TABLE_rx_counters']['ROW_rx_counters'][1]['eth_inbcast'])txucNew = int(out['TABLE_tx_counters']['ROW_tx_counters'][0]['eth_outucast'])txmcNew = int(out['TABLE_tx_counters']['ROW_tx_counters'][1]['eth_outmcast'])txbcNew = int(out['TABLE_tx_counters']['ROW_tx_counters'][1]['eth_outbcast'])i += 1print '%-3d %8d %8d %8d %8d %8d %8d' % \(i, rxucNew - rxuc, rxmcNew - rxmc, rxbcNew - rxbc, txucNew - txuc, txmcNew - txmc,
txbcNew - txbc)
switch# python bootflash:deltaCounters.py Ethernet1/1 1 5row rx_ucast rx_mcast rx_bcast tx_ucast tx_mcast tx_bcast=========================================================
0 791 1 0 212739 0=========================================================1 0 0 0 0 26 02 0 0 0 0 27 03 0 1 0 0 54 04 0 1 0 0 55 05 0 1 0 0 81 0switch#
Cisco Nexus 9000 Series NX-OS Programmability Guide, Release 7.x74
Shells and ScriptingNon-interactive Python

The following example shows how a source command specifies command-line arguments. In the example,policy-map is an argument to the cgrep python script. The example also shows that a source command canfollow the pipe operator ("|").switch# show running-config | source sys/cgrep policy-map
policy-map type network-qos nw-pfcpolicy-map type network-qos no-drop-2policy-map type network-qos wred-policypolicy-map type network-qos pause-policypolicy-map type qos foopolicy-map type qos classifypolicy-map type qos cos-basedpolicy-map type qos no-drop-2policy-map type qos pfc-tor-port
Running Scripts with Embedded Event ManagerOn Cisco Nexus 9000 Series devices, Embedded Event Manager (EEM) policies support Python scripts.
The following example shows how to run a Python script as an EEM action:
• An EEM applet can include a Python script with an action command.switch# show running-config eem
!Command: show running-config eem!Time: Sun May 1 14:40:07 2011
version 6.1(2)I2(1)event manager applet a1event cli match "show clock"action 1 cli python bootflash:pydate.pyaction 2 event-default
• You can search for the action that is triggered by the event in the log file by running the show filelogflash:event_archive_1 command.switch# show file logflash:event_archive_1 | last 33
eem_event_time:05/01/2011,19:40:28 event_type:cli event_id:8 slot:active(1)vdc:1 severity:minor applets:a1eem_param_info:command = "exshow clock"Starting with policy a1Python
2011-05-01 19:40:28.644891Executing the following commands succeeded:
python bootflash:pydate.py
PC_VSH_CMD_TLV(7679) with q
Python Integration with Cisco NX-OS Network InterfacesOnCiscoNexus 9000 Series devices, Python is integratedwith the underlying CiscoNX-OS network interfaces.You can switch from one virtual routing context to another by setting up a context through thecisco.vrf.set_global_vrf() API.
Cisco Nexus 9000 Series NX-OS Programmability Guide, Release 7.x75
Shells and ScriptingRunning Scripts with Embedded Event Manager

The following example shows how to retrieve an HTML document over themanagement interface of a device.You can also establish a connection to an external entity over the inband interface by switching to a desiredvirtual routing context.switch# pythonPython 2.7.5 (default, Oct 8 2013, 23:59:43)[GCC 4.6.3] on linux2Type "help", "copyright", "credits" or "license" for more information.>>> import urllib2>>> from cisco.vrf import *>>> set_global_vrf('management')>>> page=urllib2.urlopen('http://172.23.40.211:8000/welcome.html')>>> print page.read()Hello Cisco Nexus 9000
>>>>>> import cisco>>> help(cisco.vrf.set_global_vrf)Help on function set global vrf in module cisco.vrf:
set global vrf(vrf)Sets the global vrf. Any new sockets that are created (using socket.socket)will automatically get set to this vrf (including sockets used by otherpython libraries).
Arguments:vrf: VRF name (string) or the VRF ID (int).
Returns: Nothing
>>>
Cisco NX-OS Security with PythonCiscoNX-OS resources are protected by the CiscoNX-OS Sandbox layer of software and by the CLI role-basedaccess control (RBAC).
All users who are associated with a Cisco NX-OS network-admin or dev-ops role are privileged users. Userswho are granted access to Python with a custom role are regarded as nonprivileged users. Nonprivileged usershave limited access to Cisco NX-OS resources, such as the file system, guest shell, and Bash commands.Privileged users have greater access to all the resources of Cisco NX-OS.
Examples of Security and User AuthorityThe following example shows how a privileged user runs commands:switch# pythonPython 2.7.5 (default, Oct 8 2013, 23:59:43)[GCC 4.6.3] on linux2Type "help", "copyright", "credits" or "license" for more information.>>> import os>>> os.system('whoami')admin0>>> f=open('/tmp/test','w')>>> f.write('hello from python')>>> f.close()>>> r=open('/tmp/test','r')>>> print r.read()hello from python
Cisco Nexus 9000 Series NX-OS Programmability Guide, Release 7.x76
Shells and ScriptingCisco NX-OS Security with Python

>>> r.close()
The following example shows a nonprivileged user being denied access:switch# pythonPython 2.7.5 (default, Oct 8 2013, 23:59:43)[GCC 4.6.3] on linux2Type "help", "copyright", "credits" or "license" for more information.>>> import os>>> os.system('whoami')system(whoami): rejected!-1>>> f=open('/tmp/test','r')Permission denied. Traceback (most recent call last):File "<stdin>", line 1, in <module>
IOError: [Errno 13] Permission denied: '/tmp/test'>>>
RBAC controls CLI access based on the login user privileges. A login user's identity is given to Python thatis invoked from the CLI shell or from Bash. Python passes the login user's identity to any subprocess that isinvoked from Python.
The following is an example for a privileged user:>>> from cli import *>>> cli('show clock')'11:28:53.845 AM UTC Sun May 08 2011\n'>>> cli('configure terminal ; vrf context myvrf')''>>> clip('show running-config l3vm')
!Command: show running-config l3vm!Time: Sun May 8 11:29:40 2011
version 6.1(2)I2(1)
interface Ethernet1/48vrf member blue
interface mgmt0vrf member management
vrf context bluevrf context managementvrf context myvrf
The following is an example for a nonprivileged user:>>> from cli import *>>> cli('show clock')'11:18:47.482 AM UTC Sun May 08 2011\n'>>> cli('configure terminal ; vrf context myvrf2')Traceback (most recent call last):File "<stdin>", line 1, in <module>File "/isan/python/scripts/cli.py", line 20, in cliraise cmd_exec_error(msg)
errors.cmd_exec_error: '% Permission denied for the role\n\nCmd exec error.\n'
The following example shows an RBAC configuration:switch# show user-accountuser:admin
this user account has no expiry date
Cisco Nexus 9000 Series NX-OS Programmability Guide, Release 7.x77
Shells and ScriptingExamples of Security and User Authority

roles:network-adminuser:pyuser
this user account has no expiry dateroles:network-operator python-role
switch# show role name python-role
Example of Running Script with SchedulerThe following example shows a Python script that is running the script with the scheduler feature:#!/bin/env pythonfrom cli import *from nxos import *import os
switchname = cli("show switchname")try:
user = os.environ['USER']except:
user = "No user"pass
msg = user + " ran " + __file__ + " on : " + switchnameprint msgpy_syslog(1, msg)# Save this script in bootflash:///scripts
switch# conf tEnter configuration commands, one per line. End with CNTL/Z.switch(config)# feature schedulerswitch(config)# scheduler job name testplanswitch(config-job)# python bootflash:///scripts/testplan.pyswitch(config-job)# exitswitch(config)# scheduler schedule name testplanswitch(config-schedule)# job name testplanswitch(config-schedule)# time start now repeat 0:0:4Schedule starts from Mon Mar 14 16:40:03 2011switch(config-schedule)# endswitch# term mon2011 Mar 14 16:38:03 switch %VSHD-5-VSHD_SYSLOG_CONFIG_I: Configured from vty by admin on10.19.68.246@pts/2switch# show scheduler scheduleSchedule Name : testplan------------------------------User Name : adminSchedule Type : Run every 0 Days 0 Hrs 4 MinsStart Time : Mon Mar 14 16:40:03 2011Last Execution Time : Yet to be executed-----------------------------------------------
Job Name Last Execution Status-----------------------------------------------
testplan -NA-==============================================================================switch#switch# 2011 Mar 14 16:40:04 switch %USER-1-SYSTEM_MSG: No user ran/bootflash/scripts/testplan.py on : switch - nxpython2011 Mar 14 16:44:04 switch last message repeated 1 timeswitch#
Cisco Nexus 9000 Series NX-OS Programmability Guide, Release 7.x78
Shells and ScriptingExample of Running Script with Scheduler

C H A P T E R 7Scripting with Tcl
• About Tcl, on page 79• Running the Tclsh Command, on page 81• Navigating Cisco NX-OS Modes from the Tclsh Command, on page 82• Tcl References, on page 84
About TclTcl (pronounced "tickle") is a scripting language that increases flexibility of CLI commands. You can use Tclto extract certain values in the output of a show command, perform switch configurations, run Cisco NX-OScommands in a loop, or define Embedded Event Manager (EEM) policies in a script.
This section describes how to run Tcl scripts or run Tcl interactively on Cisco NX-OS devices.
Tclsh Command HelpCommand help is not available for Tcl commands. You can still access the help functions of Cisco NX-OScommands from within an interactive Tcl shell.
This example shows the lack of Tcl command help in an interactive Tcl shell:switch# tclshswitch-tcl# set x 1switch-tcl# puts ?
^% Invalid command at '^' marker.switch-tcl# configure ?<CR>session Configure the system in a sessionterminal Configure the system from terminal input
switch-tcl#
In the preceding example, the Cisco NX-OS command help function is still available but the Tcl puts commandreturns an error from the help function.
Note
Cisco Nexus 9000 Series NX-OS Programmability Guide, Release 7.x79

Tclsh Command HistoryYou can use the arrow keys on your terminal to access commands you previously entered in the interactiveTcl shell.
The tclsh command history is not saved when you exit the interactive Tcl shell.Note
Tclsh Tab CompletionYou can use tab completion for Cisco NX-OS commands when you are running an interactive Tcl shell. Tabcompletion is not available for Tcl commands.
Tclsh CLI CommandAlthough you can directly access Cisco NX-OS commands from within an interactive Tcl shell, you can onlyexecute Cisco NX-OS commands in a Tcl script if they are prepended with the Tcl cli command.
In an interactive Tcl shell, the following commands are identical and execute properly:switch-tcl# cli show module 1 | incl Modswitch-tcl# cli "show module 1 | incl Mod"switch-tcl# show module 1 | incl Mod
In a Tcl script, you must prepend Cisco NX-OS commands with the Tcl cli command as shown in the followingexample:set x 1cli show module $x | incl Modcli "show module $x | incl Mod"
If you use the following commands in your script, the script fails and the Tcl shell displays an error:show module $x | incl Mod"show module $x | incl Mod"
Tclsh Command SeparationThe semicolon (;) is the command separator in both Cisco NX-OS and Tcl. To execute multiple Cisco NX-OScommands in a Tcl command, you must enclose the Cisco NX-OS commands in quotes ("").
In an interactive Tcl shell, the following commands are identical and execute properly:switch-tcl# cli "configure terminal ; interface loopback 10 ; description loop10"switch-tcl# cli configure terminal ; cli interface loopback 10 ; cli description loop10switch-tcl# cli configure terminalEnter configuration commands, one per line. End with CNTL/Z.
switch(config-tcl)# cli interface loopback 10switch(config-if-tcl)# cli description loop10switch(config-if-tcl)#
Cisco Nexus 9000 Series NX-OS Programmability Guide, Release 7.x80
Shells and ScriptingTclsh Command History

In an interactive Tcl shell, you can also execute Cisco NX-OS commands directly without prepending the Tclcli command:switch-tcl# configure terminalEnter configuration commands, one per line. End with CNTL/Z.
switch(config-tcl)# interface loopback 10switch(config-if-tcl)# description loop10switch(config-if-tcl)#
Tcl VariablesYou can use Tcl variables as arguments to the Cisco NX-OS commands. You can also pass arguments intoTcl scripts. Tcl variables are not persistent.
The following example shows how to use a Tcl variable as an argument to a Cisco NX-OS command:switch# tclshswitch-tcl# set x loop10switch-tcl# cli "configure terminal ; interface loopback 10 ; description $x"switch(config-if-tcl)#
TclquitThe tclquit command exits the Tcl shell regardless of which Cisco NX-OS commandmode is currently active.You can also press Ctrl-C to exit the Tcl shell. The exit and end commands change Cisco NX-OS commandmodes. The exit command terminates the Tcl shell only from the EXEC command mode.
Tclsh SecurityThe Tcl shell is executed in a sandbox to prevent unauthorized access to certain parts of the Cisco NX-OSsystem. The system monitors CPU, memory, and file system resources being used by the Tcl shell to detectevents such as infinite loops, excessive memory utilization, and so on.
You configure the initial Tcl environment with the scripting tcl init init-file command.
You can define the looping limits for the Tcl environment with the scripting tcl recursion-limit iterationscommand. The default recursion limit is 1000 iterations.
Running the Tclsh CommandYou can run Tcl commands from either a script or on the command line using the tclsh command.
You cannot create a Tcl script file at the CLI prompt. You can create the script file on a remote device andcopy it to the bootflash: directory on the Cisco NX-OS device.
Note
Cisco Nexus 9000 Series NX-OS Programmability Guide, Release 7.x81
Shells and ScriptingTcl Variables

Procedure
PurposeCommand or Action
Starts a Tcl shell.tclsh [bootflash:filename [argument ...]]
Step 1
If you run the tclsh command with noarguments, the shell runs interactively, readingExample:Tcl commands from standard input and printingswitch# tclsh ?
<CR>bootflash: The file to run
command results and error messages to thestandard output. You exit from the interactiveTcl shell by typing tclquit or Ctrl-C.
If you run the tclsh command with arguments,the first argument is the name of a script filecontaining Tcl commands and any additionalarguments are made available to the script asvariables.
Example
The following example shows an interactive Tcl shell:switch# tclshswitch-tcl# set x 1switch-tcl# cli show module $x | incl ModMod Ports Module-Type Model Status1 36 36p 40G Ethernet Module N9k-X9636PQ okMod Sw HwMod MAC-Address(es) Serial-Num
switch-tcl# exitswitch#
The following example shows how to run a Tcl script:switch# show file bootflash:showmodule.tclset x 1while {$x < 19} {cli show module $x | incl Modset x [expr {$x + 1}]}
switch# tclsh bootflash:showmodule.tclMod Ports Module-Type Model Status1 36 36p 40G Ethernet Module N9k-X9636PQ okMod Sw HwMod MAC-Address(es) Serial-Num
switch#
Navigating Cisco NX-OS Modes from the Tclsh CommandYou can change modes in Cisco NX-OS while you are running an interactive Tcl shell.
Cisco Nexus 9000 Series NX-OS Programmability Guide, Release 7.x82
Shells and ScriptingNavigating Cisco NX-OS Modes from the Tclsh Command

Procedure
PurposeCommand or Action
Starts an interactive Tcl shell.tclsh
Example:
Step 1
switch# tclshswitch-tcl#
Runs a Cisco NX-OS command in the Tcl shell,changing modes.
configure terminal
Example:
Step 2
The Tcl prompt changes to indicatethe Cisco NX-OS command mode.
Noteswitch-tcl# configure terminalswitch(config-tcl)#
Terminates the Tcl shell, returning to thestarting mode.
tclquit
Example:
Step 3
switch-tcl# tclquitswitch#
Example
The following example shows how to change Cisco NX-OS modes from an interactive Tcl shell:switch# tclshswitch-tcl# configure terminalEnter configuration commands, one per line. End with CNTL/Z.switch(config-tcl)# interface loopback 10switch(config-if-tcl)# ?description Enter description of maximum 80 charactersinherit Inherit a port-profileip Configure IP featuresipv6 Configure IPv6 featureslogging Configure logging for interfaceno Negate a command or set its defaultsrate-limit Set packet per second rate limitshutdown Enable/disable an interfacethis Shows info about current object (mode's instance)vrf Configure VRF parametersend Go to exec modeexit Exit from command interpreterpop Pop mode from stack or restore from namepush Push current mode to stack or save it under namewhere Shows the cli context you are in
switch(config-if-tcl)# description loop10switch(config-if-tcl)# tclquitExiting Tclswitch#
Cisco Nexus 9000 Series NX-OS Programmability Guide, Release 7.x83
Shells and ScriptingNavigating Cisco NX-OS Modes from the Tclsh Command

Tcl ReferencesThe following titles are provided for your reference:
• Mark Harrison (ed), Tcl/Tk Tools, O'Reilly Media, ISBN 1-56592-218-2, 1997
• Mark Harrison and Michael McLennan, Effective Tcl/Tk Programming, Addison-Wesley, Reading, MA,USA, ISBN 0-201-63474-0, 1998
• John K. Ousterhout, Tcl and the Tk Toolkit, Addison-Wesley, Reading, MA, USA, ISBN 0-201-63337-X,1994.
• Brent B. Welch, Practical Programming in Tcl and Tk, Prentice Hall, Upper Saddle River, NJ, USA,ISBN 0-13-038560-3, 2003.
• J Adrian Zimmer, Tcl/Tk for Programmers, IEEE Computer Society, distributed by JohnWiley and Sons,ISBN 0-8186-8515-8, 1998.
Cisco Nexus 9000 Series NX-OS Programmability Guide, Release 7.x84
Shells and ScriptingTcl References

C H A P T E R 8iPXE
This chapter contains the following sections:
• About iPXE, on page 85• Netboot Requirements, on page 86• Guidelines and Limitations, on page 86• Boot Mode Configuration, on page 86• Verifying the Boot Order Configuration, on page 87
About iPXEiPXE is an open source network-boot firmware. iPXE is based on gPXE, which is an open-source PXE clientfirmware and bootloader derived from Etherboot. Standard PXE clients use TFTP to transfer data whereasgPXE supports more protocols.
Here is a list of additional features that iPXE provides over standard PXE:
• Boots from a web server via HTTP, iSCSI SAN, FCoE, and so on
• Supports both IPv4 and IPv6
• Netboot supports HTTP/TFTP, IPv4, and IPv6
• Supports embedded scripts into the image or served by the HTTP/TFTP, and so on
• Supports stateless address autoconfiguration (SLAAC) and stateful IP autoconfiguration variants forDHCPv6. iPXE supports boot URI and parameters for DHCPv6 options. This depends on IPv6 routeradvertisement.
In addition, we have disabled some of the existing features from iPXE for security reasons such as:
• Boot support for standard Linux image format such as bzImage+initramfs/initrd, or ISO, and so on
• Unused network boot options such as FCoE, iSCSI SAN, Wireless, and so on
• Loading of unsupported NBP (such as syslinux/pxelinux) because these can boot system images that arenot properly code-signed.
Cisco Nexus 9000 Series NX-OS Programmability Guide, Release 7.x85

Netboot RequirementsThe primary requirements are:
• A DHCP server with proper configuration.
• A TFTP/HTTP server.
• Enough space on the device's bootflash because NX-OS downloads the image when the device is PXEbooted.
• IPv4/IPv6 support—for better deployment flexibility
Guidelines and LimitationsPXE has the following configuration guidelines and limitations:
• Starting with NX-OS 7.0(3)F3(1), iPXE is supported on the Cisco Nexus 9508 switch.
• While auto-booting through iPXE, there is a window of three seconds where you can enter Ctrl+B toexit out of the PXE boot. The system prompts you with the following options:
Please choose a bootloader shell:1). GRUB shell2). PXE shellEnter your choice:
• HTTP image download vs. TFTP—TFTP is UDP based and it can be problematic if packet loss startsappearing. TCP is a window-based protocol and handles bandwidth sharing/losses better. As a result,TCP-based protocols support is more suitable given the sizes of the Cisco Nexus images which are over250 Mbytes.
• iPXE only allows/boots Cisco signed NBI images. Other standard image format support is disabled forsecurity reasons.
Boot Mode ConfigurationVSH CLI
switch# configure terminalswitch(conf)# boot order bootflash|pxe [bootflash|pxe]switch(conf)# end
The keyword bootflash indicates it is Grub based booting.Note
For example, to do a PXE boot mode only, the configuration command is:switch(conf)# boot order pxe
Cisco Nexus 9000 Series NX-OS Programmability Guide, Release 7.x86
Shells and ScriptingNetboot Requirements

To boot Grub first, followed by PXE:switch(conf)# boot order bootflash pxe
To boot PXE first, followed by Grub:switch(conf)# boot order pxe bootflash
If you never use the boot order command, by default the boot order is Grub.
The following sections describe how you can toggle from Grub and iPXE.Note
Grub CLI
bootmode [-g|-p|-p2g|-g2p]
FunctionKeyword
Grub only-g
PXE only-p
PXE first, followed by Grub if PXE failed-p2g
Grub first, followed by PXE if Grub failed-g2p
The Grub CLI is useful if you want to toggle the boot mode from the serial console without booting a fullNexus image. It also can be used to get a box out of the continuous PXE boot state.
iPXE CLI
bootmode [-g|--grub] [-p|--pxe] [-a|--pxe2grub] [-b|--grub2pxe]
FunctionKeyword
Grub only– – grub
PXE only– – pxe
PXE first, followed by Grub if PXE failed– – pxe2grub
Grub first, followed by PXE if Grub failed– – grub2pxe
The iPXE CLI is useful if you wish to toggle the boot mode from the serial console without booting a fullNexus image. It also can be used to get a box out of continuous PXE boot state.
Verifying the Boot Order ConfigurationTo display boot order configuration information, enter the following command:
Cisco Nexus 9000 Series NX-OS Programmability Guide, Release 7.x87
Shells and ScriptingVerifying the Boot Order Configuration

PurposeCommand
Displays the current boot order from the runningconfiguration and the boot order value on the nextreload from the startup configuration.
show boot order
Cisco Nexus 9000 Series NX-OS Programmability Guide, Release 7.x88
Shells and ScriptingVerifying the Boot Order Configuration

C H A P T E R 9Kernel Stack
This chapter contains the following sections:
• About Kernel Stack, on page 89• Guidelines and Limitations, on page 89• Changing the Port Range, on page 90
About Kernel StackKernel Stack (kstack) uses well known Linux APIs to manage the routes and front panel ports.
Open Containers, like the Guest Shell, are Linux environments that are decoupled from the host software.You can install or modify software within that environment without impacting the host software packages.
Guidelines and LimitationsUsing the Kernel Stack has the following guidelines and limitations:
• Starting with NX-OS 7.0(3)F3(1), the Kernel Stack is supported on the Cisco Nexus 9508 switch.
• Guest Shell, other open containers, and the host Bash Shell use Kernel Stack (kstack).
• Open containers start in the host default namespace
• Other network namespaces might be accessed by using the setns system call
• The nsenter and ip netns exec utilities can be used to execute within the context of a differentnetwork namespace.
• The PIDs and identify options for the ip netns command do not work without modification becauseof the file system device check. A vrfinfo utility is provided to give the network administrator thesame information.
• Open containers may read the interface state from /proc/net/dev or use other normal Linux utilitiessuch as netstat or ifconfig without modification. This provides counters for packets that have initiated/ terminated on the switch.
• Open containers may use ethtool –S to get extended statistics from the net devices. This includes packetsswitched through the interface.
Cisco Nexus 9000 Series NX-OS Programmability Guide, Release 7.x89

• Open containers may run packet capture applications like tcpdump to capture packets initiated from orterminated on the switch.
• There is no support for networking state changes (interface creation/deletion, IP address configuration,MTU change, etc.) from the Open containers
• IPv4 and IPv6 are supported
• Raw PF_PACKET is supported
• Well-known ports (0-15000) may only be used by one stack (Netstack or kstack) at a time, regardless ofthe network namespace.
• There is no IP connectivity between Netstack and kstack applications. This is a host limitation whichalso applies to open containers.
• Open containers are not allowed to send packets directly over an Ethernet out-of-band channel (EOBC)interface to communicate with the linecards or standby Sup.
• From within an open container, direct access to the EOBC interface used for internal communicationwith linecards or the standby supervisor. The host bash shell should be used if this access is needed.
• The management interface (mgmt0) is represented as eth1 in the kernel netdevices.
• Use of the VXLAN overlay interface (NVE x) is not supported for applications utilizing the kernel stack.NX-OS features, including CLI commands, are able to use this interface via netstack.
For more information about the NVE interface, see the Cisco Nexus 9000 Series NX-OS VXLANConfiguration Guide.
Changing the Port RangeNetstack and kstack divide the port range between them. The default port ranges are as follows:
• Kstack—15001 to 58000
• Netstack—58001 to 65535
Within this range 63536 to 65535 are reserved for NAT.Note
Procedure
PurposeCommand or Action
This command modifies the port range forkstack. This command does not modify theNetstack range.
[no] sockets local-port-range start-portend-port
Step 1
Cisco Nexus 9000 Series NX-OS Programmability Guide, Release 7.x90
Shells and ScriptingChanging the Port Range

Example
The following example sets the kstack port range:switch# sockets local-port-range 15001 25000
What to do next
After you have entered the command, be aware of the following issues:
• Reload the switch after entering the command.
• Leave a minimum of 7000 ports unallocated which are used by Netstack.
• Specify the start-port as 15001 or the end-port as 65535 to avoid holes in the port range.
Cisco Nexus 9000 Series NX-OS Programmability Guide, Release 7.x91
Shells and ScriptingChanging the Port Range

Cisco Nexus 9000 Series NX-OS Programmability Guide, Release 7.x92
Shells and ScriptingChanging the Port Range

P A R T IIApplications
• Third-Party Applications, on page 95• Ansible, on page 107• Puppet Agent, on page 109• Using Chef Client with Cisco NX-OS , on page 113• Nexus Application Development - ISO, on page 117• Nexus Application Development - SDK, on page 121• NX-SDK, on page 129


C H A P T E R 10Third-Party Applications
This chapter contains the following sections:
• About Third-Party Applications, on page 95• Guidelines and Limitations, on page 95• Installing Third-Party Native RPMs/Packages, on page 95• Persistent Third-Party RPMs, on page 97• Installing RPM from VSH, on page 98• Third-Party Applications, on page 101
About Third-Party ApplicationsThe RPMs for the Third-Party Applications are available in the repository at https://devhub.cisco.com/artifactory/open-nxos/7.0-3-I2-1/x86_64/. These applications are installed in the native host by using the yumcommand in the Bash shell or through the NX-OS CLI.
When you enter the yum install rpm command, a Cisco YUM plug-in gets executed. This plug-in copies theRPM to a hidden location. On switch reload, the system reinstalls the RPM.
For configurations in /etc, a Linux process, incrond, monitors artifacts that are created in the directory andcopies them to a hidden location, which gets copied back to /etc.
Guidelines and LimitationsRPMs for the Third-Party Applications have the following guidelines and limitations:
• Starting with NX-OS 7.0(3)F3(1), the RPMs for the Third-Party Applications are supported on the CiscoNexus 9508 switch.
Installing Third-Party Native RPMs/PackagesThe complete workflow of package installation is as follows:
Cisco Nexus 9000 Series NX-OS Programmability Guide, Release 7.x95

Procedure
Configure the repository on the switch to point to the Cisco repository where agents are stored.bash-4.2# cat /etc/yum/repos.d/open-nxos.repo[open-nxos]name=open-nxosbaseurl=https://devhub.cisco.com/artifactory/open-nxos/7.0-3-I2-1/x86_64/
enabled=1gpgcheck=0sslverify=0
An example of installation of an RPM using yum, with full install log.
Example:bash-4.2# yum install splunkforwarderLoaded plugins: downloadonly, importpubkey, localrpmDB, patchaction, patching,protect-packagesSetting up Install ProcessResolving Dependencies--> Running transaction check---> Package splunkforwarder.x86_64 0:6.2.3-264376 will be installed--> Finished Dependency Resolution
Dependencies Resolved
=============================================================================================
Package Arch Version Repository Size=============================================================================================Installing:splunkforwarder x86_64 6.2.3-264376 open-nxos 13 M
Transaction Summary=============================================================================================Install 1 Package
Total size: 13 MInstalled size: 34 MIs this ok [y/N]: yDownloading Packages:Running Transaction CheckRunning Transaction TestTransaction Test SucceededRunning TransactionInstalling : splunkforwarder-6.2.3-264376.x86_64
1/1complete
Installed:splunkforwarder.x86_64 0:6.2.3-264376
Complete!bash-4.2#
An example of querying the switch for successful installation of the package, and verifying that its processesor services are up and running.
Cisco Nexus 9000 Series NX-OS Programmability Guide, Release 7.x96
ApplicationsInstalling Third-Party Native RPMs/Packages

Example:bash-4.2# yum info splunkforwarderLoaded plugins: downloadonly, importpubkey, localrpmDB, patchaction, patching,protect-packagesFretta | 951 B 00:00 ...groups-repo | 1.1 kB 00:00 ...localdb | 951 B 00:00 ...patching | 951 B 00:00 ...thirdparty | 951 B 00:00 ...Installed PackagesName : splunkforwarderArch : x86_64Version : 6.2.3Release : 264376Size : 34 MRepo : installedFrom repo : open-nxosSummary : SplunkForwarderLicense : CommercialDescription : The platform for machine data.
Persistent Third-Party RPMsThe following is the logic behind persistent third-party RPMs:
• A local yum repository is dedicated to persistent third-party RPMs. The/etc/yum/repos.d/thirdparty.repo points to/bootflash/.rpmstore/thirdparty.
• Whenever you enter the yum install third-party.rpm command, a copy of the RPM is saved in//bootflash/.rpmstore/thirdparty.
• During a reboot, all the RPMs in the third-party repository are reinstalled on the switch.
• Any change in the /etc configuration files persists under /bootflash/.rpmstore/config/etcand they are replayed during boot on /etc.
• Any script that is created in the /etc directory persists across reloads. For example, a third-party servicescript that is created under /etc/init.d/ brings up the apps during a reload.
The rules in iptables are not persistent across reboots when they are modified ina bash-shell.
To make the modified iptables persistent, seeMaking an Iptable Persistent AcrossReloads, on page 152.
Note
Cisco Nexus 9000 Series NX-OS Programmability Guide, Release 7.x97
ApplicationsPersistent Third-Party RPMs

Installing RPM from VSH
Package AdditionNX-OS feature RPMs can also be installed by using the VSH CLIs.
Procedure
PurposeCommand or Action
Displays the packages and versions that alreadyexist.
show install packageStep 1
Determine supported URIs.install add ?Step 2
The install add command copies the packagefile to a local storage device or network server.
install add rpm-packagenameStep 3
Example
The following example shows how to activate the Chef RPM:switch# show install packageswitch# install add ?WORD Package namebootflash: Enter package uriftp: Enter package urihttp: Enter package urimodflash: Enter package uriscp: Enter package urisftp: Enter package uritftp: Enter package uriusb1: Enter package uriusb2: Enter package urivolatile: Enter package uriswitch# install addbootflash:chef-12.0.0alpha.2+20150319234423.git.1608.b6eb10f-1.el5.x86_64.rpm[####################] 100%Install operation 314 completed successfully at Thu Aug 6 12:58:22 2015
What to do next
When you are ready to activate the package, go to Package Activation, on page 99.
Adding and activating an RPM package can be accomplished in a single command:switch#install add bootflash:chef-12.0.0alpha.2+20150319234423.git.1608.b6eb10f-1.el5.x86_64.rpmactivate
Note
Cisco Nexus 9000 Series NX-OS Programmability Guide, Release 7.x98
ApplicationsInstalling RPM from VSH

Package Activation
Before you begin
The RPM has to have been previously added.
Procedure
PurposeCommand or Action
Displays the list of packages that were addedand not activated.
show install inactiveStep 1
Activates the package.install activate rpm-packagenameStep 2
Example
The following example shows how to activate a package:switch# show install inactiveBoot image:
NXOS Image: bootflash:///yumcli6.bin
Inactive Packages:sysinfo-1.0.0-7.0.3.x86_64
Loaded plugins: downloadonly, importpubkey, localrpmDB, patchaction, patching,: protect-packages
Available Packageschef.x86_64 12.0.0alpha.2+20150319234423.git.1608.b6eb10f-1.el5 thirdpartyeigrp.lib32_n9000 1.0.0-r0 groups-reposysinfo.x86_64 1.0.0-7.0.3 patchingswitch# install activate chef-12.0-1.el5.x86_64.rpm[####################] 100%Install operation completed successfully at Thu Aug 6 12:46:53 2015
Deactivating Packages
Procedure
PurposeCommand or Action
Deactivates the RPM package.install deactivate package-nameStep 1
Example
The following example shows how to deactivate the Chef RPM package:switch# install deactivate chef
Cisco Nexus 9000 Series NX-OS Programmability Guide, Release 7.x99
ApplicationsPackage Activation

Removing Packages
Before you begin
Deactivate the package before removing it. Only deactivated RPM packages can be removed.
Procedure
PurposeCommand or Action
Removes the RPM package.install remove package-nameStep 1
Example
The following example shows how to remove the Chef RPM package:switch# install remove chef-12.0-1.el5.x86_64.rpm
Displaying Installed Packages
Procedure
PurposeCommand or Action
Displays a list of the installed packages.show install packagesStep 1
Example
The following example shows how to display a list of the installed packages:switch# show install packages
Displaying Detail Logs
Procedure
PurposeCommand or Action
Displays the detail logs.show tech-support installStep 1
Example
The following example shows how to display the detail logs:switch# show tech-support install
Cisco Nexus 9000 Series NX-OS Programmability Guide, Release 7.x100
ApplicationsRemoving Packages

Upgrading a Package
Procedure
PurposeCommand or Action
Upgrade a package.install add package-name activate upgradeStep 1
Example
The following example shows how to upgrade a package:switch# install add bootflash:bgp-1.0.1-r0.lib32_n9000.rpm activate ?downgrade Downgrade packageforced Non-interactiveupgrade Upgrade packageswitch# install add bootflash:bgp-1.0.1-r0.lib32_n9000.rpm activate upgrade[####################] 100%Install operation completed successfully at Thu Aug 6 12:46:53 2015
Downgrading a Package
Procedure
PurposeCommand or Action
Downgrade a package.install add package-name activate downgradeStep 1
Example
The following example shows how to downgrade a package:switch# install add bootflash:bgp-1.0.1-r0.lib32_n9000.rpm activate ?downgrade Downgrade packageforced Non-interactiveupgrade Upgrade packageswitch# install add bootflash:bgp-1.0.1-r0.lib32_n9000.rpm activate downgrade[####################] 100%Install operation completed successfully at Thu Aug 6 12:46:53 2015
Third-Party Applications
NX-OSFor more information about NX-API REST API object model specifications, see https://developer.cisco.com/media/dme/index.html
Cisco Nexus 9000 Series NX-OS Programmability Guide, Release 7.x101
ApplicationsUpgrading a Package

DevOps Configuration Management ToolsFor DevOps configuration management tools, refer to the following links:
• Ansible 2.0 Release(Nexus Support), http://releases.ansible.com/ansible/
• Ansible NX-OS Sample Modules, https://github.com/jedelman8/nxos-ansible
• Puppet, https://forge.puppetlabs.com/puppetlabs/ciscopuppet
• Cisco Puppet Module(Git), https://github.com/cisco/cisco-network-puppet-module/tree/master
• Chef, https://supermarket.chef.io/cookbooks/cisco-cookbook
• Cisco Chef Cookbook(Git), https://github.com/cisco/cisco-network-chef-cookbook/tree/master
V9KTo download a virtual Nexus 9000 switch, for an ESX5.1/5.5, VirtualBox, Fusion, and KVM, go tohttps://software.cisco.com/portal/pub/download/portal/select.html?&mdfid=286312239&flowid=81422&softwareid=282088129.
Automation Tool Educational ContentFor a free book on Open NX-OS architecture and automation, see http://www.cisco.com/c/dam/en/us/td/docs/switches/datacenter/nexus9000/sw/open_nxos/programmability/guide/Programmability_Open_NX-OS.pdf
collectdcollectd is a daemon that periodically collects system performance statistics and provides multiple means tostore the values, such as RRD files. Those statistics can then be used to find current performance bottlenecks(for example, performance analysis) and predict future system load (that is, capacity planning).
For additional information, see https://collectd.org.
GangliaGanglia is a scalable distributed monitoring system for high-performance computing systems such as clustersand grids. It is based on a hierarchical design that is targeted at federations of clusters. It leverages widelyused technologies such as XML for data representation, XDR for compact, portable data transport, and RRDtoolfor data storage and visualization. It uses engineered data structures and algorithms to achieve low per-nodeoverheads and high concurrency. The implementation is robust, has been ported to an extensive set of operatingsystems and processor architectures, and is currently in use on thousands of clusters around the world. It hasbeen used to link clusters across university campuses and around the world and can scale to handle clusterswith 2000 nodes.
For additional information, see http://ganglia.info.
Cisco Nexus 9000 Series NX-OS Programmability Guide, Release 7.x102
ApplicationsDevOps Configuration Management Tools

IperfIperf was developed by NLANR/DAST to measure maximum TCP and UDP bandwidth performance. Iperfallows the tuning of various parameters and UDP characteristics. Iperf reports bandwidth, delay jitter, datagramloss.
For additional information, see http://sourceforge.net/projects/iperf/ or http://iperf.sourceforge.net.
LLDPThe link layer discover protocol (LLDP) is an industry standard protocol that is designed to supplant proprietarylink layer protocols such as EDP or CDP. The goal of LLDP is to provide an intervendor compatible mechanismto deliver link layer notifications to adjacent network devices.
For more information, see https://vincentbernat.github.io/lldpd/index.html.
NagiosNagios is open source software that monitors the following through the Nagios remote plug-in executor(NRPE) and through SSH or SSL tunnels:
• Network services through ICMP, SNMP, SSH, FTP, HTTP, and so on
• Host resources, such as CPU load, disk usage, system logs, and so on
• Alert services for servers, switches, applications
• Services
For more information, see https://www.nagios.org/.
OpenSSHOpenSSH is an open-source version of the SSH connectivity tools that encrypts all traffic (including passwords)to eliminate eavesdropping, connection hijacking, and other attacks. OpenSSH provides secure tunnelingcapabilities and several authentication methods, and supports all SSH protocol versions.
For more information, see http://www.openssh.com.
QuaggaQuagga is a network routing software suite that implements various routing protocols. Quagga daemons areconfigured through a network accessible CLI called a "vty."
Only Quagga BGP has been validated.Note
For more information, see http://www.nongnu.org/quagga/.
Cisco Nexus 9000 Series NX-OS Programmability Guide, Release 7.x103
ApplicationsIperf

SplunkSplunk is a web-based data collection, analysis, and monitoring tool that has search, visualization, andprepackaged content for use-cases. The raw data is sent to the Splunk server using the Splunk UniversalForwarder. Universal Forwarders provide reliable, secure data collection from remote sources and forwardthat data into the Splunk Enterprise for indexing and consolidation. They can scale to tens of thousands ofremote systems, collecting terabytes of data with a minimal impact on performance.
For additional information, see http://www.splunk.com/en_us/download/universal-forwarder.html.
tcollectortcollector is a client-side process that gathers data from local collectors and pushes the data to Open TimeSeries Database (OpenTSDB).
tcollector has the following features:
• Runs data collectors and collates the data.
• Manages connections to the time series database (TSD).
• Eliminates the need to embed TSD code in collectors.
• Deduplicates repeated values.
• Handles wire protocol work.
For additional information, see http://opentsdb.net/docs/build/html/user_guide/utilities/tcollector.html.
tcpdumptcpdump is a CLI application that prints a description of the contents of packets on a network interface thatmatch a Boolean expression. The description is preceded by a timestamp, printed, by default, as hours, minutes,seconds, and fractions of a second since midnight.
tcpdump can be run with the following flags:
• -w, which causes it to save the packet data to a file for later analysis.
• -r, which causes it to read from a saved packet file rather than to read packets from a network interface.
• -V, which causes it to read a list of saved packet files.
In all cases, tcpdump processes only the packets that match the expression.
For more information, see http://www.tcpdump.org/manpages/tcpdump.1.html.
TSharkTShark is a network protocol analyzer on the CLI. Tshar lets you capture packet data from a live network, orread packets from a previously saved capture file. You can print either a decoded form of those packets to thestandard output or write the packets to a file. TShark's native capture file format is pcap, the format that isused by tcpdump and various other tools also. TShark can be used within the Guest Shell after removing thecap_net_admin file capability.
Cisco Nexus 9000 Series NX-OS Programmability Guide, Release 7.x104
ApplicationsSplunk

setcapcap_net_raw=ep /sbin/dumpcap
This command must be run within the Guest Shell.Note
For more information, see https://www.wireshark.org/docs/man-pages/tshark.html.
Cisco Nexus 9000 Series NX-OS Programmability Guide, Release 7.x105
ApplicationsTShark

Cisco Nexus 9000 Series NX-OS Programmability Guide, Release 7.x106
ApplicationsTShark

C H A P T E R 11Ansible
• Prerequisites, on page 107• About Ansible, on page 107• Cisco Ansible Module, on page 107
PrerequisitesGo to https://docs.ansible.com/ansible/intro_installation.html for installation requirements for supportedcontrol environments.
About AnsibleAnsible is an open-source IT automation engine that automates cloud provisioning, configurationmanagement,application deployment, intraservice orchestration, and other IT needs.
Ansible uses small programs that are called Ansible modules to make API calls to your nodes, and applyconfigurations that are defined in playbooks.
By default, Ansible represents what machines it manages using a simple INI file that puts all your managedmachines in groups of your own choosing.
More information can be found from Ansible:
https://www.ansible.com/Ansible
https://docs.ansible.com/Ansible Automation Solutions. Includes installationinstructions, playbook instructions and examples,module lists, and so on.
Cisco Ansible ModuleThere are multiple Cisco NX-OS-supported modules and playbooks for Ansible, as per the following tableof links:
Configuration Management ToolsNX-OS developer landing page.
Cisco Nexus 9000 Series NX-OS Programmability Guide, Release 7.x107

Repo for ansible nxos playbooksAnsible NX-OS playbook examples
nxos network modulesAnsible NX-OS network modules
Cisco Nexus 9000 Series NX-OS Programmability Guide, Release 7.x108
ApplicationsCisco Ansible Module

C H A P T E R 12Puppet Agent
This chapter includes the following sections:
• About Puppet, on page 109• Prerequisites, on page 109• Puppet Agent NX-OS Environment, on page 110• ciscopuppet Module, on page 110
About PuppetThe Puppet software package, developed by Puppet Labs, is an open source automation toolset for managingservers and other resources. The Puppet software accomplishes server and resource management by enforcingdevice states, such as configuration settings.
Puppet components include a puppet agent which runs on the managed device (node) and a Puppet Master(server). The Puppet Master typically runs on a separate dedicated server and serves multiple devices. Theoperation of the puppet agent involves periodically connecting to the Puppet Master, which in turn compilesand sends a configuration manifest to the agent. The agent reconciles this manifest with the current state ofthe node and updates state that is based on differences.
A puppet manifest is a collection of property definitions for setting the state on the device. The details forchecking and setting these property states are abstracted so that a manifest can be used for more than oneoperating system or platform. Manifests are commonly used for defining configuration settings, but they alsocan be used to install software packages, copy files, and start services.
More information can be found from Puppet Labs:
https://puppetlabs.comPuppet Labs
https://puppet.com/products/faqPuppet Labs FAQ
https://puppet.com/docsPuppet Labs Documentation
PrerequisitesThe following are prerequisites for the Puppet Agent:
• You must have a Cisco device and operating system software release that supports the installation.
Cisco Nexus 9000 Series NX-OS Programmability Guide, Release 7.x109

• Cisco Nexus 9300 Series switch.
• Cisco Nexus 9500 Series switch.
• Cisco NX-OS release 7.0(3)I2(5) or later.
• You must have the required disk storage available on the device for virtual services installation anddeployment of Puppet Agent.
• A minimum of 450MB free disk space on bootflash.
• You must have Puppet Master server with Puppet 4.0 or later.
• You must have Puppet Agent 4.0 or later.
Puppet Agent NX-OS EnvironmentThe Puppet Agent software must be installed on a Cisco Nexus platform in the Guest Shell (the Linux containerenvironment running CentOS). TheGuest Shell provides a secure, open execution environment that is decoupledfrom the host.
Starting with the CiscoNX-OSRelease 9.2(1), the Bash-shell (nativeWindRiver Linux environment underlyingNX-OS) install of Puppet Agent is no longer supported.
The following provides information about agent-software download, installation, and setup:
https://github.com/cisco/cisco-network-puppet-module/blob/develop/docs/README-agent-install.md
Puppet Agent: Installation & Setup on Cisco Nexusswitches (Manual Setup)
ciscopuppet ModuleThe ciscopuppet module is a Cisco developed open-source software module. It interfaces between the abstractresources configuration in a puppet manifest and the specific implementation details of the Cisco NexusNX-OS operating system and platform. This module is installed on the Puppet Master and is required forpuppet agent operation on Cisco Nexus switches.
The ciscopuppet module is available on Puppet Forge.
The following provide additional information about the ciscopuppet module installation procedures:
https://forge.puppetlabs.com/puppetlabs/ciscopuppetciscopuppet Module location
(Puppet Forge)
https://github.com/cisco/cisco-network-puppet-module/tree/master#resource-by-tech
Resource Type Catalog
https://github.com/cisco/cisco-network-puppet-module/tree/masterciscopuppet Module: Source CodeRepository
Cisco Puppet Module::README.mdciscopuppetModule: Setup&Usage
Cisco Nexus 9000 Series NX-OS Programmability Guide, Release 7.x110
ApplicationsPuppet Agent NX-OS Environment

https://docs.puppetlabs.com/puppet/latest/reference/modules_installing.htmlPuppet Labs: Installing Modules
https://github.com/cisco/cisco-network-puppet-module/tree/master/examples
Puppet NX-OS Manifest Examples
Configuration Management ToolsNX-OS developer landing page.
Cisco Nexus 9000 Series NX-OS Programmability Guide, Release 7.x111
Applicationsciscopuppet Module

Cisco Nexus 9000 Series NX-OS Programmability Guide, Release 7.x112
Applicationsciscopuppet Module

C H A P T E R 13Using Chef Client with Cisco NX-OS
This chapter includes the following sections:
• About Chef, on page 113• Prerequisites, on page 113• Chef Client NX-OS Environment, on page 114• cisco-cookbook, on page 114
About ChefChef is an open-source software package that is developed by Chef Software, Inc. The software package is asystems and cloud infrastructure automation framework that deploys servers and applications to any physical,virtual, or cloud location, no matter the size of the infrastructure. Each organization consists of one or moreworkstations, a single server, and every node that the chef-client has configured and is maintaining. Cookbooksand recipes are used to tell the chef-client how each node should be configured. The chef-client, which isinstalled on every node, does the actual configuration.
A Chef cookbook is the fundamental unit of configuration and policy distribution. A cookbook defines ascenario and contains everything that is required to support that scenario, including libraries, recipes, files,and more. A Chef recipe is a collection of property definitions for setting state on the device. The details forchecking and setting these property states are abstracted away so that a recipe may be used for more than oneoperating system or platform. While recipes are commonly used for defining configuration settings, they alsocan be used to install software packages, copy files, start services, and more.
The following references provide more information from Chef:
LinkTopic
https://www.chef.ioChef home
https://docs.chef.io/chef_overview.htmlChef overview
https://docs.chef.io/Chef documentation (all)
PrerequisitesThe following are prerequisites for Chef:
Cisco Nexus 9000 Series NX-OS Programmability Guide, Release 7.x113

• You must have a Cisco device and operating system software release that supports the installation:
• Cisco Nexus 9500 Series switch
• Cisco Nexus 9300 Series switch
• Cisco NX-OS Release 7.0(3)I2(5) or later
• You must have the required disk storage available on the device for Chef deployment:
• A minimum of 500 MB of free disk space on bootflash
• You need a Chef server with Chef 12.4.1 or higher.
• You need Chef Client 12.4.1 or higher.
Chef Client NX-OS EnvironmentThe chef-client software must be installed on a Cisco Nexus platform in the Guest Shell (the Linux containerenvironment running CentOS). This software provides a secure, open execution environment that is decoupledfrom the host.
Starting with the CiscoNX-OSRelease 9.2(1), the Bash-shell (nativeWindRiver Linux environment underlyingNX-OS) install of chef-client is no longer supported.
The following documents provide step-by-step guidance about agent-software download, installation, andsetup:
LinkTopic
cisco-cookbook::README-install-agent.mdChef Client: Installation and setup on Cisco Nexusplatform (manual setup)
cisco-cookbook::README-chef-provisioning.mdChef Client: Installation and setup on Cisco Nexusplatform (automated installation using the Chefprovisioner)
cisco-cookbookcisco-cookbook is a Cisco-developed open-source interface between the abstract resources configuration ina Chef recipe and the specific implementation details of the Cisco NX-OS and platforms. This cookbook isinstalled on the Chef Server and is required for proper Chef Client operation on Cisco Nexus devices.
The cisco-cookbook can be found on Chef Supermarket.
The following documents providemore detail for cisco-cookbook and generic cookbook installation procedures:
LinkTopic
https://supermarket.chef.io/cookbooks/cisco-cookbookcisco-cookbook location
Cisco Nexus 9000 Series NX-OS Programmability Guide, Release 7.x114
ApplicationsChef Client NX-OS Environment

LinkTopic
https://github.com/cisco/cisco-network-chef-cookbook/tree/master#resource-by-tech
Resource Type Catalog
https://github.com/cisco/cisco-network-chef-cookbook/tree/master
cisco-cookbook: Source Code Repository
https://github.com/cisco/cisco-network-chef-cookbook/blob/master/README.md#setup
cisco-cookbook: Setup and usage
https://supermarket.chef.ioChef Supermarket
https://github.com/cisco/cisco-network-chef-cookbook/tree/master/recipes
Chef NX-OS Manifest Examples
Cisco Nexus 9000 Series NX-OS Programmability Guide, Release 7.x115
Applicationscisco-cookbook

Cisco Nexus 9000 Series NX-OS Programmability Guide, Release 7.x116
Applicationscisco-cookbook

C H A P T E R 14Nexus Application Development - ISO
This chapter contains the following sections:
• About ISO, on page 117• Installing the ISO, on page 117• Using the ISO to Build Applications, on page 118• Using RPM to Package an Application, on page 119
About ISOThe ISO image is a bootableWind River 5 environment that includes the necessary tools, libraries, and headersto build and RPM-package third-party applications to run natively on a Cisco Nexus switch.
The content is not exhaustive, and it might be required that the user download and build any dependenciesneeded for any particular application.
Some applications are ready to be downloaded and used from the Cisco devhub website and do not requirebuilding.
Note
Installing the ISOThe ISO image is available for download at: http://devhub.cisco.com/artifactory/simple/open-nxos/7.0-3-I2-1/x86_64/satori-vm-intel-xeon-core.iso.
The ISO is intended to be installed as a virtual machine. Use instructions from your virtualization vendor toinstall the ISO.
Procedure
Step 1 (Optional) VMware-based installation.
The ISO image installation on a VMWare virtual machine requires the virtual disk to be configured as SATAand not SCSI.
Cisco Nexus 9000 Series NX-OS Programmability Guide, Release 7.x117

Step 2 (Optional) QEMU-based installation.
Enter the following commands:bash$ qemu-img create satori.img 10Gbash$ qemu-system-x86_64 -cdrom ./satori-vm-intel-xeon-core.iso -hda ./satori.img -m 8192
Once the ISO starts to boot, a menu is displayed. Choose the Graphics Console Install option. This installsto the virtual HD. Once the install is complete, the virtual machine must be rebooted.
What to do next
To login to the system, enter root as the login and root as the password.
Using the ISO to Build Applications Most of the build procedures that work with the SDK, and Linux ingeneral, also apply to the ISO environment. However, there is no shell environment script to run. The defaultpaths should be fine to use the toolsinstalled. The source code for applications needs to be obtained throughthe usual mechanisms such as a source tar file or git repository.
Build the source code:bash$ tar --xvzf example-lib.tgzbash$ mkdir example-lib-installbash$ cd example-lib/bash$ ./configure --prefix=/path/to/example_lib_installbash$ make
bash$ make install
Using the ISO to Build ApplicationsMost of the build procedures that work with the SDK, and Linux in general, also apply to the ISO environment.However, there is no shell environment script to run. The default paths should be fine to use the tools installed.The source code for applications needs to be obtained through the usual mechanisms such as a source tar fileor git repository.
Procedure
Build the source code.a) tar –xvzf example-lib.tgzb) mkdir example-lib-installc) cd example-lib/d) ./configure –prefix=path_to_example-lib-installe) makef) make install
The steps are normal Linux.
Example:
The following example shows how to build the source code:
Cisco Nexus 9000 Series NX-OS Programmability Guide, Release 7.x118
ApplicationsUsing the ISO to Build Applications

bash$ tar –xvzf example-lib.tgzbash$ mkdir example-lib-installbash$ cd example-lib/bash$ ./configure –prefix=<path_to_example-lib-install>bash$ makebach$ make install
Using RPM to Package an ApplicationIf the application successfully builds using "make", then it can be packaged into an RPM.
RPM and spec files
The RPM package format is designed to package up all files (binaries, libraries, configurations, documents,etc) that are needed for a complete install of the given application. The process of creating an RPM file istherefore somewhat non-trivial. To aid in the RPM build process, a .spec file is used that controls everythingabout the build process.
Note
Many third-party applications are available on the internet in the form of source code packaged into tarballs.In many cases, these tarballs will include a .spec file to help with RPM build process. Unfortunately, manyof these .spec files are not updated as frequently as the source code itself. Even worse, sometimes there is nospec file at all. In these cases the spec file may need editing or even creating from scratch so that RPMs canbe built.
Note
Cisco Nexus 9000 Series NX-OS Programmability Guide, Release 7.x119
ApplicationsUsing RPM to Package an Application

Cisco Nexus 9000 Series NX-OS Programmability Guide, Release 7.x120
ApplicationsUsing RPM to Package an Application

C H A P T E R 15Nexus Application Development - SDK
This chapter contains the following sections:
• About the Cisco SDK, on page 121• Installing the SDK, on page 121• Procedure for Installation and Environment Initialization, on page 122• Using the SDK to Build Applications, on page 123• Using RPM to Package an Application, on page 124• Creating an RPM Build Environment, on page 125• Using General RPM Build Procedure, on page 125• Example to Build RPM for collectd with No Optional Plug-Ins, on page 126• Example to Build RPM for collectd with Optional Curl Plug-In, on page 127
About the Cisco SDKThe Cisco SDK is a development kit based on Yocto 1.2. It contains all of the tools needed to build applicationsfor execution on a Cisco Nexus switch running the NX-OS Release 7.0(3)I2(1). The basic components arethe C cross-compiler, linker, libraries, and header files that are commonly used in many applications. The listis not exhaustive, and it might be required that the you download and build any dependencies needed for anyparticular application. Note that some applications are ready to be downloaded and used from the Cisco devhubwebsite and do not require building. The SDK can be used to build RPM packages which may be directlyinstalled on a switch.
Installing the SDKThe following lists the system requirements:
• The SDK can run on most modern 64-bit x86_64 Linux systems. It has been verified on CentOS 7 andUbuntu 14.04. Install and run the SDK under the Bash shell.
• The SDK includes binaries for both 32-bit and 64-bit architectures, so it must be run on an x86_64 Linuxsystem that also has 32-bit libraries installed.
Cisco Nexus 9000 Series NX-OS Programmability Guide, Release 7.x121

Procedure
Check if the 32-bit libraries are installed:
Example:bash$ ls /lib/ld-linux.so.2
If this file exists, then 32-bit libraries should be installed already. Otherwise, install 32-bit libraries as follows:
• For CentOS 7:bash$ sudo yum install glibc.i686
• For Ubuntu 14.04:bash$ sudo apt-get install gcc-multilib
Procedure for Installation and Environment InitializationThe SDK is available for download at: http://devhub.cisco.com/artifactory/simple/open-nxos/7.0-3-I2-1/x86_64/wrlinux-5.0.1.13-eglibc-x86_64-n9000-nxos-image-rpm-sdk-sdk.sh
This file is a self-extracting archive that installs the SDK into a directory of your choice. You are promptedfor a path to an SDK installation directory.
bash$ ./wrlinux-5.0.1.13-eglibc-x86_64-n9000-nxos-image-rpm-sdk-sdk.shEnter target directory for SDK (default: /opt/windriver/wrlinux/5.0-n9000):/path/to/sdk_install_directoryYou are about to install the SDK to "/path/to/sdk_install_directory". ProceedY/n?YExtracting SDK...doneSetting it up...doneSDK has been successfully set up and is ready to be used.bash$
Use the source environment-setup-x86_64-wrs-linux command to add the SDK-specific paths to your shellenvironment. This must be done for each shell you intend to use with the SDK. This is the key to setting upthe SDK in order to use the correct versions of the build tools and libraries.
Procedure
Step 1 Browse to the installation directory.Step 2 Enter the following command at the Bash prompt:
bash$ source environment-setup-x86_64-wrs-linux
Cisco Nexus 9000 Series NX-OS Programmability Guide, Release 7.x122
ApplicationsProcedure for Installation and Environment Initialization

Using the SDK to Build ApplicationsMany of the common Linux build processes work for this scenario. Use the techniques that are best suitedfor your situation.
The source code for an application package can be retrieved in various ways. For example, you can get thesource code either in tar file form or by downloading from a git repository where the package resides.
The following are examples of some of the most common cases.
(Optional) Verify that the application package builds using standard configure/make/make install.bash$ tar --xvzf example-app.tgzbash$ mkdir example-lib-installbash$ cd example-app/bash$ ./configure --prefix=/path/to/example-app-installbash$ makebash$ make install
Sometimes it is necessary to pass extra options to the ./configure script, for example to specify whichoptional components and dependencies are needed. Passing extra options depends entirely on the applicationbeing built.
Example - Build Ganglia and its dependencies
In this example, we build ganglia, along with the third-party libraries that it requires - libexpat, libapr, andlibconfuse.
libexpatbash$ wget 'http://downloads.sourceforge.net/project/expat/expat/2.1.0/expat-2.1.0.tar.gz'bash$ mkdir expat-installbash$ tar xvzf expat-2.1.0.tar.gzbash$ cd expat-2.1.0bash$ ./configure --prefix=/home/sdk-user/expat-installbash$ makebash$ make installbash$ cd ..
libaprbash$ wget 'http://www.eu.apache.org/dist/apr/apr-1.5.2.tar.gz'bash$ mkdir apr-installbash$ tar xvzf apr-1.5.2.tar.gzbash$ cd apr-1.5.2bash$ ./configure --prefix=/home/sdk-user/apr-installbash$ makebash$ make installbash$ cd ..
libconfuse
confuse requires the extra --enable-shared option to ./configure, otherwise it builds a statically linkedlibrary instead of the required shared library.
Note
Cisco Nexus 9000 Series NX-OS Programmability Guide, Release 7.x123
ApplicationsUsing the SDK to Build Applications

bash$ wget 'http://savannah.nongnu.org/download/confuse/confuse-2.7.tar.gz'bash$ mkdir confuse-installbash$ tar xvzf confuse-2.7.tar.gzbash$ cd confuse-2.7bash$ ./configure --prefix=/home/sdk-user/confuse-install --enable-sharedbash$ makebash$ make installbash$ cd ..
ganglia
The locations to all the required libraries are passed to ./configure.Note
bash$ wget'http://downloads.sourceforge.net/project/ganglia/ganglia%20monitoring%20core/3.7.2/ganglia-3.7.2.tar.gz'bash$ mkdir ganglia-installbash$ tar xvzf ganglia-3.7.2.tar.gzbash$ cd ganglia-3.7.2bash$ ./configure --with-libexpat=/home/sdk-user/expat-install--with-libapr=/home/sdk-user/apr-install/bin/apr-1-config--with-libconfuse=/home/sdk-user/confuse-install --prefix=/home/sdk-user/ganglia-installbash$ makebash$ make installbash$ cd ..
Using RPM to Package an ApplicationIf the application successfully builds using "make", then it can be packaged into an RPM.
RPM and spec files
The RPM package format is designed to package up all files (binaries, libraries, configurations, documents,etc) that are needed for a complete install of the given application. The process of creating an RPM file istherefore somewhat non-trivial. To aid in the RPM build process, a .spec file is used that controls everythingabout the build process.
Note
Many third-party applications are available on the internet in the form of source code packaged into tarballs.In many cases, these tarballs will include a .spec file to help with RPM build process. Unfortunately, manyof these .spec files are not updated as frequently as the source code itself. Even worse, sometimes there is nospec file at all. In these cases the spec file may need editing or even creating from scratch so that RPMs canbe built.
Note
Cisco Nexus 9000 Series NX-OS Programmability Guide, Release 7.x124
ApplicationsUsing RPM to Package an Application

Creating an RPM Build EnvironmentBefore using the SDK to build RPMs, an RPM build directory structure must be created, and some RPMmacros set.
Procedure
Step 1 Create the directory structure:bash$ mkdir rpmbuildbash$ cd rpmbuildbash$ mkdir BUILD RPMS SOURCES SPECS SRPMS
Step 2 Set the topdir macro to point to the directory structure created above:bash$ echo "_topdir ${PWD}" > ~/.rpmmacros
This step assumes that the current user does not already have a .rpmmacros file that is already setup. If it is inconvenient to alter an existing .rpmmacros file, then the following may be added to allrpmbuild command lines:
Note
--define "_topdir ${PWD}"
Step 3 Refresh the RPM DB:bash$ rm /path/to/sdk/sysroots/x86_64-wrlinuxsdk-linux/var/lib/rpm/__db.*bash$ rpm --rebuilddb
The rpm and rpmbuild tools in the SDK have been modified to use/path/to/sdk/sysroots/x86_64-wrlinuxsdk-linux/var/lib/rpm as the RPMdatabase instead of the normal /var/lib/rpm. This modification prevents any conflicts with theRPM database for the host when not using the SDK and removes the need for root access. AfterSDK installation, the SDK RPM database must be rebuilt through this procedure.
Note
Using General RPM Build ProcedureGeneral RPM Build procedure is as follows:bash$ wget --no-check-certificate --directory-prefix=SOURCES http://<URL of example-apptarball>bash$ # determine location of spec file in tarball:bash$ tar tf SOURCES/example-app.tar.bz2 | grep '.spec$'bash$ tar xkvf SOURCES/example-app.tar.bz2 example-app/example-app.specbash$ mv example-app/example-app.spec SPECS/bash$ rm -rf example-appbash$ rpmbuild -v --bb SPECS/example-app.spec
The result is a binary RPM in RPMS/ that can be copied to the switch and installed. Installation andconfiguration of applications can vary. Refer to the application documents for those instructions.
Cisco Nexus 9000 Series NX-OS Programmability Guide, Release 7.x125
ApplicationsCreating an RPM Build Environment

This rpmbuild and installation on the switch is required for every software package that is required to supportthe application. If a software dependency is required that is not already included in the SDK, the source codemust be obtained and the dependencies built. On the build machine, the package can be built manually forverification of dependencies. The following example is the most common procedure:bash$ tar xkzf example-lib.tgzbash$ mkdir example-lib-installbash$ cd example-lib/bash$ ./configure --prefix=/path/to/example-lib-installbash$ makebash$ make install
These commands place the build files (binaries, headers, libraries, and so on) into the installation directory.From here, you can use standard compiler and linker flags to pick up the location to these new dependencies.Any runtime code, such as libraries, are required to be installed on the switch also, so packaging requiredruntime code into an RPM is required.
There are many support libraries already in RPM form on the Cisco devhub website.Note
Example to Build RPM for collectd with No Optional Plug-InsDownload source tarball and extract spec file:bash$ wget --no-check-certificate --directory-prefix=SOURCEShttps://collectd.org/files/collectd-5.5.0.tar.bz2bash$ tar tf SOURCES/collectd-5.5.0.tar.bz2 | grep '.spec$'collectd-5.5.0/contrib/redhat/collectd.speccollectd-5.5.0/contrib/aix/collectd.speccollectd-5.5.0/contrib/sles10.1/collectd.speccollectd-5.5.0/contrib/fedora/collectd.specbash$ tar xkvf SOURCES/collectd-5.5.0.tar.bz2 collectd-5.5.0/contrib/redhat/collectd.specbash$ mv collectd-5.5.0/contrib/redhat/collectd.spec SPECS/bash$ rm -rf collectd-5.5.0
There are four spec files in this tarball. The Red Hat spec file is the most comprehensive and is the only onethat contains the correct collectd version. We will use it as an example.
This spec file sets the RPM up to use /sbin/chkconfig to install collectd. However on a Nexus switch, youwill use the /usr/sbin/chkconfig instead. Edit the following edited in the spec file:bash$ sed -r -i.bak 's%(^|\s)/sbin/chkconfig%\1/usr/sbin/chkconfig%' SPECS/collectd.spec
collectd has numerous optional plug-ins. This spec file enables many plug-ins by default. Many plug-ins haveexternal dependencies, so options to disable these plug-ins must be passed to the rpmbuild command line.Instead of typing out one long command line, we can manage the options in a Bash array as follows:bash$ rpmbuild_opts=()bash$ for rmdep in \> amqp apache ascent bind curl curl_xml dbi ipmi java memcachec mysql nginx \> notify_desktop notify_email nut openldap perl pinba ping postgresql python \> rrdtool sensors snmp varnish virt write_http write_riemann> do> rpmbuild_opts+=("--without")> rpmbuild_opts+=(${rmdep})
Cisco Nexus 9000 Series NX-OS Programmability Guide, Release 7.x126
ApplicationsExample to Build RPM for collectd with No Optional Plug-Ins

> donebash$ rpmbuild_opts+=(--nodeps)bash$ rpmbuild_opts+=(--define)bash$ rpmbuild_opts+=("_unpackaged_files_terminate_build 0")
It is then passed to rpmbuild as follows to start the entire build and RPM package process:bash$ rpmbuild "${rpmbuild_opts[@]}" -bb SPECS/collectd.spec
You can then find the resulting RPMs for collectd in the RPMS directory.
These RPM files can now be copied to the switch and installed from the switch Bash shell:bash$ rpm --noparentdirs -i /bootflash/collectd-5.5.0-1.ia32e.rpm
Example to Build RPM for collectd with Optional Curl Plug-InThe collectd curl plug-in has libcurl as a dependency.
In order to satisfy this link dependency during the RPM build process, it is necessary to download and buildcurl under the SDK:bash$ wget --no-check-certificate http://curl.haxx.se/download/curl-7.24.0.tar.gzbash$ tar xkvf curl-7.24.0.tar.gzbash$ cd curl-7.24.0bash$ ./configure --without-ssl --prefix /path/to/curl-installbash$ makebash$ make installbash$ cd ..
The curl binaries and libraries are installed to /path/to/curl-install. This directory will be createdif it does not already exist, so you must have write permissions for the current user. Next, download the sourcetarball and extract the spec file. This step is exactly the same as in the collectd example for no plugins.
Note
bash$ wget --no-check-certificate --directory-prefix=SOURCEShttps://collectd.org/files/collectd-5.5.0.tar.bz2bash$ tar tf SOURCES/collectd-5.5.0.tar.bz2 | grep '.spec$'collectd-5.5.0/contrib/redhat/collectd.speccollectd-5.5.0/contrib/aix/collectd.speccollectd-5.5.0/contrib/sles10.1/collectd.speccollectd-5.5.0/contrib/fedora/collectd.specbash$ tar xkvf SOURCES/collectd-5.5.0.tar.bz2 collectd-5.5.0/contrib/redhat/collectd.specbash$ mv collectd-5.5.0/contrib/redhat/collectd.spec SPECS/bash$ rm -rf collectd-5.5.0
There are four spec files in this tarball. The Red Hat spec file is the most comprehensive, and it is the onlyone to contain the correct collectd version. We will use that one as an example.
Note
This spec file sets the RPM up to use /sbin/chkconfig to install collectd. However on a Cisco Nexusswitch, you must use/usr/sbin/chkconfig instead, so the following can be edited in the spec file:
Cisco Nexus 9000 Series NX-OS Programmability Guide, Release 7.x127
ApplicationsExample to Build RPM for collectd with Optional Curl Plug-In

bash$ sed -r -i.bak 's%(^|\s)/sbin/chkconfig%\1/usr/sbin/chkconfig%' SPECS/collectd.spec
Here a deviation from the previous example is encountered. The collectd rpmbuild process needs to know thelocation of libcurl. Edit the collectd spec file to add the following.
Find the string%configure in SPECS/collectd.spec. This line and those following it define the optionsthat rpmbuild will pass to the ./configure script.
Add the following option:--with-libcurl=/path/to/curl-install/bin/curl-config \
Next a Bash array is built again to contain the rpmbuild command options. Note the following differences:
• curl is removed from the list of plug-ins not to be built• The addition of --with curl=force
bash$ rpmbuild_opts=()bash$ for rmdep in \> amqp apache ascent bind curl_xml dbi ipmi java memcachec mysql nginx \> notify_desktop notify_email nut openldap perl pinba ping postgresql python \> rrdtool sensors snmp varnish virt write_http write_riemann> do> rpmbuild_opts+=("--without")> rpmbuild_opts+=(${rmdep})> donebash$ rpmbuild_opts+=("--with")bash$ rpmbuild_opts+=("curl=force")bash$ rpmbuild_opts+=(--nodeps)bash$ rpmbuild_opts+=(--define)bash$ rpmbuild_opts+=("_unpackaged_files_terminate_build 0")
It is then passed to rpmbuild as follows to start the entire build and RPM package process:bash$ rpmbuild "${rpmbuild_opts[@]}" -bb SPECS/collectd.spec
The resulting RPMs in the RPMs directory will now also include collectd-curl. These RPM files can now becopied to the switch and installed from the switch Bash shell:bash$ rpm --noparentdirs -i /bootflash/collectd-5.5.0-1.ia32e.rpmbash$ rpm --noparentdirs -i /bootflash/collectd-curl-5.5.0-1.ia32e.rpm
Cisco Nexus 9000 Series NX-OS Programmability Guide, Release 7.x128
ApplicationsExample to Build RPM for collectd with Optional Curl Plug-In

C H A P T E R 16NX-SDK
• About the NX-SDK, on page 129• Install the NX-SDK, on page 130• Building and Packaging C++ Applications, on page 130• Installing and Running Custom Applications, on page 133
About the NX-SDKThe Cisco NX-OS SDK (NX-SDK) is a C++ abstraction and plugin-library layer that streamlines access toinfrastructure for automation and custom application creation, such as generating custom:
• CLIs
• Syslogs
• Event and Error managers
• Inter-application communication
• High availability (HA)
• Route manager
You can use C++, Python, or Go for application development with NX-SDK.
Requirements
The NX-SDK has the following requirements:
• Docker
• A Linux environment (either Ubuntu 14.04, or Centos 6.7). Cisco recommends using the providedNX-SDK Docker containers. For more information, see https://github.com/CiscoDevNet/NX-SDK.
Related Information
For more information about Cisco NX-SDK, go to:
Cisco Nexus 9000 Series NX-OS Programmability Guide, Release 7.x129

• https://github.com/CiscoDevNet/NX-SDK. Click the versions.md link (https://github.com/CiscoDevNet/NX-SDK/blob/master/versions.md) to get information about features and details on eachsupported release.
Install the NX-SDKProcedure
Step 1 Note The Cisco SDK is required for applications started in VSH.
The Cisco SDK is optional for applications started in Bash.
(Optional) Build the Cisco SDK RPM to persist on switch reloads and from standby mode.a) Pull the Docker image for Ubuntu 14.04+ or Centos 6.7+ from https://hub.docker.com/r/dockercisco/
nxsdk.b) Source for a 32-bit environment:
Example:export ENXOS_SDK_ROOT=/enxos-sdkcd $ENXOS_SDK_Rootsource environment-setup-x86-linux
Step 2 Clone the NX-SDK toolkit from https://github.com/CiscoDevNet/NX-SDK.git.
Example:git clone https://github.com/CiscoDevNet/NX-SDK.git
What to do next
The following references to the API can be found in $PWD/nxsdk and includes the following:
• The NX-SDK public C++ classes and APIs,
• Example applications, and
• Example Python applications.
Building and Packaging C++ ApplicationsThe following instructions describes how to build and package your custom C++ NX-OS application.
Procedure
Step 1 Build your application files..a) Building a C++ application requires adding your source files to the Makefile
Cisco Nexus 9000 Series NX-OS Programmability Guide, Release 7.x130
ApplicationsInstall the NX-SDK

Example:
The example below uses the customCliApp.cpp file from /examples
...##Directory Structure...EXNXSDK_BIN:= customCliApp...
b) Build the C++ application using themake command.
Example:$PWD/nxsdk# make clean
$PWD/nxsdk# make all
Step 2 (Optional) Package your application.
Auto-generate RPM package
Custom RPM packages for your applications are required to run on VSH and allow you to specify whether agiven application persists on switch reloads or system switchovers. Use the following to create a customspecification file for your application.
RPM packaging is required to be done within the provided ENXOS Docker image.Note
a) Use the rpm_gen.py script to auto-generate RPM package for a custom application.
Example:
Specify the -h option of the script to display the usages of the script./NX-SDK# python scripts/rpm_gen.py -h
b) By default, NXSDK_ROOT is set to /NX-SDK. If NX-SDK is installed in another location other than thedefault, then you must set NXSDK_ROOT env to the appropriate location for the script to run correctly.
Example:export NXSDK_ROOT=<absolute-path-to-NX-SDK>
Example of Auto-generate RPM package for C++ App examples/customCliApp.cpp
/NX-SDK/scripts# python rpm_gen.py CustomCliApp#########################################################################################################
Generating rpm package...
Executing(%prep): /bin/sh -e /enxos-sdk/sysroots/x86_64-wrlinuxsdk-linux/var/tmp/rpm-tmp.49266+ umask 022+ cd /enxos-sdk/sysroots/x86_64-wrlinuxsdk-linux/usr/lib/rpm/../../src/rpm/BUILD+ exit 0Executing(%build): /bin/sh -e/enxos-sdk/sysroots/x86_64-wrlinuxsdk-linux/var/tmp/rpm-tmp.49266+ umask 022+ cd /enxos-sdk/sysroots/x86_64-wrlinuxsdk-linux/usr/lib/rpm/../../src/rpm/BUILD+ exit 0Executing(%install): /bin/sh -e/enxos-sdk/sysroots/x86_64-wrlinuxsdk-linux/var/tmp/rpm-tmp.49266+ umask 022+ cd /enxos-sdk/sysroots/x86_64-wrlinuxsdk-linux/usr/lib/rpm/../../src/rpm/BUILD+ /bin/rm -rf/enxos-sdk/sysroots/x86_64-wrlinuxsdk-linux/usr/lib/rpm/../../../var/tmp/customCliApp-root
Cisco Nexus 9000 Series NX-OS Programmability Guide, Release 7.x131
ApplicationsBuilding and Packaging C++ Applications

+ /bin/mkdlr -p/enxos-sdk/sysrOOts/x86_64-wrIinuxsdk-linux/usr/lib/rpm/../../../var/tmp/customCliApp-root//isan/bin
+ cp -R /NX-SDK/bin /enxos-sdk/sysroots/x86_64-wrlinuxsdk-linux/usr/lib/rpm/../../../var/tmp/customCliApp-root//isan/bin+ exit 0Processing files: customCliApp-1.0-7.03.I6.1.x86_64Requires: libc.so.6 libc.so.6(GLIBC 2.0) 3.0) Libc.so.6(GLIBC_2.1.3) libdl.so.2 libgcc_s.so.1libgcc_s.so.1(GCC_3.0) libm.so.6 libnxsdk.so libstdc++.so.6 libstdc++.so.6 (CXXAB1 1.3)libstdc++.so.6(GLIBCXX 3.4) libstdc++.so.6(GLIBCXX_3.4.14) rt1d(GNU HASH)Checking for unpackaged file(s):/enxos-sdk/sysroots/x86_64-wrlinuxsdk-linux/usr/lib/rpm/check-files/enos-sdk/sysroots/x86_64-wrlinuxsdk-linux/usr/lib/rpm/../../../var/tmp/customCliApp-rootWrote:/enxos-sdk/sysrootS/X86_64-wrlinuxsdk-linux/usr/src/rpm/SRPMS/customCliApp-1.0-7.0.3.I6.1.src-rpm
Wrote:/enxos-sdk/sysrootS/X86_64-wrlinuxsdk-linux/usr/src/rpm/RPMS/x86_64/customCliApp-1.0-7.0.3.I6.1.x86_64.rpmExecuting($clean): /bin/sh -e/enxos-sdk/sysroots/x86_64-wrlinuxsdk-linux/var/tmp/rpm-tmp.49266+ umask 022+ cd /enxos-sdk/sysroots/x86_64-wrlinuxsdk-linux/usr/lib/rpm/../../src/rpm/BUILD+ / bin/rm -rf/enxos-sdk/sysroots/x86_64-wrlinuxsdk-linux/usr/lib/rpm/../../../var/tmp/customCliApp-root
RPM package has been built#########################################################################################################
SPEC file: /NX-SDK/rpm/SPECS/customCliApp.specRPM file : /NX-SDK/rpm/RPMS/customCliApp-1.0-7.0.3.I6.1.x86_64.rpm
Manually-generate RPM Package
Custom RPM packages for your applications are required to run on VSH and allow you to specify whether agiven application persists on switch reloads or system switchovers. Use the following steps to create a customspecification file (*.spec) for your application.
a) Export the Cisco SDK RPM source to $RPM_ROOT.
Example:
export RPM_ROOT=$ENXOS_SDK_ROOT/sysroots/x86_64-wrlinuxsdk-linux/usr/src/rpm
b) Enter the $RPM_ROOT directory.
Example:
ls $RPM_ROOT (BUILD RPMS SOURCES SPECS SRPMS)
c) Create/edit your application-specific *.spec file.
Refer to the customCliApp.spec file in the /rpm/SPECS directory for an example specificationfile.
We recommend installing application files to /isan/bin/nxsdk on the switch as per theexample customCliApp.spec file.
Note
Example:
vi $RPM_ROOT/SPECS/<application>.spec
d) Build your RPM package.
Cisco Nexus 9000 Series NX-OS Programmability Guide, Release 7.x132
ApplicationsBuilding and Packaging C++ Applications

Example:
rpm -ba $RPM_ROOT/SPECS/<application>.spec
A successful build will generate an RPM file in $RPMS_ROOT/RPMS/x86_64/
Installing and Running Custom ApplicationsYou can install applications by copying binaries to the switch, or installing unpacking the binaries from theRPM package.
Only custom applications that are installed from RPM packages can persist on switch reload or systemswitchovers. We recommend reserving copying binaries to the switch for simple testing purposes.
Note
To run NX-SDK apps inside the swtich (on box), you must have the Cisco SDK build environment that isinstalled.
The Cisco SDK is required to start applications in VSH: VSH requires that all applications be installed throughRPMs, which requires that being built in the Cisco SDK.
The Cisco SDK is not required for Python application.
The Cisco SDK is not required for C++ application, but is still recommended: Using g++ to build applicationsand then copying the built files to the switch may pose stability risks as g++ is not supported.
Note
To install or run custom applications on the switch, use this procedure:
Before you begin
The switch must have the NX-SDK enabled before running any custom application. Run feature nxsdk onthe switch.
Procedure
Step 1 Install your application using either VSH or Bash.
To install your application using VSH, perform the following:
a) Add the RPM package to the installer.
Example:switch(config)# install add bootflash:<app-rpm-package>.rpm
b) After installation, check if the RPM is listed as inactive.
Example:switch(config)# show install inactive
Cisco Nexus 9000 Series NX-OS Programmability Guide, Release 7.x133
ApplicationsInstalling and Running Custom Applications

c) Activate the RPM package.
Example:switch(config)# install activate <app-rpm-package>
d) After activation, check if the RPM is listed as active.
Example:switch(config)# show install active
To install your application using Bash, run the following commands:switch(config)# run bash sudo subash# yum install /bootflash/<app-rpm-package>.rpm
Step 2 Start your application.
C++ applications can run from VSH or Bash.
• To run a C++ application in VSH, run the nxsdk command:switch(config)# nxsdk service-name /<install directory>/<application>
If the application is installed in /isan/bin/nxsdk, the full file path is not required. You can usethe nxsdk service-name app-name form of the command.
Note
• To run a C++ application in Bash, start Bash then start the application.switch(config)# run bash sudo subash# <app-full-path> &
Python applications can run from VSH or Bash.
• To run a Python application from VSH, run the nxsdk command:switch(config)# nxsdk service-name <app-full-path>
The Python application must be made executable to start from VSH:
• Run chmod +x app-full-path
• Add #!/isan/bin/nxpython to the first link of your Python application.
Note
• To run a Python application from Bash,switch(config)# run bash sudo subash# /isan/bin/nxsdk <app-full-path>
By default, NX-SDK uses /isan/bin/nxsdk to run Python applications in Bash, but youcan specify a different install directory if needed.
Note
Step 3 Run show nxsdk internal service to verify that your application is running
Example:switch(config)# show nxsdk internal service
switch(config)# show nxsdk internal service
NXSDK total services (Max Allowed) : 2 (32)NXSDK Default App Path : /isan/bin/nxsdk
Cisco Nexus 9000 Series NX-OS Programmability Guide, Release 7.x134
ApplicationsInstalling and Running Custom Applications

NXSDK Supported Versions : 1.0
Service-name Base App Started(PID) Version RPM Package------------------------- --------------- ------------ ---------- --------------------
/isan/bin/capp1 nxsdk_app2 VSH(25270) 1.0capp1-1.0-7.0.3.I6.1.x86_64/isan/bin/TestApp.py nxsdk_app3 BASH(27823) - -
Step 4 Stop you application.
You can stop your application in the following ways:
• To stop all NX-SDK applications, run no feature nxsdk.
• To stop a specific application in VSH, run no nxsdk service-name /install directory/application
• To stop a specific application in Bash, run application stop-event-loop
Step 5 Uninstall your application.
To uninstall the RPM from the switch using VSH, perform the following:
a) Deactivate the active RPM package.
Example:switch# install deactive <app-rpm-package>
b) Verify that the package is deactivated.
Example:switch# show install inactive
c) Remove the RPM package.
Example:switch# install remove <app-rpm-package>
To uninstall the RPM from the switch using Bash, run yum remove app-full-path
Cisco Nexus 9000 Series NX-OS Programmability Guide, Release 7.x135
ApplicationsInstalling and Running Custom Applications

Cisco Nexus 9000 Series NX-OS Programmability Guide, Release 7.x136
ApplicationsInstalling and Running Custom Applications

P A R T IIINX-API
• NX-API CLI, on page 139• NX-API REST, on page 155• NX-API Developer Sandbox, on page 157

C H A P T E R 17NX-API CLI
• About NX-API CLI, on page 139• Using NX-API CLI, on page 140• Table of NX-API Response Codes, on page 153
About NX-API CLINX-API CLI is an enhancement to the Cisco Nexus 9000 Series CLI system, which supports XML output.NX-API CLI also supports JSON output format for specific commands.
On Cisco Nexus devices, command-line interfaces (CLIs) are run only on the device. NX-API CLI improvesthe accessibility of these CLIs by making them available outside of the switch by using HTTP/HTTPS. Youcan use this extension to the existing Cisco Nexus CLI system on the Cisco Nexus 9000 Series devices.NX-API CLI supports show commands, configurations, and Linux Bash.
NX-API CLI supports JSON-RPC.
TransportNX-API uses HTTP/HTTPS as its transport. CLIs are encoded into the HTTP/HTTPS POST body.
NX-API is also supported through UNIX Domain Sockets for applications running natively on the host orwithin Guest Shell.
The NX-API backend uses the Nginx HTTP server. The Nginx process, and all its children processes, areunder the Linux cgroup protection where the CPU and memory usage is capped. If the Nginx memory usageexceeds the cgroup limitations, the Nginx process is restarted and the NX-API configuration (the VRF, port,and certificate configurations) is restored.
Message FormatNX-API is an enhancement to the Cisco Nexus 9000 Series CLI system, which supports XML output. NX-APIalso supports JSON output format for specific commands.
Cisco Nexus 9000 Series NX-OS Programmability Guide, Release 7.x139

• NX-API XML output presents information in a user-friendly format.
• NX-API XML does not map directly to the Cisco NX-OS NETCONF implementation.
• NX-API XML output can be converted into JSON.
Note
Security• NX-API supports HTTPS. All communication to the device is encrypted when you use HTTPS.
NX-API is integrated into the authentication system on the device. Users must have appropriate accounts toaccess the device through NX-API. NX-API uses HTTP basic authentication. All requests must contain theusername and password in the HTTP header.
You should consider using HTTPS to secure your user's login credentials.Note
You can enable NX-API by using the feature manager CLI command. NX-API is disabled by default.
NX-API provides a session-based cookie, nxapi_auth when users first successfully authenticate. With thesession cookie, the username and password are included in all subsequent NX-API requests that are sent tothe device. The username and password are used with the session cookie to bypass performing the fullauthentication process again. If the session cookie is not included with subsequent requests, another sessioncookie is required and is provided by the authentication process. Avoiding unnecessary use of the authenticationprocess helps to reduce the workload on the device.
A nxapi_auth cookie expires in 600 seconds (10 minutes). This value is a fixed and cannot be adjusted.Note
NX-API performs authentication through a programmable authentication module (PAM) on the switch. Usecookies to reduce the number of PAM authentications, which reduces the load on the PAM.
Note
Using NX-API CLIThe commands, command type, and output type for the Cisco Nexus 9000 Series devices are entered usingNX-API by encoding the CLIs into the body of a HTTP/HTTPS POST. The response to the request is returnedin XML or JSON output format.
For more details about NX-API response codes, see Table of NX-API Response Codes, on page 153.Note
NX-API CLI is enabled by default for local access. The remote HTTP access is disabled by default.
Cisco Nexus 9000 Series NX-OS Programmability Guide, Release 7.x140
NX-APISecurity

The following example shows how to configure and launch the NX-API CLI:
• Enable the management interface.switch# conf tswitch(config)# interface mgmt 0switch(config)# ip address 192.0.20.123/24switch(config)# vrf context managmentswitch(config)# ip route 10.0.113.1/0 1.2.3.1
• Enable the NX-API nxapi feature.switch# conf tswitch(config)# feature nxapi
The following example shows a request and its response in XML format:
Request:<?xml version="1.0" encoding="ISO-8859-1"?><ins_api><version>0.1</version><type>cli_show</type><chunk>0</chunk><sid>session1</sid><input>show switchname</input><output_format>xml</output_format>
</ins_api>
Response:<?xml version="1.0"?><ins_api><type>cli_show</type><version>0.1</version><sid>eoc</sid><outputs><output><body><hostname>switch</hostname>
</body><input>show switchname</input><msg>Success</msg><code>200</code>
</output></outputs>
</ins_api>
The following example shows a request and its response in JSON format:
Request:{
"ins_api": {"version": "0.1","type": "cli_show","chunk": "0","sid": "session1","input": "show switchname","output_format": "json"
}}
Cisco Nexus 9000 Series NX-OS Programmability Guide, Release 7.x141
NX-APIUsing NX-API CLI

Response:{
"ins_api": {"type": "cli_show","version": "0.1","sid": "eoc","outputs": {
"output": {"body": {
"hostname": "switch"},"input": "show switchname","msg": "Success","code": "200"
}}
}}
There is a known issue where an attempt to delete a user might fail, resulting in an error message similar tothe following appearing every 12 hours or so:user delete failed for username:userdel: user username is currently logged in - securityd
This issue might occur in a scenario where you try to delete a user who is still logged into a switch throughNX-API. Enter the following command in this case to try to log the user out first:switch(config)# clear user username
Then try to delete the user again. If the issue persists after attempting this workaround, contact Cisco TACfor further assistance.
Note
Escalate Privileges to Root on NX-APIFor NX-API, the privileges of an admin user can escalate their privileges for root access.
The following are guidelines for escalating privileges:
• Only an admin user can escalate privileges to root.
• Escalation to root is password protected.
The following examples show how an admin escalates privileges to root and how to verify the escalation.Note that after becoming root, the whoami command shows you as admin; however, the admin account hasall the root privileges.
First example:
<?xml version="1.0"?><ins_api><version>1.0</version><type>bash</type><chunk>0</chunk><sid>sid</sid><input>sudo su root ; whoami</input><output_format>xml</output_format>
Cisco Nexus 9000 Series NX-OS Programmability Guide, Release 7.x142
NX-APIEscalate Privileges to Root on NX-API

</ins_api>
<?xml version="1.0" encoding="UTF-8"?><ins_api><type>bash</type><version>1.0</version><sid>eoc</sid><outputs><output><body>admin </body><code>200</code><msg>Success</msg>
</output></outputs>
</ins_api>
Second example:
<?xml version="1.0"?><ins_api><version>1.0</version><type>bash</type><chunk>0</chunk><sid>sid</sid><input>sudo cat path_to_file </input><output_format>xml</output_format>
</ins_api>
<?xml version="1.0" encoding="UTF-8"?><ins_api><type>bash</type><version>1.0</version><sid>eoc</sid><outputs><output><body>[Contents of file]</body><code>200</code><msg>Success</msg>
</output></outputs>
</ins_api>
Sample NX-API ScriptsYou can access sample scripts that demonstrate how to use a script with NX-API. To access a sample script,click the following link then choose the directory that corresponds to the required software release:https://github.com/datacenter/nexus9000/tree/master/nx-os/nxapi/
NX-API Management CommandsYou can enable and manage NX-API with the CLI commands listed in the following table.
Table 5: NX-API Management Commands
DescriptionNX-API Management Command
Enables NX-API.feature nxapi
Cisco Nexus 9000 Series NX-OS Programmability Guide, Release 7.x143
NX-APISample NX-API Scripts

DescriptionNX-API Management Command
Disables NX-API.no feature nxapi
Specifies a port.nxapi {http | https} port port
Disables HTTP/HTTPS.no nxapi {http | https}
Displays port and certificate information.show nxapi
Specifies the upload of the following:
• HTTPS certificate when httpscrt is specified.
• HTTPS key when httpskey is specified.
Example of HTTPS certificate:nxapi certificate httpscrt certfile bootflash:cert.crt
Example of HTTPS key:nxapi certificate httpskey keyfile bootflash:privkey.key
nxapi certificate {httpscrt certfile |httpskey keyfile} filename
Enables a certificate.nxapi certificate enable
Specifies the default VRF, management VRF, or named VRF.
In Cisco NX-OS Release 7.0(3)I2(1) nginx listens ononly one VRF.
Note
nxapi use-vrf vrf
Implements any access restrictions and can be run in managementVRF.
You must enable feature bash-shell and then run thecommand from Bash Shell. For more information onBash Shell, see the chapter on Bash.
Note
Iptables is a command-line firewall utility that uses policy chainsto allow or block traffic and almost always comes pre-installedon any Linux distribution.
For more information about making iptables persistentacross reloads when they are modified in a bash-shell,see Making an Iptable Persistent Across Reloads, onpage 152.
Note
ip netns exec management iptables
Following is an example of a successful upload of an HTTPS certificate:switch(config)# nxapi certificate httpscrt certfile certificate.crtUpload done. Please enable. Note cert and key must match.switch(config)# nxapi certificate enableswitch(config)#
You must configure the certificate and key before enabling the certificate.Note
Cisco Nexus 9000 Series NX-OS Programmability Guide, Release 7.x144
NX-APINX-API Management Commands

Following is an example of a successful upload of an HTTPS key:switch(config)# nxapi certificate httpskey keyfile bootflash:privkey.keyUpload done. Please enable. Note cert and key must match.switch(config)# nxapi certificate enableswitch(config)#
Working With Interactive Commands Using NX-APITo disable confirmation prompts on interactive commands and avoid timing out with an error code 500,prepend interactive commands with terminal dont-ask. Use ; to separate multiple interactive commands,where each ; is surrounded with single blank characters.
Following are several examples of interactive commands where terminal dont-ask is used to avoid timingout with an error code 500:terminal dont-ask ; reload module 21
terminal dont-ask ; system mode maintenance
NX-API Request ElementsNX-API request elements are sent to the device in XML format or JSON format. The HTTP header of therequest must identify the content type of the request.
You use the NX-API elements that are listed in the following table to specify a CLI command:
Table 6: NX-API Request Elements for XML or JSON Format
DescriptionNX-API Request Element
Specifies the NX-API version.version
Cisco Nexus 9000 Series NX-OS Programmability Guide, Release 7.x145
NX-APIWorking With Interactive Commands Using NX-API

DescriptionNX-API Request Element
Specifies the type of command to be executed.
The following types of commands are supported:
• cli_show
CLI show commands that expect structured output. If thecommand does not support XML output, an error message isreturned.
• cli_show_array
CLI show commands that expect structured output. Only forshow commands. Similar to cli_show, but withcli_show_array, data is returned as a list of one element, oran array, within square brackets [ ].
• cli_show_ascii
CLI show commands that expect ASCII output. This alignswith existing scripts that parse ASCII output. Users are ableto use existing scripts with minimal changes.
• cli_conf
CLI configuration commands.
• bash
Bash commands. Most non-interactive Bash commands aresupported by NX-API.
Note • Each command is only executable with the currentuser's authority.
• The pipe operation is supported in the output whenthe message type is ASCII. If the output is in XMLformat, the pipe operation is not supported.
• A maximum of 10 consecutive show commandsare supported. If the number of show commandsexceeds 10, the 11th and subsequent commandsare ignored.
• No interactive commands are supported.
type
Cisco Nexus 9000 Series NX-OS Programmability Guide, Release 7.x146
NX-APINX-API Request Elements

DescriptionNX-API Request Element
Some show commands can return a large amount of output. Forthe NX-API client to start processing the output before the entirecommand completes, NX-API supports output chunking for showcommands.
Enable or disable chunk with the following settings:
Do not chunk output.0
Chunk output.1
Note • Only show commands support chunking. When aseries of show commands are entered, only the firstcommand is chunked and returned.
• For the XML output message format (XML is thedefault.), special characters, such as < or >, areconverted to form a valid XML message (< isconverted into < > is converted into >).
You can use XML SAX to parse the chunkedoutput.
When chunking is enabled, themessage format is limitedto XML. JSON output format is not supported whenchunking is enabled.
Note
chunk
Valid only for configuration CLIs, not for show commands.Specifies the configuration rollback options. Specify one of thefollowing options.
• Stop-on-error—Stops at the first CLI that fails.
• Continue-on-error—Ignores and continues with other CLIs.
• Rollback-on-error—Performs a rollback to the previous statethe system configuration was in.
The rollback element is available in the cli_conf modewhen the input request format is XML or JSON.
Note
rollback
The session ID element is valid only when the response messageis chunked. To retrieve the next chunk of the message, you mustspecify a sid to match the sid of the previous response message.
sid
Cisco Nexus 9000 Series NX-OS Programmability Guide, Release 7.x147
NX-APINX-API Request Elements

DescriptionNX-API Request Element
Input can be one command or multiple commands. However,commands that belong to different message types should not bemixed. For example, show commands are cli_show message typeand are not supported in cli_conf mode.
Except for bash, multiple commands are separated with" ; ". (The ; must be surrounded with single blankcharacters.)
Prepend commands with terminal dont-ask to avoidtiming out with an error code 500. For example:terminal dont-ask ; cli_conf ; interface Eth4/1; no shut ; switchport
For bash, multiple commands are separated with ";".(The ; is not surrounded with single blank characters.)
Note
The following are examples of multiple commands:
show version ; show interface brief ; showvlan
cli_show
interface Eth4/1 ; no shut ; switchportcli_conf
cd /bootflash;mkdir new_dirbash
input
The available output message formats are the following:
Specifies output in XML format.xml
Specifies output in JSON format.json
The CiscoNexus 9000 Series CLI supports XMLoutput,which means that the JSON output is converted fromXML. The conversion is processed on the switch.
To manage the computational overhead, the JSONoutput is determined by the amount of output. If theoutput exceeds 1 MB, the output is returned in XMLformat. When the output is chunked, only XML outputis supported.
The content-type header in the HTTP/HTTPS headersindicate the type of response format (XML or JSON).
Note
output_format
When JSON-RPC is the input request format, use the NX-API elements that are listed in the following tableto specify a CLI command:
Cisco Nexus 9000 Series NX-OS Programmability Guide, Release 7.x148
NX-APINX-API Request Elements

Table 7: NX-API Request Elements for JSON-RPC Format
DescriptionNX-API Request Element
A string specifying the version of the JSON-RPC protocol.
Version must be 2.0.
jsonrpc
A string containing the name of the method to be invoked.
NX-API supports either:
• cli ̶ show or configuration commands
• cli_ascii ̶ show or configuration commands; output withoutformatting
• cli_array ̶ only for show commands; similar to cli, but withcli_array, data is returned as a list of one element, or an array,within square brackets, [ ].
method
A structured value that holds the parameter values used during theinvocation of a method.
It must contain the following:
• cmd ̶ CLI command
• version ̶ NX-API request version identifier
params
Valid only for configuration CLIs, not for show commands.Configuration rollback options. You can specify one of thefollowing options.
• Stop-on-error—Stops at the first CLI that fails.
• Continue-on-error—Ignores the failed CLI and continues withother CLIs.
• Rollback-on-error—Performs a rollback to the previous statethe system configuration was in.
rollback
An optional identifier established by the client that must contain astring, number, or null value, if it is specified. The value shouldnot be null and numbers contain no fractional parts. If a user doesnot specify the id parameter, the server assumes that the request issimply a notification, resulting in a no response, for example, id :1
id
NX-API Response ElementsThe NX-API elements that respond to a CLI command are listed in the following table:
Cisco Nexus 9000 Series NX-OS Programmability Guide, Release 7.x149
NX-APINX-API Response Elements

Table 8: NX-API Response Elements
DescriptionNX-API Response Element
NX-API version.version
Type of command to be executed.type
Session ID of the response. This element is valid only when the responsemessage is chunked.
sid
Tag that encloses all command outputs.
Whenmultiple commands are in cli_show or cli_show_ascii, each commandoutput is enclosed by a single output tag.
When the message type is cli_conf or bash, there is a single output tag forall the commands because cli_conf and bash commands require context.
outputs
Tag that encloses the output of a single command output.
For cli_conf and bash message types, this element contains the outputs ofall the commands.
output
Tag that encloses a single command that was specified in the request. Thiselement helps associate a request input element with the appropriateresponse output element.
input
Body of the command response.body
Error code returned from the command execution.
NX-API uses standard HTTP error codes as described by the HypertextTransfer Protocol (HTTP) Status Code Registry(http://www.iana.org/assignments/http-status-codes/http-status-codes.xhtml).
code
Error message associated with the returned error code.msg
Restricting Access to NX-APIThere are two methods for restricting HTTP and HTTPS access to a device: ACLs and iptables. The methodthat you use depends on whether you have configured a VRF for NX-API communication using the nxapiuse-vrf <vrf-name> CLI command.
Use ACLs to restrict HTTP or HTTPS access to a device only if you have not configured NXAPI to use aspecific VRF. For information about configuring ACLs, see the Cisco Nexus 9000 Series NX-OS SecurityConfiguration Guide:
https://www.cisco.com/c/en/us/support/switches/nexus-9000-series-switches/products-installation-and-configuration-guides-list.html
If you have configured a VRF for NX-API communication, however, ACLs will not restrict HTTP or HTTPSaccess. Instead, create a rule for an iptable. For more information about creating a rule, see Updating an iptable,on page 151.
Cisco Nexus 9000 Series NX-OS Programmability Guide, Release 7.x150
NX-APIRestricting Access to NX-API

Updating an iptableAn iptable enables you to restrict HTTP or HTTPS access to a device when a VRF has been configured forNX-API communication. This section demonstrates how to add, verify, and remove rules for blocking HTTPand HTTPS access to an existing iptable.
Procedure
Step 1 To create a rule that blocks HTTP access:bash-4.3# ip netns exec management iptables -A INPUT -p tcp --dport 80 -j DROP
Step 2 To create a rule that blocks HTTPS access:bash-4.3# ip netns exec management iptables -A INPUT -p tcp --dport 443 -j DROP
Step 3 To verify the applied rules:bash-4.3# ip netns exec management iptables -L
Chain INPUT (policy ACCEPT)target prot opt source destinationDROP tcp -- anywhere anywhere tcp dpt:httpDROP tcp -- anywhere anywhere tcp dpt:https
Chain FORWARD (policy ACCEPT)target prot opt source destination
Chain OUTPUT (policy ACCEPT)target prot opt source destination
Step 4 To create and verify a rule that blocks all traffic with a 10.155.0.0/24 subnet to port 80:
bash-4.3# ip netns exec management iptables -A INPUT -s 10.155.0.0/24 -p tcp --dport 80 -jDROPbash-4.3# ip netns exec management iptables -L
Chain INPUT (policy ACCEPT)target prot opt source destinationDROP tcp -- 10.155.0.0/24 anywhere tcp dpt:http
Chain FORWARD (policy ACCEPT)target prot opt source destination
Chain OUTPUT (policy ACCEPT)target prot opt source destination
Step 5 To remove and verify previously applied rules:
This example removes the first rule from INPUT.
bash-4.3# ip netns exec management iptables -D INPUT 1bash-4.3# ip netns exec management iptables -L
Chain INPUT (policy ACCEPT)target prot opt source destination
Chain FORWARD (policy ACCEPT)
Cisco Nexus 9000 Series NX-OS Programmability Guide, Release 7.x151
NX-APIUpdating an iptable

target prot opt source destination
Chain OUTPUT (policy ACCEPT)target prot opt source destination
What to do next
The rules in iptables are not persistent across reloads when they are modified in a bash-shell. To make therules persistent, see Making an Iptable Persistent Across Reloads, on page 152.
Making an Iptable Persistent Across ReloadsThe rules in iptables are not persistent across reloads when they are modified in a bash-shell. This sectionexplains how to make a modified iptable persistent across a reload.
Before you begin
You have modified an iptable.
Procedure
Step 1 Create a file called iptables_init.log in the /etc directory with full permissions:bash-4.3# touch /etc/iptables_init.log; chmod 777 /etc/iptables_init.log
Step 2 Create the /etc/sys/iptables file where your iptables changes will be saved:bash-4.3# ip netns exec management iptables-save > /etc/sysconfig/iptables
Step 3 Create a startup script called iptables_init in the /etc/init.d directory with the following set of commands:
#!/bin/sh
### BEGIN INIT INFO
# Provides: iptables_init
# Required-Start:
# Required-Stop:
# Default-Start: 2 3 4 5
# Default-Stop:
# Short-Description: init for iptables
# Description: sets config for iptables
# during boot time
### END INIT INFO
PATH=/usr/local/sbin:/usr/local/bin:/sbin:/bin:/usr/sbin:/usr/bin
Cisco Nexus 9000 Series NX-OS Programmability Guide, Release 7.x152
NX-APIMaking an Iptable Persistent Across Reloads

start_script() {ip netns exec management iptables-restore < /etc/sysconfig/iptablesip netns exec management iptablesecho "iptables init script executed" > /etc/iptables_init.log
}case "$1" instart)start_script;;stop);;
restart)sleep 1$0 start;;
*)echo "Usage: $0 {start|stop|status|restart}"exit 1
esacexit 0
Step 4 Set the appropriate permissions to the startup script:bash-4.3# chmod 777 /etc/init.d/iptables_int
Step 5 Set the iptables_int startup script to on with the chkconfig utility:bash-4.3# chkconfig iptables_init on
The iptables_init startup script will now execute each time that you perform a reload, making the iptable rulespersistent.
Table of NX-API Response CodesThe following are the possible NX-API errors, error codes, and messages of an NX-API response.
The standard HTTP error codes are at the Hypertext Transfer Protocol (HTTP) Status Code Registry(http://www.iana.org/assignments/http-status-codes/http-status-codes.xhtml).
Note
Table 9: NX-API Response Codes
MessageCodeNX-API Response
Success.200SUCCESS
Output is piped elsewhere due to request.204CUST_OUTPUT_PIPED
Bash command error.400BASH_CMD_ERR
Chunking honors only one command.400CHUNK_ALLOW_ONE_CMD_ERR
CLI execution error.400CLI_CLIENT_ERR
Cisco Nexus 9000 Series NX-OS Programmability Guide, Release 7.x153
NX-APITable of NX-API Response Codes

Input CLI command error.400CLI_CMD_ERR
Incoming message is invalid.400IN_MSG_ERR
No input command.400NO_INPUT_CMD_ERR
Permission denied.401PERM_DENY_ERR
Configuration mode does not allow show .405CONF_NOT_ALLOW_SHOW_ERR
Show mode does not allow configuration.405SHOW_NOT_ALLOW_CONF_ERR
Maximum number of consecutive showcommands exceeded. The maximum is 10.
413EXCEED_MAX_SHOW_ERR
Response size too large.413MSG_SIZE_LARGE_ERR
Backend processing error.500BACKEND_ERR
System internal file operation error.500FILE_OPER_ERR
System internal LIBXML NS error. This is arequest format error.
500LIBXML_NS_ERR
System internal LIBXML parse error. This is arequest format error.
500LIBXML_PARSE_ERR
System internal LIBXML path context error. Thisis a request format error.
500LIBXML_PATH_CTX_ERR
System internal memory allocation error.500MEM_ALLOC_ERR
User not found from input or cache.500USER_NOT_FOUND_ERR
XML to JSON conversion error.500XML_TO_JSON_CONVERT_ERR
Bash command not supported.501BASH_CMD_NOT_SUPPORTED_ERR
Chunking allows only XML output.501CHUNK_ALLOW_XML_ONLY_ERR
JSON not supported due to a potential largeamount of output.
501JSON_NOT_SUPPORTED_ERR
Message type not supported.501MSG_TYPE_UNSUPPORTED_ERR
Pipe XML for this command is not allowed ininput.
501PIPE_XML_NOT_ALLOWED_IN_INPUT
Structured output unsupported.501STRUCT_NOT_SUPPORTED_ERR
Unknown error.600ERR_UNDEFINED
Cisco Nexus 9000 Series NX-OS Programmability Guide, Release 7.x154
NX-APITable of NX-API Response Codes

C H A P T E R 18NX-API REST
• About NX-API REST, on page 155• Guidelines and Limitations, on page 155
About NX-API RESTNX-API REST
In Release 7.0(3)I2(1), the NX-API REST SDK has been added.
On Cisco Nexus devices, configuration is performed using command-line interfaces (CLIs) that run only onthe device. NX-API REST improves the accessibility of the Nexus configuration by providing HTTP/HTTPSAPIs that:
• Make specific CLIs available outside of the switch.
• Enable configurations that would require issuing many CLI commands by combining configurationactions in relatively few HTTP/HTTPS operations.
NX-API REST supports show commands, basic and advanced switch configurations, and Linux Bash.
NX-API REST uses HTTP/HTTPS as its transport. CLIs are encoded into the HTTP/HTTPS POST body.The NX-API REST backend uses the Nginx HTTP server. The Nginx process,and all of its children processes,are under Linux cgroup protection where the CPU and memory usage is capped. If the Nginx memory usageexceeds the cgroup limitations, the Nginx process is restarted and the NX-API configuration (the VRF, port,and certificate configurations) is restored.
For more information about the Cisco Nexus 3000 and 9000 Series NX-API REST SDK, seehttps://developer.cisco.com/docs/nx-os-n3k-n9k-api-ref/.
Guidelines and LimitationsNX-API REST has the following guidelines and limitations:
• Starting with NX-OS 7.0(3)F3(1), NX-API REST is supported on the Cisco Nexus 9508 switch.
Cisco Nexus 9000 Series NX-OS Programmability Guide, Release 7.x155

Cisco Nexus 9000 Series NX-OS Programmability Guide, Release 7.x156
NX-APIGuidelines and Limitations

C H A P T E R 19NX-API Developer Sandbox
• About the NX-API Developer Sandbox, on page 157• Guidelines and Restrictions for the Developer Sandbox, on page 158• Configuring the Message Format and Command Type, on page 158• Using the Developer Sandbox, on page 160• Using the Developer Sandbox to Convert CLI Commands to REST Payloads, on page 160• Using the Developer Sandbox to Convert from REST Payloads to CLI Commands, on page 163
About the NX-API Developer SandboxThe NX-API Developer Sandbox is a web form hosted on the switch. It translates NX-OS CLI commandsinto equivalent XML or JSON payloads, and converts NX-API REST payloads into their CLI equivalents.
The web form is a single screen with three panes—Command (top pane), Request, and Response— as shownin the figure.Figure 1: NX-API Developer Sandbox with Example Request and Output Response
Cisco Nexus 9000 Series NX-OS Programmability Guide, Release 7.x157

Controls in the Command pane allow you to choose a message format for a supported API, such as NX-APIREST, and a command type, such as XML or JSON. The available command type options vary dependingon the selected message format.
When you type or paste one or more CLI commands into the Command pane, the web form converts thecommands into an API payload, checking for configuration errors, and displays the resulting payload in theRequest pane. If you then choose to post the payload directly from the Sandbox to the switch, using the POSTbutton in the Command pane, the Response pane displays the API response.
Conversely, when you type an NX-API REST designated name (DN) and payload into the Command paneand select the nx-api restMessage format and the model Command type, Developer Sandbox checksthe payload for configuration errors, then the Response pane displays the equivalent CLIs.
Guidelines and Restrictions for the Developer Sandbox• Clicking POST in the Sandbox commits the command to the switch, which can result in a configurationor state change.
• Some feature configuration commands are not available until their associated feature has been enabled.
Configuring the Message Format and Command TypeTheMessage Format and Command Type are configured in the upper right corner of the Command pane(the top pane). ForMessage Format, choose the format of the API protocol that you want to use. The DeveloperSandbox supports the following API protocols:
Table 10: NX-OS API Protocols
DescriptionProtocol
A standard lightweight remote procedure call (RPC) protocol that can be used to deliverNX-OSCLI commands in a JSONpayload. The JSON-RPC 2.0 specification is outlinedby jsonrpc.org.
json-rpc
Cisco NX-API proprietary protocol for delivering NX-OS CLI or bash commands inan XML payload.
xml
Cisco NX-API proprietary protocol for delivering NX-OS CLI or bash commands ina JSON payload.
json
Cisco NX-API proprietary protocol for manipulating and reading managed objects(MOs) and their properties in the internal NX-OS data management engine (DME)model. For more information about the Cisco Nexus 3000 and 9000 Series NX-APIREST SDK, see https://developer.cisco.com/site/cisco-nexus-nx-api-references/.
nx-api rest
The YANG ("Yet Another Next Generation") data modeling language for configurationand state data.
nx yang
When theMessage Format has been chosen, a set of Command Type options are presented just below theMessage Format control. The Command Type setting can constrain the input CLI and can determine the
Cisco Nexus 9000 Series NX-OS Programmability Guide, Release 7.x158
NX-APIGuidelines and Restrictions for the Developer Sandbox

Request and Response format. The options vary depending on theMessage Format selection. For eachMessage Format, the following table describes the Command Type options:
Table 11: Command Types
Command typeMessage format
• cli — show or configuration commands
• cli-ascii — show or configuration commands, output withoutformatting
json-rpc
• cli_show — show commands. If the command does not supportXML output, an error message will be returned.
• cli_show_ascii — show commands, output without formatting
• cli_conf — configuration commands. Interactive configurationcommands are not supported.
• bash— bash commands.Most non-interactive bash commands aresupported.
The bash shell must be enabled in the switch.Note
xml
• cli_show — show commands. If the command does not supportXML output, an error message will be returned.
• cli_show_ascii — show commands, output without formatting
• cli_conf — configuration commands. Interactive configurationcommands are not supported.
• bash— bash commands.Most non-interactive bash commands aresupported.
The bash shell must be enabled in the switch.Note
json
• cli — configuration commands
• model — DN and corresponding payload.
nx-api rest
• json — JSON structure is used for payload
• xml — XML structure is used for payload
nx yang
Output Chunking
In order to handle large show command output, some NX-API message formats support output chunking forshow commands. In this case, an Enable chunk mode checkbox appears below the Command Type controlalong with a session ID (SID) type-in box.
When chunking is enabled, the response is sent in multiple "chunks," with the first chunk sent in the immediatecommand response. In order to retrieve the next chunk of the response message, you must send an NX-APIrequest with SID set to the session ID of the previous response message.
Cisco Nexus 9000 Series NX-OS Programmability Guide, Release 7.x159
NX-APIConfiguring the Message Format and Command Type

Using the Developer Sandbox
Using the Developer Sandbox to Convert CLI Commands to RESTPayloads
Online help is available by clicking Quick Start in the upper right corner of the Sandbox window.
Additional details, such as response codes and security methods, can be found in the chapter "NX-API CLI".
Only configuration commands are supported.
Tip
Procedure
Step 1 Configure theMessage Format and Command Type for the API protocol you want to use.
For detailed instructions, see Configuring the Message Format and Command Type, on page 158.
Step 2 Type or paste NX-OS CLI configuration commands, one command per line, into the text entry box in the toppane.
You can erase the contents of the text entry box (and the Request and Response panes) by clicking Reset atthe bottom of the top pane.
Cisco Nexus 9000 Series NX-OS Programmability Guide, Release 7.x160
NX-APIUsing the Developer Sandbox
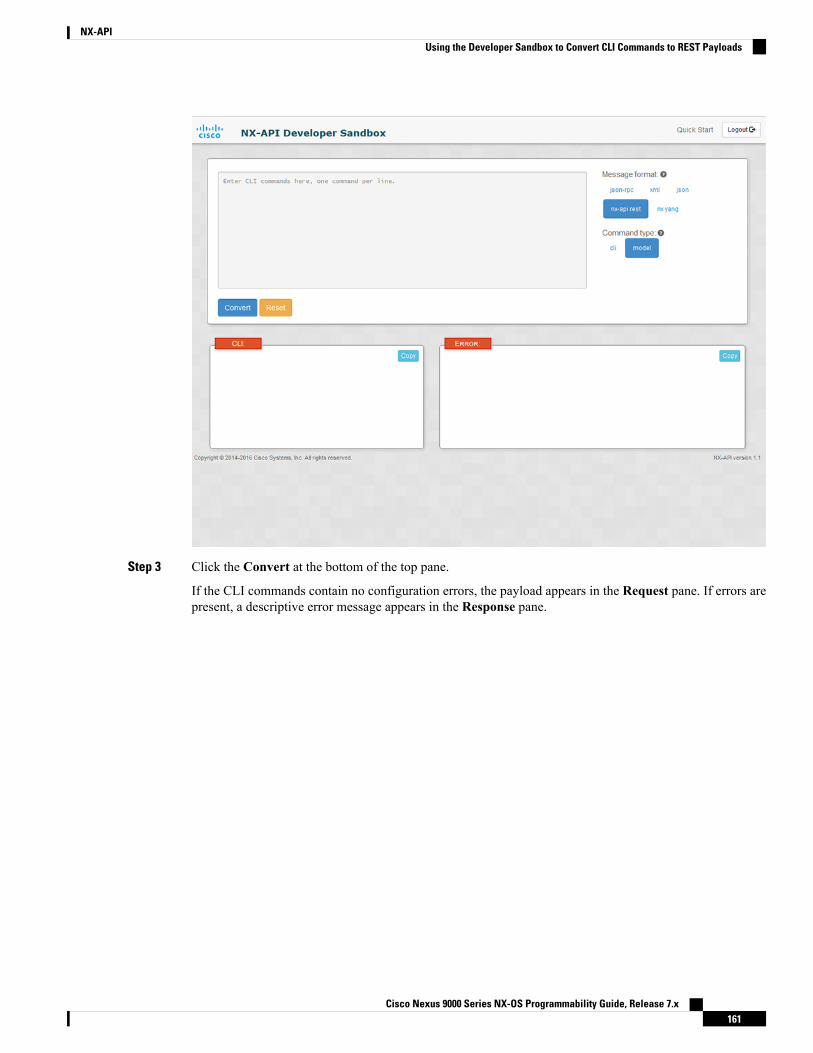
Step 3 Click the Convert at the bottom of the top pane.
If the CLI commands contain no configuration errors, the payload appears in the Request pane. If errors arepresent, a descriptive error message appears in the Response pane.
Cisco Nexus 9000 Series NX-OS Programmability Guide, Release 7.x161
NX-APIUsing the Developer Sandbox to Convert CLI Commands to REST Payloads

Step 4 When a valid payload is present in the Request pane, you can click POST to send the payload as an API callto the switch.
The response from the switch appears in the Response pane.
Clicking POST commits the command to the switch, which can result in a configuration or statechange.
Warning
Cisco Nexus 9000 Series NX-OS Programmability Guide, Release 7.x162
NX-APIUsing the Developer Sandbox to Convert CLI Commands to REST Payloads

Step 5 You can copy the contents of the Request or Response pane to the clipboard by clicking Copy in the pane.Step 6 You can obtain a Python implementation of the request on the clipboard by clicking Python in the Request
pane.
Using the Developer Sandbox to Convert from REST Payloadsto CLI Commands
Online help is available by clicking Quick Start in the upper right corner of the Sandbox window.
Additional details, such as response codes and security methods, can be found in the chapter "NX-API CLI".
Tip
Procedure
Step 1 Select nx-api rest as theMessage Format and model as the Command Type.
Example:
Cisco Nexus 9000 Series NX-OS Programmability Guide, Release 7.x163
NX-APIUsing the Developer Sandbox to Convert from REST Payloads to CLI Commands

Step 2 Enter a DN and payload into the text entry box in the top pane. Then click on the Convert button below thetop pane.
Example:
For this example, the DN is api/mo/sys.json and the NX-API REST payload is:{"topSystem": {"attributes": {"name": "REST2CLI"
}}
}
Cisco Nexus 9000 Series NX-OS Programmability Guide, Release 7.x164
NX-APIUsing the Developer Sandbox to Convert from REST Payloads to CLI Commands

When you click on theConvert button, the CLI equivalent appears in theCLI pane as shown in the followingimage.
Cisco Nexus 9000 Series NX-OS Programmability Guide, Release 7.x165
NX-APIUsing the Developer Sandbox to Convert from REST Payloads to CLI Commands

Cisco Nexus 9000 Series NX-OS Programmability Guide, Release 7.x166
NX-APIUsing the Developer Sandbox to Convert from REST Payloads to CLI Commands

The Developer Sandbox cannot convert all payloads into equivalent CLIs, even if the Sandboxconverted the CLIs to NX-API REST payloads. The following is a list of possible sources of errorthat can prevent a payload from completely converting to CLI commands:
Table 12: Sources of REST2CLI Errors
ResultPayload Issue
The Error pane will return an error related tothe attribute.
Example:
CLI
Error unknown attribute'fakeattribute' in element'l1PhysIf'
The payload contains an attribute that does notexist in the MO.
Example:api/mo/sys.json{"topSystem": {"children": [{"interfaceEntity": {"children": [{"l1PhysIf": {"attributes": {"id": "eth1/1","fakeattribute":
"totallyFake"}
}}
]}
}]
}}
The Error Pane will return an error related tothe unsupported MO.
Example:
CLI
Error The entire subtree of"sys/dhcp" is not converted.
The payload includes MOs that aren't yetsupported for conversion:
Example:api/mo/sys.json{"topSystem": {"children": [{"dhcpEntity": {"children": [{"dhcpInst": {"attributes": {"SnoopingEnabled": "yes"
}}
}]
}}
]}
}
Note
Cisco Nexus 9000 Series NX-OS Programmability Guide, Release 7.x167
NX-APIUsing the Developer Sandbox to Convert from REST Payloads to CLI Commands

Cisco Nexus 9000 Series NX-OS Programmability Guide, Release 7.x168
NX-APIUsing the Developer Sandbox to Convert from REST Payloads to CLI Commands

P A R T IVModel-Driven Programmability
• Infrastructure Overview, on page 171• Managing Components, on page 175• NETCONF Agent, on page 181• Converting CLI Commands to Network Configuration Format, on page 189• RESTConf Agent, on page 195• gRPC Agent, on page 199• Dynamic Logger, on page 211• Model-Driven Telemetry, on page 219• Hardware Telemetry, on page 255


C H A P T E R 20Infrastructure Overview
• About Model-Driven Programmability, on page 171• About the Programmable Interface Infrastructure, on page 171
About Model-Driven ProgrammabilityThemodel-driven programmability of the NX-OS device allows you to automate the configuration and controlof the device.
Data Modeling
Data modeling provides a programmatic and standards-basedmethod of writing configurations to the networkdevice, replacing the process of manual configuration. Data models are written in a standard, industry-definedlanguage. Although configuration using a CLI may be more human-friendly, automating the configurationusing data models results in better scalability.
The Cisco NX-OS device supports the YANG data modeling language. YANG is a data modeling languageused to describe configuration and operational data, remote procedure calls, and notifications for networkdevices.
Programmable Interfaces
Three standards-based programmable interfaces are supported by NX-OS for operations on the data model:NETCONF, RESTConf, and gRPC.
About the Programmable Interface InfrastructureThis section provides a brief overview of the NX-OS Programmable Interface infrastructure.
Cisco Nexus 9000 Series NX-OS Programmability Guide, Release 7.x171

When a request is received whether via NETCONF, RESTConf, or gRPC, the request is converted into anabstract message object. That message object is distributed to the underlying model infrastructure based onthe namespace in the request. Using the namespace, the appropriate model is selected and the request is passedto it for processing. The model infrastructure executes the request (read or write) on the device datastore. Theresults are returned to the agent of origin for response transmission back to the requesting client.
NX-OS Programmable Interface Agents
Agents provide an interface between the Device and clients. They specify the transport, the protocol, and theencoding of the communications with the Device. NX-OS Programmable Interfaces support three agents:NETCONF, RESTConf, and gRPC, each providing different interfaces for configuration management of theDevice via YANG models.
Supported YANGmodels for each Cisco NX-OS release are provided at https://devhub.cisco.com/artifactory/open-nxos-agents.
Note
Cisco Nexus 9000 Series NX-OS Programmability Guide, Release 7.x172
Model-Driven ProgrammabilityAbout the Programmable Interface Infrastructure

Table 13: NX-OS Programmable Interface Agents
EncodingProtocolTransportAgent
XMLSSHNETCONF
XML or JSONdraft-ietf-netconf-restconf-10[1HTTPRESTConf
Google ProtobufgRPC Protocol Spec[2]HTTPgRPC
The protocol specifications are described in the following documents:
• [1] RESTCONF Protocol draft-ietf-netconf-restconf-10 https://tools.ietf.org/html/draft-ietf-netconf-restconf-10
• [2] Cisco NX-OS gRPC Protocol Specification
Model Infrastructure
The Model Infrastructure takes requests that are received from the Agent, determines the namespace that isassociated with the YANG model in the request, and selects the model component matching the namespaceto process the request. When the selected model component completes request processing, the processingresults are sent to the requesting Agent for transmission back to the client. The Model Infrastructure is alsoresponsible for handling protocol initiation requests involving authentication, handshaking, and so on, asspecified by the Agent protocol.
Device YANG Model
The Device Configuration is described in a YANG model that is called a Device Model. The Device Modelis manifested in the Model Infrastructure as another model component with the Device namespace.
Common YANG Models
A Common Model is another kind of model component that contains within its elements, YANG Paths to theequivalent DeviceModel elements. These equivalent DeviceModel elements are used to read and write DeviceModel data in the Device YANG context.
Additional YANG References
Additional information about YANG can be found at the YANG Central Wiki http://www.yang-central.org/twiki/bin/view/Main/WebHome (M. Bjorklund, Ed.)
Cisco Nexus 9000 Series NX-OS Programmability Guide, Release 7.x173
Model-Driven ProgrammabilityAbout the Programmable Interface Infrastructure

Cisco Nexus 9000 Series NX-OS Programmability Guide, Release 7.x174
Model-Driven ProgrammabilityAbout the Programmable Interface Infrastructure

C H A P T E R 21Managing Components
• About the Component RPM Packages, on page 175• Preparing For Installation, on page 176• Downloading Components from the Cisco Artifactory, on page 177• Installing RPM Packages, on page 178
About the Component RPM Packages
Beginning with Cisco Nexus NX-OS 7.0(3)I7(1), the NX-OS Programmable Interface Base Component RPMpackages (agents, the Cisco native model, the majority of other required models, and infrastructure) areincluded in the NX-OS image. As a result, nearly all the required software is installed automatically when theimage is loaded. This means that there is no need to download and install the bulk of the software from theCisco Artifactory. The exception is the OpenConfig model, which is required. You must explicitly downloadthe OpenConfig models from the Cisco Artifactory.
However, for Cisco Nexus NX-OS 7.0(3)I6(1) and earlier releases, or for the purpose of upgrading, thefollowing sections describing downloading and installing the packages are required.
Note
NX-OS Programmable Interface Component RPM packages may be downloaded from the Cisco Artifactory.Three types of component RPM packages are needed:
• NX-OS Programmable Interface Infrastructure Components
• Common Model Components
• Agent Components
NX-OS Programmable Interface Infrastructure Components
The NX-OS Programmable Interface Infrastructure comprises two RPM packages:
• mtx-infra— This RPM is platform-independent.
• mtx-device-model— This RPM is platform-dependent and must be selected to match the installedNX-OS image at the time of Cisco Artifactory download.
Cisco Nexus 9000 Series NX-OS Programmability Guide, Release 7.x175

Common Model Components
Common Model component RPMs provides support for Openconfig and IETF defined models. In order toenable support for one or more desired Common Models, the associated Common Model component RPMsmust be downloaded and installed. As with the mtx-device-model RPM, Common Model components arealso platform-dependent and must be selected to match the installed NX-OS image at the time of CiscoArtifactory download.
Following is the list of supported RPMs:
• mtx-openconfig-bgp
• mtx-openconfig-bgp-multiprotocol
• mtx-openconfig-if-ip
• mtx-openconfig-interfaces
• mtx-openconfig-local-routing
• mtx-openconfig-routing-policy
• mtx-openconfig-vlan
Agent Components
Three agent packages are available: NETCONF, RESTConf and gRPC. At least one agent must be installedin order to have access to the modeled NX-OS interface.
Beginning with Cisco Nexus NX-OS 7.0(3)I7(3), you can enable the agents using the feature netconf andfeature restconf commmands. However, these commands are not included in prior releases, so for releasesCisco Nexus NX-OS 7.0(3)I7(1) to 7.0(3)I7(3), you must enter the bash shell using the instructions in the"Opening the Bash Shell on the Device" section in Preparing For Installation, on page 176, then run thenetconfctl start and restconfctl start commands.
Note
Preparing For InstallationThis section contains installation preparation and other useful information for managing NX-OS ProgrammableInterface components.
Opening the Bash Shell on the Device
RPM installation on the switch is performed in the bash shell. Make sure feature bash is configured on thedevice.Switch# configure terminalEnter configuration commands, one per line. End with CNTL/Z.Switch(config)# feature bash-shellSwitch(config)# endSwitch# run bash sudo subash-4.2#
Cisco Nexus 9000 Series NX-OS Programmability Guide, Release 7.x176
Model-Driven ProgrammabilityPreparing For Installation

To return to the device CLI prompt from bash, type exit or Ctrl-D.
Verify Device Readiness
You can use the following CLI show commands to confirm the readiness of the device before installation ofan RPM.
• show module— Indicates whether all modules are up.Switch# show module
• show system redundancy status— Indicates whether the standby device is up and running and in HAmode. If a standby sync in progress, the RPM installation may fail.Switch# show system redundancy status
If the line cards have failed to come up, enter the createrepo /rpms command in the bash shell.bash-4.2# createrepo /rpms
Copying Files to the Device
You can use SCP to copy files to the device, using a command in this form.
copy scp://username@source_ip/path_to_agent_rpm bootflash: vrf management
Example:
Switch# copy scp://[email protected]//myrpms/mtx-infra.1.0.0.r082616.x86_64.rpm bootflash:vrf management
Displaying Installed NX-OS Programmable Interface RPMs
To show all installed NXOS Programmable Interface RPMs, issue the following command on the device:
bash-4.2# yum list installed | grep mtx
Downloading Components from the Cisco ArtifactoryThe NX-OS Programmable Interface Component RPMs can be downloaded from the Cisco Artifactory at thefollowing URL:
https://devhub.cisco.com/artifactory/open-nxos-agents
The NX-OS Programmable Interface Component RPMs adhere to the following naming convention:
mtx-name.ma.mi.ma.rYYYYYY.x86_64.rpm
or
mtx-name-XXXX.ma.mi.ma.rYYYYYY.x86_64.rpm
where
• name—MTX component name (such as infra, device-model, openconfig-interface, netconf, etc)
• ma.mi.ma—RPM Version Number (major.minor.maintenance)
Cisco Nexus 9000 Series NX-OS Programmability Guide, Release 7.x177
Model-Driven ProgrammabilityDownloading Components from the Cisco Artifactory

• XXXX—NX-OS Image ID
• rYYYYYY—RPM build ID
Select and download the desired NX-OS Programmable Interface Component RPM packages to a local serverfor installation on the device as described in the following sections.
Installing RPM Packages
Installing the Programmable Interface Infrastructure RPM Packages
Before you begin
• From the Cisco Artifactory, download the following packages:
• mtx-infra.ma.mi.ma.rYYYYYY.x86_64.rpm (Infrastructure)
• mtx-device-XXXX.ma.mi.ma.rYYYYYY.x86_64.rpm RPM (Device Model)
• Using the CLI commands in Verify Device Readiness, on page 177, confirm that all line cards in theactive and standby devices are up and ready.
Procedure
Step 1 Copy the downloaded RPMs to the device.
Example:
Switch# copy scp://[email protected]//myrpms/mtx-infra.1.0.0.r082616.x86_64.rpm bootflash:vrf managementSwitch# copy scp://[email protected]//myrpms/mtx-device.1.0.0.r082616.x86_64.rpm bootflash:vrf management
Step 2 From the bash shell, install the MTX Infra RPM.
Example:
bash-4.2# cd /bootflashbash-4.2# yum install mtx-infra.1.0.0.r082616.x86_64.rpm
Step 3 From the bash shell, install the MTX Device Model RPM.
Example:
bash-4.2# cd /bootflashbash-4.2# yum install mtx-device.1.0.0.r082616.x86_64.rpm
Step 4 From the bash shell, verify the installation.
Cisco Nexus 9000 Series NX-OS Programmability Guide, Release 7.x178
Model-Driven ProgrammabilityInstalling RPM Packages

Example:
bash-4.2# yum list installed | grep mtx
What to do next
Install one or more Common Model RPM Packages.
Installing Common Model RPM Packages
Before you begin
• Install the Programmable Interface Infrastructure RPM packages.
• Download the Common Model RPM packages from the Cisco Artifactory.
Procedure
Step 1 Copy the downloaded Common Model RPMs to the device.
Example:
bash-4.2# copyscp://[email protected]//myrpms/mtx-openconfig_interfaces.1.0.0.r082616.x86_64.rpm bootflash:vrf management
Step 2 From the bash shell, install each Common Model RPM.
Example:
bash-4.2# cd /bootflashbash-4.2# yum install mtx-openconfig_interfaces.1.0.0.r082616.x86_64.rpm
Step 3 From the bash shell, verify the installation.
Example:
bash-4.2# yum list installed | grep mtx
What to do next
Install one or more NX-OS Programmable Interface Agent RPM Packages.
Cisco Nexus 9000 Series NX-OS Programmability Guide, Release 7.x179
Model-Driven ProgrammabilityInstalling Common Model RPM Packages

Installing Agent RPM Packages
Before you begin
• Install the Programmable Interface Infrastructure RPM packages.
• Install one or more Common Model RPM packages.
• Download the Agent RPM packages from the Cisco Artifactory.
Procedure
Step 1 Copy the downloaded Agent RPMs to the device.
Example:
bash-4.2# copy scp://[email protected]//myrpms/myrpms/mtx-netconf.1.0.0.r082616.x86_64.rpmbootflash: vrf management
Step 2 From the bash shell, install the Agent RPM.
Example:
bash-4.2# cd /bootflashbash-4.2# yum install mtx-netconf.1.0.0.r082616.x86_64.rpm
Step 3 From the bash shell, verify the installation.
Example:
bash-4.2# yum list installed | grep mtx
What to do next
Configure the Agent.
Cisco Nexus 9000 Series NX-OS Programmability Guide, Release 7.x180
Model-Driven ProgrammabilityInstalling Agent RPM Packages

C H A P T E R 22NETCONF Agent
• About the NETCONF Agent, on page 181• Guidelines and Limitations, on page 183• Configuring the NETCONF Agent, on page 183• Using the NETCONF Agent, on page 184• Troubleshooting the NETCONF Agent, on page 188
About the NETCONF AgentThe Cisco NX-OS NETCONF Agent is a client-facing interface that provides secure transport for the clientrequests and server responses in the form of a YANG model, encoded in XML.
The NETCONF Agent supports a candidate configuration feature. The Candidate configuration datastoretemporarily holds candidate configuration and any changes you make without changing the runningconfiguration. You can then choose when to update the configuration of the device with the candidateconfiguration when you commit and confirm the candidate configuration.
If you do not confirm the changes, exit from a nonpersistent NETCONF client session, or choose to cancelthe commit after you commit the change, a system timer then times out and rolls back the changes if you donot confirm the changes.
If you initiate a confirmed-commit operation with a persistent token, the NETCONF client session becomesa persistent process. In a persistent process, exiting the NETCONF client session will not call an automaticroll-back and the changes cannot be rolled back without the matching persistent token.
Cisco NX-OS NETCONF supports the following configuration capabilities:
• Writable-Running Capabilityurn:ietf:params:netconf:capability:writable-running:1.0
• Rollback-on-error Capabilityurn:ietf:params:netconf:capability:rollback-on-error:1.0
• Candidate Configuration Capabilityurn:ietf:params:netconf:capability:candidate:1.0
• Validation Capabilityurn:ietf:params:netconf:capability:validate:1.1
• Confirmed Commit Capability
Cisco Nexus 9000 Series NX-OS Programmability Guide, Release 7.x181

urn:ietf:params:netconf:capability:confirmed-commit:1.1
When a new session starts, the NETCONF Agent sends out a <hello> message advertising its capabilities.The following example shows a NETCONF agent sending a <hello> message to the client:
<?xml version="1.0" encoding="UTF-8"?><hello>
<capabilities>
<capability>urn:ietf:params:netconf:base:1.0</capability><capability>urn:ietf:params:netconf:base:1.1</capability><capability>urn:ietf:params:netconf:capability:writable-running:1.0</capability><capability>urn:ietf:params:netconf:capability:rollback-on-error:1.0</capability><capability>urn:ietf:params:netconf:capability:candidate:1.0</capability><capability>urn:ietf:params:netconf:capability:validate:1.1</capability><capability>urn:ietf:params:netconf:capability:confirmed-commit:1.1</capability>
<capability>http://cisco.com/ns/yang/cisco-nx-os-device?revision=2017-04-06&module=cisco-nx-os-device&deviations=cisco-nx-os-device-deviations</capability>
</capabilities>
<session-id>1438752697</session-id></hello>
The Cisco NX-OS NETCONF Agent supports the following NETCONF Protocol operations:
• get
• get-config
• edit-config
• close-session
• kill-session
Candidate configuration supports the following NETCONF Protocol operations.
• Operations for the candidate configuration as <source> or <target>.
• get-config
• edit-config
• copy-config
• lock
• unlock
• validate
• Operations for the candidate configuration that do not require explicitly specifying the candidateconfiguration as <source> or <target>.
• commit
• cancel-commit
• discard-changes
Cisco Nexus 9000 Series NX-OS Programmability Guide, Release 7.x182
Model-Driven ProgrammabilityAbout the NETCONF Agent

The delete-config operation is not allowed.Note
Guidelines and LimitationsThe NETCONF Agent has the following guideline and limitation:
• NETCONF does not support enhanced Role-Based Access Control (RBAC) as specified in RFC 6536.Only users with a "network-admin" role are granted access to the NETCONF agent.
• NETCONF requires RPM to be installed on port 830.
Configuring the NETCONF AgentThe NETCONF Agent supports the following optional configuration parameters under the [netconf]section in the configuration file (/etc/mtx.conf).
DescriptionParameter
(Optional) Specifies the timeout in minutes afterwhich idle client sessions are disconnected.
The default value is 5 minutes.
A value of 0 disables timeout.
idle_timeout
(Optional) Specifies the number of maximumsimultaneous client sessions.
The default value is 5 sessions.
The range is 1 to 10.
limit
The following is an example of the [netconf] section in the configuration file:
[netconf]mtxadapter=/opt/mtx/lib/libmtxadapternetconf.1.0.1.soidle_timeout=10limit=1
For the modified configuration file to take effect, you must restart the NETCONF Agent using the CLIcommand [no] feature netconf to disable and re-enable.
Cisco Nexus 9000 Series NX-OS Programmability Guide, Release 7.x183
Model-Driven ProgrammabilityGuidelines and Limitations

Using the NETCONF AgentGeneral Commands
The NETCONF Agent is enabled or disabled by the command [no] feature netconf.
Initializing the Candidate Configuration Datastore
The candidate configuration can only be initialized with the contents of the running configuration. To Initializethe candiate configuring datastore, send a Copy-Config request using SSH, with candidate as the target andrunning as the source.
Performing Read and Write on the Candidate Configuration
To read from the candidate configuration, send a Get-Config request with SSH, using candidate as the source.
To write to the contents of the candidate configuration, send an Edit-Config request with SSH, using candidateas the target.
NETCONF Candidate Configuration Workflow
The candidate configuration workflow is as follows:
• Edit the candidate configuration file.
• Validate the candidate configuration.
• Commit the changes to the running configuration.
Example: An SSH Session
This example shows initiating a session using the SSH client and sending an Edit-Config and Get requestusing the SSH Client.
client-host % ssh -s [email protected] -p 830 netconfclient-host % ssh -s [email protected] -p 830 netconfUser Access VerificationPassword:<?xml version="1.0" encoding="UTF-8"?><hello>
<capabilities><capability>urn:ietf:params:netconf:base:1.0</capability><capability>urn:ietf:params:netconf:base:1.1</capability><capability>urn:ietf:params:netconf:capability:writable-running:1.0</capability><capability>urn:ietf:params:netconf:capability:rollback-on-error:1.0</capability><capability>urn:ietf:params:netconf:capability:candidate:1.0</capability><capability>urn:ietf:params:netconf:capability:validate:1.1</capability><capability>urn:ietf:params:netconf:capability:confirmed-commit:1.1</capability>
<capability>http://cisco.com/ns/yang/cisco-nx-os-device?revision=2017-04-06&module=cisco-nx-os-device&deviations=cisco-nx-os-device-deviations</capability>
</capabilities><session-id>1912037714</session-id>
</hello>]]>]]><hello xmlns="urn:ietf:params:xml:ns:netconf:base:1.0"><capabilities>
Cisco Nexus 9000 Series NX-OS Programmability Guide, Release 7.x184
Model-Driven ProgrammabilityUsing the NETCONF Agent

<capability>urn:ietf:params:netconf:base:1.1</capability></capabilities>
</hello>]]>]]>#794<rpc message-id="101"xmlns="urn:ietf:params:xml:ns:netconf:base:1.0"xmlns:nc="urn:ietf:params:xml:ns:netconf:base:1.0">
<edit-config><target>
<running/></target><config>
<System xmlns="http://cisco.com/ns/yang/cisco-nx-os-device"><bgp-items>
<inst-items><dom-items>
<Dom-list><name>default</name>
<rtrId>2.2.2.2</rtrId></Dom-list>
</dom-items></inst-items>
</bgp-items></System>
</config></edit-config>
</rpc>##
#190<?xml version="1.0" encoding="UTF-8"?><rpc-reply message-id="101"xmlns="urn:ietf:params:xml:ns:netconf:base:1.0"xmlns:nc="urn:ietf:params:xml:ns:netconf:base:1.0">
<ok/></rpc-reply>
##
#511<rpc message-id="109"xmlns="urn:ietf:params:xml:ns:netconf:base:1.0"><get-config>
<source><running/>
</source><filter type="subtree">
<System xmlns="http://cisco.com/ns/yang/cisco-nx-os-device"><bgp-items>
<inst-items><dom-items>
<Dom-list/></dom-items>
</inst-items></bgp-items>
</System></filter>
</get-config></rpc>##
#996<?xml version="1.0" encoding="UTF-8"?>
Cisco Nexus 9000 Series NX-OS Programmability Guide, Release 7.x185
Model-Driven ProgrammabilityUsing the NETCONF Agent

<rpc-reply message-id="109"xmlns="urn:ietf:params:xml:ns:netconf:base:1.0">
<data><System>
<bgp-items><inst-items>
<dom-items><Dom-list>
<name>default</name><always>disabled</always><bestPathIntvl>300</bestPathIntvl><holdIntvl>180</holdIntvl><kaIntvl>60</kaIntvl><maxAsLimit>0</maxAsLimit><pfxPeerTimeout>30</pfxPeerTimeout><pfxPeerWaitTime>90</pfxPeerWaitTime><reConnIntvl>60</reConnIntvl><rtrId>2.2.2.2</rtrId>
</Dom-list></dom-items>
</inst-items></bgp-items>
</System></data>
</rpc-reply>
##
Note that the operation attribute in edit-config identifies the point in configuration where the specifiedoperation will be performed. If the operation attribute is not specified, the configuration is merged into theexisting configuration data store. Operation attribute can have the following values:
• create
• merge
• delete
The following example shows how to delete the configuration of interface Ethernet 0/0 from the runningconfiguration.xmlns="urn:ietf:params:xml:ns:netconf:base:1.0">
<edit-config><target>
<running/></target><default-operation>none</default-operation><config xmlns:xc="urn:ietf:params:xml:ns:netconf:base:1.0">
<top xmlns="http://example.com/schema/1.2/config"><interface xc:operation="delete">
<name>Ethernet0/0</name></interface>
</top></config>
</edit-config></rpc>]]>]]>
Error MessagesIf a request results in an error, the response payload includes the error.
Cisco Nexus 9000 Series NX-OS Programmability Guide, Release 7.x186
Model-Driven ProgrammabilityError Messages

Errors Defined by Cisco
The following are the errors defined by Cisco.
DescriptionError defined by Cisco
Unknown error encountered.unknown-error-cond
The requested operation is not supported. (not-yet-implemented).n-y-i
Error in request payload.namespace-not-found
Error in request payload.namespace-already-exists
Error in request payload.object-not-found
Error in request payload.object-not-container
Error in request payload.object-not-property
Error in request payload.no-property-in-object
Internal error.invalid-dn
Internal error.invalid-arg
Error in request payload.already-exists
Error in request payloadcontainer-not-found
Error in request payload.container-already-exists
Error in request payload.property-not-found
Error in request payload.property-already-exists
Error in request payload.malformed
Internal error.alloc-failed
Internal error.sigint
Internal error.not-initialized
Internal error.inappropriate
The following is an example of a NETCONF error response payload that reports an invalid IP address value:
<?xml version="1.0" encoding="UTF-8"?><rpc-reply message-id="320" xmlns="urn:ietf:params:xml:ns:netconf:base:1.0"><rpc-error><error-type>Protocol</error-type><error-tag>operation-failed</error-tag><error-severity>Error</error-severity><error-message xml:lang="en">Property Merge (set property) Failed: operation-failed
value=500.500.500.500</error-message><error-path>/config/System/bgp-items/inst-items/dom-items/Dom-list/rtrId</error-path>
</rpc-error></rpc-reply>
Cisco Nexus 9000 Series NX-OS Programmability Guide, Release 7.x187
Model-Driven ProgrammabilityError Messages

Troubleshooting the NETCONF AgentTroubleshooting Connectivity
• From a client system, ping the management port of the switch to verify that the switch is reachable.
• In the bash shell of the switch, execute the service netconf status command to check the agent status.
• Check whether the RSA host key for SSH is outdated. If this is the case, remove the RSA host key entryof the switch from the ~/.ssh/known_hosts file on the client host. This example shows the messagereceived when the host key is outdated:
lient-host % ssh -s [email protected] -p 830 netconf@@@@@@@@@@@@@@@@@@@@@@@@@@@@@@@@@@@@@@@@@@@@@@@@@@@@@@@@@@@ @ WARNING: REMOTE HOST IDENTIFICATION HAS CHANGED! @@@@@@@@@@@@@@@@@@@@@@@@@@@@@@@@@@@@@@@@@@@@@@@@@@@@@@@@@@@@ IT IS POSSIBLE THAT SOMEONE IS DOING SOMETHING NASTY!Someone could be eavesdropping on you right now (man-in-the-middle attack)! It is also possible that the RSA hostkey has just been changed. The fingerprint for the RSA keysent by the remote host is82:3d:49:5c:1b:08:4c:8e:19:94:a8:1f:32:8d:1e:dd. Pleasecontact your system administrator. Add correct host keyin /users/myuser/.ssh/known_hosts to get rid of thismessage. Offending key in/users/myuser/.ssh/known_hosts:304 Passwordauthentication is disabled to avoid man-in-the-middleattacks. Keyboard-interactive authentication is disabledto avoid man-in-the-middle attacks. User AccessVerification Permission denied(publickey,password,keyboard-interactive).client-host %
Cisco Nexus 9000 Series NX-OS Programmability Guide, Release 7.x188
Model-Driven ProgrammabilityTroubleshooting the NETCONF Agent

C H A P T E R 23Converting CLI Commands to NetworkConfiguration Format
• Information About XMLIN, on page 189• Licensing Requirements for XMLIN, on page 189• Installing and Using the XMLIN Tool, on page 190• Converting Show Command Output to XML, on page 190• Configuration Examples for XMLIN, on page 191
Information About XMLINThe XMLIN tool converts CLI commands to the Network Configuration (NETCONF) protocol format.NETCONF is a network management protocol that provides mechanisms to install, manipulate, and deletethe configuration of network devices. It uses XML-based encoding for configuration data and protocolmessages. The NX-OS implementation of the NETCONF protocol supports the following protocol operations:<get>, <edit-config>, <close-session>, <kill-session>, and <exec-command>.
The XMLIN tool converts show, EXEC, and configuration commands to corresponding NETCONF <get>,<exec-command>, and <edit-config> requests. You can enter multiple configuration commands into a singleNETCONF <edit-config> instance.
The XMLIN tool also converts the output of show commands to XML format.
Licensing Requirements for XMLINTable 14: XMLIN Licensing Requirements
License RequirementProduct
XMLIN requires no license. Any feature not included in a license package is bundled withthe Cisco NX-OS system images and is provided at no extra charge to you. For a completeexplanation of the Cisco NX-OS licensing scheme, see the Cisco NX-OS Licensing Guide.
CiscoNX-OS
Cisco Nexus 9000 Series NX-OS Programmability Guide, Release 7.x189

Installing and Using the XMLIN ToolYou can install the XMLIN tool and then use it to convert configuration commands to NETCONF format.
Before you begin
The XMLIN tool can generate NETCONF instances of commands even if the corresponding feature sets orrequired hardware capabilities are not available on the device. But, you might still need to install some featuresets before entering the xmlin command.
Procedure
PurposeCommand or Action
switch# xmlinStep 1
Enters global configuration mode.switch(xmlin)# configure terminalStep 2
Converts configuration commands toNETCONF format.
Configuration commandsStep 3
Generates the corresponding <edit-config>request.
(Optional) switch(config)(xmlin)# endStep 4
Enter the end command to finish thecurrent XML configuration beforeyou generate an XML instance for ashow command.
Note
Converts show commands to NETCONFformat.
(Optional) switch(config-if-verify)(xmlin)#show commands
Step 5
Returns to EXEC mode.(Optional) switch(config-if-verify)(xmlin)# exitStep 6
Converting Show Command Output to XMLYou can convert the output of show commands to XML.
Before you begin
Make sure that all features for the commands you want to convert are installed and enabled on the device.Otherwise, the commands fail.
You can use the terminal verify-only command to verify that a feature is enabled without entering it on thedevice.
Make sure that all required hardware for the commands you want to convert are present on the device.Otherwise, the commands fail.
Make sure that the XMLIN tool is installed.
Cisco Nexus 9000 Series NX-OS Programmability Guide, Release 7.x190
Model-Driven ProgrammabilityInstalling and Using the XMLIN Tool

Procedure
PurposeCommand or Action
Enters global configuration mode.switch# show-command | xmlinStep 1
You cannot use this command withconfiguration commands.
Note
Configuration Examples for XMLINThe following example shows how the XMLIN tool is installed on the device and used to convert a set ofconfiguration commands to an <edit-config> instance.
switch# xmlin******************************************Loading the xmlin tool. Please be patient.******************************************Cisco Nexus Operating System (NX-OS) SoftwareTAC support: http://www.cisco.com/tacCopyright ©) 2002-2013, Cisco Systems, Inc. All rights reserved.The copyrights to certain works contained in this software areowned by other third parties and used and distributed underlicense. Certain components of this software are licensed underthe GNU General Public License (GPL) version 2.0 or the GNULesser General Public License (LGPL) Version 2.1. A copy of eachsuch license is available athttp://www.opensource.org/licenses/gpl-2.0.php andhttp://www.opensource.org/licenses/lgpl-2.1.php
switch(xmlin)# configure terminalEnter configuration commands, one per line. End with CNTL/Z.switch(config)(xmlin)# interface ethernet 2/1% Successswitch(config-if-verify)(xmlin)# cdp enable% Successswitch(config-if-verify)(xmlin)# end<?xml version="1.0"?><nf:rpc xmlns:nf="urn:ietf:params:xml:ns:netconf:base:1.0"xmlns="http://www.cisco.com/nxos:6.2.2.:configure_"xmlns:m="http://www.cisco.com/nxos:6.2.2.:_exec"xmlns:m1="http://www.cisco.com/nxos:6.2.2.:configure__if-eth-base" message-id="1"><nf:edit-config>
<nf:target><nf:running/>
</nf:target><nf:config><m:configure><m:terminal><interface>
<__XML__PARAM__interface><__XML__value>Ethernet2/1</__XML__value><m1:cdp><m1:enable/>
</m1:cdp></__XML__PARAM__interface></interface></m:terminal></m:configure>
Cisco Nexus 9000 Series NX-OS Programmability Guide, Release 7.x191
Model-Driven ProgrammabilityConfiguration Examples for XMLIN

</nf:config></nf:edit-config>
</nf:rpc>]]>]]>
The following example shows how to enter the end command to finish the current XML configuration beforeyou generate an XML instance for a show command.
switch(xmlin)# configure terminalEnter configuration commands, one per line. End with CNTL/Z.switch(config)(xmlin)# interface ethernet 2/1switch(config-if-verify)(xmlin)# show interface ethernet 2/1********************************************************Please type "end" to finish and output the current XML document before building a new one.********************************************************% Command not successful
switch(config-if-verify)(xmlin)# end<?xml version="1.0"?><nf:rpc xmlns:nf="urn:ietf:params:xml:ns:netconf:base:1.0"xmlns="http://www.cisco.com/nxos:6.2.2.:configure_"xmlns:m="http://www.cisco.com/nxos:6.2.2.:_exec" message-id="1">
<nf:edit-config><nf:target>
<nf:running/></nf:target><nf:config>
<m:configure><m:terminal>
<interface><__XML__PARAM__interface>
<__XML__value>Ethernet2/1</__XML__value></__XML__PARAM__interface>
</interface></m:terminal></m:configure>
</nf:config></nf:edit-config>
</nf:rpc>]]>]]>
switch(xmlin)# show interface ethernet 2/1<?xml version="1.0"?><nf:rpc xmlns:nf="urn:ietf:params:xml:ns:netconf:base:1.0"xmlns="http://www.cisco.com/nxos:6.2.2.:if_manager" message-id="1"><nf:get><nf:filter type="subtree"><show><interface><__XML__PARAM__ifeth>
<__XML__value>Ethernet2/1</__XML__value></__XML__PARAM__ifeth>
</interface></show>
</nf:filter></nf:get>
</nf:rpc>]]>]]>switch(xmlin)# exitswitch#
The following example shows how you can convert the output of the show interface brief command to XML.
Cisco Nexus 9000 Series NX-OS Programmability Guide, Release 7.x192
Model-Driven ProgrammabilityConfiguration Examples for XMLIN

switch# show interface brief | xmlin<?xml version="1.0"?><nf:rpc xmlns:nf="urn:ietf:params:xml:ns:netconf:base:1.0"xmlns="http://www.cisco.com/nxos:6.2.2.:if_manager"
message-id="1"><nf:get><nf:filter type="subtree">
<show><interface>
<brief/></interface>
</show></nf:filter>
</nf:get></nf:rpc>]]>]]>
Cisco Nexus 9000 Series NX-OS Programmability Guide, Release 7.x193
Model-Driven ProgrammabilityConfiguration Examples for XMLIN

Cisco Nexus 9000 Series NX-OS Programmability Guide, Release 7.x194
Model-Driven ProgrammabilityConfiguration Examples for XMLIN

C H A P T E R 24RESTConf Agent
• About the RESTConf Agent, on page 195• Guidelines and Limitations, on page 196• Configuring the RESTConf Agent, on page 196• Using the RESTConf Agent, on page 196• Troubleshooting the RESTConf Agent, on page 197
About the RESTConf AgentCisco NX-OS RESTConf is an HTTP -based protocol for configuring data that are defined in YANG version1, using datastores defined in NETCONF.
NETCONF defines configuration datastores and a set of Create, Retrieve, Update, and Delete (CRUD)operations that can be used to access these datastores. The YANG language defines the syntax and semanticsof datastore content, operational data, protocol operations, and event notifications.
Cisco NX-OS RESTConf uses HTTP operations to provide CRUD operations on a conceptual datastorecontaining YANG-defined data. This data is compatible with a server which implements NETCONF datastores.
The RESTCONF protocol supports both XML and JSON payload encodings. User authentication is donethrough the HTTP Basic Authentication.
The following table shows the Protocol operations that the Cisco NX-OS RESTConf Agent supports:
NETCONF EquivalentRESTConf
NETCONF: noneOPTIONS
NETCONF: noneHEAD
NETCONF: <get-config>, <get>GET
NETCONF: <edit-config> (operation="create")POST
NETCONF: <edit-config> (operation="create/replace")PUT
NETCONF: <edit-config> (operation="merge")PATCH
NETCONF: <edit-config> (operation="delete")DELETE
Cisco Nexus 9000 Series NX-OS Programmability Guide, Release 7.x195

Guidelines and LimitationsThe RESTCONF Agent has the following guideline and limitation:
• Cisco NX-OS RESTCONF is based on an RFC draft entitled RESTCONF Protocoldraft-ietf-netconf-restconf-10 (https://tools.ietf.org/html/draft-ietf-netconf-restconf-10).
• RESTCONF does not support enhanced Role-Based Access Control (RBAC) as specified in RFC 6536.Only users with a "network-admin" role are granted access to the RESTCONF agent.
Configuring the RESTConf AgentThe RESTConf Agent does not require any configuration in the configuration file (/etc/mtx.conf).
Using the RESTConf AgentGeneral Commands
• Configure the following commands to enable HTTP or HTTPS access:
• feature nxapi
• nxapi http port 80
• nxapi https port 443
General Control Commands
You can enable or disable the RESTCONF Agent [no] feature restconf command.
Viewing the Agent Status
To view the status of the RESTCONF agent, use the show feature command and include the expressionrestconf.switch-1# show feature | grep restconfrestconf 1 enabledswitch-1#
Sending a POST Request to the Server Using Curl
client-host % curl -X POST -H "Authorization: Basic YWRtaW46Y2lzY28=" -H "Content-Type:application/yang.data+xml" -d '<always>enabled</always><rtrId>2.2.2.2</rtrId>'"http://192.0.20.123/restconf/data/Cisco-NX-OS-device:System/bgp-items/inst-items/dom-items/Dom-list=default"-i
HTTP/1.1 201 CreatedServer: nginx/1.7.10Date: Tue, 27 Sep 2016 20:25:31 GMTTransfer-Encoding: chunked
Cisco Nexus 9000 Series NX-OS Programmability Guide, Release 7.x196
Model-Driven ProgrammabilityGuidelines and Limitations

Connection: keep-aliveSet-Cookie: nxapi_auth=admin:147500853169574134Status: 201 CreatedLocation: /System/bgp-items/inst-items/dom-items/Dom-list=default/always/rtrId/
Sending a GET Request to the Server Using Curl
client-host % curl -X GET -H "Authorization: Basic YWRtaW46Y2lzY28=" -H "Accept:application/yang.data+xml""http://192.0.20.123/restconf/data/Cisco-NX-OS-device:System/bgp-items/inst-items/dom-items/Dom-list?content=config"-i
HTTP/1.1 200 OKServer: nginx/1.7.10Date: Tue, 27 Sep 2016 20:26:03 GMTContent-Type: application/yang.data+xmlContent-Length: 395Connection: keep-aliveSet-Cookie: nxapi_auth=admin:147500856185650327Status: 200 OK
<Dom-list><name>default</name><always>enabled</always><bestPathIntvl>300</bestPathIntvl><holdIntvl>180</holdIntvl><kaIntvl>60</kaIntvl><maxAsLimit>0</maxAsLimit><pfxPeerTimeout>30</pfxPeerTimeout><pfxPeerWaitTime>90</pfxPeerWaitTime><reConnIntvl>60</reConnIntvl><rtrId>2.2.2.2</rtrId>
</Dom-list>client-host %
Troubleshooting the RESTConf AgentTroubleshooting Connectivity
• Enable the web server by issuing the feature nxapi command.
• Ensure that the nxapi http port 80 command is configured to open up the port for HTTP
• Ensure that the nxapi https port 443 command is configured to open up the port for HTTPS.
• Ping the management port of the switch to verify that the switch is reachable.
Cisco Nexus 9000 Series NX-OS Programmability Guide, Release 7.x197
Model-Driven ProgrammabilityTroubleshooting the RESTConf Agent

Cisco Nexus 9000 Series NX-OS Programmability Guide, Release 7.x198
Model-Driven ProgrammabilityTroubleshooting the RESTConf Agent

C H A P T E R 25gRPC Agent
• About the gRPC Agent, on page 199• Guidelines and Limitations, on page 200• Configuring the gRPC Agent, on page 200• Using the gRPC Agent, on page 201• Troubleshooting the gRPC Agent, on page 203• gRPC Protobuf File, on page 203
About the gRPC AgentThe Cisco NX-OS gRPC protocol defines a mechanism through which a network device can be managed andits configuration data can be retrieved and installed. The protocol exposes a complete and formal ApplicationProgramming Interface (API) that clients can use to manage device configurations.
The Cisco NX-OS gRPC protocol uses a remote procedure call (RPC) paradigm where an external clientmanipulates device configurations utilizing Google Protocol Buffer (GPB)-defined API calls along with theirservice- specific arguments. These GPB-defined APIs transparently cause an RPC call to the device that returnreplies in the same GPB-defined API context.
The gRPC Agent provides a secure transport through TLS and user authentication and authorization throughAAA.
The functional objective of the Cisco NX-OS gRPC protocol is to mirror that provided by NETCONF,particularly in terms of both stateless and stateful configuration manipulation for maximum operationalflexibility.
The Cisco NX-OS gRPC Agent supports the following protocol operations:
• Get
• GetConfig
• GetOper
• EditConfig
• StartSession
• CloseSession
• KillSession
Cisco Nexus 9000 Series NX-OS Programmability Guide, Release 7.x199

The gRPC Agent supports two types of operations:
• Stateless operations are performed entirely within a single message without creating a session.
• Stateful operations are performed using multiple messages. The following is the sequence of operationsthat are performed:
1. Start the session. This action acquires a unique session ID.
2. Perform session tasks using the session ID.
3. Close the session. This action invalidates the session ID.
The following are the supported operations. See the Appendix for their RPC definitions in the .proto file thatis exported by the gRPC Agent.
DescriptionOperation
Starts a new session between the client and server and acquires a unique sessionID.
StartSession
Writes the specified YANG data subset to the target datastore.EditConfig
Retrieves the specified YANG configuration data subset from the source datastore.GetConfig
Retrieves the specified YANG operational data from the source datastore.GetOper
Retrieves the specified YANG configuration and operational data from the sourcedatastore.
Get
Forces the termination of a session.KillSession
Requests graceful termination of a session.CloseSession
GetConfig, GetOper, and Get are stateless operations so don’t require a session ID.
EditConfig can be either stateless or stateful. For a stateless operation, specify the SessionID as 0. For a statefuloperation, a valid (nonzero) SessionID is required.
The gRPC Agent supports timeout for the sessions. The idle timeout for sessions can be configured on thedevice, after which idle sessions are closed and deleted.
Guidelines and LimitationsThe gRPC Agent has the following guideline and limitation:
• gRPC does not support enhanced Role-Based Access Control (RBAC) as specified in RFC 6536. Onlyusers with a "network-admin" role are granted access to the gRPC agent.
Configuring the gRPC AgentThe gRPCAgent supports the following configuration parameters under the [grpc] section in the configurationfile (/etc/mtx.conf).
Cisco Nexus 9000 Series NX-OS Programmability Guide, Release 7.x200
Model-Driven ProgrammabilityGuidelines and Limitations

DescriptionParameter
(Optional) Specifies the timeout in minutes afterwhich idle client sessions are disconnected.
The default timeout is 5 minutes.
A value of 0 disables timeout.
idle_timeout
(Optional) Specifies the number of maximumsimultaneous client sessions.
The default limit is 5 sessions.
The range is from 1 through 50.
limit
(Optional) Specifies the port number on which thegRPC Agent listens.
The default port is 50051.
lport
Specifies the key file location for TLS authentication.
The default location is /opt/mtx/etc/grpc.key.
key
Specifies the certificate file location for TLSauthentication.
The default location is /opt/mtx/etc/grpc.pem.
cert
Specifies the type of secure connection.
Valid choices are:
• TLS for TLS
• NONE for an insecure connection
security
Using the gRPC AgentGeneral Commands
You can enable or disable the gRPC Agent by issuing the [no] feature grpc command.
Example: A Basic Yang Path in JSON Format
client-host % cat payload.json{"namespace": "http://cisco.com/ns/yang/cisco-nx-os-device","System": {"bgp-items": {"inst-items": {"dom-items": {"Dom-list": {"name": "default","rtrId": "7.7.7.7",
Cisco Nexus 9000 Series NX-OS Programmability Guide, Release 7.x201
Model-Driven ProgrammabilityUsing the gRPC Agent

"holdIntvl": "100"}
}}
}}
}
The JSON structure has been pretty-formatted here for readability.Note
Sending an EditConfig Request to the Server
client-host % ./grpc_client -username=admin -password=cisco -operation=EditConfig-e_oper=Merge -def_op=Merge -err_op=stop-on-error -infile=payload.json -reqid=1-source=running -tls=true -serverAdd=192.0.20.123 -lport=50051
######################################################Starting the client service######################################################TLS set true for client requests1ems.cisco.comTLS FLAG:1192.0.20.123:50051All the client connections are securedSending EditConfig request to the serversessionid is0reqid:1{"rpc-reply":{"ok":""}}
Sending a GetConfig Request to the Server
client-host % ./grpc_client -username=admin -password=cisco -operation=GetConfig-infile=payload.json -reqid=1 -source=running -tls=true -serverAdd=192.0.20.123 -lport=50051
######################################################Starting the client service######################################################TLS set true for client requests1ems.cisco.comTLS FLAG:1192.0.20.123:50051All the client connections are securedSending GetConfig request to the serverin get configGot the response from the server#########################################Yang Json is:#########################################{"rpc-reply":{"data":{"System":{"bgp-items":{"inst-items":{"dom-items":{"Dom-list":{"name":"default","rtrId":"7.7.7.7","holdIntvl":"100"}}}}}}}}#########################################client-host %
Cisco Nexus 9000 Series NX-OS Programmability Guide, Release 7.x202
Model-Driven ProgrammabilityUsing the gRPC Agent

Troubleshooting the gRPC AgentTroubleshooting Connectivity
• From a client system, verify that the agent is listening on the port. For example:
client-host % nc –z 192.0.20.222 50051Connection to 192.0.20.222 50051 port [tcp/*] succeeded!client-host % echo $?0client-host %
• In the NX-OS, check the gRPC agent status by issuing show feature | grep grpc.
gRPC Protobuf FileThe gRPC Agent exports the supported operations and data structures in the proto definition file at/opt/mtx/etc/nxos_grpc.proto. The file is included in the gRPC Agent RPM. The following shows thedefinitions:
// Copyright 2016, Cisco Systems Inc.// All rights reserved.
syntax = "proto3";
package NXOSExtensibleManagabilityService;
// Service provided by Cisco NX-OS gRPC Agentservice gRPCConfigOper {
// Retrieves the specified YANG configuration data subset from the// source datastorerpc GetConfig(GetConfigArgs) returns(stream GetConfigReply) {};
// Retrieves the specified YANG operational data from the source datastorerpc GetOper(GetOperArgs) returns(stream GetOperReply) {};
// Retrieves the specified YANG configuration and operational data// subset from the source datastorerpc Get(GetArgs) returns(stream GetReply){};
// Writes the specified YANG data subset to the target datastorerpc EditConfig(EditConfigArgs) returns(EditConfigReply) {};
// Starts a new session between the client and server and acquires a// unique session IDrpc StartSession(SessionArgs) returns(SessionReply) {};
// Requests graceful termination of a sessionrpc CloseSession(CloseSessionArgs) returns (CloseSessionReply) {};
// Forces the termination of a sessionrpc KillSession(KillArgs) returns(KillReply) {};
Cisco Nexus 9000 Series NX-OS Programmability Guide, Release 7.x203
Model-Driven ProgrammabilityTroubleshooting the gRPC Agent

// Unsupported; reserved for futurerpc DeleteConfig(DeleteConfigArgs) returns(DeleteConfigReply) {};
// Unsupported; reserved for futurerpc CopyConfig(CopyConfigArgs) returns(CopyConfigReply) {};
// Unsupported; reserved for futurerpc Lock(LockArgs) returns(LockReply) {};
// Unsupported; reserved for futurerpc UnLock(UnLockArgs) returns(UnLockReply) {};
// Unsupported; reserved for futurerpc Commit(CommitArgs) returns(CommitReply) {};
// Unsupported; reserved for futurerpc Validate(ValidateArgs) returns(ValidateReply) {};
// Unsupported; reserved for futurerpc Abort(AbortArgs) returns(AbortReply) {};
}
message GetConfigArgs{
// JSON-encoded YANG data to be retrievedstring YangPath = 1;
// (Optional) Specifies the request ID. Default value is 0.int64 ReqID = 2;
// (Optional) Specifies the source datastore; only "running" is supported.// Default is "running".string Source = 3;
}
message GetConfigReply{
// The request ID specified in the request.int64 ReqID = 1;
// JSON-encoded YANG data that was retrievedstring YangData = 2;
// JSON-encoded error information when request failsstring Errors = 3;
}
message GetOperArgs{
// JSON-encoded YANG data to be retrievedstring YangPath = 1;
// (Optional) Specifies the request ID. Default value is 0.int64 ReqID = 2;
}
message GetOperReply{
// The request ID specified in the request.int64 ReqID = 1;
// JSON-encoded YANG data that was retrievedstring YangData = 2;
Cisco Nexus 9000 Series NX-OS Programmability Guide, Release 7.x204
Model-Driven ProgrammabilitygRPC Protobuf File

// JSON-encoded error information when request failsstring Errors = 3;
}
message GetArgs{
// JSON-encoded YANG data to be retrievedstring YangPath=1;
// (Optional) Specifies the request ID. Default value is 0.int64 ReqID = 2;
}
message GetReply{
// The request ID specified in the request.int64 ReqID = 1;
// JSON-encoded YANG data that was retrievedstring YangData = 2;
// JSON-encoded error information when request failsstring Errors = 3;
}
message EditConfigArgs{
// JSON-encoded YANG data to be editedstring YangPath = 1;
// Specifies the operation to perform on teh configuration datastore with// the YangPath data. Possible values are:// create// merge// replace// delete// remove// If not specified, default value is "merge".string Operation = 2;
// A unique session ID acquired from a call to StartSession().// For stateless operation, this value should be set to 0.int64 SessionID = 3;
// (Optional) Specifies the request ID. Default value is 0.int64 ReqID = 4;
// (Optional) Specifies the target datastore; only "running" is supported.// Default is "running".string Target = 5;
// Specifies the default operation on the given object while traversing// the configuration tree.// The following operations are possible:// merge: merges the configuration data with the target datastore;// this is the default.// replace: replaces the configuration data with the target datastore.// none: target datastore is unaffected during the traversal until// the specified object is reached.string DefOp = 6;
// Specifies the action to be performed in the event of an error during// configuration. Possible values are:
Cisco Nexus 9000 Series NX-OS Programmability Guide, Release 7.x205
Model-Driven ProgrammabilitygRPC Protobuf File

// stop// roll-back// continue// Default is "roll-back".string ErrorOp = 7;
}
message EditConfigReply{
// The request ID specified in the request.int64 ReqID = 1;
// If EditConfig is successful, YangData contains a JSON-encoded "ok" response.string YangData = 2;
// JSON-encoded error information when request failsstring Errors = 3;
}
message DeleteConfigArgs{
// A unique session ID acquired from a call to StartSession().// For stateless operation, this value should be set to 0.int64 SessionID = 1;
// (Optional) Specifies the request ID. Default value is 0.int64 ReqID = 2;
// (Optional) Specifies the target datastore; only "running" is supported.// Default is "running".string Target = 3;
}
message DeleteConfigReply{
// The request ID specified in the request.int64 ReqID = 1;
// If DeleteConfig is successful, YangData contains a JSON-encoded "ok" response.string YangData = 2;
// JSON-encoded error information when request failsstring Errors = 3;
}
message CopyConfigArgs{
// A unique session ID acquired from a call to StartSession().// For stateless operation, this value should be set to 0.int64 SessionID = 1;
// (Optional) Specifies the request ID. Default value is 0.int64 ReqID = 2;
// (Optional) Specifies the source datastore; only "running" is supported.// Default is "running".string Source = 3;
// (Optional) Specifies the target datastore; only "running" is supported.// Default is "running".string Target = 4;
}
message CopyConfigReply
Cisco Nexus 9000 Series NX-OS Programmability Guide, Release 7.x206
Model-Driven ProgrammabilitygRPC Protobuf File

{// The request ID specified in the request.int64 ReqID = 1;
// If CopyConfig is successful, YangData contains a JSON-encoded "ok" response.string YangData = 2;
// JSON-encoded error information when request failsstring Errors = 3;
}
message LockArgs{
// A unique session ID acquired from a call to StartSession().int64 SessionID = 1;
// (Optional) Specifies the request ID. Default value is 0.int64 ReqID=2;
// (Optional) Specifies the target datastore; only "running" is supported.// Default is "running".string Target = 3;
}
message LockReply{
// The request ID specified in the request.int64 ReqID = 1;
// If Lock is successful, YangData contains a JSON-encoded "ok" response.string YangData = 2;
// JSON-encoded error information when request failsstring Errors = 3;
}
message UnLockArgs{
// A unique session ID acquired from a call to StartSession().int64 SessionID = 1;
// (Optional) Specifies the request ID. Default value is 0.int64 ReqID = 2;
// (Optional) Specifies the target datastore; only "running" is supported.// Default is "running".string Target = 3;
}
message UnLockReply{
// The request ID specified in the request.int64 ReqID = 1;
// If UnLock is successful, YangData contains a JSON-encoded "ok" response.string YangData = 2;
// JSON-encoded error information when request failsstring Errors = 3;
}
message SessionArgs{
// (Optional) Specifies the request ID. Default value is 0.
Cisco Nexus 9000 Series NX-OS Programmability Guide, Release 7.x207
Model-Driven ProgrammabilitygRPC Protobuf File

int64 ReqID = 1;}
message SessionReply{
// The request ID specified in the request.int64 ReqID = 1;int64 SessionID = 2;
// JSON-encoded error information when request failsstring Errors = 3;
}
message CloseSessionArgs{
// (Optional) Specifies the request ID. Default value is 0.int64 ReqID = 1;
// A unique session ID acquired from a call to StartSession().int64 SessionID = 2;
}
message CloseSessionReply{
// The request ID specified in the request.int64 ReqID = 1;
// If CloseSession is successful, YangData contains a JSON-encoded "ok" response.string YangData = 2;
// JSON-encoded error information when request failsstring Errors = 3;
}
message KillArgs{
// A unique session ID acquired from a call to StartSession().int64 SessionID = 1;
int64 SessionIDToKill = 2;
// (Optional) Specifies the request ID. Default value is 0.int64 ReqID = 3;
}
message KillReply{
// The request ID specified in the request.int64 ReqID = 1;
// If Kill is successful, YangData contains a JSON-encoded "ok" response.string YangData = 2;
// JSON-encoded error information when request failsstring Errors = 3;
}
message ValidateArgs{
// A unique session ID acquired from a call to StartSession().int64 SessionID = 1;
// (Optional) Specifies the request ID. Default value is 0.int64 ReqID = 2;
Cisco Nexus 9000 Series NX-OS Programmability Guide, Release 7.x208
Model-Driven ProgrammabilitygRPC Protobuf File

}
message ValidateReply{
// The request ID specified in the request.int64 ReqID = 1;
// If Validate is successful, YangData contains a JSON-encoded "ok" response.string YangData = 2;
// JSON-encoded error information when request failsstring Errors = 3;
}
message CommitArgs{
// A unique session ID acquired from a call to StartSession().int64 SessionID = 1;
// (Optional) Specifies the request ID. Default value is 0.int64 ReqID = 2;
}
message CommitReply{
// (Optional) Specifies the request ID. Default value is 0.int64 ReqID = 1;
// If Commit is successful, YangData contains a JSON-encoded "ok" response.string YangData = 2;
// JSON-encoded error information when request failsstring Errors = 3;
}
message AbortArgs{
// A unique session ID acquired from a call to StartSession().int64 SessionID = 1;
// (Optional) Specifies the request ID. Default value is 0.int64 ReqID = 2;
}
message AbortReply{
// (Optional) Specifies the request ID. Default value is 0.int64 ReqID = 1;
// If Abort is successful, YangData contains a JSON-encoded "ok" response.string YangData = 2;
// JSON-encoded error information when request failsstring Errors = 3;
}
Cisco Nexus 9000 Series NX-OS Programmability Guide, Release 7.x209
Model-Driven ProgrammabilitygRPC Protobuf File

Cisco Nexus 9000 Series NX-OS Programmability Guide, Release 7.x210
Model-Driven ProgrammabilitygRPC Protobuf File

C H A P T E R 26Dynamic Logger
• Prerequisites, on page 211• Reference, on page 211
PrerequisitesBefore using dynamic logging, confirm that the following are on your switch:
• The libmtxlogmgr*.so library is installed /opt/mtx/lib/. The libmtxlogmgr*.so libraryis part of the mtx_infra RPM.
• The mtx.conf file that is located in /etc/ contains:[mtxlogger]config=/opt/mtx/conf/mtxlogger.cfg
• The mtxlogger.cfg file is in /opt/mtx/conf/.
ReferenceThe configuration file has the following structure:<config name="nxos-device-mgmt"><container name="mgmtConf"><container name="logging"><leaf name="enabled" type="boolean" default="false"></leaf><leaf name="allActive" type="boolean" default="false"></leaf><container name="format"><leaf name="content" type="string" default="$DATETIME$ $COMPONENTID$ $TYPE$:
$MSG$"></leaf><container name="componentID">
<leaf name="enabled" type="boolean" default="true"></leaf></container><container name="dateTime">
<leaf name="enabled" type="boolean" default="true"></leaf><leaf name="format" type="string" default="%y%m%d.%H%M%S"></leaf>
</container><container name="fcn">
<leaf name="enabled" type="boolean" default="true"></leaf><leaf name="format" type="string"
default="$CLASS$::$FCNNAME$($ARGS$)@$LINE$"></leaf></container>
Cisco Nexus 9000 Series NX-OS Programmability Guide, Release 7.x211

</container><container name="dest"><container name="console"><leaf name="enabled" type="boolean" default="false"></leaf>
</container><container name="file"><leaf name="enabled" type="boolean" default="false"></leaf><leaf name="name" type="string" default="mtx-internal.log"></leaf><leaf name="location" type="string" default="./mtxlogs"></leaf>
<leaf name="mbytes-rollover" type="uint32" default="10"></leaf><leaf name="hours-rollover" type="uint32" default="24"></leaf><leaf name="startup-rollover" type="boolean" default="false"></leaf>
<leaf name="max-rollover-files" type="uint32" default="10"></leaf></container>
</container><list name="logitems" key="id"><listitem><leaf name="id" type="string"></leaf>
<leaf name="active" type="boolean" default="true"></leaf></listitem>
</list></container>
</container></config>
The <list> tag defines the log filters by <componentID>.
The following table describes some of the containers and their leaves.
Table 15: Container and Leaf Descriptions
Contained Leaf andDescription
Contained ContainersContainer DescriptionContainer
enabled: Boolean thatdetermines whetherlogging is on or off.Default off.
allActive: Boolean thatactivates all definedlogging items for logging.Default off
format
dest
file
Also containslist tag"logitems"
Note
Contains all logging datatypes
logging
Cisco Nexus 9000 Series NX-OS Programmability Guide, Release 7.x212
Model-Driven ProgrammabilityReference

Contained Leaf andDescription
Contained ContainersContainer DescriptionContainer
content: String listing datatypes included in logmessages. Includes:
• $DATETIME$:Include date or timein log message
• $COMPONENTID$:Include componentname in logmessage.
• $TYPE$: Includesmessage type ("",INFO, WARNING,ERROR)
• $SRCFILE$:Includes name ofsource file.
• $SRCLINE$:Include line numberof source file
• $FCNINFO$ Includeclass::function namefrom the source file.
• $MSG$: Includeactual log messagetext.
componentID
dateTime
type
fcn
Contains the log messageformat information
format
enabled: Boolean thatdetermines if the logmessage includes thecomponent ID. Default to"true." Value of "false"returns a "" string in logmessage.
NAName of loggedcomponent.
componentID
enabled: Boolean whetherto include date or timeinformation in logmessage. Default isenabled.
format: String of values toinclude in log message.Format of%y%m%d.%H%M%S.
NADate or time of logmessage
dateTime
Cisco Nexus 9000 Series NX-OS Programmability Guide, Release 7.x213
Model-Driven ProgrammabilityReference

Contained Leaf andDescription
Contained ContainersContainer DescriptionContainer
NAconsole: Destinationconsole. Only oneallowed.
file: destination file.Multiple allowed.
Holds destination logger'sconfiguration settings.
dest
enabled: Boolean thatdetermines whether theconsole is enabled forlogging. Default of"false."
NADestination consoleconsole
Cisco Nexus 9000 Series NX-OS Programmability Guide, Release 7.x214
Model-Driven ProgrammabilityReference

Contained Leaf andDescription
Contained ContainersContainer DescriptionContainer
enabled: Boolean thatdetermines whether thedestination is enabled.Default is "false."
name: String of thedestination log file.Default of"mtx-internal.log"
location: String ofdestination file path.Default at "./mtxlogs."
mbytes-rollover: uint32that determines the lengthof the log file before thesystem overwrites theoldest data. Default is 10Mbytes.
hours-rollover: uint32 thatdetermines the length ofthe log file in terms ofhours. Default is 24 hours.
startup-rollover: Booleanthat determines if the logfile is rolled over uponagent start or restart.Default value of "false."
max-rollover-files: uint32that determines themaximum number ofrollover files; deletes theoldest file when themax-rollover-files valueexceeded. Default valueof 10.
NADetermines the settings ofthe destination file.
file
Example
The following is the configuration file with the default installed configuration.<config name="nxos-device-mgmt"><container name="mgmtConf"><container name="logging"><leaf name="enabled" type="boolean" default="false">true</leaf><leaf name="allActive" type="boolean" default="false">false</leaf><container name="format"><leaf name="content" type="string" default="$DATETIME$ $COMPONENTID$ $TYPE$:
$MSG$">$DATETIME$ $COMPONENTID$ $TYPE$ $SRCFILE$ @ $SRCLINE$ $FCNINFO$:$MSG$</leaf>
Cisco Nexus 9000 Series NX-OS Programmability Guide, Release 7.x215
Model-Driven ProgrammabilityReference
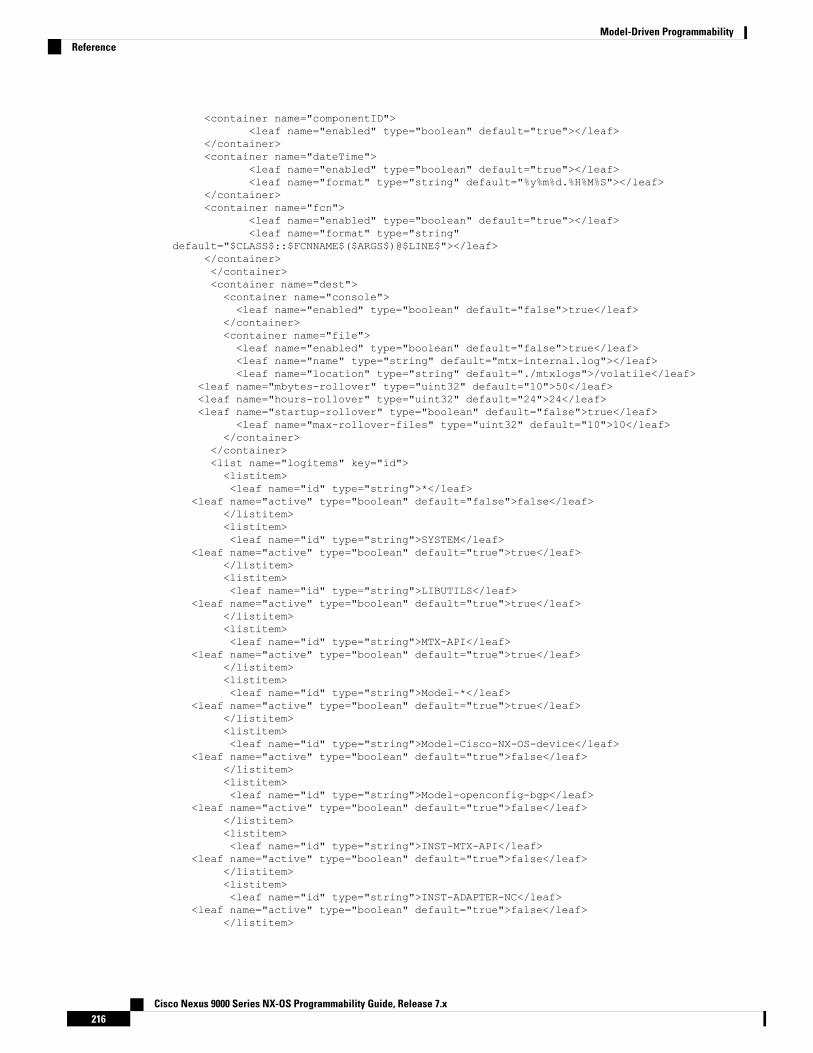
<container name="componentID"><leaf name="enabled" type="boolean" default="true"></leaf>
</container><container name="dateTime">
<leaf name="enabled" type="boolean" default="true"></leaf><leaf name="format" type="string" default="%y%m%d.%H%M%S"></leaf>
</container><container name="fcn">
<leaf name="enabled" type="boolean" default="true"></leaf><leaf name="format" type="string"
default="$CLASS$::$FCNNAME$($ARGS$)@$LINE$"></leaf></container></container><container name="dest"><container name="console"><leaf name="enabled" type="boolean" default="false">true</leaf>
</container><container name="file"><leaf name="enabled" type="boolean" default="false">true</leaf><leaf name="name" type="string" default="mtx-internal.log"></leaf><leaf name="location" type="string" default="./mtxlogs">/volatile</leaf>
<leaf name="mbytes-rollover" type="uint32" default="10">50</leaf><leaf name="hours-rollover" type="uint32" default="24">24</leaf><leaf name="startup-rollover" type="boolean" default="false">true</leaf>
<leaf name="max-rollover-files" type="uint32" default="10">10</leaf></container>
</container><list name="logitems" key="id"><listitem><leaf name="id" type="string">*</leaf>
<leaf name="active" type="boolean" default="false">false</leaf></listitem><listitem><leaf name="id" type="string">SYSTEM</leaf>
<leaf name="active" type="boolean" default="true">true</leaf></listitem><listitem><leaf name="id" type="string">LIBUTILS</leaf>
<leaf name="active" type="boolean" default="true">true</leaf></listitem><listitem><leaf name="id" type="string">MTX-API</leaf>
<leaf name="active" type="boolean" default="true">true</leaf></listitem><listitem><leaf name="id" type="string">Model-*</leaf>
<leaf name="active" type="boolean" default="true">true</leaf></listitem><listitem><leaf name="id" type="string">Model-Cisco-NX-OS-device</leaf>
<leaf name="active" type="boolean" default="true">false</leaf></listitem><listitem><leaf name="id" type="string">Model-openconfig-bgp</leaf>
<leaf name="active" type="boolean" default="true">false</leaf></listitem><listitem><leaf name="id" type="string">INST-MTX-API</leaf>
<leaf name="active" type="boolean" default="true">false</leaf></listitem><listitem><leaf name="id" type="string">INST-ADAPTER-NC</leaf>
<leaf name="active" type="boolean" default="true">false</leaf></listitem>
Cisco Nexus 9000 Series NX-OS Programmability Guide, Release 7.x216
Model-Driven ProgrammabilityReference

<listitem><leaf name="id" type="string">INST-ADAPTER-RC</leaf>
<leaf name="active" type="boolean" default="true">false</leaf></listitem><listitem><leaf name="id" type="string">INST-ADAPTER-GRPC</leaf>
<leaf name="active" type="boolean" default="true">false</leaf></listitem>
</list></container>
</container></config>
Cisco Nexus 9000 Series NX-OS Programmability Guide, Release 7.x217
Model-Driven ProgrammabilityReference

Cisco Nexus 9000 Series NX-OS Programmability Guide, Release 7.x218
Model-Driven ProgrammabilityReference

C H A P T E R 27Model-Driven Telemetry
• About Telemetry, on page 219• Licensing Requirements for Telemetry, on page 221• Installing and Upgrading Telemetry, on page 221• Guidelines and Restrictions for Telemetry, on page 222• Configuring Telemetry Using the CLI, on page 226• Configuring Telemetry Using the NX-API, on page 241• Additional References, on page 254
About TelemetryCollecting data for analyzing and troubleshooting has always been an important aspect in monitoring thehealth of a network.
Cisco NX-OS provides several mechanisms such as SNMP, CLI, and Syslog to collect data from a network.These mechanisms have limitations that restrict automation and scale. One limitation is the use of the pullmodel, where the initial request for data from network elements originates from the client. The pull modeldoes not scale when there is more than one network management station (NMS) in the network. With thismodel, the server sends data only when clients request it. To initiate such requests, continual manual interventionis required. This continual manual intervention makes the pull model inefficient.
A push model continuously streams data out of the network and notifies the client. Telemetry enables thepush model, which provides near-real-time access to monitoring data.
Telemetry Components and ProcessTelemetry consists of four key elements:
• Data Collection— Telemetry data is collected from the Data Management Engine (DME) database inbranches of the object model specified using distinguished name (DN) paths. The data can be retrievedperiodically (frequency-based) or only when a change occurs in any object on a specified path(event-based). You can use the NX-API to collect frequency-based data.
• Data Encoding— The telemetry encoder encapsulates the collected data into the desired format fortransporting.
NX-OS encodes telemetry data in the Google Protocol Buffers (GPB) and JSON format.
Cisco Nexus 9000 Series NX-OS Programmability Guide, Release 7.x219

• Data Transport—NX-OS transports telemetry data using HTTP for JSON encoding and the Googleremote procedure call (gRPC) protocol for GPB encoding. The gRPC receiver supports message sizesgreater than 4 MB. (Telemetry data using HTTPS is also supported if a certificate is configured.)
Starting with Cisco Nexus 7.0(3)I7(1), UDP and secure UDP (DTLS) are supported as telemetry transportprotocols. You can add destinations that receive UDP. The encoding for UDP and secure UDP can beGPB or JSON.
Use the following command to configure the UDP transport to stream data using a datagram socket eitherin JSON or GPB:
destination-group numip address xxx.xxx.xxx.xxx port xxxx protocol UDP encoding {JSON | GPB }
Example for an IPv4 destination:
destination-group 100ip address 171.70.55.69 port 50001 protocol UDP encoding GPB
The UDP telemetry is with the following header:
typedef enum tm_encode_ {TM_ENCODE_DUMMY,TM_ENCODE_GPB,TM_ENCODE_JSON,TM_ENCODE_XML,TM_ENCODE_MAX,
} tm_encode_type_t;
typedef struct tm_pak_hdr_ {uint8_t version; /* 1 */uint8_t encoding;uint16_t msg_size;uint8_t secure;uint8_t padding;
}__attribute__ ((packed, aligned (1))) tm_pak_hdr_t;
Use the first 6 bytes in the payload to process telemetry data using UDP, using one of the followingmethods:
• Read the information in the header to determine which decoder to use to decode the data, JSON orGPB, if the receiver is meant to receive different types of data from multiple endpoints.
• Remove the header if you are expecting one decoder (JSON or GPB) but not the other.
Depending on the receiving operation system and the network load, using theUDP protocol may result in packet drops.
Note
• Telemetry Receiver—A telemetry receiver is a remote management system or application that storesthe telemetry data.
The GPB encoder stores data in a generic key-value format. The encoder requires metadata in the form of acompiled .proto file to translate the data into GPB format.
Cisco Nexus 9000 Series NX-OS Programmability Guide, Release 7.x220
Model-Driven ProgrammabilityTelemetry Components and Process

In order to receive and decode the data stream correctly, the receiver requires the .proto file that describesthe encoding and the transport services. The encoding decodes the binary stream into a key value string pair.
A telemetry .proto file that describes the GPB encoding and gRPC transport is available on Cisco's GitLab:https://github.com/CiscoDevNet/nx-telemetry-proto
High Availability of the Telemetry ProcessHigh availability of the telemetry process is supported with the following behaviors:
• System Reload—During a system reload, any telemetry configuration and streaming services arerestored.
• Supervisor Failover—Although telemetry is not on hot standby, telemetry configuration and streamingservices are restored when the new active supervisor is running.
• Process Restart—If the telemetry process freezes or restarts for any reason, configuration and streamingservices are restored when telemetry is restarted.
Licensing Requirements for TelemetryLicense RequirementProduct
Telemetry requires no license. Any feature not included in a license package is bundledwith the Cisco NX-OS image and is provided at no extra charge to you. For a completeexplanation of the Cisco NX-OS licensing scheme, see theCisco NX-OS Licensing Guide.
Cisco NX-OS
Installing and Upgrading TelemetryInstalling the Application
The telemetry application is packaged as a feature RPM and included with the NX-OS release. The RPM isinstalled by default as part of the image bootup. After installation, you can start the application using thefeature telemetry command. The RPM file is located in the /rpms directory and is named as follows:
telemetry-version-build_ID.libn32_n9000.rpm
As in the following example:telemetry-2.0.0-7.0.3.I5.1.lib32_n9000.rpm
Installing Incremental Updates and Fixes
Copy the RPM to the device bootflash and use the following commands from the bash prompt:feature bashrun bash sudo su
Then copy the RPM to the device bootflash. Use the following commands from the bash prompt:yum upgrade telemetry_new_version.rpm
The application is upgraded and the change appears when the application is started again.
Cisco Nexus 9000 Series NX-OS Programmability Guide, Release 7.x221
Model-Driven ProgrammabilityHigh Availability of the Telemetry Process

Downgrading to a Previous Version
To downgrade the telemetry application to a previous version, use the following command from the bashprompt:
yum downgrade telemetry
Verifying the Active Version
To verify the active version, run the following command from the switch exec prompt:show install active
The show install active command will only show the active installed RPM after an upgrade has occurred.The default RPM that comes bundled with the NX-OS will not be displayed.
Note
Guidelines and Restrictions for TelemetryTelemetry has the following configuration guidelines and limitations:
• Telemetry is supported in Cisco NX-OS releases starting from 7.0(3)I5(1) for releases that support thedata management engine (DME) Native Model.
• Release 7.0(3)I6(1) supports DME data collection, NX-API data sources, Google protocol buffer (GPB)encoding over Google Remote Procedure Call (gRPC) transport, and JSON encoding over HTTP.
• The smallest sending interval (cadence) supported is five seconds for a depth of 0. Theminimum cadencevalues for depth values greater than 0 depends on the size of the data being streamed out. Configuringcadences below the minimum value may result in undesirable system behavior.
• Up to five remote management receivers (destinations) are supported. Configuring more than five remotereceivers may result in undesirable system behavior.
• In the event that a telemetry receiver goes down, other receivers will see data flow interrupted. The failedreceivermust be restarted. Then start a new connectionwith the switch by unconfiguring then reconfiguringthe failer receiver's IP address under the destination group.
• Telemetry can consume up to 20% of the CPU resource.
• To configure SSL certificate based authentication and the encryption of streamed data, you can providea self signed SSL certificate with certificate ssl cert path hostname "CN" command. (NX-OS 7.0(3)I7(1)and later).
• QoS Explicit Congestion Notification (ECN) statistics are supported only on Cisco Nexus 9364C,9336C-FX, and 93240YC-FX switches.
Configuration Commands After Downgrading to an Older Release
After a downgrade to an older release, some configuration commands or command options might fail becausethe older release may not support them. As a best practice when downgrading to an older release, unconfigureand reconfigure the telemetry feature after the new image comes up to avoid the failure of unsupportedcommands or command options.
Cisco Nexus 9000 Series NX-OS Programmability Guide, Release 7.x222
Model-Driven ProgrammabilityGuidelines and Restrictions for Telemetry

The following example shows this procedure:
• Copy the telemetry configuration to a file:
switch# show running-config | section telemetryfeature telemetrytelemetrydestination-group 100ip address 1.2.3.4 port 50004 protocol gRPC encoding GPB
sensor-group 100path sys/bgp/inst/dom-default depth 0
subscription 600dst-grp 100snsr-grp 100 sample-interval 7000
switch# show running-config | section telemetry > telemetry_running_configswitch# show file bootflash:telemetry_running_configfeature telemetrytelemetrydestination-group 100ip address 1.2.3.4 port 50004 protocol gRPC encoding GPB
sensor-group 100path sys/bgp/inst/dom-default depth 0
subscription 600dst-grp 100snsr-grp 100 sample-interval 7000
switch#
• Execute the downgrade operation. When the image comes up and the switch is ready, copy the telemetryconfigurations back to the switch:
switch# copy telemetry_running_config running-config echo-commands`switch# config terminal``switch(config)# feature telemetry``switch(config)# telemetry``switch(config-telemetry)# destination-group 100``switch(conf-tm-dest)# ip address 1.2.3.4 port 50004 protocol gRPC encoding GPB ``switch(conf-tm-dest)# sensor-group 100``switch(conf-tm-sensor)# path sys/bgp/inst/dom-default depth 0``switch(conf-tm-sensor)# subscription 600``switch(conf-tm-sub)# dst-grp 100``switch(conf-tm-sub)# snsr-grp 100 sample-interval 7000``switch(conf-tm-sub)# end`Copy complete, now saving to disk (please wait)...Copy complete.switch#
gRPC Error Behavior
The switch client will disable the connection to the gRPC receiver if the gRPC receiver sends 20 errors. Youwill then need to unconfigure then reconfigure the receiver's IP address under the destination group to enablethe gRPC receiver. Errors include:
• The gRPC client sends the wrong certificate for secure connections,
• The gRPC receiver takes too long to handle client messages and incurs a timeout. Avoid timeouts byprocessing messages using a separate message processing thread.
Cisco Nexus 9000 Series NX-OS Programmability Guide, Release 7.x223
Model-Driven ProgrammabilityGuidelines and Restrictions for Telemetry

Telemetry Compression for gRPC Transport
Starting with Cisco NX-OS 7.0(3)I7(1), telemetry compression support is available for gRPC transport. Youcan use the use-compression gzip command to enable compression. (Disable compression with the nouse-compression gzip command.)
The following example enables compression:
switch(config)# telemetryswitch(config-telemetry)# destination-profileswitch(config-tm-dest-profile)# use-compression gzip
The following example shows compression is enabled:
switch(conf-tm-dest)# show telemetry transport 0 stats
Session Id: 0Connection Stats
Connection Count 0Last Connected: NeverDisconnect Count 0Last Disconnected: Never
Transmission StatsCompression: gzip
Transmit Count: 0Last TX time: NoneMin Tx Time: 0 msMax Tx Time: 0 msAvg Tx Time: 0 msCur Tx Time: 0 ms
switch2(config-if)# show telemetry transport 0 stats
Session Id: 0Connection StatsConnection Count 0Last Connected: NeverDisconnect Count 0Last Disconnected: NeverTransmission StatsCompression: disabledSource Interface: loopback1(1.1.3.4)Transmit Count: 0Last TX time: NoneMin Tx Time: 0 msMax Tx Time: 0 msAvg Tx Time: 0 msCur Tx Time: 0 msswitch2(config-if)#
The following is an example of use-compression as a POST payload:
{"telemetryDestProfile": {"attributes": {"adminSt": "enabled"
},"children": [{"telemetryDestOptCompression": {
Cisco Nexus 9000 Series NX-OS Programmability Guide, Release 7.x224
Model-Driven ProgrammabilityGuidelines and Restrictions for Telemetry
"attributes": {"name": "gzip"
}}
}]
}}
NX-API Sensor Path Limitations
NX-API can collect and stream switch information not yet in the DME using show commands. However,using the NX-API instead of streaming data from the DME has inherent scale limitations as outlined:
• The switch backend dynamically processes NX-API calls such as show commands,
• NX-API spawns several processes that can consume up to a maximum of 20% of the CPU.
• NX-API data translates from the CLI to XML to JSON.
The following is a suggested user flow to help limit excessive NX-API sensor path bandwidth consumption:
1. Check whether the show command has NX-API support. You can confirm whether NX-API supports thecommand from the VSH with the pipe option: show <command> | json or show <command> | json
pretty.
Avoid commands that take the switch more than 30 seconds to return JSON output.Note
2. Refine the show command to include any filters or options.
• Avoid enumerating the same command for individual outputs; i.e., show vlan id 100, show vlan id101, etc.. Instead, use the CLI range options; i.e., show vlan id 100-110,204, whenever possible toimprove performance.
If only the summary/counter is needed, then avoid dumping a whole show command output to limitthe bandwidth and data storage required for data collection.
3. Configure telemetry with sensor groups that use NX-API as their data sources. Add the show commandsas sensor paths
4. Configure telemetry with a cadence of 5 times the processing time of the respective show command tolimit CPI usage.
5. Receive and process the streamed NX-API output as part of the existing DME collection.
Telemetry VRF Support
Starting with Cisco NX-OS 7.0(3)I7(1), telemetry VRF support allows you to specify a transport VRF. Thismeans that the telemetry data stream can egress via front-panel ports and avoid possible competition betweenSSH/NGINX control sessions.
You can use the use-vrf vrf-name command to specify the transport VRF.
The following example specifies the transport VRF:
Cisco Nexus 9000 Series NX-OS Programmability Guide, Release 7.x225
Model-Driven ProgrammabilityGuidelines and Restrictions for Telemetry

switch(config)# telemetryswitch(config-telemetry)# destination-profileswitch(config-tm-dest-profile)# use-vrf test_vrf
The following is an example of use-vrf as a POST payload:
{"telemetryDestProfile": {"attributes": {"adminSt": "enabled"
},"children": [{"telemetryDestOptVrf": {"attributes": {"name": "default"
}}
}]
}}
Configuring Telemetry Using the CLI
Configuring Telemetry Using the NX-OS CLIThe following steps enable streaming telemetry and configuring the source and destination of the data stream.These steps also include optional steps to enable and configure SSL/TLS certificates and GPB encoding.
Before you begin
Your switch must be running Cisco NX-OS Release 7.3(0)I5(1) or a later release.
Procedure
PurposeCommand or Action
Create an SSL or TLS certificate on the serverthat will receive the data, where
(Optional) openssl argument
Example:
Step 1
private.key file is the private key and thepublic.crt is the public key.Generate an SSL/TLS certificate using a
specific argument, such as the following:
• To generate a private RSA key: opensslgenrsa -cipher -out filename.keycipher-bit-length
For example:switch# openssl genrsa -des3 -outserver.key 2048
Cisco Nexus 9000 Series NX-OS Programmability Guide, Release 7.x226
Model-Driven ProgrammabilityConfiguring Telemetry Using the CLI

PurposeCommand or Action
• To write the RSA key: openssl rsa -infilename.key -out filename.key
For example:switch# openssl rsa -in server.key-out server.key
• To create a certificate that contains thepublic or private key: openssl req
-encoding-standard -new -newfilename.key -out filename.csr -subj'/CN=localhost'
For example:switch# openssl req -sha256 -new-key server.key -out server.csr-subj '/CN=localhost'
• To create a public key: openssl x509 -req-encoding-standard -days timeframe-in filename.csr -signkey filename.key-out filename.csr
For example:switch# openssl x509 -req -sha256-days 365 -in server.csr -signkeyserver.key-out server.crt
Enter the global configuration mode.configure terminal
Example:
Step 2
switch# configure terminalswitch(config)#
Enable the streaming telemetry feature.feature telemetryStep 3
Enable NX-API.feature nxapiStep 4
Enable the VRF management to be used forNX-API communication.
nxapi use-vrf managementStep 5
Enter configuration mode for streamingtelemetry.
telemetry
Example:
Step 6
switch(config)# telemetryswitch(config-telemetry)#
Use an existing SSL/TLS certificate.(Optional) certificate certificate_pathhost_URL
Step 7
Example:switch(config-telemetry)# certificate/bootflash/server.key localhost
Cisco Nexus 9000 Series NX-OS Programmability Guide, Release 7.x227
Model-Driven ProgrammabilityConfiguring Telemetry Using the NX-OS CLI

PurposeCommand or Action
(Optional) Specify a transport VRF or enabletelemetry compression for gRPC transport.
Step 8 • Enter the destination-profile commandto specify the default destination profile.
Example: • Enter any of the following commands:
switch(config-telemetry)# • use-vrf vrf to specify thedestination VRF.destination-profile
switch(conf-tm-dest-profile)# use-vrf• use-compression gzip to specifythe destination compressionmethod.
defaultswitch(conf-tm-dest-profile)#use-compression gzip
After configuring the use-vrfcommand, you must configure anew destination IP address withinthe new VRF. However, you mayre-use the same destination IPaddress by unconfiguring andreconfiguring the destination. Thisensures that the telemetry datastreams to the same destination IPaddress in the new VRF.
Note
Create a sensor group with ID srgp_id andenter sensor group configuration mode.
sensor-group sgrp_id
Example:
Step 9
Currently only numeric ID values aresupported. The sensor group defines nodes thatwill be monitored for telemetry reporting.
switch(config-telemetry)# sensor-group100switch(conf-tm-sensor)#
Select a data source. Select from either DMEor NX-API as the data source.
(Optional) data-source data-source-type
Example:
Step 10
DME is the default data source.Noteswitch(config-telemetry)# data-sourceNX-API
Add a sensor path to the sensor group.path sensor_path depth 0[filter-condition filter]
Step 11
• The depth setting specifies the retrievallevel for the sensor path. Depth settingsof 0 - 32, unbounded are supported.
Example:
• The following command is applicable forDME, not for NX-API:switch(conf-tm-sensor)# pathsys/bd/bd-[vlan-100] depth 0
depth 0 is the default depth.
NX-API-based sensor pathscan only use depth 0.
If a path is subscribed for theevent collection, the depthonly supports 0 andunbounded. Other valueswould be treated as 0.
Note
filter-condition eq(l2BD.operSt,"down")
Use the following syntax for state-basedfiltering to trigger only when operStchanges from up to down, with nonotifications of when the MO changes.switch(conf-tm-sensor)# pathsys/bd/bd-[vlan-100] depth 0
Cisco Nexus 9000 Series NX-OS Programmability Guide, Release 7.x228
Model-Driven ProgrammabilityConfiguring Telemetry Using the NX-OS CLI

PurposeCommand or Actionfilter-conditionand(updated(l2BD.operSt),eq(l2BD.operSt,"down"))
• The optional filter-condition parametercan be specified to create a specific filterfor event-based subscriptions.• The following command is applicable for
NX-API, not for DME:switch(conf-tm-sensor)# path "showinterface" depth 0
For state-based filtering, the filter returnsboth when a state has changed and whenan event has occurred during the specifiedstate. That is, a filter condition for the DNsys/bd/bd-[vlan] of eq(l2Bd.operSt,"down") triggers when the operStchanges, and when the DN's propertychanges while the operSt remains down,such as a no shutdown command isissued while the VLAN is operationallydown.
query-condition parameter — ForDME, based on the DN, thequery-condition parameter can bespecified to fetch MOTL andephemeral data with the followingsyntax: query-condition"rsp-foreign-subtree=applied-config";query-condition"rsp-foreign-subtree=ephemeral".
Note
Create a destination group and enterdestination group configuration mode.
destination-group dgrp_id
Example:
Step 12
Currently dgrp_id only supports numeric IDvalues.
switch(conf-tm-sensor)#destination-group 100switch(conf-tm-dest)#
Specify an IPv4 IP address and port to receiveencoded telemetry data.
(Optional) ip address ip_address portport protocol procedural-protocolencoding encoding-protocol
Step 13
gRPC is the default transportprotocol.
GPB is the default encoding.
NoteExample:switch(conf-tm-sensor)# ip address171.70.55.69 port 50001 protocol gRPCencoding GPBswitch(conf-tm-sensor)# ip address171.70.55.69 port 50007 protocol HTTPencoding JSON
switch(conf-tm-sensor)# ip address171.70.55.69 port 50009 protocol UDPencoding JSON
Create a destination profile for the outgoingdata.
ip_version address ip_address portportnum
Step 14
Example: When the destination group is linked to asubscription, telemetry data is sent to the IP
Cisco Nexus 9000 Series NX-OS Programmability Guide, Release 7.x229
Model-Driven ProgrammabilityConfiguring Telemetry Using the NX-OS CLI

PurposeCommand or Action
address and port that is specified by thisprofile.
• For IPv4:switch(conf-tm-dest)# ip address1.2.3.4 port 50003
Create a subscription node with ID and enterthe subscription configuration mode.
subscription sub_id
Example:
Step 15
Currently sub_id only supports numeric IDvalues.
switch(conf-tm-dest)# subscription 100switch(conf-tm-sub)#
When subscribing to a DN, checkwhether the DN is supported byDME using REST to ensure thatevents will stream.
Note
Link the sensor group with ID sgrp_id to thissubscription and set the data sampling intervalin milliseconds.
snsr-grp sgrp_id sample-interval interval
Example:switch(conf-tm-sub)# snsr-grp 100sample-interval 15000
Step 16
An interval value of 0 creates an event-basedsubscription, in which telemetry data is sentonly upon changes under the specified MO.An interval value greater than 0 creates afrequency-based subscription, in whichtelemetry data is sent periodically at thespecified interval. For example, an intervalvalue of 15000 results in the sending oftelemetry data every 15 seconds.
Link the destination group with ID dgrp_id tothis subscription.
dst-grp dgrp_id
Example:
Step 17
switch(conf-tm-sub)# dst-grp 100
Configuration Examples for Telemetry Using the CLIThis example creates a subscription that streams data for the sys/bgp root MO every 5 seconds to thedestination IP 1.2.3.4 port 50003.
switch(config)# telemetryswitch(config-telemetry)# sensor-group 100switch(conf-tm-sensor)# path sys/bgp depth 0switch(conf-tm-sensor)# destination-group 100switch(conf-tm-dest)# ip address 1.2.3.4 port 50003switch(conf-tm-dest)# subscription 100switch(conf-tm-sub)# snsr-grp 100 sample-interval 5000switch(conf-tm-sub)# dst-grp 100
This example creates a subscription that streams data for sys/intf every 5 seconds to destination IP 1.2.3.4port 50003, and encrypts the stream using GPB encoding verified using the test.pem.
Cisco Nexus 9000 Series NX-OS Programmability Guide, Release 7.x230
Model-Driven ProgrammabilityConfiguration Examples for Telemetry Using the CLI

switch(config)# telemetryswitch(config-telemetry)# certificate /bootflash/test.pem foo.test.google.frswitch(conf-tm-telemetry)# destination-group 100switch(conf-tm-dest)# ip address 1.2.3.4 port 50003 protocol gRPC encoding GPBswitch(config-dest)# sensor-group 100switch(conf-tm-sensor)# path sys/bgp depth 0switch(conf-tm-sensor)# subscription 100switch(conf-tm-sub)# snsr-grp 100 sample-interval 5000switch(conf-tm-sub)# dst-grp 100
This example creates a subscription that streams data for sys/cdp every 15 seconds to destination IP 1.2.3.4port 50004.
switch(config)# telemetryswitch(config-telemetry)# sensor-group 100switch(conf-tm-sensor)# path sys/cdp depth 0switch(conf-tm-sensor)# destination-group 100switch(conf-tm-dest)# ip address 1.2.3.4 port 50004switch(conf-tm-dest)# subscription 100switch(conf-tm-sub)# snsr-grp 100 sample-interval 15000switch(conf-tm-sub)# dst-grp 100
This example creates a cadence-based collection of show command data every 750 seconds.
switch(config)# telemetryswitch(config-telemetry)# destination-group 1switch(conf-tm-dest)# ip address 172.27.247.72 port 60001 protocol gRPC encoding GPBswitch(conf-tm-dest)# sensor-group 1switch(conf-tm-sensor# data-source NX-APIswitch(conf-tm-sensor)# path "show system resources" depth 0switch(conf-tm-sensor)# path "show version" depth 0switch(conf-tm-sensor)# path "show environment power" depth 0switch(conf-tm-sensor)# path "show environment fan" depth 0switch(conf-tm-sensor)# path "show environment temperature" depth 0switch(conf-tm-sensor)# path "show process cpu" depth 0switch(conf-tm-sensor)# path "show nve peers" depth 0switch(conf-tm-sensor)# path "show nve vni" depth 0switch(conf-tm-sensor)# path "show nve vni 4002 counters" depth 0switch(conf-tm-sensor)# path "show int nve 1 counters" depth 0switch(conf-tm-sensor)# path "show policy-map vlan" depth 0switch(conf-tm-sensor)# path "show ip access-list test" depth 0switch(conf-tm-sensor)# path "show system internal access-list resource utilization" depth0switch(conf-tm-sensor)# subscription 1switch(conf-tm-sub)# dst-grp 1switch(conf-tm-dest)# snsr-grp 1 sample-interval 750000
This example creates an event-based subscription for sys/fm. Data is streamed to the destination only ifthere is a change under the sys/fm MO.
switch(config)# telemetryswitch(config-telemetry)# sensor-group 100switch(conf-tm-sensor)# path sys/fm depth 0switch(conf-tm-sensor)# destination-group 100switch(conf-tm-dest)# ip address 1.2.3.4 port 50005switch(conf-tm-dest)# subscription 100switch(conf-tm-sub)# snsr-grp 100 sample-interval 0switch(conf-tm-sub)# dst-grp 100
Cisco Nexus 9000 Series NX-OS Programmability Guide, Release 7.x231
Model-Driven ProgrammabilityConfiguration Examples for Telemetry Using the CLI

During operation, you can change a sensor group from frequency-based to event-based, and change event-basedto frequency-based by changing the sample-interval. This example changes the sensor-group from the previousexample to frequency-based. After the following commands, the telemetry application will begin streamingthe sys/fm data to the destination every 7 seconds.
switch(config)# telemetryswitch(config-telemetry)# subscription 100switch(conf-tm-sub)# snsr-grp 100 sample-interval 7000
Multiple sensor groups and destinations can be linked to a single subscription. The subscription in this examplestreams the data for Ethernet port 1/1 to four different destinations every 10 seconds.
switch(config)# telemetryswitch(config-telemetry)# sensor-group 100switch(conf-tm-sensor)# path sys/intf/phys-[eth1/1] depth 0switch(conf-tm-sensor)# destination-group 100switch(conf-tm-dest)# ip address 1.2.3.4 port 50004switch(conf-tm-dest)# ip address 1.2.3.4 port 50005switch(conf-tm-sensor)# destination-group 200switch(conf-tm-dest)# ip address 5.6.7.8 port 50001 protocol HTTP encoding JSONswitch(conf-tm-dest)# ip address 1.4.8.2 port 60003switch(conf-tm-dest)# subscription 100switch(conf-tm-sub)# snsr-grp 100 sample-interval 10000switch(conf-tm-sub)# dst-grp 100switch(conf-tm-sub)# dst-grp 200
A sensor group can contain multiple paths, a destination group can contain multiple destination profiles, anda subscription can be linked to multiple sensor groups and destination groups, as shown in this example.
switch(config)# telemetryswitch(config-telemetry)# sensor-group 100switch(conf-tm-sensor)# path sys/intf/phys-[eth1/1] depth 0switch(conf-tm-sensor)# path sys/epId-1 depth 0switch(conf-tm-sensor)# path sys/bgp/inst/dom-default depth 0
switch(config-telemetry)# sensor-group 200switch(conf-tm-sensor)# path sys/cdp depth 0switch(conf-tm-sensor)# path sys/ipv4 depth 0
switch(config-telemetry)# sensor-group 300switch(conf-tm-sensor)# path sys/fm depth 0switch(conf-tm-sensor)# path sys/bgp depth 0
switch(conf-tm-sensor)# destination-group 100switch(conf-tm-dest)# ip address 1.2.3.4 port 50004switch(conf-tm-dest)# ip address 4.3.2.5 port 50005
switch(conf-tm-dest)# destination-group 200switch(conf-tm-dest)# ip address 5.6.7.8 port 50001
switch(conf-tm-dest)# destination-group 300switch(conf-tm-dest)# ip address 1.2.3.4 port 60003
switch(conf-tm-dest)# subscription 600switch(conf-tm-sub)# snsr-grp 100 sample-interval 7000switch(conf-tm-sub)# snsr-grp 200 sample-interval 20000switch(conf-tm-sub)# dst-grp 100switch(conf-tm-sub)# dst-grp 200
Cisco Nexus 9000 Series NX-OS Programmability Guide, Release 7.x232
Model-Driven ProgrammabilityConfiguration Examples for Telemetry Using the CLI

switch(conf-tm-dest)# subscription 900switch(conf-tm-sub)# snsr-grp 200 sample-interval 7000switch(conf-tm-sub)# snsr-grp 300 sample-interval 0switch(conf-tm-sub)# dst-grp 100switch(conf-tm-sub)# dst-grp 300
You can verify the telemetry configuration using the show running-config telemetry command, as shownin this example.
switch(config)# telemetryswitch(config-telemetry)# destination-group 100switch(conf-tm-dest)# ip address 1.2.3.4 port 50003switch(conf-tm-dest)# ip address 1.2.3.4 port 50004switch(conf-tm-dest)# endswitch# show run telemetry
!Command: show running-config telemetry!Time: Thu Oct 13 21:10:12 2016
version 7.0(3)I5(1)feature telemetry
telemetrydestination-group 100ip address 1.2.3.4 port 50003 protocol gRPC encoding GPBip address 1.2.3.4 port 50004 protocol gRPC encoding GPB
You can specify transport VRF and telemetry data compression for gRPC using the use-vrf anduse-compression gzip commands, as shown in this example.
switch(config)# telemetryswitch(config-telemetry)# destination-profileswitch(conf-tm-dest-profile)# use-vrf defaultswitch(conf-tm-dest-profile)# use-compression gzipswitch(conf-tm-dest-profile)# sensor-group 1switch(conf-tm-sensor)# path sys/bgp depth unboundedswitch(conf-tm-sensor)# destination-group 1switch(conf-tm-dest)# ip address 1.2.3.4 port 50004switch(conf-tm-dest)# subscription 1switch(conf-tm-sub)# dst-grp 1switch(conf-tm-sub)# snsr-grp 1 sample-interval 10000
Displaying Telemetry Configuration and StatisticsUse the following NX-OS CLI show commands to display telemetry configuration, statistics, errors, andsession information.
show telemetry control database
This command displays the internal databases that reflect the configuration of telemetry.
switch# show telemetry control database ?<CR>> Redirect it to a file>> Redirect it to a file in append modedestination-groups Show destination-groups
Cisco Nexus 9000 Series NX-OS Programmability Guide, Release 7.x233
Model-Driven ProgrammabilityDisplaying Telemetry Configuration and Statistics

destinations Show destinationssensor-groups Show sensor-groupssensor-paths Show sensor-pathssubscriptions Show subscriptions| Pipe command output to filter
switch# show telemetry control database
Subscription Database size = 1
--------------------------------------------------------------------------------Subscription ID Data Collector Type--------------------------------------------------------------------------------100 DME NX-API
Sensor Group Database size = 1
--------------------------------------------------------------------------------Sensor Group ID Sensor Group type Sampling interval(ms) Linked subscriptions--------------------------------------------------------------------------------100 Timer 10000(Running) 1
Sensor Path Database size = 1
--------------------------------------------------------------------------------Subscribed Query Filter Linked Groups Sec Groups Retrieve level Sensor Path--------------------------------------------------------------------------------No 1 0 Full sys/fm
Destination group Database size = 2
--------------------------------------------------------------------------------Destination Group ID Refcount--------------------------------------------------------------------------------100 1
Destination Database size = 2
--------------------------------------------------------------------------------Dst IP Addr Dst Port Encoding Transport Count--------------------------------------------------------------------------------192.168.20.111 12345 JSON HTTP 1192.168.20.123 50001 GPB gRPC 1
show telemetry control database sensor-paths
This command displays sensor path details for telemetry configuration, including counters for encoding,collection, transport, and streaming.switch-1(conf-tm-sub)# show telemetry control database sensor-pathsSensor Path Database size = 4----------------------------------------------------------------------------------------------------Row ID Subscribed Linked Groups Sec Groups Retrieve level Path(GroupId) : Query :Filter----------------------------------------------------------------------------------------------------1 No 1 0 Full sys/cdp(1) : NA : NA
GPB Encoded Data size in bytes (Cur/Min/Max): 0/0/0JSON Encoded Data size in bytes (Cur/Min/Max): 65785/65785/65785Collection Time in ms (Cur/Min/Max): 10/10/55Encoding Time in ms (Cur/Min/Max): 8/8/9Transport Time in ms (Cur/Min/Max): 0/0/0Streaming Time in ms (Cur/Min/Max): 18/18/65
Cisco Nexus 9000 Series NX-OS Programmability Guide, Release 7.x234
Model-Driven ProgrammabilityDisplaying Telemetry Configuration and Statistics

2 No 1 0 Self show module(2) : NA : NAGPB Encoded Data size in bytes (Cur/Min/Max): 0/0/0JSON Encoded Data size in bytes (Cur/Min/Max): 1107/1106/1107Collection Time in ms (Cur/Min/Max): 603/603/802Encoding Time in ms (Cur/Min/Max): 0/0/0Transport Time in ms (Cur/Min/Max): 0/0/1Streaming Time in ms (Cur/Min/Max): 605/605/803
3 No 1 0 Full sys/bgp(1) : NA : NAGPB Encoded Data size in bytes (Cur/Min/Max): 0/0/0JSON Encoded Data size in bytes (Cur/Min/Max): 0/0/0Collection Time in ms (Cur/Min/Max): 0/0/44Encoding Time in ms (Cur/Min/Max): 0/0/0Transport Time in ms (Cur/Min/Max): 0/0/0Streaming Time in ms (Cur/Min/Max): 1/1/44
4 No 1 0 Self show version(2) : NA : NAGPB Encoded Data size in bytes (Cur/Min/Max): 0/0/0JSON Encoded Data size in bytes (Cur/Min/Max): 2442/2441/2442Collection Time in ms (Cur/Min/Max): 1703/1703/1903Encoding Time in ms (Cur/Min/Max): 0/0/0Transport Time in ms (Cur/Min/Max): 0/0/0Streaming Time in ms (Cur/Min/Max): 1703/1703/1904
switch-1(conf-tm-sub)#
show telemetry control stats
This command displays the statistics about the internal databases about configuration of telemetry.
switch# show telemetry control statsshow telemetry control stats entered
--------------------------------------------------------------------------------Error Description Error Count--------------------------------------------------------------------------------Chunk allocation failures 0Sensor path Database chunk creation failures 0Sensor Group Database chunk creation failures 0Destination Database chunk creation failures 0Destination Group Database chunk creation failures 0Subscription Database chunk creation failures 0Sensor path Database creation failures 0Sensor Group Database creation failures 0Destination Database creation failures 0Destination Group Database creation failures 0Subscription Database creation failures 0Sensor path Database insert failures 0Sensor Group Database insert failures 0Destination Database insert failures 0Destination Group Database insert failures 0Subscription insert to Subscription Database failures 0Sensor path Database delete failures 0Sensor Group Database delete failures 0Destination Database delete failures 0Destination Group Database delete failures 0Delete Subscription from Subscription Database failures 0Sensor path delete in use 0Sensor Group delete in use 0Destination delete in use 0Destination Group delete in use 0Delete destination(in use) failure count 0
Cisco Nexus 9000 Series NX-OS Programmability Guide, Release 7.x235
Model-Driven ProgrammabilityDisplaying Telemetry Configuration and Statistics

Failed to get encode callback 0Sensor path Sensor Group list creation failures 0Sensor path prop list creation failures 0Sensor path sec Sensor path list creation failures 0Sensor path sec Sensor Group list creation failures 0Sensor Group Sensor path list creation failures 0Sensor Group Sensor subs list creation failures 0Destination Group subs list creation failures 0Destination Group Destinations list creation failures 0Destination Destination Groups list creation failures 0Subscription Sensor Group list creation failures 0Subscription Destination Groups list creation failures 0Sensor Group Sensor path list delete failures 0Sensor Group Subscriptions list delete failures 0Destination Group Subscriptions list delete failures 0Destination Group Destinations list delete failures 0Subscription Sensor Groups list delete failures 0Subscription Destination Groups list delete failures 0Destination Destination Groups list delete failures 0Failed to delete Destination from Destination Group 0Failed to delete Destination Group from Subscription 0Failed to delete Sensor Group from Subscription 0Failed to delete Sensor path from Sensor Group 0Failed to get encode callback 0Failed to get transport callback 0switch# Destination Database size = 1
--------------------------------------------------------------------------------Dst IP Addr Dst Port Encoding Transport Count--------------------------------------------------------------------------------192.168.20.123 50001 GPB gRPC 1
show telemetry data collector brief
This command displays the brief statistics about the data collection.
switch# show telemetry data collector brief
----------------------------------------------------------------------Collector Type Successful Collections Failed Collections----------------------------------------------------------------------DME 143 0
show telemetry data collector details
This command displays detailed statistics about the data collection which includes breakdown of all sensorpaths.
switch# show telemetry data collector details
--------------------------------------------------------------------------------Succ Collections Failed Collections Sensor Path--------------------------------------------------------------------------------150 0 sys/fm
show telemetry event collector errors
This command displays the errors statistic about the event collection.
Cisco Nexus 9000 Series NX-OS Programmability Guide, Release 7.x236
Model-Driven ProgrammabilityDisplaying Telemetry Configuration and Statistics

switch# show telemetry event collector errors
--------------------------------------------------------------------------------Error Description Error Count--------------------------------------------------------------------------------APIC-Cookie Generation Failures - 0Authentication Failures - 0Authentication Refresh Failures - 0Authentication Refresh Timer Start Failures - 0Connection Timer Start Failures - 0Connection Attempts - 3Dme Event Subscription Init Failures - 0Event Data Enqueue Failures - 0Event Subscription Failures - 0Event Subscription Refresh Failures - 0Pending Subscription List Create Failures - 0Subscription Hash Table Create Failures - 0Subscription Hash Table Destroy Failures - 0Subscription Hash Table Insert Failures - 0Subscription Hash Table Remove Failures - 0Subscription Refresh Timer Start Failures - 0Websocket Connect Failures - 0
show telemetry event collector stats
This command displays the statistics about the event collection which includes breakdown of all sensor paths.
switch# show telemetry event collector stats
--------------------------------------------------------------------------------Collection Count Latest Collection Time Sensor Path--------------------------------------------------------------------------------
show telemetry control pipeline stats
This command displays the statistics for the telemetry pipeline.
switch# show telemetry pipeline statsMain Statistics:
Timers:Errors:
Start Fail = 0
Data Collector:Errors:
Node Create Fail = 0
Event Collector:Errors:
Node Create Fail = 0 Node Add Fail = 0Invalid Data = 0
Memory:Allowed Memory Limit = 1181116006 bytesOccupied Memory = 93265920 bytes
Queue Statistics:Request Queue:
High Priority Queue:
Cisco Nexus 9000 Series NX-OS Programmability Guide, Release 7.x237
Model-Driven ProgrammabilityDisplaying Telemetry Configuration and Statistics

Info:Actual Size = 50 Current Size = 0Max Size = 0 Full Count = 0
Errors:Enqueue Error = 0 Dequeue Error = 0
Low Priority Queue:Info:
Actual Size = 50 Current Size = 0Max Size = 0 Full Count = 0
Errors:Enqueue Error = 0 Dequeue Error = 0
Data Queue:High Priority Queue:
Info:Actual Size = 50 Current Size = 0Max Size = 0 Full Count = 0
Errors:Enqueue Error = 0 Dequeue Error = 0
Low Priority Queue:Info:
Actual Size = 50 Current Size = 0Max Size = 0 Full Count = 0
Errors:Enqueue Error = 0 Dequeue Error = 0
show telemetry transport
This command displays all configured transport sessions.
switch# show telemetry transport
Session Id IP Address Port Encoding Transport Status-----------------------------------------------------------------------------------0 192.168.20.123 50001 GPB gRPC Connected
show telemetry transport <session-id>
This command displays detailed session information for a specific transport session.
switch# show telemetry transport 0
Session Id: 0IP Address:Port 192.168.20.123:50001Transport: gRPCStatus: DisconnectedLast Connected: Fri Sep 02 11:45:57.505 UTCLast Disconnected: NeverTx Error Count: 224Last Tx Error: Fri Sep 02 12:23:49.555 UTC
switch# show telemetry transport 1
Session Id: 1
Cisco Nexus 9000 Series NX-OS Programmability Guide, Release 7.x238
Model-Driven ProgrammabilityDisplaying Telemetry Configuration and Statistics

IP Address:Port 10.30.218.56:51235Transport: HTTPStatus: DisconnectedLast Connected: NeverLast Disconnected: NeverTx Error Count: 3Last Tx Error: Wed Apr 19 15:56:51.617 PDT
show telemetry transport <session-id> stats
This command displays details of a specific transport session.Session Id: 0Transmission Stats
Compression: disabledSource Interface: not set()Transmit Count: 319297Last TX time: Fri Aug 02 03:51:15.287 UTCMin Tx Time: 1 msMax Tx Time: 3117 msAvg Tx Time: 3 msCur Tx Time: 1 ms
show telemetry transport <session-id> errors
This command displays detailed error statistics for a specific transport session.switch# show telemetry transport 0 errorsSession Id: 0Connection ErrorsConnection Error Count: 0Transmission ErrorsTx Error Count: 30Last Tx Error: Thu Aug 01 04:39:47.083 UTCLast Tx Return Code: No error
Displaying Telemetry Log and Trace InformationUse the following NX-OS CLI commands to display the log and trace information.
show tech-support telemetry
This NX-OS CLI command collects the telemetry log contents from the tech-support log. In this example,the command output is redirected into a file in bootflash.
switch# show tech-support telemetry > bootflash:tmst.log
tmtrace.bin
This BASH shell command collects telemetry traces and prints them out.
switch# configure terminalswitch(config)# feature bashswitch(config)# run bashbash-4.2$ tmtrace.bin -d tm-errorsbash-4.2$ tmtrace.bin -d tm-logsbash-4.2$ tmtrace.bin -d tm-events
Cisco Nexus 9000 Series NX-OS Programmability Guide, Release 7.x239
Model-Driven ProgrammabilityDisplaying Telemetry Log and Trace Information

For example:bash-4.2$ tmtrace.bin -d tm-logs[01/25/17 22:52:24.563 UTC 1 29130] [3944724224][tm_ec_dme_auth.c:59] TM_EC: Authenticationrefresh url http://127.0.0.1/api/aaaRefresh.json[01/25/17 22:52:24.565 UTC 2 29130] [3944724224][tm_ec_dme_rest_util.c:382] TM_EC: PerformedPOST request on http://127.0.0.1/api/aaaRefresh.json[01/25/17 22:52:24.566 UTC 3 29130] [3944724224][tm_mgd_timers.c:114] TM_MGD_TIMER: Startingleaf timer for leaf:0x11e17ea4 time_in_ms:540000[01/25/17 22:52:45.317 UTC 4 29130] [3944724224][tm_ec_dme_event_subsc.c:790] TM_EC: Eventsubscription database size 0[01/25/17 22:52:45.317 UTC 5 29130] [3944724224][tm_mgd_timers.c:114] TM_MGD_TIMER: Startingleaf timer for leaf:0x11e17e3c time_in_ms:50000bash-4.2#
The tm-logs option is not enabled by default because it is verbose.
Enable tm-logs with the tmtrace.bin -L D tm-logs command.
Disable tm-logs with the tmtrace.bin -L W tm-logs command.
Note
show system internal telemetry trace
The show system internal telemetry trace [tm-events | tm-errors |tm-logs | all] command displays systeminternal telemetry trace information.
switch# show system internal telemetry trace allTelemetry All Traces:Telemetry Error Traces:[07/26/17 15:22:29.156 UTC 1 28577] [3960399872][tm_cfg_api.c:367] Not able to destroy destprofile list for config node rc:-1610612714 reason:Invalid argument[07/26/17 15:22:44.972 UTC 2 28577] [3960399872][tm_stream.c:248] No subscriptions fordestination group 1[07/26/17 15:22:49.463 UTC 3 28577] [3960399872][tm_stream.c:576] TM_STREAM: Subscriptoin1 does not have any sensor groups
3 entries printedTelemetry Event Traces:[07/26/17 15:19:40.610 UTC 1 28577] [3960399872][tm_debug.c:41] Telemetry xostrace buffersinitialized successfully![07/26/17 15:19:40.610 UTC 2 28577] [3960399872][tm.c:744] Telemetry statistics createdsuccessfully![07/26/17 15:19:40.610 UTC 3 28577] [3960399872][tm_init_n9k.c:97] Platform intf:grpc_traces:compression,channelswitch#
switch# show system internal telemetry trace tm-logsTelemetry Log Traces:0 entries printedswitch#switch# show system internal telemetry trace tm-eventsTelemetry Event Traces:[07/26/17 15:19:40.610 UTC 1 28577] [3960399872][tm_debug.c:41] Telemetry xostrace buffersinitialized successfully![07/26/17 15:19:40.610 UTC 2 28577] [3960399872][tm.c:744] Telemetry statistics createdsuccessfully![07/26/17 15:19:40.610 UTC 3 28577] [3960399872][tm_init_n9k.c:97] Platform intf:grpc_traces:compression,channel[07/26/17 15:19:40.610 UTC 4 28577] [3960399872][tm_init_n9k.c:207] Adding telemetry to
Cisco Nexus 9000 Series NX-OS Programmability Guide, Release 7.x240
Model-Driven ProgrammabilityDisplaying Telemetry Log and Trace Information

cgroup[07/26/17 15:19:40.670 UTC 5 28577] [3960399872][tm_init_n9k.c:215] Added telemetry tocgroup successfully!
switch# show system internal telemetry trace tm-errorsTelemetry Error Traces:0 entries printedswitch#
Configuring Telemetry Using the NX-API
Configuring Telemetry Using the NX-APIIn the object model of the switch DME, the configuration of the telemetry feature is defined in a hierarchicalstructure of objects as shown in the section "Telemetry Model in the DME." Following are the main objectsto be configured:
• fmEntity—Contains the NX-API and Telemetry feature states.
• fmNxapi—Contains the NX-API state.
• fmTelemetry—Contains the Telemetry feature state.
• telemetryEntity—Contains the telemetry feature configuration.
• telemetrySensorGroup—Contains the definitions of one or more sensor paths or nodes to bemonitored for telemetry. The telemetry entity can contain one or more sensor groups.
• telemetryRtSensorGroupRel—Associates the sensor group with a telemetry subscription.
• telemetrySensorPath—Apath to bemonitored. The sensor group can containmultiple objectsof this type.
• telemetryDestGroup—Contains the definitions of one or more destinations to receive telemetrydata. The telemetry entity can contain one or more destination groups.
• telemetryRtDestGroupRel—Associates the destination group with a telemetry subscription.
• telemetryDest—A destination address. The destination group can contain multiple objectsof this type.
• telemetrySubscription— Specifies how and when the telemetry data from one or more sensorgroups is sent to one or more destination groups.
• telemetryRsDestGroupRel—Associates the telemetry subscription with a destination group.
• telemetryRsSensorGroupRel—Associates the telemetry subscription with a sensor group.
• telemetryCertificate—Associates the telemetry subscription with a certificate and hostname.
To configure the telemetry feature using the NX-API, you must construct a JSON representation of thetelemetry object structure and push it to the DME with an HTTP or HTTPS POST operation.
Cisco Nexus 9000 Series NX-OS Programmability Guide, Release 7.x241
Model-Driven ProgrammabilityConfiguring Telemetry Using the NX-API

For detailed instructions on using the NX-API, see the Cisco Nexus 3000 and 9000 Series NX-API REST SDKUser Guide and API Reference.
Note
Before you begin
Your switch must be running Cisco NX-OS Release 7.3(0)I5(1) or a later release.
Your switch must be configured to run the NX-API from the CLI:switch(config)# feature nxapi
NX-API sends telemetry data over management VRF:switch(config)# nxapi use-vrf management
Procedure
PurposeCommand or Action
The root element is fmTelemetry and the basepath for this element is sys/fm. Configure theadminSt attribute as enabled.
Enable the telemetry feature.
Example:
{
Step 1
"fmEntity" : {"children" : [{"fmTelemetry" : {"attributes" : {"adminSt" : "enabled"
}}
}]
}}
The root element is telemetryEntity and thebase path for this element is sys/tm. Configurethe dn attribute as sys/tm.
Create the root level of the JSON payload todescribe the telemetry configuration.
Example:
Step 2
{"telemetryEntity": {
"attributes": {"dn": "sys/tm"
},}
}
A telemetry sensor group is defined in anobject of class telemetrySensorGroup.
Create a sensor group to contain the definedsensor paths.
Example:
Step 3
Configure the following attributes of theobject:
"telemetrySensorGroup": {
Cisco Nexus 9000 Series NX-OS Programmability Guide, Release 7.x242
Model-Driven ProgrammabilityConfiguring Telemetry Using the NX-API

PurposeCommand or Action"attributes": {
"id": "10",• id—An identifier for the sensor group.Currently only numeric ID values aresupported.
"rn": "sensor-10""dataSrc": "NX-API"
}, "children": [{• rn— The relative name of the sensorgroup object in the format: sensor-id.
}]}
• dataSrc— Selects the data source fromDEFAULT, DME, or NX-API.
Children of the sensor group object willinclude sensor paths and one or more relationobjects (telemetryRtSensorGroupRel) toassociate the sensor group with a telemetrysubscription.
The telemetryCertificate defines the locationof the SSL/TLS certificate with the telemetrysubscription/destination.
(Optional) Add an SSL/TLS certificate and ahost.
Example:
Step 4
{"telemetryCertificate": {
"attributes": {"filename": "root.pem""hostname": "c.com"
}}
}
A telemetry destination group is defined intelemetryEntity. Configure the id attribute.
Define a telemetry destination group.
Example:
Step 5
{"telemetryDestGroup": {"attributes": {"id": "20"
}}
}
A telemetry destination profile is defined intelemetryDestProfile.
Define a telemetry destination profile.
Example:
Step 6
• Configure the adminSt attribute asenabled.{
"telemetryDestProfile": {• UndertelemetryDestOptSourceInterface,
"attributes": {"adminSt": "enabled"
}, configure the name attribute with an"children": [interface name to stream data from the{configured interface to a destination withthe source IP address."telemetryDestOptSourceInterface": {
"attributes": {"name": "lo0"
}}
}
Cisco Nexus 9000 Series NX-OS Programmability Guide, Release 7.x243
Model-Driven ProgrammabilityConfiguring Telemetry Using the NX-API

PurposeCommand or Action]
}}
A telemetry destination is defined in an objectof class telemetryDest. Configure thefollowing attributes of the object:
Define one or more telemetry destinations,consisting of an IP address and port numberto which telemetry data will be sent.
Example:
Step 7
• addr—The IP address of the destination.
{ • port— The port number of thedestination."telemetryDest": {
"attributes": {• rn—The relative name of the destinationobject in the format: path-[path].
"addr": "1.2.3.4","enc": "GPB","port": "50001",
• enc—The encoding type of the telemetrydata to be sent. NX-OS supports:
"proto": "gRPC","rn":
"addr-[1.2.3.4]-port-50001"} • Google protocol buffers (GPB) for
gRPC.}}
• JSON for C.
• GPB or JSON for UDP and secureUDP (DTLS).
• proto— The transport protocol type ofthe telemetry data to be sent. NX-OSsupports:
• gRPC
• HTTP
• VUDP and secure UDP (DTLS)
A telemetry subscription is defined in an objectof class telemetrySubscription. Configurethe following attributes of the object:
Create a telemetry subscription to configurethe telemetry behavior.
Example:
Step 8
• id—An identifier for the subscription.Currently only numeric ID values aresupported.
"telemetrySubscription": {"attributes": {
"id": "30","rn": "subs-30" • rn— The relative name of the
subscription object in the format: subs-id.}, "children": [{}]
}Children of the subscription object will includerelation objects for sensor groups(telemetryRsSensorGroupRel) anddestination groups(telemetryRsDestGroupRel).
Cisco Nexus 9000 Series NX-OS Programmability Guide, Release 7.x244
Model-Driven ProgrammabilityConfiguring Telemetry Using the NX-API

PurposeCommand or Action
Add the sensor group object as a child objectto the telemetrySubscription element underthe root element (telemetryEntity).
Step 9
Example:{
"telemetrySubscription": {"attributes": {"id": "30"
}"children": [{"telemetryRsSensorGroupRel":
{"attributes": {"sampleIntvl": "5000","tDn": "sys/tm/sensor-10"
}}
}]
}}
The relation object is of classtelemetryRsSensorGroupRel and is a child
Create a relation object as a child object of thesubscription to associate the subscription tothe telemetry sensor group and to specify thedata sampling behavior.
Step 10
object of telemetrySubscription. Configurethe following attributes of the relation object:
Example: • rn— The relative name of the relationobject in the format:rssensorGroupRel-[sys/tm/sensor-group-id]."telemetryRsSensorGroupRel": {
"attributes": {• sampleIntvl—The data sampling periodin milliseconds. An interval value of 0
"rType": "mo","rn":
"rssensorGroupRel-[sys/tm/sensor-10]", creates an event-based subscription, in"sampleIntvl": "5000",which telemetry data is sent only upon"tCl": "telemetrySensorGroup",changes under the specified MO. An"tDn": "sys/tm/sensor-10",
"tType": "mo" interval value greater than 0 creates a}
} frequency-based subscription, in whichtelemetry data is sent periodically at thespecified interval. For example, aninterval value of 15000 results in thesending of telemetry data every 15seconds.
• tCl— The class of the target (sensorgroup) object, which istelemetrySensorGroup.
• tDn— The distinguished name of thetarget (sensor group) object, which issys/tm/sensor-group-id.
Cisco Nexus 9000 Series NX-OS Programmability Guide, Release 7.x245
Model-Driven ProgrammabilityConfiguring Telemetry Using the NX-API

PurposeCommand or Action
• rType—The relation type, which ismofor managed object.
• tType— The target type, which ismofor managed object.
A sensor path is defined in an object of classtelemetrySensorPath. Configure thefollowing attributes of the object:
Define one or more sensor paths or nodes tobe monitored for telemetry.
Example:
Step 11
• path— The path to be monitored.Single sensor path
{• rn—The relative name of the path objectin the format: path-[path]
"telemetrySensorPath": {"attributes": { • depth—The retrieval level for the sensor
path. A depth setting of 0 retrieves onlythe root MO properties.
"path": "sys/cdp","rn": "path-[sys/cdp]","excludeFilter": "","filterCondition": "",
• filterCondition— (Optional) Creates aspecific filter for event-based
"path": "sys/fm/bgp","secondaryGroup": "0","secondaryPath": "", subscriptions. The DME provides the"depth": "0" filter expressions. For more information}
regarding filtering, see the Cisco APIC}REST API Usage Guidelines on}
composing queries:https://www.cisco.com/c/en/us/td/docs/Example:switches/datacenter/aci/apic/sw/2-x/rest_Single sensor path for NX-API
{
cfg/2_1_x/b_Cisco_APIC_REST_API_Configuration_Guide/b_Cisco_APIC_REST_API_Configuration_Guide_chapter_01.html#d25e1534a1635"telemetrySensorPath": {
"attributes": {"path": "show interface","path": "show bgp","rn": "path-[sys/cdp]","excludeFilter": "","filterCondition": "","path": "sys/fm/bgp","secondaryGroup": "0","secondaryPath": "","depth": "0"
}}
}
Example:
Multiple sensor paths
{"telemetrySensorPath": {
"attributes": {"path": "sys/cdp","rn": "path-[sys/cdp]","excludeFilter": "",
Cisco Nexus 9000 Series NX-OS Programmability Guide, Release 7.x246
Model-Driven ProgrammabilityConfiguring Telemetry Using the NX-API

PurposeCommand or Action"filterCondition": "","path": "sys/fm/bgp","secondaryGroup": "0","secondaryPath": "","depth": "0"
}}
},{
"telemetrySensorPath": {"attributes": {
"excludeFilter": "","filterCondition": "","path": "sys/fm/dhcp","secondaryGroup": "0","secondaryPath": "","depth": "0"
}}
}
Example:
Single sensor path filtering for BGP disableevents:
{"telemetrySensorPath": {
"attributes": {"path": "sys/cdp","rn": "path-[sys/cdp]","excludeFilter": "","filterCondition":
"eq(fmBgp.operSt.\"disabled\")","path": "sys/fm/bgp","secondaryGroup": "0","secondaryPath": "","depth": "0"
}}
}
Add sensor paths as child objects to the sensorgroup object (telemetrySensorGroup).
Step 12
Add destinations as child objects to thedestination group object(telemetryDestGroup).
Step 13
Add the destination group object as a childobject to the root element (telemetryEntity).
Step 14
The relation object is of classtelemetryRtSensorGroupRel and is a child
Create a relation object as a child object of thetelemetry sensor group to associate the sensorgroup to the subscription.
Step 15
object of telemetrySensorGroup. Configurethe following attributes of the relation object:Example:
Cisco Nexus 9000 Series NX-OS Programmability Guide, Release 7.x247
Model-Driven ProgrammabilityConfiguring Telemetry Using the NX-API

PurposeCommand or Action
"telemetryRtSensorGroupRel": {• rn— The relative name of the relationobject in the format:rtsensorGroupRel-[sys/tm/subscription-id].
"attributes": {"rn":
"rtsensorGroupRel-[sys/tm/subs-30]",• tCl—The target class of the subscriptionobject, which is telemetrySubscription.
"tCl": "telemetrySubscription",
"tDn": "sys/tm/subs-30"• tDn—The target distinguished name ofthe subscription object, which issys/tm/subscription-id.
}}
The relation object is of classtelemetryRtDestGroupRel and is a child
Create a relation object as a child object of thetelemetry destination group to associate thedestination group to the subscription.
Step 16
object of telemetryDestGroup. Configure thefollowing attributes of the relation object:Example:
• rn— The relative name of the relationobject in the format:rtdestGroupRel-[sys/tm/subscription-id].
"telemetryRtDestGroupRel": {"attributes": {
"rn":"rtdestGroupRel-[sys/tm/subs-30]", • tCl—The target class of the subscription
object, which is telemetrySubscription."tCl": "telemetrySubscription",
"tDn": "sys/tm/subs-30" • tDn—The target distinguished name ofthe subscription object, which issys/tm/subscription-id.
}}
The relation object is of classtelemetryRsDestGroupRel and is a child
Create a relation object as a child object of thesubscription to associate the subscription tothe telemetry destination group.
Step 17
object of telemetrySubscription. Configurethe following attributes of the relation object:Example:
• rn— The relative name of the relationobject in the format:rsdestGroupRel-[sys/tm/destination-group-id].
"telemetryRsDestGroupRel": {"attributes": {
"rType": "mo","rn": • tCl—The class of the target (destination
group) object, which istelemetryDestGroup.
"rsdestGroupRel-[sys/tm/dest-20]","tCl": "telemetryDestGroup","tDn": "sys/tm/dest-20","tType": "mo"
• tDn— The distinguished name of thetarget (destination group) object, whichis sys/tm/destination-group-id.
}}
• rType—The relation type, which ismofor managed object.
• tType— The target type, which ismofor managed object.
The base path for the telemetry entity is sys/tmand the NX-API endpoint is:
Send the resulting JSON structure as anHTTP/HTTPS POST payload to the NX-APIendpoint for telemetry configuration.
Step 18
Cisco Nexus 9000 Series NX-OS Programmability Guide, Release 7.x248
Model-Driven ProgrammabilityConfiguring Telemetry Using the NX-API

PurposeCommand or Action{{URL}}/api/node/mo/sys/tm.json
Example
The following is an example of all the previous steps collected into one POST payload (note thatsome attributes may not match):{"telemetryEntity": {"children": [{"telemetrySensorGroup": {"attributes": {"id": "10"
}"children": [{"telemetrySensorPath": {"attributes": {"excludeFilter": "","filterCondition": "","path": "sys/fm/bgp","secondaryGroup": "0","secondaryPath": "","depth": "0"
}}
}]
}},{"telemetryDestGroup": {"attributes": {"id": "20"
}"children": [{"telemetryDest": {"attributes": {"addr": "10.30.217.80","port": "50051","enc": "GPB","proto": "gRPC"
}}
}]
}},{"telemetrySubscription": {"attributes": {"id": "30"
}"children": [{"telemetryRsSensorGroupRel": {"attributes": {"sampleIntvl": "5000","tDn": "sys/tm/sensor-10"
}}
},
Cisco Nexus 9000 Series NX-OS Programmability Guide, Release 7.x249
Model-Driven ProgrammabilityConfiguring Telemetry Using the NX-API

{"telemetryRsDestGroupRel": {"attributes": {"tDn": "sys/tm/dest-20"
}}
}]
}}]
}}
Configuration Example for Telemetry Using the NX-API
Streaming Paths to a Destination
This example creates a subscription that streams paths sys/cdp and sys/ipv4 to a destination 1.2.3.4 port
50001 every five seconds.
POST https://192.168.20.123/api/node/mo/sys/tm.json
Payload:{
"telemetryEntity": {"attributes": {
"dn": "sys/tm"},"children": [{
"telemetrySensorGroup": {"attributes": {
"id": "10","rn": "sensor-10"
}, "children": [{"telemetryRtSensorGroupRel": {
"attributes": {"rn": "rtsensorGroupRel-[sys/tm/subs-30]","tCl": "telemetrySubscription","tDn": "sys/tm/subs-30"
}}
}, {"telemetrySensorPath": {
"attributes": {"path": "sys/cdp","rn": "path-[sys/cdp]","excludeFilter": "","filterCondition": "","secondaryGroup": "0","secondaryPath": "","depth": "0"
}}
}, {"telemetrySensorPath": {
"attributes": {"path": "sys/ipv4","rn": "path-[sys/ipv4]","excludeFilter": "",
Cisco Nexus 9000 Series NX-OS Programmability Guide, Release 7.x250
Model-Driven ProgrammabilityConfiguration Example for Telemetry Using the NX-API

"filterCondition": "","secondaryGroup": "0","secondaryPath": "","depth": "0"
}}
}]}
}, {"telemetryDestGroup": {
"attributes": {"id": "20","rn": "dest-20"
},"children": [{
"telemetryRtDestGroupRel": {"attributes": {
"rn": "rtdestGroupRel-[sys/tm/subs-30]","tCl": "telemetrySubscription","tDn": "sys/tm/subs-30"
}}
}, {"telemetryDest": {
"attributes": {"addr": "1.2.3.4","enc": "GPB","port": "50001","proto": "gRPC","rn": "addr-[1.2.3.4]-port-50001"
}}
}]}
}, {"telemetrySubscription": {
"attributes": {"id": "30","rn": "subs-30"
},"children": [{
"telemetryRsDestGroupRel": {"attributes": {
"rType": "mo","rn": "rsdestGroupRel-[sys/tm/dest-20]","tCl": "telemetryDestGroup","tDn": "sys/tm/dest-20","tType": "mo"
}}
}, {"telemetryRsSensorGroupRel": {
"attributes": {"rType": "mo","rn": "rssensorGroupRel-[sys/tm/sensor-10]","sampleIntvl": "5000","tCl": "telemetrySensorGroup","tDn": "sys/tm/sensor-10","tType": "mo"
}}
}]}
}]
Cisco Nexus 9000 Series NX-OS Programmability Guide, Release 7.x251
Model-Driven ProgrammabilityConfiguration Example for Telemetry Using the NX-API

}}
Filter Conditions on BGP Notifications
The following example payload enables notifications that trigger when the BFP feature is disabled as per thefilterCondition attribute in the telemetrySensorPathMO. The data is streamed to10.30.217.80 port
50055.POST https://192.168.20.123/api/node/mo/sys/tm.json
Payload:{"telemetryEntity": {"children": [{"telemetrySensorGroup": {"attributes": {"id": "10"
}"children": [{"telemetrySensorPath": {"attributes": {"excludeFilter": "","filterCondition": "eq(fmBgp.operSt,\"disabled\")","path": "sys/fm/bgp","secondaryGroup": "0","secondaryPath": "","depth": "0"
}}
}]
}},{"telemetryDestGroup": {"attributes": {"id": "20"
}"children": [{"telemetryDest": {"attributes": {"addr": "10.30.217.80","port": "50055","enc": "GPB","proto": "gRPC"
}}
}]
}},{"telemetrySubscription": {"attributes": {"id": "30"
}"children": [{"telemetryRsSensorGroupRel": {"attributes": {"sampleIntvl": "0","tDn": "sys/tm/sensor-10"
Cisco Nexus 9000 Series NX-OS Programmability Guide, Release 7.x252
Model-Driven ProgrammabilityConfiguration Example for Telemetry Using the NX-API

}}
},{"telemetryRsDestGroupRel": {"attributes": {"tDn": "sys/tm/dest-20"
}}
}]
}}]
}}
Using Postman Collection for Telemetry Configuration
An example Postman collection is an easy way to start configuring the telemetry feature, and can run alltelemetry CLI equivalents in a single payload. Modify the file in the preceding link using your preferred texteditor to update the payload to your needs, then open the collection in Postman and run the collection.
Telemetry Model in the DMEThe telemetry application is modeled in the DME with the following structure:
model|----package [name:telemetry]
| @name:telemetry|----objects
|----mo [name:Entity]| @name:Entity| @label:Telemetry System|--property| @name:adminSt| @type:AdminState||----mo [name:SensorGroup]| | @name:SensorGroup| | @label:Sensor Group| |--property| | @name:id [key]| | @type:string:Basic| | @name:dataSrc| | @type:DataSource| || |----mo [name:SensorPath]| | @name:SensorPath| | @label:Sensor Path| |--property| | @name:path [key]| | @type:string:Basic| | @name:filterCondition| | @type:string:Basic| | @name:excludeFilter| | @type:string:Basic| | @name:depth| | @type:RetrieveDepth||----mo [name:DestGroup]
Cisco Nexus 9000 Series NX-OS Programmability Guide, Release 7.x253
Model-Driven ProgrammabilityTelemetry Model in the DME

| | @name:DestGroup| | @label:Destination Group| |--property| | @name:id| | @type:string:Basic| || |----mo [name:Dest]| | @name:Dest| | @label:Destination| |--property| | @name:addr [key]| | @type:address:Ip| | @name:port [key]| | @type:scalar:Uint16| | @name:proto| | @type:Protocol| | @name:enc| | @type:Encoding||----mo [name:Subscription]
| @name:Subscription| @label:Subscription|--property| @name:id| @type:scalar:Uint64|----reldef| | @name:SensorGroupRel| | @to:SensorGroup| | @cardinality:ntom| | @label:Link to sensorGroup entry| |--property| @name:sampleIntvl| @type:scalar:Uint64||----reldef
| @name:DestGroupRel| @to:DestGroup| @cardinality:ntom| @label:Link to destGroup entry
DNs Available to Telemetry
For a list of DNs available to the telemetry feature, see Model-Driven Telemetry, on page 219.
Additional References
Related DocumentsDocument TitleRelated Topic
Telemetry Deployment for VXLAN EVPN SolutionExample configurations of telemetry deployment forVXLAN EVPN.
Cisco Nexus 9000 Series NX-OS Programmability Guide, Release 7.x254
Model-Driven ProgrammabilityAdditional References

C H A P T E R 28Hardware Telemetry
• About Streaming Statistics Export (SSX), on page 255
About Streaming Statistics Export (SSX)The Streaming Statistics Export (SSX) module reads statistics from the ASIC and sends them to a remoteserver (collector) for analysis. SSX can read a register or (directly accessible) memory of the switch.
The contents of registers and the packet format are specified by an instruction sequence.
Statistics are assembled as a packet with a flexible MTU size and a user-defined header. These packets aresent through one of the front-panel ports of the switch.
Headers are configured by software, and packets that are streamed are always UDP packets. Different headerscan be configured and selected with an SSX instruction set. An ASIC can send the statistics (packets) todifferent collectors.
Each header is followed by a metadata provided by the ASIC. The metadata contains information such as PTPtimestamp and sequence number. A monotonically increasing packet sequence number is maintained by theASIC for each header. This allows the collector to detect a lost packet by monitoring the sequence number.
The packet payload (statistics) consists of TLV formatted data (T=type, L=length, V=values). Type specifiesthe contents of the TLV; length specifies the number of bytes contained in the TLV; and values is a list ofstatistic values. (Type also specifies which “decoder” required to extract the values in the TLV.)
Packet FormatSSX architecture provides the flexibility for software to export statistics with programmable header formats.The headers are obtained from header memory. The config register CFG_header_base points to the start ofthe header memory. In this release, all the statistics are exported as a payload of a UDP packet. Each headerentry in the memory corresponds to a collector. The header_idx field in the HDR instruction is used to pickcollector to which to send the packet to. Having the flexibility to choose the collector allows for pickingmultiple tunnel endpoints for different kinds of data thus balancing the load across a set of collectors. Forexample, a given engine may receive stats only from a particular slice of the chip or receive all the statisticsfrom only one chip in the system and so on.
It is important to note that the IP_header length and header checksum are programmed correctly by thesoftware. Software must ensure that TLVs that form the payload of this packet does not exceed the lengthspecified in the header. If the TLV size is smaller than the packet length, ASIC will pad appropriate numberof zeros.
Cisco Nexus 9000 Series NX-OS Programmability Guide, Release 7.x255

An exported packet consists of one packet header (selected by the instruction HDR), metadata and one ormore TLV headers (selected by the instruction TLV). Each TLV header is followed by statistics values. TheCRC for the packet is computed by the ASIC.
Metadata FormatMetadata fields precede the actual statistics data. It is inserted by the ASIC.
typedef bitset metadata_t {big_endian 1;field ptp_tstp { bits 64; }field seq_num { bits 32; }field system { bits 16; }field board { bits 8; }field asic { bits 4; }field ver { bits 4; }}
The metadata contains the following information:
DescriptionField
A 64-bit number that represents the time elapsed since epoch. The higher order32 bits represent seconds and lower 32 bits represent nanoseconds.
PTP timestamp
A monotonically increasing packet sequence number is maintained by theASIC for each header. This allows the collector to detect any lost packet bykeeping track of the sequence number.
Sequence number
A configurable ID that is used to identify the source switch for each packet.System ID
Indicates the type of ASIC.ASIC
Indicates the type of board.Board
Indicates the software version of SSX.Ver
In order to notify the collectors of sequence of each UDP delivery, a monotonically increasing seq_num(32bits) is inserted by the ASIC into the packet’s metadata record. This seq_num is unique per collector.Seqnum is maintained alongside each header entry, and is stored in the address immediately following thelast address of the header entry. ASIC increments the seq_num (rolls over) in the header memory once apacket to the given collector is exported.
Note
PayloadEach SSX packet contains a single TLV header.
The packet payload consists of TLV formatted data (T=Type, L=Length, V=Values).
Type specifies the contents of the TLV; Length specifies the number of bytes contained in the TLV; Valuesis a list of statistics values.
Cisco Nexus 9000 Series NX-OS Programmability Guide, Release 7.x256
Model-Driven ProgrammabilityMetadata Format

The Type field is divided into several subfields:
bitset type {big_endian 1;field group { bits 8; }field block { bits 8; }field index { bits 32; }}
The TLV header contains the following:
DescriptionSub-FieldField
Slice number from where the statistics are read.GroupType
Indicates the block within the ASIC (such as BAX, PRX, MAC, and so on)Block
The higher order 24 bits of the index indicate the counter index for each counter,which comes from the TLV file. When the SSX monitor is applied on thesystem, a TLV file is generated and saved as /mnt/pss/asic_tlv.cfg. Refer tothe TLV file to determine the TLV encoding in the packets that the switchstreams for each counter type.
The lower order 8 bits of the index indicates the packet index. The packet indexis needed when more than one packet is needed to fit the data for a singlecounter index.
Index
Indicates the length of the value in the payload.Length
SSX ApplicationsSSX supports many opcodes and general purpose registers to host many applications. For standalone streamingstatistics, certain user-specified statistics can be exported from ASIC to one or more external analyzers.Examples of these user-specified statistics include:
• Queue congestion
• Queue drops
• RMON counters
Configuring SSXConfiguring SSX on a switch requires:
• Enabling the SSX feature
• Configuring an SSX collector
• Configuring an SSX record
• Configuring an SSX monitor
• Applying an SSX monitor
Cisco Nexus 9000 Series NX-OS Programmability Guide, Release 7.x257
Model-Driven ProgrammabilitySSX Applications

Examples of these are shown below.
Enabling the SSX Feature
switch# confEnter configuration commands, one per line. End with CNTL/Z.switch(config)# feature hw_telemetry
HW Telemetry enabledswitch(config)#switch(config)# hardware-telemetry ssxswitch(config-ssx)#
Configuring an SSX Collector
switch(config)# ssx collector collector1switch(config-ssx-collector)# ?destination Destination configurationdscp DSCPmtu MTUno Negate a command or set its defaultssource Source configurationend Go to exec modeexit Exit from command interpreterpop Pop mode from stack or restore from namepush Push current mode to stack or save it under namewhere Shows the cli context you are inswitch(config-ssx-collector)# source ip-address 10.20.30.40switch(config-ssx-collector)# destination ip-address 10.10.10.2switch(config-ssx-collector)# source udp-port ?<1-65535> UDP port to be configured, default 49153switch(config-ssx-collector)# source udp-port 49153switch(config-ssx-collector)# destination udp-port ?<1-65535> UDP port to be configured, default 49153switch(config-ssx-collector)# destination udp-port 49153switch(config-ssx-collector)# mtu ?<64-9216> MTU port to be configuredswitch(config-ssx-collector)# mtu 1500switch(config-ssx-collector)# dscp ?<0-63> DSCP to be configuredswitch(config-ssx-collector)# dscp 0
Configuring an SSX Record
switch(config)# ssx record record1switch(config-ssx-record)# ?collect Stats type to be configuredinterval Time interval to be configuredno Negate a command or set its defaultsend Go to exec modeexit Exit from command interpreterpop Pop mode from stack or restore from namepush Push current mode to stack or save it under namewhere Shows the cli context you are inswitch(config-ssx-record)# collect ?eg-q-deptheg-q-dropseg-q-microburst
Cisco Nexus 9000 Series NX-OS Programmability Guide, Release 7.x258
Model-Driven ProgrammabilityConfiguring SSX

eg-q-peaking-q-depthing-q-dropsing-q-peaksmac-mibsswitch(config-ssx-record)# collect eg-q-depthswitch(config-ssx-record)# interval ?<100-1000> Time interval in increments of 100msswitch(config-ssx-record)# interval 100
Configuring an SSX Monitor
switch(config)# ssx monitor monitor1switch(config-ssx-monitor)# ?collector Collector to be configuredno Negate a command or set its defaultsrecord Record to be monitoredend Go to exec modeexit Exit from command interpreterpop Pop mode from stack or restore from namepush Push current mode to stack or save it under namewhere Shows the cli context you are inswitch(config-ssx-monitor)# collector collector1switch(config-ssx-monitor)# record record1
Applying an SSX Monitor
switch(config)# system ssx monitor monitor1
SSX CountersThe following counters are supported by SSX.
The information in the following table applies for NX-OS Releases 7.0(3)I7(4) and earlier:
MeaningCounter
Instant buffer utilization per output queueeg-q-depth
Tail drops per output queueeg-q-drops
Microburst recordseg-q-microburst
Buffer peak counters per output queueeg-q-peak
Instant buffer utilization per input queueing-q-depth
Overflow drops per input queueing-q-drops
RMON counters per MAC channelmac-mibs
The information in the following table applies for NX-OS Releases 7.0(3)I7(5) and later:
Cisco Nexus 9000 Series NX-OS Programmability Guide, Release 7.x259
Model-Driven ProgrammabilitySSX Counters

MeaningCounter
Average depth per output queue
If you upgrade from NX-OS Release 7.0(3)I7(5) toNX-OS Release 9.2(1), remove featurehardware-telemetry before the upgrade and re-enableit after the upgrade if you have this ssx collect optionconfigured.
Note
egress queue average-depth
Instant buffer utilization per output queueegress queue depth
Tail drops per output queueegress queue drops
Microburst recordsegress queue microburst
Buffer peak counters per output queueegress queue peak
Streams the buffer occupancy per pool groupegress pool-group depth
Streams the buffer occupancy per sliceegress buffer depth
Instant buffer utilization per input queueingress queue depth
Overflow drops per input queueingress queue drops
RMON counters per MAC channelethernet counters
SSX show CommandsThe following are show commands that are associated with SSX and hardware telemetry.
The information in the following table applies for NX-OS Releases 7.0(3)I7(4) and earlier:
DescriptionCommand
Displays information about current running-config.show running-config
Displays details about SSX.show hw_telemetry ssx details
Displays details about the SSX monitor.show hw_telemetry ssx monitor all
Displays details about the SSX collector.show hw_telemetry ssx collector all
Displays details about SSX record.show hw_telemetry ssx record all
Displays details about system internals.show system internal hw_telemetry details
Displays details about system internal debug history.show system internal hw_telemetry event-historydebug
Displays details about system internal errors.show system internal hw_telemetry event-historyerrors
Cisco Nexus 9000 Series NX-OS Programmability Guide, Release 7.x260
Model-Driven ProgrammabilitySSX show Commands

DescriptionCommand
Displays details about system internal messages.show system internal hw_telemetry event-historymsgs
Displays details about system internal memorystatistics.
show system internal hw_telemetry mem-stats detail
Displays details about the system internal access listdetails
show system internal access-list resource hw-telemetrydetail
The information in the following table applies for NX-OS Releases 7.0(3)I7(5) and later:
DescriptionCommand
Displays information about current running-config.show running-config
Displays details about SSX.show ssx details
Displays details about the SSX monitor.show ssx monitor all
Displays details about SSX exporter.show ssx exporter all
Displays details about the SSX record.show ssx record all
Displays details about system internals.show system internal hardware_telemetry details
Displays details about the system internal debughistory.
show system internal hardware_telemetryevent-history debug
Displays details about system internal errors.show system internal hardware_telemetryevent-history errors
Displays details about system internal messages.show system internal hardware_telemetryevent-history msgs
Displays details about system internal memorystatistics.
show system internal hardware_telemetry mem-statsdetail
Displays details about tne system internal access listdetails
show system internal access-list resourcehardware-telemetry detail
Example: Read MAC MIBsThe following is an example of reading MAC MIBs.
Read MIBs from the 16 MACs in slice0 of a N9K-C9508-FM-2 and send it using a UDP header of size =48B and payload of size 1518B (including 4B CRC).
Each MAC contains 91 counters, each being 64 bits (or 8 Bytes) and the start address for each MAC MIBsis separated by 0x8000.
After each data set is sent, the ASIC will generate an interrupt (ITR 5) to indicate that the packets have beensent.
Cisco Nexus 9000 Series NX-OS Programmability Guide, Release 7.x261
Model-Driven ProgrammabilityExample: Read MAC MIBs
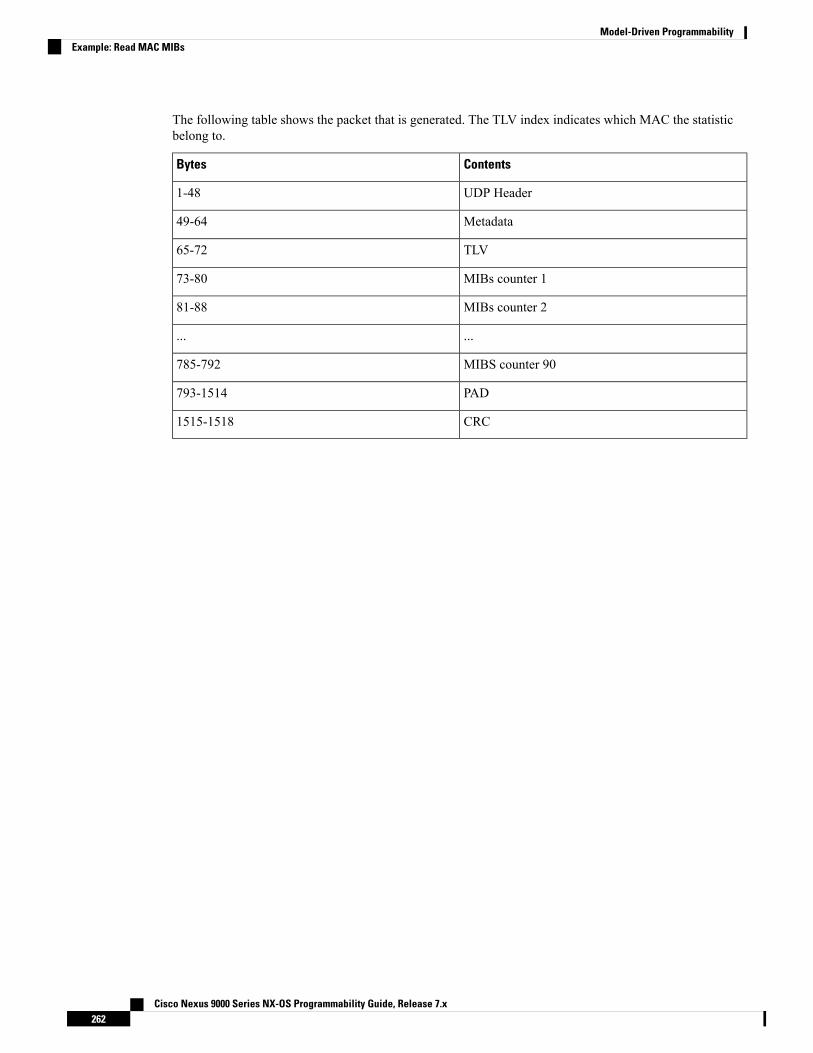
The following table shows the packet that is generated. The TLV index indicates which MAC the statisticbelong to.
ContentsBytes
UDP Header1-48
Metadata49-64
TLV65-72
MIBs counter 173-80
MIBs counter 281-88
......
MIBS counter 90785-792
PAD793-1514
CRC1515-1518
Cisco Nexus 9000 Series NX-OS Programmability Guide, Release 7.x262
Model-Driven ProgrammabilityExample: Read MAC MIBs

P A R T VXML Management Interface
• XML Management Interface, on page 265

C H A P T E R 29XML Management Interface
This section contains the following topics:
• About the XML Management Interface, on page 265• Licensing Requirements for the XML Management Interface, on page 266• Prerequisites to Using the XML Management Interface, on page 267• Using the XML Management Interface, on page 267• Information About Example XML Instances, on page 280• Additional References, on page 287
About the XML Management Interface
Information About the XML Management InterfaceYou can use the XMLmanagement interface to configure a device. The interface uses the XML-based NetworkConfiguration Protocol (NETCONF), which allows you to manage devices and communicate over the interfacewith an XML management tool or program. The Cisco NX-OS implementation of NETCONF requires youto use a Secure Shell (SSH) session for communication with a device.
NETCONF is implemented with an XML Schema (XSD) that allows you to enclose device configurationelements within a remote procedure call (RPC) message. From within an RPC message, select one of theNETCONF operations that matches the type of command that you want the device to execute. You canconfigure the entire set of CLI commands on the device with NETCONF. For information about usingNETCONF, see the Creating NETCONF XML Instances, on page 270 and RFC 4741.
For more information about using NETCONF over SSH, see RFC 4742.
This section includes the following topics:
NETCONF LayersThe following table lists the NETCONF layers:
Table 16: NETCONF Layers
ExampleLayer
SSHv2Transport protocol
Cisco Nexus 9000 Series NX-OS Programmability Guide, Release 7.x265

ExampleLayer
RPC, RPC-replyRPC
get-config, edit-configOperations
show or configuration commandContent
The following is a description of the four NETCONF layers:
• SSH transport protocol—Provides an encrypted connection between a client and the server.
• RPC tag—Introduces a configuration command from the requestor and the corresponding reply from theXML server.
• NETCONF operation tag—Indicates the type of configuration command.
• Content—Indicates the XML representation of the feature that you want to configure.
SSH xmlagentThe device software provides an SSH service that is called xmlagent that supports NETCONF over SSHVersion 2.
The xmlagent service is referred to as the XML server in Cisco NX-OS software.Note
NETCONF over SSH starts with the exchange of a Hello message between the client and the XML server.After the initial exchange, the client sends XML requests, which the server responds to with XML responses.The client and server terminate requests and responses with the character sequence >. Because this charactersequence is not valid in XML, the client and the server can interpret when messages end, which keepscommunication in sync.
The XML schemas that define the XML configuration instances that you can use are described in CreatingNETCONF XML Instances, on page 270.
Licensing Requirements for the XML Management InterfaceLicense RequirementProduct
The XML management interface requires no license.Any feature that is not included in a license packageis bundled with the Cisco NX-OS image and isprovided at no extra charge to you. For a completeexplanation of the Cisco NX-OS licensing scheme,see the Cisco NX-OS Licensing Guide.
Cisco NX-OS
Cisco Nexus 9000 Series NX-OS Programmability Guide, Release 7.x266
XML Management InterfaceSSH xmlagent

Prerequisites to Using the XML Management InterfaceUsing the XML management interface has the following prerequisites:
• You must install SSHv2 on the client PC.
• You must install an XML management tool that supports NETCONF over SSH on the client PC.
• You must set the appropriate options for the XML server on the device.
Using the XML Management InterfaceThis section describes how to manually configure and use the XML management interface.
Use the XML management interface with the default settings on the device.Note
Configuring the SSH and the XML Server Options Through the CLIBy default, the SSH server is enabled on your device. If you disable SSH, you must enable it before you startan SSH session on the client PC.
You can configure the XML server options to control the number of concurrent sessions and the timeout foractive sessions. You can also enable XML document validation and terminate XML sessions.
The XML server timeout applies only to active sessions.Note
For more information about configuring SSH, see the Cisco NX-OS security configuration guide for yourplatform.
For more information about the XML commands, see the Cisco NX-OS system management configurationguide for your platform.
Procedure
Step 1 Enter global configuration mode.
configure terminal
Step 2 (Optional) Display information about XML server settings and active XML server sessions. You can findsession numbers in the command output.
show xml server status
Step 3 Validate XML documents for the specified server session.
xml server validate all
Cisco Nexus 9000 Series NX-OS Programmability Guide, Release 7.x267
XML Management InterfacePrerequisites to Using the XML Management Interface

Step 4 Terminate the specified XML server session.
xml server terminate session
Step 5 (Optional) Disable the SSH server so that you can generate keys.
no feature ssh
Step 6 Enable the SSH server. (The default is enabled.)
feature ssh
Step 7 (Optional) Display the status of the SSH server.
show ssh server
Step 8 Set the number of XML server sessions allowed.
xml server max-session sessions
The range is from 1 to 8. The default is 8.
Step 9 Set the number of seconds after which an XML server session is terminated.
xml server timeout seconds
The range is from 1 to 1200. The default is 1200 seconds.
Step 10 (Optional) Display information about the XML server settings and active XML server sessions.
show xml server status
Step 11 (Optional) Saves the running configuration to the startup configuration.
copy running-config startup-config
Example
The following example shows how to configure SSH and XML server options through the CLI:switch# configure terminalswitch(config)# xml server validate allswitch(config)# xml server terminate 8665switch(config)# no feature sshswitch(config)# feature ssh serverswitch(config)# xml server max-session 6switch(config)# xml server timeout 2400switch(config)# copy running-config startup-config
Starting an SSHv2 SessionYou can start an SSHv2 session on a client PC with the ssh2 command that is similar to the following:ssh2 username@ip-address -s xmlagent
Enter the login username, the IP address of the device, and the service to connect to. The xmlagent service isreferred to as the XML server in the device software.
Cisco Nexus 9000 Series NX-OS Programmability Guide, Release 7.x268
XML Management InterfaceStarting an SSHv2 Session

The SSH command syntax can differ based on the SSH software on the client PC.Note
If you do not receive a Hello message from the XML server, verify the following conditions:
• The SSH server is enabled on the device.
• The max-sessions option of the XML server is adequate to support the number of SSH connections tothe device.
• The active XML server sessions on the device are not all in use.
Sending a Hello MessageYou must advertise your capabilities to the server with a Hello message before the server processes any otherrequests. When you start an SSH session to the XML server, the server responds immediately with a Hellomessage. This message informs the client of the capabilities of the server. The XML server supports onlybase capabilities and, in turn, expects that the client supports only these base capabilities.
The following are sample Hello messages from the server and the client:
You must end all XML documents with ]]>]]> to support synchronization in NETCONF over SSH.Note
Hello Message from a Server
<?xml version="1.0"?><hello xmlns="urn:ietf:params:xml:ns:netconf:base:1.0"><capabilities><capability>urn:ietf:params:xml:ns:netconf:base:1.0</capability></capabilities><session-id>25241</session-id>
</hello>]]>]]>
Hello Message from a Client
<?xml version="1.0"?><nc:hello xmlns:nc="urn:ietf:params:xml:ns:netconf:base:1.0"><nc:capabilities><nc:capability>urn:ietf:params:xml:ns:netconf:base:1.0</nc:capability></nc:capabilities>
</nc:hello>]]>]]>
Obtaining XML Schema Definition (XSD) Files
Procedure
Step 1 From your browser, navigate to the Cisco software download site at:
Cisco Nexus 9000 Series NX-OS Programmability Guide, Release 7.x269
XML Management InterfaceSending a Hello Message

http://software.cisco.com/download/navigator.html
The Download Software window is displayed.
Step 2 From the list of products that are displayed, choose Switches > Data Center Switches > platform model.Step 3 If you are not already logged in as a registered Cisco user, you are prompted to log in now.Step 4 From the Select a Software Type list, choose NX-OS XML Schema Definition.Step 5 Find the desired release and click Download.Step 6 If you are requested to, follow the instructions to apply for eligibility to download strong encryption software
images.
The Cisco End User License Agreement is displayed.
Step 7 Click Agree and follow the instructions to download the file to your PC.
Sending an XML Document to the XML ServerTo send an XML document to the XML server through an SSH session that you opened in a command shell,copy the XML text from an editor and paste it into the SSH session. Although typically you use an automatedmethod to send XML documents to the XML server, you can verify the SSH connection to the XML serverthrough this copy-paste method.
The following are the guidelines to follow when sending an XML document to the XML server:
• Verify that the XML server has sent the Hello message immediately after you started the SSH session,by looking for the Hello message text in the command shell output.
• Send the client Hello message before you send XML requests. Note that the XML server sends the Helloresponse immediately, and no additional response is sent after you send the client Hello message.
• Always terminate the XML document with the character sequence ]]>]]>.
Creating NETCONF XML InstancesYou can create NETCONF XML instances by enclosing the XML device elements within an RPC tag andNETCONF operation tags. The XML device elements are defined in feature-based XML schema definition(XSD) files, which enclose available CLI commands in an XML format.
The following are the tags that are used in the NETCONF XML request in a framework context. Tag linesare marked with the following letter codes:
• X —XML declaration
• R—RPC request tag
• N—NETCONF operation tags
• D—Device tags
NETCONF XML Framework Context
X <?xml version="1.0"?>R <nc:rpc message-id="1" xmlns:nc="urn:ietf:params:xml:ns:netconf:base:1.0"
Cisco Nexus 9000 Series NX-OS Programmability Guide, Release 7.x270
XML Management InterfaceSending an XML Document to the XML Server

R xmlns="http://www.cisco.com/nxos:1.0:nfcli”>N <nc:get>N <nc:filter type="subtree">D <show>D <xml>D <server>D <status/>D </server>D </xml>D </show>N </nc:filter>N </nc:get>R </nc:rpc>]]>]]>
You must use your own XML editor or XML management interface tool to create XML instances.Note
RPC Request TagAll NETCONFXML instances must begin with the RPC request tag <rpc>. The <rpc> element has a messageID (message-id) attribute. This message-id attribute is replicated in the <rpc-reply> and can be used to correlaterequests and replies. The <rpc> node also contains the following XML namespace declarations:
• NETCONF namespace declaration—The <rpc> and NETCONF tags that are defined in theurn:ietf:params:xml:ns:netconf:base:1.0 namespace, are present in the netconf.xsdschema file.
• Device namespace declaration—Device tags encapsulated by the <rpc> and NETCONF tags are definedin other namespaces. Device namespaces are feature-oriented. Cisco NX-OS feature tags are defined indifferent namespaces. RPC Request Tag <rpc> is an example that uses the NFCLI feature. It declaresthat the device namespace isxmlns=http://www.cisco.com/nxos:1.0:nfcli. nfcli.xsdcontains this namespace definition. For more information, see Obtaining XML Schema Definition (XSD)Files, on page 269.
Examples
RPC Request Tag <rpc>
<nc:rpc message-id="315" xmlns:nc="urn:ietf:params:xml:ns:netconf:base:1.0"xmlns=http://www.cisco.com/nxos:1.0:nfcli">...</nc:rpc>]]>]]>
Configuration Request
<?xml version="1.0"?><nc:rpc message-id="16" xmlns:nc="urn:ietf:params:xml:ns:netconf:base:1.0"xmlns="http://www.cisco.com/nxos:1.0:if_manager"><nc:edit-config><nc:target><nc:running/>
</nc:target><nc:config><configure>
Cisco Nexus 9000 Series NX-OS Programmability Guide, Release 7.x271
XML Management InterfaceRPC Request Tag

<__XML__MODE__exec_configure><interface><ethernet><interface>2/30</interface><__XML__MODE_if-ethernet><__XML__MODE_if-eth-base><description><desc_line>Marketing Network</desc_line>
</description></__XML__MODE_if-eth-base>
</__XML__MODE_if-ethernet></ethernet>
</interface></__XML__MODE__exec_configure>
</configure></nc:config>
</nc:edit-config></nc:rpc>]]>]]>
__XML__MODE tags are used internally by the NETCONF agent. Some tags are present only aschildren of a certain __XML__MODE. By examining the schema file, you can find the correct modetag that leads to the tags representing the CLI command in XML.
Note
NETCONF Operations TagsNETCONF provides the following configuration operations:
Table 17: NETCONF Operations in Cisco NX-OS
ExampleDescriptionNETCONF Operation
NETCONFClose Session Instance,on page 281
Closes the current XML serversession.
close-session
NETCONF Commit Instance:Candidate ConfigurationCapability, on page 285
Sets the running configuration tothe current contents of candidateconfiguration.
commit
NETCONF Confirmed CommitInstance, on page 286
Provides the parameters to committhe configuration for a specifiedtime. If a commit operation doesnot follow this operation within theconfirm-timeout period, theconfiguration is reverted to the statebefore the confirmed-commitoperation.
confirmed-commit
NETCONF Copy Config Instance,on page 282
Copies the contents of the sourceconfiguration datastore to the targetdatastore.
copy-config
—Operation not supported.delete-config
Cisco Nexus 9000 Series NX-OS Programmability Guide, Release 7.x272
XML Management InterfaceNETCONF Operations Tags

ExampleDescriptionNETCONF Operation
NETCONF Edit Config Instance,on page 282
NETCONF Rollback-On-ErrorInstance, on page 286
Configures the features in therunning configuration of the device.You use this operation forconfiguration commands.
edit-config
Creating NETCONF XMLInstances, on page 270
Receives configuration informationfrom a device. You use thisoperation for show commands. Thesource of the data is the runningconfiguration.
get
Creating NETCONF XMLInstances, on page 270
Retrieves all or part of aconfiguration.
get-config
NETCONF Kill Session Instance,on page 281
Closes the specified XML serversession. You cannot close your ownsession.
kill-session
NETCONFLock Instance, on page284
Allows a client to lock theconfiguration system of a device.
lock
NETCONF Unlock Instance, onpage 285
Releases the configuration lock thatthe session issued.
unlock
NETCONF Validate CapabilityInstance, on page 287
Checks the configuration of acandidate for syntactical andsemantic errors before applying theconfiguration to a device.
validate
Device TagsThe XML device elements represent the available CLI commands in XML format. The feature-specific schemafiles contain the XML tags for CLI commands of that particular feature. See Obtaining XMLSchemaDefinition(XSD) Files, on page 269.
Using this schema, it is possible to build an XML instance. The relevant portions of the nfcli.xsd schema filethat was used to build the NETCONF instances. See (Creating NETCONF XML Instances, on page 270).
show xml Device Tags
<xs:element name="show" type="show_type_Cmd_show_xml"/><xs:complexType name="show_type_Cmd_show_xml"><xs:annotation><xs:documentation>to display xml agent information</xs:documentation></xs:annotation><xs:sequence><xs:choice maxOccurs="1"><xs:element name="xml" minOccurs="1" type="xml_type_Cmd_show_xml"/><xs:element name="debug" minOccurs="1" type="debug_type_Cmd_show_debug"/></xs:choice></xs:sequence><xs:attribute name="xpath-filter" type="xs:string"/>
Cisco Nexus 9000 Series NX-OS Programmability Guide, Release 7.x273
XML Management InterfaceDevice Tags

<xs:attribute name="uses-namespace" type="nxos:bool_true"/></xs:complexType>
Server Status Device Tags
<xs:complexType name="xml_type_Cmd_show_xml"><xs:annotation><xs:documentation>xml agent</xs:documentation></xs:annotation><xs:sequence><xs:element name="server" minOccurs="1" type="server_type_Cmd_show_xml"/></xs:sequence></xs:complexType><xs:complexType name="server_type_Cmd_show_xml"><xs:annotation><xs:documentation>xml agent server</xs:documentation></xs:annotation><xs:sequence><xs:choice maxOccurs="1"><xs:element name="status" minOccurs="1" type="status_type_Cmd_show_xml"/><xs:element name="logging" minOccurs="1" type="logging_type_Cmd_show_logging_facility"/></xs:choice></xs:sequence></xs:complexType>
Device Tag Response
<xs:complexType name="status_type_Cmd_show_xml"><xs:annotation><xs:documentation>display xml agent information</xs:documentation></xs:annotation><xs:sequence><xs:element name="__XML__OPT_Cmd_show_xml___readonly__" minOccurs="0"><xs:complexType><xs:sequence><xs:group ref="og_Cmd_show_xml___readonly__" minOccurs="0" maxOccurs="1"/></xs:sequence></xs:complexType></xs:element></xs:sequence></xs:complexType><xs:group name="og_Cmd_show_xml___readonly__"><xs:sequence><xs:element name="__readonly__" minOccurs="1" type="__readonly___type_Cmd_show_xml"/></xs:sequence></xs:group><xs:complexType name="__readonly___type_Cmd_show_xml"><xs:sequence><xs:group ref="bg_Cmd_show_xml_operational_status" maxOccurs="1"/><xs:group ref="bg_Cmd_show_xml_maximum_sessions_configured" maxOccurs="1"/><xs:group ref="og_Cmd_show_xml_TABLE_sessions" minOccurs="0" maxOccurs="1"/></xs:sequence></xs:complexType>
The __XML__OPT_Cmd_show_xml___readonly__ tag is optional. This tag represents the response. Formore information on responses, see RPC Response Tag, on page 279.
Note
You can use the | XML option to find the tags that you can use to execute a <get> operation. The followingis an example of the | XML option. This example shows you that the namespace-defining tag to execute
Cisco Nexus 9000 Series NX-OS Programmability Guide, Release 7.x274
XML Management InterfaceDevice Tags

operations on this device is http://www.cisco.com/nxos:1.0:nfcli, and that the nfcli.xsd filecan be used to build requests.
You can enclose the NETCONF operation tags and the device tags within the RPC tag. The </rpc> end tagis followed by the XML termination character sequence.
XML Example
Switch#> show xml server status | xml<?xml version="1.0" encoding="ISO-8859-1"?><nf:rpc-reply xmlns:nf="urn:ietf:params:xml:ns:netconf:base:1.0"xmlns="http://www.cisco.com/nxos:1.0:nfcli"><nf:data><show><xml><server><status><__XML__OPT_Cmd_show_xml___readonly__><__readonly__><operational_status><o_status>enabled</o_status></operational_status><maximum_sessions_configured><max_session>8</max_session></maximum_sessions_configured></__readonly__></__XML__OPT_Cmd_show_xml___readonly__></status></server></xml></show></nf:data></nf:rpc-reply>]]>]]>
Extended NETCONF OperationsCisco NX-OS supports an <rpc> operation named <exec-command>. The operation allows client applicationsto send CLI configuration and show commands and to receive responses to those commands as XML tags.
The following is an example of the tags that are used to configure an interface. Tag lines are marked with thefollowing letter codes:
• X —XML declaration
• R—RPC request tag
• EO—Extended operation
The following table provides a detailed explanation of the operation tags:
Table 18: Operation Tags
DescriptionTag
Executes a CLI command.<exec-command>
Cisco Nexus 9000 Series NX-OS Programmability Guide, Release 7.x275
XML Management InterfaceExtended NETCONF Operations

DescriptionTag
Contains the CLI command. A command can be ashow command or configuration command. Separatemultiple configuration commands by using asemicolon (;). Although multiple show commandsare not supported, you can sendmultiple configurationcommands in different <cmd> tags as part of the samerequest. For more information, see the Example onConfiguration CLI Commands Sent Through<exec-command>.
<cmd>
Replies to configuration commands that are sent through the <cmd> tag are as follows:
• <nf:ok>̶̶—̶All configuration commands are executed successfully.
• <nf:rpc-error>—Some commands have failed. The operation stops at the first error, and the <nf:rpc-error>subtree provides more information about which configuration has failed. Configurations that are executedbefore the failed command would have been applied to the running configuration.
Configuration CLI Commands Sent Through the <exec-command>
The show command must be sent in its own <exec-command> instance as shown in the followingexample:
X <?xml version="1.0"?>R <nf:rpc xmlns:nf="urn:ietf:params:xml:ns:netconf:base:1.0"xmlns:nxos="http://www.cisco.com/nxos:1.0" message-id="3">EO <nxos:exec-command>EO <nxos:cmd>conf t ; interface ethernet 2/1 </nxos:cmd>EO <nxos:cmd>channel-group 2000 ; no shut; </nxos:cmd>EO </nxos:exec-command>R </nf:rpc>]]>]]>
Response to CLI Commands Sent Through the <exec-command>
The following is the response to a send operation:
<?xml version="1.0" encoding="ISO-8859-1"?><nf:rpc-reply xmlns:nf="urn:ietf:params:xml:ns:netconf:base:1.0"xmlns:nxos="http://www.cisco.com/nxos:1.0" message-id="3"><nf:ok/></nf:rpc-reply>]]>]]>
Show CLI Commands Sent Through the <exec-command>
The following example shows how the show CLI commands that are sent through the<exec-command> can be used to retrieve data:
<?xml version="1.0"?><nf:rpc xmlns:nf="urn:ietf:params:xml:ns:netconf:base:1.0"
Cisco Nexus 9000 Series NX-OS Programmability Guide, Release 7.x276
XML Management InterfaceExtended NETCONF Operations

xmlns:nxos="http://www.cisco.com/nxos:1.0" message-id="110"><nxos:exec-command><nxos:cmd>show interface brief</nxos:cmd></nxos:exec-command></nf:rpc>]]>]]>
Response to the show CLI Commands Sent Through the <exec-command>
<?xml version="1.0" encoding="ISO-8859-1"?><nf:rpc-reply xmlns:nf="urn:ietf:params:xml:ns:netconf:base:1.0"xmlns:nxos="http://www.cisco.com/nxos:1.0"xmlns:mod="http://www.cisco.com/nxos:1.0:if_manager" message-id="110"><nf:data><mod:show><mod:interface><mod:__XML__OPT_Cmd_show_interface_brief___readonly__><mod:__readonly__><mod:TABLE_interface><mod:ROW_interface><mod:interface>mgmt0</mod:interface><mod:state>up</mod:state><mod:ip_addr>192.0.2.20</mod:ip_addr><mod:speed>1000</mod:speed><mod:mtu>1500</mod:mtu></mod:ROW_interface><mod:ROW_interface><mod:interface>Ethernet2/1</mod:interface><mod:vlan>--</mod:vlan><mod:type>eth</mod:type><mod:portmode>routed</mod:portmode><mod:state>down</mod:state><mod:state_rsn_desc>Administratively down</mod:state_rsn_desc><mod:speed>auto</mod:speed><mod:ratemode>D</mod:ratemode></mod:ROW_interface></mod:TABLE_interface></mod:__readonly__></mod:__XML__OPT_Cmd_show_interface_brief___readonly__></mod:interface></mod:show></nf:data></nf:rpc-reply>]]>]]>
Failed Configuration
<?xml version="1.0"?><nf:rpc xmlns:nf="urn:ietf:params:xml:ns:netconf:base:1.0"xmlns:nxos="http://www.cisco.com/nxos:1.0" message-id="3"><nxos:exec-command><nxos:cmd>configure terminal ; interface ethernet2/1 </nxos:cmd><nxos:cmd>ip address 192.0.2.2/24 </nxos:cmd><nxos:cmd>no channel-group 2000 ; no shut; </nxos:cmd></nxos:exec-command></nf:rpc>]]>]]><?xml version="1.0" encoding="ISO-8859-1"?><nf:rpc-reply xmlns:nf="urn:ietf:params:xml:ns:netconf:base:1.0"xmlns:nxos="http://www.cisco.com/nxos:1.0" message-id="3"><nf:rpc-error>
Cisco Nexus 9000 Series NX-OS Programmability Guide, Release 7.x277
XML Management InterfaceExtended NETCONF Operations

<nf:error-type>application</nf:error-type><nf:error-tag>invalid-value</nf:error-tag><nf:error-severity>error</nf:error-severity><nf:error-message>Ethernet2/1: not part of port-channel 2000</nf:error-message><nf:error-info><nf:bad-element>cmd</nf:bad-element></nf:error-info></nf:rpc-error></nf:rpc-reply>]]>]]>
After a command is executed, the interface IP address is set, but the administrative state is notmodified (the no shut command is not executed. The administrative state is not modified becausethe no port-channel 2000 command results in an error.
The <rpc-reply> is due to a show command that is sent through the <cmd> tag that contains theXML output of the show command.
You cannot combine configuration and show commands on the same <exec-command> instance.The following example shows config and show commands that are combined in the same instance.
Combination of configure and show Commands
<?xml version="1.0"?><nf:rpc xmlns:nf="urn:ietf:params:xml:ns:netconf:base:1.0"xmlns:nxos="http://www.cisco.com/nxos:1.0" message-id="110"><nxos:exec-command><nxos:cmd>conf t ; interface ethernet 2/1 ; ip address 1.1.1.4/24 ; show xmlserver status </nxos:cmd></nxos:exec-command></nf:rpc>]]>]]><?xml version="1.0" encoding="ISO-8859-1"?><nf:rpc-reply xmlns:nf="urn:ietf:params:xml:ns:netconf:base:1.0"xmlns:nxos="http://www.cisco.com/nxos:1.0" message-id="110"><nf:rpc-error><nf:error-type>application</nf:error-type><nf:error-tag>invalid-value</nf:error-tag><nf:error-severity>error</nf:error-severity><nf:error-message>Error: cannot mix config and show in exec-command. Config cmdsbefore the show were executed.Cmd:show xml server status</nf:error-message><nf:error-info><nf:bad-element>cmd</nf:bad-element></nf:error-info></nf:rpc-error></nf:rpc-reply>]]>]]>
show CLI Commands Sent Through the <exec-command>
<?xml version="1.0"?><nf:rpc xmlns:nf="urn:ietf:params:xml:ns:netconf:base:1.0"xmlns:nxos="http://www.cisco.com/nxos:1.0" message-id="110"><nxos:exec-command><nxos:cmd>show xml server status ; show xml server status </nxos:cmd></nxos:exec-command></nf:rpc>]]>]]><?xml version="1.0" encoding="ISO-8859-1"?><nf:rpc-reply xmlns:nf="urn:ietf:params:xml:ns:netconf:base:1.0"
Cisco Nexus 9000 Series NX-OS Programmability Guide, Release 7.x278
XML Management InterfaceExtended NETCONF Operations

xmlns:nxos="http://www.cisco.com/nxos:1.0" message-id="110"><nf:rpc-error><nf:error-type>application</nf:error-type><nf:error-tag>invalid-value</nf:error-tag><nf:error-severity>error</nf:error-severity><nf:error-message>Error: show cmds in exec-command shouldn't be followed by anything</nf:error-message><nf:error-info><nf:bad-element><cmd></nf:bad-element></nf:error-info></nf:rpc-error></nf:rpc-reply>]]>]]>
NETCONF RepliesFor every XML request sent by a client, the XML server sends an XML response that is enclosed in the RPCresponse tag <rpc-reply>.
RPC Response TagThe following example shows the RPC response tag <rpc-reply>:
RPC Response Tag <rpc-reply>
<nc:rpc-reply message-id=”315” xmlns:nc="urn:ietf:params:xml:ns:netconf:base:1.0"xmlns=http://www.cisco.com/nxos:1.0:nfcli"><ok/></nc:rpc-reply>]]>]]>
RPC Response Elements
The elements <ok>, <data>, and <rpc-error> can appear in the RPC response. The following table describesthe RPC response elements that can appear in the <rpc-reply> tag:
Table 19: RPC Response Elements
DescriptionElement
The RPC request completed successfully. Thiselement is used when no data is returned in theresponse.
<ok>
The RPC request completed successfully. The datathat are associated with the RPC request is enclosedin the <data> element.
<data>
The RPC request failed. Error information is enclosedin the <rpc-error> element.
<rpc-error>
Interpreting the Tags Encapsulated in the data TagThe device tags encapsulated in the <data> tag contain the request, followed by the response. A clientapplication can safely ignore all the tags before the <readonly> tag, as show in the following example:
Cisco Nexus 9000 Series NX-OS Programmability Guide, Release 7.x279
XML Management InterfaceNETCONF Replies

RPC Reply Data
<?xml version="1.0" encoding="ISO-8859-1"?><nf:rpc-reply xmlns:nf="urn:ietf:params:xml:ns:netconf:base:1.0"xmlns="http://www.cisco.com/nxos:1.0:if_manager"><nf:data><show><interface><__XML__OPT_Cmd_show_interface_brief___readonly__><__readonly__><TABLE_interface><ROW_interface><interface>mgmt0</interface><state>up</state><ip_addr>xx.xx.xx.xx</ip_addr><speed>1000</speed><mtu>1500</mtu></ROW_interface><ROW_interface><interface>Ethernet2/1</interface><vlan>--</vlan><type>eth</type><portmode>routed</portmode><state>down</state><state_rsn_desc>Administratively down</state_rsn_desc><speed>auto</speed><ratemode>D</ratemode></ROW_interface></TABLE_interface></__readonly__></__XML__OPT_Cmd_show_interface_brief___readonly__></interface></show></nf:data></nf:rpc-reply>]]>]]>
<__XML__OPT.*> and <__XML__BLK.*> appear in responses and are sometimes used in requests.These tags are used by the NETCONF agent and are present in responses after the <__readonly__>tag. They are necessary in requests, and should be added according to the schema file to reach theXML tag that represents the CLI command.
Note
Information About Example XML Instances
Example XML InstancesThis section provides examples of the following XML instances:
• NETCONF Close Session Instance, on page 281
• NETCONF Kill Session Instance, on page 281
• NETCONF Copy Config Instance, on page 282
Cisco Nexus 9000 Series NX-OS Programmability Guide, Release 7.x280
XML Management InterfaceInformation About Example XML Instances

• NETCONF Edit Config Instance, on page 282
• NETCONF Get Config Instance, on page 283
• NETCONF Lock Instance, on page 284
• NETCONF Unlock Instance, on page 285
• NETCONF Commit Instance: Candidate Configuration Capability, on page 285
• NETCONF Confirmed Commit Instance, on page 286
• NETCONF Rollback-On-Error Instance, on page 286
• NETCONF Validate Capability Instance, on page 287
NETCONF Close Session InstanceThe following examples show the close-session request, followed by the close-session response:
Close Session Request
<?xml version="1.0"?><nc:rpc message-id="101" xmlns:nc="urn:ietf:params:xml:ns:netconf:base:1.0"xmlns="http://www.cisco.com/nxos:1.0"><nc:close-session/></nc:rpc>]]>]]>
Close Session Response
<nc:rpc-reply xmlns:nc="urn:ietf:params:xml:ns:netconf:base:1.0"xmlns="http://www.cisco.com/nxos:1.0" message-id="101"><nc:ok/></nc:rpc-reply>]]>]]>
NETCONF Kill Session InstanceThe following examples show the kill session request, followed by the kill session response:
Kill Session Request
<nc:rpc message-id="101" xmlns:nc="urn:ietf:params:xml:ns:netconf:base:1.0"xmlns="http://www.cisco.com/nxos:1.0"><nc:kill-session><nc:session-id>25241</nc:session-id></nc:kill-session></nc:rpc>]]>]]>
Kill Session Response
<?xml version="1.0"?><nc:rpc-reply xmlns:nc="urn:ietf:params:xml:ns:netconf:base:1.0"xmlns="http://www.cisco.com/nxos:1.0" message-id="101"><nc:ok/></nc:rpc-reply>]]>]]>
Cisco Nexus 9000 Series NX-OS Programmability Guide, Release 7.x281
XML Management InterfaceNETCONF Close Session Instance

NETCONF Copy Config InstanceThe following examples show the copy config request, followed by the copy config response:
Copy Config Request
<rpc message-id="101"xmlns="urn:ietf:params:xml:ns:netconf:base:1.0"><copy-config><target><running/></target><source><url>https://[email protected]:passphrase/cfg/new.txt</url></source></copy-config></rpc>
Copy Config Response
xmlns="urn:ietf:params:xml:ns:netconf:base:1.0"><ok/></rpc-reply>
NETCONF Edit Config InstanceThe following examples show the use of NETCONF edit config:
Edit Config Request
<?xml version="1.0"?><nc:rpc message-id="16" xmlns:nc="urn:ietf:params:xml:ns:netconf:base:1.0"xmlns="http://www.cisco.com/nxos:1.0:if_manager"><nc:edit-config><nc:target><nc:running/></nc:target><nc:config><configure><__XML__MODE__exec_configure><interface><ethernet><interface>2/30</interface><__XML__MODE_if-ethernet><__XML__MODE_if-eth-base><description><desc_line>Marketing Network</desc_line></description></__XML__MODE_if-eth-base></__XML__MODE_if-ethernet></ethernet></interface></__XML__MODE__exec_configure></configure></nc:config>
Cisco Nexus 9000 Series NX-OS Programmability Guide, Release 7.x282
XML Management InterfaceNETCONF Copy Config Instance

</nc:edit-config></nc:rpc>]]>]]>
Edit Config Response
<?xml version="1.0"?><nc:rpc-reply xmlns:nc="urn:ietf:params:xml:ns:netconf:base:1.0"xmlns="http://www.cisco.com/nxos:1.0:if_manager" message-id="16"><nc:ok/></nc:rpc-reply>]]>]]>
The operation attribute in edit config identifies the point in configuration where the specified operationis performed. If the operation attribute is not specified, the configuration is merged into the existingconfiguration data store. The operation attribute can have the following values:
• create
• merge
• delete
Edit Config: Delete Operation Request
The following example shows how to delete the configuration of interface Ethernet 0/0 from therunning configuration:
xmlns="urn:ietf:params:xml:ns:netconf:base:1.0"><edit-config><target><running/></target><default-operation>none</default-operation><config xmlns:xc="urn:ietf:params:xml:ns:netconf:base:1.0"><top xmlns="http://example.com/schema/1.2/config"><interface xc:operation="delete"><name>Ethernet0/0</name></interface></top></config></edit-config></rpc>]]>]]>
Response to Edit Config: Delete Operation
The following example shows how to edit the configuration of interface Ethernet 0/0 from the runningconfiguration:<rpc-reply message-id="101"xmlns="urn:ietf:params:xml:ns:netconf:base:1.0"><ok/></rpc-reply>]]>]]>
NETCONF Get Config InstanceThe following examples show the use of NETCONF get config:
Cisco Nexus 9000 Series NX-OS Programmability Guide, Release 7.x283
XML Management InterfaceNETCONF Get Config Instance

Get Config Request to Retrieve the Entire Subtree
<rpc message-id="101"xmlns="urn:ietf:params:xml:ns:netconf:base:1.0"><get-config><source><running/></source><filter type="subtree"><top xmlns="http://example.com/schema/1.2/config"><users/></top></filter></get-config></rpc>]]>]]>
Get Config Response with Results of a Query
<rpc-reply message-id="101"xmlns="urn:ietf:params:xml:ns:netconf:base:1.0"><data><top xmlns="http://example.com/schema/1.2/config"><users><user><name>root</name><type>superuser</type><full-name>Charlie Root</full-name><company-info><dept>1</dept><id>1</id></company-info></user><!-- additional <user> elements appear here... --></users></top></data></rpc-reply>]]>]]>
NETCONF Lock InstanceThe following examples show a lock request, a success response, and a response to an unsuccessful attempt:
Lock Request
<rpc message-id="101"xmlns="urn:ietf:params:xml:ns:netconf:base:1.0"><lock><target><running/></target></lock></rpc>]]>]]>
Response to a Successful Acquisition of Lock
<rpc-reply message-id="101"xmlns="urn:ietf:params:xml:ns:netconf:base:1.0">
Cisco Nexus 9000 Series NX-OS Programmability Guide, Release 7.x284
XML Management InterfaceNETCONF Lock Instance

<ok/> <!-- lock succeeded --></rpc-reply>]]>]]>
Response to an Unsuccessful Attempt to Acquire Lock
<rpc-reply message-id="101"xmlns="urn:ietf:params:xml:ns:netconf:base:1.0"><rpc-error> <!-- lock failed --><error-type>protocol</error-type><error-tag>lock-denied</error-tag><error-severity>error</error-severity><error-message>Lock failed, lock is already held</error-message><error-info><session-id>454</session-id><!-- lock is held by NETCONF session 454 --></error-info></rpc-error></rpc-reply>]]>]]>
NETCONF Unlock InstanceThe following examples show the use of NETCONF unlock:
Unlock Request
<rpc message-id="101"xmlns="urn:ietf:params:xml:ns:netconf:base:1.0"><unlock><target><running/></target></unlock></rpc>
Response to an Unlock Request
<rpc-reply message-id="101"xmlns="urn:ietf:params:xml:ns:netconf:base:1.0"><ok/></rpc-reply>
NETCONF Commit Instance: Candidate Configuration CapabilityThe following examples show a commit operation and a commit reply:
Commit Operation
<rpc message-id="101"xmlns="urn:ietf:params:xml:ns:netconf:base:1.0"><commit/></rpc>
Cisco Nexus 9000 Series NX-OS Programmability Guide, Release 7.x285
XML Management InterfaceNETCONF Unlock Instance

Commit Reply
<rpc-reply message-id="101"xmlns="urn:ietf:params:xml:ns:netconf:base:1.0"><ok/></rpc-reply>
NETCONF Confirmed Commit InstanceThe following examples show a confirmed commit operation and a confirmed commit reply:
Confirmed Commit Request
<rpc message-id="101"xmlns="urn:ietf:params:xml:ns:netconf:base:1.0"><commit><confirmed/><confirm-timeout>120</confirm-timeout></commit></rpc>]]>]]>
Confirmed Commit Response
<rpc-reply message-id="101"xmlns="urn:ietf:params:xml:ns:netconf:base:1.0"><ok/></rpc-reply>]]>]]>
NETCONF Rollback-On-Error InstanceThe following examples show how to configure rollback on error and the response to this request:
Rollback-On-Error Capability
<rpc message-id="101"xmlns="urn:ietf:params:xml:ns:netconf:base:1.0"><edit-config><target><running/></target><error-option>rollback-on-error</error-option><config><top xmlns="http://example.com/schema/1.2/config"><interface><name>Ethernet0/0</name><mtu>100000</mtu></interface></top></config></edit-config></rpc>]]>]]>
Cisco Nexus 9000 Series NX-OS Programmability Guide, Release 7.x286
XML Management InterfaceNETCONF Confirmed Commit Instance

Rollback-On-Error Response
<rpc-reply message-id="101"xmlns="urn:ietf:params:xml:ns:netconf:base:1.0"><ok/></rpc-reply>]]>]]>
NETCONF Validate Capability InstanceThe following examples show the use of NETCONF validate capability. The stringurn:ietf:params:netconf:capability:validate:1.0 identifies the NETCONF validate capability.
Validate Request
xmlns="urn:ietf:params:xml:ns:netconf:base:1.0"><validate><source><candidate/></source></validate></rpc>]]>]]>
Response to Validate Request
<rpc-reply message-id="101"xmlns="urn:ietf:params:xml:ns:netconf:base:1.0"><ok/></rpc-reply>]]>]]>
Additional ReferencesThis section provides additional information that is related to implementing the XML management interface.
RFCs
TitleRFCs
NETCONF Configuration ProtocolRFC 4741
Using the NETCONF Configuration Protocol overSecure Shell (SSH)
RFC 4742
Cisco Nexus 9000 Series NX-OS Programmability Guide, Release 7.x287
XML Management InterfaceNETCONF Validate Capability Instance

Cisco Nexus 9000 Series NX-OS Programmability Guide, Release 7.x288
XML Management InterfaceAdditional References

A P P E N D I X AStreaming Telemetry Sources
• About Streaming Telemetry, on page 289• Guidelines and Limitations, on page 289• Data Available for Telemetry, on page 289
About Streaming TelemetryThe streaming telemetry feature of the Cisco Nexus 3000 and 9000 switches continuously streams data outof the network and notifies the client, providing near-real-time access to monitoring data.
Guidelines and LimitationsFollowing are the guideline and limitations for streaming telemetry:
• The telemetry feature is available in Cisco Nexus 3000 and 9000 switches.
• Switches with less than 8 GB of memory do not support telemetry.
• Software streaming telemetry does not support the TCP protocol. The tcp option is displayed in the Helptext, but is not accepted during configuration.
Data Available for TelemetryFor each component group, the distinguished names (DNs) in the appendix of the NX-API DME ModelReference can provide the listed properties as data for telemetry.
Cisco Nexus 9000 Series NX-OS Programmability Guide, Release 7.x289

Cisco Nexus 9000 Series NX-OS Programmability Guide, Release 7.x290
Streaming Telemetry SourcesData Available for Telemetry