cisco content services switch security configuration guide · ccie, ccip, ccna, ccnp, cisco, the...
TRANSCRIPT

Corporate HeadquartersCisco Systems, Inc.170 West Tasman DriveSan Jose, CA 95134-1706USAhttp://www.cisco.comTel: 408 526-4000
800 553-NETS (6387)Fax: 408 526-4100
Cisco Content Services Switch Security Configuration GuideSoftware Version 7.40August 2004
Text Part Number: OL-5650-01

THE SPECIFICATIONS AND INFORMATION REGARDING THE PRODUCTS IN THIS MANUAL ARE SUBJECT TO CHANGE WITHOUT NOTICE. ALL STATEMENTS, INFORMATION, AND RECOMMENDATIONS IN THIS MANUAL ARE BELIEVED TO BE ACCURATE BUT ARE PRESENTED WITHOUT WARRANTY OF ANY KIND, EXPRESS OR IMPLIED. USERS MUST TAKE FULL RESPONSIBILITY FOR THEIR APPLICATION OF ANY PRODUCTS.
THE SOFTWARE LICENSE AND LIMITED WARRANTY FOR THE ACCOMPANYING PRODUCT ARE SET FORTH IN THE INFORMATION PACKET THAT SHIPPED WITH THE PRODUCT AND ARE INCORPORATED HEREIN BY THIS REFERENCE. IF YOU ARE UNABLE TO LOCATE THE SOFTWARE LICENSE OR LIMITED WARRANTY, CONTACT YOUR CISCO REPRESENTATIVE FOR A COPY.
The Cisco implementation of TCP header compression is an adaptation of a program developed by the University of California, Berkeley (UCB) as part of UCB’s public domain version of the UNIX operating system. All rights reserved. Copyright © 1981, Regents of the University of California.
NOTWITHSTANDING ANY OTHER WARRANTY HEREIN, ALL DOCUMENT FILES AND SOFTWARE OF THESE SUPPLIERS ARE PROVIDED “AS IS” WITH ALL FAULTS. CISCO AND THE ABOVE-NAMED SUPPLIERS DISCLAIM ALL WARRANTIES, EXPRESSED OR IMPLIED, INCLUDING, WITHOUT LIMITATION, THOSE OF MERCHANTABILITY, FITNESS FOR A PARTICULAR PURPOSE AND NONINFRINGEMENT OR ARISING FROM A COURSE OF DEALING, USAGE, OR TRADE PRACTICE.
IN NO EVENT SHALL CISCO OR ITS SUPPLIERS BE LIABLE FOR ANY INDIRECT, SPECIAL, CONSEQUENTIAL, OR INCIDENTAL DAMAGES, INCLUDING, WITHOUT LIMITATION, LOST PROFITS OR LOSS OR DAMAGE TO DATA ARISING OUT OF THE USE OR INABILITY TO USE THIS MANUAL, EVEN IF CISCO OR ITS SUPPLIERS HAVE BEEN ADVISED OF THE POSSIBILITY OF SUCH DAMAGES.
Cisco Content Services Switch Security Configuration GuideCopyright © 2004, Cisco Systems, Inc. All rights reserved.
CCSP, the Cisco Square Bridge logo, Cisco Unity, Follow Me Browsing, FormShare, and StackWise are trademarks of Cisco Systems, Inc.; Changing the Way We Work, Live, Play, and Learn, and iQuick Study are service marks of Cisco Systems, Inc.; and Aironet, ASIST, BPX, Catalyst, CCDA, CCDP, CCIE, CCIP, CCNA, CCNP, Cisco, the Cisco Certified Internetwork Expert logo, Cisco IOS, Cisco Press, Cisco Systems, Cisco Systems Capital, the Cisco Systems logo, Empowering the Internet Generation, Enterprise/Solver, EtherChannel, EtherFast, EtherSwitch, Fast Step, GigaDrive, GigaStack, HomeLink, Internet Quotient, IOS, IP/TV, iQ Expertise, the iQ logo, iQ Net Readiness Scorecard, LightStream, Linksys, MeetingPlace, MGX, the Networkers logo, Networking Academy, Network Registrar, Packet, PIX, Post-Routing, Pre-Routing, ProConnect, RateMUX, Registrar, ScriptShare, SlideCast, SMARTnet, StrataView Plus, SwitchProbe, TeleRouter, The Fastest Way to Increase Your Internet Quotient, TransPath, and VCO are registered trademarks of Cisco Systems, Inc. and/or its affiliates in the United States and certain other countries.
All other trademarks mentioned in this document or Website are the property of their respective owners. The use of the word partner does not imply a partnership relationship between Cisco and any other company. (0406R)
OL-5650-01
C O N T E N T S
Preface xi
Audience xii
How to Use This Guide xii
Related Documentation xiii
Symbols and Conventions xvi
Obtaining Documentation xvii
Cisco.com xvii
Ordering Documentation xviii
Documentation Feedback xviii
Obtaining Technical Assistance xviii
Cisco Technical Support Website xix
Submitting a Service Request xix
Definitions of Service Request Severity xx
Obtaining Additional Publications and Information xx
C H A P T E R 1 Controlling CSS Access 1-1
Changing the Administrative Username and Password 1-2
Creating Usernames and Passwords 1-3
Controlling Remote User Access to the CSS 1-6
Configuring Virtual Authentication 1-7
Configuring Console Authentication 1-8
Controlling Administrative Access to the CSS 1-10
Enabling Administrative Access to the CSS 1-10
Disabling Administrative Access to the CSS 1-11
iiiCisco Content Services Switch Security Configuration Guide

Contents
Controlling CSS Network Traffic Through Access Control Lists 1-12
ACL Overview 1-13
ACL Configuration Quick Start 1-15
Creating an ACL 1-17
Deleting an ACL 1-18
Configuring Clauses 1-19
Adding a Clause When ACLs are Globally Enabled 1-25
Deleting a Clause 1-26
Applying an ACL to a Circuit or DNS Queries 1-27
Removing an ACL from Circuits or DNS Queries 1-28
Enabling ACLs on the CSS 1-29
Disabling ACLs on the CSS 1-30
Showing ACLs 1-30
Setting the Show ACL Counters to Zero 1-32
Logging ACL Activity 1-32
ACL Example 1-34
Configuring Network Qualifier Lists for ACLs 1-35
Creating an NQL 1-36
Describing an NQL 1-36
Adding Networks to an NQL 1-36
Adding an NQL to an ACL Clause 1-38
Showing NQL Configurations 1-38
C H A P T E R 2 Configuring the Secure Shell Daemon Protocol 2-1
Enabling SSH 2-2
Configuring SSH Access 2-3
Configuring SSHD in the CSS 2-3
Configuring SSHD Keepalive 2-3
Configuring SSHD Port 2-4
Configuring SSHD Server-Keybits 2-4
ivCisco Content Services Switch Security Configuration Guide
OL-5650-01

Contents
Configuring Telnet Access When Using SSHD 2-5
Showing SSHD Configurations 2-6
C H A P T E R 3 Configuring the CSS as a Client of a RADIUS Server 3-1
RADIUS Configuration Quick Start 3-3
Configuring a RADIUS Server for Use with the CSS 3-4
Configuring Authentication Settings 3-5
Configuring Authorization Settings 3-5
Specifying a Primary RADIUS Server 3-6
Specifying a Secondary RADIUS Server 3-7
Configuring the RADIUS Server Timeouts 3-8
Configuring the RADIUS Server Retransmits 3-8
Configuring the RADIUS Server Dead-Time 3-9
Showing RADIUS Server Configuration Information 3-9
C H A P T E R 4 Configuring the CSS as a Client of a TACACS+ Server 4-1
TACACS+ Configuration Quick Start 4-2
Configuring TACACS+ Server User Accounts for Use with the CSS 4-3
Configuring Authentication Settings 4-3
Configuring Authorization Settings 4-4
Configuring Global TACACS+ Attributes 4-5
Setting the Global CSS TACACS+ Timeout Period 4-6
Defining a Global Encryption Key 4-7
Setting the Global TACACS+ Keepalive Frequency 4-7
Defining a TACACS+ Server 4-8
Setting TACACS+ Authorization 4-11
Sending Full CSS Commands to the TACACS+ Server 4-12
vCisco Content Services Switch Security Configuration Guide
OL-5650-01

Contents
Setting TACACS+ Accounting 4-13
Showing TACACS+ Server Configuration Information 4-14
C H A P T E R 5 Configuring Firewall Load Balancing 5-1
Overview of FWLB 5-2
Firewall Synchronization 5-3
Configuring FWLB 5-3
Configuring a Keepalive Timeout for a Firewall 5-4
Configuring an IP Static Route for a Firewall 5-5
Configuring OSPF to Advertise Firewall Routes 5-6
Configuring RIP to Advertise Firewall Routes 5-7
Example of FWLB Static Route Configuration 5-7
Configuring FWLB with VIP and Virtual Interface Redundancy 5-10
Example of Firewall and Route Configurations 5-13
CSS-OUT-L Configuration 5-13
CSS-OUT-R Configuration 5-13
CSS-IN-L Configuration 5-14
CSS-IN-R Configuration 5-14
Displaying Firewall Flow Summaries 5-15
Displaying Firewall IP Routes 5-16
Displaying Firewall IP Information 5-17
I N D E X
viCisco Content Services Switch Security Configuration Guide
OL-5650-01

F I G U R E S
Figure 1-1 CSS Directory Access Privileges 1-5
Figure 1-2 ACLs Enabled on the CSS 1-14
Figure 5-1 Example of FWLB 5-9
Figure 5-2 FWLB with VIP/Interface Redundancy Configuration 5-11
viiCisco Content Services Switch Security Configuration Guide
OL-5650-01

Figures
viiiCisco Content Services Switch Security Configuration Guide
OL-5650-01
T A B L E S
Table 1-1 ACL Configuration Quick Start 1-16
Table 1-2 Clause Command Options 1-21
Table 1-3 Field Descriptions for the show acl Command Output 1-31
Table 1-4 Field Descriptions for the show nql Command Output 1-38
Table 2-1 Field Descriptions for the show sshd config Command 2-6
Table 2-2 Field Descriptions for the show sshd sessionsCommand 2-7
Table 3-1 RADIUS Configuration Quick Start 3-3
Table 3-2 Field Descriptions for the show radius config Command 3-10
Table 3-3 Field Descriptions for the show radius statistics Command 3-11
Table 4-1 TACACS+ Configuration Quick Start 4-2
Table 4-2 Field Descriptions for the show tacacs-server Command 4-14
Table 5-1 Field Descriptions for the show flow Command 5-16
Table 5-2 Field Descriptions for the show ip routes firewall Command 5-16
Table 5-3 Field Descriptions for the show ip routes firewall Command 5-17
ixCisco Content Services Switch Security Configuration Guide
OL-5650-01

Tables
xCisco Content Services Switch Security Configuration Guide
OL-5650-01
Preface
This guide provides instructions for configuring the security features of the Cisco 11500 Series Content Services Switches (CSS). Information in this guide applies to all CSS models except where noted.
The CSS software is available in a Standard or optional Enhanced feature set. Proximity Database and Secure Management, which includes Secure Shell Host and SSL strong encryption for the Device Management software, are optional features.
This preface contains the following major sections:
• Audience
• How to Use This Guide
• Related Documentation
• Symbols and Conventions
• Obtaining Documentation
• Documentation Feedback
• Obtaining Technical Assistance
• Obtaining Additional Publications and Information
xiCisco Content Services Switch Security Configuration Guide
OL-5650-01

PrefaceAudience
AudienceThis guide is intended for the following trained and qualified service personnel who are responsible for configuring the CSS:
• Web master
• System administrator
• System operator
How to Use This GuideThis guide is organized as follows:
Chapter Description
Chapter 1, Controlling CSS Access
Control access to the CSS including user and network traffic access.
Chapter 2, Configuring the Secure Shell Daemon Protocol
Configure Secure Shell Daemon (SSHD) protocol to provide secure encrypted communications between two hosts communicating over an insecure network.
Chapter 3, Configuring the CSS as a Client of a RADIUS Server
Configure Remote Authentication Dial-In User Service (RADIUS) protocol as a client on the CSS.
Chapter 4, Configuring the CSS as a Client of a TACACS+ Server
Configure Terminal Access Controller Access Control System (TACACS+) protocol as a client on the CSS.
Chapter 5, Configuring Firewall Load Balancing
Configure firewall load balancing between CSSs for enhanced security.
xiiCisco Content Services Switch Security Configuration Guide
OL-5650-01

PrefaceRelated Documentation
Related DocumentationIn addition to this guide, the Content Services Switch documentation includes the following publications.
Document Title Description
Release Note for the Cisco 11500 Series Content Services Switch
This release note provides information on operating considerations, caveats, and command line interface (CLI) commands for the Cisco 11500 series CSS.
Cisco 11500 Series Content Services Switch Hardware Installation Guide
This guide provides information for installing, cabling, and powering the Cisco 11500 series CSS. In addition, this guide provides information about CSS specifications, cable pinouts, and hardware troubleshooting.
Cisco Content Services Switch Getting Started Guide
This guide describes how to perform initial administration and configuration tasks on the CSS, including:
• Booting the CSS for the first time and on a routine basis, and logging in to the CSS
• Configuring the username and password, Ethernet management port, static IP routes, and the date and time
• Configuring DNS server for hostname resolution
• Configuring sticky cookies with a sticky overview and advanced load-balancing method using cookies
• A task list to help you find information in the CSS documentation
• Troubleshooting the boot process
xiiiCisco Content Services Switch Security Configuration Guide
OL-5650-01

PrefaceRelated Documentation
Cisco Content Services Switch Administration Guide
This guide describes how to perform administrative tasks on the CSS, including upgrading your CSS software and configuring the following:
• Logging, including displaying log messages and interpreting sys.log messages
• User profile and CSS parameters
• SNMP
• RMON
• XML documents to configure the CSS
• CSS scripting language
• Offline Diagnostic Monitor (Offline DM) menu
Cisco Content Services Switch Routing and Bridging Configuration Guide
This guide describes how to perform routing and bridging configuration tasks on the CSS, including:
• Management ports, interfaces, and circuits
• Spanning-tree bridging
• Address Resolution Protocol (ARP)
• Routing Information Protocol (RIP)
• Internet Protocol (IP)
• Open Shortest Path First (OSPF) protocol
• Cisco Discovery Protocol (CDP)
• Dynamic Host Configuration Protocol (DHCP) relay agent
Document Title Description
xivCisco Content Services Switch Security Configuration Guide
OL-5650-01

PrefaceRelated Documentation
Cisco Content Services Switch Content Load-Balancing Configuration Guide
This guide describes how to perform CSS content load-balancing configuration tasks, including:
• Flow and port mapping
• Services
• Service, global, and script keepalives
• Source groups
• Loads for services
• Dynamic Feedback Protocol (DFP)
• Owners
• Content rules
• Sticky parameters
• HTTP header load balancing
• Content caching
• Content replication
Cisco Content Services Switch Global Server Load-Balancing Configuration Guide
This guide describes how to perform CSS global load-balancing configuration tasks, including:
• Domain Name System (DNS)
• DNS Sticky
• Content Routing Agent
• Client-Side Accelerator
• Network proximity
Cisco Content Services Switch Redundancy Configuration Guide
This guide describes how to perform CSS redundancy configuration tasks, including:
• VIP and virtual interface redundancy
• Adaptive session redundancy
• Box-to-box redundancy
Document Title Description
xvCisco Content Services Switch Security Configuration Guide
OL-5650-01
PrefaceSymbols and Conventions
Symbols and ConventionsThis guide uses the following symbols and conventions to identify different types of information.
Caution A caution means that a specific action you take could cause a loss of data or adversely impact use of the equipment.
Warning A warning describes an action that could cause you physical harm or damage the equipment.
Note A note provides important related information, reminders, and recommendations.
Bold text indicates a command in a paragraph.
Cisco Content Services Switch SSL Configuration Guide
This guide describes how to perform CSS SSL configuration tasks, including:
• SSL certificate and keys
• SSL termination
• Back-end SSL
• SSL initiation
Cisco Content Services Switch Command Reference
This reference provides an alphabetical list of all CLI commands including syntax, options, and related commands.
Cisco Content Services Switch Device Management User’s Guide
This guide describes how to use the Device Management user interface, an HTML-based Web-based application that you use to configure and manage your CSS.
Document Title Description
xviCisco Content Services Switch Security Configuration Guide
OL-5650-01

PrefaceObtaining Documentation
Courier text indicates text that appears on a command line, including the CLI prompt.
Courier bold text indicates commands and text you enter in a command line.
Italics text indicates the first occurrence of a new term, book title, emphasized text, and variables for which you supply values.
1. A numbered list indicates that the order of the list items is important.
a. An alphabetical list indicates that the order of the secondary list items is important.
• A bulleted list indicates that the order of the list topics is unimportant.
– An indented list indicates that the order of the list subtopics is unimportant.
Obtaining DocumentationCisco documentation and additional literature are available on Cisco.com. Cisco also provides several ways to obtain technical assistance and other technical resources. These sections explain how to obtain technical information from Cisco Systems.
Cisco.comYou can access the most current Cisco documentation at this URL:
http://www.cisco.com/univercd/home/home.htm
You can access the Cisco website at this URL:
http://www.cisco.com
You can access international Cisco websites at this URL:
http://www.cisco.com/public/countries_languages.shtml
xviiCisco Content Services Switch Security Configuration Guide
OL-5650-01

PrefaceDocumentation Feedback
Ordering DocumentationYou can find instructions for ordering documentation at this URL:
http://www.cisco.com/univercd/cc/td/doc/es_inpck/pdi.htm
You can order Cisco documentation in these ways:
• Registered Cisco.com users (Cisco direct customers) can order Cisco product documentation from the Ordering tool:
http://www.cisco.com/en/US/partner/ordering/index.shtml
• Nonregistered Cisco.com users can order documentation through a local account representative by calling Cisco Systems Corporate Headquarters (California, USA) at 408 526-7208 or, elsewhere in North America, by calling 800 553-NETS (6387).
Documentation FeedbackYou can send comments about technical documentation to [email protected].
You can submit comments by using the response card (if present) behind the front cover of your document or by writing to the following address:
Cisco SystemsAttn: Customer Document Ordering170 West Tasman DriveSan Jose, CA 95134-9883
We appreciate your comments.
Obtaining Technical AssistanceFor all customers, partners, resellers, and distributors who hold valid Cisco service contracts, Cisco Technical Support provides 24-hour-a-day, award-winning technical assistance. The Cisco Technical Support Website on Cisco.com features extensive online support resources. In addition, Cisco Technical Assistance Center (TAC) engineers provide telephone support. If you do not hold a valid Cisco service contract, contact your reseller.
xviiiCisco Content Services Switch Security Configuration Guide
OL-5650-01

PrefaceObtaining Technical Assistance
Cisco Technical Support WebsiteThe Cisco Technical Support Website provides online documents and tools for troubleshooting and resolving technical issues with Cisco products and technologies. The website is available 24 hours a day, 365 days a year at this URL:
http://www.cisco.com/techsupport
Access to all tools on the Cisco Technical Support Website requires a Cisco.com user ID and password. If you have a valid service contract but do not have a user ID or password, you can register at this URL:
http://tools.cisco.com/RPF/register/register.do
Submitting a Service RequestUsing the online TAC Service Request Tool is the fastest way to open S3 and S4 service requests. (S3 and S4 service requests are those in which your network is minimally impaired or for which you require product information.) After you describe your situation, the TAC Service Request Tool automatically provides recommended solutions. If your issue is not resolved using the recommended resources, your service request will be assigned to a Cisco TAC engineer. The TAC Service Request Tool is located at this URL:
http://www.cisco.com/techsupport/servicerequest
For S1 or S2 service requests or if you do not have Internet access, contact the Cisco TAC by telephone. (S1 or S2 service requests are those in which your production network is down or severely degraded.) Cisco TAC engineers are assigned immediately to S1 and S2 service requests to help keep your business operations running smoothly.
To open a service request by telephone, use one of the following numbers:
Asia-Pacific: +61 2 8446 7411 (Australia: 1 800 805 227)EMEA: +32 2 704 55 55USA: 1 800 553 2447
For a complete list of Cisco TAC contacts, go to this URL:
http://www.cisco.com/techsupport/contacts
xixCisco Content Services Switch Security Configuration Guide
OL-5650-01
PrefaceObtaining Additional Publications and Information
Definitions of Service Request SeverityTo ensure that all service requests are reported in a standard format, Cisco has established severity definitions.
Severity 1 (S1)—Your network is “down,” or there is a critical impact to your business operations. You and Cisco will commit all necessary resources around the clock to resolve the situation.
Severity 2 (S2)—Operation of an existing network is severely degraded, or significant aspects of your business operation are negatively affected by inadequate performance of Cisco products. You and Cisco will commit full-time resources during normal business hours to resolve the situation.
Severity 3 (S3)—Operational performance of your network is impaired, but most business operations remain functional. You and Cisco will commit resources during normal business hours to restore service to satisfactory levels.
Severity 4 (S4)—You require information or assistance with Cisco product capabilities, installation, or configuration. There is little or no effect on your business operations.
Obtaining Additional Publications and InformationInformation about Cisco products, technologies, and network solutions is available from various online and printed sources.
• Cisco Marketplace provides a variety of Cisco books, reference guides, and logo merchandise. Visit Cisco Marketplace, the company store, at this URL:
http://www.cisco.com/go/marketplace/
• The Cisco Product Catalog describes the networking products offered by Cisco Systems, as well as ordering and customer support services. Access the Cisco Product Catalog at this URL:
http://cisco.com/univercd/cc/td/doc/pcat/
• Cisco Press publishes a wide range of general networking, training and certification titles. Both new and experienced users will benefit from these publications. For current Cisco Press titles and other information, go to Cisco Press at this URL:
http://www.ciscopress.com
xxCisco Content Services Switch Security Configuration Guide
OL-5650-01

PrefaceObtaining Additional Publications and Information
• Packet magazine is the Cisco Systems technical user magazine for maximizing Internet and networking investments. Each quarter, Packet delivers coverage of the latest industry trends, technology breakthroughs, and Cisco products and solutions, as well as network deployment and troubleshooting tips, configuration examples, customer case studies, certification and training information, and links to scores of in-depth online resources. You can access Packet magazine at this URL:
http://www.cisco.com/packet
• iQ Magazine is the quarterly publication from Cisco Systems designed to help growing companies learn how they can use technology to increase revenue, streamline their business, and expand services. The publication identifies the challenges facing these companies and the technologies to help solve them, using real-world case studies and business strategies to help readers make sound technology investment decisions. You can access iQ Magazine at this URL:
http://www.cisco.com/go/iqmagazine
• Internet Protocol Journal is a quarterly journal published by Cisco Systems for engineering professionals involved in designing, developing, and operating public and private internets and intranets. You can access the Internet Protocol Journal at this URL:
http://www.cisco.com/ipj
• World-class networking training is available from Cisco. You can view current offerings at this URL:
http://www.cisco.com/en/US/learning/index.html
xxiCisco Content Services Switch Security Configuration Guide
OL-5650-01

PrefaceObtaining Additional Publications and Information
xxiiCisco Content Services Switch Security Configuration Guide
OL-5650-01
Cisco Content ServiceOL-5650-01
C H A P T E R 1
Controlling CSS AccessThis chapter describes how to configure access to the CSS including network traffic. Information in this chapter applies to all models of the CSS, except where noted.
This chapter contains the following major sections:
• Changing the Administrative Username and Password
• Creating Usernames and Passwords
• Controlling Remote User Access to the CSS
• Controlling Administrative Access to the CSS
• Controlling CSS Network Traffic Through Access Control Lists
• Configuring Network Qualifier Lists for ACLs
1-1s Switch Security Configuration Guide

Chapter 1 Controlling CSS AccessChanging the Administrative Username and Password
Changing the Administrative Username and Password
During the initial log in to the CSS you enter the default user name admin and the default password system in lowercase text. For security reasons, you should change the administrative username and password. Security on your CSS can be compromised because the administrative username and password are configured to be the same for every CSS shipped from Cisco Systems.
The administrative username and password are stored in nonvolatile random access memory (NVRAM). Each time you reboot the CSS, it reads the username and password from NVRAM and reinserts them in to the user database. SuperUser status is assigned to the administrative username by default.
You can change the administrative username and password, but because the information is stored in NVRAM, you cannot permanently delete them. If you delete the administrative username using the no username command, the CSS deletes the username from the running-config file, but restores the username from NVRAM when you reboot the CSS.
Use the username-offdm name password text command to change the administrative username or password.
Note You can also use the Security Options menu from the Offline DM menu (accessed during the boot process) to change the administrative username and password. Refer to the Cisco Content Services Switch Administration Guide for information on the Offline DM menu.
For example, to change the default administrative username and password to a different username and password, enter.
(config)# username-offdm bobo password secret
1-2Cisco Content Services Switch Security Configuration Guide
OL-5650-01

Chapter 1 Controlling CSS AccessCreating Usernames and Passwords
Creating Usernames and PasswordsLogging into the CSS requires a username and password. The CSS supports a maximum of 32 usernames, including the administrator and technician usernames. You can assign each user with SuperUser or User status.
• User - Allows access to a limited set of commands that enable you to monitor and display CSS parameters, but not change them. A User prompt ends with the > symbol.
• SuperUser - Allows access to the full set of CLI commands, including those in User mode, that enable you to configure the CSS. A SuperUser prompt ends with the # symbol.
From SuperUser mode, you can enter global configuration mode and its subordinate configuration modes. If you do not specify superuser when configuring a new user, the new user has only user-level status by default.
Caution Creating or modifying a username and password is restricted to CSS users who are identified as either administrators or technicians, and it is contingent on whether the restrict user-database command has been entered.
Use the username command to create usernames and passwords to log in to the CSS. The syntax for this global configuration mode command is:
username name [des-password|password] password {superuser} {dir-access access}
The following example creates a SuperUser named picard with a password of captain.
(config)# username picard password “captain” superuser
The options and variables are as follows:
• name - Sets the username you want to assign or change. Enter an unquoted text string with no spaces and a maximum of 16 characters. To see a list of existing usernames, enter username ?.
• des-password - Specifies the password is Data Encryption Standard (DES) encrypted. Use this option only when you are creating a file for use as a script or a startup configuration file. Enter the DES password as a case-sensitive unquoted text string 6 to 64 characters in length.
1-3Cisco Content Services Switch Security Configuration Guide
OL-5650-01
Chapter 1 Controlling CSS AccessCreating Usernames and Passwords
• password - Specifies the password is not encrypted. Use this option when you use the CLI to dynamically create users.
• password - The password. Enter an unquoted text string with no spaces and a length of 6 to 16 characters. The CSS allows all special characters in a password except for the percent sign (%).
Note If you specify the des-password option, you must know the encrypted form of this password to successfully log in to the CSS. You can find the CSS encrypted password in the running configuration. To display the CSS running configuration, use the show running-config command (see the “Creating Usernames and Passwords” section).
• superuser - Specifies SuperUser privileges to allow a user to access SuperUser mode. If you do not enter this option, the user can only access User mode.
• dir-access - (Optional) Defines the CSS directory access privileges for the username. There are access privileges assigned to the seven CSS directories, in the following order: Script, Log, Root (installed CSS software), Archive, Release Root (configuration files), Core, and MIBs. By default, users have both read- and write-access privileges (B) to all seven directories. Administrators or technicians can use the dir-access option to selectively implement a set of directory access privileges for each user. Changing the access level also affects the use of the CLI commands associated with directories.
To use the dir-access option, you must first specify the restrict user-database command to implement security restrictions for the CSS user database.
1-4Cisco Content Services Switch Security Configuration Guide
OL-5650-01

Chapter 1 Controlling CSS AccessCreating Usernames and Passwords
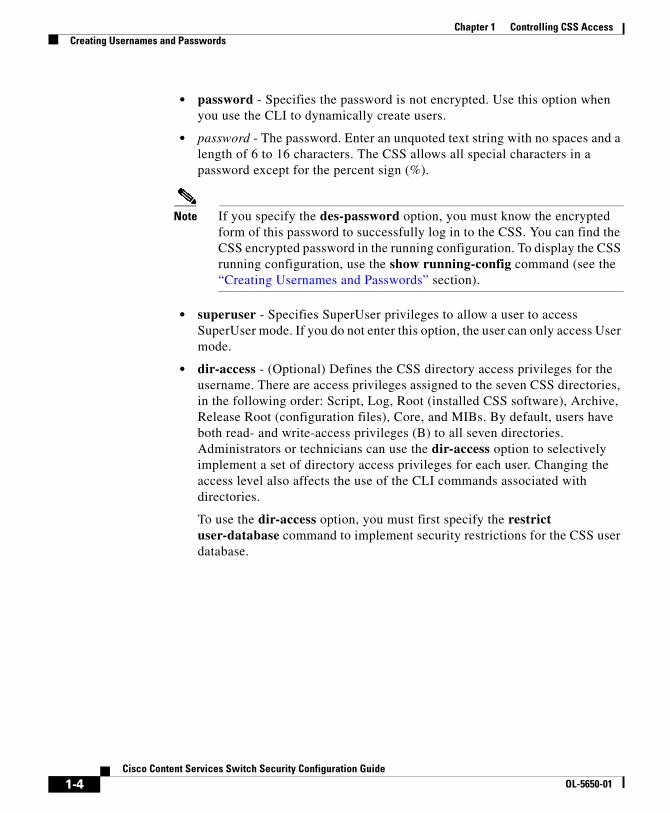
• access - Specifies directory access privileges for the username. By default, users have both read- and write-access privileges (B) to all seven directories. Enter, in order, one of the following access privilege codes for each of the seven CSS directories:
– R - Read-only access to the CSS directory
– W - Write-only access to the CSS directory
– B - Both read- and write-access privileges to the CSS directory
– N - No access privileges to the CSS directory
Figure 1-1 illustrates the directory access privileges for a username.
Figure 1-1 CSS Directory Access Privileges
For example, to define directory access for username picard, enter:
(config)# username picard password “captain” superuser NWBNNNR
To display a list of existing usernames, enter:
(config)# username ?
To remove an existing username, enter:
(config)# no username picard
To change a user password, reenter the username command and specify the new password. Remember to include SuperUser privileges if required. For example:
(config)# username picard password “flute” superuser
Caution The no username command removes a user permanently. Make sure you want to perform this action because you cannot undo this command.
NWBNNNR
MIBs directory, set to read-only access
Core directory, set to None (no directory access)
Release Root directory, set to None (no directory access)
Archive directory, set to None (no directory access)
Root directory, set to both read and write-access
Log directory, set to write-only access
Script directory, set to None (no directory access) 5911
0
1-5Cisco Content Services Switch Security Configuration Guide
OL-5650-01

Chapter 1 Controlling CSS AccessControlling Remote User Access to the CSS
Controlling Remote User Access to the CSSTo control access to the CSS, you can configure the CSS to authenticate remote (virtual) or console users. The CSS can authenticate users by using the local user database, RADIUS server, or TACACS+ server. You can also allow user access without authenticating or disallowing all remote user access to the CSS.
You can set a maximum of three authentication methods: a primary, secondary, or tertiary authentication method. The primary method is the first authentication method that the CSS tries. If the primary authentication method fails (for example, the RADIUS server is down or is unreachable), the CSS tries the secondary method. And if the secondary method fails, then the CSS tries the tertiary method. In the event the tertiary method also fails, the CSS displays a message that authentication has failed.
The CSS does not attempt a secondary or tertiary authentication method under the following conditions:
• If the authentication method is local, and the local username is not found in the local user database.
• If the authentication method is local and the local username is found in the local user database, but the password is invalid.
• If the authentication method is radius, and the RADIUS server rejects the primary authentication request from the CSS.
• If the authentication method is tacacs, and the TACACS+ server rejects the primary authentication request from the CSS.
Before you can use RADIUS or TACACS+ as either the virtual authentication method or the console authentication method, you must enable communication with the RADIUS or TACACS+ security server. Use either the radius-server command (refer to the Chapter 3, Configuring the CSS as a Client of a RADIUS Server) or the tacacs-server command (see the Chapter 4, Configuring the CSS as a Client of a TACACS+ Server).
This section includes the following topics:
• Configuring Virtual Authentication
• Configuring Console Authentication
To display virtual and console authentication settings, use the show user-database command.
1-6Cisco Content Services Switch Security Configuration Guide
OL-5650-01
Chapter 1 Controlling CSS AccessControlling Remote User Access to the CSS
Configuring Virtual AuthenticationVirtual authentication allows remote users to log in to the CSS when they are using FTP, Telnet, SSHD, or the Device Management user interface with or without requiring a username and password. The CSS can also deny access to all remote users.
You can configure the CSS to authenticate users by using the local database, RADIUS server, or TACACS+ server. By default, the CSS uses the local database as the primary method to authenticate users and disallows user access for the secondary and tertiary method.
Use the virtual authentication command to configure the primary, secondary, or tertiary virtual authentication method. The syntax for this global configuration command is:
virtual authentication [primary|secondary|tertiary [local|radius|tacacs|disallowed]]
The options for this command are as follows:
• primary - Defines the first authentication method that the CSS uses. The default primary virtual authentication method is the local user database.
• secondary - Defines the second authentication method that the CSS uses if the first method fails. The default secondary virtual authentication method is to disallow all user access.
Note If you are configuring a TACACS+ server as the primary authentication method, define a secondary authentication method, such as local.
• tertiary - Defines the third authentication method that the CSS uses if the second method fails. The default tertiary virtual authentication method is to disallow all user access.
• local - The CSS uses the local user database for authentication.
• radius - The CSS uses the configured RADIUS server for authentication.
• tacacs - The CSS uses the configured TACACS+ server for authentication.
• disallowed - The CSS disallows access by all remote users. Entering this option does not terminate existing connections.
1-7Cisco Content Services Switch Security Configuration Guide
OL-5650-01

Chapter 1 Controlling CSS AccessControlling Remote User Access to the CSS
To remove users currently logged in to the CSS, use the disconnect command.
To define the TACACS+ server as the primary virtual authentication method, enter:
#(config) virtual authentication primary tacacs
To define local user database as the secondary virtual authentication method, enter:
#(config) virtual authentication secondary local
Configuring Console AuthenticationConsole authentication allows users to log in to the CSS through a terminal connected to the console port with or without requiring a username and password. The CSS cannot disallow user access as a primary authentication method; however, it can disallow user access as a secondary or tertiary authentication method.
You can configure the CSS to authenticate users by using the local database, RADIUS server, or TACACS+ server. By default, the CSS uses the local database as the primary method to authenticate users and disallows user access for the secondary and tertiary method.
Use the console authentication command to configure the primary, secondary, or tertiary console authentication method. The syntax for this global configuration command is:
console authentication [primary [local|radius|tacacs|none]|secondary|tertiary [local|radius|tacacs|none|disallowed]]
The options for this command are as follows:
• primary - Defines the first authentication method that the CSS uses. The default primary console authentication method is the local user database.
• local - The CSS uses the local user database for authentication.
• radius - The CSS uses the configured RADIUS server for authentication.
• tacacs - The CSS uses the configured TACACS+ server for authentication.
• none - The CSS uses no authentication method. All users can access the CSS.
1-8Cisco Content Services Switch Security Configuration Guide
OL-5650-01

Chapter 1 Controlling CSS AccessControlling Remote User Access to the CSS
• secondary - Defines the second authentication method that the CSS uses if the first method fails. The default secondary console authentication method is to disallow all user access.
Note If you are configuring a TACACS+ server as the primary authentication method, define a secondary authentication method, such as local. If you do not configure a secondary method and use the default of disallowed, you have the possibility of being locked out of the CSS.
• tertiary - Defines the third authentication method that the CSS uses if the second method fails. The default tertiary console authentication method is to disallow all user access.
• disallowed - The CSS disallows access by all users (secondary or tertiary authentication method only). Entering this option does not terminate existing connections.
To remove users currently logged in to the CSS, use the disconnect command.
To define the TACACS+ server as the primary console authentication method, enter:
#(config) console authentication primary tacacs
To define local user database as the secondary console authentication method, enter:
#(config) console authentication secondary local
To disable authentication on the console port allowing users to access the CSS without a username and password, enter:
#(config) no console authentication
1-9Cisco Content Services Switch Security Configuration Guide
OL-5650-01

Chapter 1 Controlling CSS AccessControlling Administrative Access to the CSS
Controlling Administrative Access to the CSSCSS access through a console, FTP, SSH, SNMP, and Telnet is enabled by default. The CSS supports a maximum of four FTP sessions and a maximum of four Telnet sessions. Use the restrict and no restrict commands to enable or disable console, FTP, SNMP, SSH, Telnet, user database, secure and unsecure XML, and web management data transfer to the CSS.
Specifying the restrict command does not prevent the CSS from listening for connection attempts on the restricted port. For TCP connections, the CSS completes the TCP 3-way handshake, then terminates the connection with an error to prevent any data transfer from occurring. For UDP SNMP connections, the CSS simply discards the packets.
To secure restricted ports from unauthorized access, configure ACL clauses to deny packets destined to these ports, while permitting normal traffic to flow through the CSS. You can also use ACLs to secure the CSS itself. See the “Controlling CSS Network Traffic Through Access Control Lists” section for information about configuring ACLs for the CSS.
Enabling Administrative Access to the CSSTo enable console, FTP, SNMP, SSH, Telnet, user database, secure and unsecure XML, and web management access to the CSS, use the following no restrict commands:
• no restrict console - Enables console access to the CSS (enabled by default).
• no restrict ftp - Enables FTP access to the CSS (enabled by default).
• no restrict ssh - Enables SSH access to the CSS (enabled by default).
• no restrict snmp - Enables SNMP access to the CSS (enabled by default).
• no restrict telnet - Enables Telnet access to the CSS (enabled by default).
• no restrict user-database - Enables users to clear the running-config file and create or modify usernames. Only administrator and technician users can perform these tasks (enabled by default).
• no restrict secure-xml - Enables the transfer of XML configuration files to the CSS through secure HTTPS SSL connections (disabled by default).
1-10Cisco Content Services Switch Security Configuration Guide
OL-5650-01

Chapter 1 Controlling CSS AccessControlling Administrative Access to the CSS
• no restrict xml - Enables the transfer of XML configuration files to the CSS through unsecure HTTP connections (disabled by default).
• no restrict web-mgmt - Enables Device Management user interface access to the CSS (disabled by default).
Note Disable Telnet access when you want to use the Secure Shell Host (SSH) server. For information about configuring SSH, refer to Chapter 2, Configuring the Secure Shell Daemon Protocol.
For example, to enable Device Management user interface access, enter:
(config)# no restrict web-mgmt
Refer to the Cisco Content Services Switch Administration Guide for details on configuring the Simple Network Management Protocol (SNMP) features on your CSS. For details on making web-based configuration changes to the CSS using Extensible Markup Language (XML), refer to the Cisco Content Services Switch Administration Guide. For details on using the Device Management user interface, refer to the Cisco Content Services Switch Device Management User’s Guide.
Disabling Administrative Access to the CSSTo disable console, FTP, SNMP, SSH, Telnet, user database, secure and unsecure XML, and web management access to the CSS, use the following restrict commands:
• restrict console - Disables console access to the CSS (enabled by default).
• restrict ftp - Disables FTP access to the CSS (enabled by default).
• restrict snmp - Disables SNMP access to the CSS (enabled by default).
• restrict ssh - Disables SSHD access to the CSS (enabled by default).
• restrict telnet - Disables Telnet access to the CSS (enabled by default).
• restrict user-database - Prevents users from clearing the running-config file and creating or modifying usernames. Only administrator and technician users can perform these tasks (enabled by default).
1-11Cisco Content Services Switch Security Configuration Guide
OL-5650-01

Chapter 1 Controlling CSS AccessControlling CSS Network Traffic Through Access Control Lists
• restrict secure-xml - Disables the transfer of XML configuration files to the CSS through secure HTTPS SSL connections (disabled by default).
• restrict xml - Disables the transfer of XML configuration files to the CSS through unsecure HTTP connections (disabled by default).
• restrict web-mgmt - Disables web management access to the CSS (disabled by default).
For example, to disable Telnet access, enter:
(config)# restrict telnet
Controlling CSS Network Traffic Through Access Control Lists
The CSS provides traffic filtering capabilities with access control lists (ACLs). ACLs filter inbound network traffic by controlling whether packets are forwarded or blocked at the CSS interfaces. You can configure ACLs for routed network protocols, filtering the protocol packets as the packets pass through the CSS.
The following sections describe how to configure an ACL:
• ACL Overview
• ACL Configuration Quick Start
• Creating an ACL
• Deleting an ACL
• Configuring Clauses
• Adding a Clause When ACLs are Globally Enabled
• Deleting a Clause
• Applying an ACL to a Circuit or DNS Queries
• Removing an ACL from Circuits or DNS Queries
• Enabling ACLs on the CSS
• Disabling ACLs on the CSS
• Showing ACLs
• Setting the Show ACL Counters to Zero
1-12Cisco Content Services Switch Security Configuration Guide
OL-5650-01
Chapter 1 Controlling CSS AccessControlling CSS Network Traffic Through Access Control Lists
• Logging ACL Activity
• ACL Example
ACL OverviewACLs configured on the CSS provide a basic level of security for accessing your network. Without ACLs on the CSS, all packets passing through VLAN circuits on the CSS could be allowed onto the entire network. With ACLs, you may want to permit all e-mail traffic on the CSS circuit, but block Telnet traffic. You can also use ACLs to allow one client to access a part of the network and prevent another client from accessing the same area.
An ACL consists of clauses that you define. The CSS uses these clauses to determine how to handle each packet it processes on a VLAN circuit. When the CSS examines each packet, it either forwards or blocks the packet based on whether or not the packet matches a clause in the ACL. You must configure a permit clause in an ACL to allow traffic through the circuit. An implicit “deny all” clause exists at the end of every ACL.
When configuring ACLs on a CSS, you must apply an ACL to each VLAN circuit on the CSS to control traffic on the VLAN. An applied ACL on a circuit assigns the ACL and its clauses to the circuit.
After you apply an ACL to each CSS circuit, you must enable the ACLs on the CSS. Globally enabling ACLs affect all circuits in the CSS. When you enable ACLs, the CSS uses the clauses in all ACLs to permit or deny traffic on all circuits. If a circuit does not have an ACL, the CSS applies an implicit “deny all” clause to this circuit causing the CSS to deny all traffic on it.
1-13Cisco Content Services Switch Security Configuration Guide
OL-5650-01
Chapter 1 Controlling CSS AccessControlling CSS Network Traffic Through Access Control Lists
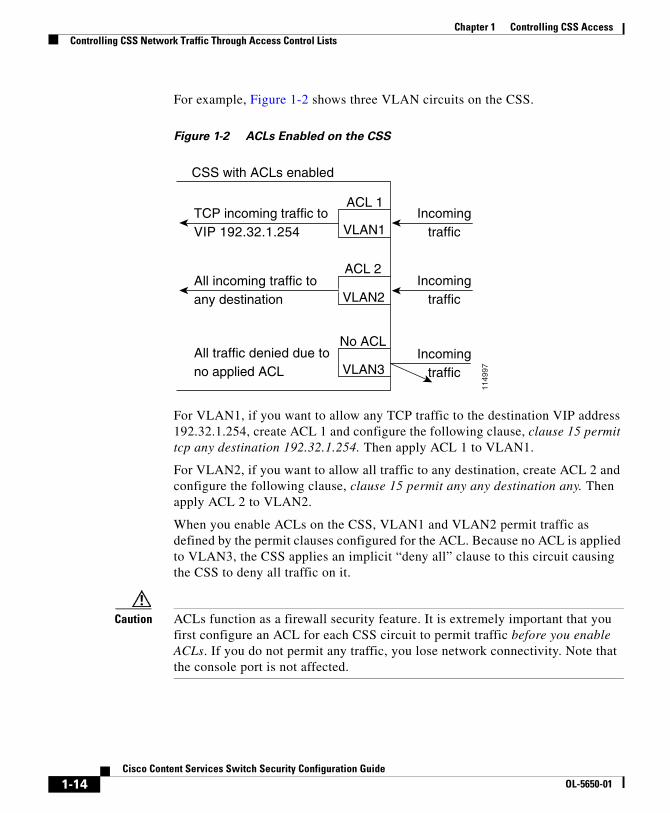
For example, Figure 1-2 shows three VLAN circuits on the CSS.
Figure 1-2 ACLs Enabled on the CSS
For VLAN1, if you want to allow any TCP traffic to the destination VIP address 192.32.1.254, create ACL 1 and configure the following clause, clause 15 permit tcp any destination 192.32.1.254. Then apply ACL 1 to VLAN1.
For VLAN2, if you want to allow all traffic to any destination, create ACL 2 and configure the following clause, clause 15 permit any any destination any. Then apply ACL 2 to VLAN2.
When you enable ACLs on the CSS, VLAN1 and VLAN2 permit traffic as defined by the permit clauses configured for the ACL. Because no ACL is applied to VLAN3, the CSS applies an implicit “deny all” clause to this circuit causing the CSS to deny all traffic on it.
Caution ACLs function as a firewall security feature. It is extremely important that you first configure an ACL for each CSS circuit to permit traffic before you enable ACLs. If you do not permit any traffic, you lose network connectivity. Note that the console port is not affected.
1149
97
CSS with ACLs enabled
Incomingtraffic
TCP incoming traffic toVIP 192.32.1.254
All incoming traffic toany destination
All traffic denied due tono applied ACL
ACL 1
VLAN1
ACL 2
VLAN2
VLAN3
No ACL
Incomingtraffic
Incomingtraffic
1-14Cisco Content Services Switch Security Configuration Guide
OL-5650-01

Chapter 1 Controlling CSS AccessControlling CSS Network Traffic Through Access Control Lists
Enabling ACLs globally affects all traffic on all CSS circuits whether they have ACLs or not. When you enable ACLs, all traffic on a circuit that is not configured in an ACL permit clause is denied. If you do not apply an ACL on each circuit, the CSS denies traffic on that circuit.
When the CSS is using ACLs, its hardware implements a maximum of 10 ACLs with simple Layer 3 or Layer 4 clauses. The CSS software implements more complicated ACLs with Layer 5 clauses.
Note ACLs are not supported on the CSS Ethernet Management port.
ACLs do not block ARP packets.
You cannot use an ACL clause with a source group to perform source address translation of traffic destined to an SSL module. This clause will be accepted by the CSS but will be ignored for flows terminated at the SSL module. You can apply NAT to connections towards servers after SSL processing.
If you are load-balancing passive FTP servers and you want to use an ACL to apply a source group, you must configure services directly in the source group. For details on using source groups to support FTP sessions, refer to the Cisco Content Services Switch Content Load-Balancing Configuration Guide.
ACL Configuration Quick StartUse the quick-start procedure in Table 1-1 to configure an ACL. Each step includes the CLI command required to complete the task. For a complete description of each feature, see the sections following this procedure.
Note You must configure an ACL with at least one permit clause for each CSS circuit. Otherwise, the CSS denies all traffic on the circuit.
1-15Cisco Content Services Switch Security Configuration Guide
OL-5650-01

Chapter 1 Controlling CSS AccessControlling CSS Network Traffic Through Access Control Lists
Table 1-1 ACL Configuration Quick Start
Task and Command Example
1. Enter global configuration mode.
# config(config)#
2. Create an ACL and access ACL mode. Enter an ACL index number from1 to 99.
(config)# acl 7Create ACL <7>, [y,n]:y(config-acl[7])#
3. Configure clauses in the ACL. The CSS will use the clauses to control traffic on the circuit on which you will apply the ACL (for example, VLAN1). Enter a clause number from 1 to 254 and define the clause parameters. The syntax for defining a clause is:
clause number permit|deny|bypass protocol [source_info {source_port}] dest [dest_info {dest_port}] {log} {prefer servicename} {sourcegroup name}
See Table 1-2 for information on the clause command options. For example, to block ports 20 to 23 for all user access coming into the CSS on a circuit from outside the network, enter:
(config-acl[7])# clause 10 deny any any destination range 20 23
To permit all other traffic through the CSS on a circuit, enter:
(config-acl[7])# clause 15 permit any any destination any
4. Apply the ACL to a specific circuit. In this example, there is only one VLAN, the default VLAN1. For example, to apply acl 7 to circuit VLAN1, enter:
(config-acl[7])# apply circuit-(VLAN1)
You can also apply ACL 7 to all circuits on the CSS by using the apply all command.
1-16Cisco Content Services Switch Security Configuration Guide
OL-5650-01
Chapter 1 Controlling CSS AccessControlling CSS Network Traffic Through Access Control Lists
The following running-config example shows the result of entering the commands in Table 1-1.
!**************************** ACL ****************************acl 7
clause 10 deny any any destination range 20 23clause 15 permit any any destination any
apply circuit-(VLAN1)
!************************** GLOBAL ***************************acl enable
Creating an ACLACLs contain clauses to control traffic on CSS circuits. Because all circuits are affected when you globally enable ACLs on the CSS, you must create an ACL for each circuit. You can apply an ACL to more than one circuit. You can also apply an ACL to all circuits on the CSS.
5. You must repeat steps 1 through 4 to create an ACL with at least one permit clause for all other circuits and apply the ACL to them. If a circuit does not have an applied ACL when you enable ACLs on the CSS, the CSS denies traffic on the circuit.
6. Enable all ACLS on the CSS. Enter the global acl enable command for all ACLs to take effect on all CSS circuit.
Caution Because enabling ACLs globally affects all traffic on all CSS circuits, only permit clauses in an ACL allows traffic through the circuit. If you do not apply an ACL to a circuit, the CSS applies an implicit “deny all” clause to this circuit causing the CSS to deny all traffic on it.
For example, enter:
(config)# acl enable
Table 1-1 ACL Configuration Quick Start (continued)
Task and Command Example
1-17Cisco Content Services Switch Security Configuration Guide
OL-5650-01

Chapter 1 Controlling CSS AccessControlling CSS Network Traffic Through Access Control Lists
Note If a circuit does not have an ACL, the CSS applies an implicit “deny all” clause to this circuit causing the CSS to deny all traffic on it.
To create an ACL and access ACL mode, use the acl index number command. The index number defines the ACL and can range from 1 to 99. To display a list of existing ACLs, use the acl ? command.
(config)# acl 7
When you access this mode, the prompt changes to the ACL mode of the index number you created. For example:
(config-acl[7])#
After you create an ACL, you must add clauses to it. For more information, see the “Configuring Clauses” section.
Deleting an ACLWhen you no longer need an ACL and its clauses on the CSS, you can delete the ACL. When you delete an ACL, all of its clauses are also deleted. To delete an ACL, use the no acl command. For example, to delete ACL 7, enter:
(config)# no acl 7
If you delete an ACL that is currently applied to a circuit and ACLs are enabled on the CSS, the ACL is removed from the circuit and the CSS denies traffic on the circuit. If you want to permit traffic on the circuit, globally disable the ACLs on the CSS, which permits all traffic on a circuit.
For example:
1. In global configuration mode, disable all ACLs on the CSS.
(config)# acl disable
2. In ACL mode, remove the ACL from the circuit. For example, enter:
(config-acl[7])# remove circuit-(VLAN1)
3. In global configuration mode, delete the ACL. For example, enter:
(config)# no acl 7
1-18Cisco Content Services Switch Security Configuration Guide
OL-5650-01

Chapter 1 Controlling CSS AccessControlling CSS Network Traffic Through Access Control Lists
4. Apply another ACL on the circuit. If you do not apply an ACL on the circuit, the CSS denies traffic on the circuit when you enable ACLs on the CSS.
5. Reenable all ACLs on the CSS. Enter:
(config)# acl enable
Configuring ClausesThe clauses you configure on an ACL determine how the CSS controls traffic on a circuit. When you configure a clause, you must assign a number to it. The number assigned to each clause is important. The CSS processes the ACL starting from clause 1 and sequentially progresses through the rest of the clauses. When assigning numbers to clauses, assign the lowest numbers to clauses with the most specific matches. Then, assign higher numbers to clauses with less specific matches.
You do not need to enter the clauses sequentially. The CSS automatically inserts the clause in the appropriate order in the ACL. For example, if you enter clauses 10 and 24, and then clause 15, the CSS inserts the clauses in the correct sequence.
To create a clause to permit, deny, or bypass traffic on a circuit, use the clause command. The clause number is the number you want to assign to the clause. Enter a number from 1 to 254.
Note Once you add a new clause to an ACL when ACLs are enabled on the CSS, you must reapply the ACL on the circuit. For more information, see the “Adding a Clause When ACLs are Globally Enabled” section.
When you create a clause, you cannot modify it. You must delete the clause and create a new clause. For information on deleting a clause, see the “Deleting a Clause” section.
The CSS applies a hidden default “deny all” clause as clause 255 to all ACLs. You must specify permit clauses that allow traffic including management traffic on the CSS.
The syntax for the clause command is:
1-19Cisco Content Services Switch Security Configuration Guide
OL-5650-01
Chapter 1 Controlling CSS AccessControlling CSS Network Traffic Through Access Control Lists
• clause number bypass - Creates a clause in the ACL to permit traffic on a circuit and bypasses (does not process) content rules that apply to the traffic. The syntax for clause bypass is:
clause number bypass protocol [source_info {source_port}]dest [dest_info {dest_port}] {sourcegroup name} {prefer servicename}
Note The bypass option bypasses traffic only on a content rule, and, therefore, does not cause Network Address Translating (NATing) to occur. Do not use the bypass option in an ACL clause with a source group. The bypass option does not affect NATing on a source group.
• clause number deny - Creates a clause in the ACL to deny traffic on a circuit. The syntax for clause deny is:
clause number deny protocol [source_info {source_port}]dest [dest_info {dest_port}] {sourcegroup name} {prefer servicename}
• clause number permit - Creates a clause in the ACL to permit traffic on a circuit. When you configure an ACL permit clause, all traffic not specified in a permit clause is denied by default. The syntax for clause permit is:
clause number permit protocol [source_info {source_port}]dest [dest_info {dest_port}] {sourcegroup name} {prefer servicename}
Note When a destination in an ACL clause is a Layer 5 content rule, the CSS does not spoof the connection. Therefore, the ACL clause does not function as would be expected. As a workaround, you may configure an additional clause to permit the TCP/IP addresses and ports. Be aware that content is matched on both clauses. For example,clause 14 permit any any destination content Layer5/L5 eq 80 (original clause) clause 15 permit tcp any destination 200.200.200.200 eq 80 (This is an additional clause to handle the SYN, where the destination IP address is the IP address configured in the Layer 5 content rule. Note that this clause number must be greater than the destination content clause number.)
1-20Cisco Content Services Switch Security Configuration Guide
OL-5650-01

Chapter 1 Controlling CSS AccessControlling CSS Network Traffic Through Access Control Lists
Table 1-2 provides variables and options for the clause command. Bolded syntax defines keywords that you enter on the command line. Italics define variables where you enter a value such as an IP address or a host name.
Table 1-2 Clause Command Options
Variables and Options Parameters
number The number you want to assign to the clause. Enter a number from 1 to 254.
action The action to apply to the clause. Enter one of the following: bypass, deny, permit
protocol The protocol for the traffic type. Enter one of the following: any, icmp, igp, igmp, ospf, tcp, udp
source_info The source of the traffic. Enter one of the following:
• ip_address (optionally include subnet mask in IP address format only) for the source IP address and optional mask IP address.
• hostname for the source host name. Enter a host name in mnemonic host-name format. Configure the CSS DNS client first to enable the CSS to translate the host name.
• any for any combination of source IP address and host name information.
• nql nql_name for an existing Network Qualifier List (NQL) consisting of a list of IP addresses.
1-21Cisco Content Services Switch Security Configuration Guide
OL-5650-01

Chapter 1 Controlling CSS AccessControlling CSS Network Traffic Through Access Control Lists
source_port The source port for the traffic. If you do not designate a source port, this clause allows traffic from any port number. Enter one of the following:
• eq port is equal to the port number.
• lt port is less than the port number.
• gt port is greater than the port number.
• neq port is not equal to the port number.
• range low high for a range of port numbers, inclusive. Enter numbers from a range of 1 to 65535. Separate the low and high number with a space.
destination_info The destination information for the traffic. Enter one of the following:
• destination any for any combination of destination information.
• destination content owner_name/rule_name for an owner content rule. Separate the owner and rule name with a / character.
• destination ip_address (for the destination IP address and optional subnet mask IP address. Include subnet mask as IP address only; no Classless Inter-domain routing (CIDR) address.
• destination hostname for the destination host name. To use a hostname, configure the CSS DNS client first to enable the CSS to translate the host name.
• nql nql_name for an existing NQL consisting of host IP addresses. Enter the name of the NQL.
Table 1-2 Clause Command Options (continued)
Variables and Options Parameters
1-22Cisco Content Services Switch Security Configuration Guide
OL-5650-01

Chapter 1 Controlling CSS AccessControlling CSS Network Traffic Through Access Control Lists
destination_port The destination port. Enter one of the following. You may use a port number or port name with the options.
• eq port is equal to the port number.
• lt port is less than the port number.
• gt port is greater than the port number.
• neq port is not equal to the port number.
• range low high for a range of port numbers, inclusive. Enter numbers from a range of 1 to 65535. Separate the low and high number with a space.
• port names:
– https = Port 443 Https
– ldap = Port 389 Ldap
– bgp = Port 179 Bgp
– ntp = Port 123 Ntp
– nntp = Port 119 Nntp
– pop = Port 110 Pop
– http = Port 80 Http,
– gopher = Port 70 Gopher
– domain = Port 53 Domain
– smtp = Port 25 Smtp
– telnet = Port 23 Telnet,
– ftp = Port 21 Ftp
– ftp-data = Port 20 Ftp-data
– none = None
If you do not define a destination port, this clause allows traffic to any port.
Table 1-2 Clause Command Options (continued)
Variables and Options Parameters
1-23Cisco Content Services Switch Security Configuration Guide
OL-5650-01
Chapter 1 Controlling CSS AccessControlling CSS Network Traffic Through Access Control Lists
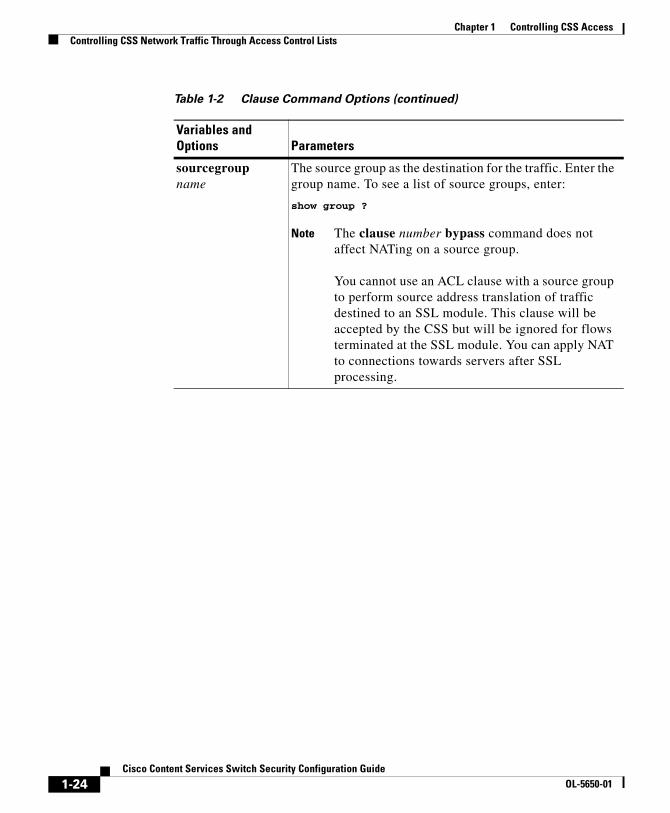
sourcegroupname
The source group as the destination for the traffic. Enter the group name. To see a list of source groups, enter:
show group ?
Note The clause number bypass command does not affect NATing on a source group.
You cannot use an ACL clause with a source group to perform source address translation of traffic destined to an SSL module. This clause will be accepted by the CSS but will be ignored for flows terminated at the SSL module. You can apply NAT to connections towards servers after SSL processing.
Table 1-2 Clause Command Options (continued)
Variables and Options Parameters
1-24Cisco Content Services Switch Security Configuration Guide
OL-5650-01

Chapter 1 Controlling CSS AccessControlling CSS Network Traffic Through Access Control Lists
After you create clauses for an ACL, you can apply the ACL to a circuit. For more information, see the “Applying an ACL to a Circuit or DNS Queries” section.
Adding a Clause When ACLs are Globally EnabledIf you are adding a new clause to an applied ACL when ACLs are globally enabled on the CSS, you must reapply the ACL to the circuit using the apply circuit command for the clause to take effect.
prefer service_name
Prefer the specified service as the traffic destination over other services. To define more than one preferred service, separate each service with a comma (,). You can define a maximum of two services.
You cannot configure services learned through an Application Peering Protocol (APP) session as preferred services. A remote service learned through APP is of the form [email protected] and can been seen on the show service summary screen. When configuring an ACL clause, you cannot use this service as a preferred service. If you save this clause in the startup-config and reboot the CSS, a startup error occurs because this service has not been learned through APP at this point. For example:
clause 10 permit any any destination any prefer [email protected]
Note ACLs configured with a preferred service take precedence over stickiness.
If you specify both a source group and a preferred service in a clause, you must specify the source group before you specify the preferred service within the clause.
Table 1-2 Clause Command Options (continued)
Variables and Options Parameters
1-25Cisco Content Services Switch Security Configuration Guide
OL-5650-01

Chapter 1 Controlling CSS AccessControlling CSS Network Traffic Through Access Control Lists
For example, you apply ACL 7 to VLAN1 and then globally enable ACLs on the CSS. At a later time, to add a new clause to ACL 7 and to have the clause take effect on the CSS, enter:
(config-acl[7])# clause 200 permit any any destination any(config-acl[7])# apply circuit-(VLAN1)
Deleting a ClauseIf you modify an existing clause, you must delete it from the ACL and then readd it. To delete a clause, use the no clause command. For example, to delete clause 6, enter:
(config-acl[7]) no clause 6
When ACLs are applied to a circuit and enabled on a CSS, the CSS considers them in use. You cannot delete a clause from an ACL in use. To delete the clause, remove its applied ACL from the circuit, delete a clause, and then reapply the ACL to the circuit.
For example, to delete clause 6 from ACL 7 on circuit VLAN1:
1. In ACL mode, remove ACL 7 from the circuit VLAN1. Enter:
(config-acl[7]) remove circuit-(VLAN1)
2. Delete clause 6. Enter:
(config-acl[7]) no clause 6
3. Reapply ACL 7 to circuit VLAN1. Enter:
(config-acl[7]) apply circuit-(VLAN1)
1-26Cisco Content Services Switch Security Configuration Guide
OL-5650-01

Chapter 1 Controlling CSS AccessControlling CSS Network Traffic Through Access Control Lists
Note When you remove an applied ACL from the circuit, the CSS applies an implicit “deny all” clause to this circuit causing the CSS to deny all traffic on it. If you want the CSS to permit traffic on the circuit when removing the applied ACL from the circuit, globally disable ACLs on the CSS with the global configuration mode acl disable command. By disabling all ACLs on the CSS, the CSS permits all traffic on all circuits.
Applying an ACL to a Circuit or DNS QueriesAfter you configure the clauses on an ACL, use the apply command to assign an ACL to all circuits, an individual circuit, or to DNS queries.
Note When you add a new clause to an applied ACL, use the apply circuit command to reapply the ACL on the circuit for the clause to take effect.
You cannot apply an empty ACL to a circuit. If you attempt to do so, this error message appears: Cannot apply ACL for it has no clauses.
The syntax and options for this ACL mode command are:
• apply all - Applies the ACL to all existing circuits. For example:
(config-acl[7])# apply all
• apply circuit - (circuit_name) - Applies the ACL to an individual circuit. For example, to apply acl 7 to circuit VLAN1:
(config-acl[7])# apply circuit-(VLAN1)
To display a list of circuits, use the apply ? command.
• apply dns - Adds the ACL to DNS queries.
(config-acl[7])# apply dns
If you configure a domain name on a content rule on a CSS using the add dns domain_ name command, a DNS query for that domain name does match an ACL that is configured with the apply dns command.
1-27Cisco Content Services Switch Security Configuration Guide
OL-5650-01

Chapter 1 Controlling CSS AccessControlling CSS Network Traffic Through Access Control Lists
However, if you configure a CSS with the dns-server command, and the CSS receives a DNS query for a domain name that you configured on the CSS using the host command, the DNS query does not match an ACL that is configured with the apply dns command.
After you apply an ACL and ACLs are disabled on the CSS, you must enter the global configuration acl enable command to enable the ACLs on the CSS. For information on the acl enable command, see the “Enabling ACLs on the CSS” section later in this chapter.
Removing an ACL from Circuits or DNS QueriesRemove an ACL from the circuit when you need to delete a clause from an ACL, the ACL applied to the circuit, or an ACL from DNS queries. To remove an ACL from all circuits, an individual circuit, or DNS queries, use the remove command. The syntax and options for this ACL mode command are:
• remove all - Removes the ACL from all circuits.
(config-acl[7])# remove all
• remove circuit (circuit_name) - Removes the ACL from a specific circuit. For example, enter:
(config-acl[7])# remove circuit-(VLAN1)
To display a list of circuits that you can remove, use the remove ? command.
• remove dns - Removes the ACL from DNS queries. For example, enter:
(config-acl[7])# remove dns
We recommend that you globally disable ACLs on the CSS before removing an ACL from a circuit. If you remove an ACL from a circuit when ACLs are enabled on the CSS, the CSS applies an implicit “deny all” clause to this circuit causing the CSS to deny all traffic on it. If you do not want to deny traffic on the circuit, you must disable all ACLs on the CSS and then remove ACL from the circuit. By disabling all ACLs on the CSS, the CSS permits all traffic on all circuits.
For example:
1. In global configuration mode, disable all ACLs on the CSS.
(config)# acl disable
1-28Cisco Content Services Switch Security Configuration Guide
OL-5650-01

Chapter 1 Controlling CSS AccessControlling CSS Network Traffic Through Access Control Lists
2. In ACL mode, remove the ACL from the circuit.
(config-acl[7])# remove circuit-(VLAN1)
3. Make any changes to the ACL.
If you delete an ACL from the circuit, configure another ACL with a permit clause for the circuit, and then apply it to the circuit. Otherwise, when you reenable the ACLs on the CSS, the CSS denies traffic on the circuit.
4. Reapply the ACL on the circuit.
(config-acl[7])# apply circuit-(VLAN1)
5. In global configuration mode, reenable all ACLs on the CSS.
(config)# acl enable
Enabling ACLs on the CSSAfter you configure ACLs and their clauses, and apply an ACL to each CSS circuit, you can globally enable all ACLs for use on the CSS. When you globally enable all ACLs, the CSS affects all traffic on all circuits and only allows traffic on circuits with ACLs containing a permit clause.
Caution It is extremely important that you first configure an ACL for each CSS circuit to permit traffic before you enable ACLs. Enabling ACLS affects all circuits. If you do not permit traffic, you lose network connectivity. When you enable ACLs, all traffic on a circuit that is not configured in an ACL permit clause is denied. The CSS applies an implicit “deny all” clause to any circuit that does not have an ACL applied to it.
For example, you configure three circuits on the CSS (VLAN1, VLAN2, and VLAN3). Then you configure an ACL for VLAN1 only. When you globally enable ACLs, VLAN1 passes traffic based on the ACL. However, VLAN2 and VLAN3 discard all packets because of the implicit “deny all” clause that the CSS applies to the circuits because they do not have an ACL.
Before you globally enable ACLs on the CSS, make sure that you have console access. The console port is not affected if you lose network connectivity because of an ACL configuration problem.
1-29Cisco Content Services Switch Security Configuration Guide
OL-5650-01

Chapter 1 Controlling CSS AccessControlling CSS Network Traffic Through Access Control Lists
Use the global configuration acl enable command to enable all ACLs on the CSS. To globally enable all ACLs, enter:
(config)# acl enable
Disabling ACLs on the CSSIf you need to add, change, or delete an ACL or delete an ACL clause, we recommend that you disable all ACLs on the CSS before removing the ACL from the circuit. If you remove an ACL before globally disabling ACLs, the CSS applies an implicit “deny all” clause to the circuit from which the ACL is removed and denies traffic on the circuit.
Note Globally disabling ACLs on the CSS disables all ACLs on the CSS and permits all traffic on all CSS circuits.
To globally disable all ACLs on the CSS, enter:
(config)# acl disable
Showing ACLsUse the show acl commands to display access control lists and clauses. The show acl commands are available in all modes.
When you show an ACL clause that is applied to a circuit, the display includes:
• Content Hits - A flow can be defined as a stream of UDP and TCP packets between a client and a server. The CSS must receive a number of packets from the client and the server before it can completely set up a flow. All of these packets, received before the flow is completely set up, are subject to ACL checks and can cause increments to the ACL Content Hits counter.
• Router Hits - All non-UDP and non-TCP packets subjected to ACL checks cause increments to the ACL Router Hits counter. All UDP and TCP traffic terminating on the CSS (for example, a Telnet or FTP session) cause increments to the ACL Router Hits counter.
1-30Cisco Content Services Switch Security Configuration Guide
OL-5650-01
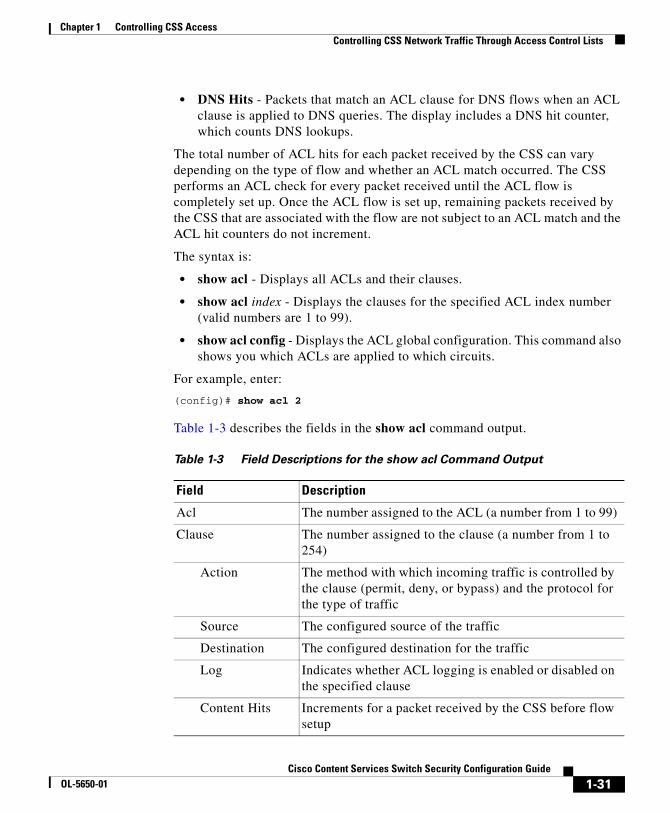
Chapter 1 Controlling CSS AccessControlling CSS Network Traffic Through Access Control Lists
• DNS Hits - Packets that match an ACL clause for DNS flows when an ACL clause is applied to DNS queries. The display includes a DNS hit counter, which counts DNS lookups.
The total number of ACL hits for each packet received by the CSS can vary depending on the type of flow and whether an ACL match occurred. The CSS performs an ACL check for every packet received until the ACL flow is completely set up. Once the ACL flow is set up, remaining packets received by the CSS that are associated with the flow are not subject to an ACL match and the ACL hit counters do not increment.
The syntax is:
• show acl - Displays all ACLs and their clauses.
• show acl index - Displays the clauses for the specified ACL index number (valid numbers are 1 to 99).
• show acl config - Displays the ACL global configuration. This command also shows you which ACLs are applied to which circuits.
For example, enter:
(config)# show acl 2
Table 1-3 describes the fields in the show acl command output.
Table 1-3 Field Descriptions for the show acl Command Output
Field Description
Acl The number assigned to the ACL (a number from 1 to 99)
Clause The number assigned to the clause (a number from 1 to 254)
Action The method with which incoming traffic is controlled by the clause (permit, deny, or bypass) and the protocol for the type of traffic
Source The configured source of the traffic
Destination The configured destination for the traffic
Log Indicates whether ACL logging is enabled or disabled on the specified clause
Content Hits Increments for a packet received by the CSS before flow setup
1-31Cisco Content Services Switch Security Configuration Guide
OL-5650-01

Chapter 1 Controlling CSS AccessControlling CSS Network Traffic Through Access Control Lists
Setting the Show ACL Counters to ZeroUse the zero counts command to reset the content and DNS hit counters in theshow acl command screen to zero for a specific ACL. You must be in an ACL to use this command. The CSS clears counters only for that ACL.
The syntax and options for this command are:
(config-acl[7])# zero counts
Logging ACL ActivityWhen you configure the CSS to log ACL activity, it logs the event of the packet matching the clause and ACL. The CSS sends log information to the location you specified in the logging command. For information on the logging command, refer to the Cisco Content Services Switch Administration Guide.
Note We do not recommend logging of an ACL or its clauses. If you enable ACL or clause logging, it may degrade the performance of the CSS.
Before you configure logging for a specific ACL clause, ensure that global ACL logging is enabled. To globally enable ACL logging, use the global configuration mode logging subsystem acl level debug-7 command.
Because the CSS does not save the clause log enable command in the running-config, you must reenable logging if the CSS reboots.
Router Hits Increments for a packet directly forwarded to the CSS through a Telnet or FTP session or from a non-TCP or UDP packet
DNS Hits Increments for a packet that matches an ACL clause for DNS flows
Table 1-3 Field Descriptions for the show acl Command Output (continued)
Field Description
1-32Cisco Content Services Switch Security Configuration Guide
OL-5650-01

Chapter 1 Controlling CSS AccessControlling CSS Network Traffic Through Access Control Lists
To enable logging on an existing ACL clause, use the log enable option for the clause command and enter:
(config-acl[7])# clause 1 log enable
If ACLs are globally enabled on the CSS, configure logging on an existing ACL clause:
1. In global configuration mode, disable all ACLs on the CSS.
(config)# acl disable
2. Enter the ACL mode for which you want to enable logging.
(config)# acl 7(config-acl[7])#
3. Remove the ACL from the circuit.
(config-acl[7]) remove circuit-(VLAN1)
4. Enable logging for the existing clause.
(config-acl[7])# clause 1 log enable
5. Reapply the ACL to the circuit.
(config-acl[7])# apply circuit-(VLAN1)
6. In global configuration mode, reenable all ACLs on the CSS.
(config)# acl enable
To disable ACL logging for a specific clause, enter:
1. In global configuration mode, disable all ACLs on the CSS.
(config)# acl disable
2. Enter the ACL mode for which you want to disable logging.
(config)# acl 7(config-acl[7])#
3. Remove the ACL from the circuit.
(config-acl[7]) remove circuit-(VLAN1)
4. Disable logging for the existing clause.
(config-acl[7])# clause 1 log disable
1-33Cisco Content Services Switch Security Configuration Guide
OL-5650-01
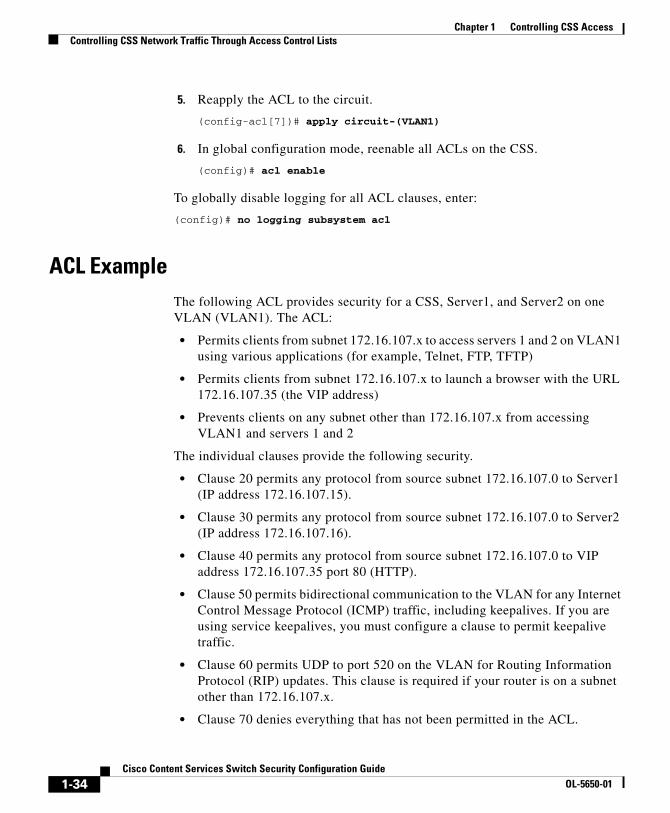
Chapter 1 Controlling CSS AccessControlling CSS Network Traffic Through Access Control Lists
5. Reapply the ACL to the circuit.
(config-acl[7])# apply circuit-(VLAN1)
6. In global configuration mode, reenable all ACLs on the CSS.
(config)# acl enable
To globally disable logging for all ACL clauses, enter:
(config)# no logging subsystem acl
ACL ExampleThe following ACL provides security for a CSS, Server1, and Server2 on one VLAN (VLAN1). The ACL:
• Permits clients from subnet 172.16.107.x to access servers 1 and 2 on VLAN1 using various applications (for example, Telnet, FTP, TFTP)
• Permits clients from subnet 172.16.107.x to launch a browser with the URL 172.16.107.35 (the VIP address)
• Prevents clients on any subnet other than 172.16.107.x from accessing VLAN1 and servers 1 and 2
The individual clauses provide the following security.
• Clause 20 permits any protocol from source subnet 172.16.107.0 to Server1 (IP address 172.16.107.15).
• Clause 30 permits any protocol from source subnet 172.16.107.0 to Server2 (IP address 172.16.107.16).
• Clause 40 permits any protocol from source subnet 172.16.107.0 to VIP address 172.16.107.35 port 80 (HTTP).
• Clause 50 permits bidirectional communication to the VLAN for any Internet Control Message Protocol (ICMP) traffic, including keepalives. If you are using service keepalives, you must configure a clause to permit keepalive traffic.
• Clause 60 permits UDP to port 520 on the VLAN for Routing Information Protocol (RIP) updates. This clause is required if your router is on a subnet other than 172.16.107.x.
• Clause 70 denies everything that has not been permitted in the ACL.
1-34Cisco Content Services Switch Security Configuration Guide
OL-5650-01

Chapter 1 Controlling CSS AccessConfiguring Network Qualifier Lists for ACLs
!**************************** ACL ***************************acl 1clause 20 permit any 172.16.107.0 255.255.255.0 destination 172.16.107.15clause 30 permit any 172.16.107.0 255.255.255.0 destination 172.16.107.16clause 40 permit any 172.16.107.0 255.255.255.0 destination 172.16.107.35 eq 80clause 50 permit ICMP any destination anyclause 60 permit udp any destination any eq 520clause 70 deny any any destination anyapply circuit-(VLAN1)
Configuring Network Qualifier Lists for ACLsNQL configuration mode allows you to configure a network qualifier list (NQL). An NQL is a list of networks or specific services, identified by IP address and subnet mask, that you assign to an ACL clause as a source or destination. By grouping networks into an NQL and assigning the NQL to an ACL clause, you have to create only one clause instead of a separate clause for each network.
The CSS enables you to configure a maximum of 512:
• Networks or services per NQL
• NQLs per CSS
This functionality is useful, for example, in a caching environment in which you have a network you want to bypass and send content requests directly to the origin servers (servers containing the content). You can also use an NQL for users who prefer a service based on a specific network.
To access NQL configuration mode, use the nql command. The prompt changes to (config-nql [name]). You can also use this command from NQL mode to access another NQL.
See the following sections to configure an NQL:
• Creating an NQL
• Describing an NQL
• Adding Networks to an NQL
• Adding an NQL to an ACL Clause
• Showing NQL Configurations
1-35Cisco Content Services Switch Security Configuration Guide
OL-5650-01

Chapter 1 Controlling CSS AccessConfiguring Network Qualifier Lists for ACLs
Creating an NQLEnter the name of the new NQL you want to create or an existing NQL. Enter the name as an unquoted text string with no spaces and a maximum of 31 characters. You can create a maximum of 512 NQLs per CSS.
For example, enter:
(config)# nql bypass_nql(config-nql[bypass_nql])#
To display a list of existing NQLs, use the nql ? command. If no NQLs currently exist, the CSS prompts you to enter a new name.
To remove an existing NQL, use the no nql command. For example, enter:
(config)# no nql bypass_nql
Describing an NQLTo provide a description for an NQL, use the description command in NQL mode. Enter the NQL description as a quoted text string with a maximum length of63 characters.
For example, enter:
(config-nql[bypass_nql])# description “Bypass services”
Adding Networks to an NQLTo add a maximum of 512 networks or services to an NQL, use the ip address command. Enter an IP address with either a subnet prefix or a subnet mask. You may also add an optional description for the IP address and turn on logging.
The syntax and options are:
ip address ip_address[/subnet_prefix| subnet_mask] {“description”}{log}
1-36Cisco Content Services Switch Security Configuration Guide
OL-5650-01
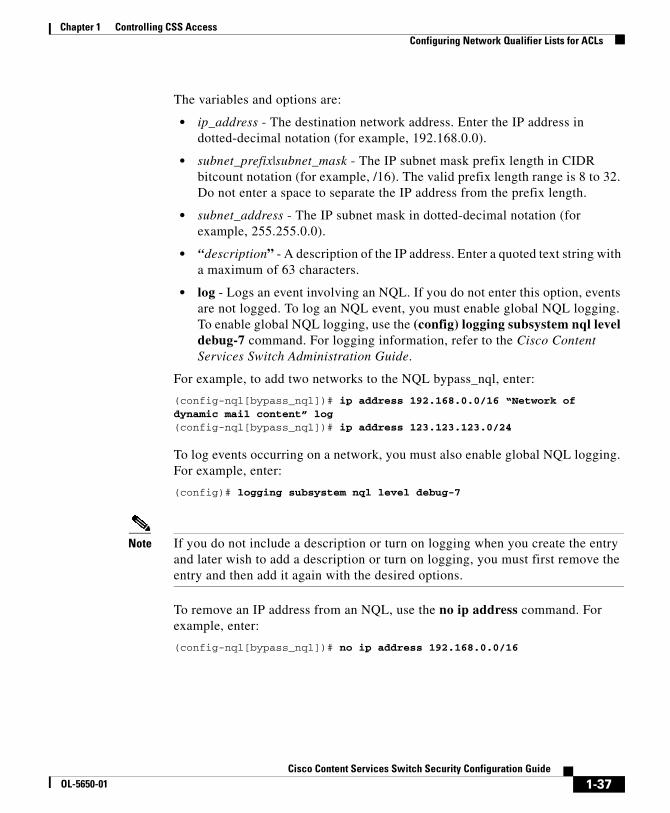
Chapter 1 Controlling CSS AccessConfiguring Network Qualifier Lists for ACLs
The variables and options are:
• ip_address - The destination network address. Enter the IP address in dotted-decimal notation (for example, 192.168.0.0).
• subnet_prefix|subnet_mask - The IP subnet mask prefix length in CIDR bitcount notation (for example, /16). The valid prefix length range is 8 to 32. Do not enter a space to separate the IP address from the prefix length.
• subnet_address - The IP subnet mask in dotted-decimal notation (for example, 255.255.0.0).
• “description” - A description of the IP address. Enter a quoted text string with a maximum of 63 characters.
• log - Logs an event involving an NQL. If you do not enter this option, events are not logged. To log an NQL event, you must enable global NQL logging. To enable global NQL logging, use the (config) logging subsystem nql level debug-7 command. For logging information, refer to the Cisco Content Services Switch Administration Guide.
For example, to add two networks to the NQL bypass_nql, enter:
(config-nql[bypass_nql])# ip address 192.168.0.0/16 “Network of dynamic mail content” log(config-nql[bypass_nql])# ip address 123.123.123.0/24
To log events occurring on a network, you must also enable global NQL logging. For example, enter:
(config)# logging subsystem nql level debug-7
Note If you do not include a description or turn on logging when you create the entry and later wish to add a description or turn on logging, you must first remove the entry and then add it again with the desired options.
To remove an IP address from an NQL, use the no ip address command. For example, enter:
(config-nql[bypass_nql])# no ip address 192.168.0.0/16
1-37Cisco Content Services Switch Security Configuration Guide
OL-5650-01
Chapter 1 Controlling CSS AccessConfiguring Network Qualifier Lists for ACLs
Adding an NQL to an ACL ClauseTo add an NQL to an ACL clause:
1. Create the ACL. For example, enter:
(config)# acl 10
2. Define the clause, including the NQL as either a source or destination.
This clause example bypasses content rules for any traffic from any source going to the destination networks defined in NQL bypass_nql on port 80.
(config-acl[10])# clause 1 bypass any any destination nql bypass_nql eq 80
Showing NQL ConfigurationsUse the show nql command to display NQL configuration information. The syntax for this command is:
• show nql - Displays information for all NQLs. If you enter this command in NQL mode, the CSS displays the addresses only for the current NQL.
• show nql nql_name - Displays information for the specified NQL. Enter the NQL name as a case-sensitive unquoted text string with no spaces. To see a list of existing NQL names, use the show nql ? command.
For example, enter:
(config-nql[bypass_nql])# show nql
Table 1-4 describes the fields in the show nql command output.
Table 1-4 Field Descriptions for the show nql Command Output
Field Description
Name The name of the NQL.
Description The description associated with the NQL.
IP Addresses The IP addresses and subnet mask supported by the NQL. If configured, a description appears after the address.
1-38Cisco Content Services Switch Security Configuration Guide
OL-5650-01

Cisco Content ServiceOL-5650-01
C H A P T E R 2
Configuring the Secure Shell Daemon ProtocolThe Secure Shell Daemon (SSHD) protocol provides secure encrypted communications between two hosts communicating over an insecure network. The CSS supports an implementation of OpenSSH to provide this secure communication. SSHD uses the standard CSS login sequence of entering the username and password at the CSS login prompts.
SSHD on the CSS supports both the SSH v1 and v2 protocols. For SSH v1, the software provides encrypted communication using ciphers such as 3DES or Blowfish. For SSH v2, the software provides 128-bit AES, Blowfish, 3DES, CAST128, Arcfour, 192-bit AES, or 256-bit AES.
Caution When using SSHD, ensure that the CSS is not configured to perform a network boot from a network-mounted file system on a remote system (a diskless environment). If you require the CSS to use the network-mounted method of booting, be aware that the SSHD protocol is not supported.
If the CSS has been booted using a network boot from a network-mounted file system, the CSS logs the following error message by SSHD as the protocol attempts to initialize (and then exit from operation):
Unable to initialize sshd; failure to seed random number generator
2-1s Switch Security Configuration Guide

Chapter 2 Configuring the Secure Shell Daemon ProtocolEnabling SSH
This chapter contains the following major sections:
• Enabling SSH
• Configuring SSH Access
• Configuring SSHD in the CSS
• Configuring Telnet Access When Using SSHD
• Showing SSHD Configurations
Enabling SSHTo enable SSH functionality in your CSS, you must purchase the Secure Management software option. If you purchased the Secure Management software option:
• During the initial CSS order placement, the software Claim Certificate is included in the accessory kit.
• After you receive the CSS, Cisco Systems sends the Claim Certificate to you by mail.
Note If you cannot locate the Secure Management option Claim Certificate in the accessory kit, call the Cisco Technical Assistance Center (TAC) toll free, 24 hours a day, 7 days a week at 1-800-553-2447 or 1-408-526-7209. You can also e-mail TAC at [email protected].
Follow the instructions on the Claim Certificate to obtain the Secure Management software license key.
To enter the Secure Management license key and activate SSH:
1. Log in to the CSS and enter the license command.
# license
2. Enter the Secure Management license key.
Enter the Software License Key (q to quit): nnnnnnnnnnnn
The Secure Management license key is now properly installed and the SSH function activated.
2-2Cisco Content Services Switch Security Configuration Guide
OL-5650-01

Chapter 2 Configuring the Secure Shell Daemon ProtocolConfiguring SSH Access
Configuring SSH AccessSSH access to the CSS is enabled by default through the no restrict ssh command. You can verify the SSH access selection in the running-config file.
To enhance security when using SSHD, disable Telnet access (Telnet access is enabled by default). Use the telnet-access disable command as described in Chapter 1, Controlling CSS Access.
To enable SSH access to the CSS, enter:
(config)# no restrict ssh
To disable SSH access, enter:
(config)# restrict ssh
Configuring SSHD in the CSSThe CSS provides the following commands for configuring SSHD:
• sshd keepalive - Enables TCP keepalive messages
• sshd port - Specifies the SSHD port
• sshd server-keybits - Sets the number of bits in the ephemeral protocol server key (SSH v1 only)
Ensure you enable SSHD access to the CSS for SSHD to accept connections from SSH clients. By default, SSH access is enabled through the no restrict ssh global command.
Configuring SSHD KeepaliveThe CSS supports sending TCP keepalive messages to the client as a means for the server to determine whether the SSHD connection to the client is functioning (for example, if the network has gone down or the client has become unresponsive). If you disable sending SSHD keepalives to a client, sessions may hang indefinitely on the server, which consumes system resources.
Use the sshd keepalive command to enable SSHD keepalive. SSHD keepalive is enabled by default.
2-3Cisco Content Services Switch Security Configuration Guide
OL-5650-01

Chapter 2 Configuring the Secure Shell Daemon ProtocolConfiguring SSHD in the CSS
To enable sending SSHD keepalives to the client, enter:
(config)# sshd keepalive
To disable sending SSHD keepalives, enter:
(config)# no sshd keepalive
Configuring SSHD PortThe default port number for SSH is 22. To specify the port number to which the server listens for connections from clients, use the sshd port command. Enter a port number of 22 or from 512 to 65535.
Note When you configure a new sshd port, you may receive a message saying that the port is invalid or unavailable. This message can appear if the port is in use internally by the CSS. If this message occurs, enter a different port number.
For example, to configure port number 65530 as the SSHD port, enter:
(config)# sshd port 65530
To reset the port number to the default of 22, enter:
(config)# no sshd port
Configuring SSHD Server-KeybitsTo specify the number of bits in the ephemeral protocol server key, use the sshd server-keybits command. The sshd server-keybits command pertains only to SSH v1 connections. Enter the number of bits from 512 to 1024 (the valid range). The default is 768.
2-4Cisco Content Services Switch Security Configuration Guide
OL-5650-01

Chapter 2 Configuring the Secure Shell Daemon ProtocolConfiguring Telnet Access When Using SSHD
Note The valid range for this command is 512 to 1024. However, to maintain backward compatibility with version 5.00, the CSS allows you to enter a value from 512 to 32768. If you enter a value greater than 1024, the CSS changes the value to the default of 768. When you reboot the CSS, the following error message appears to remind you of the valid range:
NETMAN-3: sshd: Bad server key size <configured value>; range 512 to
1024; defaulting to 768
For example, to set the number of bits in the server key to 1024, enter:
(config)# sshd server-keybits 1024
To reset the number of bits to the default of 768, enter:
(config)# no sshd server-keybits
Configuring Telnet Access When Using SSHDBy default, Telnet access to the CSS is enabled. When you use SSHD, you can disable nonsecure Telnet access to the CSS. To enhance security when using SSHD, we recommend that you disable Telnet access. Use the global restrict telnet command to disable Telnet access to the CSS.
To disable Telnet access, enter:
(config)# restrict telnet
To reenable Telnet access to the CSS, enter:
(config)# no restrict telnet
2-5Cisco Content Services Switch Security Configuration Guide
OL-5650-01

Chapter 2 Configuring the Secure Shell Daemon ProtocolShowing SSHD Configurations
Showing SSHD ConfigurationsUse the show sshd command to display SSHD configurations. This command provides the following options:
• show sshd config - Displays the SSHD configuration
• show sshd sessions - Displays a summary of the current active SSHD server sessions. The command displays data only if an SSH client is currently configured.
• show sshd version - Show the current version of the SSHield package running in the CSS.
To display the SSHD configuration, enter:
# show sshd config
Table 2-1 describes the fields in the show sshd config command output.
Table 2-1 Field Descriptions for the show sshd config Command
Field Description
Maximum Sessions Allowed
The maximum number of concurrent SSHD sessions (five maximum).
Active Sessions The number of currently active SSHD sessions.
Log Level The current log level.
Listen Socket Count The number of sockets that SSHD is currently listening on (not currently configurable, default is 1).
Listen Port The port number that SSHD uses to listen for client connections (set by the sshd port command). The default is 22 (the default port for SSH). The port number is 22 or from 512 to 65535.
Listen Address The address that SSHD uses to listen for client connections (not currently configurable; default is 0.0.0.0).
Server Key Bits The number of bits to use when generating the SSHv1 server key. The default is 768. The range is from 512 to 1024.
2-6Cisco Content Services Switch Security Configuration Guide
OL-5650-01
Chapter 2 Configuring the Secure Shell Daemon ProtocolShowing SSHD Configurations
To display the SSHD sessions, enter:
# show sshd sessions
Table 2-2 describes the fields in the show sshd sessions command output.
RSA Protocol (SSH1) The status of SSHv1 access (not currently configurable; default is enabled).
Empty Passwords Disabled. The username must always have an associated password.
Keepalive The status of sending a TCP keepalive to the client: Enabled or Disabled. SSHD keepalive is enabled by default.
SSH2 Cipher List A list of SSHv2 cipher suites supported for authentication, encryption, and data integrity between the client and the server.
Table 2-1 Field Descriptions for the show sshd config Command (continued)
Field Description
Table 2-2 Field Descriptions for the show sshd sessions
Command
Field Description
Session_ID The session ID.
Conn_TID The connection task ID of the SSHD server handling the connection (tSshConn).
Login_TID The login task ID handling the connection (tSshCli).
2-7Cisco Content Services Switch Security Configuration Guide
OL-5650-01
Chapter 2 Configuring the Secure Shell Daemon ProtocolShowing SSHD Configurations
To display the SSHD version, enter:
# show sshd versionSSHield version 1.5, SSH version OpenSSH_3.0.2p1
PTY_FD The file descriptor used by the login task to communicate with the CSS CLI.
The PTY_FD file descriptor allows you to correlate the SSH client sessions with those sessions listed under the Line field in the show lines output. For example, the show sshd sessions output displays an SSH client session connected to PTY_FD32. If you enter the show lines command you see a line in the display listing sshc32 (for SSH client pty_fd32). This correlation allows you to view the login time, idle time, and the location of the client of the SSH sessions through the show lines command.
Remote IP/Remote Port
The remote IP and port number of the SSHD session.
Table 2-2 Field Descriptions for the show sshd sessions
Command (continued)
Field Description
2-8Cisco Content Services Switch Security Configuration Guide
OL-5650-01

Cisco Content ServiceOL-5650-01
C H A P T E R 3
Configuring the CSS as a Client of a RADIUS ServerThe Remote Authentication Dial-In User Service (RADIUS) protocol is a distributed client/server protocol that protects networks against unauthorized access. RADIUS uses the User Datagram Protocol (UDP) to exchange authentication and configuration information between the CSS authentication client and the active authentication server that contains all user authentication and network service access information. The RADIUS host is normally a multiuser system running RADIUS server software.
When a user remotely logs in to a CSS operating as a RADIUS client, the CSS sends an authentication request (including username, encrypted password, client IP address, and port ID) to the central RADIUS server. The RADIUS server is responsible for receiving user connection requests, authenticating users, and returning all configuration information necessary for the client to deliver services to the users. Transactions between the RADIUS client and the RADIUS server are authenticated through the use of a shared secret.
Once the RADIUS server receives the authentication request, it validates the sending client and consults a database of users to match the login request. If no response is returned by the RADIUS server within a period of time, the authentication request is retransmitted a predefined number of times. The RADIUS client can forward requests to an alternate secondary RADIUS server in the event that the primary server is down or is unreachable.
3-1s Switch Security Configuration Guide

Chapter 3 Configuring the CSS as a Client of a RADIUS Server
In a configuration where both a primary RADIUS server and a secondary RADIUS server are specified, and one or both of the RADIUS servers become unreachable, the CSS automatically transmits a keepalive authentication request to query the server(s). The CSS transmits the username “query” and the password “areyouup” to the RADIUS server (encrypted with the RADIUS server’s key) to determine the server’s state. The CSS continues to send this keepalive authentication request until the RADIUS server indicates it is available.
Use the radius-server command and its options to specify the RADIUS server host (primary RADIUS server, and, optionally, a secondary RADIUS server), communication time interval settings, and a shared secret text string. This command is available in global configuration mode.
This chapter contains the following major sections:
• RADIUS Configuration Quick Start
• Configuring a RADIUS Server for Use with the CSS
• Specifying a Primary RADIUS Server
• Specifying a Secondary RADIUS Server
• Configuring the RADIUS Server Timeouts
• Configuring the RADIUS Server Retransmits
• Configuring the RADIUS Server Dead-Time
• Showing RADIUS Server Configuration Information
After configuring the RADIUS server, enable RADIUS authentication for console and virtual logins (if the username and password pair is not in the local user database) through the virtual authentication and console authentication commands. Refer to Chapter 1, Controlling CSS Access for details on the two commands.
3-2Cisco Content Services Switch Security Configuration Guide
OL-5650-01

Chapter 3 Configuring the CSS as a Client of a RADIUS ServerRADIUS Configuration Quick Start
RADIUS Configuration Quick StartTable 3-1 provides a quick overview of the steps required to configure the RADIUS feature on a CSS. Each step includes the CLI command required to complete the task. For a complete description of each feature and all the options associated with the CLI command, refer to the sections following the table.
Table 3-1 RADIUS Configuration Quick Start
Task and Command Example
1. Configure the authentication settings on the Cisco Secure ACS in the Network Configuration section of the Cisco Secure ACS HTML interface, the Add AAA Client page, and complete the following fields:
• AAA Client Hostname
• AAA Client IP Address
• Key
• Authenticate Using
See the “Configuring Authentication Settings” section.
2. To determine the privilege level of users accessing the CSS, configure the user accounts on the RADIUS server. See the “Configuring Authorization Settings” section.
3. Use the radius-server primary command to specify a primary RADIUS server used to authenticate user information from the CSS RADIUS client (console or virtual authentication). See the “Specifying a Primary RADIUS Server” section.
(config)# radius-server primary 172.27.56.76 secret Hello
4. Use the radius-server secondary command to specify a secondary RADIUS server to authenticate user information from the CSS RADIUS client (console or virtual authentication). See the “Specifying a Secondary RADIUS Server” section.
(config)# radius-server secondary 172.27.56.79 secret Hello
3-3Cisco Content Services Switch Security Configuration Guide
OL-5650-01

Chapter 3 Configuring the CSS as a Client of a RADIUS ServerConfiguring a RADIUS Server for Use with the CSS
The following running-configuration example shows the results of entering the commands in Table 3-1.
!*************************** GLOBAL *************************** radius-server primary 172.27.56.76 secret Hello auth-port 1645 radius-server secondary 172.27.56.79 secret Hello auth-port 1645 virtual authentication primary radius
Configuring a RADIUS Server for Use with the CSSThis section provides background information on the setup of a RADIUS server. It is intended as a guide to help ensure proper communication with a RADIUS server and a CSS operating as a RADIUS client.
The following sections summarize the recommended settings for the Cisco Secure Access Control Server (ACS) when used as a centralized RADIUS server with the CSS.
5. Use the virtual authentication command to configure the primary, secondary, and tertiary virtual authentication method. See Chapter 1, Controlling CSS Access.
#(config) virtual authentication primary radius
6. (Recommended) Use the show radius command and its options to display information and statistics about the RADIUS server configuration. See the “Showing RADIUS Server Configuration Information” section.
(config)# show radius config all(config)# show radius statistics all
Table 3-1 RADIUS Configuration Quick Start (continued)
Task and Command Example
3-4Cisco Content Services Switch Security Configuration Guide
OL-5650-01
Chapter 3 Configuring the CSS as a Client of a RADIUS ServerConfiguring a RADIUS Server for Use with the CSS
Configuring Authentication SettingsTo configure the authentication settings on Cisco Secure ACS, go to the Network Configuration section of the Cisco Secure ACS HTML interface, the Add AAA Client page, and complete the following fields:
• AAA Client Hostname - Enter a name you want assigned to the CSS.
• AAA Client IP Address - Enter the IP address of the CSS Ethernet Management port or of a CSS circuit (depending on how the CSS is configured to communicate with the Cisco Secure ACS).
• Key - Enter the shared secret that the CSS and Cisco Secure ACS use to authenticate transactions. For correct operation, you must specify the identical shared secret on both the Cisco Secure ACS and the CSS. The key is case-sensitive.
• Authenticate Using - Select the RADIUS (IETF) network security protocol to use the standard IETF RADIUS attributes with the CSS.
Configuring Authorization SettingsTo determine the privilege level of users accessing the CSS, you must configure the user accounts on the RADIUS server.
To configure the group authorization settings:
1. From the Group Setup section of the Cisco Secure ACS HTML interface, Group Setup Select page, select the group for which you want to configure RADIUS settings.
2. From the Group Settings section of the Cisco Secure ACS HTML interface, click the IETF RADIUS Attributes, [006] Service-Type checkbox. Then select Administrative. Administrative is required to enable RADIUS authentication for privileged user (SuperUser) connection with the CSS.
3-5Cisco Content Services Switch Security Configuration Guide
OL-5650-01

Chapter 3 Configuring the CSS as a Client of a RADIUS ServerSpecifying a Primary RADIUS Server
To add a user to a group, go to the User Setup section of the Cisco Secure ACS HTML interface:
• On the User Setup Select page, specify a username.
• On the User Setup Edit page, specify the following:
– Password Authentication - Select an applicable authentication type from the list.
– Password - Specify and confirm a password.
– Group - Select the previously created RADIUS group to which you want to assign the user.
Specifying a Primary RADIUS ServerTo specify a primary RADIUS server used to authenticate user information from the CSS RADIUS client (console or virtual authentication), use the radius-server primary command . The syntax for this global configuration mode command is:
radius-server primary ip_address secret string {auth-port port_number}
Options and variables for this command are as follows:
• primary ip_address - The IP address or host name for the primary RADIUS server. Enter the address in either dotted-decimal IP notation (for example, 192.168.11.1) or mnemonic host-name format (for example, myhost.mydomain.com).
• secret string - The shared secret text string between the primary RADIUS server and the CSS RADIUS client. The shared secret allows authentication transactions between the client and primary RADIUS server to occur. Enter the shared secret as a case-sensitive string with no spaces (16 characters maximum).
• auth-port port_number - (Optional) The UDP port on the primary RADIUS server allocated to receive authentication packets from the RADIUS client. Valid entries are 0 to 65535. The default is 1645.
To specify a primary RADIUS server, enter:
(config)# radius-server primary 172.27.56.76 secret Hello auth-port 30658
3-6Cisco Content Services Switch Security Configuration Guide
OL-5650-01

Chapter 3 Configuring the CSS as a Client of a RADIUS ServerSpecifying a Secondary RADIUS Server
To remove a primary RADIUS server, enter:
(config)# no radius-server primary
Specifying a Secondary RADIUS ServerThe CSS directs authentication requests to the secondary RADIUS server when the specified RADIUS primary server is unavailable. To specify a secondary RADIUS server to authenticate user information from the CSS RADIUS client (console or virtual authentication), use the radius-server secondary command.
Note Configuration of a secondary RADIUS server is optional.
The syntax for this global configuration mode command is:
radius-server secondary ip_address secret string {auth-port port_number}
Options and variables for this command are as follows:
• secondary ip_address - The IP address or host name for the secondary RADIUS server. Enter the address in either dotted-decimal IP notation (for example, 192.168.11.1) or mnemonic host-name format (for example, myhost.mydomain.com).
• secret string - The shared secret text string between the secondary RADIUS server and the CSS RADIUS client. The shared secret allows authentication transactions between the client and secondary RADIUS server to occur. Enter the shared secret as a case-sensitive string with no spaces (16 characters maximum).
• auth-port port_number - (Optional) The UDP port on the primary RADIUS server allocated to receive authentication packets from the RADIUS client. Valid entries are 0 to 65535. The default is 1645.
To specify a secondary RADIUS server, enter:
(config) radius-server secondary 172.27.56.79 secret Hello auth-port 30658
To remove a secondary RADIUS server, enter:
(config)# no radius-server secondary
3-7Cisco Content Services Switch Security Configuration Guide
OL-5650-01
Chapter 3 Configuring the CSS as a Client of a RADIUS ServerConfiguring the RADIUS Server Timeouts
Configuring the RADIUS Server TimeoutsBy default, the CSS waits 10 seconds for the RADIUS server (primary or secondary) to reply to an authentication request before retransmitting requests to the RADIUS server. Use the radius-server timeout command to specify the time interval that the CSS waits for the RADIUS server (primary or secondary) to reply to an authentication request before retransmitting requests to the RADIUS server. You configure the number of retransmitted requests to the server through the radius-server retransmit command (see the “Configuring the RADIUS Server Retransmits” section). Valid entries are 1 to 255 seconds.
For example, to configure the configure the RADIUS server timeout interval to 1 minute (60 seconds), enter:
(config)# radius-server timeout 60
To reset the RADIUS server retransmit request to the default of 10 seconds, enter:
(config)# no radius-server timeout
Configuring the RADIUS Server RetransmitsBy default, the CSS retransmits three authentication requests to a timed-out RADIUS server before considering the server dead and stopping transmission. Use the radius-server retransmit command to specify the number of times the CSS retransmits an authentication request to a timed-out RADIUS server before considering the server dead and stopping transmission. If a secondary RADIUS server has been identified, the server is selected as the active server. Valid entries are 1 to 30 retries.
If the RADIUS server does not respond to the CSS retransmitted requests, the CSS considers the server as dead, stops transmitting to the server, and starts the dead timer as defined through the radius-server dead-time command (see the “Configuring the RADIUS Server Dead-Time” section). If a secondary server is configured, the CSS transmits the requests to the secondary server. If the secondary server does not respond to the request, the CSS considers the server dead and starts the dead timer. If there is no active server, the CSS stops transmitting requests until the primary RADIUS server becomes alive.
For example, to configure the number of RADIUS server retransmissions to 5, enter:
(config)# radius-server retransmit 5
3-8Cisco Content Services Switch Security Configuration Guide
OL-5650-01

Chapter 3 Configuring the CSS as a Client of a RADIUS ServerConfiguring the RADIUS Server Dead-Time
To reset the RADIUS server retransmit request to the default of 3 retransmissions, enter:
(config)# no radius-server retransmit
Configuring the RADIUS Server Dead-TimeDuring the dead-time interval, the CSS sends probe access-request packets to verify that the RADIUS server (primary or secondary) is available and can receive authentication requests. The dead-time interval starts when the server does not respond to the number of authentication request transmissions configured through the radius-server retransmit command. When the server responds to a probe access-request packet, the CSS transmits the authentication request to the server.
Use the radius-server dead-time command to set the time interval in which the CSS verifies whether a nonresponsive server is operational. Valid entries are 1 to 255 seconds. The default is 5 seconds.
To configure the RADIUS server dead-time to 15 seconds, with probe access-requests enabled, enter:
(config)# radius-server dead-time 15
To reset the RADIUS server dead-time request to the default of 5 seconds, enter:
(config)# no radius-server dead-time
Showing RADIUS Server Configuration InformationUse the show radius command to display information and statistics about the RADIUS server configuration. The syntax and options for the command are as follows:
• show radius config [all|primary|secondary] - Displays RADIUS configuration information for a specific server or all servers, identified by type
• show radius statistics [all|primary|secondary] - Displays RADIUS authentication statistics for a specific server or all servers, identified by type
To view the configuration for a RADIUS primary server, enter:
(config)# show radius config primary
3-9Cisco Content Services Switch Security Configuration Guide
OL-5650-01

Chapter 3 Configuring the CSS as a Client of a RADIUS ServerShowing RADIUS Server Configuration Information
To view the authentication statistics for a RADIUS secondary server, enter:
(config)# show radius statistics secondary
Table 3-2 describes the fields in the show radius config command output.
Table 3-2 Field Descriptions for the show radius config Command
Field Description
Server IP Address
The IP address or host name for the specified RADIUS server
Secret The shared secret text string between the specified RADIUS server and the CSS RADIUS client
Port The UDP port on the specified RADIUS server allocated to receive authentication packets from the CSS RADIUS client; the default port number is 1645
State The operational stats of the RADIUS server (ALIVE, DOWN, UNKNOWN)
Dead Timer The time interval (in seconds) that the CSS probes a nonresponsive RADIUS server (primary or secondary) to determine whether it is operational and can receive authentication requests
Timeout The interval (in seconds) that the CSS RADIUS client waits for the RADIUS server to reply to an authentication request before retransmitting requests to the RADIUS server
Retransmit Limit The number of times the CSS RADIUS client retransmits an authentication request to a timed out RADIUS server before stopping transmission to that server
Probes The packets that the CSS RADIUS client automatically transmits as a means to determine whether the RADIUS server is still available and can receive authentication requests
3-10Cisco Content Services Switch Security Configuration Guide
OL-5650-01
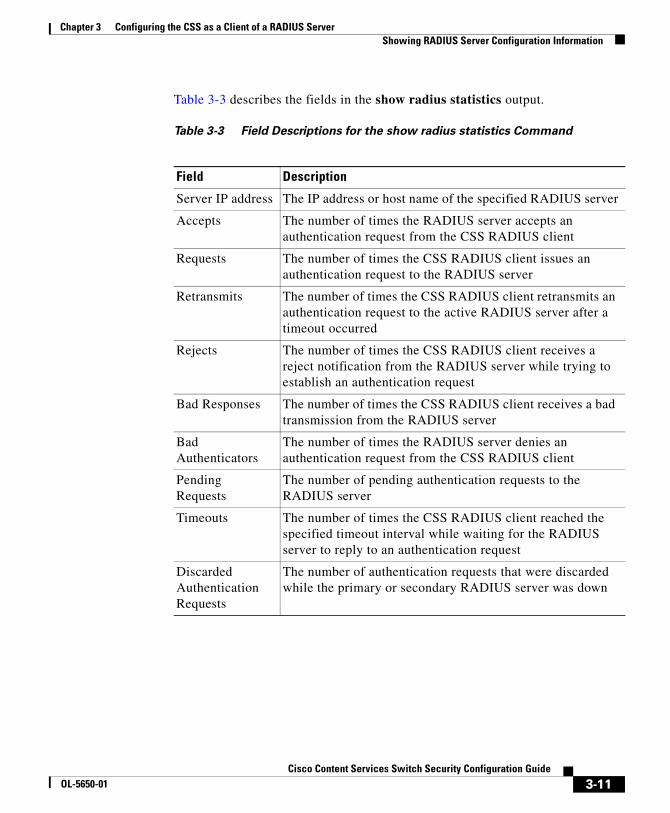
Chapter 3 Configuring the CSS as a Client of a RADIUS ServerShowing RADIUS Server Configuration Information
Table 3-3 describes the fields in the show radius statistics output.
Table 3-3 Field Descriptions for the show radius statistics Command
Field Description
Server IP address The IP address or host name of the specified RADIUS server
Accepts The number of times the RADIUS server accepts an authentication request from the CSS RADIUS client
Requests The number of times the CSS RADIUS client issues an authentication request to the RADIUS server
Retransmits The number of times the CSS RADIUS client retransmits an authentication request to the active RADIUS server after a timeout occurred
Rejects The number of times the CSS RADIUS client receives a reject notification from the RADIUS server while trying to establish an authentication request
Bad Responses The number of times the CSS RADIUS client receives a bad transmission from the RADIUS server
Bad Authenticators
The number of times the RADIUS server denies an authentication request from the CSS RADIUS client
Pending Requests
The number of pending authentication requests to the RADIUS server
Timeouts The number of times the CSS RADIUS client reached the specified timeout interval while waiting for the RADIUS server to reply to an authentication request
Discarded Authentication Requests
The number of authentication requests that were discarded while the primary or secondary RADIUS server was down
3-11Cisco Content Services Switch Security Configuration Guide
OL-5650-01

Chapter 3 Configuring the CSS as a Client of a RADIUS ServerShowing RADIUS Server Configuration Information
3-12Cisco Content Services Switch Security Configuration Guide
OL-5650-01

Cisco Content ServiceOL-5650-01
C H A P T E R 4
Configuring the CSS as a Client of a TACACS+ ServerThe Terminal Access Controller Access Control System (TACACS+) protocol provides access control for routers, network access servers (NAS), or other devices through one or more daemon servers. TACACS+ encrypts all traffic between the NAS and daemon using TCP communications for reliable delivery.
You can configure the CSS as a client of a TACACS+ server to provide a method for authentication of users, and a method of authorization and accounting of configuration and nonconfiguration commands.
This chapter contains the following major sections:
• TACACS+ Configuration Quick Start
• Configuring TACACS+ Server User Accounts for Use with the CSS
• Configuring Global TACACS+ Attributes
• Defining a TACACS+ Server
• Setting TACACS+ Authorization
• Setting TACACS+ Accounting
• Showing TACACS+ Server Configuration Information
After you configure the TACACS+ server on the CSS, configure TACACS+ authentication for virtual or console authentication. Refer to Chapter 1, Controlling CSS Access for details.
4-1s Switch Security Configuration Guide
Chapter 4 Configuring the CSS as a Client of a TACACS+ ServerTACACS+ Configuration Quick Start
TACACS+ Configuration Quick StartTable 4-1 provides a quick overview of the steps required to configure the TACACS+ feature on a CSS. Each step includes the CLI command required to complete the task. For a complete description of each feature and all the options associated with the CLI command, see the sections following the table.
Table 4-1 TACACS+ Configuration Quick Start
Task and Command Example
1. Configure the authentication settings on the Cisco Secure ACS in the Network Configuration section of the Cisco Secure ACS HTML interface, the Add AAA Client page, and complete the following fields:
• AAA Client Hostname
• AAA Client IP Address
• Key
• Authenticate Using
See the “Configuring Authentication Settings” section.
2. To determine the privilege level of users accessing the CSS, configure the user accounts on the TACACS+ server. See the “Configuring Authorization Settings” section.
3. (Optional) If you are configuring global timeout, keepalive frequency, or encryption key attributes for the TACACS+ server, you must configure these parameters before you configure the server. For information on configuring global TACACS+ attributes, see the “Configuring Global TACACS+ Attributes” section.
4. Use the tacacs-server command to define a server. You must provide the IP address and port number for the server. You can optionally define a specific timeout period, encryption key, or keepalive frequency, and designate the server as the primary server. See the “Defining a TACACS+ Server” section.
(config)# tacacs-server 192.168.11.1 12 20 “summary” primary frequency 10
4-2Cisco Content Services Switch Security Configuration Guide
OL-5650-01

Chapter 4 Configuring the CSS as a Client of a TACACS+ ServerConfiguring TACACS+ Server User Accounts for Use with the CSS
The following running-configuration example shows the results of entering the commands in Table 4-1.
!************************** GLOBAL **************************virtual authentication primary tacacs tacacs-server 192.168.11.1 12 20 6dab4b3gibcbef3e primary frequency 10
Configuring TACACS+ Server User Accounts for Use with the CSS
This section provides background information on the setup of a TACACS+ server. It is intended as a guide to help ensure proper communication with a TACACS+ server and a CSS operating as a TACACS+ client.
The following sections summarize the recommended Cisco Secure Access Control Server (ACS) TACACS+ user authentication and authorization settings.
Configuring Authentication SettingsTo configure the authentication settings on Cisco Secure ACS, go to the Network Configuration section of the Cisco Secure ACS HTML interface, the Add AAA Client page, and complete the following fields:
• AAA Client Hostname - Enter a name you want assigned to the CSS.
• AAA Client IP Address - Enter the IP address of the CSS Ethernet management port or of a CSS circuit (depending on how the CSS is configured to communicate with the Cisco Secure ACS).
5. Use the virtual authentication command to configure the primary, secondary, and tertiary virtual authentication method.
#(config) virtual authentication primary tacacs
6. (Recommended) Verify your TACACS+ server configuration. See the “Showing TACACS+ Server Configuration Information” section.
(config)# show tacacs-server
Table 4-1 TACACS+ Configuration Quick Start (continued)
Task and Command Example
4-3Cisco Content Services Switch Security Configuration Guide
OL-5650-01
Chapter 4 Configuring the CSS as a Client of a TACACS+ ServerConfiguring TACACS+ Server User Accounts for Use with the CSS
• Key - Enter the shared secret that the CSS and Cisco Secure ACS use to authenticate transactions. For correct operation, you must specify the identical shared secret on both the Cisco Secure ACS and the CSS. The key is case-sensitive.
• Authenticate Using - Select TACACS+ (Cisco IOS).
Configuring Authorization SettingsTo determine the privilege level of users accessing the CSS, you must configure the user accounts on the TACACS+ server to permit or deny execution of the privilege command. The CSS queries the TACACS+ server for authorization to execute the privilege command. If the server allows the privilege command, the user is granted privileged (SuperUser and configuration modes) access to the CSS. If the server denies the privilege command, the user is granted nonprivileged (User mode) access to the CSS.
To configure the group authorization settings:
1. From the Group Setup section of the Cisco Secure ACS HTML interface, Group Setup Select page, select the group for which you want to configure TACACS+ settings.
2. On the Shell Command Authorization Set page, click the Per Group Command Authorization checkbox
3. Under Unmatched Cisco IOS Commands, either permit or deny execution of the privilege command:
• For a group that has SuperUser privileges on the CSS, select Permit. A SuperUser can issue any CSS command.
• For a group that has User privileges on the CSS, select Deny. A user can issue CSS commands that does not change the CSS configuration; for example, show commands.
An alternative way to configure the group authorization settings is as follows:
1. Select Shared Profile Components, Shell Command Authorization Sets page.
2. Click the Add button to add a set or to edit an existing set.
3. Enter a name and description.
4-4Cisco Content Services Switch Security Configuration Guide
OL-5650-01
Chapter 4 Configuring the CSS as a Client of a TACACS+ ServerConfiguring Global TACACS+ Attributes
4. Proceed next to Unmatched Commands, either permit or deny execution of the privilege command:
• For a user that has SuperUser privileges on the CSS, click Permit. A SuperUser can issue any CSS command.
• For a user that has User privileges on the CSS, click Deny. A user can issue CSS commands that do not change the CSS configuration; for example, show commands.
5. From the Group Setup section, Group Setup Select page, select the group for which you want to configure TACACS+ settings.
6. On the Shell Command Authorization Set section, select Assign a Shell Command Authorization Set for any network device.
7. Select the set from the list.
To add a user to a group, go to the User Setup section of the Cisco Secure ACS HTML interface:
• On the User Setup Select page, specify a username.
• On the User Setup Edit page, specify the following:
– Password Authentication - Select an applicable authentication type from the list.
– Password - Specify and confirm a password.
– Group - Select the previously created TACACS+ group to which you want to assign the user.
Configuring Global TACACS+ AttributesThe TACACS+ timeout period, encryption key, and keepalive frequency have default values that are applied to the TACACS server. During the server configuration, you can configure these attributes to be specific to the server or omit them for the server to accept the default values. You can change the default values for any of these global attributes. The following sections provide information for:
• Setting the Global CSS TACACS+ Timeout Period
• Defining a Global Encryption Key
• Setting the Global TACACS+ Keepalive Frequency
4-5Cisco Content Services Switch Security Configuration Guide
OL-5650-01

Chapter 4 Configuring the CSS as a Client of a TACACS+ ServerConfiguring Global TACACS+ Attributes
Note The timeout, encryption key, or keepalive frequency that you define when you configure a TACACS+ server overrides the global attribute (see the “Defining a TACACS+ Server” section).
Setting the Global CSS TACACS+ Timeout PeriodThe CSS allows you to define a global TACACS+ timeout period for use with all configured TACACS+ servers. To determine the availability of the TACACS+ servers, the CSS sends periodic TCP keepalive probes to them. If the server does not respond to the probe within the timeout period, the CSS considers the server unavailable.
If the CSS attempts to contact the server and does not receive a response within the defined timeout value, it uses another server. The next configured server is contacted and the process is repeated. If a second (or third) TACACS+ server has been identified, the CSS selects that server as the active server.
If the CSS cannot reach all three TACACS+ servers, users are not authenticated and cannot log in to the CSS unless TACACS+ is used in combination with a RADIUS or local server, as defined through the virtual command or the console command. See Chapter 1, Controlling CSS Access for details about the two commands.
To change the timeout period, use the tacacs-server timeout command. Enter a number from 1 to 255. The default is 5 seconds. The CSS dynamically applies the modified global timeout period and the new value automatically takes effect on the next TACACS+ connection.
For example, to set the timeout period to 60 seconds, enter:
#(config) tacacs-server timeout 60
To reset the timeout period to the default of 5 seconds, enter:
#(config) no tacacs-server timeout
Note The timeout period that you configure when you specify a TACACS+ server overrides the global timeout period (see the “Defining a TACACS+ Server” section).
4-6Cisco Content Services Switch Security Configuration Guide
OL-5650-01
Chapter 4 Configuring the CSS as a Client of a TACACS+ ServerConfiguring Global TACACS+ Attributes
Defining a Global Encryption KeyThe CSS allows you to define a global encryption key for communications with all configured TACACS+ servers. To encrypt TACACS+ packet transactions between the CSS and the TACACS+ server, you must define an encryption key. If you do not define an encryption key, packets are not encrypted. The key is a shared secret value that is identical to the one on the TACACS+ server. Use the tacacs-server key command to specify a shared secret between the CSS and the server.
The shared secret key can be either clear text entered in quotes or the DES-encrypted secret. The clear text key is DES-encrypted before it is placed in the running configuration. Either key type can have a maximum of 100 characters. The CSS dynamically applies the modified key and the new value automatically takes effect on the next TACACS+ connection.
For example, to define the clear text key, enter:
#(config) tacacs-server key “market”
To define a DES-encrypted key, enter:
#(config) tacacs-server key acskefterefesdtx
To remove the key, enter:
#(config) no tacacs-server key
Note A shared secret that you configure when you specify a TACACS+ server overrides the global encryption key (see the “Defining a TACACS+ Server” section).
Setting the Global TACACS+ Keepalive FrequencyThe CSS allows you to define a global keepalive frequency for use with all configured TACACS+ servers. To determine the availability of the TACACS+ servers, the CSS sends periodic TCP keepalive probes to them. If the server does not respond to the probe within the configured timeout period, the CSS considers the server unavailable.
4-7Cisco Content Services Switch Security Configuration Guide
OL-5650-01

Chapter 4 Configuring the CSS as a Client of a TACACS+ ServerDefining a TACACS+ Server
When it sends a keepalive to the TACACS+ server, the CSS attempts to use a persistent connection with the server. If the server is not configured for persistence, the CSS opens a new connection each time it sends a keepalive.
To set the global TACACS+ keepalive frequency, use the tacacs-server frequency command in global configuration mode. This command has the following syntax:
tacacs-server frequency number
The number variable defines the keepalive frequency in seconds. Enter an integer from 0 to 255. The default is 5 seconds. A setting of 0 disables keepalives. The CSS dynamically applies the modified keepalive frequency and immediately restarts the keepalive with the new value.
For example, to set the global TACACS+ keepalive frequency to 50 seconds, enter:
(config)# no tacacs-server frequency 50
Note A keepalive frequency that you configure when you specify a TACACS+ server overrides the global keepalive frequency (see the “Defining a TACACS+ Server” section).
To reset the global TACACS+ keepalive frequency to the default of 5 seconds, use the no tacacs-server frequency command.
For example, enter:
(config)# no tacacs-server frequency
Defining a TACACS+ ServerThe TACACS+ server contains the TACACS+ authentication, authorization, and accounting databases. You can designate a maximum of three servers on the CSS. However, the CSS uses only one server at a time. The CSS selects the server based upon availability, giving preference to the configured primary server. The CSS sends periodic TCP keepalive probes at a frequency of every five seconds to the TACACS+ server to determine its operational state: Alive, Dying, or Dead. The TCP keepalive frequency is not user-configurable in the CSS.
4-8Cisco Content Services Switch Security Configuration Guide
OL-5650-01

Chapter 4 Configuring the CSS as a Client of a TACACS+ ServerDefining a TACACS+ Server
Note For general guidelines on the recommended setup of a TACACS+ server (the Cisco Secure Access Control Server in this example), see the “TACACS+ Configuration Quick Start” section.
To apply a TACACS+ global attribute, such as the timeout period, keepalive frequency, or shared secret, to a TACACS+ server, you must configure the global attribute before you configure the server. To apply a modified global attribute to a configured CSS TACACS+ server, remove the server and reconfigure it.
Use the tacacs-server command to define a server. You must provide the IP address and port number for the server. You can optionally define the timeout period and encryption key and designate the server as the primary server.
The syntax for this global configuration command is:
tacacs-server ip_address port {timeout [“cleartext_key”|des_key]} {primary} {frequency number}
The variables and options for this command are as follows:
• ip_address - The IP address of the TACACS+ server. Enter the IP address in dotted-decimal format.
• port - The TCP port of TACACS+ server. The default port is 49. You can enter a port number from 1 to 65535.
• timeout - (Optional) The amount of time to wait for a response from the server. Enter a number from 1 to 255. The default is 5 seconds. Defining this option overrides the tacacs-server timeout command. For more information on the TACACS+ timeout period and setting a global timeout, see the “Setting the Global CSS TACACS+ Timeout Period” section.
• “cleartext_key”|des_key - (Optional) The shared secret between the CSS and the server. You must define an encryption key to encrypt TACACS+ packet transactions between the CSS and the TACACS+ server. If you do not define an encryption key, packets are not encrypted.
The shared secret value is identical to the one on the TACACS+ server. The shared secret key can be either clear text entered in quotes or the DES-encrypted secret entered without quotes. The clear text key is DES-encrypted before it is placed in the running configuration. Either key type can have a maximum of 100 characters.
4-9Cisco Content Services Switch Security Configuration Guide
OL-5650-01

Chapter 4 Configuring the CSS as a Client of a TACACS+ ServerDefining a TACACS+ Server
Defining this option overrides the tacacs-server key command. For more information on defining a global encryption key, see the “Defining a Global Encryption Key” section.
• primary - (Optional) Assigns the TACACS+ server precedence over the other configured servers. You can specify only one primary server.
• frequency number - (Optional) Allows you to set the keepalive frequency for the specified TACACS+ server. The default number variable is 5 seconds. The range for the variable is 0 to 255. A setting of 0 disables keepalives. Defining this option overrides the tacacs-server frequency command.
Note If you need to change a timeout period or the shared secret for a specific server, you must delete the server and redefine it with the updated parameter.
For example, to define a primary TACACS+ server at IP address 192.168.11.1 with a default port of 49, a timeout period of 12 seconds, a clear text shared secret of summary, and a keepalive frequency of 10 seconds, enter:
#(config) tacacs-server 192.168.11.1 12 20 “summary” primary frequency 10
To delete a TACACS+ server at IP address 192.168.11.1 with a default port of 49, enter:
#(config) no tacacs-server 192.168.11.1 49
After configuring the TACACS+ server, enable TACACS+ authentication for console and virtual logins (if the username and password pair is not in the local user database) through the virtual authentication and console authentication commands. See Chapter 1, Controlling CSS Access for information about the two commands.
4-10Cisco Content Services Switch Security Configuration Guide
OL-5650-01

Chapter 4 Configuring the CSS as a Client of a TACACS+ ServerSetting TACACS+ Authorization
Setting TACACS+ AuthorizationTACACS+ authorization allows the TACACS+ server to control specific CSS commands that the user can execute. CSS authorization divides the command set into two categories:
• Configuration commands that change the CSS running configuration. For example, all commands in global configuration mode. For a complete list of global configuration mode commands, refer to the Cisco Content Services Switch Command Reference.
• Nonconfiguration commands that do not change the running configuration. These commands include, but are not limited to, mode transition, show, and administrative commands. For example, cls (clear screen), endbranch, help, ping, show, terminal, traceroute, and so on. For a complete list of nonconfiguration commands, refer to the Cisco Content Services Switch Command Reference.
Note When you configure TACACS+ on a CSS, the CSS does not authorize scripts through the TACACS+ server. Because the CSS transforms all XML commands into scripts, the CSS also does not authorize XML commands through the TACACS+ server.
By default, authorization is disabled. When authorization is enabled, the TACACS+ server is responsible for granting permission or denying all attempts to issue commands.
When you enable authorization, the exchange between the TACACS+ server and the CSS causes a delay in executing the command. Failure of the TACACS+ server results in the failure of all authorization requests and the suspension of user activity unless another server is reachable. To enable users to execute commands in this case, configure a failover authentication method to a local user database. Users must log back in to the CSS.
4-11Cisco Content Services Switch Security Configuration Guide
OL-5650-01

Chapter 4 Configuring the CSS as a Client of a TACACS+ ServerSending Full CSS Commands to the TACACS+ Server
In releases prior to 7.30.1.05, if you transitioned from one CLI mode to another (for example, from config mode to service mode), and a service already existed regardless of whether TACACS+ authorization was enabled for configuration or nonconfiguration commands, the CSS did not perform authorization on the command. If you were creating a service and authorization for configuration commands was enabled, then the TACACS+ server was queried if you were authorized to perform the command. In software version 7.30.1.05 and later, on a mode transition in an existing service, the CSS sends a command authorization request to the TACACS+ server if nonconfiguration commands are enabled.
Use the tacacs-server authorize config command to enable authorization of all commands that change the running configuration. For example:
#(config) tacacs-server authorize config
Use the tacacs-server authorize non-config command to enable authorization of all commands that do not change the running configuration. For example:
#(config) tacacs-server authorize non-config
Use the no form of these commands to disable authorization. For example, to disable authorization for commands that affect the running configuration, enter:
#(config) no tacacs-server authorize config
To disable authorization for commands that do not affect the running configuration, enter:
#(config) no tacacs-server authorize non-config
Sending Full CSS Commands to the TACACS+ ServerCSS users can send the commands in their abbreviated syntax to the TACACS+ server. By default, the CSS sends the full syntax of the command, even though you enter the command in its abbreviated form. By expanding the syntax, the CSS minimizes TACACS+ authorization command failures resulting from their abbreviations.
Use the no form of the command to disable the CSS from sending the full command and instead to send the command as entered by the user. For example, enter:
#(config) no tacacs-server send-full-command
4-12Cisco Content Services Switch Security Configuration Guide
OL-5650-01
Chapter 4 Configuring the CSS as a Client of a TACACS+ ServerSetting TACACS+ Accounting
To reenable the CSS to send the full command syntax, use the tacacs-server send-full-command command. For example:
#(config) tacacs-server send-full-command
Setting TACACS+ AccountingTACACS+ accounting allows the TACACS+ server to receive an accounting report for commands that the user can execute. CSS accounting divides the command set into two categories:
• Configuration commands that change the CSS running configuration.
• Nonconfiguration commands that do not change the running configuration. These commands include, but are not limited to, mode transition commands, show commands, and administrative commands.
By default, the CSS disables accounting. When you enable accounting, you can account for configuration commands, nonconfiguration commands, or both.
Note Failure of the TACACS+ server does not result in the suspension of user activity.
Use the tacacs-server account config command to enable the CSS to send accounting reports to the TACACS+ server for all commands that change the running configuration. For example:
#(config) tacacs-server account config
Use the tacacs-server account non-config command to enable the CSS to send accounting reports to the TACACS+ server for all commands that do not change the running configuration. For example:
#(config) tacacs-server account non-config
Use the no form of these commands to disable accounting. For example, to disable accounting for commands that affect the running configuration, enter:
#(config) no tacacs-server account config
To disable accounting for commands that do not affect the running configuration, enter:
#(config) no tacacs-server account non-config
4-13Cisco Content Services Switch Security Configuration Guide
OL-5650-01
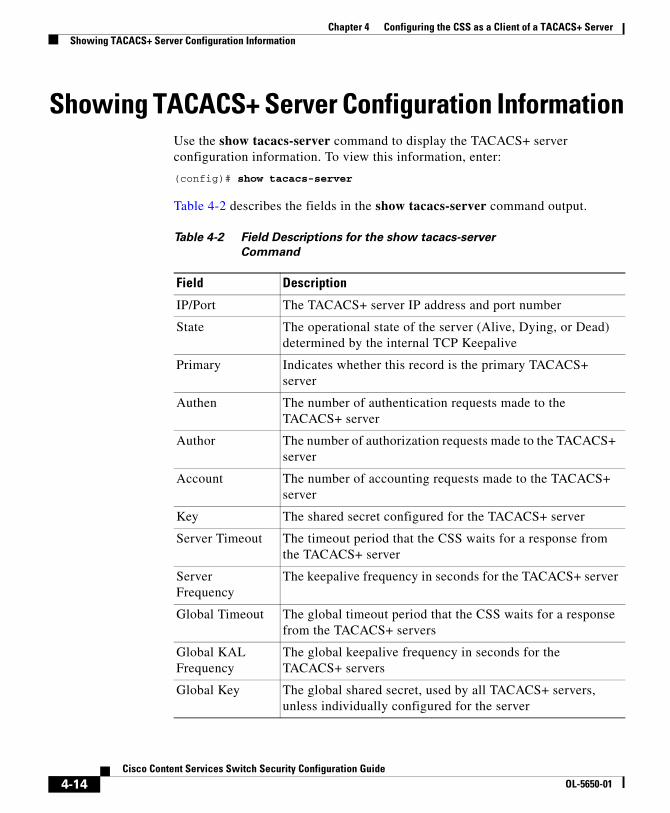
Chapter 4 Configuring the CSS as a Client of a TACACS+ ServerShowing TACACS+ Server Configuration Information
Showing TACACS+ Server Configuration InformationUse the show tacacs-server command to display the TACACS+ server configuration information. To view this information, enter:
(config)# show tacacs-server
Table 4-2 describes the fields in the show tacacs-server command output.
Table 4-2 Field Descriptions for the show tacacs-server
Command
Field Description
IP/Port The TACACS+ server IP address and port number
State The operational state of the server (Alive, Dying, or Dead) determined by the internal TCP Keepalive
Primary Indicates whether this record is the primary TACACS+ server
Authen The number of authentication requests made to the TACACS+ server
Author The number of authorization requests made to the TACACS+ server
Account The number of accounting requests made to the TACACS+ server
Key The shared secret configured for the TACACS+ server
Server Timeout The timeout period that the CSS waits for a response from the TACACS+ server
Server Frequency
The keepalive frequency in seconds for the TACACS+ server
Global Timeout The global timeout period that the CSS waits for a response from the TACACS+ servers
Global KAL Frequency
The global keepalive frequency in seconds for the TACACS+ servers
Global Key The global shared secret, used by all TACACS+ servers, unless individually configured for the server
4-14Cisco Content Services Switch Security Configuration Guide
OL-5650-01

Chapter 4 Configuring the CSS as a Client of a TACACS+ ServerShowing TACACS+ Server Configuration Information
Authorize Config Commands
Indicates whether configuration commands receive authorization
Authorize Non-Config
Indicates whether nonconfiguration commands receive authorization
Account Config Commands
Indicates whether the CSS sends accounting reports to TACACS+ servers for all commands that change the running configuration
Account Non-Config
Indicates whether the CSS sends accounting reports to TACACS+ servers for all commands that cannot change the running configuration
Table 4-2 Field Descriptions for the show tacacs-server
Command (continued)
Field Description
4-15Cisco Content Services Switch Security Configuration Guide
OL-5650-01

Chapter 4 Configuring the CSS as a Client of a TACACS+ ServerShowing TACACS+ Server Configuration Information
4-16Cisco Content Services Switch Security Configuration Guide
OL-5650-01

Cisco Content ServiceOL-5650-01
C H A P T E R 5
Configuring Firewall Load BalancingThis chapter describes how to configure the CSS Firewall Load Balancing (FWLB) feature. Information in this chapter applies to all CSS models, except where noted.
This chapter contains the following major sections:
• Overview of FWLB
• Configuring FWLB
• Configuring FWLB with VIP and Virtual Interface Redundancy
• Displaying Firewall Flow Summaries
• Displaying Firewall IP Routes
• Displaying Firewall IP Information
5-1s Switch Security Configuration Guide

Chapter 5 Configuring Firewall Load BalancingOverview of FWLB
Overview of FWLBFWLB enables you to configure a maximum of 15 firewalls per CSS. Configuring multiple firewalls can overcome performance limitations and remove the single point of failure when all traffic is forced through a single firewall. The FWLB feature ensures that the CSS will forward all packets with the same source and destination IP addresses through the same firewall. The CSS accomplishes this task by performing an XOR on the source and destination IP address.
Because the CSS can exist on either side of a firewall, it can balance traffic over multiple firewalls simultaneously. Each firewall is active and available in the load balancing firewall algorithm. The CSS uses the source and destination IP addresses in the algorithm to calculate which firewall to use for each flow.
A CSS monitors the health of a firewall by sending a custom ICMP keepalive request every second to the remote CSS on the other side of the firewall. If the CSS does not receive a keepalive request from the remote CSS for 3 to 16 seconds (configurable timeout), the CSS declares the firewall path unusable. Each CSS does not reply to the sending CSS, but transmits its own keepalive requests every second totally independent of the other CSS. For details about configuring the keepalive timeout, see the “Configuring a Keepalive Timeout for a Firewall” section.
FWLB acts as a Layer 3 device. Each connection to the firewall is a separate IP subnet. All flows between a pair of IP addresses, in either direction, traverse the same firewall. FWLB performs routing functions; it does not apply content rules to FWLB decisions.
Note Firewalls cannot perform Network Address Translation (NAT). If your configuration requires NATing, you must configure a content rule or source group on the CSS to provide this function.
To configure FWLB, you must define the following parameters for each path through the firewalls on both local and remote CSSs:
• Firewall index (identifies the physical firewall), local firewall IP address,remote firewall IP address, and CSS VLAN IP address
• Static route that the CSS will use for each firewall
See the sections that follow for information on configuring FWLB.
5-2Cisco Content Services Switch Security Configuration Guide
OL-5650-01

Chapter 5 Configuring Firewall Load BalancingConfiguring FWLB
Firewall SynchronizationFirewall solutions providing Stateful Inspection, such as Check Point™ FireWall-1®, create and maintain virtual state for all connections through their devices, even for stateless protocols such as UDP and RPC. This state information, including details on Network Address Translation (NAT), is updated according to the data transferred. Different firewall modules running on different machines, such as those in a FWLB environment, can then share this information by mutually updating each other on the different state information of their connections.
Firewall synchronization (as shown in Figure 5-1) provides a significant benefit whereby each firewall device is aware of all connections in a firewall load balanced environment, making recovery of a failed firewall immediate and transparent to its users.
Note For details on configuring firewall synchronization, refer to your specific firewall documentation. In the case of a FireWall-1 device, you can find detailed configuration information in the Check Point Software FireWall-1 Architecture and Administration guide, in the chapter Active Network Management.
Configuring FWLBA CSS must exist on each side of the firewall to control which firewall is selected for each flow. Within the firewall configuration, you must configure both the local and remote CSSs with the same firewall index number.
To avoid dropping packets, the CSS directs all packets between a pair of IP addresses across the same firewall. This applies to packets flowing in either direction. If a failure occurs on one path, all traffic will use the remaining path or balance traffic on the remaining paths.
Note You must define the firewall index before you define the firewall route or the CSS will return an error message. To configure the route, see the ip route... firewall command.
5-3Cisco Content Services Switch Security Configuration Guide
OL-5650-01

Chapter 5 Configuring Firewall Load BalancingConfiguring FWLB
You must define firewall parameters for each path through the firewalls on both local and remote CSSs. Use the ip firewall command to define firewall parameters.
The syntax for this global configuration mode command is:
ip firewall index local_firewall_address remote_firewall_address remote_switch_address
The variables are:
Note Enter all IP addresses in dotted-decimal notation (for example, 192.168.11.1).
• index - The index number to identify the firewall. Enter a number from 1 to 254.
• local_firewall_IP address - The IP address of the firewall on a subnet connected to the CSS.
• remote_firewall_IP address - The IP address of the firewall on the remote subnet that connects to the remote CSS.
• remote_switch_IP address - The IP address of the remote CSS.
For example:
(config)# ip firewall 1 192.168.27.1 192.168.28.1 192.168.28.3
To delete a firewall index, enter:
(config)# no ip firewall 1
Caution When you delete a firewall index, all routes associated with that index are also deleted.
Configuring a Keepalive Timeout for a FirewallA CSS sends a custom ICMP keepalive request to the remote CSS on the other side of the firewall every second. The two CSS switches at the endpoints of the firewall configuration must use the same firewall keepalive timeout value. Otherwise, routes on one CSS may not failover simultaneously with those on the other CSS, which could result in asymmetric routing across the firewalls.
5-4Cisco Content Services Switch Security Configuration Guide
OL-5650-01

Chapter 5 Configuring Firewall Load BalancingConfiguring FWLB
Use the ip firewall timeout number command to specify the number of seconds the CSS will wait to receive a keepalive message from the remote CSS before declaring the firewall unreachable.The timeout range is 3 to 16 seconds. The default is 3 seconds.
Note The amount of time required for a firewall path to become available is unaffected by this command; it remains at three seconds.
For example, to set a timeout of 16 enter:
(config)# ip firewall timeout 16
To reset the firewall timeout to the default value of three seconds, enter:
(config)# no ip firewall timeout
Configuring an IP Static Route for a FirewallTo configure a static route for firewalls, use the ip route... firewall command. You can optionally set the administrative distance for the IP route.
Note You must define the firewall index before you define the firewall static route or the CSS will return an error message. To configure the firewall index, see the ip firewall command.
The syntax for this command is:
ip route ip_address subnet_mask firewall index distance
The variables are:
• ip_address - The destination network address. Enter the IP address in dotted-decimal notation (for example, 192.168.11.1).
• subnet_mask - The IP subnet mask. Enter the mask in either:
– CIDR bitcount notation (for example, /24). Do not enter a space to separate the IP address from the prefix length.
– Dotted-decimal notation (for example, 255.255.255.0).
5-5Cisco Content Services Switch Security Configuration Guide
OL-5650-01
Chapter 5 Configuring Firewall Load BalancingConfiguring FWLB
• index - An existing index number for the firewall route. For information on configuring a firewall index, see the ip firewall command.
• distance - The optional administrative distance. Enter an integer from 1 to 254. A smaller number is preferable. The default value is 1.
Note The CLI prevents you from configuring IP static routes that are firewall routes and IP static routes that are not firewall routes with the same destination addresses and administrative costs. Make either the costs or the addresses unique between firewall and non-firewall routes.
For example:
(config)# ip route 192.168.2.0/24 firewall 1 2
To remove a firewall route, enter:
(config)# no ip route 192.168.2.0/24 firewall 1
Configuring OSPF to Advertise Firewall RoutesTo advertise firewall routes from other protocols through OSPF, use the ospf redistribute firewall command. Redistribution of these routes makes them OSPF external routes.
You can optionally:
• Define the network cost for the route by including the metric option. Enter a number from 1 to 16,777,215. The default is 1.
• Define a 32-bit tag value to advertise each external route by including the tag option. You can use it to communicate information between autonomous system boundary routers (ASBRs).
• Advertise the routes as ASE type1 by including the type1 option. The default is ASE type2. The difference between type1 and type2 is how the cost is calculated. For a type2 ASE, only the external cost (metric) is considered when comparing multiple paths to the same destination. For type1 ASE, the combination of the external cost and the cost to reach the ASBR is used.
For example:
(config)# ospf redistribute firewall metric 3 type1
5-6Cisco Content Services Switch Security Configuration Guide
OL-5650-01

Chapter 5 Configuring Firewall Load BalancingConfiguring FWLB
To stop advertising firewall routes, enter:
(config)# no ospf redistribute firewall
Configuring RIP to Advertise Firewall RoutesTo advertise firewall routes from other protocols through RIP, use the rip redistribute firewall command. You may also include an optional metric that the CSS uses when advertising this route. Enter a number from 1 to 15. The default is 1.
For example, to advertise a firewall route through RIP, enter:
(config)# rip redistribute firewall 3
Note By default, RIP advertises RIP routes and local routes for interfaces running RIP. This command also advertises other routes.
To stop advertising firewall routes, enter:
(config)# no rip redistribute firewall
Example of FWLB Static Route ConfigurationThis section describes how to configure FWLB for two firewalls between two CSSs. To configure a static route for FWLB, you must define the following parameters for each path through the firewalls on both the local (client) and a remote (server) CSSs:
• Firewall index (identifies the physical firewall), local firewall IP address, remote firewall IP address, and CSS VLAN IP address. You must configure the ip firewall command before you configure the static route or the CSS will report an error.
• Static route each CSS will use for each firewall.
5-7Cisco Content Services Switch Security Configuration Guide
OL-5650-01

Chapter 5 Configuring Firewall Load BalancingConfiguring FWLB
To configure CSS-A (the client side of the network configuration) as shown in Figure 5-1:
1. Use the ip firewall command to define firewall 1. For example:
(config)# ip firewall 1 192.168.28.1 192.168.27.1 192.168.27.3
2. Use the ip route command to define the static route for firewall 1. For example:
(config)# ip route 192.168.2.0/24 firewall 1
3. Use the ip firewall command to define firewall 2. For example:
(config)# ip firewall 2 192.168.28.2 192.168.27.2 192.168.27.3
4. Use the ip route command to define the static route for firewall 2. For example:
(config)# ip route 192.168.2.0/24 firewall 2
To configure CSS-B (the server side of the network configuration) as shown in Figure 5-1:
1. Use the ip firewall command to define firewall 1. For example:
(config)# ip firewall 1 192.168.27.1 192.168.28.1 192.168.28.3
2. Use the ip route command to define the static route for firewall 1. For example:
(config)# ip route 0.0.0.0/0 firewall 1
3. Use the ip firewall command to define firewall 2. For example:
(config)# ip firewall 2 192.168.27.2 192.168.28.2 192.168.28.3
4. Use the ip route command to define the static route for firewall 2. For example:
(config)# ip route 0.0.0.0/0 firewall 2
Firewall configurations are displayed in the IP portion of the running-config. For example:
(config)# show running-config
5-8Cisco Content Services Switch Security Configuration Guide
OL-5650-01

Chapter 5 Configuring Firewall Load BalancingConfiguring FWLB
Figure 5-1 illustrates the configuration defined in the firewall commands.
Figure 5-1 Example of FWLB
CSS-B
CSS-A
Server1
Client
Firewall 2Firewall 1
Client
Server2 Server3
Internet
Router
Client
192.168.28.1 192.168.28.2
VLAN2 - 192.168.1.153
Firewall synchronization link
VLAN1192.168.28.3
VLAN1192.168.27.3
VLAN2 - 192.168.2.153
192.168.27.1 192.168.27.2
4964
9
5-9Cisco Content Services Switch Security Configuration Guide
OL-5650-01
Chapter 5 Configuring Firewall Load BalancingConfiguring FWLB with VIP and Virtual Interface Redundancy
Configuring FWLB with VIP and Virtual Interface Redundancy
Configure FWLB with VIP and virtual interface redundancy to provide the following benefits:
• Very fast failover (typically 1 to 3 seconds)
• No single point of failure
• All CSSs forward traffic (active-backup configuration)
Note For details on configuring VIP and virtual interface Redundancy, refer to the Cisco Content Services Switch Redundancy Configuration Guide.
This configuration consists of two redundant CSSs and two Layer 2 devices on either side of the firewall. If a CSS fails, the redundant CSS on the same side of the firewall assumes the additional load.
Note When you configure FWLB with VIP and virtual interface redundancy, do not configure shared VIPs. Shared VIPs are not supported by the FWLB topology. For more information about shared VIPs, refer to the Cisco Content Services Switch Redundancy Configuration Guide.
You must configure the VIPs on the CSS that has the services directly connected to it or connected through a Layer 2 device. Do not configure content rules with VIPs on a CSS when the services are located on the other side of the firewall and connected to another CSS participating in FWLB. This type of configuration will result in asymmetric paths and could cause firewalls performing stateful inspection to tear down connections.
5-10Cisco Content Services Switch Security Configuration Guide
OL-5650-01

Chapter 5 Configuring Firewall Load BalancingConfiguring FWLB with VIP and Virtual Interface Redundancy
In Figure 5-2, odd-numbered firewalls are connected to the Layer 2 switches servicing the CSS-OUT-L and CSS-IN-L CSSs. Even-numbered firewalls are connected to the Layer 2 switches servicing the CSS-OUT-R and CSS-IN-R CSSs.
Figure 5-2 FWLB with VIP/Interface Redundancy Configuration
Each firewall must have two addresses on either side of it. The first address is used for the next hop on the lower-cost static (primary) path. The second address is used for the next hop on the higher-cost floating-static (secondary) path.
Set the floating-static paths with a higher cost (typically a cost of 10) than those associated with the static paths (typically a cost of 1). If a CSS fails (for example, CSS-OUT-L), CSS-OUT-R will use the higher cost path to send traffic to CSS-IN-L.
10.2.200.210.2.200.12
10.2.200.110.2.200.11
Layer 2switch
Layer 2switch
Layer 2switch
Layer 2switch
CSS-OUT-L CSS-OUT-R
10.2.1.254 10.2.1.253
CSS-IN-L CSS-IN-R
10.3.1.224 10.3.1.223
10.2.200.310.2.200.13
Redundantinterface
Redundant VIP
10.2.200.410.2.200.14
10.3.200.210.3.200.12
10.3.200.110.3.200.11
10.3.200.310.3.200.13
10.3.200.410.3.200.14
Firewall 2Firewall 1 Firewall 3 Firewall 4
Redundantinterface
5926
3
5-11Cisco Content Services Switch Security Configuration Guide
OL-5650-01

Chapter 5 Configuring Firewall Load BalancingConfiguring FWLB with VIP and Virtual Interface Redundancy
If the firewall supports it, you can use multinetting by configuring multiple addresses on the firewall. If the firewall does not support multiple addresses per physical interface, use the ap-kal-fwlb-multinet script to simulate multiple addresses for the firewall. The script takes arguments of “realAddress secondaryAddress”. The script creates a static ARP entry for each firewall interface.
Note You can also enter the static ARP entries manually. However, the benefit of the script is that it will change the ARP entries if you replace the firewall and the MAC address changes.
Failover time is very fast at 1 to 3 seconds, because:
• Floating-static path is already up
• Firewall path information has been exchanged
• Circuits are up
If a Layer 2 switch fails, traffic will rehash over every other firewall. If there are an even number of firewalls, 50 percent of the traffic will rehash to the same firewalls.
Note If you configure redundant interfaces on both sides of a CSS, use critical services to ensure that if one interface fails over to backup, the other interface does the same. If you are implementing multiple interfaces, use firewall interfaces as critical services on external CSSs, and firewall interfaces (configured as service type redundancy-up) and backend servers on internal CSSs. For details on configuring critical services and configuring redundant uplink services, refer to the Cisco Content Services Switch Redundancy Configuration Guide.
5-12Cisco Content Services Switch Security Configuration Guide
OL-5650-01

Chapter 5 Configuring Firewall Load BalancingConfiguring FWLB with VIP and Virtual Interface Redundancy
Example of Firewall and Route ConfigurationsThe following ip firewall and ip route example configurations are valid for Figure 5-2 with four active firewalls.
CSS-OUT-L Configuration
ip firewall 1 10.2.200.1 10.3.200.1 10.3.1.224ip firewall 2 10.2.200.2 10.3.200.2 10.3.1.224ip firewall 3 10.2.200.3 10.3.200.3 10.3.1.224ip firewall 4 10.2.200.4 10.3.200.4 10.3.1.224ip firewall 11 10.2.200.11 10.3.200.11 10.3.1.223ip firewall 12 10.2.200.12 10.3.200.12 10.3.1.223ip firewall 13 10.2.200.13 10.3.200.13 10.3.1.223ip firewall 14 10.2.200.14 10.3.200.14 10.3.1.223ip route 10.3.0.0 255.255.0.0 firewall 1 1ip route 10.3.0.0 255.255.0.0 firewall 2 1ip route 10.3.0.0 255.255.0.0 firewall 3 1ip route 10.3.0.0 255.255.0.0 firewall 4 1ip route 10.3.0.0 255.255.0.0 firewall 11 10ip route 10.3.0.0 255.255.0.0 firewall 12 10ip route 10.3.0.0 255.255.0.0 firewall 13 10ip route 10.3.0.0 255.255.0.0 firewall 14 10
CSS-OUT-R Configuration
ip firewall 11 10.2.200.11 10.3.200.11 10.3.1.223ip firewall 12 10.2.200.12 10.3.200.12 10.3.1.223ip firewall 13 10.2.200.13 10.3.200.13 10.3.1.223ip firewall 14 10.2.200.14 10.3.200.14 10.3.1.223ip firewall 1 10.2.200.1 10.3.200.1 10.3.1.224ip firewall 2 10.2.200.2 10.3.200.2 10.3.1.224ip firewall 3 10.2.200.3 10.3.200.3 10.3.1.224ip firewall 4 10.2.200.4 10.3.200.4 10.3.1.224ip route 10.3.0.0 255.255.0.0 firewall 11 1ip route 10.3.0.0 255.255.0.0 firewall 12 1ip route 10.3.0.0 255.255.0.0 firewall 13 1ip route 10.3.0.0 255.255.0.0 firewall 14 1ip route 10.3.0.0 255.255.0.0 firewall 1 10ip route 10.3.0.0 255.255.0.0 firewall 2 10ip route 10.3.0.0 255.255.0.0 firewall 3 10ip route 10.3.0.0 255.255.0.0 firewall 4 10
5-13Cisco Content Services Switch Security Configuration Guide
OL-5650-01

Chapter 5 Configuring Firewall Load BalancingConfiguring FWLB with VIP and Virtual Interface Redundancy
CSS-IN-L Configuration
ip firewall 1 10.3.200.1 10.2.200.1 10.2.1.254ip firewall 2 10.3.200.2 10.2.200.2 10.2.1.254ip firewall 3 10.3.200.3 10.2.200.3 10.2.1.254ip firewall 4 10.3.200.4 10.2.200.4 10.2.1.254ip firewall 11 10.3.200.11 10.2.200.11 10.2.1.253ip firewall 12 10.3.200.12 10.2.200.12 10.2.1.253ip firewall 13 10.3.200.13 10.2.200.13 10.2.1.253ip firewall 14 10.3.200.14 10.2.200.14 10.2.1.253ip route 0.0.0.0 0.0.0.0 firewall 1 1ip route 0.0.0.0 0.0.0.0 firewall 2 1ip route 0.0.0.0 0.0.0.0 firewall 3 1ip route 0.0.0.0 0.0.0.0 firewall 4 1ip route 0.0.0.0 0.0.0.0 firewall 11 10ip route 0.0.0.0 0.0.0.0 firewall 12 10ip route 0.0.0.0 0.0.0.0 firewall 13 10ip route 0.0.0.0 0.0.0.0 firewall 14 10
CSS-IN-R Configuration
ip firewall 11 10.3.200.11 10.2.200.11 10.2.1.253ip firewall 12 10.3.200.12 10.2.200.12 10.2.1.253ip firewall 13 10.3.200.13 10.2.200.13 10.2.1.253ip firewall 14 10.3.200.14 10.2.200.14 10.2.1.253ip firewall 1 10.3.200.1 10.2.200.1 10.2.1.254ip firewall 2 10.3.200.2 10.2.200.2 10.2.1.254ip firewall 3 10.3.200.3 10.2.200.3 10.2.1.254ip firewall 4 10.3.200.4 10.2.200.4 10.2.1.254ip route 0.0.0.0 0.0.0.0 firewall 11 1ip route 0.0.0.0 0.0.0.0 firewall 12 1ip route 0.0.0.0 0.0.0.0 firewall 13 1ip route 0.0.0.0 0.0.0.0 firewall 14 1ip route 0.0.0.0 0.0.0.0 firewall 1 10ip route 0.0.0.0 0.0.0.0 firewall 2 10ip route 0.0.0.0 0.0.0.0 firewall 3 10ip route 0.0.0.0 0.0.0.0 firewall 4 10
5-14Cisco Content Services Switch Security Configuration Guide
OL-5650-01

Chapter 5 Configuring Firewall Load BalancingDisplaying Firewall Flow Summaries
Displaying Firewall Flow SummariesUse the show flows command to display the flow summary for a source IP address, or for a specific source address and its destination IP address on a Switch Processor (SP) in a CSS. You can display up to 4096 flows per SP.
This information allows you to:
• Identify which firewall is used for a particular flow
• View flows to ensure the proper operation of FWLB
The syntax is:
show flows source_address destination_address
The variables are:
• source_address - The source IP address for the flows. Enter the address in dotted-decimal format (for example, 192.168.11.1).
• destination_address - The destination IP address. Enter the address in dotted-decimal format (for example, 192.168.11.1).
For example:
(config)# show flows 192.165.22.1 192.163.2.3
To display the flows for a specific source IP address, enter:
(config)# show flows 192.165.22.1
To display the flows for specific source and destination IP addresses, enter:
(config)# show flows 192.165.22.1 192.163.2.3
5-15Cisco Content Services Switch Security Configuration Guide
OL-5650-01

Chapter 5 Configuring Firewall Load BalancingDisplaying Firewall IP Routes
Table 5-1 describes the fields in the show flows output.
Displaying Firewall IP RoutesUse the show ip routes firewall command to display all static firewall routes. For example:
(config)# show ip routes firewall
Table 5-2 describes the fields in the show ip routes firewall output.
Table 5-1 Field Descriptions for the show flow Command
Field Description
Src Address The source address for the flow
SPort The source port for the flow
Dst Address The destination address for the flow
DPort The destination port for the flow
NAT Dst Address The NAT destination address
Prot The protocol of the flow (TCP or UDP)
InPort The interface port for the in flow
OutPort The interface port for the out flow
Table 5-2 Field Descriptions for the show ip routes firewall Command
Field Description
Prefix/length The IP address and prefix length for the route.
Next hop The IP address for the next hop.
If The ifIndex value that identifies the local interface through which the next hop of this route should be reached.
Type The type of the route entry. The type is remote.
Proto The protocol for the route, firewall.
Age The maximum age for the route.
Metric The metric cost for the route.
5-16Cisco Content Services Switch Security Configuration Guide
OL-5650-01

Chapter 5 Configuring Firewall Load BalancingDisplaying Firewall IP Information
Displaying Firewall IP InformationUse the show ip firewall command to display the configured values of the IP firewall keepalive timeout and the state of each firewall path configured on the CSS. For example:
(config)# show ip firewall
Table 5-3 describes the fields in the show ip routes output.
Table 5-3 Field Descriptions for the show ip routes firewall Command
Field Description
IP Firewall KAL Timeout
The number of seconds the CSS will wait to receive a keepalive message from the remote CSS before declaring the firewall unreachable.
Firewall Index The index number to identify the firewall.
State The current state of the connection to the remote switch (Init, Reachable, or Unreachable).
Next Hop The IP address used for the next hop.
Remote Firewall
The IP address of the firewall on the remote subnet that connects to the remote CSS.
Remote Switch The IP address of the remote CSS.
Time Since Last KAL Tx
The length of time since the last keepalive message was transmitted.
Time Since Last KAL Rx
The length of time since the last keepalive message was received.
5-17Cisco Content Services Switch Security Configuration Guide
OL-5650-01

Chapter 5 Configuring Firewall Load BalancingDisplaying Firewall IP Information
5-18Cisco Content Services Switch Security Configuration Guide
OL-5650-01

Cisco Content ServicesOL-5650-01
I N D E X
A
Access Control Lists. See ACLs
ACLs
adding an NQL to a clause 1-38
applying to a circuit 1-27
clause number 1-19
configuration example 1-34
configuring 1-15
configuring clauses 1-19
creating 1-17
definition 1-13
deleting 1-18
disabling globally 1-30
disabling logging globally 1-33, 1-34
enabling globally 1-28, 1-30
firewall security 1-14
globally enabling 1-29
logging activity 1-32
overview 1-12
prefer option, using static proximity 1-25
proximity, configuring using prefer option 1-25
quick start 1-15
showing 1-30
specifying a source group 1-24
static proximity, configuring using prefer option 1-25
using to configure static proximity 1-25
administrative distance, configuring for firewall load balancing 5-6
administrative password
changing 1-2
administrative username
changing 1-2
audience xii
C
caution
creating/modifying username or password 1-3
existing username, removing 1-5
changing
administrative password 1-2
administrative username 1-2
user directory access privileges 1-4
user password 1-5
CLI
User commands versus SuperUser commands 1-3
IN-1 Switch Security Configuration Guide

Index
configuration example
ACL 1-34
firewall load balancing 5-7
configuration quick start
ACL 1-15
configuring
ACL 1-12
CSS as RADIUS client 3-1
CSS as TACACS+ client 4-8
source group in an ACL 1-24
static proximity in ACL clause 1-25
user name and password 1-3
console
authentication, configuring 1-8
enabling access 1-10
restricting access to the CSS 1-11
Content Services Switch
remote access, controlling 1-6
restricting access 1-10
D
directory access privileges (username) 1-4
disabling
ACL logging 1-33
Telnet access for SSHD 2-3, 2-5
Telnet for use with SSHD 2-3
displaying
username 1-5
IN-2Cisco Content Services Switch Security Configuratio
documentation
audience xii
chapter contents xii
set xiii
symbols and conventions xvi
E
example
static route for firewall load balancing 5-7
F
firewall
caution when deleting 5-4
load balancing 5-2
RIP redistribute, configuring 5-7
synchronization 5-3
timeout 5-5
firewall load balancing
configuring 5-3
flow summaries, displaying 5-15
IP information, displaying 5-17
IP routes, displaying 5-16
IP static route, configuring 5-4, 5-5
overview 5-2
static route configuration example 5-7
firewall security, configuring with ACLs 1-14
n GuideOL-5650-01
Index
FTP
enabling access 1-10
restricting access to the CSS 1-11
I
IP route
firewall load balancing, displaying 5-16, 5-17
static, for firewall load balancing 5-5
K
keepalive
ACL example 1-34
L
license key
Enhanced feature set 2-2
Proximity Database 2-2
license key, Secure Management 2-2
load balancing
firewall, configuring 5-4
firewall, overview 5-2
logging ACL activity 1-32
Cisco Content OL-5650-01
N
NAT 5-2, 5-3
Network Qualifier List. See NQL
NQL
adding network to 1-36
clause, adding 1-38
creating 1-36
defining a description 1-36
defining network IP address 1-37
defining network subnet mask 1-37
describing network 1-37
displaying configurations 1-38
enabling logging 1-37
overview 1-35
P
password
administrative, changing 1-2
administrative password, changing 1-2
user, configuring 1-3
user password, changing 1-5
Q
quick start
ACLs 1-15
IN-3Services Switch Security Configuration Guide
Index
R
RADIUS
Cisco Secure Access Control Server (ACS) 3-4
console authentication 1-8
CSS as RADIUS client, configuring 3-1
displaying configuration information 3-9
overview 3-1
primary RADIUS server 3-6
RADIUS server host parameters 3-1
running-config example 3-4
secondary RADIUS server 3-7
server, configuring 3-4
server dead-time 3-9
server retransmits 3-8
server timeouts 3-8
virtual authentication 1-6, 1-7
remote access, setting for CSS 1-6
removing
ACLs 1-28
user name 1-5
restricting
access to the CSS 1-10
route
IP static, for firewall load balancing 5-5
running-config example
RADIUS 3-4
TACACS+TACACS+
running-config example 4-3
IN-4Cisco Content Services Switch Security Configuratio
S
Secure Management license key 2-2
Secure Shell Daemon. See SSHD
showing
ACLs 1-30
RADIUS server configuration 3-9
TACACS+ server configuration 4-14
SNMP
enabling access 1-10
restricting access to the CSS 1-11
source group
specifying in an ACL 1-24
SSHD
configuring 2-1
displaying configurations 2-6
enabling access to the CSS 1-10
keepalive, configuring 2-3
port, configuring 2-4
restricting access to the CSS 1-11
Secure Management license key, entering 2-2
server-keybits, configuring 2-4
static proximity, configuring using ACL prefer option 1-25
statistics
RADIUS server 3-9
n GuideOL-5650-01
Index
T
TACACS+
accounting, setting 4-13
authentication, setting 4-11
Cisco Secure Access Control Server (ACS) 4-3
console authentication 1-8
CSS as client, configuring 4-8
displaying configuration information 4-14
global encryption key 4-7
global keepalive frequency 4-7
global timeout period 4-6
overview 4-1
server, configuring 4-3
TACACS+ server parameters 4-8
virtual authentication 1-7
Telnet
disabling for use with SSHD 2-3, 2-5
enabling access 1-10
enabling and disabling for SSHD 2-3, 2-5
restricting access to the CSS 1-11
U
User-database, restricting access to the CSS 1-10, 1-11
username
configuring 1-3
directory access privileges 1-4
Cisco Content OL-5650-01
displaying 1-5
removing 1-5
user password
changing 1-5
configuring 1-3
V
virtual authentication, configuring 1-7
W
web management
enabling access 1-11
restricting access to the CSS 1-12
X
XML
enabling access to the CSS 1-10
enabling secure HTTPS SSL access to the CSS 1-10
enabling unsecure HTTP access to the CSS 1-11
restricting secure HTTPS SSL access to the CSS 1-12
restricting unsecure HTTP access to the CSS 1-12
IN-5Services Switch Security Configuration Guide

Index
IN-6Cisco Content Services Switch Security Configuratio
n GuideOL-5650-01