cisco anyconnect secure mobility client v4.3 for · pdf filecisco anyconnect secure mobility...
TRANSCRIPT

Americas Headquarters:
Cisco Systems, Inc., 170 West Tasman Drive, San Jose, CA 95134-1706 USA
© 2016 Cisco Systems, Inc. All rights reserved.
Cisco AnyConnect Secure Mobility Client v4.3 for Windows 10
CC Configuration Guide
Version 1.0
September 2016

Table of Contents
1 Introduction ................................................................................................................. 7
Audience ............................................................................................................. 7 1.1
Purpose ................................................................................................................ 7 1.2
Document References ......................................................................................... 7 1.3
TOE Overview .................................................................................................... 7 1.4
Operational Environment .................................................................................... 8 1.5
Required non-TOE Hardware/ Software ........................................................ 8 1.5.1
Evaluated Configuration ..................................................................................... 8 1.6
Excluded Functionality ....................................................................................... 9 1.7
2 Preparative Procedures and Operational Guidance for the IT Environment ............ 10
Install and Configure a Certificate Authority ................................................... 10 2.1
Install and Configure a VPN Gateway .............................................................. 11 2.2
VPN Gateway PKI Configuration and Enrollment ....................................... 12 2.2.1
Configure AnyConnect IKE, IPsec settings profile settings on the ASA ..... 18 2.2.2
Configure AnyConnect ................................................................................. 25 2.2.3
TOE Platform Configuration ............................................................................ 25 2.3
Install and Configure TOE platform ............................................................. 25 2.3.1
Enroll the TOE Platform with the CA .......................................................... 25 2.3.2
Import Certificates onto the TOE Platform .................................................. 26 2.3.3
3 Secure Acceptance of the TOE and Trusted Updates ............................................... 26
Download the Core / VPN Module - Windows Standalone installer (MSI)..... 26 3.1
Download Profile Editor - Windows Standalone installer (MSI) ..................... 27 3.2
4 Secure Installation and Configuration ...................................................................... 29
Core / VPN Module - Windows Standalone installer (MSI) ............................ 29 4.1
Profile Editor - Windows Standalone installer (MSI)....................................... 29 4.2
The AnyConnect Local Policy .......................................................................... 30 4.3
AnyConnect Client Profiles .............................................................................. 31 4.4
The AnyConnect Stand-Alone Profile Editor ............................................... 32 4.4.1
5 Secure Operation ....................................................................................................... 33
Acceptance of the Gateway certificate ............................................................. 34 5.1

Establish IPsec connection ............................................................................ 34 5.1.1
IPsec Session Interruption/Recovery ................................................................ 36 5.2
Exiting AnyConnect.......................................................................................... 36 5.3
Trusted Updates ................................................................................................ 36 5.4
Cryptographic Support ...................................................................................... 37 5.5
6 Related Documentation ............................................................................................. 37
Documentation Feedback.................................................................................. 37 6.1
7 Obtaining Technical Assistance ................................................................................ 37

List of Tables
Table 1: Acronyms .............................................................................................................. 5
Table 2 Cisco Documentation ............................................................................................ 7
Table 3: Operational Environment Components ................................................................ 8
Table 4: Excluded Functionality ......................................................................................... 9
List of Figures
Figure 1 TOE deployed in a two-tier CA solution ........................................................... 10

List of Acronyms
The following acronyms and abbreviations are used in this document:
Table 1: Acronyms
Acronyms /
Abbreviations
Definition
AES Advanced Encryption Standard
CC Common Criteria for Information Technology Security Evaluation
CEM Common Evaluation Methodology for Information Technology Security
CM Configuration Management
DRBG Deterministic Random Bit Generator
EAL Evaluation Assurance Level
EC-DH Elliptic Curve-Diffie-Hellman
ECDSA Elliptic Curve Digital Signature Algorithm
ESP Encapsulating Security Payload
GCM Galois Counter Mode
HMAC Hash Message Authentication Code
IKE Internet Key Exchange
IPsec Internet Protocol Security
IT Information Technology
NGE Next Generation Encryption
OS Operating System
PP Protection Profile
RFC Request For Comment
SHS Secure Hash Standard
SPD Security Policy Database
ST Security Target
TCP Transport Control Protocol
TOE Target of Evaluation
TSC TSF Scope of Control
TSF TOE Security Function
TSP TOE Security Policy
UDP User datagram protocol
VPN Virtual Private Network

DOCUMENT INTRODUCTION
Prepared By:
Cisco Systems, Inc.
170 West Tasman Dr.
San Jose, CA 95134
DOCUMENT INTRODUCTION
This document provides supporting evidence for an evaluation of a specific Target of
Evaluation (TOE), the AnyConnect Secure Mobility Client v4.3 for Windows 10
(AnyConnect Secure Mobility Desktop Client). This Operational User Guidance with
Preparative Procedures addresses the administration of the TOE software and hardware
and describes how to install, configure, and maintain the TOE in the Common Criteria
evaluated configuration. Administrators of the TOE will be referred to as administrators,
authorized administrators, TOE administrators, semi-privileged administrators, and
privileged administrators in this document. All administrative actions that are relevant to
the Common Criteria (CC) Evaluation and claimed Protection Profile(s) are described
within this document. This document will include pointers to the official Cisco
documentation in order to aid the administrator in easily identifying the CC relevant
administrative commands, including subcommands, scripts (if relevant), and
configuration files, that are related to the configuration (including enabling or disabling)
of the mechanisms implemented in AnyConnect Secure Mobility Desktop Client that are
necessary to enforce the requirements specified in the claimed PP(s).

1 Introduction This Operational User Guidance with Preparative Procedures documents the
administration of the AnyConnect Secure Mobility Desktop Client TOE, as it was
certified under Common Criteria. The AnyConnect Secure Mobility Desktop Client may
be referenced below by the related acronym e.g. VPN Client or simply the TOE.
Audience 1.1
This document is written for administrators installing and configuring the TOE. This
document assumes that you are familiar with the basic concepts and terminologies used
in internetworking, and understand your network topology and the protocols that the
devices in your network can use, that you are a trusted individual, and that you are trained
to use the operating systems on which you are running your network.
Purpose 1.2
This document is the Operational User Guidance with Preparative Procedures for the
Common Criteria evaluation. It was written to highlight the specific TOE configuration
and administrator functions and interfaces that are necessary to configure and maintain
the TOE in the evaluated configuration. This document is not meant to detail specific
actions performed by the administrator but rather is a road map for identifying the
appropriate locations within Cisco documentation to get the specific details for
configuring and maintaining AnyConnect Secure Mobility Desktop Client operations.
All security relevant commands to manage the TSF data are provided within this
documentation within each functional section.
Document References 1.3
This section lists the Cisco Systems documentation that is also a portion of the Common
Criteria Configuration Item (CI) List. The documents used are shown below in Table 2.
Throughout this document, the guides will be referred to by the “#”, such as [1].
Table 2 Cisco Documentation
# Title Link
[1] Cisco AnyConnect Secure
Mobility Client Administrator
Guide, Release 4.3
http://www.cisco.com/c/en/us/td/docs/security/vpn_client/anyconnect/a
nyconnect43/administration/guide/b_AnyConnect_Administrator_Guid
e_4-3.html
[2] Release Notes for Cisco
AnyConnect Secure Mobility
Client, Release 4.3
http://www.cisco.com/c/en/us/td/docs/security/vpn_client/anyconnect/a
nyconnect43/release/notes/b_Release_Notes_AnyConnect_4_3.html
TOE Overview 1.4
The TOE is the core VPN component of the Cisco AnyConnect Secure Mobility Client
for Windows 10 (herein after referred to as the VPN client, or the TOE). The Cisco
AnyConnect Secure Mobility client is the next-generation VPN client, providing remote
users with secure IPsec (IKEv2) VPN connections to the Cisco 5500 Series Adaptive

Security Appliance (ASA) VPN Gateway allowing installed applications to communicate
as though connected directly to the enterprise network. The TOE is a software-only
product running on Windows 10.
Operational Environment 1.5
Required non-TOE Hardware/ Software 1.5.1
The TOE requires the following IT Environment Components when the TOE is
configured in its evaluated configuration:
Table 3: Operational Environment Components
Component Usage/Purpose Description
Certificate Authority A Certificate Authority is used to provide valid digital certificates.
Microsoft Windows
10
The Microsoft Windows 10 Operating System provides an execution
platform for the TOE to run. The TOE operates on any of the following
versions of Windows 10:
1507
1511
1607
ASA 5500-X series
VPN Gateway
The Cisco ASA 5500-X with software version 9.1 or later functions as the
head-end VPN Gateway.
ASDM Management
Platform The ASDM 7.6 operates from any of the following operating systems:
Windows 7, 8
Apple OS X 10.4 or later
Red Hat Enterprise Linux 5 (GNOME or KDE)
Note that that ASDM software is installed on the ASA appliance and the
management platform is used to connect to the ASA and run the ASDM.
The only software installed on the management platform is a Cisco ASDM
Launcher.
The underlying OS platform provides some of the security functionality required in the
VPNv1.4 Client PP, and is denoted using the phrase “TOE Platform” in this document.
References in this document to “ASA” refer to a VPN Gateway.
Evaluated Configuration 1.6
The TOE is a VPN client application and requires one of the following Common Criteria
certified Microsoft Windows 10 Operating System to run:
Microsoft Windows 10 Home Edition (32-bit and 64-bit versions)
Microsoft Windows 10 Pro Edition (32-bit and 64-bit versions)
Microsoft Windows 10 Enterprise Edition (32-bit and 64-bit versions)
Refer to the Microsoft Windows 10 Security Target1 for information regarding the
evaluated configuration requirements.
The TOE requires x86 Pentium class processor or greater and 100 MB available hard disk
space.
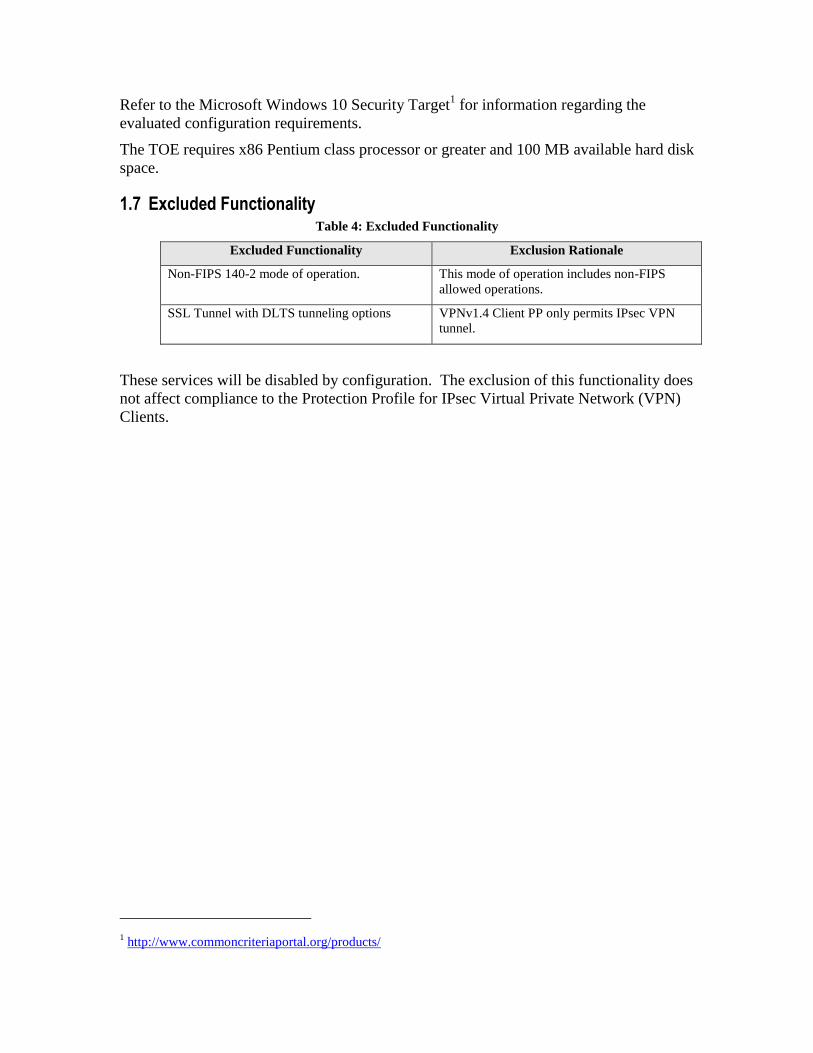
Excluded Functionality 1.7Table 4: Excluded Functionality
Excluded Functionality Exclusion Rationale
Non-FIPS 140-2 mode of operation. This mode of operation includes non-FIPS
allowed operations.
SSL Tunnel with DLTS tunneling options VPNv1.4 Client PP only permits IPsec VPN
tunnel.
These services will be disabled by configuration. The exclusion of this functionality does
not affect compliance to the Protection Profile for IPsec Virtual Private Network (VPN)
Clients.
1 http://www.commoncriteriaportal.org/products/

2 Preparative Procedures and Operational Guidance for the IT Environment
The TOE requires a minimum one (1) Certificate Authority (CA), one (1) VPN Gateway,
and one (1) end-user Windows 10 OS machine in the IT environment.
To resemble customer PKI environments, a two-tier CA solution using an Offline Root
CA and an Enterprise Subordinate CA employing Microsoft 2012 R2 Certificate
Authority (CA) will be referenced in this section. Other CA products in place of
Microsoft may be used.
A Root CA is configured as a standalone (Workgroup) server while the Subordinate CA
is configured as part of a Microsoft domain with Active Directory services enabled. See
figure 1 below:
Figure 1 TOE deployed in a two-tier CA solution
The Subordinate CA issues X.509 digital certificates and provides a Certificate
Revocation List (CRL) to the TOE Platform and VPN Gateway.
Alternatively, one (1) single root Enterprise CA could be deployed in the IT environment.
Install and Configure a Certificate Authority 2.1
If using a Microsoft two-tier CA solution, install and configure a Root (GRAYCA) and
Enterprise Subordinate Certificate Authority (GRAYSUBCA1) in accordance with the
guidance from the vendor. The following is a step-by-step guide for the configuration of
Microsoft Active Directory Certificate Services: http://technet.microsoft.com/en-
us/library/cc772393%28v=ws.10%29.aspx
It is assumed both the Offline Root CA (GRAYCA) certificate and the Enterprise
Subordinate CA (GRAYSUBCA1) certificates depicted in figure 1 are installed and
trusted to ensure a trusted certificate chain is established.

If using a CA from a vendor other than Microsoft, follow that vendor’s CA installation
guidance.
Configuration Note:
Regardless of the CA product used, the ECDSA and RSA certificates on the ASA MUST
have the following Key Usage and Extended Key Usage properties:
o Key Usage: Digital Signature, Key Agreement
o EKU: IP security IKE intermediate, IP end security system
The Subject Alternative Name (SAN) fields within ECDSA and RSA certificates on the
ASA MUST match the connection information specified within the AnyConnect profile
on the client.
The Windows client needs to have following Key Usage and Extended Key Usage
properties:
o Key Usage: Digital Signature, Key Agreement
o EKU: Client Authentication
Configuration Note:
The TOE evaluated configuration permits multiple settings for asymmetric cryptography
(digital signatures and integrity/hash algorithms), Key Exchange, and bulk IPsec
encryption protocols. The configuration referenced in this document uses the following
parameters:
IKEv2
Bulk IPsec Encryption – AES-GCM 256
Key Exchange – ECDH 384 (Group 20)
Digital Signature – ECDSA 384
Integrity Hashing – SHA-2 384
The administrator should note that other values are permitted for the TOE to use within
AES cryptographic operations and Diffie-Hellman Key Exchange. These are noted in
section 2.2.2. The TOE does not permit use of IKEv1.
Install and Configure a VPN Gateway 2.2
Install Cisco ASA 9.1 (or later), optionally with ASDM, in accordance with installation
guides and release notes appropriate for the versions to be installed. ASDM allows the
ASA to be managed from a graphical user interface. Alternatively, if the administrator
prefers, equivalent command line (CLI) configuration steps could be used.
Links to ASA/ASDM documentation set are below:
ASDM Configuration:
General Operations ASDM Configuration—Cisco ASA Series General
Operations ASDM Configuration Guide, 7.3

http://www.cisco.com/c/en/us/td/docs/security/asa/asa93/asdm73/general/asa-
general-asdm.html
VPN ASDM Configuration—Cisco ASA Series VPN ASDM Configuration
Guide, 7.3
http://www.cisco.com/c/en/us/td/docs/security/asa/asa93/asdm73/vpn/asa-vpn-
asdm/vpn-asdm-wizard.html
ASDM Release Notes—Release Notes for Cisco ASDM, 7.3(x)
http://www.cisco.com/c/en/us/td/docs/security/asdm/7_3/release/notes/rn73.html
ASA CLI Configuration:
General Operations CLI Configuration—Cisco ASA Series General
Operations CLI Configuration Guide, 9.1
http://www.cisco.com/en/US/docs/security/asa/asa91/configuration/general/asa_9
1_general_config.html
VPN CLI Configuration—Cisco ASA Series General Operations CLI
Configuration Guide, 9.1
http://www.cisco.com/en/US/docs/security/asa/asa91/configuration/vpn/asa_91_v
pn_config.html
Command Reference—Cisco ASA Series Command Reference, 9.1
http://www.cisco.com/en/US/docs/security/asa/asa91/command/reference/cmdref.
html
ASA Release Notes—Release Notes for the Cisco ASA Series, 9.1(x)
http://www.cisco.com/en/US/docs/security/asa/asa91/release/notes/asarn91.html
The appropriate licenses must be installed on the ASA to permit use of AnyConnect
remote access IPsec VPN.
Refer to the Cisco License Management portal at http://www.cisco.com/go/license
VPN Gateway PKI Configuration and Enrollment 2.2.1
In this section, specific ASA PKI configurations along with the enrollment process will
be discussed. An offline, manual enrollment process must be followed.
1. Configure the hostname and domain name. In ASDM go to, Configuration >
Device Setup > Device Name/Password and enter the appropriate information
for the local network and then select “Apply”.

The ASA administrator must obtain the CA certificates from the PKI admin and
import the certificates to an ASA Trustpoint. A Trustpoint is essentially where a
trusted CA certificate is stored. The ASA admin can open the CA certificates with
WordPad to copy and paste.
2. In ASDM, go to Configuration > Device Management > Certificate
Management > CA Certificates and select “Add”. Enter the Trustpoint Name
(i.e. GRAYCA), open the certificate file with WordPad, copy the certificate and
then paste the PEM formatted certificate (or browse to file). Then select “Install
Certificate”.
3. Next, the previous steps must be performed again for the Subordinate CA. In
ASDM, go to Configuration > Device Management > Certificate Management
> CA Certificates and select “Add”. Enter the Trustpoint Name
(GRAYSUBCA1), open the certificate file with WordPad, copy the certificate and
then paste the PEM formatted certificate (or browse to file). Then select “Install
Certificate”.

4. Generate a key pair. To stay consistent with the algorithms noted at the top of
section 2, generate an ECDSA 384-bit key called “ecdsa-384”. In ASDM, go to
Configuration > Device Management > Certificate Management > Identity
Certificates and select “Add”. The “Add Identity Certificate” window appears.
Select “Add New Identity Certificate” and enter the CN. Then, next to “Key
Pair”, select “New”.

5. Select “ECDSA”, then select “Enter new key pair name” and add the name.
Ensure the size is “384” and select “Generate Now”.
6. Return to the “Add Identity Certificate” page, select “Advanced” and enter the
FQDN and IP address information under “Certificate Parameter” and select “Ok”.

7. Return to the “Add Identity Certificate” page, select “Add Certificate”.
8. The Certificate Signing Request (CSR) dialogue box appears. Save the CSR to a
location and select “OK”.

9. Configuration note: The CSR will now need to be sent to the CA administrator
and processed to obtain the ASA identity certificate.
10. Retrieve the identity certificate from the CA admin and install on the ASA. In
ASDM, go to Configuration > Device Management > Certificate Management >
Identity Certificates and select the “Pending” request and select “Install”.
11. Open the ID certificate in NotePad and Paste the certificate in (or browse to file).
Then select “Install Certificate”.
At this point, the VPN Gateway (ASA) has an identity certificate and the CA certificates
are installed.

Configure AnyConnect IKE, IPsec settings profile settings on the ASA 2.2.2
a. Ensure appropriate licenses are enabled on the ASA. Refer to the Cisco License
Management portal at http://www.cisco.com/go/license
b. Enable AnyConnect and IKEv2 on the ASA. In ASDM, go to Configuration >
Remote Access VPN > Network (Client) Access > AnyConnect Connection
Profiles and select Enable Cisco AnyConnect checkbox and Allow Access under
IKEv2.
Select the checkbox under Enable Client Services.
Configuration Note: The ASA supports client-services, which provides the ASA
with the capability to push AnyConnect profiles to the client.
c. On the AnyConnect Connection Profiles page mentioned above, select Device
Certificate. Ensure Use the same device certificate… is NOT checked and
select the EC ID certificate under the ECDSA device certificate. Then select Ok.
d. Create IKEv2 crypto policy using the algorithms permitted in the Common
Criteria evaluated configuration. In ASDM, go to Configuration > Remote
Access VPN > Network (Client) Access > Advanced > IPsec > IKE Policies and add an IKEv2 policy.

Select Add and enter 1 for the highest priority. The range is 1 to 65535, with 1
the highest priority.
Encryption:
AES Specifies AES-CBC with a 128-bit key encryption for ESP.
AES-256 Specifies AES-CBC with a 256-bit key encryption for ESP.
AES-GCM-128 Specifies AES Galois Counter Mode 128-bit encryption
AES-GCM-256 Specifies AES Galois Counter Mode 256-bit encryption
D-H Group: Choose the Diffie-Hellman group identifier. This is used by each
IPsec peer to derive a shared secret, without transmitting it to each other. Valid
Selections are: 14, 19, 20, 24
PRF Hash - Specify the PRF used for the construction of keying material for all
of the cryptographic algorithms used in the SA. Valid selections are: sha256 and
sha384
In this example configuration select:
Priority: 1
AES Galois Counter Mode (AES-GCM) 256-bit encryption: When
GCM is selected, it precludes the need to select an integrity algorithm.
This is because the authenticity capabilities are built into GCM, unlike
CBC (Cipher-Block Chaining).
Diffie-Hellman Group: 20
Integrity Hash: Null
PRF Hash: sha384
Lifetime: 86400
Select Ok.

Administrator Note: Use of any Additional Encryption, DH-Group,
Integrity or PRF Hash not listed in section 2.2.2 is not evaluated.
Administrator Note: The advanced tab displays the IKE strength
enforcement parameter. Ensure the Security Association (SA) Strength
Enforcement parameter is checked. This ensures that the strength of the
IKEv2 encryption cipher is higher than the strength of its child IPsec SA’s
encryption ciphers. Higher strength algorithms will be downgraded.
The CLI equivalent is: crypto ipsec ikev2 sa-strength-enforcement
e. Create an IPSEC proposal. In ASDM, go to Configuration > Remote Access
VPN > Network (Client) Access > Advanced > IPsec > IPsec Proposals
(Transform Sets) and add an IKEv2 IPSec Proposal. then select Ok.
In the example below the name used is NGE-AES-GCM-256 with AES-GCM-
256 for encryption and Null for the Integrity Hash:
Select Ok.
f. Create a dynamic crypto map, select the IPsec proposal and apply to the outside
interface. In ASDM, go to Configuration > Remote Access VPN > Network
(Client) Access > Advanced > IPsec > Crypto Maps. Select Add, select the
outside interface and the IKEv2 proposal.

g. Click the Advanced Tab. Ensure the following:
Enable NAT-T — Enables NAT Traversal (NAT-T) for this policy
Security Association Lifetime Setting — is set to 8 hours (28800 seconds)
Select Ok.
h. Create an address pool VPNUSERS that will be assigned to VPN users. Address
pools contain the following fields:
Name—Specifies the name assigned to the IP address pool.
Starting IP Address—Specifies the first IP address in the pool.
Ending IP Address—Specifies the last IP address in the pool.
Subnet Mask—Selects the subnet mask to apply to the addresses in the
pool.

In ASDM, go to Configuration > Remote Access VPN > Network (Client)
Access > Address Assignment > Address Pools and add an IP pool specifying
the above fields and then select Ok.
i. Add a group policy that will apply the desired settings to the VPN users. Group
Policies lets you manage AnyConnect VPN group policies. A VPN group policy
is a collection of user-oriented attribute/value pairs stored either internally on the
ASA device. Configuring the VPN group policy lets users inherit attributes that
you have not configured at the individual group or username level. By default,
VPN users have no group policy association. The group policy information is
used by VPN tunnel groups and user accounts.
In ASDM, go to Configuration > Remote Access VPN > Network (Client)
Access > Group Polices and Add an internal group policy.
Ensure the VPN tunnel protocol is set to IKEv2 and the IP pool created above is
referenced in the policy by de-selecting the Inherit check box and selecting the
appropriate setting. Relevant DNS, WINS and domain names can also be added in
the policy in the Servers section. Refer to example group policy NGE-VPN-GP
below:
Select Ok.

j. Create a tunnel group name. A tunnel group contains tunnel connection policies
for the IPsec connection. A connection policy can specify authentication,
authorization, and accounting servers, a default group policy, and IKE attributes.
In ASDM, go to Configuration > Remote Access VPN > Network (Client)
Access > AnyConnect Connection Profiles. At the bottom of the page under
Connection Profiles, select Add.
In the example below the tunnel group name NGE-VPN-RAS is used.
The configuration references Certificate authentication, the associated group
policy NGE-VPN-GP and Enable IPsec (IKEv2).
Note: DNS and domain name can also be added here. Also ensure only IPsec is
used by not checking the enable SSL VPN Client Protocol.
Once completed, select Ok.
k. Create a certificate map, mapping the NGE VPN users to the VPN tunnel group
that was previously created. The certificate map will be applied to the AC users.
In this scenario, the Subordinate CA common name was matched to ensure an
incoming TOE platform request with an EC certificate issued from the
Subordinate CA will be mapped to the appropriate tunnel group that was

previously created. VPN users that are not issued a certificate from the EC CA
will fall back to the default tunnel groups and fail authentication and will be
denied access.
In ASDM, go to Configuration > Remote Access VPN > Advanced >
Certificate to AnyConnect and Clientless SSL VPN Connection Profile Maps.
Under Certificate to Connection Profile Maps select Add. Choose the existing
DefaultCertificateMap with a priority of 10 and reference the NGE-RAS-VPN
tunnel group.
Then select Ok
l. In ASDM, go to Configuration > Remote Access VPN > Advanced >
Certificate to AnyConnect and Clientless SSL VPN Connection Profile Maps.
Under Mapping Criteria select Add. Select Issuer for field, Common Name
(CN) for component, Contains for Operator and CANAME for value and then
select Ok.
Ensure to select APPLY on the main page and SAVE the configuration.

Configure AnyConnect 2.2.3
To configure ASA to accept VPN connections from the AnyConnect VPN client,
use the AnyConnect VPN Wizard. This wizard configures IPsec (IKEv2) VPN
protocols for remote network access.
Refer to the instructions here:
http://www.cisco.com/c/en/us/td/docs/security/asa/asa91/asdm71/vpn/asdm_71_v
pn_config/vpn_asdm_wizard.html#pgfId-1052383
TOE Platform Configuration 2.3
This section describes installing and configuring the end-user Windows machine.
Install and Configure TOE platform 2.3.1
Install Windows 10 or Windows 10 Anniversary Update in accordance with the guidance
from the vendor.
Enroll the TOE Platform with the CA 2.3.2
The Microsoft “MMC” Certificate snap-in tool should be used to both generate a CSR
and import certificates. Information on the use of MMC can be found here:
http://technet.microsoft.com/en-us/library/dd632619.aspx
The TOE platform administrator needs to follow the steps below from Microsoft to
complete a manual CSR on a Windows machine: http://technet.microsoft.com/en-
us/library/cc730929.aspx
Configuration Note: In step 4, select: (No template) CNG key
Configuration Note: In step 6, select: PKCS #10
Configuration Note: In step 8, the properties of the Certificate Request, ensure the
following is selected:
Click the Subject tab. Provide a Value for Subject name/Full DN.
Click the Private Key tab. Select the ECDSA_P384, Microsoft Software
Key Storage Provider.
o Configuration Note: If using RSA, the TOE platform administrator
will choose RSA, Microsoft Software Key Storage Provider instead of
ECDSA.
Click the drop-down box to select the Hash Algorithm. Select sha384 and
click OK.
Click the Extensions tab
o Click the drop-down box Under Key usage and select Digital
Signature and select Add and OK.
o Click the drop-down box Under Extended Key Usage and Select
Server Authentication and select Add and OK.

After completing Step 9, save the CSR to a location and select “OK”
Configuration Note: The CSR will now need to be sent to the CA administrator and
processed to obtain the TOE platform identity certificate. If using a CA from a vendor
other than Microsoft, follow that vendor’s guidance for use of templates and certificate
generation.
Import Certificates onto the TOE Platform 2.3.3
Import the CA certificates and the TOE platform identity certificate into the Windows
certificate store. To import certificates, refer to the following instructions from
Microsoft: http://technet.microsoft.com/en-us/library/cc754489.aspx
Configuration Note: The CA certificate must be in the Trusted Root Store.
3 Secure Acceptance of the TOE and Trusted Updates This section provides instructions for securely accepting the TOE and any subsequent
TOE updates. “Updates” are a new version of the TOE.
Download the Core / VPN Module - Windows Standalone installer (MSI) 3.1
1. Download the Core VPN Module – Windows Standalone installer (MSI) TOE
software from software.cisco.com into a directory on the TOE platform.
2. Upon installation, the TOE platform will verify the digital signature is valid.
The administrator can also optionally manually verify that the TOE platform
validated the digital signature of the file by performing the following:
a. Use Windows Explorer to locate the installer file (e.g. anyconnect-
win-4.3.00000-pre-deploy-k9). Right-click on the file and select the
"Properties" menu item at the bottom of the context menu. Select
“Digital Signatures” tab, select “Cisco Systems, Inc.” in the Name of
signer and click the Details button.
b. The Digital Signature Information should say the signature is “OK” as
displayed in the example below:
c. If the Digital Signature information says the signature is “not valid” as
displayed in the example below:
Do not continue to install the VPN module and contact Cisco
Technical Support for assistance.
d. Click View Certificate and then select Details tab. As shown in the
figure below, the Extended Key Usage Field should have a Code
Signing value of 1.3.6.1.5.5.7.3.3.

e. If the code signing value and certificate is correct, click OK three
times.
Download Profile Editor - Windows Standalone installer (MSI) 3.2
1. Download the TOE software from software.cisco.com into a directory on the
TOE platform.
2. Upon installation, the TOE platform will verify the digital signature is valid.
The administrator can also optionally manually verify that the TOE platform
validated the digital signature of the file by performing the following:
a. Use Windows Explorer to locate the installer file (e.g. anyconnect-
profileeditor-win-4.3.00000-k9). Right-click on the file and select the
"Properties" menu item at the bottom of the context menu. Select
“Digital Signatures” tab and select the Details button.
b. The Digital Signature Information should say the signature is “OK” as
displayed in the example below:”

If the Digital Signature information says the signature is “not valid” as
displayed in the example below:
Do not continue to install the Profile Editor and contact Cisco
Technical Support for assistance.
c. Click View Certificate and then select Details tab. As shown in the
figure below, the Extended Key Usage Field should have a Code
Signing value of 1.3.6.1.5.5.7.3.3.
d. If the code signing value and certificate is correct, click OK three
times.
4 Secure Installation and Configuration
Core / VPN Module - Windows Standalone installer (MSI) 4.1
1. Install the downloaded file by double-clicking the file name (e.g. anyconnect-
win-4.3.00000-pre-deploy-k9). Upon installation, a digital signature
verification check will automatically be performed. The authorized source for
the digitally signed updates is "Cisco Systems, Inc." Verification includes a
check that the certificate is valid and has a Code Signing Value of
1.3.6.1.5.5.7.3.3 in the EKU field. Should the installation abort stating the
signature was not valid, do not continue the installation and contact Cisco
Technical Support for assistance.
2. The Cisco AnyConnect Secure Mobility Client Setup dialog box will appear.
3. Click Next to continue.
4. After reading the End-User License Agreement, click the radio button to
select the terms in the agreement. Click Next to continue.
5. The “Ready to Install” dialogue box will appear.
6. Click Install to Continue.
7. The software will install. Click Finish when complete.
8. Navigate to All Programs > Cisco > Cisco AnyConnect Secure Mobility
Client and click on the Cisco AnyConnect Secure Mobility Client icon
9. Clicking the ‘About’ button will display version information.
Profile Editor - Windows Standalone installer (MSI) 4.2
Cisco AnyConnect Secure Mobility client features and settings are enabled in
AnyConnect profiles. Profiles are created using the AnyConnect profile editors, which
are GUI-based configuration tools launched from ASDM.
This section describes installation of a standalone version of the profile editors for
Windows that users with admin privileges can use as an alternative to the profile editors
integrated with ASDM.
The installation also installs the VPN local policy editor.
1. Install the downloaded file by double-clicking the file name (e.g. anyconnect-
profileeditor-win-4.1.00028-k9). Upon installation, a digital signature
verification check will automatically be performed. The authorized source for
the digitally signed updates is "Cisco Systems, Inc.". Verification includes a
check that the certificate is valid and has a Code Signing Value of
1.3.6.1.5.5.7.3.3 in the EKU field. Should the installation abort stating the
signature was not valid, do not continue the installation and contact Cisco
Technical Support for assistance.
2. The Welcome to Cisco AnyConnect Profile Editor Setup Wizard will appear.
3. Click Next to Continue
4. The Choose Setup Type dialogue box will appear. Click Custom.
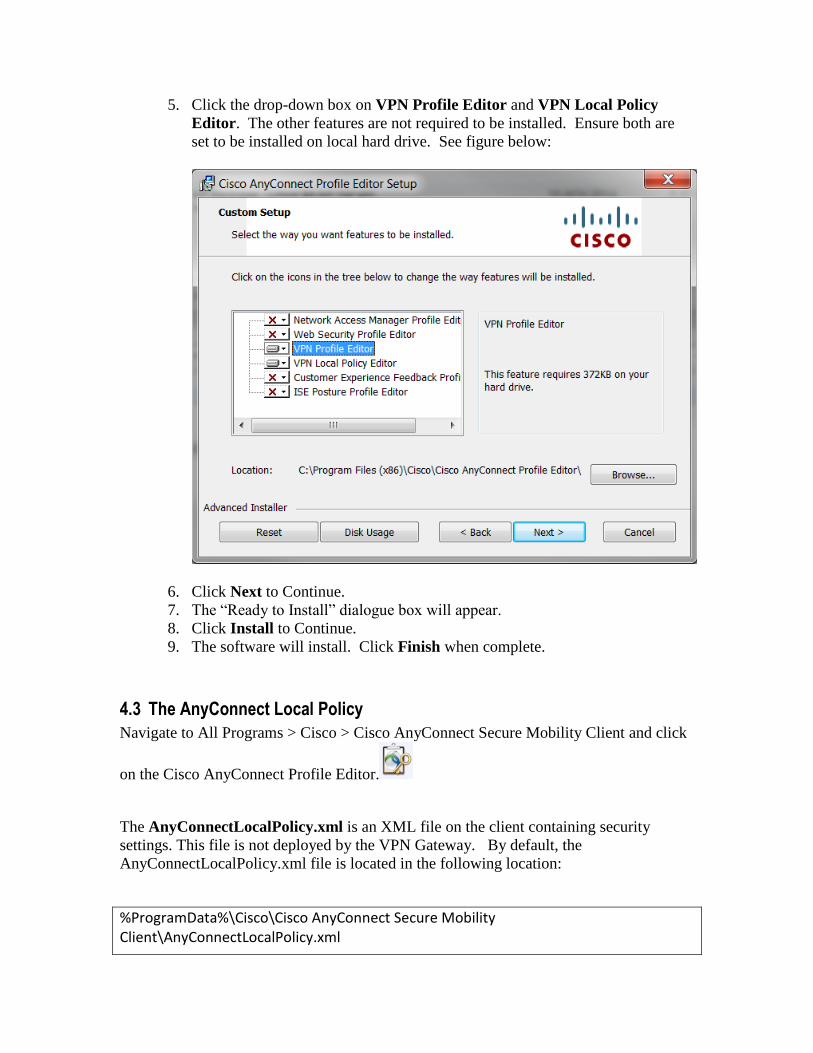
5. Click the drop-down box on VPN Profile Editor and VPN Local Policy
Editor. The other features are not required to be installed. Ensure both are
set to be installed on local hard drive. See figure below:
6. Click Next to Continue.
7. The “Ready to Install” dialogue box will appear.
8. Click Install to Continue.
9. The software will install. Click Finish when complete.
The AnyConnect Local Policy 4.3
Navigate to All Programs > Cisco > Cisco AnyConnect Secure Mobility Client and click
on the Cisco AnyConnect Profile Editor.
The AnyConnectLocalPolicy.xml is an XML file on the client containing security
settings. This file is not deployed by the VPN Gateway. By default, the
AnyConnectLocalPolicy.xml file is located in the following location:
%ProgramData%\Cisco\Cisco AnyConnect Secure Mobility Client\AnyConnectLocalPolicy.xml

From the File Menu, Select Open. Browse to the above and click the Open Button. The
following settings must be enabled with a checkbox:
FIPS Mode
Strict Certificate Trust
Enable CRL Check
Strict Certificate Trust prevents users the ability to accept a certificate that could not be
successfully verified.
Configuration Note: If the ASA is used to centrally update client profiles globally for
all AnyConnect users uncheck the setting to Bypass Downloader. Refer to additional
information in section 4.4 below.
Additional information on these settings can be found in the Local Policy Parameters and
Values section of [1].
From the File Menu, select Save and then Exit
AnyConnect Client Profiles 4.4
Cisco AnyConnect Secure Mobility client features and settings are enabled in
AnyConnect profiles. Profiles are created using the AnyConnect profile editors.
A form of the AnyConnect profile editor exists integrated with the ASDM tool. This
form of the AnyConnect Profile editor is used when the ASA is used to centrally manage
profiles globally for all AnyConnect users using the “Enable Client Services” option
discussed in section 2.2.2.
There is also a standalone version of the profile editors for Windows that you can use as
an alternative to the profile editors integrated with ASDM. Users with admin privileges
can manage or modify their own profiles.
For initial configuration of the TOE, AnyConnect profiles must either be:
Created using the profile editors integrated with ASDM and exported to a local or
remote windows host computer where the AnyConnect client resides. For this
option refer to the Exporting an AnyConnect Client Profile function within
ASDM.
Created using standalone version of the Profile Editor. See section 4.4.1 below.
The AnyConnect Stand-Alone Profile Editor 4.4.1
To use the standalone version of the Profile Editor, navigate to All Programs > Cisco >
Cisco AnyConnect Secure Mobility Client and click the AnyConnect Stand-Alone Profile
Editor icon.
By default, the profile is located in the following location:
%ProgramData%\Cisco\Cisco AnyConnect Secure Mobility Client\Profile\
RemoteAccessIKEv2_client_profile.xml
“RemoteAccessIKEv2_client_profile.xml” is an example name. The name of the Group
Policy on the ASA Gateway MUST match the name of the .xml file in the location above,
or profile mismatch errors will occur.
From the File Menu, Select Open. Browse to the above and click the Open Button.
Configuration Note: If this is the first time use of the Stand-Alone Profile Editor, the
file should not exist. Proceed with the remainder of the steps in this section and save the
file as a new .xml file in the above location.
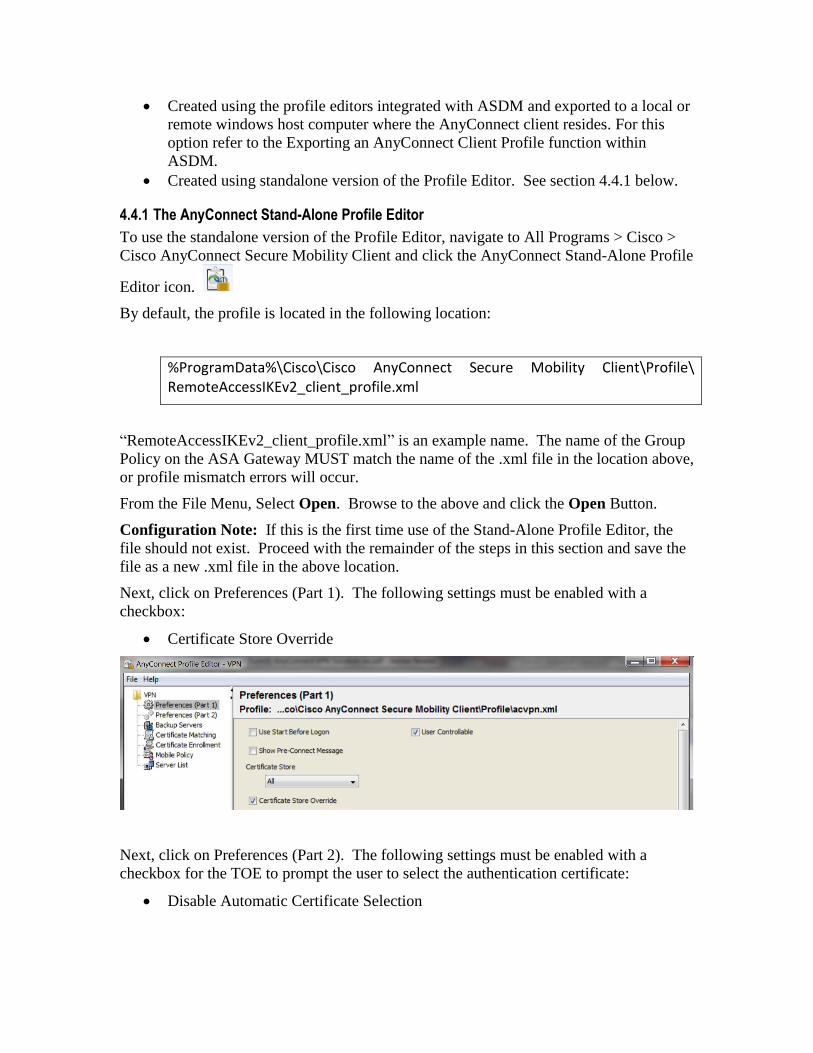
Next, click on Preferences (Part 1). The following settings must be enabled with a
checkbox:
Certificate Store Override
Next, click on Preferences (Part 2). The following settings must be enabled with a
checkbox for the TOE to prompt the user to select the authentication certificate:
Disable Automatic Certificate Selection

Next, click on Certificate Matching. Certificate Matching refines the list of certificates
for use by AnyConnect when multiple are present in the certificate store.
Next, click on Server List. Ensure the Server List is populated correctly for the VPN
gateways in your environment. Click a Server List Entry. For each server list entry,
ensure IPsec is selected as the primary protocol drop-down box.
Configuration Note: An accurate host name and address MUST match the name
presented in the certificate. This means the FQDN (or IP Address) MUST match the
Subject Alternative Name (SAN) that is presented in the certificate by the ASA.
From the File Menu, select Save and then Exit; Reboot the Computer.
Configuration Note: The name of the local configured profile needs to match the name
of the remote access policy on the ASA.
Additional information on these settings can be found in the Edit a client Profile Using
the Stand-Alone Profile Editor section of [1].
5 Secure Operation Launch the Cisco AnyConnect Secure Mobility Client.
Note: As a remote access client accessing resources behind the ASA gateway, the TOE
operates only in tunnel mode and does not operate in transport mode. No configuration is
required for the TOE to operate in tunnel mode.
Note: The TOE implements IKEv2 and does not support IKEv1. No configuration is
required for the TOE to operate using IKEv2.

Note: Should the Cisco AnyConnect Secure Mobility Client fail to start, examine the
contents of the Application and System log in the Windows Event Viewer. Should the
TOE executable for some reason become corrupt or illegitimate, the TOE will fail a
signature verification checked performed by the platform on the executable files. The
system log will state the Cisco AnyConnect Secure Mobility Client is not a valid Win32
application.
Click the Connect Button to connect to one of the predefined VPN Gateways.
Acceptance of the Gateway certificate 5.1
If the VPN gateway certificate is valid and this is the first connection to the gateway you
will be prompted to accept the certificate into the Windows certificate store.
Establish IPsec connection 5.1.1
Next, if the Gateway is configured for additional authentication with user credentials, you
will be prompted to enter them.
The connection should then be established. To verify click the Cisco AnyConnect icon in
the System Tray. You should see a green checkbox stating it is connected to the VPN
Gateway (Server).
To end the VPN Session, click the Disconnect Button.

Administrator Note: If the VPN gateway certificate is invalid or fails the CRL check,
AnyConnect will disallow the connection. If this situation occurs, the administrator will
receive the following message:
Upon clicking OK, the connection attempt will show it failed:
Configuration Note: Upon connection to the VPN gateway, traffic destined for the
server list entry (and any host in the VPN address pool behind it) corresponds to traffic in
the SPD requiring IPsec (i.e. PREOTECT). There isn’t any traffic destined for the VPN
gateway (or any host behind) that can BYPASS IPsec protection, unless split tunneling is
enabled.
PROTECT 5.1.1.1
Entries for PROTECT are configured through remote access group policy on the ASA
using ASDM. For PROTECT entries, the traffic flows through the IPsec VPN tunnel
provided by the TOE. No configuration is required for the TOE tunnel all traffic. The
administrator optionally could explicitly set this behavior with the command in their
Group Policy: split-tunnel-policy tunnelall
An XML format of the policy on client defines the remote access policy the TOE will
use. Refer to section 4.4.
BYPASS 5.1.1.2
The TOE supports BYPASS operations (when split tunneling has been explicitly
permitted by Remote Access policy). When split tunneling is enabled, the ASA VPN

Gateway pushes a list of network segments to the TOE to PROTECT. All other traffic
travels unprotected without involving the TOE thus bypassing IPsec protection.
Split tunneling is configured in a Network (Client) Access group policy. The
administrator has the following options:
Excludespecified: Exclude only networks specified by split-tunnel-network-list
Tunnelspecified: Tunnel only networks specified by split-tunnel-network list
Refer to the "About Configuring Split Tunneling for AnyConnect Traffic" section in
the VPN ASDM configuration guide and see steps provided in the "Configure Split-
Tunneling for AnyConnect Traffic" section.
After making changes to the group policy in ASDM, be sure the group policy is
associated with a Connection Profile in Configuration > Remote Access VPN > Network
(Client) Access > AnyConnect Connection Profiles > Add/Edit > Group Policy. An
XML format of the policy on client defines the remote access policy the TOE will use.
Refer to section 4.4.
BYPASS SPD entries are provided by the host platform through implicit network traffic
permit rules. No configuration is required on the TOE platform to allow it to pass this
traffic.
DISCARD 5.1.1.3
DISCARD SPD entries are performed exclusively by the TOE platform by creating
firewall rules. The administrator should follow instructions from Microsoft for creating
firewall rules on the TOE platform.
IPsec Session Interruption/Recovery 5.2
If an IPsec session between the TOE and a VPN Gateway is unexpectedly interrupted, the
connection will be broken. The TOE will display a message that the VPN is
disconnected.
If this message appears, the user should re-initiate the IPsec VPN connection to the
gateway.
Exiting AnyConnect 5.3
Exiting AnyConnect terminates the current VPN connection and stops all AnyConnect
processes. Use this action sparingly. Other apps or processes on your device may be
using the current VPN connection and exiting AnyConnect may adversely affect their
operation.
To exit AnyConnect, from the AnyConnect applet click Disconnect.
Trusted Updates 5.4
This section provides instructions for securely accepting the TOE and any subsequent
TOE updates. “Updates” are a new version of the TOE.

TOE versioning can be queried by the user by clicking the ‘About’ button which will
display version information.
When there is an update for Cisco AnyConnect, the process to update is the same as a
new installation.
Section 4 in this document provides the instructions for installing the TOE.
Cryptographic Support 5.5
The TOE provides cryptography in support of IPsec with ESP symmetric cryptography
for bulk AES encryption/decryption and SHA-2 algorithm for hashing. In addition the
TOE provides the cryptography to support Diffie-Hellman key exchange and derivation
function used in the IKEv2 and ESP protocols. Instructions to configure cryptographic
functions are described in section 2.2 of this document.
Note: Use of other cryptographic security functionality not described above does not fall
in the scope of evaluation and was not evaluated nor tested during the CC evaluation.
6 Related Documentation Use this document in conjunction with AnyConnect documentation at the following
location:
http://www.cisco.com/c/en/us/products/security/anyconnect-secure-mobility-
client/index.html
Documentation Feedback 6.1
If you are reading Cisco product documentation on the World Wide Web, you can submit
technical comments electronically. Click Feedback in the toolbar and select
Documentation. After you complete the form, click Submit to send it to Cisco.
You can e-mail your comments to [email protected].
To submit your comments by mail, for your convenience many documents contain a
response card behind the front cover. Otherwise, you can mail your comments to the
following address:
Cisco Systems, Inc., Document Resource Connection
170 West Tasman Drive
San Jose, CA 95134-9883
We appreciate your comments.
7 Obtaining Technical Assistance Cisco provides Cisco.com as a starting point for all technical assistance. Customers and
partners can obtain documentation, troubleshooting tips, and sample configurations from
online tools. For Cisco.com registered users, additional troubleshooting tools are
available from the TAC website.

Cisco.com is the foundation of a suite of interactive, networked services that provides
immediate, open access to Cisco information and resources at anytime, from anywhere in
the world. This highly integrated Internet application is a powerful, easy-to-use tool for
doing business with Cisco.
Cisco.com provides a broad range of features and services to help customers and partners
streamline business processes and improve productivity. Through Cisco.com, you can
find information about Cisco and our networking solutions, services, and programs. In
addition, you can resolve technical issues with online technical support, download and
test software packages, and order Cisco learning materials and merchandise. Valuable
online skill assessment, training, and certification programs are also available.
Customers and partners can self-register on Cisco.com to obtain additional personalized
information and services. Registered users can order products, check on the status of an
order, access technical support, and view benefits specific to their relationships with
Cisco.
To access Cisco.com, go to the following website:
http://www.cisco.com