cigar-box ukulele kit - musicmakers · options: each cigar box is different. some have clasps to...
TRANSCRIPT

CIGAR-BOX UKULELE KIT
MUSICMAKERS
PO Box 2117Stillwater, MN 55082
6 5 1 - 4 3 9 - 9 1 2 0
w w w . h a r p k i t . c o m
PARTS LIST:
Cigar BoxPre-cut String BoardSet of 4 Strings4 Geared Tuners16 Tiny screws for gearsPlastic NutPlastic Bridge20 Flat ToothpicksFlatpick2 Wood Screws, 3/4”2 Cup WashersAssembly Instructions
TOOLS & SUPPLIESYOU WILL NEED:
Elmer’s Wood GlueDamp RagPencilSanding Block (100 grit)Wire CutterScrewdriverDrill
6. GENTLY sand the frets flush with the edge of the stick. This is best done with a flat sanding block or stick. Be sure to work the sandpaper downward only. You don’t want to lift the frets off.
Use the same downward strokes to bevel the ends of the frets a little, as shown, by holding the sanding block at an angle. Test the feel of the string board by slid-ing your hand along the edges. Everything should feel nice and smooth.
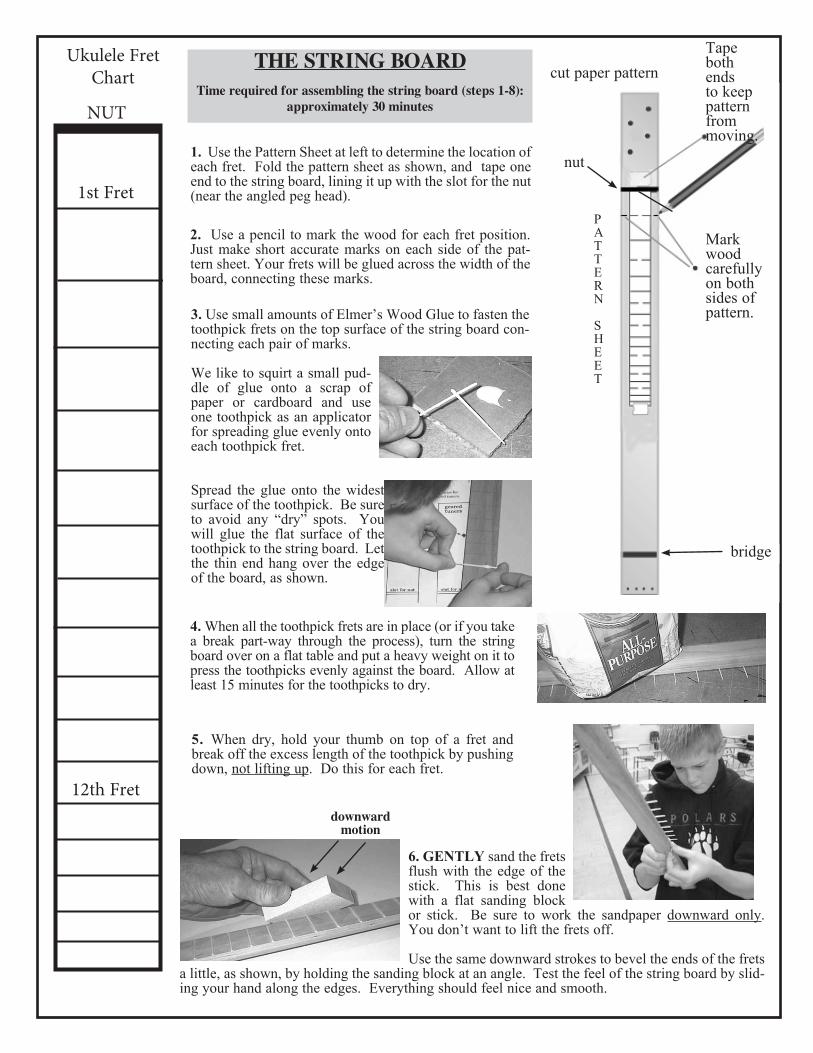
THE STRING BOARDTime required for assembling the string board (steps 1-8):
approximately 30 minutes
1. Use the Pattern Sheet at left to determine the location of each fret. Fold the pattern sheet as shown, and tape one end to the string board, lining it up with the slot for the nut (near the angled peg head).
2. Use a pencil to mark the wood for each fret position. Just make short accurate marks on each side of the pat-tern sheet. Your frets will be glued across the width of the board, connecting these marks.
Ukulele Fret Chart cut paper pattern
Tape both ends to keep pattern frommoving.
Markwoodcarefully on both sides of pattern.
PATTERN
SHEET
nut
bridge
3. Use small amounts of Elmer’s Wood Glue to fasten the toothpick frets on the top surface of the string board con-necting each pair of marks.
We like to squirt a small pud-dle of glue onto a scrap of paper or cardboard and use one toothpick as an applicator for spreading glue evenly onto each toothpick fret.
Spread the glue onto the widest surface of the toothpick. Be sure to avoid any “dry” spots. You will glue the flat surface of the toothpick to the string board. Let the thin end hang over the edge of the board, as shown.
4. When all the toothpick frets are in place (or if you take a break part-way through the process), turn the string board over on a flat table and put a heavy weight on it to press the toothpicks evenly against the board. Allow at least 15 minutes for the toothpicks to dry.
5. When dry, hold your thumb on top of a fret and break off the excess length of the toothpick by pushing down, not lifting up. Do this for each fret.
downward motion
NUT
1st Fret
12th Fret
9. Install the geared tuners by screwing the 8 tiny screws through the holes in the gear plate on the underside of the peghead. Be careful to orient the gears according to the photo.
You can drill pilot holes for the screws with a 1/16” drill bit if you like, or just press an awl into the wood to form starting holes for the screws.
You will need a #1 size Phillips screwdriver bit for these tiny screws.
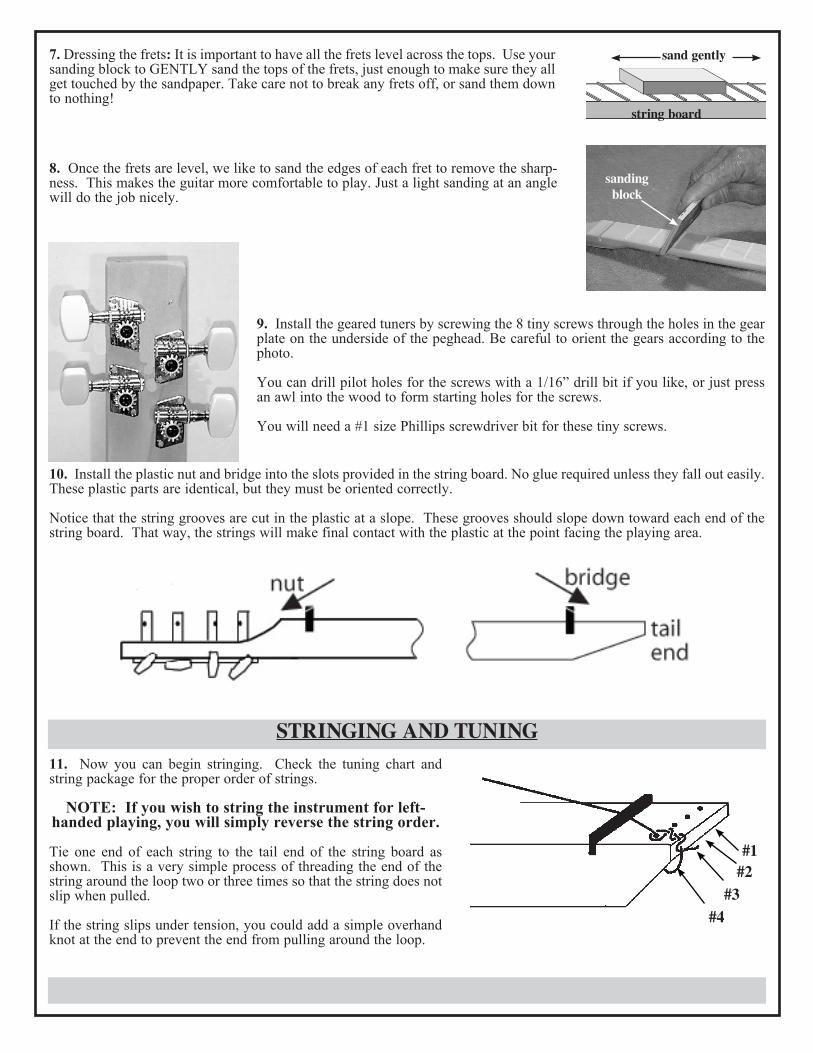
7. Dressing the frets: It is important to have all the frets level across the tops. Use your sanding block to GENTLY sand the tops of the frets, just enough to make sure they all get touched by the sandpaper. Take care not to break any frets off, or sand them down to nothing!
sand gently
string board
8. Once the frets are level, we like to sand the edges of each fret to remove the sharp-ness. This makes the guitar more comfortable to play. Just a light sanding at an angle will do the job nicely.
sandingblock
10. Install the plastic nut and bridge into the slots provided in the string board. No glue required unless they fall out easily. These plastic parts are identical, but they must be oriented correctly.
Notice that the string grooves are cut in the plastic at a slope. These grooves should slope down toward each end of the string board. That way, the strings will make final contact with the plastic at the point facing the playing area.
STRINGING AND TUNING11. Now you can begin stringing. Check the tuning chart and string package for the proper order of strings.
NOTE: If you wish to string the instrument for left-handed playing, you will simply reverse the string order.
Tie one end of each string to the tail end of the string board as shown. This is a very simple process of threading the end of the string around the loop two or three times so that the string does not slip when pulled.
If the string slips under tension, you could add a simple overhand knot at the end to prevent the end from pulling around the loop.
#1#2
#3#4

UkuleleTuning
A4
E4C4
G4
12. Thread the other end of the string through the correct tuning pin, leaving some slack in the wire so it wraps around the post as you turn the button. We like to have the strings wrap over the inside of the posts, as shown below, so they don’t get in the way of each other.
13. We like to attach the string board to the cigar box lid using two screws and cup washers from the inside of the box. The question often arises about where to attach to a cigar box lid. We like to avoid covering nice artwork (as shown on a couple samples on the cover photo), but sometimes the instrument just looks better with the neck centered on the box. So this is a judgment call on your part. The benefit of attaching the neck with screws is that you can always move it to a different position or another box in the future.
When you decide where to mount the neck, use some double-side tape to hold the wood in place as you open the lid and drive the screws into the wood. You should drill small pilot holes (3/32” drill) for the screws to avoid splitting the wood.
OPEN BOXESCLOSED BOXES
Add a strap if you like!Mounting screws with cup washers
OPTIONS: Each cigar box is different. Some have clasps to hold the lid shut, others don’t. You can just hold the box shut with a rubber band, or you can look for some sort of hasp or latch at the hardware store. Gluing a ribbon from the box to the lid is a nice touch -- we used superglue to hold each end of the ribbon to the wood. A 48” piece of nylon webbing or sturdy ribbon makes a perfect strap. Use superglue or a short screw to to fasten the strap to the box.
wind the strings downward on the post
If you need tuning assistance, check our free on-line keyboard sounds at www.harpkit.com/freetuner. You can click on each note of the keyboard to hear the pitch (C4 is Middle C).
heavieststring
wind strings to the inside of the posts
#1
#2
#4
#3