cics ts for z/os: installation guide - ibm - united states · pdf filecics transaction server...
TRANSCRIPT

CICS Transaction Server for z/OS
Installation GuideVersion 3 Release 1
GC34-6426-08
���


CICS Transaction Server for z/OS
Installation GuideVersion 3 Release 1
GC34-6426-08
���

Note!Before using this information and the product it supports, be sure to read the general information under “Notices” on page493.
Ninth edition (July 2010)
This edition applies to Version 3 Release 1 of CICS Transaction Server for z/OS, program number 5655-M15, andto all subsequent versions, releases, and modifications until otherwise indicated in new editions. Make sure you areusing the correct edition for the level of the product.
© Copyright IBM Corporation 1989, 2010.US Government Users Restricted Rights – Use, duplication or disclosure restricted by GSA ADP Schedule Contractwith IBM Corp.

Contents
Preface . . . . . . . . . . . . . . . . . . . . . . . . . . . xvWhat this book is about . . . . . . . . . . . . . . . . . . . . . . xvWho is this book for?. . . . . . . . . . . . . . . . . . . . . . . xvWhat you need to know to understand this book. . . . . . . . . . . . . xvHow to use this book . . . . . . . . . . . . . . . . . . . . . . xvi
for planning . . . . . . . . . . . . . . . . . . . . . . . . . xvifor installation . . . . . . . . . . . . . . . . . . . . . . . . xvi
Notes on terminology . . . . . . . . . . . . . . . . . . . . . . xviCICS system connectivity. . . . . . . . . . . . . . . . . . . . . xvii
Summary of changes . . . . . . . . . . . . . . . . . . . . . . xixChanges for CICS Transaction Server for z/OS, Version 3 Release 1 . . . . xixChanges for CICS Transaction Server for z/OS Version 2 Release 3 . . . . . xixChanges for CICS Transaction Server for z/OS Version 2 Release 2 . . . . . xxChanges for CICS Transaction Server for z/OS, Version 2 Release 1 . . . . . xxChanges for CICS Transaction Server for OS/390 Version 1 Release 3 . . . . xxi
CICSPlex SM installation and setup . . . . . . . . . . . . . . . . xxiChanges for CICS Transaction Server for OS/390 Version 1 Release 2 . . . . xxiChanges for CICS Transaction Server for OS/390 Version 1 Release 1 . . . . xxi
Part 1. Planning for Installation . . . . . . . . . . . . . . . . . . . . . . . . 1
Chapter 1. Introduction . . . . . . . . . . . . . . . . . . . . . . 3Overview of CICS TS . . . . . . . . . . . . . . . . . . . . . . . 3
Packaging . . . . . . . . . . . . . . . . . . . . . . . . . . 3CICS TS elements and features . . . . . . . . . . . . . . . . . . . 4
Exclusive and non-exclusive elements and features . . . . . . . . . . . 4What you receive with CICS TS . . . . . . . . . . . . . . . . . . . 4
Documentation . . . . . . . . . . . . . . . . . . . . . . . . 5Summary of elements in CICS TS . . . . . . . . . . . . . . . . . 6
The CICS Clients and The CICS Transaction Gateway. . . . . . . . . . . 7Installing CICS TS . . . . . . . . . . . . . . . . . . . . . . . . 7
Chapter 2. Installing CICS TS . . . . . . . . . . . . . . . . . . . 9Requirements for CICS TS . . . . . . . . . . . . . . . . . . . . . 9
Hardware requirements for installing CICS TS . . . . . . . . . . . . . 9Software requirements for installing CICS TS. . . . . . . . . . . . . 10
DASD storage requirements for CICS TS . . . . . . . . . . . . . . . 11Installing CBPDO . . . . . . . . . . . . . . . . . . . . . . . . 11
using the SMP/E RECEIVE, APPLY, and ACCEPT commands . . . . . . 11using the DFHISTAR process . . . . . . . . . . . . . . . . . . 12
Installing ServerPac . . . . . . . . . . . . . . . . . . . . . . . 13What you need to install the ServerPac . . . . . . . . . . . . . . . 14Summary of the ServerPac installation steps . . . . . . . . . . . . . 14
The next step . . . . . . . . . . . . . . . . . . . . . . . . . 15
Chapter 3. Installing CICS TS using DFHISTAR . . . . . . . . . . . . 17Edit the DFHISTAR Job. . . . . . . . . . . . . . . . . . . . . . 17
Specify the CICS Transaction Server Temporary Installation Libraries . . . . 20Specify the JOB Parameters for Installation Jobs . . . . . . . . . . . 20Specify the Scope of the Installation . . . . . . . . . . . . . . . . 21Specify the Type of JES to be Used . . . . . . . . . . . . . . . . 21Specify the Utilities to be used . . . . . . . . . . . . . . . . . . 21
© Copyright IBM Corp. 1989, 2010 iii

Specify the Prefix of CICS Transaction Server Jobs . . . . . . . . . . 22Specify the Indexes of CICS Transaction Server Data Sets . . . . . . . 22Specify the CICS TS HFS Directories and Data Sets . . . . . . . . . . 23Specify extra qualifiers . . . . . . . . . . . . . . . . . . . . . 24Specify Block Sizes . . . . . . . . . . . . . . . . . . . . . . 24Specify the Disk Unit for Work Data Sets . . . . . . . . . . . . . . 24Specify SMS Option for DASD Allocations . . . . . . . . . . . . . . 24Specify Disk Volumes . . . . . . . . . . . . . . . . . . . . . 25Allocate the Space for CICS Transaction Server Disk Volumes . . . . . . 28Specify Attributes of the Temporary SMP/E Work Data Sets . . . . . . . 28Specify Attributes of the Permanent SMP/E Data Sets . . . . . . . . . 29Specify SMP/E Zone Attributes . . . . . . . . . . . . . . . . . . 30Specify the High-level Qualifiers for SMP/E Data Sets . . . . . . . . . 33Specify the distribution tape device type . . . . . . . . . . . . . . 33Specify Attributes of the CICS Transaction Server system Data Sets . . . . 33Specify Attributes of any additional target Libraries. . . . . . . . . . . 34Specify the Data Set Name of the SISPLOAD Library . . . . . . . . . 35Specify the Data Set Name of the CSSLIB Library . . . . . . . . . . . 35Specify the Data Set Name of the SCEECPP Library . . . . . . . . . . 35Specify the Data Set Name of the SCEELKED Library . . . . . . . . . 36Specify the Data Set Name of the SCEELKEX Library . . . . . . . . . 36Specify the Data Set Name of the SCEEOBJ Library . . . . . . . . . . 36Specify the Data Set Name of the SCEESAMP Library . . . . . . . . . 36Specify the Data Set Name of the SCLBSID Library . . . . . . . . . . 36Specify the Data Set Name of the SCSQLOAD Library . . . . . . . . . 36Specify the Data Set Name of the SCSQANLE Library . . . . . . . . . 37Specify the Data Set Name of the SCSQCICS Library . . . . . . . . . 37Specify the Data Set Name of the SCSQAUTH Library . . . . . . . . . 37Specify the Name of the Java directory . . . . . . . . . . . . . . . 37Specify the Data Set Name of the SDSNLOAD Library . . . . . . . . . 37Specify the Data Set Name of the SEZARPCL and SEZACMTX libraries 37Specify the Data Set Name of the SCEECICS & SCEERUN libraries . . . . 38Specify the Data Set Name of the SCEERUN2 & SCEELIB libraries . . . . 38Specify the Data Set Name of the SCEEBND2 library . . . . . . . . . 38Specify Log stream and Log stream Structure Attributes. . . . . . . . . 38
Create RACF Profiles for the CICS Transaction Server Data Sets . . . . . . 39Run the DFHISTAR Job . . . . . . . . . . . . . . . . . . . . . 39
Check the Output from the DFHISTAR Job . . . . . . . . . . . . . 40Check that You Are Ready to Run the Installation Jobs . . . . . . . . . . 41Run the installation Jobs . . . . . . . . . . . . . . . . . . . . . 42
Run Times of the Installation Jobs . . . . . . . . . . . . . . . . . 42The DFHIHFS0 Job . . . . . . . . . . . . . . . . . . . . . . 43The DFHIHFS1 Job . . . . . . . . . . . . . . . . . . . . . . 43The DFHISMKD Job . . . . . . . . . . . . . . . . . . . . . . 44The DFHINST1 Job . . . . . . . . . . . . . . . . . . . . . . 44The DFHINST2 Job . . . . . . . . . . . . . . . . . . . . . . 44The DFHINST3 Job . . . . . . . . . . . . . . . . . . . . . . 45The DFHINST4 Job . . . . . . . . . . . . . . . . . . . . . . 46The DFHINST5 Job . . . . . . . . . . . . . . . . . . . . . . 46The DFHINST6 Job . . . . . . . . . . . . . . . . . . . . . . 46The DFHIJVMJ Job . . . . . . . . . . . . . . . . . . . . . . 47
Check the Output from the Installation Jobs . . . . . . . . . . . . . . 47What next? . . . . . . . . . . . . . . . . . . . . . . . . . . 48
Copy the CICS Transaction Server Procedures into a Procedure Library. . . 48Create Extra Sets of CICS Transaction Server Target Libraries (Optional) 50Load the CICS Transaction Server Source Material (Optional) . . . . . . 52
iv CICS TS for z/OS: Installation Guide
Load Other Optional Features . . . . . . . . . . . . . . . . . . 53Activating CICS Transaction Server . . . . . . . . . . . . . . . . . 53Checklist for the CICS Transaction Server for z/OS Installation . . . . . . . 53
Chapter 4. Post-installation requirements . . . . . . . . . . . . . . 55Implementing changes in your z/OS environment for CICS . . . . . . . . . 55
APF-authorizing CICS SDFHAUTH library . . . . . . . . . . . . . . 56Authorizing CICS region userids to RACF . . . . . . . . . . . . . . 56Adding SDFHLINK to the MVS LNKLST . . . . . . . . . . . . . . 57Defining CICS as an MVS subsystem . . . . . . . . . . . . . . . 57Defining and installing the CICS Type 3 SVC . . . . . . . . . . . . . 57Reviewing the high-performance option . . . . . . . . . . . . . . . 58Defining CICS regions as applications to VTAM . . . . . . . . . . . . 58Defining log streams . . . . . . . . . . . . . . . . . . . . . . 58MVS ASR exit . . . . . . . . . . . . . . . . . . . . . . . . 59
Planning for CICSPlex SM . . . . . . . . . . . . . . . . . . . . 60Planning for CICSPlex SM migration . . . . . . . . . . . . . . . . 60
Parallel Sysplex considerations . . . . . . . . . . . . . . . . . . . 60
Chapter 5. Installing the CICS Information Center . . . . . . . . . . . 61Requirements . . . . . . . . . . . . . . . . . . . . . . . . . 61Installing the information center on a workstation . . . . . . . . . . . . 61Installing the information center on a server . . . . . . . . . . . . . . 62Installing the CICS plug-in in an Eclipse IDE or help system . . . . . . . . 63
Part 2. Setting up the MVS environment for CICS . . . . . . . . . . . . . . . 65
Chapter 6. Authorizing the hlq.SDFHAUTH library . . . . . . . . . . . 67
Chapter 7. Authorizing CICS regions to access MVS resources . . . . . 69Protecting CICS load module data sets . . . . . . . . . . . . . . . . 69
Authorizing access to data set services modules . . . . . . . . . . . 70Authorizing access to a CICS region’s VTAM ACB . . . . . . . . . . . . 70Authorizing the region userid to access category 1 transactions . . . . . . . 71Authorizing access to an SMSVSAM server . . . . . . . . . . . . . . 71Authorizing access to MVS log streams . . . . . . . . . . . . . . . . 72
Authorizations for users of IXCMIAPU . . . . . . . . . . . . . . . 72Authorizations for CICS regions. . . . . . . . . . . . . . . . . . 73
Authorizing CICS region userids to z/OS UNIX System Services . . . . . . 74Activating RACF resource classes . . . . . . . . . . . . . . . . . . 75
Chapter 8. Defining the default CICS userid to RACF . . . . . . . . . 77
Chapter 9. Installing CICS-required modules in the MVS linklist . . . . . 79CICS-supplied modules required in the MVS linklist . . . . . . . . . . . 79
CICS shared data tables modules for the MVS linklist . . . . . . . . . 80Modules of other MVS products in the MVS linklist. . . . . . . . . . . . 81
Chapter 10. Defining CICS as an MVS subsystem . . . . . . . . . . . 83The IEASYSxx MVS initialization member . . . . . . . . . . . . . . . 83The IEFSSNaa MVS subsystem initialization member . . . . . . . . . . 84The SYS1.PARMLIB(BPXPRMxx) parameters . . . . . . . . . . . . . 84The console message-handling facility . . . . . . . . . . . . . . . . 86
The DFHSSIyy message-formatting initialization member . . . . . . . . 87Default message-formatting initialization parameters . . . . . . . . . . 88Activating message formatting . . . . . . . . . . . . . . . . . . 89
Contents v
||

Modules needed to use the console message-handling facilities . . . . . . 89Coexistence considerations . . . . . . . . . . . . . . . . . . . 90
EXCI pipe allocation . . . . . . . . . . . . . . . . . . . . . . . 91The DFHSSIyy initialization member . . . . . . . . . . . . . . . . 91The EXCI pipe allocation limit . . . . . . . . . . . . . . . . . . 91Default EXCI pipe allocation limit initialization parameter . . . . . . . . 91
Chapter 11. Installing the CICS Type 3 SVC . . . . . . . . . . . . . 93Defining the CICS SVCs to your MVS . . . . . . . . . . . . . . . . 93Using more than one version of the CICS Type 3 SVC . . . . . . . . . . 94MRO between different CICS releases with a changed SVC number . . . . . 95
Chapter 12. Selecting the high-performance option . . . . . . . . . . 97Defining DFHHPSVC to MVS . . . . . . . . . . . . . . . . . . . 97Loading module DFHHPSVC. . . . . . . . . . . . . . . . . . . . 97
Removing existing DFHHPSVC modules from the MVS nucleus . . . . . . 98
Chapter 13. Defining CICS regions as applications to VTAM . . . . . . . 99Defining specific CICS APPL statements to VTAM . . . . . . . . . . . . 99
VTAM APPL parameters for CICS regions . . . . . . . . . . . . . . 99VTAM version and release level indicator . . . . . . . . . . . . . . . 101Message DFHZC3473 on opening the VTAM ACB . . . . . . . . . . . 101Cross-domain considerations . . . . . . . . . . . . . . . . . . . 101
VTAM LU alias facility . . . . . . . . . . . . . . . . . . . . . 102
Chapter 14. Installing CICS modules in the MVS link pack area . . . . . 107Preparing to install CICS modules in the MVS link pack area . . . . . . . 107
Benefits of using the MVS link pack area . . . . . . . . . . . . . . 107What is meant by the MVS link pack area? . . . . . . . . . . . . . 108Which modules must be in the MVS link pack area . . . . . . . . . . 108Which modules can be in the MVS link pack area? . . . . . . . . . . 109Service considerations. . . . . . . . . . . . . . . . . . . . . 110
How to use modules in the MVS link pack area . . . . . . . . . . . . 111Space requirements for CICS modules in the MVS link pack area . . . . . . 111Defining the CICS LPA library to your MVS . . . . . . . . . . . . . . 111Installing CICS modules in the LPA . . . . . . . . . . . . . . . . . 112
Selecting modules for the MVS link pack area . . . . . . . . . . . . 112The CICS-supplied SMP/E USERMOD, DFHUMOD . . . . . . . . . . 113Changing a CICS-supplied USERMOD . . . . . . . . . . . . . . 113Preparing the USERMOD . . . . . . . . . . . . . . . . . . . 113Receiving and applying the USERMOD . . . . . . . . . . . . . . 113
Controlling the use of modules from the MVS link pack area. . . . . . . . 114Modules in the MVS link pack area from hlq.SDFHAUTH . . . . . . . . 114Modules in the MVS link pack area from hlq.SDFHLOAD . . . . . . . . 114
Sample DFHCSDUP job to specify USELPACOPY(YES) . . . . . . . . . 118
Chapter 15. Defining CICS IPCS exit control data to MVS . . . . . . . 121The DFHIPCSP CICS exit control data . . . . . . . . . . . . . . . 121
Chapter 16. MVS Program properties table entries . . . . . . . . . . 123RACF password checking . . . . . . . . . . . . . . . . . . . . 123Non-swappable CICS regions . . . . . . . . . . . . . . . . . . . 123MVS protection key for CICS . . . . . . . . . . . . . . . . . . . 124
Chapter 17. MVS performance definitions . . . . . . . . . . . . . 125Implementing MVS workload management . . . . . . . . . . . . . . 125
vi CICS TS for z/OS: Installation Guide
########

Matching CICS performance parameters to service policies . . . . . . . . 126
Chapter 18. MVS automatic restart management definitions . . . . . . 127Implementing MVS automatic restart management . . . . . . . . . . . 127
Chapter 19. MVS cross-system MRO definitions . . . . . . . . . . . 129Sysplex overview . . . . . . . . . . . . . . . . . . . . . . . 129MVS XCF considerations for MRO . . . . . . . . . . . . . . . . . 129
Chapter 20. PR/SM policy for handling MVS failures . . . . . . . . . 131XCF PR/SM policy . . . . . . . . . . . . . . . . . . . . . . . 131
Chapter 21. MVS ASREXIT - SYMREC Authorization Exit . . . . . . . . 133
Chapter 22. Definitions required for VSAM RLS support . . . . . . . . 135Defining the master coupling facility lock structure . . . . . . . . . . . 135Defining coupling facility cache structures and cache sets . . . . . . . . 135
Defining cache sets. . . . . . . . . . . . . . . . . . . . . . 136Defining SMS storage classes for RLS access . . . . . . . . . . . . . 136Altering data set attributes for RLS access . . . . . . . . . . . . . . 136Defining sharing control data sets . . . . . . . . . . . . . . . . . 137Authorizing CICS userids for VSAM RLS support . . . . . . . . . . . . 138Adding new parameters to SYS1.PARMLIB(IGDSMSxx) . . . . . . . . . 138Establishing new procedures for VSAM RLS support . . . . . . . . . . 138Activating the coupling facility structures . . . . . . . . . . . . . . . 139
Chapter 23. Console messages. . . . . . . . . . . . . . . . . . 141
Chapter 24. Defining the logger environment for CICS journaling . . . . 143Requirements planning and checklist . . . . . . . . . . . . . . . . 143Setting up the environment for CICS log manager . . . . . . . . . . . 148
Coupling facility or DASD-only? . . . . . . . . . . . . . . . . . 150Coupling facility log streams . . . . . . . . . . . . . . . . . . . 151
Defining coupling facility structures . . . . . . . . . . . . . . . . 152Planning considerations for the number of log structures . . . . . . . . 155Log structure naming conventions . . . . . . . . . . . . . . . . 156Defining coupling facility log streams . . . . . . . . . . . . . . . 156Sizing considerations for coupling facility log streams . . . . . . . . . 158Coupling facility requirements in an RLS environment . . . . . . . . . 165Staging data sets for coupling facility log streams. . . . . . . . . . . 166
DASD-only log streams . . . . . . . . . . . . . . . . . . . . . 167Defining DASD-only log streams . . . . . . . . . . . . . . . . . 168Sizing considerations for DASD-only log streams . . . . . . . . . . . 169Converting a DASD-only log stream to use a coupling facility . . . . . . 172
Analyzing SMF Type 88 records . . . . . . . . . . . . . . . . . . 173Managing secondary storage . . . . . . . . . . . . . . . . . . . 174
Managing log data sets . . . . . . . . . . . . . . . . . . . . 174Log tail management . . . . . . . . . . . . . . . . . . . . . 175
Chapter 25. Enabling Unicode data conversion by z/OS . . . . . . . . 177Selecting conversion images . . . . . . . . . . . . . . . . . . . 177
Chapter 26. Applying service to CICS Transaction Server for z/OS . . . . 179Load library secondary extents . . . . . . . . . . . . . . . . . . 179The CICS TS-supplied SMP/E procedure . . . . . . . . . . . . . . . 179APAR fixes . . . . . . . . . . . . . . . . . . . . . . . . . . 180
Contents vii
||||

PTFs . . . . . . . . . . . . . . . . . . . . . . . . . . . . 180CICS service considerations . . . . . . . . . . . . . . . . . . . 181CICSPlex SM service considerations . . . . . . . . . . . . . . . . 181Servicing the CICS messages data set . . . . . . . . . . . . . . . 182
Part 3. Getting ready to run CICS . . . . . . . . . . . . . . . . . . . . . . 183
Chapter 27. Tailoring the CICS-supplied skeleton jobs . . . . . . . . 185The CICS installation libraries . . . . . . . . . . . . . . . . . . . 185What you should do . . . . . . . . . . . . . . . . . . . . . . 186Running DFHISTAR . . . . . . . . . . . . . . . . . . . . . . 186
Chapter 28. Creating the CICS data sets . . . . . . . . . . . . . . 189Naming conventions . . . . . . . . . . . . . . . . . . . . . . 190Creating data sets common to all CICS regions, DFHCOMDS job. . . . . . 191
Creating several copies of the DFHCSD and SYSIN data sets . . . . . . 191Creating data sets unique to each CICS region, DFHDEFDS job . . . . . . 192Creating the CICS messages data set, DFHCMACI job . . . . . . . . . 193
Defining the DFHCMACD file and associated CICS resources . . . . . . 193Defining the sample applications data sets . . . . . . . . . . . . . . 194
The CUA text level application . . . . . . . . . . . . . . . . . . 194The FILEA sample application programs . . . . . . . . . . . . . . 195The CICS Application Programming Primer sample application . . . . . . 195
Chapter 29. Defining DL/I support. . . . . . . . . . . . . . . . . 197PDIRs. . . . . . . . . . . . . . . . . . . . . . . . . . . . 197Adding remote DL/I support . . . . . . . . . . . . . . . . . . . . 198
Defining a PSB directory . . . . . . . . . . . . . . . . . . . . 198Coding CICS system initialization parameters for remote DL/I support . . . 198
Global user exits for DL/I. . . . . . . . . . . . . . . . . . . . . 199
Chapter 30. Adding CICS support for programming languages . . . . . 201Installing Language Environment support . . . . . . . . . . . . . . . 201
Installing CICS support for Language Environment . . . . . . . . . . 202Language Environment support for COBOL . . . . . . . . . . . . . 203Language Environment support for C and C++. . . . . . . . . . . . 203Language Environment support for PL/I . . . . . . . . . . . . . . 204Language Environment support for CICS JVM programs . . . . . . . . 204
Chapter 31. Verifying your Java components installation . . . . . . . 205Verifying Java components checklist . . . . . . . . . . . . . . . . 205Java Virtual Machine sample definition files . . . . . . . . . . . . . . 207
JVM profiles . . . . . . . . . . . . . . . . . . . . . . . . 207JVM properties files. . . . . . . . . . . . . . . . . . . . . . 208Java 2 security policy for EJBs . . . . . . . . . . . . . . . . . 209
Authorizing the hlq.SDFJAUTH library . . . . . . . . . . . . . . . . 210The hlq.SDFJLPA library . . . . . . . . . . . . . . . . . . . . . 210Amending parameters in SYS1.PARMLIB(BPXPRMxx) . . . . . . . . . . 210
Chapter 32. Installing MRO and ISC support . . . . . . . . . . . . 211Installing MRO support . . . . . . . . . . . . . . . . . . . . . 211
Defining CICS as an MVS subsystem . . . . . . . . . . . . . . . 212Installing the modules DFHIRP and DFHCSVC in the LPA . . . . . . . 212Installing required hardware and software for XCF/MRO . . . . . . . . 212Defining MVS images as systems in an XCF sysplex . . . . . . . . . 212Enabling MRO for CICS startup . . . . . . . . . . . . . . . . . 213
viii CICS TS for z/OS: Installation Guide

Adding ISC support . . . . . . . . . . . . . . . . . . . . . . . 213Running a CICS region with ISC . . . . . . . . . . . . . . . . . 213
Chapter 33. Enabling TCP/IP in a CICS region . . . . . . . . . . . . 215Using TCP/IP in a CICS region . . . . . . . . . . . . . . . . . . 215
Chapter 34. Enabling REXX for CICS . . . . . . . . . . . . . . . 217Step 1--Modify your RDO definitions to add required entries . . . . . . . . 217Step 2--Create the RFS filepools . . . . . . . . . . . . . . . . . . 217Step 3--BIND the CICSQL program to your DB2 plan . . . . . . . . . . 218Step 4--Add DD statements to your CICS startup job . . . . . . . . . . 218Step 5--Modify member CICSTART . . . . . . . . . . . . . . . . . 218Step 6--Format the RFS filepools. . . . . . . . . . . . . . . . . . 218Step 7--Verifying the installation . . . . . . . . . . . . . . . . . . 219Step 8--Accessing the supplied softcopy documentation . . . . . . . . . 219Customization information for REXX . . . . . . . . . . . . . . . . 219
Changing supplied CICS transaction codes . . . . . . . . . . . . . 220RFS filepool definitions . . . . . . . . . . . . . . . . . . . . 221TD queues needed for IMPORT and EXPORT commands . . . . . . . 221SQL definitions used for authorizing transactions to use DB2 . . . . . . 221Special exec data sets used by the REXX Development System . . . . . 222Special USER ids and their usage . . . . . . . . . . . . . . . . 222Other considerations . . . . . . . . . . . . . . . . . . . . . 223Online HELP facility . . . . . . . . . . . . . . . . . . . . . 223
Part 4. CICS verification. . . . . . . . . . . . . . . . . . . . . . . . . . . 225
Chapter 35. Running the installation verification procedures . . . . . . 227Preparation for running the IVPs . . . . . . . . . . . . . . . . . . 227
Create the CICS data sets for the IVP jobs . . . . . . . . . . . . . 227Install the CICS SVC for the IVP jobs . . . . . . . . . . . . . . . 227Define and activate the CICS applids . . . . . . . . . . . . . . . 228Authorize the IVP userid . . . . . . . . . . . . . . . . . . . . 228Review security requirements for the IVP jobs . . . . . . . . . . . . 229Define log streams . . . . . . . . . . . . . . . . . . . . . . 230Specify system initialization parameters for the IVP jobs . . . . . . . . 231
Resources for the CICS messages facility, CMAC . . . . . . . . . . . 232The CICS startup procedure, DFHSTART . . . . . . . . . . . . . . 232
DD statements for CICS data sets . . . . . . . . . . . . . . . . 233Verify batch job, DFHIVPBT. . . . . . . . . . . . . . . . . . . . 234
Sample job log for the DFHIVPBT job . . . . . . . . . . . . . . . 235Output from the DFHIVPBT job . . . . . . . . . . . . . . . . . 238
Verify interactive job, DFHIVPOL . . . . . . . . . . . . . . . . . . 241Defining a terminal for the online IVP . . . . . . . . . . . . . . . 242Defining the CICS APPLID to VTAM . . . . . . . . . . . . . . . 244Defining an MVS console . . . . . . . . . . . . . . . . . . . 244Defining a TSO user as a console device. . . . . . . . . . . . . . 245Running the DFHIVPOL job. . . . . . . . . . . . . . . . . . . 246Logging on at a VTAM terminal . . . . . . . . . . . . . . . . . 249Using CICS-supplied transactions through a terminal . . . . . . . . . 250Using the CEDA transaction . . . . . . . . . . . . . . . . . . 252Invoking and executing sample programs. . . . . . . . . . . . . . 253Using transactions from a console device. . . . . . . . . . . . . . 253Terminating CICS . . . . . . . . . . . . . . . . . . . . . . 255
Verifying shared data tables support . . . . . . . . . . . . . . . . 255Example verification of shared data tables . . . . . . . . . . . . . 256
Contents ix
Verifying the CICS-DBCTL interface. . . . . . . . . . . . . . . . . 262The IMS installation requirements for the DFHIVPDB job . . . . . . . . 262The DFHIVPDB job steps . . . . . . . . . . . . . . . . . . . 262
Testing the CICS-DB2 environment . . . . . . . . . . . . . . . . . 267Run DB2 jobs DSNTEJ5C and DSNTEJ5P . . . . . . . . . . . . . 267Starting a DB2 organization or project application. . . . . . . . . . . 267
Running the EJB "Hello World" sample . . . . . . . . . . . . . . . 268
Part 5. CICSPlex SM installation and setup . . . . . . . . . . . . . . . . . 269
Chapter 36. CICSPlex SM setup checklist and worksheets . . . . . . . 271Installation checklist . . . . . . . . . . . . . . . . . . . . . . 272
MVS installation and setup checklist . . . . . . . . . . . . . . . 272System worksheet . . . . . . . . . . . . . . . . . . . . . . 275CAS worksheet . . . . . . . . . . . . . . . . . . . . . . . 276CMAS worksheet . . . . . . . . . . . . . . . . . . . . . . 277Local MAS worksheet . . . . . . . . . . . . . . . . . . . . . 279
Chapter 37. Setting up the MVS environment . . . . . . . . . . . . 281Noting IEASYSxx values . . . . . . . . . . . . . . . . . . . . . 281Updating IEASYSxx (CAS) . . . . . . . . . . . . . . . . . . . . 282Updating IEASYSxx (CMAS) . . . . . . . . . . . . . . . . . . . 282Authorizing libraries. . . . . . . . . . . . . . . . . . . . . . . 283Updating the MVS linklist. . . . . . . . . . . . . . . . . . . . . 284Preparing to use the CICSPlex SM API . . . . . . . . . . . . . . . 284
Installing the REXX function package . . . . . . . . . . . . . . . 285Using CICSPlex SM modules in the MVS link pack area . . . . . . . . . 286
Space requirements . . . . . . . . . . . . . . . . . . . . . 286Installing CICSPlex SM modules into the LPA . . . . . . . . . . . . 287Applying maintenance to LPA modules. . . . . . . . . . . . . . . 288
Chapter 38. VTAM requirements . . . . . . . . . . . . . . . . . 289Defining VTAM requirements (CAS) . . . . . . . . . . . . . . . . . 289
Step 1: (Optional) Creating a mode table . . . . . . . . . . . . . . 289Step 2: Creating a VTAM application definition (CAS) . . . . . . . . . 291Step 3: Defining cross-domain resources (CAS) . . . . . . . . . . . 292Step 4: Updating the configuration list (CAS) . . . . . . . . . . . . 292Step 5: Activating the major nodes (CAS). . . . . . . . . . . . . . 293
Defining VTAM requirements (CMAS) . . . . . . . . . . . . . . . . 293Step 1: Creating a VTAM application definition (CMAS) . . . . . . . . 294Step 2: Defining cross-domain resources (CMAS) . . . . . . . . . . 295Step 3: Updating the configuration list (CMAS) . . . . . . . . . . . . 296Step 4: Activating the major nodes (CMAS) . . . . . . . . . . . . . 296
Chapter 39. Generating post-installation members . . . . . . . . . . 297
Chapter 40. Creating and managing CICSPlex SM data sets . . . . . . 299CAS-related data sets . . . . . . . . . . . . . . . . . . . . . . 299Creating the CICSPlex SM data repository . . . . . . . . . . . . . . 299Populating the CICSPlex SM data repository . . . . . . . . . . . . . 302Converting the CICSPlex SM data repository . . . . . . . . . . . . . 302Expanding the CICSPlex SM data repository . . . . . . . . . . . . . 304Taking backups of the CICSPlex SM data repository . . . . . . . . . . 304
Defining a forward recovery log for the data repository . . . . . . . . . 304
x CICS TS for z/OS: Installation Guide

Chapter 41. Upgrading the CSD and macro definitions . . . . . . . . 307Creating CICS resource definition tables for CMASs. . . . . . . . . . . 307Updating the CSD files using DFHCSDUP (CMAS) . . . . . . . . . . . 307Journalmodel considerations in a CICS TS z/OS CMAS . . . . . . . . . 308Considerations when upgrading the CSD release (CMAS) . . . . . . . . 309Considerations when sharing the CSD (CMAS) . . . . . . . . . . . . 309Updating CICS resource definition tables for MASs . . . . . . . . . . . 310Updating CSD files using DFHCSDUP (MVS MAS) . . . . . . . . . . . 311Considerations when upgrading the CSD release (MVS MAS) . . . . . . . 312Considerations when sharing the CSD (MVS MAS) . . . . . . . . . . . 312
Chapter 42. Preparing user access to CICSPlex SM . . . . . . . . . 313
Chapter 43. Setting up a coordinating address space (CAS) . . . . . . 315Preparing to start a CAS . . . . . . . . . . . . . . . . . . . . . 315
START command for a CAS . . . . . . . . . . . . . . . . . . 316Identifying and connecting to a CAS . . . . . . . . . . . . . . . 318
Setting the CAS system communication information . . . . . . . . . . . 318Preparing to stop a CAS . . . . . . . . . . . . . . . . . . . . . 318
Stopping a CAS . . . . . . . . . . . . . . . . . . . . . . . 318
Chapter 44. Setting up a CICSPlex SM address space (CMAS) . . . . . 321Before you begin. . . . . . . . . . . . . . . . . . . . . . . . 321CICSPlex SM auxiliary storage usage . . . . . . . . . . . . . . . . 321Preparing to transmit generic alerts to NetView . . . . . . . . . . . . 322Preparing to start a CMAS . . . . . . . . . . . . . . . . . . . . 323
Editing CICSPlex SM system parameters . . . . . . . . . . . . . 325CMAS-related CICS SIT parameters . . . . . . . . . . . . . . . 326Controlling tasks in a CMAS . . . . . . . . . . . . . . . . . . 328Controlling CICS storage in a CMAS . . . . . . . . . . . . . . . 329START command for a CMAS . . . . . . . . . . . . . . . . . . 330
Setting the VTAM APPLID for a CMAS . . . . . . . . . . . . . . . 330Shutting down a CMAS . . . . . . . . . . . . . . . . . . . . . 330
Using the SHUtdown command . . . . . . . . . . . . . . . . . 331Using the COSD transaction . . . . . . . . . . . . . . . . . . 331
Restarting a CMAS . . . . . . . . . . . . . . . . . . . . . . . 331
Chapter 45. Setting up a CICS managed application system (MAS). . . . 333Before you begin. . . . . . . . . . . . . . . . . . . . . . . . 333Using CICS global user exits and user-replaceable modules. . . . . . . . 333Controlling the use of modules from the LPA . . . . . . . . . . . . . 334Preparing to start an MVS MAS . . . . . . . . . . . . . . . . . . 334
Activating DB2 connections during CICS startup . . . . . . . . . . . 335MQSeries connections . . . . . . . . . . . . . . . . . . . . 336MVS MAS-related CICS SIT parameters . . . . . . . . . . . . . . 336Preparing the MAS for history recording . . . . . . . . . . . . . . 338
Stopping and restarting management of a CICS system . . . . . . . . . 339Stopping management of a CICS system. . . . . . . . . . . . . . 339Restarting management of a CICS system . . . . . . . . . . . . . 339Terminating a MAS . . . . . . . . . . . . . . . . . . . . . . 340
Controlling the number of long running tasks in a MAS. . . . . . . . . . 340
Chapter 46. Setting up a CICSPlex SM Web User Interface server . . . . 341Preparing a CICS system to act as the Web User Interface server . . . . . 341Configure CICS Web support . . . . . . . . . . . . . . . . . . . 342Review CICS system initialization parameters . . . . . . . . . . . . . 343
Contents xi
##
||||||||

Specify language and codepage . . . . . . . . . . . . . . . . . . 344Prepare codepage conversion table . . . . . . . . . . . . . . . . . 345Generate the Program Load Table (PLT) . . . . . . . . . . . . . . . 345Create the Web User Interface server repository (EYUWREP) . . . . . . . 346Specify the customizable view and menu help data set. . . . . . . . . . 346Specify the Web User Interface server initialization parameters. . . . . . . 347
Required parameters . . . . . . . . . . . . . . . . . . . . . 347Optional parameters . . . . . . . . . . . . . . . . . . . . . 348
Update CICS CSD definitions . . . . . . . . . . . . . . . . . . . 355Transient data queue definitions . . . . . . . . . . . . . . . . . 356Temporary storage models . . . . . . . . . . . . . . . . . . . 356
Specify the JCL DD statements . . . . . . . . . . . . . . . . . . 356Security considerations . . . . . . . . . . . . . . . . . . . . . 357
CICS security considerations . . . . . . . . . . . . . . . . . . 357Secure Sockets Layer support . . . . . . . . . . . . . . . . . . 358Authorizing access to MVS data sets . . . . . . . . . . . . . . . 358
Additional tasks . . . . . . . . . . . . . . . . . . . . . . . . 359Submit start-up JCL . . . . . . . . . . . . . . . . . . . . . 359Check browser connection . . . . . . . . . . . . . . . . . . . 359Obtain view and menu definitions . . . . . . . . . . . . . . . . 359Shutdown the Web User Interface server . . . . . . . . . . . . . . 359
Chapter 47. Configuring the Starter Set . . . . . . . . . . . . . . 361The Starter Set samples libraries . . . . . . . . . . . . . . . . . . 361
JCL in CICSTS31.CPSM.SEYUJCL for creating the Starter Set . . . . . 361JCL in CICSTS31.CPSM.SEYUJCL for running the Starter Set . . . . . . 362Definitions in CICSTS31.CPSM.SEYUDEF for the Starter Set environment 362The Starter Set naming convention . . . . . . . . . . . . . . . . 363
Creating the Starter Set environment . . . . . . . . . . . . . . . . 364Selecting the Starter Set configuration . . . . . . . . . . . . . . . 364Defining the Starter Set environment . . . . . . . . . . . . . . . 365Starting the Starter Set components . . . . . . . . . . . . . . . 366
Deleting the Starter Set . . . . . . . . . . . . . . . . . . . . . 368Using the Starter Set as a model . . . . . . . . . . . . . . . . . . 368
Chapter 48. Applying service to CICSPlex SM . . . . . . . . . . . . 371CICS Transaction Server for z/OS-supplied SMP/E procedure . . . . . . . 371
Applying PTFs to CICSPlexes running CICS Transaction Server for z/OS,Version 3 Release 1 and later . . . . . . . . . . . . . . . . . 371
Chapter 49. Using the EYUINST EXEC to tailor skeleton jobs . . . . . . 373Sample JCL editing considerations . . . . . . . . . . . . . . . . . 373EYUINST EXEC parameters . . . . . . . . . . . . . . . . . . . 375Sample JCL execution considerations . . . . . . . . . . . . . . . . 382
Chapter 50. CICSPlex SM system parameters . . . . . . . . . . . . 383
Chapter 51. CMAS journaling . . . . . . . . . . . . . . . . . . 397
Chapter 52. Preparing to use the IPCS tools . . . . . . . . . . . . 401Updating BLSCECT . . . . . . . . . . . . . . . . . . . . . . 401Updating library allocations . . . . . . . . . . . . . . . . . . . . 402SDUMP options . . . . . . . . . . . . . . . . . . . . . . . . 402
Part 6. CICSPlex SM verification . . . . . . . . . . . . . . . . . . . . . . . 405
xii CICS TS for z/OS: Installation Guide
||||||||||||||||||||##||||||||||||||||||||

Chapter 53. CICSPlex SM installation verification procedures . . . . . 407If the IVPs do not work as described . . . . . . . . . . . . . . . . 407The stages of IVP1 and IVP2 . . . . . . . . . . . . . . . . . . . 407The IVP samples libraries . . . . . . . . . . . . . . . . . . . . 408
Chapter 54. Installation verification procedure 1 (IVP1) . . . . . . . . 411Setting up the CICSPlex SM environment on system A . . . . . . . . . 411Starting up and verifying CICSPlex SM components on system A . . . . . 413
1: Start the CAS EYUCAS1A . . . . . . . . . . . . . . . . . . 4132: Start the CMAS EYUCMS1A . . . . . . . . . . . . . . . . . 4143: Define a CICSplex to CICSPlex SM . . . . . . . . . . . . . . 4154: Run the batched repository update facility on system A . . . . . . . 4185: Start the MAS EYUMAS1A . . . . . . . . . . . . . . . . . . 419
Testing CICSPlex SM functions . . . . . . . . . . . . . . . . . . 420Test the operations functions on system A . . . . . . . . . . . . . 420
Chapter 55. Installation verification procedure 2 (IVP2) . . . . . . . . 425Setting up the CICSPlex SM environment on system B . . . . . . . . . 426Starting up and verifying CICSPlex SM components on system B . . . . . 427
1: Create CAS definitions . . . . . . . . . . . . . . . . . . . 4282: Start the CAS EYUCAS1B . . . . . . . . . . . . . . . . . . 4323: Checking CAS-to-CAS connections . . . . . . . . . . . . . . . 4334: Start the CMAS EYUCMS1B . . . . . . . . . . . . . . . . . 4345: Run the batched repository update facility on system B . . . . . . . 4356: Enable EYUCMS1B to manage EYUPLX01 . . . . . . . . . . . . 4367: Start the MAS EYUMAS1B . . . . . . . . . . . . . . . . . . 439
Testing CICSPlex SM functions . . . . . . . . . . . . . . . . . . 440Test the operations functions on system B . . . . . . . . . . . . . 440
Customizing the installation verification procedures . . . . . . . . . . . 443
Part 7. Appendixes . . . . . . . . . . . . . . . . . . . . . . . . . . . . . 445
Appendix. CICS modules eligible for the MVS link pack area . . . . . . 447CICS modules required in the MVS link pack area . . . . . . . . . . . 447CICS modules eligible for the MVS link pack area . . . . . . . . . . . 447Information about modules eligible for the MVS link pack area . . . . . . . 447
Priority . . . . . . . . . . . . . . . . . . . . . . . . . . 448Size . . . . . . . . . . . . . . . . . . . . . . . . . . . 448Option/Note . . . . . . . . . . . . . . . . . . . . . . . . 448
Glossary of SMP/E terms used in this book . . . . . . . . . . . . . 465
Bibliography . . . . . . . . . . . . . . . . . . . . . . . . . 467The CICS Transaction Server for z/OS library . . . . . . . . . . . . . 467
The entitlement set . . . . . . . . . . . . . . . . . . . . . . 467PDF-only books . . . . . . . . . . . . . . . . . . . . . . . 467
Other CICS books . . . . . . . . . . . . . . . . . . . . . . . 469Books from related libraries . . . . . . . . . . . . . . . . . . . . 469
Systems Network Architecture (SNA) . . . . . . . . . . . . . . . 469Advanced communications function for VTAM (ACF/VTAM) . . . . . . . 469NetView Version 3.1 . . . . . . . . . . . . . . . . . . . . . 470NetView MultiSystem Manager Version 2.2 . . . . . . . . . . . . . 470DATABASE 2 (DB2) . . . . . . . . . . . . . . . . . . . . . 470eNetwork Communications Server for OS/2 Warp, Version 5 . . . . . . 470Virtual Storage Access Method (VSAM) . . . . . . . . . . . . . . 470Resource Access Control Facility (RACF). . . . . . . . . . . . . . 470
Contents xiii

System Modification Program Extended (SMP/E) . . . . . . . . . . . 470Sysplex planning. . . . . . . . . . . . . . . . . . . . . . . 471DFSMS/MVS . . . . . . . . . . . . . . . . . . . . . . . . 471MVS . . . . . . . . . . . . . . . . . . . . . . . . . . . 471
Determining if a publication is current . . . . . . . . . . . . . . . . 471
Accessibility . . . . . . . . . . . . . . . . . . . . . . . . . 473
Index . . . . . . . . . . . . . . . . . . . . . . . . . . . . 475
Notices . . . . . . . . . . . . . . . . . . . . . . . . . . . 493Trademarks. . . . . . . . . . . . . . . . . . . . . . . . . . 494
Sending your comments to IBM . . . . . . . . . . . . . . . . . 495
xiv CICS TS for z/OS: Installation Guide

Preface
What this book is aboutThis book describes CICS® Transaction Server for z/OS®, Version 3 Release 1(CICS TS). It takes you through the necessary planning and helps you install CICSTransaction Server for z/OS, Version 3 Release 1. It contains guidance abouttailoring CICS for use in your systems environment. It:
v Describes the content of CICS TS and the two delivery methods—ServerPac andCBPDO
v Explains the method of installing CICS TS (with either ServerPac or CBPDO),and provides references to the required sources of information. In this book,“installing” means loading the code into the libraries in preparation for themigration and customizing tasks.
v Lists the hardware and software you must have to run the CICS TS productelements and exploit the function provided by CICS TS.
v Covers installation, and verification of that installation, for both CICS andCICSPlex® SM.
v Tells you about installing the workstation-based components of CICS TS.
The book assumes that you are upgrading to CICS TS levels of all the productelements in the Server.
Planning the migration to CICS TS requires that you understand the functionprovided by the CICS TS product set. You can learn about the function in thevarious product libraries of the individual elements that comprise the product set.
Always check the product libraries (for example, in the CICS Transaction Server forz/OS Migration from CICS TS Version 2.3) for changes that might affect CICS TSelements.
Who is this book for?This book is intended for experienced CICS system programmers who are planningto migrate to CICS TS.
This book is also for system programmers who are responsible for installing andtailoring CICS and CICSPlex SM.
By “experienced”, we mean that a system programmer's experience includesinstalling and managing CICS and some or all of the other elements in the CICS TSproduct set.
What you need to know to understand this bookTo fully understand the installation information in this book, you should haveexperience of the IBM® MVS™ operating system, and the System ModificationProgram/Extended (SMP/E) licensed program needed to maintain CICS andCICSPlex SM. To use the installation verification procedures, you should be familiarwith the JCL and cataloged procedures for MVS. It also helps if you are familiarwith CICS and CICSPlex SM concepts.
© Copyright IBM Corp. 1989, 2010 xv

How to use this book
for planningRead through the sections of this book that tell you about:
v The products and hardware you need to support the function that comes withCICS TS.
v The pointers to migration and installation information that is in the productlibraries that you receive with CICS TS.
Once you have identified the actions you need to take to complete your migration,write a plan describing the steps your installation will take. Include your estimate ofhow much time each step requires and who will do it.
for installationCICS and CICSPlex SM are available only as elements of the CICS TransactionServer, through either the ServerPac or CBPDO method of delivery. For informationabout these two methods of delivery of the CICS Transaction Server, seeChapter 2, “Installing CICS TS,” on page 9.
To install the CICS Transaction Server using the CBPDO method, you should usethe CICS Transaction Server for z/OS Program Directory, together with theinstructions contained in the Memo to Users Extension, to load the software fromthe tape DASD. For the ServerPac method, you follow the supplied set of ISPFdialogs and the accompanying documentation.
After you have loaded the CICS Transaction Server elements to DASD, you shouldthen use this book to tailor CICS to your environment; that is to:v Integrate CICS with MVS and ACF/VTAMv Apply service to CICS (if required)v Create the CICS data setsv Install DB2® support (if required)v Install MRO and ISC support (if required)v Run the installation verification procedures (if required).
Notes:
1. “CICS modules eligible for the MVS link pack area,” on page 447 gives detailsof the CICS modules that are needed in, and eligible for, the MVS link packarea.
2. If you installed CICS from CBPDO, you do not need to run the DFHISTAR jobagain to specify the post-installation parameters. However, if you wish to createseveral copies of the post-installation jobs (for example to create several copiesof the DFHDEFDS job to define CICS data sets unique to several CICSregions), you can edit and run the DFHISTAR job as many times as required.
Some of the information in this book is also of interest if you have installed CICSTransaction Server using the ServerPac method of delivery.
In particular, you should edit and run the DFHISTAR job, specifying the keywordPOST, to define parameters needed to tailor your CICS environment.
Notes on terminologyCICS is used throughout this book to mean the CICS element of the IBM CICSTransaction Server for z/OS, Version 3 Release 1.
xvi CICS TS for z/OS: Installation Guide

CICSPlex SM refers to CICSPlex System Manager, an element of CICSTransaction server.
CICS TS Version 2 region is used to refer to a CICS region running under CICSTS Version 2, in contrast, for example, to a CICS/ESA 4.1 region.
MVS is used throughout this book to mean the operating system MVS, or the BaseControl Program (BCP) element of z/OS.
RACF® is used throughout this book to mean the MVS Resource Access ControlFacility (RACF) or any other external security manager that provides equivalentfunction.
The term CICS TS 3.1 region is used to refer to a CICS region running under CICSTS Version 3 Release 1, in contrast, for example, to a CICS/ESA 4.1 region.
$ In the programming examples in this book, the dollar symbol ($,) is used as anational currency symbol and is assumed to be assigned the EBCDIC code pointX'5B'. In some countries a different currency symbol, for example the pound symbol(£), or the yen symbol (¥), is assigned the same EBCDIC code point. In thesecountries, the appropriate currency symbol should be used instead of the dollarsymbol.
hlq Throughout this book, the term hlq is used to denote the high-level qualifier ofthe CICS TS data sets; for example, CICSTS31.CICS for CICS data sets andCICSTS31.CPSM for CICSPlex SM data sets. The CICSTS31 part of the high-levelqualifier is defined by the LINDEX parameter in the DFHISTAR installation job.
IMS™ library namesThe IMS libraries referred to in this chapter are identified by IMS.libnam (forexample, IMS.SDFSRESL). If you are using your own naming conventions,change the IMS prefix to match those naming conventions.
CICS system connectivityThis release of CICSPlex SM can be used to control CICS systems that are directlyconnected to it.
For this release of CICSPlex SM, the connectable CICS systems are:v CICS Transaction Server for z/OS 3.1v CICS Transaction Server for z/OS 2.3v CICS Transaction Server for z/OS 2.2v CICS Transaction Server for OS/390® 1.3
You can use this release of CICSPlex SM to control systems running supportedreleases of CICS that are connected to, and managed by, your previous release ofCICSPlex SM. However, if you have any directly-connectable release levels ofCICS, as listed above, that are connected to a previous release of CICSPlex SM,you are strongly recommended to migrate them to the current release ofCICSPlex SM, to take full advantage of the enhanced management services. Seethe CICS Transaction Server for z/OS Migration from CICS TS Version 2.3 forinformation on how to do this.
Preface xvii
###
|
||

Table 1 shows which supported CICS systems can be directly connected to whichreleases of CICSPlex SM.
Table 1. Directly-connectable CICS systems by CICSPlex SM release
CICS system CICSPlex SMcomponent of CICSTS 3.1
CICSPlex SMcomponent of CICSTS 2.3
CICSPlex SMcomponent of CICSTS 2.2
CICSPlex SMcomponent of CICSTS 1.3
CICS TS 3.1 Yes No No No
CICS TS 2.3 Yes Yes No No
CICS TS 2.2 Yes Yes Yes No
CICS TS 1.3 Yes Yes Yes Yes
TXSeries™ 4.3.0.4 No Yes Yes No
TXSeries 5.0 No Yes Yes No
xviii CICS TS for z/OS: Installation Guide
||
||||
|||
|||
|||
|||||
|||||
|||||
|||||
|||||
||||||

Summary of changes
This book is based on the Installation Guide for CICS Transaction Server for z/OS,Version 2 Release 3, GC34-6224-00. Changes from that edition are marked byvertical bars in the left margin.
This part lists briefly the changes that have been made for the following recentreleases:
Changes for CICS Transaction Server for z/OS, Version 3 Release 1The more significant changes for this edition are:
v Technical changes :
– A new topic, Chapter 25, “Enabling Unicode data conversion by z/OS,” onpage 177
– There are changes to Chapter 5, “Installing the CICS Information Center,” onpage 61
– In CICSPlex SM, support for the CICS NT remote MAS is removed, and thecorresponding topic in the section about CICSPlex SM verification is deleted.
– References to HFS directories now show the optional /pathprefix, see, forexample, “Specify the CICS TS HFS Directories and Data Sets” on page 23
v Structural changes :
– Chapter 3, “Installing CICS TS using DFHISTAR,” on page 17 is a collection oftopics which used to appear in the the CICS Transaction Server for z/OSProgram Directory
– Chapter 46, “Setting up a CICSPlex SM Web User Interface server,” on page341 is a topic which used to appear in the the CICSPlex System ManagerWeb User Interface Guide
Changes for CICS Transaction Server for z/OS Version 2 Release 3The more significant changes for this edition are:
v Technical changes :
– In CICSPlex SM, support for the CICS OS/2 remote MAS is removed, andthe corresponding topic in the section about CICSPlex SM verification isdeleted.
– New or revised topics include:
- “Java Virtual Machine sample definition files” on page 207
- “Authorizing the hlq.SDFJAUTH library” on page 210
- “Populating the CICSPlex SM data repository” on page 302
- “CMAS-related CICS SIT parameters” on page 326
- “Preparing the MAS for history recording” on page 338
v Structural changes :
– Chapter 5, “Installing the CICS Information Center,” on page 61 has beenmoved from the back of the book. It is now in Part 1, “Planning forInstallation,” on page 1.
© Copyright IBM Corp. 1989, 2010 xix

Changes for CICS Transaction Server for z/OS Version 2 Release 2The more significant changes for this edition are:
v Technical changes :
– In support of the new CICSPlex SM remote MAS agent for Windows, twochapters have been added:
- Setting up a CICSPlex SM remote MAS agent for Windows
- Installation verification procedure 6 (IVP6)
– Chapter 50, “CICSPlex SM system parameters,” on page 383 has beenupdated with several new security-related parameters.
v Chapter 44, “Setting up a CICSPlex SM address space (CMAS),” on page 321has been expanded with the addition of the new sections “Controlling tasks in aCMAS” on page 328 and “Controlling CICS storage in a CMAS” on page 329.
v Stuctural changes :
– A new chapter Chapter 34, “Enabling REXX for CICS,” on page 217 containsinformation about REXX that previously appeared in the CICS TransactionServer for z/OS Program Directory.
– The former Appendix A, dealing with “Disk space needed for CICS”, has beenremoved. This information is available from the CICS Transaction Server forz/OS Program Directory. As a consequence, the former Appendix B is nowAppendix A.
Changes for CICS Transaction Server for z/OS, Version 2 Release 1The more significant changes for this edition are:
v This book has a new PART Part 1, “Planning for Installation,” on page 1, whichreplaces the Planning for Installation manual of earlier releases.
v Information has been added to Chapter 7, “Authorizing CICS regions to accessMVS resources,” on page 69 describing “Authorizations for users of IXCMIAPU”on page 72.
v In Chapter 24, “Defining the logger environment for CICS journaling,” on page143, suggested values for HIGHOFFLOAD and LOWOFFLOAD have beenrevised, and new sections “Requirements planning and checklist” on page 143and “Analyzing SMF Type 88 records” on page 173 have been added.
v Chapter 29, “Defining DL/I support,” on page 197 is significantly changed.
v Chapter 30, “Adding CICS support for programming languages,” on page 201 isnew.
v Chapter 31, “Verifying your Java components installation,” on page 205, replacesthe previous “ Java™ support” chapter.
v Chapter 33, “Enabling TCP/IP in a CICS region,” on page 215 is new.
v CICPlex SM for this release of CICS Transaction Server does not support CICSsystems running under VSE/ESA. The chapters: “Setting up a CICS/VSE remotemanaged application system (MAS)” and “Installation verification procedure 3(IVP3)”, (of the previous release) are removed.
For most items in each of the lists above, there is a reference to the part of thebook where there is more detail.
xx CICS TS for z/OS: Installation Guide

Changes for CICS Transaction Server for OS/390 Version 1 Release 3v Post-installation, addition to chapter on authorizing CICS regions
v VTAM® definitions required for CICS: PERSIST=MULTI
v Defining an MVS console
v Java support
CICSPlex SM installation and setupTo support the inclusion of CICSPlex SM as an element of CICS TransactionServer for OS/390, Version 1 Release 3, and the consequent revised installationprocesses, a new part, Part 5, “CICSPlex SM installation and setup,” on page 269has been added to explain how to install the CICSPlex SM element. Thisinformation was previously available in the CICSPlex SM Setup book at theprevious release. It contains the following chapters
v Chapter 36, “CICSPlex SM setup checklist and worksheets,” on page 271.
v Chapter 43, “Setting up a coordinating address space (CAS),” on page 315.
v Chapter 44, “Setting up a CICSPlex SM address space (CMAS),” on page 321.
v Chapter 45, “Setting up a CICS managed application system (MAS),” on page333.
v Chapter 47, “Configuring the Starter Set,” on page 361.
v Chapter 48, “Applying service to CICSPlex SM,” on page 371.
v Chapter 53, “CICSPlex SM installation verification procedures,” on page 407.
v Chapter 55, “Installation verification procedure 2 (IVP2),” on page 425.
v Chapter 49, “Using the EYUINST EXEC to tailor skeleton jobs,” on page 373.
v Chapter 50, “CICSPlex SM system parameters,” on page 383.
v Chapter 51, “CMAS journaling,” on page 397.
v Chapter 52, “Preparing to use the IPCS tools,” on page 401.
Changes for CICS Transaction Server for OS/390 Version 1 Release 2The major changes to CICS that affect CICS Transaction Server for OS/390,Version 1 Release 2 are:
v Chapter 24, “Defining the logger environment for CICS journaling,” on page 143has been rewritten, to include information about DASD-only log streams.
v The chapter discussing the installation of DB2 support has been removed.Information about CICS DB2 is available in the CICS DB2 Guide.
v A new section Chapter 7, “Authorizing CICS regions to access MVS resources,”on page 69 to explain how to authorize CICS region userids to z/OS UNIXSystem Services.
Changes for CICS Transaction Server for OS/390 Version 1 Release 1The major changes to CICS Transaction Server for OS/390 Release 1 that affectthis book are:v Support for the MVS loggerv The removal of journal controlv Support for VSAM RLS.
Other changes made to this book include:
v The removal of information relating to XRF, including information for theDFHALTDS and DFHIVPAL jobs
Summary of changes xxi

v The removal of information relating to the CICSplex IVPs.
xxii CICS TS for z/OS: Installation Guide

Part 1. Planning for Installation
This part discusses planning considerations prior to Installation. It contains thefollowing chapters
v Chapter 1, “Introduction,” on page 3
v Chapter 2, “Installing CICS TS,” on page 9
v Chapter 3, “Installing CICS TS using DFHISTAR,” on page 17
v Chapter 4, “Post-installation requirements,” on page 55
v Chapter 5, “Installing the CICS Information Center,” on page 61
© Copyright IBM Corp. 1989, 2010 1

2 CICS TS for z/OS: Installation Guide

Chapter 1. Introduction
Generally, large online CICS applications run on an MVS operating system togetherwith a collection of other supporting software products, some provided by IBM andothers by independent software vendors (ISVs). Functional additions includedistributed CICS software on alternative platforms, enabling you to distributetransaction processing, with CICS on the MVS host acting as a large databaseserver. IBM recognizes that customers traditionally run these products at variousrelease levels—a piecemeal or mix-and-match approach.
CICS TS, together with other z/OS Software Servers, is designed to make it easierto install and operate the mix of software you need to run your business.
Overview of CICS TSWith CICS Transaction Server for z/OS (CICS TS), IBM continues to integrate CICSwith a set of other supporting software, offering you a single product in place ofseveral products. You order an entire set of software, integrated into one licensedproduct, instead of having to order new levels of some products but not others.
CICS TS is a member of the z/OS family of MVS-based software servers, and isseparately orderable as a single part number.
Within CICS TS, the levels of all products reflect the level of the CICS TS productitself. Even the word “product” has new meaning; for this reason the products thatmake up the base of CICS TS are called elements. CICS TS marks a significantchange from the former piecemeal approach to the way you order and install CICSand its related software.
Getting all the elements in CICS TS installed and running is the subject of thisbook. Because the elements and features of CICS TS are integrated into a singlepackage with compatible service levels, it is expected that you will migrate allelements and features of CICS TS at the same time.
PackagingThe packaging of CICS TS into a number of elements is similar to the packaging ofz/OS. For its operating system environment, CICS TS requires z/OS, Version 1Release 4. As you prepare to install CICS TS, keep in mind that you gain thebenefits of a comprehensively tested environment when you install CICS TS.
In summary, the concept of CICS TS is to integrate a range of transaction serverfunctions into a single product that delivers the function previously provided by anumber of individual IBM software products. CICS TS consists of several baseelements. The intent is that IBM ships, and you run, all elements at the singlerelease level that IBM has subjected to comprehensive system testing.
Migrating from one release of CICS TS to the next is relatively simple, and thetransition from your current systems to CICS TS should also be straightforward.
© Copyright IBM Corp. 1989, 2010 3

CICS TS elements and featuresCICS TS consists of base elements that deliver essential transaction serverfunctions. When you order CICS TS, you receive all the base elements, describedin Table 2 on page 6.
Two methods of installing CICS TS come free with your license:
1. A system replace method called ServerPac
2. The Custom-Built Product Delivery Option (CBPDO).
Exclusive and non-exclusive elements and featuresSome elements and features contain new function that is available only within CICSTS. This book labels such an element or feature exclusive: new function isexclusive to CICS TS. If an element or feature is exclusive, you receive newfunction only through CICS TS. That is, while prior levels continue to be available,future functional enhancements occur only within CICS TS.
Other elements, however, exist both within CICS TS and also as separatelyorderable products. These are non-exclusive.
IBM's direction is to make functional enhancements only within CICS TS.
What you receive with CICS TSBecause the elements of CICS TS are integrated into a single package, you areexpected to install the entire product.
You can install CICS TS using one of several IBM packages. Two of thesepackages are available at no additional charge when you license CICS TS: (1)ServerPac, the system replace deliverable, or (2) CBPDO.
There is no stand-alone product tape for CICS TS, and there is no Custom BuiltInstallation Process Offering (CBIPO).
Because of the overall ease of installing, IBM recommends that you chooseServerPac, if possible.
v If you order the ServerPac offering, you receive:
– A series of tapes, each in IEBCOPY dump-by-dataset format (not a physicalvolume dump) containing a complete generated CICS TS system.Thisconsists of distribution and target libraries, consolidated software inventory(CSI) and other SMP/E libraries already generated. CICS TS elements andtheir service are integrated into distribution and target libraries.
IBM has IPLed the system and executed all installation verification programs(IVPs) prior to shipment.
– A CustomPac dialog, accessed through ISPF, that produces jobs that unloadthe tape to DASD. Through the dialog, you can name the data sets and placethem in the catalogs you specify. The following accompanying documentationtells you how to use the dialog:- ServerPac: Installing Your Order (customized for each customer order)- ServerPac: Using the Installation Dialog, SA22-7815
– All unintegrated service, available on a service tape.
– Sample jobs to assist with the installation of CICS TS product and service.
Through the dialog, you can:
4 CICS TS for z/OS: Installation Guide

– Name the data sets and place them on the volumes and in the catalogs youchoose
– Save configuration data for the next install, easing your move to the nextrelease of CICS TS
– Run tailored post-installation verification jobs.
v If you order CBPDO, you receive one logically stacked SMP/E RELFILE tapethat contains all the base elements. Depending on your customer profile, youreceive uninstalled service. You also receive:
– Sample jobs to help you install CICS TS and service.
– Custom-Built Offerings Plan/Install, SC23-0352; the CBPDO Memo to UsersExtension; CICS TS Program Directory, GC33-1200, and program materialsthat describe your CBPDO order.
Figure 1 illustrates the content differences between the ServerPac method and theCBPDO method of installing CICS TS.
DocumentationRegardless of whether you use ServerPac or CBPDO, you receive:
Integration-tested codeand PTFs
Integration-tested codein RELFILE
format
Integration-tested PTFs
HipersHipers
PE fixes PE fixes
UninstalledPTFs based
on yourcustomer
profile
PTFs requiredfor new products
Other IBMproducts
you mighthave ordered
.
.
.
PTFs notintegrated
and availablefor preventivemaintenance
All service in both deliverables iscurrent to within a week of order.
ServerPac CBPDO
IBMrecommends
you installthis code.
Integratedinto
libraries
Figure 1. Contents of the ServerPac and the CBPDO Delivery
Chapter 1. Introduction 5

v The CICS TS Program Directory and other installation information for theelements, in hardcopy and softcopy.
v Essential hardcopy books to help you with installation.
v All the publications for CICS Transaction Server for z/OS in softcopy as part ofthe CICS Information Center. This is supplied on a CD-ROM. Installationinstructions for the CICS Information Center can be found in Chapter 5, “Installingthe CICS Information Center,” on page 61.
For details of all the publications available, see “Bibliography” on page 467.
Summary of elements in CICS TSThis section lists all the elements and features in CICS Transaction Server for z/OS.Most of the elements are products that have been available for some time; you mayalready be running some of them.
Table 2 lists all elements that are in the CICS TS base. The table tells you:
NameThe short name of the element used in this book.
Excl.Whether the element is exclusive. In the Excl. column, Yes indicates anexclusive element, and No indicates a non-exclusive element that is alsoavailable as a stand-alone product.
Function LevelThe latest CICS TS release in which the element changed (that is, was addedto CICS TS or had new function added). For non-exclusive elements, thiscolumn also gives the release level of the stand-alone product.
Note: To ensure compatibility with previous releases, the CICS base elementmaintains its own level (identification) number. Each time new function isadded to CICS and shipped with the CICS Transaction Server product,the CICS level number is incremented. The CICS level number no longerimplies a specific version and release number, because CICS is nolonger a separate product.
The CICS level number in CICS TS is 0640. This number is returned inthe RELEASE parameter of the INQUIRE SYSTEM command. The 0640number also appears in other forms such as 6.4.0 in offline utilities suchas statistics and dump formatters to identify the level of utility beingused, and as the suffix in module names such as DFHPD640.
CommentsSome general information about the element.
Table 2. List of base elements shipped in CICS TS
Name of element Excl. Function level Comments
CICS Yes CICS TS V3 R1 CICS includes:v ONC RPC supportv CICS Web interfacev CICS DB2 attachment facilityv CICS/DDM
6 CICS TS for z/OS: Installation Guide

Table 2. List of base elements shipped in CICS TS (continued)
Name of element Excl. Function level Comments
CICSPlex SM Yes CICS TS V3 R1 Updated to support new levels of function inCICS. CICSPlex SM becomes an exclusiveelement in CICS TS Release 3.
IBM CICSPlex System Manager for MVS/ESAVersion 1 Release 3 continues to be available forcustomers that are not yet ready to migrate toCICS TS (for example, customer with CICS/ESAVersion 4 Release 1 or earlier).
Application MigrationAid
No CICS TS V1 R1 First available in 1990, this element is stillavailable stand-alone as IBM CustomerInformation Control System (CICS) programoffering, CICS Application Migration Aid, programnumber 5695-061.
REXX for CICS No CICS TS V1 R2 (REXX forCICS/ESA V1R1)
Separately available as REXX for CICS, programnumber 5655-B54.
The CICS Clients and The CICS Transaction GatewayCICS Transaction Server for z/OS does not include the CICS Universal Clients orthe CICS Transaction Gateway. To use the CICS Universal Client V5 or the CICSTransaction Gateway V5, licenses for these products are required.
Installing CICS TSChapter 2, “Installing CICS TS,” on page 9 tells you about installing the CBPDOdelivery version of CICS TS.
Chapter 1. Introduction 7
##

8 CICS TS for z/OS: Installation Guide

Chapter 2. Installing CICS TS
IBM offers the following methods for installing CICS TS:v ServerPacv CBPDO, using the SMP/E RECEIVE, APPLY, and ACCEPT commandsv CBPDO, using the DFHISTAR processv IBM customized packages.
The first three of these are entitled offerings, and are the subject of this book, butIBM customized packages are fee-based and are not discussed except for thefollowing summary information. Depending on the country in which you order, youcan purchase one of the following customized packages:
v A SystemPac, which tailors CICS TS to your environment, such as DASD layoutand naming conventions, based on information provided to IBM.
v SoftwareXcel Installation Express (SIE), which tailors CICS TS to yourspecification and provides services that perform the actual install for you.
v Other fee-based services and customized offerings.
Both the ServerPac and CBPDO methods of delivering CICS TS come with a set ofdocumentation that you use when you install the product. To help you plan ahead,this chapter gives you a preview of some of this information, such as theinformation contained in the Program Directory, which is shipped regardless of thedelivery method you choose.
Note: The Program Directory is available in hardcopy only with the product—itcannot be ordered separately. A softcopy version is available on the CICS TSCD-ROM product kit, and also on the Transaction Processing and DataCollection Kit, SK2T-0730. The Program Directory is also available on theCBPDO and ServerPac tapes.
This chapter also helps you with other planning steps you must take:
v Ensuring you have the required hardware and software to install and run CICSTS; see “Requirements for CICS TS.”
v Ensuring you have enough DASD storage space for CICS TS; see “DASDstorage requirements for CICS TS” on page 11.
v Outlining the install steps for CBPDO; see “Installing CBPDO” on page 11
Requirements for CICS TSA major part of your planning effort involves looking at the software and hardwarerequired for the system that you are installing.
Hardware requirements for installing CICS TSWhether you choose the CBPDO method or the ServerPac method, the hardwarerequirement is the same.
Hardware requirements are more fully described in the CICS Transaction Server forz/OS Release Guide
You need a hardware configuration that runs the required levels of MVS, providedthe configuration has a terminal and a tape device capable of reading one of thefollowing types of tape on which CICS TS is supplied:v 6250 bpi 9-track reels
© Copyright IBM Corp. 1989, 2010 9

v 3480 cartridgesv 4MM DAT cartridges
Software requirements for installing CICS TSThe system software requirements for installing CICS TS using the ServerPacmethod or the CBPDO method is the same except for the addition of SMP/E forCBPDO.
Software requirements are more fully described in the CICS Transaction Server forz/OS Release Guide
The products shown in Table 3 must be installed on the system you use to installboth the ServerPac and the CBPDO.
Table 3. Program products required on the installing system for ServerPac and CBPDO
Program Product Minimum Level
z/OS (5694-A01) Version 1 Release 4.
z/OS includes the following elements that are required for installingCICS TS:
v Interactive System Productivity Facility (ISPF)
v Time Sharing Option/Extended (TSO/E)
v DFSMS/MVS
v Language Environment®
v Two components of eNetwork Communications Server: SNA andIP (previously VTAM and TCP/IP).
v z/OS UNIX system services (see “HFS and PDSE requirements”for more information.
If you are installing CICS TS using the CBPDO method, you alsoneed:
v System Modification Program/Extended (SMP/E)
v High Level Assembler/MVS & VM & VSE.
Service note:: See the CICS Transaction Server for z/OS Program Directory forinformation about the service which should be applied on z/OSVersion 1 Release 4 to ensure that CICS TS installs correctly.
HFS and PDSE requirementsSome components of CICS TS are installed in PDSE data sets and HFS files. CICSTS for z/OS, Version 3.1 requires PDSE data set support for installation tocomplete successfully. DFSMS/MVS, which is supplied as an element of z/OS,provides this support for PDSE data sets. The components concerned are part ofthe CICS support for Java programs and for IIOP inbound to Java applications. ForFMID JCI640D, which contains the HFS-dependent code, the OMVS address spacemust be active in full-function mode, otherwise the install of this function fails.
In the set of installation jobs, there are some new initial jobs to create the HFS filesand the directories shown in Figure 2 on page 11. You run these jobs before any ofthe normal DFHINSTn jobs. Note that the user ID running these jobs requiressuperuser authority.
10 CICS TS for z/OS: Installation Guide

Notes:
1. If you normally maintain additional SMP/E target zone libraries for the purposeof applying service, you can also create additional directories at the /cicsts31level to create the HFS equivalent. See the DFHIHFSA job for more information.
2. The pathprefix in Figure 2 is optional.
DASD storage requirements for CICS TSThe amount of storage required for all the target and distribution data sets isdetailed in the space table in the CICS Transaction Server for z/OS: ProgramDirectory.
Installing CBPDOYou install all the elements from the CICS TS CBPDO using a single installationprocess. The CBPDO Memo to Users Extension contains information about theCBPDO you ordered, and the features and service it includes. It also containsCBPDO installation information.
The first planning task is to read the Memo to Users Extension thoroughly beforestarting any of the install tasks. If you are a new user of CBPDO, you should alsoread the IBM publication, MVS Custom-Built Offerings Planning and Installation,SC23-0352.
The CICS Transaction Server for z/OS: Program Directory gives a sampleIEBCOPY job that you can customize to copy RELFILE(2) from the CICS TSCBPDO tape. Modify the LABEL=3 parameter to reference the file number ofRELFILE(2) as supplied on the CBPDO tape. When you have copied RELFILE(2) toDASD, you generate a single set of install jobs using the CICS TS job generator,DFHISTAR. This generates the following set of customized install jobs, based onthe parameters you specify to DFHISTAR:
v DFHIHFS0, DFHIHFS1, DFHIHFSA, and DFHISMKD, the HFS-related jobs
v DFHINST1 through DFHINST6
using the SMP/E RECEIVE, APPLY, and ACCEPT commandsThe CICS Transaction Server for z/OS: Program Directory describes this processand tells you when to return to the CICS Transaction Server for z/OS InstallationGuide to continue..
/usr1 /usr2 /usr3 /usrn
/lpp
/cicsts
/cicsts13 /cicstsnn/cicsts22 /cicsts23 /cicsts31
/pathprefix
Figure 2. The HFS directory structure for CICS java and IIOP files
Chapter 2. Installing CICS TS 11
|
|||
|

using the DFHISTAR process“Edit the DFHISTAR Job” on page 17 describes all the parameters that you canspecify to customize the install jobs, and explains the jobs that are generated.
One of the most significant parameters you are asked to specify is the high-levelqualifier for the data sets into which the jobs install the product. CICS TS comprisesa number of elements that are installed in a single process by the DFHINSTn jobs.To ensure the element libraries are easily identified, DFHISTAR adds an elementqualifier to the data set names. Using the default high-level qualifier CICSTS31, thenames generated by DFHISTAR take the following form:
CICS CICSTS31.CICS.ddname
CICSPlex SM CICSTS31.CPSM.ddname
Application Migration Aid CICSTS31.AMA.ddname
REXX for CICS CICSTS31.REXX.ddname
To enable you to customize the HFS-related jobs, the following parameters areprovided in the DFHISTAR job:
HFS0DSNThe data set name of the HFS to be mounted at directory /pathprefix/usr/lpp/cicsts. Pathprefix is variable, and optional, The other parts of this directoryname structure are fixed. The default data set name isOMVS.USR.LPP.CICSTS.
This parameter is used by job DFHIHFS0.
HFS1DSNThe data set name of the HFS to be mounted at directory /pathprefix/usr/lpp/cicsts/ussdir, where ussdir is a variable you specify in the ussdir parameter inDFHISTAR. If you omit the ussdir parameter it defaults to the value of theTINDEX parameter in lowercase, which in turn defaults to CICSTS31, so if bothdefaults are taken, the full directory path resolves to /pathprefix/usr/lpp/cicsts/cicsts31.
The default data set name is OMVS.USR.LPP.CICSTS.CICSTS31.
This parameter is used by job DFHIHFS1.
HFSADSNThe data set name of the HFS to be mounted at directory /pathprefix/usr/lpp/cicsts/ussdira, where ussdira is a variable you also specify in DFHISTAR. Ifyou omit the ussdira parameter it defaults to the value (in lower case) ofAINDEX, which in turn defaults to CICSTS31.A. The default data set name isOMVS.USR.LPP.CICSTS.CICSTS31.A.
This parameter is used by job DFHIHFSA.
Running the install jobsRun the install jobs as follows:
1. Run the HFS-related jobs to create the HFS directories down to the /cicsts31level:
DFHIHFS0 (required once only)This job creates the HFS specified on the HFS0DSN parameter and alsothe /cicsts directory at /pathprefix/usr/lpp.
This job is required once only, the first time you install CICS TS, and can beskipped in subsequent releases.
12 CICS TS for z/OS: Installation Guide
##
##
##
##

Note: When you install a new release of z/OS, directories down to the/pathprefix/usr/lpp level are replaced, effectively losing the /cicstsand lower directories. Issue the make directory command (mkdir/pathprefix/usr/lpp/cicsts) to recreate mount point/pathprefix/usr/lpp/cicsts for the HFS defined in DFHIHFS0(OMVS.USR.LPP.CICSTS). The mount command should already bein the PARMLIB member BPXPRMxx, copied from the DFHBPXP0member of SDFHINST.
DFHIHFS1 (required)This job creates, at /pathprefix/usr/lpp/cicsts, the HFS specified on theHFS1DSN parameter and also the directory specified on the parameter(default name /cicsts31).
DFHIHFSA (optional)This job creates, at /usr/lpp/cicsts, the alternate HFS specified on theHFSADSN parameter and also the directory specified on the ussdiraparameter (default name /cicsts31.a).
2. Run DFHISMKD to create the directories and HFS under /pathprefix/usr/lpp/cicsts/cicsts31, required for FMID JCI640D, to contain the Java and IIOPclasses, samples, and so on, that have to reside in HFS.
3. Run the DFHINST1 through DFHINST4 jobs as described in the ProgramDirectory
4. Run the CBPDO-supplied SMP/E RECEIVE job, RCVPDO, located in theCBPDO RIMLIB dataset (this replaces the DFHINST5 job described in theProgram Directory).
5. Run the DFHINST6 job.
Note: This job must run in the same MVS image in which you ran theDFHISMKD job to create the HFS directories. DFHINST6 uses theCICS TS HFS directories and data sets, and these are accessible onlyin the MVS in which you created them.
There is more detailed information about all these jobs in the CICS TS CICSTransaction Server for z/OS Program Directory, and also in the comments at thestart of each job.
On completion of the installation jobs, you have all the elements installed. Note thatthere is no provision within the DFHISTAR job generator, or in the generated jobs,to exclude an element from the install process. When you run the jobs, SMP/Einstalls all the elements included on the CICS TS CBPDO tape.
By default, SMP/E installs CICS TS in new SMP/E global, target, and distributionzones. The DFHINST3 job creates a new CSI data set for each zone. If you want tovary this default SMP/E configuration, see the CICS Transaction Server for z/OSProgram Directory for information about the parameters that control the SMP/Ezones and the disposition of the CSI data sets.
Installing ServerPacA CICS TS ServerPac consists of a number of tapes, the exact number dependingon whether other products are included with the CICS TS Serverpac, and also onthe type of tape requested. For example, a ServerPac order can comprise thefollowing:
v A tape that contains related-installation material (RIM) files.
Chapter 2. Installing CICS TS 13

v Three tapes that contain the CICS TS product, consisting of all the SMP/E CSIdata sets, and the target and distribution libraries.
v A service tape.
If you already have printed copies of the ServerPac manuals that you need to installthe ServerPac, use these to guide you through the installation process. If you don'thave copies, download and print the manuals from the first ServerPac tape. Thereis a sample job, in member PRTDOC, on the RIM tape, that you can use to printthe manuals.
What you need to install the ServerPacYou need the following resources to install the CICS TS ServerPac:
v A tape drive for reading the tapes.
v A TSO session for running the CustomPac dialog.
v A copy of the ServerPac: Using the Installation Dialog manual, SA22-7815.
v The ServerPac: Installing Your Order, customized for each customer order
v The CustomPac dialog supplied with ServerPac.
First-time user of the CustomPac dialog for ServerPacIf you are installing a ServerPac for the first time, start by installing the CustomPacdialog, as described in the ServerPac: Using the Installation Dialog manual in“Chapter 2. Installing and Starting the Dialogs”.
When you have installed the dialog, invoke the dialog as directed in the ServerPac:Using the Installation Dialog manual under the INVOCATION topic.
Existing user of the CustomPac dialog for ServerPacIf you have installed a ServerPac version of CICS TS for a previous order, use thedialog already installed. Invoke the CustomPac dialog, either from the ISPF primaryoptions menu, or by invoking the ServerPac CLIST.
As an existing user of the CustomPac dialog, you can begin at the step describedin the ServerPac: Using the Installation Dialog manual, in “Chapter 2. Receive aNew Order”.
Summary of the ServerPac installation stepsWhen you invoke the CustomPac dialog, you are presented with the primary optionmenu, from which you can:v Receive the order (option R)v Install the order (option I).
Note: The primary menu also enables you to display information about orders.
The following tasks are described, with illustrations of the various panels, in theServerPac: Using the Installation Dialog manual:
Receive the orderThis step is described in section “6.0 Receive an Order”.
The “Order Receive” panels enable you enter your CICS TS order information,and complete the job card information needed to generate the order-receive job.The final phase of this step presents you with the generated JCL in an editsession, from which you can submit the job to receive the installation material(RIM) files to your DASD.
14 CICS TS for z/OS: Installation Guide

Install ordersThis step is described in section “7.0 Installation Menu”.
The “Installation Menu” panels enable you to:
v Configure the order control information tables.
v Define values for the installation variables used in skeleton batch jobs.
v Define the names of the SMP/E zones into which you want to install CICSTS.
v Modify data set profiles and DASD allocation for the order.
v Define catalog data set names and the aliases associated with them.
v Define system-specific aliases (where applicable)
v Select and submit the installation jobs
v Save the installation work configuration for use with future CICS TS orders
v Update the order inventory status.
The next stepAfter you have completed the basic installation process using one of thesemethods, the next step is to test the two main elements, CICS and CICSPlex SM.In general, this means running the CICS installation verification procedures (IVPs)and the CICSPlex SM starter set.
These post-installation steps are discussed in the Chapter 4, “Post-installationrequirements,” on page 55 chapter.
Chapter 2. Installing CICS TS 15

16 CICS TS for z/OS: Installation Guide

Chapter 3. Installing CICS TS using DFHISTAR
IBM offers the DFHISTAR process for those who prefer to use it for installation. Thistopic covers the following subjects:v “Edit the DFHISTAR Job”v “Create RACF Profiles for the CICS Transaction Server Data Sets” on page 39v “Run the DFHISTAR Job” on page 39v “Check that You Are Ready to Run the Installation Jobs” on page 41v “Run the installation Jobs” on page 42v “Check the Output from the Installation Jobs” on page 47v “What next?” on page 48v “Activating CICS Transaction Server” on page 53v “Checklist for the CICS Transaction Server for z/OS Installation” on page 53
Edit the DFHISTAR JobEdit the DFHISTAR job, to assign values to installation parameters for yourenvironment. The DFHISTAR job is in the TDFHINST library when you copyRELFILE(2) from the distribution tape. You can either edit the DFHISTAR jobdirectly, or copy the DFHISTAR job (to preserve the IBM-supplied values) and edityour copy.
Remember that the product is installed using cataloged data sets.
This topic describes the process of editing the parameters in the DFHISTAR job. Itcontains the following sub-topics in an order that corresponds to the order ofparameters in the DFHISTAR job:
v “Specify the CICS Transaction Server Temporary Installation Libraries” on page20
v “Specify the JOB Parameters for Installation Jobs” on page 20
v “Specify the Scope of the Installation” on page 21
v “Specify the Type of JES to be Used” on page 21
v “Specify the Utilities to be used” on page 21
v “Specify the Prefix of CICS Transaction Server Jobs” on page 22
v “Specify the Indexes of CICS Transaction Server Data Sets” on page 22
v “Specify the CICS TS HFS Directories and Data Sets” on page 23
v “Specify extra qualifiers” on page 24
v “Specify Block Sizes” on page 24
v “Specify the Disk Unit for Work Data Sets” on page 24
v “Specify SMS Option for DASD Allocations” on page 24
v “Specify Disk Volumes” on page 25
v “Allocate the Space for CICS Transaction Server Disk Volumes” on page 28
v “Specify Attributes of the Temporary SMP/E Work Data Sets” on page 28
v “Specify Attributes of the Permanent SMP/E Data Sets” on page 29
v “Specify SMP/E Zone Attributes” on page 30
v “Specify the High-level Qualifiers for SMP/E Data Sets” on page 33
v “Specify the distribution tape device type” on page 33
v “Specify Attributes of the CICS Transaction Server system Data Sets” on page 33
v “Specify Attributes of any additional target Libraries” on page 34
© Copyright IBM Corp. 1989, 2010 17

v “Specify the Data Set Name of the SISPLOAD Library” on page 35
v “Specify the Data Set Name of the CSSLIB Library” on page 35
v “Specify the Data Set Name of the SCEECPP Library” on page 35
v “Specify the Data Set Name of the SCEELKED Library” on page 36
v “Specify the Data Set Name of the SCEELKEX Library” on page 36
v “Specify the Data Set Name of the SCEEOBJ Library” on page 36
v “Specify the Data Set Name of the SCEESAMP Library” on page 36
v “Specify the Data Set Name of the SCLBSID Library” on page 36
v “Specify the Data Set Name of the SCSQLOAD Library” on page 36
v “Specify the Data Set Name of the SCSQANLE Library” on page 37
v “Specify the Data Set Name of the SCSQCICS Library” on page 37
v “Specify the Data Set Name of the SCSQAUTH Library” on page 37
v “Specify the Name of the Java directory” on page 37
v “Specify the Data Set Name of the SDSNLOAD Library” on page 37
v “Specify the Data Set Name of the SEZARPCL and SEZACMTX libraries” onpage 37
v “Specify the Data Set Name of the SCEECICS & SCEERUN libraries” on page38
v “Specify the Data Set Name of the SCEERUN2 & SCEELIB libraries” on page 38
v “Specify the Data Set Name of the SCEEBND2 library” on page 38
v “Specify Log stream and Log stream Structure Attributes.” on page 38
To help you look up details about a particular parameter, Table 4 lists theDFHISTAR parameters, in alphabetical order, with their predefined values. (Theparameters in the DFHISTAR job itself are listed in associated groups.)
The default values of the parameters are the same as the IBM-supplied values.
You can use the IBM-supplied values, define your own values, or let the CICSTransaction Server installation process determine default values for you.
Note: You can enter your values for parameters of the DFHISTAR job in lowercase;except for the HFS-related parameters (USSDIR, USSDIRA, and JAVADIR),the values are translated into uppercase when you run the DFHISTAR job.
Table 4. Alphabetical list of parameters for the DFHISTAR job
Parameter CICS-supplied value Your value ? See page
ADDTVOL CICS31 SYSALLDA 34AINDEX CICSTS31.A 34ALINDEX SYS1.CICSTS31.A 34ASMPLTS CICSTS31.A.SMPLTS 34ASMPMTS CICSTS31.A.SMPMTS 34ASMPSCDS CICSTS31.A.SMPSCDS 34ASMPSTS CICSTS31.A.SMPSTS 34AZONE AZONE 34AZONECSI CICSTS31.A.AZONE 34AZONELOG CICSTS31.A.AZONE.SMPLOG 34BLKFB80 0 24BLKISPF 3200 24BLKU 32760 24
18 CICS TS for z/OS: Installation Guide

Table 4. Alphabetical list of parameters for the DFHISTAR job (continued)
Parameter CICS-supplied value Your value ? See page
CMACVOL CICS31 25CSSLIB SYS1.CSSLIB 35DEFVOL CICS31 SYSALLDA 25DINDEX CICSTS31 22DISTVOL CICS31 SYSALLDA 25DSINFO CICSTS31 CICS31 SYSALLDA . 33DZONE DZONE 30DZONECSI CICSTS31.DZONE NEW CICS31 SYSALLDA 30DZONELOG CICSTS31.DZONE.SMPLOG NEW 30GINDEX CICSTS31 22GZONE NEW CICSOPT 30GZONECSI CICSTS31.GZONE NEW CICS31 SYSALLDA 30GZONELOG CICSTS31.GZONE.SMPLOG NEW 30HFS0DSN OMVS.USR.LPP.CICSTS 23HFS1DSN OMVS.USR.LPP.CICSTS.CICSTS31 23HFSADSN OMVS.USR.LPP.CICSTS.CICSTS31..A 23JAVADIR java142s/J1.4 37JES JES2 21JOB (No valid value) 20LIB CICSTS31.XDFHINST 20LINDEX SYS1.CICSTS31 22LOGGER-INFO 001 500 4096 64000 2048 MVSX XXXXXXXX
XXXXXXXX38
OPTVOL CICS31 SYSALLDA 25PREFIX DFH 22SCEECICS SYS1.SCEECICS 38SCEECPP SYS1.SCEECPP 35SCEELIB SYS1.SCEELIB 38SCEEBND2 SYS1.SCEEBND2 38SCEERUN SYS1.SCEERUN 38SCEERUN2 SYS1.SCEERUN2 38SCEELKED SYS1.SCEELKED 36SCEELKEX SYS1.SCEELKEX 36SCEEOBJ SYS1.SCEEOBJ 36SCLBSID SYS1.SCLBSID 36SCSQLOAD SYS1.SCSQLOAD 36SCOPE ALL 21SDSNLOAD SYS1.SDSNLOAD 37SCSQLOAD SYS1.SCSQLOAD 36SCSQANLE SYS1.SCSQANLE 37SCSQCICS SYS1.SCSQCICS 37SCSQAUTH SYS1.SCSQAUTH 37SEZACMTX SYS1.SEZACMTX 37SEZARPCL SYS1.SEZARPCL 37SISPLOAD SYS1.SISPLOAD 35SMPLTS CICSTS31.SMPLTS 29SMPMTS CICSTS31.SMPMTS 29SMPPTS CICSTS31.SMPPTS 29SMPSCDS CICSTS31.SMPSCDS 29SMPSTS CICSTS31.SMPSTS 29SMPVOL CICS31 SYSALLDA 25SMPWORK SYSALLDA 28
Chapter 3. Installing CICS TS using DFHISTAR 19

Table 4. Alphabetical list of parameters for the DFHISTAR job (continued)
Parameter CICS-supplied value Your value ? See page
SMS NO 24TAPEUNIT 3480 33TARGVOL CICS31 SYSALLDA 25TEMPLIB CICSTS31.TDFHINST 20TINDEX CICSTS31 22TZONE TZONE 30TZONECSI CICSTS31.TZONE NEW CICS31 SYSALLDA 30TZONELOG CICSTS31.TZONE.SMPLOG NEW 30USSDIR . 23USSDIRA . 34UTILITIES ASMA90 IEWL GIMSMP IEBCOPY 21WORKUNIT SYSALLDA 24XTRAQUAL . . . 24
Specify the CICS Transaction Server Temporary Installation LibrariesSpecify the data set names you want to use for the two temporary libraries that willbe used to install CICS Transaction Server. If you do not want to use the defaultnames, record your values for the TEMPLIB and LIB parameters.
TEMPLIB library_nameThis specifies the name of the temporary installation library that contains theskeleton installation jobs. Specify the name of the data set into which youcopied RELFILE(2) from the distribution tape (in the topic Copy RELFILE(2)from the Distribution Tape in the Program Directory).
Also specify this name on the SYSPROC DD statement of the DFHISTAR job.
LIB library_nameSpecifies the name of the installation output library to which the jobs generatedby the DFHISTAR job are added.
Specify the JOB Parameters for Installation JobsDecide what parameters you want to use on the JOB statements of the CICSTransaction Server installation jobs, and specify them on the JOB parameter:
JOB accounting_informationSpecifies the JOB statement and accounting information that you wantsubstituted into the jobs generated by the DFHISTAR job. For example:JOB //XXXXXXXX JOB 1,userid,MSGCLASS=A,MSGLEVEL=(1,1),JOB // CLASS=A,NOTIFY=useridJOB /*JOBPARM SYSAFF=node1JOB /*ROUTE PRINT node2.userid
Notes:
1. Do not change XXXXXXXX given in the sample JOB statement in the DFHISTARjob. This is the 8-character job name that is substituted by the DFHISTAR job.For example, for the installation job DFHIVPBT, the DFHISTAR job changesXXXXXXXX to DFHIVPBT.
2. Normal JCL rules for coding JOB statements apply to the JOB parameter.
3. If you want to add a TIME parameter to the CICS Transaction Server installationjobs, sample run times are given in “Run Times of the Installation Jobs” on page42.
20 CICS TS for z/OS: Installation Guide

4. Delete (or comment out) extra lines of the JOB statement that you do not need.
5. Normal JCL rules apply when coding the JOB statement (for example, all linesexcept the last line must end in a comma).
Specify the Scope of the InstallationSpecify the scope of the CICS Transaction Server installation on the SCOPEparameter:
SCOPE ALL|BASE|POSTSpecifies whether you want to generate all the CICS Transaction Serverinstallation and post-installation jobs, or only the post-installation jobs. Wheninstalling CICS Transaction Server from the distribution tape, you wouldnormally specify SCOPE ALL (the default). You would normally code the otheroptions, if necessary, during some post-installation tasks, as described inChapter 4, “Post-installation requirements,” on page 55.
ALLSpecifies that you want to generate all the CICS Transaction Serverinstallation jobs and all the post-installation jobs.
BASESpecifies that you want to generate only the installation jobs (DFHINST1through DFHINST6, DFHIHFS0, DFHIHFS1, and DFHISMKD) that you useto install CICS Transaction Server from the distribution tape.
POSTSpecifies that you want to generate only the post-installation jobs, that youcan use to create the CICS Transaction Server data sets, and run the IVPs.
Specify the Type of JES to be UsedSpecify the type of job entry subsystem (JES) that you intend to use to install CICSTransaction Server on the JES parameter: This enables the DFHISTAR job togenerate jobs with statements suitable for JES2 or JES3.
JES JES2|2|JES3|3Specifies the release of JES that you are using. If you are using JES2, specifyJES2 or 2. If you are using JES3, specify JES3 or 3.
Specify the Utilities to be usedSpecify the utilities to be used to install CICS Transaction Server on the UTILITIESparameter:
UTILITIES asmprog binder smpeprog copyutilSpecifies the names of utility programs to be used when installing CICSTransaction Server elements and programs that it uses.
asmprogis the program name of the assembler. Specify ASMA90, for High LevelAssembler/MVS & VM & VSE, which is required.
binderis the program name of the OS/390 binder. Ensure that program IEWLreferences the OS/390 program management binder.
smpeprogis the program name of the SMP/E program. Ihe IBM-supplied name isGIMSMP.
Chapter 3. Installing CICS TS using DFHISTAR 21

copyutilis the program name of the data set copy utility program. The IBM-suppliedname is IEBCOPY.
Note: The High Level Assembler must be either in the LINKLST concatenation oryou must add a STEPLIB DD statement that points to the library containingthe High Level Assembler in any jobs that invoke SMP/E.
Specify the Prefix of CICS Transaction Server JobsSpecify the prefix, as one through six characters, to be added to the jobs generatedby the DFHISTAR job. This prefix overwrites the first characters of the job name.For example, PREFIX USERID changes the job name DFHINST1 to USERIDT1.
PREFIX prefixOne through six characters.
Specify the Indexes of CICS Transaction Server Data SetsSpecify the high-level indexes for the CICS Transaction Server distribution, target,and SMP/E libraries allocated by the installation process.
DINDEX library_prefixAssigns a high-level index to the CICS Transaction Server SMP/E distributionlibraries (except for the SDFHLINK and SDFHLPA target libraries) allocated bythe installation process.
The library_prefix value must not be longer than 26 characters, and the leadingcharacter must be alphabetic. If you specify more than one level of index, thenames must be separated by a period (for example, DINDEX CICSTS31.TEST).
GINDEX library_prefixAssigns a high-level index to the CICS Transaction Server SMP/E globallibraries (except for the SDFHLINK and SDFHLPA target libraries) allocated bythe installation process.
The library_prefix value must not be longer than 26 characters, and the leadingcharacter must be alphabetic. If you specify more than one level of index, thenames must be separated by a period (for example, GINDEX CICSTS31.TEST).
LINDEX library_prefixAssigns a high-level index to the SDFHLPA, SDFHLINK, SDFJLPA, SEYULINKand SEYULPA libraries allocated by the installation process. The library_prefixvalue must be defined in the MVS Master Catalog.
The library_prefix value must not be longer than 26 characters, and the leadingcharacter must be alphabetic. If you specify more than one level of index, thenames must be separated by a period (for example, LINDEXSYS1.CICSTS31.CICS.TEST).
TINDEX library_prefixAssigns a high-level index to the CICS Transaction Server SMP/E targetlibraries (except for the SDFHLINK, SDFHLPA, SDFJLPA, SEYULINK, andSEYULPA target libraries) allocated by the installation process.
Notes:
1. The high-level index for the SDFHLINK and SDFHLPA libraries is defined bythe LINDEX parameter.
2. The high-level index for the data sets created by the jobs DFHCOMDS andDFHDEFDS is defined by the dsindex operand of the DSINFO parameter.
22 CICS TS for z/OS: Installation Guide
The library_prefix value must not be longer than 26 characters, and the leadingcharacter must be alphabetic. If you specify more than one level of index, thenames must be separated by a period (for example, TINDEX CICSTS31.TEST).
Specify the CICS TS HFS Directories and Data SetsThe DFHISTAR job has parameters that enable you to customize the UNIX systemservices HFS directories.
Note: When discussing HFS Directory names, this topic and the Program Directoryuse different methods to show fixed and variable names, as follows:
Table 5.
This topic uses:the Program Directoryuses: to show:
/variable /@variable@ a variable value
/constant /constant a fixed value
pathprefixThe name of an optional prefix to the CICS TS directory /usr/lpp/cicsts. Forexample:/example/usr/lpp/cicsts
ussdirThe name of the CICS TS directory under /pathprefix/usr/lpp/cicsts.
The full name is therefore /pathprefix/usr/lpp/cicsts/ussdir. Ussdir is a namethat you can choose. The default for ussdir is the value of the TINDEXparameter in lowercase.
The default path is:/pathprefix/usr/lpp/cicsts/cicsts31
Note: The name of the UNIX System Services directory after the root directory(/usr/lpp) is always /cicsts.
HFS0DSNThe dataset name of the HFS to be mounted at directory /pathprefix/usr/lpp/cicsts/cicsts31.
Note that these directory names are fixed. The default is data set nameOMVS.USR.LPP.CICSTS .
See “The DFHIHFS0 Job” on page 43 for details of the job that uses thisparameter.
HFS1DSNThe dataset name of the HFS to be mounted at directory /pathprefix/usr/lpp/cicsts/ussdir, where ussdir is the name of the directory specified on the ussdirparameter in the DFHISTAR job. The default is data set nameOMVS.USR.LPP.CICSTS.CICSTS31.
See “The DFHIHFS1 Job” on page 43 for details of the job that uses thisparameter.
HFSADSNThe dataset name of the HFS equivalent of the SMP/E “additional target zone”,to be mounted at directory /pathprefix/usr/lpp/cicsts/ussdira, where ussdira isthe name of the directory specified on the ussdira parameter in the DFHISTARjob. The default data set name is OMVS.USR.LPP.CICSTS.CICSTS31.A.
Chapter 3. Installing CICS TS using DFHISTAR 23

See the list step about running DFHIHFSA on page “DFHIHFSA” on page 51 fordetails of the job that uses this parameter.
Specify extra qualifiersSpecify extra qualifiers that can optionally be inserted into the data set name of the'target', 'distribution' and 'additional' zone data sets respectively, and inserted beforethe last data set qualifier. For example, XTRAQUAL JDOE . . changes the name ofthe target zone libraries to the values set byTINDEX.CICSTS31.CICS.JDOE.SDFHLOAD.
XTRAQUAL . . .Three qualifiers to be used by 'target', 'distribution' and 'additional' zone datasets. If a qualifier is not required, specify a period (.).
Specify Block SizesSpecify the block sizes to be used when allocating data sets during installation onthe BLKFB80 and BLKU parameters:
BLKFB80 {0|blocksize}The block size to be used when allocating data sets that have a fixed blockrecord format and record length of 80 bytes.
The IBM-supplied value in DFHISTAR is 0. You are recommended to leave thisvalue specified as 0 to allow OS/390 to determine the optimum block size foryou.
BLKU {32760|blocksize}The block size to be used when allocating data sets that have an undefinedrecord length.
BLKISPF {3200|blocksize}The block size to be used when allocating data sets in CICSPlex SystemManager that are intended to be used by ISPF.
Specify the Disk Unit for Work Data SetsSpecify the UNIT parameter for the disk or disks on which work data sets arestored on the WORKUNIT parameter:
WORKUNIT disktypea unit identifier.
Specify SMS Option for DASD AllocationsSpecifies the extent to which you want to leave the allocation of CICS TSinstallation data sets to SMS. You can either let SMS handle all DASD allocation, oryou can opt to use volume parameters to control the allocations that do not have tobe SMS-managed.
Note: Some CICS TS data sets are installed in PDSE data sets. These are:
v The SMP/E SMPLTS data set.
v The distribution library, ADFJMOD.
v The target libraries SDFJLOAD, SDFJLPA, and SDFJAUTH.
See the topic DASD Storage Requirements in the Program Directory forinformation about these data sets.
24 CICS TS for z/OS: Installation Guide

SMS Y|NIf you specify SMS Y, the VOLUME parameter is omitted from the generatedinstallation jobs, and all data set allocations are handled by SMS.
If you specify SMS N, the VOLUME parameter is included on the generatedinstallation jobs, and will be honored according to your SMS configuration. TheVOLUME parameters used are those specified on the ADDTVOL, DEFVOL,DISTVOL, CMACVOL, OPTVOL, SMPVOL, and TARGVOL parameters.
Specify Disk VolumesIf you intend installing CICS Transaction Server into disk space managed by thestorage management subsystem (SMS)1 component of MVS/DFP, you do not needto specify your own disk volumes; device assignment can be determined by SMS.In this case, proceed to “Specify SMP/E Zone Attributes” on page 30.
To allow you to make the best use of your disk space, you can specify your owndisk volumes and device types to be used to install CICS Transaction Server. Youcan specify your own disk details on the following parameters:
DEFVOL volume disktypeDefines the default disk on which the contents of the disk volumes CMACVOL,DISTVOL, OPTVOL, SMPVOL, and TARGVOL will reside if the appropriateparameter is not coded in the DFHISTAR job. For example, if you do not codethe DISTVOL parameter, the CICS distribution libraries will reside on the diskdefined by DEFVOL.
volumeis one of the following:
v The volume serial identifier, in the range 1 through 6 characters, of thedefault volume.
v A period (.) if all volumes other than CMACVOL and SMPVOL that arenot specifically defined by the appropriate parameter of the DFHISTARjob will be put onto any available volume. The CMACVOL and SMPVOLvolumes will be put onto the same volume as the library specified by theTEMPLIB parameter.
disktypeis the UNIT parameter of the volume.
If you omit the DEFVOL parameter altogether, all volumes that are notspecifically defined by the appropriate parameter of the DFHISTAR job will beput onto the same volume as the library specified by the TEMPLIB parameter.
DISTVOL volume disktypeDefines the disk on which the CICS Transaction Server distribution libraries willreside.
volumeis one of the following:
v The volume serial identifier, in the range 1 through 6 characters, of thevolume on which the distribution libraries will reside.
v A period (.) if the CICS Transaction Server libraries are to be put ontoany available volume.
1. For further information about installing system-managed storage, and about planning for and migrating storage to anSMS-managed environment, see the MVS Storage Management Library: Storage Management Subsystem Migration PlanningGuide, SC26-4406.
Chapter 3. Installing CICS TS using DFHISTAR 25

disktypeis the UNIT parameter of the volume.
Note: If you omit the DISTVOL parameter, the distribution libraries will be puton the volume specified by the DEFVOL parameter. If the DEFVOLparameter is omitted, or if a period (.) is specified for its volume operand,the distribution libraries will be put onto any available volume.
TARGVOL volume disktypeSpecifies details of the disk containing the CICS Transaction Server targetlibraries.
volumeis one of the following:
v The volume serial identifier, in the range 1 through 6 characters, of thevolume on which the CICS Transaction Server target libraries are toreside.
v A period (.) if the CICS Transaction Server target libraries are to be putonto any available volume.
disktypeis the UNIT parameter for the volume.
Note: If you omit the TARGVOL parameter, the CICS Transaction Server targetlibraries will be put onto the volume specified by the DEFVOL parameter.If the DEFVOL parameter is omitted, or if a period (.) is specified for itsvolume operand, the CICS Transaction Server target libraries will be putonto any available volume.
SMPVOL volume disktypeSpecifies the disk that contains the permanent, non-VSAM SMP/E data sets forCICS Transaction Server that are associated with global or distribution zones,and are therefore unique.
volumeis one of the following:
v The volume serial identifier, in the range 1 through 6 characters, of thevolume on which the permanent non-VSAM SMP/E data sets are toreside.
v A period (.) if the permanent non-VSAM SMP/E data sets are to be putonto the same volume as the library specified by the TEMPLIBparameter.
disktypeis the UNIT parameter for the volume.
Note: If you omit the SMPVOL parameter, the permanent non-VSAM SMP/Edata sets for CICS Transaction Server will be put on the volumespecified by the DEFVOL parameter. If the DEFVOL parameter isomitted, or if a period (.) is specified for its volume operand, the datasets will be put onto the same volume as the library specified by theTEMPLIB parameter.
OPTVOL volume disktypeSpecifies details of the disk onto which the optional source material is copied.
volumeis one of the following:
26 CICS TS for z/OS: Installation Guide

v The volume serial identifier, in the range 1 through 6 characters, of thevolume on which the optional source material is to reside.
v A period (.) if the optional source material is to be put on any availablevolume.
disktypeis the UNIT parameter of the volume. This is needed only if volume isspecified.
Note: If you omit the OPTVOL parameter, the optional source material will beput on the volume specified by the DEFVOL parameter. If the DEFVOLparameter is omitted, or if a period (.) is specified for its volume operand,the optional source material will be put onto any available volume.
CMACVOL volumeDefines the disk on which the VSAM KSDS, DFHCMACD, will reside. This dataset is used for the CICS Transaction Server messages facility (CICS-suppliedtransaction CMAC).
volumeis one of the following:
v The volume serial identifier, in the range 1 through 6 characters, of thevolume on which the VSAM KSDS, DFHCMACD, will reside
v A period (.) if the DFHCMACD data set is to be put onto the samevolume as the library specified by the TEMPLIB parameter.
Note: If you omit the CMACVOL parameter, the DFHCMACD data set will beput onto the volume specified by the DEFVOL parameter. If the DEFVOLparameter is omitted, or if a period (.) is specified for its volume operand,the DFHCMACD data set will be put onto the same volume as the libraryspecified by the TEMPLIB parameter.
When Are These Volumes Used?
DFHISTARVolumeParameter
Installing ApplyingService Customizing
AssemblingResourceTables
RunningCICSTransactionServer
SMPVOL U U U U
DISTVOL U U U
TARGVOL U U U U U
DZONECSI1 U U U
TZONECSI1 U U U U
GZONECSI1 U U U U
1 The entries for xZONECSI parameters are also for the associated xZONEparameters.
During installation: The RELFILE data sets on SMPVOL are needed duringinstallation only.
Chapter 3. Installing CICS TS using DFHISTAR 27

Applying Service or Customizing CICS Transaction Server: SMPVOL,DISTVOL, TARGVOL, DZONE, TZONE, and GZONE are needed whenever youapply service or customize your CICS Transaction Server programs.
SMPVOL and GZONE are needed whenever you apply service or customize youralternative libraries for use with the extended recovery facility.
Assembling CICS Transaction Server Tables: SMPVOL, TARGVOL, TZONE,and GZONE are needed whenever you assemble your CICS Transaction Servertables.
SMPVOL and GZONE are needed whenever you assemble CICS TransactionServer tables for the second (alternate) CICS Transaction Server region.
Running CICS Transaction Server: Only TARGVOL is needed to run CICSTransaction Server.
Allocate the Space for CICS Transaction Server Disk VolumesWhether or not you use SMS-managed data sets, you still need enough disk spacein which to create the CICS Transaction Server disk volumes.
The space required by the installation jobs on these volumes depends on the typeof disk you intend to use. The number of cylinders required on the different types ofDASD are given in Table 6. The size of the CICS Transaction Server distributionand target libraries are given in the topic DASD Storage Requirements in theProgram Directory .
Table 6. DASD storage requirements for CICS Transaction Server
Identification 3380 3390
CICSTS31.TDFHINST 1 1
CICSTS31.XDFHINST 1 1
Relfile data sets on SMPVOL 325 300
SMP/E non-VSAM data sets on SMPVOL 26 25
DISTVOL 312 288
TARGVOL 749 678
DZONE 11 11
TZONE 11 11
GZONE 11 11
Total during installation 1447 1327
Total after installation 1122 1027
Allow up to 15% on the values in Table 6 for servicing requirements. Secondaryallocations are 10% of the primary allocations.
If you intend to store other IBM software or your own application programs in theselibraries, then you must modify the generated jobs accordingly.
Specify Attributes of the Temporary SMP/E Work Data SetsYou must define the attributes of the temporary SMP/E work data sets (SMPWRK1,SMPWRK2, SMPWRK4, and SMPWRK6): for the following CICS Transaction
28 CICS TS for z/OS: Installation Guide

Server jobs: DFHINSTJ, DFHLPJPN, DFHLPUMD, and DFHSMPE. You define theattributes of those SMP/E data sets on the SMPWORK parameter:
The CICS Transaction Server jobs used to install CICS Transaction Server for z/OShave DD statements for the SMP/E data sets that they need to know about.
SMPWORK disktypeThis is the UNIT parameter for the disk that is to contain the temporary SMP/Ework data sets (SMPWRK1, SMPWRK2, SMPWRK4, and SMPWRK6) neededto install CICS Transaction Server.
If you specify a value for disktype, or omit the SMPWORK parameter altogether,//SMPWRKn DD statements are added to the following jobs generated by theDFHISTAR job:
DFHINSTJ
DFHLPUMD
DFHSMPE
If you specify NO, a period (.), or a null string, CICS Transaction Serverassumes that SMP/E knows about the temporary SMP/E work data sets. Todefine the attributes of the SMP/E work data sets, you must do one of thefollowing:
v Provide appropriate DDDEFS for the temporary SMP/E work data sets.
v Have applied the SMP/E sample usermod (SMP0001) that contains superzapstatements for updating the default attributes of the SMP/E data sets in theGIMMPDFT module.
The GIMMPDFT module, which is part of SMP/E, defines the defaultattributes of SMP/E data sets, and can be used to dynamically allocate datasets to be used by all zones. The usermod is in member GIMZPDFT in theSYS1.SAMPLIB library. You can use this usermod as a model, change it tomeet your needs, or install it as supplied. For further information about theentries in the GIMMPDFT module and the sample entry values in theusermod SMP0001, see the System Modification Program Extended:Reference manual, SA22–7772.
Notes:
1. The SMPWRK6 data set must not be allocated to Virtual I/O (VIO). If youspecify a value for disktype, ensure that this cannot happen.
Specify Attributes of the Permanent SMP/E Data SetsSpecify the attributes of the permanent SMP/E data sets on the followingparameters:
SMPPTS dsnameSpecifies the name of the SMP/E primary data set used to store temporarilyPTF function SYSMODs or other fixes that are in RECEIVE or APPLY status;that is, PTF fixes that have not been rejected or accepted.
SMPMTS dsnameSpecifies the name of the SMP/E macro temporary store (MTS) data set usedto store updated versions of macros. Although required by SMP/E, this MTSdata set is not used by CICS.
SMPSTS dsnameSpecifies the name of the SMP/E source temporary store (STS) data set usedto store updated versions of source elements. Although required by SMP/E, thisSTS data set is not used by CICS.
Chapter 3. Installing CICS TS using DFHISTAR 29

SMPSCDS dsnameSpecifies the name of the SMP/E saved control data set (SCDS) used to storeold target zone entries that have been modified by inline JCLIN processing in aSYSMOD.
SMPLTS dsnameSpecifies the name of the linkedit temporary (LTS) data set used with theCALLLIBS function. This dataset must always be an SMS-managed PDSE,whether or not Java is installed unless you have installed the PTFs for HFS andPDSE support on non-managed SMS volumes listed in Flash10007 which canbe found by links from:
http://www.ibm.com/support/techdocs
The CICS Transaction Server jobs that need to know the attributes of the SMP/Edata sets have DD statements for them.
Specify SMP/E Zone AttributesSpecify the attributes of the SMP/E distribution zone, global zone, target zone, andany additional target zones.
Note: The CICS-DB2 attachment facility contains modules named with the DSNprefix. Therefore, to prevent existing DB2 modules with the same DSNxxxxxnames from being overwritten, you should not install CICS TransactionServer into the same target and distribution zones as DB2.
To specify SMP/E zone attributes, use the following parameters:
GZONELOG dsname NEW|OLDSpecifies details of the SMP/E log for the global zone CSI.
dsnameis the name of the global zone log.
NEW|OLDSpecifies whether an existing global zone log is to be used. If you specifyNEW, any existing global zone log with the specified dsname is deleted,and a new global zone log is allocated. If you specify OLD, an existingglobal zone log is used.
TZONELOG dsname NEW|OLDSpecifies details of the SMP/E log for the target zone CSI.
dsnameis the name of the target zone log.
NEW|OLDSpecifies whether an existing target zone log is to be used. If you specifyNEW, any existing target zone log with the specified dsname is deleted,and a new target zone log is allocated. If you specify OLD, an existingtarget zone log is used.
DZONELOG dsname NEW|OLDSpecifies details of the SMP/E log for the distribution zone CSI.
dsnameis the name of the distribution zone log.
NEW|OLDSpecifies whether an existing distribution zone log is to be used. If you
30 CICS TS for z/OS: Installation Guide

specify NEW, any existing distribution zone log with the specified dsname isdeleted, and a new distribution zone log is allocated. If you specify OLD, anexisting distribution zone log is used.
GZONECSI cluster NEW|OLD volume disktypeSpecifies details of the global zone CSI.
clusteris the VSAM cluster name, minus the qualifier ‘.CSI’.
NEW|OLDSpecifies whether an existing global zone CSI is to be used. If you specifyNEW, any existing global zone CSI with the specified cluster name isdeleted, and a new global zone CSI is allocated. If you specify OLD, anexisting global zone CSI is used.
volumeis either the volume serial (volser) identifier for the volume on which theglobal zone CSI is to be allocated or a period (.) if the CSI is to be put on avolume determined by the CICS Transaction Server installation process.
disktypeis the UNIT parameter for the volume.
TZONECSI cluster NEW|OLD volume disktypeSpecifies details of the target zone CSI.
clusteris the VSAM cluster name, minus the qualifier ‘.CSI’.
NEW|OLDSpecifies whether an existing target zone CSI is to be used. If you specifyNEW, any existing target zone CSI with the specified cluster name isdeleted, and a new target zone CSI is allocated. If you specify OLD, anexisting target zone CSI is used.
volumeis either the volume serial (volser) identifier for the volume on which thetarget zone CSI is to be allocated or a period (.) if the CSI is to be put on avolume determined by the CICS Transaction Server installation process.
disktypeis the UNIT parameter for the volume.
DZONECSI cluster NEW|OLD volume disktypeSpecifies details of the distribution zone CSI.
clusteris the VSAM cluster name, minus the qualifier ‘.CSI’.
NEW|OLDspecifies whether an existing distribution zone CSI is to be used. If youspecify NEW, any existing distribution zone CSI with the specified clustername is deleted, and a new distribution zone CSI is allocated. If you specifyOLD, an existing distribution zone CSI is used.
volumeis either the volume serial (volser) identifier for the volume on which thedistribution zone CSI is to be allocated or a period (.) if the CSI is to be puton a volume determined by the CICS Transaction Server installationprocess.
Chapter 3. Installing CICS TS using DFHISTAR 31

disktypeis the UNIT parameter for the volume.
GZONE NEW|OLD optionsSpecifies whether the global zone to be used already exists.
NEW|OLDSpecifies whether an existing global zone is to be used. The DFHISTAR jobas supplied specifies NEW. Optionally change this to OLD if you want touse an existing global zone. If you specify OLD, CICS Transaction Server isinstalled into an existing SMP/E global zone.
Note: Specify NEW if you want to preserve your existing releases of CICSTransaction Server in their current SMP/E zones and install the newrelease in its own zones.
If you specify OLD, the existing SMP/E zones are used and any existingrelease of the product is deleted.
If you specify OLD, but specify NEW for the GZONECSI parameter, bothparameters are assigned the NEW disposition.
optionsSpecifies the name of the SMP/E options (on the SET BOUNDARYcommand) to be used.
TZONE zonenameSpecifies the name of the target zone.
zonenameis the name of the target zone to be used by SMP/E. This name must beunique to the target zone. It must not be longer than 7 characters, and theleading character must be alphabetic.
DZONE zonenameSpecifies the name of the distribution zone.
zonenameis the name of the distribution zone to be used by SMP/E. This name mustbe unique within the global zone. It must not be longer than 7 characters,and the leading character must be alphabetic.
SMP/E Zone and Zone Log DispositionsAs supplied, the DFHISTAR job assumes that you are going to install CICSTransaction Server into new target and distribution zones. However you can specifya new or old global zone, and new or old zone logs by the disposition optionNEW|OLD on the associated parameters of the DFHISTAR job. The dispositionoption NEW means that the DFHINST3 job deletes any existing zone or zone logwith name specified before redefining it. For example, if you specify the parameterGZONELOG CICSTS31.GZONE.SMPLOG NEW
the DFHINST3 job deletes any existing SMP/E global zone log with the nameCICSTS31.GZONE.SMPLOG before defining a new SMP/E global zone log withthat name.
Further, if you specify different dispositions for a zone parameter and its associatedzone log parameter, they are both given the default disposition NEW. This is toensure that both a zone and its zone log have the same disposition.
32 CICS TS for z/OS: Installation Guide

If you intend installing CICS Transaction Server using one new CSI for all zones,you must specify the disposition NEW on all three CSI parameters of theDFHISTAR job. For example:DZONE DZONEDZONECSI CICSTS31.SMPZONE NEW CICS31 SYSALLDADZONELOG CICSTS31.DZONE.SMPLOG NEWGZONE NEW CICSOPTGZONECSI CICSTS31.SMPZONE NEW CICS31 SYSALLDAGZONELOG CICSTS31.GZONE.SMPLOG NEWTZONE TZONETZONECSI CICSTS31.SMPZONE NEW CICS31 SYSALLDATZONELOG CICSTS31.TZONE.SMPLOG NEW
Specify the High-level Qualifiers for SMP/E Data SetsFor each different high-level qualifier that you have specified for SMP/E zone CSIs,logs, and other SMP/E data sets, you must create an ALIAS definition in the mastercatalog before the data sets can be used.
Specify the distribution tape device typeSpecify the type of device that is to be used to load the CICS Transaction Serverdistribution tape on the TAPEUNIT parameter:
TAPEUNIT devicetypeSpecifies the device type to be used to read the distribution tape. Use 3480 forthe 3480 tape cartridge, 3400-6 for the 6250 tape, or the unit names in use inyour installation.
Specify Attributes of the CICS Transaction Server system Data SetsSpecify attributes of the CICS Transaction Server system data sets, to be createdwhen you run the post-installation jobs DFHCOMDS and DFHDEFDS2 jobs, on theDSINFO parameter:
DSINFO dsindex volume disktype qualifierDefines the following attributes of CICS system data sets:
dsindexAssigns a high-level index to all the data sets defined by the jobs,DFHCOMDS and DFHDEFDS.
The leading character of dsindex must be alphabetic. dsindex can have oneor two levels of index, but each level must be no longer than eightcharacters. If you specify more than one level of index, the names must beseparated by a period (for example, CICSTS31.CICSHTC1).
volumeis the volume identifier of the volume.
disktypeis the UNIT parameter for the volume.
qualifieris a partial qualifier added to the index for the data sets created by the jobsDFHCOMDS and DFHDEFDS. You can specify a partial qualifier of up tofour alphanumeric characters; these characters are appended to thecharacters CICS to make the qualifier. If you specify a period (.) no qualifieris used.
2. For more information about the post-installation jobs DFHCOMDS and DFHDEFDS jobs, see “Creating data sets common to allCICS regions, DFHCOMDS job” on page 191.
Chapter 3. Installing CICS TS using DFHISTAR 33
Specify Attributes of any additional target LibrariesIf you want to create extra copies of the CICS Transaction Server target libraries,specify the attributes of those libraries on the following parameters:
AINDEX library_prefixAssigns a high-level index to the additional set of CICS target libraries copiedby a version of the DFHINSTA job.
Notes:
1. The high-level index for the additional SDFHLINK and SDFHLPA libraries isdefined by the ALINDEX parameter.
2. The high-level index for the data sets created by the jobs DFHCOMDS andDFHDEFDS is defined by the dsindex operand of the DSINFO parameter.
The AINDEX value must be unique (for example, it must be different from theINDEX value), it must not be longer than 26 characters, and the leadingcharacter must be alphabetic. If you specify more than one level of index, thenames must be separated by a period (for example, AINDEX CICSTS31.A.TEST).
ALINDEX library_prefixAssigns a high-level index to the additional SDFHLPA and SDFHLINK librariesallocated by running a version of the DFHINSTA job.
The library_prefix value must not be longer than 26 characters, and the leadingcharacter must be alphabetic. If you specify more than one level of index, thenames must be separated by a period (for example, ALINDEXSYS1.CICSTS31.A.TEST
AZONELOG dsnameSpecifies details of the SMP/E log for the additional target zone CSI.
dsnameis the name of the additional target zone log to be used by SMP/E.
AZONECSI clusterSpecifies details of the additional target zone CSI. The CSI data set is createdon the volume and unit specified by the ADDTVOL parameter.
clusteris the VSAM cluster name, minus the qualifier .CSI.
AZONE zonenameSpecifies the name of the additional target zone, to be used for the set of CICSTransaction Server target libraries copied by a version of the DFHINSTA job.
zonenameis the name of the additional target zone to be used by SMP/E. This namemust be unique to the target zone. It must not be longer than sevencharacters, and the leading character must be alphabetic.
ASMPSCDS dsnameSpecifies the name of the additional zone SMP/E SCDS data set.
dsnameis the name of the additional zone SMP/E SCDS data set.
ASMPMTS dsnameSpecifies the name of the additional zone SMP/E MTS data set.
dsnameis the name of the additional zone SMP/E MTS data set.
34 CICS TS for z/OS: Installation Guide
ASMPSTS dsnameSpecifies the name of the additional zone SMP/E STS data set.
dsnameis the name of the additional zone SMP/E STS data set.
ASMPLTS dsnameSpecifies the name of the additional zone SMP/E LTS data set.
dsnameis the name of the additional zone SMP/E LTS data set.
ADDTVOL volume disktypeSpecifies the volume and unit type to contain all the additional zone data sets.
volumeis the volume serial identifier of the volume.
disktypeis the UNIT parameter for the volume.
USSDIRA dsnameSpecifies the name of the UNIX System Services directory for the AdditionalTarget zone. See job DFHINSTA.
The default is the value of the AINDEX parameter in lowercase.
The UNIX System Services directory path will start /ussindex/cicsts/ussdirawhere ussindex is the translated value of the USSINDEX parameter, andussdira is the value of the USSDIRA parameter.
The default path will be: /pathprefix/usr/lpp/cicsts/cicsts31.a
Note: The name of the UNIX System Services directory after the root directory(/usr/lpp/) is always cicsts.
Specify the Data Set Name of the SISPLOAD LibrarySpecify the full data set name, up to 44 characters, of the library that containsISPLINK (SISPLOAD for ISPF Version 4 and above, or ISPLOAD for ISPF version3 and below). For example, SISPLOAD SYS1.USERID.SISPLOAD changes theSISPLOAD library name to SYS1.USERID.SISPLOAD. This library is accessed, asread-only, during the installation of CICS Transaction Server.
SISPLOAD dsnameUp to 44 characters.
Specify the Data Set Name of the CSSLIB LibrarySpecify the full data set name, up to 44 characters, of the CSSLIB library. Forexample, CSSLIB SYS1.USERID.CSSLIB changes the CSSLIB library name toSYS1.USERID.CSSLIB. This library is accessed, as read-only, during theinstallation of CICS Transaction Server.
CSSLIB dsnameUp to 44 characters.
Specify the Data Set Name of the SCEECPP LibrarySpecify the full data set name, up to 44 characters, of the SCEECPP library. Forexample, SCEECPP SYS1.USERID.SCEECPP changes the SCEECPP library name toSYS1.USERID.SCEECPP. This library is accessed, as read-only, during theinstallation of CICS Transaction Server.
Chapter 3. Installing CICS TS using DFHISTAR 35

SCEECPP dsnameUp to 44 characters.
Specify the Data Set Name of the SCEELKED LibrarySpecify the full data set name, up to 44 characters, of the SCEELKED library. Forexample, SCEELKED SYS1.USERID.SCEELKED changes the SCEELKED library name toSYS1.USERID.SCEELKED. This library is accessed, as read-only, during theinstallation of CICS Transaction Server.
SCEELKED dsnameUp to 44 characters.
Specify the Data Set Name of the SCEELKEX LibrarySpecify the full data set name, up to 44 characters, of the SCEELKEX library. Forexample, SCEELKEX SYS1.USERID.SCEELKEX changes the SCEELKEX library name toSYS1.USERID.SCEELKEX. This library is accessed, as read-only, during theinstallation of CICS Transaction Server.
SCEELKEX dsnameUp to 44 characters.
Specify the Data Set Name of the SCEEOBJ LibrarySpecify the full data set name, up to 44 characters, of the SCEEOBJ library. Forexample, SCEEOBJ SYS1.USERID.SCEEOBJ changes the SCEEOBJ library name toSYS1.USERID.SCEEOBJ. This library is accessed, as read-only, during theinstallation of CICS Transaction Server.
SCEEOBJ dsnameUp to 44 characters.
Specify the Data Set Name of the SCEESAMP LibrarySpecify the full data set name, up to 44 characters, of the SCEESAMP library. Forexample, SCEESAMP SYS1.USERID.SCEESAMP changes the SCEESAMP library name toSYS1.USERID.SCEESAMP. This library is accessed, as read-only, during theinstallation of CICS Transaction Server.
SCEESAMP dsnameUp to 44 characters.
Specify the Data Set Name of the SCLBSID LibrarySpecify the full data set name, up to 44 characters, of the SCLBSID library. Forexample, SCLBSID SYS1.USERID.SCLBSID changes the SCLBSID library name toSYS1.USERID.SCLBSID. This library is accessed, as read-only, during theinstallation of CICS Transaction Server.
SCLBSID dsnameUp to 44 characters.
Specify the Data Set Name of the SCSQLOAD LibrarySpecify the full data set name, up to 44 characters, of the SCSQLOAD library. Forexample, SCSQLOAD SYS1.USERID.SCSQLOAD changes the SCSQLOAD library name toSYS1.USERID.SCSQLOAD. This library is accessed, as read-only, during theinstallation of CICS Transaction Server.
SCSQLOAD dsnameUp to 44 characters.
36 CICS TS for z/OS: Installation Guide

Specify the Data Set Name of the SCSQANLE LibrarySpecify the full data set name, up to 44 characters, of the SCSQANLE library. Forexample, SCSQANLE SYS1.USERID.SCSQANLE changes the SCSQANLE library name toSYS1.USERID.SCSQANLE. This library is accessed, as read-only, during theinstallation of CICS Transaction Server.
SCSQANLE dsnameUp to 44 characters.
Specify the Data Set Name of the SCSQCICS LibrarySpecify the full data set name, up to 44 characters, of the SCSQCICS library. Forexample, SCSQCICS SYS1.USERID.SCSQCICS changes the SCSQCICS library name toSYS1.USERID.SCSQCICS. This library is accessed, as read-only, during theinstallation of CICS Transaction Server.
SCSQCICS dsnameUp to 44 characters.
Specify the Data Set Name of the SCSQAUTH LibrarySpecify the full data set name, up to 44 characters, of the SCSQAUTH library. Forexample, SCSQAUTH SYS1.USERID.SCSQAUTH changes the SCSQAUTH library name toSYS1.USERID.SCSQAUTH. This library is accessed, as read-only, during theinstallation of CICS Transaction Server.
SCSQAUTH dsnameUp to 44 characters.
Specify the Name of the Java directorySpecify the name of the Java directory for use by CICS JVM application programs.
JAVADIR directory nameThis parameter is appended to /pathprefix/usr/lpp/, giving a full path name of/pathprefix/usr/lpp/javadir.
Specify the Data Set Name of the SDSNLOAD LibrarySpecify the full data set name, up to 44 characters, of the DB2 SDSNLOAD library.For example, SDSNLOAD SYS1.USERID.SDSNLOAD changes the SDSNLOAD libraryname to SYS1.USERID.SDSNLOAD. This library is accessed, as read-only, duringthe installation of CICS Transaction Server.
Note: The REXX for CICS element contains some modules that are link-editedagainst the DB2 load library, SDSNLOAD. If you do not have DB2 installed,the DFHINST6 job fails because SDSNLOAD cannot be allocated to the job.To avoid this, define a dummy SDSNLOAD data set, with LRECL=0 andRECFM=U, and specify the name of this empty data set on the SDSNLOADparameter.
SDSNLOAD dsnameUp to 44 characters.
Specify the Data Set Name of the SEZARPCL and SEZACMTX librariesSpecify the full data set names, up to 44 characters, of the SEZARPCL andSEZACMTX libraries. For example, SEZARPCL SYS1.USERID.SEZARPCL changes theSEZARPCL library to SYS1.USERID.SEZARPCL and SEZACMTX
Chapter 3. Installing CICS TS using DFHISTAR 37

SYS1.USERID.SEZACMTX changes the SEZACMTX library name toSYS1.USERID.SEZACMTX. These libraries are accessed, as read-only, during theinstallation of CICS Transaction Server.
SEZARPCL dsnameUp to 44 characters.
SEZACMTX dsnameUp to 44 characters.
Specify the Data Set Name of the SCEECICS & SCEERUN librariesSpecify the full data set names, up to 44 characters, of the SCEECICS &SCEERUN libraries. For example, SCEECICS SYS1.USERID.SCEECICS changes theSCEECICS library to SYS1.USERID.SCEECICS and SCEERUN SYS1.USERID.SCEERUNchanges the SCEERUN library name to SYS1.USERID.SCEERUN. These librariesare accessed, as read-only, during the installation of CICS Transaction Server.
SCEECICS dsnameUp to 44 characters.
SCEERUN dsnameUp to 44 characters.
Specify the Data Set Name of the SCEERUN2 & SCEELIB librariesSpecify the full data set names, up to 44 characters, of the SCEERUN2 & SCEELIBlibraries. For example, SCEERUN2 SYS1.USERID.SCEERUN2 changes the SCEERUN2library to SYS1.USERID.SCEERUN2 and SCEELIB SYS1.USERID.SCEELIB changesthe SCEELIB library name to SYS1.USERID.SCEELIB. These libraries areaccessed, as read-only, during the installation of CICS Transaction Server.
SCEERUN2 dsnameUp to 44 characters.
SCEELIB dsnameUp to 44 characters.
Specify the Data Set Name of the SCEEBND2 librarySpecify the full data set name, up to 44 characters, of the SCEEBND2 library. Forexample, SCEEBND2 SYS1.USERID.SCEEBND2 changes the SCEEBND2 library toSYS1.USERID.SCEEBND2. This library is accessed, as read-only, during theinstallation of CICS Transaction Server.
SCEEBND2 dsnameUp to 44 characters.
Specify Log stream and Log stream Structure Attributes.Specify attributes of the CICS Transaction Server log streams and the couplingfacility structures that you will use when you run the post-installation jobs DFHILG1,DFHILG2, DFHILG3 and DFHILG43 jobs, on the LOGGER-INFO parameter:
LOGGER-INFO strsfx logsz shuntsz jnlsz gensz sysname loghlq logmodelDefines the following attributes of CICS Transaction Server system data sets:
3. For more information about the post-installation jobs DFHILG1, DFHILG2, DFHILG3 and DFHILG4 jobs, see Chapter 24, “Definingthe logger environment for CICS journaling,” on page 143.
38 CICS TS for z/OS: Installation Guide

strsfxThe last part of the coupling facility structure names, can be any threecharacters allowed in a structure name. Default 001. Used in DFHILG1,DFHILG2, DFHILG3 and DFHILG4.
logszThe Avgbufsize for system log streams in the LOG_DFHLOG_strsfxstructure. Default 500. Used in DFHILG1.
shuntszThe Avgbufsize for shunted system log streams in theLOG_DFHSHUNT_strsfx structure. Default 4096. Used in DFHILG1.
jnlszThe Avgbufsize for unforced user journal log streams in theLOG_USERJRNL_strsfx structure. Default 64000. Used in DFHILG1.
genszThe Avgbufsize for forced user journal log streams and forward recovery logstreams in the LOG_GENERAL_strsfx structure. Default 2048. Used inDFHILG1.
sysnameThe MVS system name used to create model log streams for DFHLOG andDFHSHUNT. Default MVSX. Used in DFHILG1.
loghlqThe first qualifier of the model name for general logs and DFHLGLOG.Used in DFHILG3 and DFHILG4.
logmodelThe second qualifier of the model name for general logs. Used in DFHILG3.
Create RACF Profiles for the CICS Transaction Server Data SetsLiaise with your Security Administrator to create appropriate RACF profiles for theCICS Transaction Server data sets, as described in the CICS RACF Security Guide.
At this stage, you need authority to access only the data set qualifiers specified onthe TEMPLIB, LIB, and INDEX parameters. (The DFHISTAR job uses a temporarysequential data set, with the high-level qualifier specified on the INDEX parameter,to resolve the parameters to be substituted into the jobs being tailored.) However, itis worth coordinating the access authority for all the CICS Transaction Server datasets at the same time.
Run the DFHISTAR JobWhen you have edited the DFHISTAR job with the values of installation parametersfor your CICS Transaction Server environment, save it.
When you are ready to tailor the skeleton jobs, submit the DFHISTAR job.
In addition to the UNIX system services HFS jobs, there are three otherHFS-related members supplied in SDFHINST. These are DFHBPXP0, DFHBPXP1,and DFHBPXPA.
DFHBPXP0This member contains a MOUNT command for inclusion in a BPXPRMxxmember of the SYS1.PARMLIB dataset. The MOUNT command applies to the
Chapter 3. Installing CICS TS using DFHISTAR 39

HFS dataset specified in the HFS0DSN parameter of the DFHISTAR job to bemounted at directory /pathprefix/usr/lpp/cicsts.
Add this mount command to the BPXPRMxx PARMLIB member after you haverun the DFHIHFS0 job.
DFHBPXP1This member contains a MOUNT command for inclusion in a BPXPRMxxmember of the SYS1.PARMLIB dataset. The MOUNT command applies to theHFS dataset specified in the HFS1DSN parameter of the DFHISTAR job to bemounted at directory /pathprefix/usr/lpp/cicsts/ussdir, where ussdir is the nameof the directory specified in the ussdir parameter in the DFHISTAR job
Add this mount command to the BPXPRMxx PARMLIB member after you haverun the DFHIHFS1 job.
DFHBPXPAThis member contains a MOUNT command for inclusion in a BPXPRMxxmember of the SYS1.PARMLIB dataset. The MOUNT command is for HFSdataset specified in the HFSADSN parameter of the DFHISTAR job to bemounted at directory /pathprefix/usr/lpp/cicsts/ussdira, where ussdira is thename of the directory specified in the ussdira parameter in the DFHISTAR job.
Add this mount command to the BPXPRMxx PARMLIB member after you haverun the DFHIHFSA job.
When the DFHISTAR job has run, the jobs listed in the topic Skeleton jobs inRELFILE(2) copied to the TDFHINST library in the Program Directory (apart fromthe DFHISTAR job) are tailored to your CICS Transaction Server environment andadded to the library that you specified on the LIB parameter of the DFHISTAR job(by default, the CICSTS31.XDFHINST library). If necessary, the DFHISTAR jobcreates the library specified on the LIB parameter.
The highest expected return code is 0.
Check the Output from the DFHISTAR JobCheck the output from the DFHISTAR job, and if needed, edit and submit theDFHISTAR job again.
The DFHISTAR job produces a job log and, if necessary, an error code:
v The output job log lists the values that were actually used for the parameters ofthe DFHISTAR job.
v If any error occurs when running the DFHISTAR job, an error code of 4 or 12 isreturned. For error code 4, the skeleton jobs are tailored and added to theCICSTS31.XDFHINST library. For error code 12, the skeleton jobs are nottailored or copied. To resolve the cause of either error code, examine the outputjob log and, if necessary, edit and submit the DFHISTAR job again.
You can run the DFHISTAR job any number of times to alter the attributes of thejobs that it creates.
When running the DFHISTAR job after the first time, you can select specific jobs tobe created, by using the SCOPE or SELECT parameter:
SCOPE ALL|BASE|POSTSpecifies whether you want to generate all the CICS Transaction Serverinstallation and post-installation jobs, or only the post-installation jobs. Wheninstalling CICS Transaction Server from the distribution tape, you would
40 CICS TS for z/OS: Installation Guide

normally specify SCOPE ALL (the default). You would normally code the otheroptions, if necessary, during some post-installation tasks, as described inChapter 4, “Post-installation requirements,” on page 55.
ALLSpecifies that you want to generate all the CICS Transaction Serverinstallation jobs and all the post-installation jobs.
BASESpecifies that you want to generate only the six installation jobs DFHINST1through DFHINST6 that you can use to install CICS Transaction Serverfrom the distribution tape.
POSTSpecifies that you want to generate only the post-installation jobs, that youcan use to create the CICS Transaction Server data sets, and run the IVPs.
SELECT jobname newnameSpecifies the new name for a copy of a post-installation job to be generatedwhen you run the DFHISTAR job. You can specify several SELECT parametersto select several post-installation jobs to be regenerated in one run of theDFHISTAR job. The SELECT parameter overrides the POST parameter; that is,if you use the SELECT parameter in the DFHISTAR job, only those jobsspecified by SELECT are generated.
Note: If you are using the SELECT parameter to generate copies of thepost-installation jobs for a new CICS Transaction Server region, youshould also change the DSINFO parameter to specify details of the datasets for the new CICS region.
For example, to create copies of the jobs DFHDEFDS and DFHIVPOL for theCICS Transaction Server region CICSINS you could specify the DSINFO andSELECT parameters of the DFHISTAR job:DSINFO userid.CICSTS31 H3P061 SYSALLDA INSSELECT DFHDEFDS INSDEFDSSELECT DFHIVPOL INSIVPOL
If you then run the DFHISTAR job, it would create the INSDEFDS job as a copyof the DFHDEFDS job, and the INSIVPOL job as a copy of the DFHIVPOL job,substituting the values that you specified on DSINFO into the new jobs.
You could then change the DSINFO and SELECT parameters, and run theDFHISTAR job to create other copies of the post-installation jobs for anotherCICS Transaction Server region.
Check that You Are Ready to Run the Installation JobsCheck that you are now ready to run the installation jobs:
1. Check the names of the data sets to be created by these jobs, because anyexisting data sets with those names are deleted by the installation jobs. If youwant to keep an existing data set with a name specified in one of the installationjobs, you must change the name to be used for the new data set. For example,for the installation parameter DZONECSI dsname NEW the data set dsname isdeleted and a new distribution zone CSI called dsname is allocated.
2. The CICS Transaction Server-supplied installation JCL will install CICSTransaction Server for z/OS into new target and distribution zones. If you wantto install CICS Transaction Server into existing target and distribution zones,you must modify the DFHINST3 job.
Chapter 3. Installing CICS TS using DFHISTAR 41

Caution: If you intend using an existing target or distribution zone thatcontains an earlier release of CICS Transaction Server, be awarethat any earlier release of CICS Transaction Server will becleared before being replaced by CICS Transaction Server.
3. If you intend installing CICS Transaction Server using both existing and newCSIs, any new CSIs must have the same control interval size as the existingCSIs.
If your existing CSIs do not have a control interval size of 4096 bytes, you mustedit the DFHINST3 job (before running it) to change theCONTROLINTERVALSIZE(4096) parameter on the commands used to createthe VSAM data sets for the new CSIs, to specify the same control interval sizeas the existing CSIs.
For further information about considerations for allocating CSI data sets, see theSystem Modification Program Extended: Reference manual, SA22–7772.
4. Ensure that you have appropriate RACF authority for the CICS TransactionServer data sets. For more information, see your Security Administrator and theCICS RACF Security Guide.
Run the installation Jobs
OMVS requirementBefore running the installation jobs:
v Ensure the MVS image was IPLed with OMVS in full-function mode.
v Ensure the userid under which you are running the jobs has superuserauthority
After you have run the DFHISTAR job to create the installation jobs, submit thosejobs in sequence to install CICS Transaction Server. This § describes the CICSTransaction Server installation jobs, and gives considerations that may affect howyou use them.
The CICS Transaction Server jobs are in the CICSTS31.XDFHINST library as aresult of running the DFHISTAR job, which you copied from the distribution tape, asdescribed in the topic Copy RELFILE(2) from the Distribution Tape in the ProgramDirectory.
These jobs should be run one at a time. Before you run a job, read the informationabout it (starting on page “DFHIHFS0” on page 43).
After you have run a job, check its output before proceeding to the next job. If a jobterminates abnormally, find out why it failed (the job log lists the error messagesproduced on each run). Correct the error, and then proceed as advised in the jobdescription. In any case, do not attempt to run the next job until the previous jobhas run successfully.
Run Times of the Installation JobsTo give you an idea what run times to expect, we ran the installation jobs on anIBM 9672 RX5 using a single LPAR. The run times were:
Job Processor Time Elapsed Time
DFHIHFS0 1 second 7 seconds
42 CICS TS for z/OS: Installation Guide

Job Processor Time Elapsed Time
DFHIHFS1 1 second 7 seconds
DFHISMKD 1 second 1 second
DFHINST1 3 seconds 30 seconds
DFHINST2 3 seconds 30 seconds
DFHINST3 1 second 15 seconds
DFHINST4 1 second 15 seconds
DFHINST5 1 minute 11 minutes
DFHINST6 24 minutes 49 minutes
These time values are suitable to run the installation jobs on an IBM 9672 RX5 orbigger system. If you have a system smaller than an IBM 9672 RX5, you may needto review these values.
The DFHIHFS0 JobThis job:
v Creates the HFS specified on the HFS0DSN parameter of the DFHISTAR job
v Creates the cicsts directory at /pathprefix/usr/lpp/
v Mounts the HFS at directory /pathprefix/usr/lpp/cicsts
v Changes the permission settings for the /cicsts directory to:
– Owner=RWX
– Group=RWX
– Other=R-X
(In octal form: 775)
Where:
– R equates to Read
– W equates to Write
– X equates to Execute
– - equates to no permission
Notes:
1. DFHIHFS0 only ever needs to be run once.
2. RACF ALTER ACCESS to the OMVS data sets must be granted before runningthis DFHIHFS0.
3. The /cicsts directory is common to all releases of CICS TS from 1.3 onwards.
4. The /cicsts directory contains only directories, each being a mount point.
5. CICS requires the MOUNT issued by DFHIHFS0 to access files stored in theHFS, but the MOUNT command is lost when you re-IPL MVS. SDFHINSTmember DFHBPXP0 contains a MOUNT command for /pathprefix/usr/lpp/cicsts. Copy this command into a BPXPRMxx member of the SYS1.PARMLIBdataset to ensure the mount is restored when MVS is IPLed.
6. All steps of DFHIHFS0 must end with return code zero for the job to besuccessful.
The DFHIHFS1 JobThis job:
Chapter 3. Installing CICS TS using DFHISTAR 43

v Unmounts the HFS at directory /pathprefix/usr/lpp/cicsts/ussdir to allow the jobto be rerun, and if necessary forces return code zero.
v Deletes from /pathprefix/usr/lpp/cicsts the directory defined by the /ussdirparameter of the DFHISTAR job. This is to allow the job to rerun, and ifnecessary forces return code zero.
v Deletes the HFS specified in the HFS1DSN parameter of the DFHISTAR job toallow the job to rerun, and if necessary forces return code zero.
v Creates the HFS specified in the HFS1DSN parameter of the DFHISTAR job.
v Creates the /ussdir directory at /pathprefix/usr/lpp/cicsts, where /ussdir is thename of the directory specified on the ussdir parameter.
v Mounts the HFS at directory /pathprefix/usr/lpp/cicsts/ussdir
v Changes the permission settings for the /ussdir directory to 775.
All steps of DFHIHFS1 must end with return code zero for the job to be successful.
CICS requires the MOUNT issued by DFHIHFS1 to access files stored in the HFS,but the MOUNT command is lost when you re-IPL MVS. SDFHINST memberDFHBPXP1 contains a MOUNT command for /pathprefix/usr/lpp/cicsts/ussdir.Copy this command into a BPXPRMxx member of the SYS1.PARMLIB dataset toensure the mount is restored when MVS is IPLed.
The DFHISMKD JobThis job creates the UNIX System Services directories.
This job must be run before any of the other installation jobs.
The highest expected return code is 0.
The DFHINST1 JobThis job allocates and catalogs CICS Transaction Server distribution and targetlibraries.
To ensure that this job can be rerun, it deletes (and uncatalogs) the data sets thatare allocated in the second step of the job.
If the DFHINST1 job terminates abnormally, examine the job log to determine thecause, correct the problem, then rerun the job.
The highest expected return code is 0.
The DFHINST2 JobThis job allocates the CICS Transaction Server RELFILE data sets. If you run theDFHINST2 job now, you ensure that enough space has been allocated to theRELFILE data sets to allow the DFHINST5 job to complete.
To ensure that the job can be rerun, it deletes (and uncatalogs) the data sets (ifthey exist) that it allocates later.
If the DFHINST2 job terminates abnormally, examine the job log to determine thecause, correct the problem, then rerun the job.
The highest expected return code is 0.
44 CICS TS for z/OS: Installation Guide

DFHINST3 and DFHINST4 jobs.DFHINST3 is a job that should be run if you have decided to allocate newSMP/E zones.
Be aware that the default specified in DFHISTAR is for the allocation of newzones. This is recommended, to ensure that existing releases of CICSTransaction Server are not deleted.
DFHINST4 is a job that will prime new SMP/E zones created in DFHINST3.
The DFHINST3 JobThis job allocates the CICS Transaction Server SMP/E data sets.
Before you run the DFHINST3 jobIf you intend installing CICS Transaction Server using both existing and newCSIs, any new CSIs must have the same control interval size as the existingCSIs.
Caution: If you intend using an existing target or distribution zone thatcontains an earlier release of CICS Transaction Serverelements, be aware that any earlier release of CICS will becleared before being replaced by CICS Transaction Server.
If your existing CSIs do not have a control interval size of 4096 bytes, youmust edit the DFHINST3 job (before running it) to change theCONTROLINTERVALSIZE(4096) parameter on the commands used to createthe VSAM data sets for the new CSIs, to specify the same control interval sizeas the existing CSIs.
For further information about considerations for allocating CSI data sets, seethe System Modification Program Extended: Reference manual, SA22–7772.
To ensure that the job can be rerun, it deletes (and uncatalogs) the data sets (ifthey exist) that it allocates later.
This job also sets up the global, target, and distribution zones, depending on theparameters that you specified to the DFHISTAR job, as follows:
1. If you specified NEW for GZONE, the global zone is deleted and redefined.
2. The distribution zone is deleted and redefined.
3. The target zone is deleted and redefined.
4. Member GIMZPOOL from SYS1.MACLIB is REPROed into the zones redefinedin the previous steps.
5. If you specified OLD for GZONE, the entries for the DZONE and TZONE namesare removed from the global zone.
If the DFHINST3 job terminates abnormally, examine the job log to find the cause,correct the problem, then rerun the job.
The highest expected return code is 0.
Chapter 3. Installing CICS TS using DFHISTAR 45

The DFHINST4 JobThis job primes the global zone, target zone, and distribution zone.
Before you run the DFHINST4 jobIf you did not run the DFHINST2 job, increase the DSSPACE values in theDFHINST4 job, before submitting it.
If the DFHINST4 job terminates abnormally, examine the job log to determine thecause, correct the problem, then repeat all jobs, beginning with DFHINST1. Thisavoids SMP/E space problems, and consequent X37 abends, during reruns of theseSMP/E jobs.
The highest expected return code is 0, if you install into new zones and 8 ifyou are installing into existing zones.
The DFHINST5 JobThis job RECEIVEs the CICS Transaction Server software from the distribution tapeinto the RELFILE data sets created by the DFHINST2 job. It is the only installationjob (apart from the initial IEBCOPY job) that requires the distribution tape to bemounted.
If the DFHINST5 job terminates abnormally, examine the job log to determine thecause, correct the problem, then repeat all jobs, beginning with DFHINST1. Thisavoids SMP/E space problems, and consequent X37 abends, during reruns of theseSMP/E jobs.
The highest expected return code is 0.
The DFHINST6 JobThis job performs the SMP/E APPLY and ACCEPT functions needed to install CICSTransaction Server into the target and distribution libraries respectively.
Before you run the DFHINST6 job
v Ensure the DB2 SDSNLOAD library is available for this job. WithoutSDSNLOAD, DFHINST6 fails; see “Specify the Data Set Name of theSDSNLOAD Library” on page 37
If you run DFHINST6 with an empty SDSNLOAD library, the APPLY stepcompletes with return code 4, and the return code from the binder is 8. TheREXX for CICS modules, CICSQL and CICDB2, which interface with DB2,are stored in SCICLOAD without the required DB2 routines and are notusable.
v DFHINST6 must be run on the same MVS image on which the HFS isinstalled.
If you have modified the other installation jobs (for example, to use existinglibraries and therefore existing target and distribution zones), considersplitting the DFHINST6 job to do APPLY CHECK, APPLY, ACCEPT CHECK,and ACCEPT functions as four separate jobs.
The DFHINST6 job is the longest running of all the installation jobs (see “RunTimes of the Installation Jobs” on page 42), and produces a large amount of printed
46 CICS TS for z/OS: Installation Guide

output. The region size for the DFHINST6 job is currently set to 'REGION=0M'. Thisis because this job requires more memory than the other install jobs. You may needto adjust your JES parameters (for example, with a JES2 /*JOBPARM LINES=99statement) to avoid a system abend 722.
This job gives a return code of 4 when all is well. (See the “GIM23903W - LINKSUCCESSFUL . . ” message, listed in the report that is output by the applyjob.) DFHINST6 job may issue messages GIM23903W and GIM23913Wdepending on the execution environment of the installer. Both thesemessages are acceptable.
The binder produces IEW2454W messages during the APPLY stage for unresolvedexternal references while some CICS Transaction Server load modules are beinglink-edited during installation, giving return code 4. You may also receive numerousIEW2646W and IEW2651W messages, which are conflicts with user-specifiedRMODE and AMODEs respectively. You can ignore these IEWxxxx messages,which are output for component object modules of executable CICS TransactionServer load modules.
Messages IEW2689W, IEW2470E, IEW2648E and IEW2303E might be displayed,and can also be ignored.
When you have run the DFHINST6 job, you should see the following SMP/Emessage in the output from the job:GIM20502I GIMSMP PROCESSING IS COMPLETE - THE HIGHEST RETURN CODE WAS 04 -
This SMP/E message can be ignored.
If any other SMP/E messages appear, see the SMP/E: Messages & Codes manualfor guidance information about their meaning, and take the appropriate action.
If the DFHINST6 job terminates abnormally, examine the job log to determine thecause, correct the problem, then repeat all the jobs, beginning with DFHINST1. Thisavoids SMP/E space problems, and consequent X37 abends, during reruns of theseSMP/E jobs.
Note: If the DFHINST6 job fails and you are using an existing global zone (that is,you specified the GZONE parameter of the DFHISTAR job with thedisposition parameter OLD), you must first REJECT the CICS TransactionServer base-level function SYSMOD before rerunning the DFHINST1 job.When you rerun the installation jobs, some steps that were successfullycompleted in the previous run will produce return codes with a value of ‘8’.
The DFHIJVMJ JobThis job is provided to create a customized version of member DFHJVMEV fromthe SDFHENV data set. This dataset contains the JVM environment variables thatare needed if you want to run a JVM program in CICS. Information about the JVMenvironment variables is given in the CICS System Definition Guide.
Check the Output from the Installation JobsWhen you have successfully run all of the installation jobs described in this chapter,CICS Transaction Server will have been loaded.
Chapter 3. Installing CICS TS using DFHISTAR 47

You now have CICS Transaction Server installed on your DASD. Back up thevolume on which CICS Transaction Server resides. This avoids the need to re-runthe installation jobs if any errors occur during customization later.
What next?You should next copy the CICS Transaction Server procedures into a catalogedprocedure library, load any CICS features that you have, and tailor the CICSTransaction Server to your needs. For information about copying the CICSTransaction Server procedures, and loading the CICS Transaction Server features,see the following topics:v “Copy the CICS Transaction Server Procedures into a Procedure Library”v “Create Extra Sets of CICS Transaction Server Target Libraries (Optional)” on
page 50v “Load the CICS Transaction Server Source Material (Optional)” on page 52v “Load Other Optional Features” on page 53
. For information about tailoring CICS Transaction Server to your needs, seeChapter 27, “Tailoring the CICS-supplied skeleton jobs,” on page 185.
Copy the CICS Transaction Server Procedures into a ProcedureLibrary
CICS Transaction Server supplies the procedures listed in Table 7.
Table 7. CICS Transaction Server-supplied procedures
Procedure Description
DFHASMVS Assembles some CICS Transaction Server programs and user-writtenassembler language programs.
DFHAUPLE Assembles and link-edits CICS Transaction Server control tables, and makesthe assembly and link-edit information available to SMP/E.Note: DFHAUPLE is installed in SDFHINST.
DFHBMSU Runs the BMS load module disassemble utility program, DFHBMSUP.
DFHEBTAL Translates, assembles, and link-edits assembler application programs usingEXEC DLI commands in a batch environment under Language Environment.
DFHEITAL Translates, assembles, and link-edits assembler application programs usingthe command-level interface.
DFHEXTAL Translates, assembles, and link-edits assembler application programs usingthe external CICS Transaction Server interface.
DFHLNKVS Link-edits CICS Transaction Server programs and application programs.
DFHMAPS Prepares physical and symbolic maps.
DFHMAPT Prepares physical and symbolic maps for C++.
DFHSMPE Executes SMP/E.Note: DFHSMPE is installed in SDFHINST.
DFHSTART Starts CICS.Note: DFHSTART is installed in SDFHINST.
DFHUPDVS Updates.
DFHYBTPL Translates, compiles, and link-edits PL/I application programs using EXECDLI commands in a batch environment under Language Environment.
DFHYBTVL Translates, compiles, and link-edits COBOL application programs usingEXEC DLI commands in a batch environment under Language Environment.
48 CICS TS for z/OS: Installation Guide

Table 7. CICS Transaction Server-supplied procedures (continued)
Procedure Description
DFHYITDL Translates, compiles, and link-edits C/370™ application programs using thecommand-level interface under Language Environment.
DFHYITEL Translates, compiles, and link-edits C++ application programs using thecommand-level interface under Language Environment.
DFHYITPL Translates, compiles, and link-edits PL/I application programs using thecommand-level interface under Language Environment.
DFHYITVL Translates, compiles, and link-edits VS COBOL application programs usingthe command-level interface under Language Environment.
DFHYXTDL Translates, compiles, and link-edits C/370 application programs using theexternal CICS Transaction Server interface under Language Environment.
DFHYXTEL Translates, compiles, and link-edits C++ application programs using theexternal CICS Transaction Server interface under Language Environment.
DFHYXTPL Translates, compiles, and link-edits PL/I application programs using theexternal CICS Transaction Server interface under Language Environment.
DFHYXTVL Translates, compiles, and link-edits VS COBOL application programs usingthe external CICS Transaction Server interface under Language Environment.
DFHZITCL Translates, compiles, and link-edits COBOL application programs using theexternal CICS Transaction Server interface under Language Environment.
DFHZITDL Translates, compiles, and link-edits XL C application programs using theexternal CICS Transaction Server interface under Language Environment.
DFHZITEL Translates, compiles, and link-edits XL C++ application programs using theexternal CICS Transaction Server interface under Language Environment.
DFHZITFL Translates, compiles, and link-edits XL C XPLINK programs using theexternal CICS Transaction Server interface under Language Environment.
DFHZITGL Translates, compiles, and link-edits XL C++ XPLINK programs using theexternal CICS Transaction Server interface under Language Environment.
DFHZITPL Translates, compiles, and link-edits PL/1 application programs using theexternal CICS Transaction Server interface under Language Environment.
ICCFCC CICS foundation classes
ICCFCCL CICS foundation classes
ICCFCGL CICS foundation classes
ICCFCL CICS foundation classes
Note:
For further information about using the CICS Transaction Server-supplied procedures, see:
v The CICS Operations and Utilities Guide, SC34-6431, for information about DFHCRST
v “The CICS TS-supplied SMP/E procedure” on page 179, for information about DFHSMPEand DFHSTART
v The CICS System Definition Guide, SC34-6428, for information about the otherprocedures.
The procedures DFHAUPLE, DFHSMPE, and DFHSTART are tailored to your CICSTransaction Server environment and stored in the CICSTS31.XDFHINST librarywhen you run the DFHISTAR job. The other procedures are not modified by theDFHISTAR job and are copied into the CICSTS31.SDFHPROC library when yourun the CICS Transaction Server installation jobs.
Chapter 3. Installing CICS TS using DFHISTAR 49
###
###
###
###
##

You should copy all these procedures into a cataloged procedure library (forexample, SYS1.PROCLIB). Before you copy the procedures, read the following:
1. Your procedure library may already contain procedures, supplied with an earlierrelease of CICS, that have the same names as the new procedures but are, infact, different. If so, you must find some way of selecting the right release. Hereare some ways of using the new versions:
a. For the time being, rename either set of procedures, and modify theappropriate jobs to use the new names.
b. Insert the new procedures into the job streams that use them, and use theprocedures as in-stream procedures. The inserted procedures should beplaced between the JOB statement and the first EXEC statement. You mustinsert a // PEND statement after the inserted procedures. When the newrelease becomes the production system, you can copy the new proceduresinto your procedure library.
c. Indicate the DDNAME of the cataloged procedure library that is to be usedto convert the JCL for the job. For example, you could use the JES2/*JOBPARM PROCLIB=xxxxxxxx. For further information about specifyingDDNAMEs in JCL, see theMVS/ESA JCL Reference manual.
2. If service is applied to the CICS Transaction Server procedures, it is theversions in the libraries CICSTS31.CICS.SDFHINST andCICSTS31.CICS.SDFHPROC that will be updated by SMP/E. You must thencopy the updated procedures into your procedure library.
3. The default for the symbolic parameter GZONE in the procedures DFHSMPEand DFHAUPLE is taken from the value that you specified by the GZONEparameter of the DFHISTAR job.
4. The default for the ZNAME symbolic parameter in the procedures DFHSMPEand DFHAUPLE is taken from the value that you specified by the TZONEparameter of the DFHISTAR job. For a description of how the ZNAMEparameter is used, see the SMPCNTL DD statement in “The CICS TS-suppliedSMP/E procedure” on page 180.
5. Change the OUTC parameter as required.
When you have read these notes, and acted on them as necessary, copy theprocedures into a cataloged procedure library.
Create Extra Sets of CICS Transaction Server Target Libraries(Optional)
You can use the CICS Transaction Server installation job, DFHISTAR, to generatean optional installation job, DFHINSTA, which you can use to create extra copies ofthe CICS Transaction Server target libraries and UNIX System Services directories.
Some of the benefits of using multiple libraries are:
v Backing out PTFs and APARs - if you apply PTFs or APARs to CICSTransaction Server and if they fail a fix-test, you can back out the changes withminimum disruption.
v DASD failure - multiple libraries protect you against failure of the DASD onwhich the CICS Transaction Server load libraries reside.
Base the decision to use multiple libraries for CICS Transaction Server on thefollowing factors:
50 CICS TS for z/OS: Installation Guide

v Your need for high availability - as already stated, the use of multiple libraries canprotect you against CICS Transaction Server downtime due to DASD failure orincorrect service (either from IBM-supplied PTFs or your own modifications toyour CICS Transaction Server region).
v The extra DASD needed - multiple libraries require more disk space.
v Other ways of providing high availability; for example, use of a CICSPlex, VTAMpersistent sessions, and MVS functions to provide restart of CICS TransactionServer regions.
v The added complexity of maintaining multiple sets of CICS Transaction Serverlibraries - two or more sets of CICS Transaction Server target libraries, togetherwith the SMP/E procedures needed to support them, increase the complexity ofmaintenance. You will need to define procedures to ensure that upgrades to theCICS Transaction Server libraries are kept under control.
v Alternative solutions - if you have already established a proven process for fixverification and for testing applications developed for your production CICSTransaction Server region, you may decide you don’t need multiple CICSTransaction Server libraries.
You can use the DFHINSTA job, generated by the DFHISTAR job, to create extrasets of CICS Transaction Server target libraries fully under the control of SMP/E.Each time you run the DFHINSTA job, you can only generate one extra set of targetlibraries.
To create an extra sets of target libraries, you should complete the following steps.You can repeat the steps to create more sets of target libraries.
1. Edit the DFHISTAR job to specify values for:
v The ADDTVOL, AINDEX, ASMPSCDS, AZONE, AZONECSI, AZONELOG,and USSDIRA parameters, for the new set of target libraries.
v The INDEX, TZONE, TZONECSI, and TZONELOG parameters, for theprimary target libraries you want to copy from. (The TZONE, TZONECSI, andTZONELOG parameters must specify the target zone that contains the CICSTransaction Server target libraries defined with the high-level qualifierprovided by the INDEX parameter.)
v The DZONE, DZONECSI, and DZONELOG parameters, for the distributionlibraries to be associated with the new set of target libraries.
v The SELECT parameter, to specify DFHINSTA (that you want to copy) andthe member name you want the generated version of DFHINSTA to be storedas in the CICSTS31.XDFHINST library. For example,SELECT DFHINSTA INSTA111
will store the generated version of DFHINSTA into member INSTA111 of theCICSTS31.XDFHINST library when you submit the DFHISTAR job.
Each time you copy DFHINSTA (to create a new set of target libraries), youshould specify a new name on the SELECT parameter (to save each copywith a different name in case you need it again in the future).
For further information about editing the DFHISTAR job, and about theparameters of the DFHISTAR job, see “Edit the DFHISTAR Job” on page 17.The other parameters in the DFHISTAR job should not be changed.
2. Submit the DFHISTAR job
When you run the DFHISTAR job, it saves the generated version of theDFHINSTA job in the CICSTS31.XDFHINST library with the member name
Chapter 3. Installing CICS TS using DFHISTAR 51

specified on the SELECT parameter in the DFHISTAR job. The data set nameof the CICSTS31.XDFHINST library is specified in the LIB parameter of theDFHISTAR job.
3. Consider running the DFHIHFSA job
If you decide to create an additional SMP/E target zone using job DFHINSTA,run the DFHIHFSA job first before running the DFHINSTA job. DFHIHFSAcreates an additional SMP/E target zone for HFS. This job:
v Unmounts the HFS at directory /pathprefix/usr/lpp/cicsts/ussdir to allow thejob to rerun, and if necessary forces return code 0.
v Deletes the /ussdira directory at /pathprefix/usr/lpp/cicsts, where ussdira isthe name of the directory specified on the ussdira parameter in theDFHISTAR job. This allows the job to rerun, and if necessary forces returncode 0.
v Deletes the HFS specified in the HFSADSN parameter of the DFHISTAR jobto allow the job to rerun, and if necessary forces return code 0.
v Creates the HFS specified in the HFSADSN parameter of the DFHISTAR job
v Creates the /ussdira directory at /pathprefix/usr/lpp/cicsts, where ussdira isthe name of the directory specified in the ussdira parameter in theDFHISTAR job
v Mount the HFS at directory /pathprefix/usr/lpp/cicsts/ussdira
v Changes the permission settings for the ussdira directory to 775
All steps of this job must end with return code zero for the job to be successful
CICS requires the MOUNT issued by DFHIHFSA to access files stored in theHFS, but the MOUNT command is lost when you re-IPL MVS. SDFHINSTmember DFHBPXPA contains a MOUNT command for /pathprefix/usr/lpp/cicsts/ussdira. Copy this command into a BPXPRMxx member of theSYS1.PARMLIB dataset to ensure the mount is restored when MVS is IPLed.
4. Submit DFHINSTA
The DFHINSTA job (or a copy of it) copies the CICS Transaction Server targetlibraries specified by the INDEX parameter, and creates corresponding CICSTransaction Server SMP/E data sets for them. In particular, it allocates a newSMP/E CSI data set for the extra target zone.
So that DFHINSTA job can be run more than once, step 1 deletes previouscopies of the data sets to be created. Step 3 deletes the SMP/E CSI data set.Step 6 removes the ZONEINDEX entry for the extra target zone.
The first time the DFHINSTA job is run, Step 6 will give the following messages:GIM35701E ** ZINDEX SUBENTRY azone WAS NOT DELETED BECAUSE
IT DOES NOT EXIST.GIM25601I THE SPECIFIED ENTRY WAS NOT UPDATED BECAUSE OF
AN ERROR DURING UCLIN PROCESSING.
You can ignore these messages the first time the job is run.
Load the CICS Transaction Server Source Material (Optional)You can use the sample job, DFHOPSRC, to load the optional CICS TransactionServer source from the distribution tapes. The DFHOPSRC job is generated in theCICSTS31.XDFHINST library when you run the DFHISTAR job.
The DFHOPSRC job runs the MVS IEBCOPY utility program to load the optionalsource data sets from the tapes into a single DASD data set.
For further information about the IEBCOPY program, see the MVS/ESA DataAdministration: Utilities Manual (SC26-4516).
52 CICS TS for z/OS: Installation Guide

Note: The DFHOPSRC job loads the tape files to a DASD device of your choice,using a BLKSIZE parameter of 6160. You can specify a different BLKSIZEparameter on the DCB and SPACE statements if you want, in which casethe space allocation should be reviewed (It may need to be changed.).
Load Other Optional FeaturesThe sample job, DFHINSTJ, is supplied to be used to load other optional featuresthat may be supplied. CICS Transaction Server V2R3 contains no optional featuresat General Availability time, but the sample job may be used if any optional featuresare shipped at a later date. The DFHINSTJ job is generated in theCICSTS31.XDFHINST library when you run the DFHISTAR job.
Activating CICS Transaction ServerAfter you have loaded CICS Transaction Server to disk, you should perform thefollowing steps:
1. (If needed) Apply service, see Chapter 26, “Applying service to CICSTransaction Server for z/OS,” on page 179
2. Integrate CICS Transaction Server with MVS, see Part 2, “Setting up the MVSenvironment for CICS,” on page 65
3. Create CICS Transaction Server system data sets, see Chapter 28, “Creatingthe CICS data sets,” on page 189
4. (Optional) Install CICS-DATABASE 2 support, see Chapter 29, “Defining DL/Isupport,” on page 197
5. (Optional) Install MRO and ISC support, see Chapter 32, “Installing MRO andISC support,” on page 211
6. (Optional) Run the installation verification procedures (IVPs), see Chapter 35,“Running the installation verification procedures,” on page 227.
Information about how to get CICS Transaction Server into operational status, isalso included as part of the process of verifying the installation, see Chapter 35,“Running the installation verification procedures,” on page 227.
Checklist for the CICS Transaction Server for z/OS InstallationTable 8. CICS Transaction Server installation checklist
Step Done? Description See page
1 Check that you have received the material that you ordered. N/A
2 Check that you have all the installation prerequisites, See the ProgramDirectory
3 Copy RELFILE(2) from the distribution tape. (Record your name forthe TDFHINST library: ______________________
See the ProgramDirectory
4 Edit the DFHISTAR job in the TDFHINST library 17
4.1 Specify the CICS Transaction Server temporary installation libraries 20
4.2 Specify the JOB parameters for installation jobs 20
4.3 Specify the scope of the installation 21
4.4 Specify the type of JES to be used 21
4.5 Specify the utilities to be used 21
4.6 Specify the prefix of CICS Transaction Server jobs 22
Chapter 3. Installing CICS TS using DFHISTAR 53

Table 8. CICS Transaction Server installation checklist (continued)
Step Done? Description See page
4.8 Specify the prefix of the CSSLIB library 35
4.9 Specify the prefix of the SISPLOAD library 35
4.10 Specify the indexes of CICS Transaction Server data sets 22
4.11 Specify block sizes 24
4.13 Specify the disk unit for work data sets 24
4.14 Specify disk volumes 25
4.15 Allocate the space for CICS Transaction Server disk volumes 28
4.16 Specify SMP/E zone attributes 30
4.17 Specify attributes of the temporary SMP/E work data sets 28
4.18 Specify attributes of the permanent SMP/E data sets 29
4.19 Specify the high-level qualifiers for SMP/E data sets 33
4.20 Specify the HFS directories and data sets 23
4.21 Specify the distribution tape device type 33
4.22 Specify attributes of the CICS Transaction Server system data sets 33
4.23 Specify attributes of any additional target libraries 34
5 Create RACF profiles for the CICS Transaction Server data sets 39
6 Run the DFHISTAR job 39
6.1 Check the output from the DFHISTAR job 40
7 Check that you are ready to run the installation jobs 41
8 Run the installation jobs 42
8.1 Check the output from the installation jobs 47
9 Copy the CICS Transaction Server procedures into a procedurelibrary
48
10 Create any extra sets of CICS Transaction Server target libraries(optional)
50
11 Load the CICS Transaction Server optional source material(optional)
52
12 Load the Japanese national language feature (optional) 53
54 CICS TS for z/OS: Installation Guide

Chapter 4. Post-installation requirements
The main task after installing CICS TS is to prepare the z/OS environment so thatyou can run the CICS and CICSPlex SM installation verification procedures (IVPs).These procedures start a CICS test region and the CICSPlex SM starter-set ofregions. For example, you cannot bring up a CICS TS region unless you install therequired CICS modules in the MVS link pack area (LPA) and include others in theMVS linklist.
This chapter outlines the main steps and points you to where you can find moreinformation to help you complete these tasks.
Implementing changes in your z/OS environment for CICSIf you are an existing CICS user and are planning to migrate to CICS TransactionServer for z/OS, Version 3 Release 1 in an established z/OS environment, most ofthe tasks described here will already have been done. In this case, review thefollowing steps to check whether you need to make any changes. If you are settingup a new z/OS environment, perhaps on new hardware, you need to ensure thatthe required support for CICS is in place.
The following is a summary of the steps to follow to enable your z/OS environmentto support CICS:
APF-authorize SDFHAUTHDefine the CICSTS31.CICS.SDFHAUTH library as an APF-authorized library.See “APF-authorizing CICS SDFHAUTH library” on page 56 for details.
Authorize CICS regions useridsAuthorize to RACF each CICS region userid to permit access to the requiredMVS resources. See “Authorizing CICS region userids to RACF” on page 56 fordetails.
Note: It is assumed that the CICS TS libraries you have installed, and otherMVS resources, are protected by RACF, or an equivalent externalsecurity manager (ESM).
Add SDFHLINK to LNKLSTInclude the CICS linklist library, CICSTS31.CICS.SDFHLINK, in the MVSLNKLST concatenation.
Define CICS as a subsystemDefine CICS as an MVS subsystem if you intend using multiregion operation(MRO), the CICS console message-handling facility, or MVS workloadmanagement.
Define and install the CICS Type 3 SVCDefine the DFHCSVC module to MVS.
Schedule an IPL to install the CICS SVC routine, DFHCSVC, and otherCICS-required modules in the MVS link pack area (LPA).
Review requirement for HPOEnsure the DFHHPSVC module is included in the MVS nucleus if you are goingto use the VTAM high-performance option (HPO), and ensure the HPO SVC isdefined as a Type 6 SVC in the appropriate MVS IEASVCxx PARMLIB member.
Define VTAM APPLs for CICS TORsDefine to VTAM each CICS region that requires VTAM support (for example, all
© Copyright IBM Corp. 1989, 2010 55
your terminal-owning regions) and also ensure that any VTAM terminaldefinitions are properly specified for connection to CICS.
Defining VTAM APPL definitions for CICS application-owning regions (AORs) isoptional.
Define log streamsDefine the minimum logging environment for CICS system logs.
Install ASR exit for SYMREC macro supportInstall an MVS ASR exit to enable CICS to use the SYMREC macro call.
Each of these tasks is discussed in more detail in the following sections.
There are also some optional tasks that you may need to perform at a later stage,but these are not essential to the initial install and operation of a basic CICSsystem. These tasks are connected with facilities such as VSAM record-levelsharing, MVS automatic restart management, and MVS performance.
APF-authorizing CICS SDFHAUTH libraryAdd the CICS SDFHAUTH library to the list of APF-authorized libraries in theappropriate PROGxx (or IEAAPFxx) member in SYS1.PARMLIB. The SDFHAUTHlibrary must be APF-authorized to enable certain CICS modules, such as DFHSIP,to run in supervisor state.
If your list(s) of APF-authorized libraries are specified in the dynamic format (in aPROGxx member), refresh the APF list dynamically using the SETPROG or SETPROG=xx command.
If your list(s) of APF-authorized libraries are specified in the static format (inIEAAPFxx members), schedule an MVS IPL for the APF-authorization to take effect.
For information about maintaining lists of APF-authorized libraries, see the z/OSMVS Initialization and Tuning Reference.
Authorizing CICS region userids to RACFEnsure each CICS region userid (the userid under which a CICS region runs) hasthe required authority (READ, UPDATE, CONTROL, or ALTER) to access thevarious protected resources it needs to use. These include load libraries and otherdata sets, coupling facility structures, the VTAM ACB, and so on.
The resources for which you need to ensure access are:
Load librariesThe CICS load libraries, CICSTS31.CICS.SDFHAUTH andCICSTS31.CICS.SDFHLOAD. All CICS regions should have READauthorization to these data sets.
VTAM ACBA VTAMAPPL general resource class profile protects a CICS region's APPLID.Each region userid should have READ authorization to its own VTAMAPPLprofile.
SMSVSAM serversA SUBSYSNM general resource class profile protects an SMSVSAM server.Each CICS region that opens an SMSVSAM control ACB during initializationmust have READ authorization to a SUBSYSNM profile named with its ownCICS APPLID.
56 CICS TS for z/OS: Installation Guide

MVS log streamsA LOGSTRM general resource class profile protects an MVS log stream. EachCICS region requires at least UPDATE authorization to its own system logLOGSTRM profile. If you expect a CICS region to create dynamically its logstream, it needs ALTER authority.
Data set services module ADRRELVLA PROGRAM general resource class profile may be used to protect access tothe DFSMSdss module, ADDRELVL . CICS links to this ADR module duringinitialization as part of its check on backup-while-open (BWO) support. EnsureCICS has READ access to this module if it is a protected resource in your MVSenvironment.
CICS category 1 transactionsThe general resource class GCICSTRN (or TCICSTRN) protect all transactions,including CICS system transactions. Each CICS region requires READauthorization to the list of category 1 transactions as defined in memberDFH$CAT1 in the CICS SDFHSAMP samples library.
When you have defined the required authorizations for CICS regions in the RACFdata base, activate the various resource classes with the RACF SETROPTScommand.
Adding SDFHLINK to the MVS LNKLSTCICS provides a number of modules that are intended for use from the MVSLNKLST. These are supplied in the SDFHLINK library, and are in two categories:1. CICS-supplied modules used by non-CICS jobs2. Modules that must be consistent across several CICS regions.
Add the CICS SDFHLINK library to the MVS LNKLST concatenation. Note thatmany of the modules in SDFHLINK can only be used from an APF-authorizedlibrary, and therefore SDFHLINK also needs to be APF-authorized.
Note: CICS also loads some non-CICS modules, and these should also be madeavailable through a library included in the LNKLST.
Defining CICS as an MVS subsystemDefine CICS as an MVS subsystem in an IEFSSNxx member of SYS1.PARMLIB ifyou plan to use any of the following CICS facilities:v Multiregion operation (MRO)v The console message-handling facilityv MVS workload management.
Defining and installing the CICS Type 3 SVCInstall the CICS TS Version 2 level of the CICS Type 3 SVC module, DFHCSVC,before you attempt to start a CICS region. To make the CICS Type 3 SVC ready foruse:
1. Define the CICS SVC as a Type 3 SVC in the appropriate MVS IEASVCxxPARMLIB member. For example, to use the CICS default SVC number, add thefollowing statements to the IEASVCxx:SVCPARM 216,REPLACE,TYPE(3),EPNAME(DFHCSVC)
2. Include the CICS LPA library, SDFHLPA, in the MVS LPALST concatenation.
3. If you define to MVS an SVC number other than the default (216), specify theSVC number to CICS on the CICSSVC system initialization parameter.
Chapter 4. Post-installation requirements 57
######

CICS contains a test to verify that it is using the correct release level of the CICSDFHCSVC module. If CICS calls an SVC module using the SVC number specifiedon the CICSSVC system initialization parameter, and the module is not at thecurrent level, CICS issues message DFHKE0104.
Reviewing the high-performance optionThe high-performance option (HPO) is provided for users who want to optimizeterminal response times and maximize transaction throughput. This option requiresthe CICS Type 6 SVC module, DFHHPSVC, to be included in the MVS nucleus Tohelp you decide on the use of HPO, see the CICS Performance Guide. If youdecide to use this option, follow the steps described in Chapter 12, “Selecting thehigh-performance option,” on page 97.
Defining CICS regions as applications to VTAMDefine each CICS terminal-owning region to VTAM as a VTAM application—that is,as a VTAM application program major node (APPL). To do this, add the requiredAPPL definition statements to a member of SYS1.VTAMLST. For example:* APPL definition for CICS region CICSHTH1**********************************************************************CICSHTH1 APPL AUTH=(ACQ,VPACE,PASS),VPACING=0,EAS=5000,PARSESS=YES X
SONSCIP=YES********************************************************************
Note: Specify the VTAM APPL name to CICS on a CICS APPLID systeminitialization parameter.
Also ensure that your VTAM terminals are properly defined for connection to CICS.This is particularly important if you intend using the CICS autoinstall function. Forthose terminals for which you want to use autoinstall, code VTAM LOGON modetable entries that correspond to the model TYPETERM/TERMINAL definitionsdefined to CICS. You can either code your own autoinstall models, or use theCICS-supplied model definitions that are generated for you when you initialize theCICS system definition data set (CSD).
For programming information about matching VTAM LOGMODE definitions withCICS model definitions, see the CICS Customization Guide.
For information about defining model and VTAM terminal definitions to CICS, seethe CICS Resource Definition Guide.
Defining log streamsCICS automatically connects to its system log stream, unless you define a journalmodel resource definition to define the log stream as TYPE(DUMMY).
Each CICS region has only one system log, which is implemented as two MVSsystem logger log streams. These are used by CICS as the primary and secondarysystem log streams and together these form a single logical log stream. Thus, as adefault each CICS region requires a minimum of two log streams.
Initially, you are recommended to define to the MVS system logger some model logstreams, and let CICS create the system log streams dynamically. If you plan to usea coupling facility for CICS logging, you must also define the log structures requiredfor the log streams. To get you started, however, using DASD-only log streams is
58 CICS TS for z/OS: Installation Guide

quicker and easier to define. Later, when you have more information available, youcan plan to define coupling facility log structures with explicit log streams tailored toyour requirements.
Define MVS model log streams using the naming convention that enables CICS tocreate log streams dynamically. Model names should be of the formmvs_sysid.DFHLOG.MODEL and mvs_sysid.DFHSHUNT.MODEL, where mvs_sysidis the system name of the MVS image in which the CICS region runs.
Example: If a CICS region, running in an MVS image with a sysid of MV10, issuesa create log stream request for its primary log stream, the system logger requires amodel log stream named MV10.DFHLOG.MODEL.
Running without a system logYou can define a CICS JOURNALMODEL resource definition with TYPE(DUMMY)to avoid having to define log streams. If you want to run the IVPs with the minimumeffort, here's what to do:
v Define JOURNALMODEL resource definitions in the CSD for the primary andsecondary system logs, DFHLOG and DFHSHUNT respectively, specifyingTYPE(DUMMY); see Figure 3 for a sample job.
v Add the CSD group containing your dummy system log journal models to yourown group list, and include your group list on the GRPLIST system initializationparameter.
Note that your group list must follow the IBM-supplied list, DFHLIST. DFHLISTincludes group DFHLGMOD (which contains DFHLOG and DFHSHUNTJOURNALMODEL definitions) but concatenating your list after DFHLIST ensuresthat your DUMMY definitions replace the IBM definitions.
MVS ASR exitA CICS program may call the first failure symptoms (FFS) component. This usesthe MVS SYMREC macro to write a symptom record to the MVS SYS1.LOGRECdataset.
//CSDLGSTR JOB 1,BELL,MSGCLASS=A,MSGLEVEL=(1,1),CLASS=A//CSDUP EXEC PGM=DFHCSDUP,REGION=1M,PARM=’CSD(READWRITE)’//STEPLIB DD DSN=CICSTS31.CICS.SDFHLOAD,DISP=SHR//DFHCSD DD DSN=CICSTS31.CICS.CICSH###.DFHCSD,DISP=SHR//SYSPRINT DD SYSOUT=*//SYSABOUT DD SYSOUT=*//SYSABEND DD SYSOUT=*//SYSUDUMP DD SYSOUT=*//SYSIN DD *** DEFINE JOURNAL MODELS FOR CICS LOG STREAMS AS DUMMY*DEFINE JOURNALMODEL(DFHLOG) GROUP(LOGTEST)DESCRIPTION(DEFINE SYSTEM LOG AS DUMMY)
JOURNALNAME(DFHLOG)TYPE(DUMMY)
*DEFINE JOURNALMODEL(DFHSHUNT) GROUP(LOGTEST)DESCRIPTION(DEFINE SYSTEM LOG AS DUMMY)
JOURNALNAME(DFHSHUNT)TYPE(DUMMY)
/*//
Figure 3. Sample job to define DUMMY JOURNALMODELs for CICS system logs
Chapter 4. Post-installation requirements 59

Install an MVS ASR exit to enable CICS to use the SYMREC macro call, otherwisethe FFS call fails. For more information, see the z/OS MVS Installation Exitsmanual.
Planning for CICSPlex SMCICSPlex SM provides both some basic IVPs and a CICSPlex SM starter set:
v See the CICSPlex SM Concepts and Planning manual, SC34-6459, for details ofthe CICSPlex SM starter set.
v See Part 6, “CICSPlex SM verification,” on page 405for details of the IVPs.
You are recommended to run the basic IVPs and the CICSPlex SM starter setbefore moving into a test environment.
Planning for CICSPlex SM migrationIf you are already a CICSPlex SM user, plan and complete your migration toCICSPlex SM before migrating your CICS regions.
CICS TS Version 3 CICSPlex SM can manage CICS regions running under thefollowing releases of CICS:v CICS Transaction Server for z/OS Version 3v CICS Transaction Server for z/OS Version 2v CICS Transaction Server for OS/390 Version 1v IBM CICS for MVS/ESA Version 3.3 and laterv IBM CICS for VSE/ESA Version 2.2 and laterv IBM CICS for OS/2 Version 2.0.1 and Version 3.0v CICS/MVS Version 2.1.2
For detailed information about migrating to the CICS Transaction Server for z/OSVersion 3 level of CICSPlex SM, see the CICS Transaction Server for z/OSMigration from CICS TS Version 2.3.
Parallel Sysplex considerationsAlthough a coupling facility is not required to operate CICS TS, you may want toinstall CICS TS in a Parallel Sysplex® environment. For information about thehardware and software requirements for a Parallel Sysplex, see the z/OS MVSSetting Up a Sysplex, SA22-7625.
60 CICS TS for z/OS: Installation Guide

Chapter 5. Installing the CICS Information Center
The CICS Information Center runs in an Eclipse framework, commonly known as ahelp system, and consists of a number of documentation plug-ins, including varioustools and connectors. The information center is supplied on CD-ROM with areadme. The readme file contains a complete list of all the plug-ins that areprovided, and you can select which plug-ins to install based on your CICSenvironment. If you already have an Eclipse help system, or an Eclipse-based IDEsuch as WebSphere® Studio Enterprise Developer, you can opt to install only theCICS documentation plug-ins. You can run the information center locally on aworkstation, or as a server with remote access. Before you begin to install theinformation center, read the following topics:
v “Requirements”
v “Installing the information center on a workstation”
v “Installing the information center on a server” on page 62
v “Installing the CICS plug-in in an Eclipse IDE or help system” on page 63
RequirementsThe information center is supported on the following platforms:
v Windows 2000
v Windows XP
v AIX® 5.2 and 5.3
v Linux RedHat Enterprise 3.0
v Linux SuSE Enterprise 3.0
v Linux RedHat Enterprise 8 and 9 for zSeries
v Linux SuSE Enterprise 8 and 9 for zSeries
v z/OS 1.4 or later
Please note that support for the information center on Linux for zSeries and z/OS isonly offered in server mode for remote access using a browser.
The information center uses a JRE. A JRE for each platform is provided with theinformation center, except for z/OS. If you want to run an information center onz/OS, you need to use the JRE provided with the operating system.
To get the best results when viewing the information center, it is recommended thatyou use one of the following browsers:
v Microsoft Internet Explorer 6.0
v Mozilla 1.7
To view PDF documents within the information center, you require Adobe AcrobatReader 4.05 or higher installed, and the Acrobat Web plug-in installed in yourbrowser.
Installing the information center on a workstationThe information center can run locally from any directory on your workstation. If youdo not have an Eclipse help system, you will need to install this first as it is requiredto run the information center. If you do have an Eclipse help system, see “Installingthe CICS plug-in in an Eclipse IDE or help system” on page 63.
© Copyright IBM Corp. 1989, 2010 61
||||||||||
|
|
|
|
|
|
|
|
|
|
|||
||
|
|
|||

1. Select the appropriate folder for your operating system on the CD-ROM. Thisfolder contains a zip file of the Eclipse help system.
2. Unzip the zip file to a new directory on your workstation. This creates an eclipsehelp system on your workstation.
3. Select the plug-ins folder on the CD-ROM. This folder contains all of thedocumentation plug-ins.
4. Copy the documentation plug-ins you require to the eclipse\plugins directory ofthe help system that you have just unzipped. The readme contains a completelist of the plug-in names and the products they refer to. It is recommended thatyou copy the CICS TS plug-in com.ibm.cics.ts.doc, the CICS support plug-incom.ibm.cicsts.doc, and associated support plug-ins com.ibm.support.core.doc and com.ibm.support.core.doc.nl.
5. At the highest directory level in your Eclipse help system, execute the fileIC_local_Start to start the information center on your workstation. This shouldautomatically launch a browser and display the information center.
Please note that you cannot run the information center locally on z/OS 1.4 or theLinux for z/OS platforms.
Installing the information center on a serverRunning the information center on a server requires you to allocate a specific portnumber, to allow remote access using a browser. You can run the informationcenter in server mode on any of the supported platforms listed in “Requirements” onpage 61. If you already have a help system installed, see “Installing the CICSplug-in in an Eclipse IDE or help system” on page 63 for information on how toinstall just the CICS documentation plug-ins. To install the information center onUNIX, Linux and Windows servers, follow these steps:
1. Select the appropriate folder for your operating system on the CD-ROM. Thisfolder contains a zip file of the Eclipse help system.
2. FTP the zip file to an appropriate directory on your server and then unzip it. Thiscreates a help system on your server.
3. Select the plug-ins folder on the CD-ROM. This folder contains all of thedocumentation plug-ins.
4. Use the readme on the CD-ROM to select which documentation plug-ins youwant to install. Copy the required plug-ins to the eclipse\plugins directory of thehelp system that you unzipped. It is recommended that you copy the CICS TSplug-in com.ibm.cics.ts.doc, the CICS support plug-in com.ibm.cicsts.doc,and associated support plug-ins com.ibm.support.core.doc andcom.ibm.support.core.doc.nl.
5. At the highest directory level in your Eclipse help system, edit the fileIC_server_start to specify the port number that you want the information centerto use. The default is 29127.
6. Execute the file IC_server_start to start the information center in server mode.
7. To verify that you can access the information center, start up a browser andtype the URL http:\\servername:port , where servername is the name of theserver where you installed the information center and port is the port numberthat you specified in the start up file.
The information center runs in the UNIX System Services (USS) component ofz/OS. To install the information center on z/OS, follow these steps:
1. Select the z/OS folder on the CD-ROM, which contains a tar file of the Eclipsehelp system.
62 CICS TS for z/OS: Installation Guide

2. FTP the tar file to a suitable HFS directory in USS.
3. Un-tar the file using the command tar -xvf filename. This creates a helpsystem on your server.
4. Select the plug-ins folder on the CD-ROM. This folder contains all of thedocumentation plug-ins.
5. Use the readme on the CD-ROM to select which documentation plug-ins youwant to install. FTP the required plug-ins to the eclipse\plugins directory of thehelp system that you unzipped. It is recommended that you copy the CICS TSplug-in com.ibm.cics.ts.doc, the CICS support plug-in com.ibm.cicsts.doc,and associated support plug-ins com.ibm.support.core.doc andcom.ibm.support.core.doc.nl.
6. At the highest directory level in your Eclipse help system, edit the fileIC_server_start.sh to specify the directory path of a JRE at 1.4.2 that you wantthe information center to use. You can also change the port number from thedefault of 29127. Use the command vi IC_server_start.sh to open the file toedit it, or if connected through TSO you can use the command oeditIC_server_start.sh. Add the following command to the beginning of the file,using the appropriate path to the JRE For example, you could specify:export PATH=/u/lpp/java142/J1.4/bin:$PATH
7. Execute the start file using the command ./IC_server_start.sh &. The &indicates that the information center should run as a background task. Thismeans that if you log off, the information center will continue to run on theserver.
8. To verify that you can access the information center, start up a browser andtype the URL http:\\servername:port , where servername is the name of theserver where you installed the information center and port is the port numberthat you specified in the start up file.
Installing the CICS plug-in in an Eclipse IDE or help systemIf you already have an Eclipse help system installed on your workstation or server,or if you are using an Eclipse-based product such as WebSphere Studio EnterpriseDeveloper, you can install the CICS documentation and run it within your existingsoftware. Ensure that you shut down your help system or product before adding theCICS documentation plug-ins. Otherwise Eclipse will not recognize the newly addedplug-ins. Follow these steps:
1. Select the plug-ins folder on the CD-ROM. This folder contains all of thedocumentation plug-ins.
2. Use the readme on the CD-ROM to select which documentation plug-ins youwant to install. It is recommended that you copy the CICS TS plug-incom.ibm.cics.ts.doc, the CICS support plug-in com.ibm.cicsts.doc, andassociated support plug-ins com.ibm.support.core.doc andcom.ibm.support.core.doc.nl.
3. Copy the required documentation plug-ins to the eclipse\plugins directory of thehelp system or Eclipse IDE that you already have installed. For example, for adefault installation of WebSphere Studio Enterprise Developer, you would copythe plug-ins to the directory C:\Program Files\IBM\WebSphereStudio\eclipse\plugins.
4. Start up the help system or Eclipse IDE to ensure that the CICS documentationis present.
Chapter 5. Installing the CICS Information Center 63

64 CICS TS for z/OS: Installation Guide
Part 2. Setting up the MVS environment for CICS
The information about ACF/VTAM, MVS, RACF and other products given inthis part is for guidance only. Always consult the current publications of theother products for the latest information. See “Books from related libraries”on page 469.
Note: “RACF” is used throughout this book to mean the MVS Resource AccessControl Facility (RACF) or any other external security manager that providesequivalent function. The advice about using RACF applies only if you havesecurity active in your system. If so, you must use an external securitymanager (such as RACF).
This part discusses what you should do after you have loaded the CICSTransaction Server elements to DASD, and before you run CICS. It contains thefollowing chapters:
v Chapter 6, “Authorizing the hlq.SDFHAUTH library,” on page 67.
v Chapter 7, “Authorizing CICS regions to access MVS resources,” on page 69.
v Chapter 8, “Defining the default CICS userid to RACF,” on page 77.
v Chapter 9, “Installing CICS-required modules in the MVS linklist,” on page 79.
v Chapter 10, “Defining CICS as an MVS subsystem,” on page 83.
v Chapter 11, “Installing the CICS Type 3 SVC,” on page 93.
v Chapter 12, “Selecting the high-performance option,” on page 97.
v Chapter 13, “Defining CICS regions as applications to VTAM,” on page 99.
v Chapter 14, “Installing CICS modules in the MVS link pack area,” on page 107.
v Chapter 15, “Defining CICS IPCS exit control data to MVS,” on page 121.
The following chapters discuss the MVS definitions required for optional CICSfunctions.
v Chapter 16, “MVS Program properties table entries,” on page 123.
v Chapter 17, “MVS performance definitions,” on page 125.
v Chapter 18, “MVS automatic restart management definitions,” on page 127.
v Chapter 19, “MVS cross-system MRO definitions,” on page 129.
v Chapter 20, “PR/SM policy for handling MVS failures,” on page 131.
v Chapter 21, “MVS ASREXIT - SYMREC Authorization Exit,” on page 133.
v Chapter 22, “Definitions required for VSAM RLS support,” on page 135.
v Chapter 23, “Console messages,” on page 141.
v Chapter 24, “Defining the logger environment for CICS journaling,” on page 143.
v Chapter 25, “Enabling Unicode data conversion by z/OS,” on page 177.
v Chapter 26, “Applying service to CICS Transaction Server for z/OS,” on page179.
© Copyright IBM Corp. 1989, 2010 65

66 CICS TS for z/OS: Installation Guide

Chapter 6. Authorizing the hlq.SDFHAUTH library
These instructions apply to the hlq.SDFHAUTH library, but if you require Javasupport, you should authorize the hlq.SDFJAUTH library in the same way. See“Authorizing the hlq.SDFJAUTH library” on page 210 for more information aboutthat library.
Although, in general, CICS runs in problem state, the CICS initialization program,DFHSIP, needs to run in supervisor state for part of its execution.
For a module to be able to run in supervisor state, it must be link-edited as anauthorized module into a partitioned data set, which must also be defined to theoperating system as APF-authorized. For CICS-supplied modules, the link-editinghas been done for you. The CICS-supplied DFHSIP module is link-edited with theauthorized attribute (using SETCODE AC(1)), and is installed in thehlq.SDFHAUTH library.
APF-authorize the hlq.SDFHAUTH library by adding it to the list of APF-authorizedlibraries in the appropriate PROGxx (or IEAAPFxx) member in SYS1.PARMLIB. Thehlq.SDFHAUTH library must be APF-authorized to enable certain CICS modules,such as DFHSIP, to run in supervisor state.
If your list(s) of APF-authorized libraries are specified in the dynamic format (in aPROGxx member), refresh the APF list dynamically using the SETPROG or SETPROG=xx command.
If your list(s) of APF-authorized libraries are specified in the static format (inIEAAPFxx members), schedule an MVS IPL for the APF-authorization to take effect.
For information about maintaining lists of APF-authorized libraries, see the z/OSMVS Initialization and Tuning Guide.
When you prepare your startup job stream, provide a STEPLIB DD statement forthe hlq.SDFHAUTH library. When you define your STEPLIB DD statement,remember that all other libraries concatenated with the hlq.SDFHAUTH library mustalso be APF-authorized. This is because, if any of the libraries in a STEPLIBconcatenation are not authorized, MVS regards all of them as unauthorized.
The hlq.SDFHLOAD library contains only programs that run in problem state, andshould not be authorized. The hlq.SDFHLOAD library must be included in the CICSDFHRPL library concatenation. There is an example of this library DD statement inthe sample job stream provided in the CICS System Definition Guide.
For information about authorizing access to CICS data sets, see the CICS RACFSecurity Guide.
© Copyright IBM Corp. 1989, 2010 67

68 CICS TS for z/OS: Installation Guide

Chapter 7. Authorizing CICS regions to access MVS resources
You should consider authorizing access to the following when planning your securityrequirements to run CICS:
CICS PDS librariesProtect your CICS data sets that use RACF. See “Protecting CICS load moduledata sets.”
VTAM ACBAuthorize each CICS region userid to OPEN the VTAM ACB for the region’sspecified APPLID. See “Authorizing access to a CICS region’s VTAM ACB” onpage 70.
CICS system transactionsAuthorize each CICS region userid to access the CICS category 1 systemtransactions. See “Authorizing the region userid to access category 1transactions” on page 71.
SMSVSAM serverAuthorize each CICS region to open the SMSVSAM control ACB if you plan touse CICS with VSAM record-level data sharing. See “Authorizing access to anSMSVSAM server” on page 71.
System logger log streamsAuthorize each CICS region userid to access the MVS system logger logstreams that are used by CICS. See “Authorizing access to MVS log streams”on page 72.
z/OS UNIX System ServicesInclude an OMVS segment in the CICS region's user profile, specifying the UIDparameter, to ensure that your CICS regions have the required access to z/OSUNIX system services. See “Authorizing CICS region userids to z/OS UNIXSystem Services” on page 74.
RACF resource classesActivate the appropriate RACF resource classes to enable terminal users toaccess CICS resources and user-defined resources. See “Activating RACFresource classes” on page 75.
Protecting CICS load module data setsTo prevent unauthorized or accidental modification of hlq.SDFHAUTH orhlq.SDFJAUTH, you should RACF-protect these libraries. Without such protection,the integrity and security of your MVS system are at risk. Additionally, if you requireprotection against the unauthorized use of DFHSIP, do not place this module in theLPA and do not include hlq.SDFHAUTH in the MVS LNKLST unless DFHSIP isRACF-protected as a controlled program with a profile in the RACF PROGRAMresource class.
You should also RACF-protect the other libraries (including hlq.SDFHLOAD) thatmake up the STEPLIB and DFHRPL library concatenations.
For information about authorizing access to CICS data sets, see the CICS RACFSecurity Guide.
© Copyright IBM Corp. 1989, 2010 69

Authorizing access to data set services modulesDuring initialization, CICS determines the availability of backup-while-open (BWO)support by linking to the callable services modules IGWAMCS2 and IGWABWO.CICS also checks the DFSMSdss (or DFDSS) release level by linking to the moduleADRRELVL. If access to this data set services module is controlled by means ofRACF PROGRAM general resource profiles, security violation messages are issuedagainst the CICS region userid, unless the userid is authorized to accessADR-prefixed module names.
You can avoid security violation messages against the CICS region userids, and stillcontrol access to data set services, as follows:
v If you have generic PROGRAM profiles protecting access to ADR modules,create a specific PROGRAM profile for the ADDRELVL module, and ensure yourCICS region userids have READ access to this specific profile.
v Instead of using PROGRAM profiles to protect access to data set services, useone of the following methods:
– Define suitable profiles in the DASDVOL general resource class.
– Defining profiles in the FACILITY general resource class that are supported byDFSMS to control access to data set services.
For information about using DASDVOL and FACILITY class profiles to control theuses of data set services, see the DFSMS/MVS DFSMSdss StorageAdministration Reference, SC26-4929, and the DFSMS/MVS DFSMSdss StorageAdministration Guide, SC26-4930.
Authorizing access to a CICS region’s VTAM ACBYou can control which users, among those who are running non-APF-authorizedprograms, can OPEN the VTAM ACB associated with a CICS address space (CICSregion). This ensures that only authorized CICS regions can present themselves asVTAM applications that provide services with this APPLID, thus preventingunauthorized users from impersonating real CICS regions. (Note that the CICSregion userid needs the OPEN access, not the issuer of the SET VTAM OPENcommand.)
To enable CICS to start up with external security, you must first have authorized theCICS region userid to open the CICS region’s VTAM ACB with the applid specifiedon the APPLID system initialization parameter.
For each APPLID, create a VTAMAPPL profile, and give the CICS region useridREAD access. For example:
RDEFINE VTAMAPPL applid UACC(NONE) NOTIFY(userid)PERMIT applid CLASS(VTAMAPPL) ID(cics_region_userid) ACCESS(READ)
The correct CICS APPLID to specify in the VTAMAPPL class is the specificAPPLID, as specified in the CICS system initialization parameters. If you are usingXRF (that is, if CICS is started with XRF=YES in effect), you must define twoVTAMAPPL profiles — one each for both the active and alternate CICS region'sspecific APPLID (the second operand on the CICS APPLID startup option).
Notes:
1. The VTAMAPPL class must be active and RACLISTed for this protection to bein effect; for example:
SETROPTS CLASSACT(VTAMAPPL) RACLIST(VTAMAPPL)
70 CICS TS for z/OS: Installation Guide
#######
###

2. If a CICS region is not to use VTAM, you do not need to authorize the CICSregion userid for the CICS applid.
3. If you do not control the opening of a CICS region’s VTAM ACB, a new VTAMapplication started with the same applid as that of a running CICS region hasthe following effect:
v The running CICS region performs a FORCECLOSE of its VTAM ACB andissues message DFHZC0101.
v The running CICS region either terminates or continues, depending on youruse of the XXRSTAT exit. (The default is to terminate.) If the CICS regioncontinues, it no longer uses VTAM.
v The new application opens the VTAM ACB with the specified applid.
v If the first running CICS region used VTAM persistent sessions, the newapplication recovers any VTAM sessions that persist from that CICS region.
For information about creating VTAMAPPL profiles for CICS region applids, see theCICS RACF Security Guide For information about the XXRSTAT exit, see the CICSCustomization Guide.
Authorizing the region userid to access category 1 transactionsTo enable CICS to start up with external security, you must first have authorized theCICS region userid to access the category 1 system transactions. If the regionuserid does not have this authority at CICS startup, CICS issues messageDFHXS1113, and terminates.
To give the region userid the authority to access the category 1 systemtransactions, edit and submit the sample job stream in Figure 4 to execute theCICS-supplied sample CLIST, DFH$CAT1. This job uses the RACF commands inthe CLIST to update the RACF database.
Note: Only a user with the RACF authority SPECIAL can execute the CLIST toupdate the RACF database.
For information about category 1 transactions and about determining the CICSregion userid, see the CICS RACF Security Guide.
Authorizing access to an SMSVSAM serverIn a test environment you might wish to use the default action and allow any CICSregion using VSAM RLS to connect to an SMSVSAM server. If you wish to protectthis access, the RACF SUBSYSNM general resource class must be active and youmust authorize each CICS region that connects to an SMSVSAM server to haveaccess to that server. This means granting access to the appropriate profile in the
//RACFMIG JOB ’accounting information’,// CLASS=A,USER=userid,PASSWORD=password//DEFINE EXEC PGM=IKJEFT01//SYSPRINT DD SYSOUT=A//SYSTSPRT DD SYSOUT=A//SYSUDUMP DD SYSOUT=A//SYSTSIN DD *EXEC ’CICSTS31.CICS.SDFHSAMP(DFH$CAT1)’ LIST/*//
Figure 4. Batch job to execute the sample CLIST, DFH$CAT1
Chapter 7. Authorizing CICS regions to access MVS resources 71
|
#####

RACF SUBSYSNM general resource class. You define profiles in the SUBSYSNMresource class to control access by subsystems like CICS that want to connect toSMSVSAM.
A SUBSYSNM profile name is the name by which a given subsystem, such asCICS, is known to VSAM. For CICS regions, you must use the CICS applid as theprofile name in the SUBSYSNM general resource class.
When CICS attempts to register the control ACB during CICS initialization,SMSVSAM calls RACF to check that the CICS region userid is authorized to aprofile name in the SUBSYSNM class that matches the CICS applid. If the CICSregion userid does not have READ authority, the register fails.
For example, if the applid of a CICS AOR is CICSDAA1, and the CICS regionuserid (shared by a number of AORs) is CICSDA# # , define and authorize theprofile as follows:RDEFINE SUBSYSNM CICSDAA1 UACC(NONE) NOTIFY(userid)
PERMIT CICSDAA1 CLASS(SUBSYSNM) ID(CICSDA# # ) ACCESS(READ)
You can use wildcard characters on the applid to specify more than one CICSregion, for example:PERMIT CICSD%%% CLASS(SUBSYSNM) ID(CICSDGRP) ACCESS(READ)
Authorizing access to MVS log streamsThere is no facility within CICS for controlling LOGSTRM security checks. This iscontrolled by the MVS security administrator activating the LOGSTRM andFACILITY general resource classes by means of the SETROPTS command.
Users of the IXCMIAPU administrative data utility and CICS regions both requireappropriate authorizations to log streams and IXLSTR coupling facility structures.
Authorizations for users of IXCMIAPUYou create log structures and define log streams using the IXCMIAPUadministrative data utility to update the LOGR data set. To do this, your useridneeds the appropriate level of authorization, as shown in the following examples:
Coupling facility structuresTo define and delete log structures using IXCMIAPU, you need ALTER accessto the LOGR resource profile named MVSADMIN.LOGR in the FACILITYgeneral resource class. For example, use the following RACF command:PERMIT MVSADMIN.LOGR CLASS(FACILITY) ACCESS(ALTER) ID(your_userid)
Coupling facility log streamsTo define, delete, and update log streams (including log stream models) that aredefined in coupling facility structures, you need:
v ALTER access to the appropriate log stream profile defined in the LOGSTRMgeneral resource class
v UPDATE access to the coupling facility structure (IXLSTR) profile defined inthe FACILITY general resource class (in this case, profile names are prefixedwith IXLSTR).
For example, if the log stream and structure resource profiles are defined toRACF with the following commands:
72 CICS TS for z/OS: Installation Guide
###
##
#

RDEFINE LOGSTRM log_stream_profile UACC(NONE) [NOTIFY]RDEFINE FACILITY IXLSTR.structure_name_a UACC(NONE) [NOTIFY]
use the following RACF commands to give your userid the requiredauthorizations to these two profiles:PERMIT log_stream_profile CLASS(LOGSTRM) ACCESS(ALTER) ID(your_userid)PERMIT IXLSTR.structure_name_a CLASS(FACILITY) ACCESS(UPDATE) ID(your_userid)
Authorizations for CICS regionsIf the LOGSTRM resource class is active, the level of authorization requireddepends on whether log streams are always explicitly defined to the MVS systemlogger.
Ensure that the CICS region userid is authorized to write to (and create ifnecessary) the log streams that are used for its system log and general logs (seeChapter 24, “Defining the logger environment for CICS journaling,” on page 143.)You do this by granting the appropriate access authorization to log stream profilesin the RACF LOGSTRM general resource class:
v If CICS is expected to create log streams dynamically, CICS must have ALTERauthority to the relevant log stream (LOGSTRM) profiles, and UPDATE authorityto the relevant coupling facility structure (IXLSTR) profiles. For example:PERMIT region_userid.applid.* CLASS(LOGSTRM) ACCESS(ALTER)
ID(region_userid)PERMIT IXLSTR.structurename CLASS(FACILITY) ACCESS(UPDATE)
ID(region_userid)
v If all the log streams that CICS writes to are already defined to MVS, CICSneeds only UPDATE authority to the log stream profiles. For example:PERMIT region_userid.applid* CLASS(LOGSTRM) ACCESS(UPDATE)
ID(region_userid)
Note: In the above examples, region_userid.applid.* is the generic profile name ofthe log stream resource. These examples illustrate a resource name prefixedby the region userid and applid. region_userid is the CICS region useridunder which CICS is running, either as a started task or batch job.
Permit READ access to those users who need to read the CICS log streams. Youmust permit UPDATE access to those users who need to update journals bygranting the user the appropriate authority to the log stream (in the LOGSTRMresource class) and to the JOURNALNAME (in the JCICSJCT class).
The generic profile in the following example could be defined to cover all the logstreams referenced by the CICS region identified by its region userid and applid:RDEFINE LOGSTRM region_userid.** UACC(NONE)
If, however, you have multiple CICS systems sharing the same region userid, butwith differing security requirements, include the applid in the generic profile, asfollows:RDEFINE LOGSTRM region_userid.applid.* UACC(NONE)
The following example allows the CICS region userid under which CICS is runningto write journal and log records to log streams in the named coupling facilitystructure:PERMIT IXLSTR.structurename CLASS(FACILITY) ACCESS(UPDATE)
ID(region_userid)
Chapter 7. Authorizing CICS regions to access MVS resources 73

The following examples give access to two categories of user:PERMIT region_userid.applid.* CLASS(LOGSTRM) ACCESS(READ)
ID(authorized_browsers)PERMIT region_userid.applid* CLASS(LOGSTRM) ACCESS(UPDATE)
ID(archive_userid)
In these examples, archive_userid is the userid under which an application programruns to purge old data from CICS logs when the data is no longer needed, andauthorized_browsers refers to the userids of users allowed to read log streams, butcannot purge data.
If several CICS regions share the same CICS region userid, you can make profilesmore generic by specifying * for the applid qualifier.
The number of profiles you define depends on the naming conventions of the logs,and to what extent you can use generic profiling.
Authorizing CICS region userids to z/OS UNIX System ServicesSome CICS facilities require access to z/OS UNIX System Services. These facilitiesare :
v CICS TCP/IP support provided by the CICS sockets domain when you specifyTCPIP=YES as a system initialization parameter. This support is required if youare planning to use HTTP, IIOP, and ECI services.
v The Java Virtual Machine (JVM). CICS JVM support is required for Javaprograms that specify JVM(YES) in their program resource definitions.
v EJB deployment.
v Using task-related user exits that are enabled with the OPENAPI option to exploitthe CICS open transaction environment. This includes the task-related user exitof the CICS-DB2 attachment facility when CICS is connected to DB2 6.1 or later.
To ensure your CICS regions have the required access to z/OS UNIX systemservices, authorize the region userids by including an OMVS segment in the CICSregion's user profile, specifying the UID parameter. In the OMVS segment, UIDspecifies the numeric user identifier.
When you are creating a new user profile for a CICS region userid:
v Add an OMVS segment with the UID parameter specified.
v Assign a home directory for the CICS region in the OMVS segment using theHOME parameter. For example, if the home directory is /u/cicsht## , specify:
HOME(’/u/cicsht## ’)
v Add a GID to the RACF group profile for the RACF group that is to be defined asthe default group of the CICS region userid.
v Connect the CICS region's user ID to the RACF group that has the required GID
For CICS region userids that already exist, add the OMVS segment informationusing the ALTUSER command. For example:ALTUSER CICSHAA1 OMVS( UID(4127) HOME(’/u/cicshaa1’))
where CICSHAA1 is the CICS region userid of a CICS AOR that is initialized withTCP/IP support, 4127 is the UNIX System Services numeric user identifier of theCICS region, and /u/cicshaa1 is the home directory.
74 CICS TS for z/OS: Installation Guide

For information about defining OMVS segment parameters in a user profile, see thez/OS Security Server RACF Command Language Reference, SA22-7687.
For information about defining UNIX system services users, see the z/OS UNIXSystem Services Planning,
Activating RACF resource classesBefore you can use RACF for CICS resources and for user-defined resources, youmust activate the associated RACF resource classes by using the RACFSETROPTS command.
To run the CICS-supplied IVPs with external security, you must activate theresource classes for CICS resources.
To use your own user-defined resources with external security in your CICSenvironment, you must:
v Define resource classes for your resources.
v Activate the resource classes.
v Optionally RACLIST resource classes to be used for QUERY SECURITYcommands. This builds in-storage profiles for those resource classes.
For information about RACF resource classes, see the CICS RACF Security Guide.
Chapter 7. Authorizing CICS regions to access MVS resources 75

76 CICS TS for z/OS: Installation Guide

Chapter 8. Defining the default CICS userid to RACF
If you intend using RACF to authorize terminal users to access CICS resources,you should define a default CICS userid to RACF and specify it on the CICSsystem initialization parameter, DFLTUSER. This default userid assigns the securityattributes to be used for all CICS terminal users who do not sign on with the CESNtransaction (or a user-written equivalent).
During startup, CICS tries to sign on the default userid. If it is not signed on (forexample, if not defined), CICS issues message DFHSN0701 and terminates CICSinitialization. After the valid default CICS userid is signed on, its security attributesare used for all CICS terminal users who do not sign on with the CESN transaction.If the default userid is defined to RACF with a CICS segment, the operatorattributes in that segment are also used for users who do not sign on.
For information about defining the userid to RACF, see the CICS RACF SecurityGuide.
© Copyright IBM Corp. 1989, 2010 77

78 CICS TS for z/OS: Installation Guide
Chapter 9. Installing CICS-required modules in the MVSlinklist
There are two categories of modules that CICS loads from the MVS linklist:1. CICS-supplied modules2. Modules of other MVS products (for example, DFSMS)
CICS-supplied modules required in the MVS linklistCICS supplies the modules listed below in the hlq.SDFHLINK library, where hlq isdefined by the LINDEX parameter in the DFHISTAR installation job.
AMDUSREF Alias of DFHTG640.
AXMSC AXM server connection routines for CICS data sharing servers.
AXMSI AXM subsystem initialization routine for CICS data sharing servers.
DFHDTCV Connection validation subroutine for shared data tables.
DFHDTSVC Shared data tables SVC services.
DFHGTCNV Subroutine used by LOGR subsystem interface.
DFHLGCNV Exit routine for LOGR subsystem interface.
DFHMVRMS General MVS RESMGR exit stub.
DFHNCIF Named counter server interface.
DFHNCOPT Named counter server options.
DFHPD640 Dump formatting routine for use with IPCS.
DFHRPDUF System dump formatting routine for ONC RPC.
DFHRPTRI Trace interpretation routine for ONC RPC.
DFHRXSVC RRS domain authorized services.
DFHSNNFY RACF CICS segment changes notification routine.
DFHSNPTO CICS RACF dynamic parse TIMEOUT keyword print routine.
DFHSNVCL CICS RACF dynamic parse OPCLASS validation routine.
DFHSNVID CICS RACF dynamic parse OPIDENT validation routine.
DFHSNVPR CICS RACF dynamic parse OPPTRY validation routine.
DFHSNVTO CICS RACF dynamic parse TIMEOUT validation routine.
DFHSSIN CICS subsystem that initializes the console message handlingfacilites.
DFHSSMGT CICS subsystem message table that contains the text of messagesfor the subsystem interface modules.
DFHTG640 Link module for the CICS GTF trace printing load moduleDFHTRGTF.
DFHTR640 Link module for the CICS GTF trace printing load moduleDFHTR640.
DFHTT640 Link module used for trace interpretation.
© Copyright IBM Corp. 1989, 2010 79

Note: It is not essential that DFHTT640 be included in the MVSLinklist, although it is recommended for the reasons given atthe end of this list. If it is not in the linklist, an APFauthorized library in the STEPLIB concatenation of the batchjob is needed for every job which needs the module.
DFHXCSVC External CICS interface (EXCI) SVC services routine.
These modules are supplied in an APF-authorized library in the MVS linklistbecause:1. They can be required by non-CICS regions such as batch jobs or a CICS data
sharing server.2. They must be consistent across several CICS regions.3. They can be required by both CICS and non-CICS regions.4. The RACF dynamic parse routines are required by the Security Administrator
who executes the ADDUSER or ALTUSER commands under TSO. Forinformation about the RACF interface routines, see the CICS RACF SecurityGuide.
These modules are in the hlq.SDFHLINK library when you install CICS.
Ensure the modules supplied in SDFHLINK are available from an APF-authorizedlibrary in the MVS linklist by:
v Adding these modules, as required, to an existing APF-authorized library definedin the MVS linklist, or
v Defining SDFHLINK itself as an APF-authorized library and including it in theMVS linklist.
Compatibility with earlier CICS releasesUnless otherwise stated, the CICS Transaction Server for z/OS, Version 3Release 1 levels of the modules in SDFHLINK are compatible with earlierreleases of CICS. The CICSPlex SM modules in SEYULINK are notcompatible with earlier releases. CICSPlex SM modules in SEYULINK arerelease specific. See “Updating the MVS linklist” on page 284 for moreinformation about CICSPlex SM linklist modules.
Note: DFHPD640, DFHTG640, DFHTR640, and DFHTT640 are releasedependant. If you run more than one release of CICS, ensure the correctversions are available (for example, DFHPD630 for CICS TS for z/OS,Version 2.3, DFHTG530 for CICS TS OS/390, Version 1 Release 3).
CICS shared data tables modules for the MVS linklistCICS supplies the following modules, for the shared data tables facility, in thehlq.SDFHLINK. If you intend using the shared data tables facility, ensure that thesemodules are available in the MVS linklist or the MVS link pack area:
v DFHDTSVC and DFHDTCV, because all regions using shared data tables mustuse the same level of SVC code
v DFHMVRMS, the RESMGR exit stub, because CICS JOBLIB/STEPLIB data setsare unavailable at end-of-memory
80 CICS TS for z/OS: Installation Guide
######

Modules of other MVS products in the MVS linklistThere are some DFSMS modules that CICS loads from the MVS linklist. Thisrequirement is either dependent on the function you are using (such asbackup-while-open (BWO) support), or on the release of DFSMS. The modules are:
IGWABWOThis module, supplied in the MVS callable services library, SYS1.CSSLIB, isloaded by CICS from the MVS linklist if you are using BWO for files accessed innon-RLS mode.
Note: In addition to IGWABWO being in the linklist, IGWAMCS2 must beinstalled in the LPA. CICS tests for the presence of this module in theLPA to determine that BWO support is present in the MVS image beforeattempting to load IGWABWO.
For files that are accessed in RLS mode, CICS does not require IGWABWO orIGWAMCS2.
IGWARLSCICS loads this module, supplied in the MVS callable services librarySYS1.CSSLIB, from the MVS linklist. CICS issues the following message if itcan not load IGWARLS:
DFHFC0116 APPLID THE LOAD OF CALLABLESERVICE IGWARLS HAS FAILED WITH RETURN CODEX’EEEE’.
CICS initialization fails if CICS cannot load this callable services module.
Chapter 9. Installing CICS-required modules in the MVS linklist 81

82 CICS TS for z/OS: Installation Guide
Chapter 10. Defining CICS as an MVS subsystem
CICS must be defined as an MVS subsystem before you can use any of followingfacilities:v The console message-handling facilityv Multiregion operation (MRO)v CICS shared data tablesv External CICS interface (EXCI).v Extended restart facility (XRF)
Also, if you are running CICS with XRF in a multi-MVS environment or a two-CPC(central processing complex) configuration, defining CICS as an MVS subsystemcan reduce operator intervention during takeover if MVS or a CPC fails while morethan one CICS is running.
For information about the console message-handling facility see “The consolemessage-handling facility” on page 86.
For information about MRO, see the CICS Intercommunication Guide.
Defining CICS as an MVS subsystem involves three members of theSYS1.PARMLIB partitioned data set: IEASYSxx, IEFSSNaa , and DFHSSIyy. Youonly need member DFHSSIyy if you want the console message-handling facility.
Note: aa,xx,yy represent suffixes that are used to distinguish different versions ofmembers of the SYS1.PARMLIB library.
Note that if you intend to start CICS with the START command you must either:
v Give the MVS started task procedure a name different from the subsystem namein IEFSSNaa (default ‘CICS’), or
v Issue the start command with the parameter SUB=JES2 or SUB=JES3 asappropriate.
For more information about the subsystem interface, see the z/OS MVS Using theSubsystem Interface .
The following topics cover:
v “The IEASYSxx MVS initialization member”
v “The IEFSSNaa MVS subsystem initialization member” on page 84
v “The SYS1.PARMLIB(BPXPRMxx) parameters” on page 84
v “The console message-handling facility” on page 86
v “EXCI pipe allocation” on page 91
The IEASYSxx MVS initialization memberIn an IEASYSxx member (of the SYS1.PARMLIB library) used for MVS initialization,include the parameter SSN=aa, where aa refers to the SYS1.PARMLIB memberIEFSSNaa that contains the definitions for all subsystems needed for this IPL ofMVS, including the definition of CICS as an MVS subsystem.
© Copyright IBM Corp. 1989, 2010 83

The IEFSSNaa MVS subsystem initialization memberTo define CICS as an MVS subsystem, code an entry in the IEFSSNaa member inthe SYS1.PARMLIB library. If you want to use the console message handlingfacility, or to change the number of pipes that can be allocated in an EXCI addressspace, code the entry by using one of the following methods:CICS,DFHSSIN,DFHSSIyy
orSUBSYS SUBNAME(CICS)
INITRTN(DFHSSIN)INITPARM(DFHSSIyy)
This entry is used for every CICS region, that you have IPLed with this version ofthe IEFSSN member, that runs under MVS. You do not have to specify bothDFHSSIN and DFHSSIyy, however apart from the suffix yy, you must code the entryfor each parameter using the exact format given in the example. The meanings ofthe terms are as follows:
CICS is the name of the CICS subsystem.
DFHSSIN is the name of the CICS subsystem routine that initializes theconsole message-handling facilities, and the number of pipes thatcan be allocated in an EXCI address space. If you omit this name,CICS is defined as an MVS subsystem, but none of the consolemessage-handling facilities are enabled, and the default number ofpipes, that can be allocated in an EXCI address space will be used.That default is 100..
DFHSSIyy is the name of a SYS1.PARMLIB member, described below, inwhich you have defined initialization parameters formessage-formatting and EXCI pipe allocation for the CICSsubsystem. If you specify DFHSSIN but omit DFHSSIyy, theDFHSSIN routine tries to use the parameters that are defined inmember DFHSSI00.
If the DFHSSI00 member does not exist, the routine uses thedefault values.v For message formatting these are defined in the DFHSSIN
member. They are described in “Default message-formattinginitialization parameters” on page 88.
v For EXCI pipe allocation, this is the fixed default value, 100.
The IEFSSNaa member in the SYS1.PARMLIB library also contains the definitionsfor all the other subsystems needed for this IPL of MVS, for example JES2, IRLM,and DATABASE 2 (DB2).
The SYS1.PARMLIB(BPXPRMxx) parametersUse of certain CICS functions and running a large number of CICS systems in anLPAR mean that the default options, shipped in the BPXPRMxx members ofSYS1.PARMLIB, are not sufficient. You must review the default options for thefollowing functions:
v C and C++ programs compiled using the XPLINK compiler option.
v Programs that run on open TCBs and use APIs other than the CICS API.
v SSL TCBs specified by the MAXSSLTCBS SIT parameters.
v Java or JVM programs
84 CICS TS for z/OS: Installation Guide
##
###
##
###
#
####
|
||||
|
|
|
|

“Amending parameters in SYS1.PARMLIB(BPXPRMxx)” on page 210
Both the use of XPLINK and of non-CICS APIs require some increase to theMAXPROCUSER and MAXPROCSYS values. If CICS is configured to use SSL,you might need to increase the MAXTHREADS and MAXTHREADTASKS values.These should exceed the MAXSSLTCBS SIT parameter.
If your system uses two or more of these facilities, corresponding further increasesin the values for these parameters is appropriate.
The z/OS MAXPROCSYS parameter specifies the maximum number of processesthat can be active at the same time, and allows you to manage system resourcesby limiting the number of processes that the system is to support. If you set theMAXPROCSYS value too low, regions might abend because CICS cannot create aprocess when attempting to attach a TCB. However, avoid setting theMAXPROCSYS value too high because this value is shared between all theaddress spaces in a z/OS system.
CICS uses at least two processes for each CICS region, which means that if youhave a large number of CICS regions, you must set your system limit to handlethese processes. The following table explains which TCBs become processes,depending on the CICS system:
Table 9. TCBs that become processes
TCBIs the TCB always aprocess? Description
Jobstep Yes The jobstep TCB is alwayscreated.
SO Yes The SO TCB is alwayscreated.
SL No The SL TCB is createdunless the systeminitialization parameter,TCPIP=NO, is specified.
QR No The QR TCB becomes aprocess when an OTE TCBis attached (that is; L8, L9,J8, J9, X8, or X9).
SP No The SP TCB becomes aprocess, and the associatedS8 TCBs are created andbecome threads only whenSSL is used.
JVM (J8 and J9) No The number of J8 or J9TCBs is controlled by theMAXJVMTCBS SITparameter. J8 and J9 TCBsrunning active JVMs requireone process each.
In summary, there is always a minimum of two processes for each CICS region, upto a minimum of seven processes for each region, depending on which additionalTCBs you are running.
Chapter 10. Defining CICS as an MVS subsystem 85
|
||||
||
|||||||
||||
||
||||
||||
||||
||||||
||||||
|||||||
|||||||||
|||

You can issue the following command to give you a list of the processes that arerunning on your system:
D OMVS, A=addressspaceid
addresspaceid is the address space that you want to query.
If you run this command at system startup, and again when your system hasstabilized; for example, when peak J8 and J9 TCBs are running, you can calculatethe most appropriate number for MAXPROCSYS.
For more information about changing BPXPRMxx parameters, monitoring systemlimits and calculating values for system resources, see z/OS Unix System ServicesPlanning.
The console message-handling facilityThe console message handling facility is an optional feature of the CICS subsystemthat can affect the appearance of CICS messages displayed on an MVS console. Itis effective when you specify FORMATMSG=YES as an initialization parameter forthe CICS subsystem. The subsystem reformatting is enabled when at least one ofthe following is executing in the MVS image where the subsystem is defined:
v Any version of CICS Transaction Server
v Any earlier version of CICS since CICS/MVS version 2 release 1.2
v A message automation subsystem (such as NetView®) which enables the MVSsubsystem console message broadcasting service
When this facility is used, it affects the messages that are displayed on MVSsystem consoles in the following ways:
v The subsystem tries to ensure that all console messages issued by all CICSregions have a standard format. The format is:
+DFHnnnn APPLID MESSAGE-TEXT
In this message:+DFHnnnn
– begins in column 1– The “plus” sign (+) which preceeds DFHnnnn, is added by MVS to
indicate that a problem-state program issued the message. It is notpresent when CICS issues the message while it is in supervisor state.
APPLID– begins in column 13– The applid inserted into the message is the specific application
identifier. This is the identifier that is specified in the systeminitialization parameter APPLID. It is the only operand when XRF=NOis also specified, or the second operand when XRF=YES is alsospecified.
MESSAGE-TEXT– begins in column 22.
v The subsystem adds routecodes specified in the ROUTECODE subsysteminitialization parameter, so the messages might be sent to more destinations.
v The subsystem reformats messages for all CICS releases, even those issued byCICS/OS/VS version 1.
86 CICS TS for z/OS: Installation Guide
||
|||
|
|||
|||

v The subsystem does not reformat messages that are issued by a CICS regionthat has not yet determined its applid. This includes messages that are issuedwhile processing the system initialization table and its overrides.
v The subsystem routine that reformats the messages does not receive controluntil after the message has been recorded in the CICS job log. Therefore, thereformatting is not usually apparent in the job log.
v Messages issued by the message domain already contain the applid. Thesubsystem does not insert the applid into such messages, but it might insertblank characters to cause alignment into standard locations.
v If the original CICS message is a long one, adding the applid might cause themessage to exceed the maximum length for an MVS console message. In thiscase, the original message is suppressed (does not appear on the console), andthe reformatted message is issued using the MVS multiple-line console messageservice to split the message over several lines. Both the original message andperhaps several instances of the reformatted multiple-line message appear in thejob log, but only one copy of the reformatted message is displayed on theconsole.
v For some messages where the applid normally follows a time and date stamp,inserting the applid in the standard position would have resulted in the applidbeing duplicated within the message. For these messages, the subsystemeliminates the time and date stamp, because these are available from othersources, and only one occurrence of the applied is shown.
The DFHSSIyy message-formatting initialization memberYou can specify message-formatting initialization parameters for the CICSsubsystem in a member DFHSSIyy of the SYS1.PARMLIB library, where yy is thesuffix that identifies the SYS1.PARMLIB member used to define the CICSsubsystem. These parameters, described in this section, are FORMATMSG,HIDEPASSWORD, and ROUTECODES. Code the parameters in columns 1 through71 of the DFHSSIyy member, for example:FORMATMSG=YES,HIDEPASSWORD=YES,ROUTECODES=(1,2)
orFORMATMSG=YESHIDEPASSWORD=YESROUTECODES=(1,2,3,4,5,6)
FORMATMSG={YES|NO}Specifies whether the CICS applid is to be inserted into all DFH consolemessages that do not use the CICS message domain.
YESInsert CICS applid into messages.
NO Do not insert CICS applid into messages.
HIDEPASSWORD={YES|NO}Specifies whether to mask the password from MODIFY commands used toenter the CICS signon transaction at an MVS console.YES
Mask the password.NO Do not mask the password.
Chapter 10. Defining CICS as an MVS subsystem 87

ROUTECODES=(n1[,n2] ....)n1, n2... are numbers representing generic routecodes that areadded to all DFHconsole messages issued by CICS. The routecodes 1-12 have specialmeanings:1 Master console action.2 Master console information.3 Tape pool.4 Direct access pool.5 Tape library.6 Disk library.7 Unit record pool.8 Teleprocessing control.9 System security.10 System error/maintenance.11 Programmer information.12 Emulators.
The status of other routecodes is as follows:13-20 Available for customer use.29-40 Reserved.41-128 Available to authorized programs only.
For more information about these routing codes, see the z/OS MVS Initializationand Tuning Reference manual for your version of MVS.
Default message-formatting initialization parametersYou can define message-formatting initialization parameters for the CICS subsystemin a member DFHSSIyy of the SYS1.PARMLIB library.
To use parameters defined in a DFHSSIyy member other than the DFHSSI00member, you must specify DFHSSIyy on the IEFSSNaa member in theSYS1.PARMLIB library used to define CICS as an MVS subsystem. If you do notspecify DFHSSIyy, the DFHSSIN routine tries to use the parameters that aredefined in the DFHSSI00 member. If the DFHSSI00 member does not exist, it usesthe default parameters that are defined in the DFHSSIN routine.
If you specify DFHSSIyy but it does not exist, the DFHSSIN routine uses the defaultmessage-formatting initialization parameters that are defined in the DFHSSINroutine
The default message-formatting initialization parameters defined in the DFHSSINroutine are:FORMATMSG=YES,HIDEPASSWORD=YES(generic routecodes are not added to messages)
The default facilities:
v Insert the CICS applid into the CICS console message between the messageidentifier and the message text. The applid is inserted into only those consolemessages (starting with DFH) that do not use the CICS message domain. TheCICS message domain inserts the CICS applid into all messages that it handles.
If the original message is a long one, inserting the CICS applid might cause themessage to exceed the maximum length for an MVS console message. In thiscase, the original message is suppressed (that is, does not appear on theconsole), and the reformatted message is issued using the MVS multiple-lineconsole message service to split the message text over several lines. Both the
88 CICS TS for z/OS: Installation Guide
original message and perhaps several instances of the reformatted multiple-linemessage appear in the job log, but only one copy of the reformatted message isdisplayed on the console.
v Examine each MODIFY command to see if it resembles a MODIFY CICS,CESN... command. If the MODIFY command contains an old or new password(PS=xxxx,NEWPS=xxxx), the default facilities obliterate the password withasterisks. If the MODIFY command does not contain a password, the passwordyou enter at the MVS console is masked.
Note: If your primary subsystem is JES3, the old and new passwords stillappear in the JES3 hardcopy log. JES3 records the MODIFY commandbefore the CICS message formatting subsystem can obliterate thepassword. (This does not happen when the primary subsystem is JES2.)The passwords are suppressed from the console for both JES2 and JES3.For information about the CESN transaction, and about how to preventpasswords from appearing in the hardcopy log, see the CICS SuppliedTransactions manual.
If you do not specify DFHSSIN in the IEFSSNaa entry that defines CICS, themessage handling facilities are not enabled. Also, if you run CICS as a started task,you cannot use the name “CICS” for the procedure name.
Activating message formattingAfter you have defined CICS as an MVS subsystem with support for the consolemessage-handling facility (and have specified the message-formatting parameters inthe DFHSSIyy member of the SYS1.PARMLIB library), the message-handling facilityis activated by the next MVS subsystem to invoke the subsystem console messagebroadcasting service of MVS console support. This occurs when you start up asupported CICS region (see “The console message-handling facility” on page 86 fora list) or if an automated-operation program, such as NetView, is active in the MVSimage.
A newly-started CICS region determines its own applid during initialization. Until theapplid is known, the message-formatting facility cannot operate. Therefore,messages issued very early in CICS initialization are not formatted.
Modules needed to use the console message-handling facilitiesTo use the console message-handling facilities that are provided by the MVSsubsystem functions of CICS, the following CICS modules must be available atMVS IPL time:
DFHSSEN The module that cleans up CICS resources atend-of-memory and at end-of-task.
DFHSSGC The subsystem generic connect module thatconnects an active CICS region to the CICSsubsystem.
DFHSSIN The CICS subsystem initialization module.
DFHSSMGT The subsystem message table that contains thetext of messages for the subsystem interfacemodules.
DFHSSWT The subsystem interface write-to-operator (WTO)
Chapter 10. Defining CICS as an MVS subsystem 89

router that determines whether WTO calls shouldbe routed to the appropriate CICS-dependentmodules.
These modules must reside in the LPA or in an APF-authorized library in the MVSlinklist, as follows:
v The modules DFHSSIN and DFHSSMGT, installed in the hlq.SDFHLINK library,must reside in an APF-authorized library in the MVS linklist.
v The DFHSSEN module installed in the hlq.SDFHLPA library, must reside in theLPA.
v The modules DFHSSGC and DFHSSWT, installed in the hlq.SDFHLPA library,must reside either in the LPA or in an APF-authorized library in the MVS linklist.
Note: hlq is defined by the LINDEX parameter in the DFHISTAR installation job.
The current versions of these modules are compatible with earlier CICS releasesthat support console message handling.
For information about adding modules that are installed in the hlq.SDFHLINK libraryto the MVS linklist, see Chapter 9, “Installing CICS-required modules in the MVSlinklist,” on page 79.
For information about adding modules installed in the hlq.SDFHLPA library to theLPA, see Chapter 14, “Installing CICS modules in the MVS link pack area,” on page107.
Coexistence considerationsTo use the message-handling facilities for CICS, you should note the followingcoexistence considerations:
Automated-operation programsIf your automation system needs to see the console messages before they arereformatted by CICS, its subsystem definition should be placed in IEFSSNXXbefore the definition for CICS. But if your automation system needs to see thereformatted messages, its definition must come after that of CICS. Consult thedocumentation of your automation package to determine which applies to you.
Other CICS releasesIf the message-handling facility has been defined to MVS (by the CICS entry in theIEFSSNaa member of the SYS1.PARMLIB library), CICS regions running earlierreleases of CICS in the same MVS image have the full benefit of the messagehandling that has been defined if either of the following is true:
v An automated-operation program, such as NetView, is active in the MVS image.
v A CICS region that supports message handling (see “The consolemessage-handling facility” on page 86 for a list) is running in the same MVSimage.
Note: A consequence of console messages now having a standard format is thatthey no longer include date, time and informational messages. If you usethese as a token, you must make a change to the code so that it looks for adifferent token.
90 CICS TS for z/OS: Installation Guide

EXCI pipe allocationThe external CICS interface is an application programming interface that enables anon-CICS program (a client program) running in MVS to call a program (a serverprogram) running in a CICS region and to pass and receive data by means of acommunications area. The CICS application is invoked as though it is linked to byanother CICS application program.
This programming interface allows a user to allocate and open sessions or pipes,which operate in "half-duplex", flip-flop" mode, to a CICS region and to pass adistributed program link (DPL) requests over them. The multiregion operation(MRO) facility of CICS interregion communication (IRC) supports these requests,and each pipe maps onto one MRO session, where the client program representsthe sending process and the CICS server region represents the receiving process.There is a default limit of 100 pipes for each EXCI address space.
The DFHSSIyy initialization memberYou can specify the EXCI pipe allocation limit for the CICS subsystem in a memberDFHSSIyy of the SYS1.PARMLIB library, where yy is the suffix that identifies theSYS1.PARMLIB member used to define the CICS subsystem. The parameter,described in this section, is LOGONLIM. Code the parameter in columns 1 through71 of the DFHSSIyy member, for example:
LOGONLIM=200
LOGONLIM=nnThe minimum and maximum values that can be specified for nn are 100and 250.
If the parameter is omitted, or the value specified lies outside the allowedrange, then CICS will assume a limit of 100. You should code theparameter only if you want to increase the limit from the default value of100.
The EXCI pipe allocation limitCICS will publish the limit if it is determined during subsystem initialization. It will doso by creating a system level name token pair formatted as follows:
Name: input, fixed length 16 byte typeBytes 0-7 : The character string ’DFHIRP ’Bytes 8-15: The character string ’LOGONLIM’
Token: output, fixed length 16 byte typeBytes 0-3 : The logon limit, held as fullword binaryBytes 4-15: Reserved, set to nulls
You can use the callable service, IEANTRT, to retrieve the token. To do this, invokeIEANTRT with level IEANT_SYSTEM_LEVEL (EQU 4). The return code isinterpreted as follows:
0 The name/token pair exists and the token has been retrieved. The logon limitcan be extracted from the token.
4 The name/token pair does not exist. The logon limit is assumed to be 100.
Any other value indicates that the callable service has detected an error.
Default EXCI pipe allocation limit initialization parameterYou can define the EXCI pipe allocation limit parameter for the CICS subsystem ina member DFHSSIyy of the SYS1.PARMLIB library.
Chapter 10. Defining CICS as an MVS subsystem 91
#
#####
#######
#
#####
#
###
####
#
##
######
###
###
##
#
#
##

To use parameters defined in DFHSSIyy member other than the DFHSSI00member, you must specify DFHSSIyy in the IEFSSNaa member in theSYS1.PARMLIB library used to define CICS as an MVS subsystem.v If you do not specify DFHSSIyy, the DFHSSIN routine tries to use the parameters
that are defined in the DFHSSI00 member.v If the DFHSSI00 member does not exist, it uses the default parameters that are
defined in the DFHSSIN routine.v If you specify DFHSSIyy but it does not exist, the DFHSSIN routine uses the
default parameters that are defined in the DFHSSIN routine.
The default EXCI pipe allocation initialization parameter defined in the DFHSSINroutine is LOGONLIM=100. You should code the parameter only if you want toincrease the limit from the default of 100.
92 CICS TS for z/OS: Installation Guide
#########
###
Chapter 11. Installing the CICS Type 3 SVC
Install the current level of the CICS Type 3 SVC, DFHCSVC, before you attempt tostart a region. To install the CICS Type 3 SVC:
1. Define the DFHCSVC module to MVS. (See “Defining the CICS SVCs to yourMVS.”)
2. Install the DFHCSVC module into the LPA.
Do not change DFHCSVC attributesDo not relink-edit the DFHCSVC module in order to install it into the LPA.The term install means move or copy a module into the LPA by usingSMP/E, or a copying method that re-blocks the copied modules when thetarget data set has a smaller block size than the data set you are copyingfrom.
The DFHCSVC module, as supplied, has the attributes AMODE(31) andRMODE(ANY); do not change these attributes.
For further information about installing the DFHCSVC module in the LPA, seeChapter 14, “Installing CICS modules in the MVS link pack area,” on page 107.
3. Specify the DFHCSVC number on the CICSSVC system initialization parameter.
The current version of the CICS SVC module is compatible with all earlier releasesof CICS, which enables you to run your earlier CICS regions with current regions inthe same MVS image.
CICS contains a test to verify that it is using the correct level of the CICSDFHCSVC module. If CICS calls an SVC module using the SVC number specifiedon the CICSSVC system initialization parameter, and the module is not at thecurrent level, CICS issues message DFHKE0104. As a result of this message,CICS either abends with a system dump, or prompts the operator to enter analternative SVC number, depending on the option specified on the PARMERRsystem initialization parameter.
Defining the CICS SVCs to your MVSYou define both the CICS Type 3 SVC and the HPO SVC to your MVS system byspecifying SVCPARM statements.
You must define the CICS SVCs in an IEASVCxx member of the SYS1.PARMLIBlibrary, using SVCPARM statements. See the z/OS MVS Initialization and TuningGuideand z/OS MVS Initialization and Tuning Reference manuals for a descriptionof the SVCPARM statements. If you are using the default SVC numbers, the CICSentries are as follows:SVCPARM 216,REPLACE,TYPE(3),EPNAME(DFHCSVC)SVCPARM 215,REPLACE,TYPE(6),EPNAME(DFHHPSVC) [Only required for HPO]
For the current SVC modules, you must specify the EPNAME parameters as in thesample CICS entries.
Note: If you have a version of the DFHHPSVC module from an earlier release ofCICS already link-edited into your MVS nucleus, you do not need to replaceit with the latest version. Versions of the DFHHPSVC module from earlier
© Copyright IBM Corp. 1989, 2010 93

releases of CICS are compatible with the current release. The CSECT name(EPNAME) of the version of the DFHHPSVC module from earlier releases isIGC215 (or IGCnnn, if SRBSVC=nnn was used as a CICS systemgeneration parameter in the earlier release).
If you are not using the default SVC numbers, change the values 215 and 216 tothe SVC numbers you have chosen.
You select the required IEASVCyy member by coding the SVC parameter (SVC=yy)in a SYS1.PARMLIB member (IEASYSxx) which you use to IPL your MVS. Whenyou code new SVC numbers, they do not come into effect until you next IPL yourMVS.
Using more than one version of the CICS Type 3 SVCYou may need to use more than one version of the CICS Type 3 SVC, for exampleto test service applied to the DFHCSVC module while using the current version in aproduction system.
You can run several CICS regions, at different release levels, in the same MVSimage, with each region using its own version of the CICS SVC. However, if someof those regions use MRO, all regions that use MRO must use the latest CICS Type3 SVC (DFHCSVC module) and the latest DFHIRP module. For information aboutusing the latest SVC with earlier releases of CICS, see “MRO between differentCICS releases with a changed SVC number” on page 95 and a pre-Version 3Installation Guide.
To use more than one version of the CICS SVC, rename the new SVC module inthe LPA, then respecify the SVC in the SVCPARM statements, as outlined in“Defining the CICS SVCs to your MVS” on page 93. To rename the new CICS SVCmodule, use the renaming facility of ISPF or IEBCOPY, or the TSO commandRENAME, renaming the module to a unique name of your choice. We recommendthat you use SMP/E to rename the CICS SVC module in the SDFHLPA library. Usethe SMP/E RENAME command to inform SMP/E of the change to the name of theCICS SVC module. Therefore, if you later use SMP/E to apply service to thatmodule, the service is applied to the renamed module in the LPA, not theDFHCSVC module.
For example, you might want to use an SVC number 255 for a test CICS region, aswell as the default CICS SVC number 216 for your production system:
1. Create and apply an SMP/E USERMOD to RENAME the new CICS SVCmodule:++USERMOD(umod1) .++VER(C150) FMID(HCI6400) .++RENAME (DFHCSVC) TONAME(newname) .
2. You could then specify the number 255 for the new CICS SVC version byadding an appropriate statement to the list of SVCPARM statements. That listwould then read:SVCPARM 216,REPLACE,TYPE(3),EPNAME(DFHCSVC)SVCPARM 215,REPLACE,TYPE(6),EPNAME(DFHHPSVC) [Only required for HPO]SVCPARM 255,REPLACE,TYPE(3),EPNAME(newname) [New CICS SVC version]
Note: The EPNAME parameter for the new CICS SVC specifies the modulename, not the CSECT name, for the new CICS SVC module.
94 CICS TS for z/OS: Installation Guide

All the SVCPARM statements apply to the same IEASVCxx member of theSYS1.PARMLIB library.
3. Re-IPL MVS to enable all the SVC versions specified in the SVCPARMstatements. After you re-IPL MVS, you can use both versions of the CICS SVC,as long as both regions do not use MRO concurrently. If both systems useMRO, only the new, latest, version of the SVC (and the latest DFHIRP module)is used by both regions.
4. In the system initialization table (SIT) for your production system, specify (by thesystem initialization parameter CICSSVC) the number of the current CICS SVC.Similarly, in the SIT for your test system, specify the number of the new CICSSVC version.
MRO between different CICS releases with a changed SVC numberIf a CICS TS region, and other CICS regions from earlier releases, in the sameMVS image use MRO, all the regions must use the CICS TS SVC module. If whenyou install the CICS TS SVC in the LPA, you give the SVC a number different fromthe number defined to the earlier CICS regions, you must respecify the SVCnumber. On each earlier release CICS region to use the CICS TS SVC, specify thenew SVC number on the CICSSVC system initialization parameter.
Chapter 11. Installing the CICS Type 3 SVC 95

96 CICS TS for z/OS: Installation Guide

Chapter 12. Selecting the high-performance option
The high-performance option (HPO) is for users whose top priority is to optimizeterminal response times and maximize transaction throughput. HPO improvesperformance by reducing the transaction path length; that is, the number ofinstructions needed to service each request.
Note: Use of HPO potentially allows CICS application programs to bypass all MVSintegrity controls. If you decide to use HPO, ensure that the applicationprograms used on your CICS system meet your own installation’s integrityrequirements.
The code to support the VTAM authorized path feature of HPO (the improved paththrough VTAM) is in CICS.
Defining DFHHPSVC to MVSThe DFHHPSVC module must be defined to MVS as a Type 6 SVC; the defaultHPO SVC number defined in the DFHSIT module is 215. If you want to change thedefault Type 6 SVC number:
1. Define the new number to MVS. (See “Defining the CICS SVCs to your MVS”on page 93.)
2. Define the new number to CICS by using the SRBSVC system initializationparameter.
If you are not using HPO, you should not load the DFHHPSVC module into theMVS nucleus. You choose to use HPO explicitly by coding HPO=YES in the systeminitialization table (SIT).
Loading module DFHHPSVCBefore you can use HPO, ensure that the HPO SVC module is included in the MVSnucleus by one of the following methods:
1. Copy the DFHHPSVC module into SYS1.NUCLEUS, renaming it to IGC215 orthe appropriate name if you are not using the default, and specify it on anINCLUDE statement in the NUCLSTxx member of the SYS1.PARMLIB library.(You must also specify the name of the NUCLSTxx member on the NUCLSTstatement of the LOADxx member of the SYS1.PARMLIB library.) TheNUCLSTxx method provides you with greater flexibility in customizing the MVSnucleus than the NMLDEF method described in the method 2.
For further information about coding a NUCLSTxx member, and about acomparison with using the NMLDEF macro, see the z/OS MVS Initialization andTuning Guide.
2. Copy the DFHHPSVC module into SYS1.NUCLEUS and specify it in a nucleusmodule list (NML) for CICS, created using the NMLDEF macro shown in thesample job in Figure 5 on page 98. This NML selects the CICS members inSYS1.NUCLEUS that are to be loaded into the MVS nucleus, and eliminates theneed for the MVS nucleus to be re-link-edited for the DFHHPSVC module (orany other module needed in the MVS nucleus).
For information about coding an NMLDEF macro, see the z/OS MVSProgramming: Authorized Assembler Services Reference Vol 3 manual.
© Copyright IBM Corp. 1989, 2010 97

Removing existing DFHHPSVC modules from the MVS nucleusYou can remove a link-edited version of the DFHHPSVC module (for an earlierrelease of CICS) from the MVS nucleus by running a link-edit job to replace theexisting version of the nucleus with one that does not contain the module to beremoved.
Notes:
1. If the existing nucleus-resident DFHHPSVC module is known to SMP/E, use theSMP/E UCLIN statement to remove the module entry.
2. You must link-edit the nucleus module, IEANUC0x, with the scatter (SCTR)attribute. If you do not do this, MVS enters a non-restartable wait state atsystem initialization.
3. If you have a version of the DFHHPSVC module from an earlier release ofCICS already installed in your MVS nucleus, you do not need to replace it withthe latest version. Versions of the DFHHPSVC module from earlier releases ofCICS are compatible with the current release.
//LOADSVC JOB ’accounting info’,MSGCLASS=A,CLASS=A//NMLDEF EXEC ASMHCL//C.SYSIN DD *IEANCnnn NMLDEF NUCL=DFHHPSVC//L.SYSLMOD DD DSN=SYS1.NUCLEUS,UNIT=3380,DISP=OLD//L.SYSIN DD *NAME IEANCnnn
/*//
where nnn is the number of the CICS NML, in the range 001 through 256. Choosethe value of nnn to be unique within your MVS nucleus.
Figure 5. Sample job stream to load the CICS Type 6 SVC into the MVS nucleus
98 CICS TS for z/OS: Installation Guide

Chapter 13. Defining CICS regions as applications to VTAM
To use VTAM terminals with CICS, ensure that your CICS regions are defined toVTAM before you attempt to run them.
To define your CICS regions to VTAM (as VTAM application programs):
1. Define VTAM application program minor nodes for your CICS regions, byspecifying APPL definition statements in a member of the SYS1.VTAMLSTlibrary (or your own user.VTAMLST library). See “Defining specific CICS APPLstatements to VTAM.”
2. Issue a VARY ACT command to activate the APPL definitions, and enable theCICS regions to connect to VTAM.
3. Ensure that you have properly defined your VTAM terminals for connection toCICS. This is particularly important if you intend using the CICS autoinstallfunction. For those terminals for which you want to use autoinstall, codeLOGON mode table entries that match the model TYPETERM/TERMINALdefinitions that CICS uses. You can either code your own autoinstall models, oruse the CICS-supplied model definitions that are generated for you when youinitialize the CICS system definition data set (CSD).
For information about defining model and terminal resource definitions to CICS,see the CICS Resource Definition Guide.
For programming information about matching VTAM LOGMODE definitions withCICS model definitions, see the CICS Customization Guide.
For further information about defining VTAM resources, see the z/OS V1R4.0Communications Server: SNA Resource Definition Reference and z/OSCommunications Server: SNA Network Implementation manuals.
Defining specific CICS APPL statements to VTAMTo define a CICS region to VTAM, specify the minor node name to be used for theCICS region on the VTAM APPL definition statement.
For example, you could use the following definition for the CICS region to beidentified as CICSHTH1:*********************************************************************** Specific APPL definition for CICS region CICSHTH1**********************************************************************CICSHTH1 APPL AUTH=(ACQ,VPACE,PASS),VPACING=0,EAS=5000,PARSESS=YES X
SONSCIP=YES,LUAPFX=XX********************************************************************
Notes:
1. Code CICSHTH1 on the CICS system initialization parameter APPLID, to definethe VTAM application identifier to CICS.
2. See “Naming conventions” on page 190 for information about the namingconvention that is used for the CICSHTH1 applid.
VTAM APPL parameters for CICS regionsWhen you define your CICS system to ACF/VTAM, include the following parameterson the VTAM APPL statement:
ACBNAME=acbnameSpecifies the minor node name (acbname) that is assigned to this application.
© Copyright IBM Corp. 1989, 2010 99

This name must be unique within the domain. If you do not specify thisparameter, the name of the VTAM APPL statement is taken.
AUTH=(ACQ,VPACE[,PASS])ACQ allows CICS to acquire LUTYPE 6 sessions. VPACE allows pacing of theintersystem flows. You need PASS if you intend using the EXEC CICS ISSUEPASS command to pass existing terminal sessions to other VTAM applications.
EAS=numberSpecifies the number of network-addressable units. The number must includethe total number of parallel sessions for this CICS system.
HAVAIL=YESIndicates that the application supports XRF sessions and can initiate XRFsessions.
LOGMODE=name(For CICS-to-CICS APPC systems.) Defines the name of the MODE table thatcontains the LU6.2 MODEENT for the secondary sessions.
LUAPFXstringspecifies the prefix characters of the LU alias to be assigned when adynamically generated cross-network CDRSC (with NQNMODE=NQNAME) iscreated for a session with CICS. VTAM concatenates the characters specifiedwith the next sequential number available to form a VTAM-generated LUALIASname for the cross-network dynamic CDRSC.
stringindicates the two characters to be used as the prefix for all dynamicallygenerated LUALIAS names for dynamic cross-network CDRSCs in sessionwith the CICS region defined by the APPL statement. Remember to takeinto account the VTAM naming conventions when choosing this prefix. ForCICS considerations when specifying the LU alias string, see “Choosing anLUAPFX value” on page 104.
Note: VTAM deletes a dynamically-generated LU alias after a terminal sessionis closed, or the last session of an APPC parallel sessions connection isclosed, and the CDRSCTI-specified timeout interval has expired. Thepermitted range of timeout values is 1 second to 7 days, but generallythe default of 8 minutes is acceptable in most situations. The CDRSCTItimer doesn't start until there are no more sessions involving theresource represented by a CDRSC.
For more information about CICS support for the VTAM dynamic LU aliasfacility, see “VTAM LU alias facility” on page 102.
PARSESS=YESSpecifies LUTYPE 6 parallel session support.
PERSIST=MULTIIndicates that the application supports Multi Node Persistent Sessions (MNPS).For further information, see the z/OS Communications Server: SNA NetworkImplementation.
SONSCIP=YESSpecifies session outage notification (SON) support. SON enables CICS, incertain cases, to recover a session after session failure without operatorintervention.
100 CICS TS for z/OS: Installation Guide

VPACING=numberSpecifies the maximum number of normal-flow requests that another logical unitcan send on an intersystem session before waiting to receive a pacingresponse. Start with a value of 5.
VTAM version and release level indicatorThe terminal control modules in CICS are assembled against z/OS, 1.4Communication Server. You can use any release of Communication Server VTAMfrom z/OS, 1.4 , or a later, compatible release. For details of the minimum level ofproducts that you can use with the current release, see the CICS TransactionServer for z/OS Release Guide.
CICS can communicate with different levels of VTAM. It can find out which level youare using, and hence what level of function is available. This means that you canupgrade CICS and SecureWay Communication Server VTAM at different times.CICS finds out whether extra function is available when a new version of VTAM isinstalled, and produces a message if the facilities are not being exploited fully.
Message DFHZC3473 on opening the VTAM ACBIf the master terminal operator opens the VTAM ACB for the first time, using thecommand CEMT SET VTAM OPEN, but CICS is not using all available VTAMfunction, message DFHZC3473 is sent to the transient data destination calledCSNE. The same message is sent there if the ACB is opened automatically duringinitialization, rather than by CEMT.
Cross-domain considerationsIf you want to use VTAM services to access a CICS region on another MVS image,you must ensure that the required cross-domain services are defined to the VTAMsinvolved.
For example, to be able to use a VTAM APPC connection between a CICS region(applid CICSHTH1) on MVS image MVSH and a CICS region (applid CICSHAJ1)on MVS image MVSJ:
1. Define the cross-domain services (CDRSC) for accessing CICSHAJ1 in amember of the SYS1.VTAMLST library (or your own user.VTAMLST library) forMVSH.
2. Issue a VARY ACT command on MVSH to activate the CDRSC definition foraccessing CICSHAJ1.
3. Define the cross-domain services (CDRSC) for accessing CICSHTH1 in amember of the SYS1.VTAMLST library (or your own user.VTAMLST library) forMVSJ.
4. Issue a VARY ACT command on MVSJ to activate the CDRSC definition foraccessing CICSHTH1.
For example, you could:
1. Create the following CDRSC definition in a member of the VTAMLST library onMVSH:CDIDHAJ1 VBUILD TYPE=CDRSC********************************************** CDRSC for access to applid CICSHAJ1 on MVSJ*********************************************CICSHAJ1 CDRSC CDRM=IYAMCDRM MVSJ
Chapter 13. Defining CICS regions as applications to VTAM 101
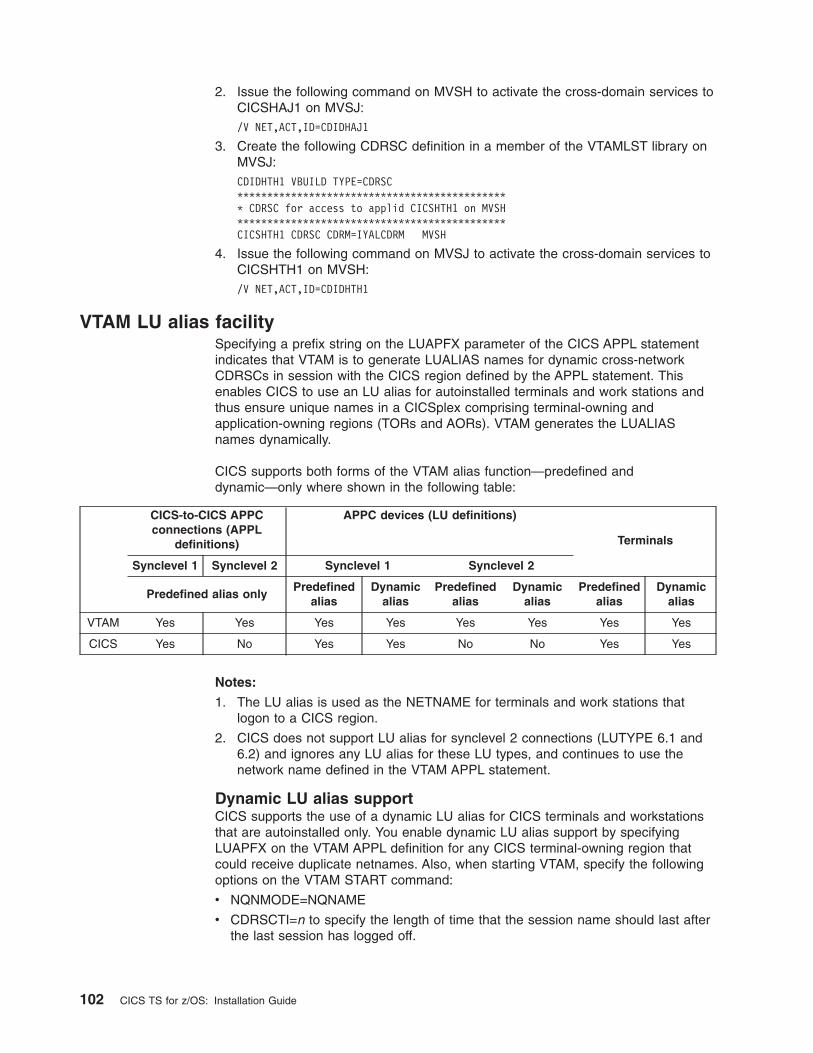
2. Issue the following command on MVSH to activate the cross-domain services toCICSHAJ1 on MVSJ:/V NET,ACT,ID=CDIDHAJ1
3. Create the following CDRSC definition in a member of the VTAMLST library onMVSJ:CDIDHTH1 VBUILD TYPE=CDRSC********************************************** CDRSC for access to applid CICSHTH1 on MVSH*********************************************CICSHTH1 CDRSC CDRM=IYALCDRM MVSH
4. Issue the following command on MVSJ to activate the cross-domain services toCICSHTH1 on MVSH:/V NET,ACT,ID=CDIDHTH1
VTAM LU alias facilitySpecifying a prefix string on the LUAPFX parameter of the CICS APPL statementindicates that VTAM is to generate LUALIAS names for dynamic cross-networkCDRSCs in session with the CICS region defined by the APPL statement. Thisenables CICS to use an LU alias for autoinstalled terminals and work stations andthus ensure unique names in a CICSplex comprising terminal-owning andapplication-owning regions (TORs and AORs). VTAM generates the LUALIASnames dynamically.
CICS supports both forms of the VTAM alias function—predefined anddynamic—only where shown in the following table:
CICS-to-CICS APPCconnections (APPL
definitions)
APPC devices (LU definitions)
Terminals
Synclevel 1 Synclevel 2 Synclevel 1 Synclevel 2
Predefined alias onlyPredefined
aliasDynamic
aliasPredefined
aliasDynamic
aliasPredefined
aliasDynamic
alias
VTAM Yes Yes Yes Yes Yes Yes Yes Yes
CICS Yes No Yes Yes No No Yes Yes
Notes:
1. The LU alias is used as the NETNAME for terminals and work stations thatlogon to a CICS region.
2. CICS does not support LU alias for synclevel 2 connections (LUTYPE 6.1 and6.2) and ignores any LU alias for these LU types, and continues to use thenetwork name defined in the VTAM APPL statement.
Dynamic LU alias supportCICS supports the use of a dynamic LU alias for CICS terminals and workstationsthat are autoinstalled only. You enable dynamic LU alias support by specifyingLUAPFX on the VTAM APPL definition for any CICS terminal-owning region thatcould receive duplicate netnames. Also, when starting VTAM, specify the followingoptions on the VTAM START command:
v NQNMODE=NQNAME
v CDRSCTI=n to specify the length of time that the session name should last afterthe last session has logged off.
102 CICS TS for z/OS: Installation Guide

Notes:
1. Make the time specified on CDRSCTI long enough to cover any time intervalspecified on CICS START commands that are issued against a terminalresource that uses a dynamic LU alias. This applies to STARTS with a delaythat run on both a TOR or AOR. If the CDRSCTI time is not long enough, aresource could log off and then log back on again with a different networkname and thus a different TERMID.
2. The CDRSCTI time interval should also be greater than that specified on theCICS AILDELAY system initialization parameter. However, if your applicationshave no dependency on the network name or termid, you can disregardCDRSCTI or set it to 1.
VTAM generates a dynamic LU alias only if LUAPFX is specified on the CICS APPLstatement and the resource comes from another network. That is, it has a differentnetwork name from the network to which the CICS region belongs.
When to use dynamic LU alias: Use dynamic LU alias where:
v Your cross-network terminals and workstations that logon to CICS are mainlyautoinstalled.
The CICS region receives logons from terminals and synclevel 1 connections(both parallel and single sessions) and those logons (or binds) are fromcross-network resources that might have duplicate network names.
However, be aware that synclevel 1 connections could become synclevel 2 in thefuture. For example, if you have a connection between a TXSeries CICS andCICS TS it is synclevel 1, but if you change to using TXSeries CICS with a PPCgateway, synclevel 2 is used. CICS does not support dynamic LU aliases forsynclevel 2 APPC connections.
v An AOR receives shipped terminals or connections with duplicate network namesfrom different TORs.
Predefined LU alias supportCICS supports the use of a predefined LU alias for CICS terminals andworkstations that are explicitly defined and those that are autoinstalled. You canalso use a predefined LU alias for CICS regions that communicate using CICSintersystem communication (ISC). You enable predefined alias support by specifyingLUALIAS=alias on any cross-domain resource (CDRSC) that needs a specific alias.
Note: A terminal or APPC sync level 1 work station that is defined to CICS on anexplicit resource definition (that is, it is not autoinstalled) and is in a differentnetwork, requires a CDRSC definition with a specific alias on the LUALIASparameter. This overrides the dynamic generation of an alias where LUAPFXis specified on the CICS region's APPL statement. To ensure that CICS canmatch the VTAM LU alias with the installed terminal definition, the LUALIASvalue must match the NETNAME specified on the CICS TERMINAL resourcedefinition.
An LUALIAS option in the CDRSC is effective if the resource comes from anotherVTAM domain (or network). That is, it is not used if the resource comes from thesame MVS image, but is used if the resource comes from another MVS imageregardless of whether it is from the same sysplex, another sysplex in the samenetwork, or from a different sysplex. If an LU alias is predefined, a dynamic LU aliasis not generated.
When to use predefined LU alias: Use predefined LU alias where:
Chapter 13. Defining CICS regions as applications to VTAM 103

v Dynamic LU alias is in operation in a CICS region and your terminals orworkstations are explicitly defined on CICS terminal resource definitions withexplicit terminal identifiers. In this case, you use predefined LU aliases tooverride the generation of dynamic LU aliases, which CICS would fail to matchwith any installed resource definition.
v Dynamic LU alias is not in operation in a CICS region, to avoid any conflict withduplicate network names.
Cross-network devices that need predefined LU alias: If the following VTAMcross-network resources are to be connected to a CICS region that is defined toVTAM with LUAPFX specified on its APPL statement, they must each have aCDRSC LUALIAS=netname entry:
v CICS RDO-defined terminals connected from another network. These includeVTAM terminals that cannot be autoinstalled:
– Pipeline terminals
– Automatic teller machines (3614 and 3624)
– Devices for which CICS does not receive logons, such as printers.
v LUTYPE 6.2 synclevel 1 connections that may be bound using limited resources.
Like other LUTYPE 6.2 connections limited resource connections release theirdynamic LU alias when CDRSCTI expires after the last session is unbound.However, these sessions are unbound whenever they are not in use, and if theyrebind after the dynamic LU alias is released, CICS would install anotherconnection, potentially with a different LU alias.
v CICS RDO-defined work stations (LUTYPE 6.2 synclevel 1 connections)connected from another network.
v Resources that require an LU name in a RACF profile definition, or resources forwhich prior knowledge of the LU name is required.
Choosing an LUAPFX valueWhen choosing an LUAPFX value, consider the scope of this parameter within theCICSplex, and also consider its scope within the sysplex in which your CICSregions operate.
A predefined LUALIAS name is supplied to CICS for cross-domain andcross-network resources. All the CICS regions in an MVS image share the sameVTAM and are in the same domain. A CICS region in a different MVS image uses adifferent VTAM and is thus in a different domain. Resources coming from one VTAMto another, but which share the name NETID, are cross-domain resources
A dynamic LUALIAS name is only supplied to CICS for cross-network resources. Aresource is a cross-network resource if it has a different network id (NETID). VTAMensures that all the dynamic LUALIAS names assigned in one MVS image areunique. However, CICS needs network names to be unique across MVS images sothat we do not get network name clashes in AORs.
It is important that all CICS regions across all connected networks use uniqueAPPLIDs. This is true whether or not dynamic LUALIASs are used—it just makes itmore important.
To ensure that all VTAM resources in a CICSplex have unique network names, usethe LUAPFX prefix as follows:
v Specify LUAPFX on terminal-owning regions (TORs) only.
104 CICS TS for z/OS: Installation Guide

v Use the same LUAPFX value for all the CICS TORs in the same MVS image(that is, for all the TORs that are connected to the same VTAM), but ensure theLUAPFX is different in each MVS image in the sysplex..
If the LUAPFX values are not the same throughout an MVS image, you risk oneresource having two different network names in the CICS regions in that image.
If the LUAPFX values are not unique to each MVS image in the sysplex, you risktwo resources attempting to install in a TOR with the same dynamic LUALIAS, orhaving two resources with the same network name in an AOR.
To ensure the uniqueness of the LU prefix in each MVS, IBM recommends thatyou use model APPL definitions, and within these use an MVS system symbol(&SYSCLONE) as suggested in the z/OS V1R4.0 Communications Server: SNAResource Definition Reference.
Note: If you use VTAM generic resources and your CICS TORs are spreadacross different MVS images, be aware that if a resource with adynamically allocated LU alias logs off and then logs on again, and VTAMswitches the resource to a VTAM in another MVS image, a differentLUALIAS is assigned because of the different LUAPFX value.
v Avoid using an LUAPFX value that corresponds to the first two characters ofCICS RDO-defined terminal names or connection names installed in theCICSplex.
Other considerations when using LU aliasesThe following are some other factors to consider when you are planning to useVTAM LU aliases with CDRSC resources:
Predictable termidsIf you need autoinstalled terminal resources to have a predictable andreproducible TERMID for such things as temporary storage queue names andSTART requests, you may need to modify your autoinstall user-replaceablemodule (URM) to select a reproducible TERMID from the network qualifiedname (NQNAME) supplied in the CINIT or the BIND.
There is an example of such code (commented-out) in the sample autoinstallURM, which extracts the network qualified name from the CINIT and BIND. Theexample illustrates how to create a TERMID from the last non-blank characterof the NETID and the last 3 non-blank characters of the real network name(NETNAME).
MVS workload managementIf your MVS workload policies specify LU name classifications, remove the LUname for any cross-network resources that are autoinstalled by CICS.
Recovery and persistent sessions supportResources for which CICS uses any VTAM LU alias (predefined or dynamic)and which come from a different network are not cataloged by a CICS regionthat is not using persistent session. This means the terminal sessions for theresources cannot be recovered during an emergency restart.
Resources for which CICS uses any VTAM LUALIAS (predefined or dynamic)and which come from a different network are catalogued if CICS is usingpersistent sessions. This enables CICS to restore resource terminal sessioninformation from the CICS catalog pending recovery of the session from VTAM.However, if the resource does not persist, the resource is deleted during anemergency restart.
Chapter 13. Defining CICS regions as applications to VTAM 105

This action is necessary because VTAM may have been restarted, which wouldcause dynamic LU aliases to be reissued to different sessions. CICS is unableto tell if VTAM has been restarted, and CICS cannot tell the difference betweena predefined and a dynamic LU alias.
CLSDST PASSIf you ISSUE PASS (CLSDST PASS) for a terminal that uses a dynamic LUalias to pass control to another CICS region in another MVS image, theresource is known by a different network name in the receiving CICS. This istrue if the APPL statement of only one or both the CICS regions specifyLUAPFX to activate dynamic LU alias.
Generic resourcesIf a number of generic resource TORs are in two different MVS images, aterminal or work station that logs on to one image is assigned a differentnetwork name if it logs off and logs on to a TOR in another image.
FEPIFEPI front end systems are not supported by VTAM LU alias.
106 CICS TS for z/OS: Installation Guide

Chapter 14. Installing CICS modules in the MVS link pack area
This section describes:
v What you should consider before you install modules in the MVS link pack area.This is in “Preparing to install CICS modules in the MVS link pack area.”
v What you should do to use CICS modules in the MVS link pack area. This is in“How to use modules in the MVS link pack area” on page 111, which providesspecific information about the following:
– “Space requirements for CICS modules in the MVS link pack area” on page111
– “Defining the CICS LPA library to your MVS” on page 111
– “Installing CICS modules in the LPA” on page 112
– “Controlling the use of modules from the MVS link pack area” on page 114
Preparing to install CICS modules in the MVS link pack areaBefore you install modules in the MVS link pack area, you should consider thefollowing points, described in subsequent topics:v “Benefits of using the MVS link pack area”v “What is meant by the MVS link pack area?” on page 108v “Which modules must be in the MVS link pack area” on page 108v “Which modules can be in the MVS link pack area?” on page 109v “Service considerations” on page 110
Benefits of using the MVS link pack areaThe benefits of placing code in the MVS link pack area are:
v It is protected from possible corruption by user applications. Because the MVSlink pack area is in protected storage, it is virtually impossible to modify thecontents of these programs.
v Performance can be improved, and the demand for real storage reduced, if youuse the MVS link pack area for program modules. If more than one copy of thesame release of CICS is running in multiple address spaces of the sameprocessor, each address space requires access to the CICS nucleus modules.These modules may either be loaded into each of the address spaces or sharedin the MVS link pack area. If they are shared in the MVS link pack area, this canreduce the working set and therefore, the demand for real storage (paging).
v You can decrease the storage requirement in the private area by judiciousallocation of the unused storage in the MVS link pack area created by roundingto the next segment.
If you know the amount of space that you need in the LPA, and from that thetotal size of the MVS common area above the CICS private storage, you candetermine which 1MB segment the boundary between the two areas lies on. Thismay indicate that there is some space in the MVS common area that is leftunused, which you could use for CICS LPA-eligible modules. By moving moremodules from CICS private storage to the LPA, you decrease the space that isneeded for modules in CICS private storage.
© Copyright IBM Corp. 1989, 2010 107

What is meant by the MVS link pack area?The MVS link pack area comprises several areas, both above and below 16 MB. Inthis publication, the term MVS link pack area refers to the pageable link packareas above and below 16MB where modules that are used from the MVS link packarea are normally installed.
Note: The MVS link pack area has both pageable and fixed parts. Although youcan install CICS modules into the fixed parts, we recommend that you usethe pageable areas for performance reasons.
The term LPA specifically refers to the MVS link pack area below 16 MB, and theterm ELPA specifically refers to the area above 16MB. A module that is link-editedwith the RMODE(ANY) attribute is loaded into the ELPA.
If you install a module into the LPA or ELPA, that module will not be retrieved fromthe until you re-IPL your MVS with CLPA specified. To use the new module andavoid an IPL, you can use the MVS dynamic LPA in one of the following ways:
v With the SETPROG LPA command
v With an LPA statement in a PROGxx member of PARMLIB, which specifies theSET PROG=xx command
Note that dynamic LPA must not be used with DFHIRP.
Which modules must be in the MVS link pack areaThe CICS modules listed in Table 10 must be in the MVS link pack area for thereasons that are given in the notes after the table.
Table 10. CICS modules required in the MVS link pack area
Module Description When needed in LPA See notesafter thistable
DFHCSVC CICS Type 3 SVC Always 1, 2, 3,4, and6
DFHDSPEX CICS post exit stub Always 1, 3, and 5
DFHDUMPX SDUMPX IEASDUMPQUERY exit
Always 1, and 3
DFHIRP Interregion communicationprogram
To use MRO, CICS shareddatabase, or the consolemessage-handling facility
1, 2, 3, and 6
DFHSSEN Subsystem interfaceend-of-memory / end-of-taskclean up routine
To use the consolemessage-handling facility
1, 2, 3, and 6
DFHSSGC Subsystem generic connectmodule
To use the consolemessage-handling facility
3, and 7
DFHSSWT Subsystem interface WTOrouter
To use the consolemessage-handling facility
3, and 7
DFH99SVC Dynamic allocation - SVCservices
Always 1, and 3
Notes:
1. Can be used only from the MVS link pack area, and must be installed therebefore CICS can be started.
108 CICS TS for z/OS: Installation Guide
###
#
##
#
2. You must always install the latest service level of the modules DFHCSVC,DFHIRP (if needed) and DFHSSEN.
3. The version of this module that is supplied with the current release, isdownward-compatible with earlier releases of CICS. It works correctly with CICSregions running earlier releases. Therefore, if you are running different releasesof CICS on the same MVS image, you should use the latest version of thismodule.
4. The DFHCSVC module must be defined to MVS as a Type 3 SVC (default SVCnumber is 216), and if you use a non-default SVC number, you must define it toCICS on the CICSSVC system initialization parameter.
Moving DFHCSVC into the MVS link pack areaDo not use the linkage editor to install the CICS SVC module into a libraryin the MVS link pack area. To copy or move the module from thehlq.SDFHAUTH library to the nominated library in the MVS link pack area,you should use either a suitable copy utility program, such as IEBCOPY, oran SMP/E USERMOD with ++MOVE statements.
5. If you are running earlier releases of CICS with the latest version, you mustensure that the latest version of the DFHDSPEX module is installed in the MVSlink pack area. The DFHDSPEX module must be in the MVS link pack area forintegrity reasons, but the post exit routine, DFHDSAUT, can reside either in theMVS link pack area, or in the CICS address space. This enables you to usedifferent levels of the DFHDSAUT module in different CICS regions running inthe same MVS image, because the DFHDSAUT module may not be compatiblebetween CICS versions.
6. To communicate by MRO, all CICS regions in the same MVS image must usethe latest level of the modules DFHCSVC, DFHIRP, and DFHSSEN in the MVSlink pack area.
If a region detects that DFHIRP is at a lower level, when attempting to openinterregion communication, it issues message DFHIR3799, and interregioncommunication fails to open.
7. To use the console message-handling facility, these modules must reside eitherin the MVS link pack area or in an APF-authorized library in the MVS linklist.
Which modules can be in the MVS link pack area?Besides those CICS modules that must be in the MVS link pack area, other CICSmodules and user application program modules are available from the MVS linkpack area.
CICS modulesA CICS module optionally installed in the MVS link pack area (that is, not a modulerequired in the MVS link pack area) can be used only by the release of CICS towhich it relates.
Those CICS modules that can reside above 16MB (for example, the CICS messagetable, DFHMGT), are loaded above 16MB. Such modules can also be installed inthe extended link pack area (ELPA).
CICS modules eligible to be used from the MVS link pack area are listed in theCICS-supplied USERMODs, DFH$UMOD (for base CICS modules), which is in thehlq.SDFHSAMP library. Details of LPA-eligible modules are in “CICS modules
Chapter 14. Installing CICS modules in the MVS link pack area 109
#####

eligible for the MVS link pack area,” on page 447, to help you select those CICSmodules that you want to install in the MVS link pack area.
User application programsUser application programs can be used from the MVS link pack area if they areread-only and:
v Written in COBOL, do not overwrite WORKING STORAGE, and are compiledusing VS COBOL II, or later version. (The CICS translator generates a CBLstatement with the required compiler options.)
v Written in PL/I (do not overwrite STATIC storage) and compiled using one of theversions of PL/1 listed in the CICS Transaction Server for z/OS Release Guide orlater. (The CICS translator inserts the required REENTRANT option into thePROCEDURE statement.)
v Written in C/370, compiled with the RENT option, and link-edited with the RENToption.
v Written in Assembler language, assembled with the RENT option, and link-editedwith the RENT and REFR options.
Command-level user application programs compiled using a LanguageEnvironment-conforming compiler, or written in Assembler language or C/370, maybe loaded above 16MB. (For information about installing application programs, seethe CICS Application Programming Guide.)
A read-only module that may reside above 16MB is also eligible for the extendedlink pack area (ELPA).
Service considerationsUsing modules with mismatching service levels can cause unpredictable results. Tobe safe, do not use the LPA version of a module if it differs from the version in theCICS libraries that you are using.
Load modules used from the LPA might be at a lower service level than the rest ofyour CICS region in any of the following circumstances:
v You are running CICS from libraries which belong to a target zone currently at ahigher service level than the LPA zone.
v You have applied service to the LPA zone since the last IPL of MVS.
v You are not using the MLPA to replace service-updated load modules, but haveapplied service to the LPA zone since last IPL of MVS for which CLPA (createlink pack area) was specified.
Thus, if you have applied service to a load module in your CICS libraries, youshould also apply the service to the LPA version of the module, if one exists. Thisstipulation is there so that the MVS link pack area always contains tested loadmodules.
Use the SMP/E RESTORE function to back off the USERMOD before the LPA zoneis updated or copied. Then apply the USERMOD again.
If you have used a copy of the CICS-supplied USERMODs to install modules intothe MVS link pack area, and the original USERMOD is serviced, you may like toreflect the changes in your version of the USERMOD.
110 CICS TS for z/OS: Installation Guide
###
||

How to use modules in the MVS link pack areaTo use CICS modules in the MVS link pack area:1. Check that you have enough space for the selected modules.2. Install the modules in the MVS link pack area.3. Control the usage of modules from the MVS link pack area.
Space requirements for CICS modules in the MVS link pack areaAllow enough space in the MVS link pack area for you to install those CICSmodules that you intend using from there. You can find out how much space youneed by:
v Reviewing the sizes of the modules that you want to install in the MVS link packarea, as given in “CICS modules eligible for the MVS link pack area,” on page447.
v Reviewing the module index of a system dump for the CICS region started withthe system initialization parameter LPA=NO.
v Calculating the module sizes that are given for each module in the listing ofmodules that are provided by the IEHLIST utility program.
Remember also to allow space for any of your user application programs that youintend using from the MVS link pack area.
Note: The total space needed depends on how the operating system packages themodules into the MVS link pack area.
What next?
Once you have determined the space needed in the MVS link pack area, youmust next create a library with enough space and define it to your MVS. Thisis in the topic “Defining the CICS LPA library to your MVS.”
Defining the CICS LPA library to your MVSCICS supplies the library hlq.SDFHLPA. This library contains the modules that mustbe in the LPA. You can also use this library to install other CICS modules orapplication programs which you want to use from the LPA.
You can give the hlq.SDFHLPA library your own index, but if you do, you mustspecify the new index on the LINDEX parameter of the DFHISTAR job.
Add the full name of the hlq.SDFHLPA library to an LPALSTxx member ofSYS1.PARMLIB. This ensures that the library contents are loaded into the PLPA atthe next IPL of your system when CLPA is specified. Also APF-authorize thehlq.SDFHLPA library, by adding its name to an IEAAPFxx member of theSYS1.PARMLIB library.
For more information about this see Chapter 31, “Verifying your Java componentsinstallation,” on page 205.
You should also RACF-protect the hlq.SDFHLPA library, to prevent unauthorized oraccidental modification of this library. For information about protecting the CICSlibraries, see the CICS RACF Security Guide.
Chapter 14. Installing CICS modules in the MVS link pack area 111

What next?During migration to the current release use of the MVS link pack area, youmay like to add a DD statement for the hlq.SDFHLPA library to the DFHRPLconcatenation of your CICS startup job stream.
You can install into the hlq.SDFHLPA library the CICS modules to be usedfrom the MVS link pack area. This is in “Installing CICS modules in the LPA.”
Installing CICS modules in the LPABy install, we mean move or copy a module into a suitable LPA library, by usingSMP/E, or by using a copying method that re-blocks the copied modules when thetarget data set has a smaller block size than the data set you are copying from (forexample, use the COPYMOD function of the IEBCOPY program). A procedure forinstalling modules into the MVS link pack area by using SMP/E is in this section.
You should not relink-edit the modules in order to get them into the LPA library.CICS modules as supplied have the necessary attributes that cause MVS to loadthem automatically above the line (into the ELPA).
To install modules in the CICS LPA library, and to ensure that SMP/E can continueto service them, complete the following steps:
1. Select those modules that you want to use from the MVS link pack area, andspecify them in the SMP/E USERMOD to be used to install the modules in theMVS link pack area.
You can use the CICS-supplied USERMOD, LPAMODS, or create and use yourown version.
If you use your own version of a USERMOD, this can include ++MOVE statementsfrom both CICS-supplied USERMODs.
2. Receive the USERMOD into the CICS global zone.
3. Apply the USERMOD to the LPA zone.
Note: When you have installed all your modules into the CICS LPA library (anddefined it to MVS), you should re-IPL your MVS with CLPA specified toenable the modules to be used from the CICS LPA library.
These steps are in the following sections.
Selecting modules for the MVS link pack areaYou should install in the MVS link pack area only those modules that you want touse from the MVS link pack area. “CICS modules eligible for the MVS link packarea,” on page 447 lists the CICS-supplied modules eligible for the MVS link packarea, and gives descriptions and other information to help you select those CICSmodules that you want to use from the MVS link pack area.
To install modules in the MVS link pack area, you should use an SMP/E USERMODthat contains ++MOVE statements for only the modules to be installed in the MVS linkpack area.
112 CICS TS for z/OS: Installation Guide

The CICS-supplied SMP/E USERMOD, DFHUMODCICS supplies an SMP/E USERMOD called DFHUMOD (in member DFH$UMOD inthe hlq.SDFHSAMP library). This USERMOD contains ++MOVE statements for allCICS modules, in the hlq.SDFHAUTH and hlq.SDFHLOAD libraries, that are eligiblefor the MVS link pack area. The USERMOD also indicates whether each module isLPA- or ELPA-eligible. You can choose which of the modules to install in the MVSlink pack area by creating your own version of the USERMOD. Your selectionisgenerally include modules in the working set of the installation.
Changing a CICS-supplied USERMODIf you intend changing a CICS-supplied USERMOD, to choose modules to install inthe MVS link pack area, take a copy of the USERMOD and update the copy only. Ifyou have copied the hlq.SDFHSAMP library, for instance when changinguser-replaceable programs, then you already have copies of the CICS-suppliedUSERMODs. If the original hlq.SDFHSAMP library is serviced, and the USERMODis modified, you may like to reflect the changes in your version.
Preparing the USERMODTo choose which read-only modules to install in the MVS link pack area, edit yourcopy of the SMP/E USERMOD to:
1. Comment out the ++MOVE statements for the modules that you do not want toinstall in the LPA, and
2. Move the remaining ++MOVE statements (for the modules that you do want toinstall in the LPA) one column to the left, so that the ++MOVE statements start incolumn one of the USERMOD module.
3. Add ++MOVE statements for your user application program modules that you wantto install in the LPA, with the ++MOVE statements starting in column one of theDFH$UMOD module.
Receiving and applying the USERMODReceive the USERMOD into the CICS global zone and apply it to the LPA targetzone. This causes SMP/E to move those load modules you have specified from thenamed CICS target library (hlq.SDFHLOAD or hlq.SDFHAUTH) into the CICS LPAlibrary. Applying the USERMOD also updates the corresponding LMOD entrieswithin the target zone SMPCSI.
Do not accept the USERMOD into the distribution zone, and for the time being, donot apply it to any other target zone.
To receive and apply the CICS-supplied sample usermods in DFH$UMOD, you canuse the associated job DFHLPUMD which is tailored to your CICS environment andstored in the hlq.XDFHINST library when you run the DFHISTAR job.
Chapter 14. Installing CICS modules in the MVS link pack area 113

What next?
To enable CICS to use the modules that you have installed in the MVS linkpack area, re-IPL your MVS with CLPA specified.
Also specify to CICS that it is to use modules from the MVS link pack area.You can also control which modules are used from the MVS link pack area inseveral ways. This is in the topic “Controlling the use of modules from theMVS link pack area.”
Controlling the use of modules from the MVS link pack areaThis topic describes what you must do to enable CICS to use modules from theMVS link pack area, and what you can do to specify that CICS is not to use eligiblemodules from the MVS link pack area.
The methods for controlling the use of modules from the MVS link pack area donot apply to the modules DFHCSVC, DFHDSPEX, and DFHIRP. These modulescan be used only from the MVS link pack area.
Modules in the MVS link pack area from hlq.SDFHAUTHCICS uses standard MVS load facilities for modules installed in the MVS link packarea from the CICS APF-authorized library, hlq.SDFHAUTH. That is, such a moduleis used from the first of the following locations that it is found in:1. STEPLIB concatenation2. MVS link pack area3. MVS LNKLST
Using modules from the MVS link pack areaTo use any of the CICS modules installed in the MVS link pack area from thehlq.SDFHAUTH library you must remove any version of the module from thehlq.SDFHAUTH library (or any other library in the STEPLIB concatenation).
Using modules from the STEPLIBYou can prevent CICS using modules installed in the MVS link pack area from thehlq.SDFHAUTH library by installing versions of those modules in a library in theSTEPLIB concatenation. CICS then uses the versions of the modules from theSTEPLIB concatenation into the CICS address space, rather than any versions thatmay be in the MVS link pack area.
Modules in the MVS link pack area from hlq.SDFHLOADThe use of CICS modules installed in the MVS link pack area from thehlq.SDFHLOAD library is controlled by CICS system initialization parameters andresource definitions.
The hlq.SDFHLOAD library is used for non-nucleus CICS modules, and some CICSnucleus modules. You can also use the library for your own user applicationprograms.
Using modules from the MVS link pack areaTo use any of the CICS modules installed in the MVS link pack area from thehlq.SDFHLOAD library:
114 CICS TS for z/OS: Installation Guide

v Copy the modules into a CICS LPA library. (That is, you do not have to removethem from the hlq.SDFHLOAD library.)
v Specify the system initialization parameter LPA=YES. CICS then uses thefollowing search order:1. MVS link pack area2. DFHRPL DD concatenation
v For a non-nucleus CICS module or user application program, specifyUSELPACOPY(YES) on the associated PROGRAM resource definition. Thesemodules are identified in the CICS-supplied USERMODs by the statement:/* Not loaded from LPA unless USELPACOPY is set to Y in the CSD */
For each CICS-supplied LPA-eligible module that needs USELPACOPY(YES)specified in its associated PROGRAM resource definition, you must create yourown resource definition with USELPACOPY(YES) specified, and use it instead ofthe CICS-supplied resource definition. This is because you cannot modify theCICS-supplied resource definitions. For example, you could use the DFHCSDUPutility program to:
1. Copy the CICS-supplied resource groups that contain the module definitionsto new resource groups.
2. For each module that needs USELPACOPY(YES), change the PROGRAMresource definition in the new resource groups to specifyUSELPACOPY(YES).
3. Add your new resource groups to a new group list (that is, at the start of thelist).
4. Append the CICS-supplied group list DFHLIST (or your own equivalent of thatgroup list) to your group list. Alternatively, include DFHLIST on the GRPLISTsystem initialization parameter as well as your group list.
5. Remove the CICS-supplied groups that you have copied.
Once the program definitions have been changed on the CSD you should:
– Reinitialize the CICS catalogs if you have been using modules not in the MVSlink pack area, and now want to use those modules from the MVS link packarea
– Specify your new group list (and DFHLIST if your group list does not includethe list of resource groups provided in DFHLIST) on the GRPLIST systeminitialization parameter.
A sample DFHCSDUP job for all CICS LPA-eligible jobs is in Figure 6 on page119.
Note: In the above example, instead of steps 3 and 4, you could use the CEDAtransaction to:
– Copy your group list to create a new group list.
– Add the new (USELPACOPY(YES)) groups to the new group list in thesame place as the original, CICS-supplied, groups.
Notes:
1. CICS uses eligible modules installed in the MVS link pack area, if:
v You have not specified the name of the module on the CICS systeminitialization parameter PRVMOD.
v The module has not been already loaded from the DFHRPL concatenation.
2. If CICS cannot find an eligible module in the MVS link pack area, it loads theprivate (non-shared) version into the CICS address space from the DFHRPLconcatenation, after issuing the message DFHLD0107I to warn you that the
Chapter 14. Installing CICS modules in the MVS link pack area 115

module is not in the MVS link pack area. (See page “The module-not-foundwarning message (DFHLD0107I)” on page 118 for more information about thismessage.)
3. CICS assumes that the PL/1 modules, IBMBPSLA and IBMBPSMA, areinstalled in the MVS link pack area and issues message DFHLD0107I if it failsto find them there. If you want your PL/I application programs to run with thePL/I shared library facility, you must ensure that the modules IBMBPSLA andIBMBPSMA are installed in the MVS link pack area, or in the hlq.SDFHLOADlibrary (or another library in the CICS DFHRPL library concatenation).
4. Program list tables (PLTs) must be placed in the DFHRPL concatenation.However, before PROGRAM resource definitions for phase one PLTPI programsand PLTSD programs are installed (for example, early in CICS initialization)CICS scans the MVS link pack area for those programs, and issues messageDFHLD0107I if it cannot find such a program there.
5. Likewise, before PROGRAM resource definitions for global and task-relateduser exit programs are installed (for example, early in CICS initialization) CICSscans the MVS link pack area for those programs, and issues messageDFHLD0107I if it cannot find such a program there.
Specifying USELPACOPY(YES)
For every non-nucleus CICS module or user application program that youhave moved to the MVS link pack area (that is, have removed from theDFHRPL concatenation), ensure that you have specified USELPACOPY(YES)on the associated PROGRAM resource definition. Otherwise, CICS isnot beable to find the module, and may fail to start up successfully.
Using modules from DFHRPLYou can prevent CICS using modules installed in the MVS link pack area from thehlq.SDFHLOAD library by either:
v Specifying NO on the LPA system initialization parameter.
This prevents CICS from using any modules installed into the MVS link packarea from the hlq.SDFHLOAD library. CICS tries to load the modules fromlibraries in the DFHRPL concatenation.
You might use this option when you want to run CICS to test a lot of LPA-eligiblemodules before installing them in the MVS link pack area. For example, youcould add the hlq.SDFHLPA library to the DFHRPL concatenation while testingCICS modules for the MVS link pack area. Once you have verified the use ofthose modules from the MVS link pack area, you should specify the LPA=YESsystem initialization parameter, and remove the hlq.SDFHLPA library from theDFHRPL concatenation.
v Specifying the name of the module on the PRVMOD system initializationparameter:PRVMOD={name|(name1,name2,...)}
This prevents CICS from using the specified modules from the MVS link packarea for only the run of CICS on which the PRVMOD parameter is specified. Youmight use the PRVMOD parameter when you want to run CICS to test a newversion of an LPA-eligible module before replacing the version already in theMVS link pack area.
Specify the full module name on the PRVMOD parameter, including any suffix(for example, DFHMCP1$). If only one module is named, the parentheses areoptional. The PRVMOD parameter may span input lines. However, do not split
116 CICS TS for z/OS: Installation Guide

module names across lines, because CICS system initialization adds a comma atthe end of every input line that does not already end with a comma. The onlyvalidity check performed on a module name is to ensure that it does not exceedeight characters.
You cannot code the PRVMOD parameter in the DFHSIT module; you canspecify it in the PARM parameter, in the SYSIN data set, or through the systemconsole.
v For a non-nucleus CICS module or user application program, specifyingUSELPACOPY(NO), the default, on the associated PROGRAM resourcedefinition. These modules are identified in the CICS-supplied USERMODs by thestatement:/* Not loaded from LPA unless USELPACOPY is set to Y in the CSD */
You might use the USELPACOPY(NO) option of the PROGRAM resourcedefinition for a more permanent exclusion of an LPA-resident module than for thesingle run of CICS control provided by the PRVMOD system initializationparameter.
Verifying modules for the MVS link pack areaWhile verifying new versions of modules to be installed into the MVS link pack area,you can instruct a CICS region to use the new versions from the DFHRPLconcatenation by any of the following options:
v The LPA=NO system initialization parameter
v The PRVMOD system initialization parameter
v The USELPACOPY(NO) option of the associated PROGRAM resource definition(where applicable)
For further information about these options, see “Using modules from DFHRPL” onpage 116
In all cases, you must install the new versions of the modules into thehlq.SDFHLOAD library, or another library in the DFHRPL concatenation.
If you are verifying many CICS LPA-eligible modules, you might like to add thehlq.SDFHLPA library to the DFHRPL concatenation. This allows you to check thatthe modules you have installed in the MVS link pack area are being loaded fromthere.
Note: The CICS-supplied usermods use SMP/E to move CICS LPA-eligiblemodules into the hlq.SDFHLPA library. Similarly, if you use SMP/E to applyservice to any of those modules, the versions in the hlq.SDFHLPA library isupdated. The updated versions of the modules are used from the MVS linkpack area after you next re-IPL your MVS with CLPA specified. Until then, ifyou add the hlq.SDFHLPA library to the DFHRPL concatenation of yourCICS region, and specify that CICS is not to use the version of the modulesin the MVS link pack area, the updated versions of the modules are usedfrom the DFHRPL concatenation.
After you have installed and verified the use of modules from the MVS link packarea, you should remove the versions of the modules from the DFHRPLconcatenation of your CICS startup job.
You can find out whether CICS is loading modules from the MVS link pack area orthe DFHRPL concatenation by reviewing the index of a system dump for the CICS
Chapter 14. Installing CICS modules in the MVS link pack area 117

region started with the system initialization parameter LPA=YES. Modules loadedfrom the MVS link pack area have the dump option LD=3.
The module-not-found warning message (DFHLD0107I)CICS issues message DFHLD0107I if it searches the MVS link pack area for amodule installed there from hlq.SDFHLOAD and fails to find it.
If you encounter this message, check that you have specified USELPACOPY(YES)on the associated PROGRAM resource definition (if applicable). For furtherinformation about using modules loaded in the MVS link pack area from thehlq.SDFHLOAD library, see “Modules in the MVS link pack area fromhlq.SDFHLOAD” on page 114.
CICS uses console routing code 11 for this particular message, which allows you tocontrol the output of this message. For example, you can:
1. Exclude, as required, routing code 11 from specific MVS console definitions inthe CONSOLxx member of SYS1.PARMLIB.
2. Use the MVS VARY command to prevent this message from appearing onspecified consoles by omitting route code 11 from a VARY command thatdefines which routing codes go to specified devices. For example:VARY devnum,CONSOLE,ROUT=(rtcode,rtcode,.,.,.)
Alternatively, you can remove route code 11 from those already defined by usingthe following VARY command:VARY devnum,CONSOLE,DROUT=(11)
3. Use the MVS message processing facility (MPF) to inhibit the message. To usethis facility, code an entry specifying the CICS message number in theMPFLSTxx member of SYS1.PARMLIB.
CICS assumes that the following PL/1 modules are LPA eligible and issuesmessage DFHLD0107I if it fails to find them there:
IBMBPSLAIBMBPSMA
Sample DFHCSDUP job to specify USELPACOPY(YES)The standard IBM-supplied program definitions in the CSD all specifyUSELPACOPY(NO). If you copy, or move, to the LPA some (or all) of the IBMprograms defined by definitions in the CSD, the next step is to modify theUSELPACOPY attribute to ensure CICS uses the LPA copy.
To simplify this task:
v IBM supplies, in the DFH$ULPA member of the SDFHSAMP library, an alternateset of DEFINE statements for all the IBM-supplied programs . All the programsdefined in DFH$ULPA specify USELPACOPY(YES).
v If you don't want all the programs to be defined for LPA use, edit the member toremove the programs that are to remain as USELPACOPY(NO).
v The USELPACOPY(YES) versions are all defined in one new group calledDFH$ULPA. Change this group name if you want to use your own name.
v The last statement in DFH$ULPA adds the group to a startup list. Edit this tospecify your own group list.
v Run the sample DFHCSDUP job shown in Figure 6 on page 119 to addtheDFH$ULPA versions of the definitions to your CSD.
118 CICS TS for z/OS: Installation Guide
###
##
##
##
##
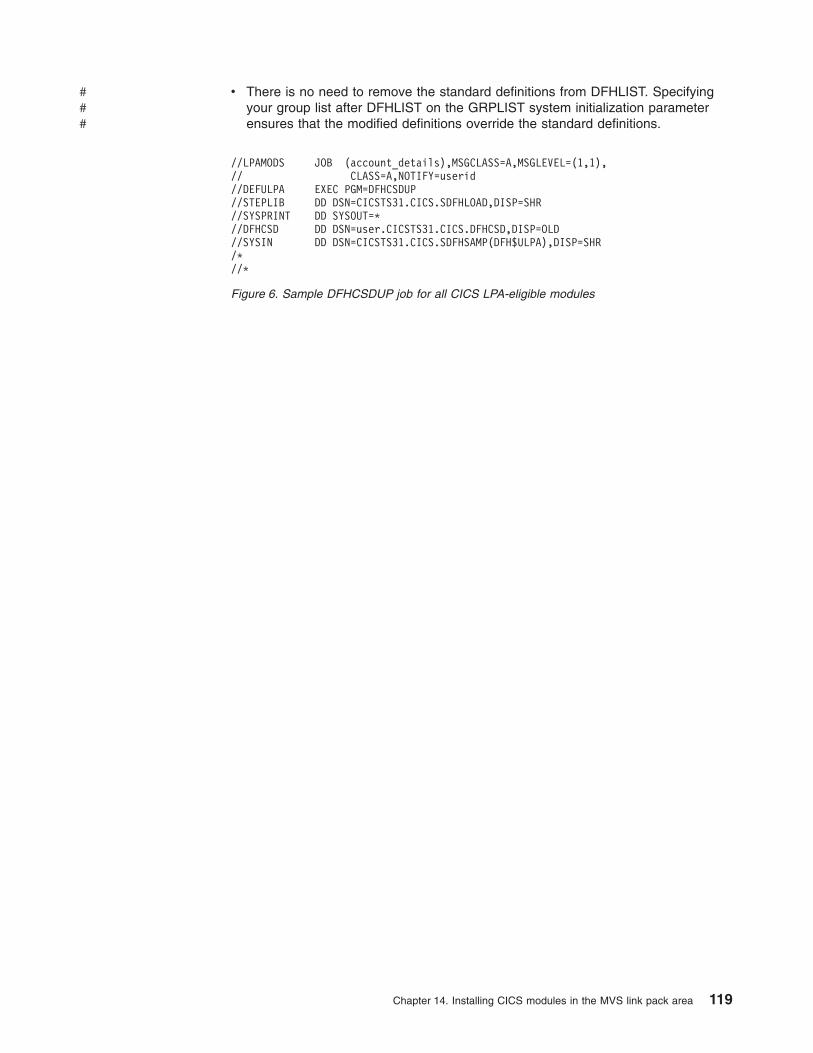
v There is no need to remove the standard definitions from DFHLIST. Specifyingyour group list after DFHLIST on the GRPLIST system initialization parameterensures that the modified definitions override the standard definitions.
//LPAMODS JOB (account_details),MSGCLASS=A,MSGLEVEL=(1,1),// CLASS=A,NOTIFY=userid//DEFULPA EXEC PGM=DFHCSDUP//STEPLIB DD DSN=CICSTS31.CICS.SDFHLOAD,DISP=SHR//SYSPRINT DD SYSOUT=*//DFHCSD DD DSN=user.CICSTS31.CICS.DFHCSD,DISP=OLD//SYSIN DD DSN=CICSTS31.CICS.SDFHSAMP(DFH$ULPA),DISP=SHR/*//*
Figure 6. Sample DFHCSDUP job for all CICS LPA-eligible modules
Chapter 14. Installing CICS modules in the MVS link pack area 119
###

120 CICS TS for z/OS: Installation Guide

Chapter 15. Defining CICS IPCS exit control data to MVS
If you use the MVS interactive problem control system (IPCS) to format and analyzeCICS system dumps, you should ensure that the release-specific CICS formattingroutines are defined and available to MVS.
The formatting routine for use under IPCS has the release identifier as part of itsname; that is, DFHPD640. This is the formatting routine you must define to IPCSwhen formatting system dumps. The CICS formatting routine is release-specific, soif you run more than one release of CICS, ensure that you use the correct versionfor the system dump you are formatting.
The DFHIPCSP CICS exit control dataIPCS provides an exit control table with imbed statements so that other productscan supply exit control information. The IPCS default table, BLSCECT, normally inthe SYS1.PARMLIB library, has the following entry for CICS:IMBED MEMBER(DFHIPCSP) ENVIRONMENT(ALL) /* CICS */
Ensure that your IPCS job can find the CICS-supplied DFHIPCSP module. TheDFHIPCSP module is in the hlq.SDFHPARM library. You can either copy theDFHIPCSP module into SYS1.PARMLIB (so that it is in the same default library asBLSCECT) or provide an IPCSPARM DD statement to specify the library containingthe IPCS control tables. For example://IPCSPARM DD DSN=SYS1.PARMLIB,DISP=SHR For BLSCECT// DD DSN=CICSTS31.CICS.SDFHPARM,DISP=SHR For DFHIPCSP
Figure 7 shows the release-specific entries that are specified in DFHIPCSP.
To use the DFHIPCSP member as it is, rename the CICS-supplied version ofDFHPDX for earlier releases to the names that are shown in the table.
For information about using IPCS to format CICS system dumps, see the CICSOperations and Utilities Guide.
EXIT EP(DFHPD212) VERB(CICS212) ABSTRACT(+’CICS Version 2 Release 1.2 analysis’)
EXIT EP(DFHPD321) VERB(CICS321) ABSTRACT(+’CICS Version 3 Release 2.1 analysis’)
EXIT EP(DFHPD330) VERB(CICS330) ABSTRACT(+’CICS Version 3 Release 3 analysis’)
EXIT EP(DFHPD410) VERB(CICS410) ABSTRACT(+’CICS Version 4 Release 1 analysis’)
EXIT EP(DFHPD510) VERB(CICS510) ABSTRACT(+’CICS Transaction Server for OS/390 Release 1 analysis’)
EXIT EP(DFHPD520) VERB(CICS520) ABSTRACT(+’CICS Transaction Server for OS/390 Release 2 analysis’)
EXIT EP(DFHPD530) VERB(CICS530) ABSTRACT(+’CICS Transaction Server for OS/390 Release 3 analysis’)
EXIT EP(DFHPD610) VERB(CICS610) ABSTRACT(+’CICS Transaction Server for z/OS V2 R1 analysis’)EXIT EP(DFHPD620) VERB(CICS620) ABSTRACT(+’CICS Transaction Server for z/OS V2 R2 analysis’)EXIT EP(DFHPD630) VERB(CICS630) ABSTRACT(+’CICS Transaction Server for z/OS V2 R3 analysis’)EXIT EP(DFHPD640) VERB(CICS640) ABSTRACT(+’CICS Transaction Server for z/OS V3 R1 analysis’)
Figure 7. Release-specific entries in DFHIPCSP for DFHPDnnn routines.
© Copyright IBM Corp. 1989, 2010 121

Implementing changesRe-IPL MVS to bring the changes that are described in this chapter into effectbefore you attempt to run the IVPs.
122 CICS TS for z/OS: Installation Guide

Chapter 16. MVS Program properties table entries
There are some CICS properties that you can optionally define to MVS. These arein the following section.
You can define entries for CICS in the MVS program properties table (PPT).Figure 8 is an example of a CICS PPT entry in the SCHEDxx member ofSYS1.PARMLIB.
For information about defining options in the PPT, see the z/OS MVS Initializationand Tuning Guide.
RACF password checkingIf your installation has a PPT entry for the DFHSIP program, you should ensure thatthe PPTNOPAS option is not set in the PPT because this bypasses password andRACF authorization checking. However, you should consider making your CICSregions non-swappable by specifying the PPTNSWP option in the PPT. Forinformation about defining CICS PPT entries in the SCHEDxx member of theSYS1.PARMLIB library, see the z/OS MVS Initialization and Tuning Referencemanual.
Non-swappable CICS regionsFor performance reasons, you should consider making your CICS regionsnon-swappable, by specifying the NOSWAP option in the PPT. However, you shouldbe aware that the use of certain functions causes CICS regions to be madenon-swappable automatically, regardless of what is specified in the PPT (forexample, regions using cross-memory services for MRO).
/*****************************************************************//* Program Properties table addition *//* for the CICS program, DFHSIP *//* *//* The following defaults apply to this CICS entry: *//* *//* No affinity to a particular processor (AFF(NONE)) *//* Can be canceled (CANCEL) *//* Requires data set integrity (DSI) *//* Not a privileged job (NOPRIV) *//* Password protection is required (PASS) *//* Not a system task (NOSYST) *//* Protection key 8 (KEY(8)) */PPT PGMNAME(DFHSIP) /* Add program name DFHSIP to the PPT*/
NOSWAP /* Non-swappable */NOPREF /* No preferred storage required */
/* */
Figure 8. Sample CICS PPT entry
© Copyright IBM Corp. 1989, 2010 123

MVS protection key for CICSCICS can run only in MVS protection key 8 (the default). You must not define anyother protection keys for CICS.
If you want to use the storage protection facility of CICS, you must specify thesystem initialization parameter STGPROT=YES, and must have the requiredhardware and software. If you operate CICS with storage protection, CICS observesthe storage keys and execution keys that you specify in various system andresource definitions. For information about the CICS storage protection facility, andhow it affects the storage allocation for the dynamic storage areas, see the CICSSystem Definition Guide. For information about hardware and software that isrequired by the CICS storage protection facility, see the CICS Transaction Serverfor z/OS Program Directory.
124 CICS TS for z/OS: Installation Guide

Chapter 17. MVS performance definitions
You can use the MVS workload management facility to manage sysplex resourcesacross MVS subsystems, in parallel with the existing system resource managementfacilities.
For information about MVS workload management, see the z/OS MVS Planning:Workload Management manual.
If you want to use the MVS workload manager facility, you should:
1. Implement workload management on the MVS images that the CICS workloadis to run on, as outlined in “Implementing MVS workload management.”
2. Ensure that CICS performance parameters correspond to the policies definedfor MVS workload management, as outlined in “Matching CICS performanceparameters to service policies” on page 126.
Implementing MVS workload managementThe task of implementing MVS workload management is part of the overall task ofplanning for, and installing, MVS.
Implementing MVS workload management generally involves the following steps:
1. Establishing your workloads.
2. Setting your business priorities.
3. Understanding your performance objectives.
4. Defining critical work.
5. Defining performance objectives based on current business needs.
6. Get agreement for your workload performance objectives.
7. Specify a service level agreement or performance objectives.
8. Specify an MVS WLM service definition that uses the information from step 7.
Note: It is helpful at this stage to record your service definition in a form thathelps you to enter it into the MVS workload manager ISPF application.You are recommended to use the worksheets provided in the z/OS MVSPlanning: Workload Management manual, SA22-7602.
9. Install MVS.
10. Set up a sysplex with a single MVS image, and run in workload managercompatibility mode.
11. Upgrade your existing XCF couple data set.
12. Start the MVS workload manager ISPF application, and use it in the followingsteps.
13. Allocate and format a new couple data set for workload management. (You cando this from the ISPF application.)
14. Define your service definition.
15. Install your service definition on the couple data set for workload management.
16. Activate a service policy.
17. Switch the MVS image into goal mode.
18. Start up a new MVS image in the sysplex. (That is, attach the new MVS imageto the couple data set for workload management, and link it to the servicepolicy.)
© Copyright IBM Corp. 1989, 2010 125

19. Switch the new MVS image into goal mode.
20. Repeat steps 18 and 19 for each new MVS image in the sysplex.
Notes:
1. Current release support for MVS workload manager is initialized automaticallyduring CICS startup.
2. All CICS regions (and other MVS subsystems) running on an MVS image withMVS workload management are subject to the effects of workload manager.
Matching CICS performance parameters to service policiesYou must ensure that the CICS performance parameters are compatible with theworkload manager service policies used for the CICS workload.
In general, you should define CICS performance objectives to the MVS workloadmanager first, and observe the effect on CICS performance. Once the MVSworkload manager definitions are working correctly, you can then consider tuningthe CICS parameters to further enhance CICS performance. However, you shoulduse CICS performance parameters as little as possible.
Performance attributes that you might consider using are:
v Transaction priority, passed on dynamic transaction routing. (Use prioritizationcarefully, if at all.) The priority assigned by the CICS dispatcher must becompatible with the task priority that is defined to MVS workload manager.
v Maximum number of concurrent user tasks for the CICS region.
v Maximum number of concurrent tasks in each transaction class.
126 CICS TS for z/OS: Installation Guide

Chapter 18. MVS automatic restart management definitions
You can exploit the MVS automatic restart management facility that is provided byMVS to implement a sysplex-wide integrated automatic restart mechanism.
If you want to use the MVS automatic restart manager facility, you should:
1. Implement automatic restart management on the MVS images that the CICSworkload is to run on.
2. Ensure that CICS startup JCL used to restart CICS regions is suitable for MVSautomatic restart management.
3. Specify appropriate CICS START options.
4. Specify appropriate MVS workload policies.
If you do not wish to use the MVS automatic restart management facility, you canuse XRF to provide restart of failed CICS regions. For information about XRF, seethe CICS/ESA 3.3 XRF Guide.
Implementing MVS automatic restart managementThe task of implementing MVS automatic restart management is part of the overalltask of planning for and installing MVS. For information about MVS automaticrestart management, see the z/OS MVS Setting Up a Sysplex manual.
Implementing MVS automatic restart management for CICS generally involves thefollowing steps:
v Ensure that the MVS images available for automatic restarts have access to thedatabases, logs, and program libraries required for the workload.
v Identify those CICS regions for which you want to use automatic restartmanagement.
v Define restart processes for the candidate CICS regions.
v Define ARM policies for the candidate CICS regions.
v Ensure that the system initialization parameter XRF=NO is specified for CICSstartup.
For further information on implementing automatic restart management, see theCICS Recovery and Restart Guide.
© Copyright IBM Corp. 1989, 2010 127

128 CICS TS for z/OS: Installation Guide

Chapter 19. MVS cross-system MRO definitions
You can use the CICS interregion communication (IRC) facility for multiregionoperation (MRO) between CICS regions across MVS images in a sysplex. Thisexploits the cross-system coupling facility (XCF) of MVS, and makes it unnecessaryto use VTAM to communicate between MVS images within the same sysplex.
Within a sysplex, DFHIRP must be installed from the highest release of CICSrunning in that MVS image.
Sysplex overviewA sysplex consists of multiple MVS systems, coupled together by hardwareelements and software services. In a sysplex, MVS provides a platform of basicmultisystem services that multisystem applications like CICS can exploit. As aninstallation’s workload grows, additional MVS systems can be added to the sysplexto enable the installation to meet the needs of the greater workload.
To use XCF to communicate in a sysplex, each CICS region joins an XCF groupcalled DFHIR000 by invoking the MVS IXCJOIN macro using services that areprovided by the DFHIRP module. The member name for each CICS region isalways the CICS APPLID (NETNAME on the CONNECTION resource definition)used for MRO partners. Each CICS APPLID must be unique within any sysplexregardless of the MVS levels that are involved. Within the sysplex, CICS regionscan communicate only with members of the CICS XCF group (DFHIR000).
MVS XCF considerations for MROEnsure that when you format the primary and alternate couple data sets used bythe XCF component of MVS:
v The value specified for the MAXMEMBER parameter is large enough to handlethe number of CICS regions and users of the EXCI in the CICS XCF group.
Each XCF group is limited to 2047 members, which is therefore the theoreticalmaximum number of CICS regions that can participate in XCF/MRO in a singlesysplex. However, the maximum size of the XCF group is reduced if you set theMVS MAXMEMBER parameter, used to define XCF couple data sets, to a lowerlimit. When calculating the maximum number of members in the CICS XCFgroup, allow one member for:
– Each CICS region to run on an MVS image in the sysplex.
– Each pipe that is allocated by a user of the external CICS interface (EXCI).For information about EXCI users and pipes, see the CICS External InterfacesGuide manual.
To list the members in the CICS XCF group, you can use the MVS DISPLAYcommand. The name of the CICS group is always DFHIR000, so you could usethe MVS command:DISPLAY XCF,GROUP,DFHIR000,ALL
v The value specified for the MAXGROUP parameter is large enough for the CICSXCF group to be established.
© Copyright IBM Corp. 1989, 2010 129

130 CICS TS for z/OS: Installation Guide

Chapter 20. PR/SM policy for handling MVS failures
If you are running CICS under MVS in a Processor Resource/Systems Manager™
(PR/SM™) environment, you should define to MVS the preferred XCF PR/SM policyfor handling MVS failures in a PR/SM environment, and define to PR/SM theauthorization for each LPAR to cause reset or deactivation of another LPAR.
XCF PR/SM policyThe function that enables MVS images to take over the resources of other MVSimages in the same sysplex. This function is also known as the PR/SM automaticreconfiguration facility (ARF).
© Copyright IBM Corp. 1989, 2010 131

132 CICS TS for z/OS: Installation Guide

Chapter 21. MVS ASREXIT - SYMREC Authorization Exit
A CICS program may call the first failure symptoms (FFS) component. This usesthe MVS SYMREC macro to write symptom records to the MVS SYS1.LOGRECdata set, in addition to, or instead of, a job log.
The SYMREC authorization exit, ASREXIT, must be in effect to allow CICS to usethe SYMREC macro call, otherwise the call fails with return code 12, reason code3868 (X'F1C').
When SYMREC is called by CICS, the ASREXIT routine issues a return code thatpermits the SYMREC to be successfully written.
The MVS sample exit programs ASREXT0 and ASREXT1, supplied inSYS1.SAMPLIB, are suitable for this purpose. For further information about theseexits, see the z/OS MVS Installation Exits manual. The ASREXIT routine candetermine if CICS is the caller by testing EPLPNAME for the value 'DFHSIP'except:
v When DFHSIP is renamed, in which case EPLPNAME contains the new name.
v When DFHSIP is the subject of an MVS LINK, in which case EPLPNAMEcontains the name of the program issuing the MVS LINK (unless it too is thesubject of an MVS LINK).
If you choose this method, you may wish to code your ASREXIT routine to allow forthese exceptions.
An alternative method of coding the ASREXIT routine is in Figure 9. This method isnot affected by the exceptions that are mentioned above.
TITLE ’SYMREC SAMPLE EXIT’ASREPLPRINT NOGENIHAPSAIKJTCBPRINT GENDFHAFCDEJECT
ASREXIT CSECTASREXIT AMODE 31
Figure 9. An example of coding the ASREXIT routine. (Part 1 of 2)
© Copyright IBM Corp. 1989, 2010 133

ASREXIT RMODE ANYUSING *,R15 Temporary addressabilityMODID BR=YESDROP R15STM R14,R12,12(R13) Save the caller’s registersLR R12,R15USING ASREXIT,R12L R3,0(,R1) Load the address of the EPLUSING EPL,R3 Get addressabilityLA R15,RCREJECT Preset "reject" return codeUSING PSA,0L R1,PSATOLD Point at current TCBUSING TCB,R1L R1,TCBEXT2 Point at TCB extensionDROP R1USING TCBXTNT2,R1ICM R1,B’1111’,TCBCAUF Point at AFCB; is there one?BZ SETRC No, branchDROP R1USING DFHAFCB,R1CLC AFIDENT,=C’AFCX’ Is it a genuine CICS AFCB?BNE SETRC No, branchCLI AFVER,AFVER1 Is it at least Version 1?BL SETRC No, branchAH R1,AFLENG Add length of AFCB’s DWDROP R1 table.USING AFTSTART-AFPFXLEN,R1 Allow for AFCB prefix lengthICM R1,B’1111’,AFTAFCS Point at AFCS; is there one?BZ SETRC No, branchDROP R1LA R15,RCWRITE Set "write" return code
SETRC DS 0HST R15,EPLRETC Store return codeDROP R0DROP R3DROP R12
EXIT LM R14,R12,12(R13) Restore caller’s registersBR R14 ReturnLTORG *
R1 EQU 1 Register 1R3 EQU 3 Register 3R12 EQU 12 Register 12R13 EQU 13 Register 13R14 EQU 14 Register 14R15 EQU 15 Register 15RCREJECT EQU X’0C’ Return code CRCWRITE EQU X’00’ Return code 0
END* CONSTANTS
Figure 9. An example of coding the ASREXIT routine. (Part 2 of 2)
134 CICS TS for z/OS: Installation Guide

Chapter 22. Definitions required for VSAM RLS support
If you plan to use VSAM RLS to enable CICS regions to share VSAM data sets,carry out the following steps:
1. Define the master coupling facility lock structure.
2. Define coupling facility cache structures and cache sets.
3. Define SMS storage classes for RLS access.
4. Alter data set characteristics, if necessary, to make data sets eligible for RLSaccess.
5. Define sharing control data sets.
6. Establish new authorization that is required by the VSAM RLS support.
7. Add new parameters to SYS1.PARMLIB.
8. Establish new procedures for VSAM RLS support.
9. Activate the coupling facility structures.
An overview of each of these steps follows.
Defining the master coupling facility lock structureVSAM RLS support requires the coupling facillity to define a master lock structure,IGWLOCK00, for cross system locking.
See the z/OS DFSMSdfp Storage Administration Reference manual for informationabout calculating the size you need for the lock structure.
The amount of coupling facility space required depends on several characteristics ofyour hardware configuration and the applications that you run, such as:v The number of processors you havev The power of your processorsv Your ratio of non-update activity to update activityv Your ratio of recoverable updates to non-recoverable updatesv Your ratio of sequential requests to direct requests
You define the lock structure in the CFRM policy with the IXCMIAPU utility.
Defining coupling facility cache structures and cache setsVSAM RLS support requires the coupling facility to define cache structures forcross system buffer invalidation. You need to determine the number and size ofcache structures you require.
The number needed depends on factors such as:v The number of coupling facilities you havev The amount of space in each coupling facilityv The amount of data that is accessed through each coupling facility
See the z/OS DFSMSdfp Storage Administration Reference manual for informationabout calculating the amount of space you will need for the cache structures. If youhave previously used data sets in LSR mode, the total amount of coupling facilityspace allocated to cache structures should not be less than the amount of storageyou were using for LSR pools, including hiperspace buffers (if used).
© Copyright IBM Corp. 1989, 2010 135

You can achieve performance benefits by:v Making the size of the cache largerv The way in which you divide cache structures across coupling facilities
You define cache structures in the CFRM policy with the IXCMIAPU utility.
Defining cache setsYou define cache sets with the ISMF control data set (CDS) application.
A cache set maps on to one or more cache structures. If more than one cache setis specified, the data sets can be re-bound to another cache structure in the set inthe event of a cache structure failure.
See the z/OS DFSMSdfp Storage Administration Reference manual for moreinformation about cache sets.
Defining SMS storage classes for RLS accessBefore you can use VSAM RLS, you need one or more storage classes whichspecify a non-blank cache set name.
The ISMF storage class application allows you to specify a cache set name whendefining or altering a storage class, together with weighting parameters for tuning,such as CF DIRECT WEIGHT and CF SEQUENTIAL WEIGHT. See the z/OSDFSMSdfp Storage Administration Reference manual for more information aboutdefining SMS storage classes.
Altering data set attributes for RLS accessBefore you can use a data set in RLS access mode, you must ensure that it iseligible. To be eligible for RLS:
v Data sets must reside in SMS managed storage.
v Data sets must specify a storage class that has a non-blank cache set name.
v Data set recoverability attributes must be defined in the ICF catalog (not in theCICS file control resource definition, where they are ignored for RLS).
You can specify a data set's attributes using the Access Method Services (AMS)DEFINE CLUSTER or ALTER CLUSTER commands.
Specifying a LOG parameter of NONE, UNDO or ALL ensures that therecoverability of the data set is not undefined. You cannot open files in RLSmode if the LOG parameter of the associated data set is UNDEFINED. If youspecify LOG(ALL), you must also specify a forward recovery log stream on theLOGSTREAMID parameter.
To use backup while open (BWO) for an RLS-accessed sphere, specify the BWOparameter. Specifying BWO(TYPECICS) means that backup while open can beused. All other values for BWO (including undefined) mean backup while open isnot allowed. BWO(TYPECICS) is only valid if LOG(ALL) and LOGSTREAMID arealso specified.
v Data sets must not specify the IMBED attribute.
If you have some data sets that specify imbed, you must remove the IMBEDoption before you can use the data sets in RLS mode. Redefine a new data setwithout IMBED and use the AMS REPRO function to copy the old data set to thenew data set.
136 CICS TS for z/OS: Installation Guide

Note: RLS supports the REPLICATE cluster attribute. It does not provide anyperformance benefit, and removing it could save DASD space.
Defining sharing control data setsVSAM RLS requires sharing control data sets. These are used to maintain dataintegrity in the sharing environment. The sharing control data set is usedsysplex-wide by all the SMSVSAM servers, and is always duplexed.
Two active (and at least one spare) sharing control data sets must be available atall times.
The size required depends on the number of MVS images in the sysplex, and onthe number of files that are expected to be open concurrently. The z/OS DFSMSdfpStorage Administration Reference manual gives information about calculating theamount of space that is needed for the sharing control data sets.
Sharing control data sets are VSAM linear data sets that must reside on volumeswhich have global connectivity. The data sets may have multiple extents, but onlyon the same volume. You define them using standard techniques for defining datasets. The names must have SYS1.DFPSHCDS as the first and second qualifiers.See the z/OS DFSMSdfp Storage Administration Reference manual for other rulesrelating to the definition of sharing control data sets.
You must not issue RESERVEs on any volumes on which sharing control data setsreside. Convert any such RESERVEs to enqueues.
You can check that the data sets are available to the sysplex with the MVSDISPLAY SMS command, on any MVS image, as follows:D SMS,SHCDS
This command shows the names of the two active, and the spare data set as in thefollowing example:
Name Size %UTIL Status Type
ACTIVE1.VP2SS03 7920KB 7920KB 74% Good ACTIVE
ACTIVE2.VP2SS03 7920KB 7920KB 74% Good ACTIVE
SPARE.VP2SS03 7920KB 7920KB 74% Good SPARE
Note: The DISPLAY command shows only the third and fourth qualifiers of thesharing control data set names; the first and second qualifiers are alwaysSYS1.DFPSHCDS.
The first time an SMSVSAM server is started in the sysplex, the sharing controldata sets need to be varied online usingV SMS,SHCDS,NEW
for the active data sets, andV SMS,SHCDS,NEWSPARE
for the spare data set (or data sets). The server cannot come up properly if this isnot done.
Chapter 22. Definitions required for VSAM RLS support 137

Authorizing CICS userids for VSAM RLS supportAuthorize each CICS userid that is to use VSAM RLS support to have read accessto a profile in the SUBSYSNUM class which matches the applid. See “Authorizingaccess to an SMSVSAM server” on page 71 for more information.
You may want to restrict access to the AMS SHCDS LIST and REMOVEcommands. The DFSMS/MVS Access Method Services for ICF manual givesinformation about using these commands.
Adding new parameters to SYS1.PARMLIB(IGDSMSxx)To include RLS support in your system, specify the required parameters in theIGDSMSxx member of SYS1.PARMLIB, as follows:
v Specify RLSINIT(YES), otherwise SMSVSAM will not initialize automatically whenyou IPL MVS. Alternatively, you can start SMSVSAM using the VARYSMS,SMSVSAM,ACTIVE command.
v Specify a value for the deadlock detection interval with theDEADLOCK_DETECTION parameter.
v Specify time intervals for the creation and synchronization of VSAM RLS SMFrecords with the CF_TIME and SMF_TIME parameters.
v Specify the maximum size of the SMSVSAM local buffer pool with theRLS_MAX_POOL_SIZE parameter.
See the z/OS DFSMSdfp Storage Administration Reference manual for informationabout these parameters.
Establishing new procedures for VSAM RLS supportNew operational procedures may be needed in a number of areas as a result ofusing VSAM RLS support. Areas to consider include:
v Integrity of data in coupling facility caches
To make sure that non-IBM products or user programs do not compromise theintegrity of data in coupling facility caches when they modify the data on avolume, you should either vary the volume offline to each system in the sysplex,or CF-quiesce the volume using theV SMS,CFVOL(volid),QUIESCE
command before running such programs
v Management of the coupling facility and coupling facility structures
v Use of RESERVEs on volumes which contain sharing control data sets
Make sure that this does not happen. You should convert RESERVEs on othervolumes into enqueues.
v Switching to non-RLS mode in order to run batch update jobs againstrecoverable data sets
This subject is in greater detail in the CICS Recovery and Restart Guide.
v Management of forward recovery and your forward recovery logs
The differences from forward recovery for non-RLS access are:
– The forward recovery log stream must be in the ICF catalog.
– All forward recovery log records for a data set merge into the same logstream.
138 CICS TS for z/OS: Installation Guide

– Your forward recovery procedure needs to use the SHCDS FRSETRR,FRUNBIND, FRBIND, and FRRESETRR commands (CICSVR version 2release 3 automatically issues these commands).
Refer to the DFSMS/MVS Version 1 Release 3 documentation for more details.
Activating the coupling facility structuresOnce defined in the CFRM policy, the coupling facility structures must be activatedusing the SETXCF START POLICY command, specifying a TYPE of CFRM and thepolicy name.
Chapter 22. Definitions required for VSAM RLS support 139

140 CICS TS for z/OS: Installation Guide
Chapter 23. Console messages
The message domain supports the use of MVS message routing codes in the range1 to 16 for those messages that are sent to the console. By default, if the issuingmodule specifies only CONSOLE (without a qualifying number) as the destination,CICS routes the message with MVS route codes 2 and 11 (for the master console –information). This support is available for all domain-type messages of the formDFHxxnnnn, where xx is the domain code, and nnnn is the message number.
CICS issues other messages (of the form DFHnnnn) with either no route code, orroute codes other than 2 and 11.
The physical destination of these messages is controlled by the ROUTECODEparameter on the MVS console entries in a SYS1.PARMLIB member, CONSOLEnn.For further information about MVS console definitions, see the z/OS MVSInitialization and Tuning Guide .
© Copyright IBM Corp. 1989, 2010 141

142 CICS TS for z/OS: Installation Guide

Chapter 24. Defining the logger environment for CICSjournaling
CICS uses the MVS system logger for all its logging and journaling requirements.Using services provided by the MVS system logger, the CICS log managersupports:
v The CICS system log, which is used for:
– Dynamic transaction backout
– Warm and emergency restarts
– Cold starts, but only if the log contains information required forresynchronizing in-doubt units-of-work
v Forward recovery logs, auto-journals, and user journals.
The MVS system logger is a component of MVS. It provides a programminginterface to access records on a log stream. For information about the MVS systemlogger, see the following MVS publications:
v z/OS MVS Setting Up a Sysplex for:
– General information about the MVS system logger
– Information about defining and formatting the LOGR couple data set
– Information about how to plan the system logger configuration, plan and setup a system logger application, and plan for recovery for system loggerapplications.
v z/OS MVS Programming: Assembler Services Reference, Volume 1 and z/OSMVS Programming: Assembler Services Reference, Volume 2for the syntax ofsystem logger services
v z/OS MVS Initialization and Tuning Reference for information about theCOUPLExx PARMLIB member.
Requirements planning and checklistThis section summarizes the requirements, and the steps that you need to follow, toset up the CICS logging environment. Some of the steps listed have a pointer tosections that provide more detailed information. These steps cover both MVS andCICS system programmer tasks and some security administrator tasks, and closecooperation between all groups is needed:
PlanningConsider the possible storage options, and choose which of the 3 availablehardware options you want to use:
v Non-volatile coupling facility, where log stream data is duplexed in theMVS logger data space. Non-volatile storage involves the use of batterybackup or an uninterruptible power supply (UPS):
– When using a UPS, you use a hardware console command to updatecoupling facility status
– When using battery backup, batteries must be online and charged.
v Volatile coupling facility, where log stream data is duplexed to a stagingdata set.
v DASD-only, where log stream data is duplexed in the MVS logger dataspace.
© Copyright IBM Corp. 1989, 2010 143

See “Coupling facility or DASD-only?” on page 150, to help you decide on oneof these or a combination of both.
As part of the planning phase:
v Determine the number CICS regions that require logger support and hencesystem log streams.
v Determine the number of user journals and autojournals that your regionsuse.
v Determine the number of forward recovery logs required for VSAM data sets.
v Determine whether any user journal or forward recovery log streams are tobe shared between regions (to create merged data automatically).
Note: The system log streams, DFHLOG and DFHSHUNT, cannot beshared.
DASD-only log streams can be shared only within the same MVSimage.
v Decide on the number and sizes of the coupling facilities to be used.
v Determine the log stream sizes:
– For coupling facility log streams, see “Coupling facility log streams” onpage 151.
– For DASD-only log streams, see “DASD-only log streams” on page 167.
For information about types of coupling facility, see the z/OS MVS Setting Up aSysplex. Note that the minimum level of coupling facility supported by the MVSsystem logger is CFLEVEL=1, with the appropriate service level of the couplingfacility control code that supports CFLEVEL=1.
MaintenanceEnsure that all maintenance affecting the MVS system logger, and the CICS logmanager and its utilities, is applied:
v Logger serviceability APARs relating to the MVS system logger are identifiedwith the LOGRSERVICE keyword.
v APARs relating to the CICS log manager are identified with the CICSLOGRkeyword.
Run DFHLSCUIf you are migrating from CICS Version 3 or Version 4, run this log stream sizingutility using one or more CICS journal data sets as input:
v Use CICS journal data sets taken from periods of heavy production use.
v In each run of DFHLSCU, use only journal data sets that are to be migratedto the same MVS log stream
See “The log stream sizing utility, DFHLSCU” on page 160 for more information.
Create and format the LOGR couple data setsIn consultation with your MVS system programmer:
v Use MVS utility IXCL1DSU to create and format the primary and alternateLOGR couple data sets.
v Identify the LOGR couple data sets to the sysplex in the COUPLExx memberin SYS1.PARMLIB
v Make the LOGR couple data set available to the sysplex.
See “Format the LOGR Couple Data Set and Make it Available to the Sysplex”in the z/OS MVS Setting Up a Sysplex manual for information about thesesteps.
144 CICS TS for z/OS: Installation Guide

Notes:
1. For this task you need know the number of log streams and, for couplingfacility log streams, the number of structures. Each CICS region needs twosystem log streams and, optionally:
v A log stream for the log of logs
v One or more log streams for forward recovery logs
v One or more log streams for autojournals
v One or more log streams for user journals
2. If you are migrating from a release of OS/390, before release 3, (to meetthe z/OS minimum requirement level for CICS TS) , you must reformat yourLOGR data sets, because logging enhancements introduced in OS/390Release 3 required LOGR couple data set of the sysplex to be formattedusing OS/390 Release 3 or later.
The removal of the 168 data set limit (described in “General logs” on page175) also requires the LOGR data set to be formatted withDSEXTENT(nnnnn). This does not apply to LOGR couple data setsformatted for DASD-only logging.
Define coupling facility structuresIf you are using the coupling facility for some or all of your log streams, updateyour CFRM policy and your LOGR couple data set with the required structuredefinitions.
See “Defining coupling facility structures” on page 152 for details, including asample job.
Establish the required security authorizationsEnsure that all the userids that are involved with running the system logger, ordefining or accessing logger resources, are authorized, and that the requiredprofiles are defined in the LOGSTRM general resource class :
v If the MVS system logger address space (IXGLOGR) is not given SAFprivileged or trusted status, ensure you give the required authorization to theuserid that runs IXGLOGR. For example, if the userid that runs IXGLOGR(defined in the RACF started procedures table (ICHRIN03), or defined in theRACF STARTED class profile) is SYSTASK:
– SYSTASK requires ALTER access to IXLSTR structure profiles in theFACILITY general resource class for access to log stream coupling facilitystructures.
– SYSTASK requires ALTER access to the data set profiles(hlq.data_set_name) in the DATASET general resource class, for eachDASD log stream and staging data set.
v To use the MVS system logger IXCMIAPU utility to define, update and deleteentries in the LOGR couple data set, you need appropriate authorizations tothe relevant RACF profiles in the LOGSTRM and FACILITY general resourceclasses. See “Authorizations for users of IXCMIAPU” on page 72 forinformation and examples of how to do this.
v To enable CICS to create log streams dynamically, and to write to logstreams, ensure that the CICS region userid has the required authorizations.See “Authorizations for CICS regions” on page 73 for information andexamples of how to do this.
For more information about authorizations for the system logger, see the z/OSMVS Setting Up a Sysplex manual
Chapter 24. Defining the logger environment for CICS journaling 145

Check sysplex definition in PARMLIBTo use the MVS system logger, each MVS image must be a member of asysplex. Ensure your sysplex definition, in PARMLIB member IEASYSxx,specifies either PLEXCFG(MONOPLEX), for a single-member sysplex, orPLEXCFG(MULTISYSTEM), for a multi-member sysplex. Also ensure that youdefine a COUPLExx member in PARMLIB.
Note: The value specified on the SYSPLEX parameter in COUPLExx formspart of DASD-only and staging data set names.
Activate the LOGR subsystemEnsure the LOGR subsystem is active to enable the CICS log manager batchutility, DFHJUP, to format and print log data. The LOGR susbsystem is definedby the following entry in IEFSSNxx PARMLIB member:SUBSYS SUBNAME(LOGR) INITRTN(IXGSSINT)
Plan staging data set requirementsStaging data sets are used for both DASD-only and coupling facility logstreams, and if specified are dynamically allocated by the MVS system logger:
v For DASD-only log streams, staging data sets are the primary (interim)storage.
v For coupling facility log streams, staging data sets are allocated by thesystem logger to safeguard log data in the event of the log data being in avolatile configuration; that is:
– There is a loss of the coupling facility battery backup
– A structure failure that results in the only copy of log data being in MVSlocal storage buffers.
Consider the following parameters:
v STG_DUPLEX(YES) and DUPLEXMODE(COND) to cause the system loggerto use staging data sets if the coupling facility is not failure independent (see“Staging data sets for coupling facility log streams” on page 166 for moreinformation)
v STG_MGMTCLAS to specify the System Managed Storage (SMS)management class to be used for staging data set allocation (valid only whenSTG_DUPLEX(YES) or DASDONLY(YES) is specified)
v STG_STORCLAS to specify the SMS storage class to be used for stagingdata set allocation (valid only when STG_DUPLEX(YES) orDASDONLY(YES) is specified)
v STG_SIZE to specify the size of staging data sets
v SHAREOPTIONS(3,3) for log stream data sets and staging data sets (see“VSAM Share Options for System Logger” in z/OS MVS Setting Up aSysplex)
Plan DASD space and SMS environment for logger secondary storageSystem logger secondary storage comprises all log stream (offload) data sets.See “Managing secondary storage” on page 174 for information about sizeparameters and other attributes relating to secondary storage
Define log streams and log stream modelsDefine the specific log streams, and log stream models for dynamic creation oflog streams, in the LOGR policy.
In particular, consider the following when defining your log streams:
146 CICS TS for z/OS: Installation Guide

v Set HIGHOFFLOAD no higher than 80% to allow the offload function to beactivated before structures reach the 90% level and provide a buffer toenable CICS to continue writing records without filling the logstream beforeoffload completes.
v Set LOWOFFLOAD for DFHLOG and DFHSHUNT in the range 40–60%.
For user journals and the log of logs, specify LOWOFFLOAD as 0.
v Specify HLQ for the high level qualifier for offload data sets—it is not part ofthe CICS log stream name. The default is IXGLOGR.
v Specify STG_DUPLEX(YES) and DUPLEXMODE(COND) for log streams inthe coupling facility to ensure that staging data sets are used automatically ifthe coupling facility is volatile or failure dependent.
v Set STG_SIZE to control the size, in 4K blocks, of staging data setsallocated by the system logger. For coupling facility log streams, the stagingdata set must hold at least as much data as the log stream in the structure,so that offloads are not triggered by the staging data sets. See The logstream sizing utility, DFHLSCU on pages 160 and 171 (for DASD-only).
v Specify LS_DATACLAS and LS_SIZE, for the SMS data class and thenumber of 4K allocation blocks respectively for log stream off load data sets(see “Managing log data sets” on page 174)
v Specify MODEL(YES) to indicate that a log stream definition is a model onlyand not an actual log stream. See SDFHINST members DFHILG2 (couplingfacility) and DFHILG5 (DASD-only) for samples of model log streams.
Note: Use AUTODELETE(YES) with a suitable retention period (RETPD) forgeneral logs but not for CICS system logs (DFHLOG and DFHSHUNT).
See “Defining coupling facility log streams” on page 156 for some sampleIXCMIAPU jobs, and see z/OS MVS Setting Up a Sysplex for generalinformation about updating LOGR policies.
Define JOURNALMODEL resource definitionsDefine JOURNALMODEL resource definitions in the CICS CSD to enable CICSto map CICS journal names to MVS system logger log stream names. See theCICS Resource Definition Guide for information about JOURNALMODELresource definitions.
Remove JCT definitionsWhen migrating a CICS region from a CICS/ESA 4.1 region (or earlier), removeall references to journal control tables (JCTs), and any DD statements for CICSjournal data sets, from startup JCL.
See the CICS Transaction Server for z/OS Migration from CICS TS Version 2.3for CICS TS Version 1 Releases 1 and 2 for information about obsoleteparameters and function relating to the old CICS journal control function andother migration information
Review AKPFREQ system initialization parameterWhen migrating a CICS region from a CICS/ESA 4.1 region (or earlier), reviewthe value specified for AKPFREQ.
This parameter now represents the number of write operations (log records) byCICS log manager to the log stream buffer before an activity keypoint is taken,whereas under the old journal control program it specifies the number ofconsecutive blocks written to the system log data set.
The parameter has a significant impact on the size of system logger primary(interim) storage, affecting the log tail management that takes place duringactivity keypoint (AKP) processing. The system logger:
Chapter 24. Defining the logger environment for CICS journaling 147
v Deletes records that are no longer of interest to CICS
v Moves records to DFHSHUNT for those tasks that wrote log records withinthe last ACP.
Update JCL of batch jobsWhen migrating a CICS region from a CICS/ESA 4.1 region (or earlier), updateDFHJUP batch job JCL. To process log streams, these jobs require theSUSBSYS keyword on DD statement for the log stream being processed.
Evaluate results after implementationAfter you have implemented the steps necessary to use the MVS system loggerfor CICS log streams and journals, evaluate the results on a continual basis.The following are aids that you can use:
v CICS interval statistics. You can collect these at specified intervals andend-of-day to obtain CICS log manager statistics. You can also collectstatistics using the DFH0STAT sample program.
v SMF Type 88 records. These are produced by the MVS system logger, andcan be printed using IXGRPT1, which is supplied in SYS1.SAMPLIB. Youcan also print these records using IXGRPT1J and IXGRPT1L.
The following sections provide more detailed information to help you with the abovesteps:
v “Coupling facility or DASD-only?” on page 150
v “Coupling facility log streams” on page 151, which contains:– “Defining coupling facility structures” on page 152– “Planning considerations for the number of log structures” on page 155– “Log structure naming conventions” on page 156– “Defining coupling facility log streams” on page 156– “Sizing considerations for coupling facility log streams” on page 158– “Coupling facility requirements in an RLS environment” on page 165– “Staging data sets for coupling facility log streams” on page 166.
v “DASD-only log streams” on page 167, which contains:– “Defining DASD-only log streams” on page 168– “Sizing considerations for DASD-only log streams” on page 169– “Converting a DASD-only log stream to use a coupling facility” on page 172.
v “Managing secondary storage” on page 174.
Setting up the environment for CICS log managerCICS system programmers need to consult with their MVS system programmers toplan for the storage that is required by the log streams needed by the many CICSlog managers operating in the sysplex.
Each log stream is a sequence of blocks of data, which the MVS system loggerinternally partitions over three different types of storage:
1. Primary storage, which holds the most recent records that were written to thelog stream. Primary storage can consist of either:
a. A structure within a coupling facility. Log data written to the coupling facilityis also copied to either a data space or a staging data set.
b. A data space in the same MVS image as the system logger. Log datawritten to the data space is also copied to a staging data set.
2. Secondary storage—when the primary storage for a log stream becomes full,the older records automatically spill into secondary storage, which consists of
148 CICS TS for z/OS: Installation Guide

data sets managed by the storage management subsystem (SMS). Each logstream, identified by its log stream name (LSN), is written to its own log datasets.
3. Tertiary storage—a form of archive storage that is used as specified in yourhierarchical storage manager (HSM) policy. Optionally, older records can bemigrated to tertiary storage, which can be either DASD data sets or tapevolumes.
See the different levels of log stream storage in Figure 10 and Figure 11 on page150.
MVS1
CurrentData Set
LSN1
LSN1
StagingData Sets
FullData Set
Primary storage
Tertiary storage
DFHSMStorage
CouplingFacility
LSNn
LogStructures
LSN1
LSN2
Secondary storage
Data SpaceSystem Logger
Figure 10. The types of storage used by the MVS system logger. This diagram shows a logstream that uses a coupling facility. Primary storage consists of space in a structure withinthe coupling facility, and either space in a staging data set or a data space in the same MVSimage as the system logger. Secondary storage consists of a series of data sets on diskstorage to which the elements of the log structure in the coupling facility are mapped. Tertiarystorage is the DFHSM storage holding older levels of the secondary storage data sets.
Chapter 24. Defining the logger environment for CICS journaling 149

Coupling facility or DASD-only?The CICS log manager supports the DASD-only option of the MVS system logger.This means that individual CICS log streams can use either coupling facility logstructures or DASD-only logging.
Take the following points into account when deciding which log streams should bedefined to use the coupling facility and which to use DASD-only:
v A coupling facility log stream must be used if you want to allow simultaneousaccess from CICS regions running in different MVS images. (Simultaneousaccess to a DASD-only log stream is limited to CICS regions in the same MVSimage.)
For example, assume that you are using RLS and have several CICSapplication-owning regions (AORs) running on different MVS images. Becausethe forward recovery log must be accessible from all the AORs, it must be
System Logger
CurrentData Set
LSN1
LSN1
StagingData Sets
FullData Set
Data Space
Primary storage
Tertiary storage
DFHSMStorage
Secondary storage
MVS1
Figure 11. The types of storage used by the MVS system logger. This diagram shows a logstream that uses DASD-only logging. Primary storage consists of a data space in the sameMVS image as the system logger, and a single staging data set. Secondary storage consistsof a series of data sets on disk storage to which hold successive copies of the single stagingdat set. Tertiary storage is the DFHSM storage holding older levels of the secondary storagedata sets.
150 CICS TS for z/OS: Installation Guide

defined as a coupling facility log stream. A CICS system log, on the other hand,is only ever accessed by a single CICS region, and can therefore always bedefined as a DASD-only log stream.
Without a coupling facility, you cannot share general log streams across MVSimages.
v Defining all your CICS log streams to use structures within a single couplingfacility is not recommended—see “Coupling facility log streams.”
v DASD-only log streams are easier to define and administer than coupling facilitylog streams.
v The CPU cost of a log write to a DASD-only log stream is greater than that of awrite to a coupling facility log stream. For more information, see the CICSPerformance Guide .
v If the amount of available coupling facility space is limited, you may want todefine some DASD-only log streams in order to minimize the amount of spaceallocated to log structures.
Notes:
1. Define a single-system sysplex (which must use a sysplex couple data set) withPLEXCFG=MONOPLEX. This is required for stand-alone MVS systems that useMVS system logger facilities.
2. Define sysplexes that have two or more MVS images withPLEXCFG=MULTISYSTEM.
Coupling facility log streamsIf you use a coupling facility, the ideal environment is provided by two or morenon-volatile coupling facilities that are failure-independent from any of the exploitingMVS images, using dedicated processor resources.
Should one coupling facility fail, or require maintenance, in such an environment,the system logger can rebuild its data in another coupling facility and continue.Running CICS systems would experience only minimal impact.
If you are unable to devote two coupling facilities for the purposes of the MVSsystem logger, the next most robust environment is provided by one dedicatedcoupling facility for normal logger and lock structure use, plus a coupling facilityLPAR. This environment has the same advantages of rebuilding with minimal impactto running CICS systems. Furthermore, MVS detects that the LPAR coupling facilityis not in a failure-independent domain, and causes the system logger to write logstream data to staging data sets for extra security.
Running with a single coupling facility is not recommended since its failure wouldcause the MVS system logger, and any other users of the coupling facility, tosuspend normal operation until access to the coupling facility were restored. CICSwould, effectively, be unusable in such a situation.
Unless you specify that the system logger is to use staging data sets, the recoveryof log stream data depends on the MVS images remaining active so that thesystem loggers can use copies of log records held in storage to repopulate thecoupling facility when it is again available. If you must run with a single couplingfacility, you are recommended to specify DUPLEXMODE(UNCOND) to force theuse of staging data sets.
Chapter 24. Defining the logger environment for CICS journaling 151

Defining coupling facility structuresIf you use a coupling facility for your CICS log streams, define the coupling facilitystructures needed for the log streams in your CFRM policy (in the CFRM data set),and in the LOGR policy (in the LOGR data set).
Updating the CFRM policy
Coupling facility space is divided into structures using the coupling facilityresource management (CFRM) policy defined in the CFRM data set. The CFRMpolicy allows you to define how MVS is to manage coupling facility resources,and you update this using the IXCMIAPU utility. See Figure 12 on page 153 fora sample job to define coupling facility structures in the CFRM policy data set.
Updating the LOGR policy
You define structures in the MVS system logger LOGR policy in the systemlogger couple data sets using the DEFINE STRUCTURE specification of theICXMIAPU utility. See Figure 13 on page 154 for a sample job to definecoupling facility structures in the LOGR policy data set.
RememberBefore attempting to run any of the IXCMIAPU jobs, ensure that the MVSsystem logger (IXGLOGR) is running. If IXGLOGR is not running (for exampleif MVS is running in LOCAL mode), logstream definition jobs fail with rc=0814.
152 CICS TS for z/OS: Installation Guide

Multiple log streams can write data to a single coupling facility structure. This doesnot mean that the log data is merged; the log data stays segregated according to
//CFRM JOB (accounting-information),CLASS=A,MSGCLASS=A//POLICY EXEC PGM=IXCMIAPU//STEPLIB DD DSN=SYS1.MIGLIB,DISP=SHR//SYSPRINT DD SYSOUT=*//*********************************************************************//* *//* System logger structure definitions should be merged with *//* definitions for other structures required by the sysplex. *//* *//* Space values are for illustration only -- substitute values *//* appropriate to your number of logs and expected activity. *//* *//* NOTE: The values in this job are not matched with the other *// sample jobs. *//*********************************************************************//SYSIN DD *
DATA TYPE(CFRM) REPORT(YES)DELETE POLICY NAME(POL1)DEFINE POLICY NAME(POL1)
PREFLIST(cfname) REBUILDPERCENT(1)/* Define coupling facilities */
CF NAME(cfname)TYPE(009674)MFG(IBM)PLANT(00)SEQUENCE(000000040032)PARTITION(3)CPCID(00)DUMPSPACE(8192)
/* Define other structures required by sysplex here . . . */...
/* Define logger structures for CICS log streams. *//* - If a choice of facilities is available, use non-volatile *//* facilities if possible *//* - Specify low REBUILDPERCENT so that structures are rebuilt *//* in the event of connectivity failure *//* - INITSIZE gives initial coupling facility size (based on sizing calcs) *//* - SIZE should be larger to allow for rebuild to a larger *//* size if INITSIZE proves to be too small *//* SIZE and INITSIZE values are for illustration only - *//* substitute values appropriate for your intended usage. */
STRUCTURE NAME(LOG_DFHLOG_001) /* CICS system logs */INITSIZE(10000) SIZE(16000)PREFLIST(cfname) REBUILDPERCENT(1)
STRUCTURE NAME(LOG_DFHSHUNT_001) /* CICS secondary logs */INITSIZE(10000) SIZE(16000)PREFLIST(cfname) REBUILDPERCENT(1)
STRUCTURE NAME(LOG_USERJNL_001) /* CICS user journals */INITSIZE(10000) SIZE(16000)PREFLIST(cfname) REBUILDPERCENT(1)
STRUCTURE NAME(LOG_GENERAL_001) /* Forward recovery logs */INITSIZE(10000) SIZE(16000)PREFLIST(cfname) REBUILDPERCENT(1)
/*//
Figure 12. Sample policy job to define logger structures to CFRM 1/2
Chapter 24. Defining the logger environment for CICS journaling 153

log stream. You can specify the number of log streams that use the resources of asingle coupling facility structure using the LOGSNUM parameter on the IXCMIAPUservice to define a structure.
Each log stream is allocated a proportion of the structure space based on thenumber of currently connected log streams (up to the limit specified in LOGSNUM).
For example, a structure may be defined to contain a maximum of, say, 30 logstreams. If only 10 log streams are connected, each log stream can use one tenthof the space in the structure. As other log streams are connected and disconnected,the MVS system logger adjusts the proportion of space to be used by each logstream.
It is important to plan carefully before specifying a value for LOGSNUM, becausethis parameter determines how much storage space in the structure is available toeach log stream. A number in the range 10 to 20 is optimum in many environments.
The JCL in Figure 13 defines log stream coupling facility structures to the MVSsystem logger. It is meant for guidance only and you should substitute valuesappropriate to your requirements.
See the z/OS MVS Programming: Assembler Services Guidez/OS MVSProgramming: Assembler Services Guide for information on planning couplingfacility configurations.
//DEFSTRUC JOB ...//POLICY EXEC PGM=IXCMIAPU//STEPLIB DD DSN=SYS1.MIGLIB,DISP=SHR//SYSPRINT DD SYSOUT=*//*********************************************************************//* *//* Define log stream coupling facility structures to the MVS logger *//* *//* AVGBUFSIZE and LOGSNUM values are just for illustration, *//* substitute values appropriate to your intended usage *//* *//*********************************************************************//SYSIN DD *
DATA TYPE(LOGR) REPORT(YES)
/* System logs */DEFINE STRUCTURE NAME(LOG_DFHLOG_001) LOGSNUM(10)
MAXBUFSIZE(64000) AVGBUFSIZE(500)
/* Secondary system logs */DEFINE STRUCTURE NAME(LOG_DFHSHUNT_001) LOGSNUM(10)
MAXBUFSIZE(64000) AVGBUFSIZE(4096)
/* User journals with unforced writes */DEFINE STRUCTURE NAME(LOG_USERJRNL_001) LOGSNUM(10)
MAXBUFSIZE(64000) AVGBUFSIZE(64000)
/* Fwd recovery logs and user jnls that are forced */DEFINE STRUCTURE NAME(LOG_GENERAL_001) LOGSNUM(10)
MAXBUFSIZE(64000) AVGBUFSIZE(2048)
/*//
Figure 13. Sample JCL to define coupling facility structures to MVS system logger
154 CICS TS for z/OS: Installation Guide

Planning considerations for the number of log structuresBear in mind the following points when planning the definition of your couplingfacility structures:
v The CFRM policy allows a maximum of 255 structures for all purposes.
v Allow a maximum of 20 log streams per structure.
v Smaller structures are more quickly allocated, rebuilt, and recovered than largerones.
v It is good practice to keep the log streams for test CICS systems (and othersystems not in regular use) in structures separate from the structures holding thelog streams of production CICS systems. This avoids the structure spaceavailable to production CICS systems being affected by structure usage of thetest CICS systems.
v It is good practice to keep the log streams for terminal-owning regions (TORs) instructures separate to those accommodating log streams for application-owningregions (AORs). In addition, keep log streams for file-owning regions in structuresseparate to those accommodating log streams for TORs and AORs.
v Share structures between MVS images. If an MVS image or logger addressspace fails, and a surviving MVS image is using the same log stream structures(although not necessarily the same log streams), the surviving image is notifiedof the failure and can initiate immediate log stream recovery for the failing MVS.
Recovery would, otherwise, be delayed until the next time that a system attemptsto connect to a log stream in the affected structures, or until the logger addressspace of the failing system is restarted.
For example, in a 4-way sysplex comprising MVSA, MVSB, MVSC, and MVSD,you might have the CICS regions that normally run on MVSA and MVSB usestructure LOG_DFHLOG_001, and the regions that run on MVSC and MVSD usestructure LOG_DFHLOG_002. Thus each MVS image has a partner to recoverits log streams in the event of an MVS failure. If a structure fails, the two MVSimages using the other structure can take over the workload. Also, if you havemore than one coupling facility, allocate the system log structures to differentcoupling facilities. See Figure 14 for an illustration of this example.
4-Way Sysplex
LOG_DFHLOG_001MVSA MVSB
(on CF1)
LOG_DFHLOG_002MVSC MVSD
(on CF2)
Figure 14. Sharing system logger structures between MVS images
Chapter 24. Defining the logger environment for CICS journaling 155

v Use the appropriate buffer size. The average buffer size (AVGBUFSIZE) definedfor a structure should be reasonably close to the actual buffer size of the logstreams using the structure. If it is not, there is a risk that usable space will beexhausted long before the structure is actually full.
Important:
1. OS/390 (since Release 3) dynamically tunes the element/entry ratio, so thevalue you specify for AVGBUFSIZE is less important than it was on earlierreleases of MVS.
2. AVGBUFSIZE, like other structure definition attributes such as MAXBUFSIZEand LOGSNUM, cannot be updated unless you first delete the log streams inthe structure definition.
v Set MAXBUFSIZE to slightly less than 64K - say, 64000. This allows CICS towrite the maximum size user record and allows coupling facility storage to beallocated in 256-byte units. If you allow MAXBUFSIZE to default, coupling facilitystorage is allocated in 512-byte units. This can be wasteful of storage.
There is no significant advantage in setting MAXBUFSIZE lower than 64000 asfar as the utilization of storage is concerned.
v Set a low value for the REBUILDPERCENT parameter in the CFRM policy for logstructures used for CICS system logs.
Log structure naming conventionsIt is sensible to adopt a naming convention for your coupling facility structures thathelp to identify the purpose of the structure. A format such as LOG_purpose_nnn isrecommended, where:
v purpose identifies the type of use of the structure.
v nnn is a sequence number to allow for more than one structure for each purpose.
Some examples are:
LOG_DFHLOG_001For the CICS primary system log. The structure should be large to avoid theneed to write data to DASD. The average buffer size would be small. See thesizing calculations in “Structure size for system log usage” on page 161.
LOG_DFHSHUNT_001For the CICS secondary system log. The structure should be small but requiresa large buffer size. A structure of 150K per log stream may well be sufficient.
LOG_USERJRNL_001For user journals where block writes are not forced. The average and maximumbuffer sizes of these structures should be the same.
LOG_GENERAL_001For forward recovery logs and user journals where block writes are forcedperiodically.
See also the section “Develop a naming convention for system logger resources” inthe z/OS MVS Setting Up a Sysplex manual.
Defining coupling facility log streamsUse the MVS IXCMIAPU utility to define coupling facility log streams to the LOGRcouple data set. The basic syntax to define a coupling facility log stream is asfollows:
156 CICS TS for z/OS: Installation Guide

DEFINE LOGSTREAM NAME(log_stream_name)STRUCTNAME(structure_name)LOWOFFLOAD(low_offload) HIGHOFFLOAD(high_offload)STG_DUPLEX(YES|NO) DUPLEXMODE(COND|UNCOND)
For detailed information about the full range of log stream attributes, see theOS/390 Setting Up a Sysplex manual. Figure 15 shows example definitions for apair of coupling facility log streams associated with a CICS system log.
Using model log streamsTo avoid having to define explicitly each log stream used by each of your CICSregions, you can use model log stream definitions. Using models, log streams aredefined to MVS dynamically, on their first usage. Figure 16 on page 158 shows anexample of coupling facility model definitions for CICS primary and secondarysystem log streams.
//DEFLOGS JOB ...//LOGDEFN EXEC PGM=IXCMIAPU//STEPLIB DD DSN=SYS1.MIGLIB,DISP=SHR//SYSPRINT DD SYSOUT=*//******************************************************************//* *//* Define coupling facility log streams for CICS system log. *//* *//* The LOWOFFLOAD value is for illustration only -- *//* substitute a value appropriate for your environment. *//* *//******************************************************************//SYSIN DD *
DATA TYPE(LOGR) REPORT(NO)DEFINE LOGSTREAM NAME(region_userid.applid.DFHLOG)
STRUCTNAME(LOG_DFHLOG_001)LOWOFFLOAD(40) HIGHOFFLOAD(80)STG_DUPLEX(YES) DUPLEXMODE(COND)
DEFINE LOGSTREAM NAME(region_userid.applid.DFHSHUNT)STRUCTNAME(LOG_DFHSHUNT_001)LOWOFFLOAD(40) HIGHOFFLOAD(80)STG_DUPLEX(YES) DUPLEXMODE(COND)
Figure 15. Example definitions of coupling facility log streams. The definitions are for theCICS primary and secondary system log streams. The value region_userid is the RACFuserid under which the CICS address space is running; applid is the CICS region’s VTAMAPPL name (taken from the APPLID system initialization parameter).
Chapter 24. Defining the logger environment for CICS journaling 157
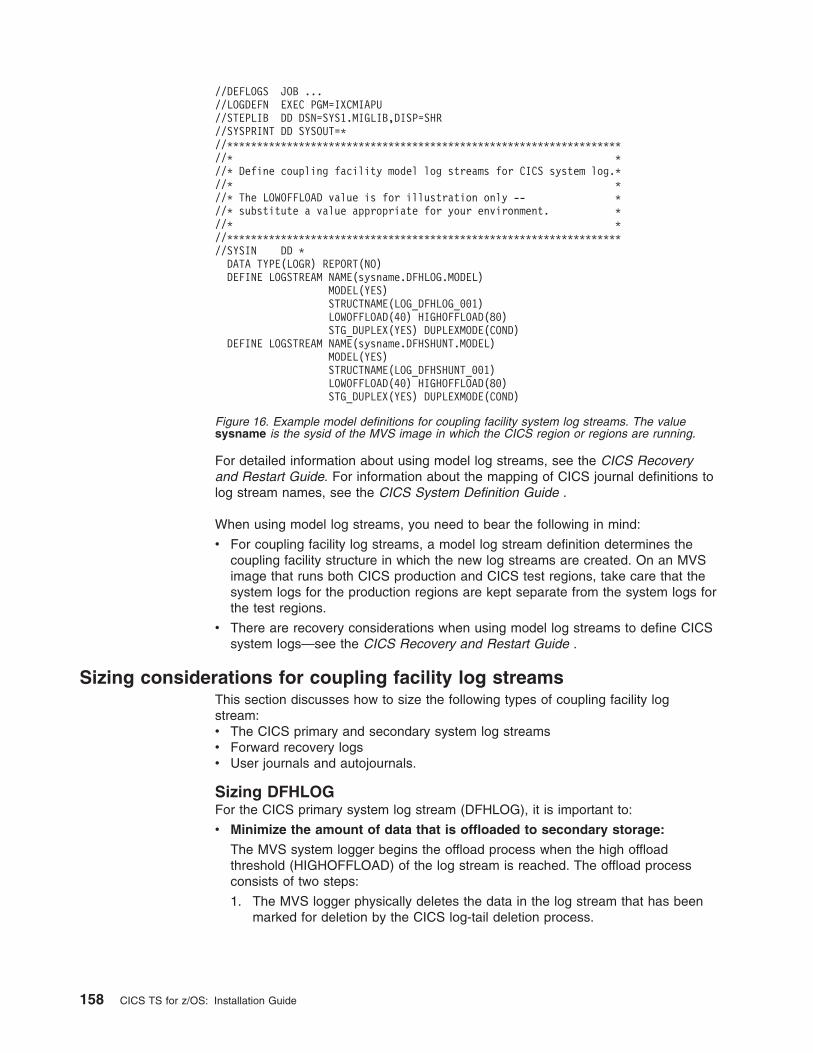
For detailed information about using model log streams, see the CICS Recoveryand Restart Guide. For information about the mapping of CICS journal definitions tolog stream names, see the CICS System Definition Guide .
When using model log streams, you need to bear the following in mind:
v For coupling facility log streams, a model log stream definition determines thecoupling facility structure in which the new log streams are created. On an MVSimage that runs both CICS production and CICS test regions, take care that thesystem logs for the production regions are kept separate from the system logs forthe test regions.
v There are recovery considerations when using model log streams to define CICSsystem logs—see the CICS Recovery and Restart Guide .
Sizing considerations for coupling facility log streamsThis section discusses how to size the following types of coupling facility logstream:v The CICS primary and secondary system log streamsv Forward recovery logsv User journals and autojournals.
Sizing DFHLOGFor the CICS primary system log stream (DFHLOG), it is important to:
v Minimize the amount of data that is offloaded to secondary storage:
The MVS system logger begins the offload process when the high offloadthreshold (HIGHOFFLOAD) of the log stream is reached. The offload processconsists of two steps:
1. The MVS logger physically deletes the data in the log stream that has beenmarked for deletion by the CICS log-tail deletion process.
//DEFLOGS JOB ...//LOGDEFN EXEC PGM=IXCMIAPU//STEPLIB DD DSN=SYS1.MIGLIB,DISP=SHR//SYSPRINT DD SYSOUT=*//******************************************************************//* *//* Define coupling facility model log streams for CICS system log.*//* *//* The LOWOFFLOAD value is for illustration only -- *//* substitute a value appropriate for your environment. *//* *//******************************************************************//SYSIN DD *
DATA TYPE(LOGR) REPORT(NO)DEFINE LOGSTREAM NAME(sysname.DFHLOG.MODEL)
MODEL(YES)STRUCTNAME(LOG_DFHLOG_001)LOWOFFLOAD(40) HIGHOFFLOAD(80)STG_DUPLEX(YES) DUPLEXMODE(COND)
DEFINE LOGSTREAM NAME(sysname.DFHSHUNT.MODEL)MODEL(YES)STRUCTNAME(LOG_DFHSHUNT_001)LOWOFFLOAD(40) HIGHOFFLOAD(80)STG_DUPLEX(YES) DUPLEXMODE(COND)
Figure 16. Example model definitions for coupling facility system log streams. The valuesysname is the sysid of the MVS image in which the CICS region or regions are running.
158 CICS TS for z/OS: Installation Guide

2. The MVS logger calculates how much data needs to be offloaded tosecondary storage, based on the difference between HIGHOFFLOAD andLOWOFFLOAD, less the amount of data that has been deleted since the lastoffload event.
To minimize the amount of data offloaded from the CICS primary system log:
– Define a suitably-sized coupling facility structure. For advice, see“Recommendations.”
– Ensure that the log-tail deletion process is working effectively. For detailedinformation about the log tail deletion process, see the CICS Recovery andRestart Guide.
v Avoid “structure-full” events:
A structure-full event occurs when a log stream’s structure space becomes fullbefore the offloading of data has completed.
For advice on monitoring and avoiding structure-full events, see the CICSPerformance Guide .
Sizing DFHSHUNTIt is important to size the secondary system log stream (DFHSHUNT) to avoidstructure-full events. However, it is normal for some data to be offloaded fromDFHSHUNT to secondary storage.
Sizing general logsIt is important to size forward recovery logs, user journals, and autojournals to avoidstructure-full events. However, because CICS does not delete data from these logstreams, it is normal for data to be offloaded to secondary storage.
RecommendationsTable 11 summarizes how you should decide on the values for various attributes onthe structure definition, log stream definition, and system definition.
Table 11. How to decide on the values of attributes
Facility Attribute Recommendation
Structure INITSIZE Use the DFHLSCU utility program or the formulaon page “INITSIZE calculation” on page 161.
SIZE Use DFHLSCU or the formula on page “SIZEcalculation” on page 163.
AVGBUFSIZE Use DFHLSCU or the formula on page“AVGBUFSIZE calculation” on page 162.Underestimate rather than overestimate.
MAXBUFSIZE 64000
Primary system logstream (DFHLOG)
HIGHOFFLOAD 80
LOWOFFLOAD Use DFHLSCU or the formula on page“LOWOFFLOAD calculation” on page 163.
Secondary systemlog stream(DFHSHUNT)
HIGHOFFLOAD 80
LOWOFFLOAD 0
General log stream HIGHOFFLOAD 80
LOWOFFLOAD 40 – 60
Log stream STG_SIZE Use DFHLSCU or the formula on page “Stagingdata set size calculation” on page 167.Overestimate rather than underestimate.
Chapter 24. Defining the logger environment for CICS journaling 159

Table 11. How to decide on the values of attributes (continued)
Facility Attribute Recommendation
CICS system AKPFREQ 4000
Note: Startup may take longer than you experienced when using earlier releases.This is due in part to the allocation and formatting of the staging data sets.The increased time that startup takes is dependent on such things as:
v Size of staging data set (STG_SIZE)
v DASD speed
v DASD contention
It can be reduced by avoiding the use of unnecessarily large staging datasets.
The log stream sizing utility, DFHLSCUIf you are migrating from CICS/ESA 3.3 or CICS/ESA 4.1, you are stronglyrecommended to use the CICS-supplied utility program, DFHLSCU, to help youcalculate your space requirements. DFHLSCU takes as input “old-style” (pre-CICSTransaction Server for OS/390, Version 1 Release 1-format) journal records, andanalyzes them to establish values for:
AVGBUFSIZEThe average buffer size, in bytes, of a log stream structure in the couplingfacility. Although it is important, that the value you specify for AVGBUFSIZEreflects as accurately as possible the real size of most log blocks written tothe structure. This leads to efficient use of the space in the coupling facilityand minimum DASD offloading frequency. However OS/390 (since release3) performs some dynamic tuning, reducing the importance of the value youspecify for AVGBUFSIZE.
You define this attribute in your DEFINE STRUCTURE job.
INITSIZEThe initial amount of space, in kilobytes, to be allocated for the log streamstructure in the coupling facility. You define this attribute in your CFRMpolicy.
HIGHOFFLOADThe point in primary storage (that is, in either the coupling facility structureor the staging data set), as a percentage of space consumed, where theMVS system logger starts its offload process. You define this attribute inyour DEFINE LOGSTREAM job.
LOWOFFLOADThe point in primary storage, as a percentage of space consumed, wherethe MVS system logger stops offloading data from primary storage to logstream DASD data sets. You define this attribute in your DEFINELOGSTREAM job.
SIZE The maximum size, in kilobytes, of the log stream structure in the couplingfacility. You define this attribute in your CFRM policy. The value of the SIZEattribute is approximately 50% greater than the value of the INITSIZEattribute. You can dynamically increase the log stream structure size up tothe value of the SIZE attribute.
STG_SIZEThe size, as a number of 4K blocks, of the staging data set for the log
160 CICS TS for z/OS: Installation Guide

stream. A coupling facility log stream may or may not use a staging dataset. For advice on the use of staging data sets with coupling facility logstreams, see “Staging data sets for coupling facility log streams” on page166.
You define this attribute in the DEFINE LOGSTREAM statements of yourIXCMIAPU job. If you are using a staging data set and do not specifySTG_SIZE, the MVS logger determines the size from
v The STG_SIZE parameter of the log stream defined on the LIKEparameter
v Uses the maximum coupling facility structure size for the structure towhich the log stream is defined. This value is obtained from the SIZEparameter of the structure in the CRFM policy.
For details on how to use DFHLSCU, see the CICS Operations and Utilities Guide .
If DFHLSCU is inappropriate for use in your environmentIf it is inappropriate for you to use DFHLSCU to help you size your coupling facilitystructures and log streams (perhaps you have no CICS Version 4 or Version 3journal records to use as input to DFHLSCU, or you are capacity planning for newapplications), the following sections help you to calculate your space requirements.
The formulae provided help you to calculate values for:v INITSIZEv AVGBUFSIZEv SIZEv LOWOFFLOADv STG_SIZE
You must base your calculations on the journaling requirements of yourapplications. This provides the starting point for the following formulae.
Structure size for system log usage: You are recommended not to place theprimary and secondary log streams in the same structure due to the large disparityin data volumes written to the primary and secondary system logs.
Generally, the volume of data that CICS keeps in the primary system log at any onetime is slightly greater than the amount written during one activity keypoint interval.This volume is determined by the activity keypoint frequency, which is measured inthe number of write requests to the CICS system log stream output buffer, anddefined on the AKPFREQ system initialization parameter. Review the valuespecified on the AKPFREQ system initialization parameter when planning couplingfacility structure sizes.
The INITSIZE value to be supplied in the CFRM policy can be calculated as follows:
The value for the number of entries (no. entries) can be calculated as follows:no. entries = ((akpintvl + trandur) * writespersec) / 0.9
where:
INITSIZE = 310 + ( LOGSNUM * A * B / 1024)where A = 2000 + (no. entries + 5)and B = (AVGBUFSIZE * 1.1289) + 195
Figure 17. INITSIZE calculation
Chapter 24. Defining the logger environment for CICS journaling 161

v akpintvl is the interval between activity keypoints which varies with workload. Itcan be calculated as follows:
akpintvl = AKPFREQ / ((N1 * R1) + (N2 * R2) + (Nn * Rn) )
where:
– N1, N2 .... Nn is the transaction rate for each transaction (transactions persecond).
– R1, R2 .... Rn is the number of log records written by each transaction.
v trandur is the execution time (between syncpoints) of the longest-runningtransaction that runs as part of the normal workload.
If this duration is longer than akpintvl value, you can either:
– Increase the value of AKPFREQ, so increasing the value of akpintvl (as longas this does not result in an unacceptably large coupling facility structuresize).
– Change the application logic to cause more frequent syncpoints.
– Calculate a structure size based on a shorter transaction duration, and acceptthat DASD offloading occurs when the long-running transaction is used.
v writespersec = lesser of 25 or ((N1 * R1) + ... (Nn * Rn)), where:
– N1, N2 .... Nn are the transaction frequencies (transactions per second) ofthe most frequently executed transactions.
– R1, R2 .... Rn is the number of log records written by each transaction.
You can calculate AVGBUFSIZE for DFHLOG from the weighted average of thedata logged by the most frequently executed transactions in the system:AVGBUFSIZE = (bytespersec / writespersec) + 48
where:
v bytespersec = (N1 * D1) + (N2 * D2) + ... (Nn * Dn), where:
– N1, N2 .... Nn are the transaction frequencies (transactions per second) ofthe most frequently executed transactions.
– D1, D2 .... Dn are the bytes of data logged by each transaction.
You can calculate the amount of data (Dn) written to the system log for eachtransaction:Dn = Ns * syncreclen +
Nfc * (fcrechdr + fcreclen) +Nts * (tsrechdr + tsreclen) +Ntd * (tdrechdr + tdreclen) +Nur * (urrechdr + urreclen)
where:
- Ns is the number of syncpoints per transaction - usually 1.
- synreclen is the syncpoint record length.
- Nfc, fcrechdr, fcreclen are, respectively, the number of recoverableupdates made, the length of the record headers, and the length of therecords for file control.
Count only READ UPDATE and WRITE ADD records. fcrechdr is 144 (136bytes of record header plus 8 bytes of file name).
Similarly:
- Nts, tsrechdr, tsreclen are for recoverable temporary storage updates.
Count only TS PUT and TS UPDATE records.
162 CICS TS for z/OS: Installation Guide

For TS PUT records, tsrechdr is 108, and tsreclen is 88.
For TS UPDATE records, tsrechdr is 108, and tsreclen is 52.
- Ntd, tdtrechdr, tdreclen are for recoverable transient data updates.
tdrechdr is 108, and tdreclen is 380.
- Nur, urrechdr, urreclen are for user records written to DFHLOG.
urrechdr is 125.
v See page “Writes per second calculation” on page 162 for details of how tocalculate writespersec
If the result of the calculation shows a value for AVGBUFSIZE that is greater than thevalue defined for MAXBUFSIZE, then the value defined for MAXBUFSIZE is takenas the value for AVGBUFSIZE, and writespersec is calculated as follows:writespersec = bytespersec / (MAXBUFSIZE - 48)
Round the final result of the INITSIZE formula up to the next multiple of 256.
The SIZE value to be supplied in the CFRM policy can be calculated as follows:
Calculate the value for the number of entries as in the INITSIZE formula.
Round the final result of the SIZE formula up to the next multiple of 256. Theformula for SIZE gives a result that is approximately fifty percent greater that theINITSIZE value.
Generally, the secondary system log stream needs to be only a fraction of the sizeof the primary log stream. Use the following formulae to calculate coupling facilityspace for DFHSHUNT:INITSIZE = (150 * LOGSNUM) + 310SIZE = (230 * LOGSNUM) + 480
You can calculate a suitable value for LOWOFFLOAD for DFHLOG using thefollowing formula:LOWOFFLOAD = (trandur * 90) / (akpintvl + trandur) + 10 (where RETPD=0 specified)
orLOWOFFLOAD = (trandur * 90) / (akpintvl + trandur) (where RETPD=dddd specified)
where:
v akpintvl is the interval between activity keypoints. See page 161 for the formulato calculate it.
v trandur is the execution time (between syncpoints) of the longest-runningtransaction that runs as part of the normal workload.
If this duration is longer than akpintvl value, you can either:
– Increase the value of AKPFREQ, so increasing the value of akpintvl (as longas this does not result in an unacceptably large coupling facility structuresize).
– Change the application logic to cause more frequent syncpoints.
SIZE = 480 + ( LOGSNUM * A * B / 1024)where A = 2500 + (no. entries + 5)and B = (AVGBUFSIZE * 1.6821) + 289
Figure 18. SIZE calculation
Chapter 24. Defining the logger environment for CICS journaling 163
– Calculate a structure size based on a shorter transaction duration, and acceptthat DASD offloading occurs when the long-running transaction is used.
Structure size for forward recovery log usage: You can merge the forwardrecovery logs written by many CICS regions onto the same log stream. You canalso use the same log stream for forward recovery data for multiple data sets.
See Figure 17 on page 161 and Figure 18 on page 163 for the formulae to calculatevalues for the INITSIZE and SIZE attributes.
Calculate a value for number of entries as follows:no. entries = writespersec * 12.5
where:writespersec = lesser of 25 or (N1 + ... + Nn)
where N1 .... Nn is the number of transactions per second writing to each dataset.
You can calculate AVGBUFSIZE as follows:AVGBUFSIZE = (bytespersec / writespersec) + 36
where:
v bytespersec = (N1 * Wr1 * (D1 + rechdr) +.. (Nn * Wrn * (Dn + rechdr)))
v writespersec = lesser of 25 or (N1 + ... + Nn), where:
– N1 .... Nn is the number of transactions per second writing to each data set.
– Wr1 ... Wrn is the number of write requests per transaction.
– D1 .... Dn is the average record length for each data set.
v rechdr is the record header length of each record.
If the records are WRITE ADD, WRITE ADD COMPLETE, or WRITE ADD DELETErecords, rechdr is 84 and is followed by the record key, and the record data(including its key).
If the result of the calculation shows a value for AVGBUFSIZE that is greater than thevalue defined for MAXBUFSIZE, then the value defined for MAXBUFSIZE is takenas the value for AVGBUFSIZE, and writespersec is calculated as follows:writespersec = bytespersec / (MAXBUFSIZE - 36)
Structure size for user journal and autojournal usage: See Figure 17 on page161 and Figure 18 on page 163 for the formulae to calculate values for theINITSIZE and SIZE attributes.
Calculate a value for number of entries as follows:no. entries = writespersec * 12.5
See the explanation of writespersec below.
For journals where the log blocks are not forced to the log stream, the averageblock size tends to be slightly less than the MAXBUFSIZE value defined for thecoupling facility structure.
For journals where the log blocks are forced to the log, (via the EXEC CICS WAITJOURNALNAME or EXEC CICS WAIT JOURNALNUM commands, or via the WAIT
164 CICS TS for z/OS: Installation Guide

option of the EXEC CICS WRITE JOURNALNAME or EXEC CICS WRITEJOURNALNUM commands), you can calculate AVGBUFSIZE from the weightedaverage of the data logged for each journal logging to the same log stream for agiven CICS system.AVGBUFSIZE = (bytespersec / (writespersec) + 36
where:
v bytespersec = (N1 * Wr1 * (D1 + rechdr) + ... (Nn *Wrn * (Dn + rechdr)))
v writespersec = lesser of 25 or ((N1 * Wa1) + ... + (Nn * Wan)) where:
– N1, .... Nn is the number of transactions per second writing to the journal.
– Wr1 .... Wrn is the number of write requests per transaction.
– Wa1 .... Wan is the number of wait requests per transaction.
– D1 .... Dn is the average record length of each journal record.
– rechdr is the record header length of each record.
Autojournal records are issued from file control. They may be DATA SET NAMErecords which consist of a 204-byte record header, and no further data.Alternatively, they may be READ ONLY, READ UPDATE, WRITE UPDATE, WRITEADD, or WRITE ADD COMPLETE records In this case, rechdr is 84 and is followedby the file control record itself.
User journal records consist of a 68-byte record header, followed by the user prefix,and the user data.
If the result of the calculation shows a value for AVGBUFSIZE that is greater than thevalue defined for MAXBUFSIZE, then the value defined for MAXBUFSIZE is takenas the value for AVGBUFSIZE, and writespersec is calculated as follows:writespersec = bytespersec / (MAXBUFSIZE - 36)
Coupling facility requirements in an RLS environmentWhen you move to an RLS environment from an environment in which multipleAORs have been accessing data sets in an FOR, the logging activity of the FOR isdistributed across the AORs. As a consequence, the coupling facility structure sizerequired by each AOR increases.
You can use the formulae for INITSIZE and SIZE, given in Figure 17 on page 161and Figure 18 on page 163. However, you need to calculate values for:v avgbufizev number of entriesv akpintvl.
using formulae which are different to those already described.
Use either reports produced by DFHLSCU for the CICS/ESA 4.1 AOR and FORsystem logs, or log stream statistics from CICS Transaction Server for z/OS, tocalculatev The number of log write operations, andv The amount of data written
in a reporting interval for the AORs and the FOR.
Chapter 24. Defining the logger environment for CICS journaling 165

Calculating increased AOR coupling facility storagerequirementsUse the following formulae to calculate:v avgbufizev number of entriesv akpintvl.
for the AORs in the new RLS environment.
Calculate the AOR AVGBUFSIZE value required by the INITSIZE and SIZEformulae as follows:AOR AVGBUFSIZE = ( AOR_bytes + (FOR_bytes / no. of AORs) ) / (intvlen * 25)
where:
v AOR_bytes is the number of bytes written to the system log by an AOR in thesampling interval.
v FOR_bytes is the number of bytes written to the system log by an FOR in thesampling interval.
v no of AORs is the number of cloned AORs using the FOR.
v intvlen is the length (in seconds) of the sampling interval (statistics orDFHLSCU).
Calculate the AOR 'number of entries' value required by the INITSIZE and SIZEformulae as follows:AOR no. entries = ((AOR_akpintvl + trandur) * 25) / 0.9
where:v AOR_akpintvl = ( AKPFREQ * intvlen ) / ( AOR_recs + (FOR_recs / no. of AORs) )
where:
– intvlen is the length (in seconds) of the sampling interval (statistics orDFHLSCU).
– AOR_recs is the number of records written to the system log by an AOR in thesampling interval.
– FOR_recs is the number of records written to the system log by an FOR in thesampling interval.
– no of AORs is the number of cloned AORs using the FOR.
v trandur is the execution time (between syncpoints) of the longest-runningtransaction that runs as part of the normal workload.
If this is longer than AOR_akpintvl, use AOR_akpintvl as the duration or considerincreasing AKPFREQ.
Once you have calculated the values for AOR AVGBUFSIZE and AOR no. entries,use the formulae for INITSIZE and SIZE, as described in Figure 17 on page 161and Figure 18 on page 163.
Staging data sets for coupling facility log streamsMVS normally keeps a second copy of the data written to the coupling facility in adata space, for use when rebuilding a coupling facility log in the event of an error.This is satisfactory as long as the coupling facility is failure-independent (in aseparate CPC and non-volatile) from MVS.
166 CICS TS for z/OS: Installation Guide

Where the coupling facility is in the same CPC, or uses volatile storage, the MVSsystem logger supports staging data sets for copies of log stream data that wouldotherwise be vulnerable to failures that impact both the coupling facility and theMVS images.
The following recommendations are for guidance when defining log streams:
v Define STG_DUPLEX(YES) and DUPLEXMODE(COND) for those log streamsassociated with the system log. This ensures that the MVS system loggerautomatically copies to staging data sets if it detects that the coupling facility isnot failure-independent and a single point of failure, and is therefore vulnerable topermanent log data loss. `
A connection to a log stream contains a single point of failure if the couplingfacility is volatile or it resides on the same CPC as the MVS system connectingto it. For example, if you have two CPCs, CPC1 and CPC2, and CPC1 has anMVS LPAR and a coupling facility, while CPC2 has only MVS LPARs, theconnections from the MVS LPAR in CPC1 to the coupling facility are failuredependent—if you lose CPC1 you lose both MVS and its local buffers and thecoupling facility. On the other hand, the connections from CPC2 are failureindependent, because the system logger local storage and buffers are in aphysically separate CPC from the coupling facility, and you would have to loseboth to lose data. With DUPLEXMODE(COND), failure dependent connectionsresult in staging sets, while failure independent connections are not allocatedstaging data sets.
v If you are operating with only a single coupling facility, you should defineSTG_DUPLEX(YES) and DUPLEXMODE(UNCOND) for those log streamsassociated with the system log.
v Define STG_DUPLEX(YES) and DUPLEXMODE(COND) for those log streamsassociated with forward recovery logs. If you do not, and there is a failure whichcauses loss of data from the log stream, you would need to take a new imagecopy of the associated VSAM data sets. There would be a consequent period oftime until this was complete when the data sets would not be fully protected.
v If you operate a non-volatile, stand-alone coupling facility for normal logging, witha PR/SM LPAR configured as a coupling facility acting as backup, define all logstreams with STG_DUPLEX(YES) and DUPLEXMODE(COND).
v Define each staging data set to be at least the same size as the log streamshare of the coupling facility, but round the average block size up to 4K.
For example, the staging data set size corresponding to the basic coupling facilityspace requirement for each CICS system log stream (DFHLOG) can becalculated by the following formula:
staging data set size = entries * rnd-avg-buf / 4096where:
rnd-avg-buf = avgbufsize (rounded up to 4K)
See page “number of entries calculation” on page 161 for the formula to calculateno. entries.
DASD-only log streamsThe CICS log manager supports the DASD-only option of the MVS system logger.Individual CICS log streams can use either coupling facility log structures orDASD-only logging. Reasons for defining a log stream to use DASD-only logginginclude:
v You do not have a coupling facility.
v You want to preserve coupling facility space for other uses.
Chapter 24. Defining the logger environment for CICS journaling 167

v You do not need to share the log stream across MVS systems. (The CICSsystem log can never be shared.)
See page “Setting up the environment for CICS log manager” on page 150 foradvice about defining individual log streams to use coupling facility or DASD-onlylogging, based on their usage.
Defining DASD-only log streamsUse the MVS IXCMIAPU utility to define DASD-only log streams to the LOGRcouple data set. The basic syntax to define a DASD-only log stream is as follows:DEFINE LOGSTREAM NAME(log stream_name)
DASDONLY(YES)MAXBUFSIZE(max_bufsize)STG_SIZE(stg_size)HIGHOFFLOAD(high_offload)LOWOFFLOAD(low_offload)
For detailed information about the full range of log stream attributes, see theOS/390 Setting Up a Sysplex manual. Figure 19 shows example definitions for apair of log streams associated with a DASD-only system log.
Using model log streamsTo avoid having to define explicitly each log stream used by each of your CICSregions, you can use model log stream definitions. Using models, log streams aredefined to MVS dynamically, on their first usage. Figure 20 on page 169 showsexample DASD-only model definitions for CICS primary and secondary system logstreams.
//DEFLOGS JOB ...//LOGDEFN EXEC PGM=IXCMIAPU//STEPLIB DD DSN=SYS1.MIGLIB,DISP=SHR//SYSPRINT DD SYSOUT=*//******************************************************************//* *//* Define DASD-only log streams for CICS system log. *//* *//* The LOWOFFLOAD and STG_SIZE values are for illustration *//* only -- substitute values appropriate for your environment. *//* *//******************************************************************//SYSIN DD *
DATA TYPE(LOGR) REPORT(NO)DEFINE LOGSTREAM NAME(region_userid.applid.DFHLOG)
DASDONLY(YES)MAXBUFSIZE(64000) STG_SIZE(3000)LOWOFFLOAD(40) HIGHOFFLOAD(80)
DEFINE LOGSTREAM NAME(region_userid.applid.DFHSHUNT)DASDONLY(YES)MAXBUFSIZE(64000) STG_SIZE(500)LOWOFFLOAD(40) HIGHOFFLOAD(80)
Figure 19. Example definitions of DASD-only log streams. The definitions are for the CICSprimary and secondary system log streams. The value region_userid is the RACF useridunder which the CICS address space is running; applid is the CICS region’s VTAM APPLname (taken from the APPLID system initialization parameter).
168 CICS TS for z/OS: Installation Guide

For information about the mapping of CICS journal definitions to log stream names,see the CICS System Definition Guide .
When using model log streams, bear in mind that, if you specify a STG_SIZE onthe model definition, all new log streams created from the model have thesame-sized staging data set.
Sizing considerations for DASD-only log streamsThis section discusses how to size the following types of DASD-only log stream:v The CICS primary and secondary system log streamsv Forward recovery logsv User journals and autojournals.
Sizing DFHLOGFor the CICS primary system log stream (DFHLOG), it is important to:
v Minimize the amount of data that is offloaded to secondary storage:
The MVS system logger begins the offload process when the high offloadthreshold (HIGHOFFLOAD) of the log stream is reached. The offload processconsists of two steps:
1. The MVS logger physically deletes the data in the log stream that has beenmarked for deletion by the CICS log-tail deletion process.
2. The MVS logger calculates how much data needs to be offloaded tosecondary storage, based on the difference between HIGHOFFLOAD andLOWOFFLOAD, less the amount of data that has been deleted since the lastoffload event.
To minimize the amount of data offloaded from the CICS primary system log, youmust:
– Define a suitably-sized staging data set. For advice, see “Recommendations”on page 170.
//DEFLOGS JOB ...//LOGDEFN EXEC PGM=IXCMIAPU//STEPLIB DD DSN=SYS1.MIGLIB,DISP=SHR//SYSPRINT DD SYSOUT=*//******************************************************************//* *//* Define DASD-only model log streams for CICS system log. *//* *//* The LOWOFFLOAD and STG_SIZE values are for illustration *//* only -- substitute values appropriate for your environment. *//* *//******************************************************************//SYSIN DD *
DATA TYPE(LOGR) REPORT(NO)DEFINE LOGSTREAM NAME(sysname.DFHLOG.MODEL)
MODEL(YES)DASDONLY(YES)MAXBUFSIZE(64000)STG_SIZE(3000)LOWOFFLOAD(40) HIGHOFFLOAD(80)
DEFINE LOGSTREAM NAME(sysname.DFHSHUNT.MODEL)MODEL(YES)DASDONLY(YES)MAXBUFSIZE(64000)STG_SIZE(500)LOWOFFLOAD(40) HIGHOFFLOAD(80)
Figure 20. Example model definitions for DASD-only system log streams. The valuesysname is the sysid of the MVS image in which the CICS region or regions are running.
Chapter 24. Defining the logger environment for CICS journaling 169

Note: It is possible to alter the size of a staging data set without deleting thelog stream. To do this, use the UPDATE LOGSTREAM request of theMVS IXCMIAPU utility to change the value of the STG_SIZEparameter.
– Ensure that the log-tail deletion process is working effectively. For detailedinformation about the log tail deletion process, see the CICS Recovery andRestart Guide.
v Avoid “staging-data-set-full” events:
A staging-data-set-full event occurs when a log stream’s staging data setbecomes full before the offloading of data has completed.
For advice on monitoring and avoiding staging-data-set-full events, see the CICSPerformance Guide.
Sizing DFHSHUNTIt is important to size the secondary system log stream (DFHSHUNT) to avoidstaging-data-set-full events. However, it is normal for some data to be offloadedfrom DFHSHUNT to secondary storage.
Sizing general logsIt is important to size forward recovery logs, user journals, and autojournals to avoidstaging-data-set-full events. However, because CICS does not delete data fromthese log streams, it is normal for data to be offloaded to secondary storage.
RecommendationsTable 12 summarizes how you should decide on the values for various attributes onthe log stream definition, and system definition.
Table 12. How to decide on the values of attributes
Facility Attribute Recommendation
Primary system logstream (DFHLOG)
HIGHOFFLOAD 80
LOWOFFLOAD Use DFHLSCU or the formula on page“LOWOFFLOAD calculations” on page 172.
MAXBUFSIZE 64000
STG_SIZE Use DFHLSCU or the formula on page “StagingDS size calculation” on page 172.
Secondary systemlog stream(DFHSHUNT)
HIGHOFFLOAD 80
LOWOFFLOAD 40 – 60
MAXBUFSIZE 64000
STG_SIZE 500 (4K blocks)
General log stream HIGHOFFLOAD 80
LOWOFFLOAD 0
MAXBUFSIZE 64000
STG_SIZE Use DFHLSCU or the formula on page “Stagingdata set size calculation” on page 167.
CICS system AKPFREQ 4000
Note: Startup may take longer than you experienced when using earlier releases.This is due in part to the allocation and formatting of the staging data sets.The increased time that startup takes is dependent on such things as:
v Size of staging data set (STG_SIZE)
170 CICS TS for z/OS: Installation Guide
v DASD speed
v DASD contention
It can be reduced by avoiding the use of unnecessarily large staging datasets.
The log stream sizing utility, DFHLSCUIf you are migrating from CICS/ESA 3.3 or CICS/ESA 4.1, you are stronglyrecommended to use the CICS-supplied utility program, DFHLSCU, to help youdefine your DASD-only log streams. DFHLSCU takes as input “old-style” (pre-CICSTransaction Server for OS/390, Version 1 Release 1-format) journal records, andanalyzes them to produce a sample log stream definition containing suggestedvalues for:
DASDONLY(YES)Specifies that this log stream is not to be associated with a coupling facility liststructure, but is to use DASD-only logging. If you specify DASDONLY(YES),you cannot use the STRUCTNAME(log_structure_name) keyword. The defaultis DASDONLY(NO).
HIGHOFFLOAD(high_offload)Specifies the point in primary storage, as a percentage of space consumed, atwhich the MVS system logger starts its offload process.
LOWOFFLOAD(low_offload)Specifies the point in primary storage, as a percentage of space consumed, atwhich the MVS system logger stops offloading data to secondary storage.
MAXBUFSIZE(max_bufsize)Specifies the size, in bytes, of the largest block of data that can be written tothe log stream. The value must be in the range 1–65532. The default value is65532.
STG_SIZE(stg_size)Specifies, as a number of 4K blocks, the size of the staging data set for the logstream. A DASD-only log stream, by definition, always uses a staging data setas part of its primary storage.
If you do not specify STG_SIZE for a DASD-only log stream, the MVS systemlogger does one of the following, in the order listed, to allocate space forstaging data sets:
1. Uses the STG_SIZE of the log stream specified on the LIKE parameter, ifLIKE is specified
2. Uses the size defined in the SMS data class for the staging data sets
3. If SMS is not available, uses dynamic allocation rules for allocating datasets.
For more information about managing staging data sets for DASD-only logstreams, see the Setting Up a Sysplex manual.
For details on how to use DFHLSCU, see the CICS Operations and Utilities Guide.
If DFHLSCU is inappropriate for use in your environmentIf it is inappropriate for you to use DFHLSCU to help you size your log streams(perhaps you have no CICS Version 4 or Version 3 journal records to use as inputto DFHLSCU, or you are capacity planning for new applications), the followingsections help you to calculate your space requirements.
The formulae provided help you to calculate values for:
Chapter 24. Defining the logger environment for CICS journaling 171

v LOWOFFLOADv STG_SIZE
You must base your calculations on the journaling requirements of yourapplications. This provides the starting point for the following formulae.
Primary system log (DFHLOG): You can calculate LOWOFFLOAD for DFHLOGusing the following formula:LOWOFFLOAD = (trandur * 90) / (akpintvl + trandur) + 10 (where RETPD=0 specified)
orLOWOFFLOAD = (trandur * 90) / (akpintvl + trandur) (where RETPD=dddd specified)
where:
v akpintvl is the interval between activity keypoints. It can be calculated asfollows:akpintvl = AKPFREQ / ( (N1 * R1) + (N2 * R2) + (Nn * Rn) )
where:
– N1, N2 .... Nn is the transaction rate for each transaction (transactions persecond).
– R1, R2 .... Rn is the number of log records written by each transaction.
v trandur is the execution time (between syncpoints) of the longest-runningtransaction that runs as part of the normal workload.
If this duration is longer than akpintvl value, you can either:
– Increase the value of AKPFREQ, so increasing the value of akpintvl (as longas this does not result in an unacceptably large staging data set size).
– Change the application logic to cause more frequent syncpoints.
– Calculate a staging data set size based on a shorter transaction duration, andaccept that offloading to secondary storage occurs when the long-runningtransaction is used.
You can calculate STG_SIZE for DFHLOG using the following formula:Staging DS size = (AKP duration) * No. of log writes per secondfor system log (no. of 4k blocks)where AKP duration = (CICS TS 390 AKPFREQ)/(No. buffers per second)
The values for the number of log writes per second and buffer puts per second canbe taken from your CICS/ESA 4.1 statistics. (The value for log writes per secondshould not exceed 30.)
Converting a DASD-only log stream to use a coupling facilityYou can upgrade a DASD-only log stream to use a coupling facility structure,without having to delete and redefine the log stream. To do this:
1. Make sure that there are no connections (neither active nor failed) to the logstream.
2. Use the UPDATE LOGSTREAM request of the MVS IXCMIAPU utility. Specifythe STRUCTNAME keyword, and let the DASDONLY keyword default to 'NO'.For example:
172 CICS TS for z/OS: Installation Guide

Notes:
1. If you want to upgrade a DASD-only log stream to a coupling facility log streamthat does not use a staging data set, you must explicitly specifySTG_DUPLEX(NO). (This is because the DASD-only log stream by definitionuses a staging data set; unless you specify STG_DUPLEX(NO), this is retainedby the coupling facility log stream.)
2. You cannot use UPDATE LOGSTREAM to convert a log stream that uses acoupling facility structure to one that uses DASD-only. To do this, you mustdelete and redefine the log stream.
Analyzing SMF Type 88 recordsWhen reviewing the output from the system logger reports produced by IXGRPT1,IXGRPT1J, and IXGRPT1L, look at the following key fields for CICS system logs:
v The number of bytes deleted from primary storage should be close to the numberof bytes written
v The number of bytes deleted from the system log after writing to offload datasets should be very low:
– If this number is high, overhead is being incurred to move data to the offloaddata set only to be later deleted.
– This is a key indicator that log tail deletion is not working as effectively as itshould.
– Check the MVS system log for any DFHRM0205 and DFHLG0743 messagesfrom the affected CICS region.
– Look for long running tasks (using CICS monitoring data or a systemmonitoring package), or check if AKPFREQ is too high.
v In general offloads are acceptable, but offloads triggered by NTRY FULLindicators are not a good sign:
– NTRY FULL indicates that the entry to element ratio is too high
– It is probably the result of having unlike logstreams defined in the samestructure
– The offloads are being triggered by all the entries being used rather thantriggered by the HIGHOFFLOAD value.
v TYPE3 I/O counts should not appear in the statistics for coupling facility logstreams, because these indicate that I/O is being initiated when over 90% of theelements for the log stream are in use.
v Average buffer size is important because:
//LOGUPDT JOB ...//LOGUPDT EXEC PGM=IXCMIAPU//SYSPRINT DD SYSOUT=A,DCB=RECFM=FBA//****************************************************************//* *//* Convert DSAD-only log stream to coupling facility log stream.*//* *//****************************************************************//SYSIN DD *
DATA TYPE(LOGR) REPORT(NO)UPDATE LOGSTREAM NAME(region_userid.applid.DFHLOG)
STRUCTNAME(LOG_DFHLOG_001)STG_DUPLEX(YES) DUPLEXMODE(COND)
Figure 21. Converting a DASD-only log stream to use a coupling facility structure. Thisexample shows the CICS primary system log stream. The value region_userid is the RACFuserid under which the CICS address space is running; applid is the CICS region’s VTAMAPPL name (taken from the APPLID system initialization parameter).
Chapter 24. Defining the logger environment for CICS journaling 173

– If over 4K, the writes are asynchronous, with a greater overhead, rather thansynchronous
– Buffer size is used to determine the entry to element ratio.
– If MAXBUFSIZE specified on the log stream definition is less than 65532bytes, the element size is 256 bytes.
– If MAXBUFSIZE is 65532 bytes, the element size is 512 bytes.
– The entry to element ratio is calculated as (average-buffer-size plus 4 dividedby 4)
Managing secondary storageThis section contains advice on how to manage secondary storage—that is, logstream data sets.
Managing log data setsYou are recommended to use System Managed Storage (SMS) to manage logstream data sets. You can specify the SMS characteristics of log data sets in anumber of ways, depending on your installation:
Using automatic class selection (ACS) routinesYou can use installation-written automatic class selection (ACS) routines toassign log data sets to SMS classes.
Using the LOGR policy,When you define or update a log stream definition in the LOGR policy, you canassign the SMS storage class, data class, and management class for both theDASD log data sets and staging data sets.
v Use LS_DATACLAS to specify the SMS data class to be used for log streamdata set allocation.
v Use LS_STORCLAS to specify the SMS storage class to be used for logstream data set allocation.
v Use LS_SIZE to specify the size, in 4K blocks, of the log stream DASD datasets. Specify a size so that each data set can contain multiple offloads of theprimary storage: this is particularly important where all the data is offloadedfor a log stream, as in the case of user journals and forward recovery logs.The MVS system logger issues message IXG256I is you specify less than64K.
If you omit the size parameter, the size is taken from the ALLOCxx memberof PARMLIB (the default is 2 tracks, which leads to a high number of newdata set allocations). Specify a size that is large enough to avoid a highfrequency of new data set allocations—aim for a new data set to be allocatedless often than once an hour.
SHAREOPTIONS(3,3)Always define logger data sets with SHAREOPTIONS(3,3), whether the systemis a part of a multiple-member sysplex or a monoplex. The common symptom ofnot having SHAREOPTIONS(3,3) is return code 84A or 403 from the logger.
For more information about managing log data sets, see the z/OS MVS Setting Upa Sysplex manual.
174 CICS TS for z/OS: Installation Guide

Log tail managementRedundant data should be deleted from log streams periodically, to conservestorage, and because the MVS system logger imposes a limit on the number ofdata sets per log stream.
The system logCICS manages the system log by deleting records, for completed units of work,during activity keypoint processing (log-tail deletion). With an appropriately sized logstream, the system log data remains in primary storage, so avoiding the overheadof data spilling to DASD.
Note that:
v The CICS system log should be used only for short-lived data required forrecovery purposes. You should not write user records for such things as audittrails to it.
v You should allow CICS to manage the size of the system log.
However, if historically you have used the system log for such things as audit trails,you may need to preserve system log data beyond the time it would normally bedeleted by CICS. You can use the RETPD MVS parameter to preserve system logdata. Define DFHLOG and DFHSHUNT to MVS with AUTODELETE(NO) andRETPD(dddd). The default values are AUTODELETE(NO) and RETPD(0).)Specifying AUTODELETE(NO) means that CICS, rather than MVS, retains controlof the log-tail trimming process; dddd is the number of days for which data is to beretained. This causes the MVS logger to physically delete an entire log data setwhen all of the data in the data set:
1. Has been marked for deletion by the CICS log-tail trimming process
2. Is older than the retention period specified for the log stream.
You can view log data that has been marked for deletion by CICS but not yetphysically deleted by MVS, using the DFHJUP utility program or the VIEW=ALLoption of the MVS IXGBRWSE macro.
General logsThe number of data sets per log stream recognized by the MVS logger is severalmillion. This means that, in general, you do not need to be concerned about thelimit being reached.
You can cause redundant data to be deleted from log streams automatically, after aspecified period. To arrange this for general log streams, define the logs to MVSwith AUTODELETE(YES) and RETPD(dddd), where dddd is the number of days forwhich data is to be retained. This causes the MVS system logger to delete an entirelog data set when all the data in it is older than the retention period (RETPD)specified for the log stream.
Note: Support for the removal of the 168 data set limit, which applied only in earlyreleases of OS/390, and support for the AUTODELETE and RETPDparameters, requires the sysplex’s LOGR couple data set to have beenformatted using OS/390 Release 3 or later. The removal of the 168 data setlimit also requires the LOGR data set to have been formatted withDSEXTENT(nnnnn).
Chapter 24. Defining the logger environment for CICS journaling 175

176 CICS TS for z/OS: Installation Guide

Chapter 25. Enabling Unicode data conversion by z/OS
z/OS can provide support for the conversion of Unicode data (either UTF-8 orUTF-16) to any of the EBCDIC CCSIDs, currently supported by CICS. If you intendto make use of this capability, you must enable the z/OS conversion services andinstall a conversion image which specifies the conversions that you want CICS toperform. See “Selecting conversion images” for more information.
Importantz/OS Support for Unicode must be activated before you start CICS.
Refer to the instructions in the z/OS manual Support for Unicode: Using ConversionServices SA22–7649. (Level –02 of that publication relates to z/OS release 1.4), tofind out the steps needed to set up your system and configure a suitable conversionimage.
If z/OS conversion services are not enabled, a message is issued by CICS toindicate this. That message can be suppressed if you do not need these services.
v If the message is encountered when starting a CICS region that is expected tomake use of these services, then an IPL is necessary to enable the z/OSconversion services.
To discover the status of z/OS conversion services after an IPL, use one of thesecommands:
/D UNI To show whether z/OS conversion services were enabled.
/D UNI,ALL To show whether z/OS conversion services were enabled, andwhich conversions are supported by the system.
from an MVS console. For details of this, see the z/OS Support for Unicode: UsingConversion Services manual SA22-7649
Selecting conversion imagesAppendix F of the z/OS Support for Unicode: Using Conversion Services manual,SA22 -7649, records those conversions which are supported though these services.CICS now supports any of these character conversions by making use of the z/OSconversion services.
The conversions entries that you select must not specify type ER.
The z/OS conversion services support big endian byte ordered data (UTF-16BE),they do not support little endian byte ordered data (UTF-16LE). When asked toconvert UTF-16LE source data to some other CCSID, CICS transforms the data tothe big-endian form of UTF-16 before calling the z/OS conversion services. Whenthe target data is identified as UTF-16 (CCSID 1200), CICS receives the converteddata from the z/OS services in big-endian byte order, and returns it in this form.
There are 3 CCSIds for UTF data,
v CCSID 1202 and CCSID 1201 indicate UTF-16LE and UTF16-BE respectively,
v CCSID 1200 indicates that the data carries a byte order marker which must beexamined to see if what follows is big-endian or little-endian.
© Copyright IBM Corp. 1989, 2010 177
|
|
||||||
|||||
||||
||
|||
||
||
|||
||
||
||||
|
|#####
|
|
||

v
When handling CCSID 1200, CICS respects the byte order marker for inboundconversions, but is not able to retain that information when handling a relatedoutbound conversion. All outbound data for CCSID 1200 is UTF16-LE. Applicationprogrammers need to know about this and perform their own LE to BE conversionsif they so require.
178 CICS TS for z/OS: Installation Guide
|
|||||

Chapter 26. Applying service to CICS Transaction Server forz/OS
Service material for CICS Transaction Server for z/OS is distributed as APAR fixesand PTFs. 4Both types of change are called SYSMODs (SYStem MODifications).
Using SMP/E control statements, you can process SYSMODs in three stages:
1. The RECEIVE control statement moves the SYSMOD into the PTF temporarystore (PTS) data set. This operation is reversed by the REJECT controlstatement.
2. The APPLY control statement moves the SYSMOD into the target libraries. Thisoperation is reversed by the RESTORE control statement.
At this point you can test the modified system.
3. The ACCEPT control statement moves the SYSMOD into the distributionlibraries. This operation is not easily reversed.
When you are dealing with APAR fixes, you should APPLY the SYSMOD, but notaccept it. If you later obtain a PTF that solves the problem in a different way, youmay be asked to RESTORE (that is, remove) the APAR fix and APPLY the PTFinstead.
When you are dealing with PTFs, you should APPLY the SYSMOD, then test it.Afterwards you can ACCEPT it.
For background information about SMP/E operations, see the System ModificationProgram Extended: General Information manual. For more detailed information, seethe System Modification Program Extended: Reference manual.
Load library secondary extentsCICS supports load library secondary extents that are created while CICS isexecuting. If you define libraries in the DFHRPL concatenation with primary andsecondary extents, and secondary extents are added while CICS is running, as aresult of link-editing into the DFHRPL library, the CICS loader detects theoccurrence and closes then reopens the library. This means that you can introducenew versions of programs by using the CEMT NEWCOPY command, even if thenew copy of the program has caused a new library extent.
However, you should not attempt to apply service to data sets that are used byexecuting CICS TS components.
The CICS TS-supplied SMP/E procedureThere is a CICS TS-supplied procedure for applying service to the CICS andCICSPlex SM components of CICS TS, called DFHSMPE. This procedure istailored to your environment and stored in the hlq.XDFHINST library when you runthe DFHISTAR job.
4. An APAR (Authorized Program Analysis Report) is raised when you and your IBM programming service representative agree thatthere is a CICS problem. You may then be given an APAR fix. When the problem has been analyzed, all users are sent a PTF(Program Temporary Fix) to correct the problem permanently on the current release. PTFs are incorporated into any future CICSrelease.
© Copyright IBM Corp. 1989, 2010 179

For information about how to apply corrective service with SMP/E, see the SystemModification Program Extended: User’s Guide.
Whenever you do any SMP/E processing on CICS or CICSPlex SM software, andyou use any of the examples quoted in the System Modification Program Extended:User’s Guide, you should specify DFHSMPE as the name of the SMP/E procedureon the EXEC statement (that is, in place of SMPPROC, as used in the examples).The DFHSMPE procedure includes the following DD statement for supplying SMP/Econtrol statements://SMPCNTL DD DSN=&&SETBDY,DISP=(OLD,DELETE)// DD DDNAME=DFHSMPIN
The ZNAME parameter of the DFHSMPE procedure generates a SET BDYcommand for the zone that is identified by the parameter. The command is stored inthe temporary data set, SETBDY. The ZNAME parameter is set to the value ofzonename that you specify for the TZONE parameter. If you do not specify anyvalue for zonename for the TZONE parameter of the DFHISTAR job, zonename(and the ZNAME value) defaults to TZONE.
Note: The ZNAME parameter also generates a SET BDY command in DFHAUPLE,the CICS TS procedure supplied for assembling and link-editing CICS controltables.
If you supply an override SMPCNTL DD statement in the job that executesDFHSMPE, remember that it must come before any DD statements that areadditional to the procedure. Furthermore, if you provide an override, you will get thefollowing MVS system message:IEF686I DDNAME REFERRED TO ON DDNAME KEYWORD IN PRIOR STEP WAS NOT RESOLVED
You receive this message because the DD statement for DFHSMPIN is missing asa result of the SMPCNTL DD override. However, the message is not a JCL error,and does not prevent the step from running successfully with a return code of 0.
If you supply any SMP/E control statements in your job via the DFHSMPINddname, they are prefixed by a SET BDY for the zone that you specify on theZNAME parameter. It does not matter if you are running SMP/E with a commandthat does not need this SET BDY statement; it does not affect the execution of yourjob.
APAR fixesGenerally, you should not ACCEPT APAR fixes into distribution libraries.Subsequent PTFs may not include the APAR fix, and you may need to reapply theAPAR fix.
If two APAR fixes are dependent on one another, and each is a prerequisite of theother, you must apply them both in the same SMP/E APPLY processing step.
PTFsPTFs are intended for all users to install to avoid possible problems.
A PTF may contain fixes for several different problems. This means that severalAPAR fixes reported in RETAIN® may all be superseded by the more permanentPTF, which:
180 CICS TS for z/OS: Installation Guide

v Provides card-image changes that are functionally equivalent to those in theAPAR fix.
v Contains object-module replacements for preassembled CICS TS programs.
For further information about using SMP/E to apply service, see the SystemModification Program Extended: User’s Guide.
CICS service considerationsIf you use the CICS TS-supplied SMP/E usermod to install a module into the LPA(for example, into the hlq.SDFHLPA library), and later apply service to that module,it is the LPA-resident version of the module that is serviced. If you have not usedthe SMP/E usermod to install the module into the LPA, it is the original version inthe hlq.SDFHAUTH library or hlq.SDFHLOAD library that is serviced.
Once you have installed CICS, and before you start the post-installation tasksdescribed in this book, you should change the TEMPLIB parameter and theSYSPROC DD statement of the DFHISTAR job to refer to the hlq.SDFHINSTlibrary. This ensures that if you need to apply service to any of the skeleton jobs,the changes (applied to the hlq.SDFHINST library) are used in subsequent runs ofDFHISTAR. In any such subsequent runs of DFHISTAR , you can use the SELECTparameter to select any jobs, affected by service, to be regenerated.
Notes:
1. If DFHISTAR is serviced, you should add the service changes to yourDFHISTAR module in the hlq.TDFHINST library (to preserve your currentinstallation parameters) or respecify your current installation parameters in theserviced DFHISTAR module (which you can copy from the hlq.SDFHINSTlibrary to the hlq.TDFHINST library).
2. Linkage editor messages IEW0461, IEW2454, IEW2646, IEW2651 andIEW2689 are produced during the APPLY stage for unresolved externalreferences. These are issued, giving a return code of 4, when some CICS loadmodules are link-edited during PTF installation. You can ignore these IEWxxxxmessages because they are produced for component object modules ofexecutable CICS load modules.
3. JCI640D and JCI640E PTFs to ship Java service are often significantly largerthan those for the base CICS product and may require more system resourcesduring APPLY processing. To avoid errors caused by insufficient storage, it isrecommended that the SMP/E APPLY step for such PTFs does not have arestricted region size. If a region size limit is used and the APPLY fails witherrors relating to insufficient storage, it may be necessary to increase or removethe limit for the SMP/E job. In some cases a region size of 500M or more maybe required.
CICSPlex SM service considerationsWhen you are preparing to run the EYUISTAR job after completing the basicinstallation of CICSPlex SM, you should verify that the TEMPLIB parameter and theSYSPROC DD statement of the EYUISTAR job refer to theCICSTS31.CPSM.SEYUINST library. This ensures that if you need to apply serviceto any of the skeleton jobs, the changes (applied to theCICSTS31.CPSM.SEYUINST library) are used in subsequent runs of theEYUISTAR job. For additional information, see “Sample JCL editing considerations”on page 373.
Chapter 26. Applying service to CICS Transaction Server for z/OS 181

If you use the CICS TS- supplied SMP/E USERMOD to install modules into the LPA(for example, into the CICSTS31.CPSM.SEYULPA library), and later apply serviceto that module, it is the LPA-resident version of the module that is serviced. If youhave not used the SMP/E USERMOD to install the module into the LPA, it is theoriginal version in the CICSTS31.CPSM.SEYUAUTH library orCICSTS31.CPSM.SEYULOAD library that is serviced.
After applying CICSPlex SM service, ensure that all CICSPlex SM regions arerunning with a consistent set of CICSPlex SM libraries. Failure to do so may causeunpredictable results.
More information on applying service to CICSPlex SM can be found in “CICSTransaction Server for z/OS-supplied SMP/E procedure” on page 371.
Servicing the CICS messages data setSome IBM-supplied service may include changes to CICS messages, andassociated changes to the CICS messages data set, DFHCMACD, used by theCICS-supplied transaction CMAC. When you have received and applied the service,you can update the CICS messages data set by running the job DFHCMACU.DFHCMACU is tailored to your CICS environment and stored in the hlq.XDFHINSTlibrary when you run the DFHISTAR job.
If a PTF contains an update to the DFHCMACD data set, you will see a ++HOLDstatement during the APPLY processing of the PTF to notify you that theDFHCMACD data set needs to be updated. The PTF will include a member calledDFHxxxxx, where xxxxx is the APAR number that is associated with the PTF. Youshould amend the DFHCMACU job so it refers to the appropriate service memberof the target library hlq.SDFHMSGS (that is, DFHxxxxx on the SYS01 cardcorresponds to the DFHxxxxx part shipped by the PTF). When you submit theDFHCMACU job, it updates the entries in the DFHCMACD data set for allmessages that are changed by the IBM supplied service.
If you are applying more than one PTF which changes the DFHCMACD data set,you should either run the DFHCMACU job for each PTF, or alternatively, you mayinclude all the PTFs within one job run, by altering the DFHCMACU job as follows:
//CMACUPD EXEC PGM=IDCAMS//SYSPRINT DD SYSOUT=*//AMSDUMP DD SYSOUT=*//SYS01 DD DSN=CICSTS31.CICS.SDFHMSGS(DFHXXXXX),DISP=SHR//SYS02 DD DSN=CICSTS31.CICS.SDFHMSGS(DFHYYYYY),DISP=SHR..//DFHCMACD DD DSN=&DSINDEX.DFHCMACD,DISP=SHR//SYSIN DD *
REPRO INFILE (SYS01) -REPLACE -
OUTFILE (DFHCMACD)REPRO INFILE (SYS02) -
REPLACE -OUTFILE (DFHCMACD)
.
./*
182 CICS TS for z/OS: Installation Guide

Part 3. Getting ready to run CICS
This part describes how to tailor the CICS-supplied skeleton jobs, apply service toCICS and create the CICS data sets. It also describes how you can use DL/Isupport with CICS, how to include MRO and ISC in your CICS region, and how touse the CICS-supplied installation verification procedures (IVPs) to confirm thatCICS is operational. It contains the following chapters:
v Chapter 27, “Tailoring the CICS-supplied skeleton jobs,” on page 185.
v Chapter 28, “Creating the CICS data sets,” on page 189.
v Chapter 29, “Defining DL/I support,” on page 197.
v Chapter 30, “Adding CICS support for programming languages,” on page 201.
v Chapter 31, “Verifying your Java components installation,” on page 205.
v Chapter 32, “Installing MRO and ISC support,” on page 211.
v Chapter 33, “Enabling TCP/IP in a CICS region,” on page 215.
© Copyright IBM Corp. 1989, 2010 183

184 CICS TS for z/OS: Installation Guide

Chapter 27. Tailoring the CICS-supplied skeleton jobs
If you used CBPDO to install CICS, edit and run DFHISTAR to tailor theCICS-supplied skeleton jobs that create the CICS data sets and run theCICS-supplied IVPs.
If you used the ServerPac to install CICS, the install job stream name is ISTAR01.ISTAR01 is produced from DFHISTAR during the ServerPac process, and placed inthe SDFHINST library. DFHISTAR is not removed from the SDFHINST library bythis process.
If you have used the distribution tape to install CICS, as described in the CICSTransaction Server for z/OS Program Directory, you would normally have tailoredthe skeleton jobs already, and should now be able to proceed to Chapter 28,“Creating the CICS data sets,” on page 189.
Which ever method you used to install CICS, you can edit and run DFHISTARseveral times, to create different copies of the skeleton jobs or subsequentlychange them. For example, to create several copies of DFHDEFDS to define datasets unique to several CICS regions, or if you have to apply service to any of theinstallation-related jobs. This enables you to tailor the jobs to your CICSenvironment after you have loaded the CICS software into the SMP/E-supportedCICS libraries.
The CICS installation librariesWhen you use CBPDO to install CICS TS, you use the installation libraries shownin Figure 22.
CICS base distribution tape
(4)
(1)
TDFHINST (2)ADFHINST
(3)
(5)SDFHINST
XDFHINST
Data set name (1)
Figure 22. Installation libraries for this release
© Copyright IBM Corp. 1989, 2010 185

The names of the CICS installation libraries in Figure 22 on page 185 and their useis explained in the following notes which refer to the numbers in the figure:
1. Skeleton installation-related jobs are copied from data set HCI6400.F2 on thedistribution tape into hlq.TDFHINST.
hlq.TDFHINSTis used to store the DFHISTAR that you edit and run to tailor theskeleton installation-related jobs to your CICS environment. Until youhave installed the CICS software into the SMP/E-supported CICSlibraries, this library also stores the skeleton jobs to be tailored.
2. You edit DFHISTAR in the hlq.TDFHINST library, to specify CICS installationparameters specific to your CICS environment.
3. When you run DFHISTAR, the tailored copies of the skeleton jobs are copiedfrom the hlq.TDFHINST library to thehlq.XDFHINST library.
hlq.XDFHINSTis used to store the tailored, executable, copies of the skeleton jobs thatare to be run.
4. To install CICS, you run the tailored copies of the CICS-supplied installation jobsto transfer the CICS software from the distribution tape to the hlq.ADFHINSTand hlq.SDFHINST libraries.
hlq.ADFHINSTis the SMP/E-supported distribution installation library.
hlq.SDFHINSTis the SMP/E-supported target installation library. After you haveinstalled the CICS software into this and other SMP/E-supportedlibraries (named SDFHxxxx and ADFHxxxx), the skeleton jobs that youshould use on any later runs of DFHISTAR are stored in the SDFHINSTlibrary.
Note: The actual names of the TDFHINST and XDFHINST libraries, and the prefixfor those and other CICS libraries, are defined in DFHISTAR, which you editas described in this chapter.
What you should doTo tailor the skeleton jobs you must run DFHISTAR. For information on how to dothis, and the parameters involved, see CICS Transaction Server for z/OS ProgramDirectory.
Running DFHISTARWhen you have edited DFHISTAR with the values for installation parameters foryour CICS environment, submit DFHISTAR.
When you run DFHISTAR, it tailors the skeleton jobs selected in the DFHISTARinput (by the SCOPE or SELECT parameter) to your environment and adds them tothe library that you specified on the LIB parameter (by default, hlq.XDFHINST). Ifnecessary, DFHISTAR creates the library that is specified on the LIB parameter.
186 CICS TS for z/OS: Installation Guide

A Table in section 6.4 of the CICS Transaction Server for z/OS Program Directorylists those skeleton jobs installed in the hlq.SDFHINST library that you can tailor byrunning DFHISTAR.
Note: You must specify the full name of the installation library from which theskeleton jobs are obtained, on the TEMPLIB parameter and SYSPROC DDstatement of DFHISTAR (by default, hlq.TDFHINST). For the post-installationtasks that are described in this book, you should specify TEMPLIBSDFHINST.
DFHISTAR produces a job log and, if necessary, an error code:
v The output job log lists the values that were actually used for the parameters ofDFHISTAR.
v If any error occurs when running DFHISTAR, an error code of 4 or 12 isreturned. For error code 4, the skeleton jobs are tailored and added to thehlq.XDFHINST library. For error code 12, the skeleton jobs are not tailored orcopied. To resolve the cause of the error, examine the output job log and, ifnecessary edit and submit DFHISTAR again.
Chapter 27. Tailoring the CICS-supplied skeleton jobs 187

188 CICS TS for z/OS: Installation Guide
Chapter 28. Creating the CICS data sets
After you have installed CICS, and applied any necessary service, you can run theDFHCOMDS, DFHDEFDS, and DFHCMACI jobs to create the CICS data sets.
CICS supports access to the following types of data sets:
v Key-sequenced data set (KSDS). With releases of DFSMS/MVS 1.4 and later, adata set can be greater than 4 GB in size if it is defined as extended format andextended addressability in the storage class. CICS supports, in both RL andnon-RLS mode, KSDS data sets that are defined with these extended attributes.
v Entry-sequenced data set (ESDS). With releases of DFSMS/MVS 1.5 and later, adata set can be greater than 4 GB in size if it is defined as extended format andextended addressability in the storage class. However, CICS does not supportESDS data sets that are defined with these extended attributes. Attempts to opendata sets defined with the extended attribute fail with error messageDFHFC0966, codes 8504, 0008, and 0068 for non-RLS access and messageDFHFC0905 for RLS access.
v Relative record data set (RRDS). With releases of DFSMS/MVS 1.5 and later, adata set can be greater than 4 GB in size if it is defined as extended format andextended addressability in the storage class. CICS supports access to extendedRRDS or VRRDS datasets if you use an RRN that can be specified in a four-byteRRN field to access the records that reside beyond the 4 GB boundary.
Data setsThe data sets created by the jobs described in this chapter are required by theIVPs described in Chapter 35, “Running the installation verificationprocedures,” on page 227.
VSAM Data sets and z/OS 1.3If you are using z/OS 1.3 or above, read Information APAR II13288.
It reports that the level of DFSMS supplied with z/OS 1.3 has changed theway that index controlintervalsize (CISIZE) is calculated for those VSAM datasets that have index components. As a result, large default CIsizes can beexpected, and this can cause open errors during CICS start-up.
This applies to both CICS data sets and your own application data sets.
Job Function
DFHCOMDS Deletes and recreates data sets common to allCICS regions.
DFHDEFDS Deletes and recreates copies of data sets that areused only by one CICS region. You run a separatecopy of this job to create the data sets for eachCICS region.
DFHCMACI Deletes and recreates the CICS messages dataset, dsindex.DFHCMACD, and loads it with the data
© Copyright IBM Corp. 1989, 2010 189
##
###

from the CICS-supplied file, DFHCMACD, in thehlq.SDFHMSGS target library.
DFH0JCUS Deletes and recreates the sample applicationsdetails data set, dsindex.SAMPLE.DFHCTCUS (andits associated alternate index and path), and loadsit with the data from the CICS-supplied file,DFH0DCUS, in the hlq.ADFHAPD2 library.
DFH0JHLP Deletes and recreates the sample applications helpdata set, dsindex.SAMPLE.DFHCTHLP, and loads itwith the data from the CICS-supplied file,DFH0DHLP, in the hlq.ADFHAPD1 library.
When you ran DFHISTAR, these jobs were tailored to your environment and storedin the library that you specified on the LIB parameter of DFHISTAR (by default,hlq.XDFHINST). If you have not yet run DFHISTAR, you should do so beforerunning any of the CICS post-installation jobs.
You can generate several copies of these jobs by rerunning DFHISTAR, selectingthe jobs that you want to copy. To generate new copies of these jobs, editDFHISTAR to specify new values for the DSINFO and SELECT parameters. Onlythose jobs that you name by the SELECT parameter are regenerated.
Naming conventionsThere are no restrictions on the data set names you choose for CICS data sets,other than MVS constraints. In the examples in this book, hlq is the high-levelqualifier, and the DD name is the lowest level. If you are running multiple CICSregions, and especially if you are running CICS with XRF, you can use the CICSAPPLID as a third level qualifier.
You should use the CTGI naming convention, as in System/390 MVS SysplexApplication Migration. For example, if CICSHTH1 is the APPLID, the data set namefor the CSD would be:DFHCSD DD DSN=CICSTS31.CICS.CICSHTH1.DFHCSD,DISP=SHR
The CTGI naming convention is a recommended example of a naming conventionthat you can use for CICS 4-character names, and is based on the 4-characterCTGI symbol, where:
C identifies an entire CICSplexT identifies the type of regionG identifies a group of regionsI identifies iterations of regions within a group
Where names are allowed to be up to eight characters long, as for CICS APPLIDs,the general recommendation is that the letters CICS are used for the first fourcharacters, particularly for production regions.
If the data set is shared between an active CICS region and an alternate CICSregion, use the generic APPLID; but if the data set is unique to either the active orthe alternate CICS region, use the specific APPLID. For information about activelyand passively shared data sets, see the CICS System Definition Guide.
190 CICS TS for z/OS: Installation Guide

Creating data sets common to all CICS regions, DFHCOMDS jobYou can use the DFHCOMDS job to delete and recreate the following data setscommon to all CICS regions:
Name Data set
DFHCSD CICS system definition.
SYSIN SYSIN data set.
Note: The CICS-supplied DFHCOMDS job creates one of each of these data setscommon to all CICS regions. If you use separate copies of any of these datasets for each CICS region, you should move and edit the appropriatestatements into the DFHDEFDS job. For further information about creatingmultiple copies of these data sets, see “Creating several copies of theDFHCSD and SYSIN data sets.”
The DFHCOMDS job comprises five job steps:
1. DELETE deletes the data sets.
2. DEFCSD defines the VSAM cluster for the CICS system definition data set,dsindex.DFHCSD, where dsindex is defined by the DSINFO parameter ofDFHISTAR.
3. INITCSD Initializes the CICS system definition data set.
4. DEFRPIDC defines the VSAM cluster for ONC RPC.
5. DEFSYSIN creates the SYSIN PDS and copies the following modules from thehlq.SDFHSAMP library:
DFH$SIPA DFH$SIPD DFH$SIPT DFH$SIP1
DFH$SIP2 DFH$SIP5 DFHRCNO DFHRCYES
Creating several copies of the DFHCSD and SYSIN data setsThe CICS-supplied DFHCOMDS job creates one of each of the DFHCSD andSYSIN data sets common to all CICS regions. If you use separate copies of any ofthese data sets for each CICS region, you should:
v Move the statements that define the data set from the DFHCOMDS job to theDFHDEFDS job.
v Edit the statements in the DFHDEFDS job to specify the symbol ®NAME forthe region qualifier in the name of the data set.
You should move and edit the appropriate data set statements before you createcopies of the DFHDEFDS job for each CICS region. When you run DFHISTAR tocreate the new copies of the DFHDEFDS job, it substitutes your values for theCICS region qualifier (®NAME) and index (&INDEX) into the data set names.
For example: If you intend using a copy of the DFHCSD data set for each CICSregion, you should copy the job steps DELCSD, DEFCSD, and INITCSD from theDFHCOMDS job to the DFHDEFDS job. You should also add the symbol®NAME for the qualifier to the name of the DFHCSD data set to give&DSINDEX.CICS®NAME.DFHCSD. If you edit DFHISTAR to select the DFHDEFDS jobto be copied, and specify the following DSINFO parameter:DSINFO userid.CICSTS31.CICS H3P060 3390 IDA .
Chapter 28. Creating the CICS data sets 191

when you run the DFHDEFDS job, it creates the DFHCSD data set calleduserid.CICSTS31.CICS.CICSIDA.DFHCSD for the CICS region identified by thequalifier IDA. If you change the SELECT and DSINFO parameters of DFHISTAR (tospecify an appropriate new job name and qualifier for another CICS region), youcan create several copies of the DFHDEFDS job to create DFHCSD and SYSINdata sets for each CICS region.
Creating data sets unique to each CICS region, DFHDEFDS jobYou can use the DFHDEFDS job to delete and recreate copies of the following datasets for each CICS region.
Name Data set
DFHADEM Resource manager for enterprise beans.
DFHAUXT Non-VSAM auxiliary trace (A).
DFHBRNSF Bridge.
DFHBUXT Non-VSAM auxiliary trace (B).
DFHDMPA Non-VSAM dump (A).
DFHDMPB Non-VSAM (B) dump.
DFHEJDIR Bridge.
DFHEJOS Object store.
DFHGCD Global catalog.
DFHHTML HTML template data set.
DFHINTRA Intrapartition transient data.
DFHLCD Local catalog.
DFHLRQ Local request queue.
DFHTEMP Temporary storage.
FILEA Sample program data.
DFHDPFMB The debugging profiles base data set.
DFHDPFMP The debugging profiles path data set.
DFHDPFMX The debugging profiles alternate index data set.
Use DFHISTAR to create a copy of the DFHDEFDS job for each CICS region. EditDFHISTAR, specifying the parameters DSINFO and SELECT, and run it once foreach region.
In DFHISTAR, specify the following parameters:
v SELECT DFHDEFDS newname to specify the new name by which the copy ofthe DFHDEFDS job is to be known.
v DSINFO to specify the following details of the data sets for each CICS region:– The high-level index (dsindex)– The serial number of the volume (volume)– The unit type of the volume (disktype)– The region qualifier (qualifier)
192 CICS TS for z/OS: Installation Guide

The format of the data set names is:dsindex.CICSqualifier.dsname
dsindexis the high-level index for the data sets, specified on the DSINFO parameter ofDFHISTAR. The default is hlq.
qualifieris the region qualifier for the data sets that are used by this CICS region,specified on the DSINFO parameter of DFHISTAR. The default is no qualifier.
dsnameis the name of the data set being defined.
For example, the default name for the CICS local catalog is hlq.CICS.DFHLCD.
The DFHDEFDS job comprises the following job steps:
1. DELETE any existing copies of the data sets
2. DEFINE defines the clusters for the data sets
3. INITDP initializes the debugging profiles base data set
4. DEFALT defines the alternate index for the debugging profiles data set
5. BLDDP builds the alternate index for the debugging profiles data set
6. INITGCD initializes the CICS global catalog
7. INITLCD initializes the CICS local catalog
8. DEFTRACE defines the trace data sets
9. DEFDUMP defines the dump data sets
10. LOADFILE loads the sample data into the FILEA data set
11. LOADHTML loads HTML templates for CICS supplied transactions.
Creating the CICS messages data set, DFHCMACI jobYou can use the DFHCMACI job to delete and recreate the CICS messages dataset DFHCMACD. This data set is used by the CICS messages facility(CICS-supplied transaction CMAC).
The DFHCMACI job comprises the following job steps:
1. DELETE deletes any existing copies of the DFHCMACD data set.
2. DEFINE defines the VSAM cluster for the CICS message data setdsindex.DFHCMACD, where dsindex is defined by the DSINFO parameter ofDFHISTAR.
3. CMACLOAD loads the CICS message data set with data from theCICS-supplied file, DFHCMACD, in the hlq.SDFHMSGS target library.
Defining the DFHCMACD file and associated CICS resourcesYou can use the CICS messages facility to provide the CICS messages and codesdescriptions online. Before you can use this facility (to access the DFHCMACD dataset), you must define the resources needed by the facility, and make them availableto your CICS region.
The file DFHCMACD, managed by CICS file control, accesses the DFHCMACDdata set. You must create a definition for this file in the CSD. The CICS-supplieddefinition for the DFHCMACD file and other resources that are needed by the CICSmessages facility are in the CSD group DFHCMAC. The CICS startup procedure,
Chapter 28. Creating the CICS data sets 193

DFHSTART, has a DD statement for the DFHCMACD file, but for dynamic allocationyou should copy the supplied resource definition for the DFHCMACD file and addthe DSNAME option.
To use the CICS messages facility in your CICS region, you must create your ownCSD group lists to include the DFHCMAC group for the CICS messages facility andany other groups of resources that your CICS region needs. You must specify yournew group lists on the GRPLIST system initialization parameter when you start upyour CICS region. If the DFHLIST of resource groups are not included in your newgroup lists, you must specify DFHLIST on the GRPLIST system initializationparameter as well as your group lists. For example,GRPLIST=(DFHLIST,MYLIST,CICSHT# 1), where MYLIST and CICSHT# 1 arecustomer-created group lists.
You should specify the DFHCMAC group of resources for the CICS messagesfacility only in those CICS regions that need to use the facility; for example on someterminal-owning regions, but perhaps not on data-owning regions.
Defining the sample applications data setsCICS provides a range of samples that you can use to help develop your ownapplications, and test various CICS functions (for example, as an aid to verifyingthat CICS has installed correctly). These programs are in the CICS 4.1 SampleApplications Guide and the Designing and Programming CICS Applications book.
Before you can use some of these samples, you must create the data sets that theyuse, and make them available to your CICS region, as described below. You do notneed to create these data sets, unless you intend using the associated sampleapplications.
The CUA text level applicationYou can use this sample application to demonstrate BMS support for the CommonUser Access (CUA) interface. The application uses an action bar, with associatedpull-downs, pop-ups, and help panels. The application programs demonstrate howto code COBOL programs to display, overlay, and remove CUA style windows.
Creating the data setsTo create the data sets that are needed by the CUA text level application, submitthe following jobs: DFH0JCUS and DFH0JHLP, installed in the hlq.XDFHINSTlibrary.
Making the data sets available to CICSYou can cause CICS to dynamically allocate the files for these data sets and openthem after CICS initialization by installing the sample resource definitions in thegroup DFH$CTXT. If no DD statement exists for these data sets in the CICS startupjob stream, the files are allocated to the data sets with DSNAMEs that are specifiedin the resource definitions: hlq.SAMPLE.DFHCTCUS, hlq.SAMPLE.DFHCTHLP, andhlq.SAMPLE.DFHCTAIX, for the data sets and the alternate index. Alternatively, youcan add DD statements for the data sets to your CICS startup job, which causesCICS to use the DSNAMEs specified on the DD statements instead of those in theresource definitions.
For information about this sample application, see the CICS 4.1 SampleApplications Guide .
194 CICS TS for z/OS: Installation Guide

The FILEA sample application programsThis comprises four sets of command-level application programs that operate onthe sample VSAM file FILEA. There is one set for each of the four programminglanguages that are supported, (Assembler, C, COBOL, and PL/I). These programsshow basic functions, such as inquire, browse, add, and update, that can serve asa framework for your own first programs. They were all written before publication ofthe Common User Access guidelines.
Creating the data setA copy of the data set that is needed by the FILEA application is created when yousubmit the DFHDEFDS job, installed in the hlq.XDFHINST library.
Making the data set available to CICSWhen you tailor the CICS installation-related jobs, as described in Chapter 27,“Tailoring the CICS-supplied skeleton jobs,” on page 185, a DD statement for theFILEA data set is added to the CICS IVP jobs and the DFHSTART procedure. If youwant CICS to dynamically allocate the data set and open the file, you shouldremove the DD statement and install a FILE resource definition with an appropriateDSNAME. (For example, as supplied in the group DFH$FILA.)
For information about this sample application, see the CICS 4.1 SampleApplications Guide .
The CICS Application Programming Primer sample applicationYou can use this sample application to demonstrate the design and programming ofa traditional CICS application. It provides online inquiry and maintenance facilitiesfor a sample customer credit file in a department store. The application uses VSAMfiles, and 3270 display and printer terminals. It was written before publication of theCommon User Access guidelines, and provides similar function (without CUAsupport) as the CUA sample application.
Creating the data setsTo create the data sets that are needed by the Primer sample application, edit andsubmit the sample job that is shown in Figure 23 on page 196.
Making the data sets available to CICSYou can cause CICS to dynamically allocate the files for these data sets and openthem on first reference by installing the sample resource definitions in the groupDFH$ACCT. If no DD statement exists for these data sets in the CICS startup jobstream, the files are allocated to the data sets with DSNAMEs that are specified inthe resource definitions: hlq.ACCTFILE and hlq.ACIXFILE. Alternatively, you canadd DD statements for the data sets to your CICS startup job, which causes CICSto use the DSNAMEs specified on the DD statements instead of those in theresource definitions.
For information about this sample application, see the CICS ApplicationProgramming Primer.
Chapter 28. Creating the CICS data sets 195

//DEFACCTF JOB (accounting parameters),MSGCLASS=A,MSGLEVEL=(1,1),// CLASS=A,NOTIFY=userid//*//*********************************************************************//* CICS/ESA sample jobs to define ACCT files//*//* This job deletes and defines the following data sets for the//* ACCT sample described in the CICS Application Programming Primer//*//* STEPS://* . DELETE AND DEFINE//* - DELETE/DEFINE THE CLUSTERS FOR://* . CICSTS31.CICS.ACCTFILE//* . CICSTS31.CICS.ACIXFILE//*//* THE HIGH-LEVEL-QUALIFIER(S) OF THE DATASETS: CICSTS31.CICS//* THE VOLUME SERIAL CICS31//* THE UNIT TYPE 3390//*//*********************************************************************//DELETE EXEC PGM=IDCAMS,REGION=1M//SYSPRINT DD SYSOUT=*//SYSIN DD *DELETE CICSTS31.CICS.ACCTFILEDELETE CICSTS31.CICS.ACIXFILESET MAXCC=0/*//DEFINE EXEC PGM=IDCAMS,REGION=1M//SYSPRINT DD SYSOUT=*//SYSIN DD */* */DEFINE CLUSTER(NAME(CICSTS31.CICS.ACCTFILE)-
KEYS(5 0)-INDEXED -RECORDSIZE(383 383)-REC(80)-SHR(2 3)-VOLUMES(CICS31)) -
DATA(NAME(CICSTS31.CICS.ACCTFILE.DATA)-UNIQUE)-
INDEX(NAME(CICSTS31.CICS.ACCTFILE.INDEX)-UNIQUE)/* */
DEFINE CLUSTER(NAME(CICSTS31.CICS.ACIXFILE)-KEYS(17 0)-INDEXED -RECORDSIZE(63 63)-REC(80)-SHR(2 3)-VOLUMES(CICS31)) -
DATA(NAME(CICSTS31.CICS.ACIXFILE.DATA)-UNIQUE)-
INDEX(NAME(CICSTS31.CICS.ACIXFILE.INDEX)-UNIQUE)
/*//*
Figure 23. Example JCL to create the Primer sample data sets
196 CICS TS for z/OS: Installation Guide

Chapter 29. Defining DL/I support
CICS can provide DL/I database support by using the IBM IMS Database Manager .For information about appropriate Versions and Releases, see the "CICS-IMSrelease compatibility“ topic in the CICS IMS Database Control Guide . As theybecome available, versions of IMS newer than those listed will also be compatible.
You can use DL/I support with CICS through:v Database control (DBCTL)v CICS remote DL/I support, also known as function shipping
This chapter describes what you do to enable a CICS region to work with remoteDL/I. For information about adding system and resource definitions for use withDBCTL, see the “Installing DBCTL, and defining CICS and IMS system resources“topic in the CICS IMS Database Control Guide .
The IMS libraries referred to in the job streams are identified by IMS.libnam (forexample IMS.PGMLIB). If you use your own naming convention for IMS libraries,please rename the IMS libraries accordingly.
CICS provides a CICS-DBCTL interface which enables DBCTL, or IMS/ESA® orIMS/ESA DM/TM, to satisfy DL/I requests that are issued from the CICS region.New users should use this method because it is simpler than local DL/I to installand provides additional function. Details of installing and using DBCTL are in theCICS IMS Database Control Guide .
CICS support for access to DL/I databases using the IBM Information ManagementSystem (IMS) product is included in the base product, and no specific installation isrequired.
For more information about storage protection, see the “Storage protection” topic inthe CICS System Definition Guide .
PDIRsA directory of program specification blocks (PDIR) is a list of program specificationblocks (PSBs) that define, for DL/I, the use of databases by application programs.
Your CICS region needs a PDIR to access a database owned by a remote CICSregion (remote DL/I support). Your CICS region does not need a PDIR to access aDL/I database owned by DBCTL. For information about accessing DL/I databasesowned by DBCTL, see the ”Performance benefits of DBCTL” topic in the CICS IMSDatabase Control Guide .
The modules providing remote DL/I support are automatically loaded by CICSduring startup when a DL/I PSB directory is specified via the PDIR= systeminitialization parameter. A PDIR is mandatory for remote DL/I support, but notrequired for database control support.
© Copyright IBM Corp. 1989, 2010 197
||||

Adding remote DL/I supportRemote DL/I support is included in CICS Transaction Server for z/OS, and workswith one of the supported levels of IMS, (see above for details of these). Usually,you use remote DL/I support, with either MRO or ISC connections, to accessdatabases owned by another CICS region. You can also use CICS remote DL/Isupport to access, through another CICS region connected to DBCTL, databasesowned by DBCTL. CICS regions accessing databases owned by DBCTL (that is,connected to DBCTL) must be running on the same MVS image as the DBCTLsystem. A simple overview is given in Figure 24.
Notes:
1. CICSB uses remote DL/I to access, through CICSA, databases owned byDBCTL 1 in MVS image 1. This is only needed if CICSB is not connected toDBCTL 1.
2. CICSB uses remote DL/I to access, through CICSC, databases owned byDBCTL 2 in MVS image 2.
3. CICSA (connected to DBCTL 1) is in the same MVS image as DBCTL 1. CICSC(connected to DBCTL 2) is in the same MVS image as DBCTL 2.
For information about accessing DL/I databases owned by DBCTL, see the CICSIMS Database Control Guide .
To add support in CICS for remote database access, you must:1. Code, assemble, and link-edit a program specification blocks directory (PDIR).2. Code the PDIR CICS system initialization parameter for remote DL/I support.
Defining a PSB directoryCode entries in a program specification block directory (PDIR), to indicate theidentity of the remote CICS region, or regions, to which you want CICS to functionship DL/I requests. You do this by coding the SYSIDNT parameter in DFHDLPSBTYPE=ENTRY macros, which you assemble and link-edit to create a PDIR. Youmust also code the MXSSASZ parameter. You can, optionally, code the RMTNAMEparameter to define the name by which the PSB is known in the remote CICSregion. For information about creating PDIRs, see the CICS Resource DefinitionGuide .
Coding CICS system initialization parameters for remote DL/I supportThe following is a summary of the DL/I parameters that you can, or must, code asCICS system initialization parameters:
MVS image 1 MVS image 2
IMS (1) (2) IMSCICSA CICSB CICSC
DBCTL DBCTLremote
DL/Ionly
1 2
Figure 24. Using CICS remote DL/I support to access DBCTL databases
198 CICS TS for z/OS: Installation Guide
|

PDIR={YES|xx} SUFFIX OF PSB DIRECTORY(MANDATORY for REMOTE DL/I)
PSBCHK={NO|YES} SECURITY CHECK OF REMOTE TERMINAL INITIATING A TRANSACTIONXPSB={YES|name|NO} PSB ENTRIES TO BE CHECKED BY RACF
For details of these (and other) system initialization parameters, see CICS SystemDefinition Guide..
Global user exits for DL/IThe following global user exits, if enabled, can be invoked when you have DL/Iapplications:
XDLIPRE and XDLIPOSTThese exits follow the issue of an EXEC DLI command or DL/I cal;XDLIPRE before the request is processed and XDLIPOST after the requestis processed. If you are running CICS with remote DL/I support, these exitsare invoked in both the CICS region executing the DL/I transactions (theAOR), and the CICS region to which the DL/I requests are function shipped(the DOR). However there are restrictions on what actions can beperformed by an exit program running at exit point XDLIPRE or XDLIPOSTwhen running in a DOR.
XRMIIN and XRMIOUTYou can use these exits to monitor activity across the resource managerinterface (RMI). For example, you can monitor control being passed to andfrom DFHEDP for EXEC DLI requests, DFHDBAT for DBCTL requests, orDSN2EXT1 for DB2 for DB2 commands. XRMIIN is invoked just beforecontrol is passed from the RMI to a task-related user exit. XRMIOUT isinvoked just after control is passed back to the RMI.
For programming information about these exits, see the CICS Customization Guide.
Chapter 29. Defining DL/I support 199

200 CICS TS for z/OS: Installation Guide

Chapter 30. Adding CICS support for programming languages
This section describes the steps necessary to add run-time support for theprogramming languages used with the CICS command level (EXEC) programminginterface. Complete the appropriate actions described in the following beforeinstalling your application programs.
To write CICS application programs that request CICS services through thecommand-level application programming interface (API), you can use assemblerlanguage, C and C++, COBOL, or PL/I.
CICS provides the support needed to run application programs written in assemblerlanguage, and Language Environment provides the required support for all the otherlanguages. The use of Language Environment is essential in CICS TransactionServer for z/OS, Version 3 Release 1. Supported compilers are listed in the CICSRelease Guide.
The CICS Transaction Server for z/OS, Version 3 Release 1 programming guidancedocumentation expects that your CICS system is using the services of LanguageEnvironment, which provides a common run-time environment for IBMimplementations of assembler and those high-level languages (HLLs) supported byCICS, namely COBOL, PL/I, C, and C++.
Note: Runtime support for OS/VS COBOL programs has been removed. OS/VSCOBOL programs cannot run under CICS Transaction Server for z/OSVersion 3, and must be upgraded to a supported level of COBOL.
Installing Language Environment supportThis section describes CICS support for Language Environment and what to do toinstall that support. The use of Language Environment is essential in CICSTransaction Server for z/OS, Version 3 Release 1.
Language Environment support is provided by run-time libraries that establish acommon execution environment for application programs compiled by high-levellanguages. All programs compiled by a high-level language, whether by a LanguageEnvironment-conforming compiler or not, must be run under CICS-LanguageEnvironment support.
The CICS-Language Environment interface is initialized automatically when CICScan:
1. Load the Language Environment interface modules, CEECCICS, CEEPIPI, andCEECTCB, from STEPLIB.
2. Successfully call the CEECCICS module to initialize the interface.
Language Environment initialization takes place during CICS startup, when CICSissues the message DFHAP1203I applid Language Environment is beinginitialized. The CEECCICS module is loaded, followed by a partition initializationcall, before the start of second phase PLT processing. If Language Environmentcannot successfully complete the initialization of all languages supported by CICS,or can only initialize some of them, it issues messages to the MVS console. IfLanguage Environment initialization fails completely, it may be because theCEECCICS module could not be loaded, or something went wrong during theloading of a particular language routine.
© Copyright IBM Corp. 1989, 2010 201
|||

Installing CICS support for Language EnvironmentTo enable Language Environment support to be installed correctly by CICS:
v Specify enough storage for the ERDSA to run CICS and Language Environmenttogether. They need a minimum of 3500KB. To this minimum, add an amount ofstorage sufficient for your own requirements.
v Ensure the CICS-Language Environment interface module, CEECCICS, and theLanguage Environment modules CEEPIPI and CEECTCB are installed in anAPF-authorized library defined in the STEPLIB concatenation in the CICS startupJCL. You can do this by including the Language Environment SCEERUN libraryin an APF-authorized library in the STEPLIB concatenation of your CICS startupjob (for example, in the CICSTS31.CICS.SDFHAUTH library), or in anAPF-authorized library in the MVS LNKLSTnn concatenation.
v Ensure that the program resource definitions for the Language Environmentlanguage interface modules have been added to the CICS CSD. Thesedefinitions are in the CEE group.
The CEE group is added automatically to the CSD and to the grouplist DFHLISTduring CICS installation, as part of the DFHCOMDS job
The definitions are also supplied as DEFINE statements in the CEECCSD andCEECCSDX members of the SCEESAMP library.
You can add the CEE group to any CICS startup group list named in theGRPLIST system initialization parameter.
v Define the Language Environment transient data destinations, CESE, and CESO(DD names CEEMSG and CEEOUT). The CICS-supplied resource definitiongroup, in the CSD, DFHDCTG, contains entries for CESE and CESO.
For information about the attributes needed for Language Environment transientdata destinations, see the IBM Language Environment for MVS & VMProgramming Guide, SC26-4818.
v Define the Language Environment runtime libraries on the CICS STEPLIB andDFHRPL DD statements as follows:
– Add the SCEERUN library, which contains CEECCICS and CEECTCB, andthe SCEERUN2 library, which contains support that is required for the IBMJava Virtual Machine (JVM) and also support for other programminglanguages, to STEPLIB or to a library in the MVS LNKLSTnn concatenation.
- Both the libraries, SCEERUN and SCEERUN2, must be APF-authorized.
– Add the SCEECICS, SCEERUN2, and SCEERUN libraries to DFHRP. (Theorder of the SCEERUN and SCEERUN2 libraries in relation to each other isnot important.)
For example://* CICS APF-authorized libraries//STEPLIB DD DSN=hlq.CICS.SDFHAUTH,DISP=SHR// DD DSN=hlq.LE.SCEERUN2,DISP=SHR// DD DSN=hlq.LE.SCEERUN,DISP=SHR//* CICS load libraries//DFHRPL DD DSN=hlq.CICS.SDFHLOAD,DISP=SHR// DD DSN=hlq.LE.SCEECICS,DISP=SHR// DD DSN=hlq.LE.SCEERUN2,DISP=SHR// DD DSN=hlq.LE.SCEERUN,DISP=SHR
Use only these Language Environment runtime libraries for all your high-levellanguage application programs.
202 CICS TS for z/OS: Installation Guide
#
|
||

Language Environment support for COBOLLanguage Environment is a prerequisite for application programs written in COBOL.For information about Language Environment, see the Language Environment forOS/390 Customization manual, SC28-1941.
Support for OS/VS COBOL programs is now withdrawn. These programs, whichhad runtime support in CICS Transaction Server for z/OS Version 2, cannot rununder CICS Transaction Server for z/OS Version 3. OS/VS COBOL programs mustbe upgraded to Language Environment conforming COBOL, and recompiled againsta level of COBOL compiler supported by CICS. The CICS Application ProgrammingGuide provides assistance with converting OS/VS COBOL programs to LanguageEnvironment conforming COBOL.
To run COBOL application programs:
v Install support for Language Environment, ensuring that CICS can initialize theLanguage Environment enviroment during startup.
v Install resource definitions for your programs with the LANGUAGE attributespecified as LANGUAGE(COBOL), or leave the language blank.
For your application programs, CICS can create and install program resourcedefinitions automatically, or you can create them specifically in the CSD, and installthem by using the GRPLIST system initialization parameter or CEDA INSTALLcommand. For more information about installing program resource definitions, seethe CICS Resource Definition Guide.
For information about Language Environment support for programming languages,see the Program Directory for IBM Language Environment for MVS and VM.
Language Environment support for C and C++Language Environment is a prerequisite for application programs compiled usingIBM C/C++ for MVS or SAA AD/Cycle C/370 compilers. Language Environmentincorporates the run-time libraries required for both these C language compilers.For information about Language Environment, see the Language Environment forOS/390 Customization manual, SC28-1941.
To run under CICS your C application programs:
v Install support for Language Environment, ensuring that CICS can initialize theLanguage Environment enviroment during startup.
v Install resource definitions for your programs with the LANGUAGE attributespecified as LANGUAGE(C) or leave the language blank.
For information about installing program resource definitions, see the CICSResource Definition Guide.
CICS supports application programs written in C++ that:
v Are compiled using the IBM C/C++ for MVS compiler (5655-121)
v Execute with the Language Environment run-time libraries
If you use Version 3 Release 2, or late, of the C/C++ compiler to compile a C++program, specify the CXX parameter when options are passed to the compiler,otherwise the C compiler is invoked. Do not specify CXX if a C program is to becompiled. See the IBM C/C++ for MVS/ESA Compiler and Run-Time MigrationGuide Version 3 Release 2, SC33-2002, for further information.
Chapter 30. Adding CICS support for programming languages 203
|||||||

For information about Language Environment support for programming languages,see the Program Directory for IBM Language Environment for MVS and VM.
Language Environment support for PL/ILanguage Environment is a prerequisite for application programs compiled usingIBM PL/I for MVS or SAA AD/Cycle PL/I compilers. Language Environmentincorporates the run-time libraries required for both these PL/I compilers. Forinformation about Language Environment, see the Language Environment forOS/390 Customization manual, SC28-1941.
PL/I support is also required if you use the Web services support in CICS; inparticular, it is required if you use the CICS-supplied SOAP 1.1 and SOAP 1.2message handler programs.
To run CICS PL/I application programs :
v Install support for Language Environment, ensuring that CICS can initialize theLanguage Environment enviroment during startup.
v Install resource definitions for the programs with the LANGUAGE attributespecified as LANGUAGE(PLI) or leave blank.
For information about installing program resource definitions, see CICS ResourceDefinition Guide.
For information about Language Environment support for programming languages,see the Program Directory for IBM Language Environment for MVS and VM.
Language Environment support for CICS JVM programsLanguage Environment is a prerequisite for CICS JVM programs. However, unlikethe other languages, JVM programs do not require the CICS-LanguageEnvironment interface. JVM programs run with Language Environment supportusing MVS services (not CICS services). JVM programs require the LanguageEnvironment support provided by the SCEERUN and SCEERUN2 libraries only,which can either be defined in the CICS STEPLIB, or included in the MVS linklist.The SCEERUN and SCEERUN2 libraries also need to be added to DFHRPL.
204 CICS TS for z/OS: Installation Guide
|||
#

Chapter 31. Verifying your Java components installation
CICS support for Java application programs is included in the base product, and nospecific installation is required. Before you begin to set up and configure Javasupport in your CICS system, follow the steps below to verify that the Javacomponents are correctly installed on your system.
1. Use the supplied checklist in “Verifying Java components checklist” to ensurethat all of the required Java components are installed in the correct locations onyour CICS system.
2. Read about the JVM components and the supplied sample definition files inmore detail in “Java Virtual Machine sample definition files” on page 207,particularly if you have not performed a default installation.
3. Authorize the hlq.SDFJAUTH library. See “Authorizing the hlq.SDFJAUTHlibrary” on page 210 for details on how to do this.
4. Amend the default parameters in the BPXPRMxx members of SYS1.PARMLIBso use the JVM supplied with CICS. See “Amending parameters inSYS1.PARMLIB(BPXPRMxx)” on page 210 for details on which parameters tochange.
When you have verified your Java installation, use the task list in Java Applicationsin CICS to begin setting up your Java environment.
Verifying Java components checklistThe following components are unloaded from the distribution tapes during thestandard installation process described in the CICS Transaction Server for z/OSProgram Directory. Note that z/OS UNIX System Services must be active in fullfunction mode during this process to enable files to be stored in HFS.
Table 13. Java components checklist
Java component Location Comments
Directoriescontaining JARfiles
HFS directories:
/pathprefix/usr/lpp/cicsts/cicsts31/lib
/pathprefix/usr/lpp/cicsts/cicsts31/samples
/pathprefix/usr/lpp/cicsts/cicsts31/docs
cicsts31 is auser-defined valuespecified on theUSSDIR parameterin the DFHISTARinstallation job.
Sample programs HFS directory:
/pathprefix/usr/lpp/cicsts/cicsts31/samples
The sampleprogramsdemonstrate theuse of IIOP, EJBs,output redirectionand the JCICSclasses
© Copyright IBM Corp. 1989, 2010 205
||
|||
|||
|
|
|
|
|||||||
||
|
|||||||

Table 13. Java components checklist (continued)
JVM profiles
DFHJVMPRDFHJVMPCDFHJVMPSDFHJVMCCDFHJVMCD(DFHJVMCD isreserved for theuse of CICS)
HFS directory:
/pathprefix/usr/lpp/cicsts/cicsts31/JVMProfilesdirectory
cicsts31 is auser-defined valuefor theCICS_DIRECTORYvariable in theDFHIJVMJinstallation job. See“JVM profiles” onpage 207 for moreinformation aboutthe JVM sampleprofiles.
JVM propertiesfiles
dfjjvmpr.propsdfjjvmpc.propsdfjjvmps.propsdfjjvmcc.propsdfjjvmcd.props
HFS directory:
/pathprefix/usr/lpp/cicsts/cicsts31/props/
cicsts31 is auser-defined valuefor theCICS_DIRECTORYvariable in theDFHIJVMJinstallation job. Formore informationabout the JVMsample propertiesfiles, see “JVMproperties files” onpage 208.
Java securitypolicy file
dfjejbpl.security
HFS directory:
/pathprefix/usr/lpp/cicsts/cicsts31/lib/security/dfjejbpl.policy
cicsts31 is auser-defined valuespecified on theUSSDIR parameterin the DFHISTARinstallation job. See“JVM propertiesfiles” on page 208for moreinformation aboutthe sample Javasecurity policy file.
hlq.SDFJAUTHlibrary
MVS PDSE libraries Containscomponents of theSJ domain. See“Authorizing thehlq.SDFJAUTHlibrary” on page210 for moreinformation.
hlq.SDFJLPAlibrary
MVS PDSE libraries The library is emptyafter installation,but is used forCICS modules thatsupport the JavaIIOP environment.See “Thehlq.SDFJLPAlibrary” on page210 for moreinformation.
206 CICS TS for z/OS: Installation Guide
|
|
||||||||
|
||
||||||||||||
||
|||||
|
|
|||||||||||||
||
|
|
||
||||||||||||
|||||||||||
|||||||||||||||

Java Virtual Machine sample definition filesCICS launches a JVM to execute a Java program that specifies a JVM in itsprogram resource definition. The JVM is created using options specified in a seriesof text files:
v JVM initialization options are specified in a JVM profile, which is named by theJVMPROFILE attribute of the program definition.
v Further system properties for the JVM are specified in a JVM properties file,which is named in the JVM profile.
v A Java 2 security policy can be named in the JVM properties file to specifysecurity options, if you are using JVMs to run Enterprise JavaBeans.
CICS provides samples of all these, as described in the following sections. “Settingup JVM profiles and JVM properties files” in Java Applications in CICS has moreinformation about these files and the relationships between them.
JVM profilesCICS provides five sample JVM profiles in the partitioned dataset namedSDFHENV. Each sample JVM profile can be used to create a different type of JVM.The sample JVM profiles are as follows:
Table 14. CICS-supplied sample JVM profiles
JVM profile Purpose
DFHJVMPR The default JVM profile if no other is specified on aPROGRAM resource definition. JVM is resettable. Doesnot use the shared class cache.
DFHJVMPC JVM is resettable and uses the shared class cache.
DFHJVMPS JVM is single-use. Not recommended for enterprise beans.
DFHJVMCC Profile for the master JVM that initializes the shared classcache.
DFHJVMCD (reserved for theuse of CICS)
Profile for CICS-defined programs. Do not use for yourown applications. Only change as necessary.
In their supplied form, the JVM profiles are defined with JVMPROPS and LIBPATHparameters that use the symbols &CICS_DIRECTORY, &JAVA_HOME. Theseprofiles are customized when you install CICS TS and run the DFHIJVMJ job, asfollows:
&CICS_DIRECTORYThis symbol is replaced with the value you specify on the USSDIR parameter inthe DFHISTAR installation job. The default is cicsts31, resulting, for example,in directory paths of the form /pathprefix/usr/lpp/cicsts/cicsts31/lib on LIBPATH.
&JAVA_HOMEThis symbol is replaced with the value you specify on the JAVADIR parameterin the DFHISTAR installation job. The default is java142/J1.4, resulting indirectory paths of the form /pathprefix/usr/lpp/java142/J1.4/bin and/pathprefix/usr/lpp/java142/J1.4/bin/classic on LIBPATH.
The string java142/J1.4 is what you should specify on JAVADIR for use with theIBM Software Developer Kit for z/OS, Java 2 Technology Edition, Version 1.4.2.
Note: The extra // characters on each side of the symbols are removed duringsymbol substitution.
Chapter 31. Verifying your Java components installation 207
After you have run DFHIJVMJ to substitute your own values for the symbol names,the customized profiles are written to the directory /pathprefix/usr/lpp/cicsts/cicsts31/JVMProfiles in the hierarchical file store (HFS), where cicsts31 is the valuethat you chose for the CICS_DIRECTORY variable used by the DFHIJVMJ jobduring CICS installation. Because the JVM profiles are stored in HFS, CICSrequires access to z/OS UNIX System Services, and to directories and files in HFS,in order to create JVMs. “Giving CICS regions access to z/OS UNIX SystemServices and HFS directories and files” in Java Applications in CICS explains howto give CICS the access it requires.
“Setting up JVM profiles and JVM properties files” in Java Applications in CICS tellsyou how to enable CICS to locate the JVM profiles, how to choose an appropriateJVM profile for your Java programs, and how to customize the supplied sampleJVM profiles to your system's requirements. In particular, if you place the JVMprofiles in a location other than the default directory /pathprefix/usr/lpp/cicsts/cicsts31/JVMProfiles, or if you choose a different name during CICS installation forthis directory, you need to change the system initialization parameterJVMPROFILEDIR to specify the correct directory, or use UNIX soft links to link tothe JVM profiles from the default directory. You also need to ensure that CICS hasaccess to the HFS directory where the JVM profiles are stored.
Note that the JVM profiles DFHJVMPR and DFHJVMCD, and their associated JVMproperties files, must always be available to CICS. DFHJVMPR is used if a Javaprogram is defined as using a JVM but no JVM profile is specified, and it is used forsample programs. DFHJVMCD is used by CICS-defined programs, including thedefault request processor program (DFJIIRP) and the program that CICS uses topublish and retract deployed JAR files (DFJIIRQ, the CICS-key equivalent ofDFJIIRP). Both these JVM profiles must therefore either be present in the directorythat is specified by JVMPROFILEDIR, or linked to by means of UNIX soft links fromthat directory, and they must be configured correctly so that they can be used inyour CICS region.
You can edit the JVM profiles with any text editor to customize them for yoursystem. “Choosing a JVM profile and JVM properties file” in Java Applications inCICS tells you about some options that you might want to change, and the CICSSystem Definition Guide has the full lists of options that you can specify using JVMprofiles and JVM properties files. For single-use JVMs (that is, with a JVM profilethat specifies the option REUSE=NO or the older option Xresettable=NO), insteadof customizing the JVM profile, you can override the options in it, using theuser-replaceable program DFHJVMAT. Normally, a JVM profile provides sufficientflexibility to configure a JVM as required. If you find that you need to make unusualmodifications, the CICS Customization Guide has more information about usingDFHJVMAT.
As JVM profiles and JVM properties files are HFS files, case is important. CICSdoes not automatically convert the name of a JVM profile or JVM properties file toupper case. When you use the name of a JVM profile or JVM properties fileanywhere in CICS, you must enter it using the same combination of upper andlower case characters that is present in the HFS file name.
JVM properties filesYou use the JVMPROPS option in a JVM profile to specify the full path of the JVMproperties file that is associated with the profile. CICS provides five sample JVMproperties files in the SDFHENV partitioned data set, which are designed to supporttheir corresponding JVM profile:
208 CICS TS for z/OS: Installation Guide

Table 15. CICS-supplied sample JVM properties files
JVM profile Associated JVM properties file
DFHJVMPR dfjjvmpr.props
DFHJVMPC dfjjvmpc.props
DFHJVMPS dfjjvmps.props
DFHJVMCC dfjjvmcc.props
DFHJVMCD (reserved for the use of CICS) dfjjvmcd.props
The sample JVM properties files are defined with the &CICS_DIRECTORY symbol,which is replaced with your own value when you run the DFHIJVMJ installation job.When the symbol substitution is complete, the customized JVM properties files arecopied to the HFS directory /pathprefix/usr/lpp/cicsts/cicsts31/props/, wherecicsts31 is the value that you chose for the CICS_DIRECTORY variable used bythe DFHIJVMJ job during CICS installation.
The JVMPROPS option on a JVM profile references a JVM properties file by usingits full path name. The CICS-supplied sample JVM profiles reference the sampleJVM properties files as follows:JVMPROPS=/pathprefix/usr/lpp/cicsts/cicsts31/props/dfjjvmpx.props
where dfjjvmpx.props is the name of the sample JVM properties file that matcheswith the sample JVM profile. If you change the name or location of a JVMproperties file, or create your own JVM properties file, you need to change theJVMPROPS option to specify the correct path name in all the JVM profiles thatreference that JVM properties file. You also need to ensure that CICS has access tothe HFS directory where the JVM properties file is stored.
As for the JVM profiles, you can edit the JVM properties files with any text editor tocustomize them for your system. “Choosing a JVM profile and JVM properties file”in Java Applications in CICS tells you about some options that you might want tochange, and the CICS System Definition Guide has the full lists of options that youcan specify using JVM properties files. Remember that CICS does notautomatically convert the name of a JVM properties file to upper case, so when youuse the name of a JVM profile or JVM properties file anywhere in CICS, you mustenter it using the same combination of upper and lower case characters that ispresent in the HFS file name.
Java 2 security policy for EJBsCICS provides a sample Java 2 security policy that you can use, or modify to suityour own requirements. The sample policy is named dfjejbpl.security, and itdefines security properties that are suitable for JVMs that are used by enterprisebeans. The sample policy is supplied on the distribution tape in SDFHENV. Duringthe installation process, the policy is customized and written to/pathprefix/usr/lpp/cicsts/cicsts31/lib/ security/dfjejbpl.policy, where cicsts31 is auser-defined value specified on the USSDIR parameter in the DFHISTARinstallation job. “Protecting Java applications in CICS” in Java Applications in CICStells you what changes you need to make to the sample JVM properties files toenable Java 2 security, how to set up a security policy file, and about theCICS-supplied sample security policy file dfjejbpl.policy.
Chapter 31. Verifying your Java components installation 209

Authorizing the hlq.SDFJAUTH libraryThis library is the partitioned data set extended (PDSE) version of SDFHAUTH, andit contains some of the components of the SJ domain. A separate library is neededbecause these components are now built using XPLink (Extra PerformanceLinkage). The SDFJAUTH library is required for Java support, and as for theSDFHAUTH library, you need to:
1. APF-authorize the SDFJAUTH library by adding it to the list of APF-authorizedlibraries in the appropriate PROGxx (or IEAAPFxx) member in SYS1.PARMLIB.
2. Provide a STEPLIB DD statement for the hlq.SDFJAUTH library in your startupjob stream.
The procedure for authorizing the SDFHAUTH library is described in Chapter 6,“Authorizing the hlq.SDFHAUTH library,” on page 67. Follow the same procedure toauthorize the SDFJAUTH library.
The hlq.SDFJLPA libraryThis library is currently empty, but is supplied to allow those CICS modules thatsupport the Java IIOP environment, and that are LPA eligible, to be included in theLPA. There are no CICS-supplied Java IIOP modules that must reside in the LPA,therefore the library is empty following the installation of CICS TS.
Note: The library SDFJLPA is a partitioned data set extended (PDSE). PDSEscannot be loaded into the LPA at MVS IPL time, because MVS nucleusinitialization processing does not recognize them. You can use the MVSSETPROG command after an IPL to dynamically add members of a PDSEinto the LPA.
Amending parameters in SYS1.PARMLIB(BPXPRMxx)The default options, shipped in the BPXPRMxx members of SYS1.PARMLIB are notsufficient for use with the JVM supplied in CICS. In particular, the values forIPCSEMNSEMS, MAXPROCSYS, MAXPROCUSER, MAXUIDS, MAXASSIZE,MAXFILEPROC, MAXPTYS, MAXTHREADS, MAXTHREADTASKS, andMAXCPUTIME are too low for CICS usage - increase them.
Recommendation:Start by using the following values. Tailor them to your system's needs asyou gain experience:IPCSEMNSEMS 1000MAXPROCSYS 500MAXPROCUSER 512MAXUIDS 500MAXASSIZE 2000000000MAXFILEPROC 512MAXPTYS 256MAXTHREADS 10000MAXTHREADTASKS 5000MAXCPUTIME 2147483647
For full details, see z/OS UNIX System Services Planning, GA22-7800, in section14.8, “Customizing the BPXPRMxx parmlib members”, and z/OS MVS Initializationand Tuning Reference, SA22-7592, in section 9.0, “BPXPRMxx (z/OS UNIX SystemServices parameters)”.
210 CICS TS for z/OS: Installation Guide

Chapter 32. Installing MRO and ISC support
This chapter describes what you have to do to include the following communicationfacilities in your CICS region:v Multiregion operation (MRO)v Intersystem communication (ISC)
The information about ACF/VTAM and MVS that is given in this chapter is forguidance only. Always consult the current ACF/VTAM or MVS publications forthe latest information. See “Books from related libraries” on page 469.
Installing MRO supportThis section describes how to install support for multiregion operation (MRO) inyour CICS regions.
CICS multiregion operation (MRO) enables CICS regions that are running in thesame MVS image, or in the same MVS sysplex, to communicate with each other.MRO does not support communication between a CICS system and a non-CICSsystem such as IMS.5
MRO does not require ACF/VTAM or SNA networking facilities. The support withinCICS that enables region-to-region communication is called interregioncommunication (IRC). IRC is implemented in three ways:
1. Through support in CICS terminal control management modules and by use of aCICS-supplied interregion program, DFHIRP, loaded in the MVS link pack area.DFHIRP is invoked by a type 3 supervisory call (SVC).
2. By MVS cross-memory services, which you can select as an alternative to theCICS type 3 SVC mechanism. Here, DFHIRP only opens and closes theinterregion links.
3. By the cross-system coupling facility (XCF) of MVS. XCF/MRO is required forlinks between CICS regions in different MVS images of an MVS sysplex. CICSselects XCF/MRO dynamically for such links, if available.
For information about the design and implementation of interregion communication,and about the benefits of cross-system MRO, see the CICS IntercommunicationGuide.
To install support for MRO, complete the following steps (outlined in more detail inthis chapter):
1. Define CICS as an MVS subsystem.
2. Install the current versions of the DFHIRP and DFHCSVC modules in the LPA.
3. If you give the SVC a new number, and you have CICS Version 1 or Version 2regions that use MRO, regenerate the CICS modules DFHCRC and DFHDRPAfor those CICS versions, specifying the SVC number.
4. Specify appropriate system initialization parameters to enable MRO for eachCICS region startup.
If you intend using cross-system MRO (XCF/MRO) you must also:
5. The external CICS interface (EXCI) uses a specialized form of MRO link to support DCE remote procedure calls to CICSprograms, and communication between MVS batch programs and CICS .
© Copyright IBM Corp. 1989, 2010 211

5. Install the required sysplex hardware and software.
6. Define the MVS images as systems in an XCF sysplex.
To use the MRO support, you must also:
7. Define and install the MRO connections appropriate to your CICS environment.
Provided you complete the above steps, you can use MRO to communicate with alllevels of CICS from CICS/ESA Version 4.1 onwards.
Should MRO be used to communicate between different releases of CICS, thefunction provided on any connection is that of the lower-level release.
Defining CICS as an MVS subsystemMultiregion operation with CICS requires MVS Subsystem Interface (SSI) support,and to obtain this you must define CICS as an operating system subsystem, asdescribed in Chapter 10, “Defining CICS as an MVS subsystem,” on page 83.
Installing the modules DFHIRP and DFHCSVC in the LPATo enable your regions to communicate by MRO, you must:
1. Install the current versions of the DFHIRP and DFHCSVC modules into the LPA,as described in Chapter 14, “Installing CICS modules in the MVS link packarea,” on page 107.
Note: If you are running CICS with MRO at different release levels, allcommunicating CICS regions must use the latest DFHIRP module andthe latest SVC module, DFHCSVC, on the same MVS image. Do not usethe dynamic LPA function to replace DFHIRP for migration betweenreleases, as this can cause incompatibility between control blocks,resulting in abend situations.
2. Define the SVC module, DFHCSVC, to MVS, as described in Chapter 11,“Installing the CICS Type 3 SVC,” on page 93.
Installing required hardware and software for XCF/MROTo be able to use the cross-systems MRO to communicate between CICS regionson different MVS images, those MVS images must be running with appropriatehardware and software. The hardware and software that are required for MVSsystems in a sysplex are in the CICS Transaction Server for z/OS ProgramDirectory.
Defining MVS images as systems in an XCF sysplexTo use XCF/MRO, all participating MVS images must be defined as part of thesame sysplex, as in Chapter 19, “MVS cross-system MRO definitions,” on page129.
Note: Within a parallel sysplex, where MRO communication between MVS imagesis by XCF/MRO, the DFHIRP programs installed in the different MVS imagescan be at different release levels. However, DFHIRP must be installed fromthe highest release of CICS running in an MVS image. For example, a CICSVersion 4 DFHIRP can communicate with a DFHIRP across XCF/MRO, butthe CICS regions running in the MVS with the Version 4 DFHIRP cannot belater than CICS/ESA Version 4.
212 CICS TS for z/OS: Installation Guide
##
##
####

Defining MRO connectionsBefore you can use MRO, you must define and install connections with attributesappropriate to your CICS environment. For information about defining connections,see the CICS Intercommunication Guide .
Enabling MRO for CICS startupFor each CICS region that is to use MRO, you must specify ISC=YES to include theintersystem communication program DFHISP.
If you want a CICS region to establish MRO communication during startup, youshould also specify YES on the IRCSTART system initialization parameter.
Alternatively, once your CICS region is running, you can establish MROcommunication by using the CEMT SET IRC OPEN command or the EXEC CICSSET IRC OPENSTATUS(cvda) command.
Either method establishes MRO communication with every CICS region that is:
1. Currently active.
2. Defined to your region by CONNECTION and SESSIONS definitions that areinstalled from the CSD. (To establish MRO communication between two CICSregions, the installed CONNECTION definition must specify INSERVICE(YES) inboth regions.)
Adding ISC supportFor communication between CICS regions that are in different MVS images, youcan use a SNA access method, such as ACF/VTAM, to provide the necessarycommunication protocols. This form of communication between regions throughSNA is called intersystem communication (ISC). (You can also use ISC in thesame CPC, through the application-to-application facilities of ACF/VTAM.)
This section outlines how to include ISC in a CICS region.
For information about the design and implementation of intersystem communicationfacilities, see the CICS Intercommunication Guide .
Unlike MRO, there are no special MVS operating system requirements for CICSintersystem communication.
Running a CICS region with ISCYou must include the following management programs in your CICS regions, (byspecifying the system initialization parameters that are given in parentheses):v DFHISC – the intersystem communication program (ISC=YES).v DFHTCP – the terminal control program (TCP=YES is the default).
Establishing ISCIntersystem communication requires VTAM support, and you must specifyVTAM=YES as a system initialization parameter. If VTAM is running during CICSinitialization, CICS opens the VTAM ACB. If VTAM is started after CICS, openingthe VTAM ACB fails, and you must open it using the CEMT SET VTAM OPENcommand when VTAM is available. CICS regions cannot communicate until theyhave established the VTAM connection.
Chapter 32. Installing MRO and ISC support 213

Defining ISC connectionsBefore you can use ISC, you must define and install connections with attributesappropriate to your CICS (and VTAM) environment. If you intend using APPC foryour ISC communications, you can take advantage of the autoinstall for APPCconnections function. For information about defining connections, and about usingthe autoinstall for APPC connections function, see the CICS Resource DefinitionGuide.
214 CICS TS for z/OS: Installation Guide

Chapter 33. Enabling TCP/IP in a CICS region
TCP/IP support is provided by the CICS sockets domain, with network servicessupplied by z/OS. The sockets domain provides support for:
The listenerThe listener monitors specified TCP/IP ports for incoming requests. It isconfigured by a TCPIPSERVICE resource definition to listen on a specificTCP/IP port and to attach a specified request receiver transaction to handleeach connection. Once the connection has been established between a clientprogram and a particular request receiver, all subsequent requests from theclient program over that connection flow to the same request receiver. Thelistener supports user applications initiated by TCP/IP services for the followingprotocols:
External Call Interface (ECI)The External Call Interface (ECI) allows client applications to use TCP/IPdirectly to CICS regions without any intervening products such asprotocol-mapping software. The External Call Interface (ECI) is supported,but not the External Presentation Interface (EPI).
See the CICS Family: Communicating from CICS on System/390® manualfor information about the External Call Interface.
Hypertext Transfer Protocol (HTTP)HTTP messages are received and sent over the Internet, using CICS Websupport. See the CICS Internet Guide for information about the transmissionof HTTP messages on the Web.
Internet InterORB Protocol (IIOP)IIOP messages are sent between client and server applications thatconform to the Common Object request Broker Architecture (CORBA). Seethe Java Applications in CICS manual for information about IIOP messages.
Outbound socket supportThis allows CICS to initiate an IP connection. Sockets can be created by onetask, shared by other tasks, and remain active after task termination, for re-useby another task.
Using TCP/IP in a CICS regionTo use TCP/IP in a CICS region, you must provide the following:
v Communications Server must be installed in the z/OS system ( In earlier OS/390releases this is called eNetwork Communications Server, or SecurewayCommunications Server). Ports belonging to Communications Server must bemade available for use by the CICS region involved.
v The CICS system initialization parameter TCPIP must be set to YES.
v TCPIPSERVICE resource definitions must be provided to define each active portand the type of service associated with it. The CICS TCP/IP listener is activatedfor the specified ports when the TCPIPSERVICE is installed, if TCPIP (YES) hasalso been specified.
v If Secure Sockets Layer (SSL) authentication is used, you must define theKEYRING system initialization parameter, to identify the RACF key ringcontaining the keys and X.509 certificates used in the SSL handshake.
v The CICS listener regions need to be configured to talk to the same nameserveron z/OS that the MVS Workload Manager is configured to use. This means that
© Copyright IBM Corp. 1989, 2010 215

you may need to reconfigure the DNS server that CICS uses to resolvehostnames, because CICS needs to resolve its own hostname ( using a call tothe gethostbyaddr function.) using the DNS server configured for the connectionoptimization in the sysplex. This may not be the system configured name serverif the sysplex is already configured for TCP/IP operation. The system nameserver may not even be on z/OS or on any of the systems in the sysplex.
You can change the resolver configuration of CICS either by altering systemTCP/IP configuration files, or by adding or changing the DD name SYSTCPD inthe CICS start-up JCL. This sets the RESOLVER_CONFIG environment variableto the MVS dataset you have specified. This file is described in the z/OS IBMCommunications Server: IP Configuration Guide, SC31-8775. It contains areference to the DNS server's IP address.
You must specify at least the following:
NSINTERADDR n.n.n.n
where n.n.n.n is the dotted decimal address of the name server to be used.
If the DD name is not included in the startup JCL, a number of system files aresearched until one is found.
Note: The TCPIPSERVICE resource definitions are for use only with theCICS-provided TCP/IP services, and have nothing to do with the z/OSCommunications Server IP CICS Sockets interface. The TCP/IP SocketInterface for CICS is supplied with z/OS Communications Server, which is anintegral part of z/OS and does not use the CICS SO domain.
216 CICS TS for z/OS: Installation Guide

Chapter 34. Enabling REXX for CICS
The REXX Development System for CICS and the REXX Runtime Facility forCICS--two program products collectively referred to as REXX for CICS--provideimproved productivity for a wide range of CICS activities.
REXX for CICS enables you to write and execute REXX programs in a CICSregion. These programs have access to most EXEC CICS commands, the CICSCEDA and CEMT transactions, and DB2 databases through the EXEC SQLinterface.
To enable your CICS system to provide the facilities of REXX for CICS, perform thefollowing steps:
v Step 1-- Consider your customization needs for REXX, see “Customizationinformation for REXX” on page 219.
You might prefer to familiarize yourself with the procedure at the first reading byignoring customization. (We intentionally show this step at the beginning andagain at the end of the list to cater for those working through the list who need itfirst, and those reading it for the first time who would benefit from covering thetopic last.)
v Step 2--“Step 1--Modify your RDO definitions to add required entries.”
v Step 3--“Step 2--Create the RFS filepools.”
v Step 4--“Step 3--BIND the CICSQL program to your DB2 plan” on page 218.
v Step 5--“Step 4--Add DD statements to your CICS startup job” on page 218.
v Step 6--“Step 5--Modify member CICSTART” on page 218.
v Step 7--“Step 6--Format the RFS filepools” on page 218.
v Step 8--“Step 7--Verifying the installation” on page 219.
v Step 9--“Step 8--Accessing the supplied softcopy documentation” on page 219.
v Step 10--“Customization information for REXX” on page 219 (if you choose toskip step 1).
Step 1--Modify your RDO definitions to add required entriesJob CICRDOR (for Runtime Facility) or job CICRDOD (for Development System) indata set CICSTS31.REXX.SCICJCL adds the entries needed by the product,including REXX/CICS profiles, VSAM files, programs, transactions, and transientdata queues. The transient data queues are used for REXX/CICS IMPORT andEXPORT commands. The jobs also contains the definitions for the REXX/CICSSQL interface that authorize the transactions to the DB2 plan. Review “Changingsupplied CICS transaction codes” on page 220 if you plan to modify the transactionIDs and also review “RFS filepool definitions” on page 221 if you plan to change theREXX file system (RFS) pool names or the number of pools to install. Edit the JCL(ensuring that you uncomment the entries as explained in comments at thebeginning of the JCL) and run the job.
A return code of 4 is acceptable.
Step 2--Create the RFS filepoolsJob CICVSAM in data set CICSTS31.REXX.SCICJCL defines the clusters neededto create the VSAM data sets needed for the RFS filepools. See “RFS filepooldefinitions” on page 221 for customizing information about RFS filepools.
© Copyright IBM Corp. 1989, 2010 217

You receive a condition code of 8 for the delete control statements if the VSAMdata sets do not exist. You receive a condition code of 0 for the define clustercontrol statements if the job runs correctly.
Step 3--BIND the CICSQL program to your DB2 planJob CICBIND in data set CICSTS31.REXX.SCICJCL binds CICSQL to the correctDB2 plan. Edit and run the job.
You might receive condition code 4 for the job depending upon the level of DB2being used.
Step 4--Add DD statements to your CICS startup jobYou need to add the following DD statements to your CICS startup job. See“Special exec data sets used by the REXX Development System” on page 222 formore information.//CICAUTH DD DSN=CICSTS31.REXX.SCICCMDS,DISP=SHR//CICEXEC DD DSN=CICSTS31.REXX.SCICEXEC,DISP=SHR//CICUSER DD DSN=CICSTS31.REXX.SCICUSER,DISP=SHR
Additionally a DD statement for CICSTS31.REXX.SCICLOAD must be added to theDFHRPL concatenation.
Step 5--Modify member CICSTARTModify member CICSTART in data set CICSTS31.REXX.SCICEXEC. See“Customization information for REXX” on page 219 for more information.
Step 6--Format the RFS filepoolsBring up the CICS region and sign onto the CICS region with a userid defined asan authorized user. Enter REXX, the default transaction id associated with theCICRXTRY exec. You should see the following line at the top of the screen, "Entera REXX command or EXIT to quit" and a "READ" in the lower right hand corner. Thecursor is in the lower left hand corner. You have now entered the supplied execwhich allows the execution of REXX and REXX/CICS commands interactively.
You may now prepare the filepools for use by entering the command: ’FILEPOOLFORMAT pool1’ where pool1 should be substituted by the filepool name youspecified in the CICSTART exec.
Note: The command should be entered as shown, including the apostrophes.
The interactive environment will echo each command at the next available line onthe screen and any requested output will also be displayed. The FILEPOOL FORMATcommand does not display any information. To determine whether the FILEPOOLFORMAT command worked successfully, enter "SAY RC". If a "0" is displayed on thenext available line, the FILEPOOL FORMAT command was successful.
Continue this process until all RFS filepools have been formatted. You only have toformat the filepool when a new filepool has been defined, or if you delete andredefine the clusters for an existing filepool.
If, in the process of formatting the filepools or interactively executing REXX orREXX/CICS commands and instructions, you fill the screen, a "MORE" indicator will
218 CICS TS for z/OS: Installation Guide

appear at the bottom right hand corner. To clear the screen, press the ENTER key.Any time you want to clear the screen of data, you may press the CLEAR key. Toexit from the interactive environment, you may press the PF3 key which simulatesthe entering of the "EXIT" REXX instruction. You may also enter the "EXIT"instruction yourself.
The interactive environment also provides for recalling previously enteredcommands. This is done by pressing the RETRIEVE key. The system has a defaultsetting for this key of PF12. This may be customized using the SETSYS RETRIEVEcommand. Pressing the RETRIEVE key causes the previously entered line to bere-displayed at the input location. You can then modify this area if required andre-execute the instruction by pressing ENTER. Pressing the RETRIEVE key multipletimes will continue to bring the next previously entered command to the input area.
Step 7--Verifying the installationTo verify the installation has been successful, three execs have been supplied.From the interactive REXX environment, enter, CALL CICIVP1. The exec willindicate what should occur.
Step 8--Accessing the supplied softcopy documentationThe REXX Development System for CICS/ESA and the REXX Runtime Facility forCICS/ESA Guide and Reference manual is included on the distribution tape in threedifferent softcopy formats.
The supplied data set CICSTS31.REXX.SCICDOC contains two members.
Member CICR3270 contains the manual in LIST3270 format, a format that has an80-character record length. CICR3270 is used as input by the online help facilitywhich is described in “Online HELP facility” on page 223.
Member CICR3820 contains the manual in LIST3820 format. Job CICBPRNT indata set CICSTS31.REXX.SCICJCL contains a sample job, which may be modifiedand executed, that prints the manual to a device which supports LIST3820formatted data.
The supplied data set CICSTS31.REXX.SCICBOOK contains one member,CICRBOOK. It contains the manual in BookManager/read format. If you haveBookManager® installed you may use this data set to view the manual.
Customization information for REXXThis section provides customizing information. It should be reviewed prior toperforming the steps listed in “Step 1--Modify your RDO definitions to add requiredentries” on page 217. It covers the following topics:
v “Changing supplied CICS transaction codes” on page 220.
v “RFS filepool definitions” on page 221.
v “TD queues needed for IMPORT and EXPORT commands” on page 221.
v “SQL definitions used for authorizing transactions to use DB2” on page 221.
v “Special exec data sets used by the REXX Development System” on page 222.
v “Special USER ids and their usage” on page 222.
v “Other considerations” on page 223.
v “Online HELP facility” on page 223.
Chapter 34. Enabling REXX for CICS 219

Changing supplied CICS transaction codesThere are three transaction ids supplied by the product. They are: REXX, EDIT, andFLST. You can change these supplied transaction ids.
The functions of REXX, EDIT, and FLSTThe functions of REXX, EDIT, and FLST are:
REXX is the default transaction id.
v If no additional operands are supplied the CICRXTRY exec starts.CICRXTRY allows the user to interactively enter REXX instructions andexecute them.
v If REXX is entered and is followed by a string (separated from REXX byblanks), the string is interpreted as a REXX exec name followed byoperands that are passed to the named REXX exec. This action causesthe named exec to execute.
When the REXX exec ends, control is returned to CICS.
EDIT is the transaction id associated with the REXX Development System editor.
v If no additional operands are supplied the CICEDIT exec starts and thefile "NONAME" in the user's current RFS directory is opened for editing.
v If EDIT is entered with an additional operand separated from thetransaction id with a blank, the operand is interpreted as the name of aparticular file in the user's current directory which is to be opened forediting.
When the EDIT session ends, control is returned to CICS.
FLST is the transaction id associated with the REXX Development System file listexec, CICFLST.
v If no additional operands are supplied, the CICFLST exec starts and thecontents of the user's current RFS directory are displayed.
v If FLST is entered with an additional operand separated from thetransaction id with a blank, the operand is interpreted as the name of aparticular RFS directory whose contents are to be listed.
When the FLST session ends, control is returned to CICS.
Changing the supplied transaction idsYou can change the names of the supplied transaction ids, and you can addadditional transactions which will call your own execs.
v The DEFTRNID commands in the member, CICSTART, in data setCICSTS31.REXX.SCICEXEC define the supplied transaction ids REXX, EDIT,and FLST, and associate them with their execs.
If you choose to change the supplied entries make sure that you update the RDOdefinitions to match your changes. If you do not want users to call the editor orfile list execs directly from CICS, you can delete the DEFTRNID commands, foreither or both of them, from CICSTART and also from the RDO definitions. Userswill not be allowed access to these directly from CICS. Ensure that you do notremove the DEFTRNID statement for the CICRXTRY exec.
v If you want to add additional transactions which call your own execs directly fromCICS, add RDO definitions for the transaction ids and add further DEFTRNIDcommands to your CICSTART exec. Your newly defined transactions becomeavailable to your users when you restart your CICS system. An authorized user
220 CICS TS for z/OS: Installation Guide
can enter the DEFTRNID command directly to give immediate availability, butuntil the CICSTART member is changed, these definitions are lost when CICS isrestarted.
RFS filepool definitionsThe supplied member, CICVSAM in CICSTS31.REXX.SCICJCL, creates the VSAMdata sets for two RFS filepools. The names for these VSAM data sets can bechanged to match your installation standards. If you do change these names makesure to make matching changes to the member, CICRDOD, as well. Since the RDOdefinitions supplied contain the data set names, DD statements are not needed inthe CICS startup job. This technique can be used to add additional files to an RFSpool or to add additional RFS filepools without restarting your CICS system.
The FILEPOOL DEFINE commands in member, CICSTART in data setCICSTS31.REXX.SCICEXEC have two purposes. The first is to define the names ofthe supplied filepools. They are: POOL1 and POOL2. You can modify these namesto your installation standards. They can be from 1 to 8 characters. They should notcontain special characters, “:” or “\”. The second purpose is to associate the filepoolids to the FCT definitions for the VSAM data set used for its directory and the firstVSAM file used for data storage.
If you want to add additional RFS filepools to your system you need to add RDOdefinitions and add FILEPOOL DEFINE commands to your CICSTART member. Ifyou intend to allow users to add RFS files to the new filepool you must define thefilepool to include a \USERS directory.
To make these new filepools available for use, you must restart CICS. However,you can also add filepools while your CICS system is active as follows.
v add the RDS definitions for the new files and define them using a batch job
v then get an authorized user to enter the FILEPOOL DEFINE command and theFILEPOOL FORMAT command
v be sure to modify CICSTART or your new definitions are lost when you restartyour CICS system
TD queues needed for IMPORT and EXPORT commandsThe REXX Development System uses dynamic allocation to IMPORT membersfrom a partitioned data set or to EXPORT RFS files to a partitioned data set. Themember CICRDOD in data set CICSTS31.REXX.SCICJCL defines three TransientData entries used as input for IMPORT and 3 Transient Data entries for output forEXPORT. This allows three users to concurrently IMPORT and three users toconcurrently EXPORT from and to partitioned data sets.
Modify the number of TDQ entries to suit your needs, but you should allow for atleast one input and one output entry. The TDQUEUE NAME must begin with REXand be suffixed with a valid character. Ensure there are no other applications usingTDQUEUE names that begin with REX because IMPORT/EXPORT will use themand may cause files to become corrupted.
SQL definitions used for authorizing transactions to use DB2The member CICRDOD in data set CICSTS31.REXX.SCICJCL authorizes thetransactions, REXX, EDIT, FLST, and DXB0 to use the DB2 plan. The first three ofthese transactions are REXX for CICS transactions and the DXB0 transaction isadded if you have OfficeVision/MVS and want to use DB2 interface calls which may
Chapter 34. Enabling REXX for CICS 221

run under the OV/MVS transaction id. If you choose to modify the suppliedtransactions for the REXX Development System, you need to modify the DB2 entrydefinitions also.
If you implement new transactions which use the DB2 interface code then youshould also add these DB2 entry definitions to your RDO group.
Special exec data sets used by the REXX Development SystemThere are three data set concatenations which are used by the REXX DevelopmentSystem which have no FCT entries. They are the DD names, CICCMDS, CICEXEC,and CICUSER. These data sets are partitioned data sets and are accessed usingMVS facilities.
CICCMDSThe CICCMDS DD name concatenation should start by referencing the dataset CICSTS31.REXX.SCICCMDS. This data set contains those execs whichimplement REXX Development System authorized commands. Onlyauthorized users or execs authorized to use authorized commands mayaccess these execs. If you choose to extend the REXX DevelopmentSystem with your own authorized commands, you should concatenate yourdata set to this DD name concatenation.
CICEXECThe CICEXEC DD name concatenation should start by referencing the dataset CICSTS31.REXX.SCICEXEC. This data set contains those execs whichare supplied by the REXX Development System that use authorizedcommands. If you choose to extend the REXX Development System withyour own execs which use authorized commands then you shouldconcatenate your data set to this DD name concatenation.
CICUSERThe CICUSER DD name concatenation should start by referencing the dataset CICSTS31.REXX.SCICUSER. This data set contains those execs whichare supplied by the REXX Development System that do not use authorizedcommands. If you choose to extend the REXX Development System withyour own execs which do not use authorized commands then you shouldconcatenate your data set to this DD name concatenation.
The facilities used to access these data set concatenations use CICS WAITEXTERNAL capabilities to avoid placing the CICS region into a wait.
Special USER ids and their usageIt is recommended that external security be used in the CICS environment. This isneeded because individual user's information is maintained by the REXXDevelopment System by the user's userid designation. Each user should have hisown identification and there should not be two users signed on to the REXXDevelopment System with the same userid at the same time. Two users with thesame userid operating at the same time could have unusual results.
If a user is not signed on to the CICS region then the special userid of “*RCUSER*”is used to access the RLS and RFS facilities.
Authorized users are identified to the REXX Development System through theAUTHUSER command. This command is an authorized command and can only be
222 CICS TS for z/OS: Installation Guide

used by an authorized user or an exec which is authorized to use authorizedcommands. CICSTART is such an exec because it resides in the CICEXEC DDname concatenation.
The member, CICSTART in the supplied data set CICSTS31.REXX.SCICEXEC thenshould be modified to contain an AUTHUSER statement to identify at least oneuserid which should be an authorized user. It is important to add the AUTHUSERstatement after the existing AUTHUSER statement for RCUSER. For example:
’AUTHUSER RCUSER’IF RC ¬= 0 THEN EXIT RC
’AUTHUSER your-userid’IF RC ¬= 0 THEN EXIT RC
You could also call another exec of your choosing, within the CICEXECconcatenation, which could contain the userids of those users who should beauthorized users.
Other considerationsThe member, CICSTART in data set CICSTS31.REXX.SCICEXEC, contains defaultdefinitions for the REXX Development System. It is executed when the first userwho executes a transaction that uses the CICREXD program after the CICS systemhas been started. This exec should be updated with any changes in customization ifthose changes are required to be effective across CICS executions.
The REXX Development System provides the capability to execute execs in eitherpseudo-conversational or conversational mode. The system default forconversational mode is specified with the SETSYS PSEUDO statement in themember, CICSTART in the data set CICSTS31.REXX.SCICEXEC. The defaultsupplied provides for pseudo-conversational to be used. CICSTART must run inconversational mode because the system has not yet been initialized enough toensure correct operation.
The CICSTART member also contains EXECLOAD commands which arecommented as shipped. EXECLOADing execs will reduce the amount of storageused by the REXX Development System because users will then share the sameexec. Also performance may be increased because these execs will not have to beloaded into CICS memory each time they are executed. EXECLOADed execs areused before any other execs. Therefore, if you EXECLOAD an exec "TEST.EXEC"and you have an exec in your RFS current directory by the same name, you will notbe able to execute your RFS copy. Care should then be used both in the naming oryour execs and EXECLOADing them. The authorization associated with the specialDD names is maintained when execs are EXECLOADed from those DD nameconcatenation.
Online HELP facilityAn online HELP facility is provided which may be used as an example of theREXX/CICS panel facility. It provides the means to search and display theLIST3270 manual which is supplied with the product. There are several steps whichmust be done in order to activate the online help.
Note: If PTF maintenance has been applied that affects data sets for the procedureoutlined below, then you should use the target library; otherwise, thedistribution library should be used.
Chapter 34. Enabling REXX for CICS 223

First, modify member CICSTART in the data set CICSTS31.REXX.SCICEXEC toreflect the correct RFS filepool and path where the online help files should be. Ifyou choose to use the default no changes to CICSTART are necessary.
Next copy the supplied data set CICSTS31.REXX.SCICDOC to a data set whosehighest level data set qualifier matches the userid of the user who will be executingthe CICHPREP exec. The reason for this is the supplied security exit for theREXX/CICS IMPORT and EXPORT commands checks the highest level qualifierand it must match the userid for the user who issues the IMPORT command.
Next copy the supplied data set CICSTS31.REXX.SCICPNL to a data set whosehighest level data set qualifier matches the userid of the user who will be executingthe CICHPREP exec. This data set contains the panel definitions which are used bythe online help. They must be IMPORTed into the RFS filepool and path defined forthe online help.
Next sign onto REXX/CICS using the REXX transaction id. If you have changed thedefault transactions, this is the transaction id associated with the CICRXTRY exec.Issue the command, 'EXEC CICHPREP'. Follow the instructions issued by the exec.This exec will reads the LIST3270 format of the manual from the data set youname, into the RFS directory specified in CICSTART. It also splits the manual intomultiple files for usage by the online help. Additionally, the panels used by theonline help are IMPORTed into the RFS system.
The online HELP facility is now ready for use.
There are several ways the user may access the online HELP.
Enter 'HELP' on the command line from the interactive environment and a table ofcontents is displayed. You also may enter this command from the command line ofthe REXX/CICS editor or the REXX/CICS filelist facilities.
Entering 'HELP xxxxx' searches the INDEX of the manual for the xxxxx entry. Iffound you are taken directly to that section of the manual.
There also is a HELP key defined for the editor and the filelist facility. It is defined inthe customizing macros for the editor and the filelist facilities. The supplied defaultfor this key is PF1. You may choose to modify the supplied default by modifyingthese profiles.
224 CICS TS for z/OS: Installation Guide

Part 4. CICS verification
This part describes the processes and procedures you should follow to run theinstallation verification procedures for CICS. It contains the following chapters
v Chapter 35, “Running the installation verification procedures,” on page 227.
© Copyright IBM Corp. 1989, 2010 225

226 CICS TS for z/OS: Installation Guide

Chapter 35. Running the installation verification procedures
After you have installed CICS, and applied any necessary service, you can use theCICS-supplied installation verification procedures (IVPs) to confirm that CICS isoperational.
There are two IVP jobs:
1. DFHIVPBT (verify batch)This job starts up CICS, specifying a pair of sequential input and outputdevices (CARDIN and PRINTER) to be used instead of an ordinaryterminal. It then executes a number of CICS transactions that are read fromCARDIN. The last transaction in the input stream shuts down CICS.
2. DFHIVPOL (verify online)This job can run CICS with either XRF=NO, or XRF=YES. It is generatedwith XRF=NO specified as an override, which you change when you areready to verify CICS with XRF.
You can use this CICS region to automatically install (autoinstall) an IBM3270 Information Display System terminal, with which you can:
v Use the master terminal transaction, CEMT. You can also use CEMTfrom the MVS system console. For information about using CEMT, seethe CICS Supplied Transactions manual.
v Use the resource definition online transaction, CEDA. For informationabout using CEDA, see the CICS Resource Definition Guide .
v Use the sample application transaction AMNU, to access the sampleVSAM file, FILEA. For a description of the FILEA sample applications,see the CICS 4.1 Sample Applications Guide .
Before you run the IVP jobs, you will need to prepare your system. The steps youneed to perform are described in “Preparation for running the IVPs.”
Preparation for running the IVPsPerform the following steps:
v Create the CICS data sets for the IVP jobs
v Install the CICS SVC for the IVP jobs
v Define and activate the CICS applids
v Authorize the IVP userid
v Review security requirements for the IVP jobs
v Define log streams
v Specify system initialization parameters for the IVP jobs
Create the CICS data sets for the IVP jobsBefore you can run any of the CICS-supplied IVP jobs, create the data sets thatthey use. For further information about creating the data sets for the IVP jobs, seeChapter 28, “Creating the CICS data sets,” on page 189.
Install the CICS SVC for the IVP jobsAll the IVP jobs require the CICS Type 3 SVC, which must be installed in the LPA.If you have not already installed the CICS SVC in the LPA (as described under
© Copyright IBM Corp. 1989, 2010 227

Chapter 14, “Installing CICS modules in the MVS link pack area,” on page 107), doso now before attempting to run any of the IVP jobs. The IVP jobs do not use theType 6 SVC (DFHHPSVC).
Define and activate the CICS applidsIf you want to use VTAM with a CICS region started by any of the CICS IVP jobs,create and activate a VTAM APPL definition for the CICS regions’s applicationidentifier (applid). The applid defined to VTAM must match the applid that isspecified on the APPLID system initialization parameter that is used by the IVP job.For example, to be able to logon to the CICS region that is started by theDFHIVPOL job, you must do one of the following:
v Create and activate an APPL definition for your own applid, which you specify onthe APPLID parameter of the DFH$SIP1 member of the SYSIN data set.
v Define and activate an APPL definition for the default applid DBDCCICS, whichyou specify on the APPLID parameter of the DFH$SIP1 member of the SYSINdata set.
For more information about creating and activating VTAM APPL definitions forCICS, see Chapter 13, “Defining CICS regions as applications to VTAM,” on page99 and “Naming conventions” on page 190.
Further, if you want to use VTAM cross-domain services to communicate betweenCICS regions on separate MVS images, you must create and activate VTAMCDRSC definitions in both MVS images involved in the communication. For moreinformation about creating and activating VTAM CDRSC definitions for CICS, see“Cross-domain considerations” on page 101.
Authorize the IVP useridTo run the IVP jobs with external security, you must define to RACF an IVP defaultCICS userid that has authority to run the transactions used as part of the IVP jobs.These transactions include the CICS-supplied transactions that are listed inTable 16. The level of authority that is required by the IVP userid depends on whatsecurity you want to use for the IVP jobs. For more information, see “Reviewsecurity requirements for the IVP jobs” on page 229.
Note: On a production system the default user should not have access to anyCICS-supplied transactions except those you need in your CICSenvironment. The resource access authorizations that you give to the defaultuser should clearly be limited to those resources that you intend to beuniversally available, and therefore not restricted in any way.
For information about the security requirements for CICS-supplied transactions, andabout CICS security in general, see the CICS RACF Security Guide .
Table 16. Transactions used as part of the IVP jobs
Application Transactions
DFH$BTCH CWTO, CEMT, CEOT, CSFE
FILEA samplesDFH$MNU AMNU, MENU, PMNU, DMNUDFH$ALL AINQ, INQY, PINQ, DINQ
AADD, ADDS, PADD, DADDAUPD, UPDT, PUPD, DUPD
228 CICS TS for z/OS: Installation Guide

Table 16. Transactions used as part of the IVP jobs (continued)
Application Transactions
DFH$xBRW ABRW, BRWS, PBRW, DBRWDFH$REN AORD, OREN, PORD, DORDDFH$xCOM AORQ, OREQ, PORQ, DORQDFH$REP AREP, REPT, PREP, DREP
Other functions CETR, CEDA, CMAC, CMSG, CSGM
Review security requirements for the IVP jobsYou can run the IVP jobs with or without external security.
As supplied, the system initialization table, DFHSIT, used by the IVP jobs, specifiesthat external security is on. However, the IVP jobs have been set up with SEC=NO,indicating that external security is not on. DFHSIT also specifies that the IVP jobsare subject to transaction security (XTRAN=YES), resource security (Xyyy=YES),and command security (XCMD=YES).
Note: As supplied, the DFH$SIP2 member of the SYSIN data set used by theDFHIVPBT job specifies the SIT override SEC=NO, so that you can run thisjob without external security.
If you choose to run the IVP jobs with external security, you must:
v Define CICS resource profiles to RACF.
v Define an IVP default CICS userid to RACF.
v Specify the IVP userid on the DFLTUSER=userid system initialization parameter.
You must also give the IVP userid sufficient authority to use transactions andresources that are needed to run the IVP jobs. That is, you must:
v Authorize the IVP userid to run the transactions that are used as part of the IVPjobs. (See Table 16 on page 228.) To do this you must add the IVP userid, withREAD access, to the access list of the RACF profiles for the transaction memberclass (TCICSTRN) or the transaction group class (GCICSTRN).
If you define the transactions as prefixed resources, you must also specify thesystem initialization parameter SECPRFX={YES |prefix} for the IVP jobs.
v Authorize the IVP userid to access the resources that are used by thetransactions. To do this you must add the IVP userid, with appropriate authority,to the access list for the resource class profiles.
v Authorize the IVP userid to issue SP-type commands using the CEMT masterterminal transaction. To do this, you must add the IVP userid, with appropriateauthority, to the access list of the RACF profiles for the resource member class(CCICSCMD) or the resource group class (VCICSCMD). You must give the IVPuserid UPDATE access for the SHUTDOWN resource class, otherwise the useridwill not be able to terminate the IVP jobs. You should also give the IVP useridUPDATE access for the DUMPDS and SYSTEM resource classes, if theDFHIVPBT job is to be run with external security.
For information about implementing external security, see the CICS RACF SecurityGuide. Alternatively, you can run the IVP jobs with limited security, for example:
Chapter 35. Running the installation verification procedures 229
#

v Without command security (XCMD=NO), the IVP userid would be able to run theIVP jobs without the need for authority to use the CEMT SP-type commands andthe resources that they access.
v With only transaction security (Xyyy=NO including XCMD=NO), the IVP useridwould be able to run the IVP jobs if authorized only to use the transactions usedas part of the IVP jobs.
Define log streamsCICS automatically attempts to connect to its system log stream, unless you definea journal model resource definition to define the log stream as TYPE(DUMMY). Thismeans that you need to decide whether you want to run the IVPs with system logs,or to run with dummy logging.
If you decide to run with actual log streams, see Chapter 24, “Defining the loggerenvironment for CICS journaling,” on page 143 for information about defining logstreams.
Alternatively, you can define a CICS JOURNALMODEL resource definition withTYPE(DUMMY) to avoid having to define log streams. If you want to run the IVPswith the minimum effort:
v Define JOURNALMODEL resource definitions in the CSD for the primary andsecondary system logs, DFHLOG and DFHSHUNT respectively, specifyingTYPE(DUMMY); see Figure 25 for a sample job.
v Add the CSD group that contains your dummy system log journal models to yourown group list, and include your group list on the GRPLIST system initializationparameter.
Note that your group list must follow the IBM-supplied list DFHLIST. DFHLISTincludes group DFHLGMOD (which contains DFHLOG and DFHSHUNTJOURNALMODEL definitions) Concatenating your list after DFHLIST ensuresthat your DUMMY definitions replace the IBM definitions.
//CSDLGSTR JOB 1,BELL,MSGCLASS=A,MSGLEVEL=(1,1),CLASS=A//CSDUP EXEC PGM=DFHCSDUP,REGION=1M,PARM=’CSD(READWRITE)’//STEPLIB DD DSN=CICSTS31.SDFHLOAD,DISP=SHR//DFHCSD DD DSN=CICSTS31.CICSH###.DFHCSD,DISP=SHR//SYSPRINT DD SYSOUT=*//SYSABOUT DD SYSOUT=*//SYSABEND DD SYSOUT=*//SYSUDUMP DD SYSOUT=*//SYSIN DD *** DEFINE JOURNAL MODELS FOR CICS LOG STREAMS AS DUMMY*DEFINE JOURNALMODEL(DFHLOG) GROUP(LOGTEST)DESCRIPTION(DEFINE SYSTEM LOG AS DUMMY)
JOURNALNAME(DFHLOG)TYPE(DUMMY)
*DEFINE JOURNALMODEL(DFHSHUNT) GROUP(LOGTEST)DESCRIPTION(DEFINE SYSTEM LOG AS DUMMY)
JOURNALNAME(DFHSHUNT)TYPE(DUMMY)
/*//
Figure 25. Sample job to define DUMMY JOURNALMODELs for CICS system logs
230 CICS TS for z/OS: Installation Guide
##########################

Specify system initialization parameters for the IVP jobsAll the IVP jobs use the system initialization parameters that are specified in theassociated DFH$SIPn member of the SYSIN data set. The DFH$SIPn members, assupplied by CICS, default to the unsuffixed SIT, DFHSIT, and the resources definedto CICS are adequate only for a basic CICS region. For example, in the case of theDFHIVPOL job, the resources defined limit the number of terminals you can use.
The DFH$SIPn members of the SYSIN data set also contain some systeminitialization parameters to exclude CICS resources not required by the IVP jobs, orto include some not specified by the default SIT.
One such parameter is TCT=5$, specifying the CICS sample terminal control table,in the hlq.SDFHLOAD library. This TCT defines the pair of sequential input andoutput devices, CARDIN and PRINTER. (These are the only devices that aredefined in DFHTCT5$.)
The DFH$SIPn members of the SYSIN data set may need to be edited for:
v The default SVC number is 216. To use a different SVC number, specifyCICSSVC=nnn in the appropriate DFH$SIPn member. For more informationabout defining CICS SVCs, see “Defining the CICS SVCs to your MVS” on page93.
The IVP jobs do not require the Type 6 SVC.
v The applid used is CICSIVP1. To use a different applid, change the systeminitialization parameter (APPLID=CICSIVP1) in the appropriate DFH$SIPnmember.
v The IVP jobs had external security switched off. To run with security (SEC=YES),define a suitable default userid (for example IVPUSER) with the requiredauthority to run the IVP transactions. Add DFLTUSER=IVPUSER in theappropriate DFH$SIPn member. For more information about defining the IVPuserid, see “Authorize the IVP userid” on page 228.
Transactions can be defined as prefixed resources by using the IVP userid,IVPUSER or any other prefix, as the prefix (for example, IVPUSER.CEMT orprefix.CEMT). To do this, add SECPRFX=YES, or SECPRFX=prefix in theappropriate DFH$SIPn member for the IVP job.
This enables transactions to be run as part of the IVP jobs without affecting otherCICS regions. For example, when the DFH$BTCH batch stream is run, CICSsends authorization requests to RACF for the transactions and identifies them asIVPUSER.xxxx, where xxxx is the transaction ID (CWTO, CEMT, and so on).
v Language Environment support, for all the high-level language sample programs,was added as described in the CICS System Definition Guide . CICS requireseither pre-defined CSD definitions, for the Language Environment modules, to beinstalled or Program autoinstall to be active.
The IVP jobs include the required DD statements for the Language Environmentlibraries as comments.
v The resources for the CICS messages facility were defined, as described in“Resources for the CICS messages facility, CMAC” on page 232, and theDFHCMAC resource group added to a group list used for the IVP jobs.
v The IVP jobs run with auxiliary trace switched on (AUXTR=ON), and the auxiliarytrace data set switching facility set to switch once only (AUXTRSW=NEXT).
Other notes about changes to the system initialization parameters for the IVP jobs,and about the IVP jobs generally, are in the sections that describe the IVP jobs.
Chapter 35. Running the installation verification procedures 231
##

If you want to use system initialization parameters to modify or enhance the scopeof the IVP jobs, see the CICS System Definition Guide for details about theparameters.
Resources for the CICS messages facility, CMACYou can use the CICS messages facility (CICS-supplied transaction CMAC) toprovide the messages and codes descriptions online. Before you can use thisfacility, you must create and initialize the CICS messages data set DFHCMACD,define the resources needed by the facility, and make them available to your CICSregion.
For information about creating and initializing the DFHCMACD data set, see“Creating the CICS messages data set, DFHCMACI job” on page 193.
The file DFHCMACD, managed by CICS file controle, accesses the DFHCMACDdata set. You must create a definition for this file in the CSD. The CICS-supplieddefinition for the DFHCMACD file and other resources that are needed by the CICSmessages facility are in the CSD group DFHCMAC. The CICS startup procedure (inthe IVP jobs) has a DD statement for the CMAC file, but for dynamic allocation youshould copy the supplied resource definition for the DFHCMACD file and add theDSNAME option.
You should specify the DFHCMAC group of resources for the CICS messagesfacility only in those CICS regions that need to use the facility; for example on someterminal-owning regions, but perhaps not on data-owning regions.
The CICS startup procedure, DFHSTARTAll the IVP jobs include a procedure to start up CICS. You can use this procedureas a basis for your own CICS startup procedures. This procedure, DFHSTART,comprises the following steps:1. CICSCNTL—determine whether CICS is to be started2. DTCNTL—determine whether dump and trace analysis is to be performed3. CICS—execute CICS4. PRTDMPA—print any contents of the CICS DFHDMPA dump data set5. PRTDMPB—print any contents of the CICS DFHDMPB dump data set6. PRTAUXT—print any contents of the auxiliary trace DFHAUXT data set7. PRTBUXT—print any contents of the auxiliary trace DFHBUXT data set.
The following symbolic parameters are defined in the IVP jobs:
INDEX1 is the high-level index of the CICS run-time datasets, as specified on the DSINFO parameter of theDFHISTAR job. Default: INDEX1=hlq
INDEX2 is the high-level index of the CICS load libraries, asspecified on the INDEX parameter of theDFHISTAR job. Default: INDEX2=hlq
REGNAM is the REGION name for a single or MRO region.Default: REGNAM=TR
REG defines the MVS region size for the CICS step.Default: REG=32M
START is the type of CICS startup to be performed.Default: START=AUTO
232 CICS TS for z/OS: Installation Guide

DUMPTR specifies whether dump and trace analysis isrequired. Default: DUMPTR=YES
RUNCICS specifies whether CICS is to be started.Default: RUNCICS=YES
OUTC is the output print class. Default: OUTC='*'
SIP is the suffix of the DFH$SIP member (in the SYSINdata set) to be used during CICS startup.Default: SIP=T
Notes:
1. The step CICS (to start up CICS) is executed only if you code RUNCICS=YES(the default). Code RUNCICS=NO if you want to perform dump and traceanalysis without starting CICS.
2. The steps PRTDMPA, PRTDMPB, DFHAUXT, and DFHBUXT are executed onlyif you specify DUMPTR=YES (the default).
3. When you run the DFHISTAR job, it overrides the default values in the IVP jobswith the values you specified in the DFHISTAR job.
DD statements for CICS data setsThe startup job step contains DD statements for the CICS data sets that are listedin Table 17.
Table 17. DD statements for CICS data sets in the DFHSTART procedure
DDname Description
SYSIN SYSIN data set, containing the DFH$SIPn members that specify systeminitialization parameter overrides.
DFHCMACD Messages data set, needed for the CICS messages transaction, CMAC.
FILEA Sample VSAM data set, needed by the FILEA sample applications.
DFHTEMP Auxiliary temporary storage data set, needed by the FILEA sampleapplications.
DFHINTRA Transient data intrapartition data set, needed by the FILEA sampleapplications.
DFHAUXTDFHBUXT
First auxiliary trace (A) data set.Second auxiliary trace (B) data set.The auxiliary trace data sets, DFHAUXT and DFHBUXT, are neededbecause the IVP jobs run with auxiliary trace switched on, and theauxiliary trace data set switching facility set to switch once only.
DFHLCD (Mandatory) CICS local catalog data set (VSAM), used by the CICSdomains to save some of their information between CICS runs, and topreserve this information across a cold start.
DFHGCD (Mandatory) CICS global catalog data set (VSAM), has a variety of uses,including: during a CICS run, holding resource definitions that are installed;and, during a controlled shutdown, recording part of the warm keypointinformation.
DFHCXRF Transient data extrapartition data set, used by CICS as the target formessages sent to any transient data destination before CICS hascompleted intrapartition transient data initialization. Use of this DDname isoptional, but if it is not used, any messages that would have been writtenhere are lost.
Chapter 35. Running the installation verification procedures 233

Table 17. DD statements for CICS data sets in the DFHSTART procedure (continued)
DDname Description
DFHLRQ The local request queue data set is used to store pending BTS requests;forexample, timer requests or requests to run activities. It is recoverable andused to ensure that, if CICS fails, no pending requests are lost. For moreinformation, see the CICS Business Transaction Services.
LOGUSR Data set for the extrapartition transient data destination, LOGA, used bythe CICS sample programs.
MSGUSR Data set for the extrapartition transient data destination, CSSL, used by anumber of CICS services.
PLIMSG Data set for the extrapartition transient data destinations used by PL/Iapplication programs. This data set is the destination for PL/I statistics andmessages (CPLI).
COUT Data set for the extrapartition transient data destinations used by C/370application programs. This data set is the destination for the C/370 outputdata streams, stdout (CCSO) and, indirectly, stderr (CCSE).
DFHDMPADFHDMPB
First transaction dump (A) data set. Second transaction dump (B) data set.The dump data sets are included because CICS always tries to open a
transaction dump data set, and issues a warning message if it is unable todo so for any reason.
DFHCSD (Mandatory) CICS system definition data set (VSAM).
Verify batch job, DFHIVPBTThe CICS-supplied verify batch job, DFHIVPBT, is tailored to your CICSenvironment and stored in the hlq.XDFHINST library when you run the DFHISTARjob.
Note: Before submitting the DFHIVPDB job, run the DFHRMUTL program to resetthe global catalog control record to perform an INITIAL start on the nextCICS startup.
This IVP comprises the following job steps:
1. Job step GENINPT unloads the member DFH$BTCH from the hlq.SDFHSAMPlibrary into the CARDIN data set (using the MVS utility program, IEBGENER).
2. Job step DFHSTART invokes the CICS initialization program, DFHSIP, tostartup CICS. The DFHSIP program reads startup system initializationparameters from the DFH$SIP2 member of the SYSIN data set.
The DFH$BTCH data set (see Figure 26 on page 235) is used as terminal input,and this should produce a printout similar to the sample output shown inFigure 28 on page 238.
234 CICS TS for z/OS: Installation Guide
#

Sample job log for the DFHIVPBT jobWhen you run the DFHIVPBT job, your job log should look similar to the exampleshown in Figure 27.
CWTO START OF BATCH STREAM DFH$BTCH\CEMT S TIME(120)\ EXIT TIME INTVL TO 120 MILLISECCEMT S DUMPDS SWITCH\ SWITCH FROM DUMP A TO BCEOT\ INQUIRE TERMINAL STATUSCSFE\ F. E. TERMINAL TEST REQUESTPRINT\ TO SEND ALL CHARACTERSTHIS MESSAGE HAS BEEN RECEIVED FROM THE TERMINAL AND IS BEING SENT BACK\END\ TO END THE TESTCSXX\ INVALID TRANSACTION IDENT.CWTO END OF BATCH STREAM DFH$BTCH - SHUTTING DOWN CICS\CEMT P SHUT\ NORMAL TERMINATION OF CICS
where \ is the End Of Data Input character X’E0’.
Figure 26. DFH$BTCH data set, input to the DFHIVPBT job
1 J E S 2 J O B L O G -- S Y S T E M M V 2 6 -- N O D E W I N M V S 2 C016.24.15 JOB35409 ---- TUESDAY, 18 JAN 2005 ----16.24.15 JOB35409 ICH70001I CICINST LAST ACCESS AT 16:23:52 ON TUESDAY, JANUARY 18, 200516.24.15 JOB35409 $HASP373 DFHIVPBT STARTED - INIT 60 - CLASS A - SYS MV2616.24.15 JOB35409 IEF403I DFHIVPBT - STARTED - TIME=16.24.1516.24.15 JOB35409 - --TIMINGS (MINS.)-- ----PAGING COUNTS---16.24.15 JOB35409 -JOBNAME STEPNAME PROCSTEP RC EXCP CPU SRB CLOCK SERV PG PAGE SWAP VIO SWAPS STEPNO16.24.15 JOB35409 -DFHIVPBT GENINPT 00 28 .00 .00 .00 175 0 0 0 0 0 116.24.15 JOB35409 -DFHIVPBT CICS CICSCNTL 01 20 .00 .00 .00 168 0 0 0 0 0 216.24.15 JOB35409 -DFHIVPBT CICS DTCNTL 01 19 .00 .00 .00 154 0 0 0 0 0 316.24.15 JOB35409 DFHPA1101 CICSIVP1 DFHSIT IS BEING LOADED.16.24.15 JOB35409 DFHPA1108 CICSIVP1 DFHSIT HAS BEEN LOADED. (GENERATED AT: MM/DD= 01/12 HH:MM= 13:57).16.24.15 JOB35409 DFHPA1100 CICSIVP1 OVERRIDE PARAMETERS FROM JCL EXEC STATEMENT: START=AUTO,SYSIN16.24.15 JOB35409 DFHPA1102 CICSIVP1 OVERRIDE PARAMETERS FROM SYSIN: �1�16.24.15 JOB35409 DFHPA1927 CICSIVP1 TCT=5$, SEQUENTIAL DEVICES 0002000016.24.15 JOB35409 DFHPA1927 CICSIVP1 TS=(,0), 0003000016.24.15 JOB35409 DFHPA1927 CICSIVP1 AUXTR=ON, 00040000
Figure 27. Sample job log for the DFHIVPBT job (Part 1 of 3)
Chapter 35. Running the installation verification procedures 235

16.24.15 JOB35409 DFHPA1927 CICSIVP1 AUXTRSW=NEXT, 0005000016.24.15 JOB35409 DFHPA1927 CICSIVP1 FCT=NO, 0007000016.24.15 JOB35409 DFHPA1927 CICSIVP1 XRF=NO, 0009000016.24.15 JOB35409 DFHPA1927 CICSIVP1 SEC=NO, 4000000016.24.15 JOB35409 DFHPA1927 CICSIVP1 SRT=NO, 4000010016.24.15 JOB35409 DFHPA1927 CICSIVP1 TRTABSZ=64, 4000020016.24.15 JOB35409 DFHPA1927 CICSIVP1 APPLID=CICSIVP1, 4000030016.24.15 JOB35409 DFHPA1927 CICSIVP1 CICSSVC=233, 4000040016.24.15 JOB35409 DFHPA1927 CICSIVP1 .END 7000000016.24.15 JOB35409 DFHPA1103 CICSIVP1 END OF FILE ON SYSIN.16.24.16 JOB35409 +DFHTR0103 TRACE TABLE SIZE IS 64K16.24.16 JOB35409 +DFHSM0122I CICSIVP1 Limit of DSA storage below 16MB is 5,120K. �2�16.24.16 JOB35409 +DFHSM0123I CICSIVP1 Limit of DSA storage above 16MB is 30M.16.24.16 JOB35409 +DFHSM0113I CICSIVP1 Storage protection is not active.16.24.16 JOB35409 +DFHSM0126I CICSIVP1 Transaction isolation is not active.16.24.16 JOB35409 +DFHDM0101I CICSIVP1 CICS is initializing.16.24.17 JOB35409 +DFHSI1500 CICSIVP1 CICS startup is in progress for CICS Transaction Server Version 3.1.016.24.17 JOB35409 +DFHDH0100I CICSIVP1 Document domain initialization has started.16.24.17 JOB35409 +DFHEJ0101 CICSIVP1 747
747 Enterprise Java domain initialization has started. Java is a747 trademark of Sun Microsystems, Inc.
16.24.17 JOB35409 +DFHLG0101I CICSIVP1 Log manager domain initialization has started.16.24.17 JOB35409 +DFHRX0100I CICSIVP1 RX domain initialization has started.16.24.17 JOB35409 +DFHSO0100I CICSIVP1 Sockets domain initialization has started.16.24.17 JOB35409 +DFHWB0109I CICSIVP1 Web domain initialization has started.16.24.17 JOB35409 +DFHXS1100I CICSIVP1 Security initialization has started.16.24.17 JOB35409 +DFHRX0101I CICSIVP1 RX domain initialization has ended.16.24.17 JOB35409 +DFHSI1501I CICSIVP1 Loading CICS nucleus.16.24.17 JOB35409 +DFHDU0304I CICSIVP1 Transaction Dump Data set DFHDMPA opened.16.24.17 JOB35409 +DFHXS1102I CICSIVP1 Security is inactive. �3�16.24.19 JOB35409 +DFHTR0113 CICSIVP1 Auxiliary trace is being started on data set DFHAUXT.16.24.19 JOB35409 +DFHCQ0100I CICSIVP1 Console queue initialization has started.16.24.19 JOB35409 +DFHCQ0101I CICSIVP1 Console queue initialization has ended.16.24.19 JOB35409 +DFHCQ0103I CICSIVP1 MVS console queue is open.16.24.19 JOB35409 +DFHCQ0200I CICSIVP1 CEKL transaction enabled.16.24.19 JOB35409 +DFHXS1101I CICSIVP1 Security initialization has ended.16.24.19 JOB35409 +DFHRM0140 CICSIVP1 Recovery manager autostart override found with value: ’AUTOINIT’.16.24.19 JOB35409 +DFHRM0149I CICSIVP1 Recovery manager autostart override record will be deleted.16.24.19 JOB35409 +DFHDH0101I CICSIVP1 Document domain initialization has ended.16.24.19 JOB35409 +DFHSO0101I CICSIVP1 Sockets domain initialization has ended.16.24.19 JOB35409 +DFHMN0105I CICSIVP1 Using default Monitoring Control Table.16.24.19 JOB35409 +DFHWB0110I CICSIVP1 Web domain initialization has ended.16.24.19 JOB35409 IEC031I D37-04,IFG0554P,DFHIVPBT,CICS,DFHAUXT,D306,P2P0C6,INST.CICSTS31.CICS.DFHAUXT16.24.19 JOB35409 +DFHTR0110 - AUXILIARY TRACE DATA SET DFHAUXT FULL - SWITCHING TO DFHBUXT16.24.19 JOB35409 +DFHMN0110I CICSIVP1 CICS Monitoring is inactive.16.24.19 JOB35409 IEC031I D37-04,IFG0554P,DFHIVPBT,CICS,DFHBUXT,D50B,P2P14B,INST.CICSTS31.CICS.DFHBUXT16.24.19 JOB35409 +DFHTR0109 - AUXILIARY TRACE DATA SET DFHBUXT FULL - AUXILIARY TRACE HAS BEEN STOPPED16.24.19 JOB35409 +DFHSI1502I CICSIVP1 CICS startup is Initial.16.24.19 JOB35409 +DFHTS0100I CICSIVP1 Temporary Storage initialization has started.16.24.19 JOB35409 +DFHLG0102I CICSIVP1 Log manager domain initialization has ended.16.24.19 JOB35409 +DFHSI1503I CICSIVP1 Terminal data sets are being opened.16.24.19 JOB35409 +DFHSI1592 CICSIVP1 CICS applid not (yet) active to VTAM.16.24.19 JOB35409 +DFHSI1572 CICSIVP1 Unable to OPEN VTAM ACB - RC=00000008, ACB Code=5A.16.24.19 JOB35409 +DFHKE0406I CICSIVP1 786
786 CICS is about to wait for predecessors defined in the MVS automatic786 restart management policy for this region.
16.24.20 JOB35409 +DFHKE0412I CICSIVP1 CICS WAITPRED call to automatic restart manager has completed.16.24.20 JOB35409 +DFHCP0101I CICSIVP1 CPI initialization has started.16.24.20 JOB35409 +DFHPR0104I CICSIVP1 Partner resource manager initialization has started.16.24.20 JOB35409 +DFHAI0101I CICSIVP1 AITM initialization has started.16.24.20 JOB35409 +DFHFC0100I CICSIVP1 File Control initialization has started.16.24.20 JOB35409 +DFHTD0100I CICSIVP1 Transient Data initialization has started.16.24.20 JOB35409 +DFHTS0101I CICSIVP1 Temporary Storage initialization has ended.16.24.20 JOB35409 +DFHTD0101I CICSIVP1 Transient Data initialization has ended.16.24.20 JOB35409 +DFHFC0101I CICSIVP1 File Control initialization has ended.16.24.20 JOB35409 +DFHCP0102I CICSIVP1 CPI initialization has ended.16.24.20 JOB35409 +DFHPR0105I CICSIVP1 Partner resource manager initialization has ended.16.24.20 JOB35409 +DFHAI0102I CICSIVP1 AITM initialization has ended.16.24.20 JOB35409 +DFHSI1511I CICSIVP1 Installing group list DFHLIST. �4�16.24.22 JOB35409 +DFHLG0103I CICSIVP1 System log (DFHLOG) initialization has started.16.24.22 JOB35409 IXG231I IXGCONN REQUEST=CONNECT TO LOG STREAM CICINST.CICSIVP1.DFHLOG 801
801 DID NOT SUCCEED FOR JOB DFHIVPBT. RETURN CODE: 00000008 REASON CODE: �5�801 0000080B DIAG1: 00000008 DIAG2: 0000F801 DIAG3: 05030004 DIAG4:801 05020010
16.24.24 JOB35409 +DFHLG0104I CICSIVP1 808
Figure 27. Sample job log for the DFHIVPBT job (Part 2 of 3)
236 CICS TS for z/OS: Installation Guide

Notes:
�1� For information about the system initialization parameters used by the IVP jobs,see page 231. (See also �2� below.)
�2� The DFHSM0122 and DFHSM0123 messages inform you of the limits availablefor the dynamic storage areas below and above 16MB. For information about thesestorage areas, see the CICS System Definition Guide.
Note: Storage for the extended read-only DSA, ERDSA, is obtained from read-onlykey 0 protected storage, because the default SIT specifiesRENTPGM=PROTECT.
�3� The DFHIVPBT job was run without external security active, because SEC=NOis specified as a SIT override parameter.
�4� The default group list, DFHLIST, is used for this run of the DFHIVPBT job.Non-default functions (for example, the CICS online messages facility) are notavailable, because their CICS resources are not defined in this group list.
808 System log (DFHLOG) initialization has ended. Log stream808 CICINST.CICSIVP1.DFHLOG is connected to structure LOG_GENERAL_008. �6�
16.24.24 JOB35409 +DFHLG0103I CICSIVP1 System log (DFHSHUNT) initialization has started.16.24.25 JOB35409 IXG231I IXGCONN REQUEST=CONNECT TO LOG STREAM 810
810 CICINST.CICSIVP1.DFHSHUNT DID NOT SUCCEED FOR JOB DFHIVPBT. RETURN810 CODE: 00000008 REASON CODE: 0000080B DIAG1: 00000008 DIAG2:810 0000F801 DIAG3: 05030004 DIAG4: 05020010
16.24.27 JOB35409 +DFHLG0104I CICSIVP1 817817 System log (DFHSHUNT) initialization has ended. Log stream817 CICINST.CICSIVP1.DFHSHUNT is connected to structure LOG_GENERAL_008.
16.24.27 JOB35409 +DFHAP1203I CICSIVP1 Language Environment is being initialized.16.24.27 JOB35409 +DFHAP1200 CICSIVP1 A CICS request to the Language Environment has failed. Reason code ’0011020’.16.24.27 JOB35409 +DFHAP1208 CICSIVP1 Language Environment cannot support the Cobol language. �7�16.24.27 JOB35409 +DFHAP1209 CICSIVP1 Language Environment cannot support the C/C++ languages. �7�16.24.27 JOB35409 +DFHAP1210 CICSIVP1 Language Environment cannot support the PL/I language. �7�16.24.27 JOB35409 +DFHAP1211I CICSIVP1 Language Environment initialization completed.16.24.27 JOB35409 +DFHWB1007 CICSIVP1 Initializing CICS Web environment.16.24.27 JOB35409 +DFHWB1008 CICSIVP1 CICS Web environment initialization is complete.16.24.27 JOB35409 +DFHSI1517 CICSIVP1 Control is being given to CICS.16.24.27 JOB35409 +DFHEJ0102 CICSIVP1 Enterprise Java domain initialization has ended.16.24.28 JOB35409 +DFHIVPBT SAMA START OF BATCH STREAM DFH$BTCH16.24.29 JOB35409 +DFHDU0303I CICSIVP1 Transaction Dump Data set DFHDMPA closed.16.24.29 JOB35409 +DFHDU0304I CICSIVP1 Transaction Dump Data set DFHDMPB opened.16.24.29 JOB35409 +DFHDU0305I CICSIVP1 Transaction Dump Data set switched to DFHDMPB16.24.34 JOB35409 +DFHIVPBT SAMA END OF BATCH STREAM DFH$BTCH - SHUTTING DOWN CICS16.24.35 JOB35409 +DFHTM1715 CICSIVP1 CICS is being quiesced by userid CICSUSER in transaction CEMT at terminal SAMA.16.24.35 JOB35409 +DFHDM0102I CICSIVP1 CICS is quiescing.16.24.35 JOB35409 +DFHTM1782I CICSIVP1 All non-system tasks have been successfully terminated.16.24.35 JOB35409 +DFHCQ0104I CICSIVP1 MVS console queue is closed.16.24.35 JOB35409 +DFHCESD CICSIVP1 SHUTDOWN ASSIST TRANSACTION CESD STARTING. SHUTDOWN IS NORMAL.16.24.37 JOB35409 +DFHRM0204 CICSIVP1 There are no indoubt, commit-failed or backout-failed UOWs.16.24.38 JOB35409 +DFHRM0130 CICSIVP1 Recovery manager has successfully quiesced.16.24.39 JOB35409 +DFHDU0303I CICSIVP1 Transaction Dump Data set DFHDMPB closed.16.24.39 JOB35409 +DFHKE1799 CICSIVP1 TERMINATION OF CICS IS COMPLETE.16.24.39 JOB35409 -DFHIVPBT CICS CICS 00 3549 .03 .00 .39 23015 0 1 446 0 1 416.24.39 JOB35409 -DFHIVPBT CICS PRTDMPA 00 135 .00 .00 .00 261 0 0 0 0 0 516.24.39 JOB35409 -DFHIVPBT CICS PRTDMPB 00 138 .00 .00 .00 257 0 0 0 0 0 616.24.42 JOB35409 -DFHIVPBT CICS PRTAUXT 00 1838 .01 .00 .03 13823 0 0 0 0 0 716.24.42 JOB35409 $HASP375 DFHIVPBT ESTIMATED LINES EXCEEDED16.24.42 JOB35409 $HASP375 DFHIVPBT ESTIMATE EXCEEDED BY 5,000 LINES16.24.42 JOB35409 $HASP375 DFHIVPBT ESTIMATE EXCEEDED BY 10,000 LINES16.24.42 JOB35409 $HASP375 DFHIVPBT ESTIMATE EXCEEDED BY 15,000 LINES16.24.43 JOB35409 $HASP375 DFHIVPBT ESTIMATE EXCEEDED BY 20,000 LINES16.24.43 JOB35409 $HASP375 DFHIVPBT ESTIMATE EXCEEDED BY 25,000 LINES16.24.43 JOB35409 $HASP375 DFHIVPBT ESTIMATE EXCEEDED BY 30,000 LINES16.24.43 JOB35409 $HASP375 DFHIVPBT ESTIMATE EXCEEDED BY 35,000 LINES16.24.43 JOB35409 $HASP375 DFHIVPBT ESTIMATE EXCEEDED BY 40,000 LINES16.24.43 JOB35409 -DFHIVPBT CICS PRTBUXT 00 1313 .01 .00 .02 13246 0 0 0 0 0 816.24.43 JOB35409 IEF404I DFHIVPBT - ENDED - TIME=16.24.4316.24.43 JOB35409 -DFHIVPBT ENDED. NAME-CICINST TOTAL CPU TIME= .06 TOTAL ELAPSED TIME= .4716.24.43 JOB35409 $HASP395 DFHIVPBT ENDED
Figure 27. Sample job log for the DFHIVPBT job (Part 3 of 3)
Chapter 35. Running the installation verification procedures 237

�5� These messages are issued when CICS is initialized and the log streams donot exist. CICS issues a request to create the log stream dynamically using MVSdefine log stream services.
�6� If system log initialization fails, CICS abends. (See also�1� in Figure 28.)
�7� If you want COBOL, C, C++ and PL/I languages, remove the comment marksfrom the SCEERUN and SCEERUN2 libraries, and increase the memory size forthe job.
Output from the DFHIVPBT jobOutput from the DFHIVPBT job (see Figure 28) includes CICS messages written toone of the extrapartition destinations, responses to the transactions in theDFH$BTCH data set, and an auxiliary trace.
DFHPG0101 01/18/2005 16:24:20 CICSIVP1 CICSUSER CSSY PPT entry for DFHWBLT has been added.DFHPG0101 01/18/2005 16:24:20 CICSIVP1 CICSUSER CSSY PPT entry for DFHWBPA has been added.DFHPG0101 01/18/2005 16:24:20 CICSIVP1 CICSUSER CSSY PPT entry for DFHWBPW has been added.DFHPG0101 01/18/2005 16:24:20 CICSIVP1 CICSUSER CSSY PPT entry for DFHWBPW1 has been added.DFHPG0101 01/18/2005 16:24:20 CICSIVP1 CICSUSER CSSY PPT entry for DFHWBPW2 has been added.DFHPG0101 01/18/2005 16:24:20 CICSIVP1 CICSUSER CSSY PPT entry for DFHWBPW3 has been added.DFHPG0101 01/18/2005 16:24:20 CICSIVP1 CICSUSER CSSY PPT entry for DFHWBPW4 has been added.DFHPG0101 01/18/2005 16:24:20 CICSIVP1 CICSUSER CSSY PPT entry for DFHWBST has been added.DFHPG0101 01/18/2005 16:24:20 CICSIVP1 CICSUSER CSSY PPT entry for DFHWBTC has been added.DFHPG0101 01/18/2005 16:24:20 CICSIVP1 CICSUSER CSSY PPT entry for DFHWBTL has been added.DFHPG0101 01/18/2005 16:24:20 CICSIVP1 CICSUSER CSSY PPT entry for DFHWBTRU has been added.DFHPG0101 01/18/2005 16:24:20 CICSIVP1 CICSUSER CSSY PPT entry for DFHWBTTA has been added.DFHPG0101 01/18/2005 16:24:20 CICSIVP1 CICSUSER CSSY PPT entry for DFHWBTTB has been added.DFHPG0101 01/18/2005 16:24:20 CICSIVP1 CICSUSER CSSY PPT entry for DFHWBTTC has been added.DFHPG0101 01/18/2005 16:24:20 CICSIVP1 CICSUSER CSSY PPT entry for DFHWBUN has been added.DFHPG0101 01/18/2005 16:24:20 CICSIVP1 CICSUSER CSSY PPT entry for DFHWBXN has been added.DFHXM0101 01/18/2005 16:24:20 CICSIVP1 CICSUSER CSSY TRANSACTION definition entry for CWBA has been added.DFHXM0101 01/18/2005 16:24:20 CICSIVP1 CICSUSER CSSY TRANSACTION definition entry for CWBC has been added.DFHXM0101 01/18/2005 16:24:20 CICSIVP1 CICSUSER CSSY TRANSACTION definition entry for CWBG has been added.DFHXM0101 01/18/2005 16:24:20 CICSIVP1 CICSUSER CSSY TRANSACTION definition entry for CWXN has been added.DFHXM0101 01/18/2005 16:24:20 CICSIVP1 CICSUSER CSSY TRANSACTION definition entry for CWXU has been added.DFHTS0104 01/18/2005 16:24:20 CICSIVP1 CICSUSER CSSY TSMODEL entry for DFHWEB has been added.DFHDH0105 01/18/2005 16:24:20 CICSIVP1 Document template definition DFHWBPW1 has been added as PROGRAM(DFHWBPW1) with
template name DFHWBPW1.DFHDH0105 01/18/2005 16:24:20 CICSIVP1 Document template definition DFHWBPW2 has been added as PROGRAM(DFHWBPW2) with
template name DFHWBPW2.DFHDH0105 01/18/2005 16:24:20 CICSIVP1 Document template definition DFHWBPW3 has been added as PROGRAM(DFHWBPW3) with
template name DFHWBPW3.DFHDH0105 01/18/2005 16:24:20 CICSIVP1 Document template definition DFHWBPW4 has been added as PROGRAM(DFHWBPW4) with
template name DFHWBPW4.DFHAM4893 I 01/18/2005 16:24:20 CICSIVP1 Install for group DFHWEB has completed successfully.DFHPG0101 01/18/2005 16:24:21 CICSIVP1 CICSUSER CSSY PPT entry for DFHPIAP has been added.DFHPG0101 01/18/2005 16:24:21 CICSIVP1 CICSUSER CSSY PPT entry for DFHPIDSH has been added.DFHPG0101 01/18/2005 16:24:21 CICSIVP1 CICSUSER CSSY PPT entry for DFHPIDSQ has been added.DFHPG0101 01/18/2005 16:24:21 CICSIVP1 CICSUSER CSSY PPT entry for DFHPIEP has been added.DFHPG0101 01/18/2005 16:24:21 CICSIVP1 CICSUSER CSSY PPT entry for DFHPILSQ has been added.DFHPG0101 01/18/2005 16:24:21 CICSIVP1 CICSUSER CSSY PPT entry for DFHPIRT has been added.DFHPG0101 01/18/2005 16:24:21 CICSIVP1 CICSUSER CSSY PPT entry for DFHPISN1 has been added.DFHPG0101 01/18/2005 16:24:21 CICSIVP1 CICSUSER CSSY PPT entry for DFHPISN2 has been added.DFHPG0101 01/18/2005 16:24:21 CICSIVP1 CICSUSER CSSY PPT entry for DFHPITP has been added.DFHPG0101 01/18/2005 16:24:21 CICSIVP1 CICSUSER CSSY PPT entry for DFHPITQ1 has been added.DFHPG0101 01/18/2005 16:24:21 CICSIVP1 CICSUSER CSSY PPT entry for DFHPIVAL has been added.DFHPG0101 01/18/2005 16:24:21 CICSIVP1 CICSUSER CSSY PPT entry for DFHPIXE has been added.DFHXM0101 01/18/2005 16:24:21 CICSIVP1 CICSUSER CSSY TRANSACTION definition entry for CPIH has been added.DFHXM0101 01/18/2005 16:24:21 CICSIVP1 CICSUSER CSSY TRANSACTION definition entry for CPIL has been added.DFHXM0101 01/18/2005 16:24:21 CICSIVP1 CICSUSER CSSY TRANSACTION definition entry for CPIQ has been added.
Figure 28. Sample job log for the DFHIVPBT job (Part 1 of 4)
238 CICS TS for z/OS: Installation Guide

DFHAM4893 I 01/18/2005 16:24:21 CICSIVP1 Install for group DFHPIPE has completed successfully.DFHFC0202 01/18/2005 16:24:21 CICSIVP1 CICSUSER CSSY FCT entry for DFHLRQ has been added.DFHAM4893 I 01/18/2005 16:24:21 CICSIVP1 Install for group DFHCBTS has completed successfully.DFHKC0102 01/18/2005 16:24:21 CICSIVP1 CICSUSER CSSY PFT entry for DFHCICSI has been added.DFHPG0101 01/18/2005 16:24:21 CICSIVP1 CICSUSER CSSY PPT entry for DFHIIRRS has been added.DFHPG0101 01/18/2005 16:24:21 CICSIVP1 CICSUSER CSSY PPT entry for DFHXOPUS has been added.DFHPG0101 01/18/2005 16:24:21 CICSIVP1 CICSUSER CSSY PPT entry for DFJIIRP has been added.DFHPG0101 01/18/2005 16:24:21 CICSIVP1 CICSUSER CSSY PPT entry for DFJIIRQ has been added.DFHXM0101 01/18/2005 16:24:21 CICSIVP1 CICSUSER CSSY TRANSACTION definition entry for CIRP has been added.DFHXM0101 01/18/2005 16:24:21 CICSIVP1 CICSUSER CSSY TRANSACTION definition entry for CIRR has been added.DFHAM4893 I 01/18/2005 16:24:21 CICSIVP1 Install for group DFHIIOP has completed successfully.DFHPG0101 01/18/2005 16:24:21 CICSIVP1 CICSUSER CSSY PPT entry for DFHIEP has been added.DFHXM0101 01/18/2005 16:24:21 CICSIVP1 CICSUSER CSSY TRANSACTION definition entry for CIEP has been added.DFHAM4893 I 01/18/2005 16:24:21 CICSIVP1 Install for group DFHIPECI has completed successfully.DFHPG0101 01/18/2005 16:24:21 CICSIVP1 CICSUSER CSSY PPT entry for DFHDLLOD has been added.DFHPG0101 01/18/2005 16:24:21 CICSIVP1 CICSUSER CSSY PPT entry for DFHEJDNX has been added.DFHPG0101 01/18/2005 16:24:21 CICSIVP1 CICSUSER CSSY PPT entry for DFHJVCVT has been added.DFHPG0101 01/18/2005 16:24:21 CICSIVP1 CICSUSER CSSY PPT entry for DFHSJJML has been added.DFHPG0101 01/18/2005 16:24:21 CICSIVP1 CICSUSER CSSY PPT entry for DFJ1ESN has been added.DFHPG0101 01/18/2005 16:24:21 CICSIVP1 CICSUSER CSSY PPT entry for DFJ1ICS has been added.DFHPG0101 01/18/2005 16:24:21 CICSIVP1 CICSUSER CSSY PPT entry for DFJ1ICSB has been added.DFHPG0101 01/18/2005 16:24:21 CICSIVP1 CICSUSER CSSY PPT entry for DFJ1ZDTC has been added.DFHXM0101 01/18/2005 16:24:21 CICSIVP1 CICSUSER CSSY TRANSACTION definition entry for CJMJ has been added.DFHAM4893 I 01/18/2005 16:24:21 CICSIVP1 Install for group DFHJAVA has completed successfully.DFHPG0101 01/18/2005 16:24:21 CICSIVP1 CICSUSER CSSY PPT entry for DFHOTR has been added.DFHXM0101 01/18/2005 16:24:21 CICSIVP1 CICSUSER CSSY TRANSACTION definition entry for CJTR has been added.DFHAM4893 I 01/18/2005 16:24:21 CICSIVP1 Install for group DFHOTS has completed successfully.DFHPG0101 01/18/2005 16:24:21 CICSIVP1 CICSUSER CSSY PPT entry for DFHRZJN has been added.DFHAM4893 I 01/18/2005 16:24:21 CICSIVP1 Install for group DFHRQS has completed successfully.DFHPG0101 01/18/2005 16:24:21 CICSIVP1 CICSUSER CSSY PPT entry for ICCFCDLL has been added.DFHAM4893 I 01/18/2005 16:24:21 CICSIVP1 Install for group DFHCFC has completed successfully.DFHPG0101 01/18/2005 16:24:21 CICSIVP1 CICSUSER CSSY PPT entry for DFHDHEI has been added.DFHAM4893 I 01/18/2005 16:24:21 CICSIVP1 Install for group DFHDOC has completed successfully.DFHPG0101 01/18/2005 16:24:21 CICSIVP1 CICSUSER CSSY PPT entry for DFHBRCV has been added.DFHPG0101 01/18/2005 16:24:21 CICSIVP1 CICSUSER CSSY PPT entry for DFHBRMP has been added.DFHPG0101 01/18/2005 16:24:21 CICSIVP1 CICSUSER CSSY PPT entry for DFHL3270 has been added.DFHAM4893 I 01/18/2005 16:24:21 CICSIVP1 Install for group DFHBR has completed successfully.DFHPG0101 01/18/2005 16:24:21 CICSIVP1 CICSUSER CSSY PPT entry for DFHZPCT has been added.DFHPG0101 01/18/2005 16:24:21 CICSIVP1 CICSUSER CSSY PPT entry for DFHZRTP has been added.DFHPG0101 01/18/2005 16:24:21 CICSIVP1 CICSUSER CSSY PPT entry for DFHZSGN has been added.DFHXM0101 01/18/2005 16:24:21 CICSIVP1 CICSUSER CSSY TRANSACTION definition entry for CPCT has been added.DFHXM0101 01/18/2005 16:24:21 CICSIVP1 CICSUSER CSSY TRANSACTION definition entry for CPSS has been added.DFHXM0101 01/18/2005 16:24:21 CICSIVP1 CICSUSER CSSY TRANSACTION definition entry for CRTP has been added.DFHAM4893 I 01/18/2005 16:24:21 CICSIVP1 Install for group DFHPSSGN has completed successfully.DFHPG0101 01/18/2005 16:24:21 CICSIVP1 CICSUSER CSSY PPT entry for DFHADMS has been added.DFHPG0101 01/18/2005 16:24:21 CICSIVP1 CICSUSER CSSY PPT entry for DFHADDRM has been added.DFHPG0101 01/18/2005 16:24:21 CICSIVP1 CICSUSER CSSY PPT entry for DFHADJR has been added.DFHXM0101 01/18/2005 16:24:21 CICSIVP1 CICSUSER CSSY TRANSACTION definition entry for CREA has been added.DFHXM0101 01/18/2005 16:24:21 CICSIVP1 CICSUSER CSSY TRANSACTION definition entry for CREC has been added.DFHAM4893 I 01/18/2005 16:24:21 CICSIVP1 Install for group DFHADST has completed successfully.DFHPG0101 01/18/2005 16:24:21 CICSIVP1 CICSUSER CSSY PPT entry for DFHEJEP has been added.DFHAM4893 I 01/18/2005 16:24:21 CICSIVP1 Install for group DFHEJBU has completed successfully.DFHPG0101 01/18/2005 16:24:21 CICSIVP1 CICSUSER CSSY PPT entry for DFHDPMS has been added.DFHPG0101 01/18/2005 16:24:21 CICSIVP1 CICSUSER CSSY PPT entry for DFHDPCP has been added.DFHPG0101 01/18/2005 16:24:21 CICSIVP1 CICSUSER CSSY PPT entry for DFHDPIN has been added.DFHPG0101 01/18/2005 16:24:21 CICSIVP1 CICSUSER CSSY PPT entry for DFHDPLU has been added.DFHXM0101 01/18/2005 16:24:21 CICSIVP1 CICSUSER CSSY TRANSACTION definition entry for CADP has been added.DFHXM0101 01/18/2005 16:24:21 CICSIVP1 CICSUSER CSSY TRANSACTION definition entry for CIDP has been added.DFHAM4893 I 01/18/2005 16:24:21 CICSIVP1 Install for group DFHDP has completed successfully.DFHPG0101 01/18/2005 16:24:21 CICSIVP1 CICSUSER CSSY PPT entry for DFHDPWB has been added.DFHPG0101 01/18/2005 16:24:21 CICSIVP1 CICSUSER CSSY PPT entry for DFHDPWM0 has been added.DFHPG0101 01/18/2005 16:24:21 CICSIVP1 CICSUSER CSSY PPT entry for DFHDPWM1 has been added.DFHPG0101 01/18/2005 16:24:21 CICSIVP1 CICSUSER CSSY PPT entry for DFHDPWM2 has been added.DFHPG0101 01/18/2005 16:24:21 CICSIVP1 CICSUSER CSSY PPT entry for DFHDPWM3 has been added.DFHPG0101 01/18/2005 16:24:21 CICSIVP1 CICSUSER CSSY PPT entry for DFHDPWM4 has been added.DFHPG0101 01/18/2005 16:24:21 CICSIVP1 CICSUSER CSSY PPT entry for DFHDPWM5 has been added.DFHPG0101 01/18/2005 16:24:21 CICSIVP1 CICSUSER CSSY PPT entry for DFHDPWM6 has been added.DFHPG0101 01/18/2005 16:24:21 CICSIVP1 CICSUSER CSSY PPT entry for DFHDPWT0 has been added.DFHPG0101 01/18/2005 16:24:21 CICSIVP1 CICSUSER CSSY PPT entry for DFHDPWT1 has been added.
Figure 28. Sample job log for the DFHIVPBT job (Part 2 of 4)
Chapter 35. Running the installation verification procedures 239

DFHPG0101 01/18/2005 16:24:21 CICSIVP1 CICSUSER CSSY PPT entry for DFHDPWT2 has been added.DFHPG0101 01/18/2005 16:24:21 CICSIVP1 CICSUSER CSSY PPT entry for DFHDPWT3 has been added.DFHPG0101 01/18/2005 16:24:21 CICSIVP1 CICSUSER CSSY PPT entry for DFHDPWT4 has been added.DFHPG0101 01/18/2005 16:24:21 CICSIVP1 CICSUSER CSSY PPT entry for DFHDPWT5 has been added.DFHPG0101 01/18/2005 16:24:21 CICSIVP1 CICSUSER CSSY PPT entry for DFHDPWT6 has been added.DFHAM4893 I 01/18/2005 16:24:21 CICSIVP1 Install for group DFHDPWB has completed successfully.DFHPG0101 01/18/2005 16:24:21 CICSIVP1 CICSUSER CSSY PPT entry for DFHSOCI has been added.DFHPG0101 01/18/2005 16:24:21 CICSIVP1 CICSUSER CSSY PPT entry for DFHSOLI has been added.DFHAM4893 I 01/18/2005 16:24:21 CICSIVP1 Install for group DFHSO has completed successfully.DFHPG0101 01/18/2005 16:24:21 CICSIVP1 CICSUSER CSSY PPT entry for CELCLEM has been added.DFHPG0101 01/18/2005 16:24:21 CICSIVP1 CICSUSER CSSY PPT entry for CELCLRH has been added.DFHPG0101 01/18/2005 16:24:21 CICSIVP1 CICSUSER CSSY PPT entry for CEECBLDY has been added.DFHPG0101 01/18/2005 16:24:21 CICSIVP1 CICSUSER CSSY PPT entry for CEECCICS has been added.DFHPG0101 01/18/2005 16:24:21 CICSIVP1 CICSUSER CSSY PPT entry for CEECMI has been added.DFHPG0101 01/18/2005 16:24:21 CICSIVP1 CICSUSER CSSY PPT entry for CEECRHP has been added.DFHPG0101 01/18/2005 16:24:21 CICSIVP1 CICSUSER CSSY PPT entry for CEECZST has been added.DFHPG0101 01/18/2005 16:24:21 CICSIVP1 CICSUSER CSSY PPT entry for CEEDATE has been added.DFHPG0101 01/18/2005 16:24:21 CICSIVP1 CICSUSER CSSY PPT entry for CEEDATM has been added.DFHPG0101 01/18/2005 16:24:21 CICSIVP1 CICSUSER CSSY PPT entry for CEEDAYS has been added.DFHPG0101 01/18/2005 16:24:21 CICSIVP1 CICSUSER CSSY PPT entry for CEEDCOD has been added.DFHPG0101 01/18/2005 16:24:21 CICSIVP1 CICSUSER CSSY PPT entry for CEEDSHP has been added.DFHPG0101 01/18/2005 16:24:21 CICSIVP1 CICSUSER CSSY PPT entry for CEEDYWK has been added.DFHPG0101 01/18/2005 16:24:21 CICSIVP1 CICSUSER CSSY PPT entry for CEEEV003 has been added.DFHPG0101 01/18/2005 16:24:21 CICSIVP1 CICSUSER CSSY PPT entry for CEEEV005 has been added.DFHPG0101 01/18/2005 16:24:21 CICSIVP1 CICSUSER CSSY PPT entry for CEEEV010 has been added.
....... the rest of group CEE
DFHPG0101 01/18/2005 16:24:22 CICSIVP1 CICSUSER CSSY PPT entry for IIGZMSGT has been added.DFHXM0101 01/18/2005 16:24:22 CICSIVP1 CICSUSER CSSY TRANSACTION definition entry for CLER has been added.DFHAM4893 I 01/18/2005 16:24:22 CICSIVP1 Install for group CEE has completed successfully.DFHFC0204 01/18/2005 16:24:22 CICSIVP1 CICSUSER CSSY FCT entry for DFHCSD has been updated.DFHLG0502 01/18/2005 16:24:23 CICSIVP1 Log stream CICINST.CICSIVP1.DFHLOG defined to MVS using model stream �1�
MV26.DFHLOG.MODEL.DFHLG0302 01/18/2005 16:24:24 CICSIVP1 Journal name DFHLOG has been installed. Journal type: MVS �2�
CICINST.CICSIVP1.DFHLOG.DFHLG0502 01/18/2005 16:24:25 CICSIVP1 Log stream CICINST.CICSIVP1.DFHSHUNT defined to MVS using model stream �1�
MV26.DFHSHUNT.MODEL.DFHLG0302 01/18/2005 16:24:27 CICSIVP1 Journal name DFHSHUNT has been installed. Journal type: MVS �2�
CICINST.CICSIVP1.DFHSHUNT.DFHLG0744 01/18/2005 16:24:27 CICSIVP1 All records in log stream CICINST.CICSIVP1.DFHLOG have been deleted.DFHLG0744 01/18/2005 16:24:27 CICSIVP1 All records in log stream CICINST.CICSIVP1.DFHSHUNT have been deleted.DFHRM0205 01/18/2005 16:24:37 CICSIVP1 An activity keypoint has been successfully taken.DFHLG0743 01/18/2005 16:24:37 CICSIVP1 Tail of log stream CICINST.CICSIVP1.DFHLOG deleted at block id
X’0000000000000001’.
MESSAGE HAS BEEN SENT
Aging( 32768 )Akp( 04000 )Cicstslevel(030100)Cmdprotect(Cmdprot)Db2conn()Debugtool( Nodebug )Dfltuser(CICSUSER)Dsalimit( 05242880 )Dsrtprogram( NONE )
Figure 28. Sample job log for the DFHIVPBT job (Part 3 of 4)
240 CICS TS for z/OS: Installation Guide

Notes:
�1� CICS messages issued when the log stream is created.
�2� This message is sent to the CRDI destination.
Verify interactive job, DFHIVPOLThe verify interactive job, DFHIVPOL, is tailored to your CICS environment andstored in the hlq.XDFHINST library when you run the DFHISTAR job. You can usethe DFHIVPOL job to start up a CICS region and try out the current facilities; forexample you can use the master terminal transaction, CEMT, and the resourcedefinition transaction, CEDA. You can also run some CICS sample applicationprograms (for example, the FILEA applications).
You need either an IBM 3270 Information Display System terminal or a consoledevice You can use both if you wish.
If you use an IBM 3270 Information Display System terminal with this IVP, you cantry CEDA, CEMT and the sample applications.
From a console device, the CEDA transaction can be used only to INSTALLresource definitions. The sample programs cannot be executed from a consoledevice.
Dtrprogram( DFHDYP )Dumping( Sysdump )Edsalimit( 0031457280 )Forceqr( Noforce )Logdefer( 00005 )Maxtasks( 005 )Mrobatch( 001 )Oslevel(010400)Progautoctlg( Ctlgmodify )Progautoexit( DFHPGADX )Progautoinst( Autoinactive )Reentprotect(Reentprot)Release(0640)Runaway( 0005000 )Scandelay( 0500 )Sdtran(CESD)Sosstatus(Notsos)Storeprotect(Inactive)Time( 0001000 )Tranisolate(Inactive)TIME < SCANDELAYRESPONSE: 1 ERROR TIME: 16.24.29 DATE: 01.18.05SYSID=CICS APPLID=CICSIVP1
DumpdsCurrentdds(B)Openstatus( Open )Switchstatus( Noautoswitch )NORMALRESPONSE: NORMAL TIME: 16.24.30 DATE: 01.18.05SYSID=CICS APPLID=CICSIVP1
Ter(SAMA) Tra(CEOT) Pri(000) Aut Ins TtiCEOT SYNTAX:< Pageable | Autopageable >< Ati | Noati >< Tti | Notti >< Uctran | Nouctran | Tranidonly >RESPONSE: NORMAL TIME: 16.24.30 DATE: 01.18.05SYSID=CICS APPLID=CICSIVP1
Figure 28. Sample job log for the DFHIVPBT job (Part 4 of 4)
Chapter 35. Running the installation verification procedures 241

If you want to communicate with CICS from an MVS console, you must define aconsole in the CSD before starting the IVP. (You cannot define a console in theTCT.) For more information, see “Defining an MVS console” on page 244.
If you want to communicate with CICS from a TSO session, you must define theTSO user as a console device in the CSD before starting the IVP. For moreinformation, see “Defining a TSO user as a console device” on page 245.
The DFHIVPOL job invokes the CICS initialization program DFHSIP to start upCICS. The DFHSIP program reads system initialization parameters from theDFH$SIP1 member of the SYSIN data set.
TCT=NO is specified as a SIT override which causes CICS to use the dummyterminal control table, DFHTCTDY. This dummy TCT contains only the CICS andVTAM control blocks that you need for use with VTAM terminals: there are noterminal entries.
For information about system initialization parameters specified as overrides for therun of the DFHIVPOL job, see “Specify system initialization parameters for the IVPjobs” on page 231.
Defining a terminal for the online IVPYou can define a VTAM terminal by either of the following two methods:
1. Use the autoinstall facility, which is the recommended method, avoiding theneed to define terminals to CICS explicitly before they can be used.
2. Define a terminal explicitly in the CSD, using the DEFINE command ofDFHCSDUP, the batch utility for updating the CSD.
Using autoinstall for a VTAM terminalIf you use the autoinstall function of CICS, you avoid the need for each VTAMterminal that requires access to CICS being explicitly defined in the CSD. Withautoinstall, the resource definitions you create using RDO can act as models ortemplates for many resources of the same type. You then leave CICS to match realresources with one of the models. CICS installs table entries for these realresources dynamically, as and when they are needed.
When using autoinstall, you should be aware that when CICS processes anautoinstall request, it uses data from the VTAM logmode table. This is an importantconsideration. An autoinstall request will succeed only when the logmode data(which is passed to CICS in the BIND image) matches one of the model terminaldefinitions recorded in the autoinstall model table (AMT) from the CSD. Forprogramming information about the LOGMODE definitions that match theCICS-supplied model definitions for autoinstall, see the CICS Customization Guide.Before attempting to start CICS and autoinstall a terminal for this IVP, check yourVTAM definitions with those given in the CICS Customization Guide. If CICS fails tomatch model and logmode data, you receive message DFHZC6987I. Forinformation about the suggested course of action if you receive messageDFHZC6987I, see the CICS Messages and Codes manual.
CSD resource definitions for autoinstall: The CSD is defined and initialized forall the IVP jobs when you run the DFHCOMDS job (see Chapter 28, “Creating theCICS data sets,” on page 189), and includes some IBM-supplied definitions for usewith autoinstall. These are defined in the following groups:
242 CICS TS for z/OS: Installation Guide

Group Name Description
DFHTERM Model terminal definitions for use with the autoinstall facility. Forexample, two of the TERMINAL definitions are 3270 and LU2.
DFHTYPE Partial terminal definitions (TYPETERMs) defining common terminalproperties, or attributes. For example, two of the TYPETERMdefinitions are DFH3270 (to define a non-SNA 3270 terminal) andDFHLU2E2 (to define a SNA 3270 model 2 terminal). TheDFHLU2E2 resource definition matches the VTAM-suppliedlogmode SNX32702.
The DFHTERM and DFHTYPE groups are included in the CICS-defined group listcalled DFHLIST, which is defined in the GRPLIST operand in the sample SIT. If theCICS-supplied definitions are not suitable for your installation, you can createadditional TYPETERM and model TERMINAL definitions in the CSD, but without aterminal you will have to do this offline, using the DFHCSDUP utility program. Forinformation about autoinstall definitions, see the CICS Resource Definition Guide .
Autoinstall also requires a user program to assign terminal identifiers, and, ifnecessary, to control access to the system. When you run the online IVP, you areunlikely to have any special requirements for terminal identifiers, or to controlaccess, in which case you can use the IBM-supplied autoinstall user program,DFHZATDX. (If you are using autoinstall for APPC connections and terminals, thesample autoinstall user program is called DFHZATDY.)
Defining a VTAM terminal in the CSDIf you want to use an explicitly defined terminal, rather than let CICS autoinstall aterminal, you will need to define it offline using the DFHCSDUP utility program. Thenormal way to create resource definitions in the CSD is to use the CEDA DEFINEcommand from a CICS master terminal, but without a terminal you can only do thisusing the DFHCSDUP utility program. For an example of a DFHCSDUP job todefine a VTAM terminal in the CSD, see Figure 29. For information about thekeywords and operands of the DFHCSDUP DEFINE commands, see the CICSResource Definition Guide .
You must substitute your own values for the operands that are coded in lowercasein the DEFTERM job shown in Figure 29:
//DEFTERM JOB (accounting information),MSGCLASS=A,// MSGLEVEL=(1,1),CLASS=A,NOTIFY=userid//VTAMDEF EXEC PGM=DFHCSDUP//STEPLIB DD DSN=CICSTS31.CICS.SDFHLOAD,DISP=SHR//DFHCSD DD DSN=CICSTS31.CICS.DFHCSD,DISP=SHR//SYSPRINT DD SYSOUT=*//SYSIN DD **DEFINE TERMINAL(trmidnt) NETNAME(vtamname) GROUP(grpname)
TYPETERM(name) INSERVICE(NO) AUTINSTMODEL(NO)*APPEND LIST(DFHLIST) TO(yourlist)
*ADD GROUP(grpname) LIST(yourlist)*LIST LIST(yourlist) OBJECTS/*//
Figure 29. Defining a terminal by using the DFHCSDUP utility program
Chapter 35. Running the installation verification procedures 243

TYPETERMSpecify a unique name to identify the resource definition that matches theproperties of the type of terminal you are using. For example, to define aSNA 3270 model 2 terminal, specify the CICS-supplied TYPETERMdefinition DFHLU2E2. For a list of the CICS-supplied TYPETERMdefinitions, or for information about creating your own definitions, see theCICS Resource Definition Guide .
GROUPCode a unique name for the group to which the terminal resource definitionis to belong.
TERMINALCode a unique 4-character terminal identifier as the name by which CICS isto know the terminal.
NETNAMECode the 8-character VTAM name that identifies this terminal to your VTAMsystem.
TO(yourlist) and LIST(yourlist)Code a unique name for yourlist. If your new group list does not include allthe CICS-supplied resources as well as your own, you must specifyDFHLIST and yourlist on the GRPLIST system initialization parameter ofyour CICS startup job.
To include the CICS-supplied list of resources in a new group list, create a new listby copying the CICS-supplied list, DFHLIST, using the APPEND command. (TheCICS-supplied group list, DFHLIST, is a protected group that you cannot modify.)You can then add your resource definition groups to the new list. Before you run theIVP, make sure you define your new group list to CICS, by adding a SIT override tothe SYSIN data set in the DFHIVPOL job stream.
Defining the CICS APPLID to VTAMYou must ensure that either:
v VTAM knows the CICS application identifier (APPLID)
or
v You change the CICS APPLID to one that is already known to your VTAMsystem.
If you use the default APPLID (DBDCCICS), define this to VTAM as described in“VTAM APPL parameters for CICS regions” on page 99, before starting theDFHIVPOL job.
Defining an MVS consoleIf you want to use an MVS console with the DFHIVPOL job, CICS requires aninstalled definition for the console. You can achieve this using one of the following:
v An autoinstall model definition, in conjunction with autoinstall support forconsoles. The model definition can specify any CONSNAME value, andreferences a TYPETERM definition that specifies DEVICE(CONSOLE).
v A predefined TERMINAL resource definition for a console, which specifies theconsole name on the CONSNAME attribute, and references a TYPETERMdefinition that specifies DEVICE(CONSOLE).
You define these resources using the DFHCSDUP utility program. TheCICS-supplied TYPETERM group, DFHTYPE, contains a typeterm definition called
244 CICS TS for z/OS: Installation Guide

DFHCONS, which is predefined with the required console properties. TheDFHTERM group, however, does not contain any corresponding terminal entries forMVS consoles. You identify the console by the CONSNAME(name) attribute, even ifthe TERMINAL definition is an autoinstall model (the console name on anautoinstall model is a dummy value, and replaced by the real console name atinstall-time).
For an example of the DEFINE command required to define a console, seeFigure 30 on page 246.
For information about defining MVS consoles to CICS, see the CICS SystemDefinition Guide.
Defining a TSO user as a console deviceA TSO user can enter MODIFY commands from terminals logged on to TSO, usingeither the TSO CONSOLE command or from SDSF. MVS activates a console using,by default, the user's TSO user ID as the console name. To CICS, the consolename passed on the MODIFY command is treated like an MVS system console,and requires an entry in the CICS system definition (CSD) file.
As in the case of the MVS system console, you can achieve this using one of thefollowing:
v An autoinstall model definition, in conjunction with autoinstall support forconsoles. The model definition can specify any CONSNAME value, andreferences a TYPETERM definition that specifies DEVICE(CONSOLE)
v A predefined TERMINAL resource definition for a console, which specifies theconsole name on the CONSNAME attribute, and references a TYPETERMdefinition that specifies DEVICE(CONSOLE).
You are recommended to define consoles to CICS with preset terminal security,using the USERID attribute on the TERMINAL definition. This avoids the TSO userhaving to sign on using the CESN transaction. Otherwise, the TSO user's CICSsignon password is displayed when entered on the CESN transaction.
For an example of a DEFINE command to define a TSO user, see Figure 30 onpage 246.
Chapter 35. Running the installation verification procedures 245

Note: Substitute your own values for the operands that are shown in italics in theDEFTERM job shown in Figure 30.
To include the CICS-supplied list of resources at startup, specify DFHLIST on theGRPLIST system initialization parameter, as well as your own group list name. Forexample, specify GRPLIST=(DFHLIST,userlista,userlistb)in the CICS SYSIN dataset member.
Running the DFHIVPOL jobThe DFHIVPOL job includes a procedure, DFHSTART, to start up CICS. When youhave successfully logged on to CICS, you can carry out any of the interactiveoperations described on page 250.
While logged on to CICS, you should perform a CEMT SET DUMPDS SWITCH toensure that both dump data sets are initialized before DFHDU640 is run when youshut down CICS.
Finally, you can shut down CICS.
Sample job log for the DFHIVPOL jobWhen you run the DFHIVPOL job, your job log should look similar to the sample logshown in Figure 31 on page 247.
//DEFTERM JOB (accounting information),MSGCLASS=A,// MSGLEVEL=(1,1),CLASS=A,NOTIFY=userid//CONSDEF EXEC PGM=DFHCSDUP//STEPLIB DD DSN=CICSTS31.CICS.SDFHLOAD,DISP=SHR//DFHCSD DD DSN=CICSTS31.CICS.DFHCSD,DISP=SHR//SYSPRINT DD SYSOUT=*//SYSIN DD *
* Define a consoleDEFINE TERMINAL(trmidnt) GROUP(grpname) TYPETERM(DFHCONS)
CONSNAME(consname) DESCRIPTION(MVS CONSOLE consname)USERID(tsouser)
* Define a TSO user as a console deviceDEFINE TERMINAL(trmidnt) GROUP(grpname) TYPETERM(DFHCONS)
CONSNAME(tsouser) DESCRIPTION(TSO USER tsouser)USERID(tsouser)
*
APPEND LIST(DFHLIST) TO(yourlist)*ADD GROUP(grpname) LIST(yourlist)*LIST LIST(yourlist) OBJECTS/*//
Figure 30. Defining a console and a TSO user by using the DFHCSDUP utility program
246 CICS TS for z/OS: Installation Guide

1 J E S 2 J O B L O G -- S Y S T E M M V 2 6 -- N O D E W I N M V S 2 C017.17.29 JOB35727 ---- TUESDAY, 18 JAN 2005 ----17.17.29 JOB35727 ICH70001I CICINST LAST ACCESS AT 16:24:15 ON TUESDAY, JANUARY 18, 200517.17.29 JOB35727 $HASP373 DFHIVPOL STARTED - INIT 69 - CLASS A - SYS MV2617.17.29 JOB35727 IEF403I DFHIVPOL - STARTED - TIME=17.17.2917.17.29 JOB35727 - --TIMINGS (MINS.)-- ----PAGING COUNTS---17.17.29 JOB35727 -JOBNAME STEPNAME PROCSTEP RC EXCP CPU SRB CLOCK SERV PG PAGE SWAP VIO SWAPS STEPNO17.17.29 JOB35727 -DFHIVPOL CICS CICSCNTL 01 23 .00 .00 .00 167 0 0 0 0 0 117.17.29 JOB35727 -DFHIVPOL CICS DTCNTL 01 19 .00 .00 .00 147 0 0 0 0 0 217.17.30 JOB35727 DFHPA1101 CICSIVP1 DFHSIT IS BEING LOADED.17.17.30 JOB35727 DFHPA1108 CICSIVP1 DFHSIT HAS BEEN LOADED. (GENERATED AT: MM/DD= 01/12 HH:MM= 13:57).17.17.30 JOB35727 DFHPA1100 CICSIVP1 OVERRIDE PARAMETERS FROM JCL EXEC STATEMENT: START=AUTO,SYSIN17.17.30 JOB35727 DFHPA1102 CICSIVP1 OVERRIDE PARAMETERS FROM SYSIN: �1�17.17.30 JOB35727 DFHPA1927 CICSIVP1 XRF=NO,17.17.30 JOB35727 DFHPA1927 CICSIVP1 AUXTR=ON,17.17.30 JOB35727 DFHPA1927 CICSIVP1 AUXTRSW=NEXT,17.17.30 JOB35727 DFHPA1927 CICSIVP1 APPLID=CICSIVP1, �2�17.17.30 JOB35727 DFHPA1927 CICSIVP1 FCT=NO,17.17.30 JOB35727 DFHPA1927 CICSIVP1 TCT=NO,17.17.30 JOB35727 DFHPA1927 CICSIVP1 SRT=NO,17.17.30 JOB35727 DFHPA1927 CICSIVP1 SEC=NO,17.17.30 JOB35727 DFHPA1927 CICSIVP1 TRTABSZ=64,17.17.30 JOB35727 DFHPA1927 CICSIVP1 PGRET=P/,17.17.30 JOB35727 DFHPA1927 CICSIVP1 PGPURGE=T/,17.17.30 JOB35727 DFHPA1927 CICSIVP1 PGCOPY=C/,17.17.30 JOB35727 DFHPA1927 CICSIVP1 PGCHAIN=X/,17.17.30 JOB35727 DFHPA1927 CICSIVP1 CICSSVC=233,17.17.30 JOB35727 DFHPA1927 CICSIVP1 .END17.17.30 JOB35727 DFHPA1103 CICSIVP1 END OF FILE ON SYSIN.17.17.31 JOB35727 +DFHTR0103 TRACE TABLE SIZE IS 64K17.17.31 JOB35727 +DFHSM0122I CICSIVP1 Limit of DSA storage below 16MB is 5,120K. �3�17.17.31 JOB35727 +DFHSM0123I CICSIVP1 Limit of DSA storage above 16MB is 30M.17.17.31 JOB35727 +DFHSM0113I CICSIVP1 Storage protection is not active.17.17.31 JOB35727 +DFHSM0126I CICSIVP1 Transaction isolation is not active.17.17.32 JOB35727 +DFHDM0101I CICSIVP1 CICS is initializing.17.17.32 JOB35727 +DFHWB0109I CICSIVP1 Web domain initialization has started.17.17.32 JOB35727 +DFHSO0100I CICSIVP1 Sockets domain initialization has started.17.17.32 JOB35727 +DFHRX0100I CICSIVP1 RX domain initialization has started.17.17.32 JOB35727 +DFHRX0101I CICSIVP1 RX domain initialization has ended.17.17.33 JOB35727 +DFHLG0101I CICSIVP1 Log manager domain initialization has started.17.17.33 JOB35727 +DFHEJ0101 CICSIVP1 296
296 Enterprise Java domain initialization has started. Java is a296 trademark of Sun Microsystems, Inc.
17.17.33 JOB35727 +DFHDH0100I CICSIVP1 Document domain initialization has started.17.17.33 JOB35727 +DFHXS1100I CICSIVP1 Security initialization has started.17.17.33 JOB35727 +DFHSI1500 CICSIVP1 CICS startup is in progress for CICS Transaction Server Version 3.1.017.17.33 JOB35727 +DFHDU0304I CICSIVP1 Transaction Dump Data set DFHDMPA opened.17.17.33 JOB35727 +DFHXS1102I CICSIVP1 Security is inactive.17.17.33 JOB35727 +DFHSI1501I CICSIVP1 Loading CICS nucleus.17.17.34 JOB35727 +DFHTR0113 CICSIVP1 Auxiliary trace is being started on data set DFHAUXT.17.17.34 JOB35727 +DFHCQ0100I CICSIVP1 Console queue initialization has started.17.17.34 JOB35727 +DFHCQ0101I CICSIVP1 Console queue initialization has ended.17.17.34 JOB35727 +DFHCQ0103I CICSIVP1 MVS console queue is open.17.17.34 JOB35727 +DFHCQ0200I CICSIVP1 CEKL transaction enabled.17.17.34 JOB35727 +DFHXS1101I CICSIVP1 Security initialization has ended.17.17.34 JOB35727 +DFHRM0141 CICSIVP1 Recovery manager autostart override record is not present.
Normal processing continues.17.17.34 JOB35727 +DFHDH0101I CICSIVP1 Document domain initialization has ended.17.17.34 JOB35727 +DFHMN0105I CICSIVP1 Using default Monitoring Control Table.17.17.34 JOB35727 +DFHMN0110I CICSIVP1 CICS Monitoring is inactive.17.17.34 JOB35727 +DFHSO0101I CICSIVP1 Sockets domain initialization has ended.17.17.35 JOB35727 IEC031I D37-04,IFG0554P,DFHIVPOL,CICS,DFHAUXT,D306,P2P0C6,INST.CICSTS31.CICS.DFHAUXT17.17.35 JOB35727 +DFHTR0110 - AUXILIARY TRACE DATA SET DFHAUXT FULL - SWITCHING TO DFHBUXT17.17.35 JOB35727 +DFHWB0110I CICSIVP1 Web domain initialization has ended.17.17.35 JOB35727 IEC031I D37-04,IFG0554P,DFHIVPOL,CICS,DFHBUXT,D50B,P2P14B,INST.CICSTS31.CICS.DFHBUXT17.17.35 JOB35727 +DFHTR0109 - AUXILIARY TRACE DATA SET DFHBUXT FULL - AUXILIARY TRACE HAS BEEN STOPPED17.17.35 JOB35727 +DFHSI1502I CICSIVP1 CICS startup is Warm.17.17.35 JOB35727 +DFHTS0100I CICSIVP1 Temporary Storage initialization has started.17.17.35 JOB35727 +DFHLG0103I CICSIVP1 System log (DFHLOG) initialization has started.17.17.35 JOB35727 +DFHLG0104I CICSIVP1 322
322 System log (DFHLOG) initialization has ended. Log stream322 CICINST.CICSIVP1.DFHLOG is connected to structure LOG_GENERAL_008.
17.17.35 JOB35727 +DFHLG0103I CICSIVP1 System log (DFHSHUNT) initialization has started.17.17.35 JOB35727 +DFHSI1503I CICSIVP1 Terminal data sets are being opened.17.17.36 JOB35727 +DFHLG0104I CICSIVP1 327
327 System log (DFHSHUNT) initialization has ended. Log stream327 CICINST.CICSIVP1.DFHSHUNT is connected to structure LOG_GENERAL_008.
Figure 31. Sample job log for the DFHIVPOL job (Part 1 of 2)
Chapter 35. Running the installation verification procedures 247
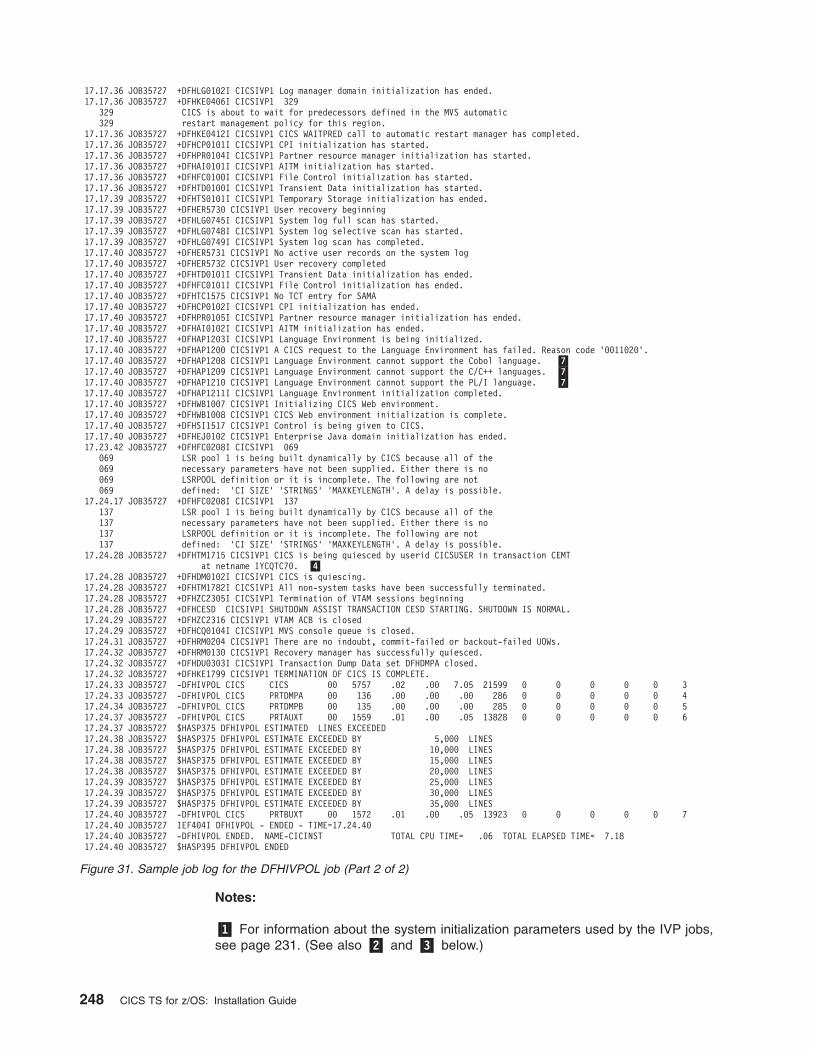
Notes:
�1� For information about the system initialization parameters used by the IVP jobs,see page 231. (See also �2� and �3� below.)
17.17.36 JOB35727 +DFHLG0102I CICSIVP1 Log manager domain initialization has ended.17.17.36 JOB35727 +DFHKE0406I CICSIVP1 329
329 CICS is about to wait for predecessors defined in the MVS automatic329 restart management policy for this region.
17.17.36 JOB35727 +DFHKE0412I CICSIVP1 CICS WAITPRED call to automatic restart manager has completed.17.17.36 JOB35727 +DFHCP0101I CICSIVP1 CPI initialization has started.17.17.36 JOB35727 +DFHPR0104I CICSIVP1 Partner resource manager initialization has started.17.17.36 JOB35727 +DFHAI0101I CICSIVP1 AITM initialization has started.17.17.36 JOB35727 +DFHFC0100I CICSIVP1 File Control initialization has started.17.17.36 JOB35727 +DFHTD0100I CICSIVP1 Transient Data initialization has started.17.17.39 JOB35727 +DFHTS0101I CICSIVP1 Temporary Storage initialization has ended.17.17.39 JOB35727 +DFHER5730 CICSIVP1 User recovery beginning17.17.39 JOB35727 +DFHLG0745I CICSIVP1 System log full scan has started.17.17.39 JOB35727 +DFHLG0748I CICSIVP1 System log selective scan has started.17.17.39 JOB35727 +DFHLG0749I CICSIVP1 System log scan has completed.17.17.40 JOB35727 +DFHER5731 CICSIVP1 No active user records on the system log17.17.40 JOB35727 +DFHER5732 CICSIVP1 User recovery completed17.17.40 JOB35727 +DFHTD0101I CICSIVP1 Transient Data initialization has ended.17.17.40 JOB35727 +DFHFC0101I CICSIVP1 File Control initialization has ended.17.17.40 JOB35727 +DFHTC1575 CICSIVP1 No TCT entry for SAMA17.17.40 JOB35727 +DFHCP0102I CICSIVP1 CPI initialization has ended.17.17.40 JOB35727 +DFHPR0105I CICSIVP1 Partner resource manager initialization has ended.17.17.40 JOB35727 +DFHAI0102I CICSIVP1 AITM initialization has ended.17.17.40 JOB35727 +DFHAP1203I CICSIVP1 Language Environment is being initialized.17.17.40 JOB35727 +DFHAP1200 CICSIVP1 A CICS request to the Language Environment has failed. Reason code ’0011020’.17.17.40 JOB35727 +DFHAP1208 CICSIVP1 Language Environment cannot support the Cobol language. �7�17.17.40 JOB35727 +DFHAP1209 CICSIVP1 Language Environment cannot support the C/C++ languages. �7�17.17.40 JOB35727 +DFHAP1210 CICSIVP1 Language Environment cannot support the PL/I language. �7�17.17.40 JOB35727 +DFHAP1211I CICSIVP1 Language Environment initialization completed.17.17.40 JOB35727 +DFHWB1007 CICSIVP1 Initializing CICS Web environment.17.17.40 JOB35727 +DFHWB1008 CICSIVP1 CICS Web environment initialization is complete.17.17.40 JOB35727 +DFHSI1517 CICSIVP1 Control is being given to CICS.17.17.40 JOB35727 +DFHEJ0102 CICSIVP1 Enterprise Java domain initialization has ended.17.23.42 JOB35727 +DFHFC0208I CICSIVP1 069
069 LSR pool 1 is being built dynamically by CICS because all of the069 necessary parameters have not been supplied. Either there is no069 LSRPOOL definition or it is incomplete. The following are not069 defined: ’CI SIZE’ ’STRINGS’ ’MAXKEYLENGTH’. A delay is possible.
17.24.17 JOB35727 +DFHFC0208I CICSIVP1 137137 LSR pool 1 is being built dynamically by CICS because all of the137 necessary parameters have not been supplied. Either there is no137 LSRPOOL definition or it is incomplete. The following are not137 defined: ’CI SIZE’ ’STRINGS’ ’MAXKEYLENGTH’. A delay is possible.
17.24.28 JOB35727 +DFHTM1715 CICSIVP1 CICS is being quiesced by userid CICSUSER in transaction CEMTat netname IYCQTC70. �4�
17.24.28 JOB35727 +DFHDM0102I CICSIVP1 CICS is quiescing.17.24.28 JOB35727 +DFHTM1782I CICSIVP1 All non-system tasks have been successfully terminated.17.24.28 JOB35727 +DFHZC2305I CICSIVP1 Termination of VTAM sessions beginning17.24.28 JOB35727 +DFHCESD CICSIVP1 SHUTDOWN ASSIST TRANSACTION CESD STARTING. SHUTDOWN IS NORMAL.17.24.29 JOB35727 +DFHZC2316 CICSIVP1 VTAM ACB is closed17.24.29 JOB35727 +DFHCQ0104I CICSIVP1 MVS console queue is closed.17.24.31 JOB35727 +DFHRM0204 CICSIVP1 There are no indoubt, commit-failed or backout-failed UOWs.17.24.32 JOB35727 +DFHRM0130 CICSIVP1 Recovery manager has successfully quiesced.17.24.32 JOB35727 +DFHDU0303I CICSIVP1 Transaction Dump Data set DFHDMPA closed.17.24.32 JOB35727 +DFHKE1799 CICSIVP1 TERMINATION OF CICS IS COMPLETE.17.24.33 JOB35727 -DFHIVPOL CICS CICS 00 5757 .02 .00 7.05 21599 0 0 0 0 0 317.24.33 JOB35727 -DFHIVPOL CICS PRTDMPA 00 136 .00 .00 .00 286 0 0 0 0 0 417.24.34 JOB35727 -DFHIVPOL CICS PRTDMPB 00 135 .00 .00 .00 285 0 0 0 0 0 517.24.37 JOB35727 -DFHIVPOL CICS PRTAUXT 00 1559 .01 .00 .05 13828 0 0 0 0 0 617.24.37 JOB35727 $HASP375 DFHIVPOL ESTIMATED LINES EXCEEDED17.24.38 JOB35727 $HASP375 DFHIVPOL ESTIMATE EXCEEDED BY 5,000 LINES17.24.38 JOB35727 $HASP375 DFHIVPOL ESTIMATE EXCEEDED BY 10,000 LINES17.24.38 JOB35727 $HASP375 DFHIVPOL ESTIMATE EXCEEDED BY 15,000 LINES17.24.38 JOB35727 $HASP375 DFHIVPOL ESTIMATE EXCEEDED BY 20,000 LINES17.24.39 JOB35727 $HASP375 DFHIVPOL ESTIMATE EXCEEDED BY 25,000 LINES17.24.39 JOB35727 $HASP375 DFHIVPOL ESTIMATE EXCEEDED BY 30,000 LINES17.24.39 JOB35727 $HASP375 DFHIVPOL ESTIMATE EXCEEDED BY 35,000 LINES17.24.40 JOB35727 -DFHIVPOL CICS PRTBUXT 00 1572 .01 .00 .05 13923 0 0 0 0 0 717.24.40 JOB35727 IEF404I DFHIVPOL - ENDED - TIME=17.24.4017.24.40 JOB35727 -DFHIVPOL ENDED. NAME-CICINST TOTAL CPU TIME= .06 TOTAL ELAPSED TIME= 7.1817.24.40 JOB35727 $HASP395 DFHIVPOL ENDED
Figure 31. Sample job log for the DFHIVPOL job (Part 2 of 2)
248 CICS TS for z/OS: Installation Guide

�2� For more information about defining an applid for the CICS IVP jobs, seeChapter 13, “Defining CICS regions as applications to VTAM,” on page 99. Anapplid of CICSIVP1 has been used in Figure 31 on page 247 page=no.
�3� The DFHSM0122 messages inform you of the limits available for the dynamicstorage areas below and above 16MB. For information about these storage areas,see the CICS System Definition Guide .
Note: Storage for the extended read-only DSA, ERDSA, is obtained from read-onlykey 0 protected storage, because the sample SIT specifiesRENTPGM=PROTECT (the default).
�4� The DFHTM1715 message is issued because the CICS region was shut downby the terminal user (with netname IYCWTC30) issuing a CEMT PERFORMSHUTDOWN command.
�7� If you want COBOL, C, C++ and PL/I languages, remove the comment marksfrom the SCEERUN and SCEERUN2 libraries, and increase the memory size forthe job.
Logging on at a VTAM terminalWhen the DFHIVPOL job displays the console message CONTROL IS BEING GIVENTO CICS, you can log on to CICS using an IBM 3270 Information Display systemterminal. Use the CICS application identifier that you specified when you brought upCICS to log on through your VTAM terminal. For example, unless you changed theAPPLID specified as a SIT override parameter, (it is CICSIVP1), enter LOGONAPPLID(CICSIVP1).
If you are using autoinstall, your logon request is passed to CICS and, provided allthe autoinstall requirements described in “Using autoinstall for a VTAM terminal” onpage 242 have been met, CICS installs your terminal. It does this by creating aTCT terminal entry (TCTTE) using the model definitions defined in the group list,DFHLIST, and the terminal identifier returned by the autoinstall user program(DFHZATDX in this case).
If you are using a terminal defined in the CSD explicitly, and included in the grouplist specified in the startup job stream, CICS identifies the installed resourcedefinitions by the VTAM net name, and creates the required TCTTE.
When you log onto CICS, your terminal can display a “good morning” message, bythe transaction specified on the GMTRAN system initialization parameter. Thedefault transaction, CSGM, displays the message shown in Figure 32 on page 250,as defined by the GMTEXT system initialization parameter.
Chapter 35. Running the installation verification procedures 249

Using CICS-supplied transactions through a terminalAfter you have started CICS with the DFHIVPOL job, you can use theCICS-supplied transactions to try out various functions of CICS, to help you verifythat CICS is working properly. You can use the transactions at a CICS terminal and,if you defined one, the system console.
Table 18 on page 251 shows some typical terminal interactions, including use of theCEMT transaction. For information about the CICS transactions that you can trywith the DFHIVPOL job, and about the message-switching responses to thosetransactions, see the CICS Supplied Transactions manual.
WELCOME TO CICS 12:56:28
******\ ******\ ******\ ******\(R)********\ ******\ ********\ ********\**\\\\**\ **\\\ **\\\\**\ **\\\\**\**\ \\ **\ **\ \\ **\ \\**\ **\ **\ *******\**\ **\ **\ *******\**\ **\ **\ \\\\**\**\ **\ **\ **\ **\ **\ **\********\ ******\ ********\ ********\******\\ ******\ ******\\ ******\\\\\\\\ \\\\\\ \\\\\\ \\\\\\
Figure 32. Screen layout for default logon message transaction, CSGM
250 CICS TS for z/OS: Installation Guide

Table 18. Typical terminal interactions
Operator Input System Response
CEMT Status: ENTER ONE OF THE FOLLOWING
DiscardInquirePerformSet
I Status: ENTER ONE OF THE FOLLOWINGOR HIT ENTER FOR DEFAULT(Followed by a list of options)
PROGPress ENTER key
STATUS: RESULTS - OVERTYPE TO MODIFYProg(CEECBLDY) Len(0000000) Ass Pro Ena Pri
Res(000) Use(0000000000) Any Cex FulPress PF3 keyPress CLEAR key
CEMT PERFORMSTATISTICSPress PF3 keyPress CLEAR key
SESSION ENDED
CETR See“Screen layout for the CETR transaction” on page 252
Press PF3 keyPress CLEAR key
Clear or PF3 pressedNormal termination of CETR
CEMT I TA Displays list of tasks in the systemPress PF3 keyPress CLEAR key
SESSION ENDED
CEMT IPROG(DFHFEP)
Prog(DFHFEP )Len(005848) Ass Pro Ena PriRes(000) Use(0000000) Any Cex Ful Qua
Press PF3 keyPress CLEAR key
SESSION ENDED
CEOT(Inquire about thisterminal)
Ter (tmid) Tra (CEOT) Pri (nnn) Pag Ins Ati Tti(Remember 'tmid' for use in next transaction, CMSG)
Press PF3 keyPress CLEAR key
SESSION ENDED
CMSG 'HELLO',R=tmid,S (Send the message 'HELLO' to your terminal)MRS OK MESSAGE HAS BEEN ROUTED(briefly at bottom right of screen)HELLO
(at top left of screen)
You may enter your CEMT input in either uppercase or lowercase, because themaster terminal transaction translates all input to uppercase. Use the CLEAR keyand the PF3 key as indicated.
If you enter the CETR transaction, CICS displays the status of the various traceoptions. The screen layout in Figure 33 on page 252 shows what the CETR displaylooks like. For information about the CETR transaction, and the other informationpanels available by using specified PF keys, see the CICS Supplied Transactions
Chapter 35. Running the installation verification procedures 251

manual.
You can alter the status of any of the trace options by overtyping the current value,indicated by ===> on the CETR display.
Using the CEDA transactionWhen DFHIVPOL starts up CICS, it uses the unsuffixed SIT, DFHSIT. This systeminitialization table specifies GRPLIST=DFHLIST, causing all the CICS resourcedefinitions that are needed for normal running to be installed. You can see whichresources are included in DFHLIST by using the CEDA transaction. For example,CEDA EXPAND LIST(DFHLIST) gives a screen similar tosimilar to that in Figure 34 onpage 253.
Press PF8 to see the continuation of the list. If you started the DFHIVPOL job withyour own group list specified instead of the DFHLIST group list, specify the name ofyour list in the CEDA EXPAND command. The CICS-defined groups all begin withDFH. For information about CEDA and the interactions for a typical sequence ofCEDA commands, see the CICS Resource Definition Guide.
CETR CICS/ESA Trace Control Facility sysid applid
Type in your choices.
Item Choice Possible choices
Internal Trace Status ===> STARTED STArted, STOppedInternal Trace Table Size ===> 64 K 16K - 1048576K
Auxiliary Trace Status ===> STOPPED STArted, STOpped, PausedAuxiliary Trace Dataset ===> B A, BAuxiliary Switch Status ===> NO NO, NExt, All
GTF Trace Status ===> STOPPED STArted, STOpped
Master System Trace Flag ===> ON ON, OFfMaster User Trace Flag ===> ON ON, OFf
When finished, press ENTER.
PF1=Help 3=Quit 4=Components 5=Ter/Trn 9=Error List
Figure 33. Screen layout for the CETR transaction
252 CICS TS for z/OS: Installation Guide

The DFHLIST group list does not include any of the sample applications groups, thegroup names of which all begin with DFH$. To use the sample programs, therefore,you must first install the resource definitions for the required samples. For example,to use the FILEA sample application:
1. Install the sample programs that are needed for the FILEA applications. You cando this by the command:CEDA INSTALL GROUP(DFH$AFLA)
2. Make the FILEA data set available to CICS. You can do this by one of thefollowing:
v Install a FILE resource definition for the FILEA data set. You can do this bythe command:CEDA INSTALL GROUP(DFH$FILA)
v Provide a DD statement for the FILEA data set in your CICS startup JCL. Forexample,//FILEA DD DISP=SHR,DSN=CICSTS31.CICS.CICSHTH1.FILEA
To end the CEDA session, press PF3.
Invoking and executing sample programsTo try the assembler-language version of the FILEA sample application, installgroup DFH$AFLA then enter the AMNU transaction.
For information about the CICS sample application programs, see CICS 4.1 SampleApplications Guide .
Using transactions from a console deviceCICS transactions (other than CECI) can be invoked from a console device, andother CICS operators can communicate with the console operator. In particular, you
EXPAND LIST(DFHLIST)ENTER COMMANDSNAME TYPE LIST DATE TIMEDFHDCTG GROUP DFHLIST 95.349 15.49.57DFHBMS GROUP DFHLIST 95.349 15.49.57DFHCONS GROUP DFHLIST 95.349 15.49.57DFHDBCTL GROUP DFHLIST 95.349 15.49.57DFHDB2 GROUP DFHLIST 95.349 15.49.57DFHEDF GROUP DFHLIST 95.349 15.49.57DFHEDP GROUP DFHLIST 95.349 15.49.57DFHFE GROUP DFHLIST 95.349 15.49.58DFHHARDC GROUP DFHLIST 95.349 15.49.58DFHINQUI GROUP DFHLIST 95.349 15.49.58DFHINTER GROUP DFHLIST 95.349 15.49.58DFHISC GROUP DFHLIST 95.349 15.49.58DFHMISC GROUP DFHLIST 95.349 15.49.58DFHMSWIT GROUP DFHLIST 95.349 15.49.58DFHOPCLS GROUP DFHLIST 95.349 15.49.58DFHOPER GROUP DFHLIST 95.349 15.49.58
+ DFHPGAIP GROUP DFHLIST 95.349 15.49.58
SYSID=CICS APPLID=CICSIVP1RESULTS: 1 TO 17 OF 47 TIME: 16.09.50 DATE: 95.349
PF 1 HELP 3 END 4 TOP 5 BOT 6 CRSR 7 SBH 8 SFH 9 MSG 10 SB 11 SF 12 CNCL
Figure 34. Screen layout for CEDA EXPAND LIST(DFHLIST) command
Chapter 35. Running the installation verification procedures 253

can use the console device for CICS master terminal functions, to control CICSterminals or to control several CICS regions in conjunction with multiregionoperation. Normal operating-system use of the console device is not inhibited, andCICS supports multiple console devices where present.
Notes:
1. The CEDA transaction can be used from a console device only to INSTALLresource definitions.
2. The CECI transaction and the sample programs cannot be used from a consoledevice.
If you issue the MVS command d consoles, this displays a list of console devices.This list identifies the console devices by name.
You can use a console device to submit MODIFY commands from your job streamif you define a console device in your CSD as CONSNAME(INTERNAL).
For further information about defining consoles, see “Defining an MVS console” onpage 244. For further information about defining TSO users as consoles, see“Defining a TSO user as a console device” on page 245.
To enter a command, use:{MODIFY|F} jobname,[’]command[’]
where:
jobnameis the region identifier for the CICS region. This is either the name of the jobbeing used to execute CICS (for example, DFHIVPOL) or the name of aprocedure if CICS was initiated as a started task.
commandis a string of data, starting with a CICS transaction identifier. If thetransaction requires further input, the operator is prompted in the same wayas any normal terminal operator. The message from CICS contains a replynumber that must be quoted in the reply.
You can use the commands shown in Figure 35 on page 255 to verify the CEMTand CEOT transactions from the MVS console. (For information about thesetransactions, see the CICS Supplied Transactions manual.)
Entering commands from TSOA TSO user can enter CICS commands as above after invoking the TSO commandCONSOLE, in either of the following formats:
CONSOLE {MODIFY|F} cicsid,[’]command[’]
CONSOLE{MODIFY|F} cicsid,[’]command[’]END
When the TSO command CONSOLE is used, TSO checks the user for authority toissue console commands. Further, if console operator command security is active,the TSO user must be specifically authorized to issue MODIFY cicsid.
The TSO user can interact with an alternate CICS by using the commandCONSOLE MODIFY altcics,CEBT.
254 CICS TS for z/OS: Installation Guide

You can also use TSO CLIST processing to issue sequences of CICS commands.
Terminating CICSTo terminate CICS, enter: CEMT P SHUT from the VTAM terminal or MVS console.(This is a short form of CEMT PERFORM SHUTDOWN.) The system responds withmessage DFH1713, and those that follow, as shown in the sample job log shownon page 247.
Verifying shared data tables supportTo verify that the shared data tables function can be used, you can:
1. Start up a CICS region on which you have installed support for shared datatables.
Note: To use shared data tables, you must install the following modules:DFHDTSVC, DFHDTCV, and DFHMVRMS in either an authorized systemlibrary in the MVS linklist (LNKLST concatenation of the MVS system) orin the LPA. When you install CICS, these modules are installed into thehlq.SDFHLINK library (which you should normally include in the MVSlinklist).
2. Define and install a user-maintained data table.
3. Try a generic read command on your data table, using the CECI transaction.(Generic reads of user-maintained data tables are allowed only with shared datatables.) If shared data tables is operational, you should see a normal response.If shared data tables is not operational, you would see an INVREQ response.
Note: This verification process uses user-maintained data tables throughout,because the behavior of CICS-maintained data tables is transparent totheir users. For example, a normal response is returned for a genericread of a CICS-maintained data table, regardless of whether or notshared data tables is operational.
To verify that the cross-memory services of shared data tables are working:
Operator Input System Response
f dfhivpol,’cemt i terminal’ Displays a list of terminals attachedto CICS
f dfhivpol,’cemt i dump’ Displays status of transaction dumpdata sets
f dfhivpol,’cemt p statistics’ CICS writes statistics to SMF data sets
f dfhivpol,’cemt i ta’ Displays number and types of taskscurrently running
f dfhivpol,’cemt p dump’ CICS invokes SDUMP macro for systemdump to be taken
f dfhivpol,’cemt i prog(dfhpep)’ Displays details of DFHPEP module
f dfhivpol,’ceot’ Displays details of operator console
f dfhivpol,’cemt i journalname’ Displays status of CICS logs
Figure 35. Using an MVS console for master terminal operations
Chapter 35. Running the installation verification procedures 255
4. Start up a second CICS region (the requester) that has an interregioncommunication (IRC) connection to the first CICS region (the server, whichcontains the user-maintained data table and source data set).
5. On the requester CICS region, do the following:
a. Define and install a remote file referring to (associated with) theuser-maintained data table on the server CICS region.
b. Close the interregion communication connection between the two CICSregions so that function shipping is impossible; that is, only thecross-memory services of shared data tables can be used to access theshared data table from the requester CICS region. To close the connection,you can enter the command:CEMT SET IRC CLOSED
To verify that function shipping cannot work, try a remote READ of a file (nota data table) on the server CICS region; you will get a SYSIDERRresponse.
c. Try a generic read command on your data table, using the CECI transaction.If the cross-memory services of shared data tables can be used, you shouldsee a normal response.
6. To restore interregion communication between the two CICS regions, open theconnection again. To do this, you can enter the command:CEMT SET IRC OPEN
Example verification of shared data tablesAs an example verification test of shared data tables, the following steps werecompleted for the CICS shared data tables environment shown in Figure 36 onpage 257:
1. A CICS region, CICSIDC, was started. (CICSIDC is the server CICS region inthis example.)
2. On CICSIDC, the following steps were completed:
a. The user-maintained data table, MYSDT, was defined and installed. TheMYSDT data table was based on the sample data set, hlq.CICSIDC.FILEA,installed on that region.
b. The following generic READ command was entered at a terminal:CECI READ FILE(MYSDT) RIDFLD(00092) KEYLENGTH(5) GE GTEQ
Figure 37 on page 258 shows the initial response (LOADING), andFigure 38 on page 258 shows the subsequent response when the commandwas repeated after the data table had completed loading.
The following steps were completed to verify the cross-memory services of shareddata tables:
3. A second CICS region, CICSIDA, was started with support for shared datatables. (CICSIDA is the requester CICS region in this example.)
256 CICS TS for z/OS: Installation Guide

4. The following IRC connections and sessions were defined and installed on theassociated CICS regions:
Region CONNECTION SESSION
CICSIDA CICA ATOCCICSIDC CICC CTOA
See Figure 41 on page 260 and Figure 42 on page 261 for the parameters usedfor the CICA and ATOC resource definitions. The parameters for the CICC andCTOA resource definitions were similar.
5. On CICSIDA, the following steps were completed:
a. The file, REMSDT, was defined and installed as remote, referring to theMYSDT data table on CICSIDC. See Figure 43 on page 261 for theparameters used for the REMSDT resource definition.
b. The file, REMFIL, was defined and installed as remote, referring to theFILEA sample file on CICSIDC.
c. The CEMT SET IRC CLOSED command was used to close the IRCconnection to CICSIDC.
d. The following generic READ command was entered at a terminal:CECI READ FILE(REMFIL) RIDFLD(00092) KEYLENGTH(5)LENGTH(80) GE GTEQ
Figure 39 on page 259 shows the response (SYSIDERR), because theremote file cannot be accessed by function-shipping. (This response wouldalso be observed for the remote data table, REMSDT, if the IRC connectionwas closed.)
e. The following generic READ command was entered at a terminal:CECI READ FILE(REMSDT) RIDFLD(00092) KEYLENGTH(5)LENGTH(80) GE GTEQ
Figure 40 on page 260 shows the response (NORMAL). This only works ifMYSDT is already open on CICSIDC, as achieved by step 2b on page 256.
CICSIDA CICSIDC
APPLICATION OWNING FILE OWNINGREGION REGION
RDO group (CICAGRP) RDO group (CICCGRP)
CONNECTION (CICA) CONNECTION (CICC)SESSION (ATOC) SESSION (CTOA) VSAM
servicesFILE (REMFIL)remote FILE (FILEA) VSAM KSDSFILE (REMSDT)remote SDT (MYSDT) CICSTS31.
crossmemoryservices
CICS.Shared data CICSIDC.table services FILEA
DATASPACE data table
Figure 36. CICS environment for example verification of shared data tables
Chapter 35. Running the installation verification procedures 257

read file(MYSDT) ridfld(00092) keylength(5) ge gteqSTATUS: COMMAND EXECUTION COMPLETE NAME=EXEC CICS READFile( ’MYSDT ’ )< SYsid() >( SEt() | Into( ’’ ) )< Length( +00000 ) >RIdfld( ’00092’ )< Keylength( +00005 ) < GEneric > >< RBa | RRn | DEBRec | DEBKey >< GTeq | Equal >< UNcommitted | Consistent | REpeatable | UPdate <token()> >< Nosuspend >
RESPONSE: LOADING EIBRESP=+0000000094 EIBRESP2=+0000000104PF 1 HELP 2 HEX 3 END 4 EIB 5 VAR 6 USER 7 SBH 8 SFH 9 MSG 10 SB 11 SF
Figure 37. On CICSIDC, response to initial CECI generic READ FILE command with SDT support. (The data table isloaded on first reference, and generic READ commands are not allowed for a user-maintained data table while it isloading.)
read file(MYSDT) ridfld(00092) keylength(5) ge gteqSTATUS: COMMAND EXECUTION COMPLETE NAME=EXEC CICS READFile( ’MYSDT ’ )< SYsid() >( SEt()| Into( ’ 000983J. S. TILLING WASHINGTON, DC 34512’ ... ) )
< Length( +00080 ) >RIdfld( ’00092’ )< Keylength( +00005 ) < GEneric > >< RBa | RRn | DEBRec | DEBKey >< GTeq | Equal >< UNcommitted | Consistent | REpeatable | UPdate <token()> >< Nosuspend >
RESPONSE: NORMAL EIBRESP=+0000000000 EIBRESP2=+0000000000PF 1 HELP 2 HEX 3 END 4 EIB 5 VAR 6 USER 7 SBH 8 SFH 9 MSG 10 SB 11 SF
Figure 38. On CICSIDC, response to CECI generic READ FILE command with SDT support. Normal response
258 CICS TS for z/OS: Installation Guide

read file(FILEA) ridfld(00092) keylength(5) length(80) ge gteqSTATUS: COMMAND EXECUTION COMPLETE NAME=EXEC CICS READFile( ’FILEA ’ )< SYsid() >( SEt()| Into( ’ ’ ... ) )
< Length( +00080 ) >RIdfld( ’00092’ )< Keylength( +00005 ) < GEneric > >< RBa | RRn | DEBRec | DEBKey >< GTeq | Equal >< UNcommitted | Consistent | REpeatable | UPdate <token()> >
< Nosuspend >
RESPONSE: SYSIDERR EIBRESP=+0000000053 EIBRESP2=+0000000130PF 1 HELP 2 HEX 3 END 4 EIB 5 VAR 6 USER 7 SBH 8 SFH 9 MSG 10 SB 11
Figure 39. On CICSIDA, response to remote CECI generic READ FILE command, with IRC closed. SYSIDERRresponse for file, REMFIL, attempting to use function shipping for associated file, FILEA, on CICSIDC
Chapter 35. Running the installation verification procedures 259

read file(MYSDT) ridfld(00092) keylength(5) length(80) ge gteqSTATUS: COMMAND EXECUTION COMPLETE NAME=EXEC CICS READFile( ’MYSDT ’ )< SYsid() >( SEt()| Into( ’ 000983J. S. TILLING WASHINGTON, DC 34512’ ... ) )
< Length( +00080 ) >RIdfld( ’00092’ )< Keylength( +00005 ) < GEneric > >< RBa | RRn | DEBRec | DEBKey >< GTeq | Equal >< UNcommitted | Consistent | REpeatable | UPdate <token()> >< Nosuspend >
RESPONSE: NORMAL EIBRESP=+0000000000 EIBRESP2=+0000000000PF 1 HELP 2 HEX 3 END 4 EIB 5 VAR 6 USER 7 SBH 8 SFH 9 MSG 10 SB 11 SF
Figure 40. On CICSIDA, response to remote CECI generic READ FILE command, with IRC closed. Normal responsefor file, REMSDT, using cross-memory services for associated shared data table, MYSDT, on CICSIDC
OBJECT CHARACTERISTICS CICS RELEASE = 0640
Connection : CICAGroup : CICAGRPDEscription : MRO CONNECTION CICSIDA TO CICSIDCCONNECTION IDENTIFIERSNetname : CICSIDCINDsys :REMOTE ATTRIBUTESREMOTESystem :REMOTEName :CONNECTION PROPERTIESACcessmethod : IRc Vtam | IRc | INdirect | XmProtocol : Appc | Lu61SInglesess : No No | YesDAtastream : User User | 3270 | SCs | STrfield | LmsRECordformat : U U | VbOPERATIONAL PROPERTIESAUtoconnect : No No | Yes | AllINService : Yes Yes | No
Figure 41. Example CONNECTION resource definition, CICA, installed on CICSIDA. Only relevant parameters areshown; other parameters were allowed to default
260 CICS TS for z/OS: Installation Guide

OBJECT CHARACTERISTICS CICS RELEASE = 0640
Sessions : ATOCGroup : CICAGRPDEscription : SESSION FOR MRO CICA TO CICCSESSION IDENTIFIERSConnection : CICASESSName :NETnameq :MOdename :SESSION PROPERTIESProtocol : Lu61 Appc | Lu61MAximum : 000 , 000 0-999RECEIVEPfx : RBRECEIVECount : 005 1-999SENDPfx : SBSENDCount : 003 1-999SENDSize : 04096 1-30720RECEIVESize : 04096 1-30720SESSPriority : 100 0-255
Figure 42. Example SESSION resource definition, ATOC, associated with connection, CICA. Only relevant parametersare shown; other parameters were allowed to default
OBJECT CHARACTERISTICS CICS RELEASE = 0640
File : REMSDTGroup : CICCGRPDEScription :VSAM PARAMETERSDSNAme :Password : PASSWORD NOT SPECIFIEDRLsaccess : No No | YesLsrpoolid : 1 1-8 | NoneREADInteg : Uncommitted Uncommitted | Consistent | RepeatDSNSharing : Allreqs Allreqs | ModifyreqsSTRings : 001 1-255Nsrgroup :REMOTE ATTRIBUTESREMOTESystem : CICCREMOTEName : MYSDTRECORDSize : 1-32767Keylength : 1-255INITIAL STATUSSTAtus : Enabled Enabled | Disabled | Unenabled
Figure 43. Example remote FILE resource definition, REMSDT, installed on CICSIDA. Only relevant parameters areshown; other parameters were allowed to default
Chapter 35. Running the installation verification procedures 261

Verifying the CICS-DBCTL interfaceThis section describes how to use the installation verification procedure,DFHIVPDB, which you can use to verify that the CICS-DBCTL interface can beused successfully.
Before you can run the DFHIVPDB job successfully, you must:
1. Tailor the DFHIVPDB job to your CICS and IMS environment.
You can do this as part of the process of tailoring all CICS samplepost-installation jobs, as described in Chapter 29, “Defining DL/I support,” onpage 197. When you run the DFHISTAR job as part of the CICS installationprocess, the DFHIVPDB job is installed in the hlq.XDFHINST library.
Note: Change the prefix of the IMS.SDFSRESL (previously called IMS.RESLIB)library in the DFHIVPDB job to the prefix that you use for your IMSlibraries.
2. Create the data sets needed by the CICS region used by the the DFHIVPDBjob.
To do this, you can tailor and run copies of the following CICS sample jobs:
DFHCOMDSThis job creates the CICS data sets common to all CICS regions.
DFHDEFDSThis job creates the data sets needed for each CICS region.
When you run the DFHISTAR job as part of the CICS installation process, thesejobs are installed in the hlq.XDFHINST library.
3. Run the IMS installation verification procedures, as outlined in “The IMSinstallation requirements for the DFHIVPDB job.”
The IMS installation requirements for the DFHIVPDB jobThe DFHIVPDB job depends on you running the IMS installation verificationprocedures, as part of the INSTALL/IVP process described in the IMS InstallationGuide. The following assumptions about the IMS INSTALL/IVP process are made:
1. The IMS sample database, DI21PART, has been successfully defined. Thiscomprises two data sets:
DI21PARTDI21PARO
2. The DI21PART database has been loaded with the IMS-supplied sample data.
3. The following IMS-supplied procedures have been installed in an executableprocedure library:
ACBGENPSBGEN
4. The sample DRA startup table, DFSPZPIV, has been built and installed in theIMS.SDFSRESL (previously called IMS.RESLIB).
5. The sample DBCTL system, IVP3, is available.
For information about installing IMS, the INSTALL/IVP process, and running the IMSIVPs, see the IMS Installation Guide.
The DFHIVPDB job stepsThe DFHIVPDB job consists of the following job steps:
262 CICS TS for z/OS: Installation Guide
###
##

1. GEN. This step unloads the member DFH$DBAN from the hlq.SDFHSAMPlibrary into a temporary sequential data set called CARDIN. This membercontains the transactions to invoke the assembler versions of the DL/I sampleapplications that CICS reads from CARDIN as soon as initialization is complete.
Note: The sequential data set CARDIN is defined in the sample terminal controltable, DFHTCT5$, as a simulated terminal.
The COBOL version, DFH$DBCB, and the PL/I version, DFH$DBPL, of thesample DL/I transactions are also in the hlq.SDFHSAMP library. If you want torun the COBOL or PL/I versions, modify this job step to load CARDIN with theappropriate member.
Output generated by the transactions is sent to a similar device – a sequentialdata set defined as PRINTER.
2. CICS. This job step executes the DFHSTART procedure to start up CICS, withthe CICS-supplied resource group list DFH$IVPL. CICS attempts to connect tothe DBCTL system IVP3, run the sample DLI transactions, and then shutdownthe CICS region.
Note: If the DBCTL system, IVP3, is not running, the sample DLI transactionswill abend.
If you want to examine the sample members used by this IVP, here is a list of them,and where you can find each one:
DFHIVPDBThis IVP contains some explanatory comments, and was installed in thehlq.XDFHINST library when you ran the DFHISTAR job. For details of theDFHISTAR job, see Chapter 27, “Tailoring the CICS-supplied skeleton jobs,”on page 185.
DFH$SIP5This is the member of the hlq.SYSIN data set that contains the systeminitialization parameter overrides specific to the DFHIVPDB job.
Note: You will probably want to specify other system initializationparameters (for example, APPLID, CICSSVC, and DFLTUSER) forthe DFHIVPDB job; the DFH$SIP5 member of the hlq.SYSIN dataset is a convenient place to do so.
DFHTCT5$This is the sample TCT that specifies the sequential devices that CICS usesin this IVP as a simulated terminal, with a terminal name of SAMA. Thesource statements are in the member, DFH$TCTS, of the hlq.SDFHSAMPlibrary.
Running the DFHIVPDB jobBefore submitting the DFHIVPDB job, run the DFHRMUTL program, as shownbelow, to reset the global catalog control record to perform an INITIAL start on thenext CICS startup.//DFHRMUTI JOB 24116475,’DFHRMUTL’,// CLASS=A,MSGCLASS=H,NOTIFY=userid//*//*--------------------------------------------------------*///* RESET GLOBAL CATALOG CONTROL RECORD TO INITIAL START *///*--------------------------------------------------------*///DFHRMUTL EXEC PGM=DFHRMUTL,REGION=1M//STEPLIB DD DSN=CICSTS31.CICS.SDFHLOAD,DISP=SHR//SYSPRINT DD SYSOUT=*
Chapter 35. Running the installation verification procedures 263
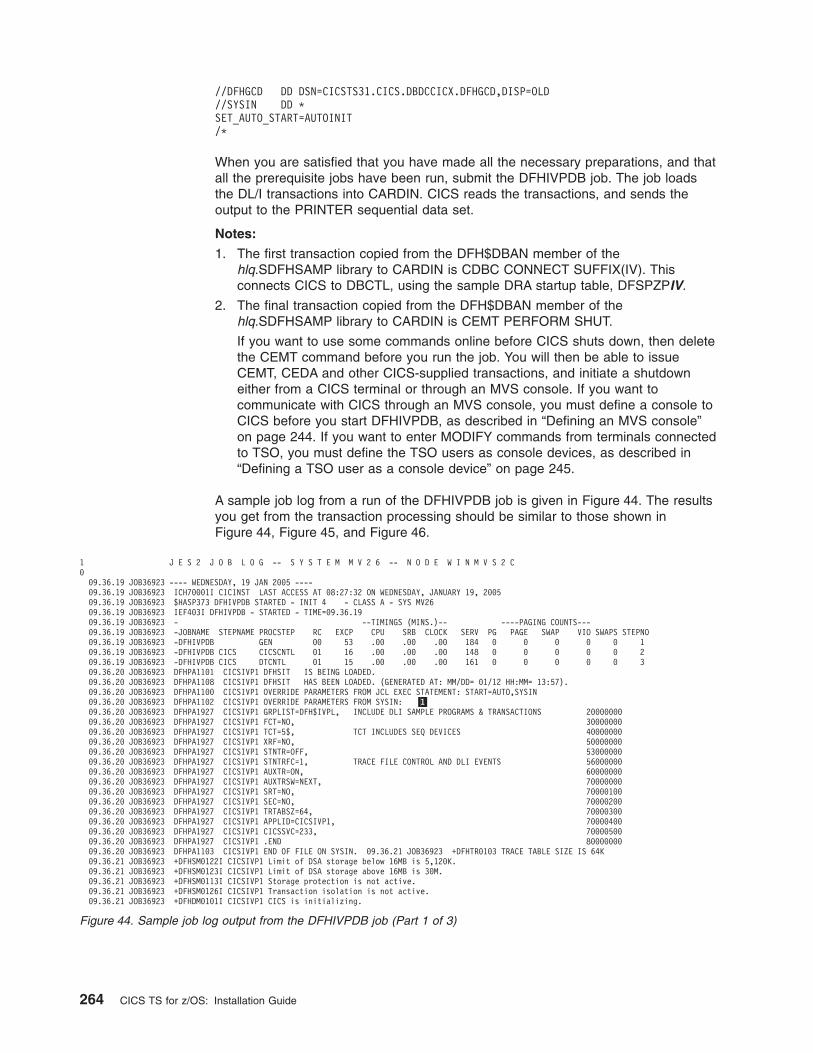
//DFHGCD DD DSN=CICSTS31.CICS.DBDCCICX.DFHGCD,DISP=OLD//SYSIN DD *SET_AUTO_START=AUTOINIT/*
When you are satisfied that you have made all the necessary preparations, and thatall the prerequisite jobs have been run, submit the DFHIVPDB job. The job loadsthe DL/I transactions into CARDIN. CICS reads the transactions, and sends theoutput to the PRINTER sequential data set.
Notes:
1. The first transaction copied from the DFH$DBAN member of thehlq.SDFHSAMP library to CARDIN is CDBC CONNECT SUFFIX(IV). Thisconnects CICS to DBCTL, using the sample DRA startup table, DFSPZPIV.
2. The final transaction copied from the DFH$DBAN member of thehlq.SDFHSAMP library to CARDIN is CEMT PERFORM SHUT.
If you want to use some commands online before CICS shuts down, then deletethe CEMT command before you run the job. You will then be able to issueCEMT, CEDA and other CICS-supplied transactions, and initiate a shutdowneither from a CICS terminal or through an MVS console. If you want tocommunicate with CICS through an MVS console, you must define a console toCICS before you start DFHIVPDB, as described in “Defining an MVS console”on page 244. If you want to enter MODIFY commands from terminals connectedto TSO, you must define the TSO users as console devices, as described in“Defining a TSO user as a console device” on page 245.
A sample job log from a run of the DFHIVPDB job is given in Figure 44. The resultsyou get from the transaction processing should be similar to those shown inFigure 44, Figure 45, and Figure 46.
1 J E S 2 J O B L O G -- S Y S T E M M V 2 6 -- N O D E W I N M V S 2 C009.36.19 JOB36923 ---- WEDNESDAY, 19 JAN 2005 ----09.36.19 JOB36923 ICH70001I CICINST LAST ACCESS AT 08:27:32 ON WEDNESDAY, JANUARY 19, 200509.36.19 JOB36923 $HASP373 DFHIVPDB STARTED - INIT 4 - CLASS A - SYS MV2609.36.19 JOB36923 IEF403I DFHIVPDB - STARTED - TIME=09.36.1909.36.19 JOB36923 - --TIMINGS (MINS.)-- ----PAGING COUNTS---09.36.19 JOB36923 -JOBNAME STEPNAME PROCSTEP RC EXCP CPU SRB CLOCK SERV PG PAGE SWAP VIO SWAPS STEPNO09.36.19 JOB36923 -DFHIVPDB GEN 00 53 .00 .00 .00 184 0 0 0 0 0 109.36.19 JOB36923 -DFHIVPDB CICS CICSCNTL 01 16 .00 .00 .00 148 0 0 0 0 0 209.36.19 JOB36923 -DFHIVPDB CICS DTCNTL 01 15 .00 .00 .00 161 0 0 0 0 0 309.36.20 JOB36923 DFHPA1101 CICSIVP1 DFHSIT IS BEING LOADED.09.36.20 JOB36923 DFHPA1108 CICSIVP1 DFHSIT HAS BEEN LOADED. (GENERATED AT: MM/DD= 01/12 HH:MM= 13:57).09.36.20 JOB36923 DFHPA1100 CICSIVP1 OVERRIDE PARAMETERS FROM JCL EXEC STATEMENT: START=AUTO,SYSIN09.36.20 JOB36923 DFHPA1102 CICSIVP1 OVERRIDE PARAMETERS FROM SYSIN: �1�09.36.20 JOB36923 DFHPA1927 CICSIVP1 GRPLIST=DFH$IVPL, INCLUDE DLI SAMPLE PROGRAMS & TRANSACTIONS 2000000009.36.20 JOB36923 DFHPA1927 CICSIVP1 FCT=NO, 3000000009.36.20 JOB36923 DFHPA1927 CICSIVP1 TCT=5$, TCT INCLUDES SEQ DEVICES 4000000009.36.20 JOB36923 DFHPA1927 CICSIVP1 XRF=NO, 5000000009.36.20 JOB36923 DFHPA1927 CICSIVP1 STNTR=OFF, 5300000009.36.20 JOB36923 DFHPA1927 CICSIVP1 STNTRFC=1, TRACE FILE CONTROL AND DLI EVENTS 5600000009.36.20 JOB36923 DFHPA1927 CICSIVP1 AUXTR=ON, 6000000009.36.20 JOB36923 DFHPA1927 CICSIVP1 AUXTRSW=NEXT, 7000000009.36.20 JOB36923 DFHPA1927 CICSIVP1 SRT=NO, 7000010009.36.20 JOB36923 DFHPA1927 CICSIVP1 SEC=NO, 7000020009.36.20 JOB36923 DFHPA1927 CICSIVP1 TRTABSZ=64, 7000030009.36.20 JOB36923 DFHPA1927 CICSIVP1 APPLID=CICSIVP1, 7000040009.36.20 JOB36923 DFHPA1927 CICSIVP1 CICSSVC=233, 7000050009.36.20 JOB36923 DFHPA1927 CICSIVP1 .END 8000000009.36.20 JOB36923 DFHPA1103 CICSIVP1 END OF FILE ON SYSIN. 09.36.21 JOB36923 +DFHTR0103 TRACE TABLE SIZE IS 64K09.36.21 JOB36923 +DFHSM0122I CICSIVP1 Limit of DSA storage below 16MB is 5,120K.09.36.21 JOB36923 +DFHSM0123I CICSIVP1 Limit of DSA storage above 16MB is 30M.09.36.21 JOB36923 +DFHSM0113I CICSIVP1 Storage protection is not active.09.36.21 JOB36923 +DFHSM0126I CICSIVP1 Transaction isolation is not active.09.36.21 JOB36923 +DFHDM0101I CICSIVP1 CICS is initializing.
Figure 44. Sample job log output from the DFHIVPDB job (Part 1 of 3)
264 CICS TS for z/OS: Installation Guide

09.36.23 JOB36923 +DFHWB0109I CICSIVP1 Web domain initialization has started.09.36.23 JOB36923 +DFHSO0100I CICSIVP1 Sockets domain initialization has started.09.36.23 JOB36923 +DFHRX0100I CICSIVP1 RX domain initialization has started.09.36.23 JOB36923 +DFHRX0101I CICSIVP1 RX domain initialization has ended.09.36.23 JOB36923 +DFHLG0101I CICSIVP1 Log manager domain initialization has started.09.36.23 JOB36923 +DFHEJ0101 CICSIVP1 790
790 Enterprise Java domain initialization has started. Java is a790 trademark of Sun Microsystems, Inc.
09.36.23 JOB36923 +DFHDH0100I CICSIVP1 Document domain initialization has started.09.36.23 JOB36923 +DFHXS1100I CICSIVP1 Security initialization has started.09.36.23 JOB36923 +DFHSI1500 CICSIVP1 CICS startup is in progress for CICS Transaction Server Version 3.1.009.36.23 JOB36923 +DFHXS1102I CICSIVP1 Security is inactive.09.36.23 JOB36923 +DFHDU0304I CICSIVP1 Transaction Dump Data set DFHDMPB opened.09.36.23 JOB36923 +DFHSI1501I CICSIVP1 Loading CICS nucleus.09.36.26 JOB36923 +DFHTR0113 CICSIVP1 Auxiliary trace is being started on data set DFHAUXT.09.36.26 JOB36923 +DFHCQ0100I CICSIVP1 Console queue initialization has started.09.36.26 JOB36923 +DFHCQ0101I CICSIVP1 Console queue initialization has ended.09.36.26 JOB36923 +DFHCQ0103I CICSIVP1 MVS console queue is open.09.36.26 JOB36923 +DFHCQ0200I CICSIVP1 CEKL transaction enabled.09.36.26 JOB36923 +DFHXS1101I CICSIVP1 Security initialization has ended.09.36.26 JOB36923 +DFHRM0140 CICSIVP1 Recovery manager autostart override found with value: ’AUTOINIT’.09.36.26 JOB36923 +DFHRM0149I CICSIVP1 Recovery manager autostart override record will be deleted.09.36.26 JOB36923 +DFHDH0101I CICSIVP1 Document domain initialization has ended.09.36.26 JOB36923 +DFHMN0105I CICSIVP1 Using default Monitoring Control Table.09.36.26 JOB36923 +DFHSO0101I CICSIVP1 Sockets domain initialization has ended.09.36.26 JOB36923 +DFHWB0110I CICSIVP1 Web domain initialization has ended.09.36.26 JOB36923 +DFHMN0110I CICSIVP1 CICS Monitoring is inactive.09.36.26 JOB36923 +DFHSI1502I CICSIVP1 CICS startup is Initial.09.36.26 JOB36923 +DFHTS0100I CICSIVP1 Temporary Storage initialization has started.09.36.26 JOB36923 +DFHSI1503I CICSIVP1 Terminal data sets are being opened.09.36.27 JOB36923 +DFHLG0102I CICSIVP1 Log manager domain initialization has ended.09.36.27 JOB36923 IEC161I 080-053,DFHIVPDB,CICS CICS,DFHTEMP,,,09.36.27 JOB36923 IEC161I INST.CICSTS31.CNTL.CICS.DFHTEMP,09.36.27 JOB36923 IEC161I INST.CICSTS31.CNTL.CICS.DFHTEMP.DATA,09.36.27 JOB36923 IEC161I ICFCAT.SYSPLEX2.CATALOGB09.36.27 JOB36923 +DFHTS0102I CICSIVP1 About to format the temporary storage data set (359 control intervals).09.36.27 JOB36923 +DFHKE0406I CICSIVP1 825
825 CICS is about to wait for predecessors defined in the MVS automatic825 restart management policy for this region.
09.36.27 JOB36923 +DFHKE0412I CICSIVP1 CICS WAITPRED call to automatic restart manager has completed.09.36.27 JOB36923 +DFHCP0101I CICSIVP1 CPI initialization has started.09.36.27 JOB36923 +DFHPR0104I CICSIVP1 Partner resource manager initialization has started.09.36.27 JOB36923 +DFHAI0101I CICSIVP1 AITM initialization has started.09.36.27 JOB36923 +DFHFC0100I CICSIVP1 File Control initialization has started.09.36.27 JOB36923 +DFHTD0100I CICSIVP1 Transient Data initialization has started.09.36.27 JOB36923 +DFHFC0101I CICSIVP1 File Control initialization has ended.09.36.27 JOB36923 +DFHTD0101I CICSIVP1 Transient Data initialization has ended.09.36.27 JOB36923 +DFHTS0101I CICSIVP1 Temporary Storage initialization has ended.09.36.27 JOB36923 +DFHCP0102I CICSIVP1 CPI initialization has ended.09.36.27 JOB36923 +DFHPR0105I CICSIVP1 Partner resource manager initialization has ended.09.36.27 JOB36923 +DFHAI0102I CICSIVP1 AITM initialization has ended.09.36.28 JOB36923 +DFHSI1511I CICSIVP1 Installing group list DFH$IVPL.09.36.29 JOB36923 IEC031I D37-04,IFG0554P,DFHIVPDB,CICS,DFHAUXT,D306,P2P0C6,INST.CICSTS31.CICS.DFHAUXT09.36.29 JOB36923 +DFHTR0110 - AUXILIARY TRACE DATA SET DFHAUXT FULL - SWITCHING TO DFHBUXT09.36.29 JOB36923 IEC031I D37-04,IFG0554P,DFHIVPDB,CICS,DFHBUXT,D50B,P2P14B,INST.CICSTS31.CICS.DFHBUXT09.36.29 JOB36923 +DFHTR0109 - AUXILIARY TRACE DATA SET DFHBUXT FULL - AUXILIARY TRACE HAS BEEN STOPPED09.36.30 JOB36923 +DFHLG0103I CICSIVP1 System log (DFHLOG) initialization has started.09.36.31 JOB36923 +DFHLG0104I CICSIVP1 844
844 System log (DFHLOG) initialization has ended. Log stream844 CICINST.CICSIVP1.DFHLOG is connected to structure LOG_GENERAL_008.
09.36.31 JOB36923 +DFHLG0103I CICSIVP1 System log (DFHSHUNT) initialization has started.09.36.31 JOB36923 +DFHLG0104I CICSIVP1 846
846 System log (DFHSHUNT) initialization has ended. Log stream846 CICINST.CICSIVP1.DFHSHUNT is connected to structure LOG_GENERAL_008.
09.36.31 JOB36923 +DFHAP1203I CICSIVP1 Language Environment is being initialized.09.36.31 JOB36923 +DFHAP1200 CICSIVP1 A CICS request to the Language Environment has failed. Reason code ’0011020’.09.36.31 JOB36923 +DFHAP1208 CICSIVP1 Language Environment cannot support the Cobol language. �7�09.36.31 JOB36923 +DFHAP1209 CICSIVP1 Language Environment cannot support the C/C++ languages. �7�09.36.31 JOB36923 +DFHAP1210 CICSIVP1 Language Environment cannot support the PL/I language. �7�09.36.31 JOB36923 +DFHAP1211I CICSIVP1 Language Environment initialization completed.09.36.31 JOB36923 +DFHWB1007 CICSIVP1 Initializing CICS Web environment.09.36.32 JOB36923 +DFHWB1008 CICSIVP1 CICS Web environment initialization is complete.09.36.32 JOB36923 +DFHSI1517 CICSIVP1 Control is being given to CICS.09.36.32 JOB36923 +DFHEJ0102 CICSIVP1 Enterprise Java domain initialization has ended.09.37.54 JOB36923 +DFHTM1715 CICSIVP1 CICS is being quiesced by userid CICSUSER in transaction CEMT at terminal SAMA.09.37.54 JOB36923 +DFHDM0102I CICSIVP1 CICS is quiescing.09.37.54 JOB36923 +DFHDB8122I CICSIVP1 CICS is about to disconnect from DBCTL for CICS shutdown.09.37.54 JOB36923 +DFHCESD CICSIVP1 SHUTDOWN ASSIST TRANSACTION CESD STARTING. SHUTDOWN IS NORMAL.09.37.54 JOB36923 +DFHDB8123I CICSIVP1 CICS disconnection from DBCTL for CICS shutdown has completed successfully.09.37.54 JOB36923 +DFHTM1782I CICSIVP1 All non-system tasks have been successfully terminated.09.37.55 JOB36923 +DFHZC2305I CICSIVP1 Termination of VTAM sessions beginning09.37.55 JOB36923 +DFHZC2316 CICSIVP1 VTAM ACB is closed09.37.55 JOB36923 +DFHCQ0104I CICSIVP1 MVS console queue is closed.09.37.58 JOB36923 +DFHRM0204 CICSIVP1 There are no indoubt, commit-failed or backout-failed UOWs.09.37.59 JOB36923 +DFHRM0130 CICSIVP1 Recovery manager has successfully quiesced.09.37.59 JOB36923 +DFHDU0303I CICSIVP1 Transaction Dump Data set DFHDMPB closed.
Figure 44. Sample job log output from the DFHIVPDB job (Part 2 of 3)
Chapter 35. Running the installation verification procedures 265

Note:
�1� The DFHIVPDB job uses the unsuffixed SIT, DFHSIT, as used by all the CICSIVPs. It also uses some system initialization parameters included in the DFH$SIP5member of the SYSIN data set, to override the parameters in DFHSIT. Further, theDFH$SIP5 member was edited to specify other system initialization parameters tocreate the DFHIVPDB job log shown. For information about these extra systeminitialization parameters used by the IVP jobs, see page 231.
�7� If you want COBOL, C, C++ and PL/I languages, remove the comment marksfrom the SCEERUN and SCEERUN2 libraries, and increase the memory size forthe job.
You should see messages similar to those in Figure 45 at the end of the MSGUSERsection of the job output.
You should see messages similar to those in Figure 46 on page 267 in the Printersection of the job output.
09.37.59 JOB36923 +DFHKE1799 CICSIVP1 TERMINATION OF CICS IS COMPLETE.09.37.59 JOB36923 -DFHIVPDB CICS CICS 00 4070 .03 .00 1.66 23769 0 0 0 0 0 409.38.00 JOB36923 -DFHIVPDB CICS PRTDMPA 00 137 .00 .00 .00 289 0 0 0 0 0 509.38.00 JOB36923 -DFHIVPDB CICS PRTDMPB 00 138 .00 .00 .00 291 0 0 0 0 0 609.38.03 JOB36923 -DFHIVPDB CICS PRTAUXT 00 1935 .01 .00 .04 13326 0 0 0 0 0 709.38.04 JOB36923 $HASP375 DFHIVPDB ESTIMATED LINES EXCEEDED09.38.04 JOB36923 $HASP375 DFHIVPDB ESTIMATE EXCEEDED BY 5,000 LINES09.38.05 JOB36923 $HASP375 DFHIVPDB ESTIMATE EXCEEDED BY 10,000 LINES09.38.05 JOB36923 $HASP375 DFHIVPDB ESTIMATE EXCEEDED BY 15,000 LINES09.38.05 JOB36923 $HASP375 DFHIVPDB ESTIMATE EXCEEDED BY 20,000 LINES09.38.05 JOB36923 $HASP375 DFHIVPDB ESTIMATE EXCEEDED BY 25,000 LINES09.38.06 JOB36923 $HASP375 DFHIVPDB ESTIMATE EXCEEDED BY 30,000 LINES09.38.06 JOB36923 -DFHIVPDB CICS PRTBUXT 00 1909 .01 .00 .05 13560 0 0 0 0 0 809.38.06 JOB36923 IEF404I DFHIVPDB - ENDED - TIME=09.38.0609.38.06 JOB36923 -DFHIVPDB ENDED. NAME-CICINST TOTAL CPU TIME= .06 TOTAL ELAPSED TIME= 1.7809.38.06 JOB36923 $HASP395 DFHIVPDB ENDED
Figure 44. Sample job log output from the DFHIVPDB job (Part 3 of 3)
DFHLG0302 01/19/2005 09:36:31 CICSIVP1 Journal name DFHLOG has been installed. Journal type: MVSCICINST.CICSIVP1.DFHLOG.
DFHLG0302 01/19/2005 09:36:31 CICSIVP1 Journal name DFHSHUNT has been installed. Journal type: MVSCICINST.CICSIVP1.DFHSHUNT.
DFHLG0744 01/19/2005 09:36:31 CICSIVP1 All records in log stream CICINST.CICSIVP1.DFHLOG have been deleted.DFHLG0744 01/19/2005 09:36:31 CICSIVP1 All records in log stream CICINST.CICSIVP1.DFHSHUNT have been deleted.DFHDB8116 I 01/19/2005 09:36:32 CICSIVP1 Connection to DBCTL IM7D is proceeding. Startup Table Suffix used is IV.DFHDB8101 I 01/19/2005 09:36:32 CICSIVP1 Connection to DBCTL IM7D is now complete. Startup Table Suffix used is IV.DFHZC3441 I 01/19/2005 09:37:55 CICSIVP1 Orderly termination of VTAM sessions requested. ((1) Module name: DFHZSHU)DFHRM0205 01/19/2005 09:37:58 CICSIVP1 An activity keypoint has been successfully taken.DFHLG0743 01/19/2005 09:37:58 CICSIVP1 Tail of log stream CICINST.CICSIVP1.DFHLOG deleted at block id
X’0000000000000FDD’.
Figure 45. Sample job log output from the end of the MSGUSER section of the DFHIVPDB job
266 CICS TS for z/OS: Installation Guide

Testing the CICS-DB2 environmentThis section outlines how you can test the CICS-DB2 environment. It uses Phase 5of the DB2 installation verification procedure. It is intended as an overview of whatis involved, and what you would expect to see.
To use the DB2 installation verification procedure, and Phase 5 in particular, see theIBM DATABASE 2 Administration Guide. That publication gives the latestinformation about the procedure, and describes the steps involved in much moredetail.
Run DB2 jobs DSNTEJ5C and DSNTEJ5PTo prepare the sample applications to be used in a CICS-DB2 environment, run thejobs DSNTEJ5C and DSNTEJ5P supplied with DB2.
Job DSNTEJ5C installs the sample application transactions in COBOL and preparesthe organization application. Job DSNTEJ5P installs the transactions in PL/I andprepares the organization, project, and phone applications.
Both these jobs perform the following functions:v Compile and link-edit the CICS online applications.v Bind the CICS online applications.v Create the BMS maps for the online applications.
Starting a DB2 organization or project applicationAfter logging on to CICS, you can start an organization or project application byentering one of the following CICS transaction codes:v D8PP, which starts the PL/I project versionv D8PS, which starts the PL/I organization versionv D8CS, which starts the COBOL organization version
If you enter one of these transaction codes, the panels shown in Figure 47 on page268 or Figure 48 on page 268 are displayed.
1DFHDB8210D Connection to DBCTL is proceeding. Check CDBC TD queue.DFHDB8225I CICSIVP1 The DBCTL ID is IM7D. The DRA Startup Table suffix is IV.
INPUT: ASMCDPA02MS16995-28PART=02MS16995-28 DESC= SCREWAREA INV PROJ DIV UNIT CURRENT ON IN TOTAL COUNT BACK
DEPT CD PRICE REQMTS ORDER STOCK DISBURSE TAKEN ORDR1. AA 165 11 0.152 260 0 300 4030 N 02. BA 165 15 0.069 60 0 80 5000 N 03. FF 554 6D 0.069 440 0 430 5000 N 04. 2 59 109 26 6.980 950 0 1000 5000 N 0
INPUT: ASMCDPA02JAN1N976BPART=02JAN1N976B DESC= DIODE CODE-AAREA INV PROJ DIV UNIT CURRENT ON IN TOTAL COUNT BACK
DEPT CD PRICE REQMTS ORDER STOCK DISBURSE TAKEN ORDR1. 2 55 091 26 0.000 170 2000 170 4710 N 0
Figure 46. Sample job log output from the Printer section of the output of the DFHIVPDB job
Chapter 35. Running the installation verification procedures 267

For detailed information about running the organization and project applications, seethe IBM DATABASE 2 Administration Guide.
Starting the DB2 phone applicationTo start the phone application, clear the screen and type in the transaction codeD8PT. You can change the transaction codes when you install DB2. Check withyour system administrator to find out if they have been changed from those shown.
Running the EJB "Hello World" sampleYou are recommended to include running the EJB "Hello World" sample in yourInstallation Verification procedures.
For a description of this procedure, see the Java Applications in CICS manual.
.
ACTION SELECTIONMAJOR SYSTEM ...: O ORGANIZATIONACTION .........:OBJECT .........:SEARCH CRITERIA.:DATA ...........:SELECT AN ACTION FROM FOLLOWING LIST
A ADD (INSERT)D DISPLAY (SHOW)E ERASE (REMOVE)U UPDATE (CHANGE)
Figure 47. Initial panel for the DB2 project application in CICS
ACTION SELECTIONMAJOR SYSTEM ...: P PROJECTSACTION .........:OBJECT .........:SEARCH CRITERIA.:DATA ...........:SELECT AN ACTION FROM FOLLOWING LIST
A ADD (INSERT)D DISPLAY (SHOW)E ERASE (REMOVE)U UPDATE (CHANGE)
Figure 48. Initial panel for the DB2 project application in CICS
268 CICS TS for z/OS: Installation Guide
Part 5. CICSPlex SM installation and setup
This part describes the processes and procedures you should follow to installCICSPlex SM. It contains the following chapters
v Chapter 36, “CICSPlex SM setup checklist and worksheets,” on page 271.
v Chapter 37, “Setting up the MVS environment,” on page 281.
v Chapter 38, “VTAM requirements,” on page 289.
v Chapter 39, “Generating post-installation members,” on page 297.
v Chapter 40, “Creating and managing CICSPlex SM data sets,” on page 299.
v Chapter 41, “Upgrading the CSD and macro definitions,” on page 307
v Chapter 42, “Preparing user access to CICSPlex SM,” on page 313
v Chapter 43, “Setting up a coordinating address space (CAS),” on page 315.
v Chapter 44, “Setting up a CICSPlex SM address space (CMAS),” on page 321.
v Chapter 45, “Setting up a CICS managed application system (MAS),” on page333.
v Chapter 46, “Setting up a CICSPlex SM Web User Interface server,” on page341.
v Chapter 47, “Configuring the Starter Set,” on page 361.
v Chapter 48, “Applying service to CICSPlex SM,” on page 371.
v Chapter 49, “Using the EYUINST EXEC to tailor skeleton jobs,” on page 373.
v Chapter 50, “CICSPlex SM system parameters,” on page 383.
v Chapter 51, “CMAS journaling,” on page 397.
v Chapter 52, “Preparing to use the IPCS tools,” on page 401.
© Copyright IBM Corp. 1989, 2010 269
||

270 CICS TS for z/OS: Installation Guide

Chapter 36. CICSPlex SM setup checklist and worksheets
This chapter contains the following aids to your installation and setup procedures:
ChecklistTo use as a guide to your progress as you set up or revise the configurationof your IBM CICSPlex System manager (CICSPlex SM) components. Thechecklist is for use with a CICS Transaction Server (or a CICS/ESA) system(referred to as an MVS system) and all of the components you can installon it.
Some of the items on the MVS checklist need be performed only once foryour CICSPlex SM environment, while others must be performed once foreach component. See the ‘Where to get information’ column for a referenceto information about how to perform each task.
The order of items in the checklist is a suggested order for performing theinstallation and setup steps. However, you may find that, particularly if youare modifying your CICSPlex SM environment, a different order is morepractical.
WorksheetsTo use as a record of the names and locations of components and datasets. The worksheets can be copied as you need.
The worksheets contain, in some cases, more than one line for a type ofCICSPlex SM component. You may have fewer or more than shown of thattype of component.
A worksheet is provided for each of the following CICSPlex SM systemcomponents:v The CICSPlex SM systemv A CASv A CMASv A local MAS
The checklist and worksheets are also provided on the tape on whichCICSPlex SM is delivered to you. They are loaded onto your system and availablein the library CICSTS31.CPSM.SEYUINST.
Table 19 lists the members by name and content. You can edit these members,filling in the information specific to your CICSPlex SM environment, so that youhave an online record of the information you need about that environment.
Table 19. Checklist and worksheets in CICSTS31.CPSM.SEYUINSTMember name Contents
EYULSTMV MVS installation and setup checklistEYUWKSYS System worksheetEYUWKCAS CAS worksheetEYUWKCMS CMAS worksheetEYUWKLMS A local MAS worksheet
© Copyright IBM Corp. 1989, 2010 271
||||||
||||
||||
||||
||||
|||||||||||

Installation checklist
MVS installation and setup checklist
Component What you need to do Values to note Where to get information
Note: Components are indicated as follows: C=CAS, CM=CMAS, LM=local MAS
C CM LM Make note ofSYS1.PARMLIB(IEASYSxx)values for this MVS system
APF= CMD= LNK=LNKAUTH= LPA=MAXCAD= MAXUSER=NSYSLX= PROG=RSVNONR= RSVSTRT=SMF= SYSNAME=
“Noting IEASYSxx values” onpage 281
C CM Update number of commondata spaces in IEASYSxx
NSYSLX value “Updating IEASYSxx (CAS)” onpage 282
CM Update number of linkageindexes in IEASYSxx
MAXCAD value “Updating IEASYSxx (CMAS)”on page 282
C CM LM Update IEAAPFxx or PROGxxto authorize index.SEYUAUTH
IEAAPFxx or PROGxxmember Library name
“Authorizing libraries” on page283
LM Update IEAAPFxx or PROGxxto authorize lindex.SEYULPAOptional library. Can bepopulated below.
IEAAPFxx or PROGxxmember Library name
“Authorizing libraries” on page283
C CM Verify lindex.SEYULINK isauthorized
LNKAUTH= value Libraryname
“Authorizing libraries” on page283
C CM Update linklist withlindex.SEYULINK
LNKLSTxx memberLibrary name
“Updating the MVS linklist” onpage 284
LM Update LPA list withlindex.SEYULPA Optionallibrary. Can be populated below.
LPALSTxx memberLibrary name
“Installing CICSPlex SMmodules into the LPA” on page287
C CM LM Create VTAM Mode Table entry Node name “Step 1: (Optional) Creating amode table” on page 289
C CM LM Use your ESM to protectCICSPlex SM libraries
As required by your ESM the CICS RACF Security Guide
C CM Define security for the CAS andCMAS startup procedures
Procedure names the CICS RACF Security Guide
C Create VTAM applicationdefinition for each CAS
SYS1.VTAMLST majornode member Applicationname(s)
“Step 2: Creating a VTAMapplication definition (CAS)” onpage 291
CM Create VTAM applicationdefinition for each CMAS
SYS1.VTAMLST majornode member Applicationname(s)
“Step 1: Creating a VTAMapplication definition (CMAS)”on page 294
C Define cross-domain resourcesfor each CAS
SYS1.VTAMLSTmembers
“Step 3: Defining cross-domainresources (CAS)” on page 292
CM Define cross-domain resourcesfor each CMAS
SYS1.VTAMLSTmembers
“Step 2: Defining cross-domainresources (CMAS)” on page295
C CM LM Add application andcross-domain resourcedefinitions to the VTAMconfiguration list
SYS1.VTAMLST(ATCCONxx)
“Step 4: Updating theconfiguration list (CAS)” onpage 292
272 CICS TS for z/OS: Installation Guide
|
|||||||
|||||||
|||||

Component What you need to do Values to note Where to get information
C CM LM Activate VTAM definitions Major node names “Step 5: Activating the majornodes (CAS)” on page 293
C CM LM Edit EYUISTAR forpost-installation members
Edited member Chapter 39, “Generatingpost-installation members,” onpage 297
C CM LM Run edited EYUISTAR memberto generate POST installmembers.
sysproc.XEYUINSToutput library name
Chapter 39, “Generatingpost-installation members,” onpage 297
LM (Optional.) Install LPA modules Installed usermod name “Installing CICSPlex SMmodules into the LPA” on page287
C (Optional.) CreateCICSPlex SM parameterrepository
dsindex.EYUIPRM “CAS-related data sets” onpage 299
C (Optional.) CreateCICSPlex SM screen repository
dsindex.EYUSDEF “CAS-related data sets” onpage 299
CM Create CICSPlex SM datarepository
dsindex.EYUDREP.cmasname
“Creating the CICSPlex SMdata repository” on page 299
CM Update CMAS CSD resourcedefinitions
CSD library name CMASGroup name CMASStartup list name
“Updating the CSD files usingDFHCSDUP (CMAS)” on page307
LM Update MAS CSD resourcedefinitions
CSD library name MASGroup name MASStartup list name
“Updating CSD files usingDFHCSDUP (MVS MAS)” onpage 311
CM Create CICSPlex SM systemparameter member for eachCMAS
Modified EYUCMS0Pparameter member(s)
“Preparing to start a CMAS” onpage 323
LM Edit CICSPlex SM systemparameter member for eachlocal MAS
Modified EYULMS0Pparameter member(s)
“Preparing to start an MVSMAS” on page 334
CM Edit CICS SIT parameters foreach CMAS
Modified parametermember(s)
“CMAS-related CICS SITparameters” on page 326
LM Edit CICS SIT parameters foreach MAS
Modified parametermember(s)
“MVS MAS-related CICS SITparameters” on page 336
CM Create CICS data sets for eachCMAS
Modified EYUDFHDSmember
“Preparing to start a CMAS” onpage 323
C Install CAS startup procedure(EYUCAS sample procedure)
Installed proceduremember Subsystem Id
“Preparing to start a CAS” onpage 315
CM Install CMAS startup procedure(EYUCMAS sample procedure)
Installed proceduremember
“Preparing to start a CMAS” onpage 323
C Update ISPF signon allocations(EYUTSODS temporaryallocation EXEC)
Logon procedure member Chapter 42, “Preparing useraccess to CICSPlex SM,” onpage 313
C Update ISPF panel selection Updated panel member Chapter 42, “Preparing useraccess to CICSPlex SM,” onpage 313
C Start the CAS Message BBMZA00IINITIALIZATIONCOMPLETE
“Preparing to start a CAS” onpage 315
Chapter 36. CICSPlex SM setup checklist and worksheets 273
|||||||
Component What you need to do Values to note Where to get information
C Start the CMAS Message EYUXL009ICAS Connectionestablished
“Preparing to start a CMAS” onpage 323
C Define CAS-to-CAS links usingCASDEF view
Subsystem ids CICSPlex System ManagerAdministration
CM Create CMAS-to-CMAS linksusing CMTCMDEF view
CMAS names TargetAPPLID Target CICSSYSID
CICSPlex System ManagerAdministration
CM Create CICSplex definitionusing CPLEXDEF view
CICSplex name CICSPlex System ManagerAdministration
LM Create all MAS definitions usingCICSSYS view
MAS name(s) CICSPlex System ManagerAdministration
LM Start the MAS Message EYUXL0007ILMAS Phase IIinitialization complete
“Preparing to start an MVSMAS” on page 334
LM Shut down the MASs usingCICSRGN view - terminatesCICS
Message EYUXL0016IMAS shutdown complete
“Stopping management of aCICS system” on page 339
274 CICS TS for z/OS: Installation Guide
||||||||
||||||
||||

System worksheet
System: _______
CAS name: _______ Subsystem ID: _______ VTAM Applid: _______
Name: VTAM Applid: CICS-SYSID:CMAS: ______________ ______________ ______________
LMAS: ______________ ______________ ______________LMAS: ______________ ______________ ______________LMAS: ______________ ______________ ______________
CMAS: ______________ ______________ ______________LMAS: ______________ ______________ ______________LMAS: ______________ ______________ ______________LMAS: ______________ ______________ ______________
CMAS: ______________ ______________ ______________LMAS: ______________ ______________ ______________LMAS: ______________ ______________ ______________LMAS: ______________ ______________ ______________
Chapter 36. CICSPlex SM setup checklist and worksheets 275
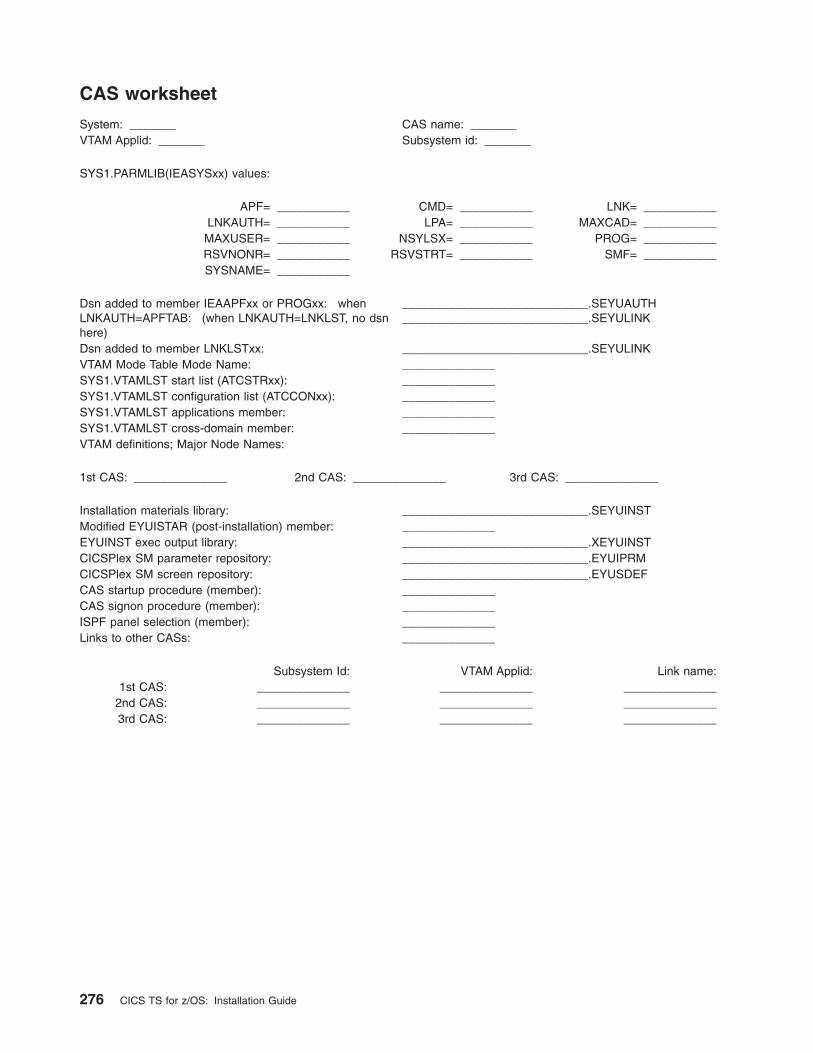
CAS worksheet
System: _______ CAS name: _______VTAM Applid: _______ Subsystem id: _______
SYS1.PARMLIB(IEASYSxx) values:
APF= ___________ CMD= ___________ LNK= ___________LNKAUTH= ___________ LPA= ___________ MAXCAD= ___________
MAXUSER= ___________ NSYLSX= ___________ PROG= ___________RSVNONR= ___________ RSVSTRT= ___________ SMF= ___________SYSNAME= ___________
Dsn added to member IEAAPFxx or PROGxx: whenLNKAUTH=APFTAB: (when LNKAUTH=LNKLST, no dsnhere)
____________________________.SEYUAUTH____________________________.SEYULINK
Dsn added to member LNKLSTxx: ____________________________.SEYULINKVTAM Mode Table Mode Name: ______________SYS1.VTAMLST start list (ATCSTRxx): ______________SYS1.VTAMLST configuration list (ATCCONxx): ______________SYS1.VTAMLST applications member: ______________SYS1.VTAMLST cross-domain member: ______________VTAM definitions; Major Node Names:
1st CAS: ______________ 2nd CAS: ______________ 3rd CAS: ______________
Installation materials library: ____________________________.SEYUINSTModified EYUISTAR (post-installation) member: ______________EYUINST exec output library: ____________________________.XEYUINSTCICSPlex SM parameter repository: ____________________________.EYUIPRMCICSPlex SM screen repository: ____________________________.EYUSDEFCAS startup procedure (member): ______________CAS signon procedure (member): ______________ISPF panel selection (member): ______________Links to other CASs: ______________
Subsystem Id: VTAM Applid: Link name:1st CAS: ______________ ______________ ______________
2nd CAS: ______________ ______________ ______________3rd CAS: ______________ ______________ ______________
276 CICS TS for z/OS: Installation Guide

CMAS worksheet
System: _______ CMAS name: _______CAS name: _______ CICS Sysid: _______ VTAM Applid: _______
SYS1.PARMLIB(IEASYSxx) values:
APF= ___________ LNK= ___________ LNKAUTH= ___________MAXCAD= ___________ NSYLSX= ___________ PROG= ___________
Dsn added to member IEAAPFxx or PROGxx: whenLNKAUTH=APFTAB: (when LNKAUTH=LNKLST, no dsnhere)
____________________________.SEYUAUTH____________________________.SEYULINK
Dsn added to member LNKLSTxx: ____________________________.SEYULINKVTAM Mode Table Node Name: ______________SYS1.VTAMLST start list (ATCSTRxx): ______________SYS1.VTAMLST configuration list (ATCCONxx): ______________SYS1.VTAMLST applications member: ______________SYS1.VTAMLST cross-domain member: ______________VTAM definitions; Node Names:
Name VTAM Applid CICS SysidLMAS: ______________ ______________ ______________LMAS: ______________ ______________ ______________LMAS: ______________ ______________ ______________
Installation materials library: ____________________________.SEYUINSTModified EYUISTAR (post-installation) member: ______________EYUINST exec output library: ____________________________.XEYUINSTCICSPlex SM data repository dsn: ___________________________________________CICS resource definition tables output dsn: ___________________________________________
CICS CSD dsn: ___________________________________________CMAS group EYU310G0 load module: ______________CMAS startup list EYU310L0 load module: ______________Modified EYUCMS0P member: ______________CICS SIT parameters member: ______________Modified EYUDFHDS member: ______________CMAS startup procedure member: ______________Links to other CMASs:
CMAS name: VTAM Applid: CICS Sysid: Protocol:______________ ______________ ______________ ____________________________ ______________ ______________ ____________________________ ______________ ______________ ____________________________ ______________ ______________ ______________
Links to LMASs:
LMAS name: VTAM Applid: CICS Sysid: Protocol:______________ ______________ ______________ ____________________________ ______________ ______________ ____________________________ ______________ ______________ ____________________________ ______________ ______________ ______________
Chapter 36. CICSPlex SM setup checklist and worksheets 277

278 CICS TS for z/OS: Installation Guide

Local MAS worksheet
MVS/ESA System: ______________CAS Name: ______________CICSplex Name: ______________CMAS CPSM Name: ______________ MAS CPSM Name: ______________CMAS CICS Sysid: ______________ MAS CICS Sysid: ______________CMAS VTAM Applid: ______________ MAS VTAM Applid: ______________MAS Type ______________ FOR, AOR, TOR
Dsn added to member IEAAPFxx or PROGxx: whenLNKAUTH=APFTAB: (when LNKAUTH=LNKLST, no dsnhere)
____________________________.SEYUAUTH____________________________.SEYULINK
Dsn added to member LPALSTxx: ____________________________.SEYULPASYS1.VTAMLST start list (ATCSTRxx): ______________SYS1.VTAMLST configuration list (ATCCONxx): ______________SYS1.VTAMLST applications member: ______________Installation materials library: ____________________________.SEYUINSTModified EYUISTAR (post-installation) member: ______________EYUINST exec output library: ____________________________.XEYUINSTLPA module (usermod) name: ______________CICS resource definition tables output dsn: ___________________________________________
CICS CSD dsn: ___________________________________________MAS group EYU310G1 load module: ______________Modified MAS startup list name: ______________Modified EYULMS0P dsn (member): ___________________________________________CICS SIT parameters dsn (member): ___________________________________________Link from CMAS:
CMAS name: VTAM Applid: CICS Sysid: Protocol:______________ ______________ ______________ ______________
Chapter 36. CICSPlex SM setup checklist and worksheets 279

280 CICS TS for z/OS: Installation Guide

Chapter 37. Setting up the MVS environment
This chapter describes the tasks you need to perform to ensure that your MVSenvironment is correctly defined to support CICSPlex SM. These tasks are asfollows:
v “Noting IEASYSxx values”
v “Updating IEASYSxx (CMAS)” on page 282
v “Updating IEASYSxx (CAS)” on page 282
v “Updating the MVS linklist” on page 284
v “Preparing to use the CICSPlex SM API” on page 284
v “Installing CICSPlex SM modules into the LPA” on page 287
Noting IEASYSxx valuesSome of the MVS initialization values located in an IEASYSxx member of theSYS1.PARMLIB library are referenced during installation of the CAS and otherCICSPlex SM address spaces.
Access the IEASYSxx member of the SYS1.PARMLIB library used to initialize yourMVS system and make note of the values assigned to the following parameters:
APF= Completes the name of the parmlib member(IEAAPFxx) that contains authorized library names.
CMD= Completes the name of the parmlib member(COMMNDxx) that contains commands to be issuedinternally during master scheduler initialization.
LNK= Completes the name of one or more parmlibmembers (LNKLSTxx) that contain names of datasets that are to be concatenated to SYS1.LINKLIB.
LNKAUTH= Specifies whether all data sets in the LNKLSTconcatenation are to be treated as APF authorizedor whether only those that are named in the APFtable are to be treated as APF authorized.
LPA= Completes the name of one or more parmlibmembers (LPALSTxx) that are concatenated toSYS1.LPALIB for the purpose of building thepageable LPA (PLPA and extended PLPA).
MAXCAD= Specifies the maximum number ofSCOPE=COMMON data spaces to be allowedduring an IPL.
MAXUSER= Specifies a value that the system uses (along withthe RSVSTRT and RSVNONR parameter values) tolimit the number of jobs and started tasks that thesystem can run concurrently during a given IPL.
NSYSLX= Specifies the number of linkage indexes (LXs), inaddition to those in the system function table, to bereserved for system linkage indexes (LXs).
PROG= Completes the name of the parmlib member(PROGxx) that contains authorized library nameswhen a dynamic APF list is being used.
© Copyright IBM Corp. 1989, 2010 281

RSVNONR= Specifies the number of address space vector table(ASVT) entries to be reserved for replacing thoseentries marked nonreusable for the duration of anIPL.
RSVSTRT= Specifies the number of ASVT entries to bereserved for address spaces created in response toa START command.
SMF= Specifies a parmlib member (SMFPRMxx) fromwhich SMF will obtain its parameters.
You should examine the SMFPRMxx member ofSYS1.PARMLIB and note the SID() value thatidentifies the system that will run the CAS.
SYSNAME= Specifies the name of the system being initialized.
For more information about these parameters, see the MVS Initialization and TuningReference manual.
Updating IEASYSxx (CAS)In every MVS/ESA image that contains a CAS, you need to verify that theIEASYSxx member of the SYS1.PARMLIB library that you use for MVS initializationincludes the parameters:
NSYSLX=nnnSet or increase the value to include the minimum number of linkageindexes (LXs) required by CICSPlex SM. Because two LXs are required forthe CAS and one LX is needed for the ESSS, the minimum number of LXsrequired for use by CICSPlex SM is 3.
If you are also setting up a CMAS, refer to “Updating IEASYSxx (CMAS)”for information about additional parameters.
For additional information about these parameters, see the MVS Initialization andTuning Reference manual.
Updating IEASYSxx (CMAS)In every MVS/ESA image that contains a CMAS, you need to verify that theIEASYSxx member of the SYS1.PARMLIB library that you use for MVS initializationincludes the parameters:
MAXCAD=nnnSet or increase the value to include the number of common MVS dataspaces that are needed for each CMAS. Each CMAS needs a minimum of6 common MVS data spaces. When setting the MAXCAD limit, allow for 6common MVS data spaces per CMAS, in addition to any common dataspaces that may be in use by other products.
NSYSLX=nnnSet or increase the value to include the minimum number of linkageindexes (LXs) that are required by CICSPlex SM. Because two LXs arerequired for the CAS and one LX is needed for the Environment ServicesSystem Services (ESSS), the minimum number of LXs required for use byCICSPlex SM is 3.
282 CICS TS for z/OS: Installation Guide

Note: This parameter may already have been defined when you set up theCAS. (See “Updating IEASYSxx (CAS)” on page 282.)
For additional information about these parameters, see the MVS Initialization andTuning Reference manual.
Authorizing librariesIn each MVS image containing a CAS and CICSPlex SM address space (CMAS),you must change the appropriate IEAAPFxx or PROGxx member of theSYS1.PARMLIB library to authorize CICSPlex SM libraries.
The libraries to be authorized in the IEAAPFxx or PROGxx member are:
CICSTS31.CPSM.SEYUAUTHNeeded to run a CAS
SYS1.CICSTS31.CPSM.SEYULINKThe link list data set, needed to run a CMAS (For more information aboutadding this data set, see “Updating the MVS linklist” on page 284.)
If your operating system uses the parameterLNKAUTH=LNKLST
(which is the default), you do not need to authorize theSYS1.CICSTS31.CPSM.SEYULINK library now.
SYS1.CICSTS31.CPSM.SEYULPAThe link pack area data set, optionally used for managed applicationsystem (MAS) LPA modules.
If you are adding the data set names to the IEAAPFxx member, the format of eachentry is:
dsname volser
where dsname is the name of one of the CICSPlex SM libraries listed above andvolser is the volume serial number of the volume on which the data set is located.
If you are adding the data set names to the PROGxx member, the format of eachentry is:
APF ADD DSNAME(dsname) VOLUME(volser)
where dsname is the name of one of the CICSPlex SM libraries listed above andvolser is the volume serial number of the volume on which the data set is located.
For additional information about adding entries to IEAAPFxx and PROGxx, see theMVS Initialization and Tuning Reference manual. If you are running with a staticAPF list, you must re-IPL MVS in order for authorization to take effect.
You should use RACF (or another external security manager) to protect theCICSTS31.CPSM.SEYUAUTH, SYS1.CICSTS31.CPSM.SEYULPA, andSYS1.CICSTS31.CPSM.SEYULINK libraries, as described in the CICS RACFSecurity Guide.
Chapter 37. Setting up the MVS environment 283

Updating the MVS linklistDepending on what components of CICSPlex SM you plan to run in an MVSimage, ensure that the following required modules reside in an authorized library inthe MVS linklist. These modules are supplied in theSYS1.CICSTS31.CPSM.SEYULINK library.
EYU9X310 In each MVS image that contains a CMAS.EYU9X310 is the initialization module for the ESSS.
This CICSPlex SM component provides a systemaddress space that is started by the first CMAS tobe initialized in the MVS image after an IPL. Foradditional information about the ESSS, seeCICSPlex System Manager Problem Determinationbook.
EYU9A310 In each MVS image that contains a CMAS whereyou wish to run the CICSPlex SM API. EYU9A310is the CICSPlex SM API subtask module.
These modules are release specific and are not compatible with earlier versions. Ifyou plan to run multiple releases of CICSPlex SM on the same MVS image, youmust have the equivalent modules specific to the releases you are running.
Note: For information on additional modules that can be placed in the MVS linklistand if you plan to use the CICSPlex SM API, see “Preparing to use theCICSPlex SM API.”
To add one or more of these modules to an authorized library in the linklist, performone of the following actions:
v Add the appropriate modules to an authorized library that is already in the linklist.
v Add the SYS1.CICSTS31.CPSM.SEYULINK library to the linklist by identifyingthe library in a LNKLSTxx member of the SYS1.PARMLIB library.
You should use RACF (or another external security manager) to protect theSYS1.CICSTS31.CPSM.SEYULINK library, as described in the CICS RACFSecurity Guide.
Preparing to use the CICSPlex SM APIIn each MVS image that contains a CMAS where you plan to run the CICSPlex SMAPI, ensure that the following required modules reside in the proper location. Thesemodules are supplied in the SYS1.CICSTS31.CPSM.SEYUAUTH library.
EYU9AB00 In either the MVS linklist or the STEPLIBconcatenation of the application that calls the API.EYU9AB00 is the API batch interface module.
EYU9XESV In an authorized library in either the MVS linklist orthe CMAS STEPLIB concatenation. EYU9XESV isthe API security exit module.
In addition, any application that calls the API must be link-edited with one of thefollowing stub routine modules, regardless of what programming language is used:
284 CICS TS for z/OS: Installation Guide
###

EYU9ABSIFor batch, TSO, or NetView programs. EYU9ABSI is supplied in theSYS1.CICSTS31.CPSM.SEYUAUTH library.
EYU9AMSIFor application programs running in CICS. EYU9AMSI is supplied in theSYS1.CICSTS31.CPSM.SEYULOAD library.
Installing the REXX function packageThe REXX run-time interface to the API is supplied as a function package and hostcommand environment. The interface consists of a single load module that containstwo entry points:
EYU9AR00 The function package
EYU9AR01 The host command
EYU9AR00 is supplied in the SYS1.CICSTS31.CPSM.SEYUAUTH library with analias of IRXFLOC.
For a REXX program to access the function package, the module EYU9AR00,along with its alternate entry point, EYU9AR01, and its alias, IRXFLOC, must residein an authorized library in one of these places:v The MVS linklistv The STEPLIB concatenation of the application that calls the API.
For a REXX program to access the function package from NetView, the EYU9AR00module must also be aliased to DSIRXLFP and placed in an authorized library ineither the MVS linklist or the STEPLIB concatenation for the NetView system.
Note: Users of the CICSPlex SM run-time interface are subject to the normalCICSPlex SM API security checks. See the information in the CICS RACFSecurity Guide.
The following members contain SMP/E user modification control statements thatyou can use to move the necessary API load modules to theSYS1.CICSTS31.CPSM.SEYULINK library. These members are supplied inCICSTS31.CPSM.SEYUSAMP.
Member Load moduleEYU$UM11 EYU9AR00EYU$UM12 EYU9AB00EYU$UM13 EYU9XESV
If you use the IRXFLOC or DSIRXLFP aliases to provide access to the REXXfunction package, they must be placed ahead of any other IRXFLOC or DSIRXLFPmodules in the STEPLIB (or MVS linklist) concatenation.
If you do not want to use the aliases for the REXX function package, you mustmodify your REXX parameter modules (IRXPARMS, IRXTSPRM, and IRXISPRM).If you do this, the following is recommended:
v The function package supplied by CICSPlex SM should be added as a Systemfunction package, rather than a Local or User function package.
v A new host command entry like the following should be added:– An 8-byte Command Environment name of ‘CPSM ’– An 8-byte Command Routine name of ‘EYU9AR01’
Chapter 37. Setting up the MVS environment 285

– A 16-byte Command Token of blanks
As the last step in installing the REXX function package, you must:v Increase the number of entries in the appropriate function package table.v Add an entry to that table for EYU9AR00.
For more information about REXX function packages and host commands, see theTSO/E Version 2 REXX/MVS Reference book.
Using CICSPlex SM modules in the MVS link pack areaThe benefits of using the MVS link pack area (LPA) are:
v Sharing – modules in the LPA can be shared by two or more CICS regions inthe same MVS image, giving an overall reduction in the total working set.
v Integrity – the LPA is page-protected, even against key 0 programs, so allmodules placed there are automatically protected against overwriting by otherprograms such as CICS applications. (This integrity feature applies equally to asingle CICS system within the processor.)
Every CICSPlex SM module installed in the LPA can be used only by the release ofCICSPlex SM to which it relates.
CICSPlex SM supplies prebuilt SMP/E USERMODs as members in theCICSTS31.CPSM.SEYUSAMP library. The USERMOD is:
EYU$UM01 - Local MAS modules
These USERMODs contain ++MOVE statements for each module that is eligible forthe extended link pack area (ELPA). A read-only module that may reside above16MB is eligible for the ELPA.
CICSPlex SM allocates an empty library for your use, calledSYS1.CICSTS31.CPSM.SEYULPA. You can use SYS1.CICSTS31.CPSM.SEYULPAas the LPA library or you can add the modules to another LPA library.
If you are going to use SYS1.CICSTS31.CPSM.SEYULPA, verify that you havealready authorized this library (see “Authorizing libraries” on page 283), and thatyou have applied appropriate security (see the CICS RACF Security Guide.) Youcan give the SYS1.CICSTS31.CPSM.SEYULPA library your own high-level index. Ifyou do, you must specify the new index on the LINDEX parameter of theEYUISTAR job.
The following sections provide information about:v Space requirementsv Installing CICSPlex SM modules into the LPAv Controlling the use of modules from the LPAv Applying maintenance to LPA modules.
Space requirementsYou must allow enough space in the link pack area for the installation of theselected CICSPlex SM modules.
The total space needed depends on how the modules are packaged into the linkpack area by the operating system and a local MAS requires approximately2 034KB.
286 CICS TS for z/OS: Installation Guide
#
#
||
|||

Installing CICSPlex SM modules into the LPAThe term install means move or copy a module into theSYS1.CICSTS31.CPSM.SEYULPA library, by using SMP/E, or by using a copyingmethod that reblocks the copied modules when the target data set has a smallerblock size than the data set you are copying from (for example, use the COPYMODfunction of the IEBCOPY program). The procedure for installing modules in the LPAby using SMP/E is described in this section.
You should not relink-edit the modules in order to get them into theSYS1.CICSTS31.CPSM.SEYULPA library. CICSPlex SM modules, as supplied,have the necessary attributes that cause MVS to load them automatically above16MB (into the ELPA).
The MVS link pack area has both pageable and fixed areas. Although you caninstall CICSPlex SM modules into the fixed areas, for performance reasons youshould use the pageable areas.
Modules to be loaded into the MVS pageable link pack area (PLPA) must havebeen link-edited with the RENT attribute. The library in which these modules residemust be named in an LPALSTxx member of the SYS1.PARMLIB library.
To install modules in the CICSPlex SM LPA library, and to ensure that SMP/E cancontinue to service them, complete the following steps for one or both of theCICSPlex SM-supplied USERMODs:
1. Receive the USERMOD into the CICSPlex SM global zone, and apply it to theCICSPlex SM target zone.
2. Define the SYS1.CICSTS31.CPSM.SEYULPA library to your MVS.
Note: You must also verify that the CSD referenced by the MAS contains theappropriate CICSPlex SM groups for loading modules from the LPA. Forinformation about updating the CSD, see “Updating CSD files usingDFHCSDUP (MVS MAS)” on page 311.
Receiving and applying the USERMODTo receive and apply the CICSPlex SM-supplied USERMOD, in EYU$UM01, youcan use the sample job EYULPMOD, which is tailored to your CICSPlex SMenvironment and stored in the CICSTS31.CPSM.XEYUINST library when you runthe EYUISTAR job. Member EYULPMOD must be edited to receive and apply thedesired USERMODs. Ensure that the EYUISTAR settings match the correspondingDFHISTAR settings.
Receive the USERMOD into the CICSPlex SM global zone and apply it to theCICSPlex SM target zone. This causes SMP/E to move those load modules youhave specified from the named CICSPlex SM target library (eitherCICSTS31.CPSM.SEYUAUTH or CICSTS31.CPSM.SEYULOAD) into theSYS1.CICSTS31.CPSM.SEYULPA library.
When the USERMOD is applied, the corresponding LMOD entries within the targetzone SMP CSI are updated. Either or both USERMODs may be applied dependingon your enterprise’s requirements.
Do not accept the USERMOD into the distribution zone, and, for the time being, donot apply it to any other target zone.
Chapter 37. Setting up the MVS environment 287
#

Defining the SYS1.CICSTS31.CPSM.SEYULPA library to your MVSAdd the full name of the SYS1.CICSTS31.CPSM.SEYULPA library to an LPALSTxxmember of SYS1.PARMLIB. This ensures that the library contents are loaded intothe PLPA at the next IPL of your system when CLPA is specified.
When you have defined the SYS1.CICSTS31.CPSM.SEYULPA library to MVS, youshould re-IPL your MVS with CLPA specified to enable the modules in theSYS1.CICSTS31.CPSM.SEYULPA library to be used from the LPA.
To run DFCSDUP to add the CICSPlex SM resource definitions required for MASexecution, use the following SYSIN control statement://SYSIN DD *UPGRADE USING(EYU9XXGB)/*
Applying maintenance to LPA modulesUse the SMP/E RESTORE function to back off the USERMOD before modules inthe LPA are updated or copied. Afterwards, the USERMOD may be reapplied.
288 CICS TS for z/OS: Installation Guide

Chapter 38. VTAM requirements
This chapter describes the VTAM requirements for each CAS, CMAS, and MASused by CICSPlex SM.
Defining VTAM requirements (CAS)ACF/VTAM definitions are required, if you are not using the cross-systems couplingfacility (XCF) for CAS-to-CAS communication links, to identify each CAS used byCICSPlex SM. This involves creating VTAM application definitions and, optionally,cross-domain resource management definitions.
If you are also setting up a CMAS, see “Defining VTAM requirements (CMAS)” onpage 293 for more information about the steps for defining the VTAM requirementsfor a CMAS.
To create VTAM application definitions and cross-domain resource managementdefinitions for a CAS, you must perform the following steps:
1. Optionally, create a mode table entry.
2. Create a VTAM application definition for each CAS you will be using.
3. Define each CAS as a cross-domain resource.
4. Add the application and cross-domain resource definitions to the VTAMconfiguration list.
5. Activate the definitions.
Depending on your VTAM conventions, you may need to modify the proceduresdescribed in this section. Specifically:
v Change references to the SYS1.VTAMLST library if you do not keep yourdefinitions in the default VTAM list.
v Modify the APPL and CDRSC statements if you want to add these statements toexisting members, rather than create new ones.
After you have the CAS running and can access CICSPlex SM, you can defineVTAM to CICSPlex SM. (See “Setting the CAS system communication information”on page 318.)
Step 1: (Optional) Creating a mode tableIf you use Network Control Programs (NCPs), you may need to create a mode tablewith the default entry shown in Figure 49 on page 290 in order to control the VTAMRUSIZES (request unit size) parameter. If you do not create a default entry, VTAMcould select a number that is too small, thus resulting in considerable systemoverhead.
To create a default mode table entry:
1. Define a mode table containing the following entry:
© Copyright IBM Corp. 1989, 2010 289

where:
modename Is a mode table name that you supply.
entryname Is a name for an entry that you supply.
For a copy of this mode table entry, see the member EYUSMPMT inCICSTS31.CPSM.SEYUSAMP.
2. Assemble the mode table source and link-edit it into SYS1.VTAMLIB on allsystems for which cross-system communication is enabled. As you do so, keepthe following in mind:
v The name you assign to the load module becomes the name of the modetable.
v You must have access to the macro library used to assemble VTAMapplications.
The JCL you use to assemble and link-edit should look like that shown inFigure 50 on page 291. (The member EYUJCLMT inCICSTS31.CPSM.SEYUSAMP contains a copy of this JCL.)
TITLE ’modename - MODE Table - Entries’modename MODETAB ,
MODEENT LOGMODE=entryname, XFMPROF=X’13’, XTSPROF=X’07’, XPRIPROT=X’B0’, XSECPROT=X’B0’, XCOMPROT=X’50B1’, XSSNDPAC=X’00’, XSRCVPAC=X’00’, XRUSIZES=X’F8F8’, XPSNDPAC=X’00’, XPSERVIC=X’060200000000000000002300’, XENCR=X’00’
MODEEND ,END ,
Figure 49. Sample mode table entry
290 CICS TS for z/OS: Installation Guide

Step 2: Creating a VTAM application definition (CAS)To establish a VTAM application definition for a CAS, either create a new member(major node) or access an existing member in the SYS1.VTAMLST library. To thismember, add the following APPL statement:
VBUILD TYPE=APPLname APPL ACBNAME=acbname,AUTH=(ACQ), x
PARSESS=YES,MODETAB=mode_table
where:
name Is a 1- to 8-character unique name.
acbnameIs the node name of this CAS. This name must be unique within thedomain. If you omit this parameter, the name of the VTAM APPL statementis used.
mode_tableIs the name of the mode table that is to govern LU 6.2 conversations.
For example, to create a VTAM application definition for the CAS on SYSA, youmight create a member named APPLCASA in the SYS1.VTAMLST library thatcontains the APPL statement:
//*----------------------------------------------------------------------//*//* Sample JCL - Assemble and Link Mode Table Entry//*//* The following needs to be provided://*------------------------------------//* ASM.SYSIN - Input member containing the mode table source.//* LINK.SYSLMOD - Output member name in SYS1.VTAMLIB//*//*---------------------------------------------------------------------//ASM EXEC PGM=ASMA90,// PARM=’OBJECT,NODECK’//SYSLIB DD DISP=SHR,DSN=SYS1.SISTMAC1// DD DISP=SHR,DSN=SYS1.MACLIB//SYSUT1 DD DSN=&&SYSUT1,// UNIT=VIO,SPACE=(1700,(600,100))//SYSTERM DD SYSOUT=*//SYSPRINT DD SYSOUT=*//SYSLIN DD DISP=(MOD,PASS),// DSN=&&OBJSET,// UNIT=VIO,SPACE=(80,(200,50))//SYSIN DD DISP=SHR,DSN=data_set_name(member_name)//*//LINK EXEC PGM=IEWL,// PARM=(XREF,LET,LIST,NCAL,REUS),// COND=(8,LT,ASM)//SYSLIN DD DISP=(OLD,DELETE),DSN=&&OBJSET// DD DDNAME=SYSIN//SYSLMOD DD DISP=SHR,DSN=SYS1.VTAMLIB(member_name)//SYSUT1 DD DSN=&&SYSUT1,// UNIT=VIO,SPACE=(1024,(50,20))//SYSPRINT DD SYSOUT=*//*
Figure 50. JCL to assemble a mode table entry
Chapter 38. VTAM requirements 291

VBUILD TYPE=APPLCASA APPL ACBNAME=CASA,AUTH=(ACQ), x
PARSESS=YES,MODETAB=AMODET
The same type of definition is needed for each CAS you will be using.
Step 3: Defining cross-domain resources (CAS)You should define cross-domain resources (CDRSCs) when:
v A CAS that is to communicate with another CAS cannot take advantage ofdynamically defined CDRSCs.
v You want to minimize the overhead involved in using dynamically definedCDRSCs.
To establish a CDRSC definition, you must either create a new member or accessan existing member in the SYS1.VTAMLST library. In the new or existing member,specify the following CDRSC statement for each CAS with which you want tocommunicate:
VBUILD TYPE=CDRSCname CDRSC CDRM=cdrm
where:
name Is the name you assigned to a CAS in Step 1.
cdrm Is the name of the MVS image previously identified as the cross-domainresource manager (CDRM).
For example, to allow the CAS on SYSA to communicate with the CASs on SYSBand SYSC, you might create the member CDRCASA on the SYS1.VTAMLSTlibrary, which contains the CDRSC statements:
VBUILD TYPE=CDRSCCASB CDRSC CDRM=VTAMBCASC CDRSC CDRM=VTAMC
where VTAMB and VTAMC are the cross-domain resource manager namesassigned to SYSB and SYSC, respectively. The same types of definitions are alsoneeded for the CASs on SYSB and SYSC. That is, for the CAS on SYSB, youmight create a member named CDRCASB that contains:
VBUILD TYPE=CDRSCCASA CDRSC CDRM=VTAMACASC CDRSC CDRM=VTAMC
For additional information about cross-domain resources, see the VTAM ResourceDefinition Reference.
Step 4: Updating the configuration list (CAS)If, in step 2 or 3, you created new members in the SYS1.VTAMLST library, youmust update the VTAM configuration list for each MVS image. This causes the newmembers to be automatically activated when VTAM starts.
To do this, add the new member names to the end of the configuration list in theappropriate ATCCONxx member of the SYS1.VTAMLST library. To find the suffix ofthe ATCCONxx member, do the following:
v Get the suffix of the COMMNDxx member from the CMD= parameter in theIEASYSxx member in SYS1.PARMLIB.
292 CICS TS for z/OS: Installation Guide

v Get the suffix of the ATCSTRxx member from the LIST= parameter on thecommand used to start VTAM in the COMMNDxx member in SYS1.PARMLIB, or(if you do not start VTAM from the COMMNDxx member) get the suffix from theLIST= parameter of the command that you use to start VTAM.
v Get the suffix of the ATCCONxx member from the CONFIG= parameter in theATCSTRxx member in SYS1.VTAMLST.
To illustrate, the examples shown in steps 2 and 3 assume the creation of membersnamed APPLCASA and CDRCASA. To add these members to the end of theconfiguration list in ATCCONxx, you would specify:APPLCASA, xCDRCASA
Note: If you added the CAS and cross-domain definitions to existing members,ATCCONxx should already contain these member names.
Step 5: Activating the major nodes (CAS)You can activate the definitions created in steps 1 and 2 by either restarting VTAMfor each system, or manually activating the definitions.
To manually activate a major node, you can issue the following commands, wherename identifies a major node created (or modified) in steps 2 and 3:
v Deactivate the major node if it is currently active by issuing the command:VARY NET,INACT,ID=name
v Activate (or reactivate) the major node by issuing the command:VARY NET,ACT,ID=name
To ensure that the major node has been activated, issue the command:D NET,ID=name
For example, to activate the member APPLCASA and then ensure that it has beenactivated, you would issue the commands:
VARY NET,INACT,ID=APPLCASAVARY NET,ACT,ID=APPLCASAD NET,ID=APPLCASA
To dynamically load a mode table that you have updated, issue the command:F NET,TABLE,OPTION=LOAD,NEWTAB=name
If you do not do this after updating and relinking a mode table with a new logmodeentry, the entry is unavailable until you have stopped and restarted VTAM. Note thatyou do not need to issue this command when you create a mode table with a singlelogmode entry.
The preceding steps need to be performed for each CAS you may be using.
Defining VTAM requirements (CMAS)ACF/VTAM definitions are required to identify each CMAS used by CICSPlex SM.This involves creating VTAM application definitions and, optionally, cross-domainresource management definitions.
Chapter 38. VTAM requirements 293
Note: You may already have defined the VTAM requirements for a CAS (see“Defining VTAM requirements (CAS)” on page 289). The steps for definingthe VTAM requirements for a CMAS are different.
To create VTAM application definitions and cross-domain resource managementdefinitions for a CMAS, you must perform the following steps:
1. Create a VTAM application definition for each CMAS you will be using.
2. Define each CMAS as a cross-domain resource.
3. Add the application and cross-domain resource definitions to the VTAMconfiguration list.
4. Activate the definitions.
Notes:
1. Before you perform these steps, be sure to specify the size of the VTAMbuffers.
v For the VTAM-to-NCP connection, specify
MAXDATA ≥ 4096
v For the NCP-to-VTAM connection, specify
MAXBFRU * IOBUF ≥ 4096
MAXBFRU * UNITSZ ≥ 4096
v For the NCP-to-NCP connection, specify
TRANSFR * BFRS = RUSIZE ≥ 4096
The size specified should be 36 bytes less than the smallest MAXDATA value inany NCP through which the link may pass. The 36 bytes allow for the headersthat are required for VTAM. For more information about the requirements for theVTAM-to-NCP connection, refer to the VTAM Resource Definition Referencemanual for your level of VTAM. For more information about the requirements forthe NCP-to-VTAM and the NCP-to-NCP connections, refer to the NCP ResourceDefinition Reference manual for your level of NCP.
If you need help determining or modifying your VTAM buffer specifications,confer with the VTAM system programmer at your enterprise.
2. Depending on your VTAM conventions, you may need to modify the proceduresthat are described in this section. Specifically:
v Change references to the SYS1.VTAMLST library if you do not keep yourdefinitions in the default VTAM list.
v Modify the APPL and CDRSC statements if you want to add these statementsto existing members, rather than create new ones.
Once CMAS is running, you can access CICSPlex SMand define VTAM toCICSPlex SM. (See “Setting the VTAM APPLID for a CMAS” on page 330.)
Step 1: Creating a VTAM application definition (CMAS)To establish a VTAM application definition for a CMAS, either create a new member(major node) or access an existing member in the SYS1.VTAMLST library. Thenadd the following APPL statement:
VBUILD TYPE=APPLname APPL ACBNAME=acbname,AUTH=(VPACE,ACQ,SPO,PASS), x
EAS=10,PARSESS=YES,SONSCIP=YES,APPC=NO, xVPACING=number
where:
294 CICS TS for z/OS: Installation Guide
name Is a 1- to 8-character unique name.
acbname Is the node name of this CMAS. This name mustbe unique within the domain. If you omit thisparameter, the name of the VTAM APPL statementis used.
vpacing Is the maximum number of normal-flow requeststhat another logical unit can send on an intersystemsession before waiting to receive a pacingresponse. Start with a value of 5.
For example, to create a VTAM application definition for the CMAS on SYSA, youmight create a member (APCMAS1) in the SYS1.VTAMLST library that contains theAPPL statement:
VBUILD TYPE=APPLCMS1 APPL ACBNAME=CMS1,AUTH=(VPACE,ACQ,SPO,PASS), x
EAS=10,PARSESS=YES,SONSCIP=YES,APPC=NO, xVPACING=5
The same type of definition is needed for each CMAS you use.
Step 2: Defining cross-domain resources (CMAS)You should define cross-domain resources (CDRSCs) when:
v A CMAS that is to communicate with another CMAS cannot take advantage ofadjacent CDRSCs.
v You want to minimize the overhead involved in using adjacent CDRSCs.
To establish a CDRSC definition, you must either create a new member or accessan existing member in the SYS1.VTAMLST library. In the new or existing member,specify the following CDRSC statement for each CMAS that you want tocommunicate with:
VBUILD TYPE=CDRSCname CDRSC CDRM=cdrm
where:
name Is the name you assigned to a CMAS in Step 1.
cdrm Is the name of the MVS image previously identified as the cross-domainresource manager (CDRM).
For example, to allow the CMAS on SYSA to communicate with the CMASs onSYSB and SYSC, you might create the member CDRCMS1, in the SYS1.VTAMLSTlibrary, which contains the CDRSC statements:
VBUILD TYPE=CDRSCCMS2 CDRSC CDRM=VTAMBCMS3 CDRSC CDRM=VTAMC
where VTAMB and VTAMC are the cross-domain resource manager names that areassigned to SYSB and SYSC respectively.
The same types of definitions are also needed for the CMASs on SYSB and SYSC.That is, for the CMAS on SYSB, you could create a member (CDRCMS2), whichcontains the CDRSC statements:
VBUILD TYPE=CDRSCCMS1 CDRSC CDRM=VTAMACMS3 CDRSC CDRM=VTAMC
Chapter 38. VTAM requirements 295

For additional information about cross-domain resources, see the VTAM ResourceDefinition Reference manual.
Step 3: Updating the configuration list (CMAS)If, in Step 1 or 2, you created new members in the SYS1.VTAMLST library, youmust update the VTAM configuration list for each MVS image. When VTAM starts, itautomatically activates the new members.
To do this, add the new member names to the end of the configuration list in theappropriate ATCCONxx member of the SYS1.VTAMLST library. To find the suffix ofthe ATCCONxx member:
v Get the suffix of the COMMNDxx member from the CMD= parameter in theIEASYSxx member in SYS1.PARMLIB.
v Get the suffix of the ATCSTRxx member from the LIST= parameter on thecommand that is used to start VTAM in the COMMNDxx member inSYS1.PARMLIB. If you do not start VTAM from the COMMNDxx member, get thesuffix from the LIST= parameter of the command that you use to start VTAM.
v Get the suffix of the ATCCONxx member from the CONFIG= parameter in theATCSTRxx member in SYS1.VTAMLST.
To illustrate, the examples shown in Steps 1 and 2 assume that the membersAPCMAS1 and CDRCMS1 exist. To add these members to the end of theconfiguration list in ATCCONxx, you would specify:APCMAS1, xCDRCMS1
Note: If you added the CMAS and cross-domain definitions to existing members,ATCCONxx should already contain these member names.
Step 4: Activating the major nodes (CMAS)You can activate the definitions that are created in Steps 1 and 2 by eitherrestarting VTAM for each system, or manually activating the definitions.
To manually activate a major node, you can issue the following commands, wherename identifies a major mode that was created (or modified) in Steps 1 and 2:
v Deactivate the major node if it is currently active by issuing the command:VARY NET,INACT,ID=name
v Activate (or reactivate) the major node by issuing the command:VARY NET,ACT,ID=name
To ensure that the major node has been activated, issue the command:D NET,ID=name
For example, to activate the member APCMAS1 and then ensure that it has beenactivated, you would issue the commands:
VARY NET,INACT,ID=APCMAS1VARY NET,ACT,ID=APCMAS1D NET,ID=APCMAS1
The preceding steps need to be performed for each CMAS you may be using.
296 CICS TS for z/OS: Installation Guide
Chapter 39. Generating post-installation members
A number of skeleton post-installation members are distributed with CICSPlex SM.You can customize and generate these post-installation members.
When you do this, the members identified in Table 20 are produced. Thesemembers can be customized, using EYUISTAR, if you perform the actionsdescribed in this section.
Table 20. Post-installation membersJob Use
EYUCAS A sample JCL procedure that you can use to start a CAS, as describedon page 315.
EYUCMAS A sample JCL procedure that you can use to start a CMAS, as describedon page 323.
EYUDEFDS Sample JCL that you can use to create the data, screen, and parameterrepositories. For additional information about creating a:v Data repository, see page 299.v Screen and parameter repository, see page 299.
EYUDFHDS Sample JCL that you can use to create the CICS region data sets for theCMAS region.
EYULPMOD Sample JCL that you can use to apply SMP/E USERMODs that moveMAS modules to the SEYULPA library.
EYUTSODS A REXX EXEC, described on page 313, that you can use to invoke theTSO interface.
Members EYUCAS, EYUDEFDS, and EYUTSODS are used in setting up a CAS.Members EYUCMAS, EYUDFHDS, and EYUDEFDS (for the data repository), areused in setting up a CMAS. Skeleton member, EYULPMOD, is used in setting up aMAS.
To customize and then generate the post-installation members, use the jobdistributed in the member EYUISTAR of the CICSTS31.CPSM.SEYUINST library.
v Tailor the job in the EYUISTAR member of the CICSTS31.CPSM.SEYUINSTlibrary using the parameters identified in Table 21.
Use the SCOPE and ENVIRONMENT parameters to qualify the specificmembers that are to be generated. That is, use SCOPE to identify the type ofmembers to be generated and ENVIRONMENT to indicate whether thosemembers are to apply to a MAS-only environment or a CMAS environment.
For additional information, see “EYUINST EXEC parameters” on page 375.
v Run the EYUISTAR job to produce the post-installation members. The resultingmembers, listed in Table 20, are stored in the library you specified on the LIBparameter of the EYUISTAR job. See “Sample JCL execution considerations” onpage 382 for further information.
For detailed information about the EYUISTAR job, see Chapter 49, “Using theEYUINST EXEC to tailor skeleton jobs,” on page 373.
© Copyright IBM Corp. 1989, 2010 297

Table 21. CMAS- and MAS-related EYUINST EXEC parametersParameter CMAS default value MAS default value
CMASNAME None n/aCINDEXnnn None n/aCRELEASE None n/aDEFVOL sysprocdd sysprocddDSINFO index defvol defvol n/aENVIRONMENT None NoneEYUIPRM dsinfo.EYUIPRM NEW n/aEYUSDEF dsinfo.EYUSDEF NEW n/aGZONECSI index.GLOBAL OLD smpvol smpvol index.GLOBAL OLD smpvol smpvolINDEX sysprocdsn_levels sysprocdsn_levelsJOB //XXXXXXXX JOB //XXXXXXXX JOBLIB sysprocdsn_levels.XEYUINST sysprocdsn_levels.XEYUINSTOLDDREP None n/aPREFIX EYU EYUSCOPE ALL ALLSELECT None NoneSYSIDNT None n/aTEMPLIB sysprocdsn sysprocdsnTIMEZONE None n/aTZONE TZONE TZONEUTILITIES ASMA90 IEWL GIMSMP ASMA90 IEWL GIMSMPWORKUNIT SYSDA SYSDA
298 CICS TS for z/OS: Installation Guide

Chapter 40. Creating and managing CICSPlex SM data sets
This chapter describes the following:
v “CAS-related data sets”
v “Creating the CICSPlex SM data repository”
v “Populating the CICSPlex SM data repository” on page 302
v “Converting the CICSPlex SM data repository” on page 302
v “Expanding the CICSPlex SM data repository” on page 304
v “Taking backups of the CICSPlex SM data repository” on page 304
You can use the post-installation job EYUDEFDS to create the CICSPlex SM datasets. The EYUDEFDS job is generated when you run the EYUISTAR job, asdescribed in Chapter 39, “Generating post-installation members,” on page 297. Thejob is stored in the library you specified on the LIB parameter of the EYUISTAR job.
CAS-related data setsThe CAS-related data sets, which may be shared by multiple CASs, are:
v A screen repository. This optional data set contains the screen configurationdefinitions created by individuals using CICSPlex SM. If you do not create thisdata set, users will not be able to save their CICSPlex SM screen configurations.(For additional information about creating and using screen configurations, seethe CICSPlex System Manager User Interface Guide.)
v A parameter repository data set. This required data set contains communicationsdefinitions used by the CAS. (See the CICSPlex System Manager Administrationmanual for information about creating and maintaining these definitions.)
The EYUDEFDS job includes the following steps related to the CAS data sets:
v SDEFDEL, which deletes any existing screen repository data set having thesame name, and SDEFALOC, which creates a new one. These steps aregenerated only when you specify a disposition of NEW with the EYUSDEFparameter of the EYUISTAR job. If you specified OLD with the EYUSDEFparameter, the existing screen repository data set is referenced by the EYUCASprocedure.
v IPRMDEL, which deletes any existing parameter repository data set having thesame name, and IPRMALOC, which creates a new one. These steps aregenerated only when you specify a disposition of NEW with the EYUIPRMparameter of the EYUISTAR job. If you specified OLD with the EYUIPRMparameter, the existing parameter repository data set is referenced by theEYUCAS procedure.
Creating the CICSPlex SM data repositoryThe CMAS-related data set is the data repository. Each CMAS must have a uniquedata repository associated with it. The data repository contains the CICSPlex SMadministration definitions applicable to its associated CMAS.
Note: The data repository is a critical component of CICSPlex SM systemmanagement. It is imperative that you take regular backups that areassociated with each CMAS in your environment.
© Copyright IBM Corp. 1989, 2010 299
It is defined to CICS as being a recoverable file which participates inSYNCPOINT and SYNCPOINT ROLLBACK operations. The CMAS musthave a CICS system log in order for these operations to operate correctly.Do not, therefore, run a CMAS with a system log that is defined as typeDUMMY as this would compromise data integrity on the CICSPlex SM datarepository.
To create the data set that contains the data repository, you can use thepost-installation job EYUDEFDS.
If you will be running multiple CMASs in the same MVS image, you must create adata repository for each CMAS. You can edit and resubmit the EYUISTAR job (asdescribed in Chapter 49, “Using the EYUINST EXEC to tailor skeleton jobs,” onpage 373), which generates the EYUDEFDS post-installation job. You may want touse the SELECT parameter to generate only the EYUDEFDS post-installation job.Once this job exists, you can edit it to make sure that the names specified with theSYSIDNT and CMASNAME parameters are unique each time you run the job.
Note: If you have already run the EYUDEFDS job (when creating the CAS datasets), be sure to delete the following steps before you rerun EYUDEFDS:v SDEFDELv SDEFALOCv IPRMDELv IPRMALOC
These steps create new screen and parameter repositories, deleting thosealready in existence. For more information about creating the screen andparameter repository data sets, see “CAS-related data sets” on page 299.
The EYUDEFDS job includes the following steps related to the creation of the datarepository:
DREPALOCThis step allocates the VSAM KSDS cluster for the data repository data set:
dsindex.EYUDREP.cmasname
where:
dsindexIs defined by the DSINFO parameter of the EYUISTAR job.
cmasnameIs defined by the CMASNAME parameter of the EYUISTAR job.
Note: CICSPlex SM does not support VSAM records that span controlintervals. Make sure that the IDCAMS job that you use to create aCICSPlex SM data repository does not specify the SPANNEDparameter. You should accept the IDCAMS default of nonspannedrecords.
DREPINIT or DREPCNVTOne of these two steps is used to setup the data repository for a CICSTransaction Server for z/OS, Version 3 Release 1 CMAS. The step that isgenerated in job EYUDEFDS depends on the OLDDREP parameter youspecified when you ran the EYUISTAR job.
Step DREPINIT is generated if you did not specify a value with theOLDDREP parameter. This step executes EYU9XDUT to initialize the newdata repository that was allocated by step DREPALOC. The new data
300 CICS TS for z/OS: Installation Guide

repository does not contain any records from a previous version ofCICSPlex SM. The EYU9XDUT utility uses the following parameters forstep DREPINIT:
CMASNAME=xxxxxxxxwhere:v You cannot change this name after the data repository is
initialized.v This name must be unique within the CICSPlex SM
environment. It should not be the same as the name of anotherCMAS, a CICSplex, a CICS system, or a CICS system group.
v Position 1 must be alphabetic or national, and cannot benumeric.
v Positions 2 through 8 can be alphabetic, national, or numeric.
SYSID=xxxxwhere:
v You cannot change this identifier after the data repository isinitialized.
v This value must match the SYSIDNT (SIT parameter) for theCMAS; see “CMAS-related CICS SIT parameters” on page 326.
v This value must not be the same as the SYSID for any otherCMAS or CICS system that is defined to CICSPlex SM.
v Positions 1 through 4 can be alphabetic, national, or numeric.
TIMEZONE=xwhere x must be a single alphabetic character (B through Z),representing one of the Greenwich time zone codes (see CICSPlexSystem Manager Administration)
ZONEOFFSET=nnwhere nn must be a two-digit numeric value (00 through 59),representing an adjustment (offset) to the TIMEZONE.
DAYLIGHT=xwhere x must be a single character (Y or N), representing daylightsaving time.
For information about defining the TIMEZONE, ZONEOFFSET, andDAYLIGHT parameters, see CICSPlex System Manager Administration.
Step DREPCNVT is generated if you specified the name of an existing datarepository on the OLDDREP parameter. This step executes EYU9XDUT toconvert existing data repository records from a previous release ofCICSPlex SM for use by CICSPlex SM for CICS Transaction Server forz/OS, Version 3 Release 1. All the records from the input data repositoryspecified on the OLDDREP parameter are added to the new data repositorythat was allocated by step DREPALOC. The input data repository is notmodified. The EYU9XDUT utility uses the following parameter for stepDREPCNVT:
TARGETVER=0310where 0310 represents the version of the new output datarepository.
Chapter 40. Creating and managing CICSPlex SM data sets 301

Populating the CICSPlex SM data repositoryYou can use the CICSPlex SM-supplied extract routine EYU9BCSD to generateCICSPlex SM resource definition records for each CSD record identified in yourinput file.
The output from EYU9BCSD is used to populate the data repository.
For more information about EYU9BCSD see CICSPlex System Manager ManagingBusiness Applications.
Converting the CICSPlex SM data repositoryYou can run the EYU9XDUT utility to convert the CICSPlex SM data repositoryfrom any release of CICSPlex SM to this release, and back again. That is, you canupgrade the data repository to the current release of CICSPlex SM, and you canconvert it back to a previous release. For example, after you have upgraded toCICSPlex SM for CICS Transaction Server for z/OS, Version 3 Release 1, you canconvert the data repository back to CICSPlex SM for CICS Transaction Server forz/OS Release 2.3 for use with a CMAS running the that level of CICSPlex SMcode.
The conversion is controlled by the TARGETVER parameter and the DD statementsyou use to execute EYU9XDUT. To convert between a previous release andCICSPlex SM for CICS Transaction Server for z/OS, Version 3 Release 1 requiresthe EYUDREP, NEWREP, and BYPASS DD statements in the JCL. The EYUDREPstatement must reference an existing input data repository, and the NEWREPstatement must reference the output data repository.
CRESxxxx is a CICSPlex SM Topology Manager object that describes instances ofa resource within a CICS system. All CRESxxxx resource table objects are deletedduring the conversion process. These deleted records are rebuilt the first time theMAS connects or joins to the CMAS. The following message is then output to theSYSPRINT DD statement with a count of how many records were not converted:EYUXD0708I CRESxxxx Resource Table nnnnn records not converted
EYU9XDUT Return codes:
0 execution completed normally. This return code is accompanied by message:EYUXD0702I Repository successfully converted
indicating the repository was successfully converted. This message may also bepreceded by the message:EYUXD0708I CRESxxxx Resource Table nnnnn records not converted
4 some records could not be converted. This return code is accompanied bymessage:EYUXD0706W DDNAME NEWREP nnnnn records were bypassed
indicating the repository was successfully converted but some records werebypassed and not written to the new repository. These records are written to theBYPASS DD statement. This message can also be preceded by message:EYUXD0708I CRESxxxx Resource Table nnnnn records not converted
302 CICS TS for z/OS: Installation Guide
######
#####
#
#
##
#
##
#
###
#
###
#

8 EYU9XDUT has failed. Check the joblog for error messages that indicate thecause of the error. For example, DD statement missing, or invalid NEWREPdataset.
Note: Shutdown the CMAS that is using EYUDREP before running EYU9XDUT,otherwise, X'A8' is returned when the dataset is opened.
Use JCL similar to that in Figure 51 to convert from Release 2 of CICSPlex SM toCICSPlex SM for CICS Transaction Server for z/OS, Version 3 Release 1. Thissample JCL assumes that you have already allocated the VSAM cluster that isreferenced by the NEWREP DD statement. The file identified by the NEWREP DDstatement must be an empty file.
In the JCL, use a value for TARGETVER that indicates the release you are convertingto. For example:
To convert to.. Use:Release 3 TARGETVER=0130CICSPlex SM for CICS TS Release 3 TARGETVER=0140CICSPlex SM for CICS Transaction Serverfor z/OS Release 2.1
TARGETVER=0210
CICSPlex SM for CICS Transaction Serverfor z/OS Release 2.2
TARGETVER=0220
CICSPlex SM for CICS Transaction Serverfor z/OS Release 2.3
TARGETVER=0230
CICSPlex SM for CICS Transaction Serverfor z/OS Release 3.1
TARGETVER=0310
When the data repository is updated from a previous release to the current release,information stored in the earlier version is carried over to the current version of thedata repository. When the data repository reverts back from the current release to aprevious release, and the record in which information is changed is identical in bothreleases, the changes are carried back to the earlier version. Likewise, if a field in arecord exists in both releases, later changes to the information in a field are carriedback to the earlier version. However, when the data repository is converted from thecurrent release to a previous release and either the record or a field in it did notexist in the previous release, the information contained in the later version ispermanently lost.
(For more information about the data repository, see “Creating the CICSPlex SMdata repository” on page 299 and “Expanding the CICSPlex SM data repository” onpage 304.)
//DREPCNVT EXEC PGM=EYU9XDUT,// PARM=(’TARGETVER=0310’)//STEPLIB DD DISP=SHR,DSN=CICSTS31.CPSM.SEYUAUTH//EYUDREP DD DISP=SHR,DSN=CPSM310.EYUDREP.cmasname//NEWREP DD DISP=OLD,DSN=CICSTS31.CPSM.EYUDREP.cmasname//BYPASS DD SYSOUT=*//SYSPRINT DD SYSOUT=*
Figure 51. Example JCL to run EYU9XDUT
Chapter 40. Creating and managing CICSPlex SM data sets 303
#######
####
##
Expanding the CICSPlex SM data repositoryThe CICSPlex SM data repository may fill up and require expansion. To expand theCICSPlex SM data repository, use the IDCAMS utility REPRO function. An exampleof the JCL to do this is in member EYUJXDRP of theCICSTS31.CPSM.SEYUSAMP library.
In that JCL, on the RECORDS(xx,yy) statement. You should specify a primary (xx)and a secondary (yy) value that are appropriate for your environment. The initialvalues are 500 and 3000.
Taking backups of the CICSPlex SM data repositoryThe CICSPlex SM data repository is defined to CICS as a VSAM file calledEYUDREP. As the data set is accessed via CICS File Control, all the normal CICSmethods of taking backups of VSAM data sets for disaster recovery purposes areavailable for use with the data repository.
You may use the following techniques for taking copies of the data repository, andfor restoring the data repository after a data set failure.
v Use HSM, or DSS, or other utilities to take copies while the associated CMAS isnot running, possibly using the Concurrent Copy technique to reduce the timeduring which the repository must be unavailable.
v Use HSM or DSS to take copies while the associated CMAS is running using theBackup While Open technique, and possibly also using the Concurrent Copytechnique, which improves the ease of use of Backup While Open. This requiresa forward recovery log (see “Defining a forward recovery log for the datarepository”).
v Use HSM or DSS to restore the data set after a data set failure.
v Use a Forward Recovery product, such as CICS VSAM Recovery (CICS/VR), toreapply updates that were made to the data set after the most recent copy wastaken. This requires a forward recovery log.
v Use remote site recovery techniques if you need an up-to-date copy of the dataset at a remote site for disaster recovery purposes. This requires a forwardrecovery log.
The CICS Recovery and Restart Guide provides information on all the termsreferred to above. In particular, it provides information about forward recovery logs,forward recovery, the CICS/VR product, Backup While Open, Concurrent Copy andits associated hardware prerequisites, taking back ups of data sets, restoring datasets from backup copies, and remote site recovery.
Defining a forward recovery log for the data repositoryThe data repository is defined in the CMAS as a VSAM file called EYUDREP.CICSPlex SM provides a default definition that defines this file as not having anassociated forward recovery log, and therefore as not being eligible for forwardrecovery.
If you use forward recovery, you require a journal logstream. Defining CICS logstreams is described in the CICS System Definition Guide, and setting up a journallogstream is described in the CICS System Definition Guide.
304 CICS TS for z/OS: Installation Guide
###

If you wish to use Forward Recovery, Backup While Open, or Remote SiteRecovery, you will need to change the definition of EYUDREP. You will need tospecify the following keywords on the definition of EYUDREP to define it as havinga forward recovery log:RECOVERY(ALL)FWDRECOVLOG(nn)
where nn is a number between 1 and 99.
The default definition of EYUDREP also does not define the repository as beingeligible for Backup While Open. To make the repository eligible for Backup WhileOpen, you should specify the following keywords:RECOVERY(ALL)FWDRECOVLOG(nn)BACKUPTYPE(DYNAMIC)
where nn is a number between 1 and 99.
The RECOVERY, FWDRECOVLOG, and BACKUPTYPE parameters of DEFINEFILE are described fully in the CICS Resource Definition Guide.
Notes:
1. You should not change any keywords on the EYUDREP definition other thanRECOVERY, FWDRECOVLOG and BACKUPTYPE. In addition, you must neverset RECOVERY(NONE). Setting RECOVERY(NONE) would cause repositorycorruption after transaction or CMAS failures.
2. You should not change the recovery options of the EYUDREPN FILE definition.This definition is used when CPSM determines that Data Repository fileoperations do not require logging. It is normal to receive LSR pool messages forEYUDREPN during CMAS initialization and you should ignore them. Thereshould be no DD statement in the CICS JCL for EYUDREPN and EYUDREPNshould not be associated with a data set name.
3. If CPSM Data Repository initialization fails (as reported by messageEUIXD0105E) and the cause is due to the EYUDREP data set requiring BatchBackout (for example CICS issues message DFHFC0921), you must recoverthe EYUDREP data set and then delete and redefine the CMAS Local andGlobal catalogs in order to reset the CICS backout required status for the dataset.
4. Requesting Backup While Open for the CICSPlex SM data repository data setvia the IDCAMS DEFINE CLUSTER definition within the ICF catalog is notsupported.
Chapter 40. Creating and managing CICSPlex SM data sets 305

306 CICS TS for z/OS: Installation Guide

Chapter 41. Upgrading the CSD and macro definitions
Appropriate resource definitions must be added to the CICS tables and the CICSsystem definition (CSD) file for each CMAS and MAS you are using.
This chapter describes the following:
v “Creating CICS resource definition tables for CMASs”
v “Updating the CSD files using DFHCSDUP (CMAS)”
v “Journalmodel considerations in a CICS TS z/OS CMAS” on page 308
v “Considerations when upgrading the CSD release (CMAS)” on page 309
v “Considerations when sharing the CSD (CMAS)” on page 309
v “Updating CICS resource definition tables for MASs” on page 310
v “Updating CSD files using DFHCSDUP (MVS MAS)” on page 311
v “Considerations when upgrading the CSD release (MVS MAS)” on page 312
v “Considerations when sharing the CSD (MVS MAS)” on page 312
Creating CICS resource definition tables for CMASsFor each CMAS, you must create resource definition table load modules that arerequired to run a CMAS. Assemble and link-edit the tables with the CICSprocedures for installing resource definition table load modules. The tables need tobe link edited into a user-supplied load library, which needs to be specified in theDFHRPL concatenation. Library CICSTS31.CPSM.SEYUSAMP must be included inthe SYSLIB concatenation for the Assembler step of the procedure used toassemble and link-edit the CICS tables.
These tables do not need modification for CICSPlex SM to function properly.
Note: CICS used to supply sample PLT and SRT tables. APARs modified releasesCICS TS 1.3, CICS TS 2.2 and CICS TS 2.3 so that they no longer needeither a PLTPI program or a special system recovery table.
CICS TS 3.1 does not supply sample PLT and SRT tables.
v Instead of a PLT, specify CPSMCONN=CMAS
v For the SRT specify the default SRT=1$.
Updating the CSD files using DFHCSDUP (CMAS)The resource definitions you must add to the CSD file for each CICS CMAS aredistributed in the EYU964G0 modules of the CICSTS31.CPSM.SEYULOAD library,where nn represents the CICS level.
Sample JCL that you can use to include the definitions is in the memberEYUJCLG0 in the CICSTS31.CPSM.SEYUSAMP library. You can edit this JCL, asin Figure 52 on page 308, to:
1. Define the CMAS group of resource definitions to the appropriate CSD file.
2. Add the CMAS group list to the CSD.
© Copyright IBM Corp. 1989, 2010 307
###
#
#
#
###

Modify the sample JCL to provide the following information:
STEPLIB Identify:
v cics.index.SDFHLOAD as the CICS load library that contains theDFHCSDUP module
v cpsm.index.SEYULOAD as the CICSPlex SM load library thatcontains the definition modules.
DFHCSD Identify cics.dfhcsd as the CICS CSD file to be updated.
SYSIN You must identify the load module (EYU9nnG0) that contains theresource definitions group that is required to run the CMAS(EYU310G0).
A return code of 4 is expected from this run of DFHCSDUP. This is because, beforeadding the designated group to the CSD, the job attempts to delete any group withthe same name.
Note: You should not normally run user transactions in a CMAS. However, if youdo choose to define your own transactions to the CMAS, you should beaware that transaction IDs used by CICSPlex SM in the CMAS have nospecific format. To avoid conflict between your names and those that areused by CICSPlex SM, you should review the transactions that are definedin the CSD group EYU310G0. For a list of these transactions, see the CICSRACF Security Guide.
Journalmodel considerations in a CICS TS z/OS CMASThe CMAS grouplists for CICS Transaction Server for z/OS include theCICS-supplied group, DFHLGMOD. If the log stream names used by theDFHLGMOD group are not appropriate for your environment, copy groupDFHLGMOD to a new group, where you can make your amendments. Finally, addthe new group to the CMAS grouplist.
See Chapter 24, “Defining the logger environment for CICS journaling,” on page143 for details on how to define log streams.
Note: Do not operate the CMAS with log streams that are defined as DUMMY. Thismay cause problems when recovering the CSD or CICSPlex SM datarepository (EYUDREP).
See Chapter 51, “CMAS journaling,” on page 397 for details about the variousCMAS journaling options that you can activate.
//CSDUP EXEC PGM=DFHCSDUP//STEPLIB DD DSN=cics.index.SDFHLOAD,DISP=SHR// DD DSN=cpsm.index.SEYULOAD,DISP=SHR//DFHCSD DD DSN=cics.dfhcsd,DISP=SHR//SYSPRINT DD SYSOUT=*//SYSIN DD *UPGRADE USING(group_load_module)/*
Figure 52. Sample JCL to run DFHCSDUP
308 CICS TS for z/OS: Installation Guide

Considerations when upgrading the CSD release (CMAS)When the CSD is upgraded to a new CICS release, you must install theCICSPlex SM group definitions for the new release into the upgraded CSD. Forexample, when the CSD is upgraded to CICS Transaction Server for z/OS, use thefollowing SYSIN to install the CICSPlex SM CMAS resource definitions for CICSTransaction Server for z/OS Release 3.1.
//SYSIN DD *UPGRADE USING(EYU964G0)/*
For information about the resource group definitions that are distributed withCICSPlex SM, see “Updating the CSD files using DFHCSDUP (CMAS)” on page307.
Considerations when sharing the CSD (CMAS)Before the CSD can be shared by multiple releases of CICS, the CSD must beupgraded by installing the CICSPlex SM resource definitions for the current CICSrelease. For information about doing so, see “Considerations when upgrading theCSD release (CMAS).”
If you are running a CMAS under a previous release of CICS that is accessingresource definitions in a CSD that has been upgraded to the current CICS release,you must update the CMAS group list. Because the CMAS group list definitions aresecured against updates, you must create a copy of the CMAS group list andupdate the copy.
For example, to run DFHCSDUP to create a copy of the CMAS group list and addthe CICS compatibility groups (DFHCOMP4, DFHCOMP5, DFHCOMP6,DFHCOMP7, DFHCOMP8, DFHCOMP9, and DFHCOMPA) that are required for aCICS/ESA 4.1 CMAS to access resource definitions in a CICS Transaction Serverfor z/OS Release 3.1 CMAS; use the following SYSIN control statements:
The control statements in Figure 53 perform the following functions:
UPGRADE USING(EYU964G0)Replaces the previous CICS/ESA, CICS TS for OS/390 or CICSTransaction Server for z/OS release CMAS group definitions with CICSTransaction Server for z/OS Release 3.1 group definitions. The CICSTransaction Server for z/OS Release 3.1 group definitions can be used torun a CICS/ESA 4.1, CICS TS for OS/390 or a CICS Transaction Server forz/OS Version 2 CMAS.
//SYSIN DD *UPGRADE USING(EYU964G0)APPEND LIST(EYU310L0) TO(EYUE41L0)ADD GROUP(DFHCOMPA) LIST(EYUE41L0)ADD GROUP(DFHCOMP9) LIST(EYUE41L0)ADD GROUP(DFHCOMP8) LIST(EYUE41L0)ADD GROUP(DFHCOMP7) LIST(EYUE41L0)ADD GROUP(DFHCOMP6) LIST(EYUE41L0)ADD GROUP(DFHCOMP5) LIST(EYUE41L0)ADD GROUP(DFHCOMP4) LIST(EYUE41L0)/*
Figure 53. Sample JCL to update CMAS group list
Chapter 41. Upgrading the CSD and macro definitions 309

APPEND LIST(EYU310L0) TO(EYUE41L0)Creates the unprotected copy of list EYU310L0.
ADD GROUP(DFHCOMPA) LIST(EYUE41L0)Adds CICS Transaction Server for z/OS Release 2.2 compatibility groupDFHCOMPA to the list EYUE41L0.
ADD GROUP(DFHCOMP9) LIST(EYUE41L0)Adds CICS TS for OS/390 Release 3 compatibility group DFHCOMP9 tothe list EYUE41L0.
ADD GROUP(DFHCOMP8) LIST(EYUE41L0)Adds CICS TS for OS/390 Release 3 compatibility group DFHCOMP8 tothe list EYUE41L0.
ADD GROUP(DFHCOMP7) LIST(EYUE41L0)Adds CICS TS for OS/390 Release 2 compatibility group DFHCOMP7 tothe list EYUE41L0.
ADD GROUP(DFHCOMP6) LIST(EYUE41L0)Adds CICS TS for OS/390 Release 1 compatibility group DFHCOMP6 tothe list EYUE41L0.
ADD GROUP(DFHCOMP5) LIST(EYUE41L0)Adds CICS/ESA 4.1 compatibility group DFHCOMP5 to the list EYUE41L0.
This JCL completes with a return code of 04 when group or list that is referencedby the UPGRADE statements is installed for the first time. This occurs because theprocessing of the UPGRADE statements attempts to delete list EYU310L0 andgroup EYU310G0 before these resources are defined.
After this job is completed successfully, you can start a CICS/ESA 4.1 CMAS byreferencing group list EYUE41L0; you can start a CICS TS for OS/390 Release 3CMAS by referencing group list EYU310L0.
To start a CICS Transaction Server for z/OS Release 2.3CMAS, you can define anadditional group list in a CICS TS for OS/390 CSD. Such a group list will includeCICS compatibility group DFHCOMP8.
To start a CICS/ESA 4.1 CMAS, you can define an additional group list in a CICSTS for OS/390 CSD. Such a group list will include CICS compatibility groupsDFHCOMPA, DFHCOMP9, DFHCOMP8, DFHCOMP7, DFHCOMP6, andDFHCOMP5, in that order.
For more information about upgrading the CICS CSD with compatibility groupdefinitions, see the “Sharing the CSD between different releases of CICS” topic inthe CICS Transaction Server for z/OS Migration from CICS TS Version 2.3 Guide,
Updating CICS resource definition tables for MASsFor each MAS, some of your CICS resource definition tables must be updated toreference the CICSPlex SM copy books that contain entries for those controltables. When you have updated the tables for each MAS, assemble and link-editthem using the CICS procedures for maintaining resource definition table loadmodules.
The process used to assemble and link-edit the CICS resource definition table loadmodules must have library CICSTS31.CPSM.SEYUSAMP in the SYSLIB
310 CICS TS for z/OS: Installation Guide

concatenation of the assembler step, or the copy book member must be insertedinto the table source member in place of the COPY statement.
Updating CSD files using DFHCSDUP (MVS MAS)The resource definitions you must add to the CSD file for each managed CICSsystem are distributed in CSD upgrade load modules inCICSTS31.CPSM.SEYULOAD.
The names of the load modules, the environment for which they are used, and thename of the resource group (created using the definitions the load modules contain)are:
Load module EYU9nnG1, where nn represents the CICSlevel (for example, 63 refers to the CICSelement in CICS TS for z/OS Version 2.3,and 64 refers to the CICS element in CICSTS for z/OS Version 3.1).
Environment MAS - USELAPCOPY(NO)
Resource group EYU310G1
Sample JCL that you can use to include the definitions is supplied in the memberEYUJCLGN in the CICSTS31.CPSM.SEYUSAMP library. You can edit this JCL, asshown in Figure 54, to:
1. Define a group of resource definitions to the appropriate CSD file.
2. Add the group name to the CSD list referenced by the CICS system initializationtable (SIT) parameter GRPLIST.
Modify the sample JCL to provide the following information:
STEPLIBIdentify:
v cics.index.SDFHLOAD as the CICS load library containing theDFHCSDUP module
v cpsm.index.SEYULOAD as the CICSPlex SM load library containing thegroup definition module.
DFHCSD Identify cics.dfhcsd as the CICS CSD file to be updated.
SYSIN Identify:v The load module containing the resource definition groupv The group name contained within the load modulev The group list used to start the MAS.
//CSDUP EXEC PGM=DFHCSDUP//STEPLIB DD DSN=cics.index.SDFHLOAD,DISP=SHR// DD DSN=cpsm.index.SEYULOAD,DISP=SHR//DFHCSD DD DSN=cics.dfhcsd,DISP=SHR//SYSPRINT DD SYSOUT=*//SYSIN DD *UPGRADE USING(group_load_module)ADD GROUP(EYU310G1) LIST(list_name)/*
Figure 54. Sample JCL to run DFHCSDUP for MVS MAS
Chapter 41. Upgrading the CSD and macro definitions 311

To avoid your transaction names clashing with those used byCICSPlex SM, you should review the names of the transactions defined inthe appropriate EYU310Gn group in the CSD. The CICSPlex SM MAStransaction names are all of the form COxx.
A return code of 4 is expected from this run of DFHCSDUP. This isbecause, before adding the designated group to the CSD, the job attemptsto delete any group with the same name.
To run the MAS using an USELPACOPY(YES) group, the appropriate loadmodules must be moved to the SYS1.CICSTS31.CPSM.SEYULPA data set.For additional information, see “Using CICSPlex SM modules in the MVSlink pack area” on page 286.
Considerations when upgrading the CSD release (MVS MAS)When the CSD is upgraded to a new CICS release, you must install theCICSPlex SM group definitions for the new release into the upgraded CSD. Forexample, when the CSD is upgraded from CICS/ESA 4.1 to the CICS TransactionServer for z/OS, use the following SYSIN statement to install the CICSPlex SMlocal MAS resource definitions for the CICS Transaction Server for z/OS 3.1:
//SYSIN DD *UPGRADE USING(EYU964G1)/*
For information about the resource group definitions distributed with CICSPlex SM,see “Updating CSD files using DFHCSDUP (MVS MAS)” on page 311.
Considerations when sharing the CSD (MVS MAS)Before the CSD can be shared by multiple releases of CICS, the CSD must beupgraded by installing the CICSPlex SM resource definitions for the current CICSrelease. For information about doing so, see “Considerations when upgrading theCSD release (MVS MAS).”
312 CICS TS for z/OS: Installation Guide

Chapter 42. Preparing user access to CICSPlex SM
To permit users to select CICSPlex SM as an application from an ISPF menu:
1. If your enterprise uses an external security manager (ESM), which contains alist of TSO command processors that can be executed by users, include thefollowing names in the table:v BBM3APIv BBM9TC20v BBM9TC23
2. Insert the following line in the existing list of menu options on one or more ofthe ISPF menu panels defined as members in the ISPPLIB library:
id,’PANEL(EYUDEZZZ) NEWAPPL(EYUD) PASSLIB’
where id is any appropriate, unique menu option id, such as CP.
3. Add the following libraries to the signon procedure for each individual who mightaccess CICSPlex SM during a TSO session:
DD name Data set nameBBILINK CICSTS31.CPSM.SEYUAUTHBBSDEF CICSTS31.CPSM.EYUSDEFISPLLIB CICSTS31.CPSM.SEYUAUTHISPMLIB CICSTS31.CPSM.SEYUMLIBISPPLIB CICSTS31.CPSM.SEYUPLIBISPTLIB CICSTS31.CPSM.SEYUTLIB
These library names should be placed after the user's data set names andbefore any other system data set names.
If you are creating a new screen repository, you must run job EYUDEFDS beforeadding the CICSTS31.CPSM.EYUSDEF data set to a TSO session.
You can also access CICSPlex SM by running a REXX EXEC from within ISPF. Asample EXEC, called EYUTSODS, is generated when you run the EYUISTAR job,as described in Chapter 39, “Generating post-installation members,” on page 297.EYUTSODS is stored in the library you specified on the LIB parameter of theEYUISTAR job.
The EYUTSODS EXEC performs the following functions:
v Allocates the required CICSPlex SM data sets to a user's TSO session. Thedata sets are concatenated ahead of any data sets already allocated to thereferenced DD name.
v Invokes the CICSPlex SM ISPF end-user interface via the command:ISPEXEC SELECT PANEL(EYUDEZZZ) NEWAPPL(EYUD) PASSLIB
v Restores the original allocation when the user exits CICSPlex SM.
© Copyright IBM Corp. 1989, 2010 313

314 CICS TS for z/OS: Installation Guide
Chapter 43. Setting up a coordinating address space (CAS)
This chapter describes the steps you must perform in order to make a coordinatingaddress space (CAS) operational. These steps consist of:v “Preparing to start a CAS”v “Setting the CAS system communication information” on page 318v “Preparing to stop a CAS” on page 318.
For a summary of the CAS setup tasks that you can refer to while performing them,see Chapter 36, “CICSPlex SM setup checklist and worksheets,” on page 271.
If you are converting your CICSPlex SM system or systems from a previousrelease to CICSPlex SM for CICS Transaction Server for z/OS, Version 3 Release1, you should read the CICS Transaction Server for z/OS Migration from CICS TSVersion 2.3.
For details on applying corrective or preventive maintenance to CICSPlex SM, seeChapter 48, “Applying service to CICSPlex SM,” on page 371.
Preparing to start a CASThere are several ways you can start a CAS. You can start a CAS:
v At MVS IPL time.
This is the recommended method for starting a CAS. To use this method:
– Verify that the CAS startup procedure is in a system procedure library, suchas SYS1.PROCLIB.
– Verify that the CAS startup procedure is in the 'Started Tasks' table of theexternal security manager (ESM).
– Include the START command, as described on page 316, in the COMMNDaamember of SYS1.PARMLIB that contains the automatic operator commands.
v From the system console.
To start a CAS from the system console:
– Verify that the CAS startup procedure is in a system procedure library, suchas SYS1.PROCLIB.
– Verify that the CAS startup procedure is in the 'Started Tasks' table of theexternal security manager (ESM).
– Have the operator issue the START command, as described on page 316.
v As a batch job.
To start a CAS as a batch job:
– Verify that the CAS startup procedure is in a system procedure library, suchas SYS1.PROCLIB.
– Construct a job stream to invoke the CAS procedure.
– Submit the job to invoke a CAS.
A sample procedure that you can use to start a CAS is supplied in the memberEYUCAS and is illustrated in Figure 55 on page 316. This member was generatedwhen you ran the EYUISTAR job, as described in Chapter 39, “Generatingpost-installation members,” on page 297. The member is stored in the library youspecified on the LIB parameter of the EYUISTAR job.
© Copyright IBM Corp. 1989, 2010 315

EXEC statement
v Identifies the program that performs basic initialization tasks(PGM=BBM9ZA00).
v Provides unlimited processing time for the CAS (TIME=1440).
v Designates the size of the private region required by the CAS(REGION=4096K). Do not define a region smaller than 4096K.
STEPLIB DD statementIdentifies the CICSTS31.CPSM.SEYUAUTH authorized load library.
BBACTDEF DD statementDefines the library that contains the SMP-installed CICSPlex SM action andview tables, that are shared by multiple systems.
BBVDEF DD statementDefines the library that contains all SMP-installed CICSPlex SM views. ACAS is responsible for retrieving the views associated with PlexManager.
BBIPARM DD statementDefines the library that contains the cross-system definitions created byCICSPlex SM users.
BBSECURE DD statementDefines the library that contains member BBMTSS00, which containsoverrides to the CICSPlex SM global security parameters. See the CICSRACF Security Guide.
START command for a CASThe syntax of the command you can use to start a CAS is:
START procname [,SSID=ssid][,XDM=Y|N] [,SPCF=Y|N][,CONVXCF=Y|N][,COLD=Y|N][,DUMP=Y|N|ALL]
where:
procnameIs the 1- to 8-character name of the procedure. (EYUCAS is the name ofthe distributed sample procedure.)
SSID=ssidIdentifies the 4-character name that uniquely identifies the CAS subsystem.Please note that:
//EYUCAS PROC SSID=CPSM, MVS/ESA Subsystem ID// XDM=N, Extended diagnostic mode// SPCF=N,CONVXCF=N, SysPlex Coupling Facility// COLD=N, Cold start option// DUMP=ALL Capture all dumps//*//CPSMCAS EXEC PGM=BBM9ZA00,// PARM=(’SSID=&SSID,XDM=&XDM,SPCF=&SPCF,CONVXCF=&CONVXCF’// ’COLD=&COLD,DUMP=&DUMP’),// TIME=1440,// REGION=4096K//*//STEPLIB DD DISP=SHR,DSN=CICSTS31.CPSM.SEYUAUTH//BBACTDEF DD DISP=SHR,DSN=CICSTS31.CPSM.SEYUADEF//BBVDEF DD DISP=SHR,DSN=CICSTS31.CPSM.SEYUVDEF//BBIPARM DD DISP=SHR,DSN=CICSTS31.CPSM.EYUIPRM//BBSECURE DD DISP=SHR,DSN=CICSTS31.CPSM.SEYUPARM//*
Figure 55. A sample CAS startup job stream
316 CICS TS for z/OS: Installation Guide

1. Subsystem names must be unique within the MVS image.2. Subsystems are created without being predefined.
The distributed sample startup JCL uses CPSM as the default subsystemidentifier. (EYUX is used as the subsystem identifier for the EnvironmentServices System Services (ESSS) and, therefore, cannot be used as a CASsubsystem ID.)
Make sure that you use this subsystem ID with the CASNAME parameter,described on page “CASNAME(name)” on page 386.
If your enterprise has more than one CAS, make sure your TSO usersknow the subsystem ID of each CAS. In the Subsystem ID field on theSession Control Parameters panel, they can specify a different CAS thanthe one they first connect to. (The Session Control Parameters panel isdescribed in the CICSPlex System Manager User Interface Guide)
XDM=Y|NIndicates whether the CAS should execute in extended diagnostic mode(XDM).
XDM, which is described in the CICSPlex System Manager ProblemDetermination manual, should be activated only when requested by IBMSupport Personnel. Specifying XDM=Y disables certain error recoverymechanisms and issues extensive diagnostic messages to the console.
SPCF=Y|NIndicates whether the sysplex coupling facility (SPCF) should be initialized.
CONVXCF=Y|NIndicates whether XCF Conversations are to be allocated for CAS-to-CASconnections. If CONVXCF=Y is specified in the startup command for allCASes in a sysplex, it is not necessary to provide a VTAM applid for eachCAS in its CASDEF record. If CONVXCF=Y is specified SPCF=Y must alsobe specified.
COLD=Y|NIndicates whether the CAS should be cold started.
When the CAS is initialized, several control blocks are built in commonstorage. Most of these blocks are freed when the CAS terminates.However, some blocks (with a total of less than 4KB of CSA) are retainedto permit the reuse of previously allocated system resources—in particular,MVS system linkage indexes (LXs).
When you reinitialize the CAS with COLD=N, the control blocks from thepreceding invocation of the CAS are used—rather than building newones—and, thus, do not consume additional common storage or valuableLXs. By contrast, COLD=Y causes new control blocks to be built. Thismeans that all previously built control blocks continue to occupy commonstorage until the system is IPLed.
Specify COLD=Y only when requested to do so by IBM Support Personnelin an attempt to clear an error condition.
DUMP=Y|N|ALLIndicates whether system dumps (SDUMPs) are to be taken when the CASsubsystem recovery manager intercepts an unexpected abend.
When DUMP=ALL is in effect, an SDUMP is attempted for all unexpectedabends.
Chapter 43. Setting up a coordinating address space (CAS) 317

If you specify DUMP=Y, the recovery manager attempts to take an SDUMPonly when the failing function is running in supervisor state. If you specifyDUMP=N, the recovery manager does not take an SDUMP for any abend,regardless of the PSW state at the time of the failure.
Identifying and connecting to a CASThe first time a user accesses CICSPlex SM, CPSM is used as the default CASsubsystem ID. If this is not the appropriate subsystem ID, the user's profile must bechanged. To do this, the user must select option 0 from the CICSPlex SM entrypanel. Then select suboption 1 and change CPSM to the appropriate subsystem ID.
When the user displays the CICSPlex SM entry panel, the names of the contextand scope that are to be in effect for the user's CICSPlex SM session are shown.When the user selects either option 1 or 2, CICSPlex SM establishes connectionbetween the CAS and the CMAS responsible for managing the CICSplex identifiedas the context.
If, after a CAS connection has been established, the user decides to use option 0.1to identify a different CAS, the user must use the END command to exit ISPF toFREE the current BBILINK allocations. From the TSO READY prompt, the usermust restart the CICSPlex SM session in order to establish a connection to thenew CAS.
Setting the CAS system communication informationNext, use the PlexManager CASDEF view to specify the CAS systemcommunication information to establish direct CAS-to-CAS communication links.The CASDEF view is described in the CICSPlex SM Administration.
Note: The CASDEF view will not be available until you have a CAS running andcan access the CICSPlex SM ISPF end-user interface.
Preparing to stop a CASBefore you stop a CAS, you should ensure that the MAXUSER, RSVNONR, andRSVSTRT parameters in IEASYSxx contain values that, in combination, will notallow the system to run out of usable ASIDs. To conserve overhead, you may wantto limit the value specified for MAXUSER and use values for RSVNONR andRSVSTRT that allow for replacement of nonreusable address spaces when thevalue at MAXUSER has been exceeded.
The total number specified for MAXUSER and RSVNONR should be greater thanzero. The sum of the values specified for MAXUSER, RSVNONR, and RSVSTRTcannot be greater than 32767, which is also the maximum for MAXUSER. For moreinformation about the MAXUSER, RSVNONR, and RSVSTRT parameters, see theMVS/ESA Initialization and Tuning Reference manual.
Stopping a CASOnce a CAS is running, you should not need to stop it unless you want to changeits operating parameters.
If you want to stop a CAS, whether it is running as a started task or as a batch job,do the following:
1. Optionally, stop any CMASs that are connected to the CAS.
318 CICS TS for z/OS: Installation Guide

The CMASs can continue to run without a CAS, but you cannot access themthrough either the ISPF end-user interface or the application programminginterface (API). You may want to leave the CMASs running if either of thefollowing is true:v You plan to restart the CAS immediately after stopping it.v The CMAS is involved in workload management for a CICSplex.
Any CMAS that is running when you restart the CAS automatically reconnectsto the CAS.
2. From the operator console, issue the MVS purge command:P casname
where casname identifies the CAS you want to stop.
3. Look for the following console message to verify that the CAS has beenstopped:
BBMZA999I CAS(ssid) Shutdown Complete - CC=nn
where ssid identifies the CAS that was stopped and nn is the completion code.
Notes:
1. When the CAS is run as a batch job and you CANCEL the job, the initiator ispurged.
2. When the CAS is run as a started task and you PURGE the task, the addressspace is no longer available for other processing.
Chapter 43. Setting up a coordinating address space (CAS) 319

320 CICS TS for z/OS: Installation Guide

Chapter 44. Setting up a CICSPlex SM address space (CMAS)
This chapter describes the steps you must perform in order to make aCICSPlex SM address space (CMAS) operational. These steps consist of:v “Before you begin”v “CICSPlex SM auxiliary storage usage”v “Preparing to transmit generic alerts to NetView” on page 322v “Preparing to start a CMAS” on page 323v “CMAS-related CICS SIT parameters” on page 326v “Shutting down a CMAS” on page 330v “Restarting a CMAS” on page 331.
For a summary of the CMAS setup tasks that you can refer to while performingthem, see Chapter 36, “CICSPlex SM setup checklist and worksheets,” on page271.
Before you beginBefore you begin, check the IEASYSxx member of SYS1.PARMLIB that you use forMVS initialization and make note of the initialization values that are referencedduring installation. For details about these values, see “Noting IEASYSxx values” onpage 281.
If you are converting your CICSPlex SM system or systems from a previousrelease to CICSPlex SM for CICS Transaction Server for z/OS, Version 3 Release1, you should read the CICS Transaction Server for z/OS Migration from CICS TSVersion 2.3.
In CICS Transaction Server for z/OS, Version 3 Release 1 a CICSPlex SM CMASwill run only in a CICS system at the same release level. For example, a CICS TS3.1 CMAS runs only in a CICS TS 3.1 region. During startup the CMAS checks theCICS release level and terminates with message EYUXL0142 if the releases do notmatch.
Note: These changes have no effect on the managed CICS systems.
For details on applying corrective or preventive maintenance to CICSPlex SM, seeChapter 26, “Applying service to CICS Transaction Server for z/OS,” on page 179.
Take note of the information in CICSPlex System Manager Concepts and Planningabout appropriate uses of a CMAS.
CICSPlex SM auxiliary storage usageWhen a CMAS is initialized, up to 9 MVS dataspaces are created. Thesedataspaces are used by CICSPlex SM to allow quick access to data from a CMASand the MASs attached to it. Although the dataspaces are logically owned by theCMAS, they are physically owned by the ESSS address space (EYUX310). Thedataspaces are deleted when the CMAS (that logically owns the dataspaces) andall local MASs that are attached to that CMAS are terminated. The dataspaces arerecreated when the CMAS is initialized again.
The size of the dataspaces is dependent upon the amount of work (end-userinterface, workload management, MAS resource monitoring, and real-time analysis
© Copyright IBM Corp. 1989, 2010 321

processing) the CMAS is performing and the number of MASs connected to theCMAS. The size may range from 20MB of storage in a relatively idle CICSPlex SMconfiguration to well over 100MB of storage in a configuration that is complex inboth the number of MASs and the amount of work requested. If you do not preparefor such an increase in storage usage, you may encounter auxiliary storageshortages when you first start to use CICSPlex SM.
As an effort to prevent such auxiliary storage shortages, you should ensure thatyour auxiliary storage capabilities can handle an increase of 100MB of storagewithin the environment. Additionally, you can monitor CICSPlex SM's dataspaceusage by using an external monitor package to determine the amount of storagethe EYUX310 job uses.
Note: If you contact IBM support personnel because of auxiliary storage shortages,they may ask you to use the CICSPlex SM online debugging transactions(COD0 and CODB) to evaluate the storage use of EYUX310. For informationabout the COD0 and CODB transactions, refer to the CICSPlex SystemManager Problem Determination manual.
If auxiliary storage shortages do occur, you can alleviate the problem by eitherdynamically increasing your auxiliary storage capability or by causing CICSPlex SMto free the allocated dataspaces, as follows:
v To dynamically increase auxiliary storage capacity, allocate an additional pagedata set, then use the MVS console command PAGEADD to make the new pagedata set available.
v To cause CICSPlex SM to free the allocated dataspaces, first terminate theCICSPlex SM agent in all local MASs connected to the CMAS. To do this, youmust use the MAS view STOp action.
If a local MAS is acting as a CICSPlex SM WLM TOR, and the DTR program isspecified as EYU9XLOP for that MAS, you must change the DTR program fromEYU9XLOP before you can use the MAS view STOp action against that MAS.(For example, you can change it to the IBM default program DFHDYP.)
After the CICSPlex SM agent is terminated in all local MASs, terminate theCMAS itself.
After the auxiliary storage capability is increased, you can restart the CMAS.Toreconnect any local MASs that remained active after the CICSPlex SM agentwas stopped, execute the COLM transaction within those CICS regions.
You can execute CORM or COLM using a modify command from the CONSOLE.
Preparing to transmit generic alerts to NetViewYou can have the real-time analysis (RTA) component of CICSPlex SM transmitgeneric alerts to an IBM NetView system when one or more user-defined conditionsoccur during analysis.
For information about how to prepare CICSPlex SM to send the generic alerts toNetView, see the discussions of the ACTNDEF view, in CICSPlex System ManagerManaging Resource Usage and the CMASD view, in the : CICSPlex SystemManager Operations Views Reference manual.
To be sure that a NetView system is ready to receive the alerts, use the NPDAcommand
DFILTER AREC
322 CICS TS for z/OS: Installation Guide
|||
||||
||
|||
|
to verify that the Event Type record IMPD is being passed to the NetView databasein the NetView system.
The resulting list should show an ACTION of PASS for ETYPES of IMPD, andRSLV.
If it is necessary to add these record types to the filter, you can issue the followingNPDA commands:
SRFILTER AREC PASS E IMPDSRFILTER AREC PASS E RSLV
If the name of the NetView Alert Receiver has been changed from the default value(NETVALRT), the CMAS only CICSPlex SM system parameter ALERTRCVR maybe used to specify the required name. See Chapter 50, “CICSPlex SM systemparameters,” on page 383 for details of the ALERTRCVR parameter.
Preparing to start a CMASThere are several ways to start a CMAS.
You can start a CMAS:
v When an MVS system is IPLed.
To use this method:
– Verify that the CMAS startup procedure is in a system procedure library, suchas SYS1.PROCLIB.
– Verify that the CMAS startup procedure is in the 'Started Tasks' table of theexternal security manager (ESM).
– Change the COMMNDaa member that is referenced by the IEASYSxxmember of SYS1.PARMLIB (as in “Noting IEASYSxx values” on page 281). toinclude a START command for the CMAS.
The START command to be included is described in “START command for aCMAS” on page 330.
v From the system console.
To start a CMAS from the system console:
– Verify that the CMAS startup procedure is in a system procedure library, suchas SYS1.PROCLIB.
– Verify that the CMAS startup procedure is in the 'Started Tasks' table of theexternal security manager (ESM).
– Have the operator issue the START command described on page 330.
v As a batch job.
To start a CMAS as a batch job:
– Verify that the CMAS startup procedure is in a system procedure library, suchas SYS1.PROCLIB.
– Construct a job stream to invoke the CMAS procedure.
– Submit the job to invoke a CMAS.
No matter which method you use to start a CMAS, be sure to verify that theprocedure references the appropriate:v CICS SIT parameters, as described on page 326.v CICSPlex SM startup parameters, as described on page 383.
Chapter 44. Setting up a CICSPlex SM address space (CMAS) 323

Notes:
1. Because the job of the CMAS is to manage a MAS, it is important that theCMAS have the ability to process data with a higher priority than the MAS.Therefore, when the MVS image is running in workload management goalmode, the CMAS jobs should be defined to the MVS service class, SYSSTC, foroptimal performance. Failure to do so may result in severe performanceproblems for CICSPlex SM.
2. After starting a CMAS for the first time, you must configure the CMAS to yourenvironment. This includes establishing the CICSplexes it is to manage and anycommunication links that are needed between this CMAS and another CMAS.For additional information about this, see CICSPlex System ManagerAdministration.
A sample procedure that you can use to start a CMAS is supplied in the memberEYUCMAS. This member was generated when you ran the EYUISTAR job, asdescribed in Chapter 39, “Generating post-installation members,” on page 297. Themember is stored in the library you specified on the LIB parameter of theEYUISTAR job.
You must create the data sets for this CICS region. JCL to create the CICS regiondata sets for the CMAS is supplied in member EYUDFHDS ofCICSTS31.CPSM.XEYUINST. This member was generated when you ran theEYUISTAR job.
Figure 56 illustrates segments of the EYUCMAS procedure that are unique toCICSPlex SM.
Review the following statements in the sample JCL that are illustrated in Figure 56.Verify that the JCL has been modified so that the:
//EYUCMAS PROC DSNCSD=CICSTS31.CPSM.DFHCSD, CSD Data Set name// DSNTBL=CICSTS31.CPSM.RGNLOAD, CICS Table Module library// RGNHLQ=CICSTS31.CPSM, CICS Region DSN qualifier// CICSPRM=EYUCnnI0, CICS Parameters// CPSMPRM=EYUCMS0P CPSM Parameters//*//CICS EXEC PGM=EYU9XECS, CMAS Startup program// PARM=’SYSIN’, CICS Parameters location// REGION=0K Region Size//*//STEPLIB DD DISP=SHR,DSN=CICSTS31.CPSM.SEYUAUTH// DD DISP=SHR,DSN=CICSTS31.CPSM.CICS.SDFHAUTH//DFHRPL DD DISP=SHR,DSN=CICSTS31.CPSM.SEYULOAD// DD DISP=SHR,DSN=CICSTS31.CPSM.CICS.SDFHLOAD// DD DISP=SHR,DSN=&DSNTBL
...//EYULOG DD SYSOUT=*//DFHJ25A DD DISP=SHR,DSN=CICSTS31.CPSM.SDFHJ25A//DFHJ25B DD DISP=SHR,DSN=CICSTS31.CPSM.SDFHJ25B
...//EYUDREP DD DISP=SHR,DSN=CICSTS31.CPSM.EYUDREP.cmasname//EYUPARM DD DISP=SHR,DSN=CICSTS31.CPSM.SEYUPARM(&CPSMPRM)//BBACTDEF DD DISP=SHR,DSN=CICSTS31.CPSM.SEYUADEF//BBVDEF DD DISP=SHR,DSN=CICSTS31.CPSM.SEYUVDEF//BBIPARM DD DISP=SHR,DSN=CICSTS31.CPSM.EYUIPRM
Figure 56. CMAS-specific JCL requirements
324 CICS TS for z/OS: Installation Guide
###
|||||

EXEC PGM=EYU9XECS statementStarts the CMAS and either verifies the existence of, or creates, the ESSS.EYU9XECS, the CMAS startup program, must be run in order for a CMASto initialize.
STEPLIB DD statementIncludes the CICSTS31.CPSM.SEYUAUTH authorized load library.
DFHRPL DD statementIncludes the CICSTS31.CPSM.SEYULOAD load library. Include the loadlibrary that contains the CICS resource definition table load modules. Theseneed to be link edited into a user-supplied load library, which needs to bespecified in the DFHRPL concatenation. See “Creating CICS resourcedefinition tables for CMASs” on page 307 for more information.
You should not include application load libraries in the DFHRPLconcatenation.
EYULOG DD statementIdentifies the log to which messages from the CMAS and its associatedmanaged application systems (MASs) are to be directed.
When you are using a sequential data set for the EYULOG, allocate 3primary cylinders and 1 secondary cylinder.
EYUDREP DD statementIdentifies the library to be used as the data repository by the CMAS, where:
cmasnameIs the name you specified for the CMASNAME parameter on theEYUISTAR job. The CMASNAME value is used by EYU9XDUT inorder to create the CICSPlex SM data repository. (See “Creatingthe CICSPlex SM data repository” on page 299.)
EYUPARM DD statementIdentifies the library that contains the CICSPlex SM system parameters.
BBACTDEF DD statementDefines the data set that contains the SMP-installed CICSPlex SM actionand view tables. These tables help the CAS determine which view namesand actions are valid within a given context.
BBVDEF DD statementDefines the library that contains all SMP-installed CICSPlex SM views.
BBIPARM DD statementIdentifies the library containing the CICSPlex SM system parameters.
Editing CICSPlex SM system parametersMember EYUCMS0P, in the CICSTS31.CPSM.SEYUPARM data set, containssample parameters for a CMAS; this member must be edited. (See Chapter 50,“CICSPlex SM system parameters,” on page 383 for a detailed description of eachparameter.)
When the CMAS is to connect to a MAS for which security is active (the CICS SITparameter for the MAS is SEC=YES), the CMAS must have CICSPlex SM securityactive. When CICSPlex SM security is not activated in the CMAS, the connectionbetween the CMAS and the MAS cannot be established. If this is attempted, thefollowing message is issued to the console, the CMAS joblog, and the CMASEYULOG:
Chapter 44. Setting up a CICSPlex SM address space (CMAS) 325

EYUCR0007E Security mismatch between CMAS cmasname andMAS masname. Connection terminating.
To activate CICSPlex SM security in the CMAS, you must specify theCICSPlex SM system parameter SEC(YES). The default is SEC(NO). (For moreinformation about the SEC parameter, see Chapter 50, “CICSPlex SM systemparameters,” on page 383.) Specifying SEC=YES in the CICS SIT parameters forthe CMAS does not affect CICSPlex SM security.
CMAS-related CICS SIT parametersThe CICSTS31.CPSM.SEYUPARM library contains CICS system initialization table(SIT) parameters that should be included in the sequential data set or partitioneddata set member EYUC64I0 as identified by the CICS SYSIN statement.
Table 22 identifies the CMAS-related CICS SIT parameters.
Notes:
1. When the second column in the table contains an asterisk, before you start aCMAS you should supply your own value for the parameter listed in the firstcolumn.
2. When the second column of the table does not contain an asterisk, do notchange the value of the parameter in the first column.
Table 22. CICS SIT parameters for a CMAS
Parameter Your value Explanation
AIEXIT=DFHZATDX VTAM terminal autoinstall program.
APPLID= * VTAM application ID for this CICS, which is acting as aCMAS. Used as CMAS name when NAME(value) is notspecified as a CICSPlex SM system parameter.
AUTORESETTIME=YES Synchronize the CICS and MVS clocks after the localtime offset has been changed. You should continue toissue the CEMT PERFORM RESET command.
AUXTR=ON Auxiliary trace - Exception records.
AUXTRSW=ALL Continuous auxiliary trace switching.
CICSSVC=216 * CICS SVC installed in LPA.
CPSMCONN=CMAS Initialize this region as a CMAS
DFLTUSER= * Non-CESN RACF user Id.
DSALIM=4M Limit of DSA storage below 16MB.
DUMPDS=A * Transaction dump data set.
DUMPSW=NEXT * Switch to next transaction dump data set.
EDSALIM=100M Limit of EDSA storage above 16MB.This is a minimuminitial value. See “Controlling CICS storage in a CMAS”on page 329 for additional information.
FCT=NO No File control table.
GMTEXT='CICSPlex SM / ESA' * Default logon message.
GRPLIST=EYU310L0 CSD group list having group EYU310G0. See “Updatingthe CSD files using DFHCSDUP (CMAS)” on page 307for additional information.
ICV=100 Region exit interval.
326 CICS TS for z/OS: Installation Guide
#####

Table 22. CICS SIT parameters for a CMAS (continued)
Parameter Your value Explanation
ICVR=20000 Runaway task interval.Note: For a CMAS running on a small processor andhaving a large number of resources defined through BAS,this value may need to be increased to about 90000.
ICVTSD=1 Terminal scan delay interval.
INTTR=ON Activate main storage trace.
IRCSTRT=YES IRC started at system initialization.
ISC=YES Load programs required for interregion or intersystemcommunications during initialization.
MXT=300 Maximum tasks to exist.This is a minimum initial value.See “Controlling CICS storage in a CMAS” on page 329for additional information.
RENTPGM=PROTECT Specifies that CICS will allocate ERDSA from readonlykey 0 protected storage.
SEC= {YES|NO} Indicates whether CICS external security checking isperformed for this CMAS. The CICS security checking isindependent of the CICSPlex SM external securitychecking (which is controlled with the CICSPlex SM SECsystem parameter) as specified in the EYUPARM DD. Forinformation about the CICSPlex SM SEC parameter forthe CMAS, see Chapter 50, “CICSPlex SM systemparameters,” on page 383.
The CICS external security checking SIT option can bespecified in the normal way, along with the other CICSsecurity related options (for example, XTRAN andXCMD).
CICS command or resource security is not appropriate ina CMAS. The XTRAN SIT option is typically used tocontrol access to the various CICSPlex SM transactionsused in a CMAS. For more information, see CICS RACFSecurity Guide.Note: No CICSPlex SM supplied transaction definitionshave CMDSEC=YES or RESSEC=YES. If this definition ischanged, or the CMDSEC=ALWAYS orRESSEC=ALWAYS SIT parameters are set in a CMAS,and a CICSPlex SM transaction receives a NOTAUTHresponse, results are unpredictable.
SIT=6$ System initialization table suffix.
SPOOL=YES System spooling interface. Required when you are goingto use the CICSPlex SM batched repository-updatefacility.
Chapter 44. Setting up a CICSPlex SM address space (CMAS) 327
########
####
###########

Table 22. CICS SIT parameters for a CMAS (continued)
Parameter Your value Explanation
START=AUTO You can normally specify START=AUTO and let CICSinitialization decide the type of start to perform.
The first time you start a CMAS, ensure the CICS globaland local catalog data sets are newly initialized. UseDFHRMUTL and DFHCCUTL respectively, with AUTOINITon the SET_AUTO_START parameter of DFHRMUTL.This makes sure that the CMAS performs an initial start,which installs the necessary CICS resource definitionsand establishes CMAS-to-CMAS connections.
Subsequently, you can manipulate the type of start for aCMAS by resetting the global catalog data set, usingDFHRMUTL to specify either AUTOINT or AUTOCOLD.For more information, see “Restarting a CMAS” on page331.
STGPROT=NO No storage protection.
SUBTSKS=1 Use additional concurrent mode TCB.
SYSIDNT= * CICS System Id.Note: The SYSIDNT value must match the EYU9XDUTSYSID parameter value used to initialize the datarepository being referenced by the EYUDREP DDstatement.
SYSTR=OFF No system activity trace.
TCT=NO No TCT needed.
TRANISO=NO No transaction isolation.
TRTABSZ=2048 Kilobytes for trace table.
TS=COLD Cold start temporary storage.
TST=NO No temporary storage table required.
USERTR=ON Enable user trace facility.
WRKAREA=2048 Bytes for Common Work Area.
XRF=NO No XRF support.Note: The extended recovery facility (XRF) is notsupported because of the way in which a CMAS usesMVS data spaces.
Controlling tasks in a CMASMany operations within a CMAS are achieved by multiple asynchronous tasks. Thisis especially true of operations that are performed between CMASs in a CMASnetwork, such as data repository synchronisation, workload management statesharing and single system image. Any of these operations, and others, can result ina number of interdependent asynchronous tasks being established or used toexecute the request. The number of tasks that can be used is based on otherfactors, such as the size of a CMAS network, how many MASs are being managed,how many CICSplexes are defined, how much API activity is performed, the scopeof EUI/WUI/API/RTA requests and so on for all the major functionality offered byCPSM.
Even though a CMAS can self regulate its tasking model and has tolerance ofdelayed requests and responses through timeout mechanisms, MXT is a concept
328 CICS TS for z/OS: Installation Guide
that is not applicable to controlling an interdependent multitasked asynchronoustasking model. Set inappropriately, you may also experience EUI and WUI hang' forlong durations if one or more of the asynchronous tasks required to execute therequested function are delayed waiting for an MXT slot. It is therefore stronglyrecommended that MXT should be set to avoid any delays in task attachment.
As task usage within a CMAS grows with the additional requirements that areplaced upon it, such as but not limited to, increased use of the API, more CMASs,more MAS's, new function use, and so on, you should set the MXT value to a levelthat continues to avoid MXT delays.
It is recommended that you monitor any MXT value for its relationship against thetask activity within each CMAS at regular intervals. If the CMAS is starting toexperience MXT delays, you should adjust the MXT value to avoid these delays.
To monitor the tasking activity within an individual CMAS, it is recommended thatyou collect and study the statistics generated by the CICS system that underlies theCMAS that it hosts. CICS transaction manager global statistics contain informationon the effect the MXT value has on task attachment. For more information andguidance on using CICS statistics see the CICS Performance Guide.
Controlling CICS storage in a CMASA CMAS is a special application dedicated to the task of managing and controllingMASs. Even though a CMAS does this with an atypical tasking model and withextensive use of MVS dataspace storage, it still has major uses of the storageprovided by the CICS system that hosts the CMAS. With an interdependentmultitasked asynchronous tasking model there is a reliance on shared storage toperform the communication between the tasks and the functions being performed.Also, according to the requirements that are placed upon a CMAS, there is a largereliance on shared storage to perform the buffering of requests and responses to betransmitted via CMAS to CMAS and CMAS to MAS links. The shared storage tosupport such operational characteristics is managed by the CICS system that hoststhe CMAS.
As CICS storage usage within a CMAS grows with the additional requirements thatare placed upon it, such as, increased use of the API, more CMASs, more MASs,increased CMAS to CMAS network traffic and new function use,you should set theEDSALIM value to a level that provides the CMAS with the amount of storage itneeds to perform its operations unimpeded. CMAS to CMAS and CMAS to MASnetwork traffic, in particular, is critical to EUI and WUI response times becauselarge amounts of data may be awaiting shipment on any of the links that a CMAScommunicates on
It is recommended that you monitor any EDSALIM value for its effect on the storageusage within each CMAS at regular intervals. If the CMAS is experiencing short onstorage (SOS) or storage fragmentation or trending towards such conditions, youshould consider increasing the EDSALIM value to meet the storage requirements ofthe CMAS. Storage fragmentation below a largest free area of 64KB will begin toadversely effect throughput and response times.
To monitor the storage usage within an individual CMAS, it is recommended thatyou collect and study the statistics generated by the CICS system that underlies theCMAS that it hosts. CICS storage manager global statistics contain information onthe overall usage of CICS storage by the CMAS that it hosts. For more informationand guidance on using CICS Statistics see the CICS Performance Guide.
Chapter 44. Setting up a CICSPlex SM address space (CMAS) 329

START command for a CMASThe syntax of the command you can use to start a CMAS is:START procname [,DSNCSD=dsn][,DSNTBL=dsn][,RGNHLQ=idx][,CICSPRM=mem][,CPSMPRM=mem]
where:
procname Is the 1- to 8-character name of the procedure.(EYUCMAS is the name of the distributed sampleprocedure.)
DSNCSD=dsn Specifies the name of the data set that contains theCSD file that has been modified to include thenecessary CICSPlex SM resource definitions.
DSNTBL=dsn Specifies the name of the data set that contains theCICS table modules that have been modified forCICSPlex SM. These need to be link edited into auser-supplied load library, which needs to bespecified in the DFHRPL concatenation. See“Creating CICS resource definition tables forCMASs” on page 307 for more information.
RGNHLQ=idx Specifies the high-level qualifier that is used withthe DFHxxxx data sets that are unique to thisCMAS.
The EYUINST EXEC parameter CINDEXestablishes the high-level qualifier that is used withCICS data sets that are shared between systems.
CICSPRM=mem Identifies the member in theCICSTS31.CPSM.SEYUPARM library that containsthe CICS SIT parameters.
CPSMPRM=mem Identifies the member in theCICSTS31.CPSM.SEYUPARM library that containsthe CICSPlex SM system parameters.
Setting the VTAM APPLID for a CMASThe last step is to use the CMTCMDEF view to set the VTAM APPLID for the targetCMAS, to establish direct CMAS-to-CMAS communication links. The CMTCMDEFview is described in the CICSPlex System Manager Administration manual.
The CMTCMDEF view is not available until you have a CMAS that can accessCICSPlex SM itself.
Shutting down a CMASYou can shut down a CMAS using:v The SHUtdown commandv The COSD transaction.
It is also possible to use the CMASSTOP command of the CODB system-leveldebugging transaction to shut down the CMAS, but CODB is restricted and shouldbe used only at the request of IBM customer support personnel
Note: You should not attempt to:
330 CICS TS for z/OS: Installation Guide

v Issue the CEMT PERFORM SHUTDOWN command against a CMAS.v Cancel the CMAS job from MVS
If you take either of these actions, the CMAS cannot shut itself downproperly.
Using the SHUtdown commandYou can issue the SHUtdown command from either the CMAS view or the CMASDview.
From the CMAS viewIssue the action command:
SHUtdown cmas
where cmas identifies the CMAS to be shut down.
From the CMASD viewIssue the action command:
SHUtdown
Using the COSD transactionYou can issue from any terminal, including an MVS console, the transaction id:
COSD
You should see an information message that indicates whether or not the CMAS isshut down. For details of these messages, see CICSPlex System ManagerMessages and Codes.
Restarting a CMASA CMAS that was shut down normally (using the CICSPlex SM SHUTDOWN actioncommand) can usually be restarted with a SIT parameter of START=AUTO.However, you must specify START=COLD if you have:
v Modified any of the CICS resource definitions that are used by the CMAS.
v Added or removed CMAS-to-CMAS (CMTCMDEF) connection definitions.
If a CMAS terminates abnormally (that is, through any means other than theCICSPlex SM SHUTDOWN action command), you must perform an emergencyrestart to allow CICS to perform backout processing. You can accomplish anemergency restart of a CMAS in one of two ways:
v If the CMAS is registered with the MVS automatic restart manager (ARM), anemergency restart occurs automatically.
v If the CMAS is not registered with ARM, specify START=AUTO in the CMASstartup procedure.
A CMAS should initialize and function properly after an emergency restart, providedyou have made no changes to the CICS resource definitions or CICSPlex SMconnection definitions.
If you have made any such changes since the last run of the CMAS (that is, theone that terminated abnormally), the CMAS may not function properly. In that case,you should shut down the CMAS with the CICSPlex SM SHUTDOWN actioncommand and restart it, specifying START=COLD. For an illustration of theSHUTDOWN action command, see “Shutting down a CMAS” on page 330.
Chapter 44. Setting up a CICSPlex SM address space (CMAS) 331
|

332 CICS TS for z/OS: Installation Guide

Chapter 45. Setting up a CICS managed application system(MAS)
This chapter describes the steps you must perform so that a CICS TS system canbe known as a managed application system (MAS) to CICSPlex SM. (Throughoutthe rest of this chapter, a CICS TS MAS is referred to as an MVS MAS.) Thefollowing levels of CICS under MVS can connect directly to, and be managed by,CICSPlex SM:v CICS Transaction Server for z/OS, Version 2 Release 3v CICS Transaction Server for z/OS, Version 2 Release 2v CICS Transaction Server for OS/390, Version 1 Release 3
The information you need is in the following sections:v “Before you begin”v “Using CICS global user exits and user-replaceable modules”v “Controlling the use of modules from the LPA” on page 334v “Preparing to start an MVS MAS” on page 334v “Stopping and restarting management of a CICS system” on page 339.
For a summary of the MAS setup tasks that you can refer to while performing them,see Chapter 36, “CICSPlex SM setup checklist and worksheets,” on page 271.
Before you beginBefore you begin, check the IEASYSxx member of SYS1.PARMLIB that you use forMVS initialization and make note of the initialization values that are referencedduring installation. For details about these values, see “Noting IEASYSxx values” onpage 281.
If you are converting your CICSPlex SM system or systems from a previousrelease to CICSPlex SM for CICS Transaction Server for z/OS, Version 3 Release1, you should read the CICS Transaction Server for z/OS Migration from CICS TSVersion 2.3 Guide.
For details on applying corrective or preventive maintenance to CICSPlex SM, seeChapter 26, “Applying service to CICS Transaction Server for z/OS,” on page 179.
Using CICS global user exits and user-replaceable modulesThis section describes the CICS global user exits (GLUE) and user replaceablemodules that are used by CICSPlex SM.
The way these exits are used by CICSPlex SM conforms to the standard describedin the CICS Customization Guide. CICSPlex SM uses these exits only to acquireinformation; the application environment is not altered.
CICSPlex SM uses the dynamic routing program user replaceable module(DTRPROG) as part of workload balancing.
The XMNOUT and XSTOUT exits are used when monitoring services are enabledfor a managed application system (MAS).
v The XMNOUT exit is used to get task and CICS monitoring data. XMNOUT isused only with a local MAS.
v The XSTOUT exit is used to get statistical data before the data is reset by CICS.
© Copyright IBM Corp. 1989, 2010 333

These exits are used to obtain monitoring and statistics information and alwaysreturn a “continue processing” return code. They are disabled when a shutdownrequest for the MAS is received.
The XMEOUT, XDUREQ, XDUREQC, XRSINDI and XDUOUT exits are used whentopology requests are enabled for a local MAS. The XMEOUT exit is used to detectshort on storage sick and well health events.
v The XRSINDI exit is used to detect topology resource changes.
v The XDUREQ exit is used to detect system dump and transaction dump sickhealth events.
v The XDUREQC exit is used to detect the completion of dump action.
v The XDUOUT exit is used to detect transaction dump well health events.
v The XSNOFF exit is used to detect user signoff events.
Controlling the use of modules from the LPAYou can control whether CICS uses modules from the LPA, by specifying the LPAand PRVMOD CICS system initialization parameters or by including or excludingthe SYS1.CICSTS31.CPSM.SEYULPA library (defined to MVS as an LPA library) inthe STEPLIB or DFHRPL concatenations.
Notes:
1. A module that is link-edited with the RMODE(ANY) attribute is loaded into theELPA.
2. It is important to remember that the LPA-resident version of a module usuallyloaded from STEPLIB is not used from the LPA if it is left in the STEPLIB DDconcatenation of libraries. If a module is found in the STEPLIB concatenation, itis loaded into the private area of the address space, and the LPA versionignored. This situation can be avoided by moving the LPA-eligible modules intoan LPA library, as described in “Installing CICSPlex SM modules into the LPA”on page 287.
For further information about controlling the use of LPA-eligible modules, seeChapter 14, “Installing CICS modules in the MVS link pack area,” on page 107,taking particular note of information concerning:v The module-not-found warning message (DFHLD0107I)v CICS SIT parameters related to LPA modules.
Preparing to start an MVS MAS
Note: Because a CICS system is unknown to CICSPlex SM until the CMAS withwhich the CICS system is associated is started, you should start the CMASbefore any of the MASs (that is, the CICS systems the CMAS is to manage).
CMAS links can fail if you have high priority jobs running alongside yourCICS regions. For example, if a MAS holding a lock cannot be dispatchedbecause of a priority conflict, the CMAS links can fail.
In order for a CICS system to be managed by CICSPlex SM, you must:
v Define the system to CICSPlex SM, as described in the CICSPlex SystemManager Administration
v Change the startup JCL for that system by:
334 CICS TS for z/OS: Installation Guide
###

– Modifying the DD statements shown in Figure 57, to include theCICSPlex SM data sets
– Verifying that the appropriate CICS SIT parameters are included
When changing these DD statements in the startup JCL for a CICS system makesure that the:
STEPLIB DD statementIncludes the CICSTS31.CPSM.SEYUAUTH authorized load library.
DFHRPL DD statementIncludes the CICSTS31.CPSM.SEYULOAD load library.
EYUPARM DD statementIdentifies the library containing the CICSPlex SM parameters.
Notes:
1. Member EYULMS0P in the CICSTS31.CPSM.SEYUPARM data set,contains sample system parameters for a local MAS; this member mustbe edited. See Chapter 50, “CICSPlex SM system parameters,” onpage 383 for a detailed description of each parameter.
2. If you want to use Business Application Services to install CICSresources in a MAS, you must specify the CICSPlex SM systemparameter MASPLTWAIT(YES) for that system. This parametersuspends CICS PLT processing until all CICS resources are installedand the CICSPlex SM MAS is fully initialized.
EYUHISTx DD statementIdentifies the history data sets for the MAS. Each MAS must have its ownset of CICSPlex SM history data sets. The data sets must be allocated tothe MAS region by means of DD cards in the JCL with DD names of theform EYUHISTx, where x is a character suffix taking values A through Z.Dynamic allocation is not supported. The data sets must be allocated with adisposition of OLD. The suffix letters must be used in ascending sequenceand no letter should be omitted. For example, if four history data sets arerequired, use DD names EYUHISTA, EYUHISTB, EYUHISTC, andEYUHISTD. See “Preparing the MAS for history recording” on page 338.
Activating DB2 connections during CICS startupThis section applies to CICS Transaction Server for z/OS, Version 3 Release 1CICS systems with the CICS-DB2 attachment facility.
Special considerations apply when BAS is used to install a DB2 connection definedto CICSPlex SM via a DB2CDEF resource definition.
When BAS is used to define and then install a DB2 connection (via a DB2CDEF)the connection starts out in NOTCONNECTED status. You can then issue a
...//STEPLIB DD DSN=CICSTS31.CPSM.SEYUAUTH,DISP=SHR//DFHRPL DD DSN=CICSTS31.CPSM.SEYULOAD,DISP=SHR//EYUPARM DD DSN=(Any PO or PS data set with LRECL=80)//EYUHISTA DD DSN=(Optional 1st history dataset)//EYUHISTB DD DSN=(Optional 2nd history dataset)//EYUHISTn DD DSN=(Optional nth history dataset)
...
Figure 57. MVS MAS-specific JCL requirements
Chapter 45. Setting up a CICS managed application system (MAS) 335
##

CONNect command on the DB2CONN view against an installed connection, tocause the connection to the DB2 subsystem to be activated.
In a test environment, it might be acceptable to wait for the MAS to start and theninstall the BAS definition, and issue a CONNECT command against the resultingDB2CONN.
However, in a production system, you might want the connection to be automaticallyactivated when the MAS starts up, as part of the PLT processing sequence, so thatthe DB2 subsystem can be accessed immediately by programs and users.
Specifying the CICS SIT parameter DB2CONN=YES does not by itself achieve this,because at the time this and other SIT parameters are processed, CICSPlex SMhas not yet installed any DB2CDEF objects.
The way to activate a DB2 connection during CICS startup is as follows:1. Ensure there is an appropriate DB2CDEF resource definition for CICSPlex SM
to install, and that the definition is set up for automatic installation.2. Specify CICSPlex SM parameter MASPLTWAIT(YES). This causes the
DB2CDEF resource definition (as well as all other BAS resource definitions) tobe installed during PLT processing.
3. Arrange for the appropriate DB2 connect program to be started after the MASstartup program (EYU9NXLM for a local MAS).
MQSeries connectionsYou cannot use BAS to define and install an MQSeries® connection before theCICSPlex SM environment has been initialized.
MVS MAS-related CICS SIT parametersYou should verify that the sequential data set or partitioned data set memberidentified by the CICS SYSIN statement includes the appropriate CICS systeminitialization table (SIT) parameters, as described in Table 23.
Table 23. CICS SIT parameters for an MVS MAS
Parameter Explanation
APPLID= VTAM application ID for this CICS system. Used as MAS name whenNAME(value) is not specified as a CICSPlex SM system parameter.
AUTORSETTIME={YES|NO} This parameter allows for the synchronization of the MVS and the CICSTOD clocks when the local time offset is changed. The default is NO.
CPSMCONN=LMAS Initialize the region as a local MAS.
DFLTUSER=userid Specify the user identifier that is to be used for security checking when auser is not defined to the ESM.
DSALIM= Limit of DSA storage below 16MB. Should be set to at least 4MB.
EDSALIM= Limit of EDSA storage below 16MB. Should be set to at least 50MB.
GRPLIST= Identify the name of the group list containing the CICSPlex SM groupadded to the CSD file for the MAS. (See “Updating CSD files usingDFHCSDUP (MVS MAS)” on page 311 for additional information.)
ISC=YES Code YES to include the CICS programs required for interregion andintersystem communications.
MCT= Monitoring control table. If you have CICS performance class monitoringactive, then you must specify a value for this parameter. You can use 2$(the default) or an existing table. (See Note below.)
336 CICS TS for z/OS: Installation Guide
||
###
##

Table 23. CICS SIT parameters for an MVS MAS (continued)
Parameter Explanation
MN=ON Activates CICS Monitor. (See Note below.)
MNFREQ=001500 Writes performance class data every 15 minutes.Note: Set only for local MAS.
MNPER=ON Tells CICS to monitor performance classes. (See Note below.)
Note for MCT, MONITOR, MN, and MNPER parameters: To get all data available for the TASK and MLOCTRANviews, MCT must have a value specified, CICS monitoring for performance classes must be activated, and you mustbe collecting performance class data.
If you do not want this data written to an SMF data set, you can suppress the monitor records. See the description ofthe SUPPRESSCMF parameter in Chapter 50, “CICSPlex SM system parameters,” on page 383.
MXT= Maximum tasks. Increase by 25 to accommodate the CICSPlex SM MAStasks.Note: CICSPlex SM rarely uses all 25 of these additional tasks. If you areusing the MXT value alone to control application transactions, increasingthis value can allow more application transactions to run concurrently. Toprevent this from occurring, you can define a transaction class for theapplication and set the MAXACTIV task value to limit the number ofconcurrent transactions.
SEC= {YES|NO} Indicate whether external security checking is to be performed for thisCICS system. Specify:
YES When READ access is granted:v READ is permittedv UPDATE is refused.
When UPDATE access is granted:v READ is permittedv UPDATE is permitted.
NO Security checking is not performed.
Notes:
1. For CICS security, the value specified with SEC= for a CMAS overridesthe value specified with SEC= for a MAS. (For more information aboutthis parameter, see the CICS RACF Security Guide.)
2. For CICSPlex SM security to be active, you must set SEC=YES for aMAS, and the CMAS to which it connects must have the CICSPlex SMsystem parameter SEC(YES). When CICSPlex SM security is notactivated in the CMAS, the connection between the CMAS and theMAS cannot be established. If this is attempted, messageEYUCR0007E is issued to the console, the CMAS joblog, and theEYULOG.
(For more information about the SEC parameter for the CMAS, seeChapter 50, “CICSPlex SM system parameters,” on page 383.)
SECPRFX={YES | NO |prefix} Specify whether the user ID is used as the prefix that is added to thebeginning of all resource names to distinguish this CICS system from otherCICS systems.
SYSIDNT= Indicate the id of the CICS system. This name should be unique within aCICSplex.
XCMD= {YES|name|NO} Indicate whether EXEC CICS system commands are to be included insecurity checking. Specify YES or NO. For more information aboutCICSPlex SM transaction security requirements, see the CICS RACFSecurity Guide.
Chapter 45. Setting up a CICS managed application system (MAS) 337
#########
#
|||

Table 23. CICS SIT parameters for an MVS MAS (continued)
Parameter Explanation
XDB2= {No|name} Indicate whether DB2 resources are to be included in security checking.Specify NO or name.
XFCT= {YES|name|NO} Indicate whether file control entries are to be included in security checking.Specify YES or NO. For more information about CICSPlex SM transactionsecurity requirements, see the CICS RACF Security Guide.
XPCT= {YES|name|NO} Indicate whether EXEC-started transactions are to be included in securitychecking. Specify YES or NO. For more information about CICSPlex SMtransaction security requirements, see the CICS RACF Security Guide.
XPPT= {YES|name|NO} Indicate whether program entries are to be included in security checking.Specify YES or NO. For more information about CICSPlex SM transactionsecurity requirements, see the CICS RACF Security Guide.
XUSER={YES|NO} Indicates whether CICS is to perform surrogate user checks. If you specifyYES, the CICS region userid must be defined as a surrogate of the useridthat starts a MAS using the COLM or CORM transaction.
Preparing the MAS for history recordingCICSPlex SM provides the ability to save and view data for completed tasks, that ishistorical task data. When an active task completes, its data is stored in a historicaldata store. The data store is made up of a number of VSAM KSDS data sets. Theremust be a minimum of two data sets and a maximum of twenty six data sets.
Each MAS must have its own set of CICSPlex SM history data sets. The data setsmust be allocated to the MAS region by means of DD cards in the JCL with DDnames of the form EYUHISTx, where x is a character suffix taking values A throughZ. Dynamic allocation is not supported. The datasets must be allocated with adisposition of OLD. The suffix letters must be used in ascending sequence and noletters should be omitted. For example, if four history data sets are required use DDnames EYUHISTA, EYUHISTB, EYUHISTC, and EYUHISTD.
The CICSPlex SM history data sets must be defined with the REUSE keyword.Task history recording uses the least recently used data set, or when starting for thefirst time EYUHISTA. When EYUHISTA becomes full, it switches to use EYUHISTBand so on in sequence. Each full data set remains open with its data available untilthe history recorder has filled all data sets and needs to start reusing the data sets.At this time EYUHISTA is set closed, emptied, re-opened, and reused first, followedby EYUHISTB and so on in sequence. If a data set is reused its previous contentsare destroyed.
Until the history recorder requires to empty a data set in order to reuse it, thehistorical task data is available for use. The data is maintained across CMAS andMAS restarts. The history data sets need not be defined as recoverable, as unit ofwork recoverability is not required. However, the CICSPlex SM history recorderfacility does require files to be defined as non-recoverable to avoid unnecessarylogging in the MAS region.
In addition, the history data sets must not be defined to use VSAM compression.The CPSM history function initializes the data sets in order to calculate how manyrecords fit in the data set, so that it can safely use sequential writes to the data set,thereby reducing the I/O overhead. Use of VSAM compression invalidates thatcalculation and cause data to be lost when the data set becomes full and a data setswitch is required.
338 CICS TS for z/OS: Installation Guide
######

CICSPlex SM provides a tuning aid in the form of a EYUPARM calledHISTRECSMSG to determine the optimum size for history data sets.HISTRECSMSG can activate the periodic output of messages detailing how manythousand records have been written to the data set. There is one record for eachcompleted task. Since CICS file control supports extended format KSDS data sets,large history data sets over 4GB in size can be defined. However when consideringusing very large data sets, take into account that when the CICSPlex SM historyrecorder reuses a data set by emptying it, a large amount of data is lost and notavailable for subsequent queries. An alternative approach to having a small numberof very large data sets, is to spread the data over more data sets. For example, byhaving twenty five data sets each one capable of holding one hours worth ofcompleted task data, at least one days worth of data can always be maintained.When the oldest data set is reused, only one hours worth of data is lost.
CICSPlex SM provides a sample job called EYUJHIST in SEYUINST for definingand initializing two history data sets.
Stopping and restarting management of a CICS systemThis section tells you how to:v Stop management of a CICS systemv Restart management of a CICS systemv Terminate a CICS system.
Stopping management of a CICS systemTo stop the MAS agent code in an active CICS system, either:
v Issue the STOP action command from the MAS view, or
v Run transaction COSH in the MAS. COSH can be started at a 3270 terminal, ata console, or via ATI.
Stopping the MAS agent prevents CICSPlex SM from accessing the MAS untileither the CICS system is restarted (see page 334) or the COLM or CORMtransaction is issued (see “Restarting management of a CICS system”).
Note: When a MAS is active as a CICSPlex SM workload management routingregion, and the dynamic routing program is set to EYU9XLOP, the STOPcommand is not honored. In this situation, before you issue the STOPcommand you must use the CICSRGND view to change the dynamic routingprogram from EYU9XLOP to the CICS default dynamic routing program,DFHDYP, or another valid dynamic routing program.
Restarting management of a CICS systemTo reactivate a running CICS system as a MAS, issue the CICS transaction:COLM For a local MAS
Note: If you want a local MAS to be recognized as a workload managementrouting region when CICSPlex SM resumes managing the system, makesure the dynamic routing program is set to EYU9XLOP. To change thedynamic routing program, use the CICS CEMT transaction before youreactivate the local MAS.
Chapter 45. Setting up a CICS managed application system (MAS) 339
#
||

Terminating a MASTo verify that the CICSPlex SM MAS shutdown processing is properly installed, youcan terminate the CICS system and check the log for the following shutdownmessage:
EYUXL0016I MAS shutdown complete
To terminate a CICS system running the MAS agent code, use the CICSRGN viewto issue the desired shutdown command. For more information about the CICSRGNview, see the CICSPlex System Manager Operations Views Reference manual.
Controlling the number of long running tasks in a MASThe MAS agent contains one primary long running task (LRT), which runs undertransaction CONL. By default, this task handles most requests directed to the MASthrough the EUI, API, WUI, and RTA. The CONL task also handles internal requestsfor the MAS, including collecting information on dynamically installed resources anddelivering this information to the CMAS. If the LRT becomes busy handling onerequest, all subsequent requests directed to the MAS are delayed until the currentrequest ends.
Alternate LRTs, which run under the CONA transaction, can be requested byspecifying a non-zero value for the MASALTLRTCNT EYUPARM. If activated, thealternate LRTs handle the EUI, API, WUI, and RTA requests normally handled bythe primary LRT. Only one alternate LRT is active at a given time. If the activealternate LRT becomes busy for longer than the value specified by theMASALTLRTTIM EYUPARM, subsequent EUI, API, WUI, and RTA requests directedto the MAS are directed to another CONA task.
Using alternate LRTs allows subsequent requests to be processed even though aprevious request has yet to be completed. This also allows the primary LRT toprocess internal requests without being delayed by the processing of an EUI, WUI,API, or RTA request.
The number of alternate long running tasks (MASLATLRTCNT) can be tuned usingthe EYUNL0911I, EYUNL0912I, and EYUNL0913I messages issued when a MASterminates or goes into restart mode. EYUNL0911I displays the number of activeCONA tasks for this execution. EYUNL012I displays the maximum number ofconcurrently busy CONA tasks. If this value is less than the value displayed byEYUNL0911I, then you might want to lower the MASALTLRTCNT so that it equalsthe value displayed by EYUNL0912I or is one greater. If the value of EYUNL0912Iis equal to the value displayed by EYUNL0911I, then the value displayed byEYUNL0913I, the number of times all active CONA tasks were busy at the sametime, is non-zero. Based upon this value you can increase the value ofMASALTLRTCNT.
The priority of the alternate LRTs can be controlled by the MASALTLRTPRIEYUPARM. Specifying this less than the default value of 255 can adversely affectthe response time of EUI, API, and WUI users, and might result in RTA EVENTs notbeing created or resolved in a timely manner.
Note: Specifying different values for MASALTLRTCNT for multiple WLM targetregions might result in an uneven distribution of transactions to those regionsbecause of differing long running task counts.
340 CICS TS for z/OS: Installation Guide
#
#######
#######
####
###########
####
###

Chapter 46. Setting up a CICSPlex SM Web User Interfaceserver
This chapter describes the steps you must perform to use the CICSPlex SM WebUser Interface. These steps consist of:
v “Preparing a CICS system to act as the Web User Interface server”
v “Configure CICS Web support” on page 342
v “Review CICS system initialization parameters” on page 343
v “Specify language and codepage” on page 344
v “Prepare codepage conversion table” on page 345
v “Generate the Program Load Table (PLT)” on page 345
v “Create the Web User Interface server repository (EYUWREP)” on page 346
v “Specify the customizable view and menu help data set” on page 346
v “Specify the Web User Interface server initialization parameters” on page 347
v “Update CICS CSD definitions” on page 355
v “Specify the JCL DD statements” on page 356
v “Security considerations” on page 357
v “Additional tasks” on page 359
Preparing a CICS system to act as the Web User Interface serverYou should consider the following before you set up your CICS system to act asyour Web User Interface server:
v The CICS system that you select to act as your Web User Interface server mustbe a dedicated CICS Transaction Server for z/OS, Version 3 Release 1CICSPlex SM MAS connected to a CICS Transaction Server for z/OS,Version 3 Release 1 CMAS. For information about how to set up a MAS, seethe CICS Transaction Server for z/OS Installation Guide.
v Decide how many Web User Interface servers you need. For example:
– If you intend to support more than one national language you need a WebUser Interface server for every language you want to support.
– You may want to have Web User Interface servers on multiple MVS images.
– You may want to have more than one Web User Interface server foravailability reasons.
– The Web User Interface server creates and maintains state data when a usersigns on via a web browser (or when an application using the data interfaceDATA/CONNECTs). Because of this state data, an affinity between the webbrowser (or application using the data interface) and server is created.
The use of techniques like dynamic virtual IP addresses (DVIPA) or distributedDVIPA may not be able to honor this affinity. If this affinity is not honored, theusual result is for web browsers to redisplay the sign on screen or for datainterface applications to receive a BADSTUB status.
– If a the Web User Interface server has a different local IP address or name tothe one used by users in their web browsers, for example due to a firewall oranother reason that causes network address translation (NAT), theTCPIPHTTPHOST Web User Interface server initialization parameter may beused to control the way the Web User Interface server generates URLs sentto web browsers. See 348 for details.
© Copyright IBM Corp. 1989, 2010 341
|
|
|
||
|
|
|
|
|
|
|
|
|
|
|
|
|
||
||
|||||
|
||
|
||
||||
||||
||||||

To set up your CICS system you should:
1. Create the CICS system and confirm that it is operational using theCICS-supplied installation verification procedures (IVPs). For information aboutthe CICS IVPs, see the CICS Transaction Server for z/OS Installation Guide.
2. Configure CICSplexes for your Web User Interface servers. We suggest thatyou configure a separate CICSplex for your Web User Interface servers. Forinformation, see the CICS Transaction Server for z/OS Installation Guide.
3. Ensure that the CMAS to which the Web User Interface connects is managingall CICSplexes that the Web User Interface server needs access to. This isbecause the Web User Interface server acts as an CICSPlex SM APIapplication. However, it is not necessary for the CMAS, to which the Web UserInterface connects, to be managing any of the MASs in these CICSplexes. Forinformation, see the CICS Transaction Server for z/OS Installation Guide.
If there is more than one CMAS on the MVS image, that the Web User Interfaceserver will run on, you need to consider which CMAS the Web User Interfaceshould connect to depending on which CICSplexes the CMAS is managing. Tocontrol this connection you can either:
v Ensure the CICSplex to which the Web User Interface server local MASbelongs is only managed by the CMAS or CMASs that the Web UserInterface should connect to, or
v Ensure that the Web User Interface server connects to a specific CMAS byspecifying the CMASSYSID EYUPARM for the server local MAS.
4. Define the Web User Interface server CICS system to CICSPlex SM as a localMAS (for information, see the CICS Transaction Server for z/OS InstallationGuide) and ensure that the CICS system has been set up correctly using theCICSPlex SM installation verification procedures (IVPs).
5. Consider basic monitoring of your Web User Interface servers. You can usestandard CICSPlex SM monitoring because the Web User Interface server isdefined as a MAS.
Configure CICS Web supportYou should always use a CICS Transaction Server for z/OS, Version 3 Release 1system to act as your Web User Interface server. In order to configure CICS websupport you should:
v Include the CICS resource definition group, DFHWEB, in the group listreferenced by the GRPLIST system initialization parameter of your CICS system.
v Run the CICS Web support sample application, DFH$WB1A, to ensure that CICSWeb support has been set up correctly.
For more information about specifying CICS system initialization parameters anddefining resources to CICS for CICS Web support, see the CICS Internet Guide.
If you wish to use the secure sockets layer (SSL) you should also:
v Create a key database containing a certificate
v Specify the appropriate system initialization parameters
v Install the appropriate resource definitions
For more information about SSL, see the CICS Internet Guide.
Notes:
1. You do not need to write your own Analyzer or Converter programs as these areprovided with the Web User Interface.
342 CICS TS for z/OS: Installation Guide
|
|||
|||
||||||
||||
|||
||
||||
|||
||
|||
||
||
||
|
|
|
|
|
|
||

2. On the Web User Interface initialization the TCPIPSERVICE is created andopened for you by the Web User Interface. You do, however, need to create atemporary TCPIPSERVICE definition to run the CICS Web support sampleapplication. This temporary TCPIPSERVICE definition should be discarded afterCICS Web support has been tested and before Web User Interface initializationhas begun.
3. The Web User Interface can either use the default certificate in the keydatabase or a named certificate. However, it can only use a named certificateprovided that the label contains only alphanumeric characters and is amaximum of 32 characters.
4. The use of pre-CICS Transaction Server for z/OS, Version 3 Release 1systems as Web User Interface servers is not supported.
Review CICS system initialization parametersYou need to specify the storage key for the CICS common work area (CWA), andthe amount of storage required for the CWA on the CWAKEY and WRKAREA CICSsystem initialization parameters as follows:CWAKEY=CICSWRKAREA=2048
To ensure that Web User Interface exception trace entries are written to the CICSauxtrace data set, as required to achieve first failure data capture, you shouldspecify the USERTR, SYSTR, and AUXTR CICS system initialization parameters asfollows:USERTR=ONSYSTR=OFFAUXTR=ON
Note: If you set AUXTR=OFF, this is overridden at startup. The Web User Interfacesets auxiliary trace on in order to record exception trace entries in the eventof a problem that does not result in a SVCDUMP.
You should specify the CPSMCONN CICS system initialization parameter to invokeCICSPlex SM code automatically during CICS initialization and initialize the regionas a CICSPlex SM Web User Interface server. This is the recommended alternativeto specifying the CICSPlex SM WUI initialization and shutdown programs ininitialization and shutdown program list tables (PLTPI and PLTSD):CPSMCONN=WUI
You should specify the action CICS should take if, at the next local midnight, theCICS time-of-day differs from the system time-of-day by more than 30 minutes (forexample, after setting clocks forward or back to adjust for Summer and Winter time)as follows:AUTORESETTIME=YES
Clients should continue to issue the CEMT PERFORM RESET command.
In addition to specifying the necessary CICS system initialization parameters forCICSPlex SM local MAS execution, specify the appropriate CICS systeminitialization parameters to enable CICS Web Interface support, for your release ofCICS. For example, TCPIP=YES for CICS Transaction Server for OS/390 version1.3 or later.
For information about these parameters see the CICS System Definition Guide.
Chapter 46. Setting up a CICSPlex SM Web User Interface server 343
||||||
||||
||
||
|||
||
||||
|||
###
|||||
|
####
#
#
|||||
|

Specify language and codepageIn addition to specifying CICS system initialization parameters for the CICS WebInterface and CICSPlex SM local MAS execution, the Web User Interface requiresan INITPARM system initialization parameter to specify the server language and theclient codepage. You need to code EYU9VKEC to represent the language of theWeb User Interface server and EYU9VWAN to represent the codepage of the clienton the INITPARM parameter.
You can select the server language and the client codepage from Table 24 andspecify them on the INITPARM parameter as follows:INITPARM=(EYU9VKEC=’xxx’,EYU9VWAN=’yyyy’)
where xxx is the language identifier of the Web User Interface server and yyyy isthe codepage identifier of the client.
Table 24. Language and codepage identifiers for INITPARM
Language Language identifier(EYU9VKEC)
Client codepage Default clientcodepage identifier(EYU9VWAN)
US English ENU ISO-8859-1 (819) ENU1
Japanese JPN Shift-JIS (943) JPN1
Simplified Chinese CHS GB2312 (1381) CHS1
Simplified Chinese CHS GB18030 (05488) CHS2
For example, if your chosen language was English you would code the INITPARMparameter as follows:INITPARM=(EYU9VKEC=’ENU’,EYU9VWAN=’ENU1’)
Notes:
1. The codepage identifier can be overridden for individual user requests byplacing it in the URL used to access the Web User Interface. For example:http://hostname:port/CICSPlexSM/codepage
where hostname is the name specified on the TCPIPHOSTNAME Web UserInterface server initialization parameter and port is the value specified on theTCPIPPORT Web User Interface server initialization parameter. For informationabout the Web User Interface server initialization parameters see “Specify theWeb User Interface server initialization parameters” on page 347.
2. If the INITPARM system initialization parameter is not specified or if a value isnot specified for EYU9VKEC or EYU9VWAN, the default values are ENU for thelanguage and ENU1 for the codepage. However, operator messages are issuedevery time default values are used.
3. A simplified Chinese web user interface server can support client browsersusing either GB2312 (CHS1) or GB18030 (CHS2). For GB2312 clients, theserver uses the EBCDIC codepage, 935. For GB18030 clients, the serverassumes a second EBCDIC codepage, 1388, which is a superset of codepage935. View sets and menus edited using a GB2312 client browser are stored in935 and can be used in either client codepage. However, if a view set or menuis edited using a GB18030 client and characters not available in 935 are used,the resulting views set or menu are not displayed correctly on GB2312 clients.Note that all supplied messages and starter set views and menus, and view
344 CICS TS for z/OS: Installation Guide
||
||||||
||
|
||
||
|||||||
||||
||||
||||
|||||
||
|
|
||
|
|||||
||||
|||||||||

sets and menus customized using CICS TS 2.2 or earlier, use the 935codepage and can be displayed on either client codepage.
4. Some web browsers do not support all the available client code pages. Forexample, many older browsers do not support GB18030.
Prepare codepage conversion tableYou need to create or modify the DFHCNV table for data conversion to allow theWeb User Interface to deal with incoming requests.
A sample copybook is provided in CICSTS31.CPSM.SEYUSAMP calledEYU$CNV1. This contains an entry for every language and client codepagecombination that is supported as follows:
EYUENU1Entry for English
EYUJPN1Entry for Japanese
EYUCHS1Entry for simplified Chinese (GB2312 clients).
EYUCHS2Entry for simplified Chinese (GB18030 clients)
You should include a copy statement for EYU$CNV1 in the DFHCNV source, forexample, the CICS Web Interface sample, DFHCNVW$. For information about thedefinitions required for the CICS Web Interface, see the CICS Internet Guide.
Once you have updated your DFHCNV source module, you should assemble andlink-edit it using the CICS procedures for maintaining conversion table loadmodules.
The process used to assemble and link-edit the CICS conversion table loadmodules must have library CICSTS31.CPSM.SEYUSAMP in the SYSLIBconcatenation of the assembler step, or the copy book member must be insertedinto the table source member in place of the COPY statement.
Generate the Program Load Table (PLT)The following paragraphs contain instructions for generating the PLT. However forCICS TS systems there is no need to specify the WUI initialization and shutdownprograms in initialization and shutdown program list tables (PLTPI and PLTSD). Therecommended alternative is to specify the CPSMCONN=WUI CICS systeminitialization parameter which will invoke CICSPlex SM code automatically duringCICS initialization to initialize the region as a CICSPlex SM Web User Interfaceserver.
Update your WUI PLTPI and PLTSD initialization and shutdown program list tableswith the following:DFHPLT TYPE=ENTRY,PROGRAM=EYU9VKIT
Note: This should be placed after the DFHDELIM for PLTPI and before theDFHDELIM for the PLTSD. An example of the DFHDELIM for PLTPI is asfollows:
Chapter 46. Setting up a CICSPlex SM Web User Interface server 345
||
||
||
||
|||
||
||
||
||
|||
|||
||||
||
|||||||
##
#
###

DFHPLT TYPE=ENTRY,PROGRAM=DFHDELIMDFHPLT TYPE=ENTRY,PROGRAM=EYU9VKIT
When you have updated your PLT CICS resource definition table, assemble andlink-edit it using the CICS procedures for maintaining resource definition table loadmodules.
Create the Web User Interface server repository (EYUWREP)The Web User Interface server repository (EYUWREP) contains the Web UserInterface server's view and menu definitions. You can use the IDCAMS utility tocreate a VSAM file for these definitions as follows:
Each Web User Interface server must have its own Web User Interface serverrepository that cannot be shared with any other Web User Interface server.
You can copy the Web User Interface server repository from one Web UserInterface server to another using IDCAMS, DFSMSdss or equivalent utility. Forexample, you may wish to copy the Web User Interface server repository from yourtest system to your production system.
You should migrate definitions using the import and export functions. Forinformation, see the CICSPlex System Manager Web User Interface Guide.
It is recommend that you back up the Web User Interface server repository data asthe repository is updated whenever changes are made using the View Editor orwhen definitions are imported using the COVC transaction. You can back up theWeb User Interface repository by using IDCAMS, DFSMSdss or equivalent utility.
Sample JCL to create the Web User Interface repository is provided, calledEYUJWREP, in SEYUINST.
Specify the customizable view and menu help data setThe Web User Interface allows a site to provide customized help for individualviews and menus. This help takes the form of HTML documents that can be servedby the Web User Interface server or by an external server. If the Web UserInterface is to serve the HTML documents, you must provide a partitioned data setto contain the HTML documents.
You can use the View Editor to customize your views and menus to include a link tothe customizable view and menu help data set. The View Editor gives you theoption of specifying:
v No help to be available for this view or menu
DEFINE CLUSTER ( -NAME( dsname ) -VOLUMES( dsvol )RECORDS( 5000 5000 )RECORDSIZE( 8192 32000 ) -CONTROLINTERVALSIZE( 8192 ) -SPANNED -INDEXEDKEYS( 20 20 )SHAREOPTIONS( 2 ) -)
Figure 58. Sample definition to create Web User Interface repository
346 CICS TS for z/OS: Installation Guide
||||||||||||||
##
|||
||
||||
||
||||
||
||||
||
||
|||||
|||
|

v Member name of a help page to be served by the Web User Interface fromDFHHTML
v URL of an external help page to be served by another HTTP server
For information about the View Editor, see the CICSPlex System Manager WebUser Interface Guide.
The Web User Interface server uses the CICS Web Interface template manager toserve the customized view and menu help. For more information, see the CICSInternet Guide.
Note: The customizable view and menu help data set (DFHHTML) must be asingle data set and should not be concatenated with any other data set.
Specify the Web User Interface server initialization parametersYou can specify the Web User Interface server initialization parameters in thestart-up job or in a fixed block 80 data set. See “Specify the JCL DD statements” onpage 356 for the DDname. All of these parameters are subject to the followingconditions unless otherwise stated:
v Lines with an asterisk in column 1 are comments and are ignored.
v Values must not contain lower case characters.
v Values must be specified in parenthesis immediately following the parameter.
v Values must not be greater than 32 characters.
For example:* An EYUWUI parameter data setDEFAULTMENU(OURHOME)TCPIPHOSTNAME(MVSXX.COMPANY.COM)TCPIPPORT(4445)
A description of the Web User Interface server initialization parameters follows withdefault values for the parameters underlined.
Required parametersThe Web User Interface server has some required initialization parameters. If youdo not specify a required parameter the Web User Interface server initializationfails. The Web User Interface server initialization also fails if any of the specifiedparameters are invalid.
The required Web User Interface server initialization parameters are:
TCPIPHOSTNAME(name)Specify the TCP/IP host name of this Web User Interface server. This isnormally the host name and domain name of the MVS system (that is, afully-qualified name). This host name is normally used by the Web UserInterface to construct URLs, depending on the client's HTTP version and thevalue of the TCPIPHTTPHOST Web User Interface server parameter.
This value is always returned in the TCPIPHOSTNAME header of aDATA/CONNECT Web User Interface Data Interface request.
The Web User Interface does not support names longer than 32 characters. Ifrequired, you may use the address of the server using the dotted decimalnotation. For example, '127.0.0.1'.
Chapter 46. Setting up a CICSPlex SM Web User Interface server 347
||
|
||
|||
||
||
||||
|
|
|
|
|
||||
||
|
||||
|
|#####
##
###

TCPIPPORT(value)Specify the TCP/IP port number of the port that you have allocated for the WebUser Interface to run on.
The value specified in this parameter must correspond to the port number givenon the CWBC transaction, if you are using a pre-CICS Transaction for OS/390version 1.3 CICS system.
Optional parametersYou might also want to consider the following Web User Interface serverinitialization parameters:
AUTOREFRESH(YES|NO)Disable the automatic refresh option for a WUI server. When YES is specified(the default), the automatic refresh control is displayed, based on the viewdefinition. When NO is specified, the automatic refresh control is not displayed,even if automatic refresh is set on the view definition. For additional informationon the automatic refresh option, see the CICSPlex SM Web User InterfaceGuide (SC34-6841).
RESOURCELIMIT(WARNING|FAIL)Specifies the action when the default warning count threshold is reached. WhenWARNING is specified (the default), message EYUVC1258W is issued and theuser can select OK to ignore the warning threshold. When FAIL is specified,message EYUVC1267E is issued and the resource request is denied. The filtercan be changed, but users of the WUI server will not be able to click OK tobypass a warning count.
Additional TCP/IP parametersYou can specify the following TCP/IP parameters only if you are using a CICSTransaction Server for OS/390 version 1.3 or later CICS system.
TCPIPADDRESS(name | INADDR_ANY)Specify the dotted decimal IP address on which the Web User Interface willlisten for incoming requests. If name is specified, it must be of the formnnn.nnn.nnn.nnn where nnn is 0 through 255. If INADDR_ANY is specified (thedefault), the Web User Interface will listen on any of the addresses known tothe TCP/IP for OS/390 host.
You do not normally need to specify the TCPIPADDRESS option unless theOS/390 host has multiple TCP/IP addresses.
TCPIPHTTPHOST(NO|YES)Indicate whether you require the TCP/IP host name used to construct URLs tobe generated based on the incoming HTTP request for HTTP version 1.1requests or later.
This option has no effect on pre HTTP 1.1 requests sent to the Web UserInterface server. The Web User Inter face server will always construct URLsusing the host name specified in the TCPIPHOSTNAME Web User Interfaceserver parameter for HTTP 1.0 (and earlier) requests.NO For HTTP 1.1 (or later) requests, the host name used in URLs
constructed by the Web User Interface server is based on the valuespecified in the TCPIPHOSTNAME Web User Interface serverparameter.
YES For HTTP 1.1 (or later) requests, the host name used in URLsconstructed by the Web User Interface server is based on the incomingURI or HTTP 'Host' header according to the HTTP 1.1 specification.
348 CICS TS for z/OS: Installation Guide
|||
|||
|
||
#######
#######
|||
||||||
||
####
#############

When HTTP 1.1 clients are used with a Web User Interface server runningTCPIPHTTPHOST(YES), the IP address or name used on the server, does notneed to be the same as that used by the HTTP 1.1 client. This can allow theWeb User Interface to be used when name address translation (NAT) isperformed (for example due to a firewall).
If TCPIPSSL(YES) is used with TCPIPHTTPHOST(YES) and HTTP 1.1 clientsare used along with different IP address names, you may receive SSL certficatewarnings due to host name mismatches.
TCPIPSSL(YES | NO)Indicate whether you require data encryption between your Web User Interfaceserver and web browser. If you select YES, you must have specified theappropriate system initialization parameters to enable SSL support in the CICSWeb Interface. For information see the CICS Internet Guide.
TCPIPSSLCERT(name)Specify (in upper case characters) the label for the SSL certificate that is to beused for the connection between the Web User Interface and the web browser.If you specify an explicit certificate, the label must be no longer than 32characters.
The default is the default certificate in the key database or key ring. asapplicable.
Note: The names of all SSL certificates to be used with the WUI server mustbe upper case.
Import optionYou can specify the following parameter if you want the Web User Interface serverto import automatically menus and view sets from a specified TD queue. This is analternative to using to import function of the COVC transaction.
AUTOIMPORTTDQ(tdq_name)Specifies the name of the CICS extrapartition transient data queue from whichyou want the server to import menu and view sets automatically during serverinitialization. In order to use this option, you need to enter a value explicitly.There is no automatic default, however, queue name COVI (DD nameEYUCOVI) is defined in the CICSPlex SM CSD group EYUnnnGW.
Note: Include this parameter in the Web User Interface initialization parametersfor the following occasions only:
v When starting the Web User Interface server for the first time.
v When starting the Web User Interface server after the view sets havebeen replaced or modified as a result of service (by a PTF).
v If you are already a CICSPlex SM user and want to import other viewsets into your existing EYUWREP data set.
Avoid using this parameter at other times because of the overheadinvolved in performing the import operation.
Data formatting optionsThese options determine how data will appear on Web User Interface displays.
CVDASTYLE(MIXED | UPPER)Indicate whether the CVDAs, EYUDAs, and so on should be displayed in uppercase or mixed case characters.
Chapter 46. Setting up a CICSPlex SM Web User Interface server 349
#####
###
|||||
|||||
||
||
||||
||||||
||
|
||
||
||
||
|||

MIXEDMixed case text, that is, the first character upper case and the restlower case, for example, 'Enabled'.
UPPERText is displayed in upper case only.
DATEFORMAT (format)Specify the format to be used to display the date on Web User Interfacedisplays as follows:
YYMMDD
DDMMYY
MMDDYY
YYYYMMDD
DDMMYYYY
MMDDYYYY
where:
DD is the day.
MM is the month.
YY and YYYY are the year in two-digit or four-digit format, respectively.
DATESEPARATOR(character | / )Specify the character to be used to separate the date elements on Web UserInterface displays.
DECIMALSEPARATOR(character | . )Specify the character to be used to denote the decimal point on Web UserInterface displays.
GMMTEXTMSG( NO | YES | BEFORE | AFTER)Specify how the CICS "good morning" message is handled.
NO The message is not issued
YES The message is issued before and after signon.
BEFOREThe message is issued before signon only.
AFTERThe message is issued after signon only.
MSGCASE (MIXED | UPPER)Indicate whether messages destined for the operator or EYULOGs should bedisplayed in mixed case or upper case characters.
MIXEDMixed case text is displayed.
If you specify MIXED, output may be displayed incorrectly on Katakanadisplay terminals, where lower case characters are displayed asKatakana symbols.
UPPERText is displayed in upper case only.
350 CICS TS for z/OS: Installation Guide
|||
||
|||
|
|
|
|
|
|
|
||
||
||
|||
|||
||
||
||
||
||
|||
||
|||
||

THOUSNDSEPARATOR(character | , )Specify the character to be used to separate thousands on Web User Interfacedisplays, when required. For example, 100000 is displayed as 100,000 if thedefault is used.
Notes:
1. The space character (hex 40) is a valid THOUSNDSEPARATOR value,allowing digits to be grouped by a space.
2. Use 0 (zero) to suppress the THOUSNDSEPARATOR value.
3. The THOUSNDSEPARATOR value is used only when required by theindividual view definition.
TIMESEPARATOR(character | : )Specify the character to be used to separate hours, minutes, and seconds onWeb User Interface displays.
Environment optionsThese specify the context and scope values, and the home menu and navigationframe, used by the Web User Interface unless overridden.
AUTOREFRESH(YES | NO)Disable the automatic refresh option for a WUI server. The default setting, YES,displays automatic refresh control, based on the view definition. When NO isspecified, automatic refresh control is not displayed, even if automatic refreshcontrol is set on the view definition. See the CICSPlex SM Web User InterfaceGuide for more information on the automatic refresh option.
DEFAULTCMASCTXT(name | EYUCMS1A)Specify the CMAS context that is set when the user signs onto the Web UserInterface.
DEFAULTCONTEXT(name | EYUPLX01)Specify the context that is set when the user signs onto the Web User Interface.
DEFAULTMAPCOLL(value | 0)Specify the number of rows in a generated map below which a map opens inthe expanded state. If the number of rows to be displayed is above this number,the map opens in a fully collapsed state. The default value of 0 means that inevery generated map all of the rows are visible when opened.
DEFAULTMENU(name | EYUSTARTMENU)Specify the name of the menu that is be presented to users after sign onto theWeb User Interface.
DEFAULTNAVIGATE(name | EYUSTARTNAVIGATE)Specify the name of the navigation frame that is presented to users after signonto the Web User Interface.
DEFAULTSCOPE(name | EYUPLX01)Specify the scope that is set when the user signs onto the Web User Interface.
DEFAULTWARNCNT(value)Specify the number of records required to trigger the record count warningmechanism before opening a view. This can take an integer value in the rangeof 0 to 99999999. The default value is 0 meaning no warnings are issued.
Note: You can also set a record count warning value applying to a group ofusers when setting up a WUI user group (this applies only if the WUI is
Chapter 46. Setting up a CICSPlex SM Web User Interface server 351
||||
|
||
|
||
|||
|||
######
|||
||
#####
|||
|||
||
||||
||

running with security switched on). A value set in a user group takesprecedence over a value set in the DEFAULTWARNCNT parameter forthe users in that group.
GLOBALPREFILTER(YES | NO)Specify whether to filter parameters the first time a view is displayed (beforedata is collected).
Note: You can also specify this parameter when setting up a WUI user group(this applies only if the WUI is running with security switched on). A valueset in a user group takes precedence (for users in that group) over thevalue set in the GLOBALPREFILTER parameter.
RESOURCELIMIT(WARNING | FAIL)Specify whether a warning or failure is issued when the resource limit isreached. The default setting, WARNING, issues message EYUVC1258W andthe user can select OK to bypass the warning threshold. Specify FAIL to issuemessage EYUVC1267E and to deny the new resource request. The WUI servercan be used to change the RESOURCELIMIT filter, however the WUI servercannot be used to bypass the warning threshold.
Operation optionsThese options name the default view set to be used if the Web User Interfacereceives an external request that does not specify a view set name but specifies anobject name. The view sets that you name in these options must represent theobjects that may be specified. For more information see the CICSPlex SystemManager Web User Interface Guide.
These parameters can be ignored if you do not intend to launch Web User Interfacedisplays in this manner.
DEFAULTCICSPLEX(name | EYUSTARTCICSPLEX)Specify the name of the default CICSplex view set.
DEFAULTCICSRGN(name | EYUSTARTCICSRGN)Specify the name of the default CICS region view set.
DEFAULTCONNECT(name | EYUSTARTCONNECT)Specify the name of the default connection view set.
DEFAULTCSYSGRP(name | EYUSTARTCSYSGRP)Specify the name of the default CICS system group view set.
DEFAULTDB2SS(name | EYUSTARTDB2SS)Specify the name of the default DB2 subsystem view set.
DEFAULTEJCOBEAN(name | EYUSTARTEJCOBEAN)Specify the name of the default Enterprise Bean in a CorbaServer view set.
DEFAULTEJDJBEAN(name | EYUSTARTEJDJBEAN)Specify the name of the default Enterprise Bean in a CICS-deployed JAR fileview set.
DEFAULTEVENT(name | EYUSTARTEVENT)Specify the name of the default event view set.
DEFAULTLOCFILE(name | EYUSTARTLOCFILE)Specify the name of the default local file view set.
DEFAULTLOCTRAN(name | EYUSTARTLOCTRAN)Specify the name of the default local transaction view set.
352 CICS TS for z/OS: Installation Guide
|||
|||
||||
#######
||||||
||
||
||
||
||
||
||
|||
||
||
||

DEFAULTPROGRAM(name | EYUSTARTPROGRAM)Specify the name of the default program view set.
DEFAULTREMFILE(name | EYUSTARTREMFILE)Specify the name of the default remote file view set.
DEFAULTREMTRAN(name | EYUSTARTREMTRAN)Specify the name of the default remote transaction view set.
DEFAULTTASK(name | EYUSTARTTASK)Specify the name of the default task view set.
User optionsINACTIVETIMEOUT(value | 30)
Specify the period, in minutes, after which inactive user sessions areterminated. The maximum period allowed is 10080 minutes (7 days).
MAXUSERS(value | 20)Specify the maximum number of concurrent users of the Web User Interface.The maximum number of concurrent users allowed is 50.
SIGNONPANEL(BASIC | ENHANCED)Specifies, if the Web user Interface server has CICS security active (SEC=YESin the system initialization parameter), whether the Web User Interface sign onpanel takes one of the following actions:
v Displays a GROUP option
v Saves previously used USER and GROUP values
v Positions the cursor in the sign on field requiring input
When the default value, BASIC, is specified, the GROUP option is not displayedon the sign on screen and the user group profile is set to the default group ofthe user. Values are not saved and the cursor is not positioned on the sign onpanel.
When the value, ENHANCED, is specified, the GROUP option is displayed onthe sign on screen and the following events occur:
v If the user enters a value, sign on proceeds and if:
– The user ID is connected to the specified group, the group is used for theWUI user group profile
– The user ID is not connected to the specified group or the group name isnot valid, sign on continues, but the WUI group profile is set to the defaultgroup of the user, and message EYUVC1227W is issued to the WUI userafter sign on is complete. Message EYUVS0024W is written to the WUIserver's EYULOG.
v If the user does not enter a value, the user group profile is set to the defaultgroup of the user
The GROUP option does not change the current connect group of the userbeing signed on. The security environment built by the WUI is always based onthe default group of the user. The group option on the WUI signon screenspecifies which WUI user group profile the user should be associated with anddoes not change any security decisions that might be made by the ExternalSecurity Manager.
When the SIGNONPANEL(ENHANCED) option is set and JavaScript is enabledin the web browser, the sign on process performs the following actions:
v Saves the user ID and group values in a cookie, so that when the signonprocess next runs, the form is filled with previously entered values
Chapter 46. Setting up a CICSPlex SM Web User Interface server 353
||
||
||
||
|
|||
|||
####
#
#
#
####
##
#
##
#####
##
######
##
##

v Positions the cursor to the sign on field requiring input
Whether the Web User Interface user group profile is set based on the defaultgroup, or specified on the GROUP option, if no matching Web User Interfacegroup profile is found, the values usually set using a user group profile are setto the system default.
The SIGNONPANEL option is ignored if the Web User Interface server isrunning with CICS Security inactive (SEC=NO in the system initializationparameter).
Accessibility optionsThese parameters specify the default colors for the Web User Interface displays.
These parameters should not normally be changed as they effect all users of theWeb User Interface server. If you want to change these parameters for reasons ofaccessibility, take care to ensure that the Web User Interface displays do notbecome unreadable.
Each parameter specifies a color as six hexadecimal digits. Each pair of digitsdescribes the red, green and blue components of the color, respectively. Forexample, FFFFFF represents white, 000000 represents black, FF0000 representsbright red, 00FF00 represents bright green, and 0000FF represents bright blue.
COLORPAPER(color)Main work frame background color.
COLORPAPERHEAVY(color)Navigation and assistance frame background color.
COLORPAPERLIGHT(color)Background color used for many interface items (for example, informationmessages, table column headings, detail view labels, view selection and refresharea).
COLORPAPERWARN(color)Background color for warning messages.
COLORPAPERERROR(color)Background color for error messages.
COLORPAPERALT(color)Background color for alternate rows on tabular displays.
COLORPAPERRULE(color)Background color for assistance frame bar containing the navigation and helpicons.
COLORINK(color)Main work frame text color.
COLORINKBANNER(color)Navigation and assistance frame text color.
COLORINKLINK(color)Unvisited link text color.
COLORINKVLINK(color)Visited link text color.
354 CICS TS for z/OS: Installation Guide
#
####
###
||
||||
||||
||
||
||||
||
||
||
|||
||
||
||
||

Problem determination optionWUITRACE(trace levels)
Specifies the level of tracing for the Web User Interface server.
The trace levels that you specify must be separated by a comma. For example:WUITRACE(8,11,13,15,18)
You can define a range of trace levels, for example:WUITRACE(1:5)
activates trace levels 1 through 5
WUITRACE(1:5,13,28:31)activates trace levels 1 through 5, 13, and 28 through 31
Attention: It is recommended that you only activate trace at the requestof IBM Support Center personnel.
Update CICS CSD definitionsThe resource definitions that you must add to the CSD file for the Web UserInterface are distributed in CSD upgrade load modules inCICSTS31.CPSM.SEYULOAD.
The names of the load modules are EYU9nnG1, where nn represents the CICSlevel (for example, 64 refers to CICS Transaction Server for z/OS Version 3Release 1, and 63 refers to the CICS element of CICS Transaction Server for z/OSVersion 2 Release 3). The name of the resource group (created using thedefinitions the load modules contain) is EYU310GW.
Note: EYU9nnG1 also contains LMAS group EYU310G1.
You can use the sample JCL shown in Figure 59 to:
v Define a group of resource definitions to the appropriate CSD file
v Add the group name to the CSD list referenced by the CICS system initializationparameter GRPLIST
Modify the sample JCL to provide the following information:
cics.index.SDFHLOADIs the CICS load library that contains the DFHCSDUP module.
cpsm.index.SEYULOADIs the CICSPlex SM load library that contains the group definition modulesEYU9nnG1.
cics.dfhcsdIs the CICS CSD file that is to be updated.
//CSDUP EXEC PGM=DFHCSDUP//STEPLIB DD DSN=cics.index.SDFHLOAD,DISP=SHR// DD DSN=cpsm.index.SEYULOAD,DISP=SHR//DFHCSD DD DSN=cics.dfhcsd,DISP=SHR//SYSPRINT DD SYSOUT=*//SYSIN DD *UPGRADE USING(group_load_module)ADD GROUP(EYU310GW) LIST(list_name)/*
Figure 59. Sample JCL to upgrade CSD to include Web User Interface group
Chapter 46. Setting up a CICSPlex SM Web User Interface server 355
||||||||||||
|
||
|
|
|
|||||
||
||
|||
|||||
|
|
|
||
|
|
||
|||
||

group_load_moduleIs the load module, EYU9nnG1, that contains the resource definition group,EYU310GW, appropriate for the level of CICS being used.
list_nameIs the group list that is used to start the Web User Interface server.
Transient data queue definitionsYou need definitions for the following transient data queues (TDQs):
COVP The Web User Interface server initialization parameters data set, EYUWUI.This is a fixed block 80 input data set.
COLG The CICSPlex SM output log, EYULOG. This is a variable length outputdata set.
COVI Sample definition for the Web User Interface import data set, EYUCOVI.This is a variable length input data set.
COVE Sample definition for the Web User Interface export data set, EYUCOVE.This is a variable length output data set.
CICS Transaction Server definitionsIf you are using the CICS element of CICS Transaction Server for z/OS, thetransient data queue (TDQ) definitions are provided in resource group EYU310GW.
COVI and COVE are provided as samples that can be used to create additionalimport and export transient data queues.
For more information about the COVI and COVE TDQs see the CICSPlex SystemManager Web User Interface Guide.
Temporary storage modelsTSMODELs and TSMDEFs should not be installed into a Web User Interface (WUI)server.
Specify the JCL DD statementsAdditional DD statements should be added to the Web User Interface server for thefollowing data sets:
EYUWUIThe Web User Interface server initialization parameters data set. See“Specify the Web User Interface server initialization parameters” on page347.
EYUWREPThe Web User Interface server repository data set. See “Create the WebUser Interface server repository (EYUWREP)” on page 346.
EYULOGThe CICSPlex SM output log.
DFHHTMLThe customizable view and menu help data set. See “Specify thecustomizable view and menu help data set” on page 346. This is optional.
356 CICS TS for z/OS: Installation Guide
|||
||
|
|
|||
|||
|||
|||
|||
||
|#
#
##
||
||
||||
|||
||
|||

EYUCOVIThe Web User Interface server import data set. For more information see“Transient data queue definitions” on page 356 and the CICSPlex SystemManager Web User Interface Guide. This is optional.
EYUCOVEThe Web User Interface server export data set. For more information see“Transient data queue definitions” on page 356 and the CICSPlex SystemManager Web User Interface Guide. This is optional.
For example,//*//DFHHTML DD DISP=SHR,DSN=data set name//EYUWREP DD DISP=SHR,DSN=data set name//EYUCOVI DD DISP=SHR,DSN=CICSTS31.CPSM.SEYUVIEW(EYUEVX01)//EYULOG DD SYSOUT=*//EYUWUI DD *DEFAULTMENU(OURHOME)TCPIPHOSTNAME(MVSXX.COMPANY>COM)TCPIPPORT(4445)/*
Security considerationsThis section describes the Web User Interface security requirements for CICSsecurity, Secure Sockets Layer (SSL) support, and access to MVS data sets.
CICS security considerationsIf your Web User Interface server region is running with CICS security active, youneed to define the security access required:
v For the CICS Web Interface
v By the administrator
v By the end-user and users of the View Editor
Table 25 on page 358 summarizes the access required by the various userids.
You may wish to use CICS transaction security (see the CICS RACF SecurityGuide) to limit the users who are allowed to control the Web User Interface servervia the COVC transaction.
See the CICSPlex System Manager Web User Interface Guide for information abouthow to control users of the Web User Interface and to limit what resources they areallowed to access.
Security access for the CICS Web InterfaceIf CICS transaction security is in use the CICS DFLTUSER (for a CICS TransactionServer for OS/390 version 1.3 or later system) or the CWBM transaction userid (fora pre-CICS Transaction Server for OS/390 version 1.3 system) must be givenaccess to the COVP, COVU, and COVE transactions.
Security access for the administratorThe userid that starts the Web User Interface (terminal user of COVC orPLTPIUSR, if started automatically via PLTPI) must have access to the COVC andCOVG transactions.
If CICS surrogate user security checking is active in the Web User Interface serverregion, the userid that started the Web User Interface (terminal user of COVC or
Chapter 46. Setting up a CICSPlex SM Web User Interface server 357
||||
||||
|
||||||||||
||
||
|
||
|
|
|
|
|||
|||
|||||
||||
||

PLTPIUSR, if started automatically via PLTPI) must have READ access towui-userid.DFHSTART in the SURROGAT class for all Web User Interface users.
Security access for the end-user and users of the View EditorThe Web User Interface end-user needs access to the COVA transaction andCICSPlex SM.
Users of the View Editor need access to the COVA transaction, CICSPlex SM andthe View Editor profile. For more information about access to the View Editor, seethe CICSPlex System Manager Web User Interface Guide.
All users who are successfully signed onto the Web User Interface have access toall of the customizable view and menu help pages, if the customizable view andmenu help is served by the Web User Interface.
SummaryTable 25 summarizes the security accesses required by users of the Web UserInterface.
Table 25. Security accesses required by users of the Web User Interface
User Roles CICS WebInterface
Administrator End-user View Editor
Transactions COVP COVECOVU
COVG COVC COVA COVA
CICS surrogateuser security
Yes
View Editorprofile
Yes
CICSPlex SMand CICSsecurity
As appropriatefor individualusers
As appropriatefor individualusers
Secure Sockets Layer supportIf you are using a CICS Transaction Server for OS/390 version 1.3 or later system,you can provide secure connections by using the Secure Sockets Layer (SSL)support to provide encryption on the connection. For information about SSL support,see the CICS Internet Guide. Also, see “Specify the Web User Interface serverinitialization parameters” on page 347 for information about the TCPIPSSL andTCPIPSSLCERT, Web User Interface server initialization parameters, that you needto specify for SSL support.
Note: Web User Interface SSL support uses server authentication only. Userauthentication is by the external security manager (ESM) user ID andpassword.
Authorizing access to MVS data setsIn addition to standard CICS and CICSPlex SM requirements, the CICS regionuserid must have the authority to access the data sets associated with theDDnames described in Table 26.
Table 26. Security access required for MVS data sets
DDnames Access required
EYUWUI READ
358 CICS TS for z/OS: Installation Guide
||
|||
|||
|||
|||
||
||||||
||||||
||||||
||||||
|||
|||||
||||
|
|||||||
|||
|
|||
||
||
||

Table 26. Security access required for MVS data sets (continued)
DFHHTML READ
EYUCOVI (and clones) READ
EYUWREP UPDATE
EYULOG UPDATE
EYUCOVE (and clones) UPDATE
Additional tasksAfter you have set up the Web User Interface you need to:
Submit start-up JCLYou should submit the start-up JCL for the Web User Interface server to start it forthe first time. To confirm that the Web User Interface server has startedsuccessfully, you should ensure that the following messages are displayed on thejob log:08.52.33 JOB03331 +EYUVS0001I IYCQCTA5 CICSPlex SM Web User Interface
initialization started.08.52.37 JOB03331 +EYUVS0002I IYCQCTA5 CICSPlex SM Web User Interface
initialization complete.
If you chose not to start the Web User Interface server during PLTPI processing,you can start it using the COVC transaction Start command.
Check browser connectionYou should check the connection between the Web User Interface and the webbrowser by typing in the following URL:http://hostname:port/CICSPlexSM
where hostname is the name specified on the TCPIPHOSTNAME Web UserInterface server initialization parameter and port is the value specified on theTCPIPPORT Web User Interface server initialization parameter. For informationabout the Web User Interface server initialization parameters see “Specify the WebUser Interface server initialization parameters” on page 347. You should bepresented with the Web User Interface server Welcome panel containing a BeginSignon button.
Obtain view and menu definitionsOnce the Web User Interface has been started, you should obtain some view andmenu definitions. You can do this by either:
v Logging onto the CICS terminal and running the COVC transaction. The Importoption of the COVC transaction enables you to import the starter set views andmenus. The starter set views and menus are provided inCICSTS31.CPSM.SEYUVIEW. For information about the COVC transaction, seethe CICSPlex System Manager Web User Interface Guide.
v Using the View Editor. For information about the View Editor see the CICSPlexSystem Manager Web User Interface Guide.
Shutdown the Web User Interface serverYou can shutdown the Web User Interface server by:
Chapter 46. Setting up a CICSPlex SM Web User Interface server 359
|
||
||
||
||
|||
||
|
|
||||
||||
||
|
||
|
|||||||
|
||
|||||
||
|
|
v Shutting down the CICS system in which the Web User Interface server isrunning.
v Using the COVC transaction. For more information about the COVC transactionsee the CICSPlex System Manager Web User Interface Guide.
360 CICS TS for z/OS: Installation Guide
||
||

Chapter 47. Configuring the Starter Set
The CICSPlex SM Starter Set establishes a sample CICSPlex SM environment ofeight managed CICS systems (MASs) across two MVS images, which are referredto as system A and system B. This chapter describes:v “The Starter Set samples libraries”v “Creating the Starter Set environment” on page 364v “Deleting the Starter Set” on page 368v “Using the Starter Set as a model” on page 368.
For a description of the structure and purpose of the Starter Set, see the CICSPlexSystem Manager Concepts and Planning manual.
The Starter Set samples librariesThe Starter Set is in two samples libraries that are installed automatically whenCICSPlex SM itself is installed. The libraries are:
v CICSTS31.CPSM.SEYUJCL, which contains sample JCL for creating, starting,and deleting the Starter Set components
v CICSTS31.CPSM.SEYUDEF, which contains definitions, such as CICS tablesand VTAM definitions, required by the Starter Set
The contents of the data sets CICSTS31.CPSM.SEYUJCL andCICSTS31.CPSM.SEYUDEF are described in the remainder of this section.
JCL in CICSTS31.CPSM.SEYUJCL for creating the Starter SetTable 27, and Table 28 identify the JCL supplied in CICSTS31.CPSM.SEYUJCL forcreating the Starter Set.
Table 27. JCL for creating the system A components of the Starter Set
Sample name Description
EYUJBBIA Creates the CAS data sets EYUSDEF and EYUIPRMEYUJCICA Creates all data sets for MASs EYUMAS1A, EYUMAS2A,
EYUMAS3A, and EYUMAS4AEYUJCMSA Creates all data sets for CMAS EYUCMS1AEYUJDRPA Creates the data repository for CMAS EYUCMS1AEYUJCSDA Creates DFHCSD data set for MASs and CMAS
Table 28. JCL for creating the system B components of the Starter Set
Sample name Description
EYUJBBIB Creates the CAS data sets EYUSDEF and EYUIPRMEYUJCICB Creates all data sets for MASs EYUMAS1B, EYUMAS2B,
EYUMAS3B, and EYUMAS4BEYUJCMSB Creates all data sets for CMAS EYUCMS1BEYUJDRPB Creates the data repository for CMAS EYUCMS1BEYUJCSDB Creates DFHCSD data set for MASs and CMAS
To create those components of the Starter Set belonging to CICSplex EYUPLX01only, you must run both the system A JCL and the system B JCL.
© Copyright IBM Corp. 1989, 2010 361
|
|||||||
||

To create those components of the Starter Set belonging to CICSplex EYUPLX02only, you must run the system B JCL.
JCL in CICSTS31.CPSM.SEYUJCL for running the Starter SetTable 29 and Table 30list and describe the JCL supplied inCICSTS31.CPSM.SEYUJCL for running the Starter Set.
Table 29. JCL for running the system A components of the Starter Set
Sample name Description
EYUJCS1A Starts CAS EYUCAS1AEYUJCSSA Starts CAS EYUCAS1A as a started taskEYUJCM1A Starts CMAS EYUCMS1AEYUJMS1A Starts MAS EYUMAS1AEYUJMS2A Starts MAS EYUMAS2AEYUJMS3A Starts MAS EYUMAS3AEYUJMS4A Starts MAS EYUMAS4A
Table 30. JCL for running the system B components of the Starter Set
Sample name Description
EYUJCS1B Starts CAS EYUCAS1BEYUJCSSB Starts CAS EYUCAS1B as a started taskEYUJCM1B Starts CMAS EYUCMS1BEYUJMS1B Starts MAS EYUMAS1BEYUJMS2B Starts MAS EYUMAS2BEYUJMS3B Starts MAS EYUMAS3BEYUJMS4B Starts MAS EYUMAS4B
To run those components belonging to CICSplex EYUPLX01 only, you use both thesystem A JCL and the system B JCL.
To run those components belonging to CICSplex EYUPLX02 only, you use only thesystem B JCL.
Definitions in CICSTS31.CPSM.SEYUDEF for the Starter Setenvironment
Table 31 and Table 32 on page 363 identify the supplied Starter Set definitions thatare required on system A and system B.
Table 31. Starter Set definitions in CICSTS31.CPSM.SEYUDEF for system A
Sample name Description
EYUDVTMA VTAM definitionsEYUDCSDX CICS TS for OS/390 1.3 DFHCSDUP definitions for Starter SetEYUDCSDZ CICS Transaction Server for z/OS 2.2, 2.3 and 3.1 DFHCSDUP
definitions for Starter SetEYUDCDMA CDRM definitionsEYUDCDSA CDRSC definitionsEYUMDTAB Modetable for CAS EYUCAS1AEYUTPLTC DFHPLT for CMAS EYUCMS1AEYUTPLTL DFHPLT for local MASsEYUTSRTS DFHSRT for CMAS EYUCMS1A and for MASs
362 CICS TS for z/OS: Installation Guide
||

Table 31. Starter Set definitions in CICSTS31.CPSM.SEYUDEF for system A (continued)
Sample name Description
EYU@ISPF ISPF logon procedureEYU@PRIM ISPF primary option panel
Table 32. Starter Set definitions in CICSTS31.CPSM.SEYUDEF for system B
Sample name Description
EYUDVTMB VTAM definitionsEYUDCDMB CDRM definitionsEYUDCDSB CDRSC definitionsEYUMDTAB Modetable for CAS EYUCAS1BEYUTPLTC DFHPLT for CMAS EYUCMS1BEYUTPLTL DFHPLT for local MASsEYUTSRTS DFHSRT for CMAS EYUCMS1B and for MASsEYU@ISPF ISPF logon procedureEYU@PRIM ISPF primary option panel
CICSplex EYUPLX01 uses both the system A and the system B definitions.
CICSplex EYUPLX02 uses the system B definitions.
The Starter Set naming conventionThe CICSPlex SM components of the Starter Set are named according to thefollowing convention:
Table 33. Starter Set naming convention: CICSPlex SM resources
CICSPlex SM resource Convention
Coordinating address space (CAS) EYUCASxx
CICS system group EYUCSGxx
CICSplex EYUPLXxx
CICSPlex SM address space (CMAS) EYUCMSxx
Managed address space (MAS) EYUMASxx
Monitor definition EYUMODxx
Monitor group EYUMOGxx
Monitor specification EYUMOSxx
Workload definition EYUWLDxx
Workload group EYUWLGxx
Workload specification EYUWLSxx
Transaction group EYUTRGxx
Analysis definition EYURTDxx
Evaluation definition EYURTExx
Analysis group EYURTGxx
Analysis specification EYURTSxx
Analysis point specification EYURAPxx
Action definition EYURTAxx
Chapter 47. Configuring the Starter Set 363
|

Table 33. Starter Set naming convention: CICSPlex SM resources (continued)
CICSPlex SM resource Convention
Status definition EYURSTxx
Time Period definitions EYUPDFxx
Resource group EYUBAGxx
Resource description EYUBADxx
Resource assignment EYUBAAxx
CICS resource definitions used by the Starter Set are named according to thefollowing convention:
Table 34. Starter Set naming convention: CICS resources
CICS resource definition type Convention
Connections xxxx
Files EYUFILxx
Journals EYUJNLxx
Modenames EYUMDNxx
Programs EYUPRGxx
Terminals Exxx
Transactions ETxx
Transient data queues EQxx
Creating the Starter Set environmentTo configure the Starter Set on any MVS image, you must have access on thatMVS image to:
v The Starter Set data sets CICSTS31.CPSM.SEYUDEF andCICSTS31.CPSM.SEYUJCL
v CICS load libraries
v CICS table-assembly JCL
v SYS1.PARMLIB and SYS1.VTAMLST (or be able to add definitions toSYS1.PARMLIB and SYS1.VTAMLST)
v The MVS console log via TSO SDSF.
Selecting the Starter Set configurationThe complete Starter Set is installed across two MVS images and comprises twoCICSplexes, EYUPLX01 and EYUPLX02. You can install the complete Starter Set,or you can install a specific subset of it. That is, you can install:
v The system A components only
v The system B components only
v EYUPLX01 only (which comprises the system A components and the system Bcomponents)
v EYUPLX02 only (which comprises the system B components).
When you have identified those parts of the Starter Set you want to install, locatethe appropriate tables of JCL and definitions in this chapter. For example, to defineand start the system A components only, you will:
364 CICS TS for z/OS: Installation Guide
|
v Run the JCL described in Table 27 on page 361v Run the JCL described in Table 29 on page 362v Use the definitions described in Table 31 on page 362.
When you have identified the JCL and sample definitions you will be using, followthe procedure described in “Defining the Starter Set environment.”
Defining the Starter Set environmentThis section describes the tasks you must perform to incorporate the Starter Set inyour MVS environment.
Notes:
1. If you have already run an IVP (as described in Chapter 53, “CICSPlex SMinstallation verification procedures,” on page 407) on the MVS image on whichyou are planning to configure the Starter Set, you will already have performedmost of the steps described below. You do not need to repeat those steps,unless the Starter Set components created during the IVP have been deleted.
2. The Starter Set MAS JCL and the CSD update job do not support languagesother than assembler. If you require support for other languages, please makeappropriate changes to DFHRPL (for the MAS JCL) and to DFHCSDUP.
Carry out the following steps as appropriate:
1. Versions of CICS in CICS Transaction Server for OS/390 and CICSTransaction Server for z/OS use MVS log streams for their system logs andrequire appropriate MVS and CICS definitions to be in place. If you alreadyhave CICS TS levels of CICS installed, and if you use the default namingconvention of userid.applid.DFHLOG and userid.applid.DFHSHUNT for thesystem log streams, you can proceed to the next step without taking anyfurther action. However, you might want to review the coupling facility spaceimplications of creating new CICS system logs.
If you do not use the default naming convention for your system logs, or youhave never previously brought up a CICS Transaction Server level of CICS,you should seek assistance from your CICS and MVS system programmers toset up the logger definitions for the sets of system logs that you require. For afull description of how to create the required MVS and CICS definitions forMVS log streams, see Chapter 24, “Defining the logger environment for CICSjournaling,” on page 143 and the CICS System Definition Guide.
Whichever naming convention you adopt, do not define the CICS system logas type DUMMY, as this would compromise data integrity on the CICSPlex SMdata repository.
2. Run the EYUISTRT job to tailor the Starter Set JCL for your environment.EYUISTRT runs the EYUINST EXEC to tailor the Starter Set members. Formore information about using EYUISTRT, see Chapter 49, “Using theEYUINST EXEC to tailor skeleton jobs,” on page 373. Table 35 identifies thoseEYUINST EXEC parameters that are applicable to the Starter Set.
Table 35. EYUINST EXEC parameters required for the Starter Set
Parameter CMAS MAS Default
BLKU Yes Yes 6144
CINDEXnnn Yes Yes None
CMASNAME Yes None
CRELEASE Yes Yes 6.4.0
Chapter 47. Configuring the Starter Set 365
||||

Table 35. EYUINST EXEC parameters required for the Starter Set (continued)
Parameter CMAS MAS Default
DSINFO Yes Yes index dsvlsr dsunit
ENVIRONMENT Yes Yes None
INDEX Yes Yes CICSTS31.CPSM
JOB Yes Yes //XXXXXXXX JOB
LIB Yes Yes index.XEYUINST
PREFIX Yes Yes EYU
SCEESAMP Yes SYS1.SCEESAMP
SCOPE Yes Yes POST
Note: The SCOPE value must be set to STARTER.
SELECT Yes None
TEMPLIB Yes Yes index.SEYUJCL
Note: For more information about TEMPLIB, see “EYUINST EXEC parameters” on page375
WORKUNIT Yes Yes SYSDA
WORKVOL Yes Yes v
3. Add VTAM definitions for the CAS, CMAS, and MASs (as appropriate) to theVTAM table. For example, for the system A Starter Set components, therelevant VTAM definitions are in members EYUDVTMA, EYUDCDMA, andEYUDCDSA of CICSTS31.CPSM.SEYUDEF.
Note: If you use Advanced Communications Function (ACF) Network ControlPrograms (NCPs), you may need to create a mode table, using thesample entry shown in EYUMDTAB, in order to control the VTAMRUSIZE (request unit size) parameter.
4. Run the JCL EYUJBBIx to define the CAS data sets.
5. Run the JCL EYUJCMSx to define the CMAS data sets.
6. Run the JCL EYUJCICx to define the MAS data sets.
7. Run the JCL EYUJDRPx to define the CMAS data repository.
8. Run the JCL EYUJCSDx to define, initialize, and load the CSD.
9. Make any necessary site-specific changes to the CSD. For example, you mightneed to add TYPETERMs, TERMINALs, or AUTOINSTALL MODELs.
10. Assemble the sample CICS tables (EYUTxxxx) into a load library.
11. Update ISPF to reflect the addition of CICSPlex SM. A sample of the changesrequired is in EYU@ISPF and EYU@PRIM in CICSTS31.CPSM.SEYUDEF.
Starting the Starter Set componentsBefore you can use the Starter Set, you must:v Start the CASv Start the CMASv Add definitions to the CMAS data repositoryv Start the MASs.
These steps must be performed on system A or system B (or both).
366 CICS TS for z/OS: Installation Guide
||||
||||

Start EYUCAS1A or EYUCAS1BTo start the CAS, you submit JCL EYUJCSx or EYUJCSSx (to start the CAS as astarted task). For example, to start EYUCAS1B as a started task, you use JCLEYUJCSS2.
Start EYUCMS1A or EYUCMS1BCheck the SIT parameters in JCL EYUJCM1A or EYUJCM1B (as appropriate), inparticular the SVC numbers and the default user, to ensure that they are suitablefor your environment. To start the CMAS, submit JCL EYUJCM1x. For example, tostart CMAS EYUCMS1B, you submit JCL EYUJCM1B.
Add definitions to the data repositoryYou define CICSplex EYUPLX01 or EYUPLX02, or both, via the CICSPlex SM userinterface. Then you use the batched repository update facility to load the remainingStarter Set definitions.
Note: If you have run an IVP on the target MVS image (system A or system B),and have not deleted the IVP components from that image, you must runstep 4 and step 7 in the section “Defining the Starter Set environment” onpage 365 before continuing with steps 1 through 4 below.
1. On system A, define CICSplex EYUPLX01, specifying EYUCMS1A as themaintenance point CMAS. Also on system A, identify EYUCMS1B as asecondary CMAS for EYUPLX01 if you are planning to define the systemB components of the Starter Set. For more information about definingCICSplexes, see the CICSPlex System Manager Administration manual.(Alternatively, you can follow the instructions in “Starting up and verifyingCICSPlex SM components on system A” on page 413.)
2. If you are installing the system B components, define EYUPLX02 onsystem B; EYUCMS1B is the maintenance point CMAS.
3. If you have defined both EYUCAS1A and EYUCAS1B, you must define alink from EYUCAS1A to EYUCAS1B, and from EYUCAS1B toEYUCAS1A. For information about defining CAS-to-CAS links, see theCICSPlex System Manager Administration manual. (Alternatively, you canfollow the instructions in “3: Checking CAS-to-CAS connections” on page433.)
4. To add the Starter Set CICSPlex SM definitions to the data repository onsystem A or system B (or both), you run the batched repository updatefacility. Definitions to be added to the data repository on system A are inmember EYUDDRPA of CICSTS31.CPSM.SEYUDEF, and those to beadded to the data repository on system B are in member EYUDDRPB ofCICSTS31.CPSM.SEYUDEF. For information about the batchedrepository update facility, see the CICSPlex System ManagerAdministration manual . (Alternatively, see the instructions for using thebatched repository update facility during the IVPs in Chapter 53,“CICSPlex SM installation verification procedures,” on page 407.)
Start the MASsTo start the MASs, submit the JCL EYUJMSnx. For example, to start MASEYUMNS2B, submit the JCL EYUJMS2B. JCL for starting the MASs is identified inTable 29 on page 362 and Table 30 on page 362. The CICSPlex SM Starter Set isnow ready to use.
Chapter 47. Configuring the Starter Set 367

If errors occur while defining or using the Starter SetIf errors occur while you are setting up the Starter Set or while you are using it, oneor more error messages might be issued. Please refer to the the CICSPlex SystemManager Messages and Codes manual for a detailed description of anyCICSPlex SM error message.
Deleting the Starter SetCICSPlex SM provides sample JCL (in data set CICSTS31.CPSM.SEYUJCL) thatyou can run to delete the Starter Set components from one or more of the MVSimages on which it is installed. Table 36, and Table 37 list the supplied deletion JCLand identify, for each sample, the components that it deletes. For example, if youwant to delete the Starter Set components on system B only, you run the deletionsamples EYUJBBDB, EYUJCIDB, EYUJDRDB, EYUJCDDB, and EYUJCMDB onsystem B. When you have deleted the Starter Set components, you must alsoremove the relevant VTAM definitions.
Table 36. JCL in CICSTS31.CPSM.SEYUJCL for deleting the Starter Set from system A
Sample name Description
EYUJBBDA Deletes the CAS data sets EYUSDEF and EYUIPRMEYUJCIDA Deletes the MAS data setsEYUJDRDA Deletes the data repositoryEYUJCDDA Deletes the DFHCSD datasetEYUJCMDA Deletes the CMAS data sets
Table 37. JCL in CICSTS31.CPSM.SEYUJCL for deleting the Starter Set from system B
Sample name Description
EYUJBBDB Deletes the CAS data sets EYUSDEF and EYUIPRMEYUJCIDB Deletes the MAS data setsEYUJDRDB Deletes the data repositoryEYUJCDDB Deletes the DFHCSD data setEYUJCMDB Deletes the CMAS data sets
To delete those components belonging to CICSplex EYUPLX01, you must run boththe system A deletion JCL and the system B deletion JCL.
To delete those components belonging to CICSplex EYUPLX02, you must run thesystem B deletion JCL.
Using the Starter Set as a modelThe CICSPlex SM Starter Set is provided primarily as instructional material.However, you can copy many of the Starter Set definitions, and use them as abasis for your own configuration, as follows:
1. Examine the Starter Set definitions and identify candidates for inclusion in yourown configuration.
2. In the CICSTS31.CPSM.SEYUDEF members EYUDDRPA and EYUDDRPB (asappropriate), locate the statements that the batched repository update facilityuses to create the definitions you want to use.
3. Copy those statements into your own PDS member and provide a validCONTEXT statement.
368 CICS TS for z/OS: Installation Guide
||

4. Load those definitions into your own data repository by running the batchedrepository update facility and specifying the maintenance point CMAS as thecontext.
For more information about the batched repository update facility, see theCICSPlex System Manager Administration manual.
Chapter 47. Configuring the Starter Set 369

370 CICS TS for z/OS: Installation Guide

Chapter 48. Applying service to CICSPlex SM
This section contains information about the service material for CICSPlex SM thatis distributed as corrective or preventive service. Both types of changes are calledsystem modifications (SYSMODs). SYSMODs are processed using SMP/E controlstatements.
For background information on SMP/E operations, see the System ModificationProgram Extended: General Information book. For more detailed information, seethe System Modification Program Extended: Reference book. For information abouthow to apply corrective service using SMP/E, see the System Modification ProgramExtended: User's Guide.
CICS Transaction Server for z/OS-supplied SMP/E procedureFor all CICS/ESA and CICS Transaction Server systems, the procedure for applyingservice is called DFHSMPE. This procedure is customized by the DFHISTAR jobstored in the CICSTS31.CICS.XDFHINST library.
For full details about applying service to the CICSPlex SM component of CICS TS,see Chapter 26, “Applying service to CICS Transaction Server for z/OS,” on page179.
Applying PTFs to CICSPlexes running CICS Transaction Server forz/OS, Version 3 Release 1 and later
Only use the procedure described below if all CMASs in your CICSPlex are runningCICS Transaction Server for z/OS, Version 3 Release 1 or a later release ofCICSPlex SM. If any CMAS in your CICSPlex is running CICS TS or an earlierrelease of CICSPlex SM, please consult the documentation that comes with thePTF for advice on how to proceed.
Some PTFs modify CICSPlex SM resource tables. The documentation will tell youif this is the case. Use the procedure described below if the PTF modifies aCICSPlex SM resource table:
v First apply the PTF to the maintenance point for the CICSPlex.
v If the PTF modifies a repository record, upgrade the repository at themaintenance point before restarting the maintenance point CMAS.
v After the maintenance point CMAS has been restarted, apply the PTF to anylocal MASs connected to the maintenance point CMAS. You can restart theselocal MASs one at a time. There is no need to restart them all together.
v After the maintenance point CMAS has been restarted, apply the PTF to anyother CMASs in the CICSPlex. You can do this at the same time as the MASsconnected to the maintenance point are being updated. You can update thenon-maintenance point CMASs one at a time and there is no need to restartthem all together.
v If the PTF modifies a repository record, upgrade the repository for thenon-maintenance point CMAS before restarting it.
v Once a non-maintenance point CMAS has been restarted, you can apply thePTF to any local MASs connected to that CMAS and restart them. You canrestart these local MASs one at a time. There is no need to restart them alltogether.
© Copyright IBM Corp. 1989, 2010 371

In other words, update the maintenance point CMAS first, then the other CMASs,and only update an LMAS after its owning CMAS has been updated.
A PTF might contain additional documentation, giving further instructions specific tothat PTF.
372 CICS TS for z/OS: Installation Guide

Chapter 49. Using the EYUINST EXEC to tailor skeleton jobs
This section describes how you can use the sample JCL members to execute theEYUINST EXEC that customizes skeleton jobs provided by CICSPlex SM.
The following sample members are provided to execute the EYUINST EXEC:
v Member EYUISTRT, in the library CICSTS31.CPSM.SEYUJCL, is provided tocustomize the Starter Set jobs.
v Member EYUISTAR, in the library CICSTS31.CPSM.SEYUINST, is provided tocustomize the post-installation jobs.
For a description of the Starter Set jobs, see Chapter 47, “Configuring the StarterSet,” on page 361.
You can edit and run the sample JCL members multiple times. For example, theEYUISTAR job can be used to select and edit skeleton member EYUDEFDS tocreate a unique data repository for each CMAS. In addition, you cansubsequently change the skeleton jobs when, for example, you have to applyservice to any of those jobs. This allows you to tailor the skeleton jobs to yourenvironment after you have loaded the CICSPlex SM software into theSMP/E-supported CICSPlex SM libraries.
The following sections provide information about:v “Sample JCL editing considerations”v “EYUINST EXEC parameters” on page 375v “Sample JCL execution considerations” on page 382.
Sample JCL editing considerationsTo tailor the sample EYUISTAR or EYUISTRT members, you can either directlymodify the contents of the member in the SMP/E target library or copy the member(to preserve the CICSPlex SM-supplied values) and then change the copy.
When you edit the EYUISTAR member, do the following:
v Set the SCOPE parameter to indicate that post-installation jobs are to begenerated.
v Set the TEMPLIB parameter to identify the installation libraryCICSTS31.CPSM.SEYUINST, which contains the skeleton jobs.
v In the SYSPROC DD statement, identify the library that contains the EYUINSTEXEC. To ensure that you are using the most current version of these jobs,identify the library as CICSTS31.CPSM.SEYUINST.
When you edit the EYUISTRT member, do the following:
v Set the TEMPLIB parameter to identify the Starter Set libraryCICSTS31.CPSM.SEYUJCL, which contains the skeleton jobs.
v In the SYSPROC DD statement, identify the library which contains the EYUINSTEXEC. To ensure that you are using the most current version of these jobs,identify the library as CICSTS31.CPSM.SEYUINST.
If the sample JCL members are serviced, you must perform one of the followingactions:
v To preserve your current installation parameters, add the service changes to thepreviously edited sample JCL member.
© Copyright IBM Corp. 1989, 2010 373

v Respecify your current installation parameters in the serviced sample JCLmembers in the SMP/E target library. These members are EYUISTAR in thelibrary CICSTS31.CPSM.SEYUINST and EYUISTRT in the libraryCICSTS31.CPSM.SEYUJCL.
The CICSPlex SM installation libraries are identified in Table 38.
When a parameter has a default value, as indicated in Table 39 on page 375, youcan use the default value by:v Omitting the parameter.v Omitting the last value with a parameter supporting multiple values.v Using a period in place of a value, where either of the following:
UTILITIES . LKED .
UTILITIES . LKED
is the same as specifying:UTILITIES ASMA90 LKED GIMSMP
If your disk space is managed by the storage management subsystem (SMS)component of MVS/DFP, the unit and volume parameters may be omitted from thegenerated JCL by specifying the value SMS for any of the UNIT or VOLUMEoperands of the EYUINST EXEC parameters. For example, to omit UNIT andVOLUME values from the JCL generated by EYUINST EXEC parameters whichobtain their default value from the DEFVOL parameter, specify:
DEFVOL SMS SMS
For the other parameters that have unit and volume specifications and that are toobtain the default from DEFVOL, use a period (which represents the default toSMS).
Table 38. Installation libraries for CICSPlex SMLibrary Function
SEYUINST The SMP/E-supported target installation library. After you have installed theCICSPlex SM software into this and other SMP/E-supported libraries(named SEYUxxxx and AEYUxxxx), this library stores the skeleton jobs youshould use on any later runs of the EYUISTAR job.
XEYUINST To store the tailored, executable, copies of the skeleton jobs that are to berun.
AEYUINST The SMP/E-supported distribution installation library.AEYUJCL The SMP/E-supported distribution library that contains the Starter Set JCL
members.SEYUJCL The SMP/E-supported target library that contains EYUISTRT and the other
Starter Set members.Note: The name of the XEYUINST library and the high-level index for the otherCICSPlex SM libraries are determined by the EYUINST EXEC parameters used in theEYUISTAR and EYUISTRT jobs. These parameters are described in “EYUINST EXECparameters” on page 375.
374 CICS TS for z/OS: Installation Guide

EYUINST EXEC parametersTable 39 identifies all of the EYUINST EXEC parameters (supplied in theEYUISTAR and EYUISTRT members) and, when appropriate, their default values.The term None indicates that the parameter has no default. Lowercase charactersindicate the source of the default value. Except as noted with the followingparameter descriptions, you may specify your own values for any of theseparameters.
The headings POST and STARTER, which also represent values you can specifywith the SCOPE parameter, indicate the type of skeleton jobs you can tailor andgenerate, where:
v POST identifies parameters used to generate customized post-installation jobs.
v STARTER identifies parameters used to generate customized Starter Set jobs.
The subheadings of CMAS and MAS indicate the environment to which theparameter applies.
Table 39. EYUINST EXEC parameters, when they are used, and their default valuesParameter POST STARTER Default value
CMAS MAS CMAS MAS
BLKU -- -- Yes Yes 6144CINDEXnnn Yes -- Yes Yes NoneCMASNAME Yes -- Yes -- NoneCRELEASE Yes -- Yes Yes 6.4.0DEFVOL Yes -- -- -- CPS310 3390DSINFO Yes -- Yes Yes index defvolENVIRONMENT Yes Yes Yes Yes NoneEYUIPRM Yes -- -- -- index.EYUIPRM NEWEYUSDEF Yes -- -- -- index.EYUSDEF NEWGZONECSI Yes Yes -- -- CICSTS31.GZONE NEW CPS310 3390INDEX Yes Yes Yes Yes CICSTS31.CPSMJOB Yes Yes Yes Yes //XXXXXXXX JOBLIB Yes Yes Yes Yes index.XEYUINSTOLDDREP Yes -- -- -- NonePREFIX Yes Yes Yes Yes EYUSCEESAMP -- -- Yes -- SYS1.SCEESAMPSCOPE Yes Yes Yes Yes POSTSELECT Yes Yes Yes Yes NoneSMPWORK Yes Yes -- -- SYSDASYSIDNT Yes -- -- -- NoneTEMPLIB Yes Yes Yes Yes index.SEYUINSTTIMEZONE Yes -- -- -- NoneTZONE Yes Yes -- -- TZONEUTILITIES Yes Yes -- -- ASMA90 IEWL GIMSMPWORKUNIT Yes Yes Yes Yes SYSDAWORKVOL Yes Yes Yes Yes -
The EYUINST EXEC parameters are:
BLKU blocksizeIndicates the block size to be used when allocating data sets that have anUNDEFINED record length.
The default is 6144.
Chapter 49. Using the EYUINST EXEC to tailor skeleton jobs 375
############

CINDEXnnn library_prefixWhere nnn represents a CICS Transaction Server for z/OS release
(Required.) The value of nnn must correspond to the release level specifiedfor the CRELEASE parameter. That is:
v CINDEX620 library_prefix specifies the high-level indexes assigned tothe CICS TS for z/OS Release 2.2 libraries.
v CINDEX630 library_prefix specifies the high-level indexes assigned tothe CICS TS for z/OS Release 2.3 libraries.
v CINDEX640 library_prefix specifies the high-level indexes assigned tothe CICS TS for z/OS Release 3.1 libraries.
The index value must not exceed 26 characters in length, and the leadingcharacter must be alphabetic. If you specify more than one level of index,the names must be separated by a period (as in CINDEX CICS.TEST) Theindex is used for the following data sets:
cindex.SDFHAUTHcindex.SDFHLOAD
One or more CINDEXnnn parameters must be specified as required by theCRELEASE parameter values.
No default is assumed.
CMASNAME name(Required when you specify CMAS with the ENVIRONMENT parameter.)
For POST, identifies a 1- to 8-character name that is to be assigned to aCMAS.
For STARTER, designates the Starter Set environment to be created sothat the appropriate subset of members are selected from the library youidentify via the TEMPLIB parameter.
The name of a CMAS must be unique within the CICSPlex SMenvironment. It should not be the same as the name of another CMAS, aCICSplex, a CICS system, or a CICS system group.
EYUCMS1AIndicates that all of the Starter Set jobs associated with System Aare to be created.
EYUCMS1BIndicates that all of the Starter Set jobs associated with System Bare to be created.
No default is assumed.
CRELEASE value1 value2 value3 value4 value5Identifies the CICS release level for each CICS region referenced by thisrun of EYUINST. From one to five values may be defined.
When SCOPE=STARTER, this identifies the CICS release level for eachCICS region installed for one of the three MVS/ESA images associated withthe Starter Set. When the SCOPE parameter is not equal to STARTER,only the first value is used. Valid values are 5.3.0, 6.2.0, 6.3.0 and 6.4.0..
The default is 6.4.0 for all five regions.
Table 40 on page 377 shows the Starter Set CICS region that is assignedthe values entered for the CRELEASE parameter. The EYUINST EXECmust be run three times in order to edit the Starter Set members for thethree MVS images. For example, when the EYUINST EXEC is run to edit
376 CICS TS for z/OS: Installation Guide

the Starter Set members for System B, the second value entered on theCRELEASE parameter determines the CICS release level assigned to theMAS1B CICS region.
Table 40. Starter Set CICS regions assigned values by the CRELEASE parameter
MVS ImageCRELEASE value for each CICS region
6.4.0 6.4.0 6.4.0 6.4.0 6.4.0 6.4.0
System A CMS1A MAS1A MAS2A MAS3A MAS4A MAS5ASystem B CMS1B MAS1B MAS2B MAS3B MAS4B MAS5B
DEFVOL volume disktypeDefines the default disk on which the CICSPlex SM libraries are to reside ifthe appropriate parameter is not coded in the job used to run the EYUINSTEXEC. For example, if you do not code the DISTVOL parameter, theCICSPlex SM distribution libraries will reside on the disk defined using theDEFVOL parameter.
volumeIs the volume serial identifier (volser) of the volume.
Use a period to specify the volser allocated in the SYSPROC DDstatement of the job used to run the EYUINST EXEC.
disktypeIs the UNIT parameter of the volume.
Use a period to specify the UNIT parameter of the volume allocatedin the SYSPROC DD statement.
If both DEFVOL parameters are defined as SMS, then other statementsincluding VOLUME and DISK values specified with a period, default also toSMS.
The defaults are the volser and unit specified with the SYSPROC DDstatement.
DSINFO dsindex volume disktypeDefines details of the data sets to be created when you run either the postinstallation jobs or the Starter Set jobs.
dsindexIs a high-level index that is to be assigned to all CICSPlex SM datasets defined by either the post-installation jobs or Starter Set jobs.
You can specify a multilevel index, where the leading character isalphabetic, each level does not exceed eight characters in length,and the total length of the data set name does not exceed 17characters. If you specify more than one level of index, the namesmust be separated by a period (for example, data.set.index).
Use a period to specify the high level index associated with theINDEX parameter.
volumeIs the volser of the data sets to be created
Use a period to specify the volser associated with the DEFVOLparameter.
disktypeIs the UNIT parameter for the volume.
Chapter 49. Using the EYUINST EXEC to tailor skeleton jobs 377

Use a period to specify the UNIT parameter associated with bothDEFVOL parameters.
The defaults are the high-level index specified with the INDEX parameterand the volser and unit specified with the DEFVOL parameter. If you areusing SMS, and values other than the DFHVOL defaults, you must codeSMS for each of these values.
ENVIRONMENT CMAS|MAS(Required.) Identifies the type of environment that is to be supported in theMVS image into which CICSPlex SM is installed.
CMAS Indicates that the MVS image is to have one or more CMASs andMASs.
MAS Indicates that the MVS image is to have only one or more MASs,and no CMASs.
No default is assumed.
EYUIPRM dsname NEW|OLDDefines details of the CICSPlex SM cross-system definitions repository.
dsnameIs the data set name of the parameter repository.
Use a period to specify dsinfo.EYUIPRM, where dsinfo is the indexspecified with the DSINFO parameter.
NEW|OLDIndicates whether an existing parameter repository is to be used.With NEW, any existing file with the specified name is deleted anda new parameter repository is allocated. With OLD, an existingparameter repository is used.
The default is NEW.
The defaults are index.EYUIPRM NEW.
EYUSDEF dsname NEW|OLDDefines details of the CICSPlex SM screen repository.
dsnameIs the data set name of the screen repository.
Use a period to specify dsinfo.EYUSDEF, where dsinfo is the indexspecified with the DSINFO parameter.
NEW|OLDIndicates whether an existing screen repository is to be used. WithNEW, any existing file with the specified name is deleted and a newscreen repository is allocated. With OLD, an existing screenrepository is used.
The default is NEW.
The defaults are index.EYUSDEF NEW.
GZONECSI cluster NEW|OLD volume disktypeSpecifies details of the global zone CSI. Ensure that the values specifiedcorrespond to the values used for GZONECSI for DFHISTAR.
clusterIs the VSAM cluster name, minus the qualifier .CSI.
378 CICS TS for z/OS: Installation Guide
||

Use a period to specify index.GLOBAL, where index is the valueassociated with the INDEX parameter.
NEW|OLDSpecifies whether an existing global zone CSI is to be used. WithNEW, any existing global zone CSI with the specified cluster nameis deleted and a new global zone CSI is allocated. With OLD, anexisting global zone CSI is used.
Use a period to specify OLD.
volumeIs the volser identifier for the volume on which the global zone CSIis to be allocated.
Use a period to specify the volser associated with the SMPVOLparameter.
disktypeIs the UNIT parameter for the volume.
Use a period to specify the UNIT parameter associated with theSMPVOL parameter.
The disposition, volume, and unit values are ignored when the SCOPE isPOST.
INDEX library_prefixAssigns a high-level index to the CICSPlex SM distribution, target andSMP/E libraries.
The index value must not exceed 26 characters in length, and the leadingcharacter must be alphabetic. If you specify more than one level of index,the names must be separated by a period (as in INDEXCICSTS31.CPSM.LEVEL2).
The default is the data set name, without the lowest level qualifier, specifiedwith the SYSPROC DD statement in the EYUISTAR job.
JOB accounting_informationSpecifies the JOB statement and JES information that you want substitutedinto the jobs generated by the job used to run the EYUINST EXEC. To dothis, edit the sample JOB statement in the job used to run the EYUINSTEXEC to specify the appropriate information, as in:
JOB //XXXXXXXX JOB 1,userid,MSGCLASS=A,MSGLEVEL=(1,1),JOB // CLASS=A,NOTIFY=useridJOB /*JOBPARM SYSAFF=node1,LINES=99JOB /*ROUTE PRINT node2.userid
Normal JCL rules for coding JOB statements apply to the JOB parameter.
The default is //XXXXXXXX JOB.
The job name is ignored. The name is the input member name after it isaltered by the PREFIX parameter.
LIB library_nameSpecifies the 1- to 44-character name of the library to which the customizedmembers generated by the EYUISTAR program are to be added.
The default is the data set name specified with the SYSPROC DDstatement in the job used to run the EYUINST EXEC, where the lowestlevel qualifier is replaced with XEYUINST, as in
Chapter 49. Using the EYUINST EXEC to tailor skeleton jobs 379

CICSTS31.CPSM.XEYUINST. (If necessary, the job used to run theEYUINST EXEC creates the library specified on the LIB parameter.)
OLDDREP dsnameIdentifies an existing data repository that is being used by a previousrelease of CICSPlex SM. The records in the existing data repository aremigrated to a new data repository for CICS TS for z/OS, Version 3.1. Theexisting data repository is not modified.
dsnameIs the VSAM cluster name of the existing data repository.
The new CICS TS for z/OS, Version 3.1 data repository will havethe name:dsinfo.EYUDREP.cmasname
where:
dsinfo Is the index specified with the DSINFO parameter.
cmasnameIs the name specified with the CMASNAME parameter.
Use a period to have an empty data repository created for CICS TSfor z/OS, Version 3.1.
PREFIX prefixDefines the 1- to 7-character prefix that is to be added to the jobsgenerated by the job used to run the EYUINST EXEC. This prefixoverwrites up to seven characters of the job name. For example, PREFIXXYZ changes the name of the job EYUDEFDS to XYZDEFDS.
The default is EYU.
SCEESAMP data set nameSpecifies the name of the Language Environment library that contains theCEECCSD and CEECCSDX members. The default is SYS1.SCEESAMP.
SCOPE POST|STARTERIndicates which group of jobs you want to generate. Specify:
POST Generates only the post-installation jobs.
STARTERGenerates only the Starter Set jobs.
The SELECT parameter overrides the SCOPE parameter; that is, if you useboth SCOPE and SELECT in the job used to run the EYUINST EXEC, onlythe job identified by SELECT is generated.
The default is for EYUISTAR is POST.
SELECT jobname1 [newname1]Identifies the member containing the post-installation or Starter Set job youwant to generate. To generate multiple jobs, specify a separate SELECTparameter for each.
jobnameIs the name of the member containing the job to be generated.
newnameIs a new 1- to 8-character name that is to be assigned to themember containing the job.
380 CICS TS for z/OS: Installation Guide

The SELECT parameter overrides the SCOPE parameter; that is, if you useboth SCOPE and SELECT in the job used to run the EYUINST EXEC, onlythe job identified by SELECT is generated.
No default is assumed.
SYSIDNT value(Required when you specify CMAS with the ENVIRONMENT parameter.)Specifies the 4-character system identifier used with the CICS TS for z/OSsystem initialization table (SIT) parameter SYSIDNT for the CMAS. Thisvalue is assigned to the data repository created by the EYUDEFDSpost-installation job.
If you are setting up more than one CMAS, you must create a separatedata repository for each CMAS.
No default is assumed.
TEMPLIB library_nameIdentifies the 1- to 44-character name of the library containing the inputmembers to be edited, when SCOPE is set to:
v POST - this is the name of the library from which the post-installationskeleton jobs can be obtained. You should specifyCICSTS31.CPSM.SEYUINST.
v STARTER - this is the name of the library from which the Starter Setskeleton jobs can be obtained. You should specifyCICSTS31.CPSM.SEYUJCL.
Using the suggested SMP/E target data sets ofCICSTS31.CPSM.SEYUINST or CICSTS31.CPSM.SEYUJCL ensure thatsubsequent runs of the job used to run the EYUINST EXEC will use theupdated version of the input members after maintenance is applied.
The default is the data set name specified with the SYSPROC DDstatement in the job used to run the EYUINST EXEC.
TIMEZONE codeRequired when you specify CMAS with the ENVIRONMENT parameter.
Specifies the time zone assigned to the data repository initialized bypost-installation job EYUDEFDS for use by the CMAS named using theCMASNAME parameter.
For additional information about how CICSPlex SM uses the time zonecodes, see the CICSPlex System Manager Administration manual.
TZONE zonenameSpecifies the name of the target zone to be used by SMP/E. This namemust be unique to the target zone. It must not be longer than sevencharacters and the leading character must be alphabetic.
Use the same name as that specified for TZONE for DFHISTAR.
The default is TZONE.
UTILITIES asmprog lkedprog smpeprogSpecifies the names of the utility programs to be used when installingCICSPlex SM and programs that it uses.
asmprogIs the program name of the assembler.
Use a period to specify ASMA90.
Chapter 49. Using the EYUINST EXEC to tailor skeleton jobs 381

lkedprogIs the program name of the linkage editor.
Use a period to specify IEWL.
smpeprogIs the program name of the SMP/E program.
Use a period to specify GIMSMP.
The defaults are ASMA90 IEWL GIMSMP.
WORKUNITSpecifies the UNIT parameter for the disk or disks on which work data setsare stored. If SMS is active, a value of NO may be used to preventEYUINST from specifying a UNIT on the allocation of the work data sets.
The default is SYSDA.
WORKVOLOptionally specifies the VOLUME parameter to be used by the work datasets allocated on the WORKUNIT unit.v If WORKUNIT is set to NO, WORKVOL has no effect.v If WORKVOL is a period, the VOLUME parameter is not used for the
allocation.
The default is a period.
Sample JCL execution considerationsAfter you have edited the EYUISTAR or EYUISTRT job, submit the job.
The job log produced by the EYUINST EXEC lists the parameter values used forthe job.
Should the EYUINST EXEC end with a return code of 04, review the warningmessage to ensure that the job ran as you intended.
When the EYUINST EXEC ends with a return code of 08 or 12, the skeleton jobsare not tailored or copied. To resolve the cause of either of these errors, examinethe output job log, correct the problem, and submit the EYUINST EXEC again.
The output from the EYUINST EXEC depends on the ENVIRONMENT and SCOPEyou set, and consists of the customized jobs identified in Table 20 on page 297.These jobs are added to the library used to run the EYUINST EXEC.
382 CICS TS for z/OS: Installation Guide
##
######
#

Chapter 50. CICSPlex SM system parameters
This chapter describes the system parameters that you can use to identify or alterCICSPlex SM attributes.
These parameters are specified by means of an extrapartition transient data queue.The transient data queue name is COPR. The parameters may be assigned to aDD * file, sequential data set or a partitioned data set member. The DD name forthe extrapartition transient data queue is EYUPARM.
The system parameters are coded as 80-byte records. Multiple system parametersmay be specified on a single record as long as they are separated by commas anddo not exceed a total of 71 characters in length. The format of the systemparameters is:
keyword(v)
where:
keywordis the name of a CICSPlex SM system parameter.
v is an alphanumeric data value that may be specified with the systemparameter.
Table 41 identifies the CICSPlex SM parameters used in the CMAS and MAS andindicates whether these parameters are required or optional.
For CMASs and CICS/ESA, CICS Transaction Server for OS/390, and CICSTransaction Server for z/OS MASs, members of the CICSTS31.CPSM.SEYUPARMlibrary containing samples of these parameters are:
EYUCMS0PCMAS parameters
EYULMS0PLocal MAS parameters
Note: Before using these members to start a CMAS or MAS, remove thecomments from the samples and supply the appropriate values.
Table 41. CICSPlex SM parameters used in CMAS and MASParameter CMAS Local MAS Default
ALERTRCVR Optional n/a NETVALRTALERTVER Optional n/a 0APISIGNMSG Optional n/a YESBASASSOCBLK Optional n/a 14301BASLOGMSG n/a Optional NOCASNAME Optional n/aCICSPLEX n/a RequiredCMASSYSID n/a OptionalCMTCMLNKACQ n/a Optional RECONNCOHTTASKPRI n/a Optional 200COIRTASKPRI n/a Optional 200COMMTSBLOCKS Optional Optional 128 (MAS)
128 (MAS)HISTORYONLY n/a Optional NO
© Copyright IBM Corp. 1989, 2010 383
||||||
||||||||||||####||||####||||||||####||||||||||||||||||||

Table 41. CICSPlex SM parameters used in CMAS and MAS (continued)Parameter CMAS Local MAS Default
HISTRECSMSG n/a Optional 0HISTSECS n/a Optional 30JRNLDEFCH Optional n/a NOJRNLOPACT Optional n/a NOJRNLRTAEV Optional n/a NOMASALRLRTCNT n/a Optional 0MASALRLRTPRI n/a Optional 255MASALRLRTTIM n/a Optional 10MASINITTIME n/a Optional 10MASPLTWAIT n/a Optional NOMAXAUXCPSM Optional n/a 50MAXAUXTOTL Optional n/a 70MAXHISTRECS n/a Optional 1MSGBUCKETS n/a Optional 1024MSGCASE Optional Optional MIXEDNAME Optional OptionalRESSTATUS Optional n/a NOTIFYSEC Optional n/a NOSECLOGMSG Optional n/a NOSECPRFX n/a n/a NOSECTIMEOUT Optional n/a 30SPOOLCLASS Optional Optional PSTALLDBCTSK n/a Optional 4STALLDBCCNT n/a Optional 4STALLDB2TSK n/a Optional 4STALLDB2CNT n/a Optional 4STALLDLITSK n/a Optional 4STALLDLICNT n/a Optional 4STALLDSPTSK n/a Optional 4STALLDSPCNT n/a Optional 2STALLENQTSK n/a Optional 4STALLENQCNT n/a Optional 4STALLFLETSK n/a Optional 3STALLFLECNT n/a Optional 4STALLILKTSK n/a Optional 2STALLILKCNT n/a Optional 3STALLLCKTSK n/a Optional 4STALLLCKCNT n/a Optional 4STALLITVTSK n/a Optional 0STALLITVCNT n/a Optional 0STALLJNLTSK n/a Optional 1STALLJNLCNT n/a Optional 3STALLPGMTSK n/a Optional 2STALLPGMCNT n/a Optional 4STALLSESTSK n/a Optional 2STALLSESCNT n/a Optional 3STALLSTGTSK n/a Optional 1STALLSTGCNT n/a Optional 2STALLTDQTSK n/a Optional 3STALLTDQCNT n/a Optional 4STALLTRMTSK n/a Optional 0STALLTRMCNT n/a Optional 0STALLTSKTSK n/a Optional 0
384 CICS TS for z/OS: Installation Guide
|||||
||||||||||||||||||||####################||||||||||||####||||||||||||||||####||||####||||||||||||||||||||||||||||||||||||||||||||||||||||||||||||||||||||||||||||||||||||||||||||||||||||||||||||||||||||||||||||||||

Table 41. CICSPlex SM parameters used in CMAS and MAS (continued)Parameter CMAS Local MAS Default
STALLTSKCNT n/a Optional 0STALLTSQTSK n/a Optional 3STALLTSQCNT n/a Optional 4STALLXMGTSK n/a Optional 4STALLXMGCNT n/a Optional 2STALLXRFTSK n/a Optional 1STALLXRFCNT n/a Optional 2SUPPRESSCMF n/a Optional NO
APARPK05183 addedTOBATCHREQ,TOONLINEREQ, andTOPOLLINT
TOBATCHREQ Optional n/a 0TOONLINEREQ Optional n/a 0TOPOLLINT Optional n/a 300WLMLOADCOUNT n/a Optional ALLQUEUEDWLMLOADTHRSH n/a Optional 65
ALERTRCVR(NETVALRT | name)Identifies the 1-8 character name of the NetView Alert Receiver to be usedby the CMAS if NetView Generic Alerts are to be sent by the CMAS toNetView.
ALERTVER( 0 | 1 )Identifies the version of the CPSM generic alert record that the CMAS willsend to NetView. See Appendix B of the CICSPlex System ManagerManaging Resource Usage manual for details on the generic alert RecordsCPSM may send to NetView.
ALERTVER is only relevant for a CMAS which is named in an ACTNDEFas sending generic alerts to NetView.
APISIGNMSG(YES | NO)Indicate whether the successful signon / signoff message, EYUXD0807I, isto be issued when a CICSPlex SM API user CONNECTs to, orDISCONNECTs (TERMINATEs) from, the CICSPlex SM API.
BASASSOCBLK(value | 14301)Specify the number of BAS association blocks that can be acquired from asingle association element. The default EYUPARM value creates anassociation segment size requiring approximately 1.2 mB of storage. If themaximum value of 114597 blocks-per-segment is specified, then theresultant segment size will be just over 8 mB.
BASLOGMSG(YES | NO)Indicate whether CICS resources defined using BAS should have theirdefinitions logged to the CSDL Transient Data Queue of the MAS whenthey are installed.
Chapter 50. CICSPlex SM system parameters 385
|||||
||||||||||||||||||||||||||||||||#
########
#
###
####################|
######

If the CICS version used by the MAS does not support the LOGMESSAGEoption of the EXEC CICS CREATE command, BASLOGMSG will have noeffect.
CASNAME(name)Identify the 4-character name of the CAS subsystem with which the CMASis to be associated.
This name must match the CAS subsystem ID identified in the CAS startupJCL and also specified with the SSID parameter of the START command.
If this parameter is omitted, the CMAS does not attempt to connect with aCAS. It is not necessary to start a CAS on the MVS system on which theCMAS runs.
Note: You should ensure that every CMAS connects to a CAS. Theconnection allows a TSO user signed on to any MVS image toaccess the CPSM EUI. It also provides Single System Image (SSI)function for requests directed at resources accessed under a CMAScontext. If you start a CMAS without a CASNAME, you need notstart a CAS on that MVS image. However, if it later becomesnecessary to connect to the EUI with the context set to that CMAS,you must bring down the CMAS and restart it with the CASNAMEparameter identifying the SSID of a CAS running on the same MVSimage.
CICSPLEX(name)Identify the 1- to 8-character name of the CICSplex to which the local MASis to be associated.
The name of a CICSplex should not be the same as the name of a CMAS,a CICS system, or a CICS system group.
CMASSYSID(name)Identify the 1- to 4-character name of the CMAS to which a MAS is to beattached.
You can also use this parameter when a local MAS is to attach to a specificCMAS in the same MVS image.
CMTCMLNKACQ( ALWAYS | RECONN)Specify whether you want the CMAS to attempt to reacquire LU6.2CMAS-to-CMAS links (CMTCMLNKs) if the initial acquire attempt made byCICS fails. The initial acquire attempt is made by CICS at CMAS startup,VTAM ACB open, or CMTCMDEF (CMAS-to-CMAS definition) install.
If the initial acquire attempts fail, CICSPlex SM network surveillance mayattempt to reacquire the LU6.2 CMAS-to-CMAS links, depending on thevalue of CMTCMLNKACQ:
ALWAYSThe CMAS will attempt to acquire CMTCMLINKs even if they havenever been established in the current CMAS run.
RECONNThe CMAS will attempt to reacquire only those CMTCMLNKs that werepreviously established in the current CMAS run. Note that if theCMTCMLNKs were not previously used in the current CMAS run andthe initial acquire attempts fail, you must acquire the CMTCLNKmanually, using one of the following methods:
386 CICS TS for z/OS: Installation Guide
##
##
###
##########
||
||
||
||
#####
###
###
######

v using the ACQUIRE action in the EYUSTARTCMTCMLINK Web UserInterface view.
v using the ACQUIRE action of the CMTCMLNK resource table in auser-written CICSPlex SM API program.
v using CEMT to manually acquire the CICS connection used by theCMTCMLNK.
Note: Depending on the CMTCMLNKACQ option in use, the repeatedacquire attempts may cause multiple error messages from CICS(DFHZC3437, DFHZC3462 and DFHZC2405) and VTAM(IST663, and IST664) logging the connection ACQUIRE attemptif the requests continue to fail.
CMTCMLNKACQ can be dynamically changed in a CMAS via theCOD0 SET command. See the Problem Determination Guide fordetails.
COHTTASKPRI( value | 200)Specify the CICS task priority for the MAS COHT task. COHT is invoked ina MAS when an API or web user interface query for completed task historyrecords (HTASK records) is directed to the MAS. Use this parameter to tunethe priority of HTASK requests so that a resource intensive query does notimpact the performance of other tasks in the MAS.
COIRTASKPRI(value | 200)Specify the task priority of COIR, in the range 0 to 255. COIR is aCICSPlex SM task that can be used to process evaluation definitions(EVALDEFs) independent of the MAS.
For each EVALDEF that requests a separate task, an instance of COIR isstarted at the specified priority. If you specify a priority of 0, no separateCOIR tasks are started; all EVALDEFs are processed by the MAS longrunning task (LRT).
Note: This parameter does not apply to CICS for Windows.
COMMTSBLOCKS((value | 512/128)This is the number of sets of control blocks allocated at CMAS or MASstartup for CPSM Communications Transport Services. These control blocksare used when data must be shipped between a CMAS or MAS and otherCMASs or MASs.
The default and minimum values for this parm are 512 in a CMAS and 128in a MAS. The maximum value is 8192 in either a CMAS or MAS.
Each set requires 1204 bytes of storage allocated in ESDSA in the CMASor MAS. If the defaults are used, the following total storage is allocated:CMAS - 512 * 1204 = 616,448 bytesMAS - 128 * 1204 = 154,112 bytes
If the maximum value is specified, the following total storage is allocated:CMAS - 8192 * 1204 = 9,863,168 bytesMAS - 8192 * 1204 = 9,863,168 bytes
If a shortage occurs during the execution of a CMAS or MAS, messageEYUCT0105E is issued. At termination of the CMAS or MAS, messageEYUCT0106W is issued. The later message will include a value equal tothe highest concurrent shortage of sets (High water mark). It is
Chapter 50. CICSPlex SM system parameters 387
##
##
##
########

recommended that the COMMTSBLOCKS parm for the CMAS or MAS beincreased by at least the amount specified by the EYUCT0106W messagebefore restarting the CMAS or MAS.
HISTORYONLY( YES | NO)Specify whether history data should be collected without collecting normalCICSPlex SM monitoring data as well. For example, if MLOCTRAN andMREMTRAN data is not required set HISTORYONLY(YES) to prevent thisdata from being collected.
HISTRECSMSG( value | 0)Specify that message EYUNL0179I 'Task History Recorder datasetEYUHISTx has accrued nnnn records' should be output each time 'value'thousand records are written to the history data sets. The maximum allowedvalue is 1000 which means output a message every time 1 million recordsare written to the history data sets.
The message can be used as an aid to determining the optimum size of thehistory data sets. A value of 0 means no EYUNL0179I messages are to beproduced.
HISTSECS( value | 30)Specify the number of seconds to use as the default when API or web userinterface users specify a parameter of RECENT(HISTSECS) whenrequesting completed task (HTASK) resource table records. The maximumallowed value is 86400 seconds (24 hours).
JRNLDEFCH(YES | NO)Causes a journal record to be written for each data repository add, delete,and update operation.
JRNLOPACT(YES | NO)Causes a journal record to be written for each successful action commandissued against a MAS or CMAS.
JRNLRTAEV(YES | NO)Causes a journal record to be written each time an real-time analysis (RTA)event is generated.
MASALTLRTCNT(0 - 5 | 0)The number of alternate long running tasks (CONA) started in the MASduring MAS agent initialization. These tasks remain active until the MASagent terminates or goes into restart mode, and handles allEUI/API/WUI/RTA normally handled by the CONL task, allowing the CONLtask to perform other processing in the MAS. At any time, only one of theCONA tasks processes requests. If the CONA task that is currentlyprocessing requests becomes busy (as determined by the value of theMASALTLRTTIM EYUPARM), subsequent requests are directed to anotherCONA task.
If zero (0) is specified, no CONA tasks are started and the CONL taskservices the EUI/API/WUI/RTA requests that are normally directed to thelong running task.
Note: Specifying different values for MASALTLRTCNT for multiple WLMtarget regions might result in an uneven distribution of transactionsto those regions because of differing long running task counts.
MASALTLRTPRI(0 - 255 | 255)The priority given to the CONA transaction for the current execution of theMAS.
388 CICS TS for z/OS: Installation Guide
##########
###
###
###

Note: Specifying this value less than 255 can adversely affect theresponse time of EUI, API, and WUI users, and might result in RTAEVENTs not being created or resolved in a timely manner
MASALTLRTTIM(1 - 3600 | 10)The amount of time in seconds for which a CONA task can be busy beforesubsequent requests are directed to another active CONA task.
MASINITTIME(value | 10)Specifies the number of minutes, from 5 to 59, that CICSPlex SM shouldwait for the MAS to initialize.v If you specify MASPLTWAIT(YES), the MASINITTIME value is the
maximum length of time that PLT processing can be suspended for MASinitialization. (By suspending PLT processing the chance of completingMAS initialization within a specified time is increased, because you areasking for less work to be done in a given time interval, and reducing thescope for contention, during that time).
v If you specify MASPLTWAIT(NO), the MASINITTIME value is themaximum length of time that can elapse before MAS initialization isaborted if it does not complete.
MASPLTWAIT(YES | NO)
Indicates whether CICSPlex SM should suspend all PLT processing untilthe MAS is fully initialized and connected to the CMAS.
v When you specify MASPLTWAIT(YES), no CICS applications can bestarted and no users can sign on to the system until CICSPlex SMcompletes the installation of resources and resumes PLT processing. IfCICSPlex SM does complete the installation of resources and resumePLT processing within the time interval specified by MASINITTIME,message EYUTS0003I is issued. If it does not complete within the timeinterval specified by MASINITTIME, message EYUNL0090W is issued,the MAS initialization is aborted and the PLT processing resumes toallow the region to function as a CICS region without CICSPlex SMcontrol. MAS Initialization can be retried by entering the COLMtransaction manually.
v When you specify MASPLTWAIT(NO), CICSPlex SM still observes theMASINITTIME value waiting for the MAS agent to complete the topologyconnect. If CICSPlex SM does not complete the topology connect withinthe time interval specified by MASINITTIME (or its default value),message EYUNL0090W is issued, the MAS initialization is aborted andthe PLT processing resumes to allow the region to function as a CICSregion without CICSPlex SM control. MAS Initialization can be retried byentering the COLM transaction manually.
If you are using Business Application Services (BAS) to automatically installresources at CICS system initialization, you should specifyMASPLTWAIT(YES) for that system.
Note: If you are using Business Application Services (BAS) to automaticallyinstall a DB2 connection, and you want the connection to beactivated during CICS startup, see the information on page 335
MAXAUXCPSM(value | 50)Specify the percent of total auxiliary storage which may be committed toeach CMAS, in the range of 1 to 99. Note that each CMAS will require24,160 4kB pages (94 mB) of cache storage at initialization. If a request foradditional cache storage would cause the CMAS to exceed this threshold,
Chapter 50. CICSPlex SM system parameters 389
###
###
###########
##
###########
########

an SDUMP is taken and the CMAS is terminated. If this occurs duringCMAS initialization, it means that the CMAS was unable to acquire theinitial allocations for all required component data cache areas. Either thevalue of MAXAUXCPSM must be increased, or the total amount of auxiliarystorage must be increased by adding or expanding external page data sets.If this threshold is reached during an attempt to create or extend a datacache after CMAS initialization has completed, ARM is invoked to attemptto restart the CMAS.
MAXAUXTOTL(value | 70)This value is the maximum total auxiliary storage usage at which the CMASallows a request for additional cache storage to be made, in the range of 1to 99. This prevents the CMAS from requesting an amount of cache storagewhich would cause the MVS system to enter a state of auxiliary storageshortage. If a request for additional cache storage would cause the CMASto exceed this threshold, an SDUMP is taken and the CMAS is terminated.This parameter can cause a CMAS to shut down even though the CMAS isnot the largest user of auxiliary storage. If this occurs during CMASinitialization, it means that the CMAS was unable to acquire the initialallocations for all required component data cache areas. The total amountof auxiliary storage available must be increased by adding or expandingexternal page data sets. If this threshold is reached during an attempt tocreate or extend a data cache after CMAS initialization has completed,ARM is invoked to attempt to restart the CMAS.
MAXHISTRECS( value | 1)Specify a limit, in the range 1 to 50, on the number of records returned on acompleted task query from the MAS to 'value' thousand records. This canbe used to limit the amount of data in a request for completed task(HTASK) resource table records. When this limit is reached, the CICSPlexSM API GET request will receive a WARNING response andMAXRECORDS reason.
MSGBUCKETS(value | 1024)Specify a value in the range 1 to 32768. This value specifies the number ofbuffers to be allocated for Topology data collection in the MAS. Each bufferis 64 bytes long. The buffer pool, allocated in the MAS cache data space, isused by CPSM's XMEOUT and XRSINDI Global User Exits and by theMAS Heartbeat task. The number of buffers must equal or exceed the totalnumber of connections, DSNAMEs, GLUEs, TRUEs, and FEPI connectionsdefined in the MAS. If the number of buffers is not sufficient for theTopology mapped resources in the MAS, a trace record with debug textXDATLOST is written at every other heartbeat interval when MAS Topologyresource data is collected. If this occurs, resources will be missing fromTopology Resource Maps for the MAS in all CMASes in the CICSplex, andquery or action requests entered from the EUI or API for specific resourcesmay fail because the target resources are not known to Topology.
MSGCASE(MIXED | UPPER)Indicate whether the following types of output should be displayed in mixedcase or upper case:v Messages issued by Message Services to the console, joblog, and
EYULOGv Batched repository-update facility outputv Diagnostic output from the CODB, COD0, and COLU transactions.
You can specify:
390 CICS TS for z/OS: Installation Guide
##############

MIXEDMixed case text is displayed as is.
If you specify MIXED, output may be displayed incorrectly onKatakana display terminals, where lower case characters aredisplayed as Katakana symbols.
UPPERMixed case text is displayed in upper case only.
NAME(name)Identify the 1- to 8-character name of the CMAS or local MAS that is to bestarted. If you do not specify this parameter, the default is the VTAMapplication ID.
RESSTATUS(NOTIFY | MSG | CONMSG)Indicate how the CMAS is to respond when a CICS resource that is beingreported to the resource status facility has a change in operational state:
NOTIFYIssues event notifications in the form of ERESSTAT resource tablerecords.
These event notifications can be monitored by using the LISTENcommand of the CICSPlex SM API. For more information, see theCICSPlex System Manager Application Programming Guide.
MSG Writes external messages to EYULOG.
If you specify MSG, event notifications are produced in addition tothe messages.
CONMSGWrites external messages to the job log, console, and EYULOG.
If you specify CONMSG, event notifications are produced inaddition to the messages.
Note: Use this option with care. It could cause a large number ofmessages to be sent to the console.
SEC(YES | NO)For a CMAS, indicate whether the CMAS is to perform security checking ofCICSPlex SM requests directed to the CICS systems it manages.
When NO all security-related parameters are ignored.
If a CMAS manages any CICS regions that are running with security active(SEC=YES specified as a system initialization parameter), the CMAS mustinclude SEC(YES) in EYUPARM. If you do not activate CICSPlex SMsecurity in the CMAS, a connection cannot be established to a CICSsystem that specifies SEC=YES. If a connection is attempted, the followingmessage is issued to the console, the CMAS job log, and the CMASEYULOG:EYUCR0007E Security mismatch between CMAS cmasname and
MAS masname. Connection terminating.
Note: If a CMAS started with SEC(NO) connects directly or indirectly to aCMAS started with SEC(YES), any request sent to the SEC(YES)CMAS will fail.
v If the request originates from the TSO EUI, the TSO user willreceive message: EYUEI0586E
Chapter 50. CICSPlex SM system parameters 391
|||
|

v If the request originates from the CICSPlex SM API connected tothe SEC(NO) CMAS, the API request will receive: RESPONSE1031 NOTPERMIT REASON 1345 USRID
v If the request originates from the CICSPlex SM Web UserInterface server connected to a SEC(NO) CMAS, the browser willreceive message: EYUVC1220E
SECLOGMSG(NO | YES | ALL)Controls whether CICSPlex SM should issue message EYUCR0009I to theCMAS EYULOG, to record security failures.
When NO is specified, the default, message EYUCR0009I is not issued.
Specify YES, or ALL, to cause message EYUCR0009I to be issued.
SECLOGMSG(YES) can be useful if the External Security Manager (ESM)does not issue messages when it cannot make a decision, or when a failureoccurs.
Note: When SECLOGMSG(YES) is specified, EYUCR0009I will be issuedonly for requests which are to be logged to the ESM.
SECLOGMSG(ALL) causes EYUCR0009I to be issued even when the ESMpermits access to the resource. The ALL operand can produce a largenumber of EYUCR0009I messages and should normally be used only underthe direction of IBM Support.
SECLOGMSG can be dynamically changed in a CMAS with the COD0 SETcommand. See the CICS Problem Determination Guide for details.
SECPRFX(YES6 |prefix useridIndicate whether the user ID is used as the prefix that is added to thebeginning of all resource names to distinguish this CICS system from otherCICS systems.
SECTIMEOUT(value|30)Specifies the time in minutes, in the range of 1 through 1440 (1 day), thatidle userids are to remain signed on within the CMAS before beingconsidered for timeout.
The value is also used to control how often the CMAS checks for idle usersto timeout. For example, with the default value of 30, the CMAS will checkevery 30 minutes for users who have not used the CMAS for 30 minutes.However, as the times are not synchronized it may mean that the userid willnot be timed out for up to double the SECTIMEOUT value. Setting thisvalue low will increase the number of calls to the External Security Manager(ESM). Setting this value high means that users may have to wait a longtime before automatically picking up security changes that affect the userid(for example, adding the user to a new group).
The CMAS or CMASLIST PURGE request (available from the EUI, API andWUI) can be used to force a CMAS to check for users to timeoutimmediately.
The CMAS or CMASLIST RESET USERID request (available from the APIand WUI) can be used to force the CMAS to rebuild the user's securityinformation the next time it is used. This request would typically be usedafter adding or removing a userid to, or from, a group, and the user doesnot want to wait to be timed out to pick up the change.
6. For a CMAS or local MAS only
392 CICS TS for z/OS: Installation Guide
###
#
#
###
##
####
##
|
|
####
#########
###
#####

SPOOLCLASS(class | P)Specify a SYSOUT class value, from A to Z, that identifies whereCICSPlex SM spool output is to be sent.
Spool output can be generated by these CICSPlex SM functions:
v The online utility transaction (COLU)
v The PRINT and CAPTURE commands of the interactive debuggingtransaction (COD0).
STALLxxxTSKWhere xxx represents a CICSPlex SM suspend class. The values for xxxare shown in Table 42.
Identify the minimum number of concurrent tasks required to enter thesuspend class. The value may be between 0 and 999. The default value foreach task is shown in Table 41 on page 383. Use 0 to indicate STALLdetection for the xxx suspend class is not active.
STALLxxxCNTWhere xxx represents a CICSPlex SM suspend class. The values for xxxare shown in Table 42.
Identify the number of consecutive occurrences of an entry in the suspendclass required for CICSPlex SM to report a STALL. The value may bebetween 0 and 999. The default value for each task is shown in Table 41 onpage 383. Use 0 to indicate STALL detection for the xxx suspend class isnot active.
Table 42. CICSPlex SM Suspend Classes
Suspend Class CICS Suspend TypesValue inSTALLxxxParameters
Text inEYUPNxxxxMessages
DBCTL DBCTL DBC DBCTRL
DB2 CDB2RDYQ CDB2TCBDB2_INIT DB2 CDB2CONNDB2CDISC DB2EDISA
DB2 DB2
DLI DLI DLI DLI
Dispatcher DS_HELD DISPATCH DSP DISP
Enqueue KC_ENQ ENQUEUE ENQ ENQUEUE
File FCxxxxxx CFDTxxxx FLE FILE
Interval Control ICxxxxxx ITV INTV
Journal JASUBTAS JCxxxxxx JNL JOURNAL
Lock Manager LMQUEUE LCK LOCK
Program Loader PROGRAM PGM PROGRAM
Allocate Session ALLOCATE SES ALLCSESS
Storage xDSA ExDSA STG STORAGE
Transient Data MBCB_xxx MRCB_xxxTDEPLOCK TDIPLOCKTD_INIT TD_READ
TDQ TSDATA
Terminal Control ZCxxxxxx TRM TERM
Task Wait EKCWAIT KCCOMPAT TSK TASKWAIT
Temporary Storage TSxxxxxx TSQ TEMPSTOR
Chapter 50. CICSPlex SM system parameters 393
####
#####
####
##
####
####
####
####
##
Table 42. CICSPlex SM Suspend Classes (continued)
Suspend Class CICS Suspend TypesValue inSTALLxxxParameters
Text inEYUPNxxxxMessages
Terminal IRLINK ILK IRLINK
Transaction Manager XM_HELD MXT TCLASS XMG TRANSACT
XRF XRxxxxxx XRF XRF
Note: EYUPNxxxx messages are issued when a stall condition occurs that generates areal-time analysis system availability monitoring (SAM) event.
SUPPRESSCMF(YES | NO)For a local MAS, indicates whether the records collected by the CICSMonitor Facility are written to SMF.
The parameter only suppresses CICS type 3 performance class records.Type 4 exception records and type 5 transaction resource records are notsuppressed. The type 3 performance records are only suppressed if theCICS region has an active CICSPlex SM monitor definition installed for theMTRAN monitoring class. You can verify which CICS regions have activemonitoring for the MTRAN class by issuing the MONACTV view from theTSO End User Interface.
TOBATCHREQ(value | 0)
APARPK05183 added TOBATCHREQ, TOONLINEREQ, and TOPOLLINT
The time in seconds before a batch request directed to a MAS is timed out.This includes RTA requests and API requests initiated from non-CICSprograms. Specify zero, or a value in the range 10 to 1800.
v If you specify zero, the default value of 240 seconds (4 minutes) isapplied. This value is then doubled when the request is transmitted to theMAS.
v If you specify a non-zero value in the range 10 to 1800, that value isused.
v If you specify a non-zero value less than 10, TOBATCHREQ is set to 10.
Depending upon the value specified for TOBATCHREQ more time outs maybe received. This may be noticed in the following ways:
RTA requestsNo data will be processed for any MAS that times out and noexternal message will be displayed. This may cause an event to notbe created, or lead to premature termination of existing events.
API requests initiated from non-CICS programsAll API requests initiated from non-CICS programs will receive aREPSONSE of ENVIRONERROR (1030) and REASON ofREQTIMEOUT (1342) and no data records will be returned,regardless of the CONTEXT and SCOPE of the request.
TOONLINEREQ(value | 0)The time in seconds before an online request directed to a MAS is timed
394 CICS TS for z/OS: Installation Guide
####
##
#####
###
###
##
#
##
####
#####
##

out. This includes EUI and WUI requests and API requests initiated fromCICS programs. Specify zero, or a value in the range 10 to 1800.
v If you specify zero, the default value of 240 seconds (4 minutes) isapplied. This value is then doubled when the request is transmitted to theMAS.
v If you specify a non-zero value in the range 10 to 1800, that value isused.
v If you specify a non-zero value less than 10, TOONLINEREQ is set to10.
Depending upon the value specified for TOONLINEREQ more time outsmay be received. This may be noticed in the following ways:
EUI requestsIf all systems that are part of the CONTEXT and SCOPE time out,the following messages are returned to the EUI display:EYUEI0591E
Communications to <masname> timed outBBMXBD15I
There is no data that satisfies your requestBBMXBD23I
0 records presented by the product
If at least one of the systems that are part of the CONTEXT andSCOPE do not time out, the records for that system (or thosesystems) will be displayed and no error messages will be displayed.
WUI requestsAll WUI requests will receive the following message and no datarecords will be displayed, regardless of the CONTEXT and SCOPEof the request.EYUVC1220E
CICSPlex SM API command (GET) failed. (Environerror,Reqtimeout)
API requests initiated from CICS programsAll API requests initiated from CICS programs will receive aREPSONSE of ENVIRONERROR (1030) and REASON ofREQTIMEOUT (1342) and no data records will be returned,regardless of the CONTEXT and SCOPE of the request.
TOPOLLINT(value | 300)The time in seconds that a CMAS delays between checking all requests todetermine if they exceed their time out time. Since polling is used todetermine when to time out a request, more reliable time outs will occur ifthis value is set less than or equal to both TOBATCHREQ andTOONLINEREQ.
When a request is directed to a MAS that is not connected to theoriginating CMAS, it is transmitted from the originating CMAS to the remoteCMAS to which the MAS is connected. When this occurs, the remoteCMAS performs the time out processing, based upon the TOBATCHREQand TOONLINEREQ values specified in the originating CMAS and theTOPOLLINT value specified in the remote CMAS. For this reason, time outprocessing will be more consistent if all CMASes in the network have thesame TOPOLLINT value.
Chapter 50. CICSPlex SM system parameters 395
##
###
##
##
##
#########
###
#######
#####
######
########

WLMLOADCOUNT(ALLQUEUED | MXTQUEUED)For a local MAS, indicates which queued tasks should be included in theWLM task load count for the MAS.
Specify ALLQUEUED to include tasks queued for both maxtask andtranclass.
Specify MXTQUEUED to include tasks queued only for maxtask.
WLMLOADTHRSH(65 | 1 - 100)For a local MAS that is defined as a CPSM WLM routing region, indicateswhat task load percentage ((active tasks/maxtask) *100) should be used aspart of the determination as to when the routing region should route totarget regions on other CECs.
For example, if the default value of 65 is used, then all target regions onthe CEC where this routing region resides must have a task load of 65% orhigher before the routing region routes to target regions on other CECs, ifall other health factors (for example, short-on-storage) for the routingregions are similar. As soon as all target regions on other CECs achieve atask load of 65% or higher, the routing region resumes routing to the targetregions on the local CEC again. When a local target region's task loaddrops below 65%, the routing region resumes routing to that target regionregardless of the task load in target regions on remote CECs.
Specifying this value lower than the default probably decreases the delay inrouting to target regions on remote CECs. Take care not to set this value solow that the threshold is met by long-running tasks in the target regions.
Specifying this value higher than the default probably increases the delay inrouting to target regions on remote CECs.
Note that the effectiveness of this parameter is increased as thecharacteristics (for example, maxtask value or number of long-runningtasks) of the target regions become similar.
396 CICS TS for z/OS: Installation Guide
###
##
#
#####
#########
###
##
###

Chapter 51. CMAS journaling
A CICSPlex SM address space (CMAS) is capable of producing CICS journalrecords to track a variety of activities in the CICSplex. These journal recordsprovide an audit trail that can aid in the recovery of data or the reconstruction ofevents that affected the CICSplex. A journal record can be written when:v A definition in the data repository is added, removed, or updatedv An operations action is issued against a MASv A real-time analysis event is generated.
For example, when a CMAS serves as the temporary maintenance point, ittemporarily stores in its data repository any definitions that you add, update, orremove. When the maintenance point CMAS resumes operation, the temporaryinformation is removed. You can obtain journal records of what is added to anddeleted from the data repository for the temporary maintenance point.
The journal records are stored in a 32KB buffer and are flushed to thecorresponding log streams when the buffer becomes full or when a normalshutdown of the CICS region is initiated.
To force the buffer to be flushed to a log stream when the CICS region is stillactive, you could specify the WAIT option on the WRITE JOURNALNAMEcommand using EXEC CICS or the CECI transaction.
To request one or more of the record types, specify the appropriate CICSPlex SMsystem parameters in the startup JCL of a CMAS:
JRNLDEFCH(YES) For data repository definition changes
JRNLOPACT(YES) For operations actions
JRNLRTAEV(YES) For real-time analysis events
For more information on these parameters, see Chapter 50, “CICSPlex SM systemparameters,” on page 383.
If you do not want to use the CICSPlex SM default log stream name of EYUJRNL,you must define a JOURNALMODEL resource in the CSD that has the desired logstream name. The distributed CMAS resource definition group and group list areprotected from modification. Thus, to make the JOURNALMODEL resourcedefinition available during CMAS initialization, you must create a new CMAS grouplist that includes the group containing the JOURNALMODEL resource definition. Toadd the JOURNALMODEL resource to the CSD, either edit and run the JCLcontained in sample member CICSTS31.CPSM.SEYUSAMP(EYUJRNE$) toexecute batch utility DFHCSDUP or use the CICS CEDA transaction. Performingeither of these steps does the following:v Appends the protected EYU310L0 group list to a new unprotected group list.v Defines the desired JOURNALMODEL for EYUJRNL in an unprotected group.v Adds the unprotected group to the new, unprotected group list.
You must also update the CICS system initialization (SIT) parameters used to startthe CMAS by setting the GRPLIST parameter to reference the new group list.
The journal records produced by a CMAS contain data mapped by a DSECT calledEYUBCPJR. Each record consists of a standard prefix and a variable data area.The contents of the data area are specific to the type of journal record beingwritten.
© Copyright IBM Corp. 1989, 2010 397

Figure 60 shows the format of EYUBCPJR.
*---------------------------------------------------------------------** EYUBCPJR DSECT Prefix **---------------------------------------------------------------------*EYUBCPJR DSECTEYUBCPJR DS 0D
CPJR_PREFIX DS 0D Prefix of recordCPJR_CMASNAME DS CL8 CMAS Name which produced recordCPJR_CONTEXT DS CL8 Plex NameCPJR_SCOPE DS CL8 Scope NameCPJR_USER DS CL8 User NameCPJR_STCK DS D Store clockCPJR_VERSION DS H Current record versionCPJR_VER_ZERO EQU 0000 Version 0CPJR_VER_ONE EQU 0001 Version 1CPJR_VER_CURR EQU CPJR_VER_ONE Current VersionCPJR_TYPE DS H Record typeCPJR_TYPE_DEFCH EQU 0001 Definition Add/Change/DeleteCPJR_TYPE_RTAEV EQU 0002 Rta EventCPJR_TYPE_OPACT EQU 0003 Operation actionCPJR_LENGTH DS F Length of entire record plus x
prefix areaDS FL8 Available for use
CPJR_LEN EQU *-CPJR_PREFIX Length of Prefix areaCPJR_DATA_AREA DS 0H Data area
*---------------------------------------------------------------------** Data record for RTA Events **---------------------------------------------------------------------*
CPJR_RTA_DATA DS 0HCPJR_RTA_TYPE DS X Record typeCPJR_RTATYPE_CRT EQU 0001 Event CreatedCPJR_RTATYPE_REM EQU 0002 Event RemovedCPJR_RTATYPE_UPD EQU 0003 Event UpdatedCPJR_RTATYPE_RES EQU 0004 Event ResolvedCPJR_RTA_GTYPE DS X Generated by typeCPJR_RTAGTYPE_SAM EQU 0001 Event produced by SamCPJR_RTAGTYPE_APM EQU 0002 Event produced by ApmCPJR_RTAGTYPE_MRM EQU 0003 Event produced by MrmCPJR_RTA_EVENT DS CL8 Event NameCPJR_RTA_MSGSTRT DS CL30 External Entry MessageCPJR_RTA_MSGEND DS CL30 External Exit MessageCPJR_RTA_EVENTXT DS CL30 Event TextCPJR_RTA_SEVERITY DS CL3 Severity LevelCPJR_RTA_DATA_L EQU *-CPJR_RTA_DATA Length of the record
Figure 60. The EYUBCPJR DSECT (Part 1 of 2)
398 CICS TS for z/OS: Installation Guide
|##

For information on writing a program to access and format CICS journal records,refer to the CICS Customization Guide.
*---------------------------------------------------------------------** Data record for Definition changes **---------------------------------------------------------------------*
CPJR_DEF_DATA DS 0HCPJR_DEF_TYPE DS X Record typeCPJR_DEFTYPE_ADD EQU 0001 Definition AddedCPJR_DEFTYPE_DEL EQU 0002 Definition DeletedCPJR_DEFTYPE_UPD EQU 0003 Definition Update
DS X ReservedCPJR_DEF_MAJORNM DS CL8 Major NameCPJR_DEF_MAJORID DS CL8 ADMIN RestypeCPJR_DEF_MAJORVR DS XL4 Major VersionCPJR_DEF_MAJORVR_NONE EQU -1 Major Version NoneCPJR_DEF_MINORNM DS CL8 Minor NameCPJR_DEF_MINORID DS CL8 ADMIN RestypeCPJR_DEF_MINORVR DS XL4 Minor VersionCPJR_DEF_MINORVR_NONE EQU -1 Minor Version NoneCPJR_DEF_SYSID DS CL8 System Id where change x
was originatedCPJR_DEF_DATA_L EQU *-CPJR_DEF_DATA Length of the record
*---------------------------------------------------------------------** Data record for Operation commands **---------------------------------------------------------------------*
CPJR_OPS_DATA DS 0HCPJR_OPS_LENGTH DS H Length of fixed and variable x
portion of data areaCPJR_OPS_NUMFLDS DS H Number of fieldsCPJR_ACTION DS CL12 Name of action
CPJR_RESNAME DS CL8 Resource NameCPJR_OPS_STRTENT DS 0C Start of data entriesCPJR_OPS_DATA_L EQU *-CPJR_OPS_DATA Length of the record*CPJR_OPS_ENTRY DS 0CCPJR_OPS_FIELD DS CL12 Field NameCPJR_OPS_DATALEN DS X Length of the DataCPJR_OPS_ENTLEN DS X Length of entire entryCPJR_OPS_FLDDATA DS 0C Start of the DataCPJR_OPS_ENT_L EQU *-CPJR_OPS_ENTRY Fixed portion length
Figure 60. The EYUBCPJR DSECT (Part 2 of 2)
Chapter 51. CMAS journaling 399
##
###

400 CICS TS for z/OS: Installation Guide

Chapter 52. Preparing to use the IPCS tools
The interactive problem control system (IPCS) provides MVS users with aninteractive facility for diagnosing software failures. You can use IPCS to format andanalyze SDUMPs produced by CICSPlex SM or stand-alone dumps obtained whileCICSPlex SM was active in the system being dumped. You can either view thedumps at your terminal or print them.
Note: The CICSPlex SM IPCS tools are available only for CASs, CMASs, or MASsrunning in an MVS image.
CICSPlex SM provides two types of IPCS tools:
v A set of panels (driven by a corresponding set of CLISTs) that allow you todisplay:– The data in a coordinating address space (CAS) dump– The names and locations of control blocks and areas of a CAS dump– Subsystem information– Address space-related control blocks– Modules loaded by CICSPlex SM– Tasks created by CICSPlex SM– Storage subpools managed by CICSPlex SM– BBC LU 6.2 communication information
v A dump formatting routine that can be used with the VERBEXIT subcommand toformat CMAS or MAS dumps
For more information about:
v IPCS, see the MVS Interactive Problem Control System: User's Guide.
v Using IPCS to format CICSPlex SM system dumps, see the CICS Operationsand Utilities Guide.
v Displaying and formatting dumps with IPCS, see the CICSPlex System ManagerProblem Determination manual.
Before you can use the CICSPlex SM IPCS tools, you must make the preparationsdescribed in:v “Updating BLSCECT”v “Updating library allocations” on page 402v “SDUMP options” on page 402.
Updating BLSCECTIPCS provides an exit control table called BLSCECT; it normally resides inSYS1.PARMLIB. This table contains imbed statements to enable other products tosupply exit control information. You must perform the following steps:
1. Update the BLSCECT table for either a MAS-only environment or for a CMASenvironment.
v When the EYUINST ENVIRONMENT parameter of MAS was used to installCICSPlex SM, then the following IMBED statement is required:IMBED MEMBER(EYUIPCSP) ENVIRONMENT(ALL)
v When the EYUINST ENVIRONMENT parameter of CMAS was used to installCICSPlex SM, then the following IMBED statements are required:IMBED MEMBER(EYUIPCSP) ENVIRONMENT(ALL)IMBED MEMBER(BBM3IPCS) ENVIRONMENT(ALL)
© Copyright IBM Corp. 1989, 2010 401

BBM3IPCS defines the CICSPlex SM main panel as CPSMSSDA, and adds anentry for the panel to the IPCS MVS component menu. EYUIPCSP identifies theCICSPlex SM formatting routine as EYU9D310 with a VERB name ofCPSM310.
2. Make sure the required parameter member(s) can be found by your IPCS job bydoing one of the following:
v Copy the required parameter member(s) from theCICSTS31.CPSM.SEYUPARM library into the same library as BLSCECT(usually SYS1.PARMLIB).
v Provide an IPCSPARM DD statement to specify the library that contains theIPCS control tables. For example, the DD statement for a batch TSO sessionmight look like this:
//IPCSPARM DD DSN=SYS1.PARMLIB,DISP=SHR for BLSCECT// DD DSN=CICSTS31.CPSM.SEYUPARM,DISP=SHR for BBM3IPCS/EYUIPCSP
For more information about SYS1.PARMLIB library members related to IPCS, seethe MVS Interactive Problem Control System (IPCS): Customization manual.
Updating library allocationsTo update the library allocations, you must do the following:
v Update the CLIST or REXX EXEC that invokes IPCS at your enterprise toinclude the following data set allocations:
ISPPLIB CICSTS31.CPSM.SEYUPLIB
Contains panels that allow you to view data structures.
SYSPROC CICSTS31.CPSM.SEYUCLIB
Contains CLISTs that obtain information from a dump and displayit. These CLISTs also create a set of IPCS symbol equates tohelp you locate data while browsing a dump outside of thepanels.
ISPMLIB CICSTS31.CPSM.SEYUMLIB
Contains messages issued by the CLISTs.
v Make sure that the EYU9D310 IPCS user exit routine is in a library in the linklistor a library that is accessed by the JOBLIB, STEPLIB, or TASKLIB option of theIPCS command, during IPCS session. To accomplish this, do one of thefollowing:
– Allocate CICSTS31.CPSM.SEYULINK to the desired DD statement.
– Copy CICSTS31.CPSM.SEYULINK (EYU9D310) to an appropriate library.
– Invoke IPCS, using the TASKLIB keyword to allocateCICSTS31.CPSM.SEYULINK .
For example, issue the TSO COMMAND:IPCS NOPARM TASKLIB(’CICSTS31.CPSM.SEYULINK ’)
SDUMP optionsMake sure the following SDUMP options are in effect at the time the dump is taken:
CSA Common service area
LPA Link pack area modules
LSQA Local system queue area
NUC Non-page-protected areas of the DAT-on nucleus
Updating BLSCECT
402 CICS TS for z/OS: Installation Guide

PSA Prefixed storage area for all processors
RGN Private area of address space being dumped
SQA System queue area
SUM Summary dump
SWA Scheduler work area
TRT GTF, system trace, and master trace data
SDUMP options
Chapter 52. Preparing to use the IPCS tools 403

SDUMP options
404 CICS TS for z/OS: Installation Guide

Part 6. CICSPlex SM verification
This part describes the processes and procedures you should follow to run theinstallation verification procedures for CICSPlex SM. It contains the followingchapters
v Chapter 53, “CICSPlex SM installation verification procedures,” on page 407
v Chapter 54, “Installation verification procedure 1 (IVP1),” on page 411
v Chapter 55, “Installation verification procedure 2 (IVP2),” on page 425
© Copyright IBM Corp. 1989, 2010 405

406 CICS TS for z/OS: Installation Guide

Chapter 53. CICSPlex SM installation verification procedures
This chapter describes how to run the CICSPlex SM installation verificationprocedures (IVPs) to confirm that CICSPlex SM has been installed successfully. Itis recommended that you run the IVPs before you complete the setup andconfiguration tasks for your environment.
There are two IVPs for the installation of CICSPlex SM on MVS, IVP1 and IVP2:
v IVP1 verifies the installation of CICSPlex SM on the first or only MVS image.
v IVP2 verifies the installation of CICSPlex SM on the second and subsequentMVS images.
IVP1 and IVP2 are largely the same, except that IVP2 incorporates tests of links toand from the CICSPlex SM components established by IVP1.
Please note the following:
v While you are running the IVPs, you will encounter the CICSPlex SM term view.A view is simply a formatted display of data relating to one or more CICSresources or CICSPlex SM definitions.
v You enter commands throughout the IVPs by typing the command name in theCOMMAND field of the current view and pressing Enter. However, if anyparticular command is assigned to a PF key, you may use the PF key instead oftyping the command name.
For general information about the CICSPlex SM ISPF user interface, see theCICSPlex System Manager User Interface Guide .
If the IVPs do not work as describedYou run the IVPs to verify that CICSPlex SM has been installed successfully.Therefore, the failure of an IVP is likely to mean that either the installation ofCICSPlex SM has not succeeded, or preceding steps of the IVP have failed. Errormessages may be issued at any stage of the IVPs: please refer to the CICSPlexSystem Manager Messages and Codes manual for detailed descriptions ofCICSPlex SM error messages.
The stages of IVP1 and IVP2During the course of performing the tasks of IVP1 and IVP2, you install a subset ofthe CICSPlex SM Starter Set that is sufficient to test all major components andfunctions of CICSPlex SM. The structure and purpose of the Starter Set aredescribed in the CICSPlex System Manager Concepts and Planning manual. Howto configure the Starter Set for use in your enterprise is described in Chapter 47,“Configuring the Starter Set,” on page 361.
The main stages of IVP1 and IVP2 are:
1. Setting up the CICSPlex SM environment
2. Starting the CICSPlex SM componentsa. Starting the CASb. Starting the CMASc. Defining a CICSplexd. Loading definitions using the batched repository update facilitye. Starting the MAS
© Copyright IBM Corp. 1989, 2010 407

3. Testing the CICSPlex SM operations functions
When you have defined your own CICSPlex SM configuration, you might want torerun IVP1 and IVP2 using your own CASs, CMASs, and MASs rather than thoseof the Starter Set. Instructions for running IVP1 and IVP2 with your ownconfiguration are supplied in “Customizing the installation verification procedures”on page 443.
The IVP samples librariesThe JCL and sample definitions you need to run IVP1 and IVP2 are in the StarterSet samples libraries CICSTS31.CPSM.SEYUJCL andCICSTS31.CPSM.SEYUDEF. The library CICSTS31.CPSM.SEYUJCL includessample JCL for creating, running, and deleting the Starter Set components createdduring IVP1 and IVP2. The library CICSTS31.CPSM.SEYUDEF includes samplessuch as VTAM definitions and CICS tables. Table 43, Table 44, Table 45, andTable 46 on page 409 identify the JCL and definitions used during IVP1 and IVP2.
Table 43. JCL in CICSTS31.CPSM.SEYUJCL for creating the IVP components
Sample name IVP1 IVP2 Description
EYUIBBIA U U Creates CAS data sets EYUSDEF and EYUIPRMon system A
EYUIBBIB U Creates CAS data sets EYUSDEF and EYUIPRMon system B
EYUICICA U U Creates MAS data sets on system AEYUICICB U Creates MAS data sets on system BEYUICMSA U U Creates CMAS data sets on system AEYUICMSB U Creates CMAS data sets on system BEYUIDRPA U U Creates data repository on system AEYUIDRPB U Creates data repository on system BEYUICSDA U U Creates DFHCSD data set on system AEYUICSDB U Creates DFHCSD data set on system B
Table 44. JCL in CICSTS31.CPSM.SEYUJCL for running the IVPs
Sample name IVP1 IVP2 Description
EYUICM1A U U Starts CMAS EYUCMS1A on system AEYUICM1B U Starts CMAS EYUCMS1B on system BEYUIMS1A U U Starts MAS EYUMAS1A on system AEYUIMS1B U Starts MAS EYUMAS1B on system BEYUICS1A U U Starts CAS EYUCAS1A on system AEYUICS1B U Starts CAS EYUCAS1B on system BEYUICSSA U U Starts CAS EYUCAS1A on system A as a started
taskEYUICSSB U Starts CAS EYUCAS1B on system B as a started
task
Table 45. Starter Set definitions in CICSTS31.CPSM.SEYUDEF used by the IVPs
Sample name IVP1 IVP2 Description
EYUDVTIA U U VTAM definitions for system AEYUDVTIB U VTAM definitions for system BEYUDCDMA U CDRM definitions for system AEYUDCDMB U CDRM definitions for system B
408 CICS TS for z/OS: Installation Guide

Table 45. Starter Set definitions in CICSTS31.CPSM.SEYUDEF used by theIVPs (continued)
Sample name IVP1 IVP2 Description
EYUMDTAB U U Modetable for CASsEYUTPLTC U U DFHPLT for CMASsEYUTPLTL U U DFHPLT for local MASEYUTSRTS U U DFHSRT for CMASs and MASsEYU@ISPF U U ISPF logon procedureEYU@PRIM U U ISPF primary option panel
Table 46. JCL in CICSTS31.CPSM.SEYUJCL for deleting components created by the IVPs
Sample name IVP1 IVP2 Description
EYUIBBDA U U Deletes CAS data sets on system AEYUIBBDB U Deletes CAS data sets on system BEYUICIDA U U Deletes MAS data sets on system AEYUICIDB U Deletes MAS data sets on system BEYUIDRDA U U Deletes the data repository on system AEYUIDRDB U Deletes the data repository on system BEYUICDDA U U Deletes the DFHCSD data set on system AEYUICDDB U Deletes the DFHCSD data set on system BEYUICMDA U U Deletes the CMAS data sets on system AEYUICMDB U Deletes the CMAS data sets on system B
Note: When you have run IVP1 and IVP2, you might want to use the JCL listed inTable 46 to delete the Starter Set components you have created. However, ifyou are planning to configure the Starter Set for use on an MVS image onwhich you have run an IVP, keeping the IVP components might save yousome effort at a later stage. See Chapter 47, “Configuring the Starter Set,”on page 361 for more information.
Chapter 53. CICSPlex SM installation verification procedures 409

410 CICS TS for z/OS: Installation Guide

Chapter 54. Installation verification procedure 1 (IVP1)
It is recommended that you run IVP1 on the first or only MVS image on which youinstall CICSPlex SM. Before you begin, ensure that the CICSPlex SM data setsare authorized as described in “Authorizing libraries” on page 283. On the MVSimage on which you run IVP1 (which is referred to in the remainder of this sectionas “system A”) you must have access to:
v The CICSPlex SM samples data sets CICSTS31.CPSM.SEYUDEF andCICSTS31.CPSM.SEYUJCL
v CICS load libraries
v CICS table-assembly JCL
v The CEDA transaction on MAS EYUMAS1A
v The MVS console log via TSO SDSF.
Figure 61shows those components of the CICSPlex SM Starter Set that are definedduring IVP1.
Setting up the CICSPlex SM environment on system APerform the following steps to prepare the MVS environment on system A forCICSPlex SM:
(TOR)EYUMAS1A
(AOR)EYUMAS2A
(AOR)EYUMAS3A
(FOR)EYUMAS4A
EYUCMS1A EYUCMS1B
MAS MAS MAS MAS
CMAS CMAS
MAS MAS MAS MAS(AOR)
EYUMAS1B(TOR)
EYUMAS2B(AOR)
EYUMAS3B(FOR)
EYUMAS4B
EYUCAS1A EYUCAS1B
CAS CAS
MVSSystem A
MVSSystem B
Figure 61. Starter Set components for IVP1. Shaded components—EYUCAS1A, EYUCMS1A, and EYUMAS1A—areused during IVP1
© Copyright IBM Corp. 1989, 2010 411
1. Run EYUISTRT on system A to tailor the skeleton jobs for the Starter Set (andthereby for the IVPs). EYUISTRT runs the EYUINST EXEC to tailor the StarterSet members. For more information about EYUISTRT, see Chapter 49, “Usingthe EYUINST EXEC to tailor skeleton jobs,” on page 373. Table 47 identifiesthose EYUINST EXEC parameters that are applicable to the Starter Set.
Table 47. EYUINST EXEC parameters required for the Starter Set
Parameter CMAS MAS Default
CINDEXnnn Yes Yes None
CMASNAME Yes None
CRELEASE Yes Yes None
DSINFO Yes index dsvlsr dsunit
ENVIRONMENT Yes Yes None
INDEX Yes Yes CICSTS31.CPSM
JOB Yes Yes //XXXXXXXX JOB
LIB Yes Yes CICSTS31.CPSM.XEYUINST
PREFIX Yes Yes EYU
SCEESAMP Yes SYS1.SCEESAMP
SCOPE Yes Yes STARTER
Note: The SCOPE value should be set to STARTER.
SELECT Yes None
TEMPLIB Yes Yes CICSTS31.CPSM.SEYUJCL
Note: For more information about TEMPLIB, see “EYUINST EXEC parameters” on page375.
2. Add VTAM definitions for EYUCAS1A, EYUCMS1A, and EYUMAS1A to theVTAM table on system A. An example of the VTAM definitions for these threeCICSPlex SM components is provided in sample EYUDVTIA.
You need not add the VTAM definitions now to system B if you plan to not runIVP2. (Remember that IVP2 should be run when you will have CMAS-to-CMAScommunication links.)
EYUDVTIA is a subset of the VTAM definitions required on system A for thecomplete Starter Set. It holds the basic definitions required to run IVP1.
Note: The sample VTAM definitions use MODETAB(EYUMDTAB). The sourceof this is in CICSTS31.CPSM.SEYUDEF, member EYUMDTAB. If youuse the starter set VTAM definitions, you must assemble this table andput it into the VTAMLST library.
If you use Network Control Programs (NCP), you may need to create amode table, using the sample entry shown in EYUMDTAB, in order tocontrol the VTAM RUSIZE (request unit size) parameter.
3. Run the JCL EYUIBBIA, which defines the BBIPARM data set for CASEYUCAS1A.
4. Run the JCL EYUICMSA, which defines all data sets required by CMASEYUCMS1A.
5. Run the JCL EYUICICA, which defines all data sets required by MASEYUMAS1A.
412 CICS TS for z/OS: Installation Guide

6. Run the JCL EYUIDRPA, which defines the CICSPlex SM data repository onsystem A.
Note: This data repository can be used with the Starter Set on system A: itdoes not need to be recreated after the IVPs have been run.)
7. Run the JCL EYUICSDA, which defines, initializes, and loads the CSD to beused by both EYUCMS1A and EYUMAS1A.
8. Make any necessary site-specific changes to the CSD created in step 7. Forexample, you might need to add TYPETERMs, TERMINALs or AUTOINSTALLMODELs.
9. Assemble the following sample CICS tables into a load library:EYUTPLTC (PLT for EYUCMS1A)EYUTPLTL (PLT for EYUMAS1A)EYUTSRTS (SRT)
Notes:
a. Ensure that you have a model installed for the system log stream. Thedefault naming convention is userid.applid.DFHLOG anduserid.applid.DFHSHUNT for a system log stream, anduserid.applid.DFHJnn (where nn is 01 through 99) for a user journal. SeeChapter 24, “Defining the logger environment for CICS journaling,” on page143 and the CICS System Definition Guide for more information aboutcreating log streams.
b. TDQ definitions are added to the CSD when the CSD is created orupgraded.
c. For details on assembling CICS control tables, see the CICS/ESA SystemDefinition Guide.
10. Update ISPF on system A to reflect the addition of CICSPlex SM. You can findan example of the required changes in EYU@ISPF and EYU@PRIM. Notethat any changes you make to ISPF are generally applicable on system A andare not confined to IVP1 only. Therefore, you should try to make a permanentchange at this stage so that you don’t have to repeat this step later. For moreinformation, see Chapter 42, “Preparing user access to CICSPlex SM,” onpage 313.
Starting up and verifying CICSPlex SM components on system AWhen the system A environment for CICSPlex SM is established, you are ready to:1. Start the CAS EYUCAS1A2. Start the CMAS EYUCMS1A3. Define a CICSplex4. Run the batched repository update facility5. Start the MAS EYUMAS1A
1: Start the CAS EYUCAS1A1. Log on to system A and start the CAS using either JCL EYUICS1A or (to start
the CAS as a started task) JCL EYUICSSA. When you start the CAS, outputsimilar to this appears in the JES2 job log:
Chapter 54. Installation verification procedure 1 (IVP1) 413

2. Look for message number BBMZA001I in the output to confirm that the CASEYUCAS1A is started.
2: Start the CMAS EYUCMS1A1. Check the CICS Transaction Server for z/OS system initialization table (SIT)
parameters in JCL EYUICM1A, in particular the SVC numbers and the defaultuser, to ensure that they are suitable for your environment.
2. Submit JCL EYUICM1A. The output from EYUICM1A is similar to this:
COMMAND INPUT ===> SCROLL ===> PAGE********************************* TOP OF DATA ********************************
J E S 2 J O B L O G -- S Y S T E M M V 2 6 --
BBMYAB62I Default system values used for CAS definitionBBMXCL41I Default system values used for target definitionBBMXBI17I Default security parameters usedBBMXBI26I Default security resource properties usedBBMXCL36I Default security resource definition used for COMMON resourcesBBMSS001I Security - ESMTYPE(RACF) SUBSYS(EYUA) REQSTOR(<asis>) APPL(EYUA)BBMZA001I CAS(MV26) SSID(EYUA) INITIALIZATION COMPLETE - R3.3.8 (HPC2300)BBMXCL36I Default security resource definition used for PLEXMGR resources
414 CICS TS for z/OS: Installation Guide

3. In the output from EYUICM1A, look for messages EYUXL0009I andEYUXL0008I to confirm that the CMAS EYUCMS1A is started.
3: Define a CICSplex to CICSPlex SMDuring this stage, you define a CICSplex to CICSPlex SM via the CICSPlex SMend-user interface.
1. Log on to TSO on system A and select the CICSPlex SM option from the mainISPF panel; the CICSPlex SM option is CP if you are using the suppliedsamples. Ensure that “EYUA” is specified as the subsystem ID. (This can bechanged using option 0.1 from the main ISPF panel.) The CICSPlex SystemManager entry panel is displayed:
COMMAND INPUT ===> SCROLL ===> PAGE11.12.45 JOB13455 +DFHCP0102I EYUCMS1A CPI initialization has ended.11.12.45 JOB13455 +DFHPR0105I EYUCMS1A Partner resource manager initialization has ended.11.12.45 JOB13455 +DFHAI0102I EYUCMS1A AITM initialization has ended.11.12.46 JOB13455 +DFHSI1511I EYUCMS1A Installing group list CMS1AGPL.11.12.48 JOB13455 +DFHLG0103I EYUCMS1A System log (DFHLOG) initialization has started.11.12.49 JOB13455 +DFHLG0104I EYUCMS1A 759
759 System log (DFHLOG) initialization has ended. Log stream759 CICINST.EYUCMS1A.DFHLOG is connected to structure LOG_GENERAL_002.
11.12.49 JOB13455 +DFHLG0103I EYUCMS1A System log (DFHSHUNT) initialization has started.11.12.50 JOB13455 +DFHLG0104I EYUCMS1A 761
761 System log (DFHSHUNT) initialization has ended. Log stream761 CICINST.EYUCMS1A.DFHSHUNT is connected to structure LOG_GENERAL_002.
11.12.50 JOB13455 +DFHLG0745I EYUCMS1A System log full scan has started.11.12.50 JOB13455 +DFHLG0748I EYUCMS1A System log selective scan has started.11.12.50 JOB13455 +DFHLG0749I EYUCMS1A System log scan has completed.11.12.50 JOB13455 +DFHRM0156 EYUCMS1A This COLD start will NOT cause any damage to local resources.11.12.50 JOB13455 +DFHRX0106I EYUCMS1A Restart processing with Resource Recovery Services (RRS) is beginning.11.12.50 JOB13455 +DFHRX0107I EYUCMS1A Restart processing with Resource Recovery Services (RRS) has ended.11.12.51 JOB13455 +DFHSI1519I EYUCMS1A The interregion communication session was successfully started.11.12.51 JOB13455 +DFHAP1203I EYUCMS1A Language Environment is being initialized.11.12.52 JOB13455 +DFHAP1211I EYUCMS1A Language Environment initialization completed.11.12.53 JOB13455 +DFHWB1007 EYUCMS1A Initializing CICS Web environment.11.12.53 JOB13455 +DFHWB1008 EYUCMS1A CICS Web environment initialization is complete.11.12.53 JOB13455 +DFHSI8440I EYUCMS1A Initiating connection to CICSPlex SM.11.12.53 JOB13455 +EYUXL0001I EYUCMS1A CMAS PLTPI program starting11.12.53 JOB13455 +EYUXL0002I EYUCMS1A CICS TRACE active11.12.54 JOB13455 +EYUXL0017I EYUCMS1A CMAS PLTPI program terminating11.12.54 JOB13455 +DFHSI1517 EYUCMS1A Control is being given to CICS.11.12.54 JOB13455 +DFHEJ0102 EYUCMS1A Enterprise Java domain initialization has ended.11.12.54 JOB13455 +EYUXL0003I EYUCMS1A CPSM Version 0310 CMAS startup in progress11.12.55 JOB13455 +DFHFC0208I EYUCMS1A 794
794 LSR pool 1 is being built dynamically by CICS because all of the794 necessary parameters have not been supplied. Either there is no794 LSRPOOL definition or it is incomplete. The following are not794 defined: ’CI SIZE’ ’STRINGS’ ’MAXKEYLENGTH’. A delay is possible.
11.12.55 JOB13455 +DFHFC0961 EYUCMS1A 799799 01/26/2005 11:12:55 EYUCMS1A Calculation of LSR pool 1 parameters799 incomplete. Filename EYUDREPN has no DSNAME.
11.12.57 JOB13455 +EYUXL0022I EYUCMS1A CMAS Phase I initialization complete11.12.57 JOB13455 +EYUXL0211I EYUCMS1A CPSM Start Up Parameters11.12.57 JOB13455 +EYUXL0212I EYUCMS1A CASNAME(EYUA)11.12.57 JOB13455 +EYUXL0212I EYUCMS1A NAME(EYUCMS1A)11.12.57 JOB13455 +EYUXL0020I EYUCMS1A ESSS connection in progress11.12.57 JOB13455 +EYUXL0004I EYUCMS1A ESSS connection complete11.12.58 JOB13455 +EYUCR0006W EYUCMS1A Security checking disabled per SEC(NO) EYUPARM parameter specification11.12.58 JOB13455 +EYUCW0108I EYUCMS1A Time zone offset from GMT computed based on CMAS time zone attributes11.12.59 JOB13455 +EYUXL0007I EYUCMS1A CMAS Phase II initialization complete11.12.59 JOB13455 +EYUXL0007I EYUCMS1A CMAS Phase III initialization complete11.12.59 JOB13455 +EYUXL0007I EYUCMS1A CMAS Phase IV initialization complete11.13.00 JOB13455 +EYUXL0009I EYUCMS1A CAS connection established11.13.30 JOB13455 +EYUXL0010I EYUCMS1A CMAS initialization complete11.13.30 JOB13455 +EYUXL0008I EYUCMS1A CICSPlex registration complete
Chapter 54. Installation verification procedure 1 (IVP1) 415

2. Select CICSPlex SM by typing the value “2” in the OPTION field. Beforepressing Enter, ensure that both the Context field and the Scope field containthe name of the CMAS, which is EYUCMS1A. The MENU menu is displayed:
3. From the MENU menu, select ADMCONFG. You can select ADMCONFG in oneof three ways. You can:
v Type ADMCONFG in the COMMAND field and press Enter.
v Move the cursor down to the ADMCONFG line, type S (for select) in the Ccolumn, and press Enter.
v Move the cursor to the ADMCONFG value or its description and press Enter.
--------------------------- CICSPlex System Manager ----------------------------OPTION ===>
0 PROFILE - User Session Parameters1 PLEXMGR - List of Service Points2 CPSM - CICSPlex SM
Default Criteria for CPSM:
Context ===> EYUCMS1AScope ===> EYUCMS1AWarning Record Count ===> 0 0 for no checkingRequire Set ===> YES YES, NO
Licensed Materials - Property of IBM5697-E93 (C) Copyright IBM Corp. 1994, 2011.All Rights Reserved. U.S. Government UsersRestricted Rights - Use, Duplication or Disclosurerestricted by GSA ADP Schedule Contract with IBM Corp.
27FEB2005 13:38:17 ----------- INFORMATION DISPLAY ---------------------------COMMAND ===> SCROLL ===> PAGECURR WIN ===> 1 ALT WIN ===>W1 =MENU==============EYUCMS1A=EYUCMS1A=27FEB2005==13:38:17=CPSM=========14===CMD Name Description--- -----------------------------------
ANALYSIS Real Time Analysis Operations ViewsCONFIG CMAS Configuration Operations ViewsMONITOR Monitoring ViewsOPERATE Operations ViewsTOPOLOGY Topology Operations ViewsWORKLOAD Workload Operations Views======== ================================================================ADMSAM RTA System Availability Monitoring Administration ViewsADMMRM RTA MAS Resource Monitoring Administration ViewsADMAPM RTA Analysis Point Monitoring Administration ViewsADMCONFG CMAS Configuration Administration ViewsADMMON Monitor Administration ViewsADMTOPOL Topology Administration ViewsADMWLM Workload Manager Administration ViewsADMBAS Business Application Services Administration ViewsADMRES Business Application Services Resource Views
416 CICS TS for z/OS: Installation Guide
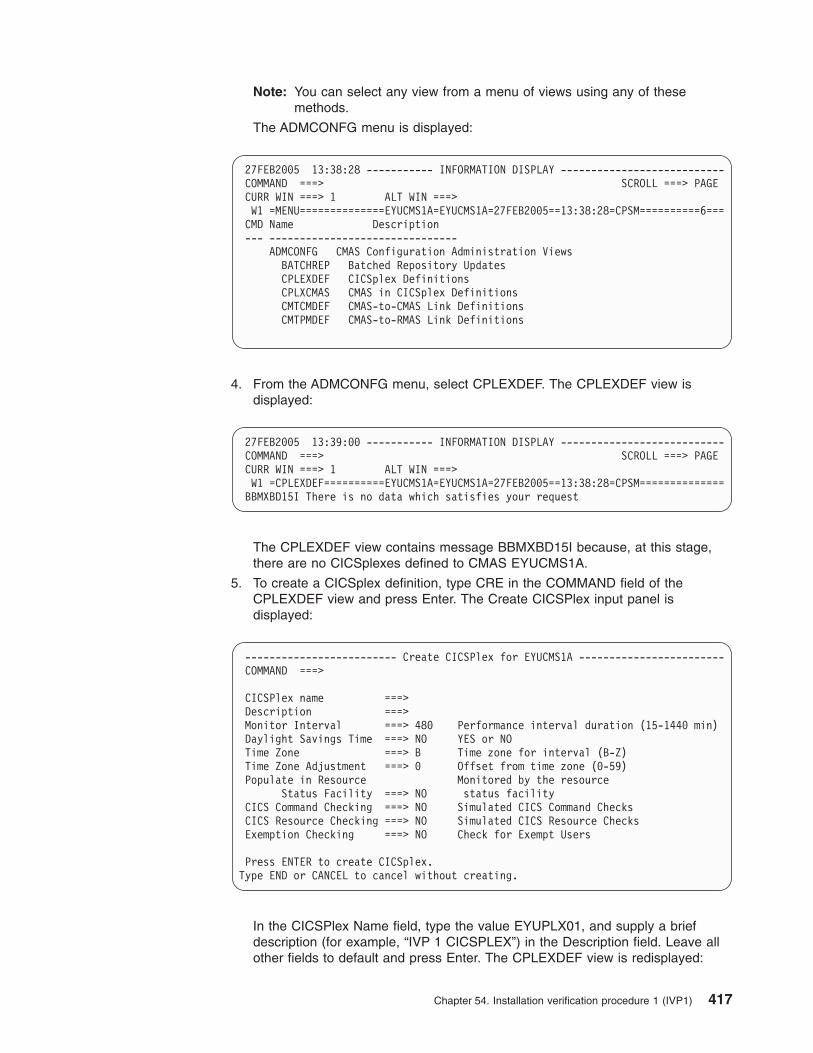
Note: You can select any view from a menu of views using any of thesemethods.
The ADMCONFG menu is displayed:
4. From the ADMCONFG menu, select CPLEXDEF. The CPLEXDEF view isdisplayed:
The CPLEXDEF view contains message BBMXBD15I because, at this stage,there are no CICSplexes defined to CMAS EYUCMS1A.
5. To create a CICSplex definition, type CRE in the COMMAND field of theCPLEXDEF view and press Enter. The Create CICSPlex input panel isdisplayed:
In the CICSPlex Name field, type the value EYUPLX01, and supply a briefdescription (for example, “IVP 1 CICSPLEX”) in the Description field. Leave allother fields to default and press Enter. The CPLEXDEF view is redisplayed:
27FEB2005 13:38:28 ----------- INFORMATION DISPLAY ---------------------------COMMAND ===> SCROLL ===> PAGECURR WIN ===> 1 ALT WIN ===>W1 =MENU==============EYUCMS1A=EYUCMS1A=27FEB2005==13:38:28=CPSM==========6===CMD Name Description--- -------------------------------
ADMCONFG CMAS Configuration Administration ViewsBATCHREP Batched Repository UpdatesCPLEXDEF CICSplex DefinitionsCPLXCMAS CMAS in CICSplex DefinitionsCMTCMDEF CMAS-to-CMAS Link DefinitionsCMTPMDEF CMAS-to-RMAS Link Definitions
27FEB2005 13:39:00 ----------- INFORMATION DISPLAY ---------------------------COMMAND ===> SCROLL ===> PAGECURR WIN ===> 1 ALT WIN ===>W1 =CPLEXDEF==========EYUCMS1A=EYUCMS1A=27FEB2005==13:38:28=CPSM==============BBMXBD15I There is no data which satisfies your request
------------------------- Create CICSPlex for EYUCMS1A ------------------------COMMAND ===>
CICSPlex name ===>Description ===>Monitor Interval ===> 480 Performance interval duration (15-1440 min)Daylight Savings Time ===> NO YES or NOTime Zone ===> B Time zone for interval (B-Z)Time Zone Adjustment ===> 0 Offset from time zone (0-59)Populate in Resource Monitored by the resource
Status Facility ===> NO status facilityCICS Command Checking ===> NO Simulated CICS Command ChecksCICS Resource Checking ===> NO Simulated CICS Resource ChecksExemption Checking ===> NO Check for Exempt Users
Press ENTER to create CICSplex.Type END or CANCEL to cancel without creating.
Chapter 54. Installation verification procedure 1 (IVP1) 417

The CPLEXDEF view now contains an entry for CICSplex EYUPLX01.
6. Return to the CICSPlex SM MENU menu by typing MENU in the COMMANDfield of the CPLEXDEF view and pressing Enter.
4: Run the batched repository update facility on system ADuring this stage you load several definitions into the data repository of CMASEYUCMS1A using the batched repository update facility.
1. From the CICSPlex SM MENU menu, select ADMCONFG. From theADMCONFG menu, select BATCHREP. The BATCHREP view is displayed:
2. To submit a job to update the data repository, type the value SUB in theCOMMAND field of the BATCHREP view and press Enter. The Start Batch Runinput panel is displayed:
Complete the Start Batch Run screen as shown above and press Enter. Thesupplied sample data repository definitions are loaded into the data repository ofEYUCMS1A.
Note: The Print Class, Print Node, and Output Userid values are site specific.Consult your MVS administrator for valid values for these fields. Be
27FEB2005 13:39:25 ----------- INFORMATION DISPLAY ---------------------------COMMAND ===> SCROLL ===> PAGECURR WIN ===> 1 ALT WIN ===>W1 =CPLEXDEF==========EYUCMS1A=EYUCMS1A=27FEB2005==13:39:25=CPSM==========1===CMD Name Mon Time Zone Day Cmd Res Xmp Res Description--- -------- Intv Zone Adj Save Chk Chk Chk Sta -----------------------------
EYUPLX01 480 B 0 NO NO NO NO NO IVP 1 CICSPLEX
27FEB2005 13:39:36 ----------- INFORMATION DISPLAY ---------------------------COMMAND ===> SCROLL ===> PAGECURR WIN ===> 1 ALT WIN ===>W1 =BATCHREP==========EYUCMS1A=EYUCMS1A=27FEB2005==13:39:36=CPSM==============BBMXBD15I There is no data which satisfies your request
COMMAND ===>
Data Set Name ===> ’CICSTS31.CPSM.SEYUDEF’
Data Set Member ===> EYUDDRIA
Print Class ===> H
Print Node ===> *
Output Userid ===> *
Run Type ===> EXECUTE (CHECK or EXECUTE)
Press ENTER to Run the Job.Type END or CANCEL to cancel without Running.
418 CICS TS for z/OS: Installation Guide

aware, however, that the Print Class value should identify a HELD outputclass so that the results of the batch run may be validated.
3. Verify that the batched repository update facility has created the definitions byexamining the JOBLOG of EYUICM1A, which is in the HELD output queue.Look for message EYUXU0218I to verify this.
4. Return to the CICSPlex SM MENU menu by typing MENU in the COMMANDfield of the BATCHREP view and pressing Enter.
5: Start the MAS EYUMAS1A1. Check the SIT parameters in JCL EYUIMS1A, in particular the SVC numbers
and the default user, to ensure that they are suitable for your environment.
2. Submit JCL EYUIMS1A from TSO. Output similar to this appears in the job log:
COMMAND INPUT ===> SCROLL ===> PAGE********************************* TOP OF DATA **************************CREATE LNKSMSCG SPEC(EYUMOS03)
GROUP(EYUCSG04)FORCE;
EYUXU0218I EYUCMS1A BATCH CREATE REQUEST COMPLETE - STATUS(OK)CREATE LNKSMSCG SPEC(EYUMOS03)
GROUP(EYUCSG05)FORCE;
EYUXU0218I EYUCMS1A BATCH CREATE REQUEST COMPLETE - STATUS(OK)CREATE LNKSRSCS SPEC(EYURTS01)
SYSTEM(EYUMAS1A);
EYUXU0218I EYUCMS1A BATCH CREATE REQUEST COMPLETE - STATUS(OK)CREATE LNKSRSCS SPEC(EYURTS01)
SYSTEM(EYUMAS4A);
EYUXU0218I EYUCMS1A BATCH CREATE REQUEST COMPLETE - STATUS(OK)
Chapter 54. Installation verification procedure 1 (IVP1) 419

3. Look for messages EYUXL0004I and EYUXL0007I to confirm that MASEYUMAS1A is started.
Testing CICSPlex SM functionsDuring this part of IVP1, you test the operations function of CICSPlex SM onsystem A.
Test the operations functions on system ADuring this stage of IVP1 you:v Change the value of a CICS resource via CICSPlex SMv Test the CICSPlex SM help facility.
1. From the CICSPlex SM MENU menu, check that the context and scope arestill set to EYUPLX01 by looking at the window information line, which is thefourth line down from the top of the display. Following the two occurrences ofthe menu name (MENU) are the context (EYUPLX01) and scope (EYUPLX01)values.
From the MENU menu, select OPERATE. The OPERATE menu is displayed:
COMMAND INPUT ===> SCROLL ===> PAGE
13.06.30 JOB13676 +DFHSI1511I EYUMAS1A Installing group list MAS1AGPL.13.06.33 JOB13676 +DFHLG0103I EYUMAS1A System log (DFHLOG) initialization has started.13.06.34 JOB13676 +DFHLG0104I EYUMAS1A 983
983 System log (DFHLOG) initialization has ended. Log stream983 CICINST.EYUMAS1A.DFHLOG is connected to structure LOG_GENERAL_002.
13.06.34 JOB13676 +DFHLG0103I EYUMAS1A System log (DFHSHUNT) initialization has started.13.06.34 JOB13676 +DFHLG0104I EYUMAS1A 997
997 System log (DFHSHUNT) initialization has ended. Log stream997 CICINST.EYUMAS1A.DFHSHUNT is connected to structure LOG_GENERAL_002.
13.06.34 JOB13676 +DFHRX0106I EYUMAS1A Restart processing with Resource Recovery Services (RRS) is beginning.13.06.35 JOB13676 +DFHRX0107I EYUMAS1A Restart processing with Resource Recovery Services (RRS) has ended.13.06.35 JOB13676 +DFHSI1519I EYUMAS1A The interregion communication session was successfully started.13.06.35 JOB13676 +DFHSZ4001 I 01/26/2005 13:06:35 EYUMAS1A FEPI initialization has started.13.06.35 JOB13676 +DFHAP1203I EYUMAS1A Language Environment is being initialized.13.06.35 JOB13676 +DFHSZ4002 I 01/26/2005 13:06:35 EYUMAS1A FEPI initialization has ended.13.06.37 JOB13676 +DFHAP1211I EYUMAS1A Language Environment initialization completed.13.06.37 JOB13676 +DFHWB1007 EYUMAS1A Initializing CICS Web environment.13.06.37 JOB13676 +DFHWB1008 EYUMAS1A CICS Web environment initialization is complete.13.06.37 JOB13676 +DFHSI8440I EYUMAS1A Initiating connection to CICSPlex SM.13.06.37 JOB13676 +EYUNX0001I EYUMAS1A LMAS PLTPI program starting13.06.38 JOB13676 +EYUXL0003I EYUMAS1A CPSM Version 0310 LMAS startup in progress13.06.39 JOB13676 +EYUXL0022I EYUMAS1A LMAS Phase I initialization complete13.06.39 JOB13676 +EYUXL0211I EYUMAS1A CPSM Start Up Parameters13.06.39 JOB13676 +EYUXL0212I EYUMAS1A NAME(EYUMAS1A)13.06.39 JOB13676 +EYUXL0212I EYUMAS1A CICSPLEX(EYUPLX01)13.06.39 JOB13676 +EYUXL0212I EYUMAS1A CMASSYSID(CM1A)13.06.39 JOB13676 +DFHEJ0102 EYUMAS1A Enterprise Java domain initialization has ended.13.06.39 JOB13676 +DFHSI1517 EYUMAS1A Control is being given to CICS.13.06.41 JOB13676 +EYUXL0020I EYUMAS1A ESSS connection in progress to CICSPLEX(EYUPLX01) for SYSID(CM1A)13.06.41 JOB13676 +EYUXL0004I EYUMAS1A ESSS connection complete13.06.41 JOB13676 +EYUCL0006I EYUMAS1A ESSS link to EYUCMS1A established13.06.41 JOB13676 +EYUXL0007I EYUMAS1A LMAS Phase II initialization complete13.06.42 JOB13676 +EYUNL0099I EYUMAS1A LMAS LRT initialization complete
420 CICS TS for z/OS: Installation Guide

2. From the OPERATE menu, enter CICSRGN to display details of CICS systemsbelonging to EYUPLX01. From the CICSRGN view, display a detailed view ofdata for region EYUMAS1A by moving the cursor to the entry for EYUMAS1Aand pressing Enter.
Note: It is not sufficient to tab to the desired line on the display, the cursormust be placed under one of the letters of the name of the region, forexample EYUMAS1A.
3. The CICSRGND view for EYUMAS1A is displayed. Move the cursor to theCurrent Tasks field and press Enter. The CICSRGN3 view is displayed.
4. Verify that the CICSPlex SM help function is working by typing HEL in theCOMMAND field of the CICSRGN3 view, moving the cursor to the MAxtasksfield, and pressing Enter. A pop-up panel 7 in which the MAxtasks field isdescribed, overwrites the CICSRGN3 view.
5. Type END in the COMMAND field of the help panel and press Enter to returnto the CICSRGN3 view.
6. From a second display, and following your local procedure, log on to CICSsystem EYUMAS1A. Type CEMT INQUIRE SYSTEM and press Enter. Asummary of current values for CICS system EYUMAS1A is displayed:
7. If you are using a version of ISPF prior to Version 3 Release 1, all help information is provided in full-screen panels.
27FEB2005 13:48:12 ----------- INFORMATION DISPLAY ---------------------------COMMAND ===> SCROLL ===> PAGECURR WIN ===> 1 ALT WIN ===>W1 =OPERATE===========EYUPLX01=EYUPLX01=27FEB2005==13:48:12=CPSM=========15===CMD Name Description--- -------------------------------
OPERATE Operations ViewsCICSBTS CICS BTS ViewsCONNECT Connection ViewsDOCTEMP Document Template ViewsDB2 DB2 and DBCTL ViewsENQUEUE Global Enqueue ViewsENTJAVA Enterprise Java component viewsEXIT Exit ViewsFEPI FEPI ViewsFILE File ViewsJOURNAL Journal ViewsPROGRAM Program ViewsREGION CICS Region ViewsTASK Task ViewsTCPIPS TCP/IP Service ViewsTCPIPGBL TCP/IP Global ViewsTDQ Transient Data Queue ViewsTEMPSTOR Temporary Storage Queue ViewsTERMINAL Terminal ViewsTRANS Transaction ViewsUOW Unit of Work Views
Chapter 54. Installation verification procedure 1 (IVP1) 421

Take a note of the current MAxtasks value.
7. Return to the CICSPlex SM session where the CICSRGN3 view is displayed.Tab the cursor to the left of the first field in the first row of data, type the wordSET, then move the cursor to the MAxtasks field, change the current value to60, and press Enter. The MAxtasks value changes to 60:
8. To verify that the value has been changed in the CICS system itself, return tothe CICS (EYUMAS1A) session and enter the CEMT INQUIRE SYSTEMcommand again. The MAxtasks value is 60:
STATUS: RESULTS - OVERTYPE TO MODIFYAging( 00500 ) Progautoexit( DFHPGADX )Akp( 04000 ) Progautoinst( Autoinactive )Cicstslevel(030100) Reentprotect(Noreentprot)Cmdprotect(Cmdprot) Release(0640)Db2conn( ) Runaway( 0020000 )Debugtool(Nodebug) Scandelay( 5000 )Dfltuser(CPSM) Sdtran(CESD)Dsalimit( 05242880 ) Sosstatus(Notsos)Dsrtprogram( NONE ) Storeprotect(Inactive)Dtrprogram( EYU9XLOP ) Time( 0005000 )Dumping( Nosysdump ) Tranisolate(Inactive)Edsalimit( 0033554432 )Forceqr( Force )Logdefer ( 00005 )Maxtasks( 080 )Mrobatch( 001 )Oslevel(010400)Progautoctlg( Ctlgmodify )
SYSID=MS1A APPLID=EYUMAS1ARESPONSE: NORMAL TIME: 13.49.16 DATE: 27.02.05
PF 1 HELP 3 END 5 VAR 7 SBH 8 SFH 9 MSG 10 SB 11 SF
27FEB2005 13:49:39 ----------- INFORMATION DISPLAY ---------------------------COMMAND ===> SCROLL ===> PAGECURR WIN ===> 1 ALT WIN ===>>W1 =CICSRGN==CICSRGN3=EYUMAS1A===EYUPLX01===27FEB2005==15:37:31====CPSM==========1
CICS System.. EYUMAS1A Tot Pgrm Use. 11 Cur LU Sess 0Current Tasks 3 Pgrm Compress 0 HWM LU Sess 0Peak Tasks... 13 Cur Act UTrn. 3Current Amax. N/A Cur Que UTrn. 0Peak Amaxtask N/A Peak Act UTrn 4Total Tasks.. 107 Peak Que UTrn 0Interval task 6 Totl Act UTrn 6Times at MAXT 0 Totl Que UTrn 0Act Max Tasks N/A Tot Que Time. 00:00:00Maxtasks..... 60 Cur Que Time. 00:00:00Pgrm AIn Attm 0 PRSS Inq Cnt. 0Pgrm AIn Xrej 0 PRSS NIB Cnt. 0Pgrm AIn Fail 0 PRSS Opn Cnt. 0Pgrm Load NIU 26 PRSS UbndCnt. 0Tot NIU Qtime 00:00:00 PRSS Err Cnt. 0NIU Reclaims. 9
422 CICS TS for z/OS: Installation Guide

End the CICS session using CESF LOGOFF and return to the CICSPlex SMsession.
9. Type TRAN in the COMMAND field of the CICSRGN3 view and press Enter.The TRAN view, showing general information about transactions withinEYUPLX01, is displayed. Move the cursor to the Tran ID CONL and pressEnter. The LOCTRAND view, showing details of local transaction CONL inEYUMAS1A, is displayed.
10. Return to the CICSPlex SM MENU menu by typing MENU in the COMMANDfield of the LOCTRAND view and pressing Enter.
IVP1 is completeIf you are planning to run CICSPlex SM on multiple MVS images, you shouldnow run IVP2. However, before you begin IVP2, you must stop EYUCAS1A,EYUCMS1A, and EYUMAS1A on system A. If you do not stop these system Acomponents, you will have difficulty running IVP2.
STATUS: RESULTS - OVERTYPE TO MODIFYAging( 00500 ) Progautoexit( DFHPGADX )Akp( 04000 ) Progautoinst( Autoinactive )Cicstslevel(030100) Reentprotect(Noreentprot)Cmdprotect(Cmdprot) Release(0640)Db2conn( ) Runaway( 0020000 )Debugtool(Nodebug) Scandelay( 5000 )Dfltuser(CPSM) Sdtran(CESD)Dsalimit( 05242880 ) Sosstatus(Notsos)Dsrtprogram( NONE ) Storeprotect(Inactive)Dtrprogram( EYU9XLOP ) Time( 0005000 )Dumping( Nosysdump ) Tranisolate(Inactive)Edsalimit( 0033554432 )Forceqr( Force )Logdefer ( 00005 )Maxtasks( 060 )Mrobatch( 001 )Oslevel(010400)Progautoctlg( Ctlgmodify )
SYSID=MS1A APPLID=EYUMAS1ARESPONSE: NORMAL TIME: 13.49.19 DATE: 27.02.05
PF 1 HELP 3 END 5 VAR 7 SBH 8 SFH 9 MSG 10 SB 11 SF
Chapter 54. Installation verification procedure 1 (IVP1) 423

424 CICS TS for z/OS: Installation Guide

Chapter 55. Installation verification procedure 2 (IVP2)
It is recommended that you run IVP2 on the second and subsequent MVS imageson which you install CICSPlex SM. Throughout this chapter, the MVS image onwhich you are running IVP2 is referred to as “system B”.
In order to run IVP2, you must have:
v Two physically connected MVS/ESA images (system A and system B) on whichCICSPlex SM has been installed
v On both systems, access to:
– The CICSPlex SM samples data sets, CICSTS31.CPSM.SEYUDEF andCICSTS31.CPSM.SEYUJCL
– CICS load libraries
– CICS table-assembly JCL
– SYS1.PARMLIB and SYS1.VTAMLST (or be able to add definitions toSYS1.PARMLIB and SYS1.VTAMLST)
v Access to the CEDA transaction on EYUMAS1B
v Access to the MVS console log via TSO SDSF.
Before you can run IVP2, you must have run IVP1 successfully and stoppedEYUCAS1A, EYUCMS1A, and EYUMAS1A.
Figure 62 on page 426 shows those components of the CICSPlex SM Starter Setthat are defined during IVP2.
© Copyright IBM Corp. 1989, 2010 425

Setting up the CICSPlex SM environment on system BPerform the following tasks to prepare the MVS environment on system B forCICSPlex SM.
1. Run EYUISTRT on system B to tailor the skeleton jobs for the Starter Set (andthereby for the IVPs). EYUISTRT runs the EYUINST EXEC to tailor the StarterSet members. For more information about EYUISTRT, see Chapter 49, “Usingthe EYUINST EXEC to tailor skeleton jobs,” on page 373.
2. Add VTAM definitions for EYUCAS1B, EYUCMS1B, and EYUMAS1B to theVTAM table on system B. An example of the VTAM definitions for these threeCICSPlex SM components is provided in sample EYUDVTIB.
Notes:
a. EYUDVTIB is a subset of the VTAM definitions required on system B forthe complete Starter Set.
b. If you use Network Control Programs (NCP), you may need to create amode table, using the sample entry shown in EYUMDTAB, in order tocontrol the VTAM RUSIZE (request unit size) parameter.
(TOR)EYUMAS1A
(AOR)EYUMAS2A
(AOR)EYUMAS3A
(FOR)EYUMAS4A
EYUCMS1A EYUCMS1B
MAS MAS MAS MAS
CMAS CMAS
MAS MAS MAS MAS(AOR)
EYUMAS1B(TOR)
EYUMAS2B(AOR)
EYUMAS3B(FOR)
EYUMAS4B
EYUCAS1A EYUCAS1B
CAS CAS
MVSSystem A
MVSSystem B
Figure 62. Starter Set components for IVP2. Shaded components—EYUCAS1A, EYUCAS1B, EYUCMS1A,EYUCMS1B, EYUMAS1A, and EYUMAS1B—are used during IVP2.
426 CICS TS for z/OS: Installation Guide

3. Run the JCL EYUIBBIB, which defines the EYUIPRM data set for CASEYUCAS1B. If you are using shared DASD, this will already have beendefined during IVP1.
4. Run the JCL EYUICMSB, which defines all data sets required by CMASEYUCMS1B.
5. Run the JCL EYUICICB, which defines all data sets required by MASEYUMAS1B.
6. Run the JCL EYUIDRPB, which defines the CICSPlex SM data repository onsystem B.
Note: This data repository can be used with the Starter Set on system B: itdoes not need to be recreated after the IVPs have been run.
7. Run the JCL EYUICSDB, which defines, initializes, and loads the CSD to beused by both EYUCMS1B and EYUMAS1B.
8. Make any necessary site-specific changes to the CSD created in step 7. Forexample, you might need to add TYPETERMs, TERMINALs or AUTOINSTALLMODELs.
9. Assemble the following sample CICS tables into a load library:EYUTPLTC (PLT for EYUCMS1B)EYUTPLTL (PLT for EYUMAS1B)EYUTSRTS (SRT)
Notes:
a. Ensure that you have a model installed for the system log stream. Thedefault naming convention is userid.applid.DFHLOG anduserid.applid.DFHSHUNT for a system log stream, anduserid.applid.DFHJnn (where nn is 01 through 99) for a user journal. SeeChapter 24, “Defining the logger environment for CICS journaling,” on page143 and the CICS System Definition Guide for more information aboutcreating log streams.
b. When using CICS TS releases, TDQ definitions are added to the CSDwhen the CSD is created or upgraded.
c. For details on assembling CICS control tables, see the CICS/ESA SystemDefinition Guide.
10. Update ISPF on system B to reflect the addition of CICSPlex SM. You can findan example of the required changes in EYU@ISPF and EYU@PRIM. Notethat any changes you make to ISPF are generally applicable on system B andare not confined to IVP2 only. Therefore, you should try to make a permanentchange at this stage so that you don’t have to repeat this step later. For moreinformation, see Chapter 42, “Preparing user access to CICSPlex SM,” onpage 313.
Starting up and verifying CICSPlex SM components on system BWhen the system B environment for CICSPlex SM is established, you are ready to:1. Create CAS definitions2. Start the CAS EYUCAS1B3. Checking CAS-to-CAS connections4. Start the CMAS EYUCMS1B5. Run the batched repository update facility6. Enable EYUCMS1B to manage EYUPLX017. Start the MAS EYUMAS1B
Chapter 55. Installation verification procedure 2 (IVP2) 427
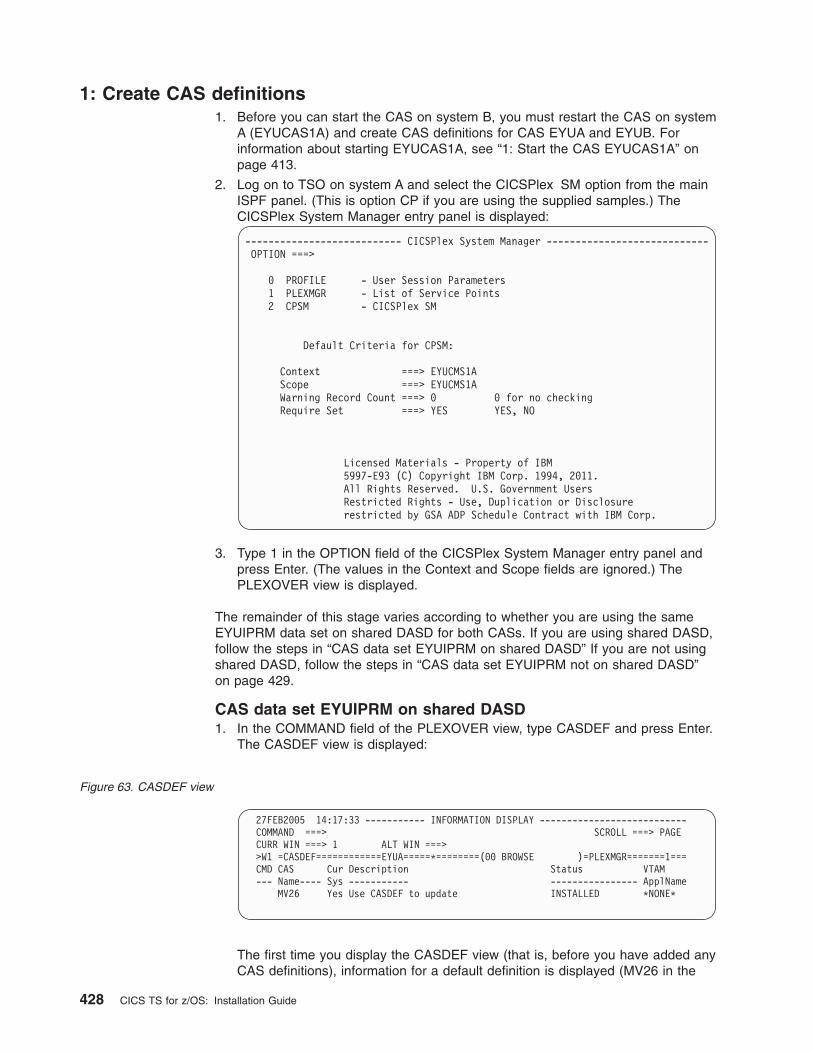
1: Create CAS definitions1. Before you can start the CAS on system B, you must restart the CAS on system
A (EYUCAS1A) and create CAS definitions for CAS EYUA and EYUB. Forinformation about starting EYUCAS1A, see “1: Start the CAS EYUCAS1A” onpage 413.
2. Log on to TSO on system A and select the CICSPlex SM option from the mainISPF panel. (This is option CP if you are using the supplied samples.) TheCICSPlex System Manager entry panel is displayed:
--------------------------- CICSPlex System Manager ----------------------------OPTION ===>
0 PROFILE - User Session Parameters1 PLEXMGR - List of Service Points2 CPSM - CICSPlex SM
Default Criteria for CPSM:
Context ===> EYUCMS1AScope ===> EYUCMS1AWarning Record Count ===> 0 0 for no checkingRequire Set ===> YES YES, NO
Licensed Materials - Property of IBM5997-E93 (C) Copyright IBM Corp. 1994, 2011.All Rights Reserved. U.S. Government UsersRestricted Rights - Use, Duplication or Disclosurerestricted by GSA ADP Schedule Contract with IBM Corp.
3. Type 1 in the OPTION field of the CICSPlex System Manager entry panel andpress Enter. (The values in the Context and Scope fields are ignored.) ThePLEXOVER view is displayed.
The remainder of this stage varies according to whether you are using the sameEYUIPRM data set on shared DASD for both CASs. If you are using shared DASD,follow the steps in “CAS data set EYUIPRM on shared DASD” If you are not usingshared DASD, follow the steps in “CAS data set EYUIPRM not on shared DASD”on page 429.
CAS data set EYUIPRM on shared DASD1. In the COMMAND field of the PLEXOVER view, type CASDEF and press Enter.
The CASDEF view is displayed:
27FEB2005 14:17:33 ----------- INFORMATION DISPLAY ---------------------------COMMAND ===> SCROLL ===> PAGECURR WIN ===> 1 ALT WIN ===>>W1 =CASDEF============EYUA=====*========(00 BROWSE )=PLEXMGR=======1===CMD CAS Cur Description Status VTAM--- Name---- Sys ----------- ---------------- ApplName
MV26 Yes Use CASDEF to update INSTALLED *NONE*
The first time you display the CASDEF view (that is, before you have added anyCAS definitions), information for a default definition is displayed (MV26 in the
Figure 63. CASDEF view
428 CICS TS for z/OS: Installation Guide

CASDEF view shown in Figure 63 on page 428). Throughtout this example CASname EYUA and EYUB are used. We will now create the definitions.
2. In the COMMAND field of the CASDEF view, type EDIT and press Enter.
3. In the COMMAND field, type ADD EYUA and press Enter. Alternatively, movethe cursor to the CMD field, type ADD and press Enter. The ADD CAS SYSTEMDEFINITION input panel is displayed:
--------------------- ADD CAS SYSTEM DEFINITION -------------------------------COMMAND ===>
CAS System Name ===> EYUA (Recommended same as MVS System Name)Description ===> SYSTEM A CAS
System Identification Information:MVS System Name ===> EYUA SMF ID ===> *SysPlex Name ===> * Subsystem ID ===> *
System Communication Information:VTAM Appl Name ===> EYUCAS1AXCF Group Name ===> EYUGR310
Enter END to add the CAS System Definition.Enter CANCEL to leave without adding.
4. Complete the ADD CAS SYSTEM DEFINITION input panel (displayed inFigure 64) then press Enter. (See the CICSPlex System Manager Administrationfor a description of the fields on this panel). If the panel is displayed as a resultof typing ADD in the CMD field, the System Identification Information is alreadycompleted with your own system defaults.
Enter END in the COMMAND field to add the definition. The CASDEF view isdisplayed again, this time showing an entry for CAS EYUA.
Repeat Steps 3 and 4 for CAS EYUB (subsystem ID EYUB and VTAMApplication name EYUCAS1B).
Enter DEL in the CMD field next to the default entry (MV26 in this example) toschedule this entry for deletion the next time the CAS is recycled.
5. Enter SAVE in the COMMAND field to save the definitions.
6. Return to the CICSPlex System Manager entry panel by typing RETURN in theCOMMAND field of the CASDEF view and pressing Enter. If you do not returnto the CICSPlex System Manager entry panel, system A will have the shared filelocked.
7. Shut down the CAS on system A.
CAS data set EYUIPRM not on shared DASD1. In the COMMAND field of the PLEXOVER view, type CASDEF and press
Enter. The CASDEF view is displayed:
Figure 64. ADD CAS system definition panel
Figure 65. CASDEF view
Chapter 55. Installation verification procedure 2 (IVP2) 429

27FEB2005 14:17:33 ----------- INFORMATION DISPLAY ---------------------------COMMAND ===> SCROLL ===> PAGECURR WIN ===> 1 ALT WIN ===>>W1 =CASDEF============EYUA=====*========(00 BROWSE )=PLEXMGR=======1===CMD CAS Cur Description Status VTAM--- Name---- Sys ----------- ---------------- ApplName
MV26 YES Use CASDEF to update INSTALLED *NONE*
The first time you display the CASDEF view (that is, before you have addedany CAS definitions) information for a default definition is displayed (MV26 inthe CASDEF view shown in Figure 65 on page 429. Throughtout this exampleCAS name EYUA and EYUB are used. We will now create the definitions.
2. In the COMMAND field of the CASDEF view, type EDIT and press Enter.
3. In the COMMAND field, type ADD EYUA and press Enter. Alternatively, movethe cursor to the CMD field, type ADD and press Enter. The ADD CASSYSTEM DEFINITION input panel is displayed:
--------------------- ADD CAS SYSTEM DEFINITION -------------------------------COMMAND ===>
CAS System Name ===> EYUA (Recommended same as MVS System Name)Description ===> SYSTEM A CAS
System Identification Information:MVS System Name ===> EYUA SMF ID ===> *SysPlex Name ===> * Subsystem ID ===> *
System Communication Information:VTAM Appl Name ===> EYUCAS1AXCF Group Name ===> EYUGROUP
Enter END to add the CAS System Definition.Enter CANCEL to leave without adding.
4. Complete the ADD CAS SYSTEM DEFINITION input panel (displayed in theexample above) then press Enter. (See the CICSPlex System ManagerAdministration for a description of the fields on this panel). If the panel isdisplayed as a result of typing ADD in the CMD field, the System IdentificationInformation is already completed with your own system defaults.
Enter END in the COMMAND field to add the definition. The CASDEF view isdisplayed again, this time showing an entry for CAS EYUA.
Repeat Steps 3 and 4 for CAS EYUB (subsystem ID EYUB and VTAMApplication name EYUCAS1B).
Enter DEL in the CMD field next to the default entry (MV26 in this example) toschedule this entry for deletion the next time the CAS is recycled.
The CASDEF view is displayed again, this time showing entries for CAS EYUAand CAS EYUB:
Figure 66. ADD CAS system defintion input panel
430 CICS TS for z/OS: Installation Guide

27FEB2005 14:17:33 ----------- INFORMATION DISPLAY ---------------------------COMMAND ===> SCROLL ===> PAGECURR WIN ===> 1 ALT WIN ===>>W1 =CASDEF============EYUA=====*========(00 EDIT MOD )=PLEXMGR=======2===CMD CAS Cur Description Status VTAM--- Name---- Sys ----------- ---------------- ApplName
EYUA YES SYSTEM A CAS UNINSTALLED EYUCAS1AEYUB NO SYSTEM B CAS UNINSTALLED EYUCAS1B
5. In the COMMAND field of the CASDEF view, type SAVE and press Enter.
6. Return to the CICSPlex System Manager entry panel by typing RETURN in theCOMMAND field of the CASDEF view and pressing Enter.
7. Shut down the CAS on system A.
8. Start CAS EYUCAS1B on system B using JCL EYUICS1B or JCL EYUICSSB(to start the CAS as a started task). Look for message number BBMZA001I inthe output to confirm that the CAS EYUCAS1B is started.
9. Log on to TSO on System B and select the CICSPlex SM option from themain ISPF panel. (The CICSPlex SM option is CP if you are using thesupplied samples.) The CICSPlex System Manager entry panel is displayed:
--------------------------- CICSPlex System Manager ----------------------------OPTION ===>
0 PROFILE - User Session Parameters1 PLEXMGR - List of Service Points2 CPSM - CICSPlex SM
Default Criteria for CPSM:
Context ===> EYUCMS1BScope ===> EYUCMS1BWarning Record Count ===> 0 0 for no checkingRequire Set ===> YES YES, NO
Licensed Materials - Property of IBM5697-E93 (C) Copyright IBM Corp. 1994, 2011.All Rights Reserved. U.S. Government UsersRestricted Rights - Use, Duplication or Disclosurerestricted by GSA ADP Schedule Contract with IBM Corp.
10. Type 1 in the OPTION field of the CICSPlex SM entry field and press Enter.The PLEXOVER view is displayed.
11. In the COMMAND field of the PLEXOVER view, type CASDEF and pressEnter. The CASDEF view is displayed:
27FEB2005 14:17:33 ----------- INFORMATION DISPLAY ---------------------------COMMAND ===> SCROLL ===> PAGECURR WIN ===> 1 ALT WIN ===>>W1 =CASDEF============EYUB=====*========(00 BROWSE )=PLEXMGR=======1===CMD CAS Cur Description Status VTAM--- Name---- Sys ----------- ---------------- ApplName
MV29 YES Use CASDEF to update INSTALLED *NONE*
The default definition for system B in this example is MV29. You now need toadd definitions for EYUA and EYUB and delete the default definition on systemB.
Chapter 55. Installation verification procedure 2 (IVP2) 431

12. In the COMMAND field, type ADD EYUB and press Enter. Alternatively, movethe cursor to the CMD field, type ADD and press Enter. The ADD CASSYSTEM DEFINITION input panel is displayed:
--------------------- ADD CAS SYSTEM DEFINITION -------------------------------COMMAND ===>
CAS System Name ===> EYUB (Recommended same as MVS System Name)Description ===>
System Identification Information:MVS System Name ===> EYUB SMF ID ===> *SysPlex Name ===> * Subsystem ID ===> *
System Communication Information:VTAM Appl Name ===> EYUCAS1BXCF Group Name ===> EYUGROUP
Enter END to add the CAS System Definition.Enter CANCEL to leave without adding.
13. Complete the ADD CAS SYSTEM DEFINITION input panel (displayed inFigure 67) then press Enter. (See the CICSPlex System ManagerAdministration for a description of the fields on this panel). If the panel isdisplayed as a result of typing ADD in the CMD field, the System IdentificationInformation is already completed with your own system defaults.
Enter END in the COMMAND field to add the definition. The CASDEF view isdisplayed again, this time showing an entry for CAS EYUB.
Repeat Steps 3 and 4 for CAS EYUA (subsystem ID EYUA and VTAMApplication name EYUCAS1A).
Enter DEL in the CMD field next to the default entry (MV29 in this example) toschedule this entry for deletion the next time the CAS is recycled.
The CASDEF view is displayed again, this time showing entries for CAS EYUBand CAS EYUA.
27FEB2005 14:17:33 ----------- INFORMATION DISPLAY ---------------------------COMMAND ===> SCROLL ===> PAGECURR WIN ===> 1 ALT WIN ===>>W1 =CASDEF============EYUB=====*========(00 EDIT MOD )=PLEXMGR=======2===CMD CAS Cur Description Status VTAM--- Name---- Sys ----------- ---------------- ApplName
EYUA NO SYSTEM A CAS UNINSTALLED EYUCAS1AEYUB YES SYSTEM B CAS UNINSTALLED EYUCAS1B
14. In the COMMAND field of the CASDEF view, type SAVE and press Enter.
15. Return to the CICSPlex System Manager entry panel by typing RETURN in theCOMMAND field of the CASDEF view and pressing Enter.
16. Shut down the CAS on system B.
2: Start the CAS EYUCAS1B1. Before you can start the CAS on system B, you must restart the CAS on system
A (EYUCAS1A). For information about starting EYUCAS1A, see “1: Start theCAS EYUCAS1A” on page 413.
Figure 67. ADD CAS system defintion input panel
432 CICS TS for z/OS: Installation Guide

2. You can start CAS EYUCAS1B using JCL EYUICS1B or (to start the CAS as astarted task) JCL EYUICSSB. When you start the CAS, output similar to thisappears in the JES2 job log.
3. Look for message number BBMZA001I in the output to confirm that the CASEYUCAS1B is started.
3: Checking CAS-to-CAS connectionsDuring this stage of IVP2, you check to confirm that the connection from the CASon system A to the CAS on system B, and from the CAS on system B to the CASon system A were installed when the CAS was started.
1. Log on to TSO on system A and select the CICSPlex SM option from the mainISPF panel. (This is option CP if you are using the supplied samples.) TheCICSPlex System Manager entry panel is displayed:
2. Type 1 in the OPTION field of the CICSPlex System Manager entry panel andpress Enter. (The values in the Context and Scope fields are ignored.) ThePLEXOVER view is displayed.
COMMAND INPUT ===> SCROLL ===> PAGE********************************* TOP OF DATA **************************
J E S 2 J O B L O G -- S Y S T E M M V 2 9 --
BBMYAB62I Default system values used for CAS definitionBBMXCL41I Default system values used for target definitionBBMXCL40W SSI Context Definition member 00 not found in BBIPARMBBMXBI17I Default security parameters usedBBMXBI26I Default security resource properties usedBBMXCL36I Default security resource definition used for COMMON resourcesBBMSS001I Security - ESMTYPE(RACF) SUBSYS(EYUB) REQSTOR(asis) APPL(EYUB)BBMZA001I CAS(EYUB) SSID(EYUB) INITIALIZATION COMPLETE - R3.3.8 (BPY3621)BBMXCL36I Default security resource definition used for PLEXMGR resources
--------------------------- CICSPlex System Manager ----------------------------OPTION ===>
0 PROFILE - User Session Parameters1 PLEXMGR - List of Service Points2 CPSM - CICSPlex SM
Default Criteria for CPSM:
Context ===> EYUCMS1AScope ===> EYUCMS1AWarning Record Count ===> 0 0 for no checkingRequire Set ===> YES YES, NO
Licensed Materials - Property of IBM5697-E93 (C) Copyright IBM Corp. 1994, 2011.All Rights Reserved. U.S. Government UsersRestricted Rights - Use, Duplication or Disclosurerestricted by GSA ADP Schedule Contract with IBM Corp.
Chapter 55. Installation verification procedure 2 (IVP2) 433

3. In the COMMAND field of the PLEXOVER view, type CASDEF and press Enter.The CASDEF view is displayed:
27FEB2005 14:17:33 ----------- INFORMATION DISPLAY ---------------------------COMMAND ===> SCROLL ===> PAGECURR WIN ===> 1 ALT WIN ===>>W1 =CASDEF============EYUA=====*========(00 BROWSE )=PLEXMGR=======2===CMD CAS Cur Description Status VTAM--- Name---- Sys ----------- ---------------- ApplName
EYUA YES SYSTEM A CAS INSTALLED EYUCAS1AEYUB NO SYSTEM B CAS INSTALLED EYUCAS1B
Both CAS entries should be installed. If they are not then place the cursor in theCMD field next to the entry and type INS.
4. Return to the CICSPlex System Manager entry panel by typing RETURN in theCOMMAND field of the CASDEF view and pressing Enter.
5. If the same EYUIPRM on shared DASD is not being used, repeat Steps 1through 4 for CAS EYUB on system B.
4: Start the CMAS EYUCMS1B1. Before you can start the CMAS on system B, you must restart the CMAS on
system A (EYUCMS1A). For information about starting EYUCMS1A, see “2:Start the CMAS EYUCMS1A” on page 414.
2. Check the CICS Transaction Server for z/OS system initialization table (SIT)parameters in JCL EYUICM1B, in particular the SVC parameters and the defaultuser, to ensure that they are suitable for your environment.
3. Submit JCL EYUICM1B. The output from JCL EYUICM1B is similar to this:
434 CICS TS for z/OS: Installation Guide

4. In the output from EYUICM1B, look for messages EYUXL0009I andEYUXL0008I to confirm that CMAS EYUCMS1B is started.
5: Run the batched repository update facility on system BDuring this stage of IVP2, you load several definitions into the data repository ofCMAS EYUCMS1B using the batched repository update facility.
1. Log on to TSO on system B. Select the CICSPlex SM option from the mainISPF panel; the CICSPlex SM option is CP if you are using the suppliedsamples. Ensure that “EYUB”is specified as the subsystem ID. (This can bechanged using option 0.1 from the main ISPF panel.) The CICSPlex SystemManager entry panel is displayed.
2. Set the context and scope fields of the CICSPlex System Manager entry panelto EYUCMS1B, then type 2 in the OPTION field and press Enter. The MENUmenu is displayed.
3. From the CICSPlex SM MENU menu, select ADMCONFG. The ADMCONFGmenu is displayed. From the ADMCONFG menu, select BATCHREP. The
COMMAND INPUT ===> SCROLL ===> PAGE11.59.23 JOB17758 +DFHSI1511I EYUCMS1B Installing group list CMS1BGPL.11.59.26 JOB17758 +DFHLG0103I EYUCMS1B System log (DFHLOG) initialization has started.11.59.27 JOB17758 +DFHLG0104I EYUCMS1B 054
054 System log (DFHLOG) initialization has ended. Log stream054 DOBROWN.EYUCMS1B.DFHLOG is connected to structure LOG_GENERAL_002.
11.59.27 JOB17758 +DFHLG0103I EYUCMS1B System log (DFHSHUNT) initialization has started.11.59.27 JOB17758 +DFHLG0104I EYUCMS1B 056
056 System log (DFHSHUNT) initialization has ended. Log stream056 DOBROWN.EYUCMS1B.DFHSHUNT is connected to structure LOG_GENERAL_002.
11.59.27 JOB17758 +DFHRX0106I EYUCMS1B Restart processing with Resource Recovery Services (RRS) is beginning.11.59.28 JOB17758 +DFHRX0107I EYUCMS1B Restart processing with Resource Recovery Services (RRS) has ended.11.59.28 JOB17758 +DFHSI1519I EYUCMS1B The interregion communication session was successfully started.11.59.28 JOB17758 +DFHAP1203I EYUCMS1B Language Environment is being initialized.11.59.30 JOB17758 +DFHAP1211I EYUCMS1B Language Environment initialization completed.11.59.30 JOB17758 +DFHWB1007 EYUCMS1B Initializing CICS Web environment.11.59.30 JOB17758 +DFHWB1008 EYUCMS1B CICS Web environment initialization is complete.11.59.31 JOB17758 +DFHSI8440I EYUCMS1B Initiating connection to CICSPlex SM.11.59.31 JOB17758 +EYUXL0001I EYUCMS1B CMAS PLTPI program starting11.59.31 JOB17758 +EYUXL0002I EYUCMS1B CICS TRACE active11.59.31 JOB17758 +EYUXL0017I EYUCMS1B CMAS PLTPI program terminating11.59.31 JOB17758 +DFHSI1517 EYUCMS1B Control is being given to CICS.11.59.31 JOB17758 +DFHEJ0102 EYUCMS1B Enterprise Java domain initialization has ended.11.59.32 JOB17758 +EYUXL0003I EYUCMS1B CPSM Version 310 CMAS startup in progress11.59.32 JOB17758 +DFHFC0208I EYUCMS1B 090
090 LSR pool 1 is being built dynamically by CICS because all of the090 necessary parameters have not been supplied. Either there is no090 LSRPOOL definition or it is incomplete. The following are not090 defined: ’CI SIZE’ ’STRINGS’ ’MAXKEYLENGTH’. A delay is possible.
11.59.32 JOB17758 +DFHFC0961 EYUCMS1B 091091 01/27/2005 11:59:32 EYUCMS1B Calculation of LSR pool 1 parameters091 incomplete. Filename EYUDREPN has no DSNAME.
11.59.33 JOB17758 +EYUXL0022I EYUCMS1B CMAS Phase I initialization complete11.59.33 JOB17758 +EYUXL0211I EYUCMS1B CPSM Start Up Parameters11.59.33 JOB17758 +EYUXL0212I EYUCMS1B CASNAME(EYUB)11.59.33 JOB17758 +EYUXL0212I EYUCMS1B NAME(EYUCMS1B)11.59.33 JOB17758 +EYUXL0020I EYUCMS1B ESSS connection in progress11.59.33 JOB17758 +EYUXL0004I EYUCMS1B ESSS connection complete11.59.34 JOB17758 +EYUCR0006W EYUCMS1B Security checking disabled per SEC(NO) EYUPARM parameter specification11.59.34 JOB17758 +EYUCW0108I EYUCMS1B Time zone offset from GMT computed based on CMAS time zone attributes11.59.35 JOB17758 +EYUXL0007I EYUCMS1B CMAS Phase II initialization complete11.59.35 JOB17758 +EYUXL0007I EYUCMS1B CMAS Phase III initialization complete11.59.35 JOB17758 +EYUXL0007I EYUCMS1B CMAS Phase IV initialization complete11.59.36 JOB17758 +EYUXL0009I EYUCMS1B CAS connection established12.00.05 JOB17758 +EYUXL0010I EYUCMS1B CMAS initialization complete12.00.05 JOB17758 +EYUXL0008I EYUCMS1B CICSPlex registration complete
Chapter 55. Installation verification procedure 2 (IVP2) 435

BATCHREP view is displayed:
4. To submit a job to update the data repository of CMAS EYUCMS1B, type SUBin the COMMAND field of the BATCHREP view and press Enter. The StartBatch Run input panel is displayed:
5. Complete the Start Batch Run screen as shown in the example above andpress Enter. Verify that the batched repository update facility has created thedefinitions by examining the JOBLOG of EYUICM1B, which is in the HELDoutput queue.
6. Return to the CICSPlex SM MENU menu by typing MENU in the COMMANDfield of the BATCHREP view and pressing Enter.
6: Enable EYUCMS1B to manage EYUPLX01During this stage of IVP2, you define EYUCMS1B as a secondary CMAS forCICSplex EYUPLX01. (CMAS EYUCMS1A is the primary CMAS for EYUPLX01.)
1. Log on to TSO on system A and select the CICSPlex SM option from the mainISPF panel. (The CICSPlex SM option is CP if you are using the suppliedsamples.) The CICSPlex System Manager entry panel is displayed:
27FEB2005 14:40:58 ----------- INFORMATION DISPLAY ---------------------------COMMAND ===> SCROLL ===> PAGECURR WIN ===> 1 ALT WIN ===>W1 =BATCHREP==========EYUCMS1B=EYUCMS1B=27FEB2005==14:40:45=CPSM==============BBMXBD15I There is no data which satisfies your request
COMMAND ===>
Data Set Name ===> ’CICSTS31.CPSM.SEYUDEF’
Data Set Member ===> EYUDDRIB
Print Class ===> H
Print Node ===> *
Output Userid ===> *
Run Type ===> EXECUTE (CHECK or EXECUTE)
Press ENTER to Run the Job.Type END or CANCEL to cancel without Running.
436 CICS TS for z/OS: Installation Guide

2. Ensure that both the Context and the Scope fields on the CICSPlex SystemManager entry panel are set to EYUCMS1A. Type 2 in the OPTION field andpress Enter. The MENU menu is displayed:
3. Select ADMCONFG from the MENU menu. The ADMCONFG menu isdisplayed:
--------------------------- CICSPlex System Manager ----------------------------OPTION ===>
0 PROFILE - User Session Parameters1 PLEXMGR - List of Service Points2 CPSM - CICSPlex SM
Default Criteria for CPSM:
Context ===> EYUCMS1AScope ===> EYUCMS1AWarning Record Count ===> 0 0 for no checkingRequire Set ===> YES YES, NO
Licensed Materials - Property of IBM5697-E93 (C) Copyright IBM Corp. 1994, 2011.All Rights Reserved. U.S. Government UsersRestricted Rights - Use, Duplication or Disclosurerestricted by GSA ADP Schedule Contract with IBM Corp.
27FEB2005 14:42:11 ----------- INFORMATION DISPLAY ---------------------------COMMAND ===> SCROLL ===> PAGECURR WIN ===> 1 ALT WIN ===>W1 =MENU==============EYUCMS1A=EYUCMS1A=27FEB2005==14:42:11=CPSM=========14===CMD Name Description--- -----------------------------------
ANALYSIS Real Time Analysis Operations ViewsCONFIG CMAS Configuration Operations ViewsMONITOR Monitoring ViewsOPERATE Operations ViewsTOPOLOGY Topology Operations ViewsWORKLOAD Workload Operations Views======== ================================================================ADMSAM RTA System Availability Monitoring Administration ViewsADMMRM RTA MAS Resource Monitoring Administration ViewsADMAPM RTA Analysis Point Monitoring Administration ViewsADMCONFG CMAS Configuration Administration ViewsADMMON Monitor Administration ViewsADMTOPOL Topology Administration ViewsADMWLM Workload Manager Administration ViewsADMBAS Business Application Services Administration ViewsADMRES Business Application Services Resource Views
Chapter 55. Installation verification procedure 2 (IVP2) 437

4. From the ADMCONFG menu, select CPLEXDEF. The CPLEXDEF view isdisplayed:
5. Move the cursor to the EYUPLX01 entry, type ADD in the CMD field, and pressEnter. The Add CMAS to CICSPlex input panel is displayed:
6. In the CMAS Name field of the Add CMAS to CICSPlex input panel, typeEYUCMS1B and press Enter. The CPLEXDEF view is redisplayed.
7. To verify that the data repository on system B has been updated with thedefinition of EYUPLX01, you must change the current context and scope toEYUCMS1B. To change the context and scope, type SET in the COMMANDfield of the CPLEXDEF view and press Enter. Complete the SET WINDOW,CONTEXT, PRODUCT, SCOPE, AND VIEW panel and press Enter.
8. Enter CMASPLEX in the COMMAND field of the CPLEXDEF view. TheCMASPLEX view, showing CICSplexes managed by EYUCMS1B, is displayed:
27FEB2005 14:42:18 ----------- INFORMATION DISPLAY ---------------------------COMMAND ===> SCROLL ===> PAGECURR WIN ===> 1 ALT WIN ===>W1 =MENU==============EYUCMS1A=EYUCMS1A=27FEB2005==14:42:18=CPSM==========6===CMD Name Description--- -------------------------------
ADMCONFG CMAS Configuration Administration ViewsBATCHREP Batched Repository UpdatesCPLEXDEF CICSplex DefinitionsCPLXCMAS CMAS in CICSplex DefinitionsCMTCMDEF CMAS-to-CMAS Link DefinitionsCMTPMDEF CMAS-to-RMAS Link Definitions
27FEB2005 14:42:27 ----------- INFORMATION DISPLAY ---------------------------COMMAND ===> SCROLL ===> PAGECURR WIN ===> 1 ALT WIN ===>W1 =CPLEXDEF==========EYUCMS1A=EYUCMS1A=27FEB2005==14:42:27=CPSM==========1===CMD Name Mon Time Zone Day Cmd Res Xmp ROD Description--- -------- Intv Zone Adj Save Chk Chk Chk --- -----------------------------
EYUPLX01 480 B 0 NO NO NO NO NO IVP 1 CICSPLEX
COMMAND ===>
CICSPlex Name EYUPLX01Description IVP 1 CICSPLEX
CMAS Name ===> Name of CMAS or Generic
Press ENTER to add CMAS to CICSPLEX.Type END or CANCEL to cancel without adding.
438 CICS TS for z/OS: Installation Guide

An entry for EYUPLX01 appears in the CMASPLEX view.
9. Return to the CICSPlex SM MENU menu by typing MENU in the COMMANDfield of the CMASPLEX view and pressing Enter.
7: Start the MAS EYUMAS1B1. Before you can start the MAS on system B, you must restart the MAS on
system A (EYUMAS1A). For information about starting EYUMAS1A, see “5:Start the MAS EYUMAS1A” on page 419.
2. Check the SIT parameters in JCL EYUIMS1B, in particular the SVC numbersand the default user, to ensure that they are suitable for your environment.
3. Submit JCL EYUIMS1B from TSO. Output similar to this appears in the job log:
27FEB2005 14:43:38 ----------- INFORMATION DISPLAY ---------------------------COMMAND ===> SCROLL ===> PAGECURR WIN ===> 1 ALT WIN ===>W1 =CMASPLEX==========EYUCMS1B=EYUCMS1B=27FEB2005==14:43:38=CPSM==========1===CMD CICSPlex MP--- -------- ---
EYUPLX01 NO
Chapter 55. Installation verification procedure 2 (IVP2) 439

4. Look for messages EYUXL0004I and EYUXL0007I in the output to confirm thatthe MAS is active.
Testing CICSPlex SM functionsDuring this part of IVP2, you test the operations and functions of CICSPlex SM onsystem B.
Test the operations functions on system BDuring this stage of IVP2 you:v Change the value of a CICS resource via CICSPlex SMv Test the CICSPlex SM help facilityv Test the CMAS-CMAS links.
1. From the CICSPlex SM MENU menu on system A, change the context andscope to EYUPLX01 then select the OPERATE option. The OPERATE menu isdisplayed:
COMMAND INPUT ===> SCROLL ===> PAGE
13.58.49 JOB21350 +DFHSI1511I EYUMAS1B Installing group list MAS1BGPL.13.58.51 JOB21350 +DFHLG0103I EYUMAS1B System log (DFHLOG) initialization has started.13.58.52 JOB21350 +DFHLG0104I EYUMAS1B 171
171 System log (DFHLOG) initialization has ended. Log stream171 DOBROWN.EYUMAS1B.DFHLOG is connected to structure LOG_GENERAL_002.
13.58.52 JOB21350 +DFHLG0103I EYUMAS1B System log (DFHSHUNT) initialization has started.13.58.52 JOB21350 +DFHLG0104I EYUMAS1B 185
185 System log (DFHSHUNT) initialization has ended. Log stream185 DOBROWN.EYUMAS1B.DFHSHUNT is connected to structure LOG_GENERAL_002.
13.58.52 JOB21350 +DFHLG0745I EYUMAS1B System log full scan has started.13.58.52 JOB21350 +DFHLG0748I EYUMAS1B System log selective scan has started.13.58.52 JOB21350 +DFHLG0749I EYUMAS1B System log scan has completed.13.58.52 JOB21350 +DFHRM0156 EYUMAS1B This COLD start will NOT cause any damage to local resources.13.58.53 JOB21350 +DFHRX0106I EYUMAS1B Restart processing with Resource Recovery Services (RRS) is beginning.13.58.53 JOB21350 +DFHRX0107I EYUMAS1B Restart processing with Resource Recovery Services (RRS) has ended.13.58.53 JOB21350 +DFHSI1519I EYUMAS1B The interregion communication session was successfully started.13.58.53 JOB21350 +DFHSZ4001 I 01/27/2005 13:58:53 EYUMAS1B FEPI initialization has started.13.58.53 JOB21350 +DFHAP1203I EYUMAS1B Language Environment is being initialized.13.58.53 JOB21350 +DFHSZ4002 I 01/27/2005 13:58:53 EYUMAS1B FEPI initialization has ended.13.58.54 JOB21350 +DFHAP1211I EYUMAS1B Language Environment initialization completed.13.58.54 JOB21350 +DFHWB1007 EYUMAS1B Initializing CICS Web environment.13.58.55 JOB21350 +DFHWB1008 EYUMAS1B CICS Web environment initialization is complete.13.58.55 JOB21350 +DFHSI8440I EYUMAS1B Initiating connection to CICSPlex SM.13.58.55 JOB21350 +EYUNX0001I EYUMAS1B LMAS PLTPI program starting13.58.55 JOB21350 +EYUXL0003I EYUMAS1B CPSM Version 310 LMAS startup in progress13.58.56 JOB21350 +EYUXL0022I EYUMAS1B LMAS Phase I initialization complete13.58.57 JOB21350 +EYUXL0211I EYUMAS1B CPSM Start Up Parameters13.58.57 JOB21350 +EYUXL0212I EYUMAS1B NAME(EYUMAS1B)13.58.57 JOB21350 +EYUXL0212I EYUMAS1B CICSPLEX(EYUPLX01)13.58.57 JOB21350 +EYUXL0212I EYUMAS1B CMASSYSID(CM1B)13.58.57 JOB21350 +DFHEJ0102 EYUMAS1B Enterprise Java domain initialization has ended.13.58.57 JOB21350 +DFHSI1517 EYUMAS1B Control is being given to CICS.13.58.57 JOB21350 +DFHSM0133 EYUMAS1B CICS is under stress (short on storage above 16MB).13.58.57 JOB21350 +DFHSM0134 EYUMAS1B CICS is no longer short on storage above 16MB.13.58.59 JOB21350 +EYUXL0020I EYUMAS1B ESSS connection in progress to CICSPLEX(EYUPLX01) for SYSID(CM1B)13.58.59 JOB21350 +EYUXL0004I EYUMAS1B ESSS connection complete13.58.59 JOB21350 +EYUCL0006I EYUMAS1B ESSS link to EYUCMS1B established13.58.59 JOB21350 +EYUXL0007I EYUMAS1B LMAS Phase II initialization complete13.58.59 JOB21350 +EYUNL0099I EYUMAS1B LMAS LRT initialization complete
440 CICS TS for z/OS: Installation Guide

2. From the OPERATE menu, enter CICSRGN to display details of CICS regionsin EYUPLX01. From the CICSRGN view, display a detailed view of data forregion EYUMAS1B by moving the cursor to the entry for EYUMAS1B andpressing Enter. The CICSRGND view for EYUMAS1B is displayed.
3. Move the cursor to the Current Tasks field and press Enter. The CICSRGN3view is displayed. Verify that the help function is working by typing HEL in theCOMMAND field of the CICSRGN3 view, moving the cursor to the MAxtasksfield, and pressing Enter. A pop-up panel, 8 in which the MAxtasks field isdescribed, overwrites the CICSRGN3 view.
Type END in the COMMAND field of the help panel and press Enter to return tothe CICSRGN3 view.
4. From a second display screen, and following your local procedure, log on toCICS system EYUMAS1B. Type CEMT INQUIRE SYSTEM and press Enter. Asummary of current values for CICS system EYUMAS1B is displayed:
8. If you are using a version of ISPF prior to Version 3 Release 1, all help information is provided in full-screen panels.
27FEB2005 13:48:12 ----------- INFORMATION DISPLAY ---------------------------COMMAND ===> SCROLL ===> PAGECURR WIN ===> 1 ALT WIN ===>W1 =OPERATE===========EYUPLX01=EYUPLX01=27FEB2005==13:48:12=CPSM=========15===CMD Name Description--- -------------------------------
OPERATE Operations ViewsCICSBTS CICS BTS ViewsCONNECT Connection ViewsDB2 DB2 and DBCTL ViewsDOCTEMP Document Template ViewsENQUEUE Global Enqueue ViewsEXIT Exit ViewsFEPI FEPI ViewsFILE File ViewsJOURNAL Journal ViewsPROGRAM Program ViewsREGION CICS Region ViewsTASK Task ViewsTCPIPS TCP/IP Service ViewsTCPIPGBL TCP/IP Global ViewsTDQ Transient Data Queue ViewsTEMPSTOR Temporary Storage Queue ViewsTERMINAL Terminal ViewsTRANS Transaction ViewsUOW Unit of Work Views
Chapter 55. Installation verification procedure 2 (IVP2) 441

Take a note of the current MAxtasks value.
5. Return to the CICSPlex SM terminal session, move the cursor to any field tothe left of the first column of data and type the word SET, then move the cursorto the MAxtasks field, change the current value to 60, and press Enter. TheMAxtasks value changes to 60:
6. To verify that the value has been changed in the CICS system itself, return tothe CICS (EYUMAS1B) session and enter the CEMT INQUIRE SYSTEMcommand again. The MAxtasks value is 60:
STATUS: RESULTS - OVERTYPE TO MODIFYAging( 00500 ) Progautoexit( DFHPGADX )Akp( 04000 ) Progautoinst( Autoinactive )Cicstslevel(030100) Reentprotect(Noreentprot)Cmdprotect(Cmdprot) Release(0640)Db2conn( ) Runaway( 0020000 )Debugtool(Nodebug) Scandelay( 5000 )Dfltuser(CPSM) Sdtran(CESD)Dsalimit( 05242880 ) Sosstatus(Notsos)Dsrtprogram( NONE ) Storeprotect(Inactive)Dtrprogram( EYU9XLOP ) Time( 0005000 )Dumping( Nosysdump ) Tranisolate(Inactive)Edsalimit( 0033554432 )Forceqr( Force )Logdefer ( 00005 )Maxtasks( 080 )Mrobatch( 001 )Oslevel(010400)Progautoctlg( Ctlgmodify )
SYSID=MS1B APPLID=EYUMAS1BRESPONSE: NORMAL TIME: 13.49.24 DATE: 27.02.05
PF 1 HELP 3 END 5 VAR 7 SBH 8 SFH 9 MSG 10 SB 11 SF
27FEB2005 13:49:39 ----------- INFORMATION DISPLAY ---------------------------COMMAND ===> SCROLL ===> PAGECURR WIN ===> 1 ALT WIN ===>>W1 =CICSRGN==CICSRGN3=EYUPLX01===EYUPLX01===27FEB2005==15:37:31====CPSM======1
CICS System.. EYUMAS1B Tot Pgrm Use. 11 Cur LU Sess 0Current Tasks 3 Pgrm Compress 0 HWM LU Sess 0Peak Tasks... 13 Cur Act UTrn. 3Current Amax. N/A Cur Que UTrn. 0Peak Amaxtask N/A Peak Act UTrn 4Total Tasks.. 107 Peak Que UTrn 0Interval task 6 Totl Act UTrn 6Times at MAXT 0 Totl Que UTrn 0Act Max Tasks N/A Tot Que Time. 00:00:00Maxtasks..... 60 Cur Que Time. 00:00:00Pgrm AIn Attm 0 PRSS Inq Cnt. 0Pgrm AIn Xrej 0 PRSS NIB Cnt. 0Pgrm AIn Fail 0 PRSS Opn Cnt. 0Pgrm Load NIU 26 PRSS UbndCnt. 0Tot NIU Qtime 00:00:00 PRSS Err Cnt. 0NIU Reclaims. 9
442 CICS TS for z/OS: Installation Guide

End the CICS terminal session using CESF LOGOFF and return to theCICSPlex SM terminal session.
7. Type the command TRAN in the COMMAND field of the CICSRGN3 view andpress Enter. The TRAN view, which shows all transactions currently installed inthe CICSplex, is displayed. Scroll down and move the cursor to the CONL entryfor EYUMAS1B, then press Enter. The LOCTRAND view, which shows details oflocal transaction CONL in EYUMAS1B, is displayed.
8. Return to the CICSPlex SM MENU menu by typing MENU in the COMMANDfield of the LOCTRAND view and pressing Enter.
IVP2 is completeIt is recommended that you repeat IVP2 on the third and subsequent MVSimages on which you install CICSPlex SM.
Customizing the installation verification proceduresWhen you have finished configuring CICSPlex SM to manage your CICS systems,you can run IVP1 and IVP2 again, but using your own CASs, CMASs, and MASs,to ensure that your configuration is working.
To run IVP1 and IVP2 with your own CICSPlex SM components, you need tochange the supplied IVP definitions:
1. Ensure that your CMAS uses the IVP1 data repository(CICSTS31.CPSM.SAMPLES.SYSTEMA.EYUDREP) on system A.
2. Ensure that your CMAS uses the IVP2 data repository(CICSTS31.CPSM.SAMPLES.SYSTEMB.EYUDREP) on system B.
3. Delete and redefine the data repositories using the supplied JCL EYUIDRPAand EYUIDRPB.
4. Throughout the IVP definitions, change all references to EYUA and EYUB to thetwo subsystem IDs of your CASs.
STATUS: RESULTS - OVERTYPE TO MODIFYAging( 00500 ) Progautoexit( DFHPGADX )Akp( 04000 ) Progautoinst( Autoinactive )Cicstslevel(030100) Reentprotect(Noreentprot)Cmdprotect(Cmdprot) Release(0640)Db2conn( ) Runaway( 0020000 )Debugtool(Nodebug) Scandelay( 5000 )Dfltuser(CPSM) Sdtran(CESD)Dsalimit( 05242880 ) Sosstatus(Notsos)Dsrtprogram( NONE ) Storeprotect(Inactive)Dtrprogram( EYU9XLOP ) Time( 0005000 )Dumping( Nosysdump ) Tranisolate(Inactive)Edsalimit( 0033554432 )Forceqr( Force )Logdefer ( 00005 )Maxtasks( 060 )Mrobatch( 001 )Oslevel(010400)Progautoctlg( Ctlgmodify )
SYSID=MS1B APPLID=EYUMAS1BRESPONSE: NORMAL TIME: 13.49.28 DATE: 27.02.05
PF 1 HELP 3 END 5 VAR 7 SBH 8 SFH 9 MSG 10 SB 11 SF
Chapter 55. Installation verification procedure 2 (IVP2) 443

5. Your CMAS EYUPARM NAME(xxxxxxxx) must refer to EYUCMS1A on system Aand EYUCMS1B on system B.
6. Your MAS EYUPARM NAME(xxxxxxxx) must refer to EYUMAS1A on system Aand EYUMAS1B on system B.
When you run IVP1 and IVP2 with your own configuration, you can omit the stepsdescribed in “Setting up the CICSPlex SM environment on system A” on page 411and in “Setting up the CICSPlex SM environment on system B” on page 426.
444 CICS TS for z/OS: Installation Guide

Part 7. Appendixes
© Copyright IBM Corp. 1989, 2010 445

446 CICS TS for z/OS: Installation Guide

Appendix. CICS modules eligible for the MVS link pack area
This topic provides information about the CICS modules that are required in theMVS link pack area, and other CICS modules that are eligible for the MVS link packarea. This information is intended to help you plan for and install CICS modules inthe MVS link pack area, for the functions that your CICS regions use.
The following terms are used in this appendix:
Term Meaning
MVS link pack area The MVS link pack area generally.
LPA The area of the MVS link pack area below 16MB.
ELPA The area of the MVS link pack area above 16MB.
For further information about installing CICS modules into the MVS link pack area,and about controlling their use from the MVS link pack area, see “Defaultmessage-formatting initialization parameters” on page 88.
CICS modules required in the MVS link pack areaCICS modules that are required in the MVS link pack area are loaded into thehlq.SDFHLPA library when you install CICS. Details of these modules is given inTable 48 on page 451. These modules are not affected by any CICS parameters oroptions, and CICS does not use the standard MVS search order for them. Forfurther information about these modules, see “The IEASYSxx MVS initializationmember” on page 83.
CICS modules eligible for the MVS link pack areaOther CICS modules that are eligible for installation in the MVS link pack area arespecified in the CICS-supplied USERMODs: DFH$UMOD (for base CICS modules).Details of these modules is given in Table 49 on page 451.
Information about modules eligible for the MVS link pack areaThe following information is provided in Table 48 on page 451 and Table 49 on page451. Some of the information applies only to the modules listed in Table 49.
Name The name of the module.
Description A brief description of the module. This gives some clues to theassociated function, useful if the module does not have a controllingCICS option.
Library (Table 49 only.) The library in which the module is installed:
Library DS name
AUTH hlq.SDFHAUTH
LOAD hlq.SDFHLOAD
LINK SYS1.hlq.SDFHLINK
You can use the CICS-supplied usermods to move the modulesfrom these libraries to the hlq.SDFHLPA library.
LPA/ELPA (Table 49 only.) In this column, the terms LPA and ELPA are used
© Copyright IBM Corp. 1989, 2010 447

to indicate whether a module is loaded into the part of the MVS linkpack area that is below (LPA) or above (ELPA) 16MB.
Priority (Table 49 only.) A nominal “priority” to help you decide whether amodule should be in the MVS link pack area and to choosebetween modules if your MVS link pack area is short on space.
Size The size of the module.
Option/Note Identifies one or more notes about the use of the module from theMVS link pack area and any associated CICS options to bespecified for the function that uses the module.
Some of these information categories are described in more detail in the followingsections.
PriorityThe priority of the modules eligible for the LPA are as follows:
1. Must be in the MVS link pack area. Information about these modules, installedin the hlq.SDFHLPA library, is given in Table 48 on page 451.
2. Generally a good candidate for inclusion in the MVS link pack area. You shouldinclude these modules in the LPA to support the associated option.
3. A good candidate for inclusion in the MVS link pack area. You should includethese modules in the MVS link pack area if you are a heavy user of theassociated function.
SizeThe module sizes were taken from the latest information available at the time ofpublishing, but may be different in your CICS environment depending on the optionsselected and if any PTFs applied affect the modules. The sizes are given here tohelp you plan the amount of storage that you need for the modules that you want toinstall in the MVS link pack area. You can get the actual sizes for these modulesfrom a directory listing of the modules or from the module index provided at theback of a formatted SDUMP taken with the LPA=NO system initialization parameterspecified.
Option/NoteThis column identifies any CICS options associated with the use of the module fromthe MVS link pack area, or refers to a note in the following list for additionalinformation, or both.
Notes:
1. The program is used from the MVS link pack area only if you set theUSELPACOPY option of its program resource definition to YES.
2. You must always install the latest service level of the CICS SVC module,DFHCSVC. You should install the DFHCSVC module into the MVS link packarea before you run the CICS installation verification procedures.
You must define the DFHCSVC module in an IEASVCxx member of theSYS1.PARMLIB library, using SVCPARM statements. You select the requiredIEASVCxx member by coding the SVC parameter (SVC=xx) in aSYS1.PARMLIB member (IEASYSyy), which you use to IPL your MVS.
You can run several CICS regions, at different release levels, in the same MVSimage, with each region using its own version of the DFHCSVC module.However, if some of those regions use MRO, then all regions that use MROmust use the latest DFHCSVC module and the latest DFHIRP module.
448 CICS TS for z/OS: Installation Guide

If you have some regions that are to use the DFHCSVC module, and you givethe SVC a number different from the SVC number used by the regions, youmust generate a new version of the DFHCRC program on the regions.
For information about defining and using the DFHCSVC module, see the CICSTransaction Server for z/OS Program Directory.
3. If your batch region is sharing the database with a CICS/OS/VS 1.7 region or aCICS/MVS Version 2 region, you can continue to use the batch regioncontroller program, DFHDRP, from before CICS/ESA Version 3. (TheCICS/ESA Version 3 DFHIRP program supports earlier levels of the DFHDRPprogram.) However, if your batch region is sharing the database with a CICSTS for z/OS, Version 3.1 region, you are recommended to install the CICS TSfor z/OS, Version 3.1 DFHDRP module in SYS1.LINKLIB, or another suitableAPF-authorized library in the MVS linklist.
4. All LPA-required modules are downward-compatible with earlier releases ofCICS. If you are running earlier releases of CICS, you must ensure that thecorrect version is installed in the LPA. The module must be in the LPA forintegrity reasons, but the post exit routine itself can reside either in the LPA, orin the CICS address space. This enables you to use different versions of theDFHDSAUT module in different CICS regions running in the same MVS image,because the DFHDSAUT module may not be compatible from release torelease.
5. The use of this pre-CICS/ESA Version 3 programmable interface to the masterterminal program, DFHEMTA, is supported for compatibility reasons only. Youare strongly recommended to use the equivalent EXEC CICS INQUIRE and|SET commands instead. The documentation for this interface is available onlyin the CICS libraries for the releases prior to CICS/ESA Version 3.
6. You can set the system tracing status by coding appropriate systeminitialization parameters, and you can also set it dynamically by using theCETR transaction.
The system initialization parameters that you can use are:
Parameter Use
AUXTR Activate auxiliary trace.
AUXTRSW Define the auxiliary switch status.
GTFTR Enable CICS to use MVS GTF tracing.
INTTR Activate CICS internal tracing.
TRTABSZ Specify the size of the internal trace table.
USERTR Set the master user trace flag on or off.
For information about using CICS trace, and using the CETR transaction tocontrol the tracing status, see the CICS Problem Determination Guide.
7. The DFHIRP module needs to be in the MVS link pack area only if you areusing MRO, CICS shared database, or the console message-handling facility.If you install the DFHIRP module in the MVS link pack area, you must alsoinstall DFHSSEN if you are using the console message-handling facility.
You must always install the latest service level of the DFHIRP (if needed) andDFHSSEN.
If you are running CICS with MRO at different release levels, all regions in thesame MVS-image must use the latest DFHIRP module.
8. To use the console message formatting facility of the MVS subsysteminterface, you must install the modules DFHSSGC and DFHSSWT either in theMVS link pack area or in an APF-authorized library in the MVS linklist. These
Appendix. CICS modules eligible for the MVS link pack area 449
########

modules are used by the subsystem interface and not directly by CICS.Therefore, the use of these modules from the MVS link pack area is notcontrolled by CICS parameters or options.
For information about enabling the console message-formatting facility, andabout the other modules it requires, see “Modules needed to use the consolemessage-handling facilities” on page 89.
9. CICS needs the following load modules, supplied with CICS, to use data tableservices:
DFHDTINTDFHDTOCDFHDTLDDFHDTRDDFHDTES
The modules are all eligible for the MVS link pack area, but DFHDTRD andDFHDTES are probably the only ones which are used sufficiently frequently tobe worth considering.
10. The following modules, used by the Shared Data Tables facility, are eligible forthe MVS link pack area:
DFHDTAMDFHDTAORDFHDTCVDFHDTFORDFHDTSVCDFHDTXSDFHMVRMS
All these modules, except for DFHMVRMS, are listed in the usermod,DFH$UMOD, supplied with CICS. Only DFHDTAM, DFHDTAOR, DFHDTFOR,and possibly DFHDTCV are used sufficiently frequently to be worth consideringfor the MVS link pack area.
The following modules, installed in the hlq.SDFHLINK library, must be installedin the MVS linklist, or in the MVS link pack area:
DFHDTSVCDFHDTCVDFHMVRMS
11. BMS=STANDARD
12. BMS=FULL
13. BMS=MINIMUM
14. DTRPGM=DFHDYP
15. SPOOL=YES
16. FCT=YES/xx
17. ISC=YES/xx
18. VTAM=YES
19. XRF=YES/xx
20. AUXTR=ON
21. TST=YES/xx
22. TCP=YES/xx
23. This module is installed into SDFJAUTH and is copied to SDFJLPA.
This column also gives any associated options that you must specify to use thefunction associated with the LPA-eligible module. Unless otherwise stated, theoptions are specified by system initialization parameters as defined in the CICS
450 CICS TS for z/OS: Installation Guide
#
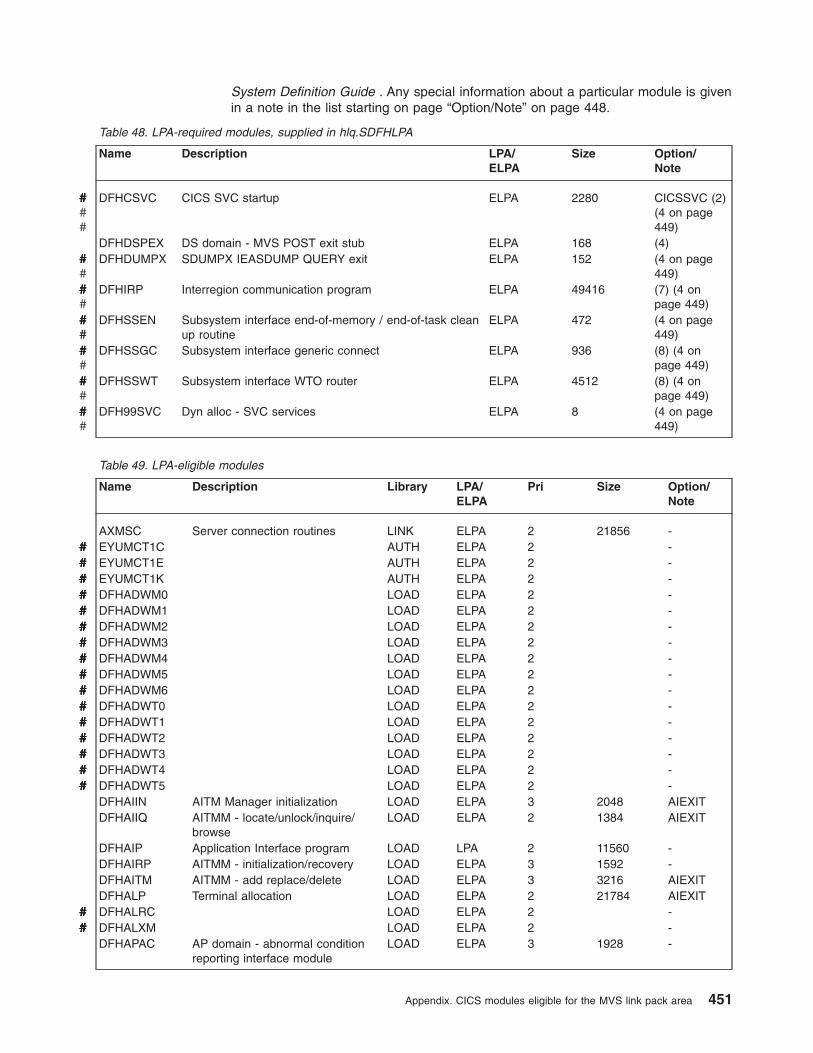
System Definition Guide . Any special information about a particular module is givenin a note in the list starting on page “Option/Note” on page 448.
Table 48. LPA-required modules, supplied in hlq.SDFHLPA
Name Description LPA/ELPA
Size Option/Note
DFHCSVC CICS SVC startup ELPA 2280 CICSSVC (2)(4 on page449)
DFHDSPEX DS domain - MVS POST exit stub ELPA 168 (4)DFHDUMPX SDUMPX IEASDUMP QUERY exit ELPA 152 (4 on page
449)DFHIRP Interregion communication program ELPA 49416 (7) (4 on
page 449)DFHSSEN Subsystem interface end-of-memory / end-of-task clean
up routineELPA 472 (4 on page
449)DFHSSGC Subsystem interface generic connect ELPA 936 (8) (4 on
page 449)DFHSSWT Subsystem interface WTO router ELPA 4512 (8) (4 on
page 449)DFH99SVC Dyn alloc - SVC services ELPA 8 (4 on page
449)
Table 49. LPA-eligible modules
Name Description Library LPA/ELPA
Pri Size Option/Note
AXMSC Server connection routines LINK ELPA 2 21856 -EYUMCT1C AUTH ELPA 2 -EYUMCT1E AUTH ELPA 2 -EYUMCT1K AUTH ELPA 2 -DFHADWM0 LOAD ELPA 2 -DFHADWM1 LOAD ELPA 2 -DFHADWM2 LOAD ELPA 2 -DFHADWM3 LOAD ELPA 2 -DFHADWM4 LOAD ELPA 2 -DFHADWM5 LOAD ELPA 2 -DFHADWM6 LOAD ELPA 2 -DFHADWT0 LOAD ELPA 2 -DFHADWT1 LOAD ELPA 2 -DFHADWT2 LOAD ELPA 2 -DFHADWT3 LOAD ELPA 2 -DFHADWT4 LOAD ELPA 2 -DFHADWT5 LOAD ELPA 2 -DFHAIIN AITM Manager initialization LOAD ELPA 3 2048 AIEXITDFHAIIQ AITMM - locate/unlock/inquire/
browseLOAD ELPA 2 1384 AIEXIT
DFHAIP Application Interface program LOAD LPA 2 11560 -DFHAIRP AITMM - initialization/recovery LOAD ELPA 3 1592 -DFHAITM AITMM - add replace/delete LOAD ELPA 3 3216 AIEXITDFHALP Terminal allocation LOAD ELPA 2 21784 AIEXITDFHALRC LOAD ELPA 2 -DFHALXM LOAD ELPA 2 -DFHAPAC AP domain - abnormal condition
reporting interface moduleLOAD ELPA 3 1928 -
Appendix. CICS modules eligible for the MVS link pack area 451
#######
#####################################
################################################################################################################
##############

Table 49. LPA-eligible modules (continued)
Name Description Library LPA/ELPA
Pri Size Option/Note
DFHAPATT AP domain - entrypoint attach LOAD ELPA 2 728 -DFHAPCR LOAD ELPA 3 -DFHAPDM AP domain - initialization/
terminationLOAD ELPA 3 5416 -
DFHAPDN AP domain - transaction definitionnotify
LOAD ELPA 3 2904 -
DFHAPEP AP domain - user exit service LOAD ELPA 2 11128 -DFHAPID LOAD ELPA 3 -DFHAPIN AP domain - special initialization
for programs and user-replaceablemodules
LOAD ELPA 2 184 -
DFHAPIQ AP domain - user exit data accessservice
LOAD ELPA 3 1232 -
DFHAPJC AP domain - journaling gateservice
LOAD ELPA 3 2528 -
DFHAPLI AP domain - language interfaceprogram
LOAD ELPA 2 27528 -
DFHAPLJ LOAD ELPA 2 -DFHAPLX AP domain - manage execution
under X8/X9 TCBLOAD ELPA 2 -
DFHAPNT AP domain - MXT notify gate LOAD ELPA 3 1096 -DFHAPPG AP domain - optimize initial_link
forLOAD ELPA 2 1808 -
DFHAPRDR AP domain gate APRD LOAD ELPA 2 22176 -DFHAPRT AP Domain - route transaction
gateLOAD ELPA 3 9104 -
DFHAPSTL AP domain - statistics collectionprogram
LOAD ELPA 2 35248 -
DFHAPTC LOAD ELPA 3 -DFHAPTI AP domain - timer notify gate LOAD ELPA 2 1096 -DFHAPTIX AP domain - expiry analysis task LOAD ELPA 2 1096 -DFHAPXM AP domain - transaction
initialization and terminationservices
LOAD LPA 2 3744 -
DFHAPXME AP domain - XM exceptionhandler
LOAD ELPA 3 2720 -
DFHASV Authorized services interface AUTH LPA 2 2504 -DFHBADML LOAD ELPA 2 -DFHBRAI Bridge Functions LOAD ELPA 3 -DFHBRAT Bridge BRAT gate Functions LOAD ELPA 3 AA0 -DFHBRFM Bridge Facility Management LOAD ELPA 3 3620 -DFHBRFR Bridge Functions LOAD ELPA 3 -DFHBRIC IC Bridge Exit Interface LOAD ELPA 2 1570 -DFHBRIQ Bridge BRIQ gate Functions LOAD ELPA 3 580 -DFHBRLK Bridge Functions LOAD ELPA 3 -DFHBRME Bridge Functions LOAD ELPA 3 -DFHBRMF Bridge Functions LOAD ELPA 3 -DFHBRMG Bridge Functions LOAD ELPA 3 -DFHBRMR Bridge Functions LOAD ELPA 3 -DFHBRMS BMS Bridge Exit Interface LOAD ELPA 2 49B0 -DFHBRNS Bridge Functions LOAD ELPA 3 -DFHBRRM Bridge Recovery Manager
FunctionsLOAD ELPA 3 8D0 -
452 CICS TS for z/OS: Installation Guide
#######
#######
#######||||||||
#######
#######

Table 49. LPA-eligible modules (continued)
Name Description Library LPA/ELPA
Pri Size Option/Note
DFHBRSP SP Bridge Exit Interface LOAD ELPA 2 D60 -DFHBRTB Bridge terminal buffer
management programLOAD ELPA 2 3F90 -
DFHBRTC Bridge support for TerminalControl requests
LOAD ELPA 2 3D08 -
DFHBRTQ Bridge terminal buffer queryprogram
LOAD ELPA 2 2AC0 -
DFHBRXM Bridge XM Attach Client LOAD ELPA 3 21E0 -DFHCCNV Data conversion for CICS OS/2
ISC usersLOAD ELPA 2 806096 (1)
DFHCCNVG LOAD ELPA 3 -DFHCDKRN LOAD ELPA 3 -DFHCEGN Goodnight transaction stub LOAD ELPA 3 2400 (1)DFHCESD Shutdown transaction LOAD ELPA 3 4088 (1)DFHCHS CICS/ESA mirror for CICS OS/2
and CICS/VMLOAD ELPA 2 8368 (1)
DFHCMAC ME domain - CICS messages andcodes transaction (CMAC)
LOAD ELPA 2 7576 (1)
DFHCMP CICS monitoring compatibilityinterface
LOAD ELPA 2 496 -
DFHCNV LOAD ELPA 3 -DFHCPIC SAA communications interface
programLOAD ELPA 2 175952 -
DFHCPIN CPI initialization program LOAD ELPA 3 2744 -DFHCPIRR SAA resource recovery interface
programLOAD ELPA 2 1176 -
DFHCPSM Translator for CICSPlex SMcommands
LOAD LPA 3 3184 -
DFHCQCQ LOAD ELPA 3 -DFHCRLB Subroutine entry to process
logging requests for MRO andLU6.1 links from assembler callers
LOAD ELPA 2 1360 -
DFHCRNP Interregion connection manager LOAD ELPA 2 10696 (1)DFHCRQ ATI purge program LOAD ELPA 2 872 (1)DFHCRR Interregion session recovery
programLOAD ELPA 3 4840 (1)
DFHCRS Remote scheduler program LOAD ELPA 2 6800 (1)DFHCRSP CICS IRC startup module LOAD ELPA 3 3528 (1)DFHCRT Transaction routing relay program
for APPC devicesLOAD ELPA 2 648 (1)
DFHCRU Performs initialization of AP gatesfor various resource managersand facilities
LOAD ELPA 2 34448 -
DFHDBAT CICS-DBCTL adapter/transformer LOAD ELPA 2 7960 (1)DFHDBCT CICS-DBCTL control program LOAD ELPA 3 16968 (1)DFHDBMOX CICS-DBCTL monitoring exit LOAD ELPA 2 488 -DFHDBREX CICS-DBCTL resume exit LOAD ELPA 2 472 -DFHDBSPX CICS-DBCTL suspend exit LOAD ELPA 2 1000 -DFHDBSSX CICS-DBCTL status exit LOAD ELPA 3 672 -DFHDBSTX CICS-DBCTL statistics exit LOAD ELPA 3 656 -DFHDBTI EXEC DLI LD table LOAD ELPA 3 9024 (1)DFHDBTOX CICS-DBCTL token exit LOAD ELPA 3 488 -DFHDCP Dump control program LOAD ELPA 3 848 -
Appendix. CICS modules eligible for the MVS link pack area 453
##############
#######
#######
#######

Table 49. LPA-eligible modules (continued)
Name Description Library LPA/ELPA
Pri Size Option/Note
DFHDHDML LOAD ELPA 2 -DFHDHRP LOAD ELPA 3 -DFHDIP Data interchange program LOAD ELPA 2 3936 DIP=YESDFHDIPDY Data interchange program
(dummy)LOAD ELPA 2 168 DIP=NO
DFHDLI DL/I call router LOAD LPA 2 4504 -DFHDLIDP DBCTL call processor LOAD ELPA 2 7032 -DFHLLOD LOAD ELPA 2 -DFHDMRM CSD open/close program LOAD ELPA 3 888 -DFHDPDML LOAD ELPA 3 -DFHDPWM0 LOAD ELPA 2 -DFHDPWM1 LOAD ELPA 2 -DFHDPWM2 LOAD ELPA 2 -DFHDPWM3 LOAD ELPA 2 -DFHDPWM4 LOAD ELPA 2 -DFHDPWM5 LOAD ELPA 2 -DFHDPWM6 LOAD ELPA 2 -DFHDPWT0 LOAD ELPA 2 -DFHDPWT1 LOAD ELPA 2 -DFHDPWT2 LOAD ELPA 2 -DFHDPWT3 LOAD ELPA 2 -DFHDPWT4 LOAD ELPA 2 -DFHDPWT5 LOAD ELPA 2 -DFHDPWT6 LOAD ELPA 2 -DFHDSAUT DS domain - authorized services AUTH ELPA 2 2280 -DFHDSBA$ BMS data stream build (standard) LOAD ELPA 2 1592 (11)DFHDSB1$ BMS data stream build (full) LOAD ELPA 2 1592 (12)DFHDSRP LOAD ELPA 2 -DFHDTAM Shared data tables: access
managerAUTH ELPA 2 11680 (10)
DFHDTAOR Shared data tables: AOR module AUTH ELPA 2 3264 (10)DFHDTCV Shared data tables connection
validationLINK ELPA 2 288 (10)
DFHDTFOR Shared data tables: FOR module AUTH ELPA 2 13400 (10)DFHDTLX LOAD ELPA 2 -DFHDTSVC Shared data tables: SVC services LINK ELPA 3 10944 (10)DFHDTXS Shared data tables connection
securityAUTH ELPA 3 1616 (10)
DFHDUIO DU domain - open/close/switch/write
LOAD LPA 2 5016 -
DFHDUSVC DU domain - SVC processingroutine
AUTH ELPA 2 4160 -
DFHDYP Dynamic routing program LOAD ELPA 2 320 (14) (1)DFHD2CC LOAD ELPA 3 -DFHD2CM0 LOAD ELPA 3 -DFHD2CM1 LOAD ELPA 3 -DFHD2CM2 LOAD ELPA 3 -DFHD2CM3 LOAD ELPA 3 -DFHD2CO LOAD ELPA 3 -DFHD2D2 LOAD ELPA 3 -DFHD2EDF LOAD ELPA 3 -DFHD2EX1 LOAD ELPA 3 -
454 CICS TS for z/OS: Installation Guide
##############
#######
#########################################################################################################
#######
#######
###############################################################

Table 49. LPA-eligible modules (continued)
Name Description Library LPA/ELPA
Pri Size Option/Note
DFHD2EX2 LOAD ELPA 3 -DFHD2EX3 AUTH ELPA 3 -DFHD2IN LOAD ELPA 3 -DFHD2INI LOAD ELPA 3 -DFHD2MSB AUTH ELPA 3 -DFHD2RP LOAD ELPA 3 -DFHD2STP LOAD ELPA 3 -DFHD2STR LOAD ELPA 3 -DFHD2TM LOAD ELPA 3 -DFHEBU EXEC FMH construction LOAD ELPA 2 432 (17)DFHECBAM LOAD ELPA 3 -DFHECID CECI service program LOAD ELPA 3 77424 (1)DFHECIP Command interpreter (CECI)
programLOAD ELPA 3 3008 (1)
DFHECSP Command syntax check (CECS)program
LOAD ELPA 3 3008 (1)
DFHEDAD RDO (CEDA) service program LOAD ELPA 3 127688 (1)DFHEDAP RDO (CEDA) program LOAD ELPA 3 3144 (1)DFHEDC EXEC interface for dump control LOAD ELPA 2 152 -DFHEDCP EXEC interface for dump
system/transactionLOAD ELPA 3 3776 -
DFHEDFBR Temporary-storage browsetransaction, CEBR
LOAD ELPA 3 12024 (1)
DFHEDFD EDF display program LOAD ELPA 3 63552 (1)DFHEDFE EDF attach error handler LOAD ELPA 3 1360 (1)DFHEDFP EDF control program LOAD ELPA 3 7512 (1)DFHEDFR EDF response table LOAD ELPA 3 576 (1)DFHEDFX EDF task switch program LOAD ELPA 3 4296 (1)DFHEDI EXEC interface for data
interchangeLOAD ELPA 2 1352 DIP=YES
DFHEDP EXEC DLI command stub LOAD ELPA 2 7128 (1)DFHEEI EXEC interface for HANDLE,
ADDRESS, ASSIGNLOAD ELPA 2 6536 -
DFHEEX EXEC FMH extraction LOAD ELPA 2 752 -DFHEGL EXEC interface for unmapped
LU6.2 commandsLOAD ELPA 2 3664 (18)
DFHEIACQ EXEC ACQUIRE TERMINAL LOAD ELPA 3 1464 -DFHEIBAM LOAD ELPA 2 -DFHEICRE EXEC CICS CREATE commands LOAD ELPA 3 86880 -DFHEIDEF LOAD ELPA 2 -DFHEIDEL LOAD ELPA 3 -DFHEIDH LOAD ELPA 2 -DFHEIDLI DL/I load table LOAD LPA 3 9248 DLIDFHEIDTI EXEC ask-time, format-time
programLOAD ELPA 2 3048 -
DFHEIEM LOAD ELPA 2 -DFHEIFC File control: EXEC interface
moduleLOAD ELPA 2 11800 -
DFHEIGDS Translator table (GDS commands) LOAD ELPA 3 2752 (1)DFHEIGDX EXEC interface load table LOAD LPA 3 3024 -DFHEIIC EXEC interface IC module LOAD ELPA 2 7824 -DFHEIINS LOAD ELPA 3 -
Appendix. CICS modules eligible for the MVS link pack area 455
###############################################################
#######
#######
#######
#####################
#######
#######
#######

Table 49. LPA-eligible modules (continued)
Name Description Library LPA/ELPA
Pri Size Option/Note
DFHEIPI LOAD ELPA 2 -DFHEIPRT EXEC interface for perform
resettimeLOAD ELPA 3 680 -
DFHEIPSE EXEC interface for performsecurity
LOAD ELPA 3 896 SEC=YES
DFHEIPSH EXEC interface for performshutdown
LOAD ELPA 3 2800 -
DFHEIQBA LOAD ELPA 2 -DFHEIQBR EXEC bridge inquire facility LOAD ELPA 3 5848 -DFHEIQCF LOAD ELPA 3 -DFHEIQDH LOAD ELPA 3 -DFHEIQDI LOAD ELPA 3 -DFHEIQDN EXEC inquire/set for external data
setsLOAD ELPA 3 7576 -
DFHEIQDS EXEC inquire/set/discard for files LOAD ELPA 3 14344 -DFHEIQDU EXEC inquire/set for dump data
sets and dump codesLOAD ELPA 3 8584 -
DFHEIQD2 LOAD ELPA 3 -DFHEIQEJ EXEC inquire EJB commands LOAD ELPA 3 12824 -DFHEIQIR EXEC inquire/set for IRC LOAD ELPA 3 1976 -DFHEIQMS EXEC inquire/set for monitor and
statsLOAD ELPA 3 13944 -
DFHEIQMT EXEC inquire/set for CEMT-onlycommands
LOAD ELPA 3 3408 -
DFHEIQOP EXEC inquire requestmodel LOAD ELPA 3 2608 -DFHEIQPI LOAD ELPA 3 -DFHEIQRQ EXEC inquire for queued requests
(REQIDs)LOAD ELPA 3 3152 -
DFHEIQRR LOAD ELPA 3 -DFHEIQSA EXEC inquire/set for system
attributesLOAD ELPA 3 8928 -
DFHEIQSC EXEC inquire/set for connections LOAD ELPA 3 16616 -DFHEIQSJ EXEC inquire/set for journals LOAD ELPA 3 3480 -DFHEIQSK EXEC inquire/set for tasks LOAD ELPA 3 15248 -DFHEIQSL EXEC inquire/discard for
journalmodelLOAD ELPA 3 3144 -
DFHEIQSM EXEC inquire/set for modenames LOAD ELPA 3 4048 -DFHEIQSO LOAD ELPA 3 -DFHEIQSP EXEC inquire/set/discard for
programsLOAD ELPA 3 6272 -
DFHEIQSQ EXEC inquire/set for TD queues LOAD ELPA 3 9096 -DFHEIQST EXEC inquire/set for terminals LOAD ELPA 3 22480 -DFHEIQSV EXEC inquire/set for volumes LOAD ELPA 3 400 -DFHEIQSX EXEC inquire/set/discard for
transactionsLOAD ELPA 3 7144 -
DFHEIQSY LOAD ELPA 3 -DFHEIQSZ EXEC CICS SPI commands for
FEPILOAD ELPA 3 3784 -
DFHEIQTR EXEC inquire/set for trace LOAD ELPA 3 10392 -DFHEIQUE EXEC inquire for exit programs LOAD ELPA 3 6288 -DFHEIQVT EXEC inquire/set for VTAM and
autoinstallLOAD ELPA 3 5968 -
DFHEIQWB LOAD ELPA 3 -
456 CICS TS for z/OS: Installation Guide
#######
###################################
##############
##############
#######
#######
#######
#######

Table 49. LPA-eligible modules (continued)
Name Description Library LPA/ELPA
Pri Size Option/Note
DFHEIQWR LOAD ELPA 3 -DFHEISO LOAD ELPA 3 -DFHEISP EXEC interface sycpoint processor LOAD ELPA 2 1576 -DFHEITAB Translator table (basic commands) LOAD ELPA 3 46272 (1)DFHEITBS Translator table (special
commands)LOAD ELPA 3 47984 (1)
DFHEITHG EXEC interface hired gun lookuptable
LOAD LPA 2 13800 -
DFHEITMT Command language table forCEMT
LOAD ELPA 3 34432 (1)
DFHEITOT Command language table forCEOT
LOAD ELPA 3 1192 (1)
DFHEITS EXEC TS request handler LOAD ELPA 2 7096 -DFHEITST CEST language definition table LOAD ELPA 3 4984 (1)DFHEITSZ EXEC CICS language definition
tableLOAD ELPA 3 8592 (1)
DFHEIWB LOAD ELPA 2 -DFHEJC EXEC interface for journaling LOAD ELPA 2 984 -DFHEJDML LOAD ELPA 3 -DFHEJITL LOAD ELPA 2 -DFHEKC EXEC interface for task control LOAD ELPA 2 1448 -DFHEMDML LOAD ELPA 2 -DFHEMEX EXEC interface for ME domain LOAD ELPA 3 2792 -DFHEMS EXEC interface for BMS LOAD ELPA 2 4264 BMSDFHEMTA Programmable interface to Master
terminal programLOAD ELPA 3 3232 (1,5)
DFHEMTD Master terminal (CEMT) serviceprogram
LOAD ELPA 3 98120 (1)
DFHEMTP Master terminal (CEMT) program LOAD ELPA 3 3232 (1)DFHEOP EXEC interface for write operator LOAD ELPA 3 2752 -DFHEOTP CEOT service program LOAD ELPA 3 3232 (1)DFHEPC EXEC interface for program
controlLOAD ELPA 2 8280 -
DFHEPS System spooling interface stub LOAD ELPA 2 2856 (15)DFHERM Resource manager interface (RMI)
moduleLOAD LPA 2 14056 -
DFHERMRS External resource manager resyncprocessor
LOAD ELPA 3 4312 -
DFHERMSP External resource managersyncpoint processor
LOAD ELPA 3 4400 -
DFHESC EXEC interface for storage control LOAD ELPA 2 1320 -DFHESE EXEC interface for query security LOAD ELPA 2 4664 -DFHESN EXEC interface for signon and
sign-offLOAD ELPA 2 4992 -
DFHESTP CEST service program LOAD ELPA 3 3232 (1)DFHESZ EXEC CICS API commands for
FEPILOAD ELPA 3 1136 -
DFHETC EXEC interface for terminal control LOAD ELPA 2 7376 -DFHETD EXEC interface for transient data LOAD ELPA 2 2728 -DFHETL LU6.2 EXEC interface stub LOAD ELPA 2 7944 -DFHETR EXEC interface for trace control LOAD ELPA 2 792 (6)DFHETRX EXEC interface for enter
tracenum, monitorLOAD ELPA 2 1232 USERTR
Appendix. CICS modules eligible for the MVS link pack area 457
##############
###############
########
#######
##############
#######

Table 49. LPA-eligible modules (continued)
Name Description Library LPA/ELPA
Pri Size Option/Note
DFHFCAT File control catalog manager LOAD ELPA 2 7328 -DFHFCBD File control BDAM request
processorLOAD LPA 2 5192 (16)
DFHFCCA File Control RLS Control ACBManager
LOAD ELPA 2 14984 -
DFHFCDL LOAD ELPA 2 -DFHFCDN File control DSN block manager LOAD ELPA 3 9856 (16)DFHFCDO LOAD ELPA 2 -DFHFCDR LOAD ELPA 2 -DFHFCDUW LOAD ELPA 2 -DFHFCD2 File control shared data tables
record request handlerLOAD ELPA 2 16120 (16) (10)
DFHFCFL File Control FRAB/FLABprocessor
LOAD ELPA 2 6896 -
DFHFCFR File Control request handler LOAD ELPA 2 10760 (16)DFHFCFS File Control state program LOAD ELPA 2 54632 (16)DFHFCIN File control initialization program LOAD ELPA 3 1448 (16)DFHFCLJ File control logging and journaling LOAD ELPA 2 16968 -DFHFCMT File control table manager LOAD ELPA 3 11864 (16)DFHFCNQ File control lock name interpreter LOAD ELPA 2 3088 -DFHFCQI File control VSAM RLS Quiesce -
InitiationLOAD ELPA 2 5408 -
DFHFCQT File control VSAM RLS Quiesce -Common System Transaction
LOAD ELPA 2 14376 -
DFHFCQU File control VSAM RLS Quiesce -Process
LOAD ELPA 2 8304 -
DFHFCQX File control VSAM RLS Quiesce -CICS RLS Quiesce Exit
LOAD ELPA 2 2440 -
DFHFCRC File control recovery control LOAD ELPA 2 20792 -DFHFCRF LOAD ELPA 2 -DFHFCRL File control VSAM SHRCTL block
managerLOAD ELPA 3 3320 (16)
DFHFCRO LOAD ELPA 2 31384 -DFHFCRP File control restart program LOAD ELPA 3 24040 (16)DFHFCRS File control VSAM RLS record
management moduleLOAD ELPA 2 24192 -
DFHFCRV File control VSAM RLS interfacemodule
LOAD ELPA 2 3576 -
DFHFCSD File control shutdown program LOAD ELPA 2 1792 (16)DFHFCST File control statistics program LOAD ELPA 3 7352 (16)DFHFCU File open utility program LOAD LPA 3 552 (16) (1)DFHFCVS File access VSAM request
processorLOAD ELPA 2 30504 (16)
DFHGMM VTAM LU startup message LOAD ELPA 2 2096 (1)DFHGTCNV Subroutine used by the LOGR
subsystem interfaceLINK ELPA 3 11736 -
DFHICP Interval control program LOAD ELPA 2 11440 -DFHICRC Interval Control Recovery module LOAD ELPA 2 7616 -DFHICXM AP domain - bind, inquire, and
release facility IC functionsLOAD ELPA 2 4952 -
DFHIEDML LOAD ELPA 3 -DFHIEP LOAD ELPA 3 -DFHIEXM LOAD ELPA 2 -
458 CICS TS for z/OS: Installation Guide
#######
#####################
#######
#####################

Table 49. LPA-eligible modules (continued)
Name Description Library LPA/ELPA
Pri Size Option/Note
DFHIIDML LOAD ELPA 3 -DFHIIPA$ BMS non-3270 input mapping
(standard)LOAD ELPA 3 2048 (11)
DFHIIP1$ BMS non-3270 input mapping(full)
LOAD ELPA 3 2048 (12)
DFHIIXM LOAD ELPA 2 -DFHINDAP Indoubt tool LOAD ELPA 3 1912 (1)DFHINDSP Indoubt tool syncpoint processor LOAD ELPA 3 1688 -DFHINDT Indoubt tool LOAD ELPA 3 6464 (1)DFHINTRU Indoubt tool task-related user exit LOAD ELPA 3 2224 (1)DFHIRW10 IRC work delivery exit program AUTH ELPA 2 1328 -DFHISP Intersystem communication
programLOAD ELPA 2 3512 ISC=YES
DFHJCP Journaling component LOAD LPA 2 2288 -DFHJVMAT AUTH ELPA 2 -DFHKCP Transaction manager startup
routineLOAD ELPA 2 8936 -
DFHKCSC DFHKCQ chain scanning fordiscard
LOAD ELPA 3 1072 -
DFHKESVC KE domain - authorized serviceroutine
AUTH ELPA 2 1768 -
DFHLDDMI LD domain - secondaryinitialization
LOAD ELPA 3 18480 -
DFHLDNT LD domain - storage notify handler LOAD ELPA 2 2464 -DFHLDST LD domain - statistics collection LOAD ELPA 3 3592 -DFHLDSVC LD domain - authorized service
routineAUTH LPA 2 2256 -
DFHLEDT Transaction dump service LOAD ELPA 2 330 -DFHLGCNV Exit routine used by the LOGR
subsystem interfaceLINK ELPA 3 20088 -
DFHLGDM Log manager domain initialization LOAD ELPA 3 346736 -DFHLIRET Language interface return program LOAD LPA 2 136 -DFHMCPA$ BMS mapping control program
(standard)LOAD ELPA 2 8248 (11)
DFHMCPE$ BMS mapping control program(minimum)
LOAD ELPA 2 7064 (13)
DFHMCP1$ BMS mapping control program(full)
LOAD ELPA 2 12920 (12)
DFHMCX BMS fast path module LOAD ELPA 2 7136 BMSDFHMCY Process MAPPINGEV Requests LOAD ELPA 2 7192 BMSDFHMET1C AUTH ELPA 2 -DFHMET1E DFHMEU base messages link-edit
moduleAUTH ELPA 2 340872 NATLANG
DFHMET1K AUTH ELPA 2 -DFHMET5C AUTH ELPA 2 -DFHMET5E DFHMEU ONC RPS messages
link-edit moduleAUTH ELPA 2 67512 -
DFHMET5K AUTH ELPA 2 -DFHMET9C AUTH ELPA 2 -DFHMET9E DFHMEU user messages link-edit
moduleAUTH ELPA 2 360 -
DFHMET9K AUTH ELPA 2 -DFHMGP Message writer program LOAD ELPA 3 14560 -
Appendix. CICS modules eligible for the MVS link pack area 459
#######
#######
#######
##############
##############
##############
#######

Table 49. LPA-eligible modules (continued)
Name Description Library LPA/ELPA
Pri Size Option/Note
DFHMGT Message generation table LOAD ELPA 3 23272 -DFHMIRS DFHMIRS LOAD ELPA 2 4816 ISC=YES
(1)DFHML1 BMS LU1 printer mapping
programLOAD ELPA 2 5144 BMS
DFHMNDML MN domain - initialization/termination
LOAD ELPA 2 74936 -
DFHMNSVC MN domain - authorized serviceroutine
AUTH ELPA 2 4600 -
DFHMRXM -DFHMSP Message switching program LOAD ELPA 2 11440 (1)DFHMXP Local queuing shipper LOAD ELPA 2 1176 (1)DFHM32A$ BMS 3270 mapping (standard) LOAD ELPA 2 6520 (11)DFHM321$ BMS 3270 mapping (full) LOAD ELPA 2 6520 (12)DFHNCIF LINK ELPA 3 -DFHNQDM NQ domain initialize, quiesce and
terminate domain functionsLOAD ELPA 2 34760 -
DFHOTDML LOAD ELPA 2 -DFHPBPA$ BMS page and text build
(standard)LOAD ELPA 2 8552 (11)
DFHPBP1$ BMS page and text build (full) LOAD ELPA 2 9352 (12)DFHPCP Program control program LOAD ELPA 2 2488 -DFHPGADX Program autoinstall exit -
AssemblerLOAD ELPA 2 200 (1)
DFHPGDM PG domain - initialize, quiesce,and terminate domain functions
LOAD ELPA 2 153328 -
DFHPGRP PG domain - recovery program LOAD ELPA 2 12888 -DFHPHP Partition handling program LOAD ELPA 2 2248 BMSDFHPIAP LOAD ELPA 2 -DFHPIDML LOAD ELPA 2 -DFHPIDSH LOAD ELPA 3 -DFHPIDSQ LOAD ELPA 3 -DFHPIITL LOAD ELPA 2 -DFHPILSQ LOAD ELPA 3 -DFHPIRS LOAD ELPA 3 -DFHPIRT LOAD ELPA 3 -DFHPISN1 LOAD ELPA 2 -DFHPISN2 LOAD ELPA 2 -DFHPITP LOAD ELPA 3 -DFHPITQ1 LOAD ELPA 3 -DFHPRCM Partner resource manager
command interfaceLOAD ELPA 3 1360 -
DFHPRFS Partner resource managerinterface to SAA communicationsinterface
LOAD ELPA 2 632 -
DFHPRIN Partner initialization load program LOAD ELPA 3 3336 -DFHPRPT Partner resource table (PRT)
managerLOAD ELPA 3 3040 -
DFHPSP System spooling interface program LOAD LPA 2 14424 (15)DFHPSSVC System spooling interface, retrieve
a data set nameAUTH ELPA 2 1472 (15)
DFHPTDML LOAD ELPA 3 -
460 CICS TS for z/OS: Installation Guide
#######
#######
####################################################################################
#######

Table 49. LPA-eligible modules (continued)
Name Description Library LPA/ELPA
Pri Size Option/Note
DFHQRY Query transaction LOAD ELPA 2 3824 (1)DFHRLRA$ BMS route list resolution
(standard)LOAD ELPA 2 2040 (11)
DFHRLR1$ BMS route list resolution (full) LOAD ELPA 2 3832 (12)DFHRMSY Resource manager resync
programLOAD ELPA 3 4160 (1)
DFHRPAL ONC RPC feature alias list LOAD ELPA 3 2384 (1)DFHRTC CRTE cancel command processor LOAD ELPA 2 864 (1)DFHRTE Transaction routing program LOAD ELPA 2 2600 (1)DFHRTSU Surrogate terminal interface
programLOAD ELPA 3 2736 -
DFHRXDML LOAD ELPA 2 -DFHRZDML LOAD ELPA 2 -DFHRZJN LOAD ELPA 2 -DFHSAIQ AP domain - system data inquire
& setLOAD ELPA 2 2224 -
DFHSFP Sign-off program LOAD ELPA 2 4144 (1)DFHSHDML LOAD ELPA 2 -DFHSHRRP LOAD ELPA 2 -DFHSHRSP LOAD ELPA 2 -DFHSHSY LOAD ELPA 2 -DFHJCSL AUTH ELPA 3 -DFHSJDML LOAD ELPA 3 -DFHSJJLL AUTH ELPA 3 -DFHSJJML LOAD ELPA 3 -DFHSKP Subtask management program LOAD ELPA 2 6448 -DFHSKTSK General purpose subtask entry
pointAUTH ELPA 3 40 -
DFHSMSVC SM domain - authorized serviceroutine
AUTH ELPA 3 11336 -
DFHSMTAB CICSPlex SM commandslanguage table
LOAD ELPA 3 632 -
DFHSNP Signon program LOAD ELPA 2 13184 (1)DFHSNUS US domain - local and remote
signonLOAD ELPA 2 52984 -
DFHSODML SO domain LOAD ELPA 2 263768 -DFHSOSE SO domain LOAD ELPA 2 23480 -DFHSPP Syncpoint program LOAD ELPA 2 1744 -DFHSTDML ST domain - initialization/
terminationLOAD ELPA 3 30520 -
DFHSUSX XRF signon LOAD ELPA 2 9240 (19)DFHSUWT WTO/WTOR interface subroutine LOAD ELPA 3 7152 -DFHSUZX ZC trace controller LOAD ELPA 3 6808 -DFHSZATR FEPI adaptor program LOAD ELPA 3 17328 -DFHTBSS Builder syncpoint processor LOAD ELPA 2 19168 -DFHTCRP Terminal control recovery program LOAD ELPA 3 25392 -DFHTDP Transient data program LOAD LPA 2 25448 -DFHTDQ Transient data program LOAD ELPA 2 30280 -DFHTDRM Transient data recovery manager
processorLOAD ELPA 2 31080 -
DFHTDRP Transient data recovery program LOAD ELPA 3 6432 -DFHTDTM TD table management gate LOAD ELPA 2 17656 -
Appendix. CICS modules eligible for the MVS link pack area 461
#####################
########################################################
########
##############

Table 49. LPA-eligible modules (continued)
Name Description Library LPA/ELPA
Pri Size Option/Note
DFHTDXM XM domain - TD facilitymanagement services
LOAD ELPA 2 3696 -
DFHTFBF Terminal facility manager bindfacility functions
LOAD ELPA 2 14528 -
DFHTFIQ Terminal facility managerinquire/set functions
LOAD ELPA 2 5632 -
DFHTFRF Terminal facility manager releasefunction
LOAD ELPA 2 4176 -
DFHTFXM LOAD ELPA 2 -DFHTIDM TI domain - initialization/
terminationLOAD ELPA 3 9264 -
DFHTMP Table manager program LOAD ELPA 2 21088 -DFHTON Terminal object resolution module LOAD ELPA 2 816 -DFHTONR Terminal object resolution recovery LOAD ELPA 2 2248 -DFHTPPA$ BMS terminal page processor
(standard)LOAD ELPA 2 3344 (11)
DFHTPP1$ BMS terminal page processor (full) LOAD ELPA 2 4336 (12)DFHTPQ BMS terminal page cleanup
programLOAD ELPA 2 4040 BMS (1)
DFHTPR BMS terminal page retrievalprogram
LOAD ELPA 2 21688 BMS (1)
DFHTPS BMS terminal page schedulingprogram
LOAD ELPA 2 4632 BMS (1)
DFHTRAO TR domain - auxiliary trace output LOAD LPA 3 1480 (20)DFHTSDML Temporary storage domain LOAD ELPA 2 123248 -DFHTSDQ LOAD ELPA 2 -DFHTSP Temporary-storage control
programLOAD ELPA 2 3928 (21)
DFHUEH User exit handler (AP domain) LOAD ELPA 2 7960 -DFHUEM User exit manager LOAD ELPA 3 7864 -DFHUSDM US domain - initialize, quiesce,
and terminate domain functionsLOAD ELPA 3 58640 -
DFHWBAAX LOAD ELPA 2 -DFHWBADX LOAD ELPA 2 -DFHWBDML LOAD ELPA 2 -DFHWBENV LOAD ELPA 3 -DFHWBERX LOAD ELPA 2 -DFHWBIMG LOAD ELPA 3 -DFHWBPA LOAD ELPA 3 -DFHWBUN LOAD ELPA 3 -DFHWSMS DFHWSMS AUTH ELPA 2 38456 (19)DFHWSSON CAVM state management signon
request handlerAUTH ELPA 2 14280 (19)
DFHWTI XRF takeover initiation program AUTH ELPA 3 11648 (19)DFHXCEIX EXCI ELPA 2 -DFHXCI External CICS interface (EXCI)
programLOAD LPA 3 3152 -
DFHXCPRX EXCI ELPA 2 -DFHXCSVC EXCI SVC services LINK ELPA 3 512 -DFHXCTAB EXCI language table LOAD ELPA 3 504 -DFHXFP Online data transformation
programLOAD ELPA 2 31744 ISC=YES
462 CICS TS for z/OS: Installation Guide
#######
#######
########################################################
#######
#######
###############

Table 49. LPA-eligible modules (continued)
Name Description Library LPA/ELPA
Pri Size Option/Note
DFHXFRM Function shipping storagerecovery
LOAD ELPA 2 1744 -
DFHXFX Optimized data transformationprogram
LOAD ELPA 2 8024 ISC=YES
DFHXRP XRF request program LOAD ELPA 2 9272 (19)DFHXRSP XRF surveillance program LOAD ELPA 2 4800 (19)DFHXSS XS domain - supervisor request
servicesAUTH ELPA 3 30576 SEC¬=NO
DFHXSWM XRF message manager forsecurity manager
LOAD ELPA 2 1744 (19)
DFHXTP Terminal sharing transformationprogram
LOAD ELPA 2 11656 ISC=YES
DFHZATA Autoinstall program LOAD ELPA 2 18648 (1)DFHZATD Autoinstall delete program LOAD ELPA 2 6584 (1)DFHZATDX User-replaceable autoinstall exit LOAD ELPA 2 392 AIEXIT (1)DFHZATDY User-replaceable autoinstall exit
with APPCLOAD ELPA 2 560 AIEXIT (1)
DFHZBAN Terminal control bind analysis LOAD LPA 2 10288 -DFHZCA VTAM working set module LOAD ELPA 2 9888 (18)DFHZCB VTAM working set module LOAD ELPA 2 39496 (18)DFHZCC VTAM working set module LOAD ELPA 2 63160 (18)DFHZCN1 CICS Client CCIN transaction LOAD ELPA 3 4472 (1)DFHZCN2 CICS Client CCIN transaction LOAD ELPA 3 4464 -DFHZCP Terminal management program LOAD ELPA 2 33528 (18)DFHZCT1 CICS Client CTIN transaction LOAD ELPA 3 103046 (1)DFHZCUT Persistent verification
signed-on-from list managementprogram
LOAD ELPA 2 5376 (18)
DFHZCW VTAM nonworking set module LOAD ELPA 3 7072 (18)DFHZCX LOCATE, ISC/IRC request LOAD ELPA 2 34728 ISC=YESDFHZCXR Transaction routing module
address listLOAD ELPA 2 28984 ISC=YES
DFHZCY VTAM nonworking set module LOAD ELPA 3 82976 (18)DFHZCZ VTAM nonworking set module LOAD ELPA 3 25712 (18)DFHZGAI APPC autoinstall - create APPC
clonesLOAD ELPA 2 9288 AIEXIT
DFHZGBM APPC manipulate bitmap LOAD ELPA 2 4776 (18)DFHZGCA LU6.2 CNOS actioning LOAD ELPA 3 6168 (18)DFHZGCC Catalog CNOS services LOAD ELPA 3 2440 (18)DFHZGCH ZC VTAM change macro domain
functionLOAD ELPA 3 4056 -
DFHZGCN LU6.2 CNOS negotiation LOAD ELPA 3 12272 (18)DFHZGIN ZC VTAM issue inquire LOAD ELPA 3 3544 -DFHZGPR VTAM persistent sessions
resource handlerLOAD ELPA 3 2848 (18)
DFHZGTA ZC table alter LOAD ELPA 2 23312 -DFHZGTI ZC table inquire gate LOAD ELPA 2 14744 -DFHZHPRX Authorized path SRB mode VTAM
EXECRPLAUTH ELPA 2 712 HPO=YES
DFHZLS1 LU6.2 CNOS request transactionprogram
LOAD ELPA 3 2160 (18) (1)
DFHZRSP Resync send program LOAD ELPA 2 248 (22) (1)DFH62XM LOAD ELPA 2 -
Appendix. CICS modules eligible for the MVS link pack area 463
#######
#######

Table 49. LPA-eligible modules (continued)
Name Description Library LPA/ELPA
Pri Size Option/Note
ICCFCTAB LOAD ELPA 3 -ICCFCTBH LOAD ELPA 3 -
464 CICS TS for z/OS: Installation Guide
##############
Glossary of SMP/E terms used in this book
ACCEPT (function of SMP/E) . SMP/E controlstatement that controls the placement (installing) ofSYSMODs into the distribution libraries. Processing issimilar to that during APPLY except that the distributionzone is updated, not the target zone, and JCLIN data isnot processed by ACCEPT.
If the installing is successful, any entries in the SCDScreated by APPLY are deleted, as are temporarylibraries created by RECEIVE. Therefore, after aSYSMOD is accepted, it can no longer be removed bySMP/E.
APAR (authorized program analysis report) .IBM-supplied fixes of a temporary corrective nature toelements of IBM-supplied function SYSMODs. APARfixes are intended to cure problems currently beingexperienced by an installation. The APAR fix is usuallyin the form of either a modification to a load module oran update to card-image data. It is intended as atemporary arrangement until a PTF is issued to fix theproblem permanently. This PTF will supersede theAPAR fix, and indeed specifies this relationship on its++VER statement.
To get an APAR SYSMOD accepted into the distributionlibraries, the APARS keyword must be specified in theACCEPT control statement, which protects againstinadvertent updating of distribution libraries that are tobe kept free of temporary fixes.
The ++VER statement in the APAR SYSMOD mustspecify the FMID of the function that “owns” theelements being updated.
++APAR(AP12345)++VER(C150) FMID(HCI6400)
You should not accept APARs into the distributionlibrary, however, because the relevant PTF will becomeavailable in due course as a more permanent form ofservice.
APPLY (function of SMP/E) . SMP/E controlstatement that applies SYSMODs to the CICS targetlibraries, where they can be tested. If the tests are notsatisfactory, you can remove all or selected SYSMODsusing the RESTORE function. If the test is successful,you can use the ACCEPT function to store the elementsfrom the SYSMOD into the distribution libraries.
During JCLIN processing, every affected entry in thetarget zone is saved in the SCDS, in case the targetsystem libraries and the target zone have to be restoredto their original status.
CSI (consolidated software inventory) . A keyedVSAM data set, logically divided by SMP/E into zones.For further information on the CSI and the logicalstructure of zones, see the System ModificationProgram Extended: User’s Guide.
Distribution zone . Describes the structure andcontents of a set of distribution libraries.
Function SYSMOD . An IBM-supplied product thatcan be installed with SMP/E. CICS Transaction Serverfor z/OS, Version 3 Release 1 is packaged as afunction SYSMOD on a distribution tape. This containsdistribution libraries and JCLIN data which SMP/E usesto create the target libraries.
FMID (keyword of CICS SYSMODs) . Keywordidentifying the release and option to which a SYSMODis applicable. For CICS Transaction Server for z/OS,Version 3 Release 1, it is always HCI6400.
Global zone . Logical division of the SMP/Econsolidated software inventory (CSI), containing suchinformation as:
v Definitions of all other related zones
v Descriptions of the SYSMODs present in the PTS
v Descriptions of the system utilities to be invokedduring SMP/E processing
v DD definition entries for use by dynamic allocation
load module . In the context of SMP/E, an executableload module in a target library (such ashlq.SDFHLOAD). The standard SMP/E abbreviation fora load module is LMOD.
PTF (program temporary fix) . IBM-supplied fixes toelements of IBM-supplied function SYSMODs. PTFs areintended for installation by all users to avoid possibleproblems.
A PTF may contain fixes for several different problems.This means that several APAR fixes reported in RETAINmay all be superseded by the more permanent PTF,which:
v Provides card-image changes that are identical tothose in the APAR fix
v Contains object-module replacements forpreassembled CICS programs
Every PTF is introduced by a ++PTF header statement,and contains the FMID keyword on its ++VERmodification control statement, identifying CICS(HCI6400) as the owner of the modules being serviced.
For example:
++PTF(UP12345)++VER(C150) FMID(HCI6400)
PTS (PTF temporary store) . SMP/E primary data setused to store temporarily SYSMODs that are inRECEIVE or APPLY status; that is, they have not beenrejected or accepted.
RECEIVE (function of SMP/E) . SMP/E controlstatement that initiates processing of a SYSMOD.
© Copyright IBM Corp. 1989, 2010 465

RECEIVE reads the SYSMODs from the SMPPTFINdata set. Each SYSMOD must have been receivedbefore any other function can be executed.
RECEIVE updates the SMPPTS data set and performssyntax checking on input. Before any SYSMOD forCICS can be received, the global zone must have beeninitialized with a global zone entry.
Service SYSMODs can be received into the (PTS)before the function to which it applies has beenreceived, and can be maintained there until the functionis received. This allows all service for a product such asCICS to be installed with the base product.
REJECT (function of SMP/E) . SMP/E controlstatement that removes SYSMODs from the PTS dataset and deletes any temporary libraries that SMP/E mayhave allocated when the SYSMOD was received(RELfiles). If the SELECT or EXCLUDE option is notcoded on the REJECT control statement, all SYSMODsnot applied or accepted are removed from the PTS.This is called a mass rejection. All other SYSMODprocessing functions (RECEIVE, APPLY, RESTORE,and ACCEPT) can have SELECT or EXCLUDEspecified, or may default to mass-processing mode.
RESTORE (function of SMP/E) . SMP/E controlstatement that removes SYSMODs from the targetsystem libraries after they have been applied, andrestores the target libraries to their status prior toapplication of the SYSMODs. If necessary, RESTOREreconstructs the target zone entries from the SCDS. Ifyou select “mass restore”, all SYSMODs that have beenapplied but not accepted are removed from the targetlibraries.
SYSMOD (system modification) . An IBM-suppliedproduct (function SYSMOD). An IBM-suppliedpreventive service (PTF). An IBM-supplied correctiveservice (APAR). A user-supplied modification(USERMOD).
Target zone . Describes the structure and contents ofa set of target system libraries.
UCLIN (function of SMP/E) . SMP/E controlstatement that can be used to manipulate the variousdata sets that make up the SMP/E data base. The mostcommon use of this function is to initialize the SMP/Edatabase before the first attempt to use it. For CICS,this initialization is performed during installation, whenDFHINST4 is run.
USERMOD (user modification) . User-suppliedmodifications to elements of IBM-supplied functionSYSMODs. USERMODs are similar to APAR fixes, butare supplied by the user and not by IBM. They may be:v A local fix to bypass a problem until an official IBM fix
is availablev A user modification to add or alter function within
CICS
The decision to modify CICS, either to add or to alterfunction, should be taken with caution, because itgreatly increases the amount of research you must dobefore installing PTFs, and may also increase theinstallation time for PTFs. Furthermore, USERMODSwill cause difficulty when you want to install futurerelease of CICS.
466 CICS TS for z/OS: Installation Guide

Bibliography
The CICS Transaction Server for z/OS libraryThe published information for CICS Transaction Server for z/OS is delivered in thefollowing forms:
The CICS Transaction Server for z/OS Information CenterThe CICS Transaction Server for z/OS Information Center is the primary sourceof user information for CICS Transaction Server. The Information Centercontains:
v Information for CICS Transaction Server in HTML format.
v Licensed and unlicensed CICS Transaction Server books provided as AdobePortable Document Format (PDF) files. You can use these files to printhardcopy of the books. For more information, see “PDF-only books.”
v Information for related products in HTML format and PDF files.
One copy of the CICS Information Center, on a CD-ROM, is providedautomatically with the product. Further copies can be ordered, at no additionalcharge, by specifying the Information Center feature number, 7014.
Licensed documentation is available only to licensees of the product. A versionof the Information Center that contains only unlicensed information is availablethrough the publications ordering system, order number SK3T-6945.
Entitlement hardcopy booksThe following essential publications, in hardcopy form, are providedautomatically with the product. For more information, see “The entitlement set.”
The entitlement setThe entitlement set comprises the following hardcopy books, which are providedautomatically when you order CICS Transaction Server for z/OS, Version 3 Release1:
Memo to Licensees, GI10-2559CICS Transaction Server for z/OS Program Directory, GI10-2586CICS Transaction Server for z/OS Release Guide, GC34-6421CICS Transaction Server for z/OS Installation Guide, GC34-6426CICS Transaction Server for z/OS Licensed Program Specification, GC34-6608
You can order further copies of the following books in the entitlement set, using theorder number quoted above:
CICS Transaction Server for z/OS Release GuideCICS Transaction Server for z/OS Installation GuideCICS Transaction Server for z/OS Licensed Program Specification
PDF-only booksThe following books are available in the CICS Information Center as AdobePortable Document Format (PDF) files:
CICS books for CICS Transaction Server for z/OSGeneral
CICS Transaction Server for z/OS Program Directory, GI10-2586CICS Transaction Server for z/OS Release Guide, GC34-6421CICS Transaction Server for z/OS Migration from CICS TS Version 2.3,GC34-6425
© Copyright IBM Corp. 1989, 2010 467

CICS Transaction Server for z/OS Migration from CICS TS Version 1.3,GC34-6423CICS Transaction Server for z/OS Migration from CICS TS Version 2.2,GC34-6424CICS Transaction Server for z/OS Installation Guide, GC34-6426
AdministrationCICS System Definition Guide, SC34-6428CICS Customization Guide, SC34-6429CICS Resource Definition Guide, SC34-6430CICS Operations and Utilities Guide, SC34-6431CICS Supplied Transactions, SC34-6432
ProgrammingCICS Application Programming Guide, SC34-6433CICS Application Programming Reference, SC34-6434CICS System Programming Reference, SC34-6435CICS Front End Programming Interface User's Guide, SC34-6436CICS C++ OO Class Libraries, SC34-6437CICS Distributed Transaction Programming Guide, SC34-6438CICS Business Transaction Services, SC34-6439Java Applications in CICS, SC34-6440JCICS Class Reference, SC34-6001
DiagnosisCICS Problem Determination Guide, SC34-6441CICS Messages and Codes, GC34-6442CICS Diagnosis Reference, GC34-6899CICS Data Areas, GC34-6902CICS Trace Entries, SC34-6443CICS Supplementary Data Areas, GC34-6905
CommunicationCICS Intercommunication Guide, SC34-6448CICS External Interfaces Guide, SC34-6449CICS Internet Guide, SC34-6450
Special topicsCICS Recovery and Restart Guide, SC34-6451CICS Performance Guide, SC34-6452CICS IMS Database Control Guide, SC34-6453CICS RACF Security Guide, SC34-6454CICS Shared Data Tables Guide, SC34-6455CICS DB2 Guide, SC34-6457CICS Debugging Tools Interfaces Reference, GC34-6908
CICSPlex SM books for CICS Transaction Server for z/OSGeneral
CICSPlex SM Concepts and Planning, SC34-6459CICSPlex SM User Interface Guide, SC34-6460CICSPlex SM Web User Interface Guide, SC34-6461
Administration and ManagementCICSPlex SM Administration, SC34-6462CICSPlex SM Operations Views Reference, SC34-6463CICSPlex SM Monitor Views Reference, SC34-6464CICSPlex SM Managing Workloads, SC34-6465CICSPlex SM Managing Resource Usage, SC34-6466CICSPlex SM Managing Business Applications, SC34-6467
ProgrammingCICSPlex SM Application Programming Guide, SC34-6468CICSPlex SM Application Programming Reference, SC34-6469
468 CICS TS for z/OS: Installation Guide

DiagnosisCICSPlex SM Resource Tables Reference, SC34-6470CICSPlex SM Messages and Codes, GC34-6471CICSPlex SM Problem Determination, GC34-6472
CICS family booksCommunication
CICS Family: Interproduct Communication, SC34-6473CICS Family: Communicating from CICS on System/390, SC34-6474
Licensed publicationsThe following licensed publications are not included in the unlicensed version of theInformation Center:
CICS Diagnosis Reference, GC34-6899CICS Data Areas, GC34-6902CICS Supplementary Data Areas, GC34-6905CICS Debugging Tools Interfaces Reference, GC34-6908
Other CICS booksThe following publications contain further information about CICS, but are notprovided as part of CICS Transaction Server for z/OS, Version 3 Release 1.
Designing and Programming CICS Applications SR23-9692CICS Application Migration Aid Guide SC33-0768CICS Family: API Structure SC33-1007CICS Family: Client/Server Programming SC33-1435CICS Transaction Gateway for z/OS Administration SC34-5528CICS Family: General Information GC33-0155CICS 4.1 Sample Applications Guide SC33-1173CICS/ESA 3.3 XRF Guide SC33-0661
Books from related libraries
Systems Network Architecture (SNA)v z/OS Communications Server: SNA Network Implementation, SC31-8777
v z/OS Communications Server: SNA Resource Definition Reference, SC31-8778
v Systems Network Architecture - Function Description of Logical Unit Types,GC20-1868
v Systems Network Architecture - Types of Logical Unit to Logical Unit Sessions,GC20-1869.
Advanced communications function for VTAM (ACF/VTAM)v Network Program Products General Information, GC30-3350
v Advanced Communications Function for VTAM Installation and ResourceDefinition, SC23-0111
v Advanced Communications Function for VTAM Customization, SC23-0112
v Advanced Communications Function for VTAM Operation, SC23-0113
v Advanced Communications Function for VTAM Messages and Codes, SC23-0114
v Advanced Communications Function for VTAM Diagnosis Guide, SC23-0116
v Advanced Communications Function for VTAM Diagnosis Reference, LY30-5582
Bibliography 469

v Advanced Communications Function for VTAM Data Areas, LY30-5584
v Advanced Communications Function for VTAM Programming, SC23-0115
v Advanced Communications Function for VTAM Reference Summary, SC23-0135.
NetView Version 3.1v NetView User's Guide, SC31-8056
v NetView Installation and Administration Guide, SC31-8043
v NetView Installation and Administration and Security Reference, SC31-8045
v NetView Customization Guide, SC31-8052
v NetView Customization: Writing Command Lists, SC31-8055
v NetView Automation Planning, SC31-8051
v NetView Automation Implementation, SC31-8050
v NetView RODM and GMFHS Programming Guide, SC31-8049
v NetView Messages, SC31-8046
NetView MultiSystem Manager Version 2.2v MultiSystem Manager: Open Topology Interface, SC31-8144
v MultiSystem Manager: Lovell NetWare NetworksOpen Topology Interface,SC31-8129
v MultiSystem Manager: OS/2 LAN Network Manager Networks, SC31-8130
v MultiSystem Manager: Internet Protocol Networks, SC31-8131
DATABASE 2 (DB2)v IBM DATABASE 2 Administration Guide, SC26-4888
v IBM DATABASE 2 Application Programming and SQL Guide, SC26-4889
v IBM DATABASE 2 Command and Utility Reference, SC26-4891.
eNetwork Communications Server for OS/2 Warp, Version 5v Quick Beginnings, GC31-8189
Virtual Storage Access Method (VSAM)v MVS/ESA Access Method Services Reference for VSAM Catalogs, GC26-4075
v MVS/ESA VSAM Administration Guide, GC26-4151
v MVS/ESA Catalog User’s Guide, GC26-4041.
Resource Access Control Facility (RACF)v Resource Access Control Facility (RACF): General Information, GC28-0722
v System Programming Library: Resource Access Control Facility (RACF),SC28-1343
v z/OS Security Server RACF Command Language Reference, SA22-7687
v Resource Access Control Facility (RACF) Security Administrators Guide,SC28-1340.
System Modification Program Extended (SMP/E)v System Modification Program Extended: User’s Guide, SC28-1302
v System Modification Program Extended: (SMP/E) Terminal User’s Guide,SC28-1109
470 CICS TS for z/OS: Installation Guide

v System Modification Program Extended: General Information, GC28-1106
v System Modification Program Extended: Reference, SC28-1107.
Sysplex planningv System/390 MVS Sysplex Application Migration, GC28-1211
DFSMS/MVSv z/OS DFSMSdfp Storage Administration Reference, SC26-7402
v DFSMS/MVS Access Method Services for ICF, SC26-4906
MVSv z/OS MVS Programming: Assembler Services Guide, SA22-7605
v z/OS MVS Programming: Assembler Services Reference, Volume 1, SA22-7606
v z/OS MVS Programming: Assembler Services Reference, Volume 2, SA22-7607
v z/OS MVS Setting Up a Sysplex, SA22-7625.
v z/OS MVS Using the Subsystem Interface, SA22-7642.
v z/OS MVS Installation Exits, SA22-7593.
v z/OS MVS Programming: Authorized Assembler Services Reference Vol 1,SA22-7609
v z/OS MVS Programming: Authorized Assembler Services Reference Vol 2,SA22-7610
v z/OS MVS Programming: Authorized Assembler Services Reference Vol 3,SA22-7611
v z/OS MVS Programming: Authorized Assembler Services Reference Vol 4,SA22-7612
v z/OS MVS Planning: Workload Management, SA22-7602.
v z/OS MVS Initialization and Tuning Guide, SA22-7591
v z/OS MVS Initialization and Tuning Reference, SA22-7592
v z/OS MVS Routing and Descriptor Codes, SA22-7624
v z/OS Program Directory, GI10-6730
v z/OS UNIX System Services Planning, GA22-7800
Determining if a publication is currentIBM regularly updates its publications with new and changed information. When firstpublished, both hardcopy and BookManager softcopy versions of a publication areusually in step. However, due to the time required to print and distribute hardcopybooks, the BookManager version is more likely to have had last-minute changesmade to it before publication.
Subsequent updates will probably be available in softcopy before they are availablein hardcopy. This means that at any time from the availability of a release, softcopyversions should be regarded as the most up-to-date.
For CICS Transaction Server books, these softcopy updates appear regularly on theTransaction Processing and Data Collection Kit CD-ROM, SK2T-0730-xx. Eachreissue of the collection kit is indicated by an updated order number suffix (the -xxpart). For example, collection kit SK2T-0730-06 is more up-to-date thanSK2T-0730-05. The collection kit is also clearly dated on the cover.
Bibliography 471

Updates to the softcopy are clearly marked by revision codes (usually a #character) to the left of the changes.
472 CICS TS for z/OS: Installation Guide

Accessibility
Accessibility features help a user who has a physical disability, such as restrictedmobility or limited vision, to use software products successfully.
You can perform most tasks required to set up, run, and maintain your CICS systemin one of these ways:
v using a 3270 emulator logged on to CICS
v using a 3270 emulator logged on to TSO
v using a 3270 emulator as an MVS system console
IBM Personal Communications provides 3270 emulation with accessibility featuresfor people with disabilities. You can use this product to provide the accessibilityfeatures you need in your CICS system.
© Copyright IBM Corp. 1989, 2010 473

474 CICS TS for z/OS: Installation Guide

Index
Special characters&CICS_DIRECTORY symbol
HFS subdirectory 207&JAVA_HOME
HFS Java subdirectory 207
AACB (VTAM), authorizing the region userid to open 70ACBNAME, parameter of VTAM APPL statement 100ACBNAME, VTAM APPL statement parameter
CAS 291CMAS 294
ACCEPT, function of SMP/E 46, 179, 465accessibility options 354ACCTFILE, primer sample application accounts data
set 194ACIXFILE, primer sample application index data
set 194activating real-time analysis
VTAM definitionsfor CAS 293for CMAS 296
ADDTVOL, parameter of DFHISTAR 35ADFHAPD1 distribution library 25ADFHAPD2 distribution library 25ADFHC370 elements 25ADFHCLIB distribution library 25ADFHCOB elements 25ADFHINST distribution library 25ADFHMAC distribution library 25ADFHMLIB distribution library 25ADFHMOD distribution library 25ADFHMSGS distribution library 25ADFHMSRC distribution library 25ADFHPARM distribution library 25ADFHPL1 elements 25ADFHPROC distribution library 25ADFHSAMP distribution library 25AINDEX, parameter of DFHISTAR 34alerts to NetView
preparing NetView to receive 322ALINDEX, parameter of DFHISTAR 34allocating
distribution and target libraries 44RELFILE data sets 44SMP/E data sets 45
allocating libraries for IPCS 402APAR (authorized program analysis report) 465APAR fixes 179, 180APF (authorized program facility) 67APF, authorized program facility 56APF, MVS initialization parameter
IEASYSxx value 281APPC parameter, VTAM APPL statement 294APPL statement
CAS 291, 294
APPL statement (continued)CMAS 294
Application Migration Aidelement in CICS TS 6
application programming interface (API)installing REXX function package 285preparing for 284
APPLIDaccessing from several MVS images 101notifying VTAM of the CICS APPLID 244using for VTAM logon 249
APPLY, function of SMP/E 46, 179, 465applying service
supplied SMP/E procedure 371applying service to CICS 179
corequisite fixes 180servicing the CICS messages data set 182
ASMHCL exec, to create an MVS nucleus module listfor CICS 98
ASMPLTS, parameter of DFHISTAR 35ASMPMTS, parameter of DFHISTAR 34ASMPSCDS, parameter of DFHISTAR 34ASMPSTS, parameter of DFHISTAR 35ASREXIT 133ATCCONxx, VTAM list member 296ATCSTRxx, VTAM list member 296attributes for SMP/E data sets 28, 29AUTH, parameter of VTAM APPL statement 100AUTH, VTAM APPL statement parameter
CAS 291CMAS 294
authorized libraries 67authorized program analysis report (APAR) 465authorized program facility (APF) 56, 67authorizing CICSTS31.CICS.SDFHAUTH 56authorizing hlq.SDFHAUTH 67authorizing hlq.SDFJAUTH 210authorizing SYS1.PARMLIB libraries 283automated-operation programs
message formatting coexistence considerations 90automatic installation of terminals 242, 243AUTOREFRESH 351AUTORESETTIME 343auxiliary storage usage 321auxiliary trace (A) data set, DFHAUXT
creating for a CICS region 192DD statement in IVP startup procedure 233
auxiliary trace (B) data set, DFHBUXTcreating for a CICS region 192DD statement in IVP startup procedure 233
AUXTR 343AZONE, parameter of DFHISTAR 34AZONECSI, parameter of DFHISTAR 34AZONELOG, parameter of DFHISTAR 34
Bbacking up the data repository 304
© Copyright IBM Corp. 1989, 2010 475

base elementslist of 6
BBACTDEF DD statementwith CAS startup JCL 316with CMAS startup JCL 325
BBIPARM DD statementwith CAS startup 316
BBM9ZA00 program for CAS startup 316BBSECURE DD statement
with CAS startup 316BBVDEF DD statement
with CAS startup JCL 316with CMAS startup JCL 325
BLKFB80 parameter of the DFHISTAR job 24BLKISPF parameter of the DFHISTAR job 24BLKU parameter of the DFHISTAR job 24block sizes for data sets 24
block sizes for 24BLSCECT
updating 401browser connection 359
Ccache sets, VSAM RLS 136CAS
create data sets 299define VTAM requirements 289
activate the major nodes 293create a mode table 289create a VTAM application 291define cross-domain resources 291, 292define information to CICSPlex SM 318update the configuration list 292
generate post-installation jobs 297JCL requirements
BBACTDEF 316BBIPARM 316BBVDEF 316CAS EXEC 316EYUCAS 315STEPLIB 316
prepare to start 315prepare user access to CICSPlex SM 313start command 316
CAS (coordinating address space)cross-domain resources 292
CAS-related data setsparameter repository 299screen repository 299
CASNAME system parameter 386catalogs
distribution and target libraries 44category 1 transactions
authorizing the region userid 57category 1 transactions, authorizing the region
userid 71CBPDO method of installing
compared with ServerPac 5description of 5
CDRSCCAS-update configuration 292CMAS-update configuration 296create or access member 292
in SYS1.VTAMLST library 294, 295defining 295
CDRSCTI, parameter of VTAM START command 102CDS (control data set), saved 30CEDA transaction 252
installing the CICS sample programs 253CEECCICS, Language Environment interface
module 201CEEMSG, transient data destination, Language
Environment 202CEEOUT, transient data destination, Language
Environment 202CESE, transient data destination, Language
Environment 202CESO, transient data destination, Language
Environment 202checklists for setup
CAS 272CMAS 272MVS MAS 272overview 271
CHS 344CHS1 344CHS2 344CICS
element in CICS TS 6CICS Clients
element in CICS TS 6CICS Distributed Data Manager (DDM)
element in CICS TS 6CICS Information Center
installing and configuring 61CICS libraries
authorizing 56, 67SMP/E function ACCEPT (DFHINST6) 46
CICS Monitoring Facility (CMF) 337CICS SIT parameters 383
CMAS-related 326MVS MAS-related 336
CICS Sockets 216CICS storage in a CMAS 329CICS SVCs, installing DFHCSVC in the LPA 108CICS system definition (CSD) files
updating 307, 311CICS system definition data set, DFHCSD 242
creating for all CICS regions 191DD statement in IVP startup procedure 234requirements for autoinstall 242
CICS system initialization parameters 343AUTORESETTIME 343AUXTR 343CPSMCONN 343CWAKEY 343INITPARM
EYU9VKEC 344EYU9VWAN 344
SYSTR 343
476 CICS TS for z/OS: Installation Guide

CICS system initialization parameters (continued)USERTR 343WRKAREA 343
CICS Transaction Gatewayelement in CICS TS 7
CICS Transaction Server librariescreating multiple sets 50target libraries 26
CICS Transaction Server-supplied procedures, copyinginto a 48
CICS TSDASD storage requirements 11description of optional features 6description of what is shipped 4installing 7, 9, 17introduction 3post installation steps 55required software and hardware 9
CICS Web Interface Feature for MVS/ESAelement in CICS TS 6
CICS Web support 342CICS-supplied transactions in interactive IVP
from a terminal 250CICSPlex SM
element in CICS TS 6CICSPLEX system parameter 386CICSPlex SM address space (CMAS)
add CICS system definitions 300CICS SIT parameters 326, 383create data repository 299define VTAM requirements 293
activate the major nodes 296define APPL statement 294define cross-domain resources 294, 295define information to CICSplex 330update configuration list 296
journalmodel considerations 308preparing for API 284restarting 331shared CSD 309START command for a CMAS 330start ESSS 284starting
as a batch job 323from the system console 323
update CICS tables 307update CSD using DFHCSDUP 307update IEASYSxx 282upgrade CSD release 309
CICSPlex SM Starter Setcreating environment 364defining environment 365deleting 368naming convention 363sample libraries 361selecting configuration 364starting components 365using as a model 368
CMAC, CICS messages facilityDD statement in IVP startup procedure 233defining resources needed 193
CMAC, CICS messages facility (continued)defining the messages data set, DFHCMACD 193messages data set, DFHCMACD 233resources needed to use with the IVP jobs 232servicing the messages data set, DFHCMACD 182
CMACVOL parameter of the DFHISTAR job 27CMAS 342CMAS (CICSPlex SM address space)
controlling CICS storage 329controlling tasks 328
CMAS (CICSPlex SM address space)add CICS system definitions 300CICS SIT parameters 326, 383create data repository 299define VTAM requirements 293
activate the major nodes 296define APPL statement 294define cross-domain resources 294, 295define information to CICSplex 330update configuration list 296
journalmodel considerations 308preparing for API 284restarting 331shared CSD 309START command for a CMAS 330start ESSS 284starting
as a batch job 323from the system console 323
update CICS tables 307update CSD using DFHCSDUP 307update IEASYSxx 282upgrade CSD release 309
CMAS journaling 397CMAS-related data sets 299CMAS-related post installation jobs
local MAS 297CMAS-specific JCL requirements
BBACTDEF 325BBVDEF 325CICS EXEC 324DFHRPL 325EYUCMAS 324EYUDREP 325EYULOG 325EYUPARM 325STEPLIB 325
CMASNAME parameter of EYU9XDUT 301CMASSYSID system parameter 386CMD, MVS initialization parameter
IEASYSxx value 281COBOL under Language Environment 203codepage 344
CHS1 344CHS2 344ENU1 344JPN1 344
codepage conversion table 345coexistence considerations
automated-operation programs 90releases of CICS before this release 90
Index 477
COIRTASKPRI system parameter 387COLG 356color of screens 354COLORINK 354COLORINKBANNER 354COLORINKLINK 354COLORINKVLINK 354COLORPAPER 354COLORPAPERALT 354COLORPAPERERROR 354COLORPAPERHEAVY 354COLORPAPERLIGHT 354COLORPAPERRULE 354COLORPAPERWARN 354COMMNDaa, operator commands member
for CAS 315for CMAS 323
common CICS data sets, creating (DFHCOMDSjob) 191
communicationsCAS-to-CAS
defining cross-domain resources 292CMAS-to-CMAS
defining cross-domain resources 295configuration views
defining CMAS-to-CMAS links 330console device for the IVP jobs
defining a TSO user 245definition 241using transactions 253
CONSOLE macro 141console message formatting
activating 89default initialization parameters 88defining CICS as an MVS subsystem 57, 83modules needed 89
console messages 141console support
defining a TSO user as a console 245TSO CLIST processing 254
consolidated software inventory (CSI) 31, 465converting the data repository 302coordinating address space (CAS)
create data sets 299cross-domain resources 292define VTAM requirements 289
activate the major nodes 293create a mode table 289create a VTAM application 291define cross-domain resources 291, 292define information to CICSPlex SM 318update the configuration list 292
generate post-installation jobs 297JCL requirements
BBACTDEF 316BBIPARM 316BBVDEF 316CAS EXEC 316EYUCAS 315STEPLIB 316
prepare to start 315
coordinating address space (CAS) (continued)prepare user access to CICSPlex SM 313start command 316
COSD transaction 331coupling facility 143
definition 152recommendations 151structures 152
coupling facility cache structures, VSAM RLS 135coupling facility lock structure, VSAM RLS 135coupling facility sizing utility, DFHLSCU 160COUT, transient data extrapartition data set
DD statement in IVP startup procedure 234COVA 358COVC 358, 359COVE 356, 358COVG 358COVI 356COVP 356, 358COVU 358CPSM310.EYUDREP
converting the data repository 302creating the data repository 300in CMAS startup JCL 325storing CMAS-to-CMAS link definitions 330
CPSM310.EYUIPRM data setcreating parameter repository 299in CAS startup JCL 299storing CMAS-to-CMAS link definitions 330
CPSM310.SEYUADEFin CAS startup JCL 315in CMAS startup JCL 324
CPSM310.SEYUAUTHauthorizing 283in CAS startup JCL 316in CMAS startup JCL 325in MAS startup JCL 335
CPSM310.SEYUINST 381CPSM310.SEYUJCL
JCL for creating Starter Set 361JCL for running Starter Set 362JCL for Starter Set environment 362
CPSM310.SEYULOADin CMAS startup JCL 325in MAS startup JCL 335resource definition 307
CPSM310.SEYUPARM 315CPSM310.SEYUSAMP
EYUJCLGN 311EYUJCLMT 290, 293EYUSMPMT 290
CPSM310.SEYUVDEFin CAS startup JCL 315in CMAS startup JCL 324
CPSM310.TEYUINSTmembers
EYUCAS 297EYUCMAS 297EYUDEFDS 297EYUDFHDS 297EYULPMOD 297
478 CICS TS for z/OS: Installation Guide

CPSM310.TEYUINST (continued)members (continued)
EYUSMPE 297EYUTSODS 313
tailoring EYUISTAR 297CMAS-related parameters 299MAS-related parameters 299
CPSM310.XEYUINST 371CPSMCONN 343creating CICS system definition
data repository 299creating CICSPlex SM data sets 299creating mode table 289creating VTAM application definition 291CRELEASE system parameter 376cross system locking, VSAM RLS 135cross-domain resources (CDRSC)
CAS-update configuration 292CMAS-update configuration 296create or access member 292
in SYS1.VTAMLST library 294, 295defining 295
cross-system coupling facility (XCF)used for interregion communication 211
CSD 355CSD files
updating 307, 311CSI (consolidated software inventory) 31, 465CSNE transient data destination 101CSSLIB parameter of the DFHISTAR job 35customizable view and menu help 346customizable view and menu help data set 346customizing CICS
adding ISC support 213installing CICS modules in MVS link pack area 107using HPO support 58, 97
CVDASTYLE 349CWAKEY 343
DDASD storage requirements
for CICS TS 11DASD-only logging
recommendations 167data repository
backing up 304converting 302creating 299defining forward recovery log for 304expanding 304for each CMAS 299identified in CMAS startup JCL 325
data sets 24RELFILE, allocating 44
data sets (non-SMP/E), assigning a high-levelindex 33
data sets for CICS 189common to all regions, creating (DFHCOMDS
job) 191
data sets for CICS (continued)unique to each region, creating (DFHDEFDS
job) 192DATEFORMAT 350DATESEPARATOR 350DAYLIGHT parameter of EYU9XDUT 301DBCTL
installation verification procedure (IVP) 262debugging profiles alternate index data set, DFHDPFMP
creating for each CICS region 192debugging profiles base data set, DFHDPFMB
creating for each CICS region 192debugging profiles path data set, DFHDPFMP
creating for each CICS region 192DECIMALSEPARATOR 350Default CICS userid, defining to RACF 77default EXCI pipe allocation limit 91DEFAULTCICSPLEX 352DEFAULTCICSRGN 352DEFAULTCMASCTXT 351DEFAULTCONNECT 352DEFAULTCONTEXT 351DEFAULTCSYSGRP 352DEFAULTDB2SS 352DEFAULTEJCOBEAN 352DEFAULTEJDJBEAN 352DEFAULTEVENT 352DEFAULTLOCFILE 352DEFAULTLOCTRAN 352DEFAULTMAPCOLL 351DEFAULTMENU 351DEFAULTNAVIGATE 351DEFAULTPROGRAM 353DEFAULTREMFILE 353DEFAULTREMTRAN 353DEFAULTSCOPE 351DEFAULTTASK 353DEFAULTWARNCNT 351defining a terminal for online IVP 242defining cross-domain resources 292Defining the hlq.SDFHLPA library to your MVS 111defining VTAM information to CICSPlex SM 318DEFVOL parameter of the DFHISTAR job 25DFH$AFLA CSD group, FILEA sample programs 253DFH$BTCH, input to the verify batch job 234DFH$FILA CSD group, FILEA sample data set 253DFH$SIP2 member of SYSIN data set 231DFH$SIPn members of SYSIN data set, for IVP
jobs 231DFHASMVS, CICS Transaction Server-supplied
procedure 48DFHAUPLE, CICS Transaction Server-supplied
procedure 48DFHAUXT data set, auxiliary trace
creating for a CICS region 192DD statement in IVP startup procedure 233
DFHBMSU, CICS Transaction Server-suppliedprocedure 48
DFHBUXT data set, auxiliary tracecreating for a CICS region 192DD statement in IVP startup procedure 233
Index 479

DFHCMACD, messages data set 182, 193defining associated CICS resources 193
DFHCMACI, job to create and initialize the messagesdata set 193
DFHCNV 345DFHCOMDS, job to create common CICS data
sets 191DFHCSD data set, CICS system definition 242
creating for all CICS regions 191DD statement in IVP startup procedure 234requirements for autoinstall 242
DFHCSDUP requirementsDFHCSD 308, 311STEPLIB 308, 311SYSIN 308, 311
DFHCSVC, CICS Type 3 SVC 108installing in the LPA 108
DFHCSVC, the CICS type 3 SVCcorrect-level check 58, 93defining to MVS 93installing 57, 93using for MRO between different CICS releases 95using more than one version 94
DFHCTAIX, sample application alternate index 194DFHCTCUS, sample application details data set 194DFHCTHLP, sample application help data set 194DFHCXRF, transient data extrapartition data set
DD statement in IVP startup procedure 233local request queue data set 234
DFHDEFDS, job to create data sets for eachregion 192
DFHDLI user exitsXDLIPOST 199XDLIPRE 199
DFHDLPSB TYPE=ENTRY macro (remote DL/I) 198DFHDMPA data set, dump
creating for a CICS region 192DD statement in IVP startup procedure 234
DFHDMPB data set, dumpcreating for a CICS region 192DD statement in IVP startup procedure 234
DFHDPFMB debugging profiles alternate index data setcreating for each CICS region 192
DFHDPFMB debugging profiles base data setcreating for each CICS region 192
DFHDPFMB debugging profiles path data setcreating for each CICS region 192
DFHDSPEX, CICS post exit stub 108installing in the LPA 108
DFHEBTAL, CICS Transaction Server-suppliedprocedure 48
DFHEITAL, CICS Transaction Server-suppliedprocedure 48
DFHEXTAL, CICS Transaction Server-suppliedprocedure 48
DFHGCD data set, global catalogcreating for a CICS region 192DD statement in IVP startup procedure 233
DFHHPSVC, VTAM authorized path SVCdefining to MVS 93, 97loading into the MVS nucleus 97
DFHHTML 346, 356, 358DFHHTML data set for HTML templates
creating for a CICS region 192DFHINST1, installation job 44DFHINST2, installation job 44DFHINST3, installation job 45DFHINST4, installation job 46DFHINST5, installation job 46DFHINST6, installation job 46DFHINSTA
submitting 52DFHINTRA data set, intapartition transient data
creating for a CICS region 192DD statement in IVP startup procedure 233
DFHIRP, interregion communication program 108installing in the LPA 108MRO requirement 212
DFHISMKD, installation job 44DFHISTAR
editing 51submitting 51
DFHISTAR, creating post-installation jobs 186DFHISTAR, job to define installation-related jobs 20
BLKFB80 parameter 24BLKISPF parameter 24BLKU parameter 24CMACVOL parameter 27CSSLIB parameter 35DEFVOL parameter 25DINDEX parameter 22DISTVOL parameter 25DSINFO parameter 33DZONE parameter 32DZONECSI parameter 31DZONELOG parameter 30GINDEX parameter 22GZONE parameter 32GZONECSI parameter 31GZONELOG parameter 30JAVADIR parameter 37JES parameter 21JOB parameter 20LIB parameter 20LINDEX parameter 22LOGGER-INFO parameter 38OPTVOL parameter 26parameter default values 18PREFIX parameter 22SCEEBND2 dsname 38SCEECICS dsname 38SCEECPP parameter 36SCEELIB dsname 38SCEELKED parameter 36SCEELKEX parameter 36SCEEOBJ parameter 36SCEERUN dsname 38SCEERUN2 dsname 38SCEESAM parameter 36SCLBSID parameter 36SCOPE parameter 21, 40SCSQAU parameter 37
480 CICS TS for z/OS: Installation Guide

DFHISTAR, job to define installation-related jobs(continued)
SCSQCI parameter 37SCSQL parameter 36SCSQLE parameter 37SEZACMTX dsname 38SEZARPCL dsname 38SISPLOAD parameter 35SMP/E zone and zone log dispositions 32SMPLTS parameter 30SMPMTS parameter 29SMPPTS parameter 29SMPSCDS parameter 30SMPSTS parameter 29SMPVOL parameter 26SMPWORK parameter 29SMS parameter 25TAPEUNIT parameter 33TARGVOL parameter 26TEMPLIB parameter 20TINDEX parameter 22TZONE parameter 32TZONECSI parameter 31TZONELOG parameter 30UTILITIES parameter 21WORKUNIT parameter 24
DFHIVPBT, batch IVP 227, 234DFH$BTCH input 234expected output 238system initialization parameters 231
DFHIVPOL, interactive IVP 227, 241CICS-supplied transactions 250sample programs 253terminating CICS 255transactions 253
DFHLCD data set, CICS local catalogcreating for each CICS region 192DD statement in IVP startup procedure 233
DFHLNKVS, CICS Transaction Server-suppliedprocedure 48
DFHLSCU, log stream sizing utility 160, 171DFHMAPS, CICS Transaction Server-supplied
procedure 48DFHMAPT, CICS Transaction Server-supplied
procedure 48DFHRPL (dynamic transaction routing exit)
in CMAS startup JCL 325in MAS startup JCL 335
DFHSIP, CICS initialization program 242DFHSMPE, cataloged procedure 179DFHSMPE, CICS Transaction Server-supplied
procedure 48DFHSSEN, subsystem interface end-of-memory /
end-of-task clean up routine 108installing in the LPA 108
DFHSSIyy, initialization member 91DFHSSIyy, message-formatting initialization
member 87DFHSTART, CICS startup procedure 232DFHSTART, CICS Transaction Server-supplied
procedure 48
DFHTEMP data set, temporary storagecreating for each CICS region 192DD statement in IVP startup procedure 233
DFHUPDVS, CICS Transaction Server-suppliedprocedure 48
DFHYBTPL, CICS Transaction Server-suppliedprocedure 48
DFHYBTVL, CICS Transaction Server-suppliedprocedure 48
DFHYITDL, CICS Transaction Server-suppliedprocedure 49
DFHYITEL, CICS Transaction Server-suppliedprocedure 49
DFHYITPL, CICS Transaction Server-suppliedprocedure 49
DFHYITVL, CICS Transaction Server-suppliedprocedure 49
DFHYXTDL, CICS Transaction Server-suppliedprocedure 49
DFHYXTEL, CICS Transaction Server-suppliedprocedure 49
DFHYXTPL, CICS Transaction Server-suppliedprocedure 49
DFHYXTVL, CICS Transaction Server-suppliedprocedure 49
DFHZATDX, autoinstall user program 243DFHZITCL, CICS Transaction Server-supplied
procedure 49DFHZITDL, CICS Transaction Server-supplied
procedure 49DFHZITEL, CICS Transaction Server-supplied
procedure 49DFHZITFL, CICS Transaction Server-supplied
procedure 49DFHZITGL, CICS Transaction Server-supplied
procedure 49DFHZITPL, CICS Transaction Server-supplied
procedure 49dfjejbpl 209dfjjvmpr
sample properties file 208dfjjvmps
sample properties file 208DFLTUSER SIT parameter
for MVS MAS 336DINDEX parameter of the DFHISTAR job 22dispositions, zone and zone log 32distribution libraries
allocating and cataloging 44installing SYSMODs 465SMP/E function ACCEPT (DFHINST6) 46
distribution zone 465distribution zone (DZONE) 32
CSI 31log 30
DISTVOL parameter of the DFHISTAR job 25DL/I
adding remote DL/I support 198database control (DBCTL) 197defining a PSB directory for remote DL/I
support 198
Index 481

DL/I (continued)DFHDLPSB TYPE=ENTRY (remote DL/I) 198function shipping 197global user exits 199MXSSASZ parameter (remote DL/I) 198requirements for remote database access 198system initialization parameters (remote DL/I) 198
DNS 216DSINFO parameter of the DFHISTAR job 33dump (A) data set, DFHDMPA
creating for a CICS region 192DD statement in IVP startup procedure 234
dump (B) data set, DFHDMPBcreating for a CICS region 192DD statement in IVP startup procedure 234
dynamic LU alias 102LUAPFX parameter 100
dynamic parse validation routines, installing 80DZONE parameter of the DFHISTAR job 32DZONECSI parameter of the DFHISTAR job 31DZONELOG parameter of the DFHISTAR job 30
EEAS parameter, VTAM APPL statement 294EAS, parameter of VTAM APPL statement 100ECI 215elapsed time during installation of CICS Transaction
Server 42elements in CICS TS
Application Migration Aid 6CICS 6CICS Clients 6CICS Distributed Data Manager (DDM) 6CICSPlex SM 6list of 4ONC RPC 6Web Interface 6
ELPA (extended link pack area)eligible modules 109
ENU 344ENU1 344Environment Services System Services (ESSS)
adding to MVS linklist 284description of 284
ENVIRONMENT, EYUINST EXEC parameterIMBED statements required in BLSCECT 401post-installation customization 297
ESSS (Environment Services System Services)adding to MVS linklist 284description of 284
exception trace 343EXCI Pipe Allocation 91EXCI pipe allocation limit 91exclusive element or feature
description 4expanding the data repository 304extended recovery facility (XRF)
sessions, HAVAIL, parameter of VTAM APPL 100EYU$CNV1 345EYU9VKEC 344
EYU9VKIT 345EYU9VWAN 344EYU9XDUT 300EYU9XESS module 284EYUCAS job 297EYUCHS1 345EYUCHS2 345EYUCMAS job 297EYUCMS01
CICS SIT parameters 326EYUCMS1A 351EYUCOVE 356, 358EYUCOVI 356, 358EYUDEFDS job 297EYUDEZZZ panel, defining ISPF option 313EYUDFHDS job 297EYUDREP data set
converting the data repository 302creating the data repository 300in CMAS startup JCL 325storing CMAS-to-CMAS link definitions 330
EYUENU1 345EYUHISTx 338EYUHISTx DD statement 335EYUIPRM data set
CAS startup JCL 315creating parameter repository 299
EYUISTARCMASNAME parameter 300DSINFO 300
EYUJPN1 345EYUJWREP 346EYULOG 356, 358EYULOG DD statement
CMAS startup JCL 325EYULPMOD job 297EYUPARM DD statement
in CMAS startup JCL 325in MAS startup JCL 335
EYUPARM parametersdescription of 385summary of 383
EYUPLX01 351EYUSMPE job 297EYUWREP 358EYUWREP (Web User Interface server
repository) 346, 356EYUWUI 356, 358
Ffeatures in CICS TS
list of 4FILEA data set, sample program data
creating for each CICS region 192DD statement in IVP startup procedure 233
FILEA sample applicationstransactions used 228
FMID, keyword of CICS SYSMODs 465FORMATMSG, parameter of DFHSSIyy 87forward recovery log for data repository 304
482 CICS TS for z/OS: Installation Guide

function shipping 197Function SYSMOD 465
Ggenerating post-installation jobs 297generic routecodes 88gethostbyaddr function 216GIMMPDFT modules, attributes of SMP/E data sets 28GIMSP messages and control statements 47GIMZPOOL, member of SYS1.MACLIB 45GINDEX parameter of the DFHISTAR job 22global catalog data set, DFHGCD
creating for a CICS region 192DD statement in IVP startup procedure 233
global zone 465global zone (GZONE) 32
CSI 31log 30
GMMTEXTMSG 350GRPLIST
MVS MAS parameter 336GZONE parameter of the DFHISTAR job 32GZONECSI parameter of the DFHISTAR job 31GZONELOG parameter of the DFHISTAR job 30
Hhardware requirements
installing CICS TS 9HAVAIL, parameter of VTAM APPL statement 100help
customizable view and menu help 346HFS 10, 205HFS0DSN parameter of the DFHISTAR job 23HFS1DSN parameter of the DFHISTAR job 23HFSADSN parameter of the DFHISTAR job
HFSADSN parameter 23HIDEPASSWORD, parameter of DFHSSIyy 87high level qualifier 79high-performance option (HPO) 93, 97
defining the CICS SVCs to MVS 93DFHHPSVC, VTAM authorized path SVC 58, 97system initialization parameter 97VTAM authorized path, DFHHPSVC 97
history recording 338HISTRECSMSG 338hlq 79hostname 344, 359HTML template data set, DFHHTML
creating for a CICS region 192http 344, 359HTTP 215
IICCFCC, CICS Transaction Server-supplied
procedure 49ICCFCCL, CICS Transaction Server-supplied
procedure 49
ICCFCGL, CICS Transaction Server-suppliedprocedure 49
ICCFCL, CICS Transaction Server-suppliedprocedure 49
IEAAPFxx, MVS authorization memberauthorizing 283
IEASYSxx, MVS initialization member 83authorizing libraries 283establishing requirements 282noting values in 281updating
for a CAS 282for a CMAS 282
IEFSSNaa, MVS subsystem initialization member 84IEW0461 message from the binder 47IEW2646 message from the binder 47IEW2651 message from the binder 47IIOP 215implementing MVS workload management 125IMS, database control (DBCTL) 197INACTIVETIMEOUT 353initialize CAS 315initialize CMAS 324initialize data repository 300initialize MVS MAS 334INITPARM 344
EYU9VKEC 344EYU9VWAN 344
installationof CICS sample programs 253
installation jobselapsed time 42messages 47restarting 42running 42
installation libraries for CICSPlex SM 374installation verification procedure (IVP) 227
applids, defining and activating 228auxiliary temporary storage data set,
DFHTEMP 233auxiliary trace data set (A), DFHAUXT 233auxiliary trace data set (B), DFHBUXT 233batch IVP, DFHIVPBT 234CICS region definition data set 234CICS startup procedure, DFHSTART 232CMAC resources 232data sets for 227FILEA data set, sample application data 233global catalog data set, DFHGCD 233interactive IVP, DFHIVPOL 241
defining a terminal for 242local catalog data set, DFHLCD 233messages data set, DFHCMACD 233RACF userid authority 228required SVC for 228security considerations 229SYSIN data set 233system definition data set 234system initialization parameters 231transaction dump (A) data set, DFHDMPA 234transaction dump (B) data set, DFHDMPB 234
Index 483

installation verification procedure (IVP) (continued)transient data extrapartition data set, COUT 234transient data extrapartition data set,
DFHCXRF 233transient data extrapartition data set, DFHLRQ 234transient data extrapartition data set, LOGUSR 234transient data extrapartition data set, MSGUSR 234transient data extrapartition data set, PLIMSG 234transient data intrapartition data set,
DFHINTRA 233using the CEDA transaction 252using transactions from console device 253
installation verification procedures (IVPs)installing CICSPlex SM on first MVS image 409installing CICSPlex SM on second MVS image 425overview 407
installing CICS TS 7installing hlq.SDFJLPA 210installing Language Environment support 202installing module in link list 284Installing modules in the MVS link pack area 111, 112installing support for programming languages 201installing system
software requirements 10InstallShield
installing CICS Information Center 61interface modules
CEECICS 201Language Environment 201
interregion communication (IRC) 211intersystem communication (ISC)
installation considerations 213intrapartition transient data data set, DFHINTRA
creating for a CICS region 192DD statement in IVP startup procedure 233
IPCS toolspreparing to use 401
updating BLSCECT 401updating library allocations 402
types of 401IPCSLIB data set for IPCS 402ISC (intersystem communication)
installation considerations 213ISMF control data set application, VSAM RLS 136ISMF storage class application 136ISPF, update primary menu 313ISPMLIB data set for IPCS 402ISPPLIB data set for IPCS 402ISPPLIB DD statement 313IVPs (installation verification procedures)
installing CICSPlex SM on first MVS image 409installing CICSPlex SM on second MVS image 425overview 407
JJava
components 205HFS files 205JVM 207samples 205
Java (continued)verifying installation 205
JAVADIR parameter of the DFHISTAR job 37JES parameter of the DFHISTAR job 21JOB parameter of the DFHISTAR job 20journal records, CMAS 397journalmodels, CMAS 308JPN 344JPN1 344JRNLDEFCH system parameter 388JRNLOPACT system parameter 388JRNLRTAEV system parameter 388JVM
JVM profiles 207properties files 208
Llanguage 344Language Environment 201
support for C language 203support for COBOL 203support for PL/I 204
Language identifiers 344CHS 344ENU 344JPN 344
language support 341LIB parameter of the DFHISTAR job 20libraries
authorizing 56, 67creating multiple sets 50load libraries
support for secondary extents 179RACF-protecting 69SMP/E function ACCEPT (DFHINST6) 46
libraries, CICSPlex SMauthorizing 283EYUISTAR related 297skeleton jobs 297
LINDEX parameter of the DFHISTAR job 22link editing CICS Transaction Server modules
IEW0461 message 47IEW2646 message 47IEW2651 message 47when running installation jobs 47
link pack area (LPA)CICS modules required in the LPA 108eligible modules 109installing CICS modules in 107, 112installing required modules
DFHCSVC, CICS SVC 108DFHDSPEX, post exit stub 108DFHIRP, interregion communication
program 108DFHSSEN, subsystem interface end-of-memory /
end-of-task clean up routine 108space for CICS requirements 111
link-editingDFHHPSVC into MVS nucleus 97messages during 47
484 CICS TS for z/OS: Installation Guide

linkedit temporary store (LTS) 30linklist, installing CICS-required modules 80linklist, installing module in 284listener 215LNK, MVS initialization parameter
IEASYSxx value 281LNKAUTH, MVS initialization parameter
IEASYSxx value 281LNKLSTxx, MVS linklist member 284load libraries 67
secondary extents 179load module 465local catalog (DFHLCD)
creating for each CICS region 192DD statement in IVP startup procedure 233
local MAS 341log manager
coupling facility considerations 151defining logger environment 143requirements planning 143using DASD-only logging 167
log stream sizing utility, DFHLSCU 160, 171log streams, authorizing the region userid to use 72logger environment
coupling facility space required for RLS AORs 165RLS implications 165staging data sets 166
LOGGER-INFO parameter of the DFHISTAR job 38LOGMODE tables 100
required entries for autoinstall 242LOGMODE, parameter of VTAM APPL statement 100LOGUSR, transient data extrapartition data set
DD statement in IVP startup procedure 234LPA (link pack area)
CICS modules required in the LPA 108eligible modules 109installing CICS modules in 107, 112installing required modules
DFHCSVC, CICS SVC 108DFHDSPEX, post exit stub 108DFHIRP, interregion communication
program 108DFHSSEN, subsystem interface end-of-memory /
end-of-task clean up routine 108space for CICS requirements 111
LPA, MVS initialization parameterIEASYSxx value 281
LPA, system initialization parameter 116LTS (linkedit temporary store) 30LUAPFX, parameter of VTAM APPL statement 100
choosing a value 104LUTYPE 6 sessions
ACQ 100PARSESS 100PERSIST 100
Mmacro temporary store (MTS) 29macros
DFHDLPSB TYPE=ENTRY (remote DL/I) 198
MAS 341MAS-specific JCL requirements
DFHRPL DD 335EYUPARM DD 335STEPLIB DD 335
MASINITTIME system parameter 389MASPLTWAIT system parameter 389MAXCAD, MVS initialization parameter
IEASYSxx value 281setting 282
MAXUSER, MVS initialization parameterIEASYSxx value 281
MAXUSERS 353message log (EYULOG)
with CMAS JCL 325messages
GIMSP 47IEW0461, from the binder 47IEW2646, from the binder 47IEW2651, from the binder 47SMP/E 47when running installation jobs 47
mode table entryCPSM310.SEYUSAMP/EYUSMPMT 290
MODETAB, VTAM APPL statement parameter 291EYUSMPMT 290
MODIFY command 254modules eligible for the LPA/ELPA 109modules, installing in LPA 107MRO between different CICS release levels 95MSGCASE 350MSGCASE system parameter 390MSGUSR, transient data extrapartition data set
DD statement in IVP startup procedure 234MTS (Macro temporary store) 29multiple CICS Transaction Server libraries
creating 50multiregion operation (MRO)
between different CICS release levels 95defining CICS as an MVS subsystem 211installation considerations 211
MVS ASR exit 59MVS ASREXIT 133MVS definitions
CICS protection key 124for CICS performance 125for console messages 141password checking 123
MVS imageXCF/MRO is required for links between CICS regions
in different 211MVS linklist
installing CICS-required modules 80installing IGWABWO 81installing IGWARLS 81other MVS product modules 81
MVS linklist, installing module in 284MVS logger 143MVS subsystem, defining CICS as 57, 83MVS workload management 125
Index 485

NNAME system parameter 391national language support 341NetView
sending generic alerts to 322network control programs for CAS 289non-exclusive element or feature
description 4NQNMODE, parameter of VTAM START
command 102NSINTERADDR 216NSYSLX, MVS initialization parameter
IEASYSxx value 281setting 282
OONC RPC
element in CICS TS 6optional source material
optional source material 52optional source material, loading 52OPTVOL parameter of the DFHISTAR job 26
PParallel Sysplex considerations
for CICS TS 60parameters
CICS SITfor CMAS 326for MVS MAS 336
CICSPlex SM system 383EYUINST EXEC 375in CMAS startup JCL 383in MAS startup JCL 383
PARSESS parameter, VTAM APPL statementCAS 291CMAS 294
PARSESS, parameter of VTAM APPL statement 100PASS option of VTAM APPL parameter AUTH 294password checking 123PDIR (PSB directory) 197PDSE 10performance definitions for MVS 125performance parameters (CICS), matching to service
policies 126PERSIST, parameter of VTAM APPL statement 100PLIMSG, transient data extrapartition data set
DD statement in IVP startup procedure 234PLT (program load table) 345PLTPI 345PLTSD 345port 344, 359post-installation jobs
CAS-related 297EYUCAS 297EYUCMAS 297, 324EYUDEFDS 297, 300EYUDFHDS 297
post-installation jobs (continued)EYULPMOD 297EYUSMPE 297MVS MAS-related 297
predefined LU alias 103PREFIX parameter of the DFHISTAR job 22preventive service 465problem state 67procedures, copying into a procedure library 48PROG, MVS initialization parameter
IEASYSxx value 281program load table (PLT) 345program temporary fix (PTF) 180program temporary store (PTS) 465properties files
dfjjvmpr sample 208dfjjvmps sample 208
protecting CICS load libraries 69protection key definition 124PRTAUXT step of IVP jobs 232PRTBUXT step of IVP jobs 232PRTDMPA step of IVP jobs 232PRTDMPB step of IVP jobs 232PRVMOD, system initialization parameter 116PTF (program temporary fix) 179, 180, 465
temporary store (PTS) 465PTF temporary store (PTS) 29PTS (PTF temporary store) 29, 465
RRACF (resource access control facility)
activating resource classes 75authorizing CICS category 1 transactions 57authorizing the region userid for category 1
transactions 71authorizing the region userid to open a region’s
VTAM ACB 70authorizing the region userid to use MVS log
streams 72defining the default CICS userid 77installing the interface routines 80IVP userid authority 228LOGSTRM general resource class 72protecting CICS load libraries 69
RECEIVE, function of SMP/E 179, 465references, unresolved 47REGION parameter for CAS startup 316region userid, authorizing for category 1
transactions 57, 71region userid, authorizing to OPEN a region’s ACB 70REJECT function of SMP/E 466release synchronization of CMAS and CICS 321RELFILE data sets
allocating 44requirements for CICS TS
hardware 9software 10
resource classes, activating 75resource definitions 355resource definitions, autoinstall for terminals 242
486 CICS TS for z/OS: Installation Guide
RESSTATUS system parameter 391restarting CMAS 331restarting MVS MAS 339RESTORE, function of SMP/E 179, 466REXX function package, installing 285routecodes, generic 88ROUTECODES, parameter of DFHSSIyy 88RSVNONR, MVS initialization parameter
IEASYSxx value 281RSVSTRT, MVS initialization parameter
IEASYSxx value 282run times of installation jobs 42RUSIZES parameter 289
Ssample applications data sets, creating
ACCTFILE, primer sample application accounts 194ACIXFILE, primer sample application index 194DFHCTAIX, sample application alternate index 194DFHCTCUS, sample application details 194DFHCTHLP, sample application help 194
sample JCLCAS 315CMAS 324EYUCAS 297EYUCMAS 297EYUDEFDS 297EYUDFHDS 297EYUJCLGN 307, 311EYULPMOD 297EYUSMPE 297MAS 335
sample program data, FILEAcreating for each CICS region 192DD statement in IVP startup procedure 233
sample programsEYU$CNV1 345EYUJWREP 346
sample programs in interactive IVP 253sample programs, installing 253saved control data set (SCDS) 30SCDS (saved control data set) 30SCEEBND2 parameter of the DFHISTAR job 38SCEECICS parameter of the DFHISTAR job 38SCEECPP parameter of the DFHISTAR job 36SCEELIB parameter of the DFHISTAR job 38SCEELKED parameter of the DFHISTAR job 36SCEELKEX parameter of the DFHISTAR job 36SCEEOBJ parameter of the DFHISTAR job 36SCEERUN parameter of the DFHISTAR job 38SCEERUN2 parameter of the DFHISTAR job 38SCEESAMP parameter of the DFHISTAR job 36SCLBSID parameter of the DFHISTAR job 36SCOPE parameter of the DFHISTAR job 21, 40scope, EYUINST EXEC parameter
post-installation customization 297SCSQANLE parameter of the DFHISTAR job 37SCSQAUTH parameter of the DFHISTAR job 37SCSQCICS parameter of the DFHISTAR job 37SCSQLOAD parameter of the DFHISTAR job 36
SDFHPL1 target library 25SDFJAUTH 210SDFJLPA 210SDSNLOAD parameter
SDSNLOAD parameter 37SDSNLOAD parameter of the DFHISTAR job 37SDUMP options 402SEC system parameter 391secondary extents, load libraries 179SECPRFX system parameter 392secure sockets layer (SSL) 342, 358security 357
COVA 358COVC 358COVE 358COVG 358COVP 358COVU 358DFHHTML 358EYUCOVE 358EYUCOVI 358EYULOG 358EYUWREP 358EYUWUI 358
security policydfjejbpl 209
security with the CICS IVPs 229SELECT, parameter of DFHISTAR 41server 341ServerPac
compared with CBIPO 5contents 4description 4software requirements 10
service, applyingsupplied SMP/E procedure 371
servicing CICS 179corequisite fixes 180
session outage notification (SON)SONSCIP 100
setting upCAS 315CMAS 307, 321MVS MAS 333
SEZACMTX parameter of the DFHISTAR job 38SEZARPCL parameter of the DFHISTAR job 38sharing control data sets, VSAM RLS 137SHUtdown action command 331shutting down a CMAS 330SISPLOAD parameter of the DFHISTAR job 35SIT parameters, CICS 383
CMAS-related 326MVS MAS-related 336
SMF, MVS initialization parameterIEASYSxx value 282
SMP/E data sets, attributes 28, 29SMP/E options, specifying 32SMP/E zone and zone log dispositions 32SMP/E, using to apply service 371SMP0001, SMP/E sample USERMOD for SMP/E data
sets 28
Index 487

SMPCNTL, DD statement of DFHSMPE 180SMPLTS parameter of the DFHISTAR job 30SMPMTS parameter of the DFHISTAR job 29SMPPTS parameter of the DFHISTAR job 29SMPSCDS parameter of the DFHISTAR job 30SMPSTS parameter of the DFHISTAR job 29SMPVOL parameter of the DFHISTAR job 26SMPWORK parameter of the DFHISTAR job 29SMS parameter of the DFHISTAR job 25software requirements
installing system 10SONSCIP parameter, VTAM APPL statement 294SONSCIP, parameter of VTAM APPL statement 100source temporary store (STS) 29SPOOLCLASS system parameter 393SSI definitions for MRO 212SSL 215SSL (secure sockets layer) 342, 358staging data sets 166STALL system parameters 393START command
CAS 316CMAS 330
Starter Setcreating environment 364defining environment 365deleting 368naming convention 363sample libraries 361selecting configuration 364starting components 365using as a model 368
startingCAS
as a batch job 315at MVS IPL time 315from the system console 315sample procedure 315
CMASas a batch job 323from the system console 323sample procedure 324
MVS MAS 335stopping
CAS 318MVS MAS 339
storage key definition 124STS (source temporary store) 29subsystem definition to MVS 211subsystem, MVS, defining CICS as 57, 83supervisor state 67SUPPRESSCMF system parameter 337, 394suppressing CMF records 337, 394SVC
correct-level check for DFHCSVC 58, 93defining to MVS 93DFHHPSVC, defining 97DFHHPSVC, loading into the MVS nucleus 97installing the CICS type 3 SVC 57, 93using DFHCSVC for MRO between different CICS
releases 95
SVC (continued)using more than one version of DFHCSVC 94
SVCPARM statement in an IEASVCcc member 93SVCs, installing DFHCSVC in the LPA 108SYMREC Authorization Exit 133SYMREC macro 59, 133synchronization of CMAS and CICS releases 321SYS1.CPSM310.SEYULINK
adding to linklist 284authorizing 283containing module for MVS linklist 284
SYS1.CPSM310.SEYULPAauthorizing 283defining to your MVS 287, 288
SYS1.PARMLIB libraryBLSCECT exit control table 401COMMNDaa member with operator commands 323IEAAPFaa
for authorizing CICSPlex SM libraries 283IEASYSxx member
establishing requirements 282when authorizing libraries 283when creating CAS started tasks 282when creating CMAS started tasks 282, 307
LNKLSTxxx memberwhen adding MVS linklist 284
SYS1.PROCLIBCAS startup procedure 315CMAS startup procedure 323
SYS1.VTAMLIBmode table 290
SYS1.VTAMLST library 292application definitions
CAS 289CMAS 294
cross-domain resource definition 292, 295mode table 289
SYSID parameter of EYU9XDUT 301SYSIN data set, partitioned
creating for all CICS regions 191DD statement in IVP startup procedure 233
SYSMOD (system modification) 179, 371, 466APAR 465Function 465PTF 465USERMOD 466
SYSNAME, MVS initialization parameterIEASYSxx value 282
sysplex, MVScross-system coupling facility (XCF)
for MRO links across MVS images 211SYSPROC data set for IPCS 402SYSTCPD 216system abend 722 47system initialization parameters 231system modification (SYSMOD) 371System Modification Program Extended (SMP/E)
ACCEPT function 46, 179, 465APPLY function 46, 179, 465DFHSMPE 179FMID keyword of CICS SYSMODs 465
488 CICS TS for z/OS: Installation Guide

System Modification Program Extended (SMP/E)(continued)
function SYSMOD 465messages 47messages during link-editing 47RECEIVE function 179, 465REJECT function 466RESTORE function 179, 466UCLIN function 466
system parametersdescription of 385summary of 383
SYSTR 343
Ttailoring CICS
installing MRO support 211TAPEUNIT parameter of the DFHISTAR job 33target libraries
allocating and cataloging 44SMP/E function ACCEPT (DFHINST6) 46
target zone 466target zone (TZONE) 32
CSI 31log 30
TARGVOL parameter of the DFHISTAR job 26TCP/IP
DNS 216ECI 215enablement 215HTTP 215IIOP 215installation requirements 215listener 215SSL 215
TCPIPADDRESS 348TCPIPHOSTNAME 344, 347, 359TCPIPHTTPHOST 348TCPIPPORT 344, 348, 359TCPIPSERVICE 342TCPIPSSL 349TCPIPSSLCERT 349TEMPLIB parameter of the DFHISTAR job 20temporary storage data set, DFHTEMP
creating for each CICS region 192DD statement in IVP startup procedure 233
terminalsdefining for the online IVP 242
THOUSNDSEPARATOR 351times taken to run the installation jobs 42TIMESEPARATOR 351TIMEZONE parameter
EYUINST EXEC 301, 375EYUXDUT 298
TINDEX parameter of the DFHISTAR job 22TOBATCHREQ
CICSPlex SM system parameter 394TOONLINEREQ
CICSPlex SM system parameter 394
TOPOLLINTCICSPlex SM system parameter 395
transaction dump data setsdump (A) data set, DFHDMPA 234dump (B) data set, DFHDMPB 234
transient data destination CSNE 101transient data extrapartition data sets
destination before transient data initialization,DFHCXRF 233
destination before transient data initialization,DFHLRQ 234
destination used by C/370 applicationprograms 234
destination used by CICS services 234destination used by PL/I application programs 234destination, LOGA, used by CICS sample
programs 234transient data queue definitions 356
COLG 356COVE 356COVI 356COVP 356
TSOdefining a TSO user as a console 245
type 3 SVC routineused for interregion communication 211
TZONE parameter of the DFHISTAR job 32TZONECSI parameter of the DFHISTAR job 31TZONELOG parameter of the DFHISTAR job 30
UUCLIN function of SMP/E 466UNIX System Services 205unresolved references 47UPAGE option of VTAM APPL parameter AUTH 294updating CICSplex definition
BLSCECT 401CSD files using DFHCSDUP 307, 311CSD release 309library allocations for IPCS
IPCSLIB 402ISPMLIB 402ISPPLIB 402SYSPROC 402
updating configuration list 292, 296URL 344, 359USERMOD (user modification) 466USERTR 343USSDIRA, parameter of DFHISTAR 35UTILITIES parameter of the DFHISTAR job 21
VVARY NET command 296verification tests, running IVP jobs 227verify batch job, DFHIVPBT 234
DFH$BTCH input 234expected output 238
verify interactive job, DFHIVPOL 241DFHIVPOL 250
Index 489

verify interactive job, DFHIVPOL (continued)invoking and executing sample programs 253terminating CICS 255using CICS-supplied terminal transactions 250using transactions 253
VPACE option of VTAM APPL parameter AUTH 100VPACING parameter, VTAM APPL statement 294VPACING, parameter of VTAM APPL statement 101VSAM RLS
activating the coupling facility structures 139adding new parameters to SYS1.PARMLIB 138altering data set attributes for RLS access 136amending parameters in
SYS1.PARMLIB(BPXPRMxx) 84, 210authorizing CICS userids 138CFRM policy 135defining cache sets 136defining coupling facility cache structures 135defining sharing control data sets 137defining SMS storage classes for RLS access 136defining the coupling facility lock structure 135definitions, required 135establishing new procedures 138ISMF control data set application 136ISMF storage class application 136IXCMIAPU utility 135
VTAMAPPL statement 99
ACBNAME parameter 100AUTH parameter 100cross-domain considerations 101EAS parameter 100HAVAIL parameter 100LOGMODE parameter 100LUAPFX parameter 100PARSESS parameter 100PERSIST parameter 100SONSCIP parameter 100VPACING parameter 101
authorized path 58, 97CICS APPLID 100cross-domain considerations 101definitions required for CICS 99LOGMODE table entries for autoinstall 242version, release, and modification level
indicator 101VTAM ACB, authorizing the region userid to open 70VTAM LU alias 102VTAM requirements
activating definitions 293, 296CAS 289CMAS 294defining APPL statement 291, 294defining cross-domain resource 292, 295updating configuration list 292, 296
WWeb User Interface server 341
temporary storage models 356
Web User Interface server initialization optionalparameters 348
Web User Interface server initializationparameters 347
AUTOREFRESH 351COLORINK 354COLORINKBANNER 354COLORINKLINK 354COLORINKVLINK 354COLORPAPER 354COLORPAPERALT 354COLORPAPERERROR 354COLORPAPERHEAVY 354COLORPAPERLIGHT 354COLORPAPERRULE 354COLORPAPERWARN 354CVDASTYLE 349DATEFORMAT 350DATESEPARATOR 350DECIMALSEPARATOR 350DEFAULTCICSPLEX 352DEFAULTCICSRGN 352DEFAULTCMASCTXT 351DEFAULTCONNECT 352DEFAULTCONTEXT 351DEFAULTCSYSGRP 352DEFAULTDB2SS 352DEFAULTEJCOBEAN 352DEFAULTEJDJBEAN 352DEFAULTEVENT 352DEFAULTLOCFILE 352DEFAULTLOCTRAN 352DEFAULTMAPCOLL 351DEFAULTMENU 351DEFAULTNAVIGATE 351DEFAULTPROGRAM 353DEFAULTREMFILE 353DEFAULTREMTRAN 353DEFAULTSCOPE 351DEFAULTTASK 353DEFAULTWARNCNT 351GMMTEXTMSG 350INACTIVETIMEOUT 353MAXUSERS 353MSGCASE 350TCPIPADDRESS 348TCPIPHOSTNAME 344, 347, 359TCPIPHTTPHOST 348TCPIPPORT 344, 348, 359TCPIPSSL 349TCPIPSSLCERT 349THOUSNDSEPARATOR 351TIMESEPARATOR 351WUITRACE 355
Web User Interface server initialization requiredparameters 347
Web User Interface server repository(EYUWREP) 346, 356
workload management, MVS 125worksheets for setup
CAS 272
490 CICS TS for z/OS: Installation Guide

worksheets for setup (continued)CMAS 272MVS MAS 272overview 271
WORKUNIT parameter of the DFHISTAR job 24WRKAREA 343WTO (write-to-operator) macro 141WUITRACE 355
XXDLIPOST global user exit 199XDLIPRE global user exit 199XRF (extended recovery facility)
sessions, HAVAIL, parameter of VTAM APPL 100XTRAQUAL parameter
XTRAQUAL parameter 24XTRAQUAL parameter of the DFHISTAR job 24XXRSTAT exit, effect on takeover of a VTAM ACB 70
Zz/OS UNIX System Services 205zone and zone log dispositions 32ZONEOFFSET parameter of EYU9XDUT 301
Index 491

492 CICS TS for z/OS: Installation Guide

Notices
This information was developed for products and services offered in the U.S.A. IBMmay not offer the products, services, or features discussed in this document in othercountries. Consult your local IBM representative for information on the products andservices currently available in your area. Any reference to an IBM product, program,or service is not intended to state or imply that only that IBM product, program, orservice may be used. Any functionally equivalent product, program, or service thatdoes not infringe any IBM intellectual property right may be used instead. However,it is the user's responsibility to evaluate and verify the operation of any non-IBMproduct, program, or service.
IBM may have patents or pending patent applications covering subject matterdescribed in this document. The furnishing of this document does not give you anylicense to these patents. You can send license inquiries, in writing, to:
IBM Director of LicensingIBM CorporationNorth Castle DriveArmonk, NY 10504-1785U.S.A.
For license inquiries regarding double-byte (DBCS) information, contact the IBMIntellectual Property Department in your country or send inquiries, in writing, to:
IBM World Trade Asia CorporationLicensing2-31 Roppongi 3-chome, Minato-kuTokyo 106, Japan
The following paragraph does not apply in the United Kingdom or any othercountry where such provisions are inconsistent with local law:INTERNATIONAL BUSINESS MACHINES CORPORATION PROVIDES THISPUBLICATION “AS IS” WITHOUT WARRANTY OF ANY KIND, EITHER EXPRESSOR IMPLIED, INCLUDING, BUT NOT LIMITED TO, THE IMPLIED WARRANTIESOF NON-INFRINGEMENT, MERCHANTABILITY, OR FITNESS FOR APARTICULAR PURPOSE. Some states do not allow disclaimer of express orimplied warranties in certain transactions, therefore this statement may not apply toyou.
This publication could include technical inaccuracies or typographical errors.Changes are periodically made to the information herein; these changes will beincorporated in new editions of the publication. IBM may make improvements and/orchanges in the product(s) and/or the program(s) described in this publication at anytime without notice.
Licensees of this program who wish to have information about it for the purpose ofenabling: (i) the exchange of information between independently created programsand other programs (including this one) and (ii) the mutual use of the informationwhich has been exchanged, should contact IBM United Kingdom Laboratories,MP151, Hursley Park, Winchester, Hampshire, England, SO21 2JN. Suchinformation may be available, subject to appropriate terms and conditions, includingin some cases, payment of a fee.
© Copyright IBM Corp. 1989, 2010 493

The licensed program described in this document and all licensed material availablefor it are provided by IBM under terms of the IBM Customer Agreement, IBMInternational Programming License Agreement, or any equivalent agreementbetween us.
TrademarksIBM, the IBM logo, and ibm.com are trademarks or registered trademarks ofInternational Business Machines Corp., registered in many jurisdictions worldwide. Acurrent list of IBM trademarks is available on the Web at Copyright and trademarkinformation at www.ibm.com/legal/copytrade.shtml.
Java and all Java-based trademarks and logos are trademarks of SunMicrosystems, Inc. in the United States, other countries, or both.
Linux is a registered trademark of Linus Torvalds in the United States, othercountries, or both.
Microsoft and Windows are trademarks of Microsoft Corporation in the UnitedStates, other countries, or both.
UNIX is a registered trademark of The Open Group in the United States and othercountries.
Other product and service names might be trademarks of IBM or other companies.
494 CICS TS for z/OS: Installation Guide

Sending your comments to IBM
If you especially like or dislike anything about this book, please use one of themethods listed below to send your comments to IBM.
Feel free to comment on what you regard as specific errors or omissions, and onthe accuracy, organization, subject matter, or completeness of this book.
Please limit your comments to the information in this book and the way in which theinformation is presented.
To ask questions, make comments about the functions of IBM products or systems,or to request additional publications, contact your IBM representative or your IBMauthorized remarketer.
When you send comments to IBM, you grant IBM a nonexclusive right to use ordistribute your comments in any way it believes appropriate, without incurring anyobligation to you.
You can send your comments to IBM in any of the following ways:
v By mail, to this address:
IBM United Kingdom LimitedUser Technologies Department (MP095)Hursley ParkWinchesterHampshireSO21 2JNUnited Kingdom
v By fax:
– From outside the U.K., after your international access code use44–1962–816151
– From within the U.K., use 01962–816151
v Electronically, use the appropriate network ID:
– IBMLink: HURSLEY(IDRCF)
– Internet: [email protected]
Whichever you use, ensure that you include:
v The publication title and order number
v The topic to which your comment applies
v Your name and address/telephone number/fax number/network ID.
© Copyright IBM Corp. 1989, 2010 495

496 CICS TS for z/OS: Installation Guide


����
Product Number: 5655-M15
GC34-6426-08

Spineinformation:
��
�C
ICS
TS
for
z/O
SIn
stal
latio
nG
uide
Vers
ion
3R
elea
se1