christmas tree wall hanging - emblibrary.com tree wall hanging instructions: mark out a half circle...
TRANSCRIPT

Christmas Tree Wall Hanging
Christmas Tree Wall Hanging
The folds make it fantastic!
This Christmas tree wall hanging is made from a semicircle that is folded so that the curved edge creates the look of garland on the tree. How neat is that?
When I first saw this type of technique, I just had to try it, just to see how it worked, and if it would indeed work for me. Well, it worked all right, and I found that adding embroidery would make the look even better.
Supplies needed:
1/2 yard of solid green trigger fabric 1/2 yard of green holiday print fabric Fat quarter of red fabric Small amount of light-weight batting 1-1/2 yards of half-inch wide lace or trim. 15 inches of quarter- inch wide ribbon. Decorative button, 1-1/2 inch size
Embroidery Designs from Embroidery Library (We used the large size):
Elf with cat Elf in Santa's Suit North Pole Village Tailor Shop North Pole Engine Pile of Gifts
Page 1

Christmas Tree Wall Hanging
Instructions:
Mark out a half circle with a radius of 15 inches onto the solid fabric. Cut the semicircle out. Use this semicircle as a pattern to cut out another semicircle from the green holiday print fabric.
Editor's note: if you are using a solid fabric that is lighter than trigger, interface the semicircle with a medium weight interfacing.
On the flat side of the green semicircle, 6-1/4 inches from one end is the pivot point for folding the tree.
Orient the semicircle so that the wrong side of the fabric is up and the flat side is to the left as you are looking at it.
Place your finger at the 6-1/4 inch point; start folding the circle back and forth so that the curved edge of the semicircle looks like it will be the garland trim on the tree. The pivot point will end up being the top of the tree. Once you have the folds even and straight on the sides, press the folds so that you have very defined creases at the fold lines. At this point you will be seeing both the right and the wrong side of the fabric. You will place the embroidery on the areas where the right side of the fabric is showing on the tree. While the tree is still folded, make placement markings for your embroidery.
Unfold the fabric and embroider the designs on the semicircle. Embroider the Train Engine and Pile of Packages designs
Page 2

Christmas Tree Wall Hangingg g
on the red fabric. Leave enough room on the piece to cut out four 4-1/2 inch squares. Two will have the designs on them, and two will be unembroidered. Also cut out two 4-1/2 inch squares from the batting.
Note: I used 1/4-inch seam allowances throughout this project.
Layer the squares with the batting on the bottom, then the unembroidered square with the right side up, and finally, the embroidered square with the right side down goes on top. Stitch the squares together on all sides. Leave a 3-inch opening on the bottom of each square for turning. Turn the squares right side out and close the opening.
Stitch the 2 semicircles together along the straight side to form a complete circle. Leave a 4-inch opening near the center of the seam for turning.
Turn the circle to the right side and stitch the trim along the very edge of the solid green semicircle. The decorative edge of the trim should face the inside of the circle.
Page 3

Christmas Tree Wall Hanging
Bring the printed fabric over the solid, so that the curved edges meet. Stitch the semicircles together around the entire curved edge.
Turn the semicircle right side out through the opening you left in the straight side. Top stitch around the entire outside edge of the semicircle. Make sure that the opening gets neatly closed up by the topstitching.
Page 4

Christmas Tree Wall Hanging
Fold the tree back into place using the creases in the solid fabric as a guide.
Press again to crease all the layers.
Cut two 6-inch pieces of ribbon and tie a knot near each of the ends. Stitch the ends of the ribbon to the tops of the red squares as shown.
Stitch each square to the bottom of the tree at the center of the ribbon loops.
Page 5
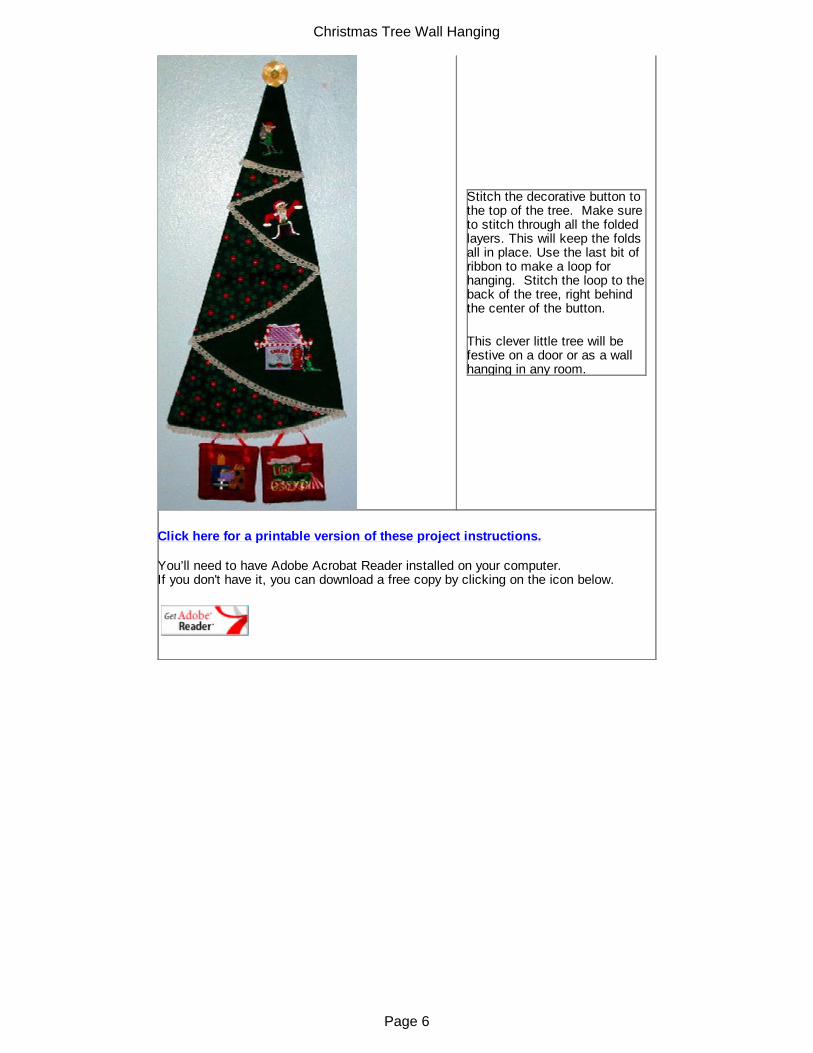
Christmas Tree Wall Hanging
Stitch the decorative button to the top of the tree. Make sure to stitch through all the folded layers. This will keep the folds all in place. Use the last bit of ribbon to make a loop for hanging. Stitch the loop to the back of the tree, right behind the center of the button.
This clever little tree will be festive on a door or as a wall hanging in any room.
Click here for a printable version of these project instructions.
You’ll need to have Adobe Acrobat Reader installed on your computer.If you don't have it, you can download a free copy by clicking on the icon below.
Page 6