chloromatic - poolandspawarehouse.com.au
TRANSCRIPT

Email: [email protected]
Salt Water Pool System
Models MCS16C MCS16CTP MC16C MCS24C MCS24CTP MC20C MCS36C MCS36CP MC30C MCS40C MCS50C
Installation & Operating Instructions
ChloroMatic®
Please pass these instructions on to the operator of this equipment.

2
Congratulations! You are now the proud owner of the renowned ChloroMatic® Salt Water Chlorinator.Please read all information in this manual carefully before installing or operating your ChloroMatic® Salt Water Pool Chlorinator.
Table of Contents
MCS16C / MCS24C / MCS36C / MCS40C1. Power Supply / Controller2. Electrolytic Cell3. 2 x 50 x 40PVC Reducing Brush4. Mounting Kit and Spare Fuse
Refer to catalogue for other models
MCS50C1. Power Supply / Control Unit2. Electrolytic Cell for ESC503. 1 x Cell adaptor (50mm)4. 1 x Cell adaptor with earth bolt (50mm)5. Mounting Kit and Spare Fuse6. 2 x 80/50mm reducing sockets7. 2 x 80mm Nut8. 2 x 80mm Socket
Packing List ................................................................................................................................................................ 2
Important Notice ......................................................................................................................................................... 3
Installation Instructions ............................................................................................................................................... 3
Pre Start Up Procedure .............................................................................................................................................. 4
Operation of your ChloroMatic® System ..................................................................................................................... 5
ESR, ESC and ESCpH Series Features .................................................................................................................... 5
Operation of ChloroMatic® System – ESC .................................................................................................................. 6
Automatic Time Clock Operation ................................................................................................................................ 8
Optional Pool Light Transformer ................................................................................................................................. 9
Maintenance of Power Supply and Electrolytic Cell ................................................................................................. 11
Day to Day Operation ................................................................................................................................................ 14
Chlorine Production .................................................................................................................................................. 15
General Information: Recommended Pool Water Chemistry ................................................................................... 16
Important Notes ........................................................................................................................................................ 16
Trouble Shooting ...................................................................................................................................................... 16
ChloroMatic® ESC pH System .................................................................................................................................. 17
Mounting Template ................................................................................................................................................... 19
Guarantee and Terms & Conditions ......................................................................................................................... 21
Packing List
For ESC only:
Salt Water Pool SystemChloroMatic®

3
IMPORTANT NOTICEFACTORS THAT WILL IMPROVE THE PERFORMANCE
AND LIFE OF YOUR SALT WATER CHLORINATORPLEASE READ THIS BEFORE OPERATING YOUR CHLORINATOR
POOL BUILDERS: Please cover this information with your customer during the new pool “Hand over Session”
Salt Water Chlorinators are a valuable piece of pool sanitising equipment and must be cared for to get the best performance and life span from it.
There are THREE main factors that will damage your chlorinator and reduce the life of the product. Please monitor the following factors in accordance with your installation & operating instructions.
1. MAINTAIN OPTIMUM SALT LEVELS: OPTIMUM SALT LEVELS: 4000-6000ppm
•RunchlorinatorattheOptimumSaltLevelsstatedwithinthisdocumentandontheproducttoensure optimum sanitiser output and cell life.•Operatingthisdeviceatlowsaltlevelswilldamagethecellandreduceitslife.•ThecontrolpaneldisplaysredLEDindicatorwarningswhenthesaltlevelsarelow.•Ifnoactionistakentorectifythesaltlevels,damagetothecellmayresultwhichwillnotbe
covered under warranty.
2. MONITOR & MAINTAIN YOUR CHLORINATOR CELL:•Tokeepyoursaltwaterchlorinatorinthebestpossiblecondition,regularmonitoringof
the electrolytic cell is recommended. The ‘Cell’ is the clear plastic housing containing the removable cell head.•DuringthechlorinationprocessawhitepowderyCalciumscalemaynaturallybuilduponthe
titanium plates in the cell. Monitor the cell to prevent excessive scale build up. Excessive scale buildupwillcausedamagetoyourcell,anddramaticallyreduceitsefficiencyandlifespan.•ReversePolaritymodelsarelowmaintenancemodelsthatminimisescalebuildup.•ThecontrolpaneldisplaysredLEDindicatorwarningswhenthecellrequirescleaning.•IfCalciumscalebuildsuppleasecleanthecell,followingthecleaninginstructions
provided on page 11.•NEVER: Use concentrated acid to clean your cell.•NEVER: Leave cell in cleaning solution for extended periods of time•NEVER: Use metal implements, scourers or brushes to clean your cell
3. BALANCED POOL WATER CHEMISTRY:•SaltlevelsMUSTbemaintainedat4500-6000ppmforoptimumperformanceandlifespan•CalciumHardnesslevelsMUST be kept to ideal ranges of 200-275ppm (for Concrete and
Tiled Pools) and 100-225ppm (for other surfaces) to prevent excessive scale build up and damage to equipment.•pHlevelsMUST be kept to ideal levels to prevent damage to equipment and pool surfaces
and to obtain optimum sanitiser effectiveness.•TotalAlkalinityandStabiliserlevelsmustalsobekeptinanidealrange.
Note: Please refer to the RECOMMENDED POOL WATER CHEMISTRY chart on page 14 for more information.
Salt Water Pool System
4
•Page3•
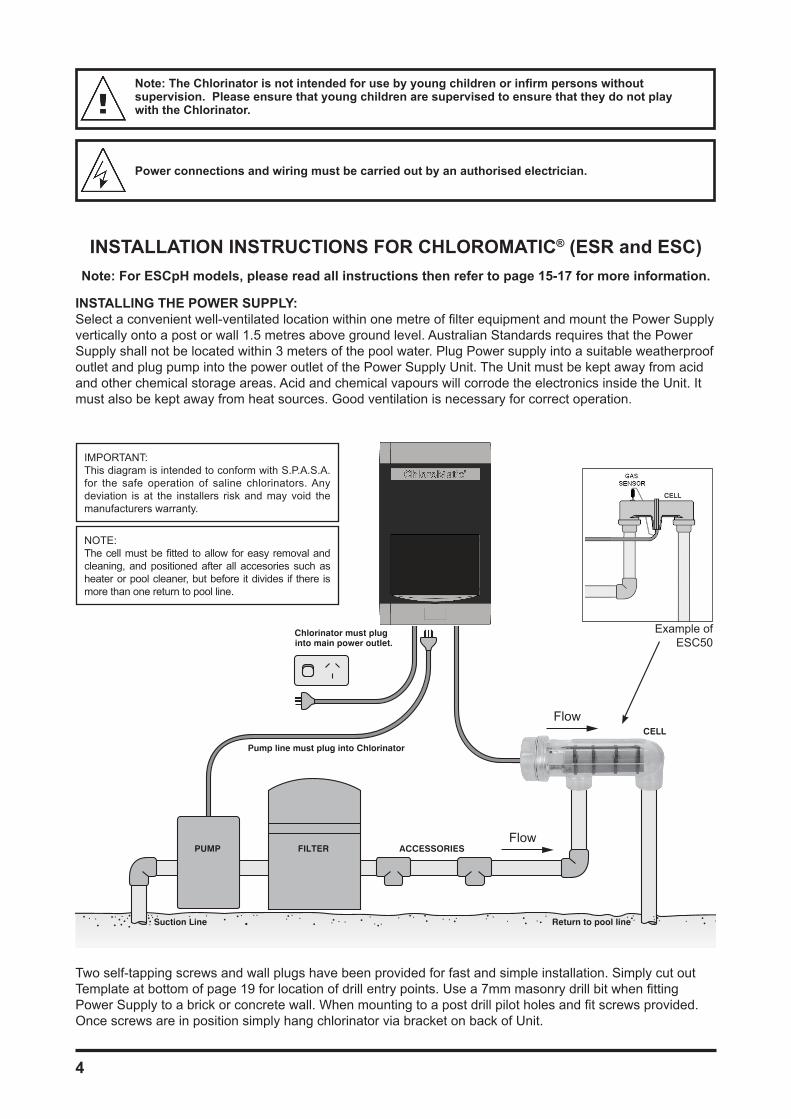
INSTALLATION INSTRUCTIONS FOR CHLOROMATIC® (ESR and ESC)
Note: For ESCpH models, please read all instructions then refer to page 15-17 for more information.
INSTALLING THE POWER SUPPLY:Selectaconvenientwell-ventilatedlocationwithinonemetreoffilterequipmentandmountthePowerSupplyvertically onto a post or wall 1.5 metres above ground level. Australian Standards requires that the Power Supply shall not be located within 3 meters of the pool water. Plug Power supply into a suitable weatherproof outlet and plug pump into the power outlet of the Power Supply Unit. The Unit must be kept away from acid and other chemical storage areas. Acid and chemical vapours will corrode the electronics inside the Unit. It must also be kept away from heat sources. Good ventilation is necessary for correct operation.
Twoself-tappingscrewsandwallplugshavebeenprovidedforfastandsimpleinstallation.SimplycutoutTemplateatbottomofpage19forlocationofdrillentrypoints.Usea7mmmasonrydrillbitwhenfittingPowerSupplytoabrickorconcretewall.Whenmountingtoapostdrillpilotholesandfitscrewsprovided.Once screws are in position simply hang chlorinator via bracket on back of Unit.
Flow
Flow
IMPORTANT:This diagram is intended to conform with S.P.A.S.A. for the safe operation of saline chlorinators. Any deviation is at the installers risk and may void the manufacturers warranty.
NOTE:Thecellmustbefittedtoallowforeasyremovalandcleaning, and positioned after all accesories such as heater or pool cleaner, but before it divides if there is more than one return to pool line.
Note: The Chlorinator is not intended for use by young children or infirm persons without supervision. Please ensure that young children are supervised to ensure that they do not play with the Chlorinator.
Power connections and wiring must be carried out by an authorised electrician.
Example of ESC50

5
•Page4•
CONNECTING THE ELECTROLYTIC CELL TO THE POWER SUPPLY:ThePowerSupplyisfittedwithaflexibleleadterminatedwithbrassconnectors.ThesemustbecorrectlyfittedtotheconnectionsontheinsideoftheCellHead.Topreventincorrectconnectionthefittingshavebeencolour coded.
ESR Black to Black & White to White
ESC / ESCpH
Either Black Terminal
The Blue Gas Sensor connector should be pushed onto the thread of the small bolt. The power outlet on the bottom of the Power Supply is dedicated to the POOL PUMP ONLY.
Important:TheCellmustbeinstalledsothatthewaterflowsthroughtheCellHousingviatheCellheadendin accordance with the arrow on the cell housing. This is to ensure correct operation of the gas sensor.
PRE - START UP PROCEDURE:Before operating your ChloroMatic® please ensure the following items have been added to your pool:
• SALT-Loadsaltintothepoolatthefollowingrates:
•AllChloroMaticModels–Around45-60kgper10,000litres(4500-6000ppm)
Connect manual vacuum system and slowly vacuum until salt dispersal is complete. Place vacuum head into deepest end of pool and allow vacuum to continue for a further 2 or 3 hours. Salt should now be completely mixed. Never add salt directly into skimmer box.
• CHLORINE-Foranewpoolinstallationthathasnotbeenchlorinated,addsufficientChlorine(liquidorgranular) to achieve a reading of 3 ppm (with a suitable test kit), or run the chlorinator system continuously for at least 24 hours or until a reading of 3 ppm is reached.
• STABILISER-Itisessentialthatpoolstabiliserbeaddedandmaintainedattherateof30-50ppmatalltimes. Do not exceed 100 ppm.
(Refer Day to Day Operation page 12 for further information).
OPERATION OF YOUR ChloroMatic® SYSTEM:Cell OutputonthedigitalLEDdisplayisexpressedasapercentage.TheDisplaywillfluctuatearound100whenproducingsanitiser-unlessinWinterMode,inwhichcasetheDisplaywillfluctuatearound85.(ReferWinterModepage8).TheUnitisfittedwithanelectroniccontrolandwarningsystem.Thisregulatestheoutput of the Unit to the preset maximum. The warning system consists of two Operation LED’s that will glow Green, or Red to indicate possible faults with the Unit or damaging operating conditions.
Do not use a double adaptor to connect more than one pump - it can cause overload to the system and could void your warranty. *Does not relate to MCS50C.

6
•Page5•
Once the salt level in the pool is correct the unit may be switched on. Set Sanitiser Output to Max (100%).The STAND - BY indicator will be On and no Cell Output will be seen for approx 30 seconds, this allows the pumpandfiltertoprimeandtheCellHousingtofillwithwater.Afterthisstart-updelay,thedisplayshouldshow100(ESRModels(+/-2),unlessinWinter Modewhereitwilldisplay85(ESRModels(+/-2).Atthispoint both Operation LED’s should be Green; if not there may be a problem. (Refer table).
DISPLAY / INDICATOR LED 1 LED 2 REASON / ACTION
STAND – BY ON Green Green
1.Start-updelayfunctioning.2. Sanitiser Output set below max. Cell is turned off. (Refer Sanitiser Output page 7)
FLOWSTAND – BY ON
Green Green1. Gas detected. Check pump/pipes for damage2. Gas sensor not connected to cell.
FLUCTUATINGAROUND 100
Green Green System operating normally.
Green Red
1. Salt level too low. Add salt at a rate of 25kg per 25,000L.2.Celliscalcified.Cleancell.3. Water temperature low. Switch to Winter Mode.
Red Red
1. Salt level below minimum. Add Salt.2.Celliscalcified.Cleancell.3. Water temperature very cold. Switch to Winter Mode. Continued operation may cause damage to system – Consult dealer for problemrectification.
PLEASE NOTE: When Winter Mode switch is On Unit will operate similar to above except Display will fluctuatearound85.(ReferWinterModepage8).
AM6
CONTROL PANEL LAYOUT
OPTIONAL POOL LIGHT SWITCH
SELECTOR SWITCH
TIME CLOCK
SANITISER OUTPUT DIAL
WINTER MODE SWITCH
OPERATION LED’S

7
ChloroMatic® MODEL ESR, ESC and ESCpH SERIES FEATURES:STAND- BY:The Stand - By indicator will be On when the Unit is preparing to produce sanitiser. This will be either during the systemsinitialstartuporwhentheCellhasbeenturnedOffduringthefiltrationcycle.
FLOW:IfthereisaproblemwithwaterfloworgasisdetectedintheCellHousingthefIowindicatorwillbeOn.Whenthisoccurs the pump or pipes should be inspected for damage and the Flow Sensor connection checked.
SANITISER OUTPUT CONTROL:The Sanitiser Output Control varies the amount of time the Cell operates during the filtration cycle. The Sanitiser Output Control will not vary the electrical current supplied to the Cell. (As shown on the Display).
Asanexample,ifonefiltrationcycleissetat5hours,andtheSanitiser Output Control is set to 80%, then the totalamountoftimetheCellwilloperateduringthe5-hourcyclewillbe4hours.IftheSanitiser Output Control is setto60%,theCellwilloperatefor3hourstotaloverthe5-hourfiltrationcycle.When the Sanitiser Output ControlissettoMIN,theCellwillbeOFFforthedurationofthefiltrationcycle.Whenthe Sanitiser Output ControlissettoMAX,theCellwillbeONforthedurationofthefiltrationcycle.
The Sanitiser Output Control is graduated in steps of 10% from MIN (OFF) to MAX (ON). Duringthefiltrationcycle,theCellwillbeturnedONandOFFanumberoftimeseachhour,unlesstheSanitiser Output Control is set at MIN or MAX. Using the previous example (of 60%), the Cell will operate for about 36 minuteseachhour.This36-minuteoperatingtimewillbemadeupofanumberofsmalleroperatingperiods.Asan example, the Cell may turn ON 12 times (for a period of 3 minutes each time) over the hour to make up the 36 minutes.
Thisenablestheelectroniccircuitrytore-adjusttoanychangesinthepoolwatercondition.Forexample,dilutionfrom winter rains, the addition of salt etc.
If the Cell is OFF and you wish to check its operation, simply turn the Sanitiser Output Control to MAX and the CellwillturnON.Oncechecked,adjusttheSanitiser Output Control back to the desired position and after a few minutes the Cell will turn OFF again.
To turn the Cell OFF, simply turn the Sanitiser Output Control to MIN. This will be convenient for backwashing.
LOW SALINITY INDICATOR Your ChloroMatic®isfittedwithanumberofprotectivesystemsincludingtheLow Salinity Indicator (operation LED’s). As the salt level in the pool decreases, the wear on the Cell increases. Although salt is not consumed in the ChloroMatic®process,itislostthroughsplashing,back-washingandonbathersastheyleavethepool.Thesalt level is also reduced by rain, which causes dilution. Salt is not lost to evaporation.As the salt level in the pool falls toward the minimum Operation LED2 will turn RED. At this point the salt level should be increased by adding 25kg of salt per 25,000 litres of pool water. The addition of salt should not affect the ChloroMatic® as it is protected against overloads. If no action is taken and the salt level continues to fall damage to the system may result.
OPERATION OF ChloroMatic® ESC SYSTEM:The ChloroMatic® ESC system has the following additional features:
1. POLARITY INDICATOR ON OUTPUT Display-The±Symbol appears before the cell output display to indicate which polarity the system is in, i.e. positive or negative. This symbol will alternate and is factory pre set.
2. SANITISER OUTPUT-WhenadjustingtheSanitiser Output (refer following section) the ESC system’s CellOutputDisplayflashesthecontrolsetting(i.e.percentageoftimethattheCelloperatesduringthefiltrationcycle) for a few seconds then resumes displaying Cell Output, or standby light (if in waiting).
3. CLEANING OF CELL – The ESC System uses a patented Electronic reverse polarity system to clean your Cell, providing the convenience of lower maintenance.
4. PUMP CUT-OUT – The ESC System features a protective interlock system which cuts off power to the pool pumpifthereisnowaterflowingthroughthecellhousing.Thisisespeciallyhelpfulifthepump‘runsdry’andhence may stop the pump motor from burning out.
TIME CLOCK
SANITISER OUTPUT DIAL

8
There are other factors that can cause the Unit not to work correctly:1. Heavy Rain-cancauseverydilutedpoolwatertopassovertheCellduetosurfaceskimming.2. Scaled Cell-ascaledCellwillnotdrawasmuchelectricalcurrentasacleanCellwhenfirststarted.3. Cold Water-coldpoolwaterreducestheabilityofaCelltocarryelectricalcurrent.(ReferWinterModebelow).4. Failing Cell-as the Cell ages there will come a time when the electrical current draw will drop. This can be
compensated for with the addition of extra salt. A Cell is considered failed when it draws less than 80 % of maximum current. To keep a failed Cell in operation Winter Mode can be used along with extra salt. There will come a time when the Cell will not respond to either extra salt or Winter Mode. It will then need to be replaced (see pg11 for replacement cell codes). Please note that the Low Salinity Indicator is not like T.D.S. meters, which are temperature compensated ScientificInstruments.Theaccuracywillbewithin500ppmsalinityandtheyarewatertemperaturedependent,justasthe Cell is.
WINTER MODE:When the Cell draws electrical current from the Power Supply, the amount of current drawn is dependent upon a number of factors. Two of these factors are Salinity and Water Temperature.
The Low Salinity Indicators on your ChloroMatic® are designed to operate at swimming season water temperatures.Whenthepoolbeginstocoolintheoff-seasonthetemperaturedropcausestheCelltobehavedifferently-itwilldrawlesselectricalcurrent.ThiscancausetheLowSalinityIndicatortoassumethatthesalinityhas fallen even if the salinity has remained relatively constant.
When the temperature of the pool water drops, the Winter Mode Switch should be placed in the ON position. The Winter Mode Indicator will then be ON. This has two effects:1. It alters the setting of the Low Salinity Indicator.2. It reduces the Cell Output by approximately 15%
The Unit will now respond to a cold pool environment. Winter Mode should not be used in the swimming season as it reduces the Cell Output, leading to less sanitiser, and it alters the setting of the Low Salinity Indicator, which could lead to premature Cell failure.
AUTOMATIC TIME CLOCK OPERATION:YourChloroMaticsaltwaterchlorinatorisfittedwithoneoftwotypesofautomatictimer
(1) Digital
(2) Analogue
(1) Models with Digital Timer:
ThedigitaltimerincludesabacklitLiquidCrystalDisplaywhichdisplaystimeofdayin12-HourformatwithAM/PM indication and a selector switch position indicator. The digital timer has up and down buttons for incremental settings.
Timer Setting and Functions:
To set your clock and various functions please refer to the table of instructions following.
NOTE:
Whenyoufirstturnonthepowertothechlorinator,itwilltakeapproximately5secondsfortheLCDtoappearonthe screen.
AM6

9
FunctionDescription
SelectorSwitch
PositionFunctions and Instructions
Set Clock 1
Set the current time on the digital clock.
Select the Set Clock position on the selector switch to enable the time of day to be input. A number ‘1’ will appear at the left of the screen.
(a)Thedisplaywillflashonandoffaslongastheselectorswitchremainsatthisposition. Use the up ▲ and down ▼ buttons to reach the desired times. Hold the buttons down for fast increments.
Set Timer 1 – ON 2
Setthestarttimeforthefirstruntimesequence.
Select the Set Timer 1 – ON position on the selector switch. A number ‘2’ will appear at the left of the screen.
Thistimeisfactorypre-setto6am.Proceedasper(a)inthe‘SetClock’instruction to change time.
To disable this timer, move up or down to 11.59PM. Press the UP button one more time to turn OFF. NOTE: This step will also disable the time for ‘Set Timer 1 – OFF’.
Set Timer 1 – OFF 3
Setthecompletiontimeofthefirstruntimesequence.
Select the Set Timer 1 – OFF position on the selector switch. A number ‘3’ will appear at the left of the screen.
Thistimeisfactorypre-setto8am.Proceedasper(a)inthe‘SetClock’instruction to change time.
Set Timer 2 – ON 4
Set the start time for the second run time sequence.
Select the Set Timer 2 – ON position on the selector switch. A number ‘4’ will appear at the left of the screen.
Thistimeisfactorypre-setto5pm.Proceedasper(a)inthe‘SetClock’instruction to change time.
To disable this timer please refer to selector switch position 2 above.
Set Timer 2 – OFF 5
Set the completion time for the second run time sequence.
Select the Set Timer 2 – OFF position on the selector switch. A number ‘5’ will appear at the left of the screen.
Thistimeisfactorypre-setto11pm.Proceedasper(a)inthe‘SetClock’instruction to change time.
To disable this timer please refer to selector switch position 4 above.
Automatic ON 6
Filtration system switches on and off automatically according to your set times.
Select the Automatic ON position on the selector switch. A number ‘6’ will appear at the left of the screen.
Manual ON 7
OverridestheautomatictimeclocksettingsandswitchesfiltrationsystemON.
Select the Manual ON position on the selector switch. A number ‘7’ will appear at the left of the screen.
NOTE: Chlorination will be constant until turned OFF or back to Automatic ON. Over chlorination may occur if left for long durations.
OFF 8
OverridestheautomatictimeclocksettingsandswitchesfiltrationsystemOFF.
Select the OFF position on the selector switch. A number ‘8’ will appear at the left of the screen.
NOTE: Chlorination / sanitisation will cease. Not recommended for long durations.

10
(2) Models with Analogue TimerIfyourPowerSupplyisfittedwithananaloguetimeclocktheoperatingtime(s)canbeeasilysetbypushingthesmallpinsforwardorbackwardstothedesiredoperatingtime(s).Theunitcomespre-setfor8hoursoperationperday.TheON-OFF-AUTOswitchfunctionsasfollows:
On- Over-ridesautomatictimeclock,FiltrationSystemswitchedon.Off- Over-ridesautomatictimeclock,FiltrationSystemswitchedoff.Auto- FiltrationSystemswitchesonandoffautomaticallyaccordingtotimesset.
OPTIONAL POOL LIGHT TRANSFORMER:
Power connections and wiring must be carried out by an authorised electrician.
Your Davey ChloroMatic®isfittedwithoneoftwotypesofpoollighttransformerconnectionsasfollows:-
TYPE 1: TERMINAL BLOCK CONNECTION BEHIND COVER PANEL BELOW DOOR
(a) 12V – Operates only 12 volt lights.
TakeoffCoverPanelbelowDoorbyremovingthetwoself-tappingscrewsatbottom.
•12Vconnections:
- InsertthetwowiresfromyourpoollightintoeitherofthewireterminalsoftheTerminalBlockprovided.Fasten screws.
•Multi-voltageconnections:
- Refertotableanddiagrambelowforwiringinstructions.
Please Note: Only one light can be connected to each light transformer. If more than one light is required please refer to your ChloroMatic® dealer.
TYPE 2: BLACK & RED TERMINAL SOCKET IN BASE OF UNIT
This terminal socket may accept light connection in two ways:
• “Banana”plugsintothebottomoftheterminal
• Wiresintotheterminalholesatrightangles,andfastenedbyscrew
SAFETY NOTICE
IMPORTANT Certain local electrical regulations state “If the supply cord is damaged, it must be replaced by a special cord available from the manufacturer or its service agent”.
MAINTENANCE OF POWER SUPPLY:Little or no maintenance is normally required with the exception of replacing blown Fuses. These Fuses can be sourced from your local ChloroMatic® Dealer. However it is essential that the wall or post to which the Unit is installed be sprayed (not the Unit itself) periodically with a good surface type insect repellent, since penetration by insects may cause damage, which is not covered by your warranty.The back of the Unit has been designed as a heat sink. It is normal for this area to become very hot.

11
MAINTENANCE OF ELECTROLYTIC CELL:The cell is composed of precious materials, and although proper maintenance can prolong its life to the maximum, eventually the process of electrolysis will wear away its delicate coating, at which time it gradually ceases to produce chlorine.
Mineral salts and calcium (scale) are deposited on the outer and the inner plate as electrolysis takes place. This buildup–willinterferewiththeflowofelectricalcurrentintheCellandthuslowerssanitiserproduction.Itisessential to inspect the Cell regularly and clean when necessary. The rate at which deposits will form on the plate differswitheachpoolandcanbeinfluencedbythefollowing:
• Calciumhardnessofthewater• WaterTemperature• pHcontrol• Waterwhichhasbeenchlorinatedwithcalciumhypochloriteforanextendedperiod• Calciumintheplastersurfacesofaconcretepool
Because these conditions vary so much, check the Cell at least weekly to begin with to see when either scale or a blue/green soapy substance appears on the plate. You will then be able to determine the cleaning cycle necessary for your pool (obviously more in summer). The intervals between cleaning could get longer to the point where cleaning is only necessary a few times each year. One exception is the use of bore water or ground water, in which case cleaning may always need to be as frequent as once a week.
NOTE: In areas with hard water, reverse polarity systems may require occasional manual cleaning.
Life of ChloroMatic® electrolytic cells vary substantially from one installation to another due to variations in operating time, water quality and composition, system and cell maintenance. Please ensure that when cell replacement is necessary you use the correct genuine ChloroMatic® replacement cell to match your system. Due to increased cell output reverse polarity Model ESC40 cells will require earlier replacement than ESC24 Models operating under equivalent conditions. Model ESC40 systems use the same cell as the ESC24. The correct ChloroMatic® Replacement cells to use are:
ChloroMatic® ESR Standard ChloroMatic® ESC / ESCpH: Reverse Polarity Cells
ESR Standard SystemsModel
ESR Replacement CellModel to order Code
ESC / ESCpHSystems Model
ESC Replacement CellModel to order Code
110 110 M0741 16 16 M0656
160 160 M0753 24 24/36/40 M0657
200 200 M0755 36 24/36/40 M0657
300 300 M0759 40 24/36/40 M0657
50 50 M4922
To clean the cell: Turn off chlorinator. Remove all leads connected to the Head Assembly. Unscrew the Cell by turning the Head Assembly clockwise – as per instructions, and withdraw from the Cell Housing.
METHOD 1Add 1 part HYDROCHLORIC ACID to 10 parts WATER in a suitable container and immerse the Cell in this solution. It should not take longer than a few minutes to clean, if it does the Cell should be cleaned more frequently.Ifthebuild–upisnotexcessiveitmaybepossibletocleanthecellplateswithajetofrunningwater.Return the Cell to its Housing and connect leads to the Head Assembly.

12
METHOD 2 As an alternative, an approved commercial Cell cleaning solution can be used a number of times effectively.
SAFETY DEVICE:Hydrogen Gas is a by – product of the chlorine producing process. A Gas Sensor has been incorporated into the UnitandCell,whichwillswitchoffchlorinationifgasisdetectedintheCellHousingorthereisnowaterflow.ChloroMatic®UnitsarealsofittedwithaThermalCut–Outtopreventoverheating.Ifthetemperaturerisestoohigh, power is automatically disconnected. The Unit will resume operation when it cools down.
DAY TO DAY OPERATION:Four Prime rules must be observed if your unit is to give the best possible service:
1. STABILISERThe importance of pool stabiliser cannot be over – emphasised. It is essential in helping retain chlorine in your pool. Chlorine is rapidly dissipated by sunlight and the use of stabiliser will reduce this dissipation substantially. Without stabiliser, it may be necessary to run the Unit for up to three times as long!
Stabiliser should be added at the rate of 500 grams for every 10,000 litres of water. Stabiliser should be maintained at a level of 30 – 50 ppm. Before adding more stabiliser, have your pool water analysed at your pool shop to ensure that you do not add too much.
2. pH AND TOTAL ALKALINITY:A correct pH level must be maintained to prevent problems such as black spot, staining, cloudy water, etc. An incorrect pH level can damage the pool. Correct pH levels are as follows; Fibreglass – 7.2 to 7.4 Concrete & tiled – 7.4 to 7.6 If you allow the pH level to rise to 8.0 or above, the chlorine required could be as much as three times the normal amount.
Total Alkalinity should not be confused with pH, although the two are closely related. Total Alkalinity determines the speed and ease of pH change. It is measured in ppm – the ideal range is 80 – 150 ppm, or refer to your pool professional.
You should use a test kit which includes a test for Total Alkalinity. Low Total Alkalinity can cause unstable pH levels – i.e. An inability to keep the pH constant may cause staining, etching and corrosion of metals. High Total Alkalinity will cause constantly high pH levels.
3. SALT LEVELS:
SaltistheessentialelementbywhichyourUnitoperates.Notenoughsaltmeansnotenoughchlorine-thissimplerule governs the total operation of your ChloroMatic®,andinsufficientsaltwilldamageyourCell.
RECOMMENDED SALT LEVEL RANGE: 4000-6000ppm
WARNING: Follow safety instructions provided with the Hydrochloric Acid or cleaning solution. When handling Hydrochloric Acid, the use of eye protection, mask and gloves are highly recommended. Extreme caution should be taken whenever handling Hydrochloric Acid or Cell Cleaning Solution.
Warning: Some people recommend that you put salt directly in the skimmer box. This is a very poor practice as it allows very high concentrations of salt to be passed through your filtration and other pool equipment.

13
SaltisNOTusedupintheprocessofproducingchlorineorbyevaporation.Saltisonlylostthroughback-washing,splash-out,overfloworbyleakagefromthepoolorplumbing.Winterrainscandilutethesaltsolutioninyour pool; therefore salt levels should be checked during this season. In colder water, the ChloroMatic should be set to Winter Mode. (Refer Winter Mode page 8).
Low salt levels will destroy the coating on the Anode plates and will void all Warranty. The ChloroMatic®hasbuiltinwarningindicatorstominimisedamageresultingfrominsufficientsaltlevels,however, the ultimate responsibility is on the owner to ensure adequate salt levels are maintained all year round.
4. RUNNING TIMES:These instructions cover ChloroMatics for residential use only.If you run your chlorinator for 24 hours a day, or for long periods, the Cell life will be greatly reduced. It is important that the correct model ChloroMatic® has been installed on your pool. Many models are available to cope with small courtyard pools up to commercial applications. (Consult your local ChloroMatic® Dealer for more information).
CHLORINE PRODUCTION:The ChloroMatic®mustberundailytogeneratesufficientchlorinetosanitisethepool.DuringSummerthisisapproximatelyeighthoursperday,preferablyintwoperiods-between6.00and8.00amandbetween5.00and11.00pm. Night time is preferable because chlorine dissipates rapidly in direct sunlight. If these running times are observed,andtheCellisfunctioningcorrectly,yourpoolwillhavesufficientchlorinewhentestedinthemorning.
If the level is too low either longer running times are required or the Sanitiser Output Control needs to be adjustedtomaximum.Harshlocalconditionssuchastrafficpollutionorwindbornedustrequiredifferentrunningtimes, in which case, seek advice from your pool shop. During Winter approximately 4 to 6 hours a day should provideenoughchlorine.Withoutsufficientfiltration/chlorination,yourpoolwillneverfunctioncorrectly.ALWAYS RUN THE FILTER WHEN SWIMMING IN THE POOL. In extremely hot weather or during periods of heavy bathing loads,therunningtimemayneedtobeextendedto10-14hoursperday.
Insomecasesyoumayfindyourchlorineleveltobetoohigh.Todetermineifthisisthecase,runyourfilter/chlorinator for the suggested times/chlorine production level and test your pool water on the morning after operation. If your chlorine test shows a high level of chlorine, either the running times can be reduced slightly, or the Sanitiser Output Controlcanbeturnedanti-clockwise.Testyourchlorinelevelagainthefollowingmorningat around the same time. If your chlorine level is still high, repeat the above process until the correct level is attained.
“SHOCK” TREATMENT:Periodically, especially during extremely hot conditions, it may be necessary to boost the amount of chlorine in your pool in order to maintain absolute sanitation of the water. This can be achieved by adding either liquid or granulated chlorine. If granulated chlorine is added, the Cell must be checked regularly, since the additives from this product will clog the electrodes. Alternatively, extend the running time of your ChloroMatic®.
CHLORINE TYPES AND COMPARISONS / MAX POOL SIZE:Many chlorinator manufacturers calibrate their units to compare with 65% granulated chlorine, making it necessary toadjusttheirreadingstoalowerlevelinordertodeterminetruechlorineproduction.TheDisplayonyourChloroMatic® expresses production as pure 100% chlorine so you will know the exact output of your Unit. Below is a comparison table of the available types of chlorine used to sanitise pools.
ChloroMatic®
Production maximum
grams/hour (100%)
Production* grams/
hour (65% equivalent)
Chlorine produced
over 8 hoursgrams(100%)
Equivalent in dry granulated
chlorinegrams(65%)
MAX POOL SIZE (litres)
Model ESR
Model ESC
pHCOOL
CLIMATESTEMPERATE CLIMATES
HOT & TROPICAL CLIMATES
110 11 17 88 136 55,000 34,000 24,000
160 16 16 16 25 128 200 80,000 50,000 35,000
200 20 31 160 248 100,000 62,000 44,000
240 24 24 24 37 192 296 120,000 75,000 55,000
300 30 46 240 368 150,000 94,000 66,000
36 36 36 55 288 440 180,000 112,000 80,000
40 40 62 320 496 200,000 125,000 100,000
50 50 67.5 351 579 250,000 200,000 160,000

14
COMMON TERMS:
Algae-Microscopicformsofplantlifewhichenterthepoolbyrain,windanddust.Therearenumerousvarieties-somearefreefloatingwhilstothersgrowonwallsandincracksandcomeindifferentcolours.Somearemoreresistant to chemical treatment than others.
Bacteria-Thegermsthatcontaminateyourpool.Introducedbyswimmers,dust,rainstormsandotherelements.
Balanced Water-ThecorrectratioofmineralcontentandpHlevelthatpreventspoolwaterfrombeing-corrosiveor scale forming.
Chloramines-Compoundsformedwhenchlorinecombineswithnitrogenfromurine,perspiration,etc.Chloramines cause eye and skin irritation, as well as unpleasant odours.
Chlorine Demand-Thechlorinerequiredtodestroygerms,algaeandothercontaminantsinthepool.
Chlorine Residual-Theamountofchlorineremainingafterchlorinedemandhasbeensatisfied.Thisisthereading obtained with your test kit.
Cyanuric Acid-Alsoknownasstabiliserorconditioner.Itreducesdissipationofchlorinebydirectsunlight.
Liquid Acid-ChemicalusedtoreducethepHandtotalalkalinityinthepoolwater,andforcleaningchlorinatorCell.
ppm-AnabbreviationforPartsPerMilliontheacceptedmeasurementofchemicalconcentrationinswimmingpoolwater.Ippm-lmg/L.
The appropriate chlorinator size for your pool is dependent on the local climate and the bather load of the pool. Please note that chlorinator cell life can be increased with shorter running times during winter and loweroutputsettings.Daveyrecommendsthatachlorinatorisrunforbetween6-8hoursadayduringsummer, and 4 hours during winter.
GENERAL INFORMATION:
NOTE:
RECOMMENDED POOL WATER CHEMISTRY
POOL WATERBALANCING
Free Chlorine(ppm) pH Total Alkalinity TA
(ppm)Calcium Hardness
(ppm)
Stabiliser – Cyanuric Acid
(ppm)
Optimum Salt Level
(ppm)
Ideal Reading / Range 1 – 3
Concrete & Tiled Pools: 7.4-7.6
Other Surfaces:7.2-
Concrete & Tiled Pools–80-120.Other Surfaces –
125-150
Concrete & Tiled Pools–200-275.Other Surfaces –
100-225
25 – 50 4000 – 6000
To Increase
Increase output of chlorinator. Add
chlorine. Increase filtrationtime.
Add buffer or soda ash
(Sodium Carbonate)
Add Sodium Bicarbonate
Add Calcium Chloride
Add CyanuricAcid Add Salt
To Decrease Add Muriatic Acid
Add Muriatic Acidor Dry Acid
Partially drain & refillpoolwithlowerhardness water to
dillute
Partially drain &refillpoolto
dillute
Partially drain &refillpool
to dillute
Frequency of Testing Weekly Weekly Weekly Weekly Regularly Regularly

15
ChloroMatic® ESC-pH SYSTEMTheESC-pHunitisacombinationoftheESCChlorinatorandapHController.Pleaserefertotherelevantchapterin this Manual for information on how to operate the chlorinator. It should be noted that there are minor differences in chlorinator operation as compared with the standard ESC system described in this Manual. The Chloromatic ESCpH unit does not display the output control setting or include run dry pump protection.ThepHControlsystemfunctionsarelocatedontheChloromaticinstrumentpanelinthedark-colouredareamarked “pH CONTROL”.
LED DIGITAL DISPLAY
■ The digital display is used to provide information on the chlorinator output, pH and pH set point. ■ The display will alternately show the chlorine production and pH■ When the pH Control switch is placed in the SET position the display will show the pH set point
FEED & pH STATUS LEDs
ThepHSTATUSLEDisusedtoindicateifthepHiswithinarangeof±0.3pHofthesetpoint.IfthepHismorethan0.3pHabovethesetpointtheLEDwillflashred/green.IfthepHislessthan0.3pHbelowthesetpointtheLEDwillflashred.
The FEED STATUS LED is used to indicate the operation of the acid dosing pump: RED ACID PUMP OFF GREEN ACID PUMP AVAILABLE GREEN FLASHING ACID PUMP DOSING
pH CONTROL
The control switch has three positions:■ RUN – In this position the acid dosing pump will operate according to the value of the pH set point and
measured pH■ SET –Thiswillallowadjustmentofthecontrollersetpointusingadjustmenttool.Turnclockwiseto
increasethesetpoint.Notethatacidpumpisoffwhenadjustingsetpoint■ OFF – Disables the acid dosing pump and control functions
IMPORTANT NOTES:1. The ChloroMatic guarantee does not apply to commercial or semi-commercial installations, i.e. where the system runs more than an average of 8 hours per day over the year. Guarantee on commercial and semi-commercial installations is 12 months only on both power supply and cells.
2. ALWAYS INSIST ON GENUINE CHLOROMATIC REPLACEMENT PARTS. If it is necessary to replace the Electrolytic Cell, beware of “look alikes”. Only the Genuine ChloroMatic Cell is designed and warranted to operate with the ChloroMatic Power Supply.
SERIOUS DAMAGE MAY RESULT TO THE ELECTRONICS INSIDE THE UNIT IF COPY ELECTRODES ARE USED AND WILL VOID WARRANTY.
TROUBLE SHOOTING:
No Chlorine Production - Check for
1. Main power outlet switched off
2. Chlorinator not plugged into main outlet
3. Pump not plugged into Chlorinator
4. Time Clock set to Off position/Power switch turned Off
5. Sanitiser Output Control turned to lowest setting
6. Chlorinator fuse blown
7. Dirty Cell
8. Filter needs backwashing
9. Gas Sensor not connected
10. Running times incorrect
11. Main house fuse blown
12. Pump motor faulty
Low Chlorine Production - Check for
1.DirtyCell-cleanifrequired
2. Filter needs backwashing
3. Display not at correct production level/Cell failing
4. Winter Mode turned On
5. Pool stabiliser too low
6. pH too high
7. Salt level too low
8. Chloromatic running time inadequate
9. Sanitiser output control set too low

16
SIMPLE DESCRIPTION OF OPERATION
The pH control has been designed to provide an acid feed in proportion to the difference between the actual pH and the pH set point. The control also operates on a cycle to allow the acid being fed to mix with the pool water. Thecycleisapproximatelyfiveminutesduration.IfthepHis0.3pHormoreabovethesetpHatthestartofacycle the acid dosing pump will operate continuously until the pH falls below the set point plus 0.3pH. When this happens the amount of time the pump operates each cycle will reduce as the pH gets closer to the set point. The acid dosing pump will turn off when the set point is reached. The proportional system is designed to keep pH relatively constant with little or no overshoot (pH falling below the set point). The Total Alkalinity (TA) plays a vital role in the maintenance of the pH. A low TA can distort the reading the unit receives from the sensor probe, and as a result excessive acid may be fed into the pool. ALWAYS MAINTAIN TA ABOVE 100ppm.
INSTALLING THE PUMP MODULE:
IMPORTANT: KEEP BARE HANDS AWAY FROM POOL ACID AND ALWAYS USE CAUTION WHEN HANDLING POOL CHEMICALS.
1. Select a convenient position within 2 metres of the ESCpH Control Unit, and 1.5 metres above ground level. Ensure chemical drum is placed as far away as possible from the Control Unit and Pump Module to avoid corrosive damage. Control Unit and Pump Module must be a minimum of 1.0 metre horizontally from drum.
2. Use the same mounting procedures as for the Control Unit. (Refer page 4).
3. Connecting Pump Module to Control Unit. Plug the mains lead into the GPO in the bottom right of the unit (marked ‘pH pump module only’.)
4. Remove cap from drum and clean in water.
5. Drill a 9mm hole through the centre of cap. Feed the clear tube through the cap, then the tube weight, then the barbedfitting.Pushenoughtubethroughthecaptoallowthetubeweighttositatthebottomofthedrum.
6. Re-fitcaptoaciddrum.
7. Place chemical drum away from the Control Unit and Pump Module to avoid possible corrosive damage from chemical vapour. Minimum distance horizontally between Pump Module and Chemical Drum is 1.0 metres.
8. UsingPVCcementfitProbe/InjectorHousingtosuctionorreturnline(beforethecellandensureprobeishorizontal to the ground). NOTE: if return has a high backpressure use the suction line. The Housing has 50mmstandardfittingswithreducerssuppliedfor40mmapplications.EnsureHousingisfittedwitharrowspointinginthedirectionofwaterflow.
IMPORTANT: ENSURE SENSOR PROBE ALWAYS REMAINS MOIST. A NON-RETURN VALVE MAY NEED TO BE FITTED IN POOL FILTRATION LINE TO STOP DRAINAGE IN THE PLUMBING. SENSOR PROBE MAY BE DAMAGED BEYOND REPAIR IF LEFT TO DRY OUT. WARRANTY WILL BE VOID IF THIS TYPE OF DAMAGE IS APPARENT.
9. Remove cap from sensor probe and discard travel solution. Remove plug from housing and carefully screw pH Sensor into housing. Keep cap in a safe place for future sensor removal. Note: The glass sensor on the pH probe is very delicate. Take care not to break when handling.
10. Connect wire from sensor probe to the connector on the base of the control unit. Ensure water (garden sprayers, reticulation etc) does not splash or spray onto the connector. This is likely to cause erroneous operation and may damage the sensor probe, voiding warranty.
11. FitInjectortoHousingandconnectthe6mmdiametercleartubes.CutCleartubecanbesoftenedinhotwaterto enable easier connection. Tube may change colour and/or become opaque in use. A one way check valve mayberequiredifinstallingonafloodedsuctionsituation.
12. Push tube onto barb connectors of dosing pump nearest arrows facing down and secure with plastic clamps provided.
13.Connectcleartubefromthechemicalcontainersthenfittubeasdescribedpreviously.
14. Ensure that hydrochloric acid is diluted by 1 Part Acid to minimum of 2 Parts water, if using Sulphuric Acid it must be no greater than 10% strength.
INITIAL SET-UP
1. After installation leave pH Control off and run pool pump for an hour. While this is being done it is a good time to ensure that the pool balance is correct.
2. Using a pool test kit measure the pH.
3. UsingthetoolsuppliedadjustCALuntilthepHdisplaymatchesthetestkitresult.Thedisplaywillalternatebetween pH and the chlorine cell production so this may take a little time to get right.

17
4. SwitchthepHControltoSETandadjusttothedesiredpHifnecessary.NOTE:forconcretepoolsitispossiblethat a pH set point of around 7.4 or below will lead to high acid consumption and frequent additions of buffer. To reduce this effect a set point of 7.7 may be more economical.
5. Switch pH Control to RUN and allow unit to operate.
6. RetestpoolpHwithtestkitoverthenextfewdaystofinetunecontrolifnecessary
7. Important – correct maintenance of pH requires the Total Alkalinity of the pool to be above 100ppm. Failure to maintain TA above this level may result in excess acid being injected into the pool which can have undesirable effects.
MAINTENANCE OF SENSORS AND PUMP MODULE
The pH Sensor can become fouled and/or scaled depending on the water quality and bather load of the pool. To clean the sensor it is necessary to wash it in a solution of 1 part hydrochloric acid and 9 parts water. Take care with the acid and read the warnings on the acid container. Dip the end of the sensor in the solution and move it around for about 20 seconds. Rinse the sensor and return it to the manifold.
The pH Control should be turned off for at least 30 minutes to allow the sensor to settle. Check that it is reading correctly and calibrate if necessary. The pH Control can now be turned on.
The Pump Module uses a “squeeze” tube to pump the acid into the pool. This tube is perishable and must be replaced periodically. We recommend replacement approximately once per year. The tube should be visually inspected regularly for leaks or damage. Tube replacement is simple:
1 Disconnect acid lines (take care to avoid acid in lines) and remove the pump clear cover2 Rotate roller arm by hand until it is vertical and pull bottom tube ends from the pump.3 Rotate the roller arm until the squeezed section of the tube can be removed4 New tube is inserted into the pump in reverse of removal procedure.
For further information on the operation and maintenance of the Davey Peristaltic Pump, please refer to the Peristaltic Pump Installation & Operating Instructions included with your ChloroMatic®.
Flow
Flow

18
Notes & Service History:

19

Davey® Repair or Replacement GuaranteeIn the unlikely event in Australia or New Zealand that this Davey product develops any malfunction within warranty periods beginning from the date of original purchase due to faulty materials or manufacture, Davey will at our option repair or replace it for you free of charge, subject to the conditions below.
Should you experience any difficulties with your Davey product, we suggest in the first instance that you contact the Davey Dealer from which you purchased the Davey product. Alternatively you can phone our Customer Service line on 1300 367 866 in Australia, or 0800 654 333 in New Zealand, or send a written letter to Davey at the address listed below. On receipt of your claim, Davey will seek to resolve your difficulties or, if the product is faulty or defective, advise you on how to have your Davey product repaired, obtain a replacement or a refund.
Your Davey Guarantee naturally does not cover normal wear or tear, replacement of product consumables (i.e. mechanical seals, bearings or capacitors), loss or damage resulting from misuse or negligent handling, improper use for which the product was not designed or advertised, failure to properly follow the provided installation and operating instructions, failure to carry out maintenance, corrosive or abrasive water or other liquid, lightning or high voltage spikes, or unauthorized persons attempting repairs. Where applicable, your Davey product must only be connected to the voltage shown on the nameplate.
Your Davey Guarantee does not cover freight or any other costs incurred in making a claim. Please retain your receipt as proof of purchase; you MUST provide evidence of the date of original purchase when claiming under the Davey Guarantee.
Davey shall not be liable for any loss of profits or any consequential, indirect or special loss, damage or injury of any kind whatsoever arising directly or indirectly from Davey products. This limitation does not apply to any liability of Davey for failure to comply with a consumer guarantee applicable to your Davey product under the Australian or New Zealand legislation and does not affect any rights or remedies that may be available to you under the Australian or New Zealand Consumer Legislation.
In Australia, you are entitled to a replacement or refund for a major failure and for compensation for any other reasonably foreseeable loss or damage. You are also entitled to have the goods repaired or replaced if the goods fail to be of acceptable quality and the failure does not amount to a major failure.
Should your Davey product require repair or service after the guarantee period; contact your nearest Davey Dealer or phone the Davey Customer Service Centre on the number listed below.
For a complete list of Davey Dealers visit our website (davey.com.au) or call:
* Installation and operating instructions are included with the product when purchased new. They may also be found on our website.
P/N MMAN008-5 supersedes P/N MMAN008-4
AUSTRALIA
Davey Support Centre6 Lakeview Drive,Scoresby, Australia 3179Ph: 1300 367 866Fax: 1300 369 119Website: davey.com.au
Davey Water Products Pty LtdMember of the GUD GroupABN 18 066 327 517
NEW ZEALAND
Davey Support Centre7 Rockridge Avenue,Penrose, Auckland 1061Ph: 0800 654 333Fax: 09 527 7654Website: daveynz.co.nz
® Davey & ChloroMatic are registered trade marks of Davey Water Products Pty Ltd.© Davey Water Products Pty Ltd 2012.
Davey Guarantee Period
Power Supply - Two Years pH Pump Module - One Year Electrolytic Cell - Three Years Sensor Probe - Three Years