check services reference guide one intellix ® check services reference guide 3 introduction to...
TRANSCRIPT

Check Services Reference Guide

Table of Contents
Introduction to Check Services 3
Reviewing the Check Management Screen 4
Performing a Check Inquiry 5 Viewing a Check Image 7
Stop Payments 8 Placing a Stop on a Check 8 Canceling a Stop Payment 10 Approving Stops and Canceled Stops 12
Submitting Check Issue and Void Information to the Bank 13 Entering a Single Check Issue or Void 13 Entering Multiple Check Issues and Voids 15 Approving Issues and Voids 16 Uploading a Check Issue/Void Information File 18 Creating a Custom Import Map 19 Importing Check Issue and Void Information 22 Approving an Imported Check Issue/Void File 24
Making Positive Pay and Reverse Positive Pay Decisions 25 About Positive Pay Decisioning 25 About Reverse Positive Pay Decisioning 25 Making Decisions on Positive Pay or Reverse Positive Pay Exceptions 25 Viewing Decision History 30 Approving Positive Pay and Reverse Positive Pay Decisions 31
Creating a Check Management Alert 33 Check Management Reports 34
Capital One Intellix® Check Services Reference Guide 2

Capital One Intellix® Check Services Reference Guide 3
Introduction to Check Services
Check Services provides the ability to:
• Perform a check inquiry and request check images
• Place or cancel a stop payment
• Enter check issue and void information and import check issue files for account reconciliation and positive pay
• Review positive pay exception items
• Make positive pay and reverse positive pay decisions
• Setup Check Management alerts
These functions are accessed through the Services g Check Services menu.
Your access to the different features and information within Check Services is based on your organization’s entitlements and policies as well as your specific permissions.

Capital One Intellix® Check Services Reference Guide 4
This is one of the central screens where various types of check items can be viewed and managed, such as:
• Actions: Clicking the drop-down arrow under Actions allows you to view, approve or delete an item
• Type: Describes the item type such as: Check Issue, Place Stop, Cancel Stop or Check Void.
• Account Number: The debit account.
• Serial # From: The serial number of the check. For a stop or cancel stop order that applies to multiple checks, the first serial number.
• Serial # To: For a stop or cancel stop order that applies to multiple checks, the last serial number.
• Amount: The amount of the check.
• Issue/Void Date: The date of the check issue or check void.
• Memo: The memo for the entry.
• Entered By: The user who created the item.
• Payee Name: The name of the payee.
• Status: The current status of the item. Possible statuses include: • Entered: The item has been entered, but needs to be approved. • Approved: The item has been approved. • Bank Confirmed: The bank has processed the item. • Deleted: The item has been deleted. • Partial Success: This indicates that the processing of a stop payment or cancel stop request was
partially successful.
Reviewing the Check Management Screen
When you select Check Management from Services g Check Services, the Check Management screen displays.

Capital One Intellix® Check Services Reference Guide 5
Performing a Check Inquiry
The Check Inquiry function allows you to retrieve information about checks from the bank system. Depending on the status of the checks you inquire about, you can carry out various actions on those checks.
Select Inquiry from the Services g Check Services menu. The Check Inquiry Filter screen displays.1
2
3
Select the account on which you wish to filter.
Select at least one additional criteria on which to filter (Serial Number, Amount, and/or Date).

Capital One Intellix® Check Services Reference Guide 6
Click View Results.
Check information that matches the filter criteria displays.
• Actions: Clicking the drop-down arrow under Actions allows you to view the item. If the status of the item is stopped, then Cancel Stop is also a choice.
• Status: The current status of the item. Possible statuses include: • Stopped: Indicates that payment has been stopped on this check. • Paid: Indicates that the check has been paid.
• Serial Number: The serial number of the check. For a stop or cancel stop order that applies to multiple checks, the first serial number.
• Amount: The amount of the check.
• Paid/Stop Date: Date the check was paid or stopped.
• Issue Date: This field is not used at this time.
• Payee Name: This field is not used at this time.
4
Capital One Intellix® Check Services Reference Guide 7
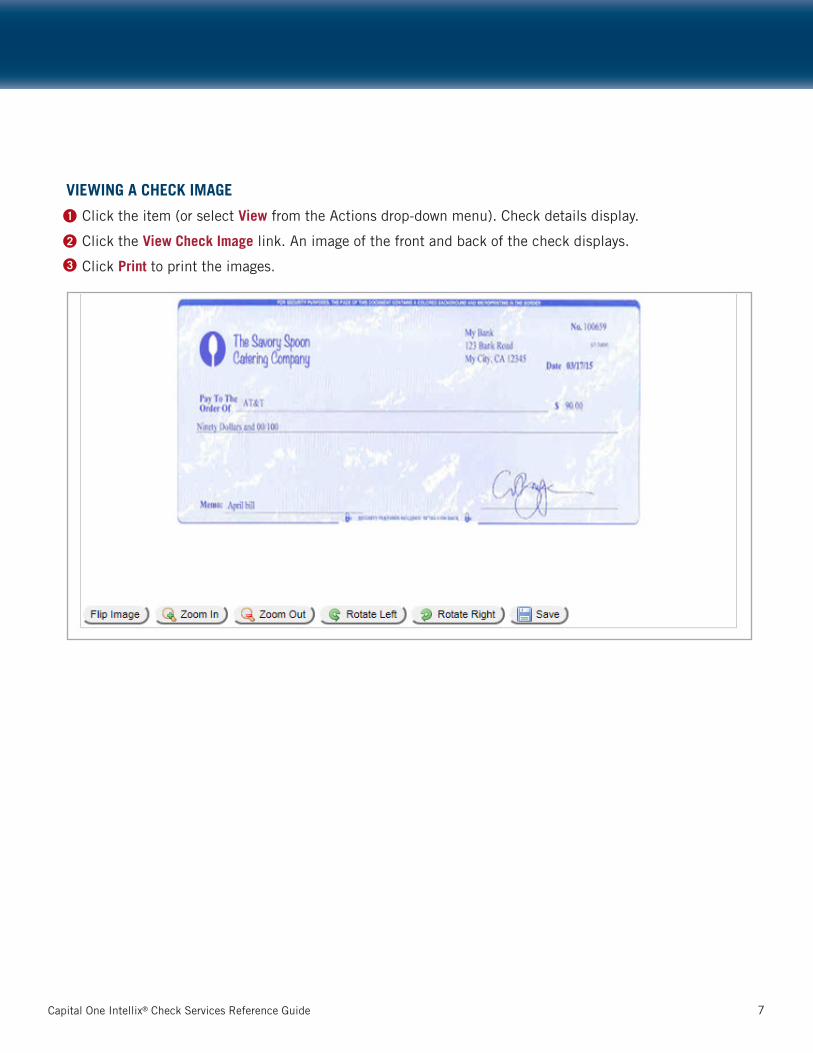
VIEWING A CHECK IMAGE
Click the item (or select View from the Actions drop-down menu). Check details display.
Click the View Check Image link. An image of the front and back of the check displays.
Click Print to print the images.
1
2
3

Capital One Intellix® Check Services Reference Guide 8
Stop Payments
PLACING A STOP ON A CHECK
Select Create Check Entry from the Services g Check Services menu. 1
2 Select Place Stop from the Check Type field. Additional criteria fields display.

In the Account Number field, enter or select the debit account. The Account Name will display.
Enter an optional Memo. Details entered in the Memo field is for internal use only, and will be stored with the transaction but not forwarded with the stop.
Enter the starting and ending serial numbers of the checks that need to be stopped. A single check number or a range can be entered.
Select a reason for the stop from the Reason field.
The Stop Duration automatically populates to six months; this is the only duration for which a stop can be placed.
Click Submit. If your organization’s policy is such that a separate approval needs to be made, then the stop payment will be in an “Entered” status and will need to be approved; otherwise, the stop payment is approved and sent to the bank.
Capital One Intellix® Check Services Reference Guide 9
3
4
5
6
7
8
Capital One Intellix® Check Services Reference Guide 10
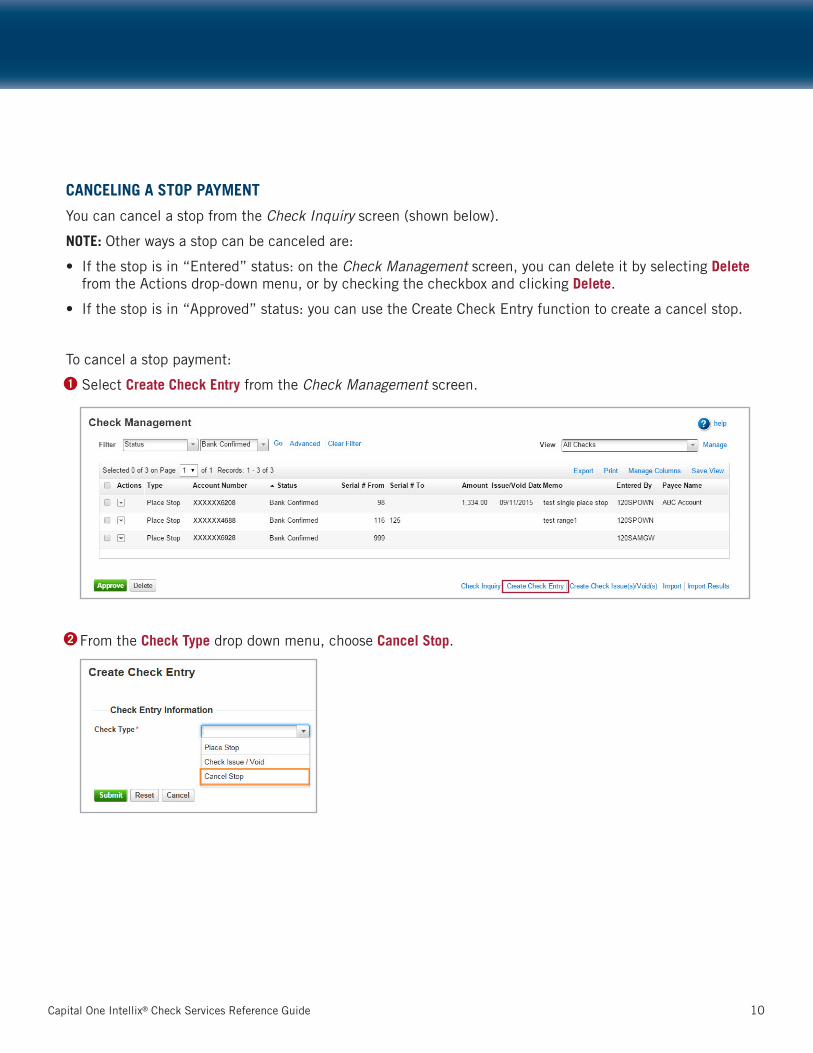
CANCELING A STOP PAYMENT
You can cancel a stop from the Check Inquiry screen (shown below).
NOTE: Other ways a stop can be canceled are:
• If the stop is in “Entered” status: on the Check Management screen, you can delete it by selecting Delete from the Actions drop-down menu, or by checking the checkbox and clicking Delete.
• If the stop is in “Approved” status: you can use the Create Check Entry function to create a cancel stop.
To cancel a stop payment:
Select Create Check Entry from the Check Management screen.
From the Check Type drop down menu, choose Cancel Stop.
1
2

Capital One Intellix® Check Services Reference Guide 11
Enter a Memo to explain why the Stop is being canceled.
Enter the Serial Number (or range of Serial Numbers).
Click Submit. The Canceled Stop will be in an “Entered” status and must be approved to be sent to the bank.
3
4
5

Capital One Intellix® Check Services Reference Guide 12
APPROVING STOPS AND CANCELED STOPS
For organizations that require a separate approval for Place Stops and/or Cancel Stops, follow the steps in this section for instructions on approving. For approvals, the process begins at the Check Management screen.
Select Check Management from the Services g Check Services menu. Only items with a status of “Entered” are eligible for approval.
1
2
3
NOTE: You can filter the Check Management list to only view items in “Entered” status.
A single item can be approved by selecting Approve from the Actions drop-down menu; multiple items can be approved by selecting the checkboxes of the items you wish to approve and clicking Approve.
Click Close on the confirmation screen.
NOTE: Prior to the cut-off time, approved items can be unapproved.

Capital One Intellix® Check Services Reference Guide 13
Submitting Check Issue and Void Information to the Bank
For organizations with Positive Pay or account reconciliation, check issue information needs to be submitted to the bank to be compared with checks presented to the bank for payment. You can also void check issues previously submitted to the bank. This information can be submitted to the bank in two ways:
• By manually entering these details and submitting to the bank
• By importing details and submitting to the bank; this includes using a System Import Map or creating a Custom Import Map
ENTERING A SINGLE CHECK ISSUE OR VOID
Select Create Check Entry from the Services g Check Services menu.
Select the Check Issue/Void from the Check Type field. Additional fields display to enter details about the check issue or void.
1
2

Capital One Intellix® Check Services Reference Guide 14
Complete the Check Detail.3
NOTE: The Memo field is for internal use only and will be stored with the transaction.
Click Submit. A Confirmation displays and you can close it, print details or create another check entry.
If your organization’s policy is such that a separate approval needs to be made, then the check issue/void will be in an “Entered” status and will need to be approved; otherwise, the check issue/void is approved and sent to the bank.
NOTE: The bank processes check issue and void information about every 75 minutes starting at 7:45 AM ET with a cutoff of 5:45 PM ET.
4

Capital One Intellix® Check Services Reference Guide 15
ENTERING MULTIPLE CHECK ISSUES AND VOIDS
Select Create Check Issues & Voids from the Services g Check Services menu. The Create Check Issues/Voids screen displays:
Select the Account. The account name appears below the chosen Account Number.
Enter a memo (optional).
Enter the following required information: A. Select Issue or Void from the Issue/Void field. B. Enter the Serial Number of the check. C. Enter the Amount of the check. D. Enter the Issue/Void Date. E. Enter the Payee Name.
To add information for additional check issues and voids, click the Add Entry link.
1
2
3
4
5

Capital One Intellix® Check Services Reference Guide 16
Click Submit Entries when complete. A Confirmation displays and you can close it, print details or return to the Check Management screen.
If your organization is set up with Dual Approval, a separate person will need to approve the submitted check issues/voids; if not, the check issues/voids are approved and sent to the bank.
NOTE: The bank processes check issue and void information about every 75 minutes starting at 7:45 AM ET with a cutoff of 5:45 PM ET.
APPROVING ISSUES AND VOIDS
For organizations that require a separate approval for Check Issues and/or Check Voids follow the steps in this section. Approvals begin at the Check Management screen.
Select Check Management from the Services g Check Services menu. Only items with a status of “Entered” are eligible for approval.
NOTE: You can filter the Check Management list to only view items in “Entered” status.
1
6

Capital One Intellix® Check Services Reference Guide 17
A single item can be approved by selecting Approve from the Actions drop-down menu; multiple items can be approved by selecting the checkboxes of the items you wish to approve and clicking Approve.
Click Close on the confirmation screen.
NOTE: Prior to the cut-off time, approved items can be unapproved.
2
3

UPLOADING A CHECK ISSUE/VOID INFORMATION FILE
To upload check issue/void information, you will need to indicate the format of the file. If the format is in one of the system defined formats (Comma Delimited or Fixed Width as shown below), you are ready to do an import. However, if the file is not in one of those formats, you will need to create a Custom Import Map first.
COMMA DELIMITED FORMAT
Field Name Length Type Comment
Bank Code 8 Optional if ABA is provided
ABA 9 Num Optional if the Bank Code is provided
Account Number 34 Char
Issue/Void Indicator 1 Char “V” for void/“I” for issue
Check Amount 11 Num Zero filled, right justified, implied decimal point
Issue/Void Date 8 Date MMDDYYYY
Check Number 10 Num Zero filled, right justified
Issue Payee Name 80 Char
FIXED WIDTH FORMAT
Field Name Start Stop Length Type Comment
Bank Code 1 8 8 Optional if ABA is provided
ABA 9 17 9 Num Optional if the Bank Code is provided
Account Number 18 51 34 Char
Issue/Void Indicator 52 52 1 Char “V” for void/”I” for issue
Check Amount 53 63 11 Num Zero filled, right justified, implied decimal point
Issue/Void Date 64 71 8 Date MMDDYYYY
Check Number 72 81 10 Num Zero filled, right justified
Issue Payee Name 82 161 80 Char
Capital One Intellix® Check Services Reference Guide 18

Capital One Intellix® Check Services Reference Guide 19
CREATING A CUSTOM IMPORT MAP
If your file is not in one of the system defined standard formats, an Import Map allows you to specify the layout of your file. This tool provides you with the ability to define the file layout, field mapping, and rules for import.
Select Import Map from the Services g Check Services menu. The Import Map screen displays.
Click Add.
1
2
Select Delimited or Fixed from the Map Type field; NACHA is not a type used for check issue and void information.
• Delimited: A file with records separated by a delimiter such as a comma or semicolon. • Fixed: A file that is a fixed width text file.
3
Capital One Intellix® Check Services Reference Guide 20
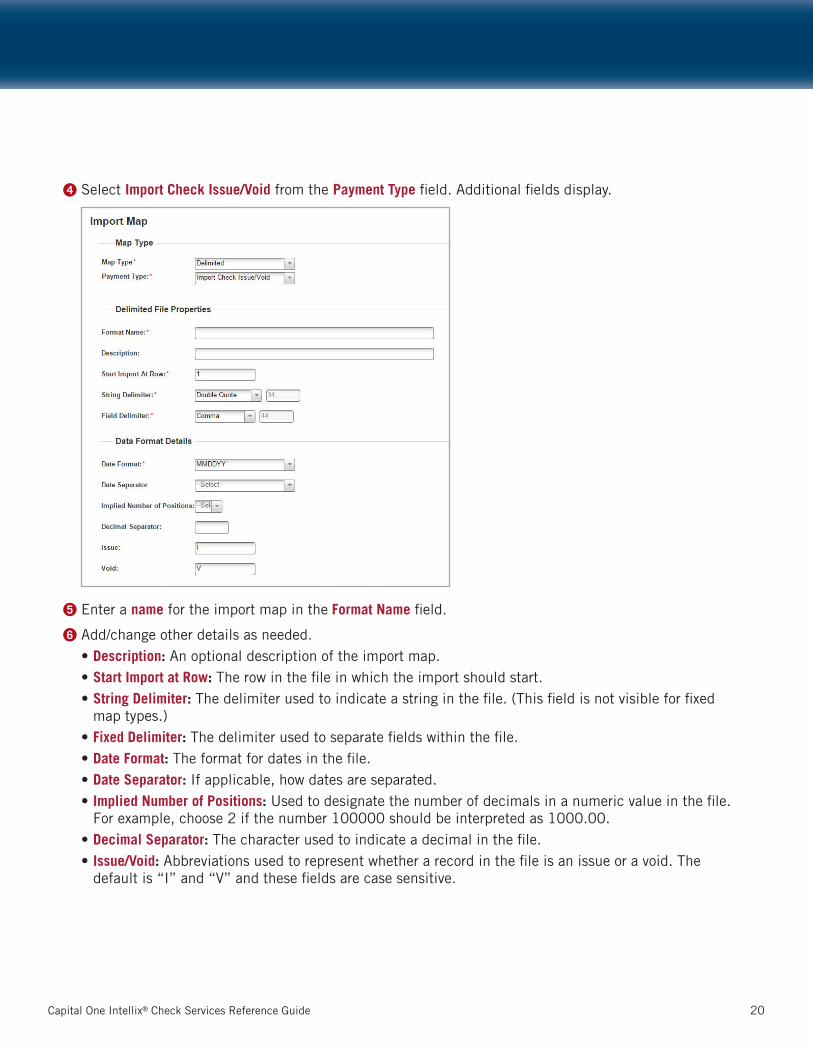
Select Import Check Issue/Void from the Payment Type field. Additional fields display.
Enter a name for the import map in the Format Name field.
Add/change other details as needed. • Description: An optional description of the import map. • Start Import at Row: The row in the file in which the import should start. • String Delimiter: The delimiter used to indicate a string in the file. (This field is not visible for fixed
map types.) • Fixed Delimiter: The delimiter used to separate fields within the file. • Date Format: The format for dates in the file. • Date Separator: If applicable, how dates are separated. • Implied Number of Positions: Used to designate the number of decimals in a numeric value in the file.
For example, choose 2 if the number 100000 should be interpreted as 1000.00. • Decimal Separator: The character used to indicate a decimal in the file. • Issue/Void: Abbreviations used to represent whether a record in the file is an issue or a void. The
default is “I” and “V” and these fields are case sensitive.
4
5
6

Capital One Intellix® Check Services Reference Guide 21
Scroll down and complete the table at the bottom of the screen to indicate how the fields in your file map to fields in the application.
• Active: Select if the field should be included in the file import. • Field Name: The name of the field in the application. • Field Number: Which field in the file maps to the field name in the application. • Match: This field is not in use at this time. • Default Value: Indicates what the default value will be set to if a value is not supplied in the file.
This field can be left blank.
NOTE: An ABA or Bank Code is required and must be specified in either the file or the Default Value.
• For all other fields except Payee Name, a value needs to be specified in the file or the Default Value.
• For clients subscribed to Payee Positive Pay, a Payee Name must also be included in the file or the Default Value.
Click Save. A confirmation displays.
Click Close.
7
8
9

Capital One Intellix® Check Services Reference Guide 22
IMPORTING CHECK ISSUE AND VOID INFORMATION
Once you have created a Custom Import Map, or if you are using one of the system defined standard import formats, you can import your file of check issue and void information.
Select Import from the Services g Check Services menu. The Import File screen displays.
In the Format Selection area, select your Import Map or one of the system defined standard import formats.
In the File Section, click Browse to select your file.
Click Import. While the import is taking place, a “File Import in Progress” message appears.
Click the ‘X’ to close the message.
You are returned to the Check Management screen. You can continue using the application while the file is loading. You will receive notification of the completion and status of the import in the message center.
1
2
3
4
5

Capital One Intellix® Check Services Reference Guide 23
To view the results of the import, choose Import Results from the Services g Check Services menu.
Within the Import Results, you can see immediatately if a file has rejected; hover over the File ID to view the reason for a reject.
NOTE: You can see additional details and print by running the Check Issue – File Import report.
To see the items in a file, click on the file name.
6
7

Capital One Intellix® Check Services Reference Guide 24
APPROVING AN IMPORTED CHECK ISSUE/VOID FILE
Imported check issue and void information must be approved before it will be sent to the bank. Depending on your permissions, you may be able to approve your own imported issues and voids, or another person may have to do the approval.
Approvals are done on the Import Results screen.
Select Import Results from the Services g Check Services menu. The Import Results screen displays with the total number of items, issues and voids.
To see the items in a file, click on the file name.
Once you have reviewed the items, and you are ready to approve them, click Cancel to return to the Import Results screen.
On the Import Results screen, select the item and click the Approve button.
If the approve is successful, a confirmation message displays. Click Close to return to the import results screen, or print the details of the items approved.
1
2
3
4
5

Making Positive Pay and Reverse Positive Pay Decisions
ABOUT POSITIVE PAY DECISIONING
For organizations with Positive Pay, once check issue and void information has been submitted to the bank, the bank will compare checks presented against check issue and void information. If a serial number (check number) or amount for a check presented for payment does not match a serial number or amount in the submitted data, an exception is created.
For organizations with “Payee” Positive Pay, the bank also compares the Payee listed on checks presented against the Payee listed within the check issue information and creates an exception if there isn’t a match.
Without an approved decision by the cut-off time, the default decision for the organization will be applied.
ABOUT REVERSE POSITIVE PAY DECISIONING
For organizations with Reverse Positive Pay, checks presented for payment are shown on the Reverse Positive Pay screen. Those checks can be reviewed and a decision can be made to allow individual checks to be paid or to indicate that a suspect check should be returned without payment.
Without an approved decision by the cut-off time, checks presented will automatically be paid.
MAKING DECISIONS ON POSITIVE PAY OR REVERSE POSITIVE PAY EXCEPTIONS
Positive Pay exceptions can be viewed on the Positive Pay screen. Similarly, Reverse Positive Pay exceptions can be viewed on the Reverse Positive Pay screen. Decisions can be made from those screens for the respective services.
Select Positive Pay (or Reverse Positive Pay) from the Services g Check Services menu.
Accounts display with a variety of information for each account set up with Positive Pay (or Reverse Positive Pay), including the number of exception items for the account and the status of decisions.
1
Capital One Intellix® Check Services Reference Guide 25

Positive Pay:
Reverse Positive Pay:
NOTE:
• Accounts that need your attention will have a status of “Decision Required” or “Actions Required.”
• The cutoff time set by the bank is displayed to assist you in making decisions in a timely manner. For exception items where an approved decision is not made by the cutoff time, the bank will apply the default decision for your organization.
Locate the specific account where you wish to make decisions. Use the filter feature if needed.
Click on the account. The Processing screen displays with a list of exception items and any existing decisions, return reasons and statuses.
Capital One Intellix® Check Services Reference Guide 26
2
3

Positive Pay:
Reverse Positive Pay:
Capital One Intellix® Check Services Reference Guide 27

Decisions can be made on one item at a time from this screen, or on multiple items at a time from the Processing screen (as shown on next page):
• Pay: To pay the selected items.
• Pay and Issue (only applicable for Positive Pay): To pay the selected item if it is valid but the check issue details were not submitted to the bank. A new check issue is created with the details from the exception item. Only use this action for exception reason “Issue is not on file” to avoid duplications.
• Return: To return the selected items. You will be prompted to select a return reason. Use the Return drop-down list to select the appropriate return reason, and then click Save. The selected reason will be used for all selected items.
• Cancel: To return to the previous screen.
To review an individual item before decisioning, click the item. A check image will also display if it’s available.
4
5
Capital One Intellix® Check Services Reference Guide 28

Decisions can be made to multiple items from the Processing screen, by selecting the items and clicking the Pay or Return button:
A confirmation displays. If your organization’s policy is such that a separate approval needs to be made, then decisions display with an “Entered” status and will need to be approved; otherwise the decisions will be approved.
Capital One Intellix® Check Services Reference Guide 29
NOTE: Approved decisions can be unapproved. However, once approved decisions have been processed by the Bank, the status will change to “Released” and can no longer be unapproved.

VIEWING DECISION HISTORY
When viewing Positive Pay or Reverse Positive Pay accounts, you can view decision history of items within those accounts.
Locate the account on the Positive Pay or Reverse Positive Pay screen.
Select View Decision History from the Actions drop-down menu for the desired account.
1
2
3
The Decision History filter screen displays.
Select the criteria for the decisions you would like to review and click View Results. Decision history displays for the account.
Capital One Intellix® Check Services Reference Guide 30

APPROVING POSITIVE PAY AND REVERSE POSITIVE PAY DECISIONS
For organizations that require a separate approval for Positive Pay decisions and/or Reverse Positive Pay decisions, follow the steps in the following two sections for instructions on approving.
For Positive Pay and Reverse Positive Pay decisions, the approval process begins on the Positive Pay and Reverse Positive Pay screens.
Select Positive Pay or Reverse Positive Pay from the Services g Check Services menu.
Accounts that contain items awaiting approval have an “Actions Required” status.
NOTE:
• The cutoff time column indicates the time when all decisions for the account need to be approved.
• For Positive Pay decisions that are not approved by the cut-off time, the default decision set by your organization will be applied.
• For Reverse Positive Pay decisions that are not approved by the cut-off time, a Pay decision will be applied.
To review and approve the decisions, click on the Account Number.
Capital One Intellix® Check Services Reference Guide 31
1
2
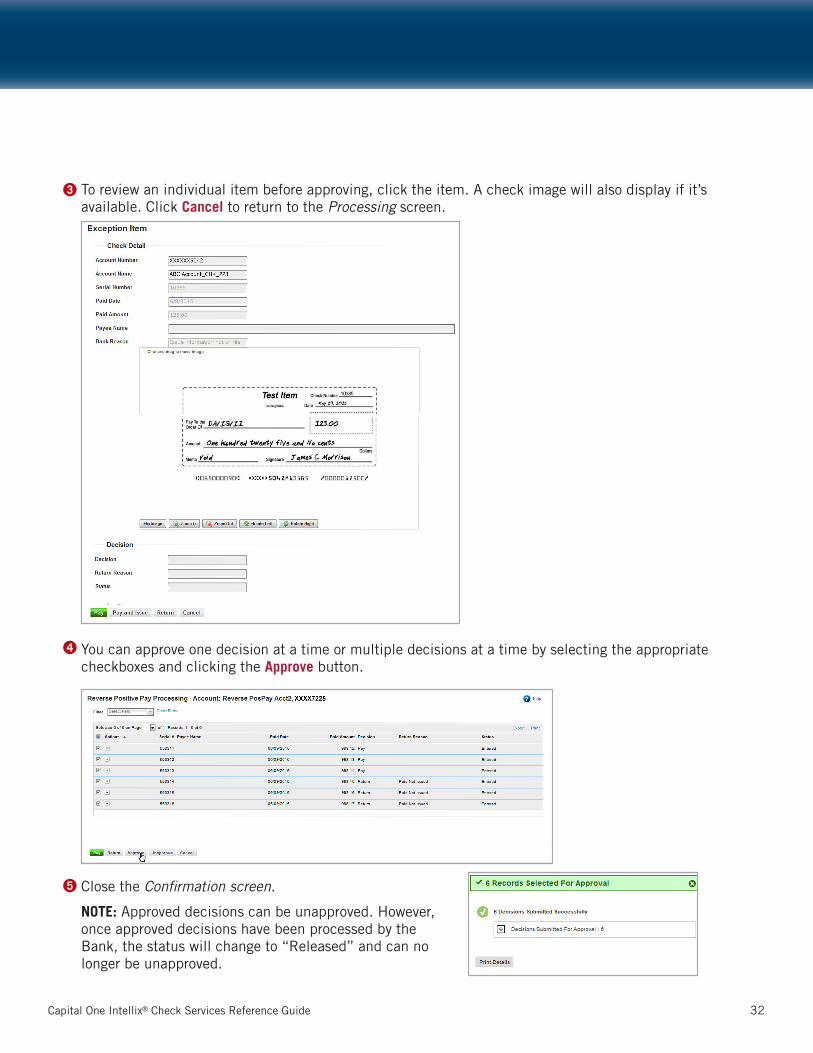
To review an individual item before approving, click the item. A check image will also display if it’s available. Click Cancel to return to the Processing screen.
4
5
3
You can approve one decision at a time or multiple decisions at a time by selecting the appropriate checkboxes and clicking the Approve button.
Close the Confirmation screen.
NOTE: Approved decisions can be unapproved. However, once approved decisions have been processed by the Bank, the status will change to “Released” and can no longer be unapproved.
Capital One Intellix® Check Services Reference Guide 32

Creating a Check Management Alert
A Check Management alert generates an automatic email message when certain events or conditions occur. For example, an alert can be generated when Check Positive Pay items require decisions.
The Check Service Alert choices are:
• Positive Pay/Reverse Positive Pay Cut off Time is Approaching: An email is sent to notify users to finish making and approving pay or return decisions as the cut off time is approaching.
• Positive Pay/Reverse Positive Pay Decision Pending Approval: An email is sent when a positive pay/reverse positive pay decision is ready to be approved.
• Positive Pay No Suspect Items: An email is sent when the selected account does not have any suspect items requiring decisions.
• Positive Pay Suspect Item Alert: An email is sent when a positive pay exception item is available for decisioning.
• Reverse Positive Pay No Paid Items: An email is sent when the selected account does not have any items requiring decisions.
• Reverse Positive Pay Paid Items: An email is sent when the selected account has items requiring a decision.
Click on the drop-down menu next to your name and select Manage Alerts. The Manage Alerts list displays.
Click Add. The Manage Alerts detail screen displays.
In the Alert Group field, select Check Management.
In the Alert Type field, you select the appropriate alert type.
Type an Alert Name.
Enter the Recipient email address. If Recipients have been set up, Recipients can be selected using the magnifying glass.
1
2
3
4
5
6
Capital One Intellix® Check Services Reference Guide 33

Click Continue. A Filter section appears.
The Filter section is used to specify the criteria which must be met in order for the alert to be sent. For example, an alert can be sent when a suspect check is received for a specific account number.
Enter filter criteria.
Click Save.
Click Add New Record to add another alert, or click Close to close the message and return to the Manage Alerts list.
CHECK MANAGEMENT REPORTS
Report Name Description
Cancel Stop Report Displays detailed information for all Cancel Stop transactions.
Check Issue Summary Shows check issue maintenance activity at a summary level. The report does not display the status history of the check; it only displays the current status.
Check Issue File Import Provides information on Check Issue files that were loaded into the system.
Check Issue Manual Entry Shows check issue maintenance activity for manually entered records only. Only the Client Admin has the rights to filter the report. Only the Bank Admin can view a shadow report.
Place/Cancel Stop Displays detail information for all place stop and cancel stop transactions. Composite Report
Place Stop Report Displays detailed information for all Place Stop transactions.
Positive Pay Exceptions Displays past and current positive pay exception items. To view the current day’s exception items, click the Actions drop-down for the Positive Pay report, and select View. To exception items older than the current day’s, click the Actions drop-down for the report, and select Filter.
Reverse Positive Pay Displays past and current reverse positive pay paid items. To view the current Paid Items day’s suspect files, click the Actions drop-down for the Positive Pay report,
and select View. To exception suspect files older than the current day’s, click the Actions drop-down for the report, and select Filter.
7
8
9
10
Capital One Intellix® Check Services Reference Guide 34

5.8.17