chassis 7-1 a-pdf split demo : purchase from
TRANSCRIPT

CHASSIS 7-1
7
CHASSIS
CONTENTSEXTERIOR PARTS ...........................................................................7- 2
REMOVAL......................................................................................7- 2REMOUNTING ..............................................................................7- 3
FRONT WHEEL ................................................................................7- 4CONSTRUCTION ..........................................................................7- 4REMOVAL AND DISASSEMBLY ..................................................7- 5INSPECTION .................................................................................7- 6REASSEMBLY AND REMOUNTING ............................................7- 7
FRONT BRAKE ................................................................................7- 9CONSTRUCTION ..........................................................................7- 9BRAKE PAD REPLACEMENT ......................................................7-10BRAKE FLUID REPLACEMENT...................................................7-11CALIPER REMOVAL AND DISASSEMBLY..................................7-11CALIPER INSPECTION ................................................................7-12CALIPER REASSEMBLY AND REMOUNTING............................7-13BRAKE DISC INSPECTION..........................................................7-14MASTER CYLINDER REMOVAL AND DISASSEMBLY ...............7-15MASTER CYLINDER INSPECTION..............................................7-16MASTER CYLINDER REASSEMBLY AND REMOUNTING .........7-16
FRONT FORK ...................................................................................7-18CONSTRUCTION ..........................................................................7-18REMOVAL AND DISASSEMBLY ..................................................7-19INSPECTION .................................................................................7-22REASSEMBLY AND REMOUNTING ............................................7-22
STEERING ........................................................................................7-26CONSTRUCTION ..........................................................................7-26REMOVAL AND DISASSEMBLY ..................................................7-26INSPECTION AND DISASSEMBLY ..............................................7-31REASSEMBLY AND REMOUNTING ............................................7-31
REAR WHEEL...................................................................................7-36CONSTRUCTION ..........................................................................7-36REMOVAL......................................................................................7-38DISASSEMBLY .............................................................................7-39INSPECTION AND DISASSEMBLY ..............................................7-40REASSEMBLY AND REMOUNTING ............................................7-40
REAR BRAKE ..................................................................................7-42REMOVAL AND DISASSEMBLY ..................................................7-42INSPECTION .................................................................................7-43REASSEMBLY AND REMOUNTING ............................................7-43REAR BRAKE ROD REMOVAL AND DISASSEMBLY.................7-44REASSEMBLY AND REMOUNTING ............................................7-45
REAR SUSPENSION........................................................................7-46CONSTRUCTION ..........................................................................7-46REMOVAL......................................................................................7-48INSPECTION AND DISASSEMBLY ..............................................7-50REASSEMBLY ..............................................................................7-52REMOUNTING ..............................................................................7-53
A-PDF Split DEMO : Purchase from www.A-PDF.com to remove the watermark
7-2 CHASSIS
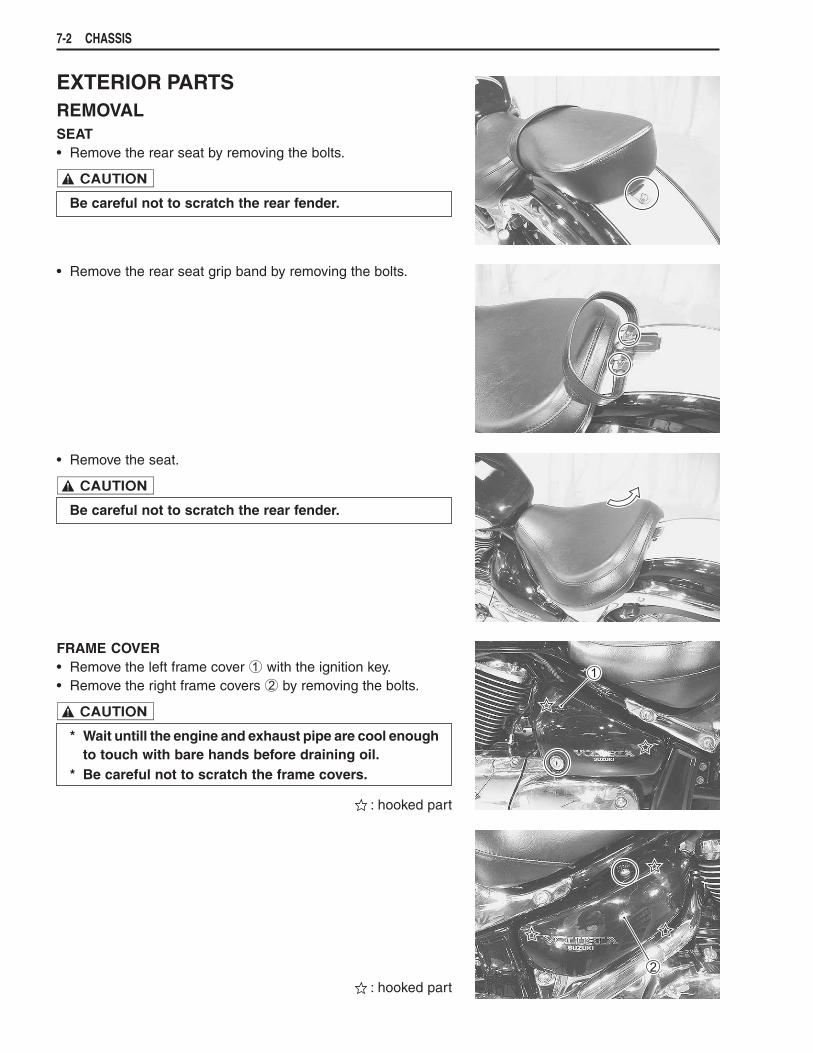
EXTERIOR PARTSREMOVALSEAT• Remove the rear seat by removing the bolts.
!Be careful not to scratch the rear fender.
• Remove the rear seat grip band by removing the bolts.
• Remove the seat.
!Be careful not to scratch the rear fender.
FRAME COVER• Remove the left frame cover 1 with the ignition key.• Remove the right frame covers 2 by removing the bolts.
!* Wait untill the engine and exhaust pipe are cool enough
to touch with bare hands before draining oil.* Be careful not to scratch the frame covers.
: hooked part
: hooked part

CHASSIS 7-3
REAR FENDER• Remove the seat. ("7-2)• Disconnect the coupler 1.
• Remove the left or right side frame handle grip.• Remove the rear fender 2.
!Be careful not to scratch the rear fenders.
NOTE:When installing the frame handle grip bolts, apply a small quan-tity of THREAD LOCK “1303” to its mounting bolts and tightenthem to the specified torque.
#99000-32030: THREAD LOCK SUPER “1303”
$ Frame handle grip mounting bolt A (M10): 50 N.m(5.0 kgf.m, 36.0 lb-ft)
REMOUNTINGRemount the seats, covers and rear fender in the reverse order ofremoval.
7-4 CHASSIS
Left Right
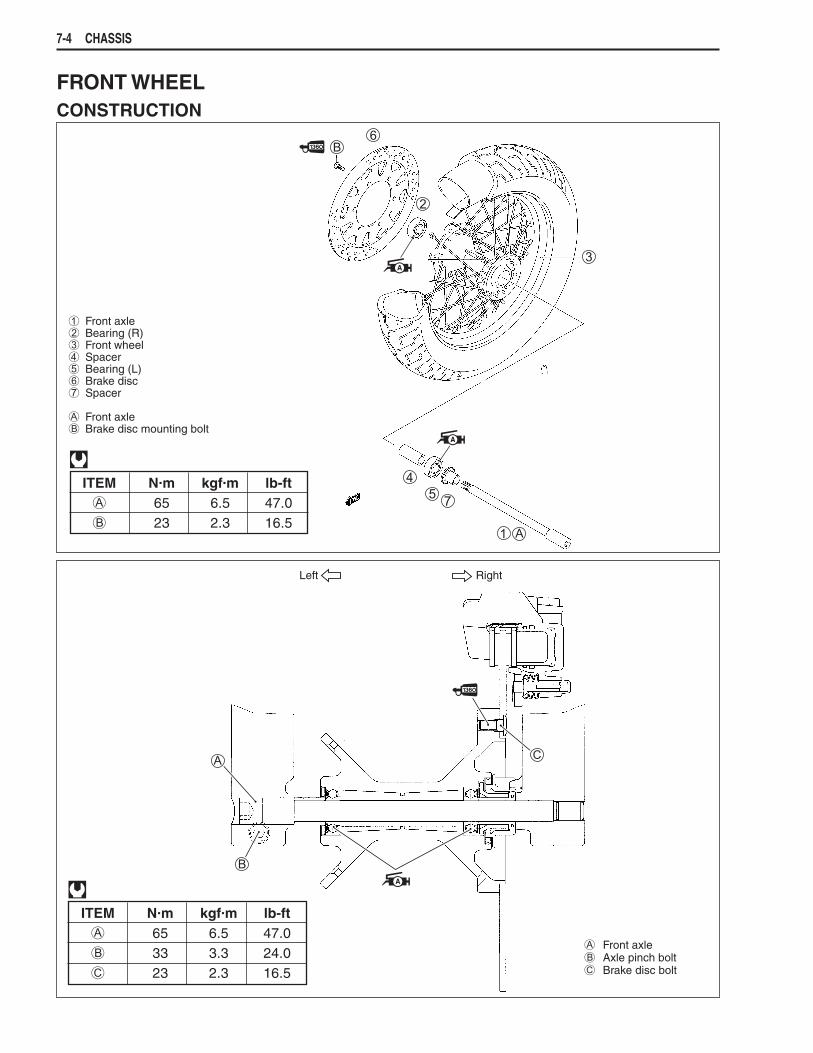
FRONT WHEELCONSTRUCTION
A Front axleB Axle pinch boltC Brake disc bolt
$ITEM N.m kgf.m lb-ftA 65 6.5 47.0B 33 3.3 24.0C 23 2.3 16.5
1 Front axle2 Bearing (R)3 Front wheel4 Spacer5 Bearing (L)6 Brake disc7 Spacer
A Front axleB Brake disc mounting bolt
$ITEM N.m kgf.m lb-ftA 65 6.5 47.0B 23 2.3 16.5

CHASSIS 7-5
REMOVAL AND DISASSEMBLY• Loosen the front axle pinch bolt 1.• Loosen the front axle 2 by using the special tool.
% 09900-18710: Hexagon socket (12 mm)
• Raise the front wheel off the ground with a jack or a woodenblock.
• Remove the front axle 2, spacers 3 and front wheel.
!Do not operate the brake lever during or after front wheelremoval.
• Remove the brake disc by removing its bolts.

7-6 CHASSIS
INSPECTIONWHEEL BEARINGSInspect the play of the wheel bearings by finger while they are inthe wheel. Rotate the inner race by finger to inspect for abnormalnoise and smooth rotation.Replace the bearing in the following procedure if there is any-thing unusual.
WHEEL BEARINGS REMOVAL• Remove the wheel bearings by using the special tool A or B.
% 09921-20220: A Bearing remover set (17 mm)or 09941-50111: B Wheel bearing remover
!The removed bearings should be replaced with new ones.
FRONT WHEELMake sure that the wheel runout (axial and radial) does not ex-ceed the service limit when checked as shown. An excessiveamount of runout is usually due to worn or loose wheel bearingsand can be corrected by replacing the bearings. If bearing re-placement fails to reduce the runout, replace the wheel with anew one.
& Wheel rim runout (axial and radial)Service Limit: 2.0 mm (0.08 in)
FRONT AXLEMeasure the front axle runout using the dial gauge. If the runoutexceeds the service limit, replace the front axle with a new one.
% 09900-20606: Dial gauge (1/100 mm)09900-20701: Magnetic stand09900-21304: V-block set (100 mm)
& Wheel axle runoutService Limit: 0.25 mm (0.010 in)
TIRE ........................................................................... "2-18

CHASSIS 7-7
REASSEMBLY AND REMOUNTINGReassemble and remount the front wheel in the reverse order ofremoval and disassembly. Pay special attention to the followingpoints:
WHEEL BEARING• Apply SUZUKI SUPER GREASE “A” to the bearings before in-
stalling.
For USA' 99000-25030: SUZUKI SUPER GREASE “A”
For the other countries' 99000-25010: SUZUKI SUPER GREASE “A”
• Install the wheel bearings using the used bearings and specialtool as described below.
% A 09941-34513: Bearing installer setB 09913-70210: Bearing installer set (40 mm)
!* First install the right wheel bearing, then install the left
wheel bearing.* The sealed covers on the bearings must face to the
outside.
BRAKE DISC• Make sure that the brake disc is clean and free of any grease.
Apply THREAD LOCK SUPER “1360” to the brake disc boltsand tighten them to the specified torque.
(99000-32130: THREAD LOCK SUPER “1360”
$ Brake disc bolt: 23 N.m (2.3 kgf.m, 16.5 lb-ft)
Left Right Left Right
Clearance

7-8 CHASSIS
SPEED SENSOR• Apply SUZUKI SUPER GREASE “A” to the speed sensor dust
seal.
For USA' 99000-25030: SUZUKI SUPER GREASE “A”
For the other countries' 99000-25010: SUZUKI SUPER GREASE “A”
• Align the grooves 1 on the speed sensor with the lugs 2 onthe wheel hub.
FRONT WHEEL• Make sure that the front fork stopper 1 and the speed sensor
stopper 2 are installed as shown.
!When installing the front wheel, position the brake discbetween the brake pads. Be careful not to damage thebrake pads.
• Tighten the front axle to the specified torque.• Tighten the front axle pinch bolt 3 on the specified torque.
$ Front axle: 65 N.m (6.5 kgf.m, 47.0 lb-ft)Front axle pinch bolt: 33 N.m (3.3 kgf.m, 24 lb-ft)
% 09900-18710: Hexagon socket (12 mm)
NOTE:Before tightening the front axle pinch bolts 3, move the front forkup and down four or five times.
NOTE:After remounting the front wheel, pump the brake lever a few timesto check for proper brake operation.
CHASSIS 7-9
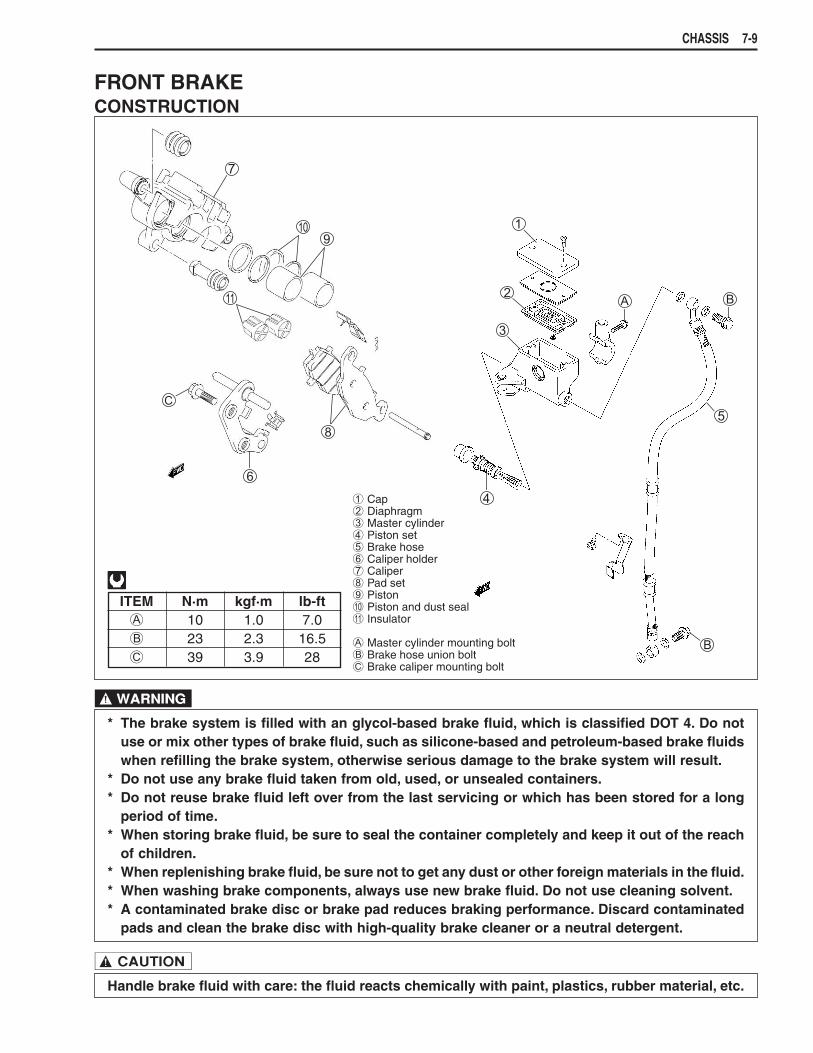
FRONT BRAKECONSTRUCTION
)* The brake system is filled with an glycol-based brake fluid, which is classified DOT 4. Do not
use or mix other types of brake fluid, such as silicone-based and petroleum-based brake fluidswhen refilling the brake system, otherwise serious damage to the brake system will result.
* Do not use any brake fluid taken from old, used, or unsealed containers.* Do not reuse brake fluid left over from the last servicing or which has been stored for a long
period of time.* When storing brake fluid, be sure to seal the container completely and keep it out of the reach
of children.* When replenishing brake fluid, be sure not to get any dust or other foreign materials in the fluid.* When washing brake components, always use new brake fluid. Do not use cleaning solvent.* A contaminated brake disc or brake pad reduces braking performance. Discard contaminated
pads and clean the brake disc with high-quality brake cleaner or a neutral detergent.
!Handle brake fluid with care: the fluid reacts chemically with paint, plastics, rubber material, etc.
1 Cap2 Diaphragm3 Master cylinder4 Piston set5 Brake hose6 Caliper holder7 Caliper8 Pad set9 Piston0 Piston and dust sealA Insulator
A Master cylinder mounting boltB Brake hose union boltC Brake caliper mounting bolt
$$$$$ITEM N·m kgf·m lb-ftA 10 1.0 7.0B 23 2.3 16.5C 39 3.9 28
7-10 CHASSIS
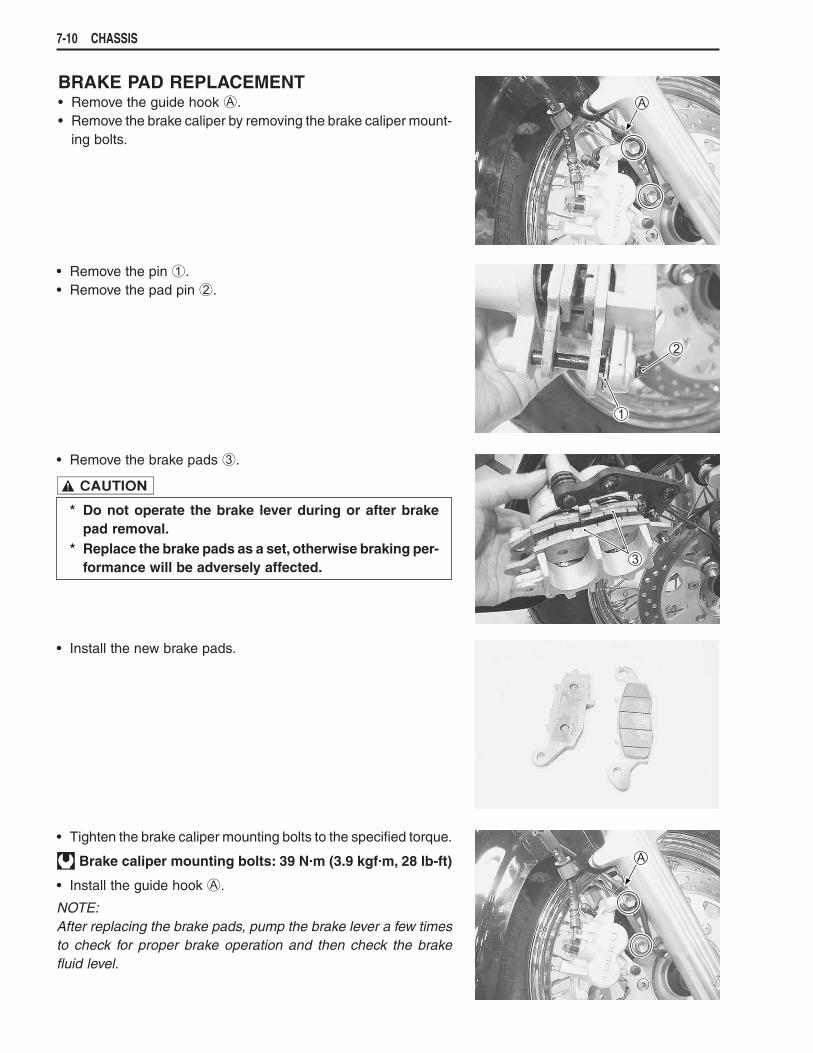
BRAKE PAD REPLACEMENT• Remove the guide hook A.• Remove the brake caliper by removing the brake caliper mount-
ing bolts.
• Remove the pin 1.• Remove the pad pin 2.
• Remove the brake pads 3.
!* Do not operate the brake lever during or after brake
pad removal.* Replace the brake pads as a set, otherwise braking per-
formance will be adversely affected.
• Install the new brake pads.
• Tighten the brake caliper mounting bolts to the specified torque.
$ Brake caliper mounting bolts: 39 N.m (3.9 kgf.m, 28 lb-ft)
• Install the guide hook A.
NOTE:After replacing the brake pads, pump the brake lever a few timesto check for proper brake operation and then check the brakefluid level.

CHASSIS 7-11
BRAKE FLUID REPLACEMENT• Place the motorcycle on a level surface and keep the handlebar
straight.• Remove the master cylinder reservoir cap and diaphragm.• Remove as much old brake fluid as possible.• Fill the reservoir with new brake fluid.
* Specification and classification: DOT 4
• Connect a clear hose to the air bleeder valve and insert theother end of the hose into a receptacle.
• Loosen the air bleeder valve and pump the brake lever until theold brake fluid is completely out of the brake system.
• Close the air bleeder valve and disconnect the clear hose. Fillthe reservoir with new brake fluid to the upper end of the in-spection window.
!Bleed air from the brake system.("2-17)
BRAKE CALIPER REMOVAL ANDDISASSEMBLY• Remove the guide hook A.• Disconnect the brake hose from the brake caliper by removing
the brake hose union bolt 1 and allow the brake fluid to draininto a suitable receptacle.
• Remove the brake caliper by removing the brake caliper mount-ing bolts 2.
)* Do not reuse the brake fluid left over from the last ser-
vicing or which has been stored for a long period oftime, otherwise serious damage to the brake systemwill result.
* Brake fluid, if it leaks, will interfere with safe runningand discolor painted surfaces. Check the brake hoseand hose joints for cracks and oil leakage.

7-12 CHASSIS
• Remove the brake pads. ("7-10)• Remove the insulator.• Remove the brake caliper holder.
• Remove the spring.
• Place a rag over the brake caliper pistons to prevent them frompopping out, and then force out the pistons using compressedair.
!Do not use extremely high pressure to remove the brakecaliper pistons, otherwise damage to the pistons will re-sult.
• Remove the dust seals and piston seals.
!Do not reuse the dust seals and piston seals to preventfluid leakage.
BRAKE CALIPER INSPECTIONBRAKE CALIPERInspect each brake caliper cylinder wall for nicks, scratches orother damage. If any damages are found, replace the brake cali-per with a new one.
BRAKE CALIPER PISTONSInspect the brake caliper pistons for any scratches or other dam-age. If any damages are found, replace the piston with a newone.

CHASSIS 7-13
RUBBER PARTSReplace the removed rubber parts with new ones.
BRAKE CALIPER REASSEMBLY ANDREMOUNTINGReassemble and remount the brake caliper in the reverse orderof removal and disassembly. Pay special attention to the followingpoints:• Wash the caliper bores and pistons with the specified brake
fluid. Thoroughly wash the dust seal grooves and piston sealgrooves.
* Specification and classification: DOT 4
!* Wash the brake caliper components with new brake
fluid before reassembly.* Do not wipe the brake fluid off after washing the com-
ponents.* When washing the components, use the specified brake
fluid. Never use different types of fluid or cleaning sol-vents such as gasoline, kerosine, etc.
* Replace the removed piston seals and dust seals withnew ones.
* Apply brake fluid to all of the seals, brake caliper boresand pistons before reassembly.
PISTON SEALS• Install the piston seals 1 and dust seals 2 as shown.
BRAKE CALIPER HOLDER• Apply SUZUKI SILICON GREASE to the brake caliper holder.
+ 99000-25100: SUZUKI SILICONE GREASE

7-14 CHASSIS
• Tighten the brake caliper mounting bolts 1, and brake hoseunion bolt 2 to the specified torque.
$ Brake caliper mounting bolt: 39 N.m (3.9 kgf.m, 28 lb-ft)Brake hose union bolt: 23 N.m (2.3 kgf.m, 16.5 lb-ft)
• For assembly procedure of brake hose: "9-18• Install the guide hook A.
NOTE:Before remounting the brake caliper, push the brake caliper pis-tons all the way into the caliper.
!Bleed air from the system after reassembling the brakecaliper. ("2-17)
BRAKE DISC INSPECTIONCheck the brake disc for cracks or damage and measure the thick-ness using the micrometer. If any damages are found or if thethickness is less than the service limit, replace the brake discwith a new one.
% 09900-20205: Micrometer (0 – 25 mm)
& Brake disc thicknessService Limit: 4.5 mm (0.098 in)
Measure the runout using the dial gauge. If the runout exceedsthe service limit, replace the brake disc with a new one.
% 09900-20606: Dial gauge (1/100 mm)09900-20701: Magnetic stand
& Brake disc runoutService Limit: 0.3 mm (0.012 in)
• If either measurement exceeds the service limit, replace thebrake disc with a new one. ("7-5)

CHASSIS 7-15
MASTER CYLINDER REMOVAL ANDDISASSEMBLY• Place a rag underneath the brake hose union bolt on the mas-
ter cylinder to catch any spilt brake fluid. Remove the brakehose union bolt and disconnect the brake hose.
!Immediately wipe off any brake fluid contacting any partof the motorcycle. The brake fluid reacts chemically withpaint, plastics, rubber materials, etc., and will damagethem severely.
• Disconnect the front brake light switch lead wire 1.• Remove the right rear view mirror 2 and master cylinder as-
sembly 3.
• Remove the brake lever 4 and front brake light switch 5.
• Remove the reservoir cap 6 and diaphragm 7.• Drain the brake fluid.
• Pull the dust boot 8 out and remove the circlip 9.