chapter 6 fitness assessment. purpose to provide the fitness professional with valuable techniques...
TRANSCRIPT

Chapter 6
Fitness Assessment

Purpose
• To provide the fitness professional with valuable techniques to build a complete fitness assessment for a client.
• To provide the fitness professional with information about how the human body should move and how kinetic chain imbalances alter movement.

Objectives
• After this presentation, the participant will be able to:– Explain the components of and rationale for an integrated
fitness assessment.– Understand how to administer a health history questionnaire
and, from the results, be able to stratify a client’s overall risk for fitness assessment.
– Understand the importance of posture: how it relates to movement observation and how to assess it.
– Understand how to perform a comprehensive health-related fitness assessment, how to obtain subjective and objective information about clients, and how to use the information collected to help design an exercise program.

Introduction
• 2008 physical activity guidelines show how inactive Americans are.
• As little as 2.5 hours a week can prevent illness
• Only 31% of Americans engage in the recommended amounts of physical activity.
• To properly train people, an accurate assessment of readiness is important.

Definition
• Fitness Assessment– A systematic problem-solving method that provides the
fitness professional with a basis for making educated decisions about exercise and acute variable selection
– Not designed to diagnose any condition, but rather to observe each client’s individual structural and functional status, creating a starting point from which to work
– Not intended to replace a medical examination

Guidelines
• Fitness professionals should not:– Diagnose medical conditions: Obtain exercise or health guidelines
from a physician, physical therapist, registered dietitian, and so forth.
– Prescribe treatment: Refer clients to a qualified medical practitioner for medical exercise prescription.
– Prescribe diets or recommend specific supplements unless qualified: Refer clients to a qualified dietitian or nutritionist for specific diet plans.
– Provide treatment of any kind for injury or disease (aside from basic first aid): Refer clients to a qualified medical practitioner for treatment of injury or disease.
– Provide rehabilitation services for clients: Design exercise programs for clients after they are released from rehabilitation.
– Provide counseling services for clients: Act as a coach for clients.

Fitness Assessment Components
• Use a variety of observation methods to obtain a balanced overview of a client– Subjective Information
• General and medical history
– Objective Information• Physiologic assessment
• Body composition
• Cardiorespiratory assessments
• Static and dynamic postural assessments
• Performance assessments

Subjective Information
• Gathered from a prospective client to give the fitness professional feedback regarding personal history such as occupation, lifestyle, and medical background– One of the easiest forms of gathering this information is
through a questionnaire. • Physical Activity Readiness Questionnaire (PAR-Q) is directed
toward detecting any possible cardiorespiratory dysfunction, such as coronary heart disease (CHD).

General History
• Ask some very basic questions concerning a client’s history and personal background to obtain a wealth of information. – Occupation
• Does your occupation require extended periods of sitting?
• Does your occupation require extended periods of repetitive movements?
• Does your occupation require you to wear shoes with a heel (dress shoes)?
• Is your occupation mentally stressful (causes anxiety)?
– Lifestyle • Recreation
• Hobbies

Medical History
• Find out a client’s medical history to obtain information about life-threatening or chronic diseases as well as structural and functional health.– Past injuries– Past surgeries– Chronic conditions– Medications

Objective Information
• Gathered to provide the fitness professional with forms of measurable information
• Can be used to compare beginning numbers to those measured weeks, months, or years later, denoting improvements in the client as well as the effectiveness of the training program – Physiologic assessments– Body composition assessments– Cardiorespiratory assessments– Posture and movement assessments– Performance assessments

Physiologic Assessments
• Provide valuable information regarding the status of the client’s health – Heart rate– Blood pressure

Physiologic Assessments
• Measuring Heart Rate– Radial pulse
• Lightly place two fingers along the arm in line with and just above the thumb.
• Once pulse is identified, count the pulses for 30 seconds and multiply by two.
• Record the 60-second pulse rate and average for 3 days.

Physiologic Assessments
• Measuring Heart Rate– Carotid pulse
• Lightly place two fingers on the neck, just to the side of the larynx.
• Once pulse is identified, count the pulses for 30 seconds and multiply by 2.
• Record the 60-second pulse rate and average for 3 days.
– Average resting heart rates• Males: 70 beats/min
• Females: 75 beats/min

Physiologic Assessments
• Training Heart Rate– Calculate the client’s training heart rate zone for
cardiorespiratory exercise.– Find estimated maximal heart rate (220 – age).– Multiply the estimated maximum heart rate by the
appropriate intensity (65–90%).• Zone One: Maximum Heart Rate x 0.65
Maximum Heart Rate x 0.79
• Zone Two: Maximum Heart Rate x 0.80
Maximum Heart Rate x 0.85
• Zone Three: Maximum Heart Rate x 0.86
Maximum Heart Rate x 0.95

Heart Rate Reserve Method
• Heart rate and oxygen uptake are linearly related during dynamic exercise, selecting a predetermined training or target heart rate (THR) based on a given percentage of oxygen consumption is the most common and universally accepted method.
• The heart rate reserve (HRR) method is defined as:
THR = [(HRmax – HRrest) × desired intensity] + HRrest

Physiologic Assessments
• Blood Pressure– Systolic and diastolic readings
• Systolic (top number)
– The pressure produced by the heart as it pumps blood to the body
– Normal systolic pressure is <120 mm Hg.
• Diastolic (bottom number)
– The minimum pressure within the arteries through a full cardiac cycle
– Normal diastolic pressure is <80 mm Hg.

Physiologic Assessments
• Blood Pressure Testing – Instruct the client to assume a comfortable, seated position
and place the appropriate-size cuff just above the elbow.– Rest the arm on a supported chair or support the client’s arm
using yours and place the stethoscope over the brachial artery using a minimal amount of pressure.
– Rapidly inflate the cuff to 20 to 30 mm Hg above the point when the pulse can no longer be felt at the wrist.
– Release the pressure at a rate of about 2 mm Hg per second, listening for sounds.
– To determine the systolic pressure, listen for the first observation of sound.
– Diastolic pressure is determined when the sounds fade away.

Body Composition
• There are a variety of methods used to estimate body composition, they vary in cost, accuracy, and skill needed to perform them.– Skinfold: measures skin fold thickness– Bioelectrical impedance: measures resistance to electrical
current– Hydrostatic weighing: Measure body density by measuring
buoyancy (ability to float)

Body Composition
• Some benefits of body composition testing include:– Identifying a client’s health risk for excessively high or low
levels of body fat– Promoting a client’s understanding of body fat– Monitoring changes in body composition– Helping estimate healthy body weight for clients and athletes– Assisting in exercise program design

Skinfold Measurement
• Effective for trainers without a lab at their disposal– Indirect measure of adipose tissue through thickness of skin– Take a minimum of two measurements at each site– Be accurate when locating landmarks– Do not measure after exercise– Not effective on extremely obese clients

Body Composition
• Body Fat– Skin-fold caliper method
• Durnin–Womersley formula’s four sites of measurement
– Biceps
– Triceps
– Subscapular
– Iliac crest

Body Composition
• Body Fat– Biceps
• Vertical fold on the front of the arm over the bicep muscle
• Halfway between the shoulder and the elbow

Body Composition
• Body Fat– Triceps
• Vertical fold on the back of the upper arm, with the arm relaxed and held freely at the side
• Halfway between the shoulder and the elbow

Body Composition
• Body Fat– Subscapular
• At a 45-degree angle, 1 to 2 cm below the inferior angle of the scapula

Body Composition
• Body Fat– Iliac crest
• At a 45-degree angle, just above the iliac crest and medial to the axillary line

Body Composition
• Calculating Body Fat Percentages– After the four sites have been measured, add the totals of
the four sites. – Use the table in the textbook for corresponding body fat
percentage.

Body Composition
• Circumference Measurements– Another source of feedback used with clients who have the
goal of altering body composition – Most important factor is consistency
• Take measurements on the same side of the body each time you test and retest

Body Composition
• Circumference Measurements– Neck
• Across the Adam’s apple

Body Composition
• Circumference Measurements– Chest
• Across the nipple line
• Or upper chest for women

Body Composition
• Circumference Measurements– Waist
• At the narrowest point of the waist, below the rib cage and just above the top of the hip bones
– If there is no apparent narrowing of the waist, measure at the belly button.

Body Composition
• Circumference Measurements– Hips
• With feet together, at the widest portion of the buttocks

Body Composition
• Circumference Measurements– Thigh
• 10 inches above the top of the patella, just below the buttocks

Body Composition
• Circumference Measurements– Calf
• At the maximal circumference between the ankle and the knee

Body Composition
• Waist-to-Hip Ratio – There is a correlation between chronic diseases and fat
stored in the midsection.• Measure the smallest part of the waist without instructing the
client to draw abdomen in.
• Measure the largest part of the hips.
• Compute the waist-to-hip ratio by dividing the waist measurement by the hip measurement.
– A ratio higher than 0.80 for females and 0.95 for males may put people at risk for a number of diseases.

Body Composition
• Body Mass Index (BMI) – To assess weight relative to height, divide body weight (in
kilograms) by height (in meters squared) or kg/m2
– Obesity-related health problems increase when a person’s BMI exceeds 25.

Cardiorespiratory
• Provide valuable information regarding cardiorespiratory efficiency and overall condition
• Provide a starting point for cardiorespiratory training zone specific to their physical condition and goal
• Two common forms – Step Test – Rockport Walk Test

Cardiorespiratory Assessments
• Step Test– Determine the client’s maximum heart rate by subtracting the
client’s age from the number 220 (220 – age).– Take the maximum heart rate and multiply it by the following
figures to determine the heart rate ranges for each zone.
• Zone One: Maximum Heart Rate x 0.65
Maximum Heart Rate x 0.75
• Zone Two: Maximum Heart Rate x 0.86
Maximum Heart Rate x 0.85
• Zone Three: Maximum Heart Rate x 0.86
Maximum Heart Rate x 0.95

Cardiorespiratory Assessments
• Step Test– Perform a 3-minute step test by having a client do 24 steps
per minute on an 12-inch step, for 3 minutes (96 steps total). • Then, measure client’s pulse for 60 seconds and record the
number as the recovery pulse.
• Locate score in the chart provided in your text.

Cardiorespiratory Assessments
• Step Test– Determine the appropriate starting program:
• Poor: Zone One
• Fair: Zone One
• Average: Zone Two
• Good: Zone Two
• Very good: Zone Three

Cardiorespiratory Assessments
• Rockport Walk Test – Determine the client’s maximum heart rate by subtracting the
client’s age from the number 220 (220 – age).– Then, take the maximum heart rate and multiply it by the
following figures to determine the heart rate ranges for each zone.
• Zone One: Maximum Heart Rate x 0.65
Maximum Heart Rate x 0.75
• Zone Two: Maximum Heart Rate x 0.76
Maximum Heart Rate x 0.85
• Zone Three: Maximum Heart Rate x 0.86
Maximum Heart Rate x 0.95
Cardiorespiratory Assessments
• Rockport Walk Test– Record the client’s weight and perform assessment.
• Have the client walk 1 mile, as fast as he or she can on a treadmill.
• Record the time it takes the client to complete the walk.
• Immediately record the client’s heart rate (beats per minute) at the 1-mile mark.
• Use the formula listed in the textbook to calculate ⩒O2 score.

Cardiorespiratory Assessments
• Rockport Walk Test– Determine the appropriate starting program:
• Poor: Zone One
• Fair: Zone One
• Average: Zone Two
• Good: Zone Two
• Very good: Zone Three

Posture and Movement
• Every movement needs a base from which to generate (and accept) force. – Better known as posture
• Posture is the alignment and function of all components of the HMS at any given moment.
• Allows for proper neuromuscular function and optimal movement

Posture
• Proper posture ensures that the muscles of the body are optimally aligned at the proper length–tension relationships necessary for efficient functioning of force–couples and joint motion (neuromuscular efficiency).
• Neuromuscular efficiency is the ability of the nervous system to properly recruit all muscles in all planes of motion.

Posture
• Without proper postural alignment, we set the body up for a series a traumas known as postural distortion patterns. – Predictable patterns of muscle
imbalance

Muscle Imbalance
• Condition in which the lengths of muscles are altered at a joint.
• Poor posture, repetitive movement, and a lack of daily movement are considered contributing factors.

Postural Distortions
• Predictable Patterns of Muscle Imbalance– Pronation Distortion Syndrome– Lower Crossed Syndrome– Upper Crossed Syndrome

Pronation Distortion Syndrome
• Characterized by– Feet
• Flattened or externally rotated
– Knees• Adducted and internally rotated
– Tight• Gastrocnemius, soleus,
peroneals, adductors, iliotibial band (IT band), hip flexors, and biceps femoris (short head)
– Weak• Anterior and posterior tibialis,
vastus medialis (VMO), gluteus maximus and medius, and hip external rotators

Lower Crossed Syndrome
• Characterized by– Anterior pelvic tilt– Tight
• Gastroncnemius, soleus, hip flexors, adductors, latissimus dorsi, and erector spinae
– Weak• Gluteus maximus and medius,
anterior tibialis, posterior tibialis, transversus abdominis, and internal obliques

Upper Crossed Syndrome
• Characterized by– Shoulders
• Protracted (rounded)
– Head• Forward
– Tight• Latissimus dorsi, pectoralis major
and minor, upper trapezius, scalenes, teres major, subscapularis, levator scapulae, and sternocleidomastoid
– Weak• Serratus anterior, rhomboids,
rhomboids, mid/lower trapezius and deep cervical flexors, infraspinatus

Movement Observations
• Dynamic postural observations (looking at movement) are often the quickest way to gain an overall impression of a client’s functional status.
• Should relate to basic functions such as squatting, pushing, pulling, and balancing
• Can also be incorporated as a first workout for your client

Movement Observations
• Overhead Squat Assessment– Designed to assess dynamic
flexibility on both sides of the body as well as integrated total body strength.
• Position– Client stands with feet shoulder-
width apart and pointed straight ahead. The foot and ankle complex should be in a neutral position.
– Have client raise his or her arms overhead, with elbow fully extended. The upper arm should bisect the ears.
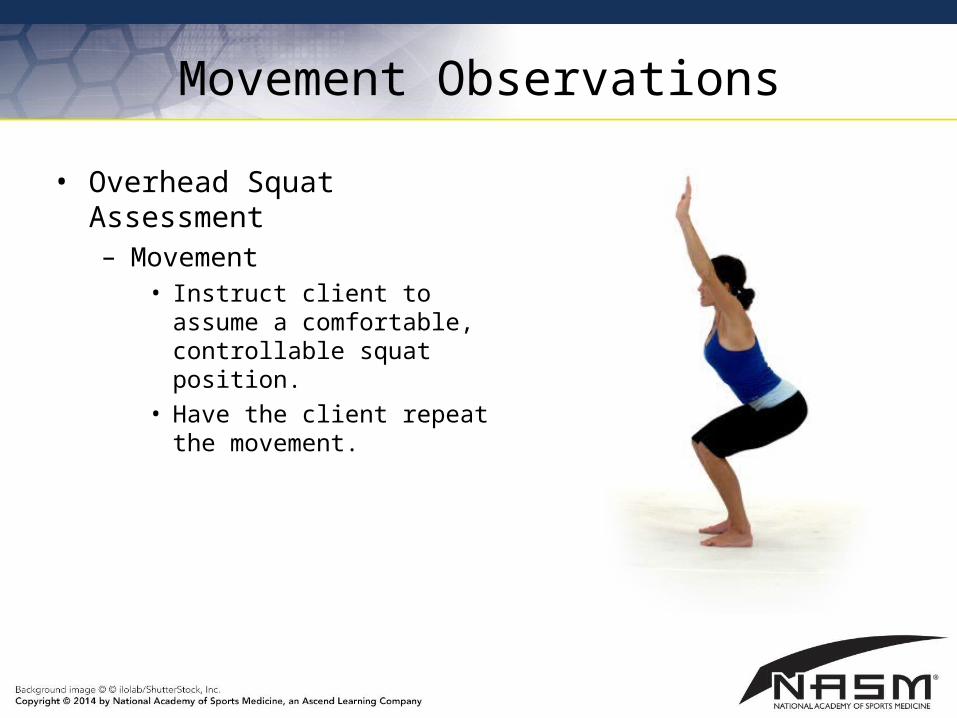
Movement Observations
• Overhead Squat Assessment– Movement
• Instruct client to assume a comfortable, controllable squat position.
• Have the client repeat the movement.

Movement Observations
• Overhead Squat Assessment – Views
• Anterior– Foot
Turns out– Knee
Moves inward or outward vs.

Movement Observations
• Overhead Squat Assessment – Views
• Lateral– Lumbo-pelvic-hip complex
Excessive forward lean Low back arches
– Shoulder complex Arms fall forward
vs.

Movement Observations
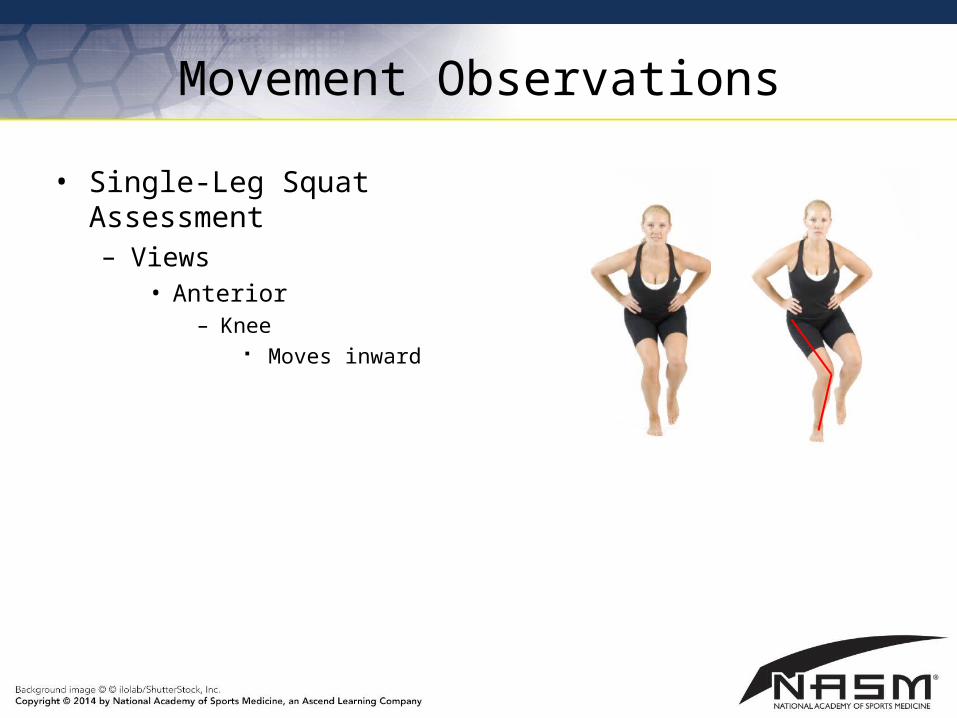
• Single-Leg Squat Assessment – Designed to assess ankle
proprioception, core strength, and hip joint stability
• Position– Client should stand, place
hands on the waist, and focus on an object straight ahead.
– The feet should be pointed straight ahead, and the foot, ankle, knee, and lumbo-pelvic-hip complex should be in a neutral position.

Movement Observations
• Single-Leg Squat Assessment– Movement
• Instruct client to raise one leg and accept weight with opposite side (stance leg). The foot of the lifted leg should be positioned next to the stance leg.
• Once the single-leg stance is achieved, progress to a single-leg squat movement
• Have the client repeat the movement.
• Perform up to five repetitions before switching sides.
Movement Observations
• Single-Leg Squat Assessment– Views
• Anterior– Knee
Moves inward

Movement Observations
• Pushing Assessment– Position
• Instruct client to draw abdomen in, feet shoulder width, and toes pointing forward.
– Movement• Instruct client to press
handles forward and return slowly.
• Perform up to 20 repetitions

Movement Observations
• Pushing Assessment– Lumbo-pelvic-hip complex
• Lumbar spine arches
– Shoulder complex• Shoulders elevate
– Head• Head protrudes forward
while pushing

Movement Observations
• Pulling Assessment– Position
• Instruct client to draw abdomen in, feet shoulder width, and toes pointing forward.
– Movement• Instruct client to pull handles
toward body and return slowly.
• Perform up to 20 repetitions

Movement Observations
• Pulling Assessment– Lumbo-pelvic-hip complex
• Lumbar spine arches
– Shoulder complex• Shoulder elevates
– Head• Head protrudes forward
while pulling

Performance
• Performance assessments can be used for clients trying to improve athletic performance.
• Basic performance assessments include:– Davies Test– Shark Skill Test – Bench Press Strength Assessment– Leg Press Strength Assessment

Performance Assessments
• Davies Test– Designed to assess upper extremity agility and stabilization – May not be suitable for individuals who lack shoulder stability

Performance Assessments
• Davies Test– Position
• Begin by placing two pieces of tape on the floor, 36 inches apart.
• Position client in a push-up position, with one hand on each piece of tape.
– Movement• Instruct client to quickly move his or her right hand to touch the
left hand.
• Perform alternating touching on each side, for 15 seconds.
• Repeat for three trials.

Performance Assessments
• Shark Skill Test – Designed to assess lower extremity agility and neuromuscular
control – Should be viewed as a progression from the single-leg squat – May not be suitable for all individuals

Performance Assessments
• Shark Skill Test– Position
• Position client in the center box of a box grid, with hands on hips and standing on one leg.
– Movement• Instruct client to hop to each box in a designated pattern, always
returning to the center box. Be consistent with the pattern that you expect of the client.
• Perform one practice run through the boxes with each foot.• Perform twice with each foot (four times total). Keep track of time. • Penalize 0.10 seconds for each of the following faults:
– Nonhopping leg touches ground– Hands come off hips– Foot goes into wrong square– Foot does not return to center square

Performance Assessments
• Bench Press Strength Assessment– Designed to estimate the one-rep maximum, for training intensity
purposes – Advanced assessment (for strength-specific goals)– May not be suitable for many clients

Performance Assessments
• Bench Press Strength Assessment– Position
• Position client on a bench, lying on his or her back. Feet should be pointed straight ahead. The low back should be in a neutral position.
– Movement• Instruct client to warm with a light weight for 8–10 repetitions
then rest 1 minute.
• Add 30 to 40 pounds (10–20% of initial load) and perform 3 to 5 repetitions then rest 2 minutes.
• Repeat this step until a true one-rep maximum has been achieved.

Performance Assessments
• Squat Assessment – Designed to estimate the one-rep leg press maximum, for
training intensity purposes – Advanced assessment (for strength-specific goals)– May not be suitable for many clients

Performance Assessments
• Squat Strength Assessment– Position
• Position standing with bar on his or her back. Feet should be pointed straight ahead and knees in line with the toes. The low back should be in a neutral position.
– Movement• Instruct client to perform 3–5 repetitions with perfect form.
• Chart amount of weight used for accomplished repetitions.
• Refer to the appendix of the textbook for comparison charts to estimate the one-rep maximum.

Summary
• The fitness assessment enables the fitness professional to decide the appropriate selection of flexibility, cardiorespiratory, core, balance, power, and strength training exercises.