chapter 5cdn.ttgtmedia.com/searchwin2000/downloads/winservcluster...232 windows server 2003...
TRANSCRIPT
CHAPTER 5
Designing a ClusteredSolution with Windows
SQL Server 2000Enterprise Edition
231
OsbNetw / Windows Server 2003 Clustering & Load Balancing / Shimonski/ 222622-6 / Chapter 5
P:\010Comp\OsbNetw\622-6\ch05.vpMonday, March 24, 2003 9:55:24 AM
Color profile: Generic CMYK printer profileComposite Default screen

232 Windows Server 2003 Clustering & Load Balancing
OsbNetw / Windows Server 2003 Clustering & Load Balancing / Shimonski/ 222622-6 / Chapter 5
In this chapter, you build, from scratch, a Windows Cluster solution using WindowsServer 2003 and SQL Server. At press time, Microsoft’s newest version of SQL Server,codenamed “Longhorn,” is too far out to be in beta, so we’ll build a clustered solution
with Windows Server 2003 and Microsoft SQL Server 2000. We’ll look at all the planningyou need to do, the actual installation, and then the configuration of the two-nodecluster. After this, you can see many of the things that could go wrong with your newSQL database cluster, as well as some advanced troubleshooting issues.
PREDESIGN PLANNINGAs with everything else covered in this book so far, taking the time to plan and designyour solution properly is the key to success. You simply can’t wing it. Every chapter hasstressed the importance of preplanning and design work, which is equally important inthis chapter. In this section, you install SQL Server 2000 Enterprise Edition (requiredfor clustering) on to a two-node failover cluster using Windows Server 2003. In Chapter1, you learned the importance of implementing a clustered solution. In the chaptersthat followed, you also saw how to implement clustered and load-balanced solutionsto achieve high availability. Now, you learn how to build a backend database tier intoyour Highly Available solution. Failover clustering in SQL Server 2000 is built on topof the Clustering Service within either Windows 2000 or Windows Server 2003 servers.You want to have a cluster because, generally, SQL Server is where your company’sdata is stored in the form of one or more databases. You can see a typical SQL Clustertopology in Figure 5-1.
Not to have access to this data could prove crippling if your company depends onit. The Cluster Service allows a controlled form of access to a shared disk where yourdatabases can reside. In time of failure, the other node can provide access to this sharedstorage. The same form of reliability (covered in Chapter 2) also goes for designing aRAID solution on the shared storage for redundancy and reliability. You must takeeverything into consideration before you install SQL Server on to your cluster becausewithout reading and planning, you might make a few mistakes that could cost youtime or be damaging to the preexisting cluster. Let’s look at, and find out why, andthen learn what the proper steps are for planning.
SQL Server Component PlanningWhen designing and planning a SQL Server cluster solution, you must understandwhat you’re working with to plan for it properly. You need to address many itemsof importance before installing and you must perform an unbelievable amount ofpreparation work first to achieve SQL cluster success.
P:\010Comp\OsbNetw\622-6\ch05.vpMonday, March 24, 2003 9:55:24 AM
Color profile: Generic CMYK printer profileComposite Default screen

Chapter 5: Designing a Clustered Solut ion with Windows SQL Server 2000 Enterprise Edit ion 233
OsbNetw / Windows Server 2003 Clustering & Load Balancing / Shimonski/ 222622-6 / Chapter 5
First, you should know that SQL Server 2000, when clustered, is placed on top ofa preexisting cluster solution. This means you first need to read either Chapter 2 orChapter 3 before you begin this chapter. SQL Server 2000 is built on top of an existingcluster and is a cluster-aware application. The SQL Server 2000 becomes a VirtualServer on top of the existing cluster solution.
SQL Server Virtual Server NameThe SQL Server Virtual name is the name of the SQL Server you’ll reference. This couldbe confusing because you’ll be naming your cluster nodes and you might think you’re
Figure 5-1. Typical topology of a SQL cluster
P:\010Comp\OsbNetw\622-6\ch05.vpMonday, March 24, 2003 9:55:24 AM
Color profile: Generic CMYK printer profileComposite Default screen

234 Windows Server 2003 Clustering & Load Balancing
naming them to be the actual SQL Server, but this isn’t the case. As you reference a singlename for SQL Server shared between two or more nodes, it must be unique to the cluster.This is called the Virtual Name, which is what all applications and clients will use to referto the SQL Server instance you created. The cluster nodes will only be referenced bytheir Virtual Names, not by their individual names.
SQL Server Virtual Server IP AddressingYou have one single IP address the clients need to access between two or more clusterednodes. This is why planning accordingly beforehand is important, so you don’t have aproblem during implementation. To reach the SQL Server instance, you need a VirtualServer IP address.
SQL Server Virtual Server Administrator AccountYou need either a preexisting or a new account to serve as the Virtual Server Administratoraccount. You can, however, use an Administrator Account (or a preexisting account),but remember what you learned earlier: in a test lab environment, this is okay, butwhen in production, you might want to create a separate service account for this purposealone. The reason is, eventually, you’ll have to change a password, or delete or disablethe account. When this happens, chaos will consume your SQL implementation becauseit could cease to function for you. The new account you create (or the preexisting oneyou use) can serve as the SQL Server service account. The account must be a domainadministrator, so when you create it, make sure this is a group you select and add tothe account.
Shared Components of a Clustered SQL ServerAs just highlighted, you have two or more nodes clustered with a Virtual SQL Serverinstance, and an IP address and an account they also share. Now, let’s look at some ofthe other components that must be shared between instances of SQL Server when it’sclustered. The following components in Table 5-1 are the underlying shared components.
Remember, while planning your SQL Server cluster, you must understand yourlimitation on exactly what you can create. For instance, when you install SQL Server asa clustered resource (Virtual Server), then you have one default instance and up to 15named instances. When discussing instances, you also must look at what kind of failoversupport to plan for when clustering SQL Server. You have the option of having singleinstance or multiple instance failover. Single instance clusters replace what you know asan Active/Passive arrangement. Multiple instance clusters replace what you know as anActive/Active arrangement.
Single Instance Cluster When designing a single instance cluster, remember, a singleinstance cluster has one active instance of SQL Server owned by a single node only.
OsbNetw / Windows 2000 & Windows Server 2003 Clustering & Load Balancing / Shimonski/ 222622-6 / Chapter 5
P:\010Comp\OsbNetw\622-6\ch05.vpMonday, March 24, 2003 9:55:25 AM
Color profile: Generic CMYK printer profileComposite Default screen

Chapter 5: Designing a Clustered Solut ion with Windows SQL Server 2000 Enterprise Edit ion 235
OsbNetw / Windows Server 2003 Clustering & Load Balancing / Shimonski/ 222622-6 / Chapter 5
Any other nodes in the cluster are in a wait state. This is the same as saying an Active/Passive cluster has one node operational to accept client requests, while the other standsidle waiting, but not accepting client requests.
Multiple Instance Cluster When building multiple instance clusters, you can build up tofour nodes. When you do, you can also have support for up to 16 instances. You’ll wantto design for having no more than four instances, though, to keep the ratio one to one . . .or four nodes, four instances. When you design each virtual node, you also want toensure you have one shared disk resource per virtual node. You can keep physical disksall in one single hardware-based array, but you’ll want to verify that your design allowsyour logical names to be unique for each instance.
You’ll understand more of the terminology as you continue reading this section, sowhen the time comes to run the setup, your design will be sound and you’ll understandwhat’s being asked of you.
SQL Server Cluster ModelSQL Server 2000 has support for the shared nothing cluster model, where each nodemanages its own resources and provides nonsharing data services. You can set upfailover with SQL Server 2000 by configuring one of two models: Active/Active andActive/Passive.
Active/Active (Multiple Instance)When using the Active-to-Active configuration, each node in the SQL Cluster has aninstance of SQL Server, which is managed by the Cluster Service. Each instance isresponsible for its own data set. When a failover does occur, the node that’s still available
Full-Text Search Each instance gets its own clustered full-textsearch resource.This search relies on the underlying MicrosoftSearch service.This service is shared by all instances.
Microsoft Distributed TransactionCoordinator (MSDTC)
Only one MSDTC resource exists per cluster.
Microsoft Message Queuing (MSMQ) All applications using MSMQ have the same limitationas with MSDTC.All instances share a single resource.
Table 5-1. SQL Server Shared Components
P:\010Comp\OsbNetw\622-6\ch05.vpMonday, March 24, 2003 9:55:25 AM
Color profile: Generic CMYK printer profileComposite Default screen

takes over for the failed node. Each node keeps a separate master database, as seen inFigure 5-2 and the following illustration.
236 Windows Server 2003 Clustering & Load Balancing
OsbNetw / Windows Server 2003 Clustering & Load Balancing / Shimonski/ 222622-6 / Chapter 5
Figure 5-2. Viewing the master database
P:\010Comp\OsbNetw\622-6\ch05.vpMonday, March 24, 2003 9:55:25 AM
Color profile: Generic CMYK printer profileComposite Default screen
One good reason to go with an Active/Active solution is if you want to partitionyour database. Because nodes in an Active/Active cluster each have their own instanceof SQL Server, this design is better for partitioned databases. Partitioning offers theadvantage of load distribution and redundancy, but requires more effort to bring onlineand is, therefore, harder to configure.
Active/Passive (Single Instance)With Active/Passive, instead of multiple instances, the cluster runs only one singleinstance of SQL Server and is managed via the Cluster Service. When a client makes arequest, only one node can answer at a time. When that node fails, the other node takesover for it during failover. When using this configuration, the two nodes share a masterdatabase. In this chapter, we’ll configure a simple Active/Passive two-node cluster.
Everything covered here is only to give you an idea on how to lay out your plan forSQL Server clustering. Most of this terminology is an add-on to Chapters 1, 2, and 3.You should understand the general concepts of clustering, load balancing, and highavailability, and you should know the terminology used to explain the same basicconcepts when designing a SQL cluster. Let’s look at some cost issues.
Planning for Failover-Based PricingBe careful when you design a solution with SQL Server and clustering. This is becauseyou might get hit with some heavy pricing for the components and software you need.Always visit Microsoft.com for the latest pricing or contact a reseller but, when youlicense SQL Server, you can do so through paying per processor. Also, specific costs arerelated to your design. If you plan to go with Active/Passive failover, you could have aprice break waiting for you. When you license the SQL product via processor, you canbend the rules when configuring Active/Passive failover. What’s nice is the Passivecomputer doesn’t require a processor or a server license. Active/Active configurationsrequire licensing both servers because you’re using both servers simultaneously.
Another good way to plan your server rollout (and cost analysis) is to plan for morecapacity than you think you might use. To be cheap on disk space when designing adatabase cluster is a mistake. Trying to get by with the bare minimum in the beginningisn’t cost-effective. You end up spending much more money adding more hard drivespace than it would have cost to build in extra capacity at the beginning. As a good ruleof thumb, you should try to plan for two or three years down the road and determinewhat you expect to need. If you run low on space, this could cause you bad performance,and then your Highly Available solution will no longer be as highly available as you want.
SQL Server 2000 Minimum RequirementsWhen designing a Windows 2000 or Windows Server 2003 cluster with SQL Server 2000,you must take into account the added requirements you’ll need. Now, more than ever,the requirements will either spell success or disaster for you. I can guarantee if you skimpon requirements for a SQL Server implementation, you’ll be unhappy. First, let’s look
Chapter 5: Designing a Clustered Solut ion with Windows SQL Server 2000 Enterprise Edit ion 237
OsbNetw / Windows Server 2003 Clustering & Load Balancing / Shimonski/ 222622-6 / Chapter 5
P:\010Comp\OsbNetw\622-6\ch05.vpMonday, March 24, 2003 9:55:25 AM
Color profile: Generic CMYK printer profileComposite Default screen
238 Windows Server 2003 Clustering & Load Balancing
OsbNetw / Windows Server 2003 Clustering & Load Balancing / Shimonski/ 222622-6 / Chapter 5
at Table 5-2, so you can learn the minimum requirements. After that, we’ll reviewsound design advice for your implementation.
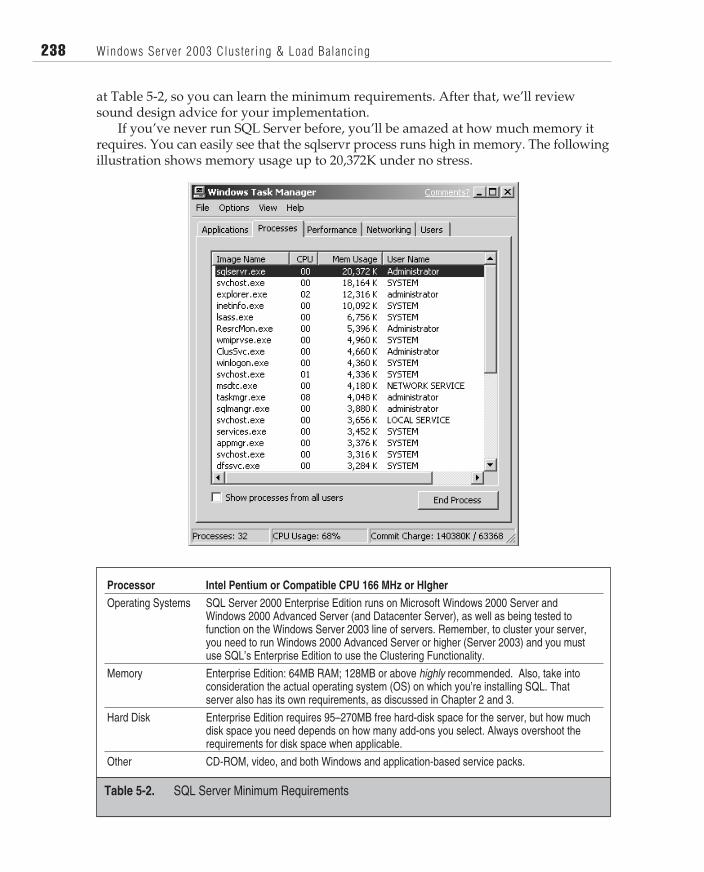
If you’ve never run SQL Server before, you’ll be amazed at how much memory itrequires. You can easily see that the sqlservr process runs high in memory. The followingillustration shows memory usage up to 20,372K under no stress.
Processor Intel Pentium or Compatible CPU 166 MHz or HIgherOperating Systems SQL Server 2000 Enterprise Edition runs on Microsoft Windows 2000 Server and
Windows 2000 Advanced Server (and Datacenter Server), as well as being tested tofunction on the Windows Server 2003 line of servers. Remember, to cluster your server,you need to run Windows 2000 Advanced Server or higher (Server 2003) and you mustuse SQL’s Enterprise Edition to use the Clustering Functionality.
Memory Enterprise Edition: 64MB RAM; 128MB or above highly recommended. Also, take intoconsideration the actual operating system (OS) on which you’re installing SQL. Thatserver also has its own requirements, as discussed in Chapter 2 and 3.
Hard Disk Enterprise Edition requires 95–270MB free hard-disk space for the server, but how muchdisk space you need depends on how many add-ons you select. Always overshoot therequirements for disk space when applicable.
Other CD-ROM, video, and both Windows and application-based service packs.
Table 5-2. SQL Server Minimum Requirements
P:\010Comp\OsbNetw\622-6\ch05.vpMonday, March 24, 2003 9:55:26 AM
Color profile: Generic CMYK printer profileComposite Default screen
OsbNetw / Windows Server 2003 Clustering & Load Balancing / Shimonski/ 222622-6 / Chapter 5
Chapter 5: Designing a Clustered Solut ion with Windows SQL Server 2000 Enterprise Edit ion 239
When planning your SQL Server cluster, you need to follow the guidelines of theminimum requirements, but exceed them as much as possible. You also need to takeinto account what else you might be running on this server. I have the SQL EnterpriseManager, the Cluster Administrator, and a few other utilities open at the same time,and I already have my server running at 145MB of used memory. Any good SQLServer implementation should be running anywhere from 512MB of RAM all the wayup to a gigabyte of RAM, if possible. Let’s look at some more detailed high-levelplanning for your SQL Server implementation.
Planning Tips for SQL Server 2000 Failover Cluster ServersIn this section, I want to create several lists for you to follow when you plan the scalingof your nodes in respect to SQL cluster planning.
• Make sure you know what the workload of your nodes will be. Although youmight not know what this is, you can test for it in the lab. Benchmarkingperformance of your applications when running on the server can give youan idea of what’s expected.
• Project your possible workload in the future, if possible. Do you foresee agradual rise in workload or will this be stagnant with little growth? Do yousee a sharp rise in growth? Planning now saves time later.
• You can also use the server’s System Monitor found in the Performance MMC,within the Administrative Tools folder in the Control Panel. We discuss thistool in Chapter 8, but this is what you can use in your lab to get an idea abouthardware resources for your server.
• Make sure you plan for your nodes to be configured with the same hardwareresources or make the failover node more powerful. Never create a node youwill “failover” to another node that has fewer resources than the original node.This can cause degradation of performance to a server during the failover.
• Visit the SQL Server web site to review for any last minute hot fixes and servicepacks that need to be applied for functionality and safety reasons at http://www.microsoft.com/sql.
• You can also visit the HCL for hardware resources that are compliant with SQLClustering. You can visit the site at http://www.microsoft.com/hcl.
Placement of SQL Server in the N-Tier ArchitectureDesign considerations for SQL Server within an N-tier architecture are important to follow.As you move closer to rolling out this solution into your Enterprise Server, you need topay close attention to where you’ll place the clusters in respect to the rest of the serversin your infrastructure. Figure 5-3 shows the main components of an N-tier architectureand where SQL Server will reside in a two-node cluster.
P:\010Comp\OsbNetw\622-6\ch05.vpMonday, March 24, 2003 9:55:26 AM
Color profile: Generic CMYK printer profileComposite Default screen

240 Windows Server 2003 Clustering & Load Balancing
OsbNetw / Windows Server 2003 Clustering & Load Balancing / Shimonski/ 222622-6 / Chapter 5
Remember, this is only a guideline. You needn’t follow this architecture layoutto the letter. Just make sure you know where you want to put this cluster and how toposition it best for your company’s benefit.
Virtual ServerWhen you install SQL Server, you won’t install it normally as you might have in thepast. In this chapter, you’ll install the server as a Virtual Server. When you prepareyour server nodes for a SQL Server cluster, be familiar with the Cluster Administratorand what’s found within it. When you install SQL Server, the Cluster Administratorwill become an element within that console. When you install SQL Server, it brings upan option to install as a Virtual Server, as seen in the next illustration.
Figure 5-3. SQL in the data layer of an N-tier architecture
P:\010Comp\OsbNetw\622-6\ch05.vpMonday, March 24, 2003 9:55:26 AM
Color profile: Generic CMYK printer profileComposite Default screen

OsbNetw / Windows Server 2003 Clustering & Load Balancing / Shimonski/ 222622-6 / Chapter 5
Each cluster group within the Cluster Administrator can contain, at most, oneVirtual SQL Server. A Virtual Server will also be configured with its own IP addressseparate from that of the cluster. This way, the clustered resource is unique and separatefrom the clustered nodes that grant you access to it. When you plan your SQL Cluster,you need to have an IP address separate from all other hosts on the network to use foronly that instance of SQL Server. The following is a layout of IP addresses you mightwant to consider.
• Public LAN Default Gateway: 192.168.1.1 /24
• Public LAN SQL Node 1: 192.168.1.2 /24
• Public LAN SQL Node 2: 192.168.1.3 /24
• SQL Server Virtual Server IP: 192.168.1.30 /24
Remember, though, this is only a guideline and you can (and should now be able to)select which IP addresses you need to configure for your network and cluster solutions.Now, let’s review a checklist you’ll want to follow for preparing for the SQL Servercluster solution.
Preinstallation ChecklistThe following is a detailed check list of points to complete before you install SQLServer on your nodes to create a SQL Cluster.
1. Read the beginning of this chapter and make sure you have all your minimumrequirements squared away based on hardware.
Chapter 5: Designing a Clustered Solut ion with Windows SQL Server 2000 Enterprise Edit ion 241
P:\010Comp\OsbNetw\622-6\ch05.vpMonday, March 24, 2003 9:55:26 AM
Color profile: Generic CMYK printer profileComposite Default screen

242 Windows Server 2003 Clustering & Load Balancing
OsbNetw / Windows Server 2003 Clustering & Load Balancing / Shimonski/ 222622-6 / Chapter 5
2. Make sure you have all the installation media, CD-ROMs, and any other formof software you need.
3. Plan your IP addressing scheme and allocate what you need from a spreadsheet,database, or networking group.
4. Plan to practice the installation with a pilot first. If you want to go straight toproduction, though, thoroughly plan your back-out plan and make sure youhave it handy if failure occurs.
5. Make a full backup copy of your production data. Then, if anything fails, youcan rebuild the servers and reapply the data afterward.
6. Hardware Compatibility List (HCL)-based hardware should be used and thehardware should be listed in the cluster category.
7. Select what platform you want to build your cluster on. If you’re usingWindows 2000 Advanced Server, make sure you go through Chapter 2 andprepare a cluster properly. If you select Windows Server 2003, go back throughChapter 3 and build a cluster properly. Make sure all service packs and hotfixes are applied.
8. Your Cluster Service nodes need to be logged into a domain. The domain mustbe readily available for the cluster service accounts to log into the domain orthe service will fail.
9. Your Cluster Service account must also be active and available to log intothe domain.
Now that you have your cluster platform available, you need to start workingtoward SQL-specific configurations.
10. Disable NetBIOS for all private network Heartbeat NIC cards before you startthe SQL Server setup program.
11. Check all the server event and error logs to make sure you don’t mistake oldproblems for new ones. You can make copies of all the old logs, so when you gothrough your installation and configuration, you can go right into the new logsand quickly see problems that are the result of the installation and configurationof SQL Server on your cluster.
12. You must configure MSDTC to run on a cluster, which you learn about in thefollowing section.
Installing and Configuring MSDTCMicrosoft Distributed Transaction Coordinator (MSDTC) is required by SQL Server 2000in a cluster for distributed queries, replication functionality, and two-phase committransactions. In a distributed environment, you must run transactions across multiplesystems at all times. Much of this is important to maintain the integrity and consistencyof the data on each system. MSDTC provides for complete transaction managementin a distributed environment. MSDTC coordinates transactions that span multiple
P:\010Comp\OsbNetw\622-6\ch05.vpMonday, March 24, 2003 9:55:26 AM
Color profile: Generic CMYK printer profileComposite Default screen
Chapter 5: Designing a Clustered Solut ion with Windows SQL Server 2000 Enterprise Edit ion 243
OsbNetw / Windows Server 2003 Clustering & Load Balancing / Shimonski/ 222622-6 / Chapter 5
databases and message queues. If the MSDTC service is stopped or disabled, thenthese transactions won’t happen.
After you install Microsoft Windows 2000 Advanced Server and/or WindowsServer 2003, and then configure your cluster, you must run the Comclust.exe programon all nodes to configure MSDTC. Then MSDTC can run in Cluster mode. In thissection, you learn all the configuration steps you need to know and set up beforeinstalling SQL Server as a Virtual Server.
By default, when MSDTC installs, it configures itself to the cluster group and setsits log on the quorum disk. This is fine but, because MSDTC will work from node toclustered node, you should configure MSDTC in a cluster as a resource. When workingwith SQL Server clustering and MSDTC, you might want to take a few things intoconsideration. For instance, if you’re clustering SQL Server, then only one instanceof MSDTC is needed. You can configure MSDTC as a resource in the cluster group,which we’ll do momentarily. Also, you’ll want to (per Microsoft’s guidelines andrecommendations) install the MSDTC resource in a group other than the main clustergroup. You can simply create a new cluster group (as explained in Chapters 2 and 3)and create the instance there. Although this is a design recommendation, it isn’t totallynecessary. Microsoft recommends that if you have it set up in the cluster group, thenyou should leave it as is. If the cluster isn’t yet in a production-based role, then therecommendation is that SQL Server be unclustered and you follow the following steps inthis section to move the MSDTC resource to a group other than the original cluster group.
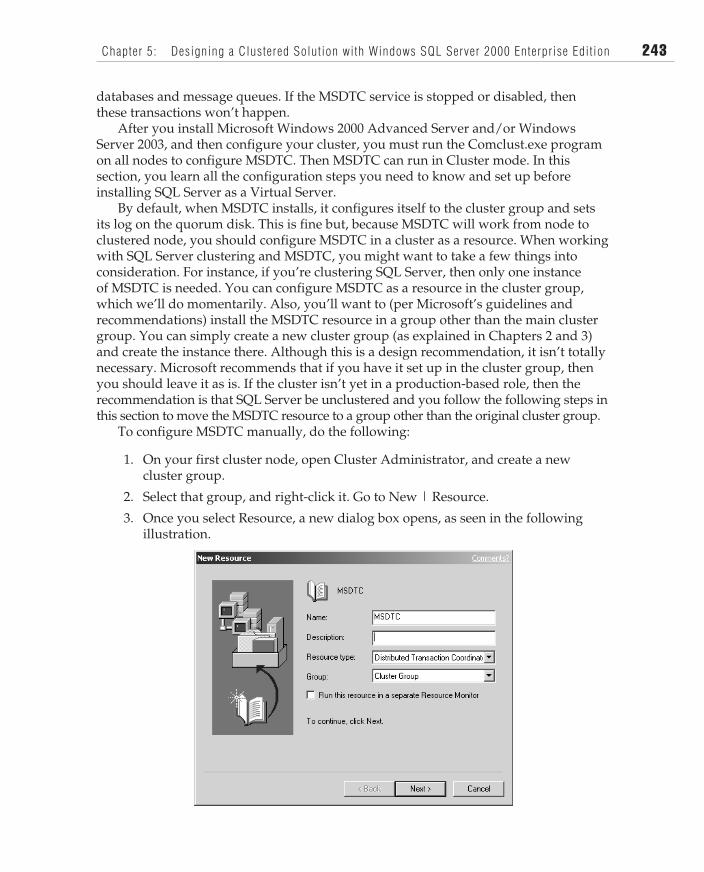
To configure MSDTC manually, do the following:
1. On your first cluster node, open Cluster Administrator, and create a newcluster group.
2. Select that group, and right-click it. Go to New | Resource.
3. Once you select Resource, a new dialog box opens, as seen in the followingillustration.
P:\010Comp\OsbNetw\622-6\ch05.vpMonday, March 24, 2003 9:55:27 AM
Color profile: Generic CMYK printer profileComposite Default screen
244 Windows Server 2003 Clustering & Load Balancing
OsbNetw / Windows Server 2003 Clustering & Load Balancing / Shimonski/ 222622-6 / Chapter 5
4. Create the new resource by entering the name of the resource (MSDTC) and whichgroup you want to install it into. Select the resource type, which is also MSDTC.
5. Click Next, and then finish creating the resource. Close Cluster Administratorto finalize the process of making a new resource.
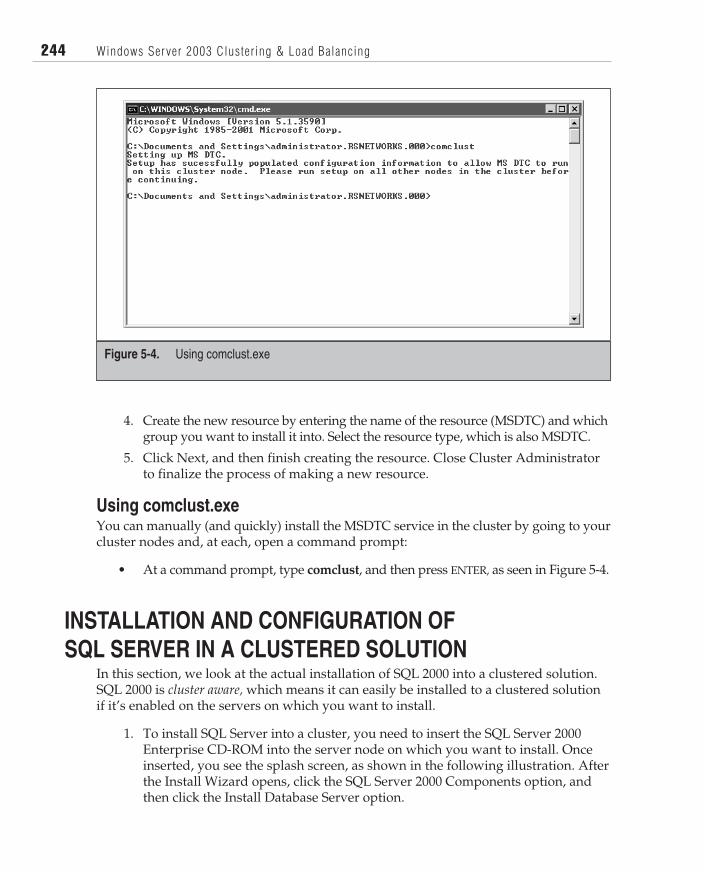
Using comclust.exeYou can manually (and quickly) install the MSDTC service in the cluster by going to yourcluster nodes and, at each, open a command prompt:
• At a command prompt, type comclust, and then press ENTER, as seen in Figure 5-4.
INSTALLATION AND CONFIGURATION OFSQL SERVER IN A CLUSTERED SOLUTION
In this section, we look at the actual installation of SQL 2000 into a clustered solution.SQL 2000 is cluster aware, which means it can easily be installed to a clustered solutionif it’s enabled on the servers on which you want to install.
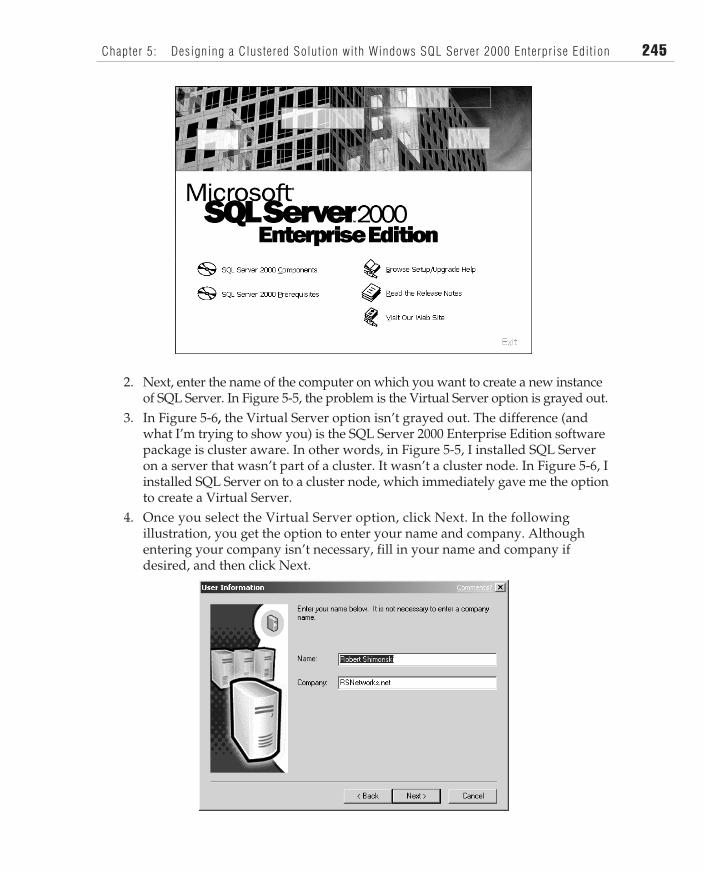
1. To install SQL Server into a cluster, you need to insert the SQL Server 2000Enterprise CD-ROM into the server node on which you want to install. Onceinserted, you see the splash screen, as shown in the following illustration. Afterthe Install Wizard opens, click the SQL Server 2000 Components option, andthen click the Install Database Server option.
Figure 5-4. Using comclust.exe
P:\010Comp\OsbNetw\622-6\ch05.vpMonday, March 24, 2003 9:55:27 AM
Color profile: Generic CMYK printer profileComposite Default screen
Chapter 5: Designing a Clustered Solut ion with Windows SQL Server 2000 Enterprise Edit ion 245
OsbNetw / Windows Server 2003 Clustering & Load Balancing / Shimonski/ 222622-6 / Chapter 5
2. Next, enter the name of the computer on which you want to create a new instanceof SQL Server. In Figure 5-5, the problem is the Virtual Server option is grayed out.
3. In Figure 5-6, the Virtual Server option isn’t grayed out. The difference (andwhat I’m trying to show you) is the SQL Server 2000 Enterprise Edition softwarepackage is cluster aware. In other words, in Figure 5-5, I installed SQL Serveron a server that wasn’t part of a cluster. It wasn’t a cluster node. In Figure 5-6, Iinstalled SQL Server on to a cluster node, which immediately gave me the optionto create a Virtual Server.
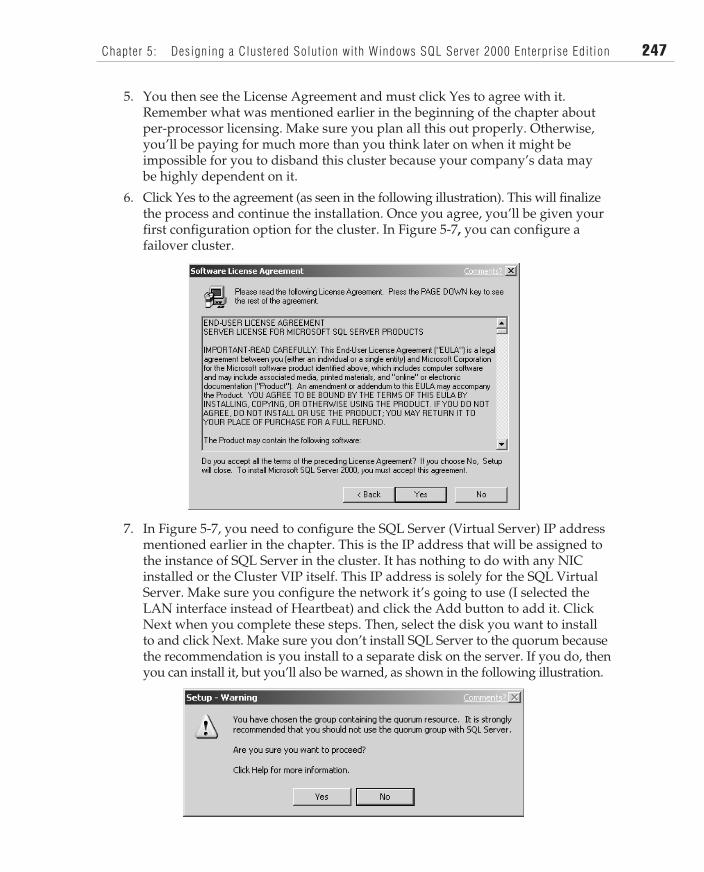
4. Once you select the Virtual Server option, click Next. In the followingillustration, you get the option to enter your name and company. Althoughentering your company isn’t necessary, fill in your name and company ifdesired, and then click Next.
P:\010Comp\OsbNetw\622-6\ch05.vpMonday, March 24, 2003 9:55:27 AM
Color profile: Generic CMYK printer profileComposite Default screen

246 Windows Server 2003 Clustering & Load Balancing
OsbNetw / Windows Server 2003 Clustering & Load Balancing / Shimonski/ 222622-6 / Chapter 5
Figure 5-5. No Virtual Server option
Figure 5-6. Virtual Server option available
P:\010Comp\OsbNetw\622-6\ch05.vpMonday, March 24, 2003 9:55:27 AM
Color profile: Generic CMYK printer profileComposite Default screen
Chapter 5: Designing a Clustered Solut ion with Windows SQL Server 2000 Enterprise Edit ion 247
OsbNetw / Windows Server 2003 Clustering & Load Balancing / Shimonski/ 222622-6 / Chapter 5
5. You then see the License Agreement and must click Yes to agree with it.Remember what was mentioned earlier in the beginning of the chapter aboutper-processor licensing. Make sure you plan all this out properly. Otherwise,you’ll be paying for much more than you think later on when it might beimpossible for you to disband this cluster because your company’s data maybe highly dependent on it.
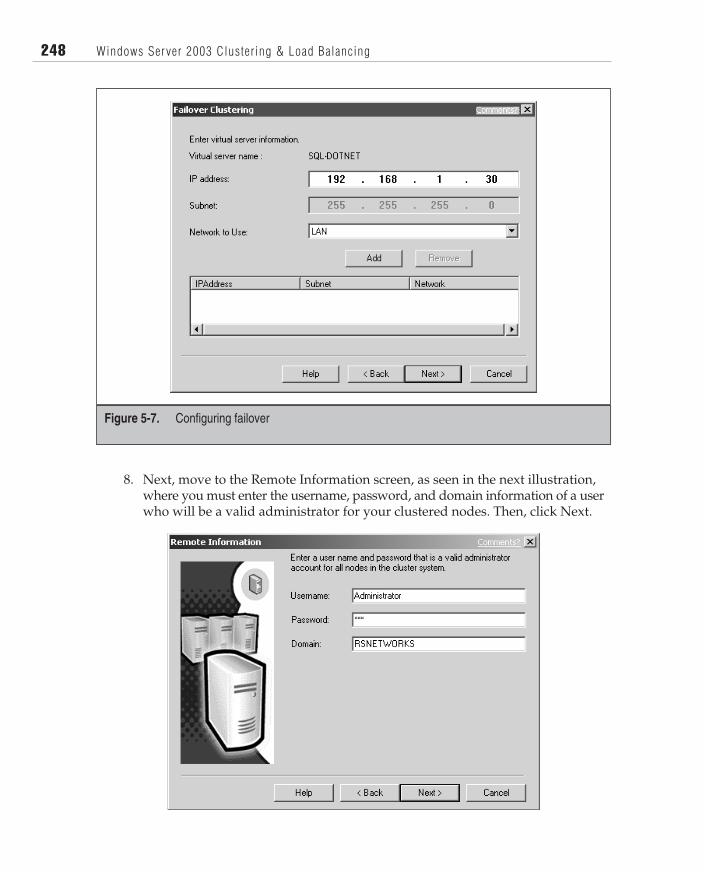
6. Click Yes to the agreement (as seen in the following illustration). This will finalizethe process and continue the installation. Once you agree, you’ll be given yourfirst configuration option for the cluster. In Figure 5-7, you can configure afailover cluster.
7. In Figure 5-7, you need to configure the SQL Server (Virtual Server) IP addressmentioned earlier in the chapter. This is the IP address that will be assigned tothe instance of SQL Server in the cluster. It has nothing to do with any NICinstalled or the Cluster VIP itself. This IP address is solely for the SQL VirtualServer. Make sure you configure the network it’s going to use (I selected theLAN interface instead of Heartbeat) and click the Add button to add it. ClickNext when you complete these steps. Then, select the disk you want to installto and click Next. Make sure you don’t install SQL Server to the quorum becausethe recommendation is you install to a separate disk on the server. If you do, thenyou can install it, but you’ll also be warned, as shown in the following illustration.
P:\010Comp\OsbNetw\622-6\ch05.vpMonday, March 24, 2003 9:55:28 AM
Color profile: Generic CMYK printer profileComposite Default screen
248 Windows Server 2003 Clustering & Load Balancing
OsbNetw / Windows Server 2003 Clustering & Load Balancing / Shimonski/ 222622-6 / Chapter 5
8. Next, move to the Remote Information screen, as seen in the next illustration,where you must enter the username, password, and domain information of a userwho will be a valid administrator for your clustered nodes. Then, click Next.
Figure 5-7. Configuring failover
P:\010Comp\OsbNetw\622-6\ch05.vpMonday, March 24, 2003 9:55:28 AM
Color profile: Generic CMYK printer profileComposite Default screen
Chapter 5: Designing a Clustered Solut ion with Windows SQL Server 2000 Enterprise Edit ion 249
OsbNetw / Windows Server 2003 Clustering & Load Balancing / Shimonski/ 222622-6 / Chapter 5
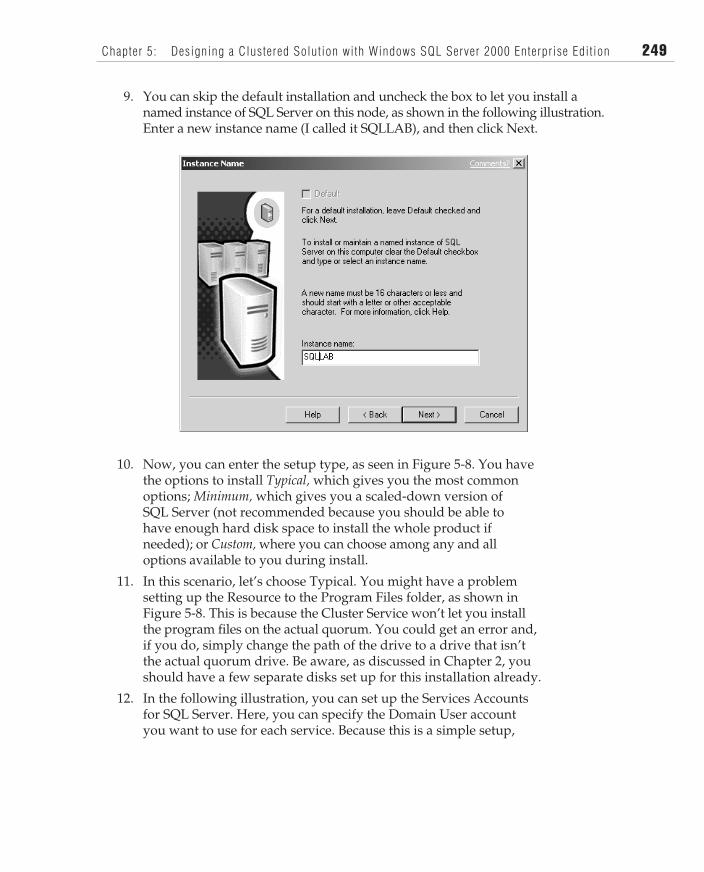
9. You can skip the default installation and uncheck the box to let you install anamed instance of SQL Server on this node, as shown in the following illustration.Enter a new instance name (I called it SQLLAB), and then click Next.
10. Now, you can enter the setup type, as seen in Figure 5-8. You havethe options to install Typical, which gives you the most commonoptions; Minimum, which gives you a scaled-down version ofSQL Server (not recommended because you should be able tohave enough hard disk space to install the whole product ifneeded); or Custom, where you can choose among any and alloptions available to you during install.
11. In this scenario, let’s choose Typical. You might have a problemsetting up the Resource to the Program Files folder, as shown inFigure 5-8. This is because the Cluster Service won’t let you installthe program files on the actual quorum. You could get an error and,if you do, simply change the path of the drive to a drive that isn’tthe actual quorum drive. Be aware, as discussed in Chapter 2, youshould have a few separate disks set up for this installation already.
12. In the following illustration, you can set up the Services Accountsfor SQL Server. Here, you can specify the Domain User accountyou want to use for each service. Because this is a simple setup,
P:\010Comp\OsbNetw\622-6\ch05.vpMonday, March 24, 2003 9:55:28 AM
Color profile: Generic CMYK printer profileComposite Default screen

I chose to have the same account used for each service—this is theadministrator account.
250 Windows Server 2003 Clustering & Load Balancing
OsbNetw / Windows 2000 & Windows Server 2003 Clustering & Load Balancing / Shimonski/ 222622-6 / Chapter 5
Figure 5-8. Setup type
P:\010Comp\OsbNetw\622-6\ch05.vpMonday, March 24, 2003 9:55:28 AM
Color profile: Generic CMYK printer profileComposite Default screen

Chapter 5: Designing a Clustered Solut ion with Windows SQL Server 2000 Enterprise Edit ion 251
OsbNetw / Windows Server 2003 Clustering & Load Balancing / Shimonski/ 222622-6 / Chapter 5
13. Once you enter your account, click Next, and then you supply an Authenticationmode. Enter a strong password for the SA account. It has been (and will continueto be) the hacker’s choice for exploitation, so when you enter your password,make sure you secure it, and don’t use anything susceptible to an attack oreasily guessed. A blank password is not recommended. Windows Authenticationis the better choice, but I selected the mixed mode to give you more insight onthe SA account. You can see the SA login in the next illustration.
14. Once you enter your password, click Next. The following illustration showsverification of the files to be copied to your hard disk.
P:\010Comp\OsbNetw\622-6\ch05.vpMonday, March 24, 2003 9:55:29 AM
Color profile: Generic CMYK printer profileComposite Default screen
252 Windows Server 2003 Clustering & Load Balancing
OsbNetw / Windows Server 2003 Clustering & Load Balancing / Shimonski/ 222622-6 / Chapter 5
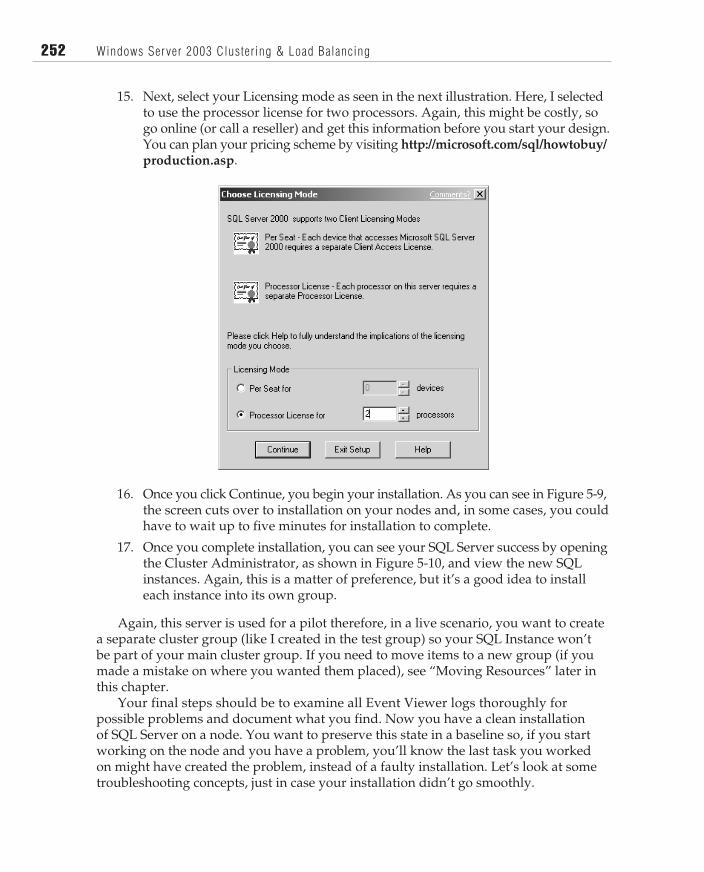
15. Next, select your Licensing mode as seen in the next illustration. Here, I selectedto use the processor license for two processors. Again, this might be costly, sogo online (or call a reseller) and get this information before you start your design.You can plan your pricing scheme by visiting http://microsoft.com/sql/howtobuy/production.asp.
16. Once you click Continue, you begin your installation. As you can see in Figure 5-9,the screen cuts over to installation on your nodes and, in some cases, you couldhave to wait up to five minutes for installation to complete.
17. Once you complete installation, you can see your SQL Server success by openingthe Cluster Administrator, as shown in Figure 5-10, and view the new SQLinstances. Again, this is a matter of preference, but it’s a good idea to installeach instance into its own group.
Again, this server is used for a pilot therefore, in a live scenario, you want to createa separate cluster group (like I created in the test group) so your SQL Instance won’tbe part of your main cluster group. If you need to move items to a new group (if youmade a mistake on where you wanted them placed), see “Moving Resources” later inthis chapter.
Your final steps should be to examine all Event Viewer logs thoroughly forpossible problems and document what you find. Now you have a clean installationof SQL Server on a node. You want to preserve this state in a baseline so, if you startworking on the node and you have a problem, you’ll know the last task you workedon might have created the problem, instead of a faulty installation. Let’s look at sometroubleshooting concepts, just in case your installation didn’t go smoothly.
P:\010Comp\OsbNetw\622-6\ch05.vpMonday, March 24, 2003 9:55:29 AM
Color profile: Generic CMYK printer profileComposite Default screen

OsbNetw / Windows Server 2003 Clustering & Load Balancing / Shimonski/ 222622-6 / Chapter 5
Chapter 5: Designing a Clustered Solut ion with Windows SQL Server 2000 Enterprise Edit ion 253
Figure 5-9. Installing SQL Server 2000
Figure 5-10. Viewing the SQL resources in Cluster Administrator
P:\010Comp\OsbNetw\622-6\ch05.vpMonday, March 24, 2003 9:55:29 AM
Color profile: Generic CMYK printer profileComposite Default screen
254 Windows Server 2003 Clustering & Load Balancing
OsbNetw / Windows Server 2003 Clustering & Load Balancing / Shimonski/ 222622-6 / Chapter 5
ADVANCED TROUBLESHOOTINGYou’ll find the mechanics of setting up a SQL Cluster are quite easy, but they can alsobe highly problematic. As a network or systems engineer, your responsibility is toquickly (and accurately) find and solve the problems at hand, as well as try to keepthem from happening in the first place. The installation and configuration of SQLServer clusters are the hardest (and most nerve-racking) to deal with. You have tounderstand that SQL Server is a database server, which means your company’s datais on that group of servers. This isn’t something you should take lightly because thedegree of risk is elevated.
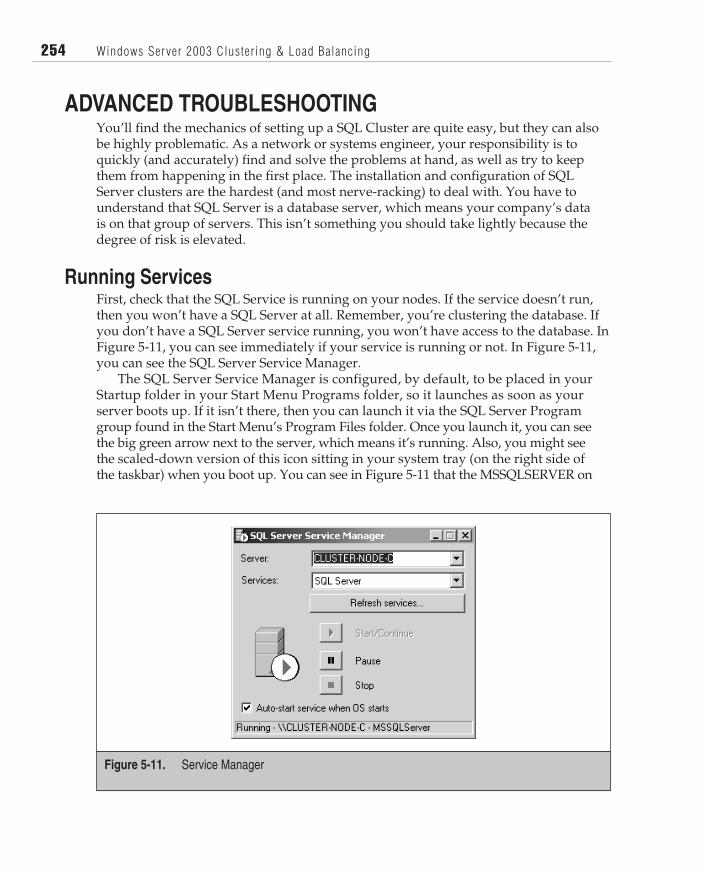
Running ServicesFirst, check that the SQL Service is running on your nodes. If the service doesn’t run,then you won’t have a SQL Server at all. Remember, you’re clustering the database. Ifyou don’t have a SQL Server service running, you won’t have access to the database. InFigure 5-11, you can see immediately if your service is running or not. In Figure 5-11,you can see the SQL Server Service Manager.
The SQL Server Service Manager is configured, by default, to be placed in yourStartup folder in your Start Menu Programs folder, so it launches as soon as yourserver boots up. If it isn’t there, then you can launch it via the SQL Server Programgroup found in the Start Menu’s Program Files folder. Once you launch it, you can seethe big green arrow next to the server, which means it’s running. Also, you might seethe scaled-down version of this icon sitting in your system tray (on the right side ofthe taskbar) when you boot up. You can see in Figure 5-11 that the MSSQLSERVER on
Figure 5-11. Service Manager
P:\010Comp\OsbNetw\622-6\ch05.vpMonday, March 24, 2003 9:55:29 AM
Color profile: Generic CMYK printer profileComposite Default screen
Chapter 5: Designing a Clustered Solut ion with Windows SQL Server 2000 Enterprise Edit ion 255
OsbNetw / Windows Server 2003 Clustering & Load Balancing / Shimonski/ 222622-6 / Chapter 5
Cluster-node-C is running, which is also a good indicator. If any of these indicators areshowing negative (like a big red stop icon), then you can try to start the service righthere in the Service Manager.
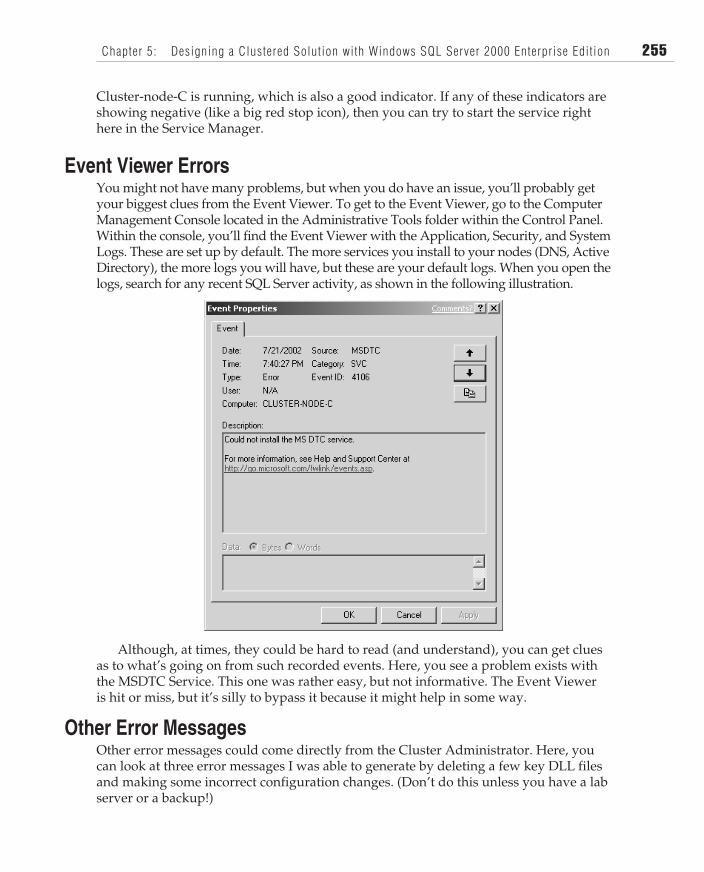
Event Viewer ErrorsYou might not have many problems, but when you do have an issue, you’ll probably getyour biggest clues from the Event Viewer. To get to the Event Viewer, go to the ComputerManagement Console located in the Administrative Tools folder within the Control Panel.Within the console, you’ll find the Event Viewer with the Application, Security, and SystemLogs. These are set up by default. The more services you install to your nodes (DNS, ActiveDirectory), the more logs you will have, but these are your default logs. When you open thelogs, search for any recent SQL Server activity, as shown in the following illustration.
Although, at times, they could be hard to read (and understand), you can get cluesas to what’s going on from such recorded events. Here, you see a problem exists withthe MSDTC Service. This one was rather easy, but not informative. The Event Vieweris hit or miss, but it’s silly to bypass it because it might help in some way.
Other Error MessagesOther error messages could come directly from the Cluster Administrator. Here, youcan look at three error messages I was able to generate by deleting a few key DLL filesand making some incorrect configuration changes. (Don’t do this unless you have a labserver or a backup!)
P:\010Comp\OsbNetw\622-6\ch05.vpMonday, March 24, 2003 9:55:29 AM
Color profile: Generic CMYK printer profileComposite Default screen

256 Windows Server 2003 Clustering & Load Balancing
OsbNetw / Windows Server 2003 Clustering & Load Balancing / Shimonski/ 222622-6 / Chapter 5
In the next illustration, you can see the Cluster Administrator isn’t allowing me touse the SQL Server Resource.
Further investigation leads me to the following illustration, where I can see that allthe SQL Server resources created during installation have been successfully damagedfrom my system modifications. This isn’t to show you how to wreck a server node. Instead,I want to show you how your server is going to react to possible problems you could have.Here, you might have to reinstall the SQL Server resource if you don’t have a valid backup.
Once I can finally open the Cluster Administrator, I see my Cluster Group is alsoshowing me a problem exists. In Figure 5-12, Cluster Administrator flags the Group
Figure 5-12. Damaged SQL Server resource in Cluster Administrator
P:\010Comp\OsbNetw\622-6\ch05.vpMonday, March 24, 2003 9:55:30 AM
Color profile: Generic CMYK printer profileComposite Default screen
(with a big red X) as well as the actual resource that could be damaged. Here, theSQLLAB resource we made during the installation has been damaged.
Again, I don’t expect you to mimic this (unless you really want to!), but I wantyou to see how the Server node will tell you there’s a problem. Let’s look at moreobscure problems and fixes.
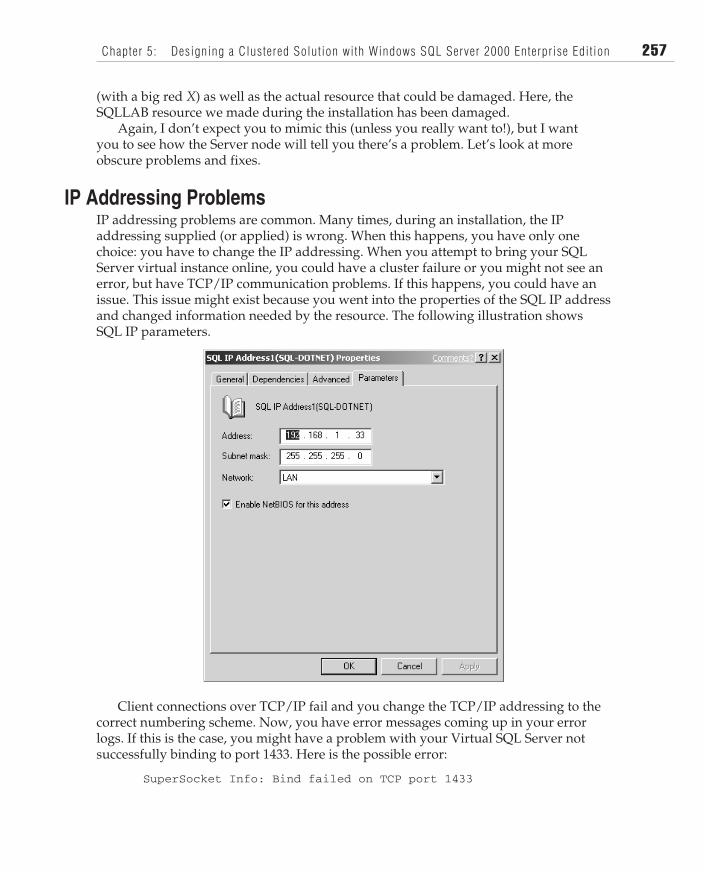
IP Addressing ProblemsIP addressing problems are common. Many times, during an installation, the IPaddressing supplied (or applied) is wrong. When this happens, you have only onechoice: you have to change the IP addressing. When you attempt to bring your SQLServer virtual instance online, you could have a cluster failure or you might not see anerror, but have TCP/IP communication problems. If this happens, you could have anissue. This issue might exist because you went into the properties of the SQL IP addressand changed information needed by the resource. The following illustration showsSQL IP parameters.
Client connections over TCP/IP fail and you change the TCP/IP addressing to thecorrect numbering scheme. Now, you have error messages coming up in your errorlogs. If this is the case, you might have a problem with your Virtual SQL Server notsuccessfully binding to port 1433. Here is the possible error:
SuperSocket Info: Bind failed on TCP port 1433
Chapter 5: Designing a Clustered Solut ion with Windows SQL Server 2000 Enterprise Edit ion 257
OsbNetw / Windows Server 2003 Clustering & Load Balancing / Shimonski/ 222622-6 / Chapter 5
P:\010Comp\OsbNetw\622-6\ch05.vpMonday, March 24, 2003 9:55:30 AM
Color profile: Generic CMYK printer profileComposite Default screen
258 Windows Server 2003 Clustering & Load Balancing
OsbNetw / Windows Server 2003 Clustering & Load Balancing / Shimonski/ 222622-6 / Chapter 5
Again, this is what you could get as an error if you change the Virtual SQL ServerIP address with the Cluster Administrator tool. If you must change the IP address ofthe SQL Server Virtual Server, then you must follow specific steps to accomplish it.Let’s see how to fix this problem.
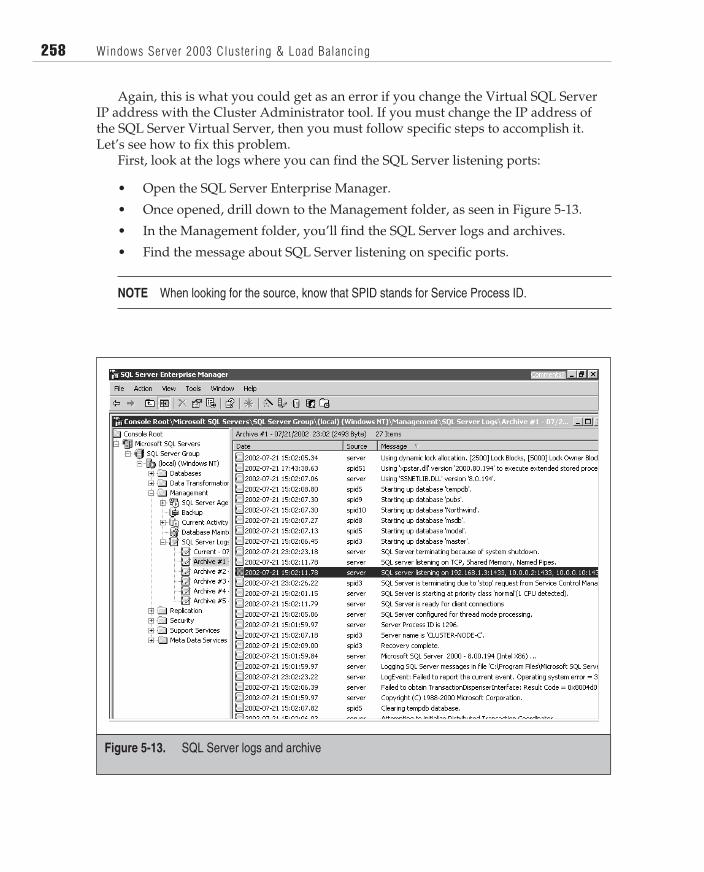
First, look at the logs where you can find the SQL Server listening ports:
• Open the SQL Server Enterprise Manager.
• Once opened, drill down to the Management folder, as seen in Figure 5-13.
• In the Management folder, you’ll find the SQL Server logs and archives.
• Find the message about SQL Server listening on specific ports.
NOTE When looking for the source, know that SPID stands for Service Process ID.
Figure 5-13. SQL Server logs and archive
P:\010Comp\OsbNetw\622-6\ch05.vpMonday, March 24, 2003 9:55:30 AM
Color profile: Generic CMYK printer profileComposite Default screen

Restart the SQL Server installation as previously outlined. Start the install, andremember to select and use the SQL Server 2000 Setup program Advanced\MaintainVirtual Server for Failover Clustering option. To use this Advanced\Maintain VirtualServer for Failover Clustering option, follow these steps:
1. Insert the SQL Server 2000 Enterprise Edition CD-ROM and let it start to install.
2. Click Install Database Server.
3. In the Welcome screen, click Next.
4. You can select the name of the Virtual Server you want to modify.
5. Type the name of the Virtual Server you want to modify (as seen in thefollowing illustration), and then click Next.
6. Click the Advanced Options tab, and then click Next.
7. Select Maintain a Virtual Server for Failover Clustering, and then click Next.
8. The Failover Clustering dialog box is now open.
9. You can add an IP address for additional networks, remove and replace anexisting IP Address, or remove IP addresses that are no longer needed.
10. Replace the IP address and click Add | Next.
11. Click Next once again, unless you want to modify more options.
12. Verify all preexisting information by clicking Next.
13. Click Finish to complete the changes.
Now, your IP addressing changes are complete. Reopen the Cluster Administratorand verify by viewing the properties of the IP address resource.
Chapter 5: Designing a Clustered Solut ion with Windows SQL Server 2000 Enterprise Edit ion 259
OsbNetw / Windows Server 2003 Clustering & Load Balancing / Shimonski/ 222622-6 / Chapter 5
P:\010Comp\OsbNetw\622-6\ch05.vpMonday, March 24, 2003 9:55:30 AM
Color profile: Generic CMYK printer profileComposite Default screen
260 Windows Server 2003 Clustering & Load Balancing
OsbNetw / Windows Server 2003 Clustering & Load Balancing / Shimonski/ 222622-6 / Chapter 5
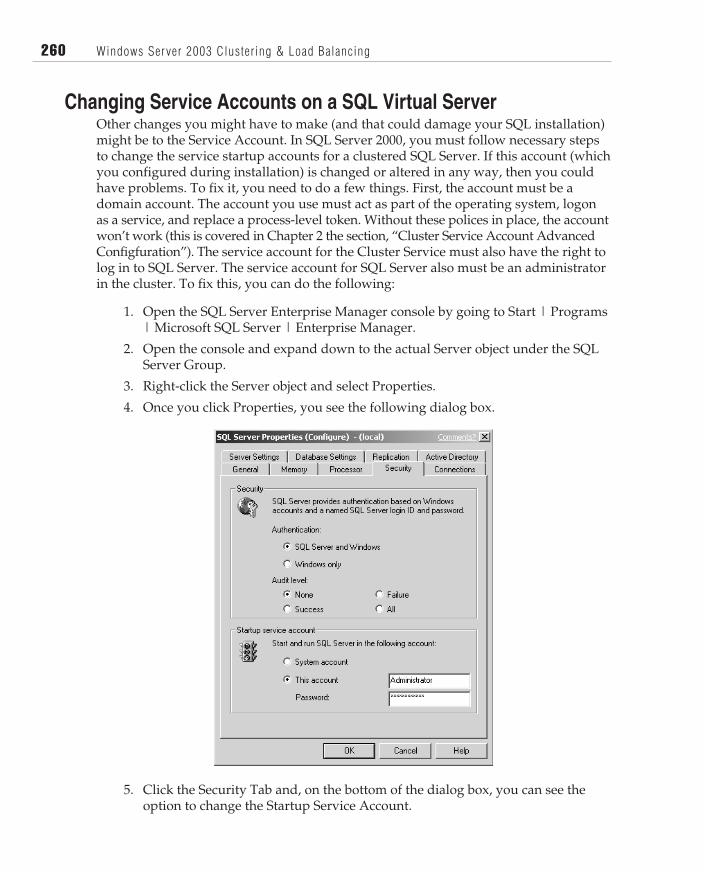
Changing Service Accounts on a SQL Virtual ServerOther changes you might have to make (and that could damage your SQL installation)might be to the Service Account. In SQL Server 2000, you must follow necessary stepsto change the service startup accounts for a clustered SQL Server. If this account (whichyou configured during installation) is changed or altered in any way, then you couldhave problems. To fix it, you need to do a few things. First, the account must be adomain account. The account you use must act as part of the operating system, logonas a service, and replace a process-level token. Without these polices in place, the accountwon’t work (this is covered in Chapter 2 the section, “Cluster Service Account AdvancedConfigfuration”). The service account for the Cluster Service must also have the right tolog in to SQL Server. The service account for SQL Server also must be an administratorin the cluster. To fix this, you can do the following:
1. Open the SQL Server Enterprise Manager console by going to Start | Programs| Microsoft SQL Server | Enterprise Manager.
2. Open the console and expand down to the actual Server object under the SQLServer Group.
3. Right-click the Server object and select Properties.
4. Once you click Properties, you see the following dialog box.
5. Click the Security Tab and, on the bottom of the dialog box, you can see theoption to change the Startup Service Account.
P:\010Comp\OsbNetw\622-6\ch05.vpMonday, March 24, 2003 9:55:31 AM
Color profile: Generic CMYK printer profileComposite Default screen

Chapter 5: Designing a Clustered Solut ion with Windows SQL Server 2000 Enterprise Edit ion 261
OsbNetw / Windows Server 2003 Clustering & Load Balancing / Shimonski/ 222622-6 / Chapter 5
You can also run the SQL Server 2000 setup in the Administrative\Maintenancemode again, but this way is much easier.
Changing a Clustered SQL Server Network NameAlthough you have a way within the Cluster Administrator to rename instances, you’llfind that doing so could create some massive problems—for instance, the possible denialof service to the resource. Because this is so easy to change (and damage), you needto know how to change the SQL Server Network Name correctly and how to fix it ifit’s damaged. You should know the correct way to rename a clustered SQL Server 2000Virtual Server is simply to uninstall and reinstall SQL Server 2000 with the new VirtualServer name. That’s it! I know this might seem like a hassle, but more of a hassle couldcome your way if you do this another way.
Make sure that before you go through with the uninstall and reinstall process thatyou have recently backed up your databases. You don’t want to lose your data. If youhave a problem getting things back online, then you have a protected copy of your data.
Moving ResourcesEarlier, I purposely made the mistake of placing the SQL Resource in the Main ClusterGroup. Now, we’ll look at how to move the SQL Resource if you make a mistake andhave to move resources from one group to another. This is how you do it withouthaving problems:
1. Open the Cluster Administrator in the Administrative Tools folder.
2. Open the Groups folder and select the Group with the resources you wantto move.
3. Right-click the resource you want to move and select the Change Group option.
4. You can specify which group you want to move to.
5. In the next illustration, verify you want to move the resources.
6. Clicking Yes moves the resources to the new group you specify.
7. In Figure 5-14, you can see the resources are now in the new group you movedthem to.
P:\010Comp\OsbNetw\622-6\ch05.vpMonday, March 24, 2003 9:55:31 AM
Color profile: Generic CMYK printer profileComposite Default screen

262 Windows Server 2003 Clustering & Load Balancing
OsbNetw / Windows Server 2003 Clustering & Load Balancing / Shimonski/ 222622-6 / Chapter 5
Network FailureAt times, you might experience a large network outage or a disconnection from thenetwork. When this happens, it’s up to you to use your troubleshooting skills to verifywhat the problem is. In Figure 5-15, you can see your first clue is in the ClusterAdministrator. First, the Cluster Groups go offline and appear to have massive errors.Your true indicator is that the LAN connection has failed somehow and is showing upas down within the console.
When you see this, you can start checking your local network connection first andwork your way outward to the cable, switch, or hub port. Once you verify the problems,you might want to refresh the console (View | Refresh) to see if your server still reportsa problem.
Figure 5-14. Resources moved to a new group
Figure 5-15. Network failure
P:\010Comp\OsbNetw\622-6\ch05.vpMonday, March 24, 2003 9:55:31 AM
Color profile: Generic CMYK printer profileComposite Default screen

Log FilesWhen you’re in a total jam, you can always look at the log files on the server. Listedhere are the basic log files that can help you in your troubleshooting. You can generallyfind the logs under the winnt\cluster directory, but you can simply find them by running asearch on your server’s drives for the *.log file. When you find them, single out a fewthat are dedicated to cluster-based operations and SQL Server. These are the files seenin the following Table 5-3.
CONCLUSIONIn this chapter, you learned the fundamentals of clustering SQL Server 2000 EnterpriseEdition. When planning your SQL Server 2000 Enterprise Edition Cluster deployment,you have much to take into consideration. This chapter’s intent was to start you fromthe beginning and take you to the end, so you can successfully plan, design, purchase,install, configure, and troubleshoot a two-node failover cluster on either Windows 2000Advanced Server or Windows Server 2003. Although every scenario or problem can’t becovered or planned for, you should have enough tools not only to get you started, butalso enable you to start, finish, and do some advanced troubleshooting on a SQL Cluster.
For further reading, log on to http://www.sql-server-performance.com. This site isa good resource for tweaking your installation after it’s up and running. To learn moreabout SQL Server fundamentals, read SQL Server 2000 A Beginner’s Guide, by DusanPetrovic (ISBN: 007212587X).
In the next chapter, we take a wide look at clustering and load balancing manydifferent solutions, so hold on! We’ve only begun to design some great solutions.
Chapter 5: Designing a Clustered Solut ion with Windows SQL Server 2000 Enterprise Edit ion 263
OsbNetw / Windows Server 2003 Clustering & Load Balancing / Shimonski/ 222622-6 / Chapter 5
Sqlstpx.log Log for the SQL Server setup, where x is the number of the setup attempts. You’ll findmultiple instances of this file if you have multiple setups.
Sqlclstr.log Log for the clustered SQL Server used for troubleshooting the SQL Server.
Cluster.log The main cluster log file for troubleshooting cluster-related issues.
Sqlstp.log The log from the user interface part of setup used for troubleshooting possible issuesrelated to set up.
Table 5-3. SQL Server Cluster Log Files
P:\010Comp\OsbNetw\622-6\ch05.vpMonday, March 24, 2003 9:55:31 AM
Color profile: Generic CMYK printer profileComposite Default screen

OsbNetw / Windows Server 2003 Clustering & Load Balancing / Shimonski/ 222622-6 / Chapter 5Blind Folio 5:264
P:\010Comp\OsbNetw\622-6\ch05.vpMonday, March 24, 2003 9:55:32 AM
Color profile: Generic CMYK printer profileComposite Default screen