chapter 5: hierarchical form lab - mannino database chapter 5: hierarchical form lab page 2 as...
TRANSCRIPT

Chapter 5: Hierarchical Form Lab
Learning Objectives
This chapter demonstrates Access 2013 features for hierarchical forms that are more complex than the
single table forms you developed in Chapter 4. At the completion of this chapter, you should have acquired the
knowledge and skills to
Create hierarchical forms using the Form Wizard.
Reuse existing subforms in new hierarchical forms.
Understand how AutoLookup queries display data on a form.
Customize combo boxes with additional fields and row restrictions.
Gain additional practice with aligning and moving controls on a form.
Use form fields to perform record and aggregate computations.
Understand how to reference fields in a main form, a subform, and a query.
Overview
This chapter takes you beyond the simple forms of Chapter 4. To develop hierarchical forms1, you need the
practical knowledge and skills of Chapter 4, the concepts of textbook Chapter 10, and the practical skills about
hierarchical forms described in this chapter. If you have forgotten the concepts of Sections 10.3 and 10.4 of textbook
Chapter 10, you should review them now. In particular, you need to know the rules for 1-M updatable queries,
components of a hierarchical form, the relationship between hierarchical forms and tables, and query formulation
skills for hierarchical forms. Without understanding these concepts, you should still be able to complete this lab, but
you may have difficulty creating hierarchical forms on your own.
This chapter guides you through the steps to create a complex hierarchical form. To make the instructions
clear, you will develop the final form through four forms of increasing complexity. In developing these four
hierarchical forms, you will learn how to define a form based on a query, link a subform and a main form,
understand AutoLookup queries, extend combo boxes with additional fields and row restrictions, and share
computations between a main and a subform. You will find that no matter the level of details in the instructions, it
often takes a trial-and-error approach to obtain the desired formatting for a form. To cement your understanding of
the concepts, you may want to repeat some parts of the lab exercises. In the last part of this chapter, you will learn
about four specialized but important features, the Subform Wizard, the tab control, conditional formatting, and
object dependencies.
5.1 Creating a Simple Hierarchical Form
The first version of the repair order form is rather simple. It manipulates the RepairOrder and PartsUsed
tables since they have a 1-M relationship (refer to the Relationships window in Figure 1). Because the repair order
form only manipulates one table in both the main form and the subform, you do not need to write updatable queries
1 Beginning in Access 2007, hierarchical forms were called “one-to- many forms.” This chapter uses the
term “hierarchical form” to be consistent with previous Access versions and the textbook.

7/9/14 Chapter 5: Hierarchical Form Lab Page 2
as described in textbook Chapter 10. In later sections you will write queries. This section provides guided instruction
to create the first repair order form and make some simple modifications to it.
Figure 1: Relationships in the Auto Repair Database
5.1.1 Using the Form Wizard to Create a Hierarchical Form
In Chapter 4 you used the Form Wizard to create single table forms. The Form Wizard also can be used to
create hierarchical forms consisting of a main form and an embedded subform. The main form contains data from
the parent table and the subform contains data from the child table. You will use the Form Wizard to create the
initial version of the repair order form using the following instructions.
1. Open the New Form Window: Choose Create Form Wizard in the Forms group of the Ribbon. Select the
RepairOrder table as shown in Figure 2.
2. Select Fields to Include: Click the >> button to move all of the fields shown in the left side (Available Fields) to
the right side (Selected Fields).
In the same wizard window, go up to the Tables/Queries selection box where the RepairOrder table name
appears and select a different table, the PartsUsed table. Now, the fields of the PartsUsed table appear
under Available Fields. Click the >> button to move all of the fields to the right side (Selected Fields).
Note, the Selected Fields window (Figure 3) contains fields from both tables. Click the Next > button when
finished.
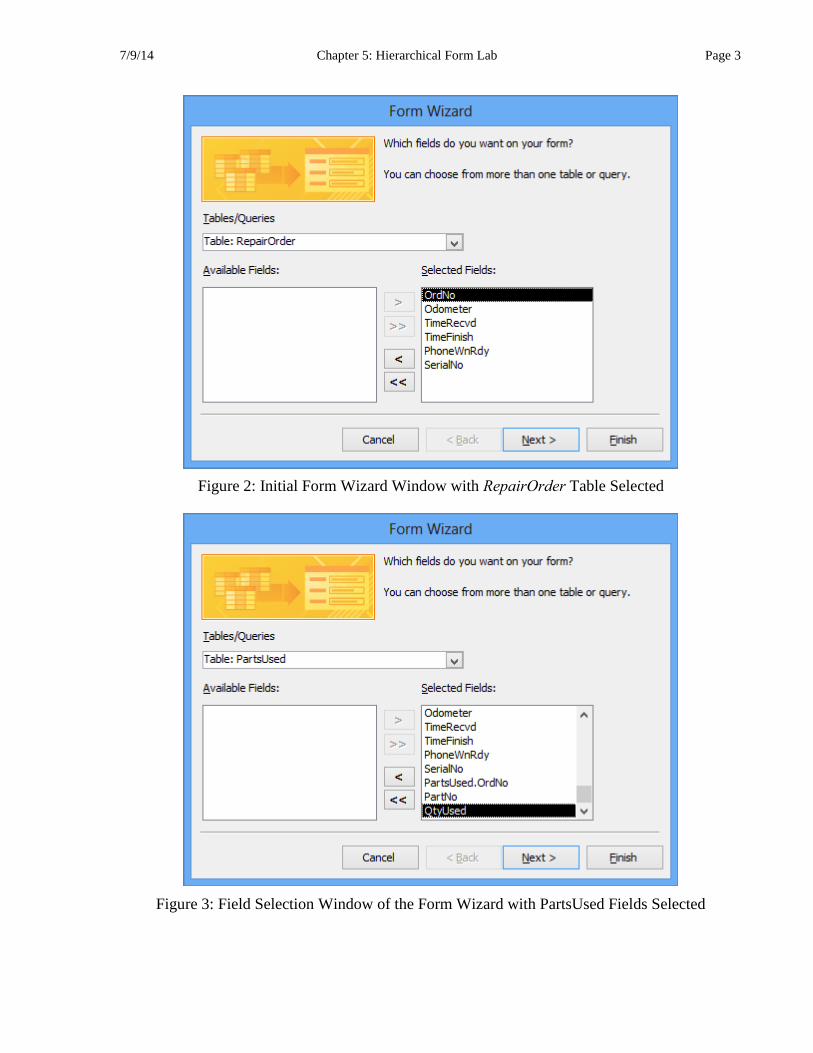
7/9/14 Chapter 5: Hierarchical Form Lab Page 3
Figure 2: Initial Form Wizard Window with RepairOrder Table Selected
Figure 3: Field Selection Window of the Form Wizard with PartsUsed Fields Selected

7/9/14 Chapter 5: Hierarchical Form Lab Page 4
3. Select Viewing Option: The next window asks how you want to view the data. Select “by RepairOrder” because
you want RepairOrder data to appear in the main form. The option button “Form with subform(s)” should be
selected as shown in Figure 4. Select it if it is not selected and click Next >.
Technical Note: If your database does not have a 1-M relationship from the RepairOrder table to
the PartsUsed table, the viewing options window will not appear. Instead, Access will assume that
you want a main form only and display the Layout window. If you have completed Chapter 2, your
database contains all the 1-M relationships.
Figure 4: Viewing Options Window of the Form Wizard
4. Select the Layout of the Subform: In the next wizard window (Figure 5), select “Datasheet” (it should be the
default) and click Next >.
5. Name the Forms: You must provide names for the main form and the subform. If not entered already, type
“RepairOrder” for the main form and “Parts: Subform1” for the subform (Figure 6). In the same window, select
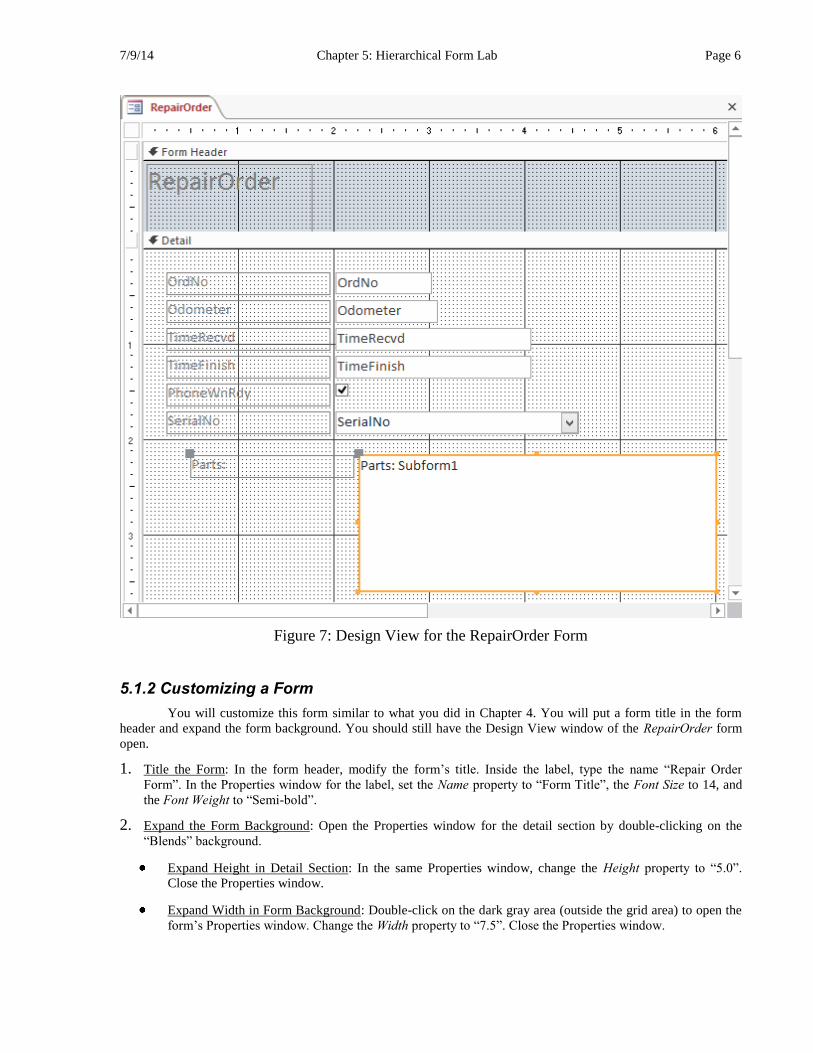
the second option, “Modify the form’s design”, and click Finish. The RepairOrder form appears in design view
as shown in Figure 7.

7/9/14 Chapter 5: Hierarchical Form Lab Page 5
Figure 5: Subform Layout Window of the Form Wizard
Figure 6: Last Window of the Form Wizard
7/9/14 Chapter 5: Hierarchical Form Lab Page 6
Figure 7: Design View for the RepairOrder Form
5.1.2 Customizing a Form
You will customize this form similar to what you did in Chapter 4. You will put a form title in the form
header and expand the form background. You should still have the Design View window of the RepairOrder form
open.
1. Title the Form: In the form header, modify the form’s title. Inside the label, type the name “Repair Order
Form”. In the Properties window for the label, set the Name property to “Form Title”, the Font Size to 14, and
the Font Weight to “Semi-bold”.
2. Expand the Form Background: Open the Properties window for the detail section by double-clicking on the
“Blends” background.
Expand Height in Detail Section: In the same Properties window, change the Height property to “5.0”.
Close the Properties window.
Expand Width in Form Background: Double-click on the dark gray area (outside the grid area) to open the
form’s Properties window. Change the Width property to “7.5”. Close the Properties window.

7/9/14 Chapter 5: Hierarchical Form Lab Page 7
3. Toggle to Form View: Scrolling through the hierarchical form (Figure 8) shows a RepairOrder record along
with its related PartsUsed records. Close the form window when you are finished.
In the Database window you will find a form named RepairOrder that displays a hierarchical form when
opened. You also will find a form titled Parts: Subform1 that displays a datasheet when opened. However,
the subform is normally opened as part of the hierarchical form, not by itself.
Figure 8: RepairOrder Hierarchical Form
5.2 Extending the Subform
The initial version of the RepairOrder hierarchical form is obviously inadequate. One improvement is to
display additional data in the subform while eliminating the OrdNo column (since it is already displayed in the main
form). When a user types an order number on the main form, the subform should display part data such as the
description and the quantity in stock. To accomplish this, you will place additional fields in the subform by
associating the subform with a query.
5.2.1 Creating a Query for the Subform
It is usually more convenient to use Query Design rather than SQL when writing a query for a form. Query
Design allows you to focus on the tables and the fields in the query result. (Remember that you still can switch
between Query Design and SQL.) Another important advantage to using Query Design for form queries concerns
the join style. To make a multiple-table query updatable in Access, the join operator style2 must be used. Since
2 See textbook Chapter 4 for a discussion of the join operator style.

7/9/14 Chapter 5: Hierarchical Form Lab Page 8
Query Design always uses the join operator style, you do not have to remember to use the join operator style. If you
use SQL directly, make sure to use the join operator style.
To enable the subform to display additional information, you need to associate the subform with a query,
not the PartsUsed table. Before revising the subform, you should first formulate the underlying query:
1. Open a New Query: Move to the Queries section in the Database window. Choose Create Query Design in
the Queries group to open the New Query window. In the Show Table window, add the PartsUsed and the Part
tables.
2. Formulate the Query: In the Query Design window, formulate a query as shown in Figure 9. Follow these tips
to formulate the query.
The query should contain all fields from the PartsUsed table: OrdNo, PartNo, and QtyUsed. In your query,
it is important that PartNo comes from the PartsUsed table, not from the Part table.
The query should contain all fields from the Part table except the PartNo field: PartDesc, UnitsInStock,
UnitPrice, and UnitSize.
Note that the query follows the rules for 1-M updatable queries described in textbook Chapter 10. In
particular, note that the child table (PartsUsed) contains both the foreign keys and its primary key. If the
Part.PartNo field were used instead of PartsUsed.PartNo, the query would not support modifications to the
PartsUsed table. The subform will not work correctly unless its underlying query supports updates to this
table. To verify that the query is updatable, follow the steps described in Appendix C.
Save the query as “SubQuery1”.
Figure 9: Query Design Window for SubQuery1
5.2.2 Creating the Repair Order Form with a New Subform
Create a hierarchical form using the Form Wizard again. Most questions can be answered identically as
before. All questions are repeated for your reference.
1. Open the New Form Window: Choose Create Form Wizard in the Forms group to open the initial window
of the Form Wizard. Select the RepairOrder table where indicated.
2. Select Fields to Include: Click the >> button to move all of the fields shown in the left side (Available Fields) to
the right side (Selected Fields).

7/9/14 Chapter 5: Hierarchical Form Lab Page 9
In the same wizard window, go up to the Tables/Queries list box where the RepairOrder table name
appears and select SubQuery1.
Now, the fields of SubQuery1 appear under Available Fields. Click the single > button to move the
following fields to the right side (Selected Fields): PartNo, QtyUsed, PartDesc, UnitsInStock, UnitPrice,
and UnitSize.
Note, the Selected Fields window contains fields from both the RepairOrder table and SubQuery1. Click
the Next > button when finished.
3. Select the Viewing Option: The next window asks how you want to view the data. Select “by RepairOrder”
because it appears in the main form. The option “Form with subform(s)” also should be selected. Click Next.
4. Select the Layout for the Subform: In the next window, select “Datasheet” (it should be the default) and click
the Next > button to advance.
5. Name the Form: Type “RepairOrder1” for the main form and “Parts: Subform2” for the subform (there is a
space between Parts: and Subform2). In the same window, select the second option, “Modify the form’s
design”, and click Finish. The RepairOrder1 form appears in design view as in Figure 10.
Figure 10: Design View for the RepairOrder1 Form
7/9/14 Chapter 5: Hierarchical Form Lab Page 10
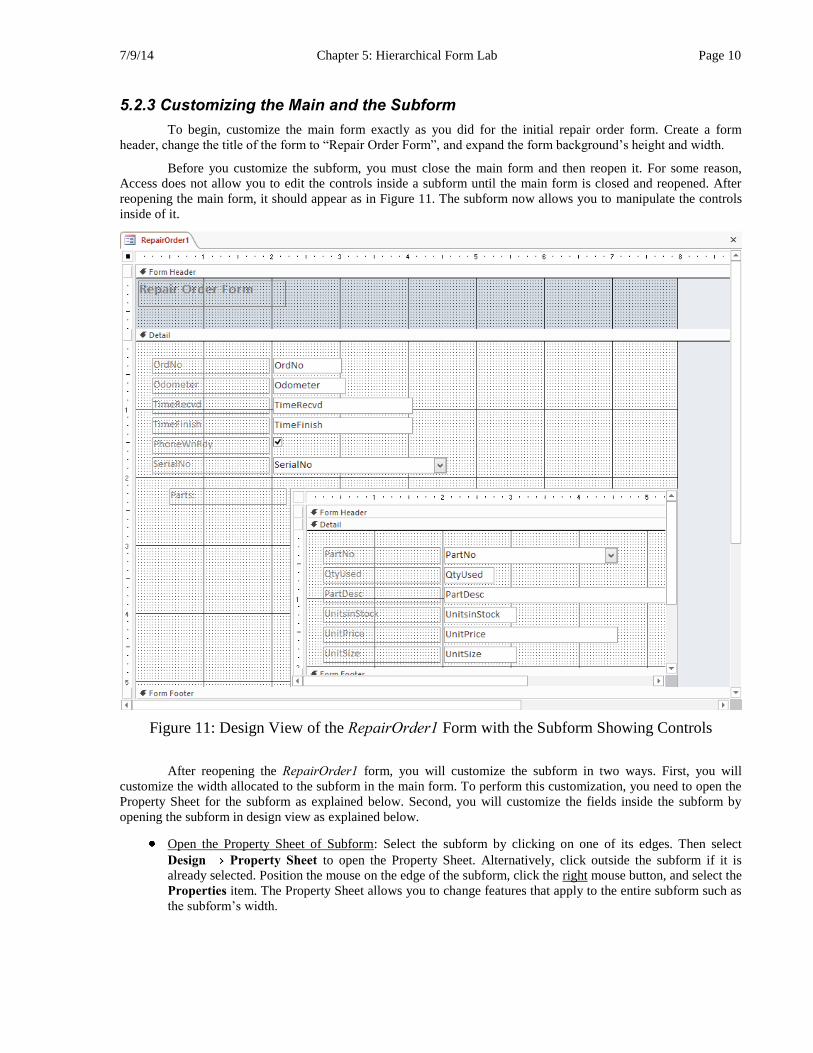
5.2.3 Customizing the Main and the Subform
To begin, customize the main form exactly as you did for the initial repair order form. Create a form
header, change the title of the form to “Repair Order Form”, and expand the form background’s height and width.
Before you customize the subform, you must close the main form and then reopen it. For some reason,
Access does not allow you to edit the controls inside a subform until the main form is closed and reopened. After
reopening the main form, it should appear as in Figure 11. The subform now allows you to manipulate the controls
inside of it.
Figure 11: Design View of the RepairOrder1 Form with the Subform Showing Controls
After reopening the RepairOrder1 form, you will customize the subform in two ways. First, you will
customize the width allocated to the subform in the main form. To perform this customization, you need to open the
Property Sheet for the subform as explained below. Second, you will customize the fields inside the subform by
opening the subform in design view as explained below.
Open the Property Sheet of Subform: Select the subform by clicking on one of its edges. Then select
Design Property Sheet to open the Property Sheet. Alternatively, click outside the subform if it is
already selected. Position the mouse on the edge of the subform, click the right mouse button, and select the
Properties item. The Property Sheet allows you to change features that apply to the entire subform such as
the subform’s width.

7/9/14 Chapter 5: Hierarchical Form Lab Page 11
Open the Property Sheet for Subform Controls: First click outside of the subform to deselect it, then point
inside the subform and double-click on a control inside the subform. You can edit the properties on any
control in the subform by double-clicking on it.
Customize the Subform
In the following steps, you need to make changes by opening the Property Sheet of the subform and then
opening the subform in design view. Continue with the following steps to customize the subform:
1. Expand the Subform: Open the subform’s Property Sheet as described previously. Change the Width property to
“6.5”.
2. Change Field Names: To change the headings for subform fields in datasheet view, you must change the label’s
Caption property. Note that labels are under the form detail section, not the form header section, as shown in
Figure 11. For each label in the subform, double-click on it and change its Caption property as indicated in
Table 1.
Table 1: Change Label Caption Properties
Label Name Label Caption Caption Change
PartNo_Label “PartNo” “Part No”
QtyUsed_Label “QtyUsed” “Quantity Used”
PartDesc_Label “PartDesc” “Description”
UnitsInStock_Label “UnitsInStock” “In Stock”
UnitPrice_Label “UnitPrice” “Price”
UnitSize_Label “UnitSize” “Size”
Shortcut: Select a label on the form and open its Property Sheet. After changing the Caption
property, do not close the Property Sheet. While the Property Sheet is still open, select the next
label and the Property Sheet changes accordingly.
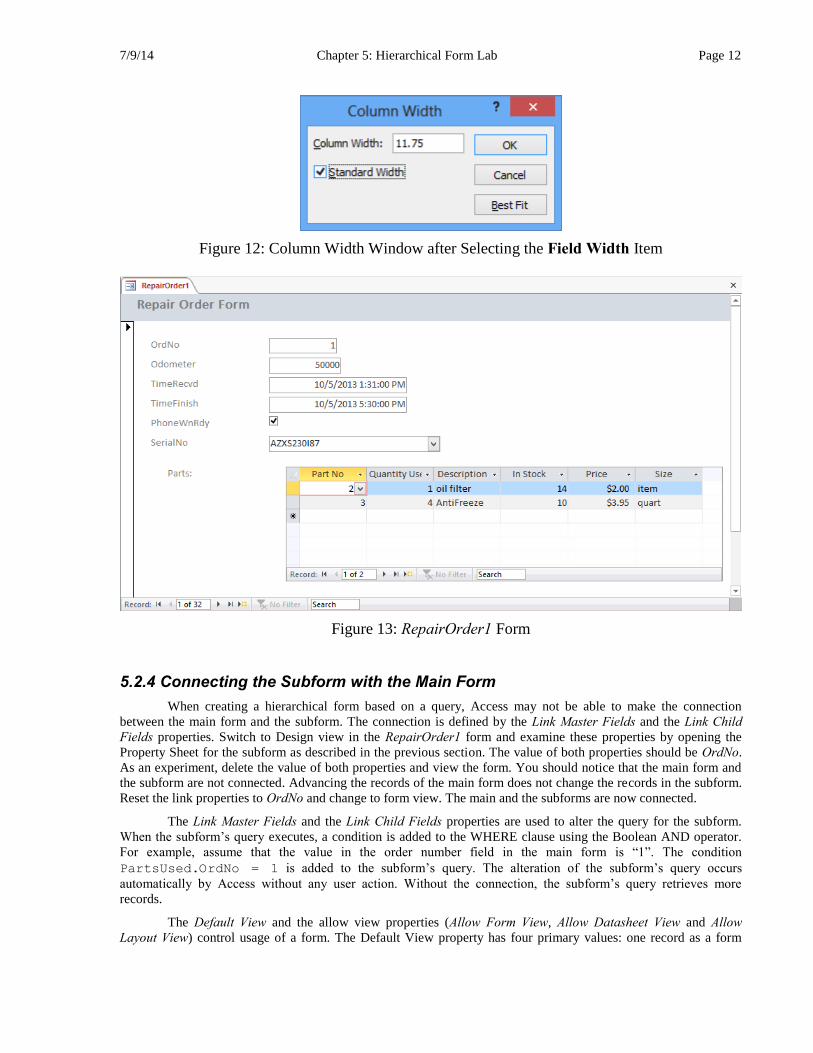
3. Set Column Width: The column width can be set only when the subform is in datasheet view. The easiest way
to put the subform in datasheet view is to put the main form in form view. After placing the main form in form
view, notice that some of the subform datasheet columns are too wide. To make the column sizes uniform,
right-click on the heading of the first column to select the column and open the shortcut menu. Select the Field
Width command and click the “Standard Width” check box in the window (Figure 12). You can also use the
Best Fit button for a tighter fit. Repeat this process for each field in the subform datasheet. You may have to
use the horizontal scroll bars to access the last few columns.
4. Close the Window: When you are finished, your form should appear in Form view as shown in Figure 13. Close
the window and save the changes when prompted.
In the Database window you should find a form named RepairOrder1 that displays a hierarchical form
when opened.
The form named Parts: Subform2 displays a datasheet when opened.
7/9/14 Chapter 5: Hierarchical Form Lab Page 12
Figure 12: Column Width Window after Selecting the Field Width Item
Figure 13: RepairOrder1 Form
5.2.4 Connecting the Subform with the Main Form
When creating a hierarchical form based on a query, Access may not be able to make the connection
between the main form and the subform. The connection is defined by the Link Master Fields and the Link Child
Fields properties. Switch to Design view in the RepairOrder1 form and examine these properties by opening the
Property Sheet for the subform as described in the previous section. The value of both properties should be OrdNo.
As an experiment, delete the value of both properties and view the form. You should notice that the main form and
the subform are not connected. Advancing the records of the main form does not change the records in the subform.
Reset the link properties to OrdNo and change to form view. The main and the subforms are now connected.
The Link Master Fields and the Link Child Fields properties are used to alter the query for the subform.
When the subform’s query executes, a condition is added to the WHERE clause using the Boolean AND operator.
For example, assume that the value in the order number field in the main form is “1”. The condition
PartsUsed.OrdNo = 1 is added to the subform’s query. The alteration of the subform’s query occurs
automatically by Access without any user action. Without the connection, the subform’s query retrieves more
records.
The Default View and the allow view properties (Allow Form View, Allow Datasheet View and Allow
Layout View) control usage of a form. The Default View property has four primary values: one record as a form

7/9/14 Chapter 5: Hierarchical Form Lab Page 13
(“Single Form”), multiple records as a table (“Datasheet”), multiple records as a form (“Continuous Forms”), and
split form providing two synchronized views (a single form and a datasheet). For most hierarchical forms, the main
form should display as a form and the subform should display as a datasheet. To restrict a hierarchical form in this
manner, you need to set the Default View and the allow view properties in both the main form and the subform.
Starting with the main form in design view, open the Properties window for the form and set the Default View
property to “Single Form” and the Allow Form View property to “Yes”. These settings force the main form to show
only a single record at a time. On the subform, set the Default View property to “Datasheet” and the Allow Datasheet
View property to “Yes”.
5.3 Extending the Main Form
In this section you will revise the main form with a query similar to what you did for the subform. The
main form will display data about the customer and the vehicle along with repair order data. You also will be
making a few layout changes such as placing a rectangle control around the vehicle and customer data.
5.3.1 Creating the Main Form Query
To enable the main form to display additional data, you need to associate the main form with a query
consisting of the RepairOrder, the Vehicle, and the Customer tables. Follow the steps below to formulate the
underlying query:
1. Open a New Query: Choose Create Query Design in the Queries group. In the Show Table window, add the
RepairOrder, Vehicle, and Customer tables.
2. Formulate the Query: In Query Design, formulate a query as shown in Figure 14. Follow these tips to develop
the query.
The query should contain all fields of the RepairOrder table.
The query should contain the following fields from the Vehicle table: Year, Make, Model, LicenseNo,
Cylinders, and CustNo (all fields except State and SerialNo).
The query should contain all fields from the Customer table except CustNo.
For practice, verify that the query follows the rules for 1-M updatable queries presented in textbook
Chapter 10.
Save the query as “MainQuery”.

7/9/14 Chapter 5: Hierarchical Form Lab Page 14
Figure 14: Query Design Window for MainQuery
5.3.2 Review of Aligning and Moving Controls
Before revising the main form, you should review ways to align and move controls. Remember from
Chapter 4 that you can move a control by selecting it and dragging the control to another location. Revising the main
form consists of moving, aligning, and adding textboxes; changing label and textbox names; and finally enclosing
textboxes inside a rectangle control. Here are some additional tips to facilitate formatting, aligning, and moving
controls:
Moving Labels and Textboxes Separately: To move a label separately, select the control and then drag its
anchor (filled rectangle in upper left corner ) of the control. You can drag the label or bound control
separately using the appropriate anchor.
Copy Label and Textbox Formats with the Format Painter: Select a label or a textbox containing the format
that you want to copy. Then click the Format Painter icon on the ribbon (Home Format Painter
in the Clipboard group), and the cursor changes to a paintbrush. Finally, click on the target label or the
textbox to copy the formatting.
Moving Labels, Textboxes, or Other Controls as One Unit: To group fields as a unit for the purpose of
formatting or moving, you can either (a) click the mouse above a corner of the fields to group and drag a
grouping rectangle across the fields, (b) simply click on each field while holding the Shift key down, or (c)
select the controls that you wish to move as a unit and click Arrange Size/Shape Group in the
Sizing & Ordering group of the Ribbon.
– To Move the Controls: While the unit is still selected, you hold the mouse button down and move the group
as one unit to the desired location.
– To Format the Unit: While the unit is still selected, you can use the toolbar to change fonts or use bold,
italics, or underline. Your changes will affect all fields at the same time.
– To Move Fields as a Unit: While the unit is still selected, drag the unit to the desired location while the
cursor is positioned at any point except an anchor in the upper left corner of any control in the unit. If you
drag from an anchor, only the individual control will move.
7/9/14 Chapter 5: Hierarchical Form Lab Page 15
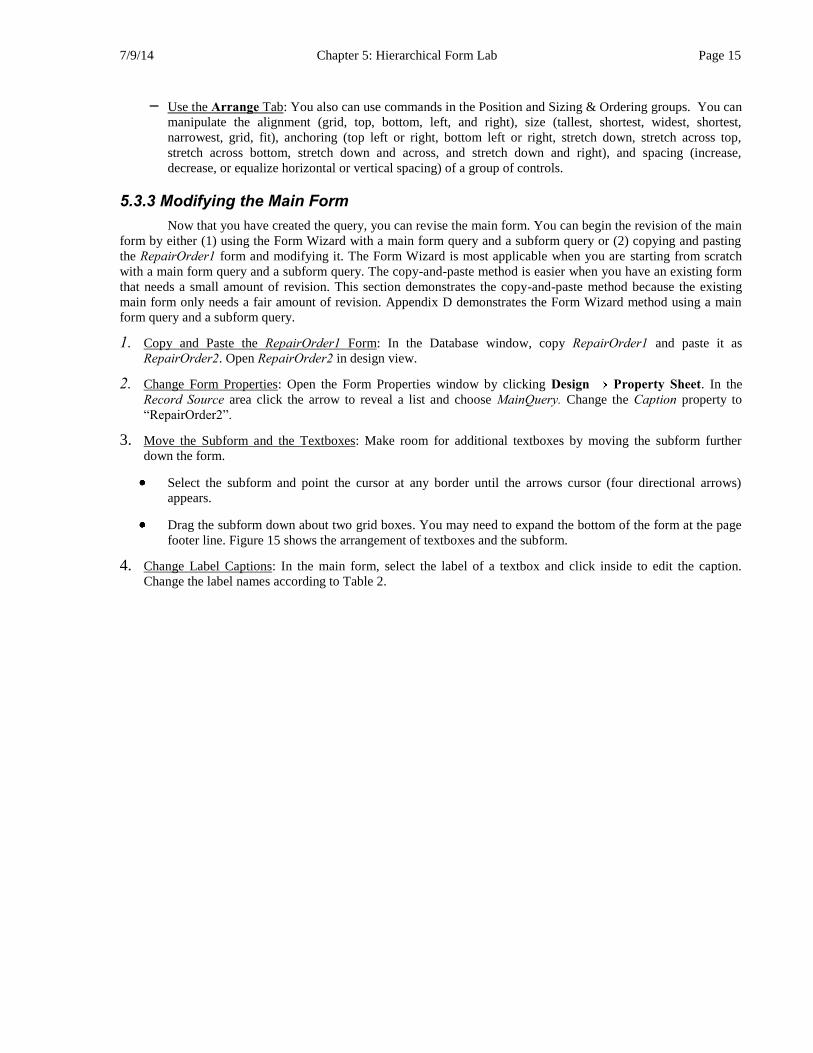
– Use the Arrange Tab: You also can use commands in the Position and Sizing & Ordering groups. You can
manipulate the alignment (grid, top, bottom, left, and right), size (tallest, shortest, widest, shortest,
narrowest, grid, fit), anchoring (top left or right, bottom left or right, stretch down, stretch across top,
stretch across bottom, stretch down and across, and stretch down and right), and spacing (increase,
decrease, or equalize horizontal or vertical spacing) of a group of controls.
5.3.3 Modifying the Main Form
Now that you have created the query, you can revise the main form. You can begin the revision of the main
form by either (1) using the Form Wizard with a main form query and a subform query or (2) copying and pasting
the RepairOrder1 form and modifying it. The Form Wizard is most applicable when you are starting from scratch
with a main form query and a subform query. The copy-and-paste method is easier when you have an existing form
that needs a small amount of revision. This section demonstrates the copy-and-paste method because the existing
main form only needs a fair amount of revision. Appendix D demonstrates the Form Wizard method using a main
form query and a subform query.
1. Copy and Paste the RepairOrder1 Form: In the Database window, copy RepairOrder1 and paste it as
RepairOrder2. Open RepairOrder2 in design view.
2. Change Form Properties: Open the Form Properties window by clicking Design Property Sheet. In the
Record Source area click the arrow to reveal a list and choose MainQuery. Change the Caption property to
“RepairOrder2”.
3. Move the Subform and the Textboxes: Make room for additional textboxes by moving the subform further
down the form.
Select the subform and point the cursor at any border until the arrows cursor (four directional arrows)
appears.
Drag the subform down about two grid boxes. You may need to expand the bottom of the form at the page
footer line. Figure 15 shows the arrangement of textboxes and the subform.
4. Change Label Captions: In the main form, select the label of a textbox and click inside to edit the caption.
Change the label names according to Table 2.
7/9/14 Chapter 5: Hierarchical Form Lab Page 16
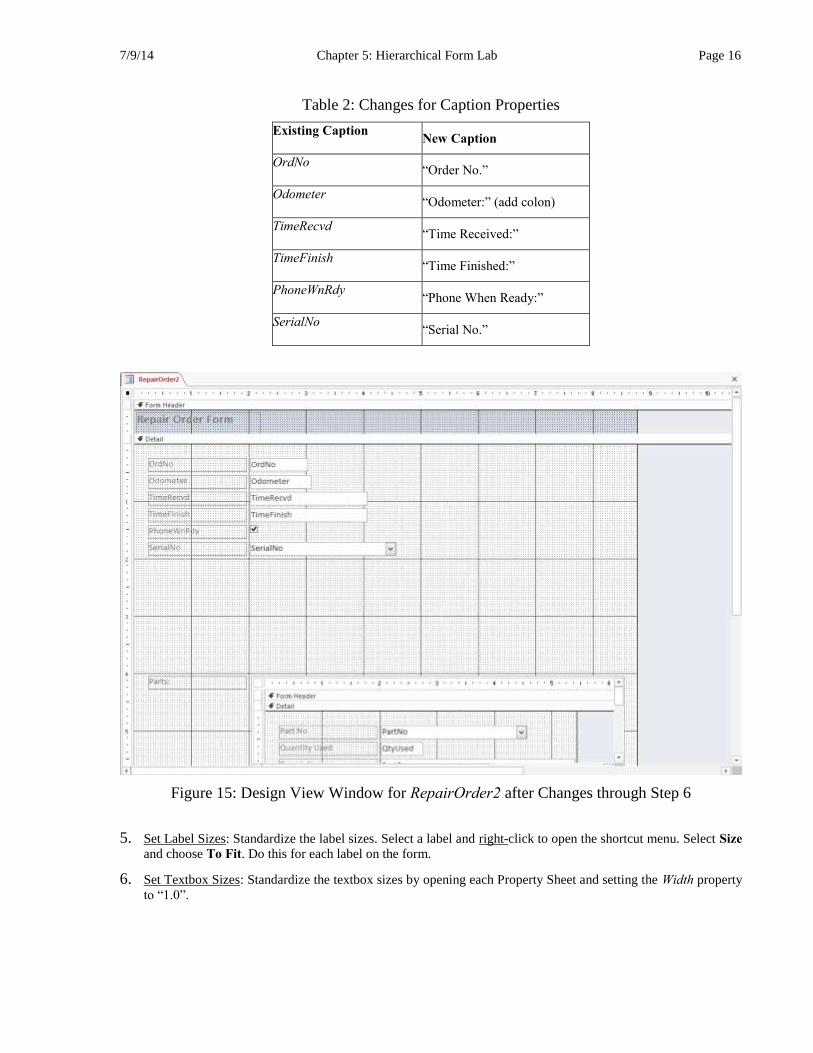
Table 2: Changes for Caption Properties
Existing Caption New Caption
OrdNo “Order No.”
Odometer “Odometer:” (add colon)
TimeRecvd “Time Received:”
TimeFinish “Time Finished:”
PhoneWnRdy “Phone When Ready:”
SerialNo “Serial No.”
Figure 15: Design View Window for RepairOrder2 after Changes through Step 6
5. Set Label Sizes: Standardize the label sizes. Select a label and right-click to open the shortcut menu. Select Size
and choose To Fit. Do this for each label on the form.
6. Set Textbox Sizes: Standardize the textbox sizes by opening each Property Sheet and setting the Width property
to “1.0”.
7/9/14 Chapter 5: Hierarchical Form Lab Page 17
Shortcut: Select the first textbox (OrdNo) and double-click to open its Property Sheet. After setting
the property, do not close the window. Instead double-click the next textbox and the Property Sheet
will change to the next textbox.
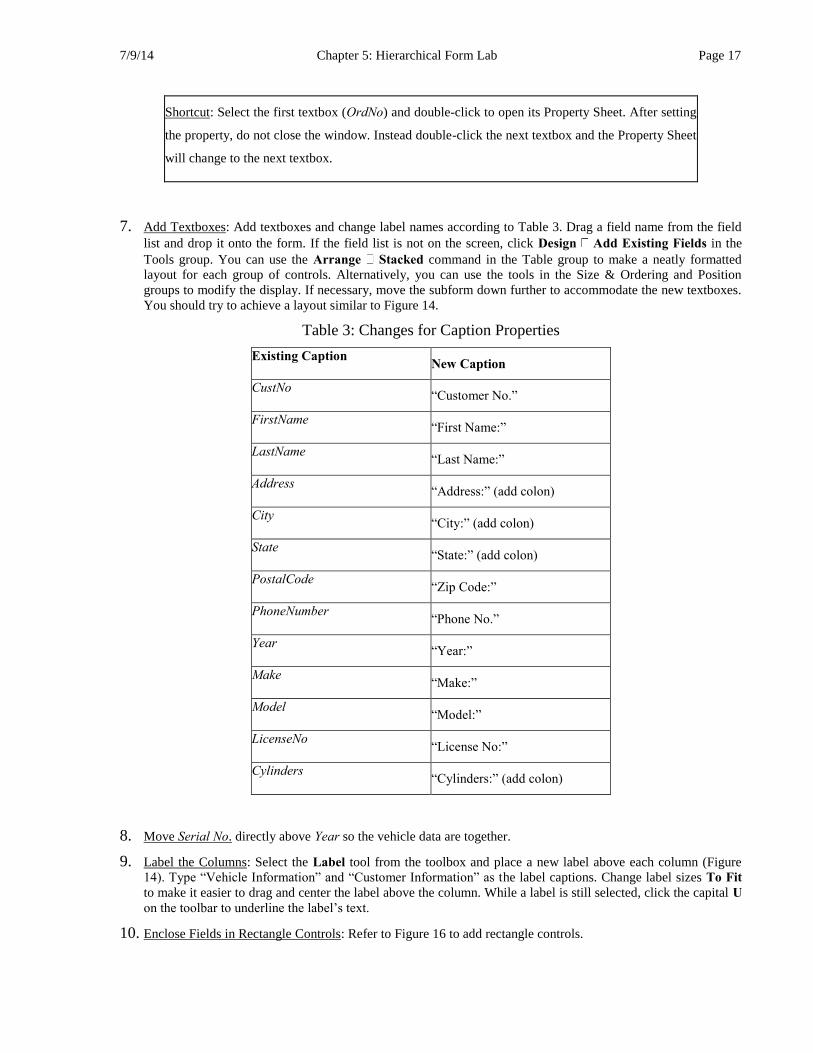
7. Add Textboxes: Add textboxes and change label names according to Table 3. Drag a field name from the field
list and drop it onto the form. If the field list is not on the screen, click Design Add Existing Fields in the
Tools group. You can use the Arrange Stacked command in the Table group to make a neatly formatted
layout for each group of controls. Alternatively, you can use the tools in the Size & Ordering and Position
groups to modify the display. If necessary, move the subform down further to accommodate the new textboxes.
You should try to achieve a layout similar to Figure 14.
Table 3: Changes for Caption Properties
Existing Caption New Caption
CustNo “Customer No.”
FirstName “First Name:”
LastName “Last Name:”
Address “Address:” (add colon)
City “City:” (add colon)
State “State:” (add colon)
PostalCode “Zip Code:”
PhoneNumber “Phone No.”
Year “Year:”
Make “Make:”
Model “Model:”
LicenseNo “License No:”
Cylinders “Cylinders:” (add colon)
8. Move Serial No. directly above Year so the vehicle data are together.
9. Label the Columns: Select the Label tool from the toolbox and place a new label above each column (Figure
14). Type “Vehicle Information” and “Customer Information” as the label captions. Change label sizes To Fit
to make it easier to drag and center the label above the column. While a label is still selected, click the capital U
on the toolbar to underline the label’s text.
10. Enclose Fields in Rectangle Controls: Refer to Figure 16 to add rectangle controls.

7/9/14 Chapter 5: Hierarchical Form Lab Page 18
In the toolbox, click the box with thick lines that denotes the rectangle control. When you move the cursor
to the form, it changes to a cross.
Point the cursor at a corner of the column and while holding down the mouse button, drag the box large
enough to enclose the column. If you need to adjust the box size, point the cursor on one of the small boxes
attached to the box. When you see a double arrow, hold the mouse button down while extending (or
shrinking) the box.
Set Back Color: Double-click on the rectangle to open its Properties window. Change the Back Color
property to white and the Special Effect property to “Sunken”. The enclosed textboxes disappear as they are
hidden under the rectangle. To make them appear, click Arrange Send to Back in the Position group.
This action moves the rectangle to the background and the textboxes to the foreground (Figure 16).
11. Set Tab Order: When you start at the Order No. field and tab through the textboxes, you will find that the order
needs a few changes.
Click Design Tab Order… in the Tools group to open the Tab Order window.
Follow the instructions in the window and move Parts: Subform2 to the end of the list and place CustNo
directly after PhoneWnRdy. Click OK when you are finished.
12. Center the Form Title: Now that the form is wider, it is appropriate to center the form title. Select the label and
right-click to open the shortcut menu. Select Size and choose To Fit. Next, drag the label to the center of the
form.
13. Toggle to Form View: Figure 17 shows the completed RepairOrder2 form. To test the form, tab through the
fields and click through a few records using the record scroll arrows below. When you are finished, close the
form and save changes when prompted.

7/9/14 Chapter 5: Hierarchical Form Lab Page 19
Figure 16: Design View Window for RepairOrder2

7/9/14 Chapter 5: Hierarchical Form Lab Page 20
Figure 17: Completed RepairOrder2 Form
5.3.4 Using the Repair Order Form for Data Manipulation
Before proceeding to other form design issues, you should understand how the RepairOrder2 form supports
data manipulation. As discussed in textbook Chapter 10, you should identify tables that can be changed by using a
form. This decision is fundamental to understanding the business process that uses the form. For the RepairOrder2
form, the RepairOrder table can be changed in the main form and the PartsUsed table can be changed in the
subform. The other tables (Vehicle, Customer, and Part) are read-only.
Even though the fields of the Vehicle, Customer, and Part tables should be read-only, the current form
design supports updates to these fields.3 The only fields in which change should be permitted are the RepairOrder
fields (OrdNo, RepairDate, Odometer, TimeRecvd, TimeFinish, PhoneWnRdy, and SerialNo) in the main form and
the PartsUsed fields (PartNo and QtyUsed) in the subform. Note that the CustNo field in the main form is read-only.
To prevent changes to the other fields, the user should not be able to establish focus in the read-only fields.
If a control accepts focus, the user can enter data into the control. To prevent a user from establishing focus, set the
Enabled property to “No” and the Locked property to “Yes”. For the RepairOrder2 form, you should set these
3 The underlying queries support updates to fields of the parent table but do not support insert operations to
the parent table.

7/9/14 Chapter 5: Hierarchical Form Lab Page 21
properties for all form fields except the form fields bound to the previously listed fields of the RepairOrder and the
PartsUsed tables.
To see the effect of setting the Enabled and the Locked properties, open the RepairOrder2 form in Form
view. Notice that you cannot establish focus in the form fields bound to fields from the Vehicle, the Customer, and
the Part tables.
AutoLookup Queries
You may wonder where read-only form fields obtain values if a user cannot enter values. AutoLookup
queries provide values for read-only form fields if these fields are bound to tables participating in a 1-M
relationship. An AutoLookup query retrieves data from a parent table when a foreign key value is entered from the
corresponding child table. You do not need to write AutoLookup queries. Access automatically creates and executes
AutoLookup queries when a user enters a foreign key value.
AutoLookup: An Access feature that provides values for fields of a parent table when the foreign
key value is entered in the corresponding child table.
To see results of AutoLookup queries, open RepairOrder2 in form view with existing records displayed. If
you select a different serial number, AutoLookup queries display Customer and Vehicle data relating to the selected
serial number from the RepairOrder table. This situation involves two AutoLookup queries. In the first AutoLookup
query, the RepairOrder table is the child table with SerialNo as the foreign key and the Vehicle table is the parent
table. In the second AutoLookup query, Vehicle is the child table with CustNo as the foreign key and Customer is
the parent table. The second AutoLookup query displays Customer data after the first AutoLookup query displays
Vehicle data. Both AutoLookup queries execute so fast that you do not notice.
For another AutoLookup query example, select a different part number in the subform. An AutoLookup
query displays the related Part fields. The AutoLookup query works in this situation because PartNo is the foreign
key of the child table (PartsUsed) and the subform contains controls bound to the parent table (Part).
5.4 Using Combo Boxes
The third revision of the repair order form involves combo box extensions. To provide a context for users,
you will add fields to the combo box lists for the SerialNo and the PartNo form fields. Some users may need to see
more than just the primary key value to choose the correct vehicle or part. To avoid mistakes and reduce the length
of a combo box list, you will modify the query for the Serial No. combo box. When a customer number value is
displayed on the form, the Serial No. combo box will display only vehicles of that customer. On occasion you may
find it necessary to change the kind of control for a form field. To provide practice, you will change the CustNo field
from a combo box to a textbox because it is a read-only form field.
5.4.1 Adding Fields to a Combo Box
The following instructions guide you to add fields to the Serial No. combo box in the main form and the
Part No. combo box in the subform. To begin, open the RepairOrder2 form in Design view.
1. Add Fields to the Serial No. Combo Box: Double-click on the Serial No. combo box to open its Property Sheet:
2. Set the Row Source Property: Click in the Row Source property area and click on the ellipsis (…) button to open
Query Design in the view pane.
Drag the Year, Make, and Model fields down into the query grid. In the Make column, click in the Sort row
and choose “Ascending” (Figure 18).
Close Query Design in the view pane. When prompted, click Yes to save these changes.
3. Set Other Properties According to Table 4:
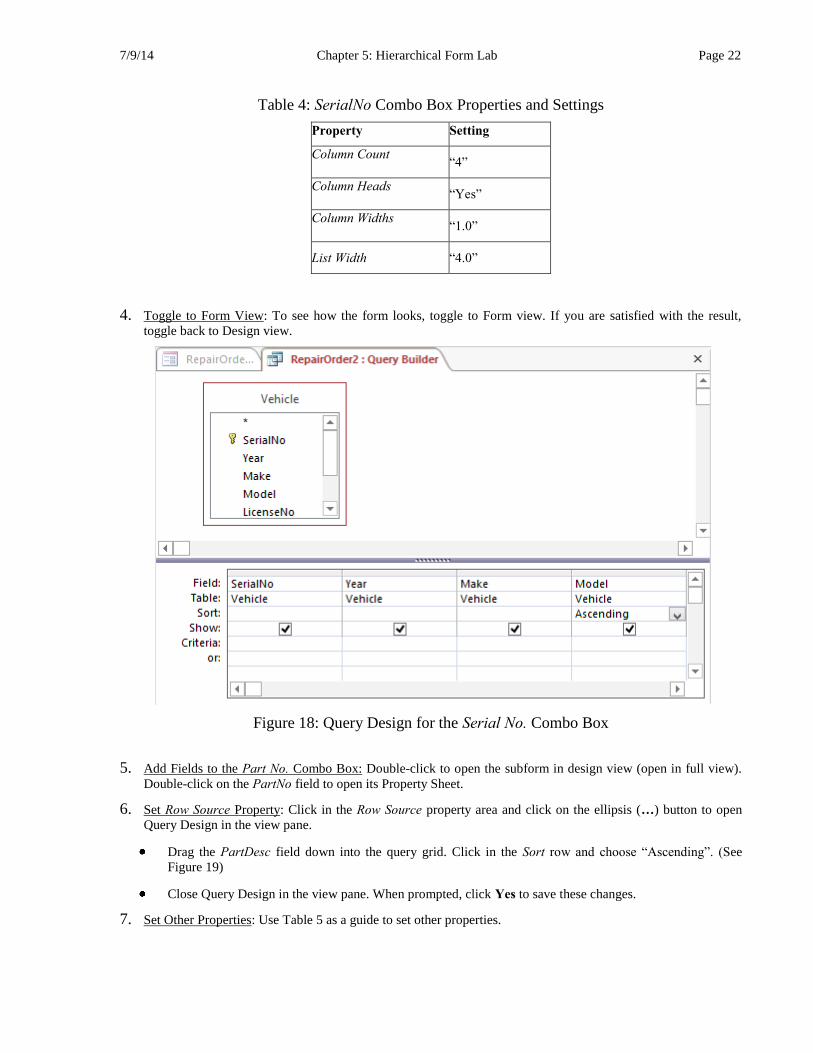
7/9/14 Chapter 5: Hierarchical Form Lab Page 22
Table 4: SerialNo Combo Box Properties and Settings
Property Setting
Column Count “4”
Column Heads “Yes”
Column Widths “1.0”
List Width “4.0”
4. Toggle to Form View: To see how the form looks, toggle to Form view. If you are satisfied with the result,
toggle back to Design view.
Figure 18: Query Design for the Serial No. Combo Box
5. Add Fields to the Part No. Combo Box: Double-click to open the subform in design view (open in full view).
Double-click on the PartNo field to open its Property Sheet.
6. Set Row Source Property: Click in the Row Source property area and click on the ellipsis (…) button to open
Query Design in the view pane.
Drag the PartDesc field down into the query grid. Click in the Sort row and choose “Ascending”. (See
Figure 19)
Close Query Design in the view pane. When prompted, click Yes to save these changes.
7. Set Other Properties: Use Table 5 as a guide to set other properties.

7/9/14 Chapter 5: Hierarchical Form Lab Page 23
Table 5: Part No. Combo Box Properties and Settings
Property Setting
Column Count “2”
Column Heads “Yes”
Column Widths “1.0”
List Width “2.0”
8. Toggle to Datasheet View: Check the appearance of the subform in datasheet view. Click the combo box to
observe the list. If you are satisfied with the result, toggle back to Design view. Then close Design View in the
view pane to return to the RepairOrder2 form.
Figure 19: Query for the Part No Combo Box
5.4.2 Restricting Values in a Combo Box List
When possible, you should make the values displayed in a combo box consistent with other values in a
form. This practice saves a user’s time (fewer list values to view) and reduces errors from choosing an incorrect list
value. You will apply this principle to the Serial No. combo box in the main form. You will modify the combo box
query to display only the vehicles for the customer number on the form. In addition, your combo box query should
display all vehicles when no customer number is displayed on the main form (data entry mode). With the main form
open in design view, use the following instructions to modify the combo box query.
1. Open the Property Sheet: Double-click the Serial No. combo box to open its Property Sheet.

7/9/14 Chapter 5: Hierarchical Form Lab Page 24
2. Edit the Row Source Property: Click the ellipsis (…) button in the Row Source property to open the Query
Design window.
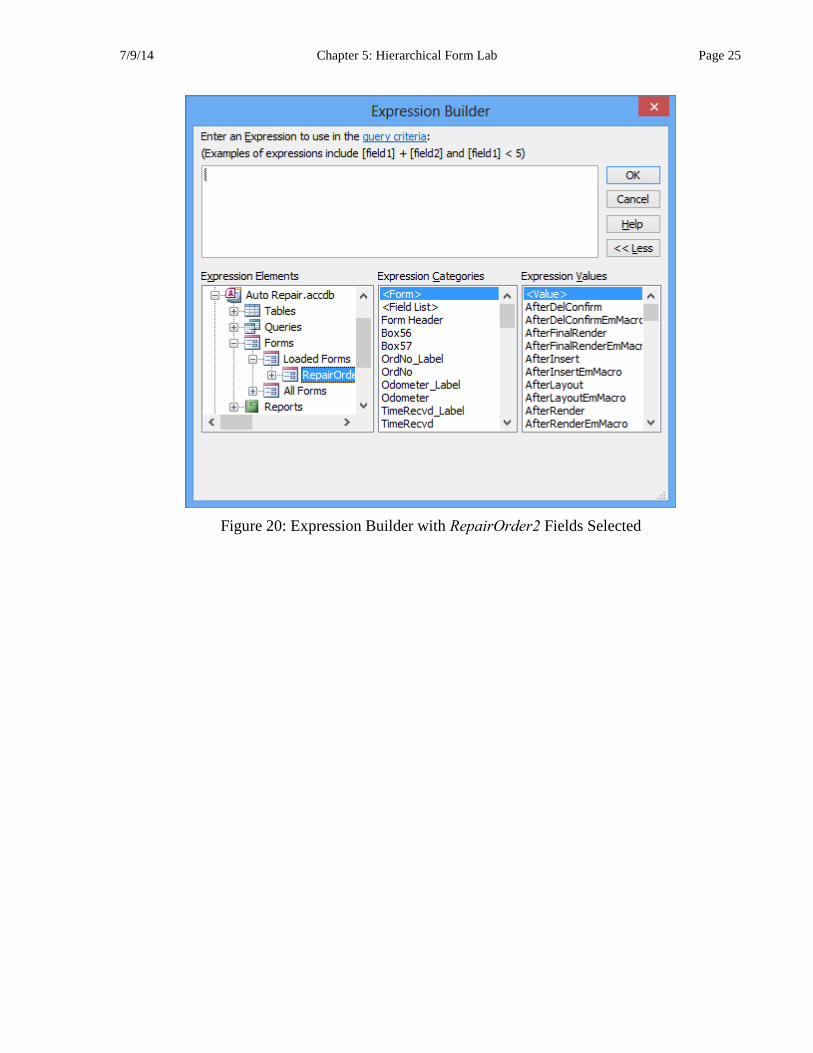
3. Enter a Condition for the CustNo Field: Drag the CustNo field from the Vehicle table to the query grid. Edit the
query grid properties as follows:
Remove the checkmark from the Show property because this field is used only for testing a condition.
In the Criteria property, open the expression builder by right-clicking and selecting the Build… item.
Expand the Forms folder in the left pane until you have opened the fields of the RepairOrder2 form, as
depicted in Figure 20. You need to expand three folders in the left pane to see the fields.
Double-click the CustNo field. You may need to scroll to find the CustNo field. A reference to the CustNo
field on the RepairOrder2 form appears in the text window (Figure 21).
Close the Expression Builder window to return to the Query Design window.
You have just entered a condition to ensure that the Vehicle.CustNo field matches the CustNo form field.
To see the complete comparison expression, switch to SQL View. You will see that the expression is
“((Vehicle.CustNo)=[Forms]![RepairOrder2]![CustNo])”. After viewing the complete
expression, switch back to Design View.
4. Enter a Condition for Null Customer Numbers: The condition on CustNo works fine if editing an existing repair
order. For data entry, you want all vehicles to display in the combo box list. To show all vehicles in data entry
mode, you must add a condition to test for null customer numbers. Use the following guidelines to add a new
column in the query grid and an OR condition to test for null customer numbers.
Scroll to a new column in the query grid. Instead of selecting a column, open the Expression Builder
window using the right mouse button.
As before, you need to select the CustNo form field. Follow the directions in Figures 20 and 21. When
finished, close the Expression Builder window.
Remove the checkmark in the Show property of this new field.
Enter a condition in the or property of this new field. Type “Is Null” in the text area.
To see the complete comparison expression, you should switch to SQL View. You will see that the
expression for the OR condition is “(([Forms]![RepairOrder2]![CustNo]) Is Null)”. The entire WHERE
clause for the combo box query is
((Vehicle.CustNo)=[Forms]![RepairOrder2]![CustNo]) OR
(([Forms]![RepairOrder2]![CustNo]) Is Null)
5. Review the Query: The final query appears in Figure 22. Note that the Criteria values are truncated because of
space limitations. If you open the Expression Builder window, you will see the entire property value. You also
can see the entire SELECT statement by toggling to SQL view.
6. Return to the Main Form: Close and save Query Design in the view pane to return to the main form.
7/9/14 Chapter 5: Hierarchical Form Lab Page 25
Figure 20: Expression Builder with RepairOrder2 Fields Selected

7/9/14 Chapter 5: Hierarchical Form Lab Page 26
Figure 21: Expression Builder with Reference to CustNo Form Field
Figure 22: Query Design Showing the Finished Query
To see the effect of your revised query, open RepairOrder2 in form view. Click the Serial No. combo box
and notice that the list is now much shorter. The revised query displays only vehicles owned by the customer on the

7/9/14 Chapter 5: Hierarchical Form Lab Page 27
form. Place the form in data entry mode by clicking Home New. Now all vehicles are displayed when you view
the Serial No. combo box list. The OR condition in the query has produced the entire list of vehicles.
There is a problem when viewing vehicles in the combo box as you advance among records. Start with the
first RepairOrder record and note the list of vehicles in the combo box. Advance to another RepairOrder record
with a different CustNo value. Notice that the combo box list has not changed. The combo box query needs to be
refreshed, click Home Refresh All Refresh in the Records group to execute the combo box query. The
combo box list now changes to reflect the different customer number.
In Chapter 8, you will write a macro to make the combo box refresh automatically. For now, you need to
manually refresh the combo box query.
5.4.3 Changing a Combo Box to a Textbox
The Customer No. combo box should be a read-only field. An AutoLookup query will generate the value
for customer number when a user selects a vehicle’s serial number. A combo box is not a good choice of a control
because the user should never select values from the list. Therefore, you will change the combo box to a textbox and
make it read-only. (Remember that you make a form field read-only by setting its Enabled property to “No” and its
Locked property to “Yes”.)
1. Change the Combo Box to a Textbox: Right-click the Customer No. combo box and select Change To Text
Box (Figure 23). Now the CustNo field is a textbox.
2. Make the Textbox Read-Only: Double-click the Customer No. textbox to open its Property Sheet. Change the
Enabled property to “No” and the Locked property to “Yes”.
3. Toggle to FormView: Notice that the Customer No. combo box is now a textbox, as shown in Figure 24. You
cannot obtain focus on the textbox because of the settings for the Enabled and the Locked properties. If you are
satisfied, close the form window and save changes when prompted.
Figure 23: Menu Selection to Change a Form Field to a Textbox

7/9/14 Chapter 5: Hierarchical Form Lab Page 28
Figure 24: Revised RepairOrder2 Form
5.5 Sharing Computations between Forms
The last feature to demonstrate involves shared computations between fields of the subform and the main
form. You want to compute the total cost for each part on the subform and display the total cost on the main form.
You will need to change both the main form and the subform to achieve this goal.
5.5.1 Making Computations in a Subform
To compute the total part cost, you will add a read-only textbox in the form footer of the subform. Since the
new textbox references the part cost (quantity used times unit price), you will add a new textbox in the subform to
contain the computed part cost. The following steps describe the actions you need to take. To begin the instructions,
open the RepairOrder2 form in Design view.
1. Open the Subform in Design View: When the subform details are exposed in Design view as in Figure 15, you
need to use the pull-down menu to open the subform in Design view in a separate window. Click the boundary
of the embedded subform and then right click to open the menu. Select Subform in New Window to open it in
Design view in a separate tabbed window.
2. Add a Textbox to the Subform: Drag a new textbox to the form detail section at the right end of the subform.
Note that you may have to expand the width of the form detail section to make room for the textbox. The
textbox is initially unbound, as shown in Figure 25.

7/9/14 Chapter 5: Hierarchical Form Lab Page 29
Figure 25: Adding a Textbox to the Subform
3. Delete the Associated Label: Select the associated label and delete it.
4. Set Textbox Name Property: Double-click the textbox to open its Property Sheet. Change the Name property to
“PartCost”.
5. Set the Control Source Property: The Control Source property should be a new field from SubQuery1.
Remember that this subform (Parts: Subform1) uses SubQuery1 as its Record Source.
Open Subquery1: Open the Property Sheet of the subform. Then, open Query Design on Subquery1 by
selecting the ellipsis (…) button in the Record Source property.
Add a Field: Scroll to the next empty field in the query grid and click the right mouse button inside the first
row. From the shortcut menu select Build… to open the Expression Builder window. Type the following
expression in the window: PartCost: [QtyUsed]*[UnitPrice]. Close the Expression Builder
and the Query Design windows and save the changes.
Set the Control Source: Select the new textbox and open its Property Sheet if not already opened. In the
Control Source property, choose the field PartCost.
5. Set Other Properties: With the Property Sheet of the new textbox still open, set other properties according to
Table 6.
Table 6: Textbox Properties and Settings
Property Setting
Name “Part Cost”
Format “Currency”
Enabled “No”
Locked “Yes”

7/9/14 Chapter 5: Hierarchical Form Lab Page 30
6. Add a Textbox in the Subform Footer: The costs for all the parts must be computed in the subform before the
total cost can be referenced in the main form. Since this textbox should not appear in the subform, place it in the
form footer of the subform, as depicted in Figure 26. You will find it easier to add the textbox in the footer of
the subform if you first open the subform in design view in a separate window.
Figure 26: Textbox Added in the Subform Footer
7. Set Caption and Name Properties: In the Property Sheet of the new label, type “Total Cost” in the Caption
property. In the Property Sheet of the new textbox, type “TotalCost” in the Name property.
8. Set the Control Source Property: In the TotalCost textbox, click the ellipsis (…) button to open the Expression
Builder window. After typing =Sum([PartCost]), click OK to close the Expression Builder window. Save
your work when finished.
9. Toggle to Datasheet: View the Part Cost column (Figure 27). If you are satisfied, close the datasheet and save
the changes. Design view appears again in the view pane.
10. Expand the Subform: To fully expose the new PartCost column in form view, the subform must be expanded.
Open the Properties window of the subform and change the Width property to “7.7”. Close the Properties
window when finished.
Figure 27: Datasheet of Parts: Subform2
7/9/14 Chapter 5: Hierarchical Form Lab Page 31
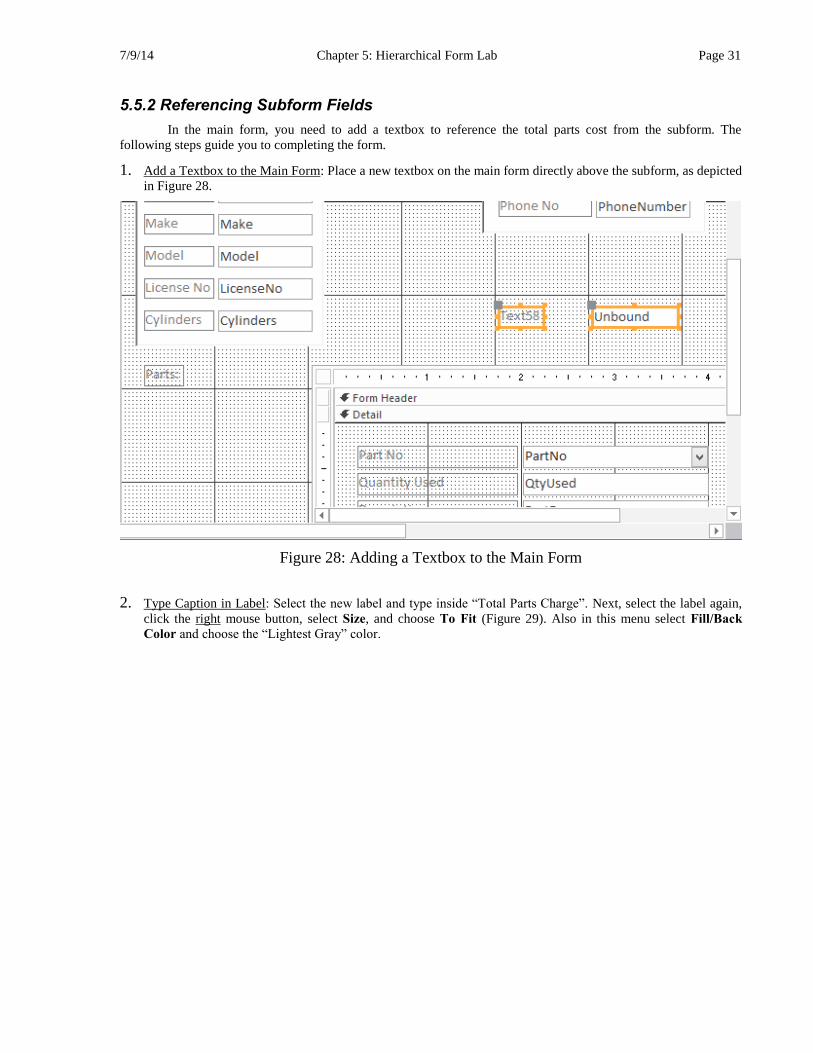
5.5.2 Referencing Subform Fields
In the main form, you need to add a textbox to reference the total parts cost from the subform. The
following steps guide you to completing the form.
1. Add a Textbox to the Main Form: Place a new textbox on the main form directly above the subform, as depicted
in Figure 28.
Figure 28: Adding a Textbox to the Main Form
2. Type Caption in Label: Select the new label and type inside “Total Parts Charge”. Next, select the label again,
click the right mouse button, select Size, and choose To Fit (Figure 29). Also in this menu select Fill/Back
Color and choose the “Lightest Gray” color.

7/9/14 Chapter 5: Hierarchical Form Lab Page 32
Figure 29: Drop Down Menu Showing Size Options
3. Set Textbox Name Property: Select the textbox, open its Properties window, and change the Name property to
“TotalPartChg”.
4. Set the Control Source Property: Click the ellipsis (…) button to open the Expression Builder window. After
typing the expression =[Parts:Subform2].[Form]![TotalCost], click OK.

7/9/14 Chapter 5: Hierarchical Form Lab Page 33
Shortcut: You can use the expression builder to generate this name. In the Expression Builder
window, select RepairOrder2 and Parts: Subform2 in the leftmost folder. Then double-click the
TotalCost field in the middle folder. The value <Expr> [Parts:
Subform2].Form![TotalCost] appears in the text window. Replace <expr> with the =
sign and close the Expression Builder window.
5. Set Other Properties According to Table 7.
Table 7: TotalPartsChg Textbox Properties and Settings
Property Setting
Format “Currency”
Enabled “No”
Locked “Yes”
Width “1.0”
Back Color The “Lightest Gray”
Special Effect “Sunken”
6. Enclose Label and Textbox in a Rectangle: Select the Rectangle tool from the toolbox and enclose the label and
the textbox.
Set Back Color: Right-click the rectangle, select Back Color, and choose the “Lightest Gray” color. Click
Position Send to Back.
Set Border Style property: Double-click on the rectangle to open its Property Sheet. Change the Border
Style property to “Transparent”.
7. Toggle to Form View (Figure 30): If you are satisfied, close and save changes.

7/9/14 Chapter 5: Hierarchical Form Lab Page 34
Figure 30: Final Version of RepairOrder2
5.6 Advanced Form Features
Before leaving the form chapters, there are four specialized but important concepts left to discuss: the
Subform Wizard, the tab control, conditional formatting, and object dependencies. The Subform Wizard allows you
to add a subform to a main form by dragging a subform control from the toolbox to the form. The tab control allows
you to create tabbed forms within a form, to improve management of scarce screen space. Conditional formatting
allows you to make specialized formats that depend on the value of a form field. Object dependencies show objects
(tables, queries, forms, and reports) related to a specific object to facilitate management of changes. To learn about
the first three features, you will add a subform to the Customer form, a tab control to the Vehicle form, and
conditional formatting to the Odometer field of the Vehicle form.
5.6.1 Adding a Subform Using the Subform Wizard
You will be adding a subform to the Customer table to display the customer’s vehicle information in the
Vehicle table datasheet. To begin, have the Customer form open in Design view:
1. Open the Subform Wizard: On the ribbon, click Design Use Control Wizards in the Conrols group to
activate a control wizard that will open when the appropriate control tool is selected. Note that if it is
highlighted, it is already activated. Next, click the Design Subform/Subreport command in the
ribbon. Drag it from the bottom of the phone number field down about one inch and four-grid-squares wide to

7/9/14 Chapter 5: Hierarchical Form Lab Page 35
provide a subform shape as shown in Figure 31. When you release the mouse, the Subform Wizard will open to
the first window (Figure 32). In this window choose “Use existing Tables and Queries” and click Next.
2. Choose Fields for Subform: In the Tables/Queries area, choose “Table:Vehicle”. From the left side (Available
Fields) below, choose CustNo, Year, Make, and Model using the > button to move these fields to the right side
(Selected Fields), as shown in Figure 33. Click Next > to continue.
3. Define Fields to Link Main Form and Subform: Select the first choice from the list (Figure 34) and click Next.
4. Name the Subform: In the area provided, type the name “Vehicle: Subform” and click Finish. The form will
open in Design view (Figure 35).
Figure 31: New Unbound Subform
Figure 32: Initial Subform Wizard Window

7/9/14 Chapter 5: Hierarchical Form Lab Page 36
Figure 33: Choose Fields to Include on Subform
Figure 34: Define Fields to Link Main Form and Subform

7/9/14 Chapter 5: Hierarchical Form Lab Page 37
Figure 35: Design View of the Vehicle Subform
5. Modify the Subform: Toggle to Form view and you will modify the size of the CustNo column to "Best Fit".
Select the CustNo column and right-mouse-click to open the shortcut menu (Figure 36). Select Column
Width… and choose “Best Fit” from the dialog box. Close and answer “Yes” to save the form when prompted.
Modify the Subform Width: Open the Customer form in Design view. Select the subform and click on the
handle on the right side of the rectangle (Figure 35). When the arrow appears, drag the subform to the left,
decreasing its width approximately one grid division. Although it will be difficult to notice in design view,
this action will decrease the background of the subform in form view from step 5 above. Also, change the
subform label to “Vehicle Information”.
6. View the Completed Customer Form: Toggle to Form view and your form should appear as in Figure 37. Close
the form and save changes.
Figure 36: Selected Column and Right Mouse Shortcut Menu

7/9/14 Chapter 5: Hierarchical Form Lab Page 38
Figure 37: Form View of Customer Form with the Vehicle Subform
5.6.2 Adding a Tab Control
You will be adding a tab control to the Vehicle form to divide the vehicle information into two tabbed
sections. To begin, open the Vehicle form in Design view.
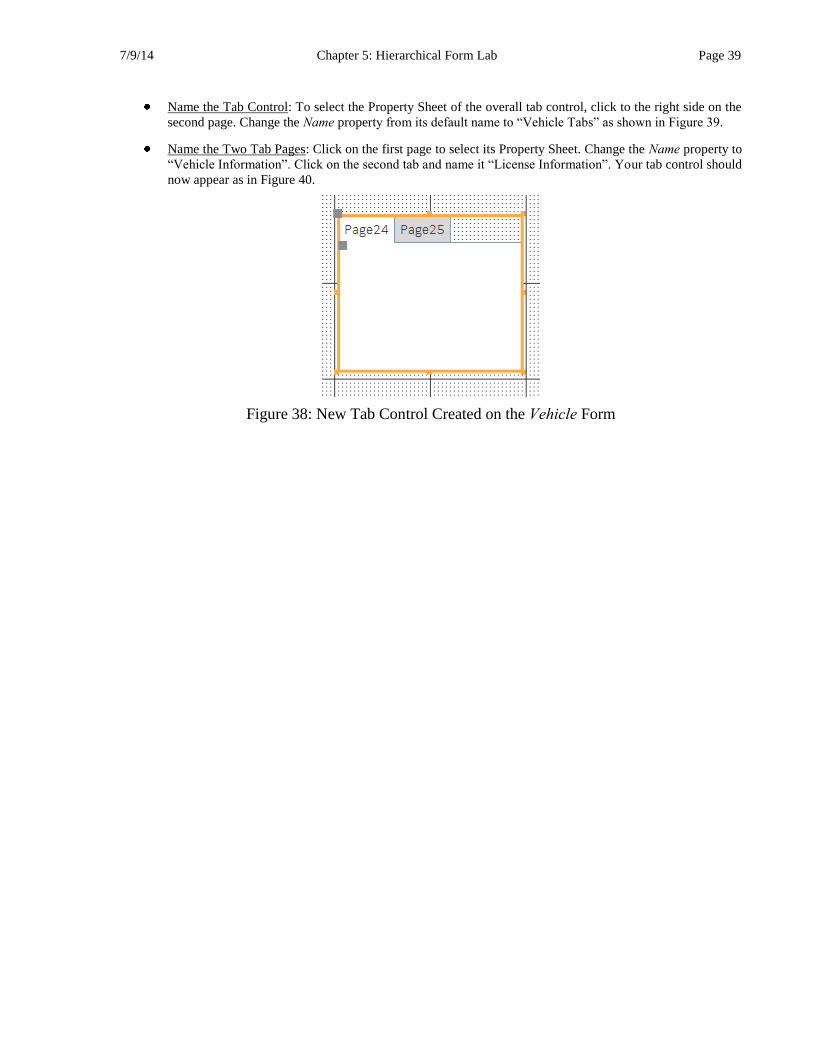
1. Create a Tab Control: Select the Tab Control tool from the Controls group of the Design ribbon and
drag it to the right of the Vehicle form fields (Figure 38). Disregard the page numbers on the tabs since you will
be modifying them later.
2. View the Tab Control Property Sheets: There are several Property Sheets for setting the tab control properties:
one for each page in the tab control and then a window for the overall tab control. Therefore, you must pay
close attention to the Property Sheet heading to be sure you are in the correct object. Practice selecting each Tab
Control Property Sheet.
7/9/14 Chapter 5: Hierarchical Form Lab Page 39
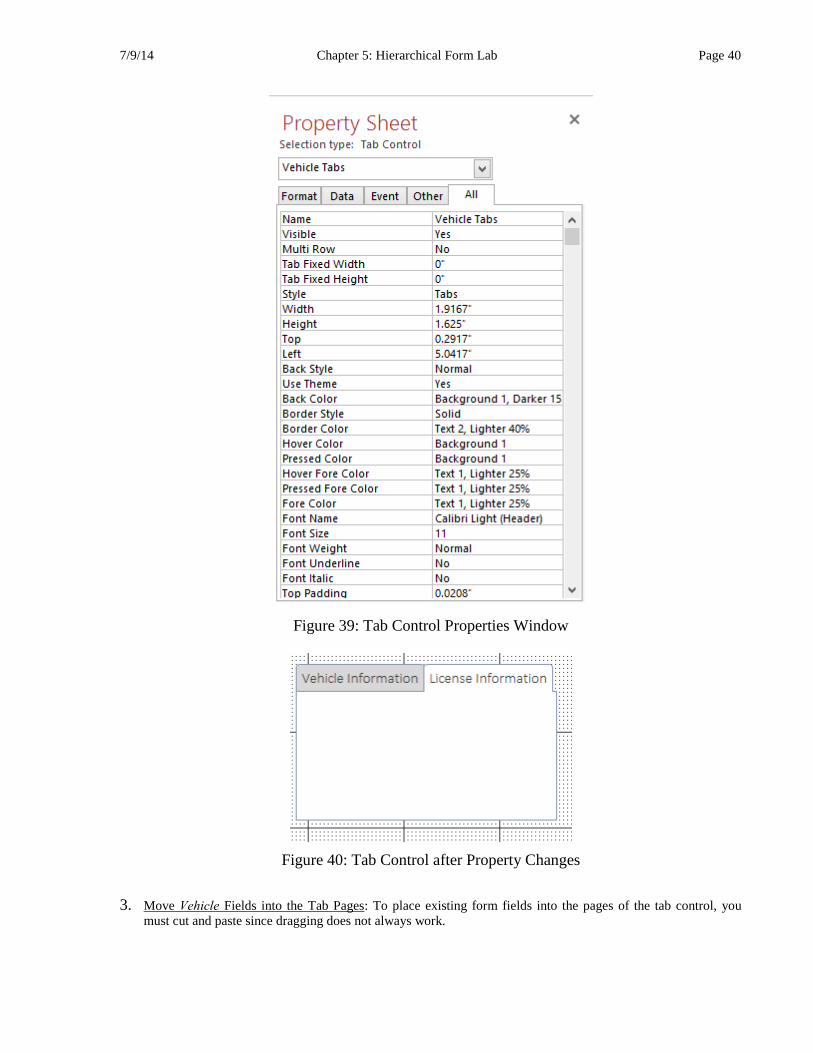
Name the Tab Control: To select the Property Sheet of the overall tab control, click to the right side on the
second page. Change the Name property from its default name to “Vehicle Tabs” as shown in Figure 39.
Name the Two Tab Pages: Click on the first page to select its Property Sheet. Change the Name property to
“Vehicle Information”. Click on the second tab and name it “License Information”. Your tab control should
now appear as in Figure 40.
Figure 38: New Tab Control Created on the Vehicle Form
7/9/14 Chapter 5: Hierarchical Form Lab Page 40
Figure 39: Tab Control Properties Window
Figure 40: Tab Control after Property Changes
3. Move Vehicle Fields into the Tab Pages: To place existing form fields into the pages of the tab control, you
must cut and paste since dragging does not always work.
7/9/14 Chapter 5: Hierarchical Form Lab Page 41
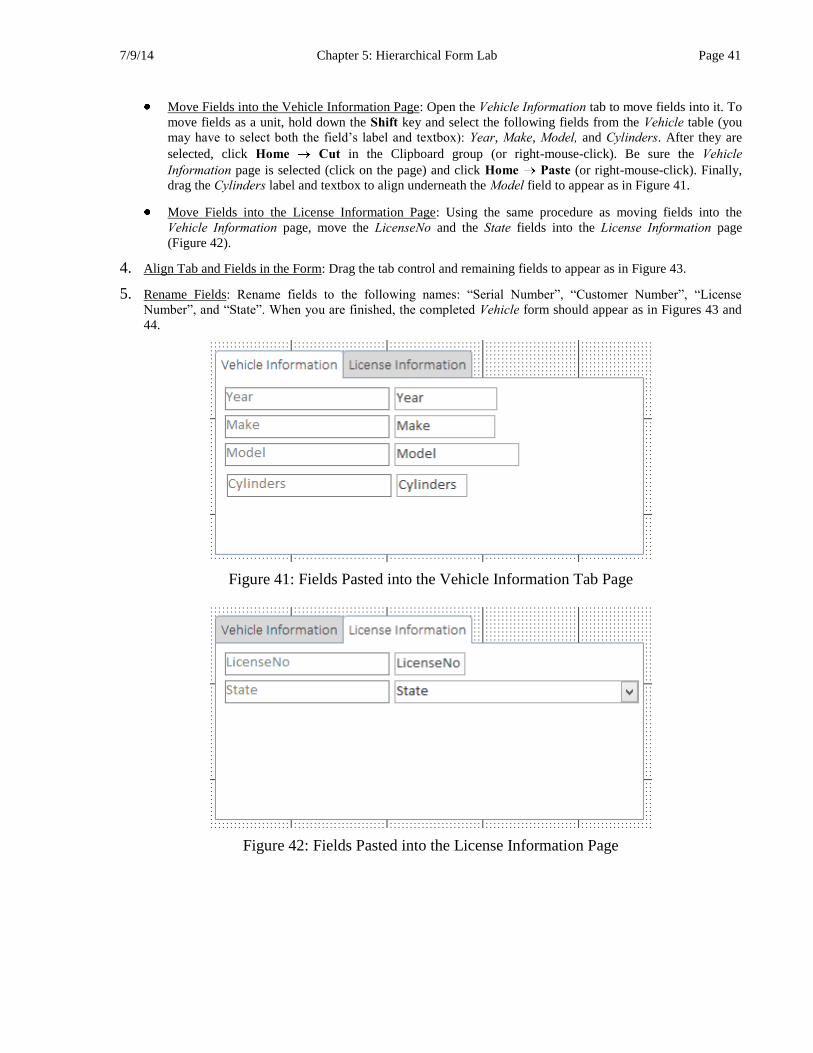
Move Fields into the Vehicle Information Page: Open the Vehicle Information tab to move fields into it. To
move fields as a unit, hold down the Shift key and select the following fields from the Vehicle table (you
may have to select both the field’s label and textbox): Year, Make, Model, and Cylinders. After they are
selected, click Home Cut in the Clipboard group (or right-mouse-click). Be sure the Vehicle
Information page is selected (click on the page) and click Home Paste (or right-mouse-click). Finally,
drag the Cylinders label and textbox to align underneath the Model field to appear as in Figure 41.
Move Fields into the License Information Page: Using the same procedure as moving fields into the
Vehicle Information page, move the LicenseNo and the State fields into the License Information page
(Figure 42).
4. Align Tab and Fields in the Form: Drag the tab control and remaining fields to appear as in Figure 43.
5. Rename Fields: Rename fields to the following names: “Serial Number”, “Customer Number”, “License
Number”, and “State”. When you are finished, the completed Vehicle form should appear as in Figures 43 and
44.
Figure 41: Fields Pasted into the Vehicle Information Tab Page
Figure 42: Fields Pasted into the License Information Page

7/9/14 Chapter 5: Hierarchical Form Lab Page 42
Figure 43: Completed Form Showing Vehicle Information Page

7/9/14 Chapter 5: Hierarchical Form Lab Page 43
Figure 44: Completed Form Showing License Information Page
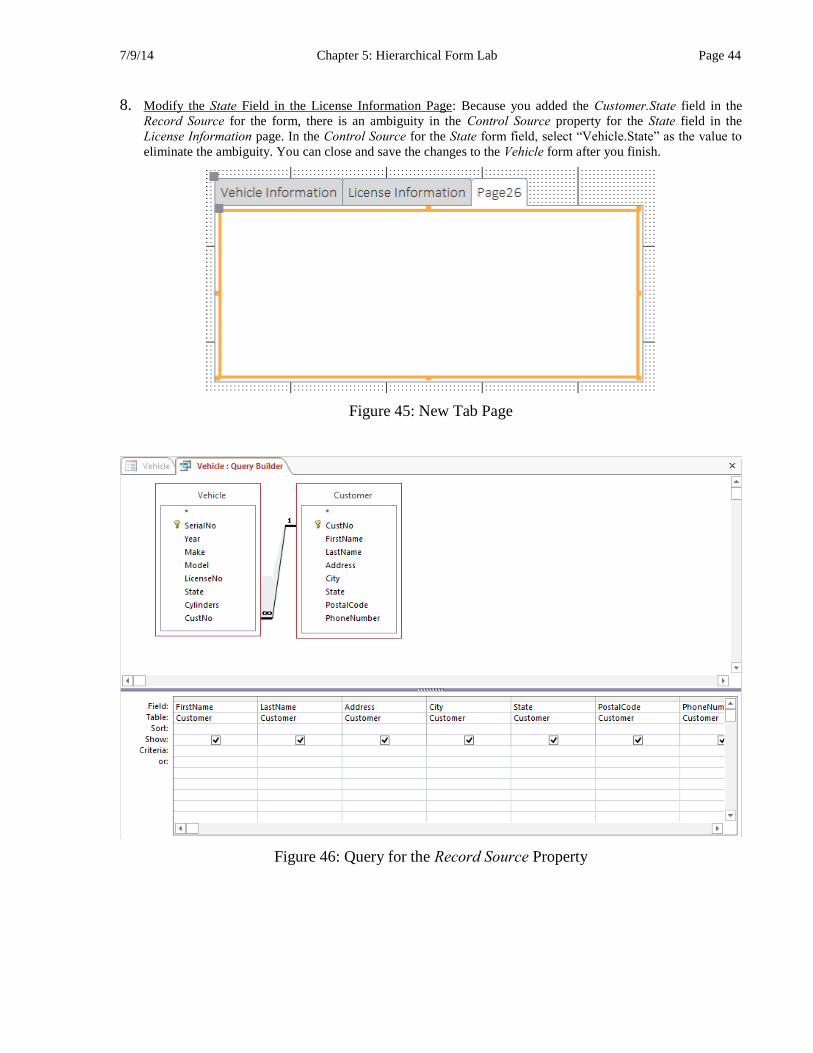
6. Add a Customer Information Tab Page: To add another tab page, right-mouse-click to the right of the second
tab page and choose Insert Page from the shortcut menu. A new page is inserted (Figure 45). Name the new
page “Customer Information”. You may have to drag the tab control wider to accommodate the new tab page.
7. Add Fields from the Customer Table to the New Tab Page: To accomplish this task, you must modify the
Record Source query so that it contains fields from both the Vehicle and the Customer tables.
Create the Vehicle Form Record Source Query: Open the main form’s Property Sheet. In the Record Source
property area, click the ellipsis (…) button to invoke the Query Builder. When it opens, you will see the
Query Design window with the Vehicle table in the upper window. To add the Customer table, click Design
Show Table in the Query Setup group and add the Customer table. Close the Show Table window.
Starting with the Customer table, drag all of the fields except for CustNo and all of the fields from the
Vehicle table to the empty grid below (Figure 46). Close Query Design in the view pane. Now the Record
Source property contains this query (Figure 47).
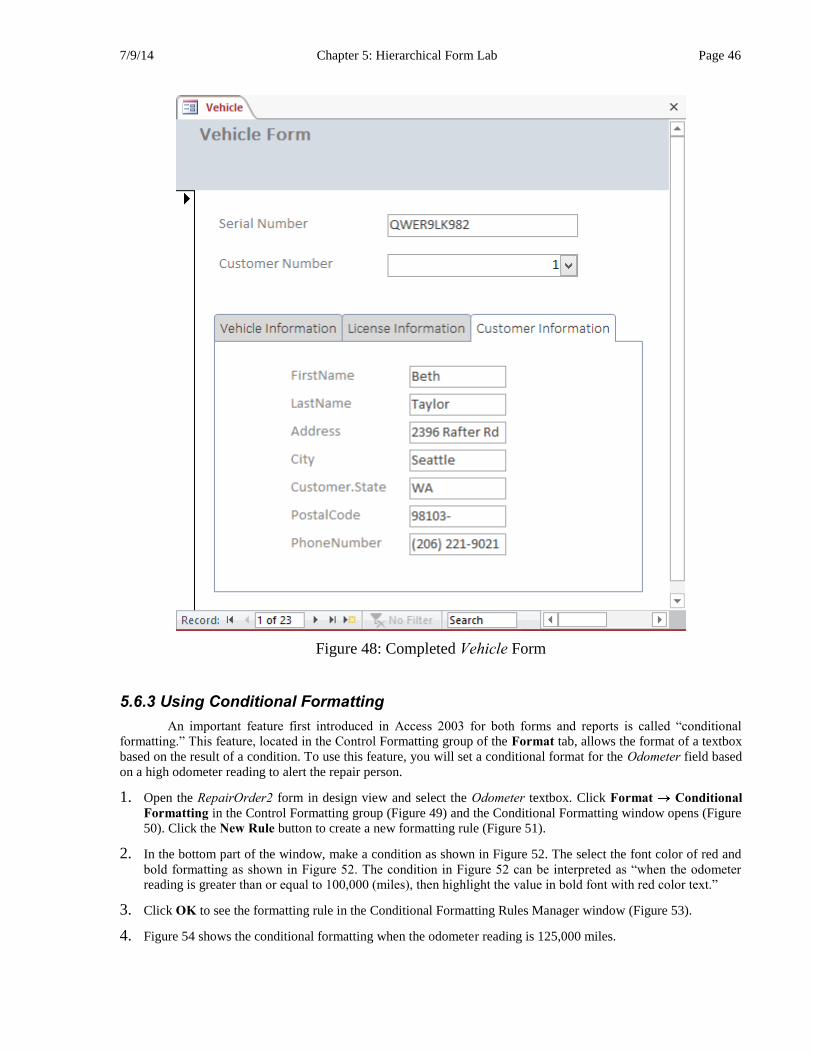
Drag Fields onto the Tab: To begin, open and select the Customer Information page. Next, open the Field
List window (Design Add Existing Fields in the Tools group) as shown in Figure 47. In the field list,
hold down the Shift key and select (as a unit) all customer fields except CustNo. Drag them toward the
middle of the tab page (Figure 47). If the field labels are too close to the textboxes, select and align the
labels and the textboxes as you have learned previously. When you are finished, your Vehicle form should
appear as in Figure 48.
7/9/14 Chapter 5: Hierarchical Form Lab Page 44
8. Modify the State Field in the License Information Page: Because you added the Customer.State field in the
Record Source for the form, there is an ambiguity in the Control Source property for the State field in the
License Information page. In the Control Source for the State form field, select “Vehicle.State” as the value to
eliminate the ambiguity. You can close and save the changes to the Vehicle form after you finish.
Figure 45: New Tab Page
Figure 46: Query for the Record Source Property

7/9/14 Chapter 5: Hierarchical Form Lab Page 45
Figure 47: Fields in the Customer Information Tab, Form Property Sheet, and Customer Table
Field List
7/9/14 Chapter 5: Hierarchical Form Lab Page 46
Figure 48: Completed Vehicle Form
5.6.3 Using Conditional Formatting
An important feature first introduced in Access 2003 for both forms and reports is called “conditional
formatting.” This feature, located in the Control Formatting group of the Format tab, allows the format of a textbox
based on the result of a condition. To use this feature, you will set a conditional format for the Odometer field based
on a high odometer reading to alert the repair person.
1. Open the RepairOrder2 form in design view and select the Odometer textbox. Click Format Conditional
Formatting in the Control Formatting group (Figure 49) and the Conditional Formatting window opens (Figure
50). Click the New Rule button to create a new formatting rule (Figure 51).
2. In the bottom part of the window, make a condition as shown in Figure 52. The select the font color of red and
bold formatting as shown in Figure 52. The condition in Figure 52 can be interpreted as “when the odometer
reading is greater than or equal to 100,000 (miles), then highlight the value in bold font with red color text.”
3. Click OK to see the formatting rule in the Conditional Formatting Rules Manager window (Figure 53).
4. Figure 54 shows the conditional formatting when the odometer reading is 125,000 miles.
7/9/14 Chapter 5: Hierarchical Form Lab Page 47
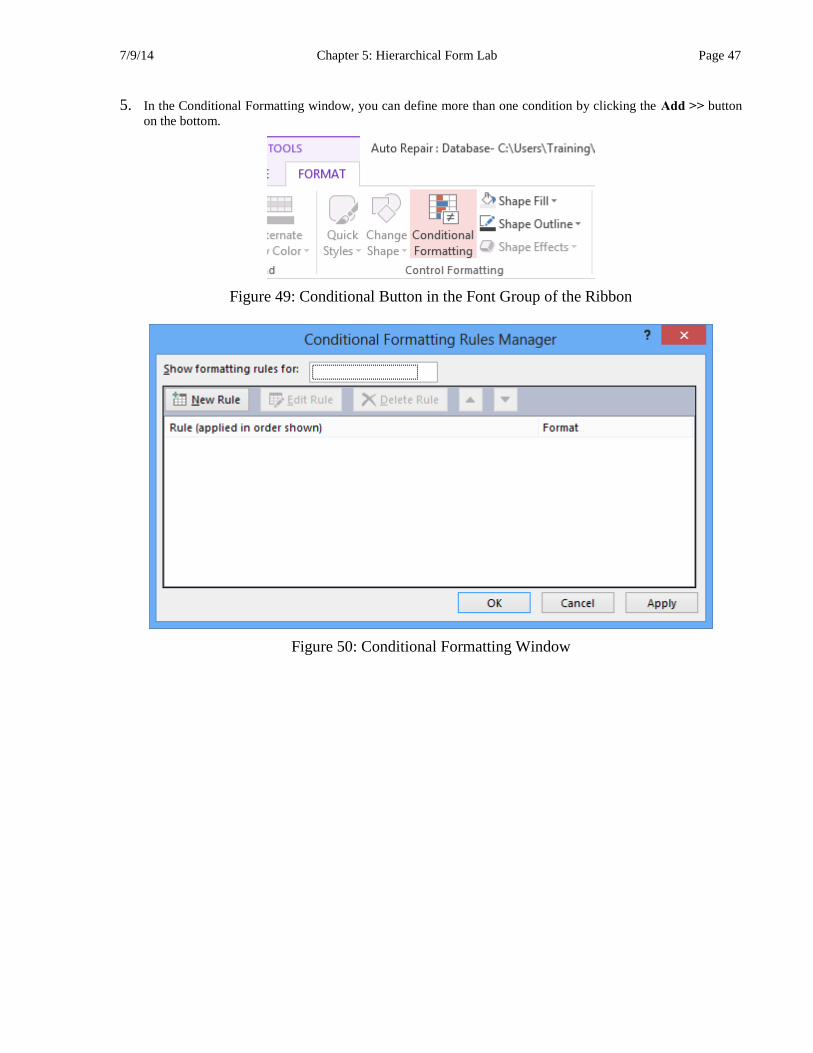
5. In the Conditional Formatting window, you can define more than one condition by clicking the Add >> button
on the bottom.
Figure 49: Conditional Button in the Font Group of the Ribbon
Figure 50: Conditional Formatting Window

7/9/14 Chapter 5: Hierarchical Form Lab Page 48
Figure 51: Empty New Formatting Rule Window
Figure 52: Setting a Condition and Formatting for a Field

7/9/14 Chapter 5: Hierarchical Form Lab Page 49
Figure 53: Formatting Rule Displayed in the Conditional Formatting Window
Figure 54: Bold, Red Formatting for a High-Mileage Vehicle
5.6.4 Object Dependencies
Object dependencies, a new feature first introduced in Access 2003, provide a convenient listing of related
objects. For example, when working on a hierarchical form, it is convenient to know the tables and queries used in
the form as well as other objects that use the form (perhaps as a subform). For a given database object (table, query,
form, or report), the object dependency feature shows the objects using the given object and the objects used by the
given object. For large databases, knowledge of object dependencies facilitates assessment of change impact. Note
that Access does not track some specialized query objects including action queries, SQL-specific queries, and
subqueries so dependency information may not be complete.
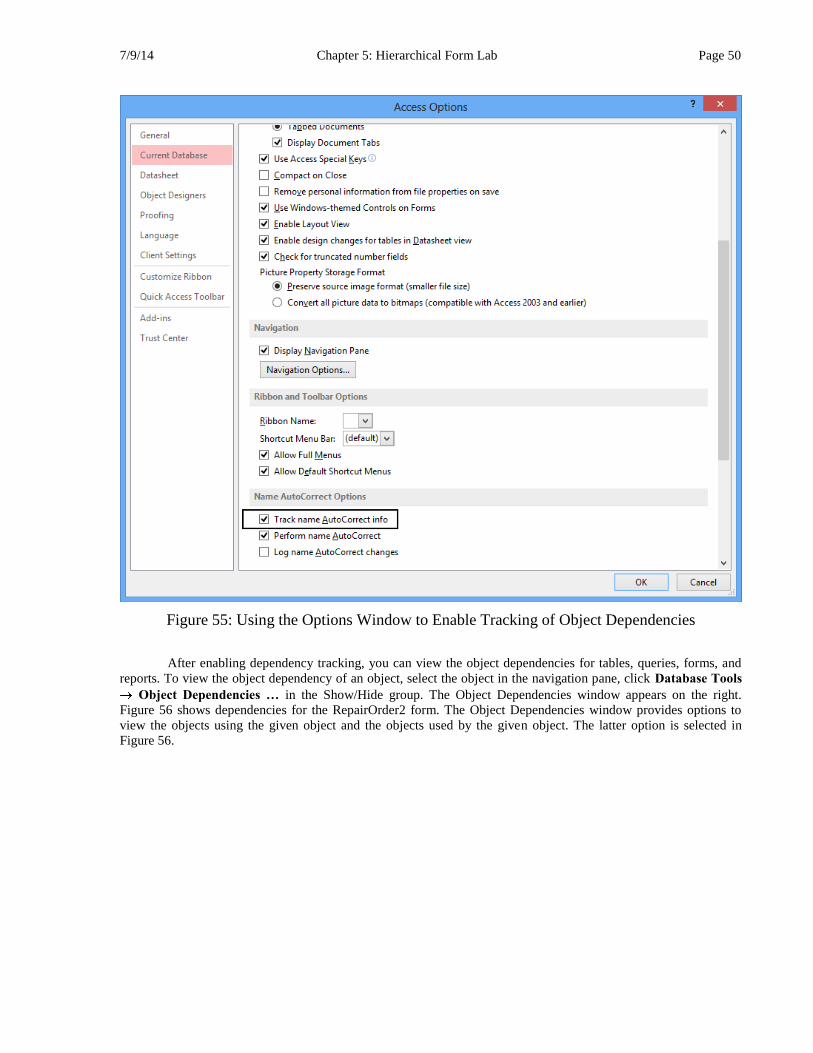
To activate the object dependency feature, you need to enable the Name AutoCorrect feature using the
Options window (File Options). In the Current Database section of the Options window, you should check the
“Track name AutoCorrect info” as shown in Figure 55.
7/9/14 Chapter 5: Hierarchical Form Lab Page 50
Figure 55: Using the Options Window to Enable Tracking of Object Dependencies
After enabling dependency tracking, you can view the object dependencies for tables, queries, forms, and
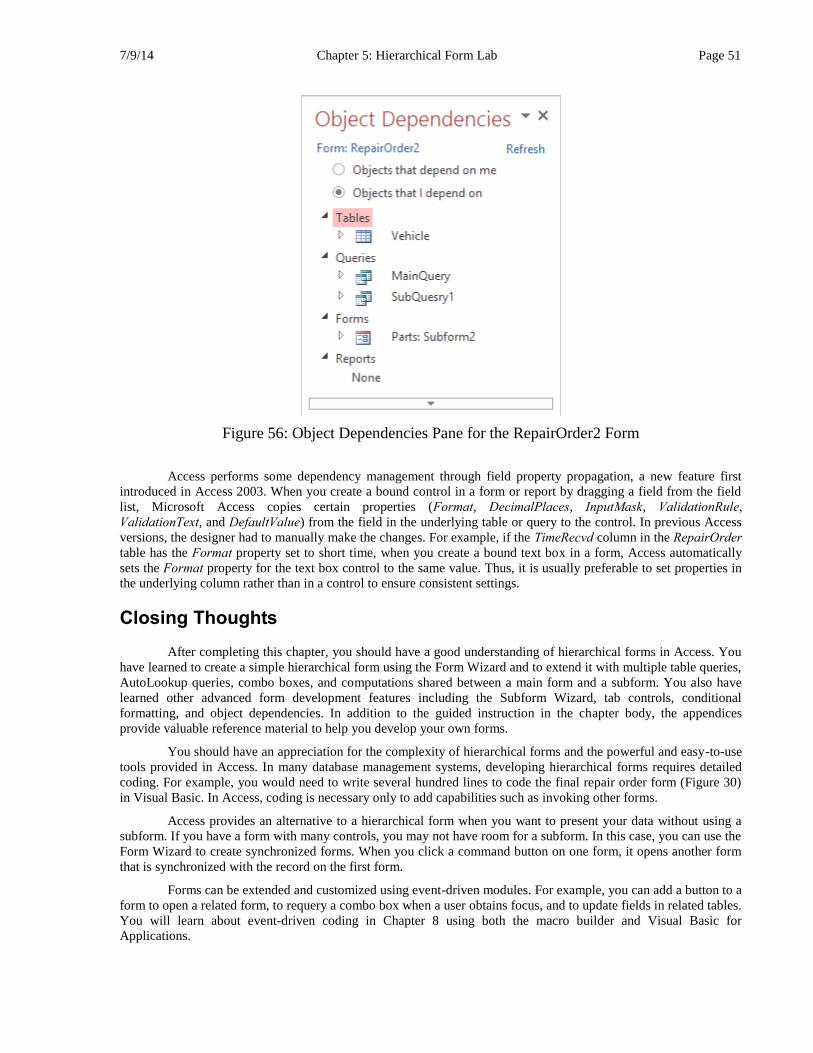
reports. To view the object dependency of an object, select the object in the navigation pane, click Database Tools
Object Dependencies … in the Show/Hide group. The Object Dependencies window appears on the right.
Figure 56 shows dependencies for the RepairOrder2 form. The Object Dependencies window provides options to
view the objects using the given object and the objects used by the given object. The latter option is selected in
Figure 56.
7/9/14 Chapter 5: Hierarchical Form Lab Page 51
Figure 56: Object Dependencies Pane for the RepairOrder2 Form
Access performs some dependency management through field property propagation, a new feature first
introduced in Access 2003. When you create a bound control in a form or report by dragging a field from the field
list, Microsoft Access copies certain properties (Format, DecimalPlaces, InputMask, ValidationRule,
ValidationText, and DefaultValue) from the field in the underlying table or query to the control. In previous Access
versions, the designer had to manually make the changes. For example, if the TimeRecvd column in the RepairOrder
table has the Format property set to short time, when you create a bound text box in a form, Access automatically
sets the Format property for the text box control to the same value. Thus, it is usually preferable to set properties in
the underlying column rather than in a control to ensure consistent settings.
Closing Thoughts
After completing this chapter, you should have a good understanding of hierarchical forms in Access. You
have learned to create a simple hierarchical form using the Form Wizard and to extend it with multiple table queries,
AutoLookup queries, combo boxes, and computations shared between a main form and a subform. You also have
learned other advanced form development features including the Subform Wizard, tab controls, conditional
formatting, and object dependencies. In addition to the guided instruction in the chapter body, the appendices
provide valuable reference material to help you develop your own forms.
You should have an appreciation for the complexity of hierarchical forms and the powerful and easy-to-use
tools provided in Access. In many database management systems, developing hierarchical forms requires detailed
coding. For example, you would need to write several hundred lines to code the final repair order form (Figure 30)
in Visual Basic. In Access, coding is necessary only to add capabilities such as invoking other forms.
Access provides an alternative to a hierarchical form when you want to present your data without using a
subform. If you have a form with many controls, you may not have room for a subform. In this case, you can use the
Form Wizard to create synchronized forms. When you click a command button on one form, it opens another form
that is synchronized with the record on the first form.
Forms can be extended and customized using event-driven modules. For example, you can add a button to a
form to open a related form, to requery a combo box when a user obtains focus, and to update fields in related tables.
You will learn about event-driven coding in Chapter 8 using both the macro builder and Visual Basic for
Applications.

7/9/14 Chapter 5: Hierarchical Form Lab Page 52
Chapter Reference
The chapter reference summarizes procedures that you practiced. For wizards discussed in the chapter, the
procedures highlight important parts of the wizards but do not list all of the steps.
Procedure 1: Using the Form Wizard to Create a Hierarchical Form (Section 5.1.1)
1. Choose Create Form Wizard in the Forms group to open the New Form window and
choose the table where indicated.
2. Click the >> or > button to move fields from the left side (Available Fields) to the right
side (Selected Fields). The Selected Fields area contains fields that will appear in the main
form.
3. In the same window, go up to the Tables/Queries selection box where the previous table
name appears and select a different table or query for the subform. Click the >> or >
button to move fields to the right side (Selected Fields). Note, the Selected Fields window
will contain fields for both the main form and the subform.
4. The next window asks how you want to view the data. Select the table/query that you
want to appear in the main form. The option “Form with subform(s)” should be selected.
5. Select the layout of the subform in the next window. Select “Datasheet” if it is not already
selected.
6. In the last window, you must provide names for the main form and the subform. In the
same window, select the second option, “Modify the form’s design”, since you will most
likely need to make modifications to the form.
Procedure 2: Editing a Subform’s Properties (Section 5.2.3)
1. You can edit the properties of a subform to change the linking fields or the form
associated with the subform.
2. The Subform Properties window can be opened by selecting the subform. Then, click
the right mouse button and select Properties. Alternatively, you can click Design
Property Sheet in the Tools group.
3. Use the Width and the Height properties to expand the size of the subform.
Alternatively, you can expand the size by selecting the subform and dragging the
double-arrow cursor.

7/9/14 Chapter 5: Hierarchical Form Lab Page 53
Procedure 3: Editing a Subform in Design View (Section 5.2.3)
1. You should open a subform in design view to edit controls in the subform.
2. To open a subform in design view, make sure that the subform is not selected before
opening it. If the subform displays as a white area, you can double click on it to open the
subform in Design view or right click inside the subform and select Subform in New
Window. If the subform is not displayed as a white area, it is already open in Design
view.
3. To change the field names that appear in the subform’s datasheet, change the Caption
property of the label associated with each textbox.
4. To change column widths, toggle the main form to form view with the subform
displayed in datasheet view. To adjust the widths of individual columns, select a column
in the subform, right-click to display a popup menu, and select the Field Width item.
You also can set a column to a standard fit (using the check box) or best fit using the
button in the Column Width window.
Procedure 4: Making a Textbox Read-Only (Section 5.4.3)
1. Making a textbox read-only prevents focus from being established. Without establishing
focus, a user cannot edit the value in a textbox. Textboxes that receive values through
AutoLookup queries are usually read-only.
2. Double-click the textbox to open its Property Sheet. Change the Enabled property to
“No” and the Locked property to “Yes”.
Procedure 5: Restricting the Values in a Combo Box (Section 5.4.2)
1. You may want to restrict the values in a combo box list to make the values consistent
with other values displayed on a form. Restricting the values can help a user quickly
find a value to select.
2. To restrict the values, edit the Row Source query value. Add a condition to a field in the
query to match the value displayed on a form. See Appendix B for the notation about
referring to form fields in a query.
Procedure 6: Sharing Computations between Forms (Section 5.5)
Sometimes a main form needs to display values computed in a subform. Typically, the main
form should display a summary total computed using all of the records in a subform. To
display a summary total, you need to change both the subform and the main form.
1. First, you need to add a textbox in the footer section of the subform. The Control Source
property of this textbox should perform the summary calculation. You should not
perform the summary calculation in the underlying query (Record Source) of the
subform.
2. Then, you need to add a textbox in the main form. The new textbox should reference the
textbox in the footer section of the subform. See Appendix B for the notation about
referring to a subform control from a control in the main form. You also can use the
expression builder to generate the proper notation.

7/9/14 Chapter 5: Hierarchical Form Lab Page 54
Procedure 7: Using the Subform Wizard (Section 5.6.1)
1. Select the Use Control Wizards button on the ribbon. Next, select the Subform tool
from the toolbox and drag it to create the subform. When you release the mouse, the
Subform Wizard will open to its first window. In this window, choose “Use existing
Tables and Queries” and click Next >.
2. In the Tables/Queries area, choose the table or query for the subform fields. From the
left side (Available Fields) below, choose the desired fields using the > button and click
Next >.
3. In the next window, you select the linking fields. If there is a 1-M relationship between
tables in the main form and the subform, Access will detect the linking fields. In this
case, you select the first choice, “Choose from a list”, to define fields to link the main
form and the subform. Otherwise, you may need to define the linking fields. Click Next
> to continue.
4. Name the subform in the area provided and click Finish. The form will open in design
view with the main form.
Procedure 8: Adding a Tab Control (Section 5.6.2)
1. Select the Tab Control tool from the ribbon and drag it to the form.
2. The Property Sheet of the tab control depends on the selection. Each tab page has its
own Properties window and the entire tab control has its own Properties window.
Name the tab control: To access the Property Sheet for the Tab Control, click to the
right side of the second page. Change the value of the Name property from its
default value.
Name an individual tab page: Click on the first tab to access its Property Sheet.
Change the Name property from its default value for each tab page.
3. The default color for the tab control is gray. To set it for transparent (if desired), open
the Property Sheet for the Tab Control and change the Back Style property to
“Transparent”.
4. To insert or delete a tab page, click to the right side of the last page and right-mouse-
click to open the shortcut window containing choices to insert page, delete page, and so
on.
5. To place main form fields into the tab control pages, you must cut and paste since
dragging does not often work.
Additional Practice
The following problems provide additional practice with the extended auto repair database as well as the
textbook databases.
7/9/14 Chapter 5: Hierarchical Form Lab Page 55
Part 1: Hierarchical Forms for the Extended Auto Repair Database
1. Using the Form Wizard, build a new hierarchical form similar to the Repair Order Form in this chapter except
that the subform contains details about labor usage, not part usage. Here are some additional details to
accommodate:
The subform should contain the LaborCode, the LabDesc, the Hours, and the HourRate columns. In
addition there should be a computed column for the labor cost (HourRate * Hours).
Write the subform query so that the RepairLabor table is updatable. Follow the rules for 1-M updatable
queries presented in textbook Chapter 10 (Section 10.3).
The subform fields for labor description, hourly rate, and labor cost should be read-only.
The subform footer should contain a summary calculation for the sum of the labor cost. The main form
should display the sum of the labor cost, the sales tax, and the total amount.
2. Build the same hierarchical form in (1) except that you should use design view to revise the original Repair
Order Form. Save the new main and subform under new names.
3. Using design view, add another sub form to the form built in (2). The second subform should display the part
charges in a similar manner to the labor usage. The second subform is independent of (not embedded in) the
labor usage subform. Here are some additional details to accommodate:
You can use the drag-and-drop method to add the second subform. Make a copy of the main form from (1)
or (2). Then, drag the Part subform from the Database window and drop it into the design view of the new
form. You might want to expand the length of the detail section before performing the drag-and-drop
operation.
Add a total field for the sum of the part charges and revise the tax and the amount due calculations to
include part charges and labor charges.
Part 2: Hierarchical Forms for the University Database
1. Use the Form Wizard to build the Course Offering Form described in textbook Chapter 10 (Section 10.4).
2. Use the Form Wizard to build the Faculty Assignment Form described in textbook Chapter 10 (Section 10.4).
3. Use the Form Wizard to build the Registration Form described in Chapter 5 (Section 5.4).
Part 3: Hierarchical Forms for the Order Entry Database
1. Using the Form Wizard and the form design view, build the Simple Order Form described in problem (22) of
textbook Chapter 10.
2. Using the Form Wizard and the form design view, build the Order Form described in problem (23) of textbook
Chapter 10. Define the main form and the subform queries before using the wizard.
3. Modify the Order Form in problem (2) according to the change described in problem (24) of textbook Chapter
10.
4. Using the Form Wizard and the form design view, build the Simple Purchase Form described in problem (25) of
textbook Chapter 10.
5. Using the Form Wizard and the form design view, build the Purchase Form described in problem (26) of
textbook Chapter 10. Define the main form and the subform queries before using the wizard.
6. Using the Form Wizard and the form design view, build the Supplier Form described in problem (27) of
textbook Chapter 10. Define the main form and the subform queries before using the wizard.

7/9/14 Chapter 5: Hierarchical Form Lab Page 56
Appendix A: Common Errors in Form Design
Appendix A describes problems that students have encountered in past academic terms. You should review
these situations carefully when you encounter an error. Most likely, your problem and its resolution are described
here. For your convenience, these problems are organized by topic area. The topic areas are listed in order of the
most common problems encountered. For simpler errors involving individual controls, the Access error checking
feature should suffice as described in Section 4.4.4 of Chapter 4.
Problems in formulating the underlying queries (Record Source property) for the main form and the subform.
The error message “Records in Table ______ would have no records on the 1 side.” indicates an error
in the underlying query (Record Source) of the form. This error often occurs when you change a value
with a combo box, but it does not indicate an error with the combo box. Remember that in a 1-M
query, it is critical that the foreign key field of the child table be in the query output. For example, in
the RepairOrder2 subform, the Record Source involves a join of Part (the parent table) and PartsUsed
(the child table). The field PartsUsed.PartNo must be in the query result. If this field is omitted (or
Part.PartNo is included instead), the resulting query will NOT be updatable. The error message that
results is “Records in Table PartsUsed would have no records on the 1 (parent) side.”
You must have a column that is common to the Record Source for the main form and the subform. In
the RepairOrder2 form, the common column is OrdNo. This column appears in both underlying
queries. In the query for the subform, this column must appear although there will not be a field in the
subform using this column. The common field is used in the Linking Child Fields and the Linking
Master Fields properties.
The queries for the main form and the subform should share a common field but usually do not have a
common table. In the RepairOrder2 form, the common column is OrdNo. But there is no table that is
used in both queries. The query for the main form contains RepairOrder, Vehicle, and Customer. The
query for the subform contains the PartsUsed and Part tables. Note that if you include the
RepairOrder table in the subform query, your hierarchical form may not work correctly.
If you do not have a common column, the Form Wizard may not detect that you want a hierarchical
form. For example, in the query for the repair order subform, assume that you use RepairOrder.OrdNo
instead of PartsUsed.OrdNo. The Form Wizard will not detect that you want a hierarchical form. This
query formulation error often occurs because your subform query has a common table (RepairOrder)
rather than a common column.
Make sure that all required fields from the updatable tables are included. Usually, there is one table in
the main form and one table from the subform that can be changed by using the form. All required
fields from these tables must be included in the query output.
Think carefully about outer joins. In some cases they are necessary; in other cases harmful. Usually
the only time you need an outer join is to include nonmatched records from a child table.
A query is not updatable if it contains a GROUP BY clause or the DISTINCT keyword. Access likes
to put GROUP BY in queries when you use Query Design. Remove the GROUP BY when using a
query for a main or subform. GROUP BY destroys updatability because each row of a GROUP BY
query can refer to several rows of the base tables. DISTINCT destroys updatability because each row
of a view may correspond to more than one row in a base table. Note that queries with the
DISTINCTROW keyword are usually updatable. With DISTINCTROW, each row in a query
corresponds to one row of a base table.
Use the join operator style to express joins in the main form and the subform queries. If you use the
cross product style (see textbook Chapter 3), Access will think that your query is not updatable.
Because Access prefers the join operator style, it is a good idea to use Query Design rather than SQL
to formulate the queries for the main form and the subform. Query Design automatically generates the
join operator style.

7/9/14 Chapter 5: Hierarchical Form Lab Page 57
Errors relating to combo boxes.
Do not confuse queries for combo boxes with the underlying queries for the main and the subform. The
combo box queries are independent of the underlying queries. Combo boxes are memory aids as they
allow a user to select a value rather than needing to remember the possible values. Therefore, the
purpose of a combo box query is to generate a list of values from which the user can select. In contrast,
the purpose of a main form or a subform query is to supply the data displayed in the various form
fields.
A combo box must be bound (Control Source property) to a field in the underlying query. Do not use
an equal sign (=) before the name. The = symbol indicates an expression, not a field.
For AutoLookup queries, the Control Source should be the foreign key, not the primary key. For
example, the Control Source for serial number should be RepairOrder.SerialNo (the foreign key), not
Vehicle.SerialNo (the primary key). If your subform query only includes the foreign key, you should
not have a problem with setting the Control Source to the primary key instead of the foreign key.
A combo box query is specified in the Row Source property. For example, the Row Source for the Part
No. combo box is a query on the Part table. Usually combo box queries involve just a single table. Do
not use the underlying query (Record Source) in the Row Source property.
You can specify the number of columns to display in the combo box with the Column Count property.
Usually the first column in the query result is bound to the combo box control. Select “1” for the
Bound Column property to bind the first column. If you set it to another value (say, “2”), no values will
display in the combo box and an error message will be generated when you move to the next record.
The Combo Box Wizard can cause confusion regarding the Column Widths property. The Combo Box
Wizard recommends that you do not display the bound column (usually the first column). Following
this recommendation is fine except that the width of the first column is set to 0. Access does not
display the value of the first column if the width is 0. To alleviate this problem, you may need to
change the Column Widths property after using the Combo Box Wizard. Set the width of the first
column to a small value such as 0.01".
AutoLookup problems.
You should be aware that AutoLookup queries only work for foreign key fields. In particular, you
should not expect AutoLookup queries to work for the primary key of the main form. For example,
you cannot enter a new value for OrdNo in the main form and expect related fields to be displayed.
You would need to formulate a search or implement a command button to search on order number.
You can tell whether AutoLookup queries apply to a form field by examining the field’s Control
Source property. If the Control Source property is set to a foreign key, AutoLookup applies to the form
field. For example, if the Control Source is Vehicle.SerialNo, AutoLookup does not apply because it is
the primary key of the Vehicle table. On the other hand, if the Control Source is RepairOrder.SerialNo,
AutoLookup applies because it is a foreign key in the RepairOrder table.
Problems relating to the appearance of your form.
You can change the amount of space on the main form by manipulating the embedded subform
(stretching or shrinking it).
You can rearrange the order of fields in the subform by moving fields in the datasheet. You must
invoke the embedded subform in form design view and then change to datasheet view. As a datasheet,
you can rearrange the columns, change the size of the columns, and cause a horizontal scroll bar to
appear. The horizontal scroll bar appears if the datasheet is wider than the subform. Note that if you do
not see a horizontal scroll bar in the datasheet view of the subform, you will NOT see a horizontal
scroll bar in the subform when it appears on the main form. This is true even if the datasheet view of
the subform is wider than the space allocated on the main form.

7/9/14 Chapter 5: Hierarchical Form Lab Page 58
Be careful about the size of the form footer on your main form. The size of the form footer is the space
between the footer boundary and the end of form. If the form footer area is too large, only the footer
will display. Nothing will display in the detail section of the form. The detail section should contain
everything on your main form. To correct this problem, reduce the size of the footer in your main
form. You can do this in design mode. Scroll down until you find the form footer divider. Then scroll
to the end of the form. Drag the end-of-form boundary so that it is close to the form footer boundary.
Calculation and naming problems.
It is generally better to perform calculations (such as UnitPrice * QtyUsed) in the underlying
query rather than in the form itself. An example of the SQL syntax for a computed field is
UnitPrice * QtyUsed AS PartCost. If you have a form field defined as a computation, you
cannot refer to the form field in an aggregate function. Rather, you must repeat the expression in the
aggregate function.
Access gives the message #name when it cannot recognize a field name in an expression. For example
in the following expression, a #name error is given if the field units is misspelled unit: =
SUM(unit). Such a misspelling error is easy to correct. Often the #name errors occur when
referencing fields in subforms. You can use the expression builder to check references to subform
fields (see the note about form field references in Appendix B).
For main form fields that reference subform fields, refer to Rule 3 described in Appendix B.
Do not use qualified field names for the Name property of a bound control. For example, do not use
RepairOrder.Ordno as the name of a textbox. If your underlying query needs a qualified name in the
result, rename the column using the AS keyword (SQL) or the rename feature of Query Design.
Access gives the “#error” message when the Name property of a form field matches a field used in the
expression of the Control Source property. If you are using an expression for the Control Source
property, make sure that the control name does not match one of the fields used in the expression.
Access may give the “#error” message when a main form field refers to a field that is computed in a
subform. This situation typically occurs when the main form field displays a summary value computed
in a subform field (see Section 5.5). The problem is not due to the computation of the summary value
in a subform field. Rather the problem is caused by a row computation performed in the subform. For
example if the subform contains a field (amount) computed as qty * prodprice, this calculation should
be performed in the subform query, not in the subform. The subform footer field can summarize this
subform field (SUM(amount)) without a problem. The problem occurs if the subform footer field uses
a field computed in another part of the subform. Because of this problem, I recommend performing
row calculations in form queries, not in the form.
On some occasions Access refuses to compute aggregate functions in subform footer fields. You may
have an error message like “#name” or “#error”. Make sure that you have followed the naming rules
described in Appendix B. If you are sure that you have followed the naming rules, here are several
tactics to try:
Try defining a new field in the subform footer and then save the subform changes. Then define a
new field in the main form with a reference to the field in the subform’s footer and save the form
again. If the error appears in the new main form field, delete the new fields (main form and
subform) and try the next tactic.
Close the form and repair the database (Database Tools Compact and Repair Database). If
the error still appears, try the next tactic.
Close the form and return to the Forms section in the Navigation pane. Copy and paste the main
form. Open the new copy of the main form to see if the error still appears.
Problems when testing your hierarchical form.
7/9/14 Chapter 5: Hierarchical Form Lab Page 59
Before completing your form, make sure that it works as expected. Test the form by inserting new
rows, scrolling through records, changing field values, and deleting records. Perform these operations
in both the main and the subform. When inserting a new record in the main form, you must select
Home New in the Records group. Pay special attention to combo boxes. Make sure that you can
select a new record in a combo box without an error message being issued.
When testing your main form, remember that updates to the primary key field of the main form are
usually not supported. For example, if you change the order number, Access will give an error unless
the Cascade Update property of the relationship is set to true.
If you set the Data Entry property of a form to “Yes”, your form will begin in data entry mode. You
will not be able to see existing records. To avoid confusion, you should usually set the Data Entry
property to “No” for both the main and the subform.

7/9/14 Chapter 5: Hierarchical Form Lab Page 60
Appendix B: Form Field References
This appendix presents rules about referring to form fields in a property or query. The rules are explained in
the help documentation but assembling them can be frustrating. Here is a convenient summary to help you.
Rule 1
When referring to a main form field in a property of another main form field, simply use the field name.
For example, in a new field in the main form that computes tax (8.5%) on the total part cost, the Control Source
property should be TotalPartChg * 0.085. The field TotalPartChg is a reference to a field in the main
form.
Rule 2
To refer to a form field inside a query, use the notation [Forms]![Form Name]![Field Name].
For example, the Criteria property for the CustNo field in the query of the Serial No. combo box is
[Forms]![RepairOrder2]![CustNo]
The Criteria value references the CustNo field on the main form. The purpose of the query is to restrict the combo box list to those vehicles with the same owner as displayed in the main form.
Rule 3
To refer to a subform field in a property of a main form field, use the notation [Subform Control
Name].[Form]![Field Name]. For example, the Control Source property of the main form field
TotalPartChg should refer to the subform field TotalCost. The Control Source property is specified as
=[Parts: Subform2].[Form]![TotalCost]
Note that Parts: Subform2 is the value in the Name property of the embedded form in the main form. If you
click (not double-click) on the embedded subform with the Properties window visible, you will see the Name
property for the embedded subform. Usually the Name property has the same value as the subform’s name in the
Database window. If they are different, use the Name property when referencing fields in the subform. Do not use
the name of the subform that appears in the Database window.
Rule 4
To refer to a main form field in a property of a subform field, use the notation Parent![Field Name].
For example, to refer to the main form field RepairDate in an expression of a subform field, use the notation
Parent![RepairDate].

7/9/14 Chapter 5: Hierarchical Form Lab Page 61
Appendix C: Steps to Test a 1-M Query
This appendix presents the steps for testing a 1-M query for insertions to the child table and updates to the
parent table. You should follow these steps before using a query as the Record Source for a main form or subform.
Refer to textbook Chapter 10 for more details about the concepts underlying updatable queries. For the exact rules
about modifications supported to 1-M queries, search the help documentation using “updating data from a query” as
the keyword and then select the topic “about updating data”.
Step 1
Identify the child table in the query. The child table will be the one that you will update by using the
query’s datasheet.
Step 2
Make sure that the last row contains an asterisk. If it does not, you probably have a GROUP BY or
DISTINCT in your query. Remove these if present. When you see the asterisk in the last row, proceed to step 3.
Step 3
Try to insert a new row in the child table. First, enter the primary key of the child table. Second, enter
values for the foreign keys of the child table. You need to use valid (existing) foreign key values. Notice that an
AutoLookup query occurs after entering each foreign key value. Third, enter the other required fields in the child
table. After entering the values, move the cursor to the new row containing an asterisk (*). If Access does not
display an error message, your query is updatable.
Example
Apply the following steps to the example below. In step 1, PartsUsed is the child table. In step 2, an
asterisk should appear in the last row of the datasheet so you can proceed to step 3. In step 3, enter an existing
OrdNo (primary key of RepairOrder) and an existing PartsUsed.PartNo (primary key of Part). Notice that an
AutoLookup query displays values of PartDesc, UnitPrice, UnitSize, and UnitsInStock. After entering a value for
QtyUsed, move the cursor to the new row. You should not have any error messages. To verify that a new row was
added to PartsUsed, open the PartsUsed table as a datasheet and see the new row that you just added.
Updatable Query Example:
SELECT OrdNo, PartsUsed.PartNo, QtyUsed, PartDesc
UnitPrice, UnitSize, UnitsInStock
FROM PartUsed INNER JOIN Part
ON PartUsed.PartNo = Part.PartNo
This query does not support insertions to the parent table (Part) because the primary key of the Part table is
not in the query result. However, it does support updates to the fields of the Part table (PartDesc, UnitPrice,
UnitSize, and UnitsInStock). To test updates to these fields, open the query as a datasheet and change one of the Part
fields. You will see the value change in all rows with the same part number.
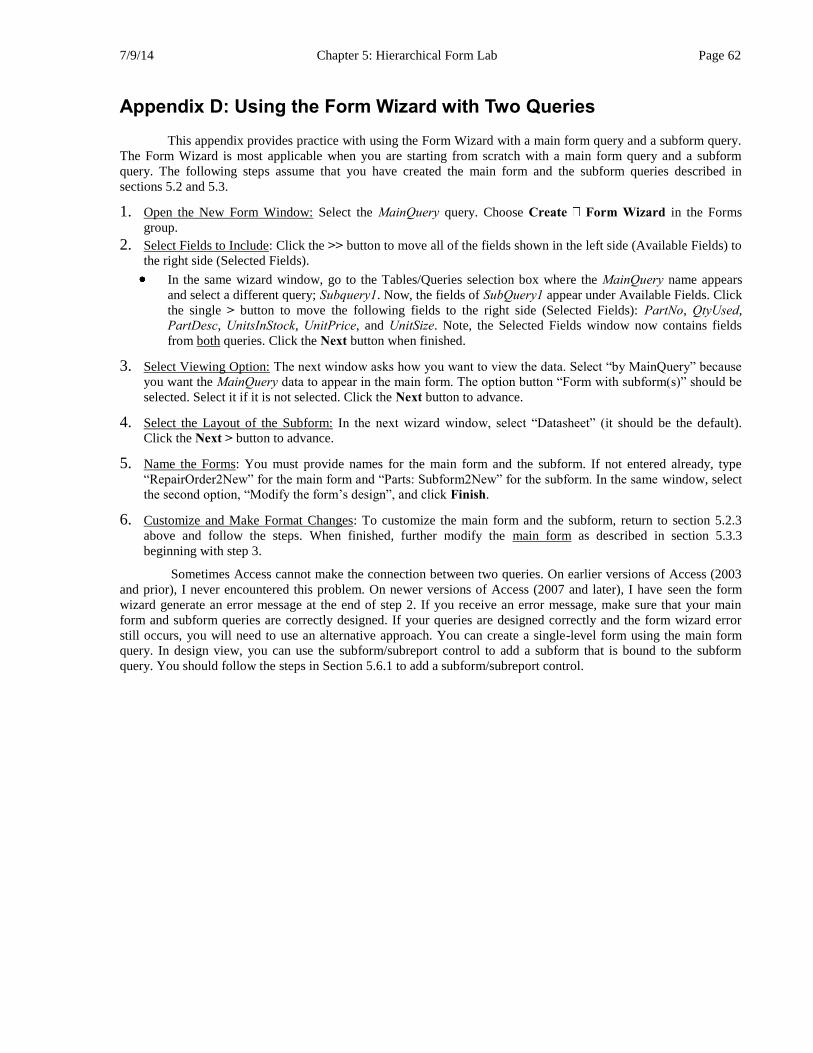
7/9/14 Chapter 5: Hierarchical Form Lab Page 62
Appendix D: Using the Form Wizard with Two Queries
This appendix provides practice with using the Form Wizard with a main form query and a subform query.
The Form Wizard is most applicable when you are starting from scratch with a main form query and a subform
query. The following steps assume that you have created the main form and the subform queries described in
sections 5.2 and 5.3.
1. Open the New Form Window: Select the MainQuery query. Choose Create Form Wizard in the Forms
group.
2. Select Fields to Include: Click the >> button to move all of the fields shown in the left side (Available Fields) to
the right side (Selected Fields).
In the same wizard window, go to the Tables/Queries selection box where the MainQuery name appears
and select a different query; Subquery1. Now, the fields of SubQuery1 appear under Available Fields. Click
the single > button to move the following fields to the right side (Selected Fields): PartNo, QtyUsed,
PartDesc, UnitsInStock, UnitPrice, and UnitSize. Note, the Selected Fields window now contains fields
from both queries. Click the Next button when finished.
3. Select Viewing Option: The next window asks how you want to view the data. Select “by MainQuery” because
you want the MainQuery data to appear in the main form. The option button “Form with subform(s)” should be
selected. Select it if it is not selected. Click the Next button to advance.
4. Select the Layout of the Subform: In the next wizard window, select “Datasheet” (it should be the default).
Click the Next > button to advance.
5. Name the Forms: You must provide names for the main form and the subform. If not entered already, type
“RepairOrder2New” for the main form and “Parts: Subform2New” for the subform. In the same window, select
the second option, “Modify the form’s design”, and click Finish.
6. Customize and Make Format Changes: To customize the main form and the subform, return to section 5.2.3
above and follow the steps. When finished, further modify the main form as described in section 5.3.3
beginning with step 3.
Sometimes Access cannot make the connection between two queries. On earlier versions of Access (2003
and prior), I never encountered this problem. On newer versions of Access (2007 and later), I have seen the form
wizard generate an error message at the end of step 2. If you receive an error message, make sure that your main
form and subform queries are correctly designed. If your queries are designed correctly and the form wizard error
still occurs, you will need to use an alternative approach. You can create a single-level form using the main form
query. In design view, you can use the subform/subreport control to add a subform that is bound to the subform
query. You should follow the steps in Section 5.6.1 to add a subform/subreport control.