chapter 2 tutorial - · pdf filechapter 2 2 smead software ... choose the type of sheet to...
TRANSCRIPT

Tutorial 1
Smead Software Solutions
Chapter 2 Tutorial
Please note that if you have COLORBAR GOLD Print-Only software, you will not be able to create or edit existing label designs.
This sample label design demonstrates how you can use the New Label Wizard, the Add New Image Wizard, and the Add Element Toolbar to create a label design.
About this tutorial The ColorBar Gold 3.5tutorial is a fun, easy and quick way to gain expertise designing labels with ColorBar. The tutorial takes about two hours to complete, but is divided into sections that make great stopping places for your busy schedule, or to simply give you a chance to catch your breath before moving forward. Each step of creating your label is illustrated with a diagram of what you will see on screen. For consistency, new screens are introduced above the diagram, and the steps to take on the new screen generally follow beneath the diagram. In many cases, significant changes to the same screen may also be illustrated. At the end of the tutorial, you will be able to compare your work to a sample label design included with ColorBar, giving you the opportunity to discover the powerful editing tools ColorBar puts at your fingertips. This tutorial is divided into the following sections: New Label Design
Setting up the design space

Chapter 2 2
Smead Software Solutions
Add New Image Wizard Creating an element Linking elements to your database
Copying Elements
Using copy and paste to save time and effort
Setting Element Properties The heart of a label design: telling your elements what to do
Text Elements Adding colored and straight text elements to your design
Bar Codes Adding bar codes to your design
Comparison
Checking your label against the included sample
Placing Shapes Adding shaped elements to your design
Editing a Design Making adjustments and perfecting your design
Data Grid Accessing your database
The sections are intended to follow each other as listed. Please work them in this order your first time through. Thereafter, the individual sections will be useful as a reference or as a refresher.

Tutorial 3
Starting ColorBar Gold 3.5 To start Colorbar Gold:
Double-click on the ColorBar icon on your computer’s desktop or, Choose ColorBar from the Programs list in your Start menu.
New Label Design ColorBar starts up with the option of opening an existing design or creating a new design. For the purposes of this tutorial:
ColorBar Gold 3.5 opening window
Select Create a new label. and click OK.
This opens the New Label Wizard:
Smead Software Solutions

Chapter 2
Smead Software Solutions
4
New Label Wizard The wizard will guide you through the setup process so you can begin your design. 1. Select Change the page size, set up margins, and/or print
multiple labels per page., and click Next>>. The paper selection window appears:
Paper selection window

Tutorial 5
2. Select Single sheets of paper with many labels per page., and click Next>>.
Choose the type of sheet to print your labels on from the Form: pull-down list:
Paper selection pull-down list 3. Select Part No. 170166 6-up Sheeted Waterguard. NOTE The various sheet sizes offered in this list are Smead label
stock, and carry Smead catalog numbers. Notice that the sample sheet on the left changes to show the new selection:
Smead Software Solutions

Chapter 2
Smead Software Solutions
6
Paper selection window completed 4. Click Next>>:
TIP The wizard’s defaults are designed for standard sheet specifications (paper size, margins, number of labels, etc.), so you can accept the next three windows without modification.
5. For the sheet size, leave the defaults of 8.500 x 11.000, and
click Next>>:
Paper size window

Tutorial 7
Paper margins window 6. For the margins, leave the default settings and click Next>>.
This opens the Label Dimensions window:
Label Dimensions window
Smead Software Solutions

Chapter 2 8
7. Click Next>> to accept the number and dimensions of the labels.
Now you will want to select a colormap for your design:
Colormap selection window
NOTE Colormaps are the heart of a color-coded label filing system. They match a color to each letter of the alphabet, and each digit from 0 through 9. These are collectively called a character set.
A colormap will only be applied to the elements you designate. 8. Click on the pull-down list and select Smead 350. There is no
need to change the defaults on this screen. 9. Click Next>>. The next window lets you type a description of the new design, as in the example below:
Smead Software Solutions

Tutorial 9
Label design description window
Notice that the Next>> button has been replaced by Finish. This tells you that the New Label Wizard is complete and you are ready to begin your design. 10. Click Finish to bring up the design screen:
Label design space
The white space is the label space. All the elements you create must fit in this space in order to print properly.
Smead Software Solutions

Chapter 2 10
Add New Image Wizard Now that you have a blank label space in front of you, it’s time to use the Add New Image Wizard: Add New Image Wizard icon 1. Click on the Add New Image Wizard icon in the upper left of
the Element Toolbar. The wizard prompts you to select the type of element to be added: New Image Wizard – select image window
Smead Software Solutions

Tutorial 11
2. Select Index System. This element is the color block that forms the foundation of a colormapped label. 3. Click Next>>. The Printer Compatibility window explains the messages and warnings you might see when printing your labels to a specific printer:
Printer compatibility information window
4. Click Next>>.
Smead Software Solutions

Chapter 2 12
Now the wizard prompts you to select an index system, choosing from one of the eight standard systems included with ColorBar. The Default is the colormap that corresponds to the index system you have chosen:
Index system selection window pull-down list 5. Select Tab from the pull-down list.
6. Click Next>>. NOTE Colormaps and index systems need not match.
Smead Software Solutions

Tutorial 13
The Data window lets you select the source information (known as the data origin) for the element.
This block will be the first in a series of four blocks corresponding to the last four digits of an account number. Because this is the first block, we will make “1” the data position. This selects the first number from the end as the source. If this sounds confusing, please refer to the Database section of the Data Origin chapter:
Data window Leave Length at 1. This ensures that the block will use only one digit. 7. Select From End for the digits to fall in the correct order.
Smead Software Solutions

Chapter 2 14
The data origin will determine the color of the block. Typically, a block element will correspond to a digit in an ID number from a database. Therefore, our data origin will be Database: New Variable – Data Origin 8. Click on New Variable… and select Database. 9. Click OK. This opens the Add Database Wizard.
Smead Software Solutions

Tutorial 15
Add Database Wizard
The Add Database Wizard walks you through the database setup: Database Setup window Normal Setup – basic database setup is the most straightforward method. 1. Click Next>>.
The Database File window allows you to choose the database:
Smead Software Solutions

Chapter 2 16
2. Click on File. This opens the Select Database File window:
Select Database File window
3. Click on the pull-down list:
Smead Software Solutions

Tutorial 17
4. Select the C drive from the pull-down list.
Select Database File path – Program Files 5. Select Program Files.
Smead Software Solutions

Chapter 2 18
Select database File path – cbgold30
6. Select cbgold30.
Select Database File path - Labels 7. Select Labels.
Smead Software Solutions
Tutorial
Smead Software Solutions
19
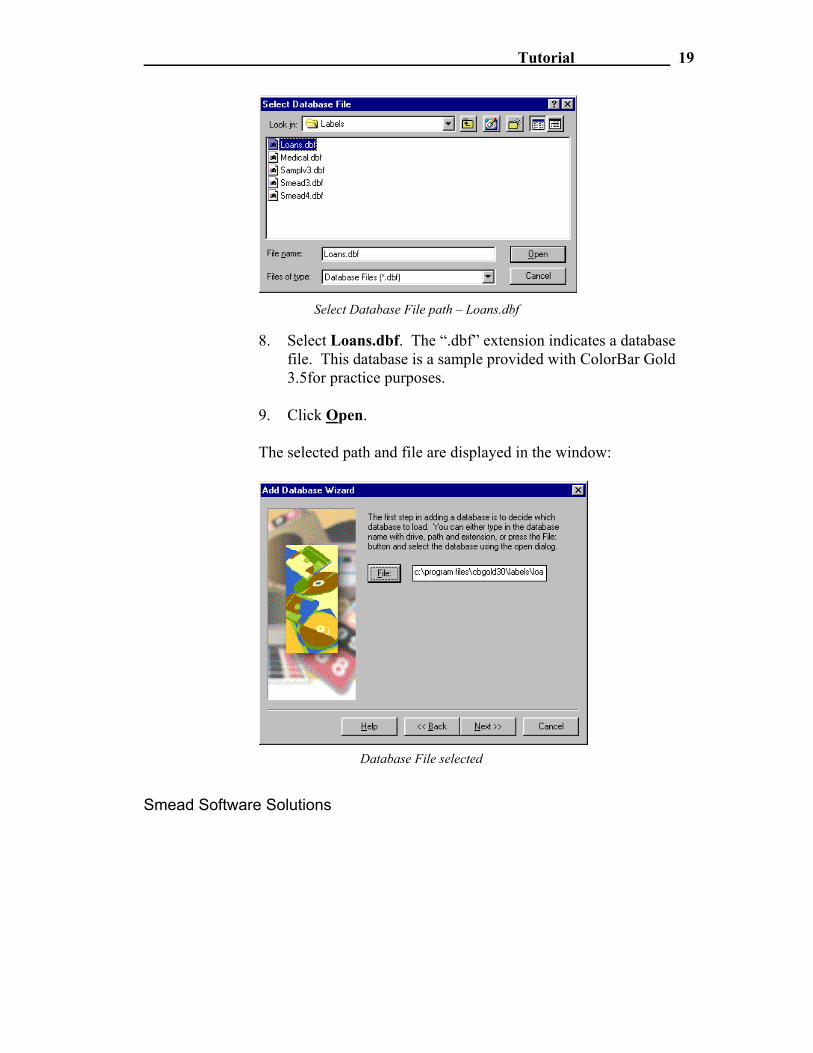
Select Database File path – Loans.dbf
8. Select Loans.dbf. The “.dbf” extension indicates a database file. This database is a sample provided with ColorBar Gold 3.5for practice purposes.
9. Click Open.
The selected path and file are displayed in the window:
Database File selected
Chapter 2 20
10. Click Next>>.
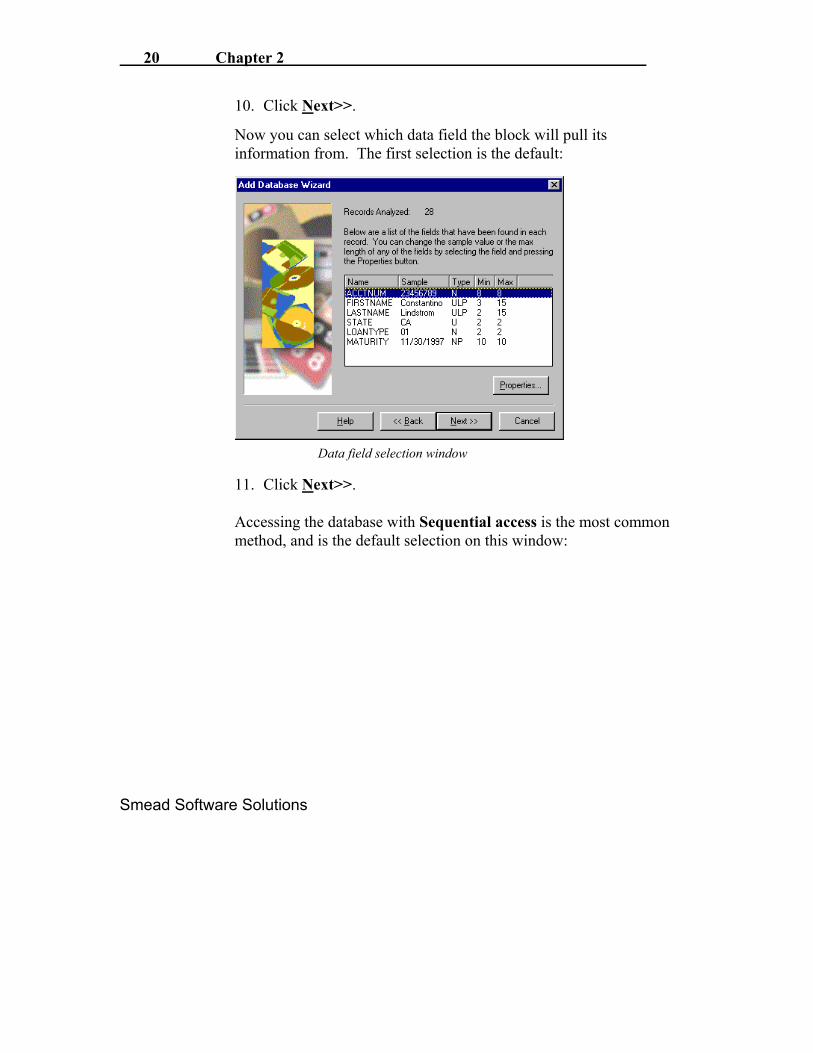
Now you can select which data field the block will pull its information from. The first selection is the default:
Data field selection window
11. Click Next>>. Accessing the database with Sequential access is the most common method, and is the default selection on this window:
Smead Software Solutions

Tutorial
Smead Software Solutions
21
Database access selection window 12. Click Next>>. The database name displays in the window. 13. Click Finish.
Database name and description window

Chapter 2 22
Add New Image wizard Returning to the Add New Image Wizard, the database fields are displayed, allowing you to review your choices:
Data Review
14. Click Next>>. The wizard suggests naming the element for future reference. For this tutorial, the default name will be fine:
Smead Software Solutions Name element window

Tutorial 23
You may also include a description of the element if you wish. 15. Click Next>>. It is easier to place an element using the mouse than to guess at coordinates. The default is using the mouse:
Element placement window
16. Click Finish>>. The design space appears, and the mouse cursor becomes an element icon for placement. 17. Place the cursor just below the upper left corner and click the
left mouse button. The block appears in the design space:
Smead Software Solutions

Chapter 2 24
Label design window – mouse placement After placing the element in the design space, you can move and size it at will.
NOTE An element is active when surrounded by red handles
Smead Software Solutions
Tutorial 25
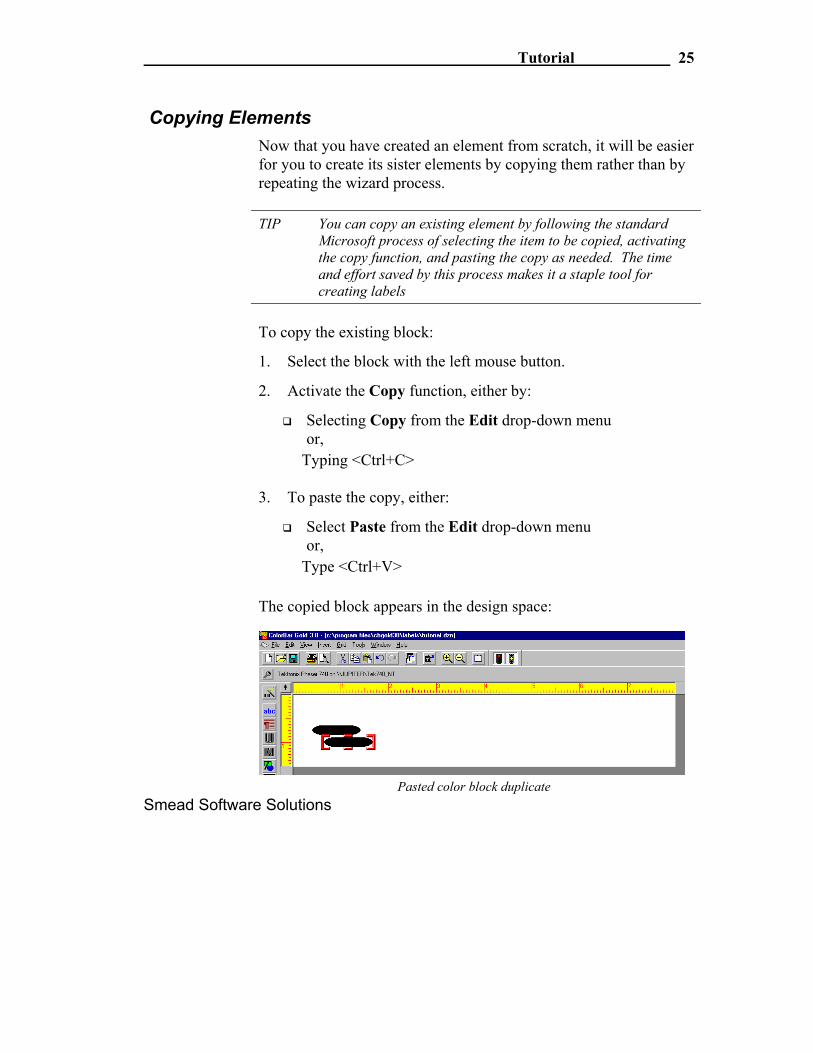
Copying Elements Now that you have created an element from scratch, it will be easier for you to create its sister elements by copying them rather than by repeating the wizard process. TIP You can copy an existing element by following the standard
Microsoft process of selecting the item to be copied, activating the copy function, and pasting the copy as needed. The time and effort saved by this process makes it a staple tool for creating labels
To copy the existing block:
1. Select the block with the left mouse button.
2. Activate the Copy function, either by:
Selecting Copy from the Edit drop-down menu or,
Typing <Ctrl+C>
3. To paste the copy, either:
Select Paste from the Edit drop-down menu or,
Type <Ctrl+V>
The copied block appears in the design space:
Pasted color block duplicate Smead Software Solutions

Chapter 2 26
Smead Software Solutions
At this point, you must decide whether to copy the remaining blocks all at once and set their attributes later, or copy them and set their attributes one at a time.
For the sake of this tutorial, we will copy them and set their attributes one at a time.
Setting Element Properties You may set an element’s properties either by:
Selecting Properties from the Tools drop-down menu or, Clicking the right mouse button on the selected element
From the Element Properties window, you can change any attribute, including the data origin, size and position, colormap, etc.
Since this copied block is an exact duplicate of the original block, we need to change some of its attributes. Perhaps the most important of these is the data position.
The first block is mapped to the first digit from the end of the account number. As the next sequential block, this duplicate needs to be mapped to the second digit from the end.
1. Select Properties from the right mouse menu.

Tutorial 27
From the Index System Properties window:
Index System Properties – data position
2. Choose the Colormap Key tab.
3. Under Data Position, change the Start: value to 2.
4. Click OK:
Duplicate color block mapped
Smead Software Solutions

Chapter 2 28
Notice that the block has changed color. It now displays the color associated with the second digit in the account number.
If you have not already placed the element, do so now:
5. Grab the block with the left mouse button and drag it up next to the first block until it looks like this:
Duplicate color block in place
Repeat these procedures for blocks three and four, using the copy function and setting the colormap start values. Your end result should look like this:
All color blocks placed and mapped
Smead Software Solutions

Tutorial 29
Aligning Elements
With the color blocks copied and placed in the design, you will want to align them. TIP ColorBar’s alignment feature lets you align elements to
each other, and within the design space as well. To align the color blocks to each other: 1. Select all the blocks by holding down the shift key and clicking
each block with the left mouse button. 2. With the cursor on one of the blocks, click the right mouse
button. This opens the right mouse menu. 3. Select Align….
This opens the Align window:
Align window – Center Vertically
4. Select Center Vertically and click OK.
Smead Software Solutions

Chapter 2 30
Your design should look like this:
Color blockas aligned to each other
5. Open the Align window again and select Center Vertical:
Align window – Center of Label 6. From the pull-down list select Center of Label. The blocks are now centered vertically within the design space:
Color blocks aligned within design space
Smead Software Solutions

Tutorial 31
Text Elements Now that you have your block elements placed and colormapped, it is time to set the text elements.
Text Color Blocks For this design, each color block will have corresponding letters beside it.
To create a text element, colored or otherwise, select the Add Text icon on the Add Element Toolbar:
Add Text icon This opens the Text Properties window:
Smead Software Solutions
Chapter 2 32
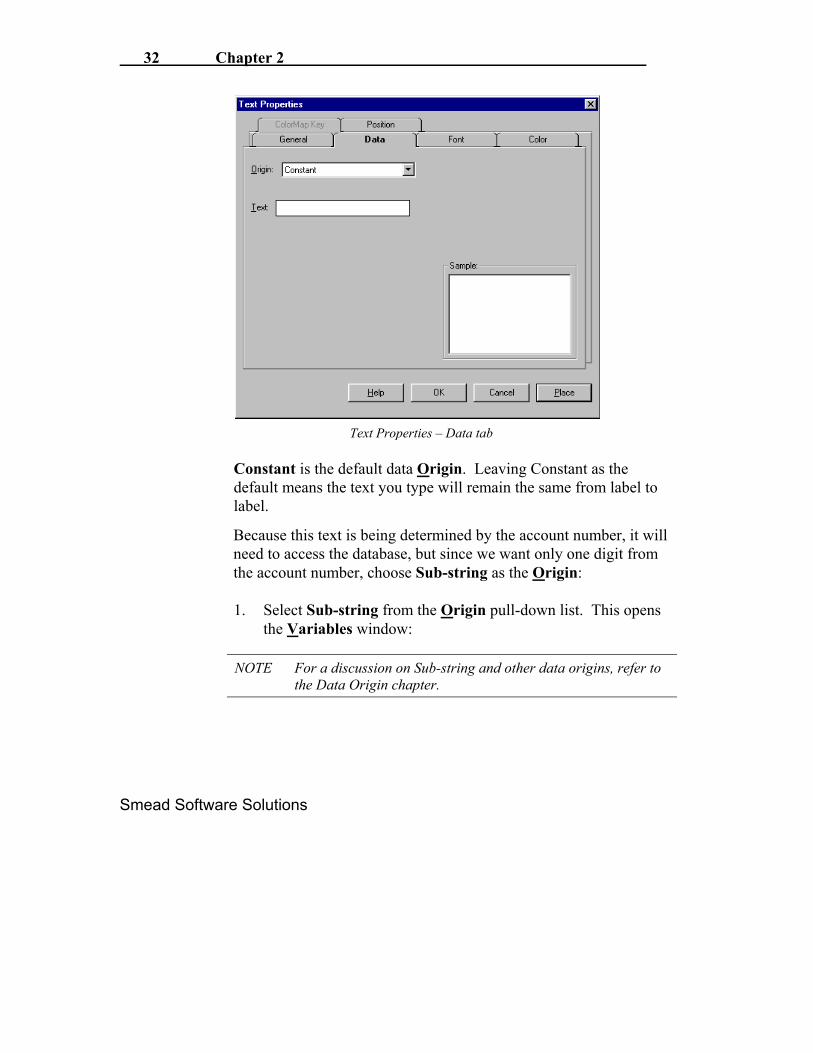
Text Properties – Data tab
Constant is the default data Origin. Leaving Constant as the default means the text you type will remain the same from label to label.
Because this text is being determined by the account number, it will need to access the database, but since we want only one digit from the account number, choose Sub-string as the Origin:
1. Selec Origin pull-down list. This opens the V
NOTE
Smead Software Solution
t Sub-string from the ariables window:
For a discussion on Sub-string and other data origins, refer to the Data Origin chapter.
s

Tutorial 33
Sub-string Data Origin settings
2. Make sure the Start: Data Position is 1, and the From End box is checked.
3. Select the Color tab:
Smead Software Solutions
Chapter 2
Smead Software Solutions
34
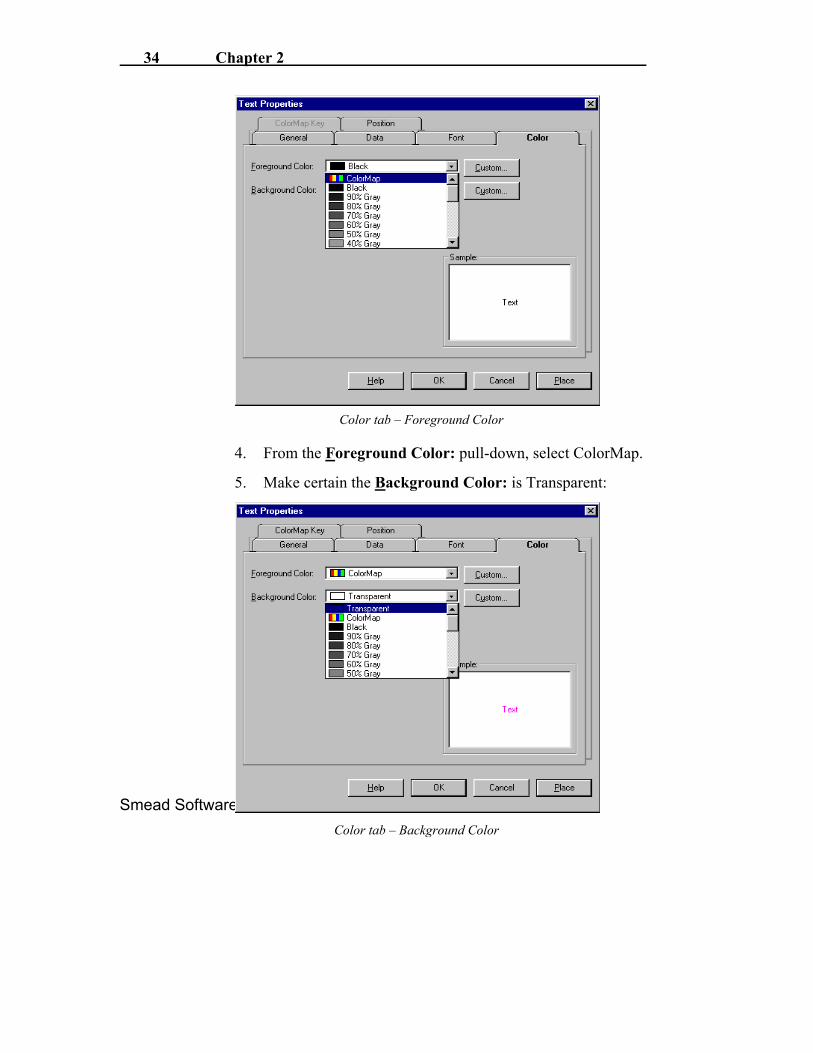
Color tab – Foreground Color 4. From the Foreground Color: pull-down, select ColorMap.
5. Make certain the Background Color: is Transparent:
Color tab – Background Color
Tutorial 35
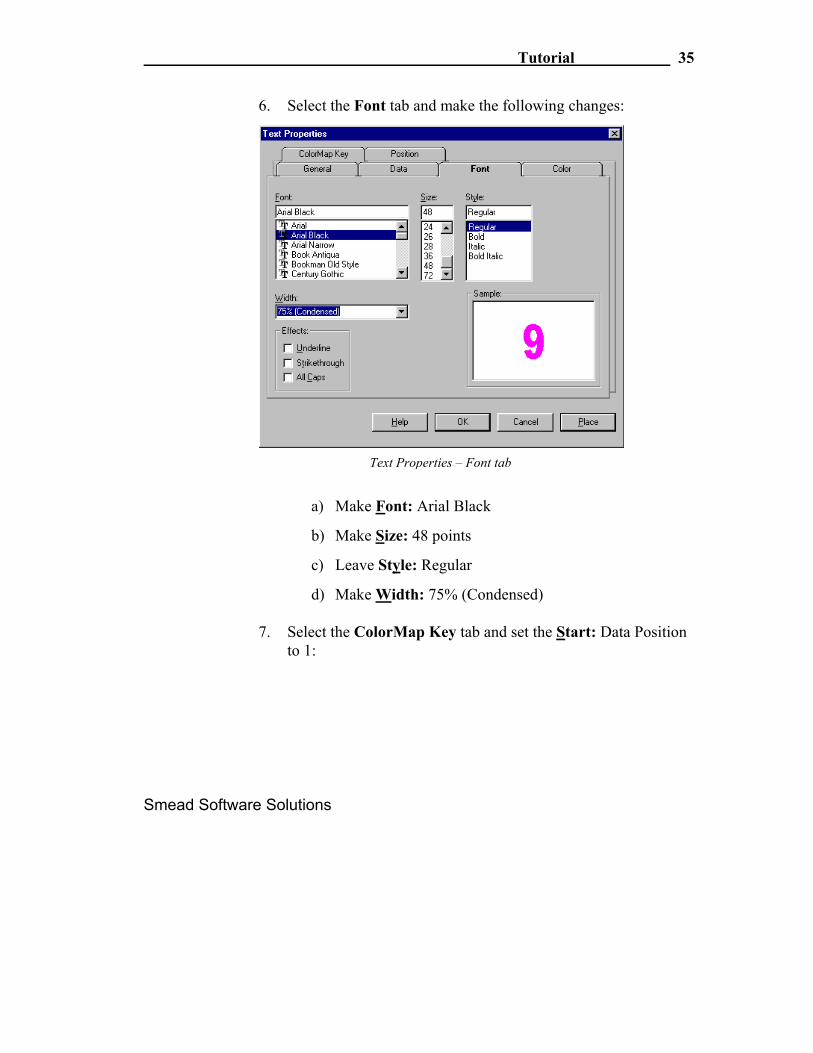
6. Select the Font tab and make the following changes:
Text Properties – Font tab
a) Make Font: Arial Black
b) Make Size: 48 points
c) Leave Style: Regular
d) Make Width: 75% (Condensed)
7. Sele tab and set the Start: Data Position to 1:
Smead Software Solutio
ct the ColorMap Key
ns

Chapter 2 36
Text Properties – ColorMap Key tab
8. Click OK.
Your label should look like this:
Text Element placed
Smead Software Solutions
Tutorial 37
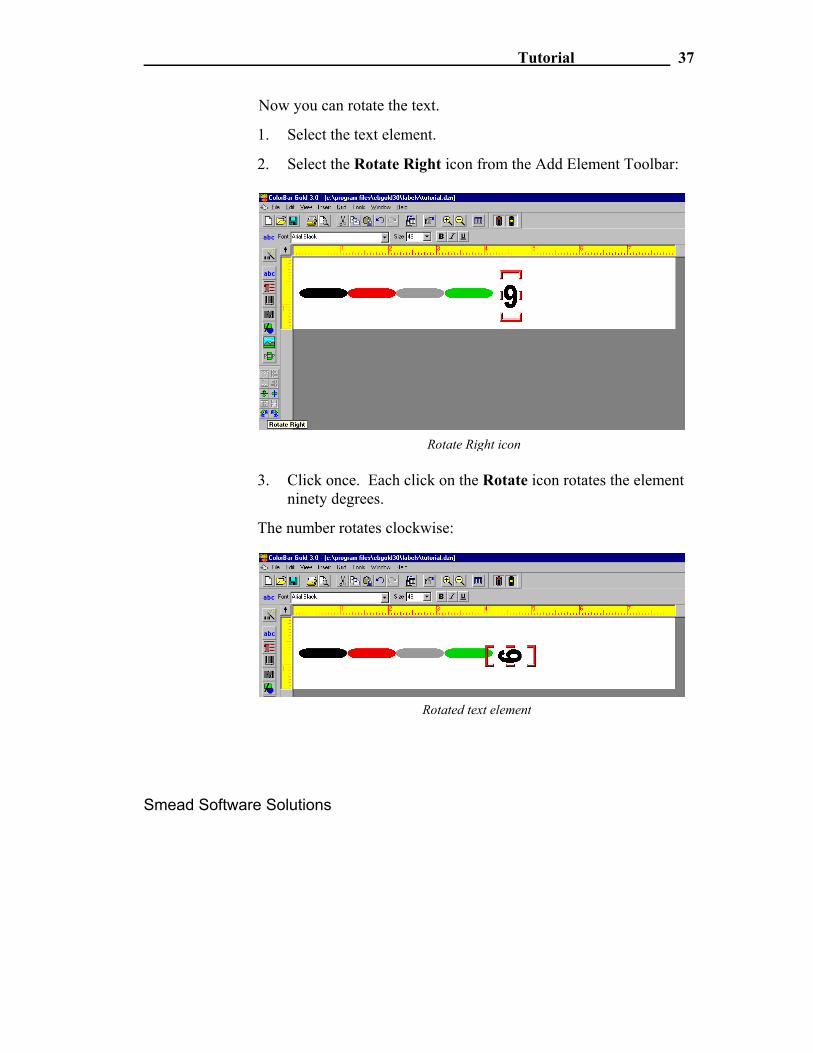
Now you can rotate the text.
1. Select the text element.
2. Select the Rotate Right icon from the Add Element Toolbar:
Rotate Right icon
3. Click once. Each click on the Rotate icon rotates the element ninety degrees.
The number rotates clockwise:
Smead Software Solutions
Rotated text element
Chapter 2 38
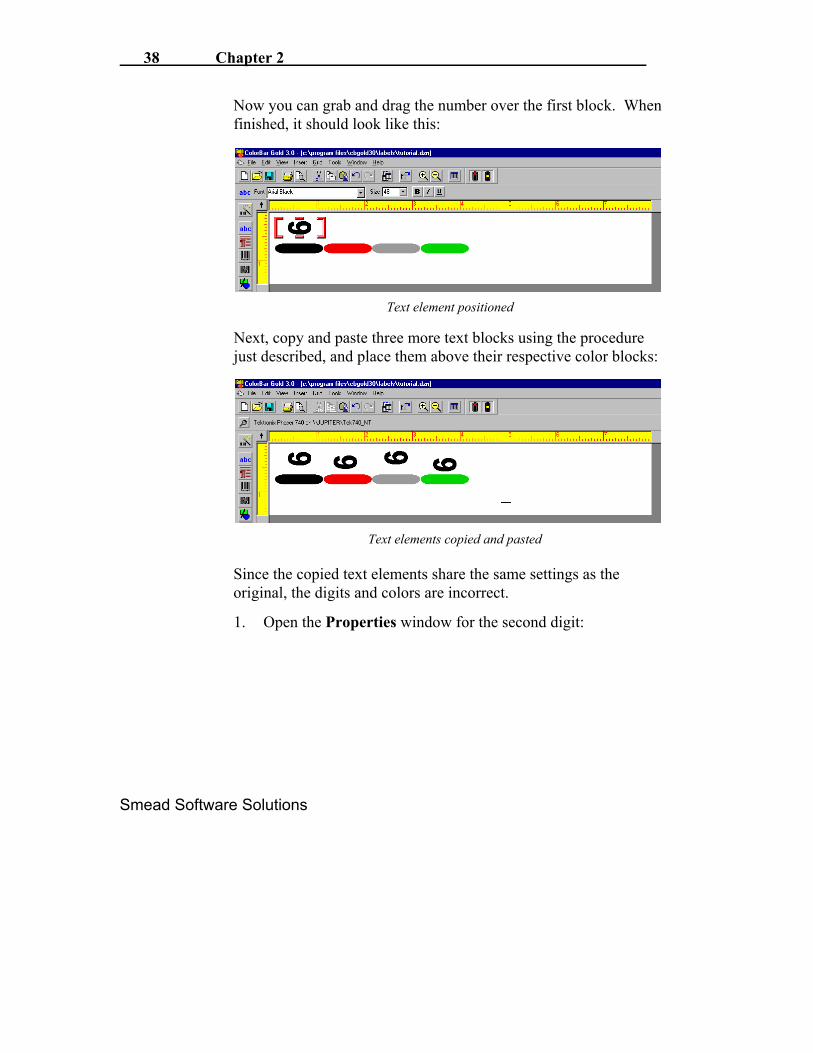
Now you can grab and drag the number over the first block. When finished, it should look like this:
Text element positioned Next, copy and paste three more text blocks using the procedure just described, and place them above their respective color blocks:
Text elements copied and pasted
Since the copied text elements share the same settings as the original, the digits and colors are incorrect.
1. Open the Properties window for the second digit:
Smead Software Solutions

Tutorial 39
Data tab – copied image
2. Change the Start: Data Position to 2.
3. Select the ColorMap Key tab:
Smead Software Solutions
ColorMap Key tab – copied image

Chapter 2 40
4. Change the Start: Data Position to 2. 5. Click OK:
Text elements mapped For the third digit, change the Start: Data Position to 3 in both the Data tab and the ColorMap Key tab. Follow this procedure for the fourth digit also. You should show the following result:
Smead Software Solutions
Copied element mapped
Tutorial 41
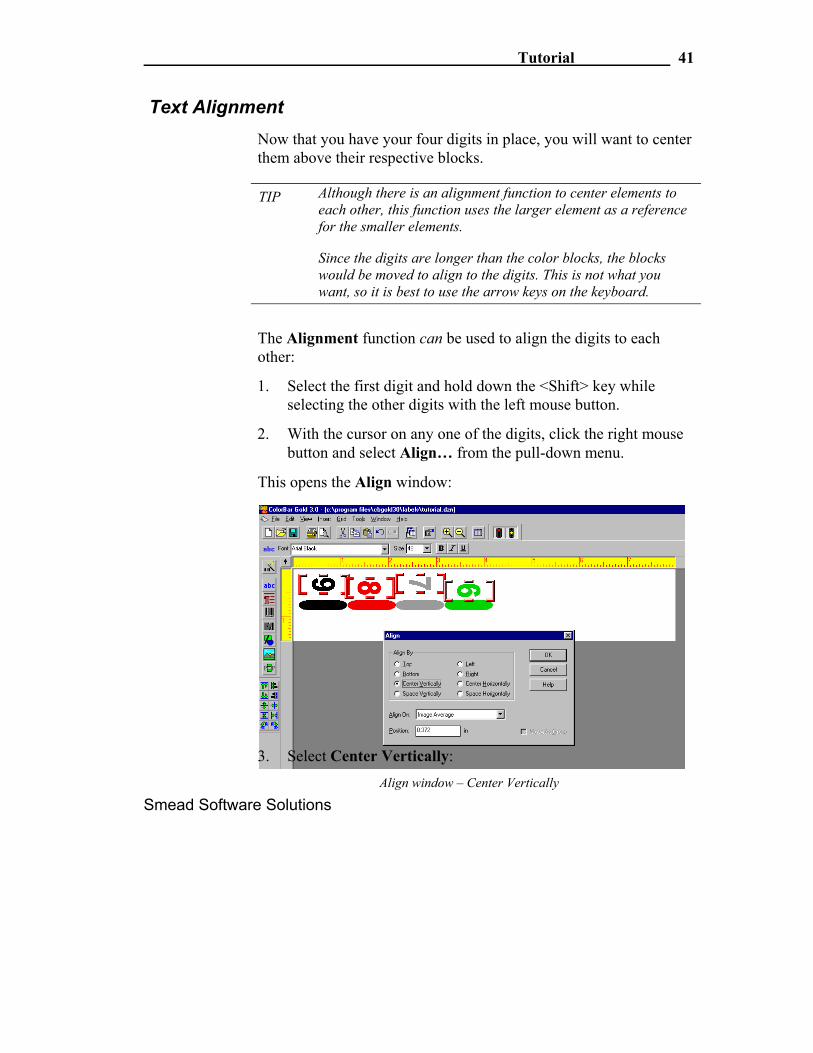
Text Alignment Now that you have your four digits in place, you will want to center them above their respective blocks.
TIP Although there is an alignment function to center elements to
each other, this function uses the larger element as a reference for the smaller elements.
Since the digits are longer than the color blocks, the blocks would be moved to align to the digits. This is not what you want, so it is best to use the arrow keys on the keyboard.
The Alignment function can be used to align the digits to each other:
1. Select the first digit and hold down the <Shift> key while selecting the other digits with the left mouse button.
2. With the cursor on any one of the digits, click the right mouse button and select Align… from the pull-down menu.
This opens the Align window:
Smead Software Solutions
3. Select Center Vertically: Align window – Center Vertically

Chapter 2 42
4. Click OK.
This aligns the digits to each other and compensates for any difference in block height.
After aligning the elements properly, you can group them together to act as one unit.
1. With your digits still selected together, click the right mouse button and select Group from the pull-down menu.
The elements join together into one large unit:
Text elements grouped
It may become apparent at this point that copying and pasting this grouped element will be much easier than re-creating individual duplicates. 1. Copy and paste the digit group element:
Grouped elements copied
Smead Software Solutions

Tutorial 43
2. Move the copy below the color blocks to look like this:
Copied group placed
Now you can align the copy to the original text element using Center Horizontally. TIP Once the elements are in place, you may group all of them
together, text and color blocks alike, to insure proper alignment.
With all the elements grouped together, moving them all together is a simple click of the mouse or arrow keys.
Your final result should look like this:
All elements grouped and repositioned
Smead Software Solutions

Chapter 2 44
TIP If you find using the mouse difficult for placing elements precisely, you can use the arrows on your keyboard to move the block with finer control.
Now that you have the color elements in place, you can move on to the other text elements.
Text Elements 1. Click on the Add Text icon:
Add Text icon 2. Type Name: in the Text: field.
Smead Software Solutions

Tutorial
Smead Software Solutions
45
Text Properties – Data tab
3. Select the Font tab and change the following fields:
Text Properties – Font tab

Chapter 2 46
a) Make Font: Arial
b) Make Size: 12 points
c) Make Style: Regular
d) Make Width: 100% (Normal)
4. Select the Color tab and make the Foreground Color Black:
Text Properties – Color tab
5. Click OK.
Notice that the text is rotated. Use the Rotate Left icon to correct it.
6. Place the block like this:
Smead Software Solutions

Tutorial 47
Text element positioned
Below “Name:”, create two more text blocks: one for Maturity: and one for State:.
You can do this either by copying the “Name:” block and changing the text under Properties, or by creating them from scratch.
Your design should look like this:
Text elements positioned
Next, align all the text elements to the right:
Smead Software Solutions

Chapter 2 48
Align Right
They should look like this:
Text elements right-aligned These elements are constants, and will remain the same on each printed label.
Next to these constants, we will create fields that will provide the required information for each person in the database.
1. Click the Add Text icon and choose Combination as the Origin:
Smead Software Solutions

Tutorial 49
Text Properties – Data tab
2. Select [Loans: LASTNAME].
3. Click Use.
4. Select [Loans: FIRSTNAME].
5. Click Use.
The Expression: window should look like this:
Smead Software Solutions

Chapter 2 50
Combination Expression
Notice that there is no space between the names in the Sample: window on the right. To correct this:
1. Place your cursor after the plus sign between the names.
2. Place a comma and a space in double-quotes after the plus sign.
3. Then add another plus sign after the end quote.
Your Expression: window should look like this:
Smead Software Solutions
Tutorial 51
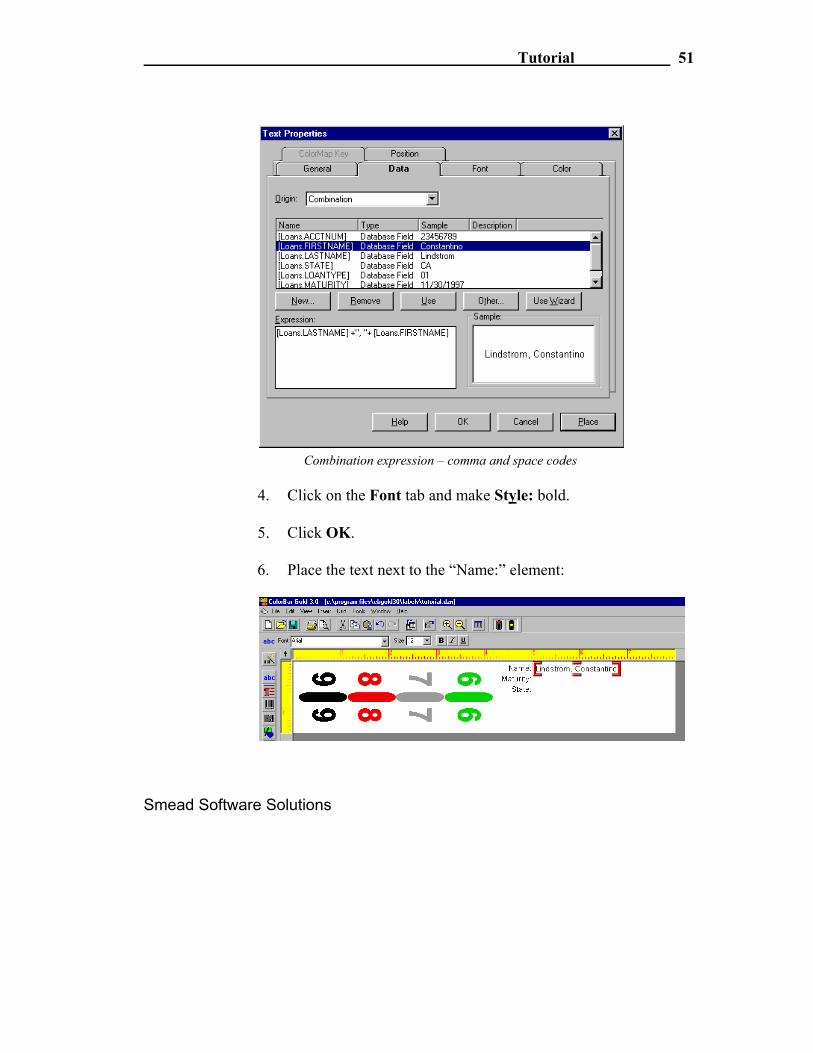
Combination expression – comma and space codes 4. Click on the Font tab and make Style: bold. 5. Click OK. 6. Place the text next to the “Name:” element:
Smead Software Solutions

Chapter 2 52
7. Align the new text to the “Name:” element, using Align Top.
Create the other two fields either by copying and pasting or by creating from scratch.
For “Maturity:” : Combination element placed
1. Set the Origin to “Database”.
2. Select “Maturity” under Fields:.
3. Click OK.
For “State:” :
1. Set the Origin to “Database”.
2. Select “State” under Fields:.
3. Click OK.
After aligning the new elements to the tops of their respective constants, left-align all three text elements to each other:
Text elements copied and positioned
Next, group each text block on the right to its match on the left:
Smead Software Solutions

Tutorial 53
Text images grouped
Now you can tighten up the space between them:
Grouped elements positioned
Smead Software Solutions
Chapter 2 54
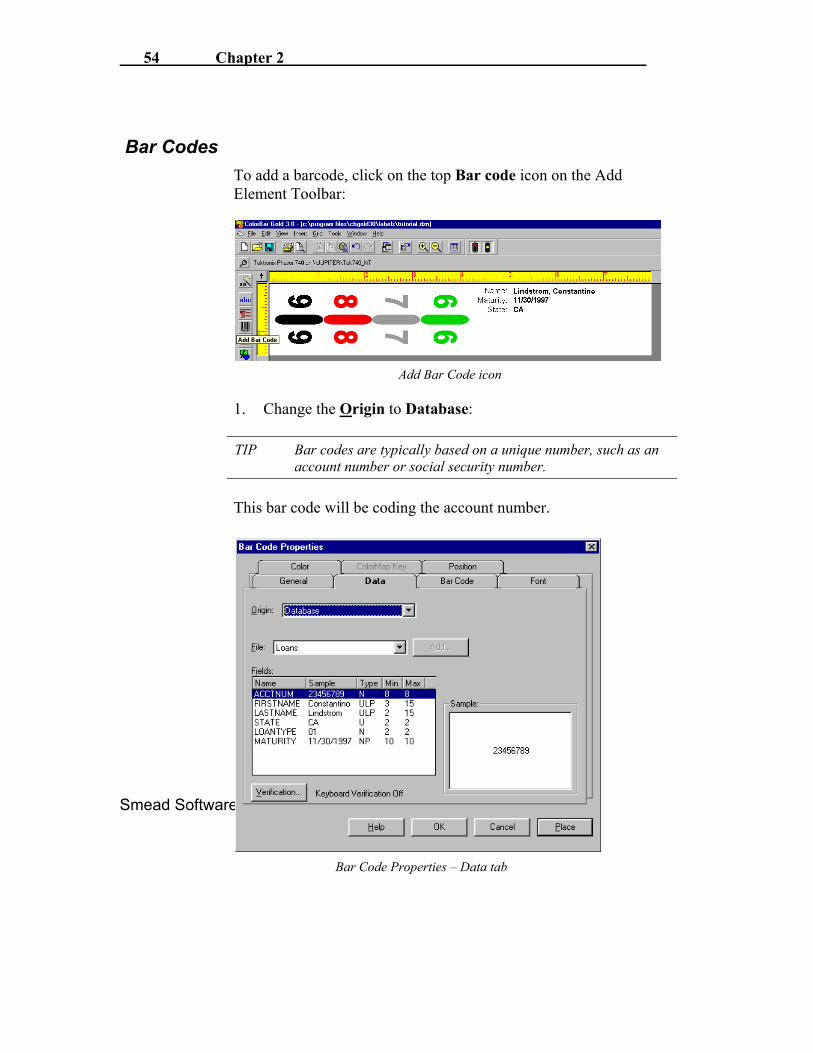
Bar Codes To add a barcode, click on the top Bar code icon on the Add Element Toolbar:
Add Bar Code icon 1. Change the Origin to Database: TIP Bar codes are typically based on a unique number, such as an
account number or social security number. This bar code will be coding the account number.
Smead Software Solutions
Bar Code Properties – Data tab

Tutorial 55
2. Select the Bar Code tab:
Bar Code Properties – Bar Code tab Accept the defaults on this window. 3. Click Place. The cursor becomes a barcode icon. Click the left button to paste it into your design:
Bar Code placed
Smead Software Solutions

Chapter 2 56
TIP Remember that you can move the bar code or any element with either the mouse or the arrow keys.
Bar codes may also be resized to fit the available space. Be careful, however, that the individual lines remain readable and do not blend together, as this will render the bar code unreadable to the scanner.
Placing Shapes With our color blocks and text elements placed, we can turn our attention to shapes. For this exercise, we will place a rectangle on the far right edge of the design.
First, Click the Add A Shape icon on the Add Element Toolbar:
Add a Shape icon
1. Select the rectangle shape in the center of the pull-down menu.
This opens the Rectangle Properties window:
Smead Software Solutions

Tutorial 57
Rectangle Properties – Position tab
2. Select Fill.
3. Select Rounded Edges.
4. Select the Color tab and choose ColorMap from the pull-down list for the Background Color:
Smead Software Solutions

Chapter 2
Smead Software Solutions
58
Rectangle Properties – Color tab 5. Select the ColorMap Key tab:
Rectangle Properties – ColorMap Key tab

Tutorial 59
6. Select [Loans: MATURITY] under Variables:.
7. Check the From End box.
Notice the sample window displays a “7”. This is the end digit of the maturity date. The rectangle will match the color for “7”.
8. Click Place:
Rectangle element placed
The rectangle may appear as a small red box.
Enlarge the rectangle to look this:
Rectangle element sized and positioned
Now you can add text elements within the rectangle to show the year.
Smead Software Solutions

Chapter 2 60
1. Click the Add Text icon and choose Sub-string for the Origin:
2. Select the Color tab and make Foreground Color Black:
Smead Software Solutions
Text properties – Data tab
Text Properties – Color tab

Tutorial 61
Make certain the Background Color is Transparent. 4. Select the Font tab and make the following changes:
Text Properties – Font tab a) Make Size: 16 points b) Make Style: bold c) Make Width: 150% (Expanded)
5. Click Place:
Smead Software Solutions

Chapter 2 62
Text element placed 6. Rotate the block using the Rotate Right icon from the toolbar
and position within the rectangle like this:
Text element positioned 7. Copy the text element and position in the bottom of the
rectangle like this:
Copied element positioned
Smead Software Solutions

Tutorial 63
Comparison This label is a close match to the Sample3 label included with ColorBar Gold 3.5.
To see how close the designs are, you can open the sample with your tutorial design still on screen.
To do this:
Open the File drop-down menu or,
Type <Ctrl+O> 1. Select Sample3.dzn:
Open File window
Smead Software Solutions

Chapter 2 64
Sample3.dzn appears in the design window:
Sample3 design opened
2. Click on the Restore button in the top right corner of the window. Be sure to click the inner Restore button, not the outer Restore button:
Inner Restore button
This reduces the Sample3 window and superimposes it above the tutorial design:
Smead Software Solutions

Tutorial
Smead Software Solutions
65
Sample3 design reduced The sample reduces:
Now you can move and resize both designs within the window so they both display:
Both designs displayed

Chapter 2 66
Smead Software Solutions
To move a design, grab the title bar by clicking and dragging it with the left mouse button.
To resize a design window, drag the edges with the left mouse button. When the cursor is properly placed for resizing, it becomes a double-headed arrow.

Tutorial 67
Editing a design In order to modify your design to match the sample, you will need to make some substantial changes. While this may seem intimidating, ColorBar makes editing a straightforward task, with tools to make your work quick and painless.
ColorMap The first thing you may notice about the tutorial design is that the colors are wrong.
Changing a colormap in ColorBar is a very simple process.
1. Click the right mouse button on a blank area, and select Properties from the menu.
This opens the Label Properties menu.
2. Select the ColorMap tab:
Smead Software Solutions Label Properties – ColorMap tab

Chapter 2 68
3. Change the ColorMap to Tab 350 from the pull-down list:
ColorMap tab pull-down list 4. Click OK. All colormapped elements in the design change to the Tab colormap scheme:
Smead Software Solutions

Tutorial 69
ColorMap changed
Changing Index Systems Next, you will want to match the index system of the sample. This requires ungrouping the elements.
1. Select the grouped element and click the right mouse button.
2. Select Group from the menu.
3. Select Ungroup.
The elements break into their individual groups:
Smead Software Solutions

Chapter 2 70
Color elements ungrouped 4. Ungroup each smaller group until the elements are separated. 5. Select all of the color blocks:
Color blocks selected 6. With your cursor on one of the blocks, open the right mouse
menu and select Properties….
7. Select the Index System tab:
Smead Software Solutions

Tutorial 71
Image Properties window – Index System tab 8. Choose TAB from the pull-down list and click OK.
The color blocks change to the TAB index system shape:
Color blocks become TAB index blocks With the blocks reshaped, they will need to be repositioned. This is easiest if they are grouped together. 9. Select Group from the right mouse menu.
Smead Software Solutions

Chapter 2 72
Color blocks grouped With the color blocks and numbers in separate groups, you can move them into position quickly. 1. Select Align… from the right mouse menu:
Align vertically within label space 2. Select Center Vertically. 3. Choose Center of Label from the pull-down list and click OK.
Color block group repositioned
Smead Software Solutions

Tutorial 73
Now you can move your number block groups into place:
All color images repositioned Compare your design to the sample:
Comparison Only minor differences remain. The color blocks and the year blocks in the rectangle need to be enlarged. To enlarge the color blocks: 1. Select the first color block of the sample design and open the
properties window. 2. Select the Position tab:
Smead Software Solutions

Chapter 2 74
Position tab – Sample3 design Use these same values for the first color block in your tutorial design. The result should look like this:
First color block resized
Smead Software Solutions

Tutorial 75
Repeat this procedure for the remaining three color blocks, matching values from the sample. When you are done, your design should look like this:
Color blocks matched Did you notice the pattern? The Vertical, Length and Width values were the same from block to block. Only the Horizontal value changed. You can use this same procedure to match the positions of your number blocks. Notice that you must change the Justification of the block from Left to Center:
Smead Software Solutions Position tab – Center justification

Chapter 2 76
Failure to change the justification to Center will cause the block to line up as if it was never rotated, as in the example below:
Left justification After repositioning the first block, it is easier to align the remaining blocks to it by using the Align Top feature. Follow this same procedure for the second row of numbers. Your result should look like this:
Color images positioned To complete the design, match the position and size of the year blocks in the rectangle, matching the values just like before. With that final effort, your design matches the sample exactly, except for the logo. We will leave that out:
Smead Software Solutions

Tutorial 77
Exit the Sample3 design by clicking on its Close button:
Sample3 Close button Then, enlarge your tutorial design window with its Maximize button. Next, you get to see the real magic of ColorBar Gold 3.5– the Data Grid!
Data Grid The Data Grid lets you see and use the database mapped to your design.
To open the Data Grid, click on the Data Grid icon on the Standard Toolbar at the top of the main window:
Smead Software Solutions

Chapter 2 78
This opens the grid and allows you to scroll through the database to view the effects on your design:
Data Grid icon
Use the arrow keychanges to your lamaking automatic
Smead Software Solutions
Data Grid active
s to scroll down the grid, and note the automatic bel design. This is how your labels will print, changes from item to item in your database:

Tutorial 79
Smead Software Solutions
Congratulations! You have completed the ColorBar Gold 3.5 Tutorial, creating a label design from scratch, adding and editing elements, changing colormaps, linking a database to your label, selecting data origins and even precisely matching an existing design.
We hope this exercise has been helpful in getting to know ColorBar Gold 3.5. The following chapters will provide more detailed information about the functions you have just used.