chainsaw warrior - combined rule book 2013 by stc-zero
DESCRIPTION
Combines the original rule book, magazine articles and info from the digital version in one place.Good for original players who want a new book, and digital players who want to understand what is happening under the hood.sized for printing on A4 or Letter. Simply set the document to fill to the height (A4) or width (Letter) without changing the aspect ratio.TRANSCRIPT

ABOUT THIS BOOK ► This volume has been produced
both for newcomers to Chainsaw
Warrior and for old-hands alike.
Whether you need a fresh copy of
the rules to replace a lost or
missing copy, or if you're a digital
player looking to understand the
tactical complexities of the game,
this book is for you.
► The main text has been copied
from the original game manual and
White Dwarf articles.
► The errata and clarifications from
the "Mission Briefing II" section of
the White Dwarf article "True
Confessions of a Chainsaw
Warrior" have been combined into
the relevant rules texts for clarity.
► The game options from White
Dwarf have been placed into a new
section of the rule book, along with
the new game options from the
digital version (Extra Training I,
Extra Training II), and some
popular fan variants from the
internet (Advanced Training,
Determination).
► Beyond these minor presentation
changes, this is the same rules text
and the same great game. Our
thanks to Stephen Hand, Games
Workshop and Auroch Digital for
Chainsaw Warrior.
CREDITS Game Design: Stephen Hand
Editing: Marc Gascoigne
Cover Art: Brett Ewins & Chris Baker
©1987
Card Art: Dave Andrews & Colin
Dixon
Interior Illustration: Dave Andrews
Graphic Design: Charles Elliott
Board Art: Colin Dixon & John
Blanche
Comic Strip Original Story: Stephen
Hand
Comic Strip Script: Marc Gascoigne
Comic Strip Art: Brett Ewins
Comic Strip Lettering: Steve Potter
Project Co-ordination: Jervis Johnson
Thanks to: Mandy Wootton, Hendrik
Barnard & Colin Hand
Extra Equipment Cards (WD88): Jervis Johnson
Overkill Options (WD92): Stephen
Hand
Extra Training Options: Auroch
Digital
Combined Rules Text: STC-Zero
This has been a Games Workshop Design
Studio Production! Bryan Ansell. Managing Director; Richard
Ellard. Studio Manager; Alan Merrett,
Production Manager; Jervis Johnson,
Development Manager; Paul Cockburn,
Projects Manager., John Blanche, Art Manager.
Charles Elliott, Graphic Designer; Mike
Brunton, Editor-White Dwarf; Paul Ryder,
Publications Assistant: Jim Bambra, Graeme
Davis, Phil Gallagher, Rick Priestley,
Designers/Developers; Tony Ackland, Dave Andrews, Colin Dixon, Artists; Julio Weaving,
Gail Morgan, Typesetting; Anthony Barton,
Production Assistant; Mark Craven,
Visualising; Ruth Jeffery, Susan McLoughlin,
David Oliver, Joanne Podoski, Ian Vadey,
Richard Wright, Finished Art; Susan Smith,
Margaret Colhshow, Annette Faulkner,
Administration.
Chainsaw Warrior and all likenesses heroin am
copyright ©1987 Games Workshop Ltd. All rights reserved. Produced by Games Workshop
2

3

'I've heard of the Secrets Act, Miller,
but this is going just too damned far!'
'My God Miller! What kind of man are
you that you'd send me in there with so
much left unsaid?'
Just following orders, son, just
following orders.'
The warrior headed for the door, and
turned to stare straight into Miller's
eyes.
'I promise you, Colonel... When I get
out of this, I'll come back and finish off
what I started five years ago in
Singapore. And this time there won't be
any Aussie MPs... anybody... to help
you...'
'II be waiting soldier, but I'm not going
to hold my breath. I've seen what
you're up against.'
'l'll be back. You've got an an hour to
find somewhere to hide.'
Then the Chainsaw Warrior was gone,
heading towards the derelict building
with just one thought left in his mind:
'Only 60 minutes to save New York!'
INTRODUCTION Welcome to Chainsaw Warrior, a
game of danger and excitement for one
player. You are the warrior, battle
hardened and trained to a peak of
fitness, a walking killing machine but t
time you may well have your match!
The building is the centre of a gigantic
warp in space and time, and through it
are pouring foul creatures * irradiated
mutations, undead zombies and worse.
And at the heart of their fearful
corruption sits the Darkness, readying
itself to destroy the whole of New
York City! You must venture into the
building, vanquish all the undead
opponents Darkness with throw at you,
fight your way into the depths of the
building, and destroy Darkness before
it can obliterate the city.
Here are some examples of the
different playing pieces so you can
Identify them:
WHAT YOU GET
► The following pieces make up
Chainsaw Warrior, and should be
in the box alongside these rules:
* 4 piece, jigsaw-cut playing board
* 168 colour cards, representing
rooms, encounters, equipment and
weapons
* 90 small counters for marking the
various charts on the board
* Comic strip introduction
* Rulebook
* 2 dice
* Game box
PREPARING FOR PLAY ► Firstly, assemble the board by
slotting the four pieces together.
Press out the cards and the small
counters using the punched lines,
and keep them to one side to refer
to. Then read the comic strip,
which introduces the game. Now
read these rules from start to finish.
There aren't many and it won't take
you that long. If there's something
you don't understand go back and
read the rule again, and maybe take
a look at the particular cards
involved. Don't worry too much
about grasping every nuance of the
game, though, as you'll find it very
easy to pick up once you start
playing!
THE PLAYING CARDS ► Separate the cards into three decks.
The Wandering Zombie deck is
made up entirely of Zombies, the
Equipment deck includes all the
items you could be equipped with,
4
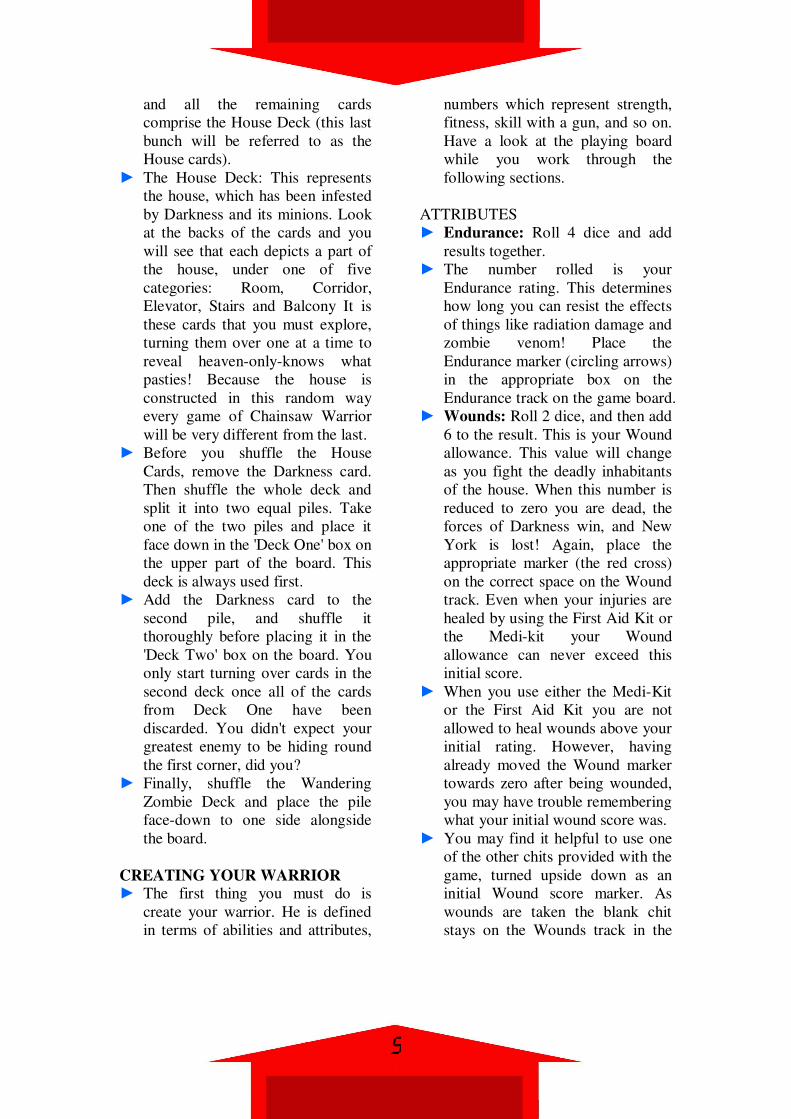
and all the remaining cards
comprise the House Deck (this last
bunch will be referred to as the
House cards).
► The House Deck: This represents
the house, which has been infested
by Darkness and its minions. Look
at the backs of the cards and you
will see that each depicts a part of
the house, under one of five
categories: Room, Corridor,
Elevator, Stairs and Balcony It is
these cards that you must explore,
turning them over one at a time to
reveal heaven-only-knows what
pasties! Because the house is
constructed in this random way
every game of Chainsaw Warrior
will be very different from the last.
► Before you shuffle the House
Cards, remove the Darkness card.
Then shuffle the whole deck and
split it into two equal piles. Take
one of the two piles and place it
face down in the 'Deck One' box on
the upper part of the board. This
deck is always used first.
► Add the Darkness card to the
second pile, and shuffle it
thoroughly before placing it in the
'Deck Two' box on the board. You
only start turning over cards in the
second deck once all of the cards
from Deck One have been
discarded. You didn't expect your
greatest enemy to be hiding round
the first corner, did you?
► Finally, shuffle the Wandering
Zombie Deck and place the pile
face-down to one side alongside
the board.
CREATING YOUR WARRIOR ► The first thing you must do is
create your warrior. He is defined
in terms of abilities and attributes,
numbers which represent strength,
fitness, skill with a gun, and so on.
Have a look at the playing board
while you work through the
following sections.
ATTRIBUTES
► Endurance: Roll 4 dice and add
results together.
► The number rolled is your
Endurance rating. This determines
how long you can resist the effects
of things like radiation damage and
zombie venom! Place the
Endurance marker (circling arrows)
in the appropriate box on the
Endurance track on the game board.
► Wounds: Roll 2 dice, and then add
6 to the result. This is your Wound
allowance. This value will change
as you fight the deadly inhabitants
of the house. When this number is
reduced to zero you are dead, the
forces of Darkness win, and New
York is lost! Again, place the
appropriate marker (the red cross)
on the correct space on the Wound
track. Even when your injuries are
healed by using the First Aid Kit or
the Medi-kit your Wound
allowance can never exceed this
initial score.
► When you use either the Medi-Kit
or the First Aid Kit you are not
allowed to heal wounds above your
initial rating. However, having
already moved the Wound marker
towards zero after being wounded,
you may have trouble remembering
what your initial wound score was.
► You may find it helpful to use one
of the other chits provided with the
game, turned upside down as an
initial Wound score marker. As
wounds are taken the blank chit
stays on the Wounds track in the
5
box denoting the original score.
► Hand-to-Hand: Roll 1 die and add
6 to find how good you area at
Hand-to-Hand combat. Place the
HtH marker (two arrows meeting)
at the appropriate place on the
Hand-to-Hand track on the board.
Is, Reflexes: Roll 1 die and add 5 to
find your Reflexes rating. This
shows how fast you are at reacting
suddenly and favourably to
unexpected events. Mark your
score on the board with the
Reflexes marker (the lightning
flash). Your Reflexes can never fall
beneath-6.
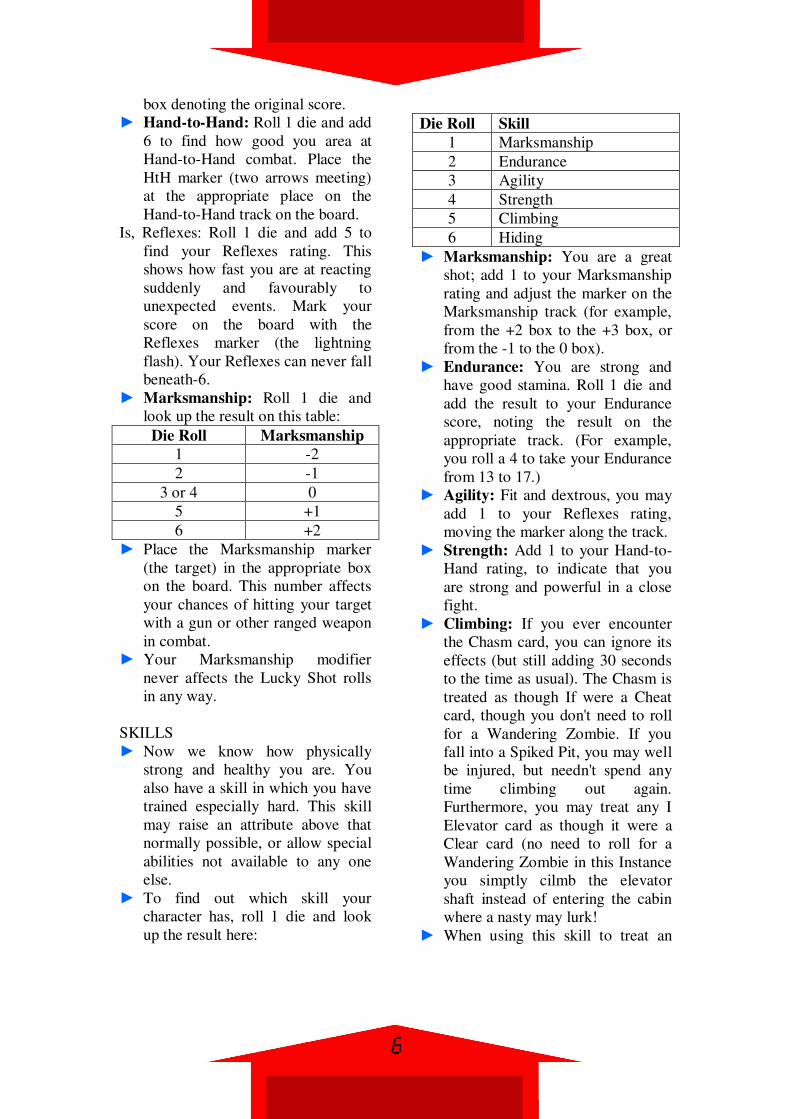
► Marksmanship: Roll 1 die and
look up the result on this table:
Die Roll Marksmanship
1 -2
2 -1
3 or 4 0
5 +1
6 +2
► Place the Marksmanship marker
(the target) in the appropriate box
on the board. This number affects
your chances of hitting your target
with a gun or other ranged weapon
in combat.
► Your Marksmanship modifier
never affects the Lucky Shot rolls
in any way.
SKILLS
► Now we know how physically
strong and healthy you are. You
also have a skill in which you have
trained especially hard. This skill
may raise an attribute above that
normally possible, or allow special
abilities not available to any one
else.
► To find out which skill your
character has, roll 1 die and look
up the result here:
Die Roll Skill
1 Marksmanship
2 Endurance
3 Agility
4 Strength
5 Climbing
6 Hiding
► Marksmanship: You are a great
shot; add 1 to your Marksmanship
rating and adjust the marker on the
Marksmanship track (for example,
from the +2 box to the +3 box, or
from the -1 to the 0 box).
► Endurance: You are strong and
have good stamina. Roll 1 die and
add the result to your Endurance
score, noting the result on the
appropriate track. (For example,
you roll a 4 to take your Endurance
from 13 to 17.)
► Agility: Fit and dextrous, you may
add 1 to your Reflexes rating,
moving the marker along the track.
► Strength: Add 1 to your Hand-to-
Hand rating, to indicate that you
are strong and powerful in a close
fight.
► Climbing: If you ever encounter
the Chasm card, you can ignore its
effects (but still adding 30 seconds
to the time as usual). The Chasm is
treated as though If were a Cheat
card, though you don't need to roll
for a Wandering Zombie. If you
fall into a Spiked Pit, you may well
be injured, but needn't spend any
time climbing out again.
Furthermore, you may treat any I
Elevator card as though it were a
Clear card (no need to roll for a
Wandering Zombie in this Instance
you simptly cilmb the elevator
shaft instead of entering the cabin
where a nasty may lurk!
► When using this skill to treat an
6
Elevator area as Clear you must
decide whether or not to do so
before turning the card over. If the
card turns out to be the First Aid
Kit, you may not take it.
► Hiding: You are an expert at
hiding in shadows and blending
into the background when danger
threatens. Whenever you encounter
a creature, you may try to hide
from it (before Testing Reflexes,
etc). Roll a die; if you roll a 6 you
are successful. Discard the creature,
and continue to the next area as
usual. If the creature was a mutant
you must still take their radiation
damage * you can't hide from
gamma rays! Of course, if you
rolled something other than a 6 you
must encounter the creature as
normal.
► If the creature you are hiding from
is a Zombie and you are venom
infected, you must still make a
Corruption check even if you
manage to hide.
SCORE MARKERS
► Once you have defined the
characteristics of your Warrior,
there are a few more counters to be
placed on the board. These are
placed as follows:
► Time Marker: Place the Time
marker (the digital clock) in the 'O'
box of the Time Track. As soon as
you enter the building this will start
slowly ticking off the minutes *
remember, you only have an hour
to complete your mission!
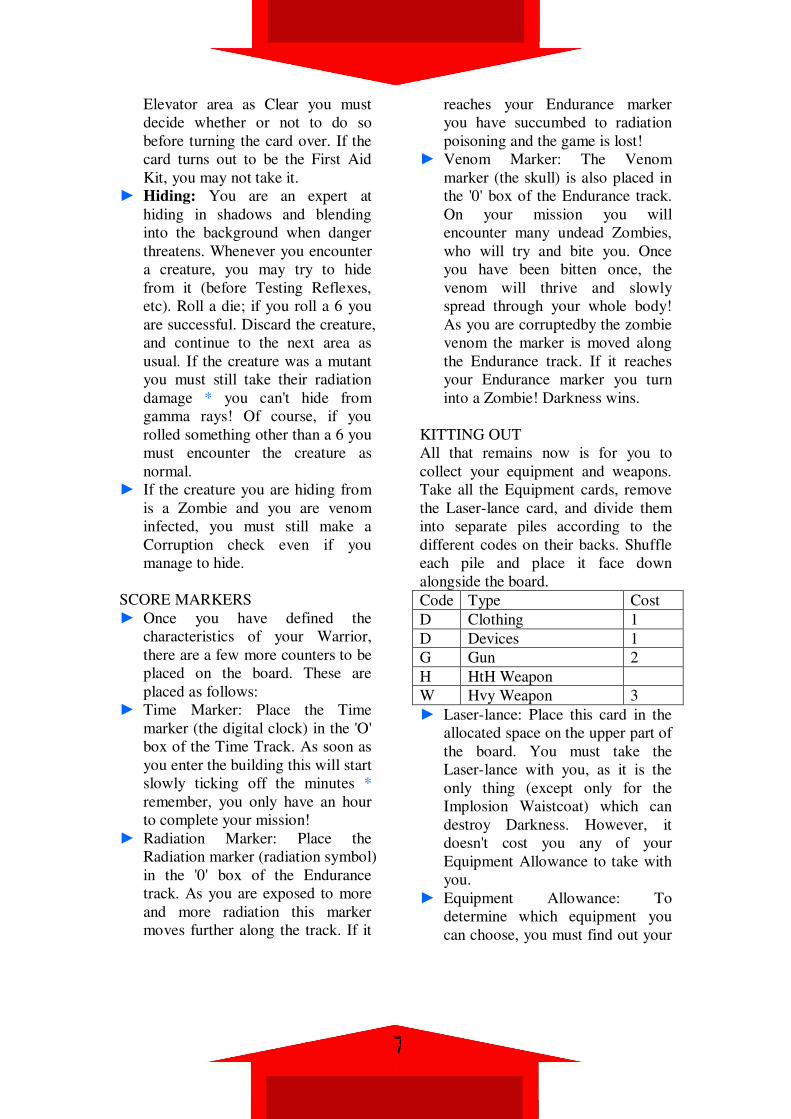
► Radiation Marker: Place the
Radiation marker (radiation symbol)
in the '0' box of the Endurance
track. As you are exposed to more
and more radiation this marker
moves further along the track. If it
reaches your Endurance marker
you have succumbed to radiation
poisoning and the game is lost!
► Venom Marker: The Venom
marker (the skull) is also placed in
the '0' box of the Endurance track.
On your mission you will
encounter many undead Zombies,
who will try and bite you. Once
you have been bitten once, the
venom will thrive and slowly
spread through your whole body!
As you are corruptedby the zombie
venom the marker is moved along
the Endurance track. If it reaches
your Endurance marker you turn
into a Zombie! Darkness wins.
KITTING OUT
All that remains now is for you to
collect your equipment and weapons.
Take all the Equipment cards, remove
the Laser-lance card, and divide them
into separate piles according to the
different codes on their backs. Shuffle
each pile and place it face down
alongside the board.
Code Type Cost
D Clothing 1
D Devices 1
G Gun 2
H HtH Weapon
W Hvy Weapon 3
► Laser-lance: Place this card in the
allocated space on the upper part of
the board. You must take the
Laser-lance with you, as it is the
only thing (except only for the
Implosion Waistcoat) which can
destroy Darkness. However, it
doesn't cost you any of your
Equipment Allowance to take with
you.
► Equipment Allowance: To
determine which equipment you
can choose, you must find out your
7

Equipment Allowance by rolling
one die and adding 2. The result is
the number of equipment points
which you may spend (for example,
a roll of 2 gives you 4 equipment
points).
► Each type of equipment has a cost
given on the back of the card and
in the table above. You may choose
as many items as you wish, up to
your Equipment Allowance.
However, you may only ever have
a maximum of one gun and one
heavy weapon at any one time, and
you may never have more than 13
pieces of equipment in total.
► For example, if you roll a 3 to get
an allowance of 5, you could
choose 1 heavy weapon (3 points)
and 2 devices (2 x 1 point); or 1
HtH weapon, 1 article of clothing
and 3 devices; and so on.
► When you come to choose the
items, you must pick them at
random from the top of the face-
down piles. Once you have chosen
all the equipment and weapons you
are allowed, place them in the
boxes on the board.
► Each Equipment card has a brief
description of its uses. You will
find a more detailed description in
the Reference Section.
► Limited Use Items & Reloading:
Some Equipment cards can only be
used once, while others may only
be used a certain number of times.
Items which have a limited number
of uses have a small box on them,
together with a note of the number
of shots or uses the item has. Place
one of the small numbered counters
corresponding to this number in the
box. Every time the item is used,
replace this counter with the next
number down, and so on. In this
way you'll keep track of how many
uses are left in your equipment .
how many shots your gun has fired,
how many charges are left in your
Laser-lance, how many Flash
Bombs you have thrown, etc.
► When the uses number reaches 0,
the equipment can no longer be
used, as it has run out of charges,
bullets or whatever powers it.
► Equipment that no longer has any
uses remaining may be discarded,
or kept in the hope that you'll find a
Dump (see the Dump Card
explanation in the Reference
Section). If you find a Dump
before you have used all of your
ammunition you may refill the
weapon, or instead you may take
along a completely fresh set of uses
for the item. Take a Spare Clip
counter and keep it alongside the
card. When the uses number
reaches '0' simply trade in the
Spare Clip for a fresh set of
ammunition or charges (doing this
takes you 30 seconds, or one move
of the Time counter).
► Equipment marked as being for
One Use Only may not be
recharged at a Dump. The card
should be discarded after use.
► Equipment Breakage: Certain traps
may damage or break some of your
equipment. When this happens the
card must be removed from play
and placed to one side. Such
weapons cannot be repaired or
refilled.
► All this done, leave the piles as
they are, as you may find more
equipment later in the game.
► Now you are fully trained and
equipped you must enter the house
and defeat Darkness and its
8
deathless minions. The future of
New York is in your hands!
PLAYING THE GAME
► All the rules you'll need to play
Chainsaw Warrior now follow.
Don't worry if you don't understand
every last detail as you read them
through; when you start playing
you'll find you rarely need to refer
to them at all. Chainsaw Warrior is
a simple game to play, but
incredibly difficult to win. If at first
you don't succeed just create a new
warrior and have another go!
RULES PRECEDENCE ► House cards which vary with the
rules take precedence over the rules,
and Equipment cards take
precedence over House cards. If
there is any doubt over a rule
follow the order of precedence and
apply common sense.
SEQUENCES OF PLAY
► Time Phase: Move the Time
marker one box along the TiRe
Track. This shows that 30 seconds
have passed during the Exploration
Phase.
► When the timer reaches 30 minutes
night falls, and you must reduce
your HtH by 1 point. When the
timer reaches 60 minutes you are
out of time and Darkness has won!
► Exploration Phase: Turn over the
first face-down card of the current
pile. Deck One is always used first;
when that runs out move to Deck
Two. Place this card face-up on the
appropriate discard pile and
respond to the encounter. Each of
the cards has a brief explanation on
it; for more details you will find the
cards listed alphabetically on the
Reference Sheet.
► When the encounter is resolved the
turn ends. Return to the Time
Phase.
► Play continues until you find and
destroy Darkness, its minions
destroy you, or the clock ticks out
and you run out of time (see The
End of the Game a little later).
FIGHTING CREATURES
► When you are faced with one or
more of the inhabitants of the
hellish house * be they a Zombie,
Chaos Agent, Mutant or Darkness
itself * you must fight it (though
there may be a chance to escape
after one round). Follow the steps
given below. If there is more than
one creature facing you, refer
instead to the section on Multiple
Opponents.
1. If the creature is a Mutant, roll
one die and move your
Radiation marker that amount
along your Endurance track.
There is no way of avoiding
this. If the Radiation marker
reaches your Endurance
counter you are dead and the
game is over.
2. If the creature is a Zombie and
you are already venom infected,
roll one die. If you score a 5 or
6 you must move the Venom
marker 1 box along the
Endurance track. If the Venom
marker reaches your Endurance
marker you have turned into a
Zombie and the game is over.
3. Do you want to shoot the
creature? If so go to 4; if not
skip two sections and go to 6.
4. Making an Aimed Shot. First
of all, Test your Reflexes by
9
rolling two dice and comparing
the result to your Reflexes
score. If you roll higher than it
the creature jumps you before
you can fire and you must
engage it in Hand-to-Hand
combat by going to 6. If you
roll equal or under your score,
though, you are quick enough
to get a shot off, go to 5.
5. Look at the weapon you wish
to use (it must be a Gun, Laser-
lance, Heavy Weapon or Knife).
You will see a list of creatures
and numbers. If your opponent
is not on the card you cannot
shoot it; go to 6 to fight it
Hand-to-Hand. If you can hit it,
roll two dice and add or
subtract your Marksmanship
rating to or from the roll. If the
roll is equal to or higher than
the number listed on the card,
the creature is killed and the
turn ends. Don't forget to tick
off the bullet you've fired by
replacing the number of shots
left with the next number down.
6. If your roll is less than that
required, you miss and must
fight Hand-to-Hand by going to
6. Remember, again, to reduce
your shots left by one.
► For example, you have just
stumbled across a Zombie. You are
carrying a Blaster and have a
Marksmanship of -1. The card says
a 7 is needed; taking your poor aim
into account you need to roll an 8
or more to beat the foul creature.
7. Making a Hand-to-Hand Attack.
Roll 2 dice and add the score to the
creature's HtH number, which is
listed on its card. Then roll 2 dice
and add the result to your current
HtH score. Compare the two
results. If they are equal there is a
draw, with neither of you
overpowering the other; go to 7. If
you score higher skip the next
section and go to 8; if you score
lower go to 9 instead.
8. You may now try to get off a
Lucky Shot by going to 10. If you
don't want to, or can't, you must
start a new round of HtH combat,
add 30 seconds and return to 6
above.
9. As long as the creature is not
Darkness, you have killed it! The
turn ends; continue play as usual. If
your opponent is Darkness you
have managed to hold it off; you
may go to 10 and try a lucky shot,
or add 30 seconds and continue the
fight by returning to 6. Remember
that Darkness can only be killed by
a blast from your Laser-lance.
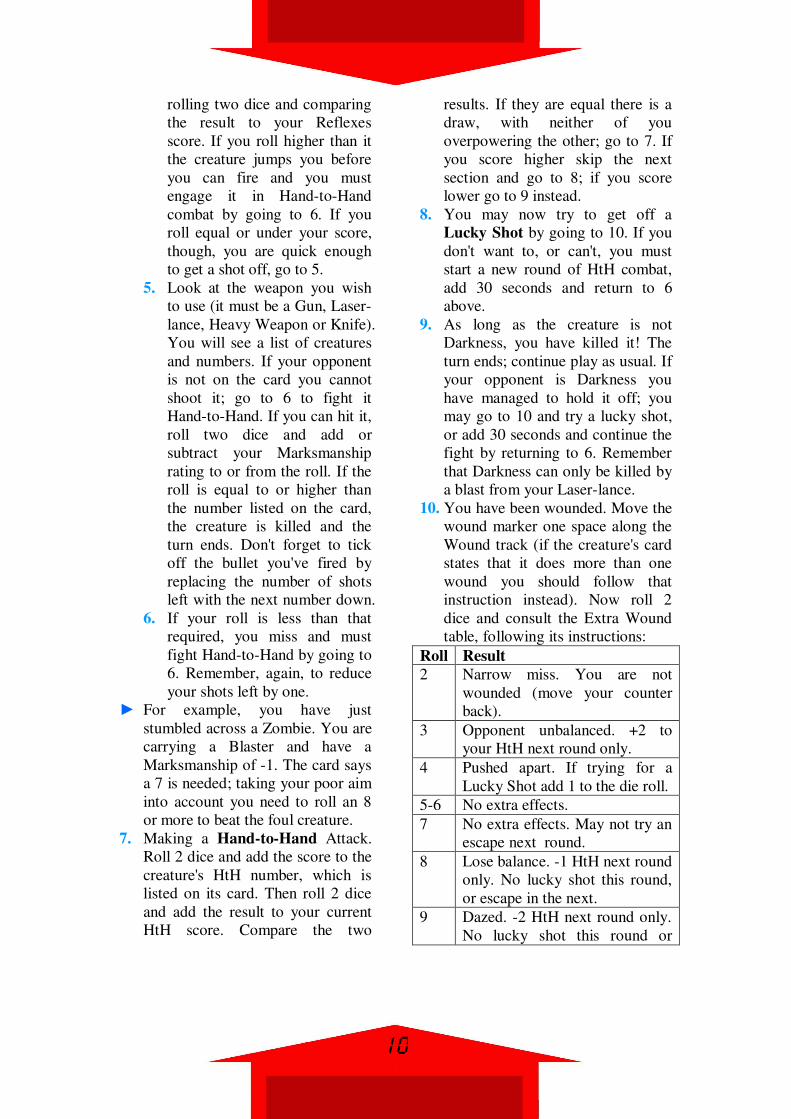
10. You have been wounded. Move the
wound marker one space along the
Wound track (if the creature's card
states that it does more than one
wound you should follow that
instruction instead). Now roll 2
dice and consult the Extra Wound
table, following its instructions:
Roll Result
2 Narrow miss. You are not
wounded (move your counter
back).
3 Opponent unbalanced. +2 to
your HtH next round only.
4 Pushed apart. If trying for a
Lucky Shot add 1 to the die roll.
5-6 No extra effects.
7 No extra effects. May not try an
escape next round.
8 Lose balance. -1 HtH next round
only. No lucky shot this round,
or escape in the next.
9 Dazed. -2 HtH next round only.
No lucky shot this round or
10
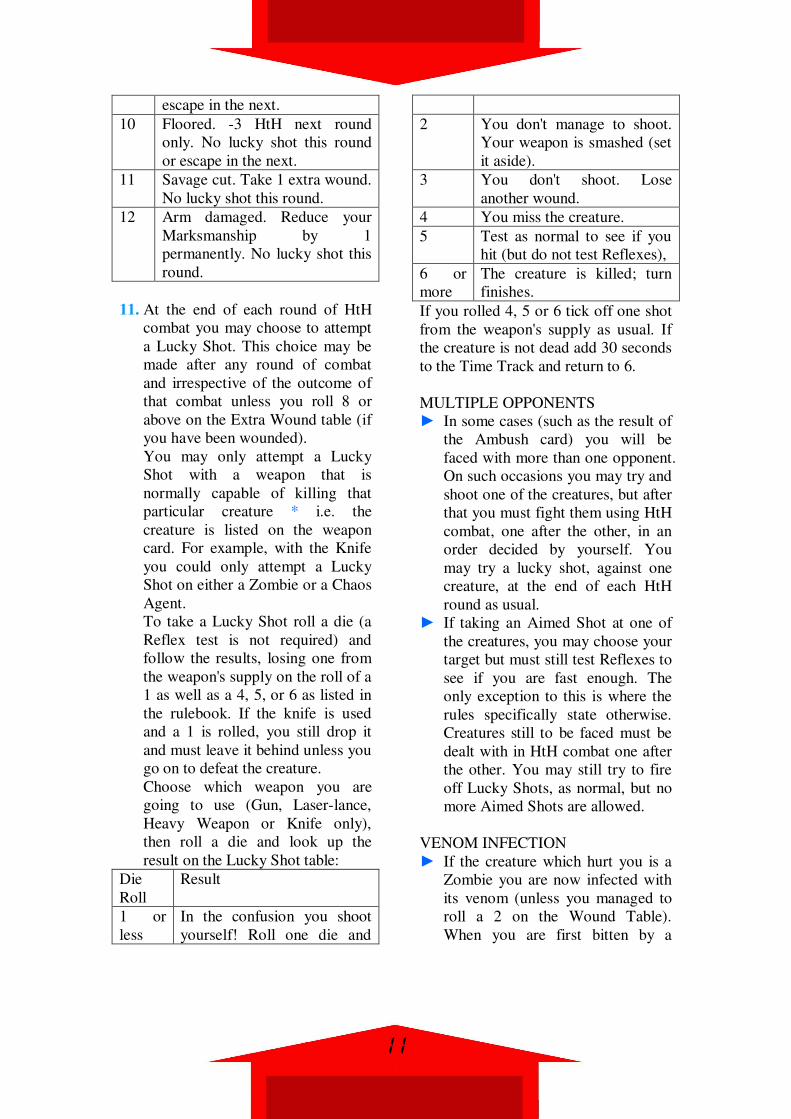
escape in the next.
10 Floored. -3 HtH next round
only. No lucky shot this round
or escape in the next.
11 Savage cut. Take 1 extra wound.
No lucky shot this round.
12 Arm damaged. Reduce your
Marksmanship by 1
permanently. No lucky shot this
round.
11. At the end of each round of HtH
combat you may choose to attempt
a Lucky Shot. This choice may be
made after any round of combat
and irrespective of the outcome of
that combat unless you roll 8 or
above on the Extra Wound table (if
you have been wounded).
You may only attempt a Lucky
Shot with a weapon that is
normally capable of killing that
particular creature * i.e. the
creature is listed on the weapon
card. For example, with the Knife
you could only attempt a Lucky
Shot on either a Zombie or a Chaos
Agent.
To take a Lucky Shot roll a die (a
Reflex test is not required) and
follow the results, losing one from
the weapon's supply on the roll of a
1 as well as a 4, 5, or 6 as listed in
the rulebook. If the knife is used
and a 1 is rolled, you still drop it
and must leave it behind unless you
go on to defeat the creature.
Choose which weapon you are
going to use (Gun, Laser-lance,
Heavy Weapon or Knife only),
then roll a die and look up the
result on the Lucky Shot table:
Die
Roll
Result
1 or
less
In the confusion you shoot
yourself! Roll one die and
2 You don't manage to shoot.
Your weapon is smashed (set
it aside).
3 You don't shoot. Lose
another wound.
4 You miss the creature.
5 Test as normal to see if you
hit (but do not test Reflexes),
6 or
more
The creature is killed; turn
finishes.
If you rolled 4, 5 or 6 tick off one shot
from the weapon's supply as usual. If
the creature is not dead add 30 seconds
to the Time Track and return to 6.
MULTIPLE OPPONENTS
► In some cases (such as the result of
the Ambush card) you will be
faced with more than one opponent.
On such occasions you may try and
shoot one of the creatures, but after
that you must fight them using HtH
combat, one after the other, in an
order decided by yourself. You
may try a lucky shot, against one
creature, at the end of each HtH
round as usual.
► If taking an Aimed Shot at one of
the creatures, you may choose your
target but must still test Reflexes to
see if you are fast enough. The
only exception to this is where the
rules specifically state otherwise.
Creatures still to be faced must be
dealt with in HtH combat one after
the other. You may still try to fire
off Lucky Shots, as normal, but no
more Aimed Shots are allowed.
VENOM INFECTION
► If the creature which hurt you is a
Zombie you are now infected with
its venom (unless you managed to
roll a 2 on the Wound Table).
When you are first bitten by a
11

Zombie the Venom Marker is left
in the 0 box of the Endurance track.
Before you are bitten it is
suggested that the marker be in the
0 box, but upside down and when
you are first bitten it should be
turned the right way up. Then go to
7.
► Venom infection is never spread by
combat damage itself but only by
the die roll made in Step 2 of the
combat round.
► The venom infection roll is only
made once per Zombie encounter.
That is, as soon as you meet a
Zombie the check is made. Checks
are not made for every 30 seconds
in contact with any one Zombie.
Furthermore, you should make 1
infection check per Zombie you
encounter. If, as a result of the
Ambush trap, you meet 5 Zombies,
you should make five infection
checks before beginning combat!
In this case you would make all
five checks before trying to shoot
or engage in HtH or anything!
► The exception to these rules is
Darkness, where (as is stated in the
rulebook) a check has to be made
for every 30 seconds of contact.
► Finally, you do not check for
infection from the Zombie that first
wounds and contaminates you.
ESCAPING
► If you are still in HtH combat after
the first full round you may escape
(or try to) in a subsequent round.
After you've added 30 seconds, but
before you've gone to step 6 again
you should look up the creature's
Escape Rating:
Creature Roll needed
Zombie 2 or more
Rat Pack 3 or more
Chaos Agent 4 or more
Mutant 5 or more
Meat Machine 6 or more
► Opponents marked with No Escape
symbol on their cards cannot be
escaped. Any Wandering Zombies
encountered while you are stuck in
a trap marked likewise cannot be
escaped either.
► You may attempt to Escape from
any one combat encounter any
number of times (one attempt per
round).
► You must roll the creature's Escape
Rating or higher on one die to get
away from it. If you roll less than
the number listed you have failed
to escape. Take the maximum
number of wounds the creature
could deliver you (for example, the
Meat Machine would give you its
full 3!). Make a roll on the Extra
Wound table, and then proceed to 6
as usual.
► If you make the roll you have
managed to escape. Roll one die
and move the Time marker that
many boxes (i.e. taking up between
30 seconds and 3 minutes of time).
The turn ends and you can start the
next one.
ESCAPING THE BUILDING
► If you have your Laser-Lance
stolen or smashed, or it runs out of
ammunition and you are unable to
find any more, or you cannot cross
the Chasm house card, you will
have to leave the building.
However, unless you are equipped
with a Teleport Implant you will
first have to find the way out. Roll
2 dice. That number of cards must
be revealed and encountered before
you are out of the building.
12

► Once you are free of the building
you must do the following. First
roll one die and add that many
minutes (riot boxes) to the Time
Track. You may recover one die
roll of wounds, and gain a further
Equipment Allowance equal to the
roll of one die. One of these points
must be spent on a new Laser-lance.
Items of equipment already held
cannot be exchanged, but you may
spend 2 points on a refill or spare
clip for any item. Gather up all the
House cards and form a new pair of
decks just as you did at the start of
the game. If you had reached the
second deck you may start at the
top of that; otherwise you must
start from the beginning again.
MISSING DARKNESS ► Some equipment cards allow you
to skip cards. If one such discard
turns out to be Darkness, stop what
you are doing, reshuffle the second
deck and start it again.
NIGHT TIME
► After 30 minutes of play it gets
dark, as indicated on the Time
Track. This has two effects: you
must subtract 1 from your HtH
rating (unless you have an
equipment card which counteracts
this), but you can now use certain
items which rely on light for their
effect, such as Flash Bombs.
► If you start the game with an HtH
rating of 7 you must still take the -
1 modifier into account when
fighting even though there is no '6'
box on the HtH track on the board.
PAUSING AND RELOADING ► You are allowed to wait in any
clear or empty area (either an area
that was empty to begin with or
one with a very recently deceased
inhabitant). However, for every 30
seconds you wait you must roll for
a Wandering Zombie (see
Wandering Zombies below).
► To reload a weapon using a Spare
Clip you must again be in a free
area. Reloading takes 30 seconds
(advance the Time marker 1 box),
during which time you should roll
for a Wandering Zombie as usual.
If the roll indicates that one arrives
you may assume that it turns up
after you have reloaded.
TESTING REFLEXES
► Some of the cards call upon you to
Test your Reflexes (to make a split
second jump out of the way of
falling rocks, for example). To
succeed you must roll your
Reflexes rating or less on 2 dice.
► For example, if your Reflexes are 8,
a roll of any number from 2 to 8 is
a success, while a roll of between 9
and 12 is a failure.
WANDERING ZOMBIES
► Whenever you encounter a Clear or
Empty area you should roll 1 die. If
you roll between 1 and 5 nothing
untoward happens, and you may
continue as usual. If you roll a 6,
however, a Wandering Zombie
turns up to do battle. Flip over the
first card on the face-down
Wandering Zombie pack. All the
normal rules apply. Once the
Zombie has (hopefully) been dealt
with, return it to the pile and
shuffle thoroughly.
13

THE END OF THE GAME ► You can die in one of two grisly
ways while hunting for Darkness'
lair:
* If the Radiation marker reaches your
Endurance limit you die of
radiation exposure.
* If your Wound marker reaches zero
you will die of wound damage.
► Furthermore, if your Venom
marker reaches your Endurance
limit you will pass from a living to
an undead state and become a
Zombie under the thrall of
Darkness! The game will end in a
victory for the forces of Evil as the
clock ticks out New York's final
minutes.
► Please note there is no complete
cures for venom infection!!
► Chainsaw Warrior ends when one
of the following things happens:
* Darkness is hit by a Shot (Aimed
or Lucky) from the Laser-Lance.
* Both you and Darkness are killed
by the Implosion Wastcoat.
* You die, either from radiation
sickness or from your wounds.
* You become a Zombie.
* You fail to find Darkness in 60
minutes and New York implodes!
► Killing Darkness and emerging
alive is a full win - well done!
Killing both Darkness and yourself
in a desperate suicide by using the
Implosion Waistcoat is a draw, but
earns you an honourable mention.
Dying, turning into a Zombie or
running out of time is a lose.
'He edged gingerly down the corridor,
every sense alert. As he neared the
corner he silently flipped off the safety
catch on the REAPER machine-gun
fitted to the stabilising harness on his
hip, and then listened carefully for any
sound His artificially enhanced
hearing picked up a tiny, almost
imperceptible rasping noise. Someone - or something - was waiting for him.
'In one fluid motion he stepped around
the corner, IR goggles allowing him to
spot instantly the foul mutated creature
that was lurking in the shadows. The
REAPER spat, its muzzle-flash
illuminating the corridor as it
spewed .50 cal high explosive
destruction. The vile thing was killed
instantly, the impact of the bullets
picking it up and hurling it 20 feet
down the corridor where it smashed, a
ruined bloody mess, into the wall.
'Striding towards the lift shaft the
creature had been guarding he glanced
at the digital timer on his wrist and
scowled Only 25 :minutes left, only 25
minutes to save New York.'
14

15

• OVERKILL OPTIONS • (Originally published bin WD92 as True Confessions of a Chainsaw Warrior, unless otherwise stated)
The tension in the operations room was so
thick that you could almost cut it with a ...
knife. 'Stow it Miller!' snarled the fighter, as he
clipped on the last ammo pouch. 'I've been in
the field too long not o t know when some-
thing's wrong.'
'I don't know what you mean soldier,' replied
the ASFU colonel. 'Nerves?'
The warrior smashed the desk top with his
steel gloved fist, sending a cup of Synthi-Caff
flying to the floor. 'You know I don't have a
'nerve' left in my body. You're holding back! I
know it and you better get it into that thick
head of yours that I won't go in until I know
everything.'
'Hey, now come on -' 'No way, Miller. I owe this city nothing. Now
spill it!'
Visibly shaken, Miller moved to open the
confidential file lying beneath a crumpled map
of the zombie infested building...
Players of Chainsaw Warrior might
like to try the following optional rules,
some of which appeared in the original
prototype, but didn't appear in the final
version of the game...
ADVANCED EQUIPMENT (By Jervis Johnson, originally published in
WD88 as "Life & Death & an American
Chainsaw)
► The following new cards can be
added to your game of Chainsaw
Warrior, simply add the cards to
the appropriate Equ4ipment decks
when equipping your warrior at the
start of the game.
► They are treated just like every
other Equipment card, but as usual
each has its own special
characteristics.
* Combat Shotgun
* R.E.A.P.E.R.
* Stun-Nux
* Smash
* X-oskeleton
* Chameleon Suit
* TDD
* Holographic Imagizer
* Dum-Dum Bullets
16

ADVANCED TRAINING (Rule by Chainsaw Warrior fans taken from
the internet)
► Instead of rolling for your
Attributes, you may distribute 24
point amongst your Attributes.
► Each Attribute has a number of
points already assigned to it (is
"Basic" value) and a maximum
number it can be raised to with
these 24 points.
► Note that this system will give you
a Chainsaw Warrior who's abilities
are slightly below average, but the
increased control should make up
for the difference.
ATTRIBUTE BASIC MAXIMUM
Endurance 4 24
Wounds 8 18
HtH 7 12
Marksman 1 6
Reflexes 6 11
Equipment 3 8
DETERMINATION (Rule by Chainsaw Warrior fans taken from
the internet)
► Each time you encounter a house
card and fail to overcome it, you
gain one Determination Counter.
Once you overcome a House Card
you must discard all Determination
Counters.
► The counter gives you +1 to all
characteristics.
► In addition, for tests not based on
characteristics, you may add +1 to
the required die roll. Guns will still
miss on a "1".
► Determination cannot apply to a
Lucky Shot.
EXTRA TRAINING I (Optional rules used in the 2013 computer
implementation by Auroch Digital)
► You may make process of creating
your Warrior less harsh, by
changing the die rolls required.
► The original rules represent the
harshest, most difficult level of the
game. You may instead play with
The Following Values for a
medium difficulty.
ATTRIBUTE ROLLS
Endurance 3D6+6
Wounds 2D6+6
HtH 2D6 (pick highest) +6
Marksman 2D6 (pick highest)
Reflexes 2D6 (pick highest) +5
Equipment 2D6 (pick highest) +2
Kitting Out May use Kitting Out II
EXTRA TRAINING II (Optional rules used in the 2013 computer
implementation by Auroch Digital)
► You may make process of creating
your Warrior less harsh, by
changing the die rolls required.
► The original rules represent the
harshest, most difficult level of the
game. You may instead play with
The Following Values for an easy
difficulty.
ATTRIBUTE ROLLS
Endurance 1D6+18
Wounds 1D6+12
HtH 3D6 (pick highest) +6
Marksman 3D6 (pick highest)
Reflexes 3D6 (pick highest) +5
Equipment 3D6 (pick highest) +4
Kitting Out Must use Kitting Out
II
17
ESCAPING ► As an alternative to the instructions
given in the rulebook you may like
to try the following:
► The rules state that after failing an
Escape attempt, you should go to
Step 6 of combat and continue
fighting. However, instead of going
to Step 6, merely add 30 seconds
and begin another round of combat
either by going to Step 6 or by
attempting to Escape once more
This was the original mode of play
and whilst more time consuming
can be less harmful to your
character.
FRENZY ► Enraged by wounds already
sustained, the warrior may go
berserk in HtH combat throwing all
caution into the wind.
► If you lose a round of combat and
are wounded, you may choose to
go berserk. Furthermore, if you roll
an 11 or 12 on the Extra Wound
Chart, you go berserk
automatically.
► A berserk warrior adds a +3 bonus
to his HtH rating for the next round
of combat only. If you still lose the
following round, you may go
berserk again. You may go berserk
for any number of rounds.
However, fighting is such a crazed
manner has its risks and costs:
► A berserk warrior who loses a
round of combat takes double the
normal amount of damage.
► Finally, frenzied fighting is very
tiring. For each round of berserk
combat you must permanently
reduce your Endurance rating by
one (move the Endurance Marker
one box down the track towards
zero), which brings you that much
closer to death by venom or
radiation...
KITTING OUT I ► When kitting out at the beginning
of the game, you may spend two
points of your Equipment
Allowance on a Spare Clip for a
piece of equipment which you have
already drawn, including the Laser
Lance.
18

KITTING OUT II ► At the start of the game, you may
spend two points of your
Equipment Allowance so that you
can choose which equipment cards
to take with you into the building
instead of drawing them at random.
KITTING OUT III -'You expect me to go in with just this?
No way, Miller! No way!'
'If you want more, you'll have to wait.
Stuff like this doesn't grow on trees,
boy...'
► After rolling for Equipment
Allowance points, you may wait
for more equipment if you want it.
If so, you kit out in the usual
manner and then immediately
move the Time Marker onto the ten
minute box of the Digital Timer.
Then roll a die and divide the
number rolled by two (rounding
fractions up). The final result (from
1 to 3) is the number of extra
Equipment Allowance gained. You
may then spend these on more
equipment.
RAPID FIRE
► If you have one of the four Guns
(Automatic Rifle, Blaster, Sub-
Machine Gun or the Combat
Shotgun from White Dwarf 88) and
you are facing a particularly mean
mutha of a creature, then you may
try and blast it to bits with a spray
of automatic fire!
► After passing your Reflex test you
decide whether you want to fire the
usual single shot or a burst of rapid
fire. If you want to fire a burst, you
must decide how many shots you
want to fire before firing. You may
fire a maximum of six shots.
► Having decided on a number, you
immediately deduct the amount
from your weapon's supply of uses,
then make a number of rolls equal
to the number of shots used. No
matter how many shots actually hit
the creature, or in what order they
hit, all the shots are used.
► Example: You have the Sub-
Machine Gun with 7 uses left when
you're suddenly faced with the
Meat Machine. You pass your
Reflex test and decide to use rapid-
fire as there's no way that you want
to go even near the thing! As you're
only half way down Deck One, you
don't want to use nearly all my
ammunition up. On the other hand,
you do want to live to see the rest
of the deck.
► You decide to fire off five shots.
With the Sub-Machine Gun you
need to roll an 11 to kill the Meat
Machine but as your
Marksmanship is + 1 you only
need a 10. Your first roll is a 6
(miss) but my second roll is a 12.
Although you destroyed the
creature with your second shot, the
other three are still used up (wasted
in this case). You carry on rolling
anyway and get stunning results:
11, 10 and 12. The shots may be
wasted but you really enjoyed
blowing the thing apart * well, into
very small pieces!
19
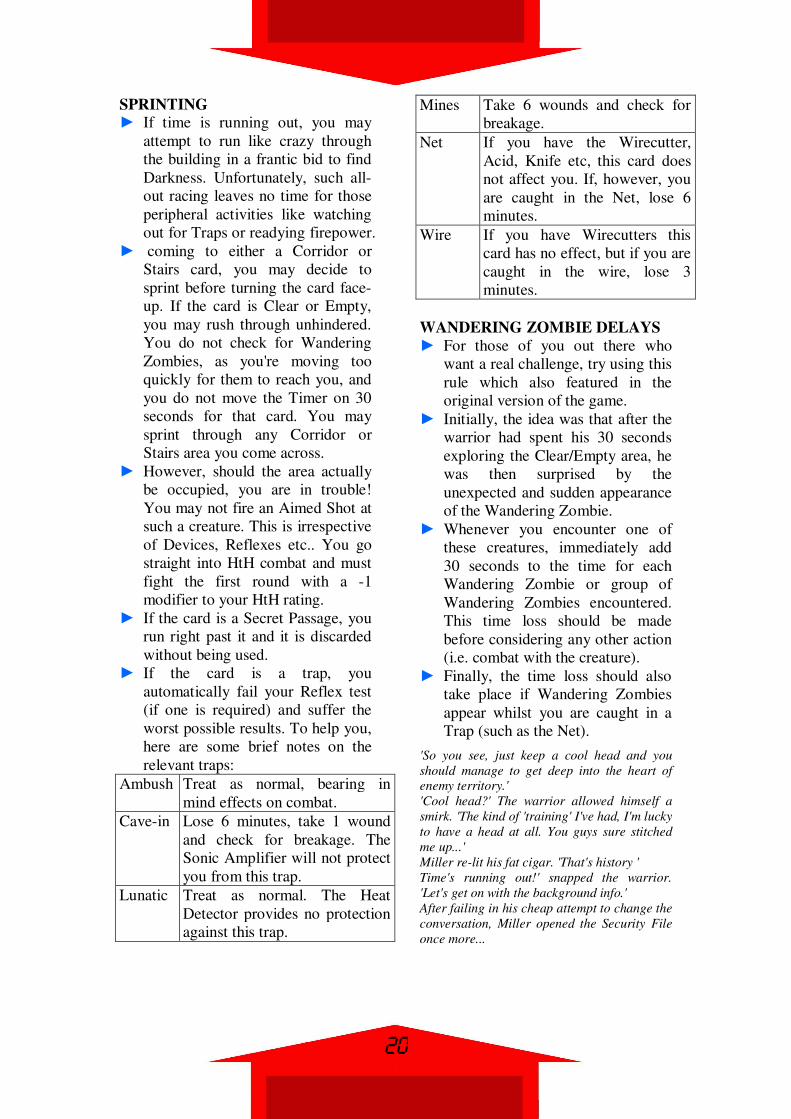
SPRINTING ► If time is running out, you may
attempt to run like crazy through
the building in a frantic bid to find
Darkness. Unfortunately, such all-
out racing leaves no time for those
peripheral activities like watching
out for Traps or readying firepower.
► coming to either a Corridor or
Stairs card, you may decide to
sprint before turning the card face-
up. If the card is Clear or Empty,
you may rush through unhindered.
You do not check for Wandering
Zombies, as you're moving too
quickly for them to reach you, and
you do not move the Timer on 30
seconds for that card. You may
sprint through any Corridor or
Stairs area you come across.
► However, should the area actually
be occupied, you are in trouble!
You may not fire an Aimed Shot at
such a creature. This is irrespective
of Devices, Reflexes etc.. You go
straight into HtH combat and must
fight the first round with a -1
modifier to your HtH rating.
► If the card is a Secret Passage, you
run right past it and it is discarded
without being used.
► If the card is a trap, you
automatically fail your Reflex test
(if one is required) and suffer the
worst possible results. To help you,
here are some brief notes on the
relevant traps:
Ambush Treat as normal, bearing in
mind effects on combat.
Cave-in Lose 6 minutes, take 1 wound
and check for breakage. The
Sonic Amplifier will not protect
you from this trap.
Lunatic Treat as normal. The Heat
Detector provides no protection
against this trap.
Mines Take 6 wounds and check for
breakage.
Net If you have the Wirecutter,
Acid, Knife etc, this card does
not affect you. If, however, you
are caught in the Net, lose 6
minutes.
Wire If you have Wirecutters this
card has no effect, but if you are
caught in the wire, lose 3
minutes.
WANDERING ZOMBIE DELAYS
► For those of you out there who
want a real challenge, try using this
rule which also featured in the
original version of the game.
► Initially, the idea was that after the
warrior had spent his 30 seconds
exploring the Clear/Empty area, he
was then surprised by the
unexpected and sudden appearance
of the Wandering Zombie.
► Whenever you encounter one of
these creatures, immediately add
30 seconds to the time for each
Wandering Zombie or group of
Wandering Zombies encountered.
This time loss should be made
before considering any other action
(i.e. combat with the creature).
► Finally, the time loss should also
take place if Wandering Zombies
appear whilst you are caught in a
Trap (such as the Net).
'So you see, just keep a cool head and you
should manage to get deep into the heart of
enemy territory.'
'Cool head?' The warrior allowed himself a
smirk. 'The kind of 'training' I've had, I'm lucky
to have a head at all. You guys sure stitched
me up...'
Miller re-lit his fat cigar. 'That's history '
Time's running out!' snapped the warrior.
'Let's get on with the background info.'
After failing in his cheap attempt to change the
conversation, Miller opened the Security File
once more...
20

21

HOUSE CARDS ► These cards have back designs
representing the different parts of
the building you will explore as
you creep or blast your way
through the house. The designs
represent the following areas:
Balconies, Corridors, Elevators,
Rooms and Stairs.
Chaos Agents ► These fearsome warriors are
trained to the peak of fitness.
Worse, they seem to have strange
mystical powers which allow them
to control the Zombies, and which
make them truly dangerous
opponents. There are nine Agents,
each with different powers and
strengths.
► Agents 1 and 2 are so quick they
will not allow you to fire a shot. Go
straight into Hand-to-Hand combat.
These are so fast that you may not
attempt an Aimed Shot. ou may try
lucky shots later.
► Agent 3 is as quick as Agents 1 &
2, and will go straight into HtH
combat. Furthermore, this agent
also has a mission. Every time he
wounds you, lose an item of
equipment instead (your choice).
The item is destroyed - remove it
from the game.
► Agent 4 is a specialist at knock-out
blows. If you lose a round of
combat you don't take a wound.
Instead you must roll 3 dice and
immediately lose that many
minutes! When you awake discard
the Agent card and continue as
normal.
► Agent 5 attacks with venom-coated
knives. If he wounds you take
normal damage - but you're now
infected with zombie venom, just
as if you'd been bitten by a Zombie.
The Helmet will not stop you
becoming infected from this venom
attack.
► Agent 6 is a martial arts assassin
with lightning speed. When
attempting to shoot him with an
Aimed Shot, you must subtract 3
from your die roll, and when
fighting HtH you must reduce your
HtH rating by 3 as well. Lucky
shots are unaffected, but you
cannot escape.
► Agent 7 is a one-man suicide squad!
Unless you can shoot him with an
Aimed Shot before he attacks (and
he's so fast your die roll must be
reduced by 1) he will dive at you
and set off explosives wrapped
around his body. Roll one die and
take that many wounds, and roll a
die for every piece of equipment
you have. On a roll of 5 or 6 that
piece is destroyed and should be
removed from the game. After
checking for each item discard the
agent.
► Agent 8 is an expert with knives.
Before doing anything roll a die. If
you roll a 5 or a 6 take one wound
lie's thrown a knife at you! Once
you've done this go straight into
Hand-to-Hand combat.
► Agent 9 is not alone - he's brought
two friends with him! Upon
revealing this card you should draw
two Wandering Zombie cards
(normal venom infection rules
apply). Add one minute to the time,
and start to fight by Testing
Reflexes to get an Aimed Shot at
one of the Zombies. The agent and
any surviving Zombies must be
fought using the Multiple
Opponents rules * but don't forget
to keep the time ticking off!
22
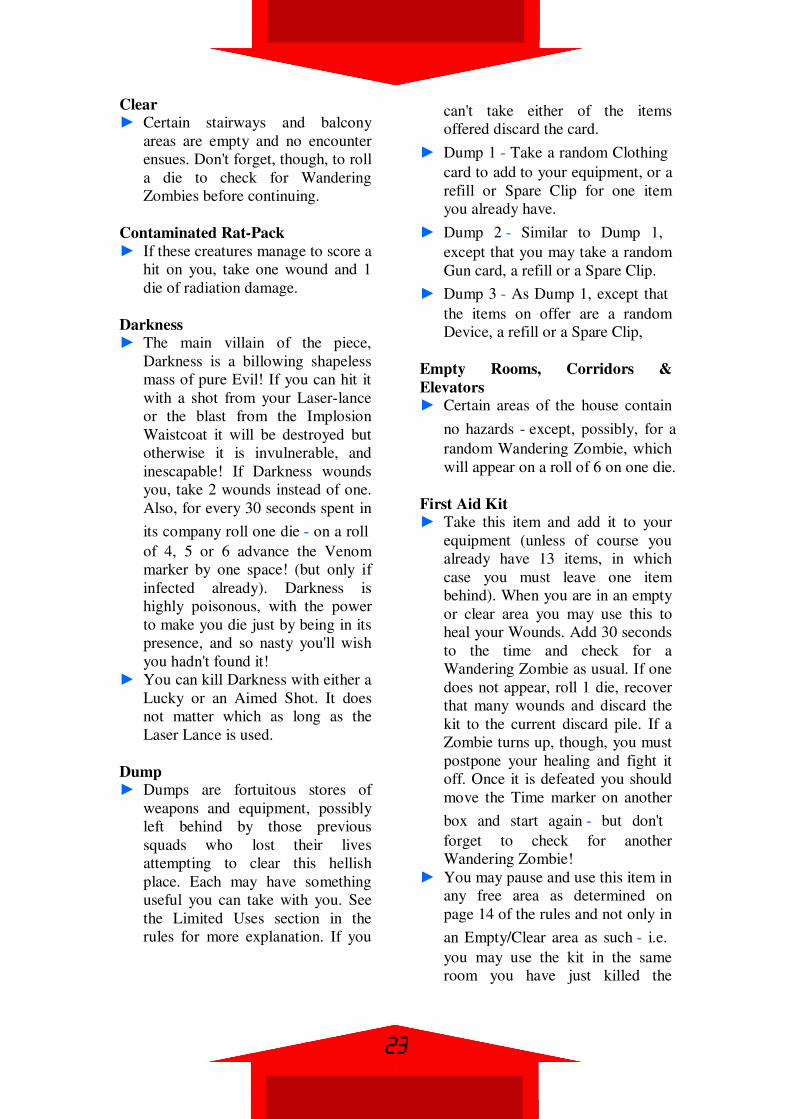
Clear ► Certain stairways and balcony
areas are empty and no encounter
ensues. Don't forget, though, to roll
a die to check for Wandering
Zombies before continuing.
Contaminated Rat-Pack
► If these creatures manage to score a
hit on you, take one wound and 1
die of radiation damage.
Darkness ► The main villain of the piece,
Darkness is a billowing shapeless
mass of pure Evil! If you can hit it
with a shot from your Laser-lance
or the blast from the Implosion
Waistcoat it will be destroyed but
otherwise it is invulnerable, and
inescapable! If Darkness wounds
you, take 2 wounds instead of one.
Also, for every 30 seconds spent in
its company roll one die - on a roll
of 4, 5 or 6 advance the Venom
marker by one space! (but only if
infected already). Darkness is
highly poisonous, with the power
to make you die just by being in its
presence, and so nasty you'll wish
you hadn't found it!
► You can kill Darkness with either a
Lucky or an Aimed Shot. It does
not matter which as long as the
Laser Lance is used.
Dump ► Dumps are fortuitous stores of
weapons and equipment, possibly
left behind by those previous
squads who lost their lives
attempting to clear this hellish
place. Each may have something
useful you can take with you. See
the Limited Uses section in the
rules for more explanation. If you
can't take either of the items
offered discard the card.
► Dump 1 - Take a random Clothing
card to add to your equipment, or a
refill or Spare Clip for one item
you already have.
► Dump 2 - Similar to Dump 1,
except that you may take a random
Gun card, a refill or a Spare Clip.
► Dump 3 - As Dump 1, except that
the items on offer are a random
Device, a refill or a Spare Clip,
Empty Rooms, Corridors &
Elevators ► Certain areas of the house contain
no hazards - except, possibly, for a
random Wandering Zombie, which
will appear on a roll of 6 on one die.
First Aid Kit ► Take this item and add it to your
equipment (unless of course you
already have 13 items, in which
case you must leave one item
behind). When you are in an empty
or clear area you may use this to
heal your Wounds. Add 30 seconds
to the time and check for a
Wandering Zombie as usual. If one
does not appear, roll 1 die, recover
that many wounds and discard the
kit to the current discard pile. If a
Zombie turns up, though, you must
postpone your healing and fight it
off. Once it is defeated you should
move the Time marker on another
box and start again - but don't
forget to check for another
Wandering Zombie!
► You may pause and use this item in
any free area as determined on
page 14 of the rules and not only in
an Empty/Clear area as such - i.e.
you may use the kit in the same
room you have just killed the
23

Mutant in, and not only in an area
that was Clear or Empty to begin
with.
The Meat Machine ► The Meat Machine is a bizarre
device, part human and part robot,
a sentient metal ghoul that roams
the house searching for new flesh
to graft onto its repulsive body! It
is, of course, a vicious killer. If it
wounds you in HtH combat roll a
die:
Die Roll Number of wounds taken
1-2 1
3-4 2
5-6 3
► Even worse, each time it hits you
the Meat Machine cause you to
suffer a permanent reduction of one
point from either your Reflexes or
your HtH rating! You must choose
which, adjusting your chart
accordingly. Neither score can be
reduced below the minimum
number listed. When either
characteristic reaches this point all
further reductions must be taken on
the other characteristic until it too
reaches the lowest value; from then
on any further reductions can be
ignored - you're in such a bad
shape it's not going to make any
more difference!
Mutant Thing ► These revolting mutants carry fatal
radiation with them. Before you
engage in combat or do anything
else you should roll one die and
advance the Radiation marker that
many boxes! If you are still alive
you may now proceed to combat.
Rat Pack ► finless you can shoot them first
these packs of vicious black rats
will swarm all over you, biting and
scratching. Whenever they score a
hit they cause the number of
Wounds listed on their card.
Secret Passage ► You've found a short cut through
the house. Roll 2 dice. You may
immediately discard up to that
number of cards without any
additional time loss. Turn over
each card in turn, you may stop at
any time, deciding before the next
card is revealed. If Darkness is
skipped in this way you must
follow the rules in the section
headed Missing Darkness. Once
you decide to skip a card it must be
discarded, regardless of what it is.
There are no encounters for any of
these cards.
Slime
► Sentient slime - a revolting mass
of oozing death! If you have Acid,
a Flare Gun, a Flamethrower or the
Laser-lance you must use it to kill
the Slime before it can get to you.
Do not Test Reflexes; roll 2 dice
and adjust it for Marksmanship. If
you score 7 or more you've singed
it badly and it retires out of the way
to allow you to pass. Roll less than
7, though, and you'll be engulfed in
it with no escape - for you the
mission is over! Not having any
useful weaponry brings the same
result. Good luck - you'll need it.
Trap - Ambush
► Roll 1 die and draw that many
Wandering Zombies from the WZ
pile. Check for venom infection as
24

usual; you may then make an
Aimed Shot at one without Testing
Reflexes if you wish. Each Zombie
must be fought in turn. Don't forget
to add 30 secs for each round of
combat after the first.
Trap - Ceiling Cave-In
► You are halfway to the other end when
the ceiling cracks and falls in on you!
Test your Reflexes. If you succeed you
manage to leap to safety. If you fail,
though, you are caught by the falling
masonry and must dig yourself out.
Roll one die and lose that many
minutes, and take 1 wound. Also, roll 1
die for every item of equipment you
have. A roll of 6 means that the item
was caught in the fall and damaged
beyond repair - discard that card.
Trap - Chasm
► An immense hole in the floor
blocks your route through the
house. Unless you have a Rope
Launcher or the Climbing skill you
will have to retrace your steps and
start again. Remove this card from
the game and see Escaping The
Building in the rules. Be warned:
your time is running out fast!
► When you escape the building as a
result of coming across the Chasm
card, you need not spend an
Equipment Allowance point
(indeed, you should not) if you still
have a Laser Lance. However, 2
points may be spent on a Spare
Clip for it.
Trap - Locked Door
► If you have the Lock Pick this card
has no effect. If not you must either
shoot or smash the door open, or
find another route. Breaking down
the door is done just like combat.
On each weapon's card there is a
rating for smashing a door. You
must roll this number or higher on
2 dice to remove the door. If you
fail add 30 seconds, check for a
Wandering Zombie, and either try
again or retrace your steps. Don't
forget to cross of the shots you use.
► To retrace your steps you must
shuffle the discard pile of the
current pack and deal off the first
five without looking at them. Add
these five to the current pack and
shuffle it. If there are less than five
cards on the discard pile use as
many as there are left.
► If you smash down a Locked Door,
or attempt to do so, you then check
for a Wandering Zombie because
of the noise you've made. This
explains why a check is not made if
you use Acid, which is silent.
► If you retrace your steps and there
are fewer than five cards currently
on the Discard pile, the few cards
that are there are shuffled back into
the current House Deck. If there
are no discards, then the Locked
Door card has no effect and is
merely discarded.
► Whether there are enough cards or
not, the Locked Door card itself is
not shuffled back into the House
Deck. Instead it is placed on the
Discard pile (to be possibly
shuffled back into the House Deck
should you retrace steps from a
second Locked Door later on).
Trap - Lunatic
► Before you do anything a half-
crazed beggar leaps out of the
shadows, grabs something from
you and flees again! He may grab
anything except an item of
25
Clothing; select an item at random
and remove it from the game.
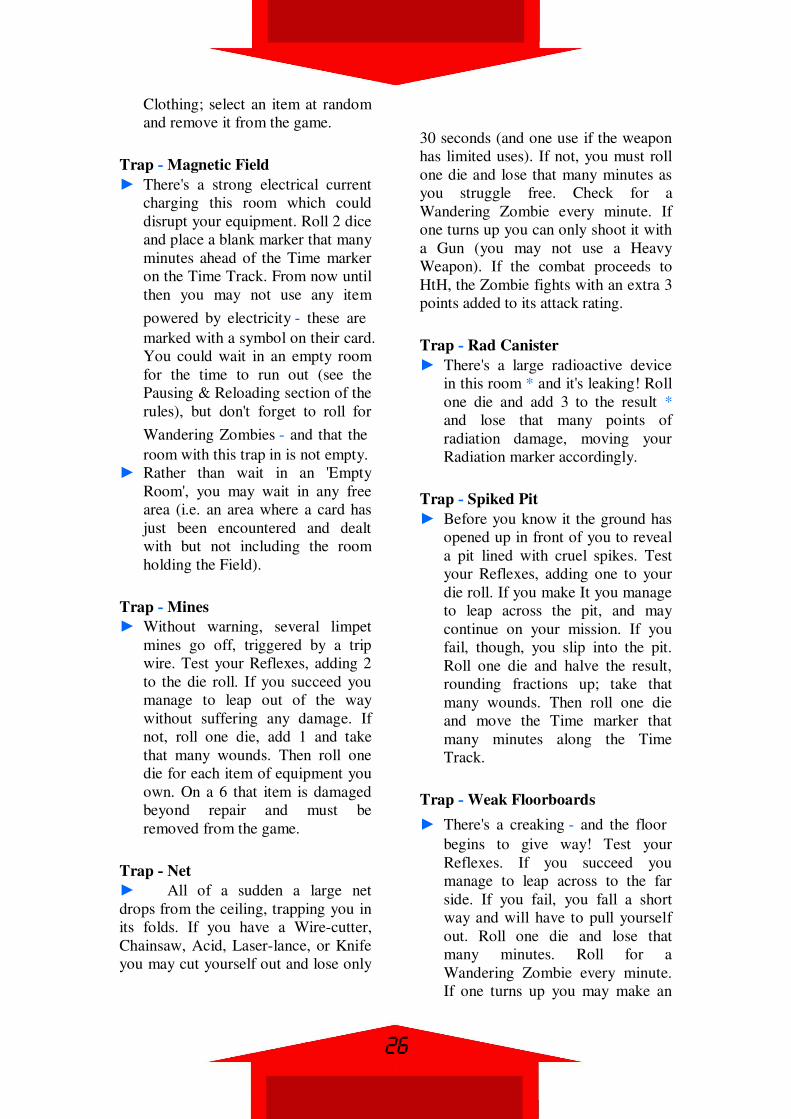
Trap - Magnetic Field
► There's a strong electrical current
charging this room which could
disrupt your equipment. Roll 2 dice
and place a blank marker that many
minutes ahead of the Time marker
on the Time Track. From now until
then you may not use any item
powered by electricity - these are
marked with a symbol on their card.
You could wait in an empty room
for the time to run out (see the
Pausing & Reloading section of the
rules), but don't forget to roll for
Wandering Zombies - and that the
room with this trap in is not empty.
► Rather than wait in an 'Empty
Room', you may wait in any free
area (i.e. an area where a card has
just been encountered and dealt
with but not including the room
holding the Field).
Trap - Mines
► Without warning, several limpet
mines go off, triggered by a trip
wire. Test your Reflexes, adding 2
to the die roll. If you succeed you
manage to leap out of the way
without suffering any damage. If
not, roll one die, add 1 and take
that many wounds. Then roll one
die for each item of equipment you
own. On a 6 that item is damaged
beyond repair and must be
removed from the game.
Trap - Net
► All of a sudden a large net
drops from the ceiling, trapping you in
its folds. If you have a Wire-cutter,
Chainsaw, Acid, Laser-lance, or Knife
you may cut yourself out and lose only
30 seconds (and one use if the weapon
has limited uses). If not, you must roll
one die and lose that many minutes as
you struggle free. Check for a
Wandering Zombie every minute. If
one turns up you can only shoot it with
a Gun (you may not use a Heavy
Weapon). If the combat proceeds to
HtH, the Zombie fights with an extra 3
points added to its attack rating.
Trap - Rad Canister
► There's a large radioactive device
in this room * and it's leaking! Roll
one die and add 3 to the result *
and lose that many points of
radiation damage, moving your
Radiation marker accordingly.
Trap - Spiked Pit
► Before you know it the ground has
opened up in front of you to reveal
a pit lined with cruel spikes. Test
your Reflexes, adding one to your
die roll. If you make It you manage
to leap across the pit, and may
continue on your mission. If you
fail, though, you slip into the pit.
Roll one die and halve the result,
rounding fractions up; take that
many wounds. Then roll one die
and move the Time marker that
many minutes along the Time
Track.
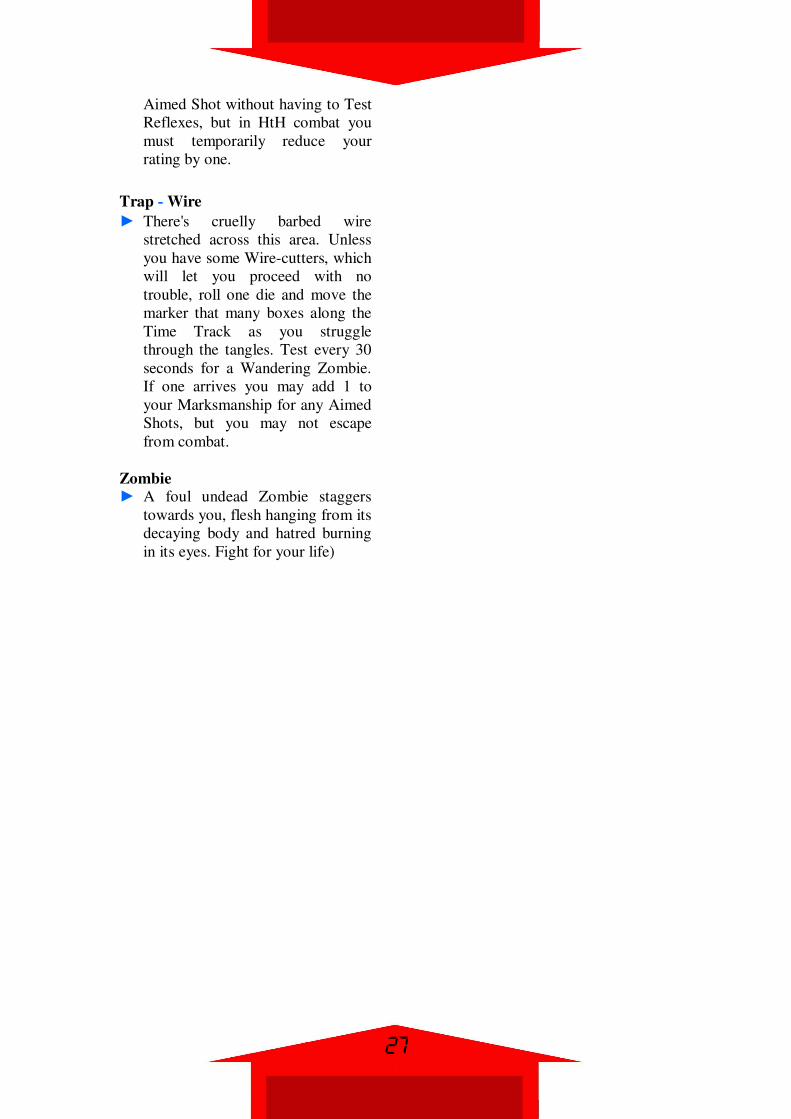
Trap - Weak Floorboards
► There's a creaking - and the floor
begins to give way! Test your
Reflexes. If you succeed you
manage to leap across to the far
side. If you fail, you fall a short
way and will have to pull yourself
out. Roll one die and lose that
many minutes. Roll for a
Wandering Zombie every minute.
If one turns up you may make an
26
Aimed Shot without having to Test
Reflexes, but in HtH combat you
must temporarily reduce your
rating by one.
Trap - Wire
► There's cruelly barbed wire
stretched across this area. Unless
you have some Wire-cutters, which
will let you proceed with no
trouble, roll one die and move the
marker that many boxes along the
Time Track as you struggle
through the tangles. Test every 30
seconds for a Wandering Zombie.
If one arrives you may add 1 to
your Marksmanship for any Aimed
Shots, but you may not escape
from combat.
Zombie ► A foul undead Zombie staggers
towards you, flesh hanging from its
decaying body and hatred burning
in its eyes. Fight for your life)
27

EQUIPMENT ► Equipment is split into several
types: HTH Weapons, Guns, Hvy
Weapons, Devices, Clothing, and
Special.
► You may wear any amount of
clothing and carry any amount of
Devices, and each will have their
full effect.
► You may only carry one Gun.
► You may only carry one Heavy
Weapon
► Although you may carry any
number of HtH weapons you may
only use one in combat. HtH
bonuses are not cumulative with
the bonuses gained from other HtH
weapons. So, you may use either
the Chainsaw or the Knife but not
both.
► Note that the card backs determine
what Deck an item belongs in, not
what type of equipment it is. Some
devices, for example, may be in
other decks.
Acid (Device) ► You have a vial of powerful Acid,
which you can use (once only) for
a variety of actions. It can be used
to burn through a Locked Door or a
Wire trap. It can be thrown at an
opponent (though with a reduction
of I from your Marksmanship, as
it's not easy to aim), Acid can even
be used for a Lucky Shot. There is
no need to roll for a Wandering
Zombie if you use Acid.
Anti-Rad Capsules (Device)
► You have one dose of these handy
pills. When you are first exposed to
radiation you may take them to
negate any damage. Once used you
should discard this card.
► You may take these after exposure
to any one source of radiation. If,
for example, you meet a Mutant
and roll a low number for radiation
damage, you may save the capsules
for later use when greater damage
may be sustained.
► When you want to use the capsules,
you do so immediately after rolling
for radiation damage, irrespective
of whether or not a Mutant is about
to attack you.
► If exposure to radiation kills you,
you may not then take the capsules
to negate the damage!
Automatic Rifle (Gun)
► The SRH VS220 automatic rifle is one
of the most advanced around, capable
of delivering up to 12 bursts of
devastating firepower that will
penetrate even the thickest of armour.
► This weapon has it limited number of
uses and a list of the scores you need to
roll on 2 dice to hit your opponents.
Blaster (Gun)
► The McDonnell RFK3 Helium-
cooled Blaster has a short range
and low penetrating power, but its
compact power pack allows It to
deliver up to 16 shots.
► This weapon has it limited number
of uses and a list of the scores you
need to roll on 2 dice to hit your
opponents.
Body Armour (Clothing) ► The McDonnell Mk3 Body
Armour is a revolutionary way of
protecting yourself from damage.
Every time you take a wound
(including those from the Extra
Wound table, etc) roll 1 die. On a
roll of 1-4 you must take the
wound as usual. On a 5 or 6,
though, the damage is taken by the
28

armour and you are unharmed. The
armour loses one use. You cannot
choose when this happens * the
armour protects you automatically
until its charge gives out.
Chainsaw (HTH Weapon) ► The Chainsaw is a vicious and very
effective weapon. Developed from
the original tree-felling devices it
now sports a strong pistol grip and
a quieter, more efficient engine.
Carrying one of these adds 3 to
your HtH rating. It can also make
short work of locked doors on a
roll of 8 or more on two dice.
► When using the Chainsaw to
demolish Locked Doors, you
should make the usual Wandering
Zombies test.
Chameleon Suit (Clothing)
► The G Tech Chameleon Suit's
highly advanced circuitry allows it
to mimic the chameleon's natural
ability to take on the colour of its
surroundings. The very high cost of
Chameleon Suits means they are
generally only used by special
operations units (such as the British
SAS, US ASFU and Russian
Spetsnaz) where the need for
stealth and hidden movement are
vital. Any character wearing the
suit can act as if they had the 'Hide'
skill. If they already have this skill
they receive a +1 modifier to the
die roll when using the skill.
► This item of clothing is powered by
electricity and should bear an
electricity symbol, which it doesn't
do at the moment. Should you
encounter the Magnetic Field, you
lose all the benefits that this suit
normally offers.
Combat Shotgun (Gun) ► CLAW stands for Close Assault
Weapon, an appropriate description
for this deadly short range weapon.
The CLAW-15 Combat Shotgun is
favoured by Police Assault Teams
operating in built-up areas, who
found that standard assault rifle
bullets have a disconcerting ability
to travel through several walls and
injure or kill innocent bystanders.
The CLAW-15, on the other hand,
combines terrific stopping power
with only limited penetration,
making it the ideal weapon for use
in inhabited non-combat areas.
► This weapon has it limited number
of uses and a list of the scores you
need to roll on 2 dice to hit your
opponents.
CA.T.S. (Device)
► The MarTech Computer
Automated Targeting System
CATS system is a high-powered
targeting device that gives a +2
bonus to your Marksmanship when
using the weapon it's attached to. It
also adds 1 to any Lucky Shot roll
when using (lie weapon. CATS can
be fitted to any Gun, Flamethrower,
Man-to-man Rockets or the Laser-
lance, but once assigned to a
weapon it cannot be switched to
another. Place the CATS counter
alongside the weapon it's attached
to. If the weapon is damaged and
discarded CATS must be discarded
too.
► Your equipment may be damaged *
as a result of Mines for example. In
such an event the CATS must be
tested separately for breakage. If it
does break, it is disconnected from
the weapon to which it was fixed
and removed from the game as
29

normal. As stated in the rules,
should the weapon break then the
CATS is also discarded!
C.N.E.S. (HtH Weapon) ► The GWC Industries Cyber Neural
Electron Scrambler prototype you
have damages opponents by
drawing on your own physical
power and using it to literally
scramble up their component atoms!
It can be used against any creature
except Darkness. Instead of rolling
for HTH combat you may use this.
Your opponent is instantly
destroyed, but you must take one
die of wounds yourself. This
device hasn't been tested
sufficiently yet and is still very
experimental, but it could get you
out of a tricky situation.
► This weapon (which draws its
energy from the character's nervous
system!) may be used at the start of
any one round of combat, even if
you had previously used another
HtH weapon in the same encounter.
► When it comes to Step 6 you may
simply choose to use this weapon
and follow the normal instructions.
Dum-Dum Bullets (Device)
► Most company's produce explosive
bullets for the weapons they
produce, although the use of such
ammunition is banned by the 1994
United Nations Treaty. Dum-dums
can be used with any Gun (not
Heavy Weapons or the Laser-
Lance) and should be placed next
to the gun on the equipment
display. If the warrior does not
have a gun they may discard this
card and choose another. Dum-
dums may be used instead of the
normal ammunition for the gun, as
long as this is declared before the
dice are rolled to see f the target is
hit, and add +2 to the dice roll.
When Dum-dums are used reduce
the Uses Left marker on the Dum-
dum card instead the gun card.
► If a character with these loses his
gun, the bullets are also discarded.
The +2 modifier itself only applies
to Aimed Shots.
Dynamite (Hvy Weapon)
► This weapon has it limited number
of uses and a list of the scores you
need to roll on 2 dice to hit your
opponents.
► Dynamite has an extra use. At the
start of any turn, after adding 30
seconds to the time as usual, you
may use one charge to blow a hole
in a wall and make a self-made
short cut! Roll one die and discard
that many cards from the deck. At
the end roll for one Wandering
Zombie; one appears on a 4, 5 or 6
due to the noise of the explosion.
Flamethrower (Hvy Weapon)
► The Hanson-King Mk16 Combat
Flame Projector is an advanced
flamethrower which looks more
like a stub-nosed automatic rifle
than the bulky devices of previous
centuries. It is capable of
delivering a constant pout of flame
up to 12 metres, with a target
accuracy of 6.2 centimetres!
► This weapon has it limited number
of uses and a list of the scores you
need to roll on 2 dice to hit your
opponents.
Flare Gun (Device) ► The Flare Gun can only be used at
night, but when you fire it you can
roll one die and treat that many
30

cards as being Clear. There's no
need to roll for Wandering
Zombies, though, as they are
scared off by the light. Each
section still costs 30 seconds to
move through. If one of the cards
turns out to be a Trap or Darkness
you must stop and respond to it,
and the flare goes out.
► If you use this to make areas Clear,
you may still stop to pick up a First
Aid Kit, take items from a Dump
or enter a Secret Passage. If you do
any of these things, the flare goes
out and you continue as normal
after dealing with the Passage or
whatever.
Flash Bombs (Device) ► A Flash Bomb can only be used at
night. Used at the start of HtH
combat they give either a +3 bonus
to your rating for the duration of
that combat, or allow you to escape
automatically at the start of the
second
Geiger Counter (Device)
► The Geiger Counter can help you
detect strong areas of radiation *
and avoid them. If a radioactive
card such as a Mutant, a Rad-
Cannister or Contaminated Rat-
Pack is revealed you can avoid the
card. Shuffle the discard pile, take
5 cards from it and shuffle them
back into the current pack. Discard
the radioactive card, and continue
as usual.
► If, when avoiding a radioactive
source, there are less than five
Discards available, shuffle them
into the current House Deck.
► If there are no Discards, the
radioactive source is simply
discarded with no penalty for the
player. Whether or not there are
Discards available, the radioactive
card is not shuffled back into the
House Deck; it is discarded. It
might possibly be shuffled back
into the House Deck should you
use the Geiger Counter to avoid a
second source later in the game.
Heat Detector (Device)
► The IR Heat Detector enables you
to pick out the warmth of living
beings before they reach you.
While you have this device you
don't need to test reflexes to shoot
Rats or Chaos Agents, and the
Lunatic card is negated * just
discard it.
Helmet (Clothing)
► Zombies use their claws to attack,
but always try and bite the neck.
While wearing this Helmet you can
still be injured by a Zombie, but
you can't become infected by its
venom.
Holographic Imagizer (Device)
► The Sony Holographic Imagizer
System™ (HIS for short) is based
upon fairly standard technology
from the HoloVision industry, of
which General Electronics' Sony
offshoot is a market leader. The
HIS produces six perfect images of
the character using the device,
which usually proves highly
disorientating to any attackers. Any
character using the HIS may
automatically escape from combat
or receive a +1 modifier to a lucky
shot die roll. The HIS may only be
used for one escape or to affect one
lucky shot die roll.
► This device is powered by
electricity and should bear an
31
electricity symbol. Should you
enter the Magnetic Field with this
device, it becomes useless for a
while.
Implosion Waistcoat (Clothing)
► This is a suicide device: a
waistcoat packed with
sophisticated microcircuitry that is
capable of triggering Darkness'
warp so it implodes before it is
fully formed. It can be triggered at
any time, killing anything in the
same area with you * as well as
yourself. Remember that you must
be alive to use the device; you can't
trigger it after failing your final
HtH roll!
Infra-Red Goggles (Clothing)
► These standard-issue goggles allow
you to see better in the dark. When
night falls you won't need to have 1
deducted from your HtH rating.
Knife (HTH Weapon)
► Your beloved Bowie Knife adds 1
to your HtH rating. You can also
throw it instead of firing a gun
(reducing your Marksmanship by 1
point) against Zombies or Chaos
Agents. If the shot misses you will
have to kill your opponent in HtH
combat (including a Lucky Shot) to
retrieve it, or it will be lost and you
must discard the card.
Lock-Pick Set (Device)
► Locked doors have no effect while
this set is in your possession.
Man-to-Man Rockets (Hvy Weapon)
► The Johnson FOD-42 'SuperWasp'
Man-to-man Rockets, meanwhile,
come as a small hand-held
launching system which can
deliver up to 4 rockets at 4 separate
targets using inbuilt microcircuitry
for their guidance systems. These
devices are expensive and rather
bulky, but their firepower is
something else!
► On the card itself it says: All
opponents (except Darkness) 4.
► This instruction, although it may
not seem clear, is equally
applicable to destroying Locked
Doors. You may use a Man-To-
Man Rocket to demolish a Locked
Door and succeed in doing so if
you can roll a 4 or above (taking
Marksmanship modifiers into
account).
► This weapon has it limited number
of uses and a list of the scores you
need to roll on 2 dice to hit your
opponents.
Medi-Kit ► The Medi-kit can be used to heal
your wounds. When you wish to
use it add 30 seconds to the time
and check for a Wandering Zombie
as usual. If one does not appear,
roll 1 die, recover that many
wounds and discard the kit. If a
Zombie turns up, though, you must
postpone your healing and fight it
off. Once it is defeated you should
move the Time marker to the next
box and start again * but don't
forget to check for another
Wandering Zombie!
► You may use the Medi-Kit in any
free area.
Metal Detector (Device) ► The Metal Detector will enable you
to spot large masses of metal from
a distance. While it's in your
possession you needn't Test
Reflexes to take a shot at the Meat
32

Machine. Furthermore, you won't
get caught in Wire or Mine traps *
simply add 1 minute to the time
and keep moving.
Poison-Coated Metal Needle (HTH
Weapon) ► This sneaky commando weapon is
kept in a small padded sheath. You
must use it in HtH combat, where it
is effective against every opponent
except Darkness. Roll one die and
halve the result (round fractions
up). This is the number of rounds it
takes your opponent to die, during
which time you must hold it off. Of
course, you may well kill the
creature anyway or die yourself
before the poison works!
► If you want to use this weapon, you
must do so in Step 6 of the first
round of combat with the creature.
Rad Fibre Jumpsuit (Clothing)
► This lightweight suit has minute
lead and carbon strips sewn into it
to absorb some of the radiation you
are likely to be exposed to.
Whenever you roll for radiation
damage you may reduce the
amount by one point.
R.E.A.P.E.R. (Hvy Weapon) ► The H&W REAPER * Fully
Stabilised Personal Hi-Calibre
Machine Gun is probably the most
efficient anti-personnel weapon in
the world. It is fitted to a specially
designed stabilising mount worn on
the firer's hip, which negates the
terrific recoil of the weapon and
allows one person to use it easily
and efficiently. Its .50 calibre
explosive bullets are capable of
blasting their way through most
forms of cover or light armour.
Due to its bulk a character wearing
the REAPER suffers a -1 modifier
to their HtH value.
► This weapon has it limited number
of uses and a list of the scores you
need to roll on 2 dice to hit your
opponents.
Remote Camera (Device) ► You can set up this video camera at
any point in the house. It takes 30
seconds to set up, but then allows
you to look ahead of you. Roll 2
dice and look at that many cards
from the current deck. Once you've
done this you must discard this
card.
► This card may be used at any time
except during combat, or if you are
unconscious or stuck in a trap of
any nature. Add 30 seconds, but do
not check for a Wandering Zombie,
roll both dice and look ahead at the
rolled number of cards. This, of
course, means that, if you find a
Secret Passage, you may use the
Remote Camera before entering the
passage or at any point along it.
► However, should you find a Secret
Passage card while using the
Camera, you can not then use it to
look down the first few passage
cards, even if the die roll entitles
you to do so. This is because the
Passage doors are presumed closed
until you open them, and the
Camera can not pass through such
obstacles. The camera can only be
used in a Passage if you find and
device to enter one before using the
Camera.
Rope And Launcher (Device) ► This handy device can be used to
get you past the Chasm card. After
an encounter on a balcony you can
33
use the Rope to bypass certain
areas. Add 30 seconds to the time,
roll one die and treat that many
cards as though there's no need to
roll for Wandering Zombies. If you
bypass Darkness follow the
Missing Darkness rules.
Smash (Divice) ► Smash is an illegal narcotic drug,
which has the effect of greatly
increasing the strength of any
person who uses it. Originally
developed by Carl Halliwell of
Sargent-Laroche SA for use as a
combat drug, research was stopped
when dangerous side-effects
proved impossible to prevent.
However, a copy of the formula
made its way onto the black market,
where customers have been found
amongst those who are stupid or
desperate enough to try it.
► Smash can be taken by a character
at any time except during combat.
For the next 5 minutes (place a
blank counter on the Time track to
remind yourself when the drug
wears out) the character adds +3 to
their HtH value. On the turn the
drug wears off the character suffers
one die of wounds.
Sonic Amplifier (Device)
► Out Sonic Amplifier is an
experimental device that magnifies
sound in a tight beam that affects
certain types of target. While it's in
your possession you needn't Test
Reflexes to hit a Zombie opponent.
You may also avoid the Cave-in
Trap; simply add 1 minute to (ho
time and discard the trap card.
Steel Gloves (Clothing) ► These reinforced gauntlets give
you a powerful punch. Add 1 to
your HtH rating. Also, when
fighting a Rat Pack you need only
take one wound if they succeed in
biting you.
Stun-Nux (HTH Weapon) ► Much favoured by the street gangs
of the numerous ghettoes of the
21st Century, Stun-Nux are an
updated version of the ever popular
knuckle-duster. An extremely
powerful electric charge is
generated by the zircon battery
housed in the grip of the Stun-Nux.
This is discharged when the Stun-
Nux hits a suitable conducting
surface (such as human flesh),
producing a spectacular and quite
deadly effect. Stun-Nux add +2 to a
character's HtH value when used.
Sub-Machine Gun (Gun) ► The Starling CFTC Sub-Machine
Gun, affectionately nicknamed the
'Widowmaker', has an excellent
capacity for damaging 'soft' targets,
but its rate of fire is such that it
tends to get through ammunition
rather quicker than most weapons.
► This weapon has it limited number
of uses and a list of the scores you
need to roll on 2 dice to hit your
opponents.
Teleport Implant (Device)
► This experimental device is
implanted in your arm to I iv you a
lifeline to the outside of the house.
If your mission is placed in
jeopardy by the loss or breakage tit
your Laser-lance, or the Chasm
house card, you can immediately
leave the building. See Escaping
34

The building in the main rules for
what happens next.
Throw Nets (HTH Weapon)
► In place of your first round of HtH
combat you may elect to throw one
of these small weighted Nets to
trap and defeat one opponent. Nets
do not work on Darkness or the
Meat Machine, and don't protect
you from radiation damage or
venom corruption.
► If you want to use this weapon, you
must do so in Step 6 of the first
round of combat with the creature.
TDD (Device) ► Rigged up by scientists
investigating the extraordinary
phenomenon that is taking place,
the Temporal Disturbance Detector
is capable of registering the
disturbance in space time generated
by Darkness. Unfortunately its
range is very limited, although it
will provide some warning of
Darkness' approach.
► Any character with the TDD will
never miss Darkness when moving
through secret passages. If the
Darkness card is one of those
discarded when moving through
the passage you may stop and fight.
In addition a character with the
TDD does not need to Test
Reflexes to see if they get off a
shot with their Laser-Lance.
Time Grenades (HTH Weapon) ► These experimental weapons cause
small fluctuations in the fabric of
space and manage to move their
victims through short distances of
time * and therefore space. Instead
of fighting HtH combat use 4 IM)
of these to remove your opponent
from play. Take (ho card and
shuffle it into the other deck (in
other words, if you are currently in
deck 1 shuffle it into deck 2; If in
deck 2 shuffle it into the deck 1
discards).
► If you want to use this weapon, you
must do so in Step 6 of the first
round of combat with the creature.
Torch (Device) ► The Torch allows you to see in the
darkness, meaning you don't take
the HtH penalty for fighting Defter
dark. When fighting creatures of
the darkness lombies and Rats * it
adds 1 to your HtH rating.
► This device and its +1 combat
bonus against Rats and Zombies
can only be used during Nigh:
Time.
Ultra-Violet Emitter (Device) ► This device repels Zombies, who
fear the powerful U/V light, and
means you need never check for
Wandering Zombies, and other
cards which rely on thorn, such as
Ambush, can be treated as Clear.
Wire-cutters (Device) ► Use these to pass through Net and
Wire traps as though they weren't
there.
X-oskeleton (Clothing)
► The Cytronic Industrial X-
oskeleton® is designed for lifting
and carrying heavy objects in
confined or inaccessible locations
where standard heavy lifting
equipment could not be used. Due
to its bulk it is not ideal in combat
situations, although the wearer's
greatly increased strength does
mean that any blow which does
35
connect has a shattering effect on
the target.
► Characters wearing an X-oskeleton
receive a +1 bonus to their HtH
value in addition to the modifier
for one HtH Weapon and may
smash through locked doors on an
8 or greater on two dice. However,
they suffer a -1 modifier to their
reflex value due to the Xoskeleton's
bulk. Any character caught in the
Electromagnetic Field trap suffers
a -2 modifier to their HtH value
instead of the +1 modifier until the
effects of the trap wear off. The X-
oskeleton may not be removed
once the character has entered the
building.
Note that in the Electronic version,
Stun-Nux give +4 against Mutants and Meat Machines.
36
EXAMPLE OF PLAY ► I am the warrior. I have the
following ratings: Endurance 15, Wounds 14,
Hand-to-Hand (including + 1 for Strength
skill) 11, Reflexes 9 and Marksmanship + 1.
My Equipment Allowance was 6, so I picked
a Gun (Sub-Machine Gun), 2 items of
Clothing (Infra-Red Goggles and Steel
Gloves), and 2 Devices (Sonic Amplifier and
a Lock-Pick Set). Now I am ready to enter
this infernal hell-hole...
► In through the door.. directly ahead
of me there are stairs, but there's no-one
around. Phew, this place is creepy!
► Empty area, check for Wandering
Zombie. Rolla 5, nothing encountered. Move
the timer on one box, and up the stairs...
► There's dust everywhere, but no
footprints... I wish these stairs'd stop
creaking! God only knows what the noise
will attract... Now what's at the top? It's a
small room, but again there's no-one here...
What's THAT? Oh, thank goodness, it's only
the shadows...
► An empty room, and again the check
reveals nothing. The clock moves on another
box, and it's...
► Another room, just like the first but
even filthier and dustier, if that's possible...
and still with those creepy shadows... There
goes my sonic amplifier * there's something
nearb... Oh God! The shadow's moving... it's
human, but it's obviously been dead... for
some time... Flesh, peeling away in strips...
and look at the teeth...
► It's a room, with a Zombie
inhabitant (Attack: 8). I let loose with my
SMG immediately, as the Sonic Amplifier
negates the need for a Reflex Test. SMG
against Zombies is 5, but I've got a + 1
Marksmanship so I need a 4 or more. A roll
of 7 and there's one (hopefully truly) dead
Zombie. Change the number of bursts
remaining on the SMG from 10 to 9, and
move on... The clock ticks on another box, as
always, and it's into the next area.
► Into the corridor quickly... let's
hope I don't meet too many more of those...
things back there... No one about, so let's
creep down to the other end... SMG at the
ready.. come on you nasties, I'm ready for
you now... corridor turns into another one,
and... Unnghggh!
► And there before me is Chaos Agent
2, waiting in ambush. He leapt at me as I
came around the corner, taking me by
surprise so I didn't have time to shoot him.
He's got an Attack of 9, compared to my HtH
11 score. He gets a pair of 6s, giving an
attack score of 21 (gulp!); I counter with a 3
and a 1, for a score of 15 and he's hit me!
My Wound Marker moves from 14 to 13, but
a roll of 7 or? the Extra Wound table
indicates only that I can't attempt an escape
next round. Fat chance * I want this sucker!
► I refrain from attempting a tricky
Lucky Shot. The clock ticks on a box, and it's
the second round of combat. The Agent rolls
a total of 6, giving him an attack score of 15;
1 counter with a roll of 10 to give me 21.
Got him, and he's out of it!! That'll show
these creeps I mean business... Pause for
breath... then on we go. The clock ticks
inexorably on, and...
► And it's out of the corridor and onto
a balcony There's no-one about, so it's on
to... another corridor. This one is empty
too ... but at the far end is an elevator, its
door standing invitingly open... If they think
I'm going into such an obvious trap they've
got a... no, wait, the reason the door's open
is because there's a First Aid Kit blocking its
track. It must have been left by one of
Johnson's people. Should just be enough
room in my pack for it-.. OK, let's chance
this elevator then...
► In the elevator I found the First Aid
Kit, which now resides among the other
items on my Equipment display. The clock
ticks ever on... have I really only been in
here five minutes?
► Right, creeps, just you be waiting
for me when this thing reaches the top, eh?
Here we are, SMG ready.. and there's no-
one about. Hmm, appears to be some sort of
sneaky passage. Well, I never was one for
going by the most obvious route...
► I've found a Secret Passage. I roll a
9, and can skip up to that many cards. Since
I'm only on Deck One there's no chance of
missing Darkness, so 171 ignore all 9 of
them. It turns out I missed a Dump, but also
3 Traps, so I didn't do badly, and I saved all
that time too.
But now where am I?....
37

DESIGNERS NOTES ► It was back in May 1986 when I
first came up with the notion for a
new game. My university degree
course was drawing rapidly to an
end, and everything was passing in
the usual flurry of sleepless nights
and barely-met dissertation
deadlines. Yet in those gaps where
I paused to preserve my sanity, I
began to toy with the idea of
designing something a bit different.
► I wanted to do something exciting
for the solitary player, something
which would be so much fun it
would compensate for the lack of
player interaction. Indeed I hoped
to create a system which would
provide the illusion of an
intelligent opponent inherent in the
design itself. And I wanted the
game to be fast and undemanding –
a kind of up-market Patience. After
playing Avalon Hill's classic 'Up
Front' my eyes were opened to the
freedom and, so far, unexploited
potential of a simple pack of cards.
I decided to make my game a card
game, bearing in mind the natural
relationship between cards and
solitaire play.
► My choice of subject came about
as a result of two factors. I have
often thought that there were not
enough good horror games on the
market and I wanted to try and
rectify that situation (indeed, I
hope this game sees the start of a
new trend). The more futuristic
aspects were derived from
watching too much telly (and some
films of a very dubious nature)
while revising. The portrayal of
Carpenter-esque, ultra-violent
horror breaks new ground in the
gaming industry, steering away
from the more traditional –though
highly enjoyable – gothic approach.
The hero himself had to be some
form of walking tank, though I see
him more as a character of comic
fiction than a Stallone clone. The
game itself had to be fast, varied
and difficult to keep the player
interested, and it had to be a
challenge. By June I had my story
line sorted out and had started to
list all the creatures, weapons,
traps, etc as well as some rudimentary
rules. With time, the more specific
mechanics came to suggest
themselves too.
~ A major influence on the game was
the nature of the house explored by
our hero. I had considered boards,
tiles, and geomorphic lay-outs but
none of these gave the proper
impression of the labyrinthine
building. The answer came from a
consideration of solo gamebooks.
My rules, story and required degree
of involvement were on roughly
the same level as those to be found
in the books. Yet, as we all know,
the books are exhaustible – they
only have a limited number of uses
before everything becomes
boringly predictable. I wanted to
build a house that could be
explored in gamebook fashion, yet
could never be exhausted. I hope
that you are as pleased with the
solution as I am.
► However, my final exam was due
and so the project had to be
shelved... or so I thought. I kid you
not when I say that I had only one
day left in which to revise for the
last exam, so far had I fallen
behind schedule. A pile of books
beckoned but... I had to get that
damned game out of my system!
38

So I went to the shops, bought the
necessary raw materials for a
finished prototype and returned –
to find that I had thrown away my
notes by accident! Which is why I
ended up, one rainy afternoon,
delving into the vast smelly rubbish
skip in the campus car park until at
last I regained my sheets of green
felt-tipped manuscript! That night
the game was on the receiving end
of some heavy testing. Luckily it
worked out first time: the closest
thing to a video game without the
electricity! Around 70 pm that
night, I started revising for that
dreaded exam...
► After informal playtesting by my
usual cronies the game underwent a
few minor alterations. It was
noticeable from the very start that
my players were becoming
addicted – good! Indeed, as far as I
know, the game has only been
beaten three times out of a
multitude of sessions (the gauntlet
is thrown!).
► Since 1985 1 had been very loosely
involved with Games Workshop
and various potential projects
resulted. One such project was
accepted for publication only to be
subsequently rejected because of
copyright difficulties, and others
followed a similar path. Nice
games Steve, shame about the
subjects. Imagine my surprise, then,
when 'Zero Hour' (the game's
original title) was virtually
contracted on the spot! Months of
labour had paid off.
► Well, I haven't seen my felt pen
original for quite some time now,
but from what I've seen at the time
of writing, GW have done a fine
job. Changes have been very few
and minor — the Workshop staff
will testify to my tenacity in such
matters — but where they have
occurred, they've mainly been in
the areas of background and
presentation. I am pleased with the
way it's turned out, being
particularly happy with the artistic
embellishing of my equipment
rules (e.g. the 'McDonnell Helium-
Cooled Blaster' as opposed to my
original plain 'blaster') and the idea
of presenting my prose
introduction in comic form was a
stroke of genius. I'd like to know if
Brett was reading my mind when
he drew the fight scene, as his
depiction of the creatures tallied so
well with my mental picture. I was
amazed and delighted.
► Hot off the felt tips is the sequel
(groan) which sees our hero joined
to steal a certain old spear from a
remote Alpine fortress. Easy.,
unless you want to take into
account the nee-Nazi stormtroopers,
the skeletal SS guards, the horde of
thirsty vampires and... but that
would be telling. Of course,
whether the game comes out is
entirely up to you out there.
► To wrap up, no flattery or mutual
back-slapping intended, but I really
must thank all those at Workshop
from whom I have received
encouragment in one form or
another. Oh, what's that you say,
"How'd the exam go?" Well, all
modesty aside, the right questions
came up and I got an A, which
goes to show that Chainsaw
Warrior is good for your education,
if not for the health of some
verminous, rotting zombies!
Stephen Hand February 1987
39
