chaininstallationand …didchain.com/cutrivt.pdf · 13a. position the u-shaped holder as seen...
TRANSCRIPT
1a. Before cutting your chain, loosen itusing your motorcycle's rear wheeladjusters. Position your KM500R or KM501Eover your chain on the bottom side of yourswingarm; cut the pin on the right side of thelink you choose first. If your chain has amaster link, it is easier to cut the chain atthe master link.
2a. Set the Cutting pin location on yourchain tool's U-shaped holder to the point Aposition.
3a. To align the tool's Cutting pin with thechosen pin head, turn the tool's large bolthead clockwise “by hand” until the Cuttingpin comes in contact with the pin head. Atthis point, make sure that the cutting pin islined up with the center of the pin you wishto push out.
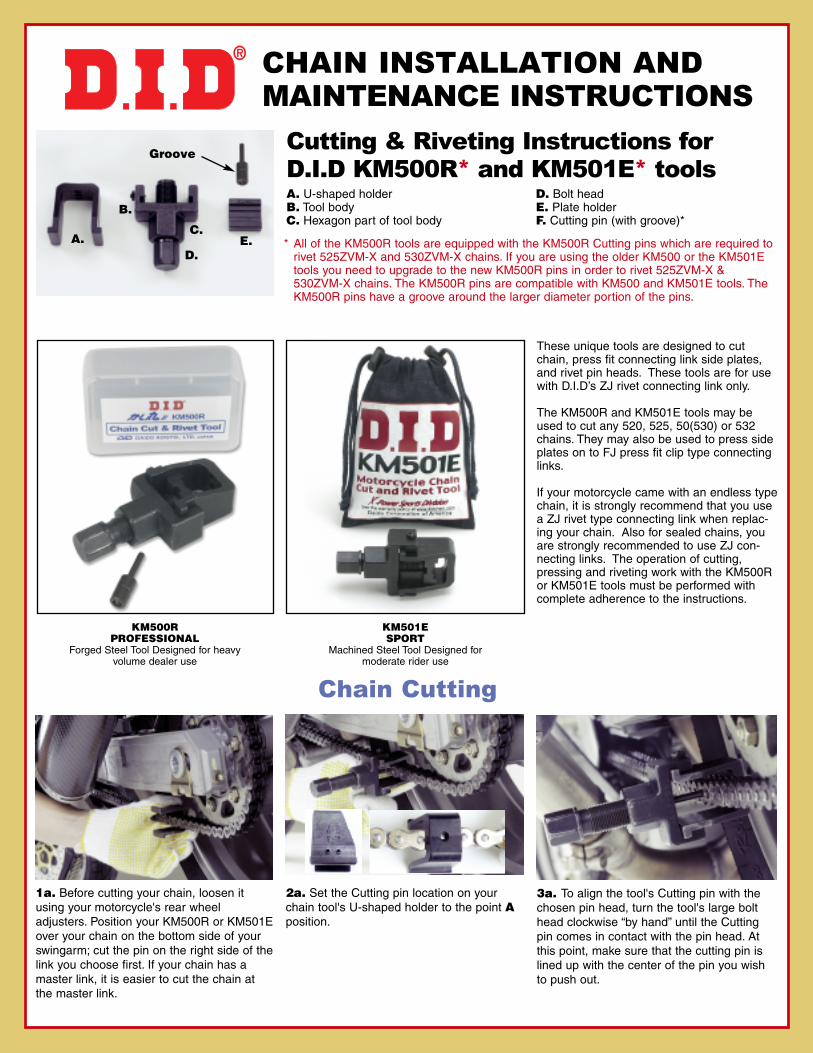
Cutting & Riveting Instructions forD.I.D KM500R* and KM501E* tools
CHAIN INSTALLATION ANDMAINTENANCE INSTRUCTIONS
A. U-shaped holderB. Tool bodyC. Hexagon part of tool body
D. Bolt headE. Plate holderF. Cutting pin (with groove)*
* All of the KM500R tools are equipped with the KM500R Cutting pins which are required torivet 525ZVM-X and 530ZVM-X chains. If you are using the older KM500 or the KM501Etools you need to upgrade to the new KM500R pins in order to rivet 525ZVM-X &530ZVM-X chains. The KM500R pins are compatible with KM500 and KM501E tools. TheKM500R pins have a groove around the larger diameter portion of the pins.
A.
B.
C.
D.E.
Groove
Chain Cutting
KM500RPROFESSIONAL
Forged Steel Tool Designed for heavyvolume dealer use
KM501ESPORT
Machined Steel Tool Designed formoderate rider use
These unique tools are designed to cutchain, press fit connecting link side plates,and rivet pin heads. These tools are for usewith D.I.D’s ZJ rivet connecting link only.
The KM500R and KM501E tools may beused to cut any 520, 525, 50(530) or 532chains. They may also be used to press sideplates on to FJ press fit clip type connectinglinks.
If your motorcycle came with an endless typechain, it is strongly recommend that you usea ZJ rivet type connecting link when replac-ing your chain. Also for sealed chains, youare strongly recommended to use ZJ con-necting links. The operation of cutting,pressing and riveting work with the KM500Ror KM501E tools must be performed withcomplete adherence to the instructions.

11a. Hold the hexagon part of the tool bodywith a 27mm closed end wrench and turnthe bolt with a 19mm closed in wrenchclockwise until the top of the pins make con-tact with the groove in the Plate holder.
12a. After pressing the sideplate on, disas-semble the chain tool and remove it fromthe chain. The next step is to flare out thepins heads for ZJ (Rivet type) or installingthe slide clip for the FJ (Cliptype) masterlink.
10a. Slide the U-shaped portion of the toolover the inside of the connecting link. Care-fully line up the dimples on the inside of theU-shaped holder with the pin heads of theconnecting link. The Cutting pin also needs tobe flipped over to where the rivet side is point-ed out. Fit the Tool body together and positionthe Plate holder onto the sideplate that needsto be pressed on. (For FJ clip type links, flipPlate holder over.) Slide the pin's riveting sideinto the Plate holder and slide the pin side intothe inside of the tool.
Press Fitting Connecting Link Side Plates
9a. With the inside of the connecting linkpushed into place holding the chaintogether with the pins sticking out the out-side of the chain, slide the O-Rings/X-Rings® into place and temporarily press theother side plate on the pins by hand. Set theCutting pin location on your chain tool's U-shaped holder to the point A position.
7a. Connect the new chain to the old chainusing either a wire or connecting link. Shifttransmission into neutral and slowly pull theold chain from under the swingarm towardthe rear which then pulls the new chain fromthe top towards the countershaft sprocket.When new chain goes completely aroundthe front sprocket and out under theswingarm, disconnect the old chain and pullboth ends together under the center of theswingarm.
8a. Before installing the connecting link, besure to put a heavy coat of the suppliedgrease into the holes of the bushings of thenew chains’ links, and on the surface of theconnecting link’s pins. If you are installing anO-Ring or X-Ring® chain, don't forget to putheavily greased O-Rings or X-Rings onthe pins between the sideplates on bothsides of the chain.
Old Chain
New Chain
Groove
4a. Use a 27mm closed in wrench to holdfirm the body of your chain tool while usinga closed end 19mm wrench on the tool'shexagon bolt head to tighten. It will be easi-er to tighten the bolt if you position yourwrenches 30° apart.
5a. Turn 19mm wrench clockwise on thetool's Hexagon bolt head to push the pincompletely out.
6a. After pushing the pin out, disassemblethe chain tool from the chain.

13a. Position the U-shaped holder as seenabove.13b. For clip type (FJ) install the open endof the clip so that it faces in the oppositedirection of the chain drive direction.
14a. Set aside the Plate Holder and set thepin on the tool body to the B position toflare out the pin heads.
15a. Hold the hexagon part of the toolbody by with a 27mm closed inwrench, and the bolt head with a 19mmclosed end wrench; turn clockwise until theflare part of the pin head makes contactwith the surface of the side plate.
16a. Example of proper flared pin head. Ifyour pin heads are not flared to this extent,Realign chain tool and flare pin heads untilthey look like the above photo. If your pinheads have cracks or the connecting link isstiff when flexed, remove connecting linkand install a new one.
16a. FLARE DIMENSIONS0.213” to 0.220”............520V
0.217” to 0.228”............520ERV30.217” to 0.228”............520ZVM20.217” to 0.228”............525ZVM20.217” to 0.228”............530ZVM20.217” to 0.228”............520ZVM-X0.217” to 0.228”............520VM0.217” to 0.228”............525VM20.217” to 0.228”............530VM0.217” to 0.228”............520ATV0.217” to 0.228”............520VT20.217” to 0.228”............520NZ0.217” to 0.228”............525NZ0.217” to 0.228”............530NZ
0.224” to 0.236”............*525ZVM-X & 530ZVM-X*Note: Make sure that the Cutting pin has a grooveif you are riveting the 525ZVM-X or 530ZVM-X chains.These chains can not be riveted by the old Cutting pins.
Riveting ZJ Connecting Link Pin Heads
SPROCKET ALIGNMENT
It is important to check sprockets forwear periodically. If wear occurs on theside of the teeth, it means there is mis-alignment, a condition which will resultin greatly reduced chain life. Checksprocket alignment visually by sightingacross them from the rear of the motor-cycle or by placing a yard stick againstthem to see if they are in the sameplane. Realign or replace as required.When new sprockets are installed, theyshould be carefully aligned on theshafts with a straight edge.
Misalignment increases drive noise leveland also increases chain and sprocketwear. Chains operating on misalignedsprockets have a tendency to developtight joints because sprocket teeth forcethe inside plates outward on the bush-ings, thus binding the joint.
SAG ADJUSTMENT
A drive chain that is too tight speeds upwear by excessive pressure on thesprocket teeth, the chain joints and theshaft bearings. A chain that is tooloose will wear quickly and may have awhip action that can cause it to snap. Achain that is too tight or too loose willresult in excessive elongation. Normalsag (see diagram) is 3/4"*. To check,press down on the top strand of thedrive chain with your fingers. Tighten orloosen to achieve 3/4"*.
KM500R Cuttingand Riveting Pin
Groove
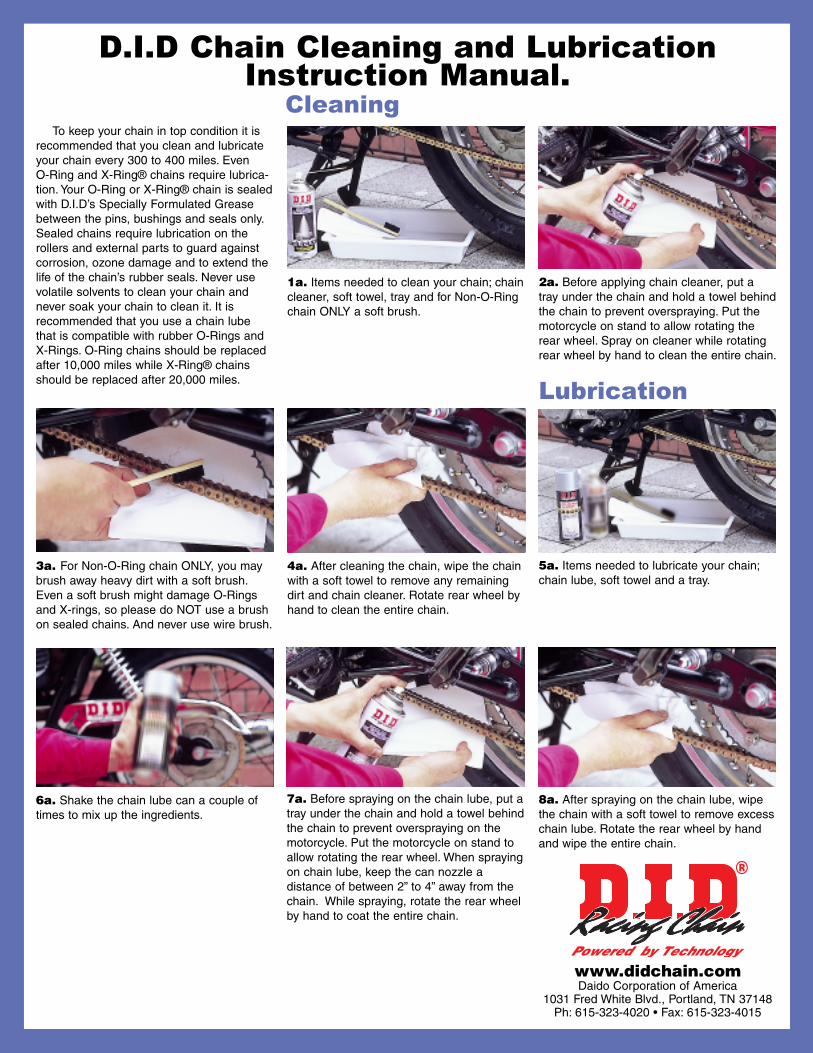
1a. Items needed to clean your chain; chaincleaner, soft towel, tray and for Non-O-Ringchain ONLY a soft brush.
2a. Before applying chain cleaner, put atray under the chain and hold a towel behindthe chain to prevent overspraying. Put themotorcycle on stand to allow rotating therear wheel. Spray on cleaner while rotatingrear wheel by hand to clean the entire chain.
3a. For Non-O-Ring chain ONLY, you maybrush away heavy dirt with a soft brush.Even a soft brush might damage O-Ringsand X-rings, so please do NOT use a brushon sealed chains. And never use wire brush.
5a. Items needed to lubricate your chain;chain lube, soft towel and a tray.
7a. Before spraying on the chain lube, put atray under the chain and hold a towel behindthe chain to prevent overspraying on themotorcycle. Put the motorcycle on stand toallow rotating the rear wheel. When sprayingon chain lube, keep the can nozzle adistance of between 2” to 4” away from thechain. While spraying, rotate the rear wheelby hand to coat the entire chain.
6a. Shake the chain lube can a couple oftimes to mix up the ingredients.
4a. After cleaning the chain, wipe the chainwith a soft towel to remove any remainingdirt and chain cleaner. Rotate rear wheel byhand to clean the entire chain.
8a. After spraying on the chain lube, wipethe chain with a soft towel to remove excesschain lube. Rotate the rear wheel by handand wipe the entire chain.
Lubrication
D.I.D Chain Cleaning and LubricationInstruction Manual.
CleaningTo keep your chain in top condition it is
recommended that you clean and lubricateyour chain every 300 to 400 miles. EvenO-Ring and X-Ring® chains require lubrica-tion. Your O-Ring or X-Ring® chain is sealedwith D.I.D’s Specially Formulated Greasebetween the pins, bushings and seals only.Sealed chains require lubrication on therollers and external parts to guard againstcorrosion, ozone damage and to extend thelife of the chain’s rubber seals. Never usevolatile solvents to clean your chain andnever soak your chain to clean it. It isrecommended that you use a chain lubethat is compatible with rubber O-Rings andX-Rings. O-Ring chains should be replacedafter 10,000 miles while X-Ring® chainsshould be replaced after 20,000 miles.
www.didchain.comDaido Corporation of America
1031 Fred White Blvd., Portland, TN 37148Ph: 615-323-4020 • Fax: 615-323-4015