certificate import to aladdin etoken - turiya infotech€¦ · getting started to start the...
TRANSCRIPT

CONTACT
Tata Consultancy Services - [Certifying Authority: PKI Services]
Advanced Technology Centre, deccanpark, 1 - Software Units Layout
Madhapur, Hyderabad - 500 081
Tel: +91 (40) 55673524 / 3525 / 3536
Fax: +91 (40) 55672222
Toll free: 1-800-425-2922
www.tcs-ca.tcs.co.in
Certificate Import to Aladdin
eToken

GE T T I N G ST A R T E D
To start the process, procure the Digital Signature Certificate Enrollment Kit from
TCS-CA or its Registration Authorities. The kit contains:
• USB Token (Aladdin eToken)
• Installation CD. This contains:
� USB Drivers
� Mozilla Firefox
� TCS FileSigner Plus Evaluation Copy
Note:
• Use the Installation CD to install the USB Token driver.
• Ensure the following before installing the USB token driver.
US I N G AL A D D I N ETO K E N
To install the eToken:
1. Insert the CD into the CD drive of your computer.
2. To install eToken driver click on etoken_driver_aladin.msi Windows
Installer Package. Accept the License Agreement and proceed with
installation.
3. Insert the USB Token in the USB port of the computer, if prompted
4. Restart the computer after the installation is complete.
You can now see the eToken Properties from the Start Menu by selecting
Programs> eToken> eToken Properties
� System Requirement:
o Operating System: Windows 2000, XP
o Browser: Internet Explorer 5.5 and above
� You should have the Administrator privileges for installing the USB Token

Click “eToken Properties” and with your eToken inserted, the following screen is
displayed:
CH A N G I N G T H E ETO K E N PA S S W O R D
All eTokens are configured at manufacture with the factory default password. This
password is “1234567890”. Click “Change password” on the eToken Properties
screen and the following eToken Properties dialog is displayed:

Enter your current eToken password in the “Current Password” field and, the new
password in the “New Password” field. Confirm new Password and click “OK” to set
the new Password.
RE N A M I N G T H E ETO K E N
For additional convenience and ease of identification, the eToken name can also be
personalized. Click “Rename eToken” on the eToken Properties screen. Since
renaming the eToken requires the eToken password, the following dialog is
displayed:
Give the Password for the eToken and click “OK”
Enter the new eToken name in the eToken Name field and click “OK” to set the
eToken Name.

Click “OK” and in the eToken Properties window the new eToken name is displayed.
IM P O R T I N G T H E CE R T I F I C A T E I N T O E T O K E N
To import the Certificate, you first need to export the certificate from the IE Browser
onto the Desktop and then import it into the eToken.
EX P O R T I N G T H E CE R T I F I C A T E
Exporting the Digital Certificate from the browser and maintaining its backup as a
‘.pfx’ file is essential since, at any point of time if your certificate gets deleted from
the browser or token or if you format your system, you can always import it again.
For exporting your Certificate that has been downloaded in your browser, Open the
IE Browser and follow the path
“ Tools>Internet Options>Content>Certificate>Personal” tab.

Choose the certificate to be exported and click on the export tab.
Click Next to the dialog to continue
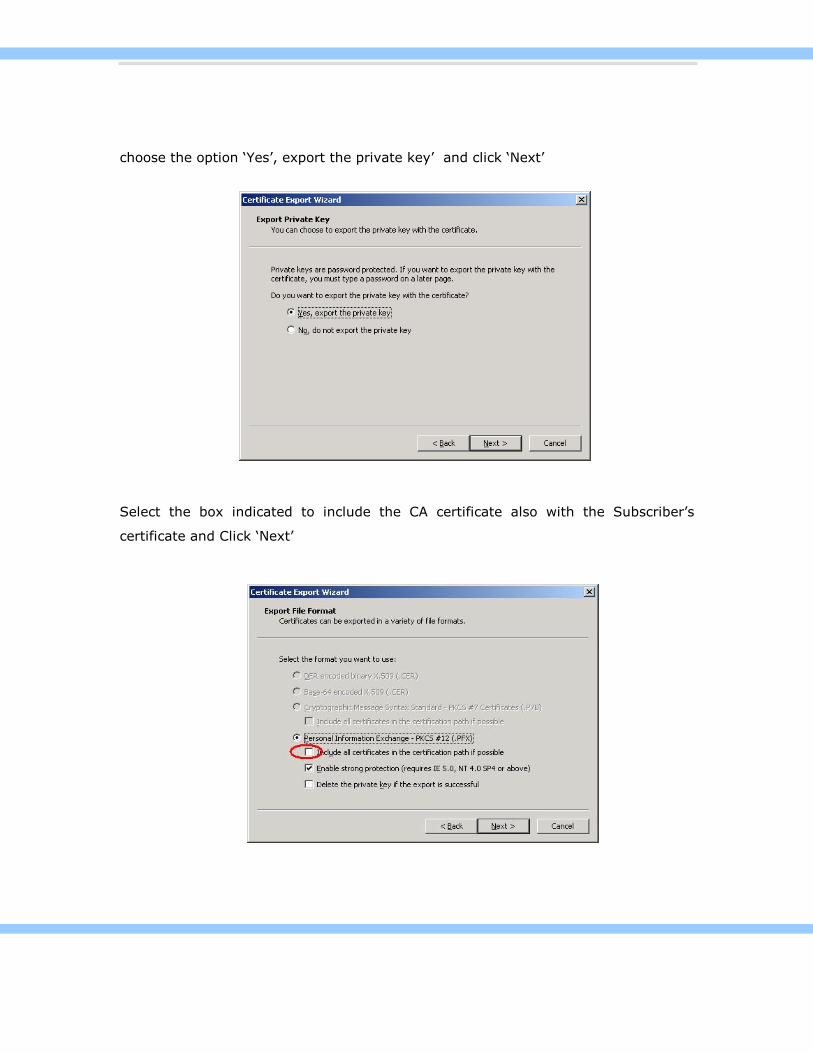
choose the option ‘Yes’, export the private key’ and click ‘Next’
Select the box indicated to include the CA certificate also with the Subscriber’s
certificate and Click ‘Next’

Enter the password to protect the PKCS#12 file. Ensure that you remember this
password since you will be needing it while importing the certificate at a later point
of time.
Choose the file name and location to save the file. Give the extension of the file as
‘.p12’ or ‘.pfx’

Click Finish to export the private key and the certificates.
A dialog box will be shown for accessing the private key. Click ‘OK’ to continue

A message will be shown indicating the successful completion of the export.
IM P O R T I N G T H E CE R T I F I C A T E I N T O E T O K E N
From the Start Menu by selecting
Programs> eToken> eToken Properties>Advanced>Certificate & Keys
The following Dialogue box appears. Click ‘Import Certificate’

If the import is from a file, which has already been exported to a particular location
on your computer, then select “Import certificate from the file” and click “OK”.
Select the path of the “. pfx” file and click “Open”.
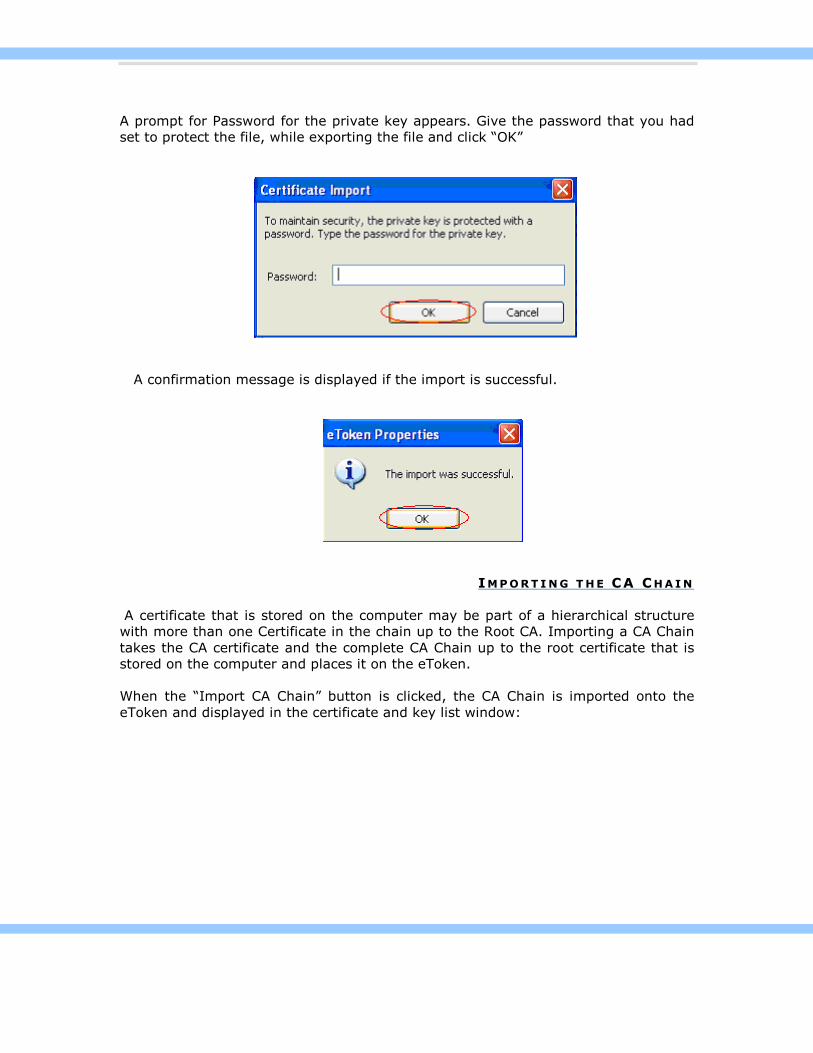
A prompt for Password for the private key appears. Give the password that you had
set to protect the file, while exporting the file and click “OK”
A confirmation message is displayed if the import is successful.
IM P O R T I N G T H E CA CH A I N
A certificate that is stored on the computer may be part of a hierarchical structure
with more than one Certificate in the chain up to the Root CA. Importing a CA Chain
takes the CA certificate and the complete CA Chain up to the root certificate that is
stored on the computer and places it on the eToken.
When the “Import CA Chain” button is clicked, the CA Chain is imported onto the
eToken and displayed in the certificate and key list window:

A message confirming the import was successful is displayed