cert member id tag & fog name___________________________________...
TRANSCRIPT

CERT MemberID Tag & FOG
Name___________________________________
Team___________________________________
Signature_______________________________
Attach Photo Here
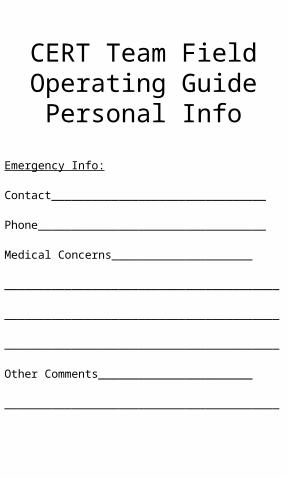
CERT Team Field Operating Guide
Personal Info
Emergency Info:
Contact________________________________
Phone__________________________________
Medical Concerns_____________________
_________________________________________
_________________________________________
_________________________________________
Other Comments_______________________
_________________________________________

CERT Team FOG Important Phone
Numbers
Team Leader___________________________
Leader Phone__________________________
EOC ____________________________________
EOC/EMA Phone________________________
Staging Area___________________________
CERT Coordinator______________________
Coord. Phone___________________________
Other___________________________________
_________________________________________

CERT Team FOG (type description
here)

Table of Contents
Equipment Checklist 1
Home Checklist 1
Water Purification 2
Triage Flow Chart 3
Triage Guide 4
Fire Extinguishers 5
Utility Shut-offs 6
Identifying HAZMAT 7
HAZMATs in Transit 8
HAZMAT Procedure 9
Physical Search 10
Box Cribbing 11
Cribbing Operation 12

CERT TEAM FOG

CERT Equipment Checklist
Before you leave your home...
• CERT Bag• Water-2 bottles
per S&R team• Non-perishable
food• Water
purification tablets
• Leather work gloves
• Goggles• Dust masks• Flashlight• Batteries/extra
bulbs
• Secondary flashlight/light sticks
• Note pads• Markers• Pens• Duct tape• Masking tape (2”)• Scissors• Crescent wrench• First aid kit• Orange spray paint• Triage tape• Utility knife
• Check family to ensure safety • Inspect house for damage• Inspect utilities and secure as needed• Call out-of-state contact at:
_________________________________________
• Get family disaster supplies
1 1

Water Purification
Water can be purified by three methods – heat, filtration and chemical treatment.
All pathogens can be killed byboiling water for 10 minutes.
For filtration and chemical treatment, use the following charts as guides.
.
Giardia and ameoba cystsEnteric bacteriaCryptosporidiumParasitic eggs and larvae
Pathogen Maximum Filter Pore Size
5 microns0.2 to 0.5 microns
3 microns20 to 30 microns
Sodium Chlorine (household bleach - 5.25% ,unscented)shake/stir, let stand for 30 minutes before using
2 drops/qt.
Chemical Clear Water
(4ppm)
Cloudy Water (8ppm)
4 drops/qt.
8 drops/gal 16 drops/gal
2 2

START TRIAGE
-- Voice Triage --
START WHERE YOU STAND
IS PERSON BREATHING?
3 3
NO
POSITION AIRWAY
YESNO
TRY AGAIN IMMEDIATE
YES
RATE OF BREATHING
Less than 30/Min
More than 30/Min
IMMEDIATE
PERFORM BLANCH TEST
REFILL GREATER THAN 2 SECONDS
CONTROL BLEEDING
IMMEDIATE
REFILL LESS THAN 2 SECONDS
CHECK MENTAL STATUS
FAILS TO FOLLOW SIMPLE COMMANDS
IMMEDIATE
FOLLOWS SIMPLE COMMANDS
DELAY
NO
DEAD
**Remove Walking Wounded -- Use as Volunteers**

Triage in a Disaster Environment
Triage, like other disaster response efforts, begins with size-up. The general procedure for triage in a disaster environment is as follows:
• Stop, Look, Listen, and Think. Before you start, stop and size up the situation by looking around you and listening. Above all, THINK about how you will approach the task at hand. Continue to size up the situation as you work.
• Conduct Voice Triage. Begin with voice triage, calling out something like, “Emergency Response Team. If you can walk, come to the sound of my voice.” Instruct those survivors who are ambulatory to remain at a designated location, and continue with the triage operation.
• Follow a Systematic Route. Start with victims closest to you and work outward in a systematic fashion.
• Conduct Triage Evaluation. Evaluate victims and tag them I (immediate), D (delayed), or DEAD. Remember to evaluate the walking wounded. Everyone must get a tag.
• Treat “I” Victims Immediately. Initiate airway management, bleeding control, and/or treatment for shock for Category I (immediate) victims.
• Document Results. Document triage results for:- Effective deployment of resources.- Information on locations of victims- A quick record of the number of casualties by degree of
severity. This will be very useful information for responders and transportation
units.• Always wear protective gear when performing triage, so that you do
not endanger your own health.
4 4

Operating a Fire Extinguisher
Always operate extinguisher in upright position. As shown in figure, the acronym to remember when operating a portable extinguisher is PASS: Pull, Aim, Squeeze, Sweep. Aim at base of fire.
5 5

Utility Shut-Offs
Gas Meter and Shut-Off Valve
Water Shut-Off
Label for quick identification
OFF
ON
OFFON
Have wrench stored in a specific location where it will be immediately available
Electrical Shut-Off
Step 2
Step 1
Pull-outCartridge Fuses
CircuitBreaker
6 6

Identifying HAZMATIn Fixed Facilities
HEALTH
4-
3-
2-
1-
0-
Too dangerous to Enter vapor or liquid
Extremely dangerous use full protective clothing
Hazardous- Usebreathing apparatus
Slightly hazardous
Like ordinary material
FLAMMABLE
4-
3-
2-
1-
0-
Extremely flammable
Ignites at normaltemperatures
Ignites when moderately heated
Must be preheated to burnWill not burn
REACTIVE
4-
3-
2-
1-
0-
May detonate- Vacate area if Materials areExposed to fire
Strong shock or heat may detonate
Use monitors from behind explosion-resistant barriers
Violent chemicalChange possible- Usehose streams fromdistance
Unstable if heated- Use normal precautions
Normally stableAvoid use of water
34
3w
S to red haza rdous m a te ria ls are som etim es identified by m eans o f the N ationa l F ire P rotection A ssocia tion (N FPA ) 704 D iam ond S ystem of p lacards. These p lacards a re loca ted on the ou ts ide o f bu ild ings a t the entrance to the s torage area. A n exam p le o f N FPA 704 D iam ond is show n in the figu re above.
7 7

ORGANICUNKNOWN
Radioactive
7
DANGEROUS
FLAMMABLELIQUID
NON-FLAMMABLEGAS
NON-FLAMMABLEGAS
2
2
FLAMMABLEGAS
Q u a ntitie s o f tra ns p o rted ha z a rd o u s m a te ria ls th a t m e e t D ep a rtm e n t o f T ra n sp o rta tio n re q u ire m e n ts a re m a rke d w ith w a rn in g p la c a rd s . T h e p la ca rd s a re 1 0 3 /4 ” h ig h a n d m u s t b e o n a ll fo u r s ide s o f th e v e h ic le . E a c h d ia m o nd -sh a p e d p la ca rd in c lu d e s th e c o lor, sy m b o l, a n d n a m e o f th e c la ss in to w h ic h the ha z a rd fa lls .
C LA S S 1 - E xplo s ive s
C LA S S 2 - G ase s
C LA S S 3 - F la m m a b le l iqu id s
C LA S S 4 - F la m m a b le so lid s
C LA S S 5 - O xid izers
C LA S S 6 - To x ic m a te ria ls
C LA S S 7 - R a d io a ctive m a te ria ls
C LA S S 8 - C o rro s ive m a te ria ls
C LA S S 9 - M isce lla n eo u s d a n g e ro u s g o o ds
D A N G E R O U S - In d ica te s a m ixe d lo a d o f h a za rdo u s m ate ria ls
Identifying HAZMATs in Transit8 8

Identifying HAZMATs in Transit
1 . S tay upw ind .2 . C all 911.3 . If authorities cannot be reached, isolate the a rea as m uch as possible .4 . D o no t a ttem pt to rescue in ju red until s ituation is assessed.5 . Do not walk into or touch spilled material. Avoid inhalation of fumes, smoke and vapors.
HAZMAT Procedure
UN ID #
Hazard class 1219
FLAMMABLE
3
9 9
1219
3
Included with the DOT placards are United Nations identification numbers specific to each transported substance. The numbers are displayed inside the placard or in an orange rectangle immediately below the placard. DOT placards should be a stop sign for CERT members. If they are present, there is danger. STOP!
Hazard class
UN ID #
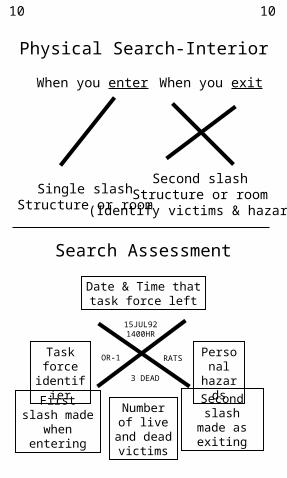
Physical Search-Interior
Search Assessment
When you enter
Single slashStructure or room
When you exit
Second slashStructure or room
(Identify victims & hazards)
Date & Time thattask force left
Number of live and dead
victims
3 DEAD
RATSOR-1
15JUL921400HR
Second slashmade as exiting
First slash madewhen entering
Personalhazards
Task force identifier
10 10

Box Cribbing
11 11

Arrangement for Leverage/Cribbing Operation
Medical Care or VictimRemoval Person
Crib Person
Lever Person
Group Leader
Crib Person
WallCollapse
12 12